Update 23C
Revision History
This document will continue to evolve as existing sections change and new information is added. All updates appear in the following table:
| Date | Module | Feature | Notes |
|---|---|---|---|
| 29 MAR 2024 | Help Desk Self-Service |
Use Intelligent Advisor to create Help Desk requests | Updated document. Revised feature information. |
| 29 MAR 2024 | Service Workflow and Automation |
Notify All Members Of A Queue For Help Desk Related Events | Updated document. Revised feature information. |
| 29 MAR 2024 | Help Desk Request Management |
Perform Mass Updates to Help Desk Requests in the Redwood User Experience | Updated document. Revised feature information. |
| 29 MAR 2024 | Help Desk Request Management |
Lookup an Employee and View the Employee's Existing Requests | Updated document. Revised feature information. |
| 01 AUG 2023 |
Help Desk Request Management |
Agent availability can be set in the global shell for Help Desk in the Redwood user experience |
Updated document. Delivered new feature in an update for 23C. |
| 01 AUG 2023 |
Help Desk Self-Service |
Use Intelligent Advisor to create Help Desk requests |
Updated document. Delivered new feature in an update for 23C. |
| 02 JUN 2023 | Created initial document. |
Overview
 HAVE AN IDEA?
We’re here and we’re listening. If you have a suggestion on how to make our cloud services even better then go ahead and tell us. There are several ways to submit your ideas, for example, through the Ideas Lab on Oracle Customer Connect. Wherever you see this icon after the feature name it means we delivered one of your ideas.
GIVE US FEEDBACK
We welcome your comments and suggestions to improve the content. Please send us your feedback at oracle_fusion_applications_help_ww_grp@oracle.com.
DISCLAIMER
The information contained in this document may include statements about Oracle’s product development plans. Many factors can materially affect Oracle’s product development plans and the nature and timing of future product releases. Accordingly, this Information is provided to you solely for information only, is not a commitment to deliver any material, code, or functionality, and should not be relied upon in making purchasing decisions. The development, release, and timing of any features or functionality described remains at the sole discretion of Oracle.
This information may not be incorporated into any contractual agreement with Oracle or its subsidiaries or affiliates. Oracle specifically disclaims any liability with respect to this information. Refer to the Legal Notices and Terms of Use for further information.
Feature Summary
Column Definitions:
Report = New or modified, Oracle-delivered, ready to run reports.
UI or Process-Based: Small Scale = These UI or process-based features are typically comprised of minor field, validation, or program changes. Therefore, the potential impact to users is minimal.
UI or Process-Based: Larger Scale* = These UI or process-based features have more complex designs. Therefore, the potential impact to users is higher.
Features Delivered Disabled = Action is needed BEFORE these features can be used by END USERS. These features are delivered disabled and you choose if and when to enable them. For example, a) new or expanded BI subject areas need to first be incorporated into reports, b) Integration is required to utilize new web services, or c) features must be assigned to user roles before they can be accessed.
| Ready for Use by End Users Reports plus Small Scale UI or Process-Based new features will have minimal user impact after an update. Therefore, customer acceptance testing should focus on the Larger Scale UI or Process-Based* new features. |
Customer Must Take Action before Use by End Users Not disruptive as action is required to make these features ready to use. As you selectively choose to leverage, you set your test and roll out timing. |
|||||
|---|---|---|---|---|---|---|
| Feature |
Report |
UI or |
UI or |
|
||
Perform Mass Updates to Help Desk Requests in the Redwood User Experience |
||||||
Lookup an Employee and View the Employee's Existing Requests |
||||||
Agent availability can be set in the global shell for Help Desk in the Redwood user experience |
||||||
Gain Visibility into Help Desk Milestone Attainment and Knowledge Article Usage |
||||||
Gain Deeper Insights into Help Desk Performance with New Subject Areas |
||||||
Help Desk
Help Desk Request Management
Perform Mass Updates to Help Desk Requests in the Redwood User Experience
Help Desk agents can now use the list page in the Redwood Experience to perform updates to multiple help desk requests concurrently for select fields. Mass updates can be completed for either Internal Service Request or HR Help Desk Requests.
Mass update saves time and effort for agents needing to update multiple help desk requests at once. For example:
- To reassign all open requests from an employee going on vacation to their backup.
- To change the status to close many requests at once.
- When an update is needed to other commonly used fields.
Steps to Enable
Enabling Mass Update requires a one-time set up.
First, the Configure Adaptive Search parameter Enable Mass Update must be set to Y. To do this:
- Go to Setup and Maintenance.
- Click on the Tasks icon on the right-hand side of the page.
- Click Search.
- Type "Configure Adaptive Search" in the search box.
- Click the Search magnifying glass icon.
- Click the Configure Adaptive Search link.
- Click on the Parameters tab.
- Highlight the Enable Mass Update line.
- Click Edit.
- When prompted if you want to continue, say Yes.
- Change the current value to Y.
- Click Save and Close.
Now, we must configure those fields that will be allowed to be mass updated.
- Click the Configure Adaptive Search link.
- Click on the Configure UI tab.
- In the left panel, click on either HR Help Desk Request or Internal Service Request, depending on which you wish to configure.
- In the far right-hand column is Enable for Mass Update.
- Check the boxes for those Fields that agents should be able to update on multiple requests at once.
- Click Save and Close.
Finally, a variable must be set within Visual Builder Studio on the Agent's List Page:
- Navigate to the Agent's List Page (Help Desk Requests card under the Help Desk tab).
- On the lefthand panel, expand the following options:
- Click on elastic-search-sr-list.
- Under the Variables tab, select enableMassUpdate.
- On the right-hand side panel, change the Value to true.
Preview your changes before publishing.
Tips And Considerations
By default, there is a limit of 10 items that can be changed at once. To change this limit up to a value between 1 and 25 (inclusive), you can change the current value of the Configure Adaptive Search parameter Maximum Number of Records that can be Selected.
Mass update should not be used for Queue or Product, even though these possibilities are shown.
Do not attempt to do a Mass Update for help desk requests which span multiple Business Units for the item you are attempting to update, as this will not work appropriately.
The amount of time it takes to update the multiple requests is directly related to the number of requests selected.
Mass update is not currently available on smaller resolution (i.e., mobile) devices.
Key Resources
A video for this functionality is found at Update Multiple Requests - WN 23C Help Desk - Oracle Video Hub.
Access Requirements
All Help Desk administrators have the ability to enable Mass Update.
Once Mass Update is enabled, the feature is available to all Help Desk agents. This is controlled by the privileges:
- SVC_VIEW_AGENT_HR_HD_PRIV (HR Help Desk Agent)
- SVC_VIEW_AGENT_ISR_HD_PRIV (Internal Help Desk Agent)
Lookup an Employee and View the Employee's Existing Requests
Help Desk in the Redwood experience now provides a page to search for an employee and then drill into an employee service summary page that includes basic information about the employee along with a list of the five most recently created requests. The information on the page, such as email address or manager's name, can also be used to confirm a caller's identity.
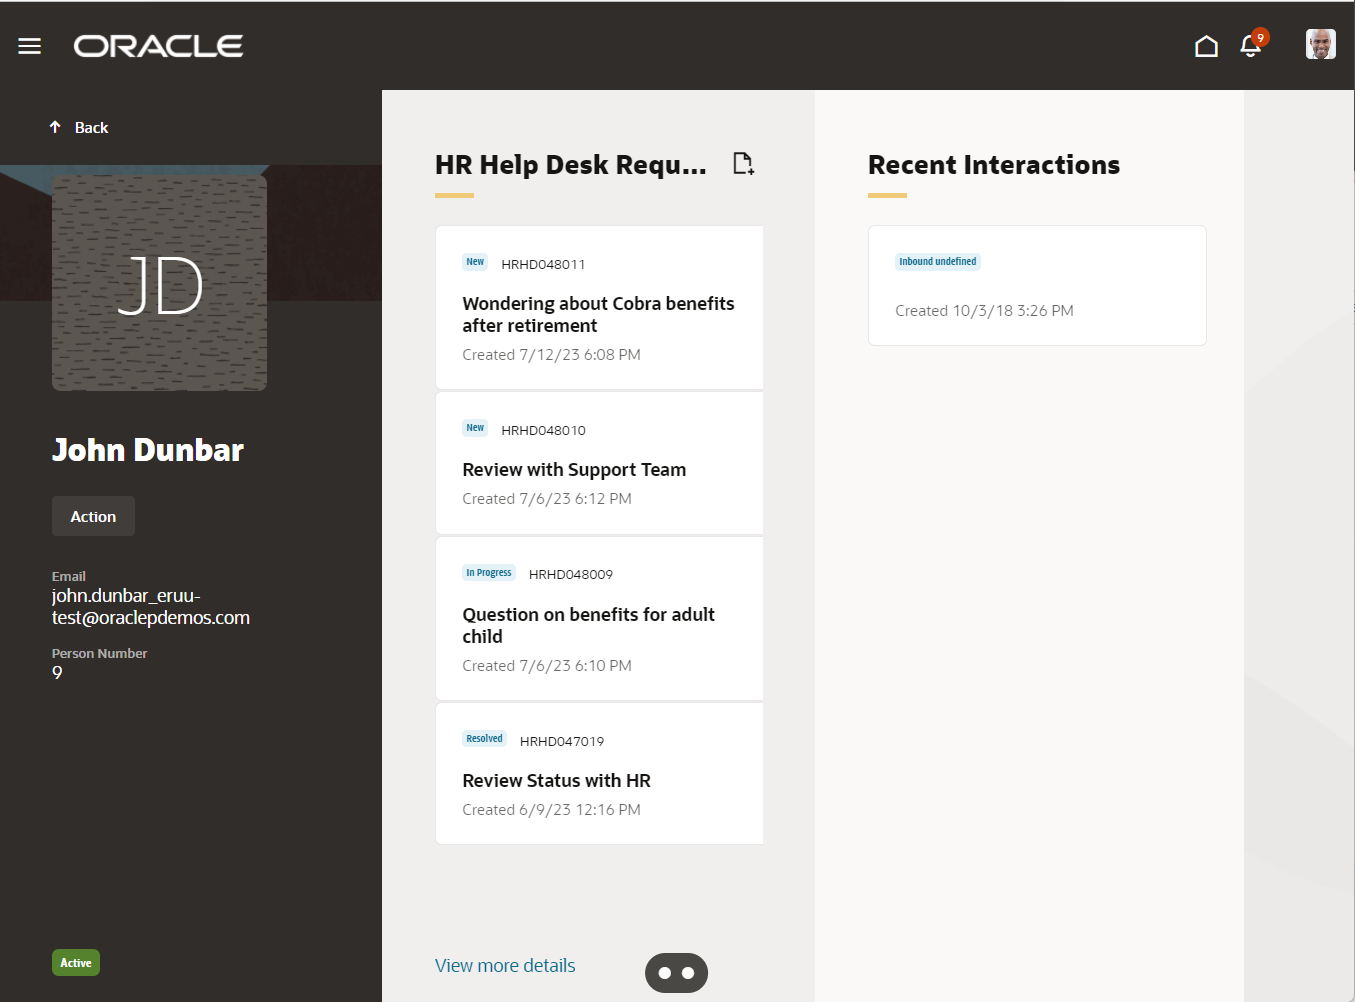
Employee Summary Page
Agents save time by being able to search for an employee using name or email address. This single search allows the agent to validate the employee's identity, view the list of open requests so that an existing request can be found without needing the request number, and see the history of recent requests to be able to assist the employee in an efficient manner.
Steps to Enable
You don't need to do anything to enable this feature.
Tips And Considerations
Searches can be done using the email address, person number, or display name.
To access the Search page, go under the Help Desk tab and click on Employee Search under the Quick Links.
Key Resources
A video demonstrating this functionality is found here: Employee Search and Summary - WN 23C Help Desk - Oracle Video Hub.
Access Requirements
All agents have access to this feature.
This is controlled by the privileges:
- SVC_VIEW_AGENT_HR_HD_PRIV (HR Help Desk Agent)
- SVC_VIEW_AGENT_ISR_HD_PRIV (Internal Help Desk Agent)
Customize Smart Actions
The list of Smart Actions that are shown in the Action Bar can be customized to add new actions or remove standard actions that are not needed.
This allows Help Desk agents to only be presented the Smart Actions that are relevant to your business processes
Steps to Enable
You don't need to do anything to enable this feature.
Tips And Considerations
To configure the Smart Actions that should be available in Help desk, use the Smart Actions setup area in Application Composer. To remove a Smart Action from appearing in the Action Bar, you will need to be in a Sandbox.
Key Resources
Please refer to the instructions found at https://docs.oracle.com/en/cloud/saas/applications-common/23c/oacex/overview-of-smart-actions.html.
Access Requirements
In order to customize Smart Actions, users must have the privilege "Manage Smart Actions" (ZCA_MANAGE_SMART_ACTIONS_PRIV).
This privilege is granted to the Help Desk Administrator roles:
- HR Service Request Administration
- Internal Service Request Administration
Agent availability can be set in the global shell for Help Desk in the Redwood user experience
In the Redwood user experience, Help Desk Agents can set their availability in the global shell at the top of the browser window.
This allows agents to navigate to pages in other Redwood applications without their availability status changing, thereby allowing assignment of help desk requests to continue.
Steps to Enable
Use the Opt In UI to enable this feature. For instructions, refer to the Optional Uptake of New Features section of this document.
Offering: Help Desk
Configure Profile Option to Enable Presence in the Global header
The profile option "ORA_SVC_MCA_GLOBAL_PRESENCE_ENABLED" determines whether you have opted in for global presence across the application. You can set this profile option either at a site level or at a user level.
Note: Enable this profile option only if you are using Service Center with the Redwood user experience
To configure the profile options for enabling presence in the global header:
- Navigate to the Setup and Maintenance work area and open the Tasks panel tab.
- Click Search from the list of displayed tasks.
- In the Search field, type Manage Admin.
- From the displayed list of tasks, click Manage Administrator Profile Values.
- Search for the profile option code “ORA_SVC_MCA_GLOBAL_PRESENCE_ENABLED"
- In the Profile Values region, specify the values in the Profile Value column for the Site Profile Level to 'Yes' if you want all users to set their presence from the global header.
- Alternatively, set the Site level value to 'No' and add a new row for every user who would set their presence from the global header.
- Click Save and Close.
Tips And Considerations
The global header controls are only available in pages within Redwood apps running on AppUI v2.
If you previously were using the presence feature available, you will need to revert those changes to configure global presence by following the steps below:
- Navigate to Setup and Maintenance.
- Click Tasks.
- Search for the Manage Administrator Profile Values task.
- Click Search.
- Click the link for the Manage Administrator Profile Values task.
- On the Manage Administrator Profile Values page,enter the Profile Option Code: SVC_HD_SHOW_AVAILABILITY
- Click Search.
- In the Profile Values region, set the Profile Value for Site to N.
- Click Save and Close.
- Click Done.
Key Resources
Refer to Implementing Help Desk for additional information.
Access Requirements
This feature is available only with the Redwood user experience and requires an opt-in to enable it.
Your administrator can configure the application so that help desk agents can make themselves available from the global header for automatic request assignment.
Service Workflow and Automation
Notify All Members Of A Queue For Help Desk Related Events
Notifications can now be sent to all members of a queue for Help Desk related events. When a notification event is defined, you can now identify all members of a queue as recipients of the notification.
Organizations that assign Help Desk requests to a queue and then have their agents take ownership of new requests can now easily notify all agents in that queue that a new issue has been routed to them. This enables agents to quickly respond to new requests and contact impacted users promptly.
Steps to Enable
To enable this feature:
- Under Setup and Maintenance, on the right-hand side, click on the Tasks icon to expand the options and click the Search link.
- Type Manage Administrator Profile Values and click the Search icon.
- Click on the Manage Administrator Profile Values task.
- Search for the appropriate Profile Option Code:
- For HR Help Desk: ORA_ENABLE_QUEUE_MEMBER_HELPDESK_NOTIFICATIONS
- For Internal Service Request (ISR) Help Desk: ORA_ENABLE_QUEUE_MEMBER_INTERNAL_SR_NOTIFICATIONS
- On the Site Level line, update the value to be Yes.
- Click Save and Close.
- Click Done.
Once you have enabled the appropriate profile option, you must define a notification trigger as you typically would through using Application Composer within a Sandbox and publishing it. For detailed instructions on defining a notification trigger, please reference the following instructions: https://docs.oracle.com/en/cloud/saas/fusion-service/fahqa/define-notification-triggers.html#s20066792
After enabling the feature and defining the notification trigger:
- From the Navigator menu, expand the Tools section and click on Notification Preference Manager.
- From the Object drop down menu, select either HR Help Desk Request or Internal Service Request as appropriate.
- Click + Add.
- Fill in all required fields/dropdowns.
- Enabled = Yes
- OverrideFlag = Yes
- Triggering Event - The new notification trigger that you'd like to override to send to the entire queue's resources.
- Notification Name and Description should give other administrators the understand what this does.
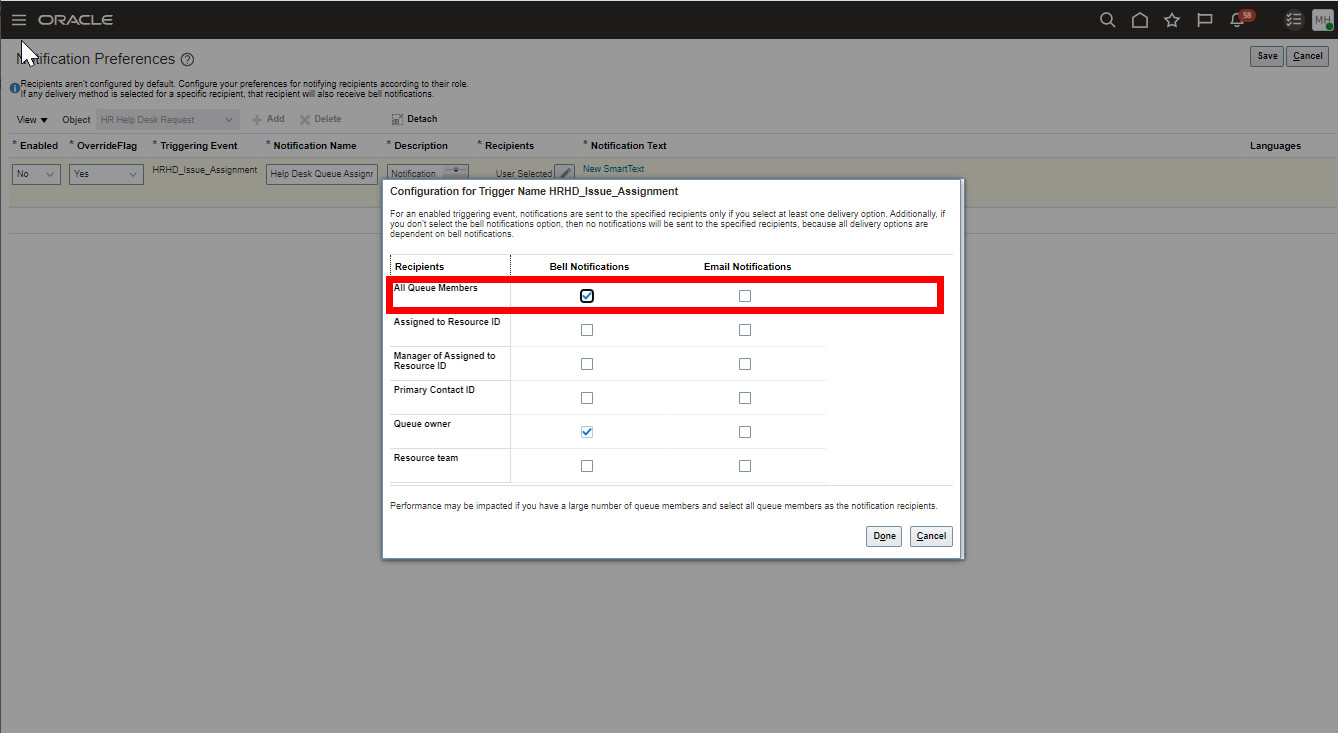
- Under recipients, click on the pencil icon to edit the recipients.
- To send to all members of the queue, click on the checkbox option for Bell Notifications or Email Notifications as desired for the line All Queue Members.
- Add the New SmartText to give an appropriate message.
- Click Publish.
- Click Save.
Tips And Considerations
If you have queues that have a large number of Agents, defining a notification that is sent to all members may have a slight impact on performance in the delivery of the notification. It is strongly recommended that you not use this notification recipient option for queues with a large membership.
Key Resources
For additional information on setup and configuration of notifications, please reference the documentation available here:
There is also a short Video showing this configuration at: Notify All Members of a Queue - WN 23C Help Desk - Oracle Video Hub
Access Requirements
To define a notification trigger in Application Composer, you will need to have a user with the appropriate privileges.
Help Desk Analytics
Gain Visibility into Help Desk Milestone Attainment and Knowledge Article Usage
Analyses built using these new subject areas enable managers to gain visibility into service request milestone target completions and compliance. Other areas of analysis include knowledge article usage in requests and their influence on issue resolution as well as HR Help Desk requests involving affected parties.
- Help Desk - HR Service Request Summary
- Help Desk - Internal Service Request Summary
Help desk managers can monitor knowledge article usage in requests as well their effectiveness in reducing resolution times. The frequency, location and other details of HR help desk issues raised on behalf of affected parties is a key input for managers to plan measures or alert other groups to prevent their occurrence.
Steps to Enable
Leverage new subject area(s) by adding to existing reports or using in new reports. For details about creating and editing reports, see the Creating and Administering Analytics and Reports book (available from the Oracle Help Center > your apps service area of interest > Books > Administration).
Tips And Considerations
Run the 'Aggregate Service Requests' scheduled process for refreshed data in reports built out of this subject area.
Key Resources
Subject Areas for Transactional Business Intelligence in Fusion Sales and Fusion Service guide.
Analyze HR Help Desk Performance for Affected Parties
An HR Help Desk Request may be filed on behalf of an affected party, who is not the primary point of contact of the request. Visibility into the affected party's details such as name, department, location, job title, and other key attributes will help pinpoint the specific employee groups, locations or positions where issues have been occurring.
A new folder called 'HR Service Request Affected Party' exposing key attributes of the Affected Party has been added to the 'Help Desk - HR Service Requests Real Time' subject area.
Gain visibility into the origins of HR help desk requests raised on behalf of affected parties to uncover common patterns and plan suitable remedial actions.
Steps to Enable
You don't need to do anything to enable this feature.
Gain Deeper Insights into Help Desk Performance with New Subject Areas
Your employee help desk requests often need to be routed to multiple agents, who are on the resource team of various queues. Managers would like to gain insights into service delivery performance in the context of agents being part of a queue. The subject area can be used in conjunction with other help desk subject areas to obtain these insights.
Two subject areas are provided to fulfill the analysis needs:
1. Help Desk - HR Help Desk Queue Resources Real Time
2. Help Desk - Internal Help Desk Queue Resources Real Time.
By gaining visibility into agent engagements across queues, managers can make better decisions on queue load balancing.
Steps to Enable
Leverage new subject area(s) by adding to existing reports or using in new reports. For details about creating and editing reports, see the Creating and Administering Analytics and Reports book (available from the Oracle Help Center > your apps service area of interest > Books > Administration).
Key Resources
Subject Areas for Transactional Business Intelligence in Fusion Sales and Fusion Service guide.
Analyze Conversations in Internal Help Desk
An agent can start an internal conversation with her fellow agents (or subject matter experts) to assist her in resolving a help desk request, through various channels. Managers and agents can gain insights into the extent of collaboration happening via internal conversations during the course of resolving a help desk request. In-depth analysis supported by key metrics such as counts of incoming/outgoing conversation messages, conversation recipients help managers are possible at the level of each help desk request, if required.
A new subject area, "Help Desk - Internal Service Request Conversation Messages Real Time" has been added.
Visibility into internal conversation recipient information, volumes and other aspects help understand the extent of collaboration occurring both within and outside the organization. An analysis of resolution times of closed requests together with their categories, queues or business units and the nature and volume of conversation messages would help uncover opportunities for improvement.
Steps to Enable
Leverage new subject area(s) by adding to existing reports or using in new reports. For details about creating and editing reports, see the Creating and Administering Analytics and Reports book (available from the Oracle Help Center > your apps service area of interest > Books > Administration).
Key Resources
Subject Areas for Transactional Business Intelligence in Fusion Sales and Fusion Service guide.
Help Desk Self-Service
Use Intelligent Advisor to create Help Desk requests
Users can now create Help Desk requests through an interview-style format using Intelligent Advisor.
Integrating with Intelligent Advisor allows decisions to be made on what information to collect, based on answers previously provided, and can be as simple or as complex as necessary for the particular situation. When using Intelligent Advisor, the "Create by Interview" action can be given as an option to agents and can be the default method of opening a help desk request for employees. This provides step-by-step guidance which can help make certain that employees provide all of the necessary information to agents during the first interaction, reducing overall resolution time.
Steps to Enable
To enable and use the Create Request by Interview button within Help Desk:
- Create an interview using Oracle Policy Modeler and deploy the interview to your Oracle Intelligent Advisor hub.
- Configure the Create by Interview button for the Employee flow, if desired:
- In Visual Builder Studio, open Oracle CX Helpdesk UI Extension App.
- Select helpdesk -> employee in the left-hand panel.
- In the right-hand panel, under the “Variable” section, set the following constants to configure the interview. You can click the Show in Variables link to open the Constants page and enter the variables there.
For HR Help Desk:
- IAenableCreateHRHDByInterview = “true”
- IAhrhdOpaHubUrl = Your Intelligent Advisor Hub URL
- IAhrhdOpaDeploymentName = Deployment name of the project created using Policy modeler
For Internal Service Request Help Desk:
- IAenableCreateISRByInterview = “true”
- IAisrOpaHubUrl = Your Intelligent Advisor Hub URL
- IAisrOpaDeploymentName = Deployment name of the project created using Policy modeler
- Configure the Create by Interview button for the Agent flow, if desired.
- In Visual Builder Studio, select helpdesk -> agent -> elastic-search-sr-list on the left-hand panel.
- Populate the variables as given above in step 2c.
4. Once the variables are entered, click Publish.
Tips And Considerations
Note that Intelligent Advisor is licensed separately, and this feature requires a license for Oracle Intelligent Advisor.
Key Resources
Refer to the Implementing Help Desk guide.
For more information about Oracle Intelligent Advisor, refer to the Overview of Oracle Intelligent Advisor Configuration.
Access Requirements
Your Oracle Intelligent Advisor administrator and Visual Builder developer should work together to configure this feature.