
- Revision History
- Overview
- Feature Summary
- Help Desk
-
- Help Desk Request Management
-
- Personal information can be manually redacted from existing messages
- Interaction List Page for Help Desk
- Use Tags to Classify Help Desk Requests
- Configure Smart Navigator to Limit Options for HR Help Desk Agents
- Cases shown on Employee Summary page and other UI Improvements
- Classic to Next Gen HR Help Desk Migration now includes Audit History
-
- Case Management
- Help Desk Analytics
- Service Workflow and Automation
- Help Desk Request Management
This document will continue to evolve as existing sections change and new information is added. All updates appear in the following table:
| Date | Module | Feature | Notes |
|---|---|---|---|
| 18 JAN 2024 | Help Desk Analytics |
Report on Internal Help Desk Request Product/Category changes | Updated document. Delivered new feature in update 24A. |
| 01 DEC 2023 | Created initial document. |
 HAVE AN IDEA?
We’re here and we’re listening. If you have a suggestion on how to make our cloud services even better then go ahead and tell us. There are several ways to submit your ideas, for example, through the Ideas Lab on Oracle Customer Connect. Wherever you see this icon after the feature name it means we delivered one of your ideas.
GIVE US FEEDBACK
We welcome your comments and suggestions to improve the content. Please send us your feedback at oracle_fusion_applications_help_ww_grp@oracle.com.
DISCLAIMER
The information contained in this document may include statements about Oracle’s product development plans. Many factors can materially affect Oracle’s product development plans and the nature and timing of future product releases. Accordingly, this Information is provided to you solely for information only, is not a commitment to deliver any material, code, or functionality, and should not be relied upon in making purchasing decisions. The development, release, and timing of any features or functionality described remains at the sole discretion of Oracle.
This information may not be incorporated into any contractual agreement with Oracle or its subsidiaries or affiliates. Oracle specifically disclaims any liability with respect to this information. Refer to the Legal Notices and Terms of Use for further information.
Column Definitions:
Report = New or modified, Oracle-delivered, ready to run reports.
UI or Process-Based: Small Scale = These UI or process-based features are typically comprised of minor field, validation, or program changes. Therefore, the potential impact to users is minimal.
UI or Process-Based: Larger Scale* = These UI or process-based features have more complex designs. Therefore, the potential impact to users is higher.
Features Delivered Disabled = Action is needed BEFORE these features can be used by END USERS. These features are delivered disabled and you choose if and when to enable them. For example, a) new or expanded BI subject areas need to first be incorporated into reports, b) Integration is required to utilize new web services, or c) features must be assigned to user roles before they can be accessed.
| Ready for Use by End Users Reports plus Small Scale UI or Process-Based new features will have minimal user impact after an update. Therefore, customer acceptance testing should focus on the Larger Scale UI or Process-Based* new features. |
Customer Must Take Action before Use by End Users Not disruptive as action is required to make these features ready to use. As you selectively choose to leverage, you set your test and roll out timing. |
|||||
|---|---|---|---|---|---|---|
| Feature |
Report |
UI or |
UI or |
|
||
Personal information can be manually redacted from existing messages |
||||||
Configure Smart Navigator to Limit Options for HR Help Desk Agents |
||||||
Cases shown on Employee Summary page and other UI Improvements |
||||||
Classic to Next Gen HR Help Desk Migration now includes Audit History |
||||||
Report on Internal Help Desk Request Product/Category changes |
||||||
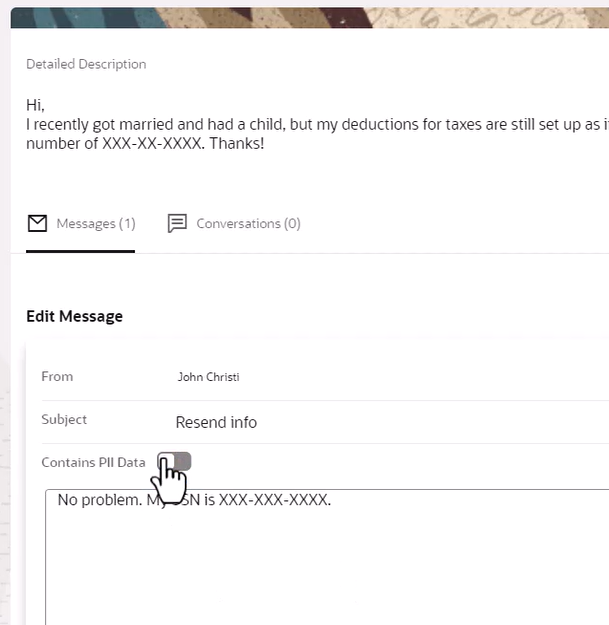
Personal information can be manually redacted from existing messages
Users with the appropriate permissions can now edit existing conversations to remove personal information that may have been accidentally included or is no longer needed.
When a Help Desk agent recognizes that Personally Identifiable Information (PII) has been included in a Help Desk message, they can now mark the message as containing PII.
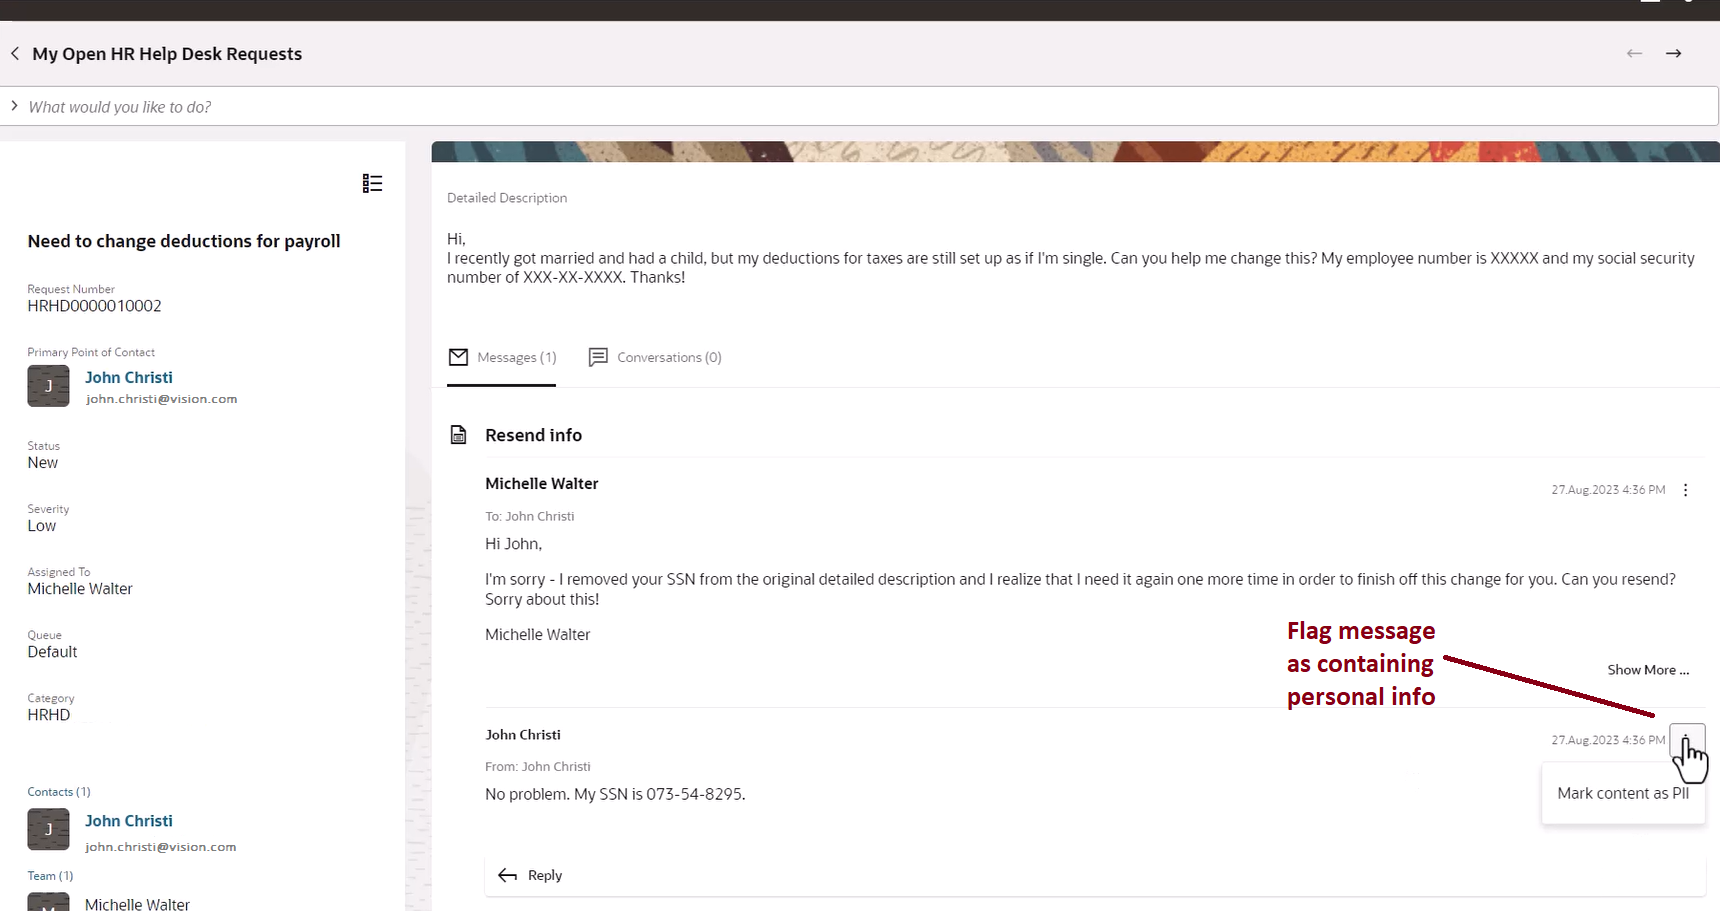
A manager with the appropriate permissions can then edit the previously saved message, and then unmark the message so that it is no longer flagged as containing PII.
This feature can be used to maintain compliance with regulations such as HIPAA, GDPR, and PCI, by removing personally identifiable information from long-term storage in the database.
Steps to Enable
To enable the feature that allows editing of messages:
- Turn on the profile option:
- Go to Setup and Maintenance.
- Click on the Task Icon.
- Click on the Search link.
- Search for Manage Administrative Profile Values.
- Search for the Profile Option Code for the type of Help Desk:
- HR Help Desk: ORA_SVC_HRHD_ENABLE_MESSAGE_EDIT
- Internal Help Desk: ORA_SVC_ISR_ENABLE_MESSAGE_EDIT
- Set the Profile Value to Yes.
- Click Save and Close.
- Click Done.
This will allow agents to mark messages as containing PII,
2. Create a new custom job role.
- Create a custom job role using the instructions found in the Securing Sales and Fusion Service guide.
| Help Desk Type | Privilege | Privilege Code |
|---|---|---|
| HR Help Desk |
Edit HR Service Request Messages |
SVC_EDIT_HRHD_MESSAGES |
| Internal Service Request Help Desk |
Edit Internal Service Request Messages |
SVC_EDIT_ISR_MESSAGES |
3. Assign this new role to whomever should be given the permissions to edit the messages. This can be done while creating the new job role, under the Users step, or you can assign the role to individual users after it is created.
Tips And Considerations
Agents should only mark the message as containing PII after the information is no longer needed.
To assist editing managers/agents in finding those message that need to be edited, an OTBI analytics report can be created.
Key Resources
Securing Sales and Fusion Service gives instructions on how to copy a standard role (such as Next Gen Human Resource Help Desk Manager).
Help Desk Roles are outlined in the Implementing Help Desk guide's chapter on About Security Roles.
Access Requirements
To configure this new feature, the administrator must have access to the Security Console and Setup and Maintenance.
Starting in 23C, Help Desk Agents are given permissions in the standard job roles to be able to mark the messages as containing Personally Identifiable Information (PII). However, this feature must be enabled for the option to be visible. (See Steps to Enable above.)
Whomever will be given the permissions to edit must be granted access to a custom job role that includes one of the following privileges:
| Help Desk Type | Privilege | Privilege Code |
|---|---|---|
| HR Help Desk |
Edit HR Service Request Messages |
SVC_EDIT_HRHD_MESSAGES |
| Internal Service Request Help Desk |
Edit Internal Service Request Messages |
SVC_EDIT_ISR_MESSAGES |
Interaction List Page for Help Desk
A new interaction list page can be accessed from the Employee Summary page, so that agents can see all recent interactions with that employee. The agent can expand any real-time interactions to view or edit the summary or resolution for any real-time interactions such as chat or phone calls using computer telephony integration.
To access the interactions page:
- Log in and navigate to the Help Desk tab.
- Under the Quick Actions, choose Employee Search.
- Search by name or email address to bring up the Employee Summary page.
- Click the View more details link at the bottom the Interactions column.
- To view the details of a real-time interaction such as Chat or Phone integration interaction, expand the interaction.
- From there you can also edit or add to the notes.
The new page allows agents to see all of the interactions with a particular employee and the interaction details if a real-time interaction was recorded.
Steps to Enable
You don't need to do anything to enable this feature.
Tips And Considerations
For non-real time interactions, such as inbound and outbound email, an interaction is list with a link to the Help Desk request.
For real-time interactions, such as chat or phone integration, the interaction can be expanded to show the resolution and wrap-up notes.
Key Resources
Once this feature is generally available, a demo will be found on Oracle Video Hub at https://videohub.oracle.com/category/Cloud+Applications%3ECustomer+Experience%3ECX+Service%3EFusion+Service%3EHelp+Desk/298218042.
Access Requirements
All Help Desk agents having either of the following privileges are able to access the new page.
- View Agent HR Help Desk (SVC_VIEW_AGENT_HR_HD)
- View Agent Internal Help Desk (SVC_VIEW_AGENT_ISR_HD)
However, the content on the page will be dependent upon the agent's security access. (For instance, an HR Help Desk agent may not be able to view Internal Help Desk requests, and an Internal Help Desk agent may not be able to view HR Help Desk requests.)
Use Tags to Classify Help Desk Requests
Help Desk Agents can now select an existing tag or create a new tag to classify Help Desk Requests in whatever way is helpful to the business. The tags field appears on the Edit Details page for any agent UI user with appropriate permissions.
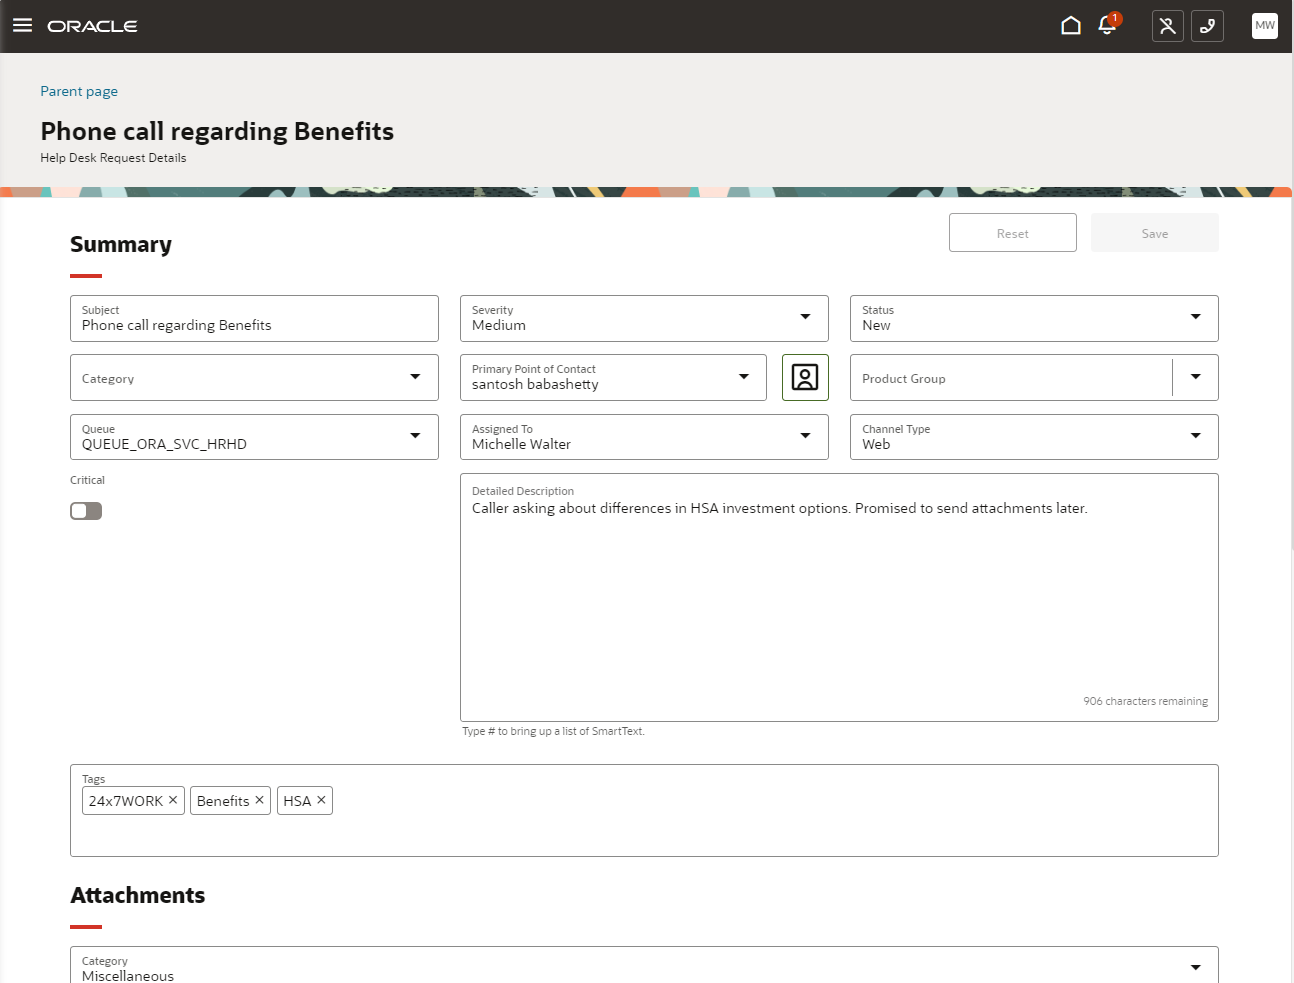
Tags also appears as a link in the left-hand column of the Help Desk request page, which, when clicked, opens the tags field at the top of the page to allow tags to be edited or deleted from the request.
Tags allow agents or help desk managers to create their own system of classification to help manage their work.
Steps to Enable
Provide the required access before using the feature. Details are in the Access #Requirements section.
Those with the "Manage Tags" privilege will automatically see the Tags field on the Agent interface. No additional setup is required. If it is desired that individual agents view, add, and delete tags, a custom role must be created to include this privilege.
Key Resources
A video demonstrating this new feature will be found at: Help Desk - Oracle Video Hub.
The Help Desk implementation guide is found at Implementing Help Desk.
Frequently asked questions and solutions can be found at Help Desk: Questions and Answers.
Access Requirements
The Manage Tags (SVC_MANAGE_TAGS) privilege is required to use tags.
By default, this privilege is provided for the following duty roles:
- HR Service Request Administration
- Internal Service Request Administration
If it is desired that individual agents view, add, and delete tags, a custom role must be created to include this privilege.
Configure Smart Navigator to Limit Options for HR Help Desk Agents
Administrators of HR Help Desk can now configure the HCM Smart Navigator to show only those items that are considered relevant to their company's business processes. For example, only those modules used and relevant to the agents can be listed, while all others are hidden.
Showing only the relevant links simplifies the user interface for agents and avoids confusion from navigating to an HCM module that is not in use.
Steps to Enable
Leverage the Visual Builder Studio to expose your applications. To learn more about extending your application using Visual Builder, visit Oracle Help Center > your apps service area of interest > Books > Configuration and Extension.
Limiting the options shown is done by extension in Visual Builder Studio, using the following instructions:
- Enter Visual Builder Studio.
- On the left, navigate to Oracle CX Help Desk UI Extension App -> helpdesk.
- Click on the Variables tab.
- Click on the Constant, hideHcmNavEntries.
- In the text box for Default Value, add the exact names of the items from the Smart Navigator, using double quotes around each item, comma separated items, and the entire list within brackets. For instance, \["Workforce Modeling","Learning","Compensation","Team Social Reputation"\]
- Save your changes.
- Preview to make certain they are showing correctly.
- Publish your changes.
Tips And Considerations
Note that:
- The items can either be the general category or individual items within the category.
- When entering the values in hideHcmNavEntries, the names must exactly match those found in the Smart Navigator, and the names are case-sensitive.
Key Resources
Once the feature is released, a video demonstrating this can be found on the Help Desk Video Hub.
Access Requirements
To configure this, the Help Desk Administrator will need the ability to make changes in Visual Builder Studio. No additional privileges are required.
Cases shown on Employee Summary page and other UI Improvements
The Employee Search page now includes a list of open Cases that are shown to the agent if they have the appropriate privileges. There is also a link to the Employee Summary page from the primary contact's name on the Edit Help Desk Request page.
Other UI enhancements include:
- New extensions have been added to allow administrators to make the default Message action be to compose an internal note rather than compose a message
- Administrators can reorder or hide the Conversations and Messages tab on the help desk request.
These user interface improvements provide additional flexibility to your administrator and allows help desk agents to see a broader view of the employee with whom they are interacting. This can save time for agents by not having to choose a default message action, not needing to switch tabs to start an internal conversation, and not needing to go to different pages to see the both cases and help desk requests for the employee.
Steps to Enable
Leverage the Visual Builder Studio to expose your applications. To learn more about extending your application using Visual Builder, visit Oracle Help Center > your apps service area of interest > Books > Configuration and Extension.
View Cases as part of Employee Summary
No configuration changes are required to enable the improvements to the Employee Summary page. Data will be shown only if the agent has the appropriate privileges.
Default Message Action
- Navigate to Visual Builder Studio
- In the AppUIs section on the left-hand side of the page, go to Oracle CX HelpDesk UI Extension App ->helpdesk.
- Click on the Variables tab.
- Highlight the defaultMessageType under Constants.
- For the Default Value on the right-hand side of the page, choose the appropriate option for your organization. The options are:
- ComposeEmail
- ComposeInternalNote
- ComposeMessage
- ComposeWebMessage
For the Default Value on the right-hand side of the page, choose the appropriate option for your organization. The default value is currently MessageAndConversations.
Hide or change the order of Messages or Conversations
To hide or change the order of Messages or Conversations, do the following:
- Navigate to Visual Builder Studio.
- In the AppUIs section on the left-hand side of the page, go to Oracle CX HelpDesk UI Extension App ->helpdesk -> service-request-detail-start.
- Click on the Variables tab.
- Highlight the detailsPageTabOrder under Constants.
- For the Default Value on the right-hand side of the page, choose the appropriate option for your organization. The options are:
- MessageAndConversations - the standard default value, showing Messages to the left of Conversations
- Messages - show Messages only and hides Conversations
- ConversationsAndMessages - shows Conversations to the left of Messages
Key Resources
Once the feature is released, a video demonstrating this can be found on the Help Desk Video Hub.
Access Requirements
To view any data within each section of the Employee Summary page, the agent must have appropriate access. For instance, to view Cases, an HR Help Desk agent would need privileges to view Cases. Similarly, a Case Worker would require view privileges for Help Desk requests in order to view all help desk requests related to the employee.
Classic to Next Gen HR Help Desk Migration now includes Audit History
When migrating from Classic HR Help Desk to the Next Gen Help Desk in the Redwood experience, administrators can now migrate all historical audit history for their classic help desk service requests. This can be done immediately following the Data Migration job or can be run at a later time to accommodate implementations that have already migrated.
This allows agents to see the full audit history for the help desk request, whether it was created or updated in the Classic Help Desk or in the HR Help Desk in the Redwood Experience.
Steps to Enable
There is nothing specific that needs to be done to enable this migration job, as long as the pre-requisites, listed under Tips and Considerations have been completed.
To migrate existing Audit History, use the following steps:
Run the Scheduled Process HR Help Desk Data Migration to Redwood Help Desk
-
Click the Navigator icon and under the Tools section, click Scheduled Processes.
-
On the Scheduled Processes page, click Schedule New Process.
-
On the Schedule New Process dialog box, select Job as the Type.
-
Search for and select the job HR Help Desk Audit Data Migration to Redwood Help Desk.
-
Click OK.
-
On the Schedule New Process dialog box, click OK.
-
The Process Details Dialog box appears.
-
Click Advanced.
-
On the Schedule tab, select As soon as possible, if it is not already selected.
-
Click Submit.
The length of time that this migration job requires is based on the number of records. However, it generally should not take more than an hour.
Re-index Adaptive Search
After the Migration job shows success, you will need to do a full re-index on Adaptive Search in order for the HR Help Desk requests audit history created in the Classic experience to be visible in the Redwood experience.
To Re-index:
-
Navigate to Setup and Maintenance.
-
Click on the Tasks icon on the right-hand side of the page.
-
Click the Search link.
-
Type Configure Adaptive Search.
-
Click the magnifying glass to initiate the search.
-
Click the Configure Adaptive Search link.
-
Click on the Setup tab on the left-hand side of the page.
-
Under the Service Section, check both HR Help Desk Request and Help Desk Contact.
-
From the Actions drop-down, select Full Publish.
-
Click Proceed with Full Publish.
-
Click Publish.
-
Click OK in response to the Warning you are given.
-
Click on the Monitor tab.
-
Click Start Process.
-
Verify that you see the Job in a WAIT status.
This will take a few hours to run. You may continue with the setup while this is running.
NOTE: It is not uncommon to get an error. If you do, restart the process from the Monitor Tab for the Configure Adaptive Search page. You can see the nature of the error under the Publish tab at the top of the page.
Tips And Considerations
The pre-requisites for running the migration audit history job include:
- Enable the Migration Profile Option.
- Migrate your Meta Data such has custom fields.
- Migrate your Data.
If you have not already started these items, please work with your Technical Migration Manager to complete these migration steps. If you do not already have a Technical Migration Manager assigned, open a Service Request with Technical Support.
Key Resources
Your Technical Migration Manager can provide you with the latest Migration Guide.
Access Requirements
In order to run the audit migration job, the user must have the privilege "Manage HR Help Desk Migration" (SVC_HR_HELPDESK_MIGRATION). By default, this privilege is given to the "HR Service Request Administration" duty role, which is part of the Next Gen Human Resource Help Desk Administrator Job Role (ORA_SVC_HUMAN_RESOURCE_HELP_DESK_ADMINISTRATOR_NG).
Enhanced Security for Case Management Data
Access Groups can now be used to secure your Cases, providing configurable rule-based access controls that dynamically determine how your users gain visibility to your Case data.
Access Groups allow you to secure your sensitive Cases in ways that match your organization's unique workflows.
Steps to Enable
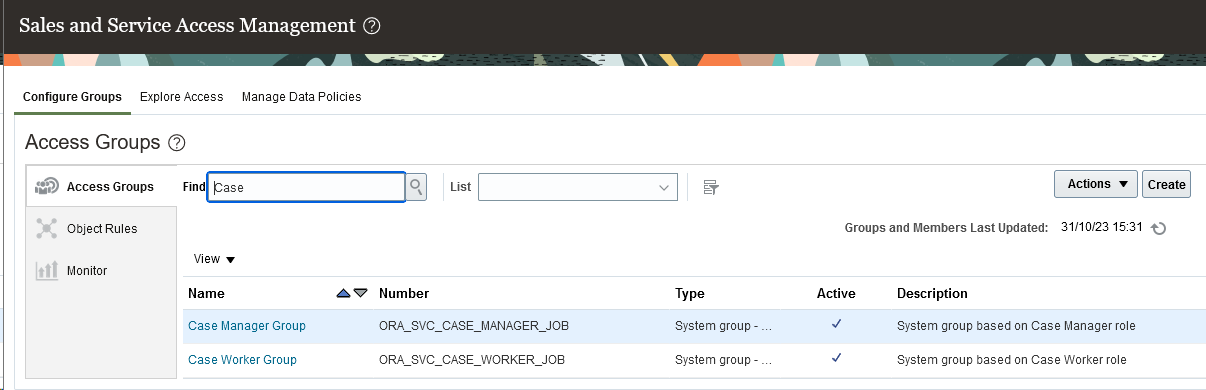
Access Groups for Cases are disabled by default. To enable Access Groups for your Cases, ensure you are an authorized administrator and use the 'Sales and Service Access Management' link in the system menu.
Tips And Considerations
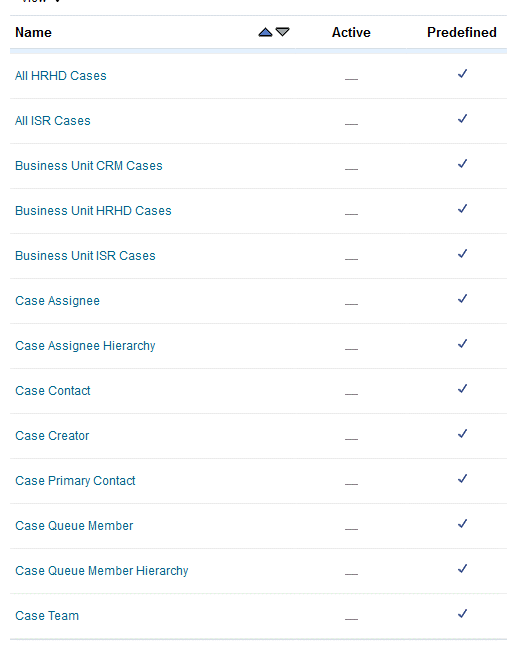
To get started quickly with Access Groups for Cases, consider using one or more of the 13 pre-configured system Access Groups.
Key Resources
For more information about Access Groups, refer to 'Overview of Access Groups' in Securing Sales and Service Guide.
Access Requirements
- Access Groups can be enabled and configured by an authorized administrator.
- Users with the "Manage Group Access" privilege (ZCA_MANAGE_GROUP_ACCESS_PRIV) can create and manage access groups.
- By default, the Sales Administrator job role and the IT Security Manager job role have the "Manage Group Access" privilege.
- Users must be assigned the duty role "Access Groups Enablement", to get the access provided through access groups. By default, users assigned any of these roles have this privilege:
- the Resource abstract role;
- any predefined Service or Sales job role.
Analyze Action Plan Completions and Delays for Cases
Action plans are a checklist, a series of events or steps that have to be done before you can close a case. Action plan analytics help you monitor completions and ensure compliance against a set of actions. Pre-defined metrics around open and closed action plans, delayed actions, and aging of action plans help managers gain insights into performance at an aggregate level to address areas of concern. Agents can gain visibility to their own action plan completions and delays. A new subject area,
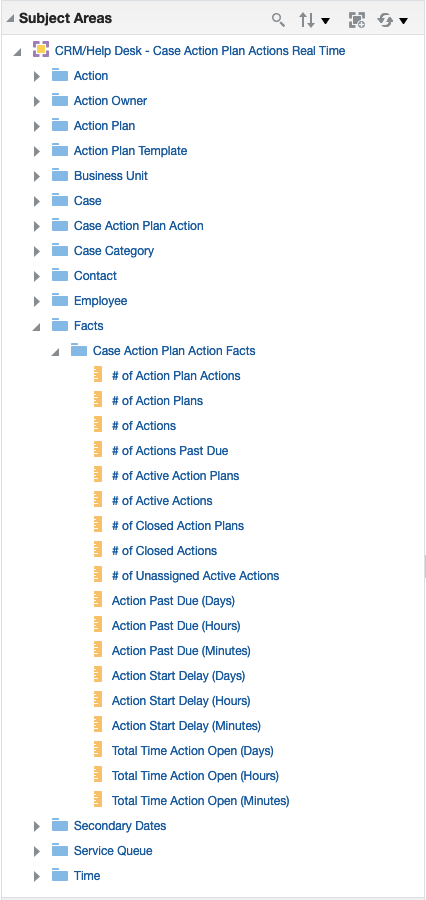
New Subject Area - CRM/Help Desk - Case Action Plan Actions Real Time is available for you to build your own analyses.
Monitor adherence to service organization policies with insights into action plan performance.
Steps to Enable
Leverage new subject area(s) by adding to existing reports or using in new reports. For details about creating and editing reports, see the Creating and Administering Analytics and Reports book (available from the Oracle Help Center > your apps service area of interest > Books > Administration).
Key Resources
https://docs.oracle.com/en/cloud/saas/sales/faoec/index.html#COPYRIGHT_0000
Report on Internal Help Desk Request Product/Category changes
Help Desk Requests go through a life cycle from the point they are created up until they are resolved and finally closed. Help Desk personnel are interested in keeping this life cycle short while attempting a timely, quality resolution to issues. The Help Desk - Internal Service Requests Lifecycle subject area already helps you monitor changes to an Internal Help Desk's assignee, queue, status and severity. With this enhancement, you can monitor changes to product and category too to help you get visibility into the duration that the request was with a specific product or category.
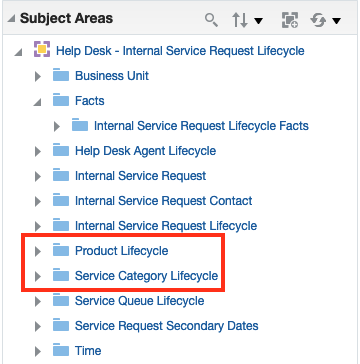
Track Product and Category Lifecycle changes
Visibility into all the products and service categories that an internal help desk has traversed during the course of its lifecycle may reveal issues in routing an assignment and help in improving efficiency and resolution times.
Steps to Enable
You don't need to do anything to enable this feature.
Key Resources
https://docs.oracle.com/en/cloud/saas/sales/faoec/Help-Desk--Internal-Service-Requests-Lifecycle-SA-26.html#Help_Desk__Internal_Service_Requests_Lifecycle_SA_26_d1e16814
Service Workflow and Automation
SmartText Usage in Service and Help Desk Requests
A SmartText entry is a reusable block of text that an agent can create and use on service request fields such as messages. An administrator can create 'public' SmartText entries that all agents can use.
A new subject area, 'CRM/Help Desk - Service Request SmartText Usages Real Time' helps you build custom analyses both for Service Center and Help Desk.
Out-of-box reports help administrators obtain ready insights.
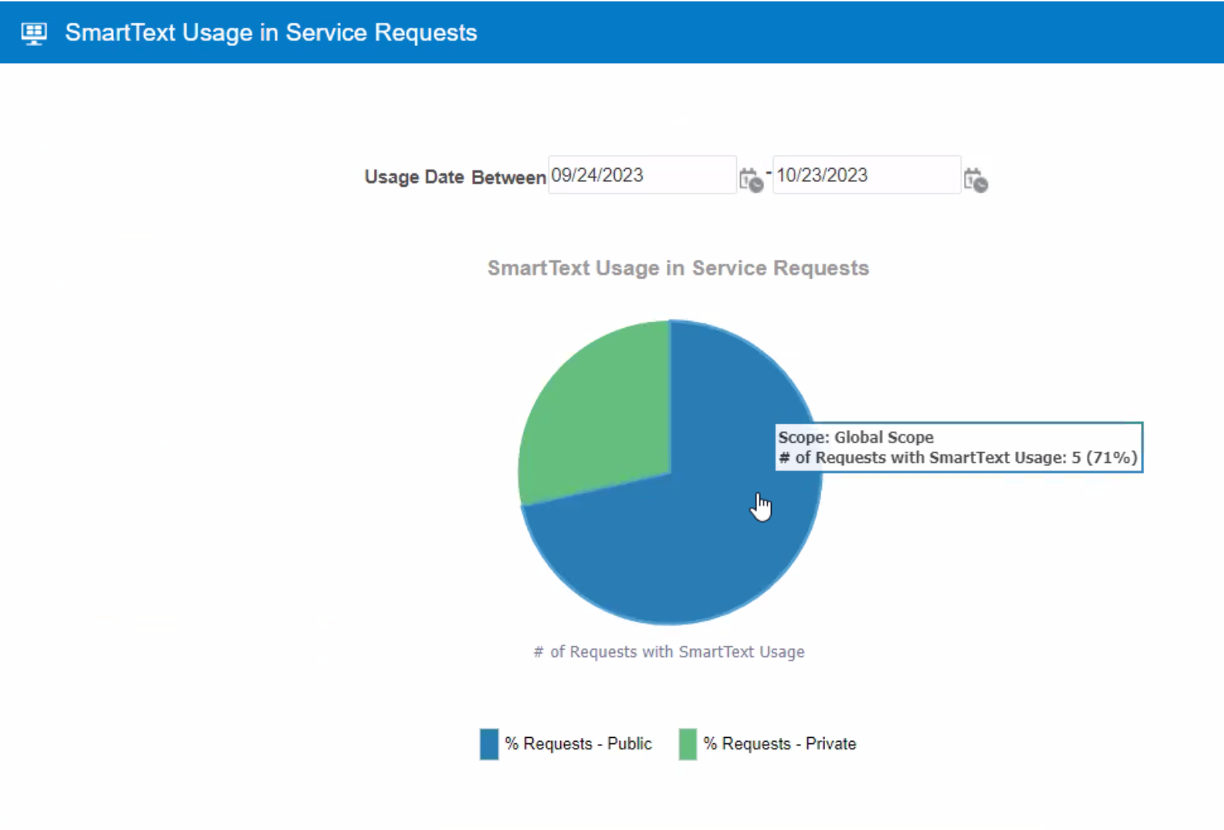
SmartText Usage Report
A better understanding of SmartText usage trends can help your administrators identify SmartText entries that have high or low adoption, so the administrators can keep the list as short as possible limited only to entries where agent's find value.
Steps to Enable
Leverage new subject area(s) by adding to existing reports or using in new reports. For details about creating and editing reports, see the Creating and Administering Analytics and Reports book (available from the Oracle Help Center > your apps service area of interest > Books > Administration).
Key Resources
https://docs.oracle.com/en/cloud/saas/sales/faoec/index.html#COPYRIGHT_0000