
- Revision History
- Overview
- Optional Uptake of New Features (Opt In)
- Feature Summary
-
- Maintenance
-
- Enable Inspections for Maintenance Work Orders
- Add Asset Contact Information
- Update Components of Assets Located in Inventory
- Manage How You Maintain Installed Base Assets
- Manage Customer Information for Installed Based Assets
- Extend the Installed Base Asset Creation and Update Pages Using Application Composer
-
- Maintenance
This document will continue to evolve as existing sections change and new information is added. All updates appear in the following table:
| Date | Feature | Notes |
|---|---|---|
| 20 SEP 2019 | Created initial document. |
This guide outlines the information you need to know about new or improved functionality in this update, and describes any tasks you might need to perform for the update. Each section includes a brief description of the feature, the steps you need to take to enable or begin using the feature, any tips or considerations that you should keep in mind, and the resources available to help you.
SECURITY AND NEW FEATURES
The Role section of each feature identifies the security privilege and job role required to use the feature. If feature setup is required, then the Application Implementation Consultant job role is required to perform the setup, unless otherwise indicated. (If a feature doesn't include a Role section, then no security changes are required to use the feature.)
If you have created job roles, then you can use this information to add new privileges to those roles as needed.
GIVE US FEEDBACK
We welcome your comments and suggestions to improve the content. Please send us your feedback at oracle_fusion_applications_help_ww_grp@oracle.com.
Optional Uptake of New Features (Opt In)
Oracle Cloud Applications delivers new updates every quarter. This means every three months you'll receive new functionality to help you efficiently and effectively manage your business. Some features are delivered Enabled meaning they are immediately available to end users. Other features are delivered Disabled meaning you have to take action to make available. Features delivered Disabled can be activated for end users in a couple of ways:
Access the Opt In page from the New Features Work Area
- Click the Navigator, and then click New Features (under the My Enterprise heading)
- On the New Features page, select the offering that includes new features you’d like to review
- Click Go to Opt In for any feature you want to opt in
- On the Edit Features page, select the Enable option for the feature, and then click Done
or... Access the Opt In page from the Setup and Maintenance Work Area
- Click the Navigator, and then click Setup and Maintenance
- On the Setup page, select your offering, and then click Change Feature Opt In
- On the Opt In page, click the Edit Features icon for any area that includes features you want to opt in
- On the Edit Features page, select the Enable option for any feature you want to opt in to. If the Enable column includes an Edit icon instead of a check box, then click the icon, select your feature options, and click Save and Close.
- Click Done.
Opt In Expiration
Occasionally, features delivered Disabled via Opt In may auto enable in a future update. This is known as an Opt In Expiration. If your cloud service has any Opt In Expirations you will see a related tab in this document. Click on that tab to see when the feature was originally delivered Disabled, and when the Opt In will expire, potentially auto enabling the feature. You can also click here to see features with Opt In Expirations across all Oracle Cloud Applications.
Column Definitions:
Report = New or modified, Oracle-delivered, ready to run reports.
UI or Process-Based: Small Scale = These UI or process-based features are typically comprised of minor field, validation, or program changes. Therefore, the potential impact to users is minimal.
UI or Process-Based: Larger Scale* = These UI or process-based features have more complex designs. Therefore, the potential impact to users is higher.
Customer Action Required = You MUST take action before these features can be used by END USERS. These features are delivered disabled and you choose if and when to enable them. For example, a) new or expanded BI subject areas need to first be incorporated into reports, b) Integration is required to utilize new web services, or c) features must be assigned to user roles before they can be accessed.
| Ready for Use by End Users Reports plus Small Scale UI or Process-Based new features will have minimal user impact after an update. Therefore, customer acceptance testing should focus on the Larger Scale UI or Process-Based* new features. |
Customer Must Take Action before Use by End Users Not disruptive as action is required to make these features ready to use. As you selectively choose to leverage, you set your test and roll out timing. |
|||||
|---|---|---|---|---|---|---|
| Feature |
Report |
UI or |
UI or |
Customer Action Required |
||
Extend the Installed Base Asset Creation and Update Pages Using Application Composer |
||||||
Enable Inspections for Maintenance Work Orders
Inspections are integral to any maintenance activity. With this update, you can collect inspection data for a maintenance operation.
Inspections for a maintenance operation can be mandatory or optional, depending on how you set up the inspection plan. Refer to the Tips & Considerations section for more information on how you can set up an inspection plan.
OPERATION WITH A MANDATORY INSPECTION PLAN

The Inspection Plan column will display the Inspection Required icon if there is a mandatory inspection plan for a work order operation. The Quick Complete and Complete with Details buttons are disabled until you do the mandatory inspection and collect the results.
You can do the inspection either by clicking the Inspection icon or by clicking the Create Inspection Results button.
OPERATION WITH OPTIONAL INSPECTION PLAN

The Inspection Plan column will display the Inspection is Optional icon if there isn’t a mandatory inspection plan for a work order operation. The Quick Complete and Complete with Details buttons are enabled, and you can complete the operation even if you don’t do the inspection.
You can do the inspection either by clicking the Inspection icon or by clicking the Create Inspection Results button.
NOTE: Inspection Plan is not mandatory to Create Inspection for the maintenance operation. If Inspection plan is not chosen, then the inspection characteristics should be added manually and results for the same should be entered in the Enter Inspection Details page.
Here are some other ways you can use do the inspections:
- Create Inspection Results task on the Maintenance Management landing page
- Create Inspection button on the Quality Management landing page
Here are the ways you can use to view the inspection results:
- Manage Inspection task on the Maintenance Management landing page
- Search Inspection button on the Quality Management landing page
Steps to Enable
You don't need to do anything to enable this feature.
Tips And Considerations
Here are some important points for you to consider when you set up an inspection plan for maintenance work orders:

- The inspection Type should be Work in process.
- The organization is generally a maintenance organization where maintenance work orders are created.
- We recommended you set the Details attribute as Item and the value of Item attribute should be an Asset Item.
- The above means that the Inspection plan is not setup against any specific Asset.
- Inspection Plan Optional check box is used to set the inspection as mandatory or optional during operation completion.
- If the check box is selected, then the inspection is optional during operation completion.
- If the check box is deselected, then the inspection is mandatory during operation completion.
- The characteristics should be added to the plan.
- Inspection actions can be configured once characteristics have been saved to the plan.
- The Inspection criteria should be either set for Operation Sequence or Operation Code.
- The disposition status should always be Ready.
- The inspection plan Status should be Approved.
To access the Quality Management work area and set up quality inspection plans, you must purchase an Oracle Product Management Cloud subscription.
Key Resources
For more information about Oracle Quality Management Cloud, refer to the "Introduction to Quality Management Cloud" topic in the Using Quality Management guide, available on the Oracle Help Center.
Role Information
- Job Role Name and Code:
- Maintenance Manager (ORA_MNT_MAINTENANCE_MANAGER_JOB)
- Maintenance Technician (ORA_MNT_MAINTENANCE_TECHNICIAN_JOB)
- Privilege Name and Code:
- Edit Inspection Results (QA_EDIT_INSPECTION_RESULTS_PRIV)
For a better insight into an asset, information about the contact person for the asset is important. With this update, you can associate a contact person for the asset. You can manage the contacts in the Engagement cloud > Contact Management. Contact association is different for each of the two kinds of assets—enterprise assets and customer assets.

Flow Chart
ENTERPRISE ASSETS
For the enterprise asset, the contact person must be an employee of the organization. A contact with the Person Type set as HR Employee usage can be associated to the asset, but only if the employee belongs to the business unit of the asset's operating organization.
If you update the asset operating organization, you must review the contact details for the new operating organization before saving.
CUSTOMER ASSETS
For a customer asset the person contact must be a customer contact. The asset contact depends on the value of Customer attribute in the asset. If you update the Customer attribute for the asset, then you must review the contact details for the new customer before saving.
CONTACT CONTEXTUAL INFORMATION
You can find the contextual information of the contact by clicking the Contact icon in the search results region of the Manage Assets page.

Manage Asset Page
Steps to Enable
You don't need to do anything to enable this feature.
Tips And Considerations
Review the contact details when
- The Operating Organization of the asset is updated.
- When the Customer Name is updated (Includes removal of customer).
Role Information
To use this feature, the following roles are required:
- Job Role Name and Code:
- Maintenance Manager (ORA_MNT_MAINTENANCE_MANAGER_JOB)
- Asset Administrator (ORA_CSE_ASSET_ADMINISTRATOR_JOB)
Update Components of Assets Located in Inventory
Add asset tracked components to an asset residing in inventory. For example, you receive an asset lifecycle tracked item into inventory from a supplier. The supplier sends you information about components of this item, and you want to track these components as assets that are a part of the received asset’s structure.
With this update, you can:
- Create and add a new asset as a component of an asset located in inventory via the user interface, the Installed Base Assets FBDI or the Installed Base Assets REST service.
- Add an existing asset as a component of an asset located in inventory via the user interface, the Installed Base Assets FBDI or the Installed Base Assets REST service
ADDING A COMPONENT VIA THE USER INTERFACE
To add a component to an asset residing in inventory via the user interface, you must first select the desired asset for editing, then navigate to the Asset Hierarchy tab.

Asset Hierarchy Tab
In the Asset Hierarchy tab, you can click the + icon on the asset card. You can choose to:
- Create the component as a new asset: Click the Create button on the dialog box and create your asset. You must confirm the addition of the new asset by clicking OK in the dialog box.

Create a New Asset in the Hierarchy
Note that since the intended parent asset is inventory-located, the newly created asset will be in the Unknown location type, until the addition of the asset is confirmed. Upon confirmation, the newly created asset inherits the parent inventory location and this location is unmodifiable.
- Add an asset you created previously to the structure: Search for the asset to be added in the dialog box and select it for addition. For the asset to be added,
- It must have the location type as Unknown
- It must be in the same operating organization than the parent asset
- It must not be already associated to another asset structure

Add an Existing Asset to the Hierarchy
REMOVING A COMPONENT
You can also remove the added component from the structure. The location type of the component is turned from the parent inventory location to the Unknown location type. This helps you re-add this asset to the correct structure, update it for correction, or terminate it.
ADDING A COMPONENT USING FBDI
The addition of a component to an inventory-located asset using the Installed Base FBDI follows the same rules as on the user interface:
- If you create the asset while adding to the parent, then the operating organization of the asset must be the same as the parent, and the location type must be provided as Unknown.
- If you add an existing asset, then the operating organization of the asset must be the same as the parent, its location type must be Unknown, and the asset must not be already associated to another asset structure.
- When you add the component to the parent asset, the component inherits the parent location too.
You must use the attributes Structure Action Code and Parent Asset Number to add the component to the parent. The Structure Action Code attribute must be ADD and the Parent Asset Number attribute must be the desired asset located in inventory.
ADDING A COMPONENT USING THE REST SERVICE
With this update, attributes Structure Action Code (StructureActionCode) and Parent Asset identifiers (ParentAssetId) have been added to the installedBaseAssets resource payload. You can now create and add a new component asset to a parent asset exactly like with FBDI, with the same rules applied. Alternately, you can also add an existing asset to the structure using the relationships resource like for other components.
Steps to Enable
You don't need to do anything to enable this feature.
Key Resources
Manage How You Maintain Installed Base Assets
Maintain installed base assets by manually creating maintenance work orders, using a maintenance program, or both.
The methods for creating maintenance work orders depends on how the asset is defined:
- Enterprise assets have an associated inventory item that is tracked using the Full Lifecycle Tracking method. The assets may or not operate in a maintenance-enabled organization.
- If the asset operates in a maintenance-enabled organization:
- You can manually create work orders in the same organization
- You can use a maintenance program for forecasting and creating work orders in the same organization
- If the asset does not operate in a maintenance-enabled organization:
- You can manually create work orders only in a supporting maintenance-enabled organization
- You can’t use the asset in a maintenance program
- If the asset operates in a maintenance-enabled organization:
- Customer assets have an associated inventory item that is customer tracked. The assets usually don’t operate in a maintenance-enabled organization. You can manually create work orders only in a supporting maintenance-enabled organization.
You can use the Allow maintenance programs and Allow work orders check boxes on the Edit Asset page to control if and how you create work orders. When you create a new asset, both check boxes are selected by default for both enterprise and customer assets. You can also use these check boxes when you create assets using the Installed Base Asset REST service.

Asset Check Boxes
Here’s how you can use the Allow maintenance programs check box:
- When the Allow maintenance programs check box is selected, you can use the enterprise asset to create a work requirement in a maintenance program, but only if the Allow work orders check box is also selected.
- When the Allow maintenance programs check box is deselected, you can’t use the enterprise asset to create any new work requirement.
NOTE: If an enterprise asset is already used in a work requirement, and then you don’t select the Allow maintenance programs check box, the enterprise asset will be disregarded by the next run of the forecast for each applicable maintenance program.
- Please note that in the earlier versions the Allow maintenance programs check box was named Maintainable asset. By selecting the Maintainable asset check box, you could view and optionally select the Allow work orders check box. Here are some other points to note:
- With this update, the check box name was changed to reflect that it will be used primarily to control whether an enterprise asset can be used in a maintenance program.
- You can use the Allow maintenance programs and Allow work orders check boxes independently as both check boxes are always displayed on the page
- Customer assets are not supported for maintenance programs in this update. Therefore, selecting or deselecting the check boxes will have no impact.
- To use the enterprise asset to create a work requirement in a maintenance program, ensure that both the Allow maintenance programs and Allow work orders check boxes are selected.
Here’s how you can use the Allow Work Orders check box:
- When the Allow work orders check box is selected, you can create work orders for both enterprise and customer assets. Here are some things to note:
- You can use the enterprise and customer assets while manually creating a work order in a maintenance-enabled Organization
- If the enterprise asset is defined in a maintenance program and you select the Allow maintenance programs check box, then you can use the enterprise asset to create a work requirement and create work orders from the forecast.
- You can also create work orders for enterprise and customer assets using the Maintenance Work Order REST service.
- When the Allow work orders check box is deselected, you can’t create work orders the asset. Here are some things to note:
- You can’t use the asset while creating any new work order, either manually, using a maintenance program, or using REST services.
- You can’t use the asset to create any new work requirement.
- If the enterprise asset is already defined in a maintenance program and you don’t select the Allow maintenance programs check box, the enterprise asset will be disregarded by the next run of the forecast for each applicable maintenance program. The forecast will be deleted as the enterprise asset is no longer used in the maintenance program.
Steps to Enable
You don't need to do anything to enable this feature.
Tips And Considerations
When you create a new asset, both check boxes are selected by default. You should only update the check boxes if you want to explicitly define that work orders can only be created manually by:
- Deselecting the Allow maintenance programs check box
- Selecting the Allow work orders check box
To manually create work orders for assets that do not operate in a maintenance-enabled organization, you can use a related maintenance-enabled organization. With organization relationships, maintenance-enabled organizations can support one or more non-maintenance organizations. When defined, all related organizations are displayed at the asset level in the Overview tab, in the Maintenance Organizations popup.
- You can find related organizations if you follow Setup and Maintenance > Setup > Manufacturing and Supply Chain Materials Management > Maintenance Management > All Tasks > Manage Maintenance Organization Relationships.
- For each maintenance-enabled organization, you can define a relationship with one or more non-maintenance organizations.
- You can use the organization relationship to use assets while manually creating work orders.
Role Information
To use this feature, the following roles are required:
- Job Role Name and Code:
- Maintenance Manager (ORA_MNT_MAINTENANCE_MANAGER)
- Customer Asset Administrator (CUSTOMER_ASSET_ADMIN_CUSTOM_ROLE)
Manage Customer Information for Installed Based Assets
Select and update the Customer Account field directly in the Edit Asset page. A customer account represents the bill-to account for the asset's customer and is based on its selling business unit.

Customer Account Field
Click the search icon on the Customer Account field to search for and select a customer account based on an asset's customer and specific selling business unit.
Alternatively, you can update the Customer field in the Search section to a value that is different than the asset's customer. Thus, you can select a different bill-to account.

Customer Account Search
When the Customer Account field is selected or updated, the bill-to account information is updated in the Last Sales Order Details tab.

Last Sales Order Details tab
Steps to Enable
You don't need to do anything to enable this feature.
Role Information
To use this feature, the following roles are required:
- Job Role Name and Code:
- Maintenance Manager (ORA_MNT_MAINTENANCE_MANAGER)
- Customer Asset Administrator (CUSTOMER_ASSET_ADMIN_CUSTOM_ROLE)
Extend the Installed Base Asset Creation and Update Pages Using Application Composer
With this update, the UI for creating asset is updated from just a dialogue box to a dedicated Create Asset page. With this, you can configure the page layout, change the display labels, order, and even hide non-required standard fields.
You can also enable and add configured fields to the page. For these configured fields, you can choose from a variety of options for the field type: Text, Number, Check Boxes, Percentage, Choice List, Date types etc. Additionally, you can set the configured fields to depend on standard fields. For example, you can set the Location field to associate to a new configured field Owner Address.
Note that for the Create Asset page, the configuration is limited to support the creation of the asset object and its key attributes. For further definition and setup of the asset, you can use the Edit Asset page.
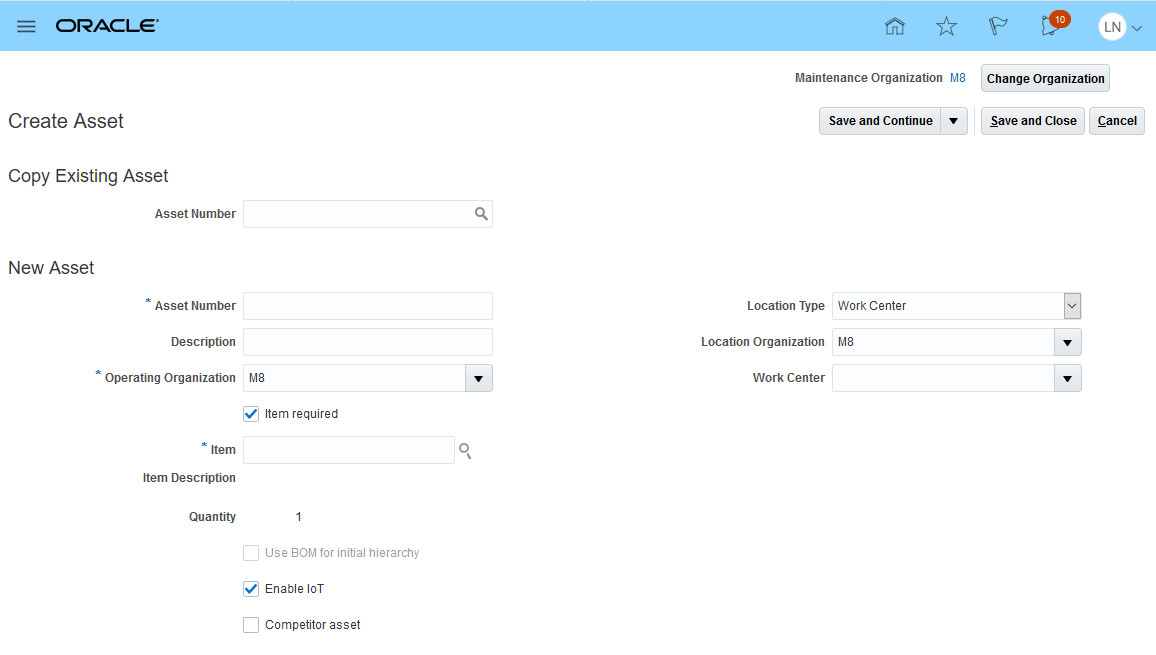
Create Asset Page
To configure asset details in the Edit Asset page, you can modify the page layout of the Edit Asset Overview tab. You can change the field labels, order, and even hide non-required standard fields. For example, you can change the Serial Number field label to Internal Serial Number , or Asset Number to Internal Asset Number.
You can also enable and add configured fields to the Overview tab. For these configured fields, you can choose from a variety of options for the field type: Text, Number, Check Boxes, Percentage, Choice List, Date types etc. Additionally, you can set the configured fields to depend on standard fields. For example, you can set the Location field to associate to a new configured field Owner Address.
You can create configured actions and links with Application Composer. An action is a button based on a Groovy script which can launch a URL. Groovy is a standard, dynamic scripting language for the Java platform for which Application Composer provides deep support. When you create an action, it may appear as an action button, or an option in the Actions menu.
When you create a link, it is embedded in the fields region of the page. With the link, you can navigate to another page in the application, or to another website. For example, you can configure a link from the Overview tab to a corporate website, or you can configure a link to an internal work order tab for the context asset.

Edit Asset Overview Tab with Configuration Examples
Watch a Demo
Steps to Enable
Leverage the Applications Composer to expose / adjust page layout and attributes. To learn more about extending your application using Applications Composer, visit Oracle Help Center > your apps service area of interest > Books > Configuration and Extension.
Key Resources
Role Information
To use this feature, the following roles are required:
- Job Role Name and Code:
- SCM Implementation Consultant (ORA_SCM_IMPLEMENTATION_CONSULTANT)
- Maintenance Manager (ORA_MNT_MAINTENANCE_MANAGER)
- Customer Asset Administrator (CUSTOMER_ASSET_ADMIN_CUSTOM_ROLE)