
- Revision History
- Overview
- Pre-Update and Post-Update Tasks
- Optional Uptake of New Features (Opt In)
- Feature Summary
-
- Maintenance
-
- Reserve Materials for Work Orders
- Assess the Status of an Inventory Lot and Take Actions for Assets Accordingly
- View Asset History
- Manage Selling Business Unit Information for an Installed Base Asset
- Get a Default Customer Asset Validation Rule Group for Your Assets
- Assign Assets to Groups Using FBDI and REST Services
- Get Updated Customer Data for Your Assets When Your Customers Are Merged
- Get Maintenance Organization by Default in the Maintenance Work Area
- Capture the Future End Date for Customer Assets
- Enhanced Material Picking for Work Orders
- Plan Demands from Maintenance Work Orders
- Enable Overpicking for Sales Orders, Transfer Orders, and Work Orders
- Manage Work Order Picking Document Output Preferences
- Define Shift Exceptions and Work Center Resource Exceptions
- Link to SCM Application Pages Using Deep Links
- Reduced Time Required to Schedule Work Orders
- Improved Performance When Generating Schedule Data
-
- Maintenance
This document will continue to evolve as existing sections change and new information is added. All updates appear in the following table:
| Date | Product | Feature | Notes |
|---|---|---|---|
| 29 SEP 2020 | Maintenance | Assign Assets to Groups Using FBDI and REST Services | Updated document. Revised feature description. |
| 18 SEP 2020 | Created initial document. |
This guide outlines the information you need to know about new or improved functionality in this update, and describes any tasks you might need to perform for the update. Each section includes a brief description of the feature, the steps you need to take to enable or begin using the feature, any tips or considerations that you should keep in mind, and the resources available to help you.
SECURITY AND NEW FEATURES
The Role section of each feature identifies the security privilege and job role required to use the feature. If feature setup is required, then the Application Implementation Consultant job role is required to perform the setup, unless otherwise indicated. (If a feature doesn't include a Role section, then no security changes are required to use the feature.)
If you have created job roles, then you can use this information to add new privileges to those roles as needed. For details about how to compare your configured job roles to predefined job roles and add security artifacts to your configured job roles, see the Security Console and Roles and Role Assignments chapters in the Oracle SCM Cloud: Securing SCM guide on the Oracle Help Center.
GIVE US FEEDBACK
We welcome your comments and suggestions to improve the content. Please send us your feedback at oracle_fusion_applications_help_ww_grp@oracle.com.
Pre-Update and Post-Update Tasks
Depending on the features you're using in your Cloud applications, you may be required to perform certain steps immediately before or after your quarterly update. For details of these pre-update and post-update steps and the product areas that are affected, refer to Oracle SCM Cloud: Performing Your Quarterly Update (doc ID 2337485.1) on My Oracle Support.
Optional Uptake of New Features (Opt In)
Oracle Cloud Applications delivers new updates every quarter. This means every three months you'll receive new functionality to help you efficiently and effectively manage your business. Some features are delivered Enabled meaning they are immediately available to end users. Other features are delivered Disabled meaning you have to take action to make available. Features delivered Disabled can be activated for end users by stepping through the following instructions using the following privileges:
- Review Applications Offering (ASM_REVIEW_APPLICATIONS_OFFERINGS_PRIV)
- Configure Oracle Fusion Applications Offering (ASM_CONFIGURE_OFFERING_PRIV)
Here’s how you opt in to new features:
- Click Navigator > My Enterprise > New Features.
- On the Features Overview page, select your offering to review new features specific to it. Or, you can leave the default selection All Enabled Offerings to review new features for all offerings.
- On the New Features tab, review the new features and check the opt-in status of the feature in the Enabled column. If a feature has already been enabled, you will see a check mark. Otherwise, you will see an icon to enable the feature.
- Click the icon in the Enabled column and complete the steps to enable the feature.
In some cases, you might want to opt in to a feature that's not listed in the New Features work area. Here's how to opt in:
- Click Navigator > My Enterprise > Offerings.
- On the Offerings page, select your offering, and then click Opt In Features.
- On the Opt In page, click the Edit Features (pencil) icon for the offering, or for the functional area that includes your feature.
- On the Edit Features page, complete the steps to enable the feature.
For more information and detailed instructions on opting in to new features for your offering, see Offering Configuration.
Opt In Expiration
Occasionally, features delivered Disabled via Opt In may be enabled automatically in a future update. This is known as an Opt In Expiration. If your cloud service has any Opt In Expirations you will see a related tab in this document. Click on that tab to see when the feature was originally delivered Disabled, and when the Opt In will expire, potentially automatically enabling the feature. You can also click here to see features with Opt In Expirations across all Oracle Cloud Applications.
Column Definitions:
Features Delivered Enabled
Report = New or modified, Oracle-delivered, ready to run reports.
UI or Process-Based: Small Scale = These UI or process-based features are typically comprised of minor field, validation, or program changes. Therefore, the potential impact to users is minimal.
UI or Process-Based: Larger Scale* = These UI or process-based features have more complex designs. Therefore, the potential impact to users is higher.
Features Delivered Disabled = Action is needed BEFORE these features can be used by END USERS. These features are delivered disabled and you choose if and when to enable them. For example, a) new or expanded BI subject areas need to first be incorporated into reports, b) Integration is required to utilize new web services, or c) features must be assigned to user roles before they can be accessed.
| Ready for Use by End Users Reports plus Small Scale UI or Process-Based new features will have minimal user impact after an update. Therefore, customer acceptance testing should focus on the Larger Scale UI or Process-Based* new features. |
Action is Needed BEFORE Use by End Users Not disruptive as action is required to make these features ready to use. As you selectively choose to leverage, you set your test and roll out timing. |
|||||
|---|---|---|---|---|---|---|
| Feature |
Report |
UI or |
UI or |
|
||
Assess the Status of an Inventory Lot and Take Actions for Assets Accordingly |
||||||
Manage Selling Business Unit Information for an Installed Base Asset |
||||||
Get a Default Customer Asset Validation Rule Group for Your Assets |
||||||
Get Updated Customer Data for Your Assets When Your Customers Are Merged |
||||||
Get Maintenance Organization by Default in the Maintenance Work Area |
||||||
Enable Overpicking for Sales Orders, Transfer Orders, and Work Orders |
||||||
Reserve Materials for Work Orders
Material availability for a maintenance work order is crucial for reducing downtime of the asset and adhering to the preventive maintenance schedule. Organizations use various processes to ensure material is available for work orders, including using a material planning solution, such as Supply Chain Planning, to make sure component materials are available based on projected demand. However, even with the best planning, maintenance managers prefer to guarantee material for a specific work order in the near term before scheduling the work order for release. With this update, you can reserve a material for a maintenance work order before or after releasing the materials to the shop floor.
Until this update, such reservations were possible for sales orders and transfer orders. With this update, work orders are included in the reservation process.
Here's what you can do with this update:
- Reservation creation: Create reservations either at the organization level or at a detailed level, such as at sub-inventory, locator, lot, or serial level.
- Reservation visibility: Identify, view, and edit the reservation, if present
- Honoring reservations: Respect the reservation in all related processes
- Issuing reserved materials
- Undo material reservations
- Analyze material reservations
You can also do these tasks via appropriate REST services.
CREATE MATERIAL RESERVATIONS
All material reservations are performed in Oracle Inventory Management Cloud. Like a sales order or transfer order, a work order is a demand placed on the warehouse to reserve and pick material. You can manually reserve material on the Create Reservations page in Inventory Management. Select demand document type Work Order to reserve material for one or more work orders. You can perform reservations for work orders or work order materials using any of the following methods.
Create and Manage Reservations in Inventory
In the Inventory Management Cloud, the Create Reservations page is used to reserve materials for all demand types manually. Use this page and the new demand document Work Order to easily find your maintenance work orders and reserve material. You can create the reservation in the following ways:
To create a reservation, search for the work order materials you want to reserve by searching with the demand document Work Order and optionally the work order number. Select the materials from the search results and select the Reserve Automatically button to create an organization-level reservation for the selected items. To create a reservation manually, select the line item from the search result list and enter the lot, sub-inventory, locator, or serial information. When you save this transaction, you create a reservation with details.
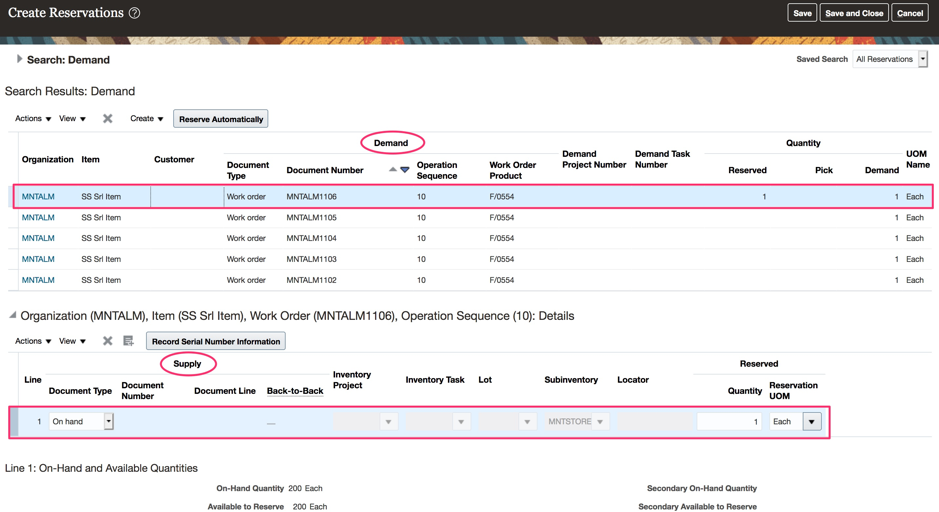
Inventory Management - Create Reservations Page
Create Reservations from Manage Work Orders and Material Availability Workbench
In both the Manage Work Orders screen and the Material Availability Workbench, you can select multiple work orders and click on the Reserve Automatically button to create organization-level reservations for all the materials on the selected work orders.
When you choose the Manually Reserve task for a particular work order, you will be directed to the Inventory Reservations page, where you can manually reserve the material with details of sub-inventory, locator, lot, serial number, and so on.
While creating a reservation for a work order, if there is no on hand quantity in the inventory organization, you can reserve for a purchase order expected in the future or transfer order or any other supply.
When performing a manual reservation, you will be able to choose the supply document type as purchase order, transfer order, or another work order and choose a specific document number and reserve for the material requirement. This reservation can only be performed manually.
You can reserve a partial quantity of a supply document to a work order. You can also reserve one supply document for multiple work orders or multiple supply documents for one work order.

Manage Work Orders Page - Create Reservations
Create and Manage Reservations from Work Order Edit Operations Item
To create a reservation against a specific material on the work order, you can select the Reserve Manually task from the work order operation. This will open the Inventory Manage Reservations page in the context of work order Operation, where you can choose a specific sub inventory and locator, lot or serial. After you complete the reservation and click on save, you are directed back to the edit work order page.

Edit Work Order Page - Reservation
View Material Reservations
Throughout the application, anywhere a source of demand is visible, the quantity reserved is also visible, and is drilled to the details of the reservation. With appropriate security privileges, you can also update the reservation.
In maintenance, the following UIs have been updated:
- Material Availability Workbench details: reserved quantity is shown for each material
- Work Order Operation Item: reserved quantity is shown for each material
- Report Material Transaction: an icon for reservation is shown on the screen. You can click on the icon to review the details of the reservation
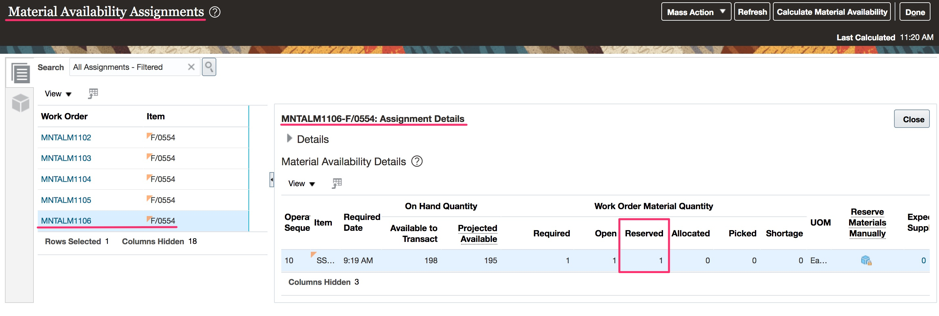
Material Availability Workbench - Details
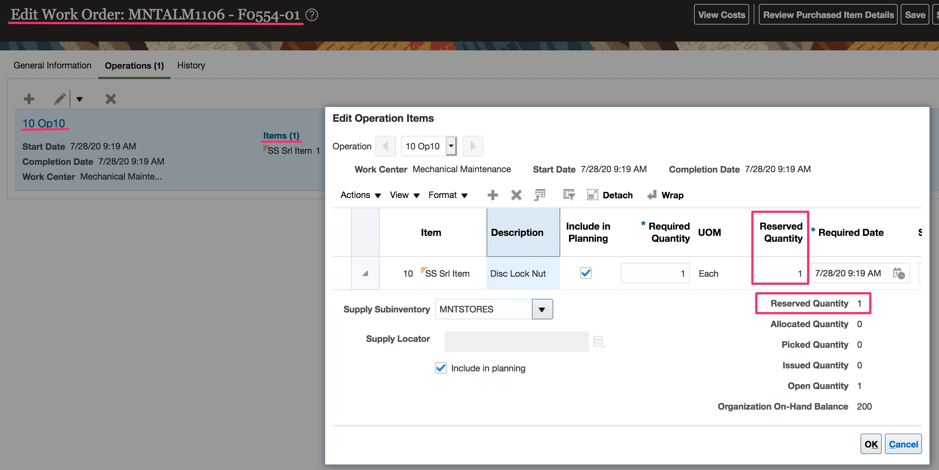
Work Order Operation Items - Reserved Quantity
Honor Material Reservations
The following tasks have been updated to honor work order reservations:
Honor material reservations when viewing material availability
The material availability workbench will always consider existing inventory reservations to be hard allocated. You will not able to force reassign an already reserved item. If the user needs to reallocate a reserved item, they need to navigate to the inventory reservation window and manually undo reservations of materials and reserve materials to the new work order.
Honor and persist reservation upon picking
Oracle Manufacturing and Maintenance Cloud applications support the ability for the maintenance personnel to pick material for specific work order demand. Until this update, you had the option to direct issue the materials to the work order or move it to the supply sub-inventory without a reservation.
With this update, the detailed reservation created for the work order are honored by pick release process and this reservation persists when the work order materials are moved to the reservable destination subinventory.
When reservations are not created for the work order, the component pick release creates the reservations for the work order materials.
If you need the reservations to persist only for a few critical materials, you can create one supply subinventory which is reservable for such materials and another supply subinventory that is not reservable, for the less critical materials.

Material Assignments, Reservations and Picking
Issuing reserved material in manufacturing
When manually issuing material or backflushing, existing reservations are considered during the transactions as below:
When a reservation exists, the details of the reserved materials can be viewed by clicking the Reservations icon from the report material transaction page. The operator reviews the details of the reservation and then can choose to issue the reserved materials or search for a different lot or serial manually.
On completion of the material transaction using reserved material, the reservation is relieved.
If you choose to issue materials that are not reserved, the pending reservations are not adjusted and only deleted when the work order is completed or cancelled.

Report Material Transactions - View Reservation
Undo material reservations
You can undo material reservations from the inventory reservations screen manually, accessed either from inventory or from the work order screen, or using the REST service.
The reservation for the work order components cannot be deleted when there are open picks associated to the reservation. Other than that, you can delete the reservation at any time.
Analyze material reservations
The existing OTBI subject areas have been updated to enable you to report on the reservation quantities for the required and issued quantities.
By reserving materials for a work order, you can ensure the reserved materials are not used for any other demand, thereby maintaining maintenance schedule adherence and on-time delivery. By reserving the right lot of materials for a work order, you also ensure that the desired maintenance goals are achieved.
Steps to Enable
The feature is made available through a setup in the plant parameter. For the given maintenance organization, select the Allow reservations for work order materials check box to enable reservations in that maintenance organization.
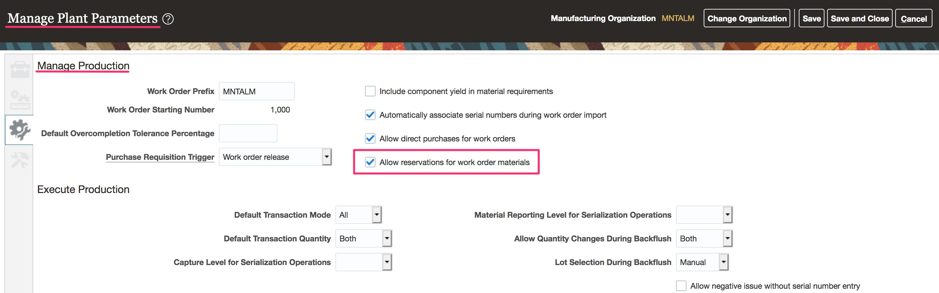
Manage Plant Parameters
Tips And Considerations
When reserving critical materials for the work order, you can note the following:
The detailed reservations created for the work order are honored by pick release process and this reservation persists when the work order materials are moved to the reservable destination subinventory.
If you need the reservations to persist only for a few critical materials, you can create one supply subinventory which is reservable for such materials and another supply subinventory that is not reservable, for the less critical materials.
Role Information
- Role:
- Maintenance Manager (ORA_MNT_MAINTENANCE_MANAGER_JOB)
- Privileges:
- Reserve Materials Automatically for Work Orders (WIP_MANAGE_WORK_ORDER_MATERIAL_RESERVATIONS)
- Manage Inventory Reservation (MANAGE_INVENTORY_RESERVATIONS_PRIV)
Assess the Status of an Inventory Lot and Take Actions for Assets Accordingly
When a lot is disabled in inventory due to incorrect data entry, all of the original, reverse, and corrected transactions in inventory and manufacturing for the disabled and new item and lot combination are maintained for historical traceability purposes. As a result, you can view the Genealogy UIs including the lot details, genealogy relationships, and transaction history with an indicator that reflects the lot is disabled.
In addition, the status of an inventory lot is taken into consideration when creating and editing an asset, so that you can't create an asset or update its end date with a disabled lot through the UI, REST, and File Based Data Import. If a lot is used for any active assets, you also can't disable the lot in inventory. In case a lot has active assets and needs to be disabled, you can end date the assets before disabling the lot.
With full visibility of lot genealogy records and asset validations, you can ensure that disabling a lot can be traced forward and backward through transactions and doesn't conflict with active asset maintenance and repair.
Steps to Enable
You don't need to do anything to enable this feature.
Tips And Considerations
Genealogy OTBI, REST, and FBDI are not enhanced to distinguish disabled lots, and the lot disable and enable actions are not reflected in the genealogy transaction history.
Refer to the Inventory feature for Disable Inventory Lots for more information.
Role Information
- Predefined job role name and code:
- Production Supervisor (ORA_WIE_PRODUCTION_SUPERVISOR_JOB)
- Maintenance Manager (ORA_MNT_MAINTENANCE_MANAGER_JOB)
- Privilege and code for configured job roles:
- Review Product Genealogy (CSE_REVIEW_PRODUCT_GENEALOGY_PRIV)
- Process Product Genealogy Transactions (CSE_PROCESS_PRODUCT_GENEALOGY_TRANSACTIONS_PRIV)
With this update, you can view all transactions performed on an asset in Maintenance as well as all integrated applications. You get a new Asset History tab within the existing Edit Asset page to view all the transactions.
Navigate to the Asset History tab to see the transactions by default in the ascending order by transaction date. You can use the filter criteria to view the required transactions. The default view shows details of the transactions like date, source application transaction type, etc.
You can drill down to the Details panel to see the changes on the asset due to a transaction. The Details panel shows the list of attributes that are updated by the transaction with the old and new values of those attributes. For example, if the asset was issued out of subinventory some attributes like Location Type, Location Organization, Location, Subinventory on the asset change. These attributes are listed in the Details panel with the values before and after the transaction.You can also view the details of the transaction using the reference hyperlink that navigates to the View Details page. However not all the transaction details are supported in this update.
Search transactions by a period, data range, source application, etc. For a better search and viewing experience, each transaction is grouped and can be used to search. For example, to see all the transactions that update the location details of the asset, then you can choose to filter the historical transaction using a group called Asset Location Changes. A single transaction can be a part of multiple groups based on asset attributes that get updated.
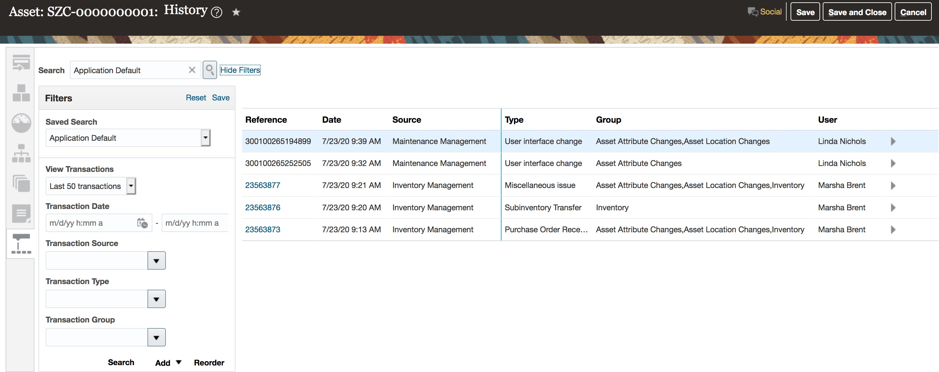
Asset History Tab
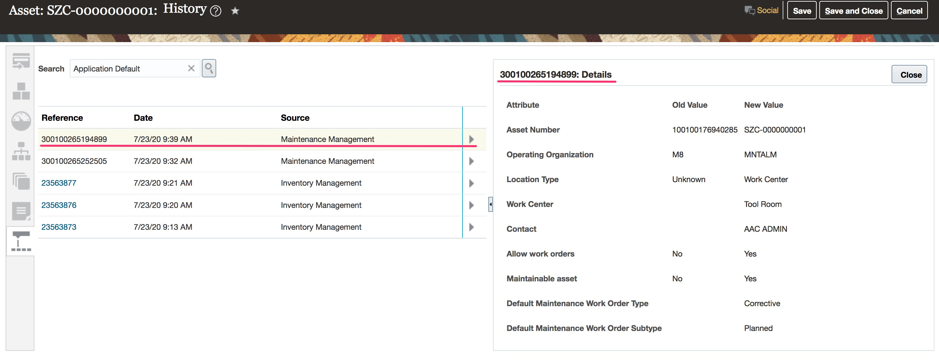
Asset History Tab with Details Panel
A historical view of all the transactions performed on asset provides valuable insights to make informed decisions during the entire lifecycle of the asset. Asset history helps stakeholders to make informed decision like whether to repair or retire an asset. Also, it helps stakeholders analyze the changes on the asset for a particular period or the entire life span.
Steps to Enable
You don't need to do anything to enable this feature.
Tips And Considerations
- Transactions presented are from applications which are currently integrated with Maintenance.
- The transactions performed in the other applications are based on item, serial number, or lot number. The transactions are accurately captured for the asset with serial number associated with it. For assets without serial number association, the transactions may not be represented accurately, in certain cases it may not be captured.
- The view transaction details is available only for inventory and work order-based transactions.
- The asset structure (hierarchy) updates are not considered in this update, and will be part of a future update.
Role Information
- Role:
- Maintenance Manager (ORA_MNT_MAINTENANCE_MANAGER_JOB)
- Privileges:
- Manage Maintainable Assets (MNT_MANAGE_MAINTAINABLE_ASSETS_PRIV)
- View Inventory Transaction (INV_VIEW_INVENTORY_TRANSACTION_PRIV)
- View Maintenance Work Orders (MNT_VIEW_MAINTENANCE_WORK_ORDERS_PRIV)
- Role:
- Asset Administrator (ORA_CSE_ASSET_ADMINISTRATOR_JOB)
- Privileges:
- Manage Customer Assets (CSI_MANAGE_CUSTOMER_ASSETS_PRIV)
- View Inventory Transaction (INV_VIEW_INVENTORY_TRANSACTION_PRIV)
- View Maintenance Work Orders (MNT_VIEW_MAINTENANCE_WORK_ORDERS_PRIV)
The following duty roles could have all the privileges needed to access asset and asset history tab links. Appropriate roles can be added to the User to gain access to Asset UI with all the links in the Asset tab.
- Manage Customer Assets Duty (ORA_CSE_MANAGE_CUSTOMER_ASSETS_DUTY)
- View Customer Assets Duty (ORA_CSE_VIEW_CUSTOMER_ASSETS_DUTY)
- Manage Enterprise Assets Duty (ORA_MNT_MANAGE_ENTERPRISE_ASSETS_DUTY)
- View Enterprise Assets Duty (ORA_MNT_VIEW_ENTERPRISE_ASSETS_DUTY)
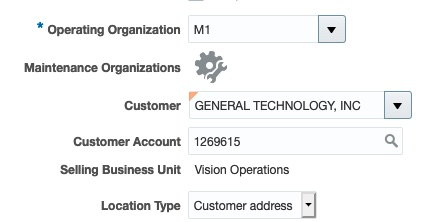
Manage Selling Business Unit Information for an Installed Base Asset
View the selling business unit information to the Asset page. This value is captured during the customer account selection. You can also use the selling business unit filter to search for assets by their selling business unit information.
View the Selling Business Unit on Asset Page
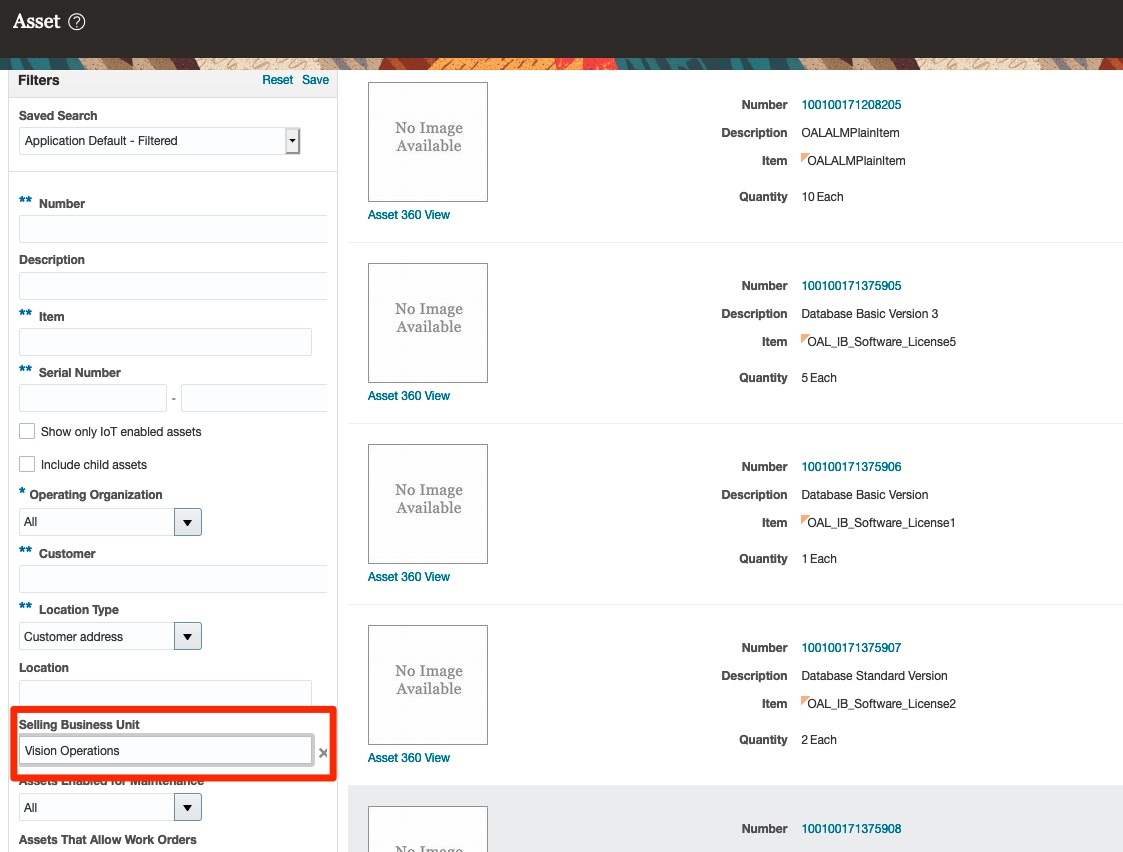
Search for Assets Using Selling Business Unit
With this update, you can capture and manage selling business unit information for an installed base asset.
Steps to Enable
You don't need to do anything to enable this feature.
Role Information
- Predefined job role name and code:
- Production Supervisor (ORA_WIE_PRODUCTION_SUPERVISOR_JOB)
- Maintenance Manager (ORA_MNT_MAINTENANCE_MANAGER_JOB)
- Privilege and code for configured job roles:
- Review Product Genealogy (CSE_REVIEW_PRODUCT_GENEALOGY_PRIV)
- Process Product Genealogy Transactions (CSE_PROCESS_PRODUCT_GENEALOGY_TRANSACTIONS_PRIV)
Get a Default Customer Asset Validation Rule Group for Your Assets
With this update, you can control if newly created customer assets are automatically added to a default customer asset validation rule group or not. These new types of groups are used to represent an asset’s status in consuming applications. Therefore, at asset creation or during customer assignment during shipping, an asset can be automatically associated to a group. This new capability is controlled based on a setting a new profile option, which is used to define which asset group the asset will be associated to.
When creating an asset group rule, you can now select the usage option called Customer asset status. This usage can only be used in a single rule, and when selected, the Enforce unique assignment of assets to groups within the rule check box is selected and can’t be deselected. This check box ensures an asset can only be automatically assigned to one group within a given rule and not across multiple groups within the rule. Additionally, you can't select any grouping attributes as they are not applicable.
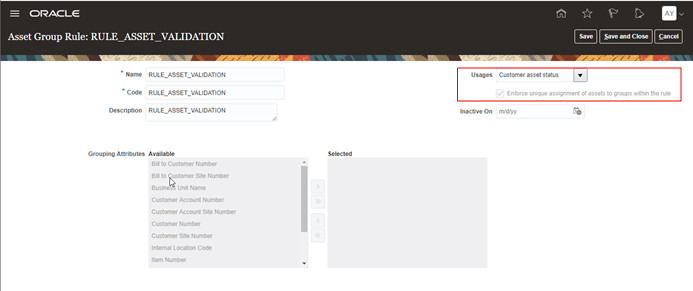
When the group rule is defined using this new usage, one or more asset groups can be created for this rule. These groups will represent the different asset statuses, allowing the asset to be associated across multiple groups at different times in its lifecycle, as driven by consuming applications. Only one of these groups can be defined in the profile option as the default group during asset creation or shipment to the customer.
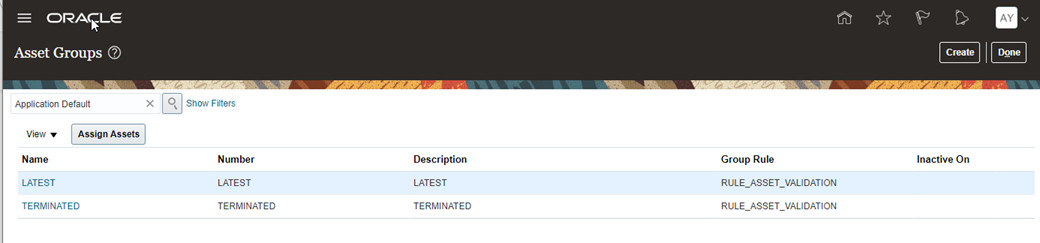
After asset creation or shipment to a customer, the asset will be associated to the group. You can view this association in the on the Asset Groups tab of the Edit Asset page.
With this update, you can choose to leverage asset groups to manage the status of an asset in a consuming application. The ability to automatically assign the asset to a default group during asset creation or shipment to the customer will streamline many customer asset business processes.
Steps to Enable
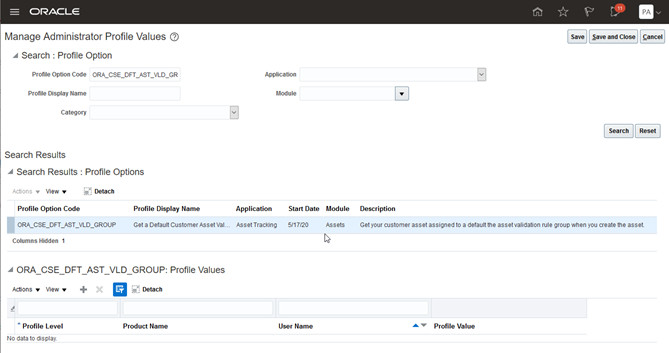
There is a new profile option entitled ORA_CSE_DFT_AST_VLD_GROUP. This profile is accessible by an administrator using the Functional Setup Manager under the task Manage Administrator Profile Values.
By default, this profile is not set, therefore newly created assets won't be added to a default customer asset validation group. When defined with a group name, when an asset is created or shipped to a customer it will be added to the asset group.
Role Information
- Setup by Administrator:
- Predefined job role name and code:
- Supply Chain Application Administrator (ORA_RCS_SUPPLY_CHAIN_APPLICATION_ADMINISTRATOR_JOB)
- Privilege name and code for configured job roles:
- Manage All Application Profile Values (FND_APP_MANAGE_ALL_PROFILE_VALUES_PRIV)
- Predefined job role name and code:
- Use by Asset Administrator:
- Predefined job role name and code:
- Asset Administrator (ORA_CSE_ASSET_ADMINISTRATOR_JOB)
- Privilege name and code for configured job roles:
- Manage Customer Assets (CSI_MANAGE_CUSTOMER_ASSETS_PRIV)
- Manage Customer Assets by Service (CSI_MANAGE_CUSTOMER_ASSETS_BY_SERVICE_PRIV)
- View Customer Assets (CSI_VIEW_CUSTOMER_ASSETS_PRIV)
- Predefined job role name and code:
Assign Assets to Groups Using FBDI and REST Services
Assign your asset to asset groups using the Import Installed Base Assets file-based data import (FBDI) template or the Installed Base Assets REST resource. The process for assigning assets to groups using FBDI and REST resources has the same controls and constraints as those applied when assigning assets to groups through the user interface pages.
You can manage your assets more efficiently by classifying them into groups using FBDI or REST services according to your needs.
Steps to Enable
Review the REST service definition in the REST API guides, available from the Oracle Help Center > your apps service area of interest > REST API. If you're new to Oracle's REST services you may want to begin with the Quick Start section.
Key Resources
Refer to the following books on the Oracle Help Center:
- File-Based Data Import for Oracle Supply Chain Management Cloud
- REST API for Oracle Supply Chain Management Cloud
Role Information
- Predefined job role name and code:
- Asset Administrator (ORA_CSE_ASSET_ADMINISTRATOR_JOB)
- Privilege name and code for configured job roles:
- Manage Customer Assets (CSI_MANAGE_CUSTOMER_ASSET_PRIV)
- Manage Customer Assets by Services (CSI_MANAGE_CUSTOMER_ASSET_BY_SERVICE_PRIV)
- View Customer Assets (CSI_VIEW_CUSTOMER_ASSET_PRIV)
Get Updated Customer Data for Your Assets When Your Customers Are Merged
The party merge process is used to resolve duplicate account and customer information in the Oracle Engagement Cloud and Oracle Financials Cloud. This includes sales and B2B accounts or contacts, as well as receivables customers, customer accounts, and customer account sites. The process results in a surviving party based on rules that are defined in these products.
With this update, customer assets are identified during the party merge process if the assets contain customer information for the duplicate party. Based on the type of party merge, the customer information is updated on the asset to the surviving party.
If there is a conflict between business units across the parties being merged, then the customer information isn’t updated on the asset and the party merge isn’t completed. Then, you must manually update the customer information on all the related assets and reprocess the party merge.
Your customer assets are managed using service requests, work orders, and subscriptions based on their associated account, contact, or customer party. Prior to this update, you had to manually update customer information for each asset after a party merge to ensure a continuation of asset management. With this update, the merge process will automatically update the customer information on the assets to the surviving party, providing a top-down party merge capability.
Steps to Enable
There are setup steps that are identified by the Oracle Engagement Cloud and Oracle Financials Cloud for using party merge.
This includes a profile option that defines which party will be the survivor based on the party record creation date: ORA_ZCH_SETMASTER_TYPE
Profile options are:
- Select Newest Record
- Select Oldest record
Role Information
- Predefined job role name and code:
- Asset Administrator (ORA_CSE_ASSET_ADMINISTRATOR_JOB)
- Privilege name and code for configured job roles:
- Manage Customer Assets (CSI_MANAGE_CUSTOMER_ASSETS_PRIV)
- Manage Customer Assets by Service (CSI_MANAGE_CUSTOMER_ASSETS_BY_SERVICE_PRIV)
- View Customer Assets (CSI_VIEW_CUSTOMER_ASSETS_PRIV)
Get Maintenance Organization by Default in the Maintenance Work Area
Prior to this update, you had to select the context maintenance organization every time you navigate to the Maintenance Management work area. With this update, you can get the maintenance organization defaulted in the Maintenance Management landing page.
A new profile is created to set the default maintenance organization for a maintenance user.
Profile Details
- Profile Code: ORA_RCS_DEFAULT_MNT_ORG
- Profile Name: Specify the organization in context automatically when navigating to maintenance management work area.
Watch a Demo
As a user with access to more than one organization, the repeated action to choose the context maintenance organization in the Maintenance Management landing page is eliminated.
Steps to Enable
You don't need to do anything to enable this feature.
Key Resources
Capture the Future End Date for Customer Assets
The lifecycle, capability, and maintainability of a customer asset is managed by using several unique date fields in the asset record. When you create an asset, you must specify the date of shipment for the asset to the customer. This date is initially defaulted to the system date, but you can set it to a past, present, or future date.
When the customer asset is created, you can update the shipment date. This date is a synchronized with the customer asset start date, which is displayed in the asset record as a read-only value.
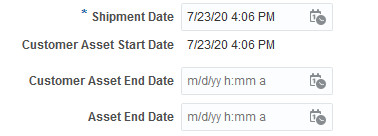
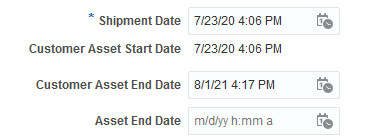
At any point after asset creation, you can choose to define or update an optional customer asset end date. Typically, this date is set to a value that represents the completion of an asset’s lifecycle with a customer or at a customer's site. Prior to this update, you could set the date to a past or present value only and the value had to be greater than the shipment date. However, in this update you can also set a future date.
Finally, you can choose to define an asset end date, which is used to identify the end of an asset’s usable and maintainable lifecycle. You can set this date to a past, present, or future value and the value must be greater than the customer asset end date, therefore greater than the shipment date. Typically, this date is set at some point in the future to a present or past value that represents the completion of an asset’s maintainable lifecycle. Once this date is set, you’re not expected to make any further updates to the shipment or customer asset end dates.
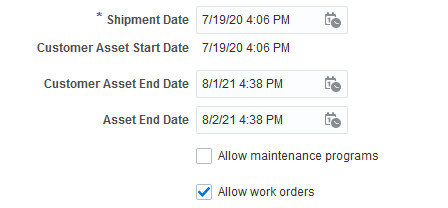
With this update, you can choose to enable the capability to define a customer end date with a future dated value or not. This new capability allows you to optionally control an asset’s operating period, licensing term or period, hardware loan or lease period, etc in consuming applications and downstream business flows.
Steps to Enable
You don't need to do anything to enable this feature.
Role Information
- Predefined job role name and code:
- Asset Administrator (ORA_CSE_ASSET_ADMINISTRATOR_JOB)
- Privilege name and code for configured job roles:
- Manage Customer Assets (CSI_MANAGE_CUSTOMER_ASSETS_PRIV)
- Manage Customer Assets by Service (CSI_MANAGE_CUSTOMER_ASSETS_BY_SERVICE_PRIV)
- View Customer Assets (CSI_VIEW_CUSTOMER_ASSETS_PRIV)
Enhanced Material Picking for Work Orders
In any large maintenance facility, it is common in the supply chain process to move materials required for a maintenance work order from the central warehouse subinventory to a shop floor supply subinventory as needed. The maintenance manager requests material from the warehouse to be picked and moved to the shop floor to support the required maintenance activity scheduled for a period. This request is made in specified intervals to keep the maintenance activity going without material shortage.
Until this update, you could filter work orders for picking based on few parameters like organization, work method, work order type, hours ahead, project, and task.
With this update, additional parameters are introduced so that the maintenance manager can request the required materials for a work order only for the given time period.
The work order material picking can be initiated in two ways:
- On the Manage Maintenance Work Orders page for specific work orders
- Using the scheduled process
PICK MATERIALS FROM THE MANAGE MAINTENANCE WORK ORDER PAGE
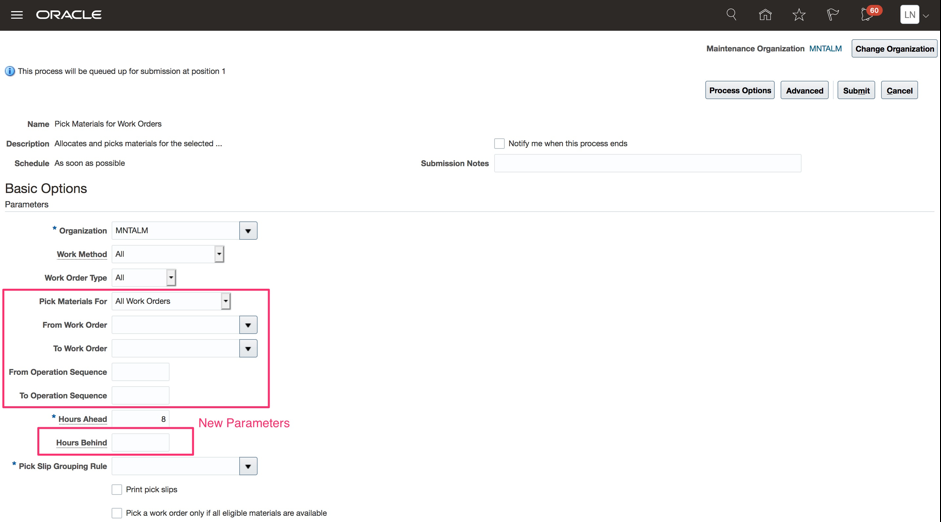
The Pick materials for Work Orders dialog box has these new parameters:
- Hours Behind
- From Operation Sequence
- To Operation Sequence.
With these new parameters you can pick materials for a specific period in hours and also for a specific operations within a work order.
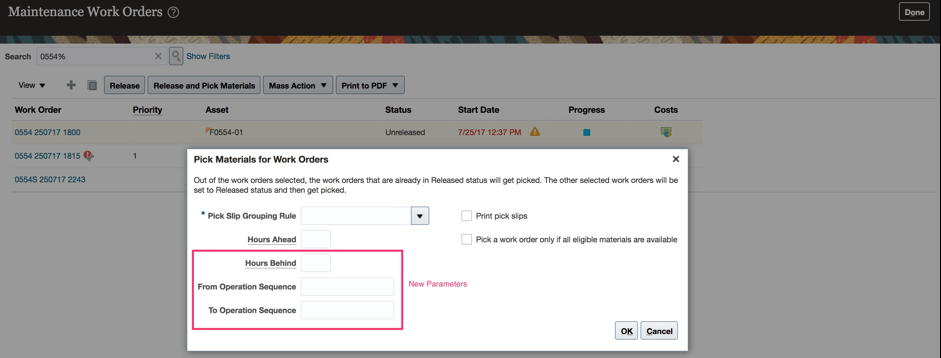
Additional Attributes in the Pick Materials for Work Orders Dialog Box
PICK MATERIALS FOR WORK ORDERS SCHEDULED PROCESS
These are the new parameters added for the scheduled process:
- Pick Materials For:
- Partially picked Work Orders
- Work Orders Without Any Material Picked
- All Work Orders
- Work Order Range: Pick materials for a range of work orders.
- Work Order Operations: Pick for specific operations of a work order.
- Hours Behind: Pick materials that were required within the specified number of hours behind the time you run the program.
Additional Attributes in the Pick Materials for Work Orders Scheduled Process
Watch a User Demo and a Setup Demo
Picking materials with enhanced filters enables shop floor personnel to more effectively control the materials to be picked and moved to the shop floor for use in the scheduled maintenance activity.
Steps to Enable
You don't need to do anything to enable this feature.
Key Resources
Role Information
- Roles:
- Maintenance Manager (ORA_MNT_MAINTENANCE_MANAGER_JOB)
- Privileges:
- WIP_MANAGE_WORK_ORDER_COMPONENT_PICKING_PRIV
Plan Demands from Maintenance Work Orders
One of the keys to return on investment in assets such as production equipment and transportation fleets is proactive maintenance to ensure their smooth functioning. With this update, you can plan supplies for components required by maintenance work orders, such as the components created to maintain production equipment and transportation fleets.
For example, a maintenance work order in organization M8 was planned, and the requirement for one of its components, KB-MNT-HEAD-STOCK, was satisfied by a planned order sourced from organization M1.

Plan Demands from Work Orders (Navigation: Supply Planning> Manage Plans> Open: Supplies and Demands)
Watch a Demo
Use this feature to help ensure you have the right components on hand to minimize the downtime of your assets to return them to service as soon as possible.
Steps to Enable
Use the Opt In UI to enable this feature. For instructions, refer to the Optional Uptake of New Features section of this document.
Offering: Supply Chain Planning
Tips And Considerations
Consider the following points when you are planning maintenance work orders:
- Maintenance work orders and maintenance work order demands are included in the plan when you select one of the following settings of the Supply Planned Items plan option:
- All planned items
- Demand plan and WIP components
- Demand plan items, WIP components, and sales orders
- The asset item itself is not planned.
- Planning (Unconstrained and Constrained) excludes all supplies (Purchased orders, Purchase requisitions) and demands (Forecasts, Sales orders, Transfer order demands) for the asset item.
- Planning also excludes safety stock for the asset item.
- Only the items used to maintain the asset are planned.
- The resources used to maintain the asset are not planned.
- The maintenance work order is considered firm in planning.
Key Resources
Role Information
You have a couple options for giving people access to this feature, depending on whether you're assigning them predefined job roles or your own configured job roles.
Users who are assigned any of these predefined job roles are automatically able to access this feature:
- Supply Chain Planner (ORA_MSC_SUPPLY_CHAIN_PLANNER_JOB)
- Materials Planner (ORA_MSC_MATERIALS_PLANNER_JOB)
Users who are assigned configured job roles that contain these privileges are able to access this feature:
- Edit Demands and Supplies (MSC_EDIT_DEMANDS_AND_SUPPLIES_PRIV)
- View Demands and Supplies (MSC_VIEW_DEMANDS_AND_SUPPLIES_PRIV
Enable Overpicking for Sales Orders, Transfer Orders, and Work Orders
When your warehouse regularly stores goods in bulk quantities, it isn't always practical for your picking agents to spend time breaking open multiple packages for individual orders. For example, your customer order quantity requires fifteen widgets out of a twenty-four widget box to make the requested finished goods. To fulfill this customer order, you'll need to break open a box of twenty-four widgets, issue the fifteen widgets to the shop floor, and then move the remaining nine widgets back to inventory. While the shop floor personnel is equipped to break open these boxes, your picking agent isn't. In this scenario, when you can't reasonably or quickly split out the allocated quantity of material on your pick slip, you need the ability to pick more than the requested quantity and then move it to an area for further processing.
Now, you can specify more than the requested quantity on your pick-and-move requests for sales orders, transfer orders, work orders, and movement requests. This feature lets you pick a quantity that makes sense for your business, move it to a staging or processing location, perform your required tasks, and then take appropriate actions to handle the remaining quantities.
Watch a Demo
The benefits of overpicking are best realized when there’s processing, or a value-added service required, between moving materials from stores to their final staging location for shipping or consumption on the shop floor. Take, for example, items boxed in multiples or lots that require breakdown to fulfill the requested quantity. It might not be efficient to breakdown boxes in a congested store. Instead, it might be more efficient to move the items to a dedicated location for processing.
For a more specific example, let's look at organizations that operate in an industrial setting. The storage of sizeable reels of cable, for the purpose of cutting to order, might pose space and equipment constraints that would prevent the order from being processed at the source. Organizations, in this case, often have a dedicated area for cutting to process the reels before staging them. Being able to reflect those stock movements efficiently in a single screen provides warehouse operators with timely visibility of their inventory. Also, colocating reels in a processing location to satisfy multiple orders creates efficiencies, with confidence that supply or demand integrity is maintained. Furthermore, the availability of a REST service to execute picking transactions, including overpicking, allows for seamless integration with third parties that are part of the organization’s warehouse ecosystem.
Steps to Enable
In the Setup and Maintenance work area, use the Manage Inventory Organizations task:
- Offering: Manufacturing and Supply Chain Materials Management
- Functional Area: Facilities
- Task: Manage Inventory Organizations
- In the Organization field, select the inventory organization and click Search. The organization is displayed in the Search Results area.
- Click Manage Organization Parameters.
- Click the Item Sourcing Details tab.
- In the Picking Defaults section, select the Overpicking for movement request enabled check box.
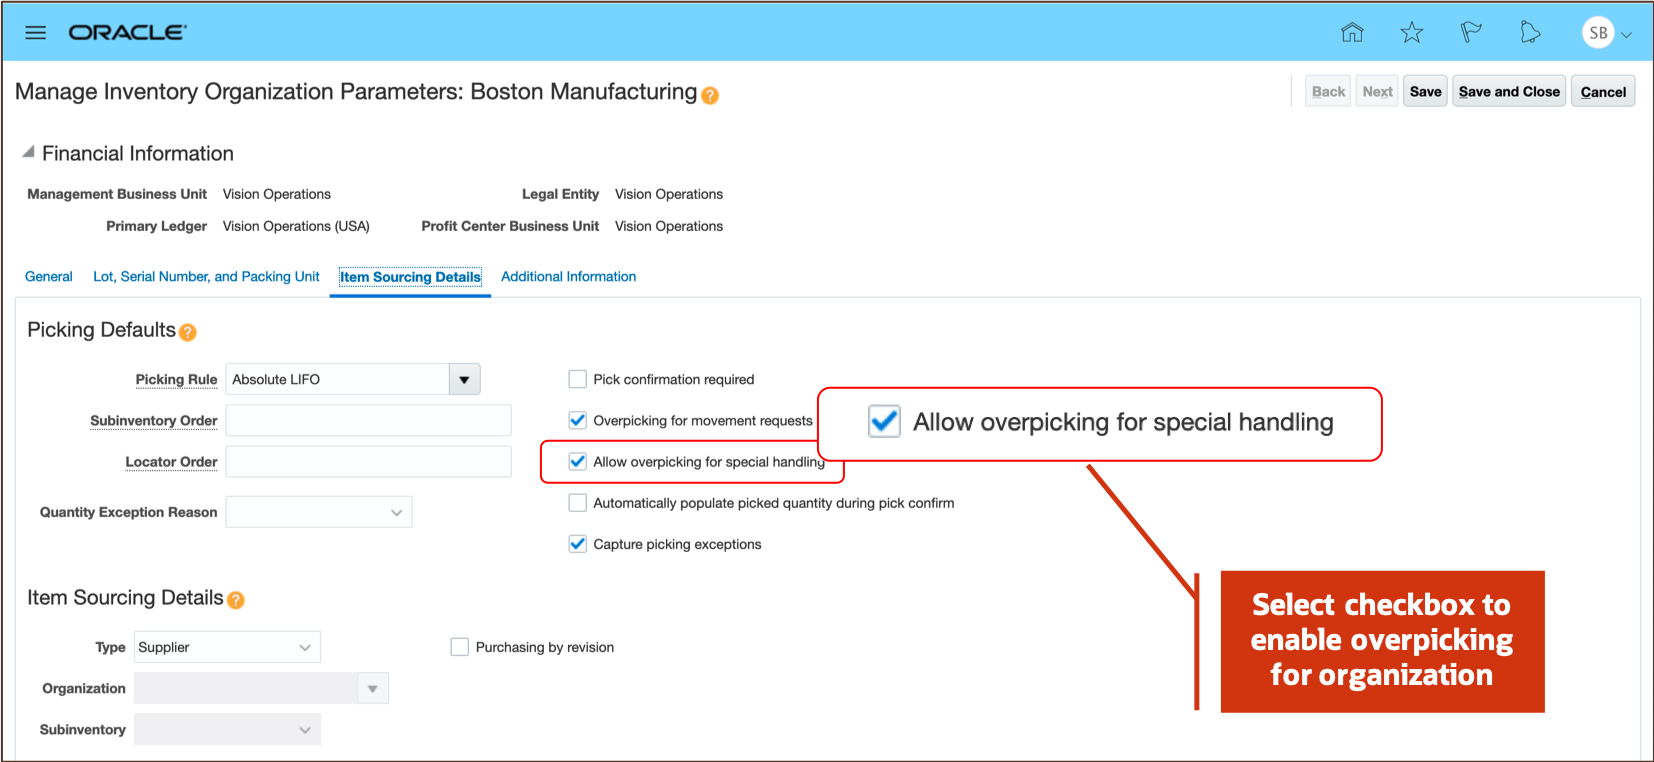
Manage Inventory Organization Parameters
Tips And Considerations
- The picked quantity must be greater than or equal to the requested quantity.
- Serial-controlled items are not currently supported by overpicking.
- Multiple lots on a single pick line are not currently supported by overpicking.
- If your inventory organization is set to allow negative balances, you can overpick and move more than is on-hand or available.
- Overshipping functionality introduced in 20A works independently of overpicking but can be used in conjunction with it.
Key Resources
- Watch Enable Overpicking for Sales Orders, Transfer Orders, and Work Orders Readiness Training
- Oracle Supply Chain Management Cloud: Using Inventory Management guide, available on the Oracle Help Center.
Role Information
You have a couple options for granting users access to this feature, depending on whether you're assigning them predefined job roles or your own configured job roles.
Users who are assigned any of these predefined job roles are automatically able to access this feature:
- Warehouse Operator (ORA_INV_WAREHOUSE_OPERATOR_JOB)
- Warehouse Manager (ORA_INV_WAREHOUSE_MANAGER_JOB)
Users who are assigned configured job roles that contain these privileges are able to access this feature:
- Confirm Pick Slip (INV_CONFIRM_PICK_SLIP_PRIV)
- Confirm Pick Slip Web Service (INV_CONFIRM_PICK_SLIP_WEB_SERVICE_PRIV)
To set up this feature, here's what you need:
- Predefined job role name and code:
- Supply Chain Application Administrator (ORA_RCS_SUPPLY_CHAIN_APPLICATION_ADMINISTRATOR_JOB)
- Warehouse Manager (ORA_INV_WAREHOUSE_MANAGER_JOB)
- Inventory Manager (ORA_INV_INVENTORY_MANAGER_JOB)
- Privilege name and code for configured job roles:
- Manage Inventory Organization (INV_MANAGE_INVENTORY_ORGANIZATION_PRIV)
Manage Work Order Picking Document Output Preferences
Picking materials for production and moving them from stores to production is a critical process.
Until this update, you were able to create a picking request for work orders based on a scheduled process or request picking for a specific set of work orders.
However, you weren't able to email the pick slip report or send it directly to a printer or fax machine.
With this update, you can now set up manufacturing pick slip output preferences using a specific task. After you have set up the output preferences, whenever you run the picking request using a schedule or for a specific set of work orders, the pick slip is automatically sent as an email or to a printer based on the setup.
Setup of Output Preferences
Create an Output Preference
This feature helps you to seamlessly send the work order pick slip reports to your desired device.
Steps to Enable
Use the Opt In UI to enable this feature. For instructions, refer to the Optional Uptake of New Features section of this document.
Offering: Manufacturing and Supply Chain Materials Management
After you opt in, perform these steps to complete your setup:
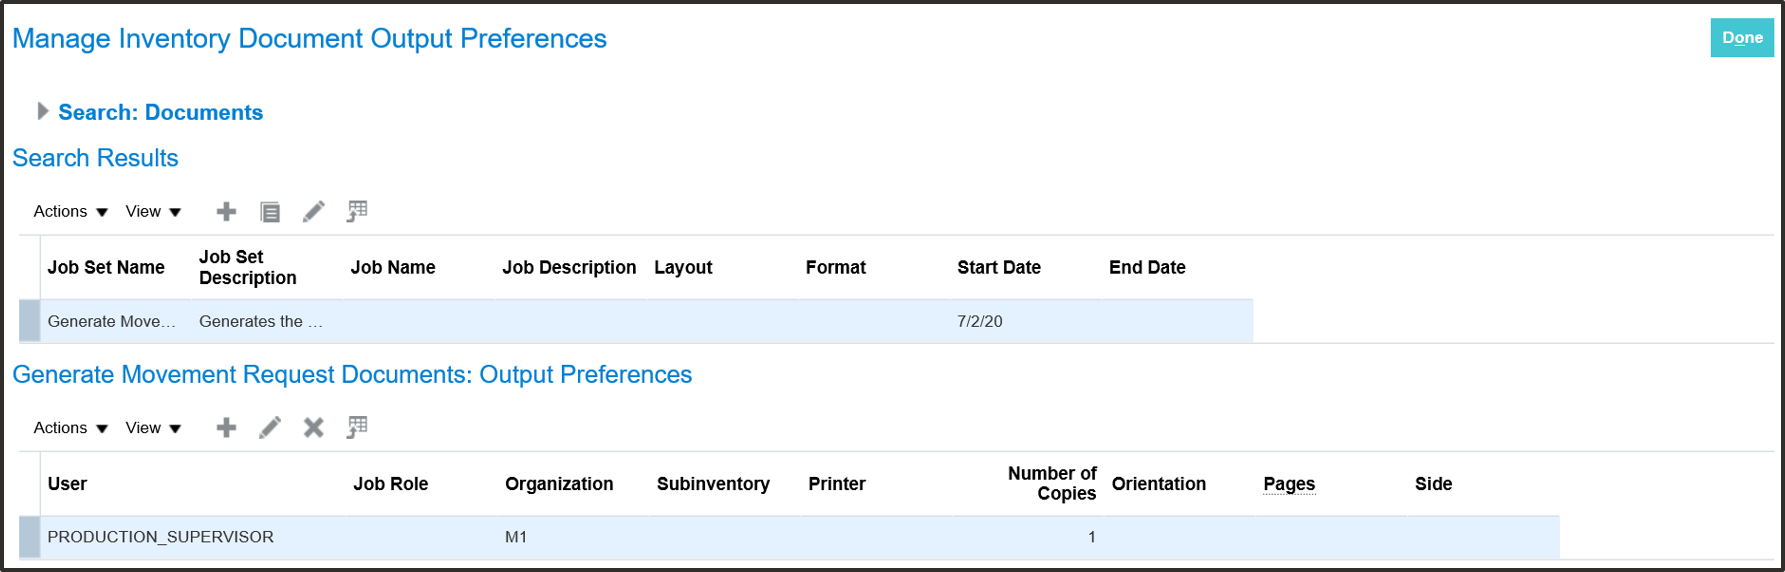
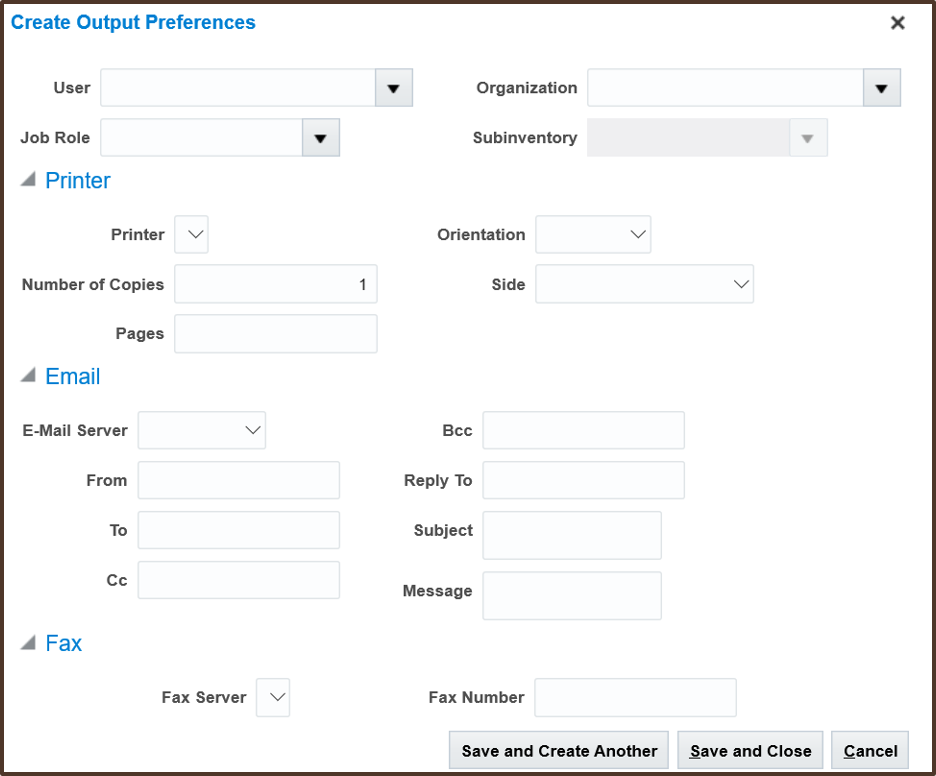
- In the Setup and Maintenance work area, search for and select the task named: Manage Inventory Document Output Preferences.
- On the Manage Inventory Document Output Preferences page, add a new record in the Search Results table. Select a Job Set Name and Job Name. Click Save and Close.
- On the Manage Inventory Document Output Preferences page, select your new record in the Search Results table.
- In the Generate Movement Request Documents: Output Preferences table, use the Actions menu to create your output preferences.
Tips And Considerations
Opting in to the feature will enable the enhanced logic to route pick slip reports to output devices. Opt in for the feature only if it is required to configure output preferences for work order pick slip reports.
Role Information
Users provisioned with the Supply Chain Application Administrator role will automatically be able to use the enhanced features for picking.
Users who are assigned configured job roles that contain the INV_MANAGE_INVENTORY_DOCUMENT_OUTPUT_PREFERENCES_PRIV privilege will also be able to access the enhanced features for picking.
Define Shift Exceptions and Work Center Resource Exceptions
With this update, you can define shift and resource calendar exceptions for your maintenance organisation. To do so, two new tasks are introduced in the Maintenance Management work area:
- Manage Production Calendar
- Manage Work Center Resource Calendar

New Tasks in the Maintenance Management Work Area
Resource exceptions can also be defined from the Edit Work Center page.
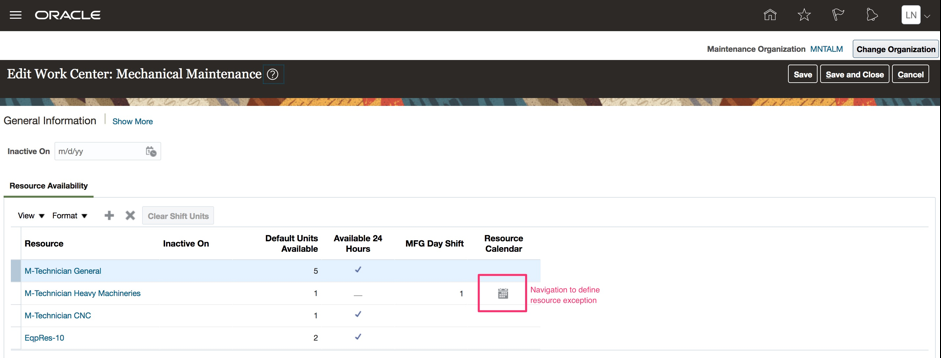
Navigation to Define Resource Exceptions in the Edit Work Center page
Watch a Define Shift Exceptions Demo and a Define Resource Exceptions Demo
With this update, your work order scheduling considers the calendar exceptions and is more accurate.
Steps to Enable
You don't need to do anything to enable this feature.
Key Resources
- Watch Define Shift Exceptions and Work Center Resource Exceptions Readiness Training
- Oracle Whitepaper on Setting Up and Using Manufacturing Calendars
Role Information
- Role:
- Maintenance Manager (ORA_MNT_MAINTENANCE_MANAGER_JOB)
- Privileges:
- Manage Work Center Resource Calendar (RCS_WORK_CENTER_RES_CALENDAR_PRIV)
- Manage Work Center Resource Exception (RCS_WORK_CENTER_RES_EXCEPTION_PRIV)
- Manage Production Calendar (RCS_MANAGE_PRODUCTION_CALENDAR_PRIV)
- Manage Plant Shift Exception (RCS_MANAGE_PLANT_SHIFT_EXCEPTION_PRIV)
- Manage Maintenance Calendar (MNT_MANAGE_MAINTENANCE_CALENDAR)
- Manage Maintenance Work Center Resource Calendar (MNT_WORK_CENTER_RES_CALENDAR)
Link to SCM Application Pages Using Deep Links
In this update, Oracle Supply Chain Management Cloud delivers new deep links that provide easy navigation directly to application pages without using the menu structure. You can use these links in a variety of ways, such as in business intelligence reports and third-party application pages.
New deep links introduced in this update are listed by product:
- Manufacturing
- Work Order (WIE_WORK_ORDER,EDIT)
- Exception (WIE_PRODUCTION_EXCEPTION,EDIT)
- Work Definition (WIS_WORK_DEFINITION,EDIT)
- Edit Resource (WIS_RESOURCE,EDIT)
- Supply Chain Collaboration
- Manage Supply Collaboration Network (COLLABORATION_RELATIONSHIP,EDIT)
- Supply Chain Financial Orchestration
- Monitor Financial Orchestration Execution (FOS_MONITOR_UI,NONE)
- Supply Chain Orchestration
- Supply Order Details (SUPPLY_ORDER,NONE)
- Supply Order Details (SUPPLY_ORDER,VIEW)
- Configurator
- Workspace (CONFIGURATOR,WORKSPACE)
- Overview (CONFIGURATOR,OVERVIEW)
- Overview (CONFIGURATOR,NONE)
- Maintenance
- Customer Asset (ORA_CSE_ASSET,EDIT)
- Edit Work Order (ORA_MNT_WORK_ORDER,EDIT)
- Manage Maintenance Work Orders (ORA_MNT_WORK_ORDER,NONE)
- Work Order (ORA_MNT_WORK_ORDER,VIEW)
- Order Management
- Manage Orders (SALES_ORDER,VIEW)
- Manage Orders (SALES_ORDER,FULFILLMENT_VIEW)
- Manage Orders (SALES_ORDER,NONE)
- Manage Orders (SALES_ORDER,CREATE)
- Product Hub
- Item (PIM_ITEM,EDIT)
- Items (ITEMS,EDIT)
- Manage Items (PIM_ITEM,NONE)
- Collaboration Messaging Framework
- Collaboration Message: {MESSAGEGUID} (B2B_MESSAGE_TRANSACTIONS,VIEW)
- Channel Revenue Management
- Manage Supplier Claims (SUPPLIER_CLAIM,NONE)
- Supplier Claim (SUPPLIER_CLAIM,EDIT)
- Quality Inspection Management
- View Inspection Results (INSPECTION_EVENTS,VIEW)
- View Inspection Plan (INSPECTION_PLANS,VIEW)
- Supply Chain Planning
- Manage Sourcing Rules (SOURCING_RULES,NONE)
- Edit Sourcing Rule (SOURCING_RULES,EDIT)
- Manage Assignment Sets (SOURCING_ASSIGNMENTS,NONE)
- Edit Assignment Set (SOURCING_ASSIGNMENTS,EDIT)
- Manage ATP Rules (ATP_RULES,NONE)
- Edit ATP Rule (ATP_RULES,EDIT)
- Manage Planning Allocation Rules (ATP_ALLOCATION_RULES,NONE)
- Edit Allocation Rule (ATP_ALLOCATION_RULES,EDIT)
- Receiving
- Receive Items (SSP_RCV_PO,NONE)
- Fiscal Document Capture
- Fiscal Document (INBOUND_FISCAL_DOCUMENT,VIEW)
- Cost Management
- Review Work Order Costs (WORK_ORDER_COST, VIEW)
- Review maintenance work order costs(MNT_WORK_ORDER_COST,VIEW)
- Review Item Costs (ITEM_COSTS,VIEW)
- Review Cost Accounting Distributions (COST_ACCOUNTING_DISTRIBUTIONS, VIEW)
- Receipt Accounting Distributions (RECEIPT_ACCTG_DISTRIBUTIONS,VIEW)
When you add deep links to reports or third-party application pages, users can simply click those links to go directly to the application pages they need to use, without any additional clicks or navigation. When a user clicks a deep link, that user's security assignment is honored; that is, users can access application pages only if they're assigned a job role that allows them access.
Steps to Enable
You can find all of the available deep links in the Deep Links work area. Some deep links, such as those assigned the NONE action, are ready to use as is. Other deep links, such as those assigned the EDIT action, require you to edit the link details before you can add the deep link to a report or third-party application page. Refer to the documentation listed in the Key Resources section for details and instructions.
Key Resources
For details about how to work with deep links, refer to these books on the Oracle Help Center:
- Oracle Applications Cloud: Configuring and Extending Applications
- Oracle SCM Cloud: Implementing Common Features for SCM
Role Information
You have a couple of options for giving people access to the Deep Links work area, depending on whether you're assigning them predefined job roles or your own configured job roles.
Users who are assigned any of these predefined job roles are automatically able to access the Deep Links work area:
- Application Developer (FND_APPLICATION_DEVELOPER_JOB)
- Application Implementation Administrator (ORA_ASM_APPLICATION_IMPLEMENTATION_ABSTRACT)
- Application Implementation Consultant (ORA_ASM_APPLICATION_IMPLEMENTATION_CONSULTANT_JOB)
- Procurement Application Administrator (ORA_PO_PROCUREMENT_APPLICATION_ADMIN_JOB)
- Supply Chain Application Administrator (ORA_RCS_SUPPLY_CHAIN_APPLICATION_ADMINISTRATOR_JOB)
Users who are assigned configured job roles that contain this privilege are able to access the Deep Links work area:
- View Administration Link (FND_VIEW_ADMIN_LINK_PRIV)
If you're using deep links specifically for reports, here are the privileges you need:
- For Business Intelligence Publisher:
- BI Author Role (BIAuthor)
- BI Consumer Role (BIConsumer)
- BI Administrator (BIAdministrator)
- For Oracle Transactional Business Intelligence (OTBI):
- BI Author Role (BIAuthor)
- BI Consumer Role (BIConsumer)
Reduced Time Required to Schedule Work Orders
Performance improvements result in less time needed to generate the availability information of work center resources in a manufacturing plant. This information is used to schedule manufacturing and maintenance work orders when they are created or updated using the product task flows, file-based data import (FBDI), or REST services.
Customers that model anywhere from several hundred to several thousand work orders each month will see dramatic performance improvements when scheduling work orders or importing via FBDI or REST services.
Also, the Calculate Lead Times and Roll Up Cumulative Lead Times scheduled process is expected to take less time to complete the calculation of manufacturing lead time for products.
Steps to Enable
You don't need to do anything to enable this feature.
Improved Performance When Generating Schedule Data
When creating a schedule, one process generates only the first year of the schedule working time data to speed up the response time. A separate process creates the remaining data after the first year of the calendar.
Customers using the Schedules REST resource will experience significant performance improvements because only the first year will be generated synchronously, while remaining years will be generated as an asynchronous process.
Steps to Enable
You don't need to do anything to enable this feature.