
This document will continue to evolve as existing sections change and new information is added. All updates appear in the following table:
| Date | Module | Feature | Notes |
|---|---|---|---|
| 22 SEP 2022 | Maintenance | Monitor IoT-Enabled Assets from the Asset Details Page | Updated document. Edited feature description. |
| 12 SEP 2022 | Maintenance | Manage Work Requests | Updated document. Removed feature because it's not yet generally available. |
| 12 SEP 2022 | Maintenance | Update Work Request Status at Work Order Completion | Updated document. Removed feature because it's not yet generally available. |
| 17 JUN 2022 | Created initial document. |
 HAVE AN IDEA?
We’re here and we’re listening. If you have a suggestion on how to make our cloud services even better then go ahead and tell us. There are several ways to submit your ideas, for example, through the Ideas Lab on Oracle Customer Connect. Wherever you see this icon after the feature name it means we delivered one of your ideas.
GIVE US FEEDBACK
We welcome your comments and suggestions to improve the content. Please send us your feedback at oracle_fusion_applications_help_ww_grp@oracle.com.
DISCLAIMER
The information contained in this document may include statements about Oracle’s product development plans. Many factors can materially affect Oracle’s product development plans and the nature and timing of future product releases. Accordingly, this Information is provided to you solely for information only, is not a commitment to deliver any material, code, or functionality, and should not be relied upon in making purchasing decisions. The development, release, and timing of any features or functionality described remains at the sole discretion of Oracle.
This information may not be incorporated into any contractual agreement with Oracle or its subsidiaries or affiliates. Oracle specifically disclaims any liability with respect to this information. Refer to the Legal Notices and Terms of Use for further information.
Pre-Update and Post-Update Tasks
Depending on the features you're using in your Cloud applications, you may be required to perform certain steps immediately before or after your quarterly update. For details of these pre-update and post-update steps and the product areas that are affected, refer to Oracle SCM Cloud: Performing Your Quarterly Update (doc ID 2337485.1) on My Oracle Support.
Optional Uptake of New Features (Opt In)
Oracle Cloud Applications delivers new updates every quarter. This means every three months you'll receive new functionality to help you efficiently and effectively manage your business. Some features are delivered Enabled meaning they are immediately available to end users. Other features are delivered Disabled meaning you have to take action to make available. Features delivered Disabled can be activated for end users by stepping through the following instructions using the following privileges:
- Review Applications Offering (ASM_REVIEW_APPLICATIONS_OFFERINGS_PRIV)
- Configure Oracle Fusion Applications Offering (ASM_CONFIGURE_OFFERING_PRIV)
Here’s how you opt in to new features:
- Click Navigator > My Enterprise > New Features.
- On the Features Overview page, select your offering to review new features specific to it. Or, you can leave the default selection All Enabled Offerings to review new features for all offerings.
- On the New Features tab, review the new features and check the opt-in status of the feature in the Enabled column. If a feature has already been enabled, you will see a check mark. Otherwise, you will see an icon to enable the feature.
- Click the icon in the Enabled column and complete the steps to enable the feature.
In some cases, you might want to opt in to a feature that's not listed in the New Features work area. Here's how to opt in:
- Click Navigator > My Enterprise > Offerings.
- On the Offerings page, select your offering, and then click Opt In Features.
- On the Opt In page, click the Edit Features (pencil) icon for the offering, or for the functional area that includes your feature.
- On the Edit Features page, complete the steps to enable the feature.
For more information and detailed instructions on opting in to new features for your offering, see Offering Configuration.
Opt In Expiration
Occasionally, features delivered Disabled via Opt In may be enabled automatically in a future update. This is known as an Opt In Expiration. If your cloud service has any Opt In Expirations you will see a related tab in this document. Click on that tab to see when the feature was originally delivered Disabled, and when the Opt In will expire, potentially automatically enabling the feature. You can also click here to see features with Opt In Expirations across all Oracle Cloud Applications.
Column Definitions:
Report = New or modified, Oracle-delivered, ready to run reports.
UI or Process-Based: Small Scale = These UI or process-based features are typically comprised of minor field, validation, or program changes. Therefore, the potential impact to users is minimal.
UI or Process-Based: Larger Scale* = These UI or process-based features have more complex designs. Therefore, the potential impact to users is higher.
Features Delivered Disabled = Action is needed BEFORE these features can be used by END USERS. These features are delivered disabled and you choose if and when to enable them. For example, a) new or expanded BI subject areas need to first be incorporated into reports, b) Integration is required to utilize new web services, or c) features must be assigned to user roles before they can be accessed.
| Ready for Use by End Users Reports plus Small Scale UI or Process-Based new features will have minimal user impact after an update. Therefore, customer acceptance testing should focus on the Larger Scale UI or Process-Based* new features. |
Customer Must Take Action before Use by End Users Not disruptive as action is required to make these features ready to use. As you selectively choose to leverage, you set your test and roll out timing. |
|||||
|---|---|---|---|---|---|---|
| Feature |
Report |
UI or |
UI or |
|
||
View Descriptive Flexfields on the Asset Information Management Page |
||||||
Streamline Order Management and Pricing Setups for Nonbillable Service |
||||||
Ship Parts to a Customer Address That Is Different from the Service Request |
||||||
Support Locator-Level Inventory for Part Returns and Transfers |
||||||
View Descriptive Flexfields on the Asset Information Management Page
You can now view descriptive flexfields for an asset in the Asset Information Management page. Click on a row in the search results table. A drawer will show the global and context-sensitive descriptive flexfield segments for the selected asset. When you click on a different row in the result table, the drawer contents will be updated to display the descriptive flexfields of the newly selected asset. You can close the drawer by clicking on the x at the top corner of the drawer or clicking the Escape (Esc) key.

This update improves productivity because you can view each asset's descriptive flexfields quickly, without navigating to another page.
Steps to Enable
You don't need to do anything to enable this feature.
Role And Privileges
No new job roles or privileges are delivered with this feature.
You have a couple of options for giving people access to this feature, depending on whether you're assigning them predefined job roles or your own configured job roles.
- Users who are assigned any of these predefined job roles can access this feature:
- Asset Administrator (ORA_CSE_ASSET_ADMINISTRATOR_JOB)
- Maintenance Manager (ORA_MNT_MAINTENANCE_MANAGER_JOB)
- Users who are assigned a configured job role that contains these privileges can access this feature:
- Manage Maintainable Assets (MNT_MANAGE_MAINTAINABLE_ASSETS_PRIV)
- View Maintainable Assets (MNT_VIEW_MAINTAINABLE_ASSETS_PRIV)
Analyze IoT Incident Details from a Maintenance Work Order
Oracle Fusion Cloud IoT Asset Monitoring can automatically create maintenance work orders when it detects an incident. The IoT incident number and some reference details, such as type, state, and priority, can be displayed on the work order References tab as a document reference. However, to diagnose and troubleshoot the incident, a supervisor or planner may want additional details that are available only in the IoT Asset Monitoring Cloud Service. Additional data from IoT would include the satisfied predicates that triggered the incidents, but also anomalies, trends, warnings, and the asset's digital twin.

Work Order Page Reference Tab
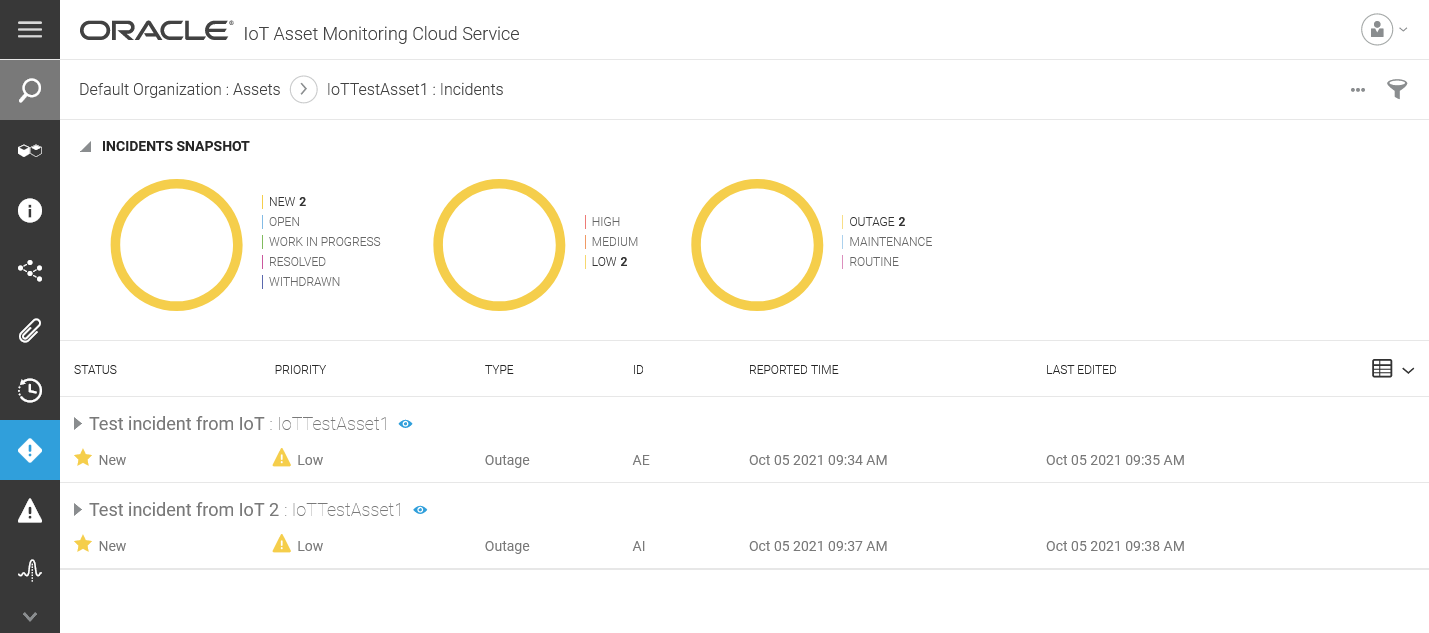
IoT Asset Monitoring Cloud Service Incident Tab
Note: Because the IoT Asset Monitoring page, Incidents tab doesn't filter down to a single incident, the page will be launched with all incidents for the asset.
Maintenance planners or technicians can use this feature to view incident details without navigating away from the work order. These additional details can help them to make planning decisions and perform the maintenance work.
Steps to Enable
You don't need to do anything to enable this feature.
Role And Privileges
You have a couple of options for giving people access to this feature, depending on whether you're assigning them predefined job roles or your own configured job roles.
- Users who are assigned any of these predefined job roles can access this feature:
- Maintenance Manager (ORA_MNT_MAINTENANCE_MANAGER_JOB)
- Maintenance Technician (ORA_MNT_MAINTENANCE_TECHNICIAN_JOB)
- Users who are assigned a configured job role that contains these privileges can access this feature:
- Manage Maintenance Work Orders (MNT_MANAGE_MAINTENANCE_WORK_ORDER_HEADERS_PRIV)
- Manage Maintenance Work Order Operations (MNT_MANAGE_MAINTENANCE_WORK_ORDER_OPERATIONS_PRIV)
- Review Maintenance Dispatch List
Monitor IoT-Enabled Assets from the Asset Details Page
A maintenance supervisor or planner will often reference asset information in the asset details page, such as asset configuration, meter readings, and failure history. However, to diagnose and troubleshoot asset problems, the supervisor may want additional information from Oracle Asset Monitoring (part of the Oracle Fusion Cloud IoT Intelligent Applications), such as KPI readings, warnings, trends, predictions, and the digital twin.
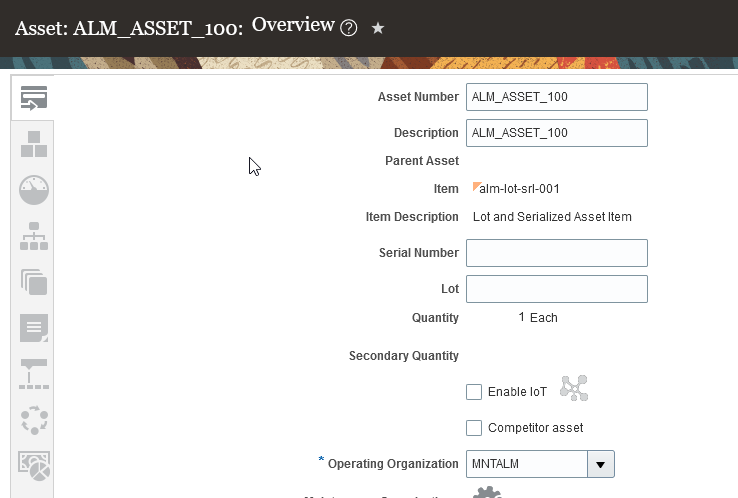
This feature provides a deep-link icon on the Asset details page next to the Enable IoT check box. This deep link icon launches the Asset Monitoring Operations Center user interface (UI) with the Digital Twin tab in focus. This UI is displayed in a separate, independent, noncontextual browser tab. User access is validated through single sign on for both the asset and IoT modules.
By default, the Asset details page renders for most assets with the Enable IoT check box selected, but there are three possible combinations of whether the check box is selected and the deep-link icon is enabled.
If the Asset details page validation confirms that asset monitoring details exist, therefore the asset has been synchronized between ALM and IoT and the Enable IoT check box is selected, then the deep link icon is enabled.

Example of the Asset Details Page with the Enable IoT Check Box Selected and the Deep-Link Icon Enabled.
If no IoT asset monitoring details exist or the asset hasn't been synchronized between ALM and IoT, even though the Enable IoT check box is selected, the deep link icon is disabled.

Example of the Asset Details Page with the Enable IoT Check Box Selected, but the Deep-Link Icon Disabled.
If the Enable IoT check box isn't selected, then the deep link icon is disabled.
Example of the Asset details Page with the Enable IoT Check Box Not Selected and the Deep-Link Icon Disabled.
When the deep-link is enabled, you can click the icon to launch the Asset Monitoring Operations Center user interface (UI) with the Digital Twin tab in focus.

IoT AM Cloud Operations Center - Digital Twin Tab
Maintenance engineers or asset managers can use this feature to view IoT details without navigating away from the asset. These additional details can help them understand the condition and operability of the asset.
Steps to Enable
You don't need to do anything to enable this feature.
Role And Privileges
You have a couple of options for giving people access to this feature, depending on whether you're assigning them predefined job roles or your own configured job roles.
- Users who are assigned any of these predefined job roles can access this feature:
- Asset Administrator (ORA_CSE_ASSET_ADMINISTRATOR_JOB)
- Users who are assigned a configured job role that contains these privileges can access this feature:
- Manage Customer Assets (CSI_MANAGE_CUSTOMER_ASSETS_PRIV)
- Manage Maintainable Assets (MNT_MANAGE_MAINTAINABLE_ASSETS_PRIV)
Streamline Order Management and Pricing Setups for Nonbillable Service
Service Logistics no longer requires you to set up Order Management and Pricing when not billing for field service. This is useful to organizations that do not require Order Management as part of their Field Service and Service Logistics implementation because there is no billing or invoicing related to service repairs.
When you set up service activities for Service Logistics, the Order Type field is no longer mandatory. If you don’t need to create sales orders, then don’t select the Create Order check box. Order Type and Order Line Type field values are no longer required.

Manage Service Activities - Order Type is Optional
The Charges tab on the Manage Work Orders and Charges page doesn’t show any values in the Price, Your Price, Amount and Order columns for any activity line with a blank Create Order check box and no associated Sales Order. The Order Number field also remains blank, even after posting charges.

Charges Tab Without Pricing Details
This streamlined setup process eliminates the need for Order Management and Pricing when you aren't billing for field service.
Steps to Enable
You don't need to do anything to enable this feature.
Key Resources
Role And Privileges
To set up this feature, you'll need this predefined job role, or a configured job role that contains these privileges:
- Predefined job role name and code:
- Field Service Administrator (ORA_RCL_FIELD_SERVICE_ADMINISTRATOR)
- Privilege names and codes for configured job roles:
- Access Service Logistics Landing Page (RCL_PORTAL_ACCESS_LANDING_PAGE_PRIV)
- Manage Estimates (RCL_MANAGE_ESTIMATES_PRIV)
Enhanced Landing Page for Depot Repair
Depot Repair infolets provide you with actionable insight into your depot repair activities. A user’s job roles and privileges determine which infolets appear on the Service Logistics landing page. The landing page currently supports infolets for field service technicians, field service administrators, parts coordinators, and depot repair managers.
The following enhancements have been made to the Service Logistics landing page:
- Added new depot repair manager infolets.
- Removed the Depot Repair and Field Service Charges by Status infolet to improve performance.
- Changed some of the Depot Repair and Field Service Charges and Estimates infolets from horizontal to vertical bar charts.
- Included fixed charges in the all of the Depot Repair and Field Service Charges and Estimates infolets
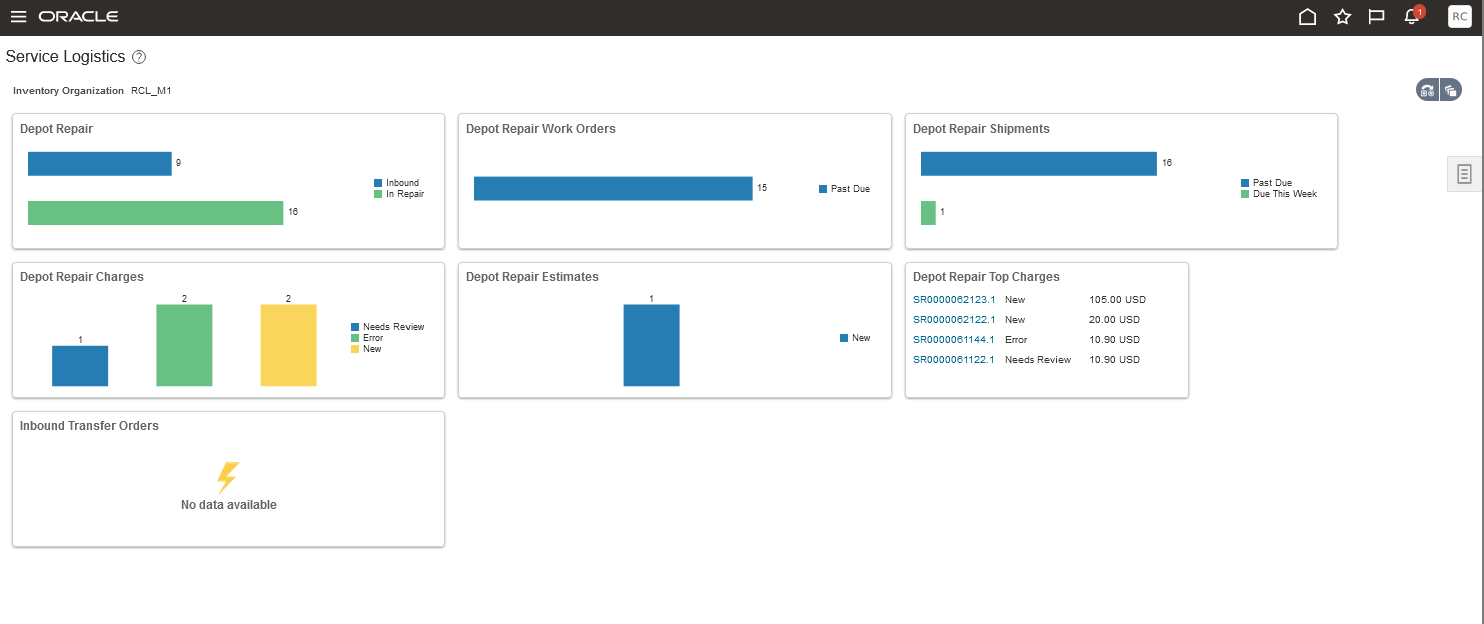
Service Logistics Landing Page for Depot Repair Managers
Depot Repair Infolet Descriptions
The following table describes the infolets that the depot repair manager sees on the landing page:
| No | Name | Description |
|---|---|---|
| 1 | Depot Repair Charges |
View counts of Depot Repair RMAs when charges in are in New, Error, or Needs Review status. These RMAs are filtered by the inventory organization selected for the Landing Page. Click on a number to open the Manage Depot Repair page to see the underlying RMAs. |
| 2 | Depot Repair Top Charges |
View a list of the top 5 depot repair RMAs sorted in descending order of their total charge amounts. These RMA are filtered the inventory organization selected for the Landing Page. Click on an RMA Number to open the Depot Repair Workbench. |
| 3 | Depot Repair Estimates |
View a count of all estimates associated to Depot Repair RMAs that are in the Pending Approval or New status. These RMAs are filtered by the inventory organization selected for the Landing Page. Click on a number to open the Manage Depot Repair page to see the underlying RMAs. |
| 4 | Depot Repair |
View a bar chart displaying a count of depot repair work orders, RMAs, and shipment order lines for each depot repair lifecycle status defined below. In 22B, we created a new non-extensible Lookup (ORA_RCL_DEPOT_LIFE_STATUS) to define the depot repair lifecycle statuses the user sees on the UI. Depot repair RMAs are return sales order lines that have an order line type tied to a depot repair logistics service activity code. Depot repair work orders are maintenance work orders that are associated to a depot repair RMA. Inbound: incoming depot repair RMAs that have a fulfillment line in Awaiting Receiving status. Received: received depot repair RMAs sales order lines without an associated depot repair work order. In Repair: depot repair work orders with status Unreleased, Released, or On Hold. To Be Shipped: depot repair work orders with status Canceled, Closed, or Completed and an associated shipment sales order line's fulfillment status is not Shipped or Billed. To Be Billed: depot repair work orders with status Canceled, Closed, or Completed and service charges for their associated depot repair RMA have not been created or posted. Shipped Not Billed: depot repair work orders with status Canceled, Closed, or Completed and a sales order shipment line with fulfillment status Awaiting Billing. The counts in this infolet are filtered by the Inventory Organization selected on the Landing Page filter. Click on any status in the bar chart to go to the Manage Depot Repair page which will display all of the RMAs tied to that status. For the repair work order drill downs, the number of RMAs on the Manage Depot Repair page will not match the count of work orders in the Infolet when an RMA has more than one repair work order. |
| 5 | Depot Repair Work Orders |
View bar chart of counts of depot repair work orders in statuses Unreleased, Released, or On Hold grouped by the planned completion date. The three groups are Past Due, Due this Week and Due beyond this week. If planned completion date isn't specified, it falls into the Due this Week group. This infolet is filtered by the inventory organization on the repair work order. Click on any bar to open the Manage Depot Repair page. This infolet counts repair work orders, but the Manage Depot Repair page lists RMAs associated with these work orders. Since an RMA can have multiple work orders, the number of work orders shown in the infolet may not match the number of RMAs shown on the Manage Depot Repair page. |
| 6 | Depot Repair Shipments |
View a bar chart with counts of repaired product shipment order lines grouped by required fulfillment date. The three groups are Past Due, Due this Week, and Due beyond this week. If the required fulfillment date isn't specified, it falls into the Due this Week group. This infolet is filtered by the inventory organization of the shipment order line. Click on any bar to open the Manage Depot Repair page which displays the Depot Repair RMAs associated to these shipment sales order lines. |
| 7 | Inbound Transfer Orders |
View a pie chart of transfer orders in status Not Shipped, Not Shipped and Delayed, Shipped, and Shipped and Delayed. This infolet is filtered by the transfer order destination inventory organization. |
These infolets provide depot repair managers with the information they need to manage the flow of work through the repair center, as well as efficiently bill customers and ship repaired products.
Steps to Enable
You don't need to do anything to enable this feature.
Role And Privileges
To use this feature, you'll need this predefined job role, or a configured job role that contains this privilege:
- Predefined job role name and code:
- Depot Repair Manager (ORA_RCL_DEPOT_REPAIR_MANAGER_JOB)
- Privilege name and code for configured job roles:
- Access Depot Repair Manager Infolets (RCL_DEPOTMGR_INFOLETS)
Ship Parts to a Customer Address That Is Different from the Service Request
You now have the flexibility to create part requirements and ship parts to a customer other than the customer listed on the service request or work order. A new Ship-to Customer field is available on the Create Part Requirements page, as well as on the Add Part and Edit Part pages, which you can access from the Manage Part Requirements page and the B2B Service Request page.
Field service administrators or technicians can create a part requirement with a ship-to customer that is different from the customer entered for the document type. The sales order ship line created from the part requirement line inherits the Ship-to Customer and Ship-to Address values from the part requirement. In the example below, the technician created a part requirement for a service request with a Customer field value of Small Inc. When the technician selected BIG COMPUTERS as the ship-to customer, the Ship-to Address field value defaulted to the ship-to customer’s address.

Create Part Requirements Page with the New Ship-to Customer Field

Add Part Page with the New Ship-to Customer Field
Field service administrators and technicians can now ship parts to a customer address other than the address associated with the document type. This also facilitates the creation of sales orders which contain valid customer and address information for tax credit calculations.
For example, an organization which leases copier machines might receive a service request for a broken copier machine located at a customer location. Now, when the technician orders parts for repair, they can enter the organization in the Customer field and the customer in the Ship-to Customer field, so the parts arrive at the customer’s location.
Steps to Enable
You don't need to do anything to enable this feature.
Key Resources
Role And Privileges
To access this feature, you'll need any predefined job role, or a configured job role that contains at least one of these privileges:
- Access Service Logistics Landing Page (RCL_PORTAL_ACCESS_LANDING_PAGE_PRIV)
- View Requirement Lines (RCL_PARTS_REQ_VIEW)
- Access Debrief Page (RCL_PORTAL_VIEW_DEBRIEF)
- Manage Estimates (RCL_MANAGE_ESTIMATES_PRIV)
Support Locator-Level Inventory for Part Returns and Transfers
You can now manage service parts inventory using locator control. Locator control helps service administrators, parts coordinators, and technicians manage field office and other field stocking locations using locators and subinventories.

New Locator Field
You can also transfer and return service parts that are under locator control and see the quantity on hand and available in the subinventory locator.
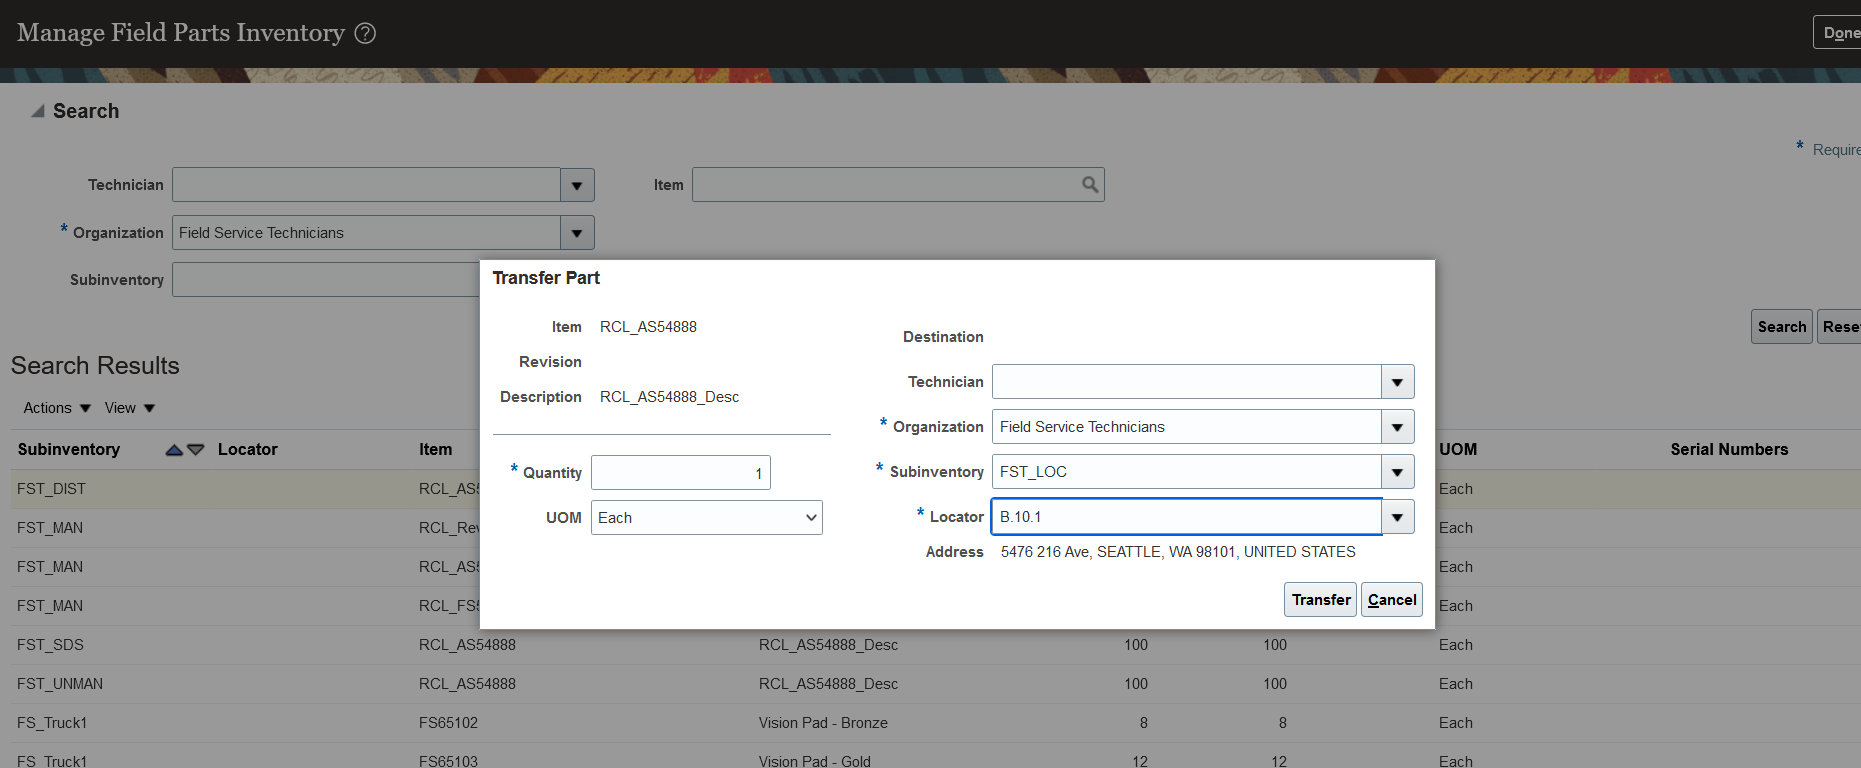
Transfer Part Using Subinventory and Locator Information
By using locator control, you gain greater visibility into your field service inventory.
Steps to Enable
Manufacturing and Supply Chain Materials Management > Inventory Management
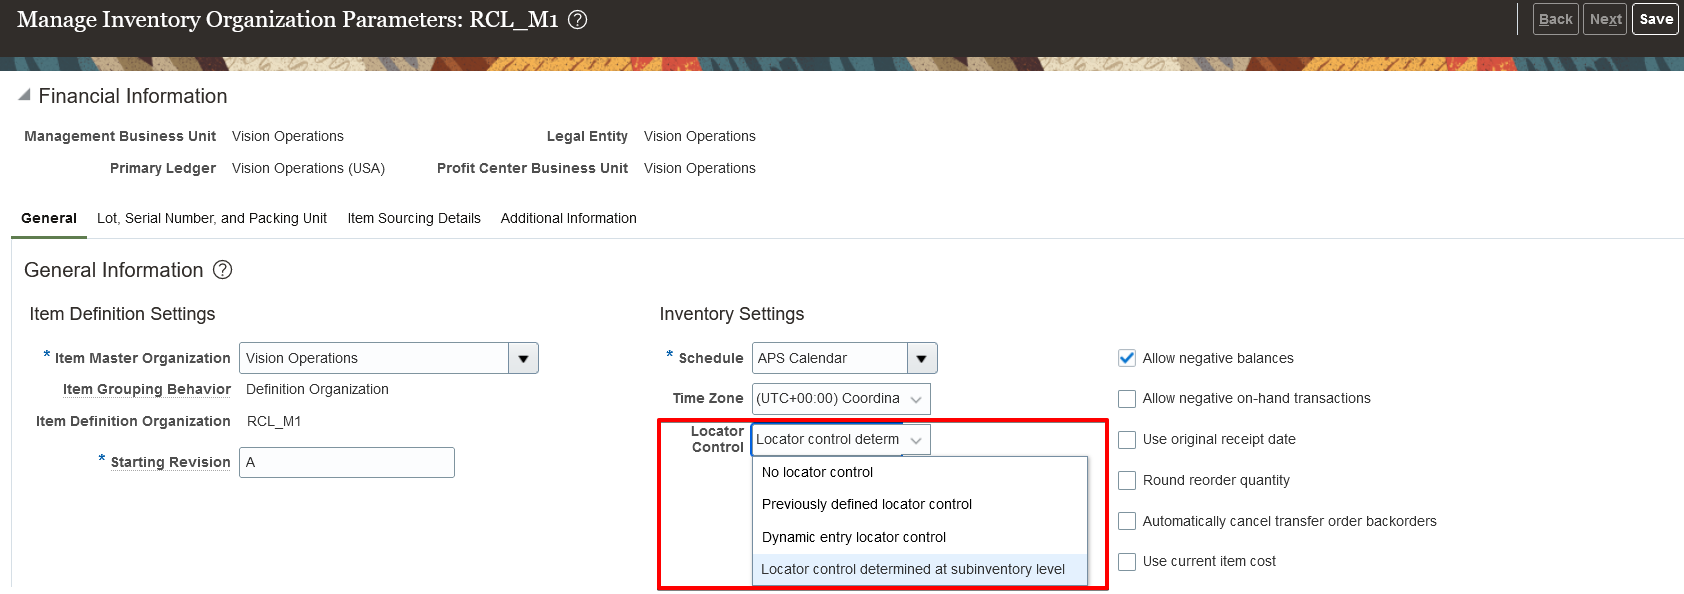
In the Manage Inventory Organization Parameters page, Locator Control field, assign your inventory organization's locator control at the subinventory level.
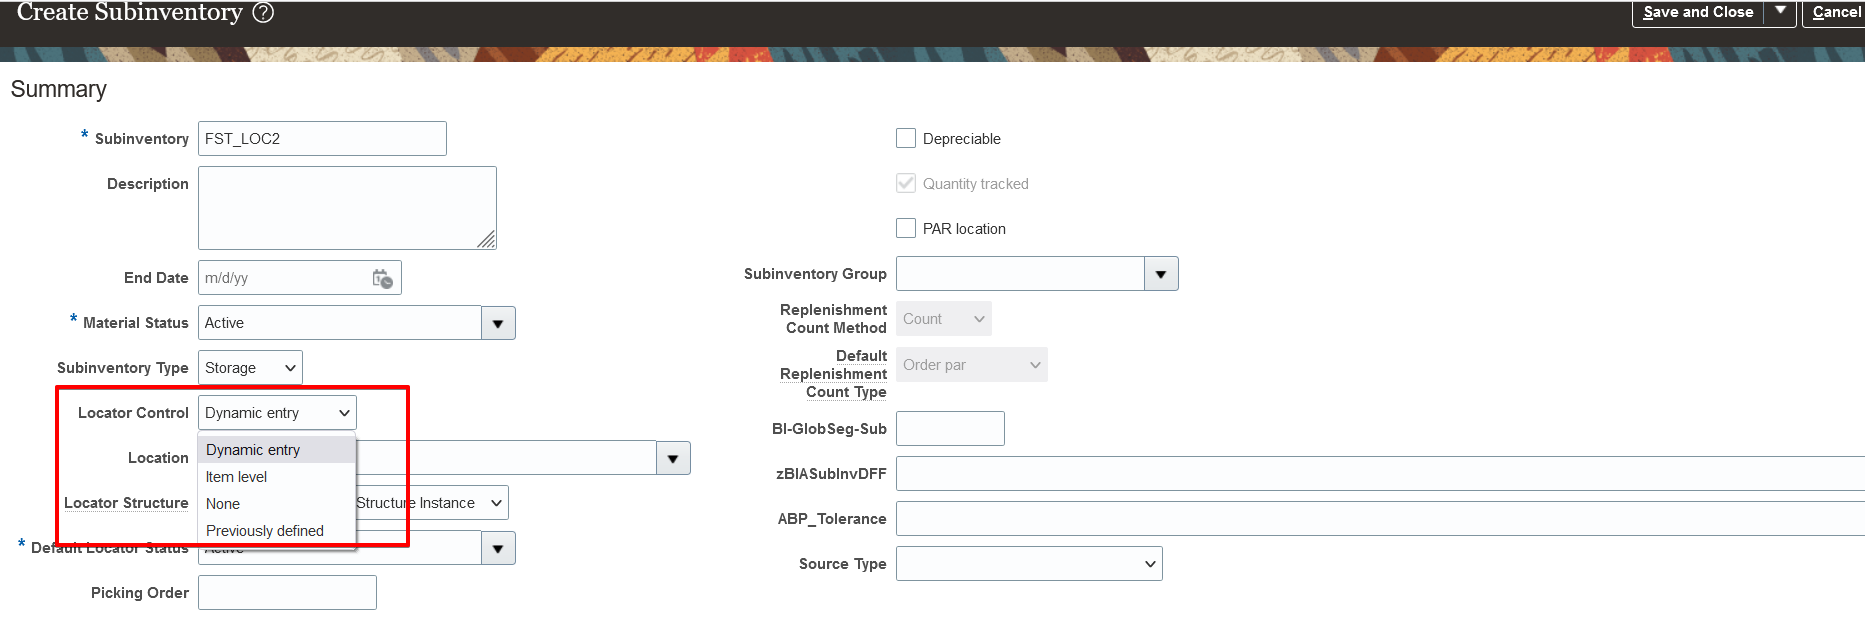
Next, in the Create Subinventory page, select a Locator Control field value to assign locator control to the subinventory.
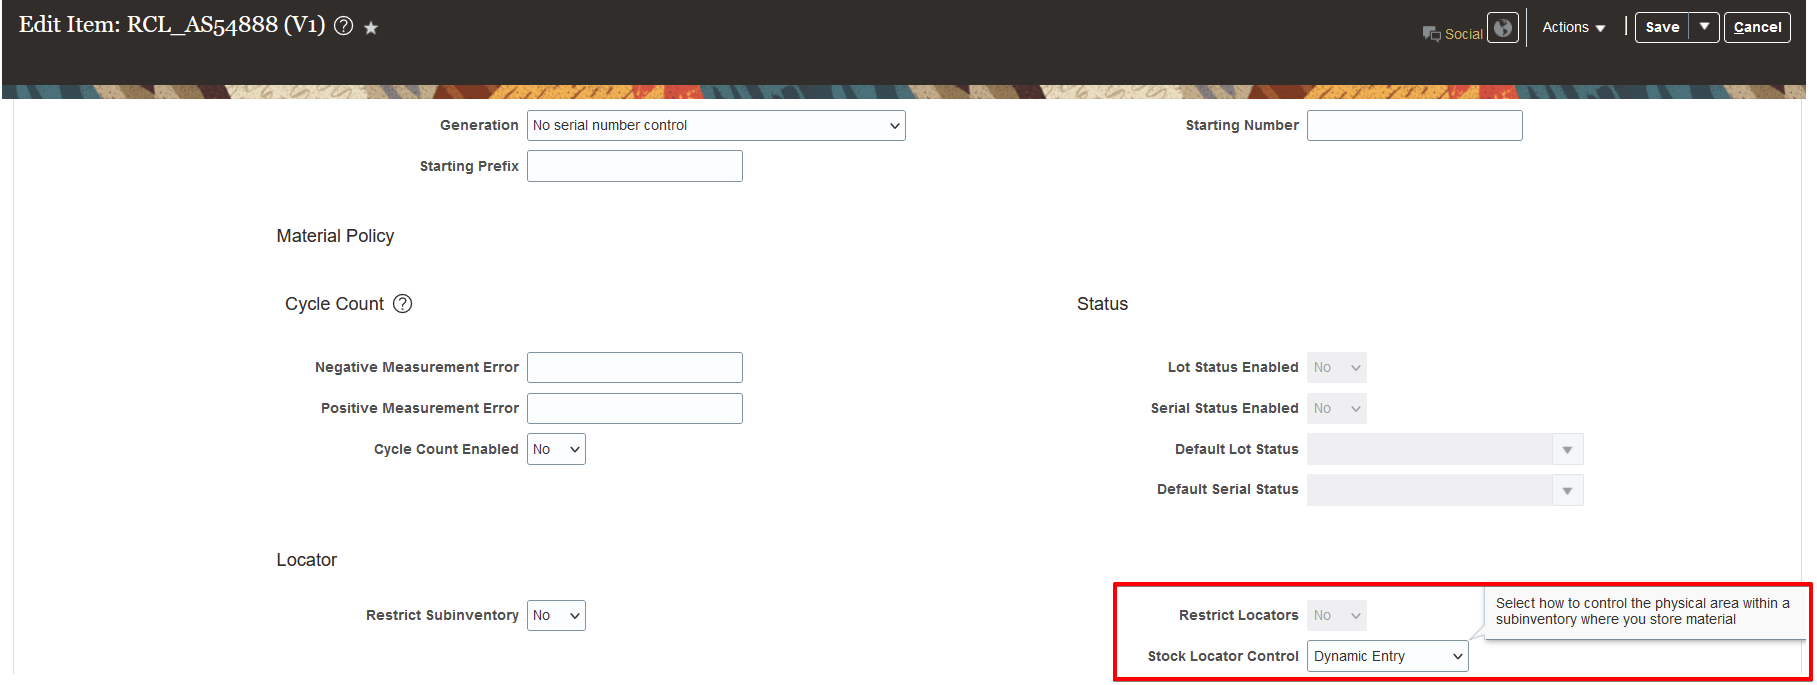
If you choose to use item level locator control in a subinventory, then, in the Edit Item page, select the Stock Locator Control to use for the item.
Tips And Considerations
Review How Inventory Organizations, Subinventories, and Locators Fit Together to understand subinventory and locator relationships and how you can use them to manage your Service Logistics stock on hand.
Consider the following when planning a hierarchy of subinventories and their corresponding locators:
- The importance, for your organization, of creating a subinventory and locator hierarchy that represents your stocking locations.
- Your organization's plan for the movement of items and labor, and utilization of labor and equipment, while putting away and picking items.
Consider the following when planning to create locators:
- Whether to allow users to dynamically create locators.
- Whether to add items to locators.
- Whether it's necessary to implement locator control.
If you decide to implement locator control, consider whether you must implement locator control for the organization, for individual subinventories, or at the item level.
Key Resources
- Oracle Supply Chain Management Cloud: Using Inventory Management guide, available on the Oracle Help Center.
- Watch Part Requirements and Ordering UI Readiness Training.
Role And Privileges
To access this feature, you'll need any predefined job role, or a configured job role that contains at least one of these privileges:
- Access Service Logistics Landing Page (RCL_PORTAL_ACCESS_LANDING_PAGE_PRIV)
- View Requirement Lines (RCL_PARTS_REQ_VIEW)
- Access Debrief Page (RCL_PORTAL_VIEW_DEBRIEF)
- Manage Estimates (RCL_MANAGE_ESTIMATES_PRIV)