
- Revision History
- Overview
- Pre-Update and Post-Update Tasks
- Optional Uptake of New Features (Opt In)
- Feature Summary
-
- Cross-Product Enhancements
- Project-Driven Supply Chain
- Order Management
- Configurator
- Channel Revenue Management
- Supplier Channel Management
- Deductions and Settlement
-
- Create Claims for Deductions and Overpayments Originating from an Invoice
- Settle Claims for Deductions and Overpayments Originating from an Invoice
- Create Customer Claims Manually
- Identify Claims Automatically for Deductions That Are Eligible for Write Off
- Create Claims Automatically for Deductions and Overpayments from Lockbox
- Global Order Promising
This document will continue to evolve as existing sections change and new information is added. All updates appear in the following table:
| Date | Product | Feature | Notes |
|---|---|---|---|
| 26 MAY 2021 | Global Order Promising | Determine Consideration of Supplier Capacity for Database-Centric Order Promising | Updated document. Delivered feature in update 21A. |
| 02 APR 2021 | Order Management | Integrate Order Management Cloud with Oracle Fusion Payments | Updated document. Revised description and steps to enable. |
| 02 APR 2021 | Order Management | Use Global Order Promising to Calculate Date Changes on Sales Orders | Updated document. Revised description. |
| 19 FEB 2021 | Global Order Promising | Other Global Order Promising Changes in This Update | Updated document. Added section. |
| 18 DEC 2020 | Created initial document. |
This guide outlines the information you need to know about new or improved functionality in this update, and describes any tasks you might need to perform for the update. Each section includes a brief description of the feature, the steps you need to take to enable or begin using the feature, any tips or considerations that you should keep in mind, and the resources available to help you.
SECURITY AND NEW FEATURES
The Role section of each feature identifies the security privilege and job role required to use the feature. If feature setup is required, then the Application Implementation Consultant job role is required to perform the setup, unless otherwise indicated. (If a feature doesn't include a Role section, then no security changes are required to use the feature.)
If you have created job roles, then you can use this information to add new privileges to those roles as needed. For details about how to compare your configured job roles to predefined job roles and add security artifacts to your configured job roles, see the Security Console and Roles and Role Assignments chapters in the Oracle SCM Cloud: Securing SCM guide on the Oracle Help Center.
GIVE US FEEDBACK
We welcome your comments and suggestions to improve the content. Please send us your feedback at oracle_fusion_applications_help_ww_grp@oracle.com.
Pre-Update and Post-Update Tasks
Depending on the features you're using in your Cloud applications, you may be required to perform certain steps immediately before or after your quarterly update. For details of these pre-update and post-update steps and the product areas that are affected, refer to Oracle SCM Cloud: Performing Your Quarterly Update (doc ID 2337485.1) on My Oracle Support.
Optional Uptake of New Features (Opt In)
Oracle Cloud Applications delivers new updates every quarter. This means every three months you'll receive new functionality to help you efficiently and effectively manage your business. Some features are delivered Enabled meaning they are immediately available to end users. Other features are delivered Disabled meaning you have to take action to make available. Features delivered Disabled can be activated for end users by stepping through the following instructions using the following privileges:
- Review Applications Offering (ASM_REVIEW_APPLICATIONS_OFFERINGS_PRIV)
- Configure Oracle Fusion Applications Offering (ASM_CONFIGURE_OFFERING_PRIV)
Here’s how you opt in to new features:
- Click Navigator > My Enterprise > New Features.
- On the Features Overview page, select your offering to review new features specific to it. Or, you can leave the default selection All Enabled Offerings to review new features for all offerings.
- On the New Features tab, review the new features and check the opt-in status of the feature in the Enabled column. If a feature has already been enabled, you will see a check mark. Otherwise, you will see an icon to enable the feature.
- Click the icon in the Enabled column and complete the steps to enable the feature.
In some cases, you might want to opt in to a feature that's not listed in the New Features work area. Here's how to opt in:
- Click Navigator > My Enterprise > Offerings.
- On the Offerings page, select your offering, and then click Opt In Features.
- On the Opt In page, click the Edit Features (pencil) icon for the offering, or for the functional area that includes your feature.
- On the Edit Features page, complete the steps to enable the feature.
For more information and detailed instructions on opting in to new features for your offering, see Offering Configuration.
Opt In Expiration
Occasionally, features delivered Disabled via Opt In may be enabled automatically in a future update. This is known as an Opt In Expiration. If your cloud service has any Opt In Expirations you will see a related tab in this document. Click on that tab to see when the feature was originally delivered Disabled, and when the Opt In will expire, potentially automatically enabling the feature. You can also click here to see features with Opt In Expirations across all Oracle Cloud Applications.
Column Definitions:
Features Delivered Enabled
Report = New or modified, Oracle-delivered, ready to run reports.
UI or Process-Based: Small Scale = These UI or process-based features are typically comprised of minor field, validation, or program changes. Therefore, the potential impact to users is minimal.
UI or Process-Based: Larger Scale* = These UI or process-based features have more complex designs. Therefore, the potential impact to users is higher.
Features Delivered Disabled = Action is needed BEFORE these features can be used by END USERS. These features are delivered disabled and you choose if and when to enable them. For example, a) new or expanded BI subject areas need to first be incorporated into reports, b) Integration is required to utilize new web services, or c) features must be assigned to user roles before they can be accessed.
Link to SCM Application Pages Using Deep Links
In this update, Oracle Supply Chain Management Cloud delivers new deep links that provide easy navigation directly to application pages without using the menu structure. You can use these links in a variety of ways, such as in business intelligence reports, notifications, and third-party application pages.
New deep links in the update are listed by product:
- Supply Chain Collaboration
- Manage Supply Collaboration Network (COLLABORATION_RELATIONSHIP,EDIT)
- Inventory Management
- Review Completed Transactions
- Inventory Pending Transactions
- SSP Manage Receipts
- View Receipts
- Manage Lots
- Manage Serial Numbers
- Create ASN
- Manage Movement Requests
- Create ASBN
- Manage Inbound Shipments - Shipment
- Manage Inbound Shipments - Purchase Order
- Receive Expected Shipments - Purchase Order
- Receive Expected Shipments - ASN
- Receive Expected Shipments - Transfer Order
- Receive Expected Shipments - In-Transit Shipment
- Receive Expected Shipments - RMA
- Manage Transfer Order
- Manage Shipment Lines
- Edit Shipment
- Channel Revenue Management
- Manage Customer Claims (CUSTOMER_CLAIM,NONE)
- Customer Claim (CUSTOMER_CLAIM,EDIT)
- Manufacturing
- Work Order (WIE_WORK_ORDER, VIEW)
- Work Order (WIE_WORK_ORDER, EDIT)
- Exception (WIE_PRODUCTION_EXCEPTION,EDIT)
- Work Definition (WIS_WORK_DEFINITION,EDIT)
- Edit Resource (WIS_RESOURCE,EDIT)
When you add deep links to reports or third-party application pages, users can simply click those links to go directly to the application pages they need to use, without any additional clicks or navigation. When a user clicks a deep link, that user's security assignment is honored; that is, users can access application pages only if they're assigned a job role that allows them access.
Steps to Enable
You can find all of the available deep links in the Deep Links work area. Some deep links, such as those assigned the NONE action, are ready to use as is. Other deep links, such as those assigned the EDIT action, require you to edit the link details before you can add the deep link to a report or third-party application page. Refer to the documentation listed in the Key Resources section for details and instructions.
Key Resources
For details about how to work with deep links, refer to these books on the Oracle Help Center:
- Oracle Applications Cloud: Configuring and Extending Applications
- Oracle SCM Cloud: Implementing Common Features for SCM
Role Information
You have a couple of options for giving people access to the Deep Links work area, depending on whether you're assigning them predefined job roles or your own configured job roles.
Users who are assigned any of these predefined job roles are automatically able to access the Deep Links work area:
- Application Developer (FND_APPLICATION_DEVELOPER_JOB)
- Application Implementation Administrator (ORA_ASM_APPLICATION_IMPLEMENTATION_ABSTRACT)
- Application Implementation Consultant (ORA_ASM_APPLICATION_IMPLEMENTATION_CONSULTANT_JOB)
- Procurement Application Administrator (ORA_PO_PROCUREMENT_APPLICATION_ADMIN_JOB)
- Supply Chain Application Administrator (ORA_RCS_SUPPLY_CHAIN_APPLICATION_ADMINISTRATOR_JOB)
Users who are assigned configured job roles that contain this privilege are able to access the Deep Links work area:
- View Administration Link (FND_VIEW_ADMIN_LINK_PRIV)
If you're using deep links specifically for reports, here are the privileges you need:
- For Business Intelligence Publisher:
- BI Author Role (BIAuthor)
- BI Consumer Role (BIConsumer)
- BI Administrator (BIAdministrator)
- For Oracle Transactional Business Intelligence (OTBI):
- BI Author Role (BIAuthor)
- BI Consumer Role (BIConsumer)
Project-Driven Supply Chain is an end-to-end, integrated solution across the Oracle Supply Chain Management and Project Management Cloud applications. This solution is designed to support various business processes of manufacturing and asset-intensive companies.
You can use the Project-Driven Supply Chain solution to manage your supply chain processes in the context of projects without creating separate organizations for each project. You can also capture supply chain costs as project expenditures.
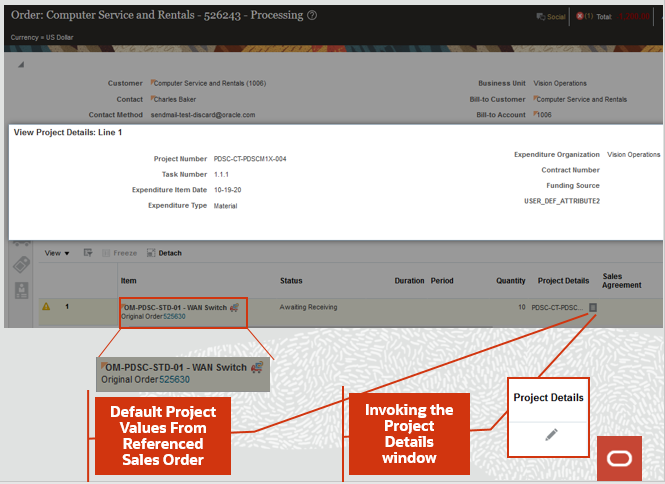
Accept Project-Specific Customer Returns
After shipping project-specific material to your customer, there’s always a chance that they might need to return some or all of those goods. If this happens, you need the return order to carry the specific project details, and the costs need to be credited appropriately to the project.
You can now create a return sales order with project and task details, receive the goods back into project-specific inventory, and receive a credit back to the project when appropriate.
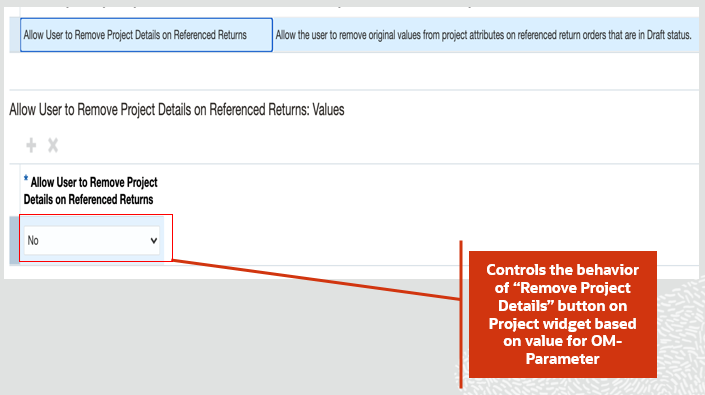
The return flow begins with the creation of a referenced or unreferenced return sales order in Oracle Order Management Cloud. A referenced return sales order copies the project and task details from the original sales order. In contrast, an unreferenced return sales order requires the order entry clerk to enter those details manually. When creating a referenced return sales order, you can remove the project and task details before submitting the order if the project is no longer valid or you want to return the goods to common inventory. To allow the removal of the project and task from a referenced return sales order, set the Allow User to Remove Project Details on Reference Returns parameter to Yes. After the return sales order is submitted and released to your warehouse for receiving, you can no longer update the project or task attributes at any point in the return.
Intercompany Referenced RMA
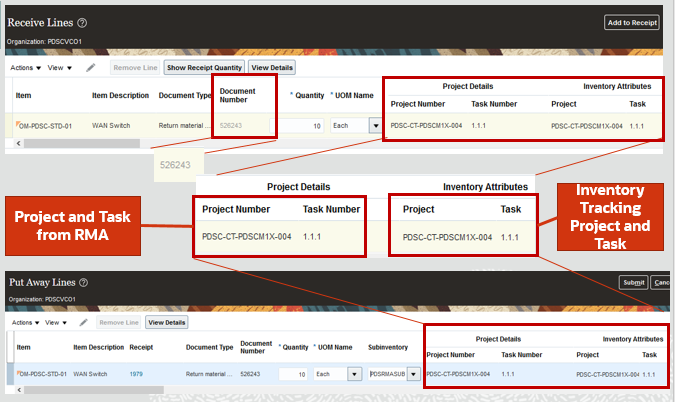
When receiving returned goods into inventory, the project and task details you entered on the sales order are displayed during receipt and put away if the organization is enabled for inventory tracking by project. Furthermore, the on-hand quantity carries the project and task segregation after put-away. Suppose your organization isn't enabled for inventory tracking by project. In this case, the project and task details aren't displayed during receipt or put away and the on-hand quantity is added to your common inventory. If no project or task details are provided on a return sales order, the on-hand quantity is added to common inventory regardless of whether or not the organization is enabled to track inventory by project.
Receive and Put Away RMA in a Project-Tracked Inventory Organization
For non-intercompany returns to project inventory, there’s no notification to the project because there’s no additional cost to the project. You need to set up your business process to issue a credit to the customer from Project Billing. For intercompany returns to project inventory, a negative expenditure is interfaced in the context of the selling profit center. A positive expenditure is interfaced to the project in the context of the receiving entity. This provides you with the ability to track the project expenditure in the appropriate expenditure organizations.
Note that the accounting line type of project clearing is used instead of deferred return material authorization (RMA) gain or loss for the return receipt. However, if your project type isn't enabled for cost collection, the deferred RMA gain or loss accounting line type is used.

Project Clearing Accounting Line Type is Used for Trades Sales Return
Watch a Demo
This feature enables you to return project-specific material directly to your organization and ensures the correct charges are credited back to your projects upon return of goods. The on-hand received from the customer is segregated by project and task after the put-away transaction, thereby maintaining the project valuation. The receipt of RMA into project inventory streamlines the project cost collection for intercompany RMA receipts.
Steps to Enable
Use the Opt In UI to enable this feature. For instructions, refer to the Optional Uptake of New Features section of this document.
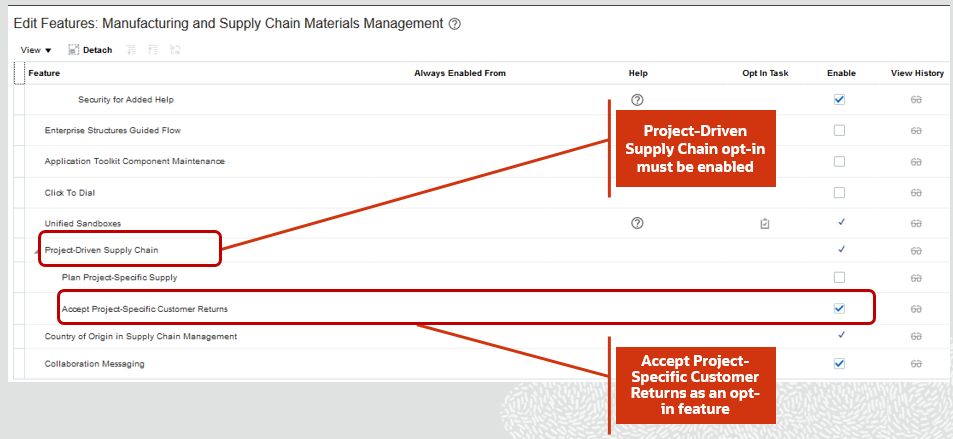
Offering: Manufacturing and Supply Chain Materials Management No Longer Optional From: Update 21C
You'll need to enable opt-in for the Accept Project-Specific Customer Returns feature to receive project-based return orders into project inventory. But first, in the Offerings work area, you'll need to enable the Project-Driven Supply Chain feature for the Manufacturing and Supply Chain Management offering.
Opt in controls how project attributes are defaulted from the original sales order for referenced returns. When opt-in isn't enabled, the original sales order's project attributes won't be defaulted on the referenced return order; however, you can enter the project details manually. The project-based return order is received in common inventory when opt-in isn't enabled.
Accept Project-Specific Customer Returns
The Allow User to Remove Project Details On Referenced Return parameter has been introduced to allow removal of project details before order submission. The parameter values are Yes or No. The default value of this parameter is No, which indicates that the project details that have defaulted from the original sales order can’t be removed.
Allow User to Remove Project Details On Referenced Return
Tips And Considerations
- The project attributes from the original sales order won't be defaulted on a referenced return order when opt-in isn't enabled, but you can enter the project details manually.
- The project-based return order is received in common inventory when opt-in isn't enabled.
- You can create a your own orchestration process with line selection criteria to skip sending lines to accounts receivable when the project indicator value is Y.
Key Resources
- Watch Accept Project-Specific Customer Returns Readiness Training
- Oracle Supply Chain Management Cloud: Using Inventory Management guide, available on the Oracle Help Center.
Role Information
You have a couple of options for giving people access to this feature, depending on whether you're assigning them predefined job roles or your own configured job roles.
Users who are assigned any of these predefined job roles are automatically able to access this feature:
- Order Entry Specialist (ORA_FOM_ORDER_ENTRY_SPECIALIST_JOB)
- Order Manager (ORA_DOO_ORDER_MANAGER_JOB)
- Warehouse Manager (ORA_INV_WAREHOUSE_MANAGER_JOB)
- Warehouse Operator (ORA_INV_WAREHOUSE_OPERATOR_JOB)
- Receiving Agent (ORA_RCV_RECEIVING_AGENT_JOB)
- Cost Accountant (ORA_CST_COST_ACCOUNTANT_JOB)
- Project Manager (ORA_PJF_PROJECT_MANAGER_JOB)
- Project Billing Specialist (ORA_PJF_PROJECT_BILLING_SPECIALIST
Users who are assigned configured job roles that contain these privileges are able to access this feature:
- Create Receiving Receipt by Web Service (RCV_CREATE_RECEIVING_RECEIPT_WEB_SERVICE_PRIV)
- Provide Receiving Transaction Details Web Service(RCV_PROVIDE_RECEIVING_TRANSACTION_DETAILS_WEB_SERVICE_PRIV)
Integrate Order Management Cloud with Oracle Fusion Payments
Starting in this update, you can use a digital verification code when you use a credit card to pay for a sales order. The Order Entry Specialist can select a credit card on the sales order in the Order Management work area from a list of cards that are available for the bill-to customer. Use a single credit card to pay for the entire sales order, or use a different credit card on each order line.
If you set the Payment Method attribute to Credit Card, then the Payment Details area displays the card you have specified as the primary card for the account in the Accounts Receivable work area. Note that you can use only one payment method for each sales order.
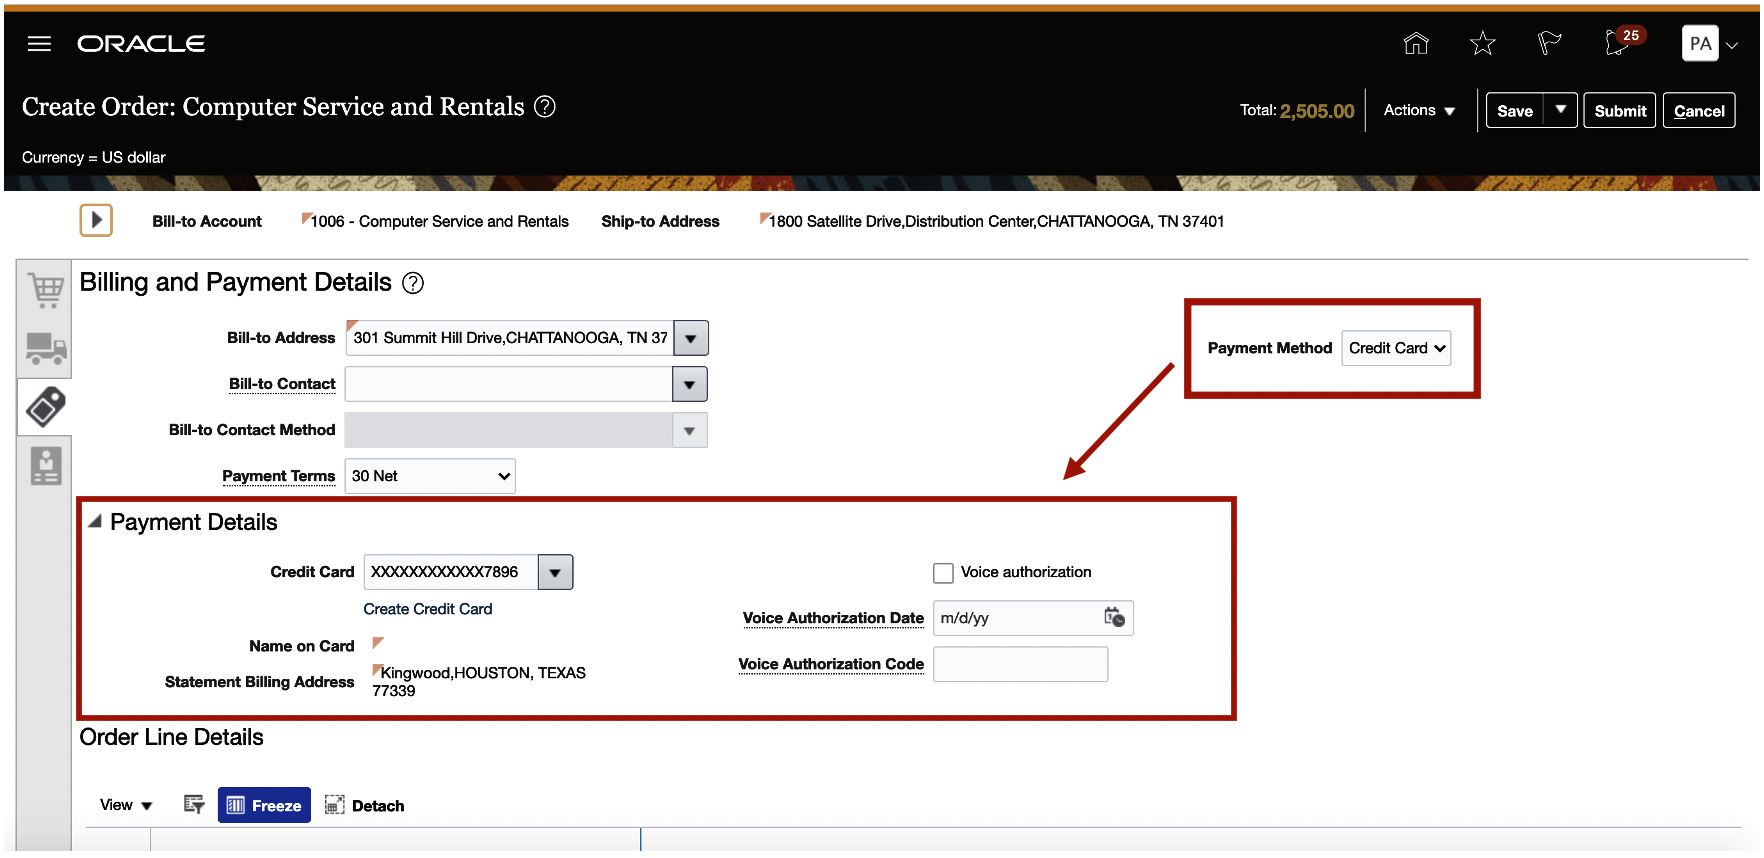
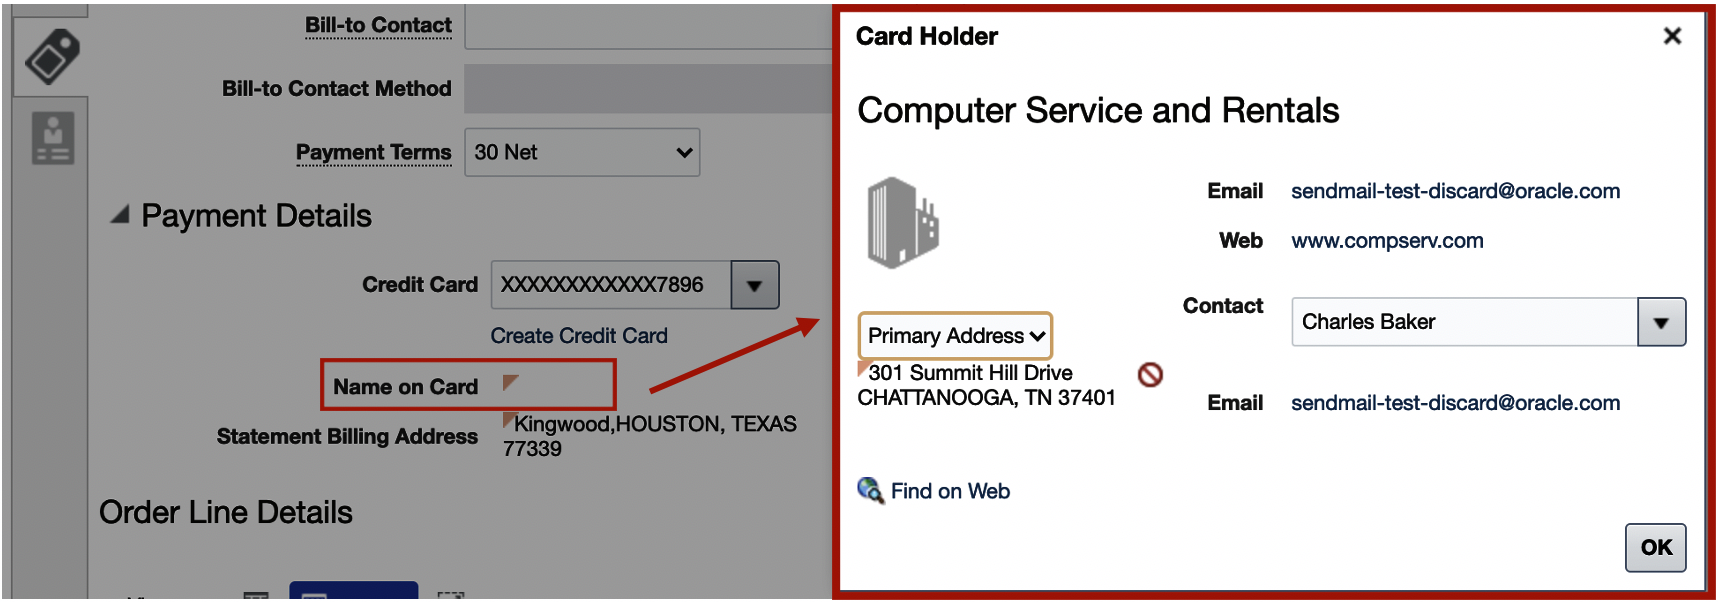
Click Name on Card to view card details.
To use a different card on the order line, click the down arrow on the order line, and then select Override Order Line. In the Override Order Line dialog, click Change Credit Card.
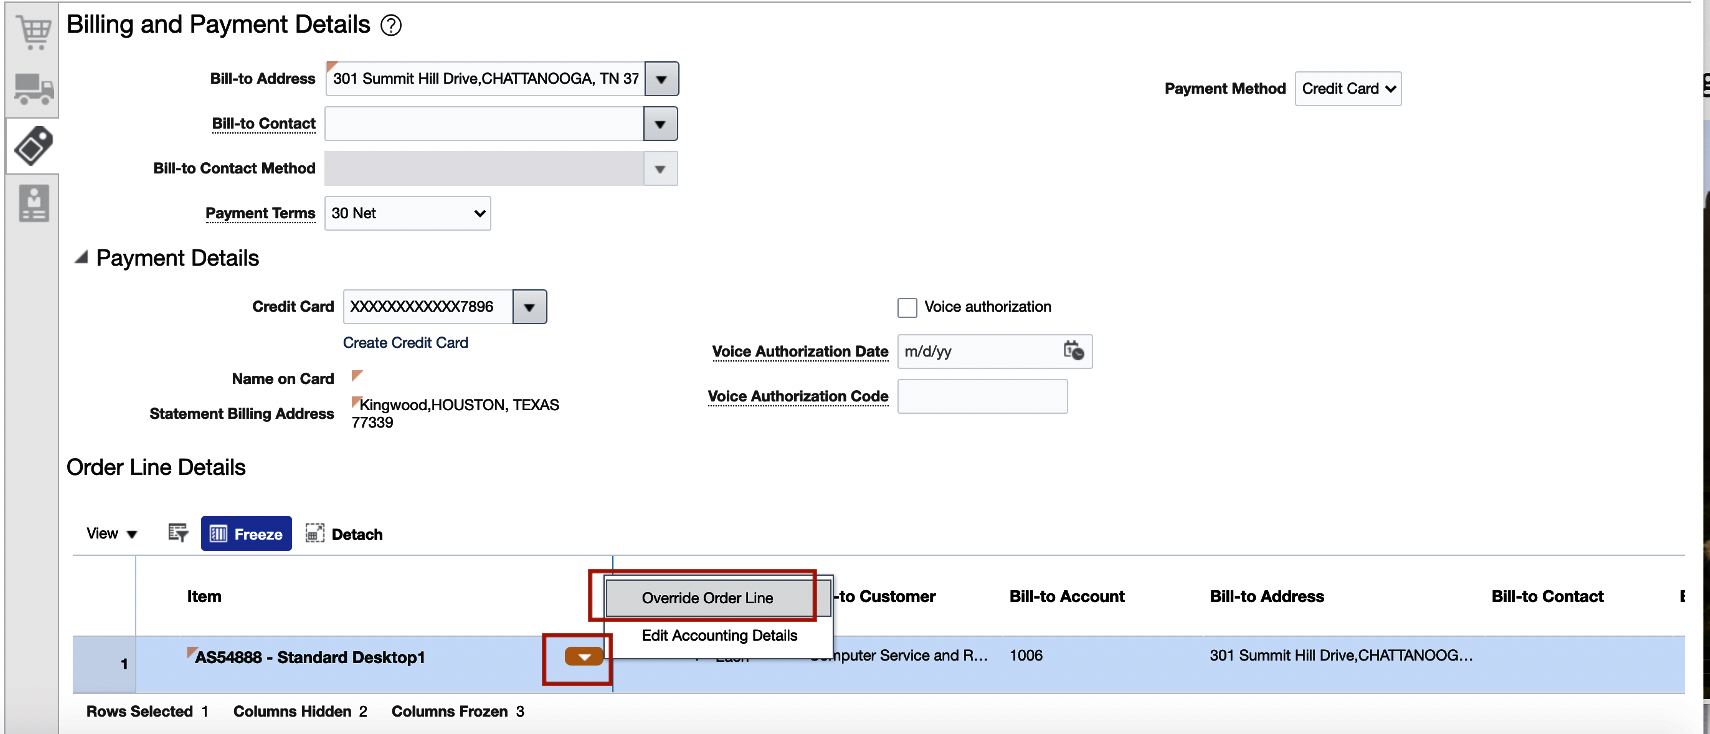
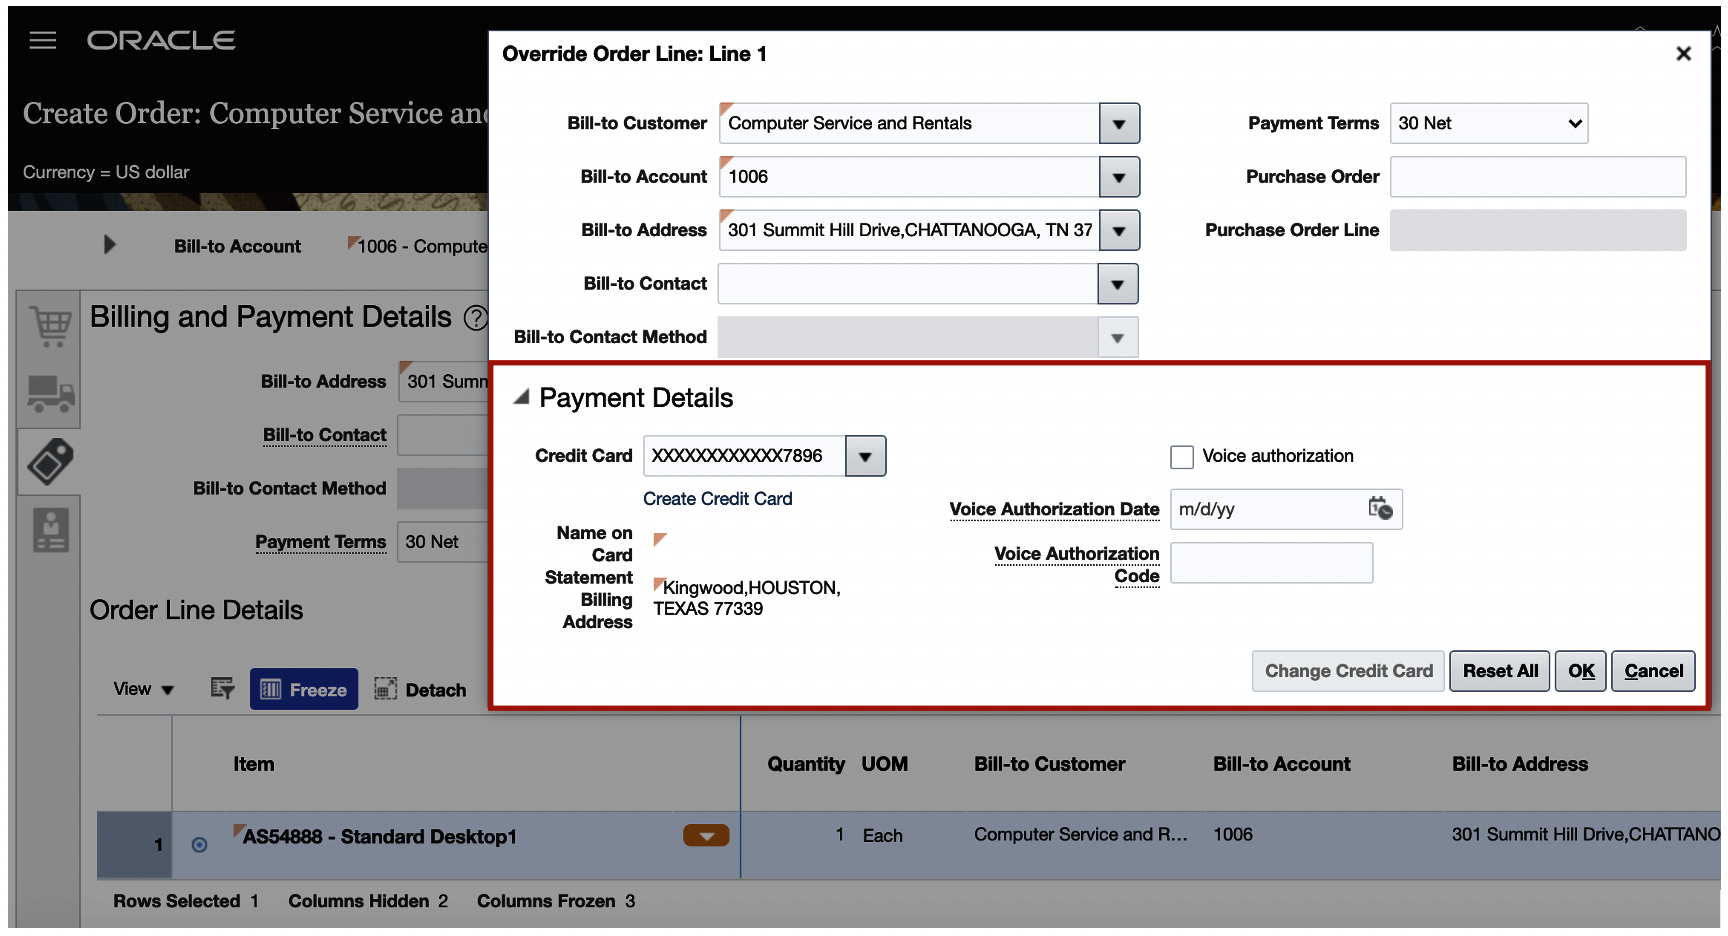
Use the Payment Details area in the dialog to edit details or select another card. Any changes you make apply only on the order line.

If you enable the Digital Verification Code option in Oracle Fusion Payments, then you can use the Security Code attribute on the order header and in the Payment Details area of the order line.
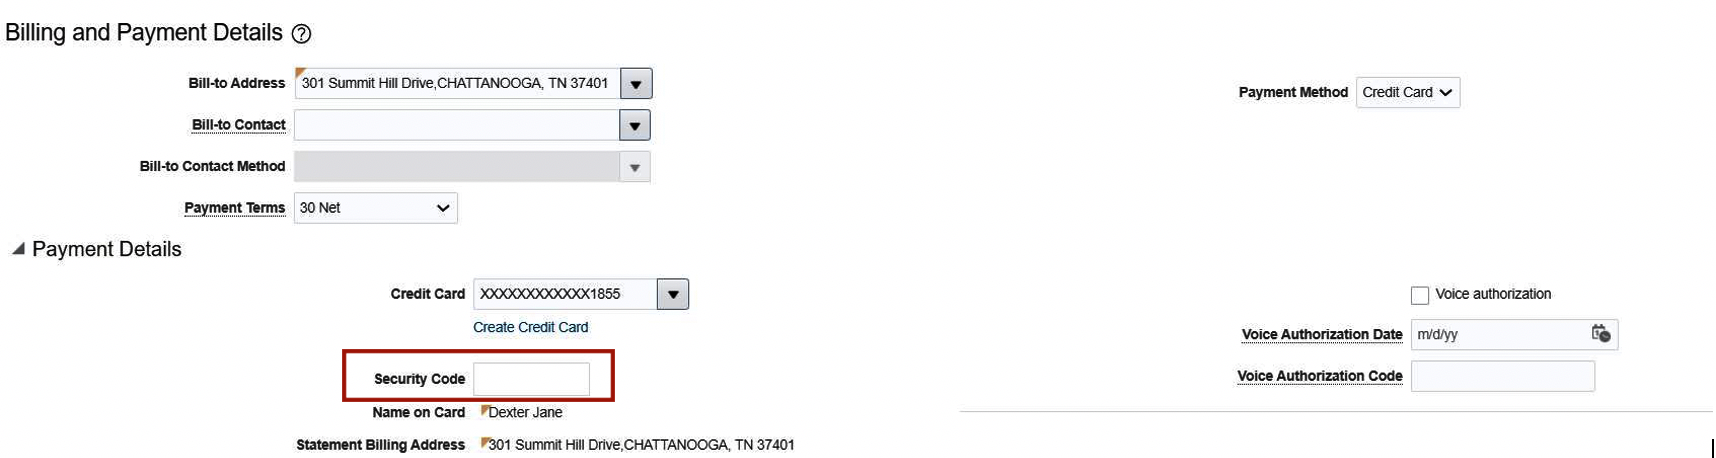
Security Code at Header

Security Code at Line
You can continue to import a sales order that's already authorized, or you can use the primary card that you specify on the customer account when you import.
You can use an order management extension to prevent the Order Entry Specialist from editing a sales order that's already authorized. For details, see the Prevent Users From Editing Payment Attributes subtopic in the More Code Examples for Order Management Extensions topic on the Oracle Help Center.
Use this feature to integrate Order Management Cloud with Oracle Fusion Payments and make sure your implementation complies with the Payment Card Industry Data Security Standard (PCI DSS).
Steps to Enable
To enable this feature you need to log a Service Request (SR).
Create a service request with Oracle Support so you can use this feature. Include these details when you create the request:
- Product: Oracle Fusion Payments Cloud Service
- Subject: Your Environment Name: Please Enable Credit Card Processing
You can use credit cards in Oracle Fusion Applications only with limited, controlled availability. Oracle Support will make sure your deployment meets the compliance requirements that the PCI Security Standards Council specifies, and will confirm that your server is located in an Oracle Data Center that meets the PCI standards. You can use credit cards only in data centers where the Oracle Fusion Payments Cloud module is certified for version 3.2.1 of the Payment Card Industry Data Security Standard (PCI DSS).
NOTE: You can use credit cards only with services that use the Oracle Fusion Payments Cloud module. The Payments module supports only some payment gateways to tokenize the card and process payment for the card. For details about certified data centers and gateways that you can use, see Is Credit Card Processing Supported In Oracle Fusion Applications? (Doc ID 1949941.1) on My Oracle Support.
Wait for Oracle Support to successfully resolve your service request, and then use the Manage Profile Options task in the Setup and Maintenance work area to create a profile option with these values:
| Attribute | Value |
|---|---|
| Profile Option Code |
FOM_ENABLE_CARD_PAYMENT |
| Profile Level |
Site |
| Profile Value |
Y |
Tips And Considerations
Warning:
-
You must never send credit card numbers that aren't tokenized or truncated (no more than the first six and last four digits show, with all other digits permanently removed) to Oracle Fusion Cloud Service.
-
You must never send the credit card data, including credit card tokens, outside the supported business flows via file, attachment, email, descriptive flex-field, or any other attribute or method.
- You must consult with your own Qualified Security Assessor (QSA) to make sure your deployment complies with the Payment Card Industry Data Security Standard (PCI DSS).
Key Resources
- Watch Miscellaneous Enhancements Readiness Training
- Oracle SCM Cloud: Implementing Order Management, available on the Oracle Help Center.
Role Information
- Order Entry Specialist
- Order Manager
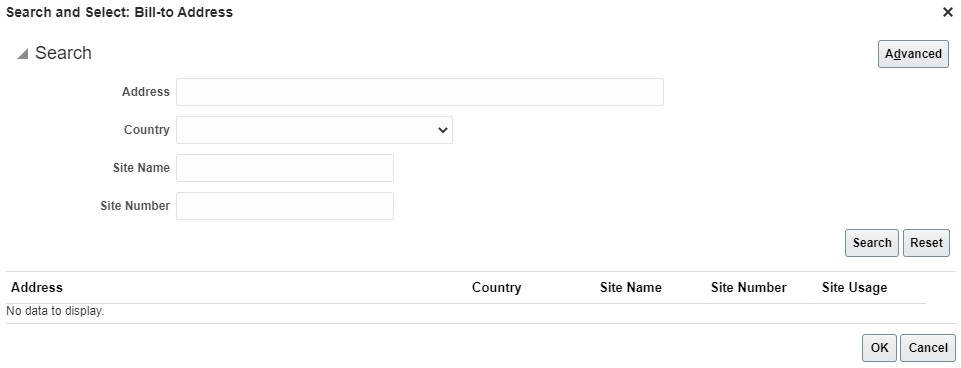
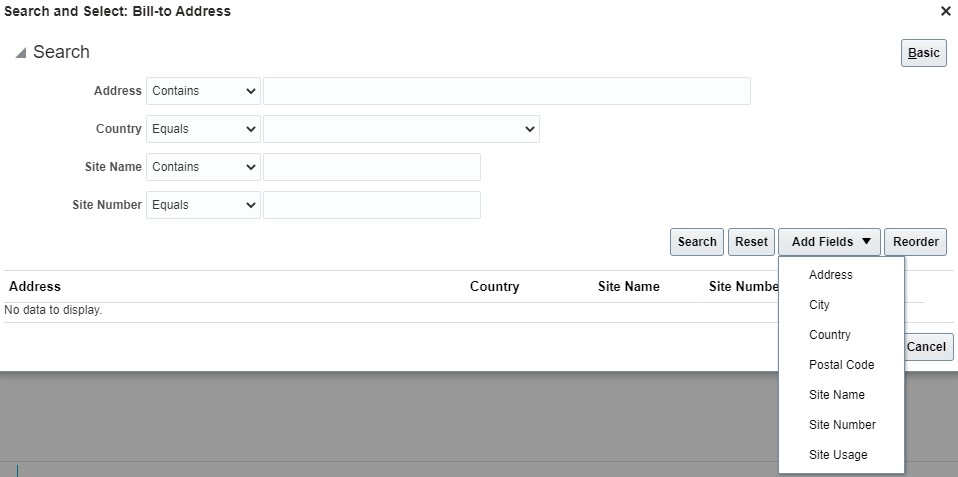
Search and Select Bill-to and Ship-to Attributes on Sales Orders
Search for the Bill-to Address attribute on the order header or the order line. Use basic search or advanced search. Use the Site Number attribute as another default search parameter for the Bill-to Address or Ship-to Address.
Use more attributes on the search dialog for Bill-to-Address in advanced search.
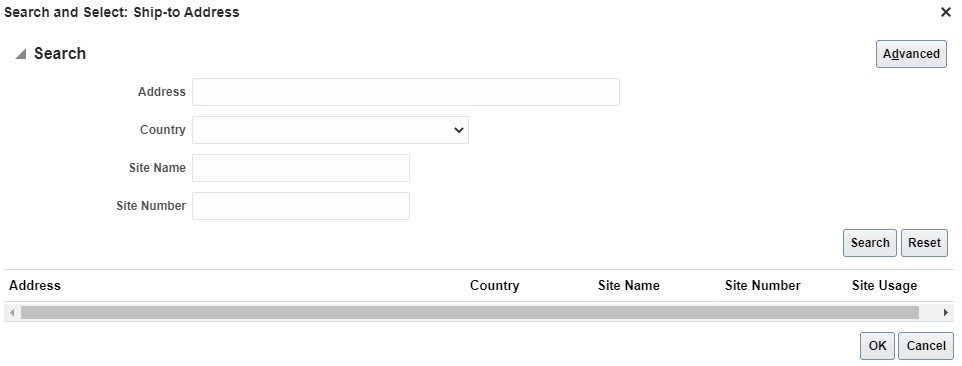
The search dialog for Ship-to Address is now consistent with the search dialog for Bill-to Address.
Use basic or and advanced search when you search on Bill-to Contact. You can also search on the new Responsibility Type attribute.
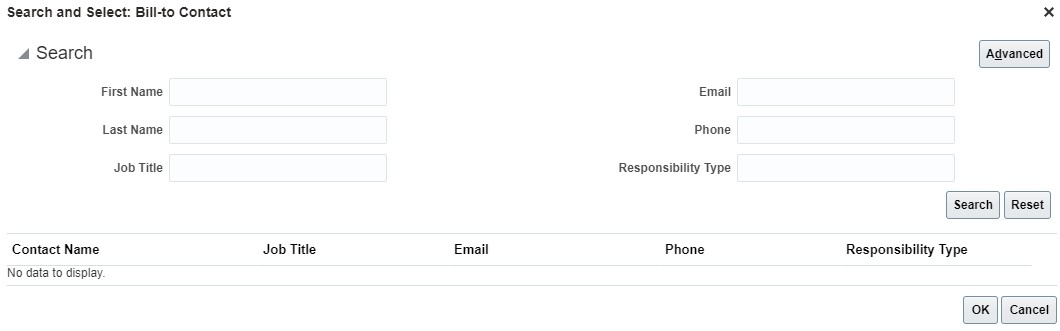
Searching for the Bill-to Contact or the Ship-to Contact on the order header and order line is now consistent with how you search for the Sold-to Contact on the order header.
Use a new search page to search on Bill-to Address is easier now because you have search parameters that are consistent with Ship-to Address.
Use new search parameters for Bill-to Contact lets you search in a way that's consistent with how you search for Sold-to Contact and Ship-to Contact.
Steps to Enable
You don't need to do anything to enable this feature.
Tips And Considerations
- Assign one or more responsibility types for each account contact or account site contact when you set up contacts in Oracle Receivables. Searching for contacts according to responsibility type simplifies filtering for search results.
Key Resources
- Watch Miscellaneous Enhancements Readiness Training
- Using Order Management
- Implementing Order Management
Role Information
To use this feature, the following roles are required:
- Order Manager
- Order Entry Specialist
Use Global Order Promising to Calculate Date Changes on Sales Orders
Oracle Order Management Cloud can use Oracle Global Order Promising Cloud to revise the scheduled ship date or scheduled arrival date, starting in update 19D.
Here's what you can do starting in update 21A.
- Revise dates for a drop shipment. If the buyer:
- Manages transportation, then Order Management revises the scheduled arrival date according to the scheduled ship date that it receives from Oracle Procurement Cloud.
- Doesn't manage transportation, then Order Management revises the scheduled ship date according to the scheduled arrival date that it receives from Oracle Procurement Cloud.
- Revise the scheduled arrival date in a back-to-back flow when the scheduled ship date changes.
With these enhancements, you can automatically revise the scheduled ship date or scheduled arrival date in your drop ship and back-to-back flows.
Steps to Enable
- In the Setup and Maintenance work area, go to the task.
- Offering: Order Management
- Functional Area: Orders
- Task: Manage Order Profiles
- Set the value of the ORA_DOO_RECOMPUTE_PROMISE_DATE profile so it meets your requirements. Your options are:
- Drop Shipment
- Back-to-Back
- Back-to-Back and Drop Shipment
- Neither Back-to-Back nor Drop Shipment
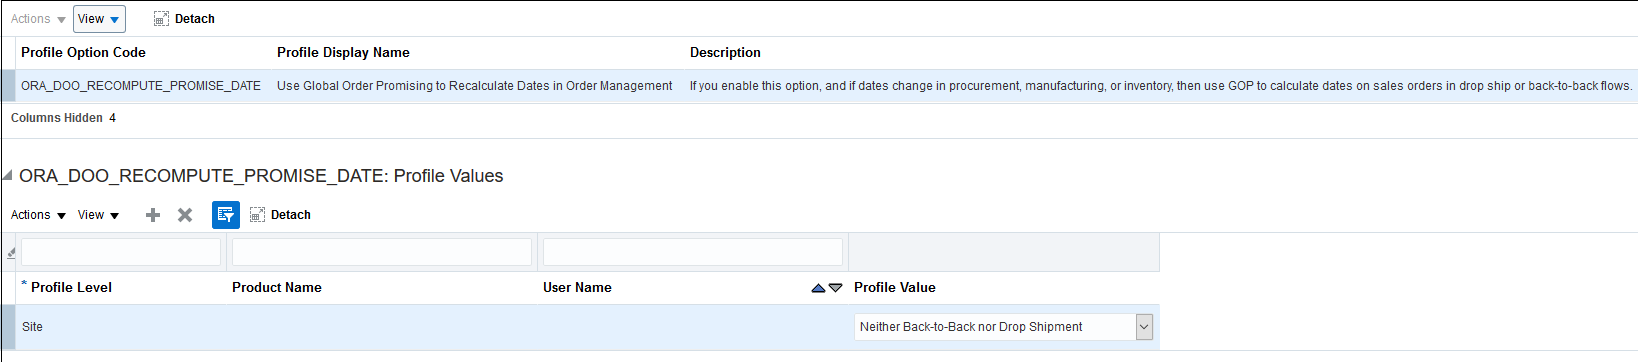
Profile Definition for ORA_DOO_RECOMPUTE_PROMISE_DATE
The default value is Neither Back-to-Back nor Drop Shipment.
Tips And Considerations
- Order Management doesn't send the revised scheduled ship date or scheduled arrival date to Procurement, so the dates on the sales order in Order Management won't match the dates on the purchase order in Procurement. This maintains the same behavior supported in prior updates.
- Order Management doesn't support date changes that occur in Procurement for a shipment set, configured item, kit, splitting the schedule, or reducing quantity. You must not make these changes in Procurement.
- You can use this feature only with orchestration processes that use Global Order Promising.
- Order Management recalculates dates for a sales order in a back-to-back buy flow only when the shipment for the order is delayed. It doesn't recalculate dates when the shipment arrives earlier than expected. For example.
- Delayed. if the promised delivery date on the purchase order is May 5th, 2021, and if the buyer changes it to May 15th 2021, then Order Management uses Global Order Promising to recalculate the Scheduled Ship Date.
- Arriving early. if the promised delivery date on the purchase order is May 5th, 2021, and if the buyer changes it to April 25th 2021, then Order Management doesn't recalculate the Scheduled Ship Date.
Key Resources
- Oracle Supply Chain Management Cloud: Implementing Order Management, available on the Oracle Help Center
Role Information
- Order Administrator
Filter Connectable Items for a Configurator Model
Define a subset of connectable items from the full set of items associated to the target item class on a connector to improve configurator runtime performance. Connectable items are items that are eligible for inclusion as part of a configuration, driven by rules, but are outside of the model's item structure as defined in the Product Information Management work area.
To improve configurator runtime performance by filtering the list of connectable items on a connector in a configurator model, when there are several thousand potential connectable items associated to the target item class on a connector.
Steps to Enable
You don't need to do anything to enable this feature.
Tips And Considerations
Implementing a connector filter is optional and is particularly effective when you have thousands of items associated to the target item class on your connector definition and have a requirement to add only a subset of these items to your final configuration.
Key Resources
- Oracle SCM Cloud Modeling Configurations for SCM guide, available on the Oracle Help Center.
Display the Item Number in the Configuration Running Summary
You can display the item number in the configuration running summary using a new template in the user interface for a configuration. This template is available from the Running Summary Template field in the overview tab of a user interface in the Configurator Models work area.
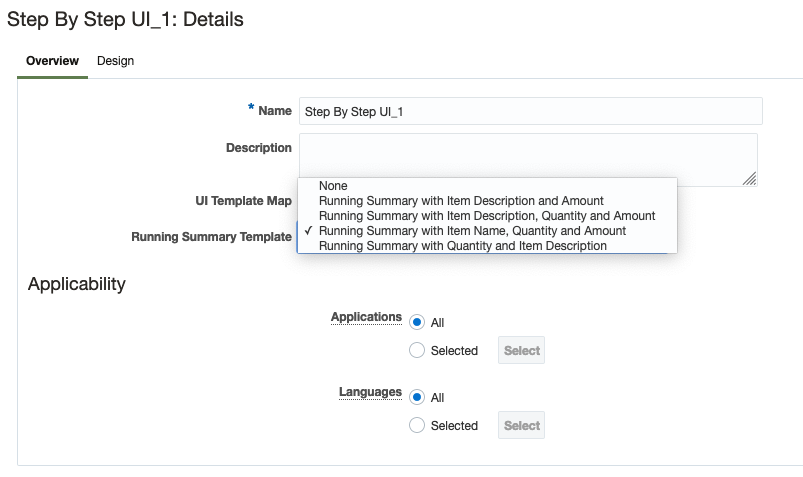
Running Summary Template in the user interface overview tab
Once this new template is selected, it will display the item number in the running summary during a configuration session.
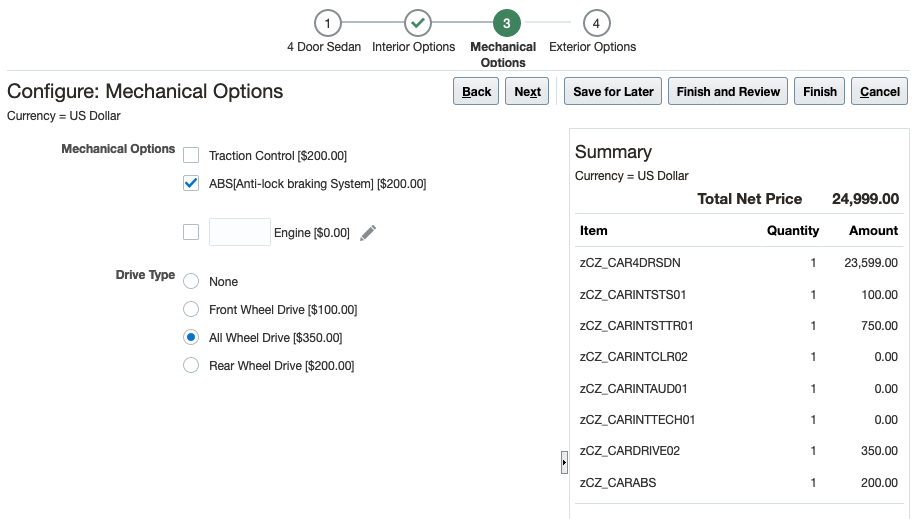
Running Summary with Item Number at runtime
Item number is a generally known entity for sales users while configuring a product with many components. With this new Running Summary template you have the ability to display the item number in the configuration user interface for quick access.
Steps to Enable
You don't need to do anything to enable this feature.
Key Resources
- Oracle SCM Cloud Modeling Configurations for SCM guide, available on the Oracle Help Center.
Role Information
Users who are assigned any of these predefined job roles are automatically able to access this feature:
- Product Configurator Manager (ORA_CZ_PRODUCT_CONFIGURATOR_MANAGER_JOB)
Users who are assigned configured job roles that contain these privileges are able to access this feature:
- Manage Configurator User Interfaces (ORA_CZ_MANAGE_USER_INTERFACES)
Creates and administers supplier trade programs, optimizing the execution and impact of programs and promotions across the demand chain.
Define Product Eligibility Rules Based on Item Attributes
Create channel program eligibility rules for a group of products. You can define item attributes on an item class to represent item details, and then reference these attributes in a channel program product eligibility rule that determines the products to which the program can be applied.
Simplify channel program eligibility rules as you have the ability to apply them for a group of products. For example, 5% accrual for Desktop computers, 7% accrual for Laptop computers.
Steps to Enable
Use the Opt In UI to enable this feature. For instructions, refer to the Optional Uptake of New Features section of this document.
Offering: Order Management
You must opt in to the functional area named: Channel Revenue Management. Then opt in to the feature named: Supplier Channel Management. Performing this opt in enables all of the Supplier Ship and Debit features described here.
If you previously opted in to the Channel Revenue Management functional area and the Supplier Channel Management feature, then this feature is automatically available to you.
Key Resources
- Watch Expanded Deductions and Settlement Readiness Training
- Oracle SCM Cloud: Using Oracle Channel Revenue Management Cloud, available on the Oracle Help Center
- Oracle SCM Cloud: Implementing Oracle Channel Revenue Management Cloud, available on the Oracle Help Center
- Oracle SCM Cloud: REST API for Oracle SCM Cloud, available on the Oracle Help Center
Role Information
You have a couple of options for giving people access to this feature, depending on whether you're assigning them predefined job roles or your own configured job roles.
Users who are assigned any of these predefined job roles are automatically able to access this feature:
- Supplier Channel Manager (ORA_CJM_SUPPLIER_CHANNEL_MANAGER_JOB)
Users who are assigned configured job roles that contain these privileges are able to access this feature:
- Manage Supplier Programs (CJM_MANAGE_SUPPLIER_PROGRAMS_PRIV)
Provides research, administration, analysis, and settlement functionalities to quickly resolve deductions and settle claims, improving customer relationships and overall financial performance.
Create Claims for Deductions and Overpayments Originating from an Invoice
Create claims to investigate deductions or overpayments when paying an invoice from a Receivables receipt. If a receipt short pays or overpays an invoice, you can choose to create a Channel Revenue claim to research and disposition the invoice dispute.
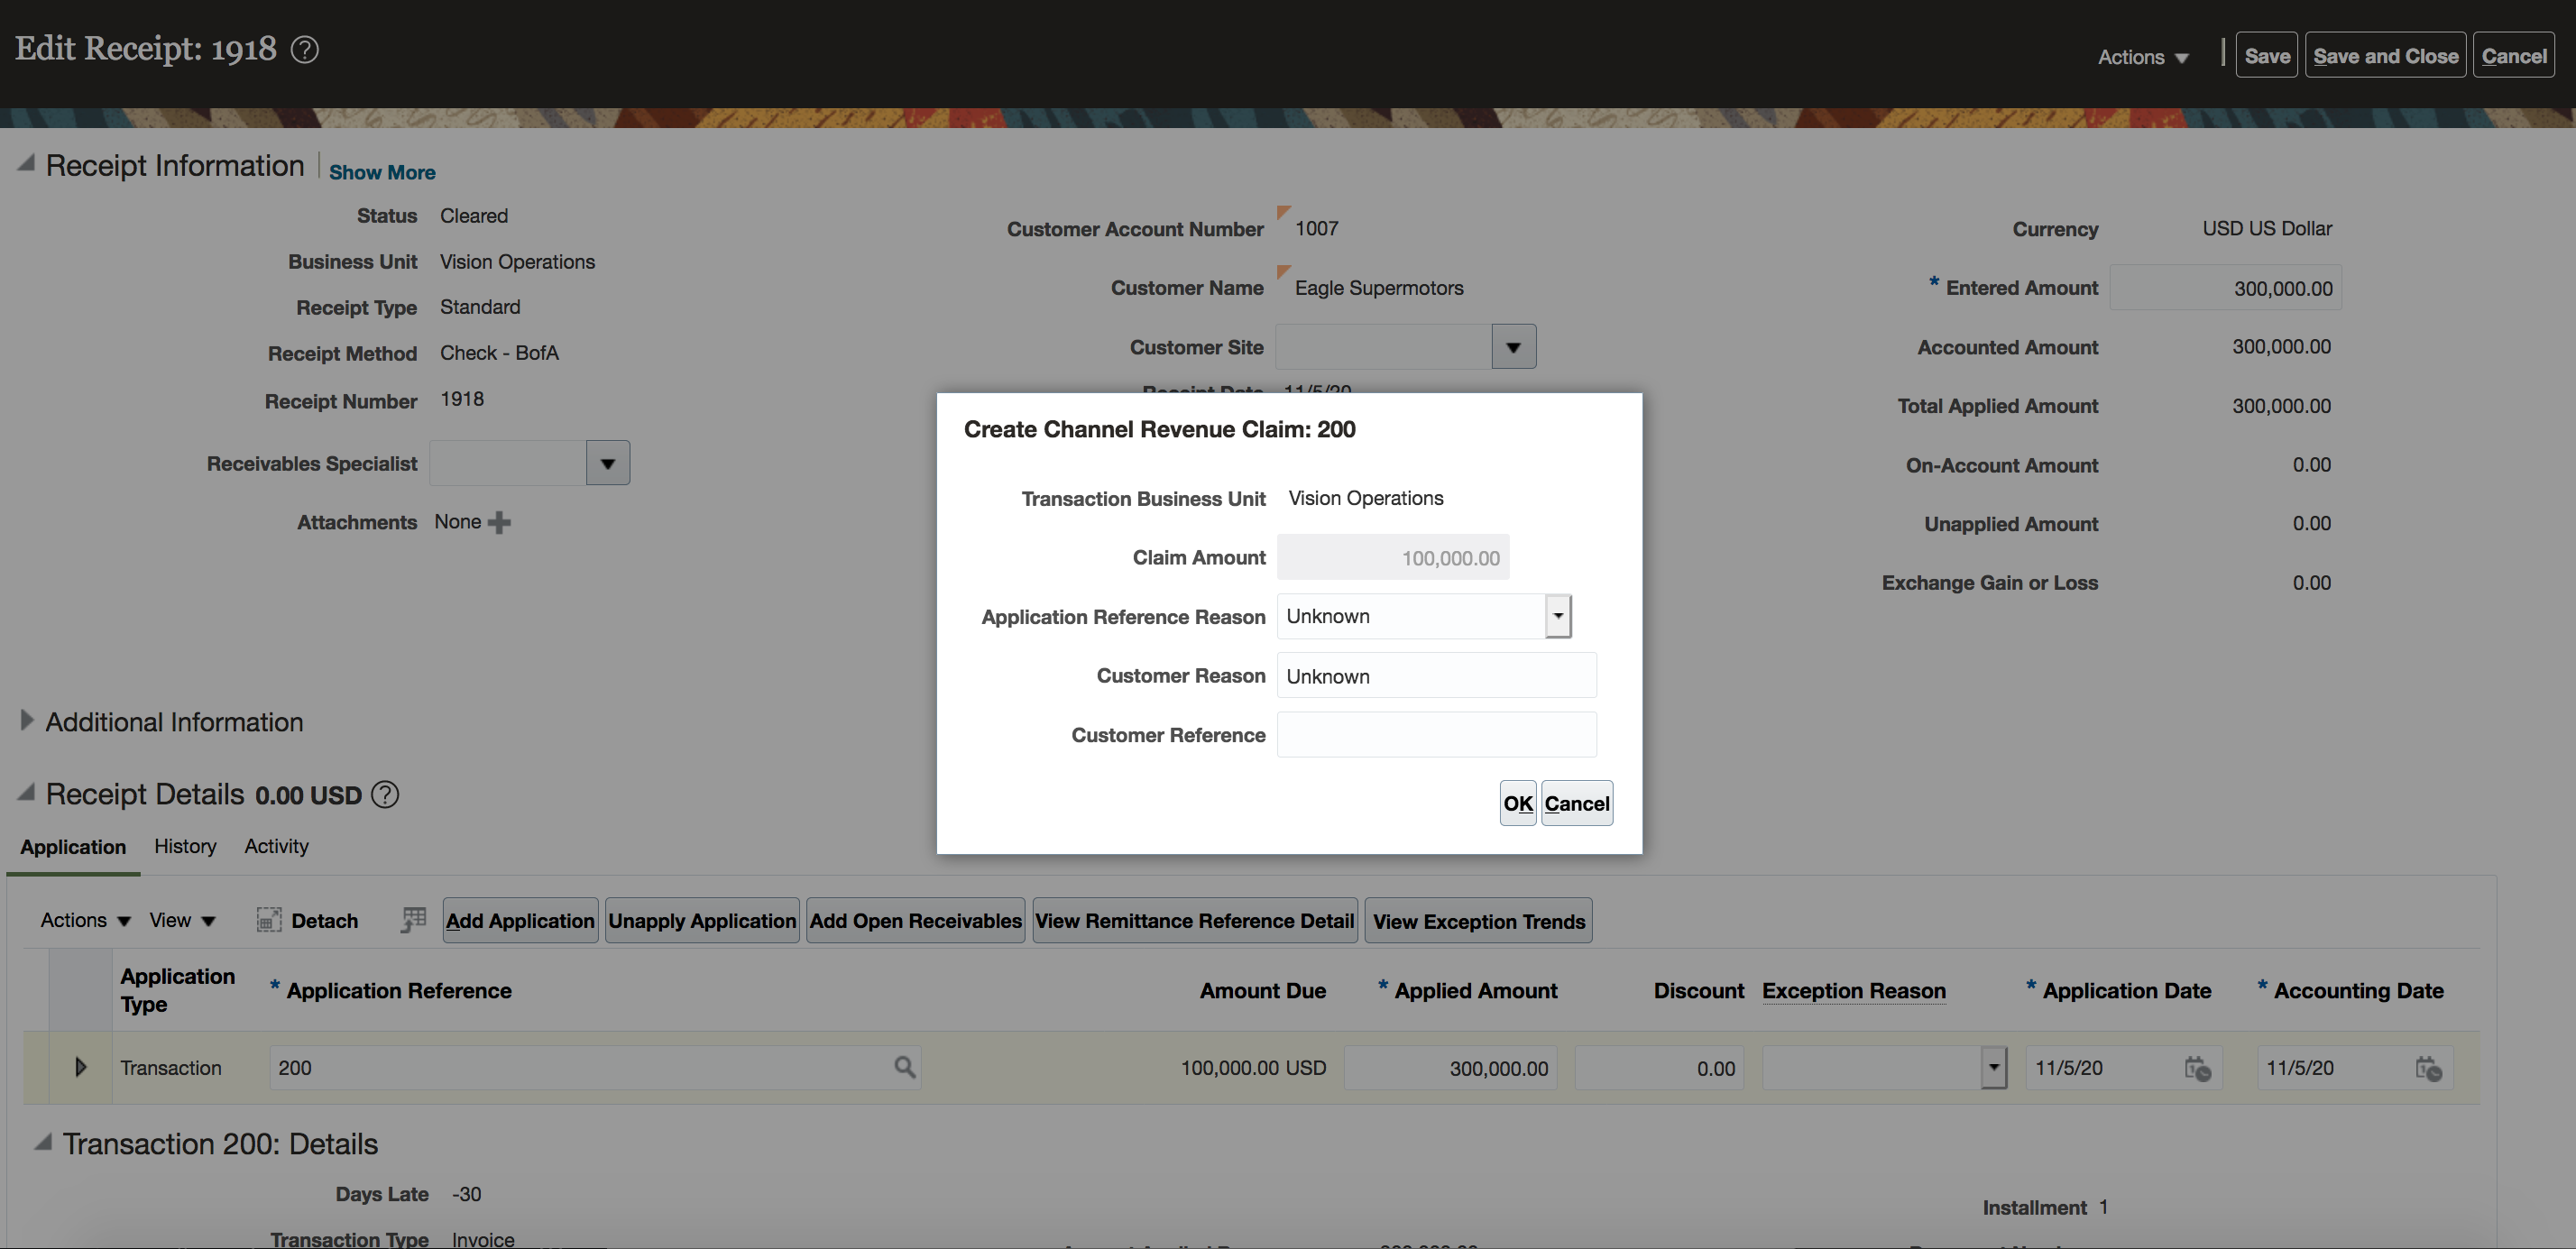
Create Channel Revenue Claim from Receivables
Once created, a claim is assigned a claim owner. A claim owner can be assigned at various levels, where the most specific level overrides a more generic level. Claims can be automatically assigned owners at the business unit, customer, account, or bill-to site levels. You can also manually assign claim owners.
When created and assigned, the channel revenue claim activity is applied to the invoice in the receipt, for tracking. This allows you to centralize the management of deductions and overpayment claims, providing transparent accountability and ownership across the deductions flow.
Steps to Enable
Use the Opt In UI to enable this feature. For instructions, refer to the Optional Uptake of New Features section of this document.
Offering: Order Management
- You must opt in to the functional area named: Channel Revenue Management. Then opt in to the feature named: Deductions and Settlement. Opting into this functional area enables all of the Deductions and Settlement features described here.
- Under the offering named: Financials and functional area named: Receivables, go to a task named: Manage Receivables System Options. Search for and select your business unit. Click the Cash Processing tab. Select the Enable channel revenue management integration check box, and click Save.
- If you previously opted into the
- Channel Revenue Management functional area and the Deductions and Settlement feature, then this feature is automatically available to you.
Additional Steps:
- Manage User Statuses (for Claim)
- Manage Claim Types
- Manage Claim Reasons
- Manage Claim Sources (for Invoice Deduction and Invoice Overpayment)
- Assign default claim type and default claim reason
- Configure default settlement method
- Manage Channel Settings
- Claim Owner at business unit level (optional)
- Manage Customer Trade Profiles
- Claim Owner
Tips And Considerations
Over crediting in AR is allowed only if the source invoice allows over crediting. This is based on the Allow overapplication option enabled in the setup of the Invoice Transaction type.
Key Resources
- Watch Expanded Deductions and Settlement Readiness Training
- For more information on Channel Revenue Management, refer to the Oracle Cloud Readiness content for Order Management
- For more information on the Channel Revenue Management Integration with Receivables, refer to the Oracle Cloud Readiness content for Financials
- Oracle SCM Cloud: Using Oracle Channel Revenue Management Cloud, available on the Oracle Help Center
- Oracle SCM Cloud: Implementing Oracle Channel Revenue Management Cloud, available on the Oracle Help Center
- Oracle SCM Cloud: REST API for Oracle SCM Cloud, available on the Oracle Help Center
Role Information
You have a couple of options for giving people access to this feature, depending on whether you're assigning them predefined job roles or your own configured job roles.
Users who are assigned any of these predefined job roles are automatically able to access this feature:
- Accounts Receivables Manager (ORA_AR_ACCOUNTS_RECEIVABLE_MANAGER_JOB)
Users who are assigned configured job roles that contain these privileges are able to access this feature:
- Manage Receivables Receipt (AR_MANAGE_RECEIVABLES_RECEIPT_PRIV)
Settle Claims for Deductions and Overpayments Originating from an Invoice
Research, resolve, and settle claims for deductions originating from an invoice using a credit memo on invoice, credit memos on account, open credit memos, open overpayments, or a write-off. You can research, resolve and settle claims for overpayments that originate from an invoice with an invoice or by applying open deductions.
You can resolve an invoice deduction with:
- A credit memo on account
- A credit memo on invoice
- Applying open credit memos
- Applying open overpayments
- Applying a write-off if under the threshold set
- And any remaining amount will be split to a child claim for further investigation.
You can resolve an invoice overpayment with:
- An invoice
- Applying open deductions
- And any remaining amount will be split to a child claim for further investigation.
The header region and General tab of the claim contains details brought over from Receivables. You are provided with the date of the claim, the bill-to and ship-to, receipt, and invoice details. During investigation, you can attach supporting documentation. You can configure your own claim types and claim reasons that you will assign when you resolve a claim. This is critical to having insight into why you have deductions and for root cause analysis.
Upon resolution, a summary is provided in the General tab before going to the Confirmation tab to see how it was settled.
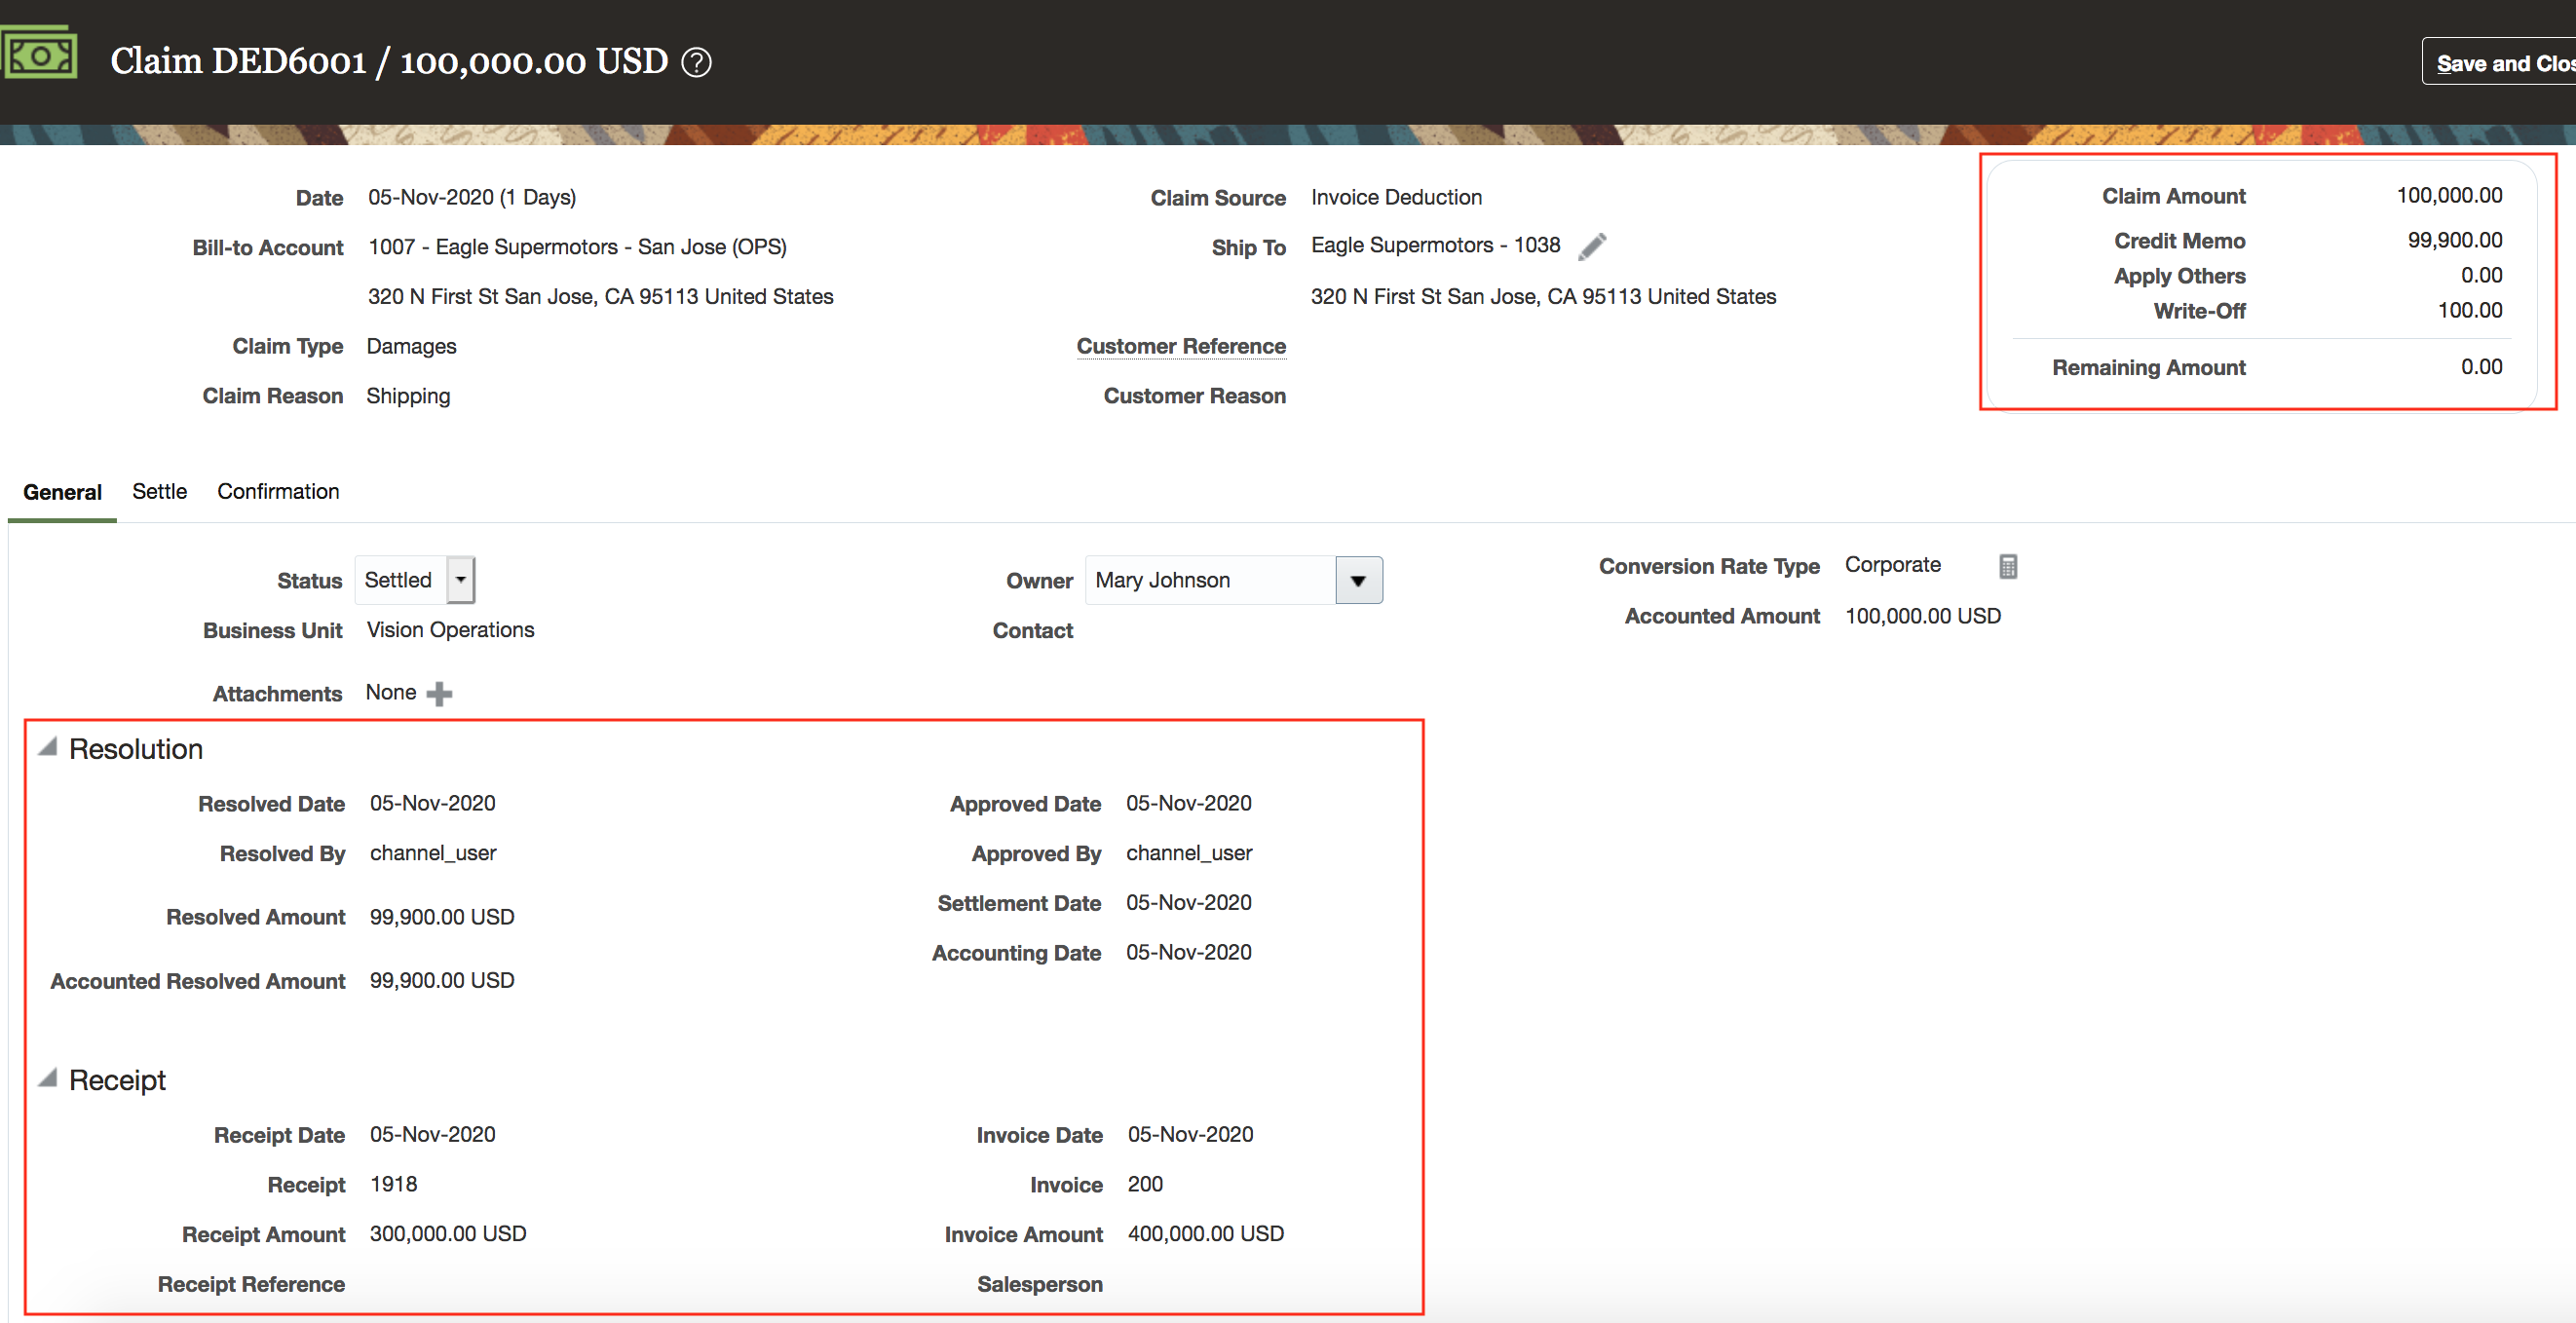
General Tab of an Invoice Deduction Claim
After investigation when you are ready to resolve the invoice deduction, go to the Settle tab. An invoice deduction can be settled by a creating credit memo - on invoice, or by applying existing credit memos or overpayments. An invoice overpayments can be settled by creating an invoice or by applying existing deductions.
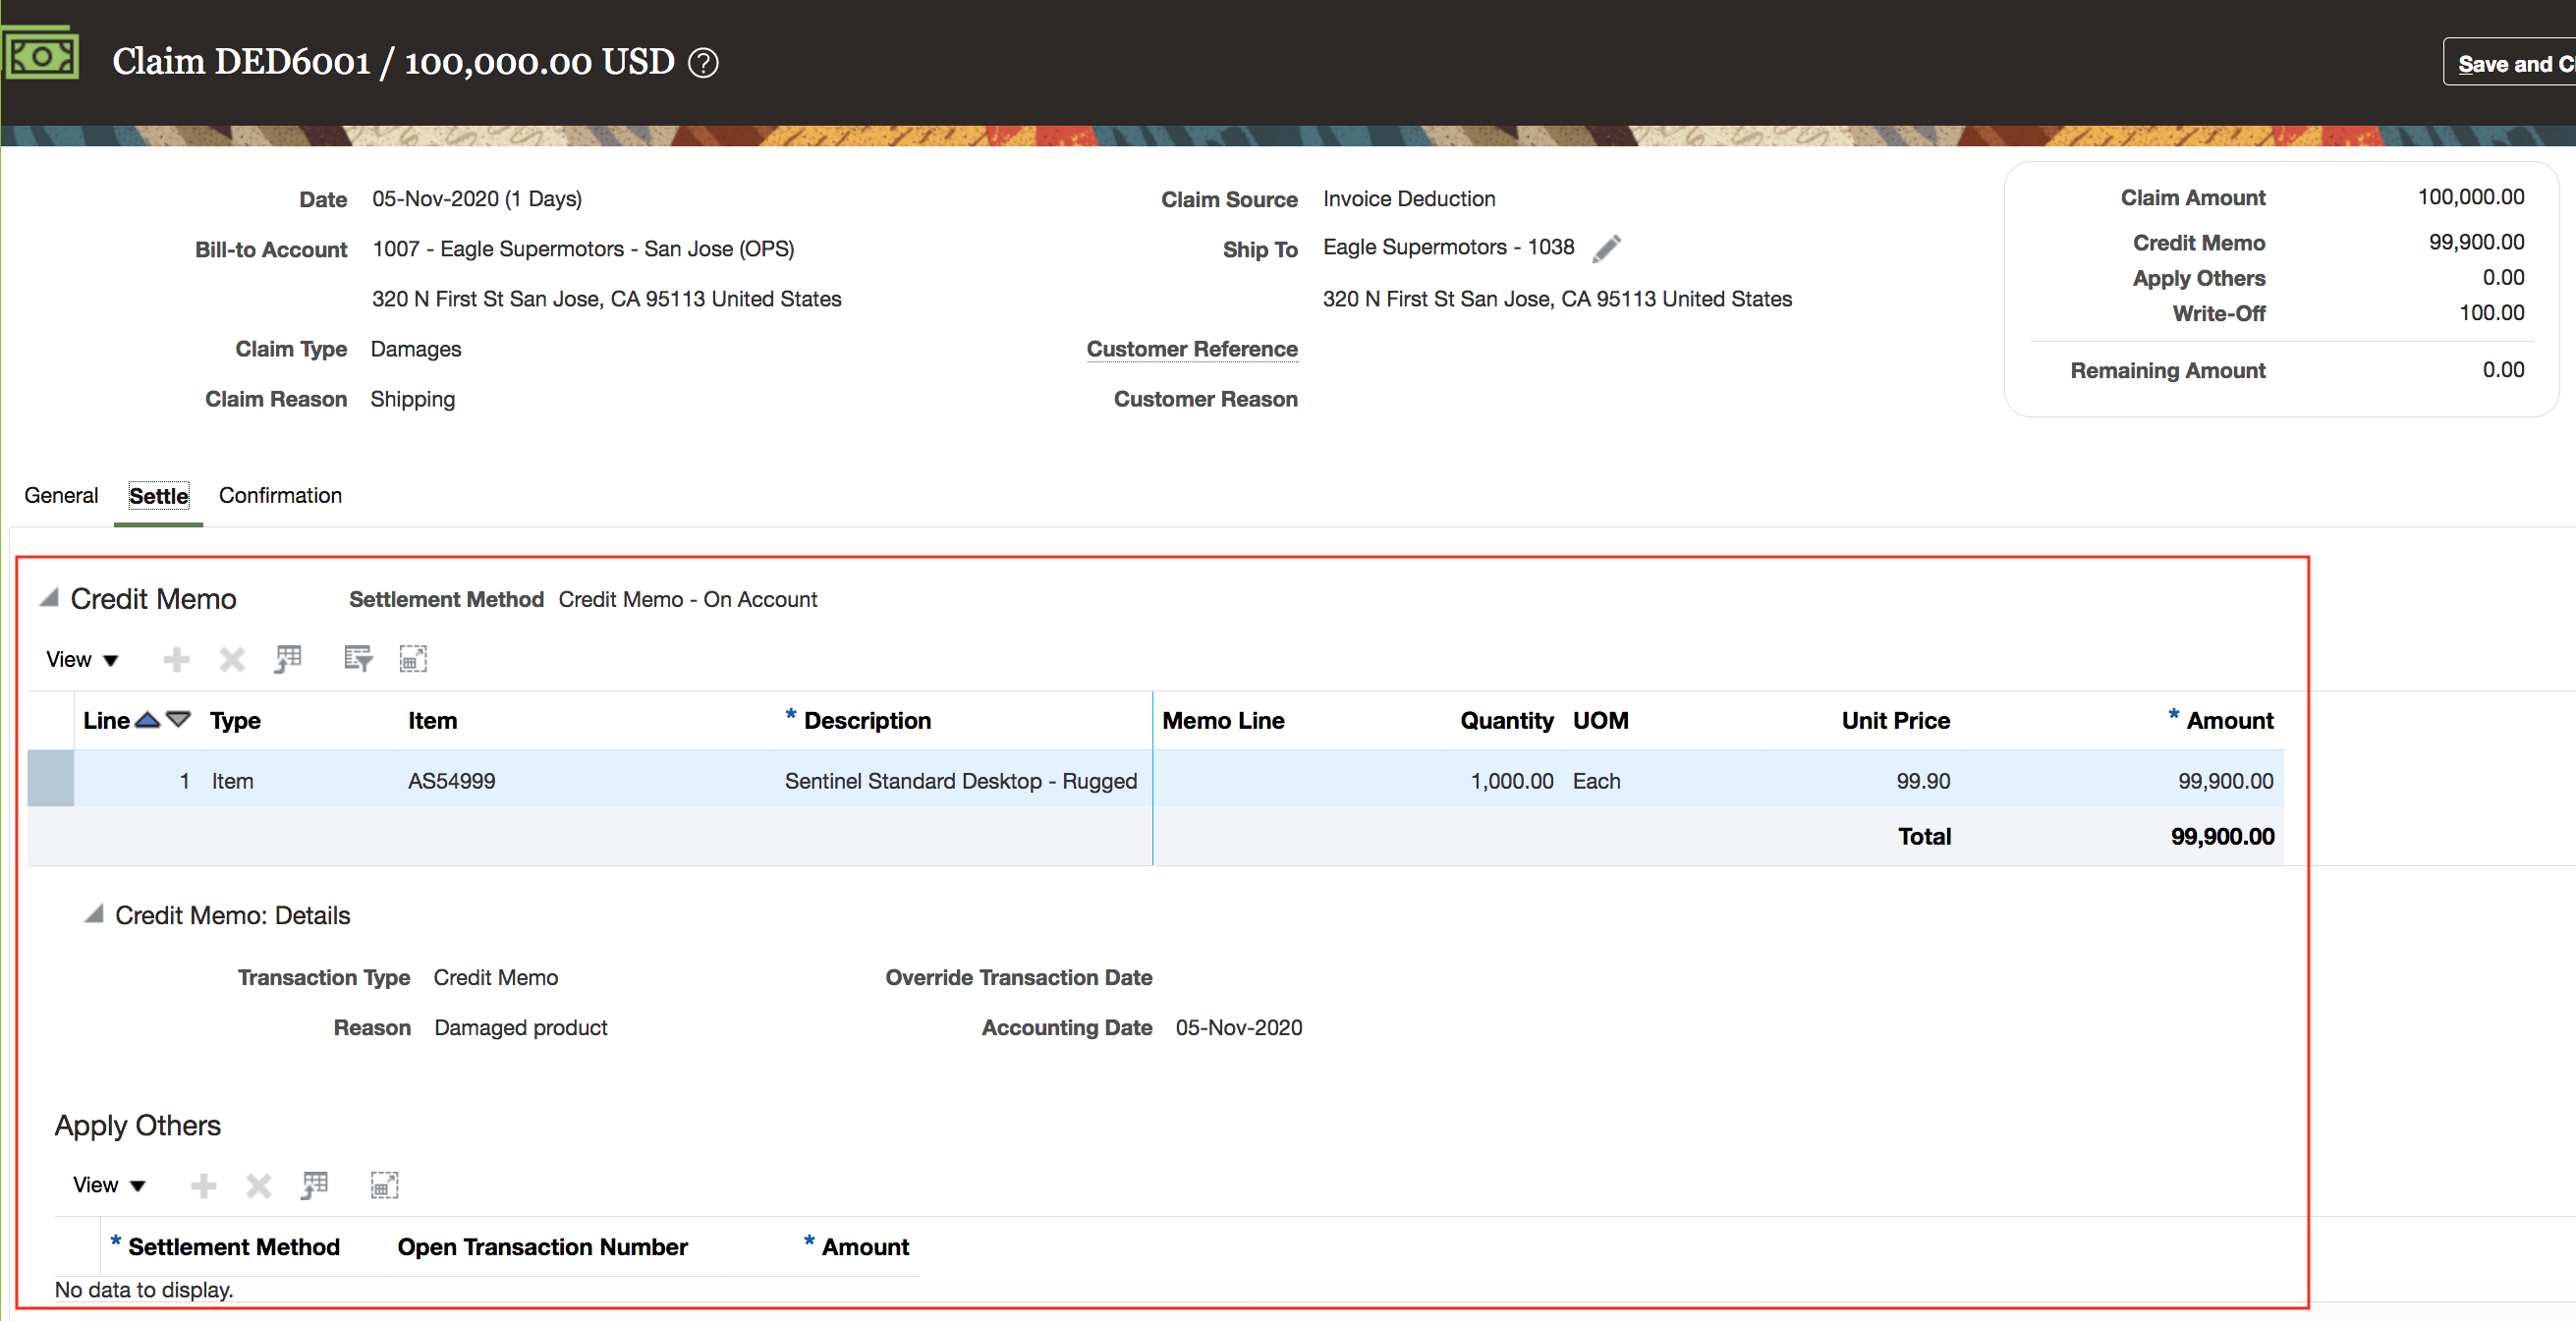
Settle Tab of an Invoice Deduction Claim
After the claims analyst resolves the claim, you can approve the claim internally, and submit it for settlement. The Settle Customer Claims process settles the claim.
Credit memos on invoice, credit memos on account, and invoices are created as new Receivables transactions and applied to the receipt. While creating a credit memo or invoice, Receivables will make a tax call to compute taxes (if applicable) on top of the amounts passed from Deductions and Settlement. Invoice deduction claims are eligible for write-offs if the remaining amount after taxes is below the write-off threshold. Write-off threshold can be set at the business unit, customer, account, or site level .
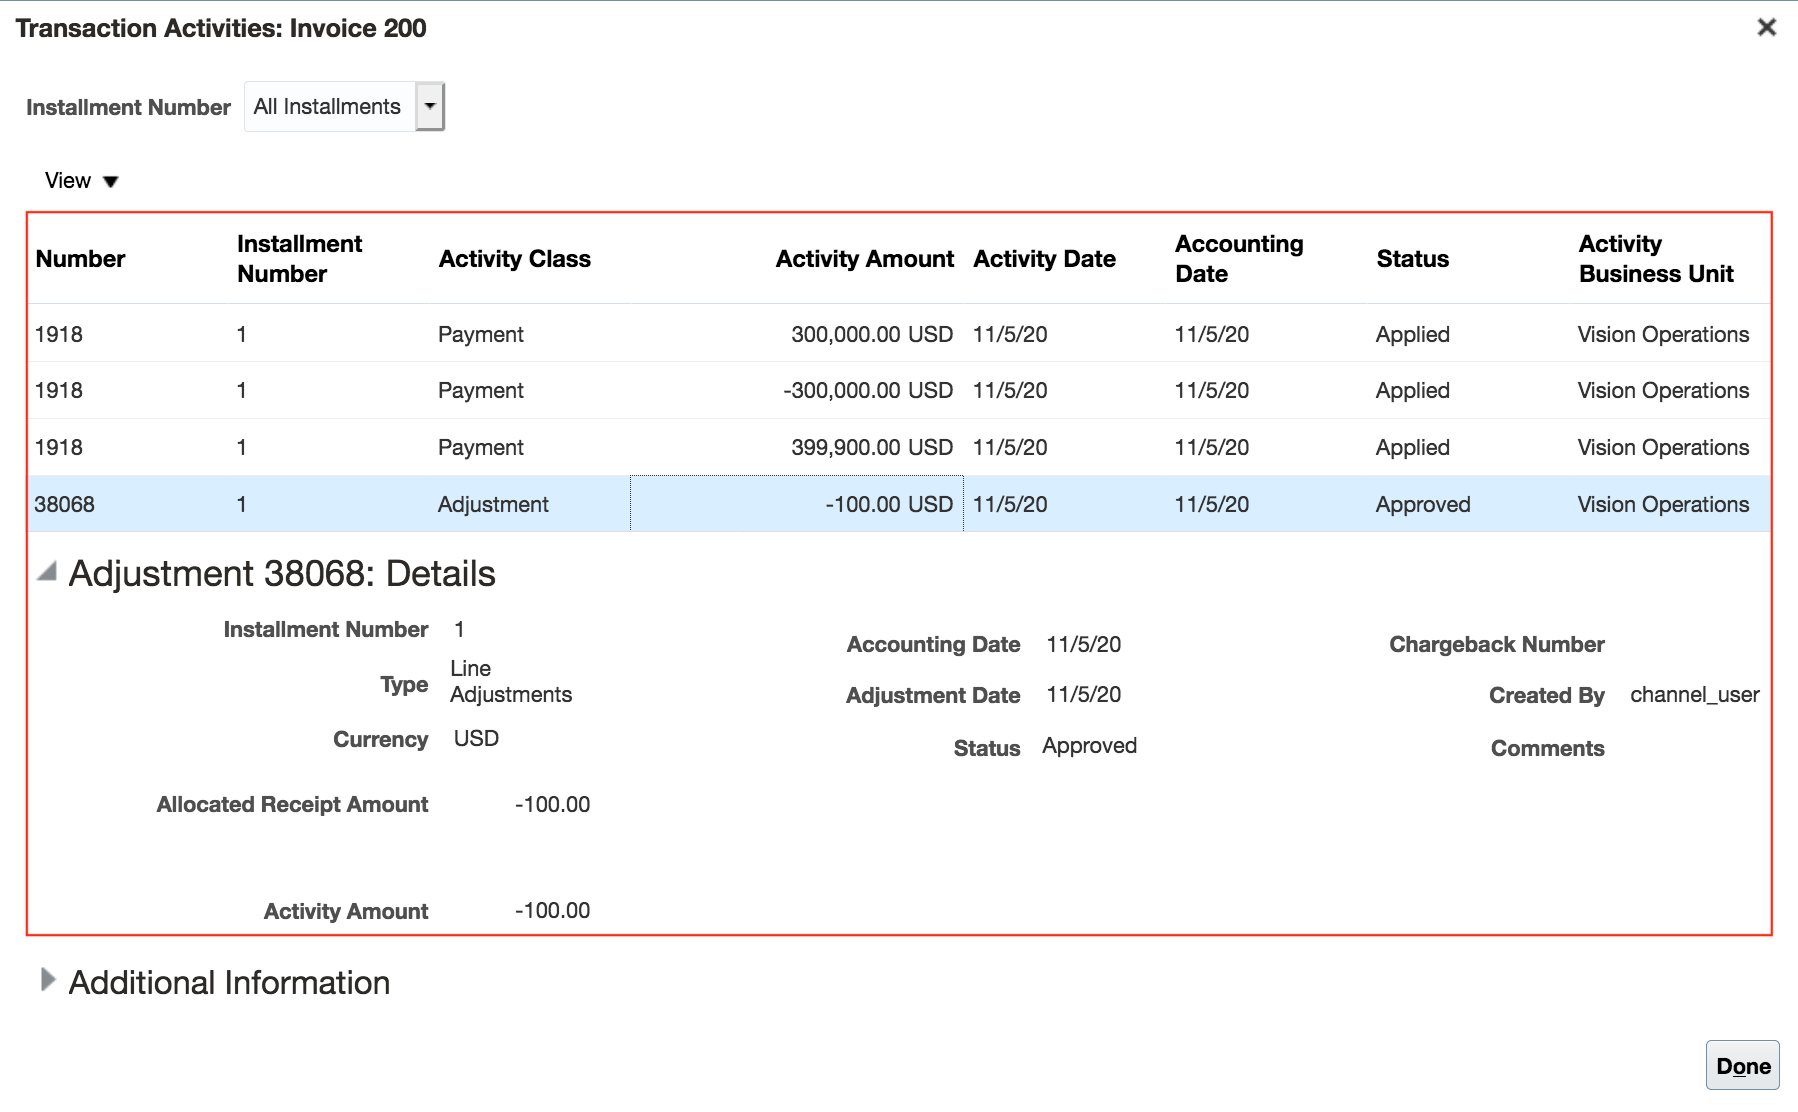
In a settled claim, the left side of the Confirmation tab shows the settlement methods used; and the right side shows the confirmation of these activities in Receivables. Settlement artifacts on the right side include any taxes or write-offs if applicable. Additionally, it will apply open transactions to the receipt, releasing them from their Netting In Progress status.
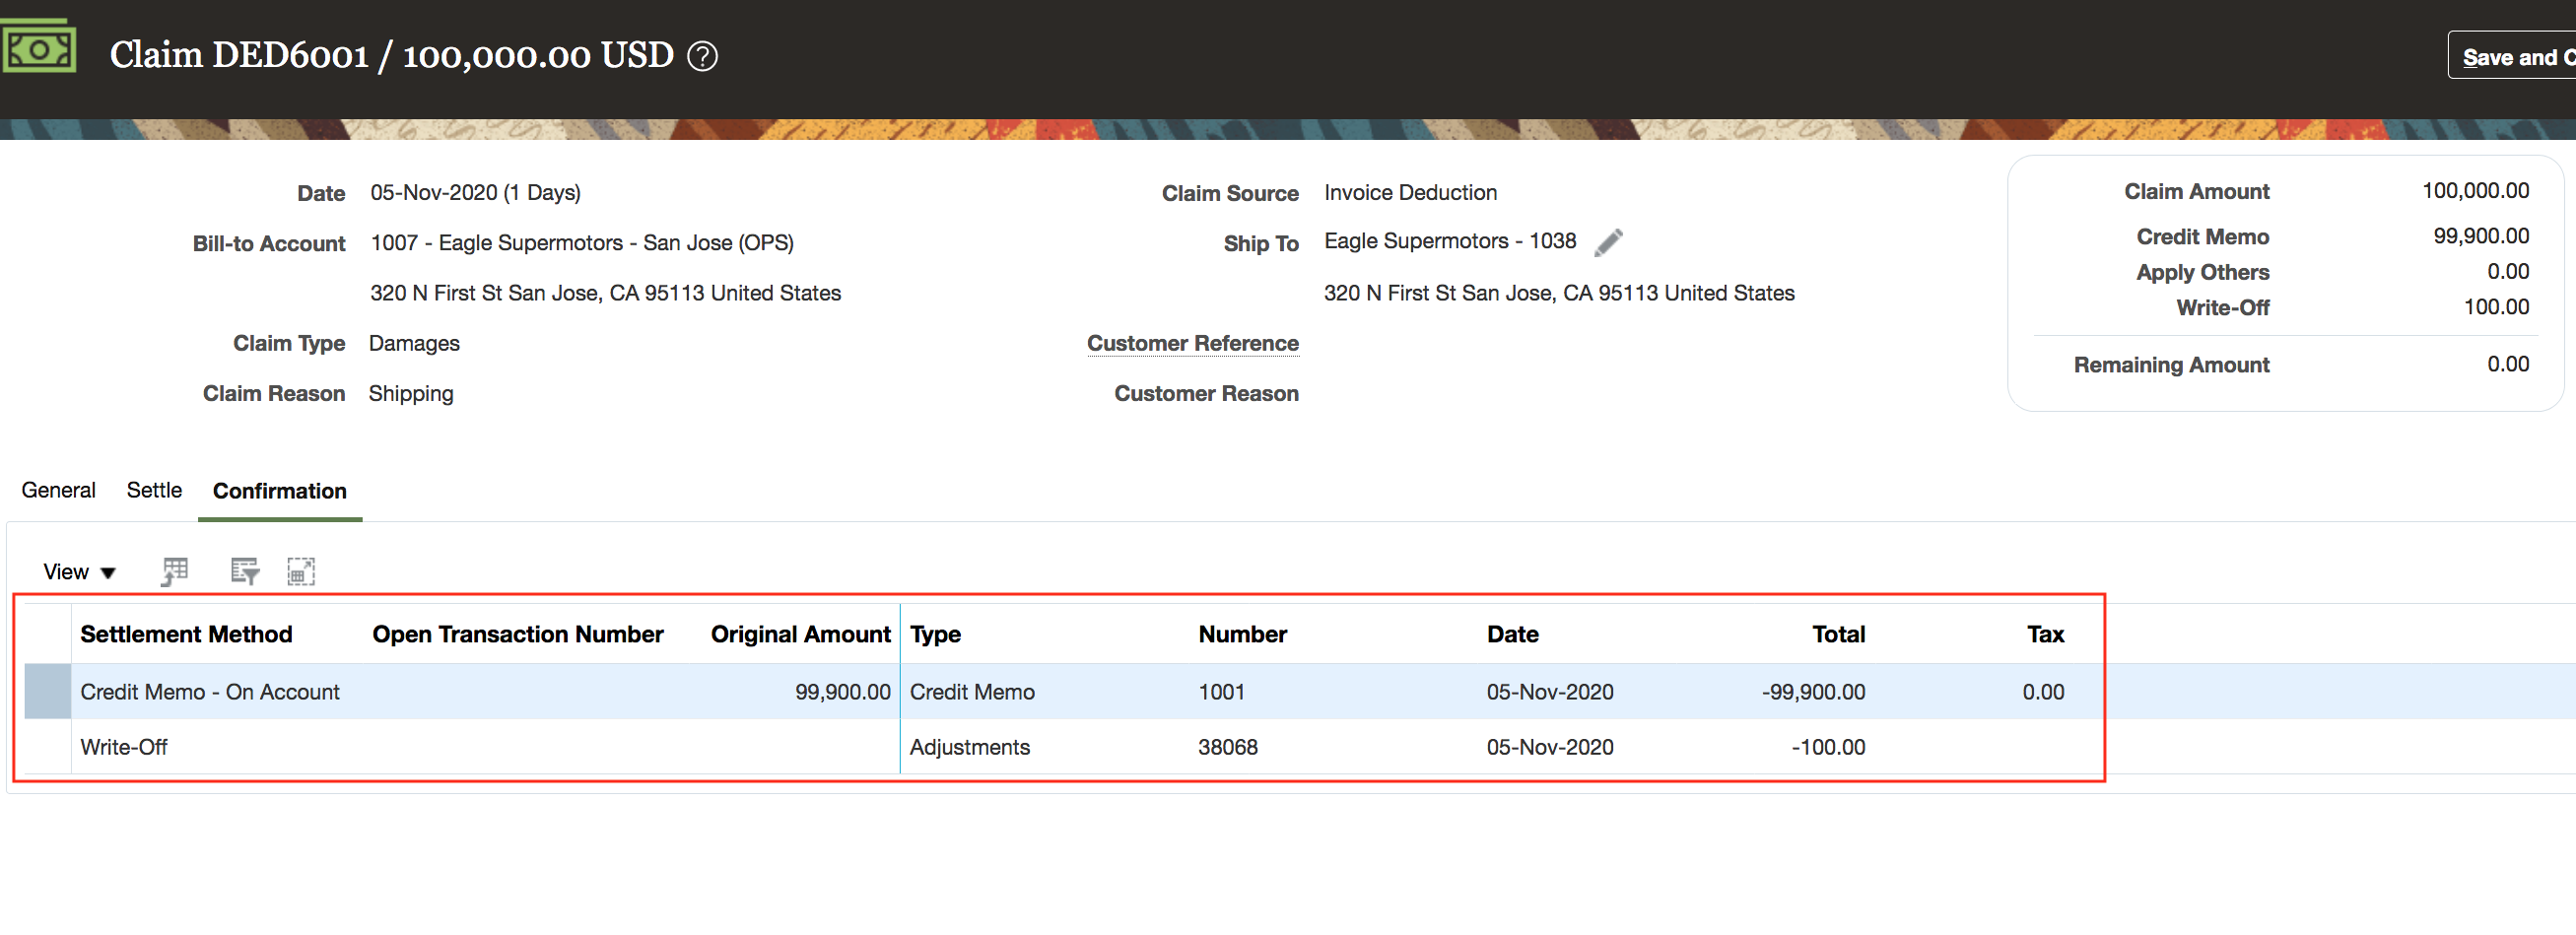
Confirmation Tab on an Invoice Deduction Claim
In Receivables, we create activities of the settlement. You can see them as activities of the receipt. These include:
- The original invoice deduction or invoice overpayment applied.
- The credit memo on invoice or credit memo on account or invoice created and applied including tax and write-offs.
- The reversal of the original invoice deduction or invoice overpayment.
- If applicable, the child claim that is created and applied.
- If the child claim was settled, you can see the activities of the child claim.

Complete Settlement of Receipt in Receivables
Invoice Write-Off
- Reduce revenue leakage from invalid invoice deductions
- Fast accurate resolution with accountability and transparency
- Discover root cause / analysis to take proactive prevention measures
- Benchmark deductions processing
- Complete and automated integration to Oracle Receivables Cloud for invoice deduction and invoice overpayment settlement including tax and write-offs
Steps to Enable
Use the Opt In UI to enable this feature. For instructions, refer to the Optional Uptake of New Features section of this document.
Offering: Order Management
- You must opt in to the functional area named: Channel Revenue Management. Then opt in to the feature named: Deductions and Settlement. Opting into this functional area enables all of the Deductions and Settlement features described here.
- Under the offering named: Financials and functional area named: Receivables, go to a task named: Manage Receivables System Options. Search for and select your business unit. Click the Cash Processing tab. Select the Enable channel revenue management integration check box, and click Save.
- If you previously opted into the
- Channel Revenue Management functional area and the Deductions and Settlement feature, then this feature is automatically available to you.
Additional Steps:
- Manage Channel Settings > Settlement by Credit Memo - On Invoice
- Credit Method for Accounting Rules
- Credit Method for Installments
- Manage Claim Types
- Manage Claim Reasons
- Manage Claim Sources (Invoice Deductions, Invoice Overpayments)
- For settlement by credit memo on invoice or credit memo on account, map a claim type to an Receivables credit memo transaction type & map a claim reason to an Receivables credit memo reason.
- For settlement by invoice, map a claim type to Receivables credit memo transaction type.
On a periodic basis, schedule the Settle Customer Claims process. This will create the resolution artifacts for the settlement methods in Receivables and apply them to the appropriate receipt. Taxes will be determined and applied to the claim. Write-offs if applicable are applied to the claim.
Tips And Considerations
- Over crediting in AR is allowed only if the source invoice allows over crediting. This is based on the Allow overapplication option enabled in the setup of the Invoice Transaction type.
Key Resources
- Watch Expanded Deductions and Settlement Readiness Training
- For more information on Channel Revenue Management, refer to the Oracle Cloud Readiness content for Order Management
- For more information on the Channel Revenue Management Integration with Receivables, refer to the Oracle Cloud Readiness content for Financials
- Oracle SCM Cloud: Using Oracle Channel Revenue Management Cloud, available on the Oracle Help Center
- Oracle SCM Cloud: Implementing Oracle Channel Revenue Management Cloud, available on the Oracle Help Center
- Oracle SCM Cloud: REST API for Oracle SCM Cloud, available on the Oracle Help Center
Role Information
You have a couple of options for giving people access to this feature, depending on whether you're assigning them predefined job roles or your own configured job roles.
Users who are assigned any of these predefined job roles are automatically able to access this feature:
- Channel Claims Manager (ORA_CJM_CLAIMS_MANAGER_JOB)
Users who are assigned configured job roles that contain these privileges are able to access this feature:
- Manage Customer Claims (CJM_MANAGE_CUSTOMER_CLAIMS_PRIV)
Create Customer Claims Manually
Create a claim manually to research and disposition a customer dispute and settle the claim in Oracle Receivables Cloud with a credit memo on account. Customers may submit reimbursement requests for various reasons such as to claim compensation for damaged goods or payment for services.

Create Manual Claim
Customer disputes or misunderstandings can be brought to a company's attention in other ways, outside of an AR short pay. Manual claims further centralizes the dispute management in a proactive manner for improved customer service and fewer deductions.
Steps to Enable
Use the Opt In UI to enable this feature. For instructions, refer to the Optional Uptake of New Features section of this document.
Offering: Order Management
- You must opt in to the functional area named: Channel Revenue Management. Then opt in to the feature named: Deductions and Settlement. Opting into this functional area enables all of the Deductions and Settlement features described here.
- Under the offering named: Financials and functional area named: Receivables, go to a task named: Manage Receivables System Options. Search for and select your business unit. Click the Cash Processing tab. Select the Enable channel revenue management integration check box, and click Save.
- If you previously opted into the
- Channel Revenue Management functional area and the Deductions and Settlement feature, then this feature is automatically available to you.
Key Resources
- Watch Expanded Deductions and Settlement Readiness Training
- For more information on Channel Revenue Management, refer to the Oracle Cloud Readiness content for Order Management
- Oracle SCM Cloud: Using Oracle Channel Revenue Management Cloud, available on the Oracle Help Center
- Oracle SCM Cloud: Implementing Oracle Channel Revenue Management Cloud, available on the Oracle Help Center
- Oracle SCM Cloud: REST API for Oracle SCM Cloud, available on the Oracle Help Center
Role Information
You have a couple of options for giving people access to this feature, depending on whether you're assigning them predefined job roles or your own configured job roles.
Users who are assigned any of these predefined job roles are automatically able to access this feature:
- Channel Claims Manager (ORA_CJM_CLAIMS_MANAGER_JOB)
Users who are assigned configured job roles that contain these privileges are able to access this feature:
- Manage Customer Claims (CJM_MANAGE_CUSTOMER_CLAIMS_PRIV)
Identify Claims Automatically for Deductions That Are Eligible for Write Off
Set threshold limits for deductions. When a customer takes a deduction, if the claim amount falls under the threshold, then claims are automatically marked for write off. If required, you can choose to review and investigate these claims.
Deductions and Settlement write-off thresholds can be set at the business unit, customer, account, or bill-to site level. Upon claim creation if a claim is under the threshold, it will be systematically written off. During settlement if a claim after taxes has a remaining amount under the threshold, it will be systematically written off.
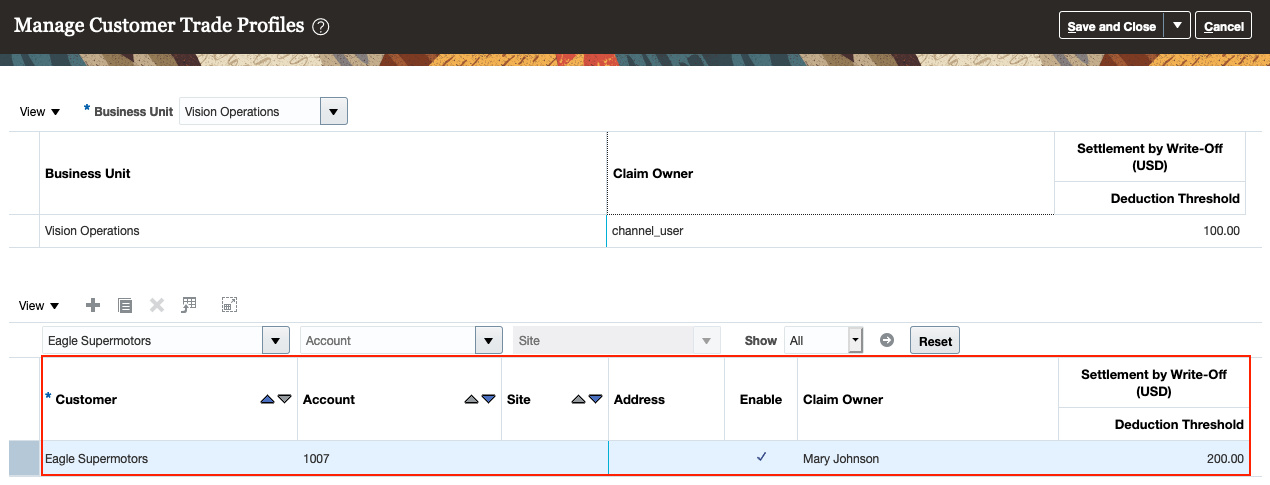
Deduction Threshold
Research and resolution of customer deduction claims can be a very labor intensive proposition, so write-offs are important to ensuring a return on the investment of time and resources working on claims.
Improve the ROI of write-offs through the occasional review of deduction thresholds in the context of actual claims to understand how customers are leveraging your write-off thresholds.
Steps to Enable
Use the Opt In UI to enable this feature. For instructions, refer to the Optional Uptake of New Features section of this document.
Offering: Order Management
- You must opt in to the functional area named: Channel Revenue Management. Then opt in to the feature named: Deductions and Settlement. Opting into this functional area enables all of the Deductions and Settlement features described here.
- Under the offering named: Financials and functional area named: Receivables, go to a task named: Manage Receivables System Options. Search for and select your business unit. Click the Cash Processing tab. Select the Enable channel revenue management integration check box, and click Save.
- If you previously opted into the
- Channel Revenue Management functional area and the Deductions and Settlement feature, then this feature is automatically available to you.
Additional Steps:
- Manage Channel Settings > Settlement by Write-off
- Receivables Activity for Receipt Write-offs
- Receivables Activity for Write-Off Adjustments
- Deduction Threshold
- Write-off Reviewer
Tips And Considerations
Unfortunately some customers will come to learn your write-off thresholds, and submit short pays under your threshold. To this end, we support the occasional pro-active review of systematic write-offs.
Proactively review write-off threshold by reviewing claims with eligible write-offs. Enable review of claims with write-offs through the enablement of the Write-off Reviewer channel setting. The reviewer should flag specific claims for further investigation and adjust thresholds accordingly. When the review is complete, don't forget to go back to disable the Write-off Reviewer channel setting.
Key Resources
- Watch Expanded Deductions and Settlement Readiness Training
- For more information on Channel Revenue Management, refer to the Oracle Cloud Readiness content for Order Management
- Oracle SCM Cloud: Using Oracle Channel Revenue Management Cloud, available on the Oracle Help Center
- Oracle SCM Cloud: Implementing Oracle Channel Revenue Management Cloud, available on the Oracle Help Center
- Oracle SCM Cloud: REST API for Oracle SCM Cloud, available on the Oracle Help Center
Role Information
You have a couple of options for giving people access to this feature, depending on whether you're assigning them predefined job roles or your own configured job roles.
Users who are assigned any of these predefined job roles are automatically able to access this feature:
- Channel Claims Manager (ORA_CJM_CLAIMS_MANAGER_JOB)
Users who are assigned configured job roles that contain these privileges are able to access this feature:
- Manage Customer Claims (CJM_MANAGE_CUSTOMER_CLAIMS_PRIV)
Create Claims Automatically for Deductions and Overpayments from Lockbox
Create claims automatically for deductions and overpayments from the lockbox receipt application process in Oracle Receivables Cloud. The lockbox receives payments and automatically creates a claim in Channel Revenue Management for any differences between the payments received and invoices, or for any debit memos taken for a specific invoice.
Many enterprises leverage lockbox banking services for the receipt of payment from customers. This lockbox integration reduces deduction creation time and improves processing efficiency.
Steps to Enable
Use the Opt In UI to enable this feature. For instructions, refer to the Optional Uptake of New Features section of this document.
Offering: Order Management
- You must opt in to the functional area named: Channel Revenue Management. Then opt in to the feature named: Deductions and Settlement. Opting into this functional area enables all of the Deductions and Settlement features described here.
- Under the offering named: Financials and functional area named: Receivables, go to a task named: Manage Receivables System Options. Search for and select your business unit. Click the Cash Processing tab. Select the Enable channel revenue management integration check box, and click Save.
- Under the offering named: Financials and functional area named: Receivables, go to a task named: Manage Lockboxes. Search for and select your lockbox. You must enable the Create claims check box, and save.
- Under the offering named: Financials and functional area named: Receivables, go to a task named: Manage Receipt Classes and Methods. Search for and select your receipt class and receipt method. Click on Remittance Bank Accounts. Search for and edit your remittance bank account to select the Claim Investigation activity.
- Under the offering named: Financials and functional area named: Receivables, go to a task named: Manage Receipt Application Exception Rules. Search for and select your Receipt Application Exception Rules. Create or extend exception rules with condition whose action is Transaction Claim to automatically create Channel Revenue Claim for invoice-related underpayments and overpayments.
- Under the offering named: Financials and functional area named: Receivables, go to a task named: Manage AutoCash Rule Sets. Search for and select your AutoCash Rule Set. Create or extend the Remaining Remittance Amount to be set as Claim Investigation to automatically create Claim Investigation for non-invoice related underpayments and overpayments.
- Under the offering named: Financials and functional area named: Receivables, go to a task named: Manage Receivables System Options. Search for and select your business unit.Click the Cash Processing tab. Set the Receipt Application Exception Rule Set and AutoCash Rule Set.
- Set the Reminder Rule Set along with the optional setup of the Application Exception Rule Set and AutoCash Rule Set at the customer account and/or site profile.
The following setups are predefined for this feature:
- Predefined Channel Revenue Management transaction source to assign to Receivables credit memos and invoices created upon settlement of a claim.
- Predefined Claim Investigation activity type under Receivables Activities. Edit this predefined activity type to include the business unit and the valid GL Code Combination Flexfield.
- Predefined Subledger Journal Entry Rule for the Event Class Receipt and Accounting Class Claim Investigation.
- Refer to the Channel Revenue Management's Deductions and Overpayments feature documentation for the Channel Revenue Management related setups.
- If you previously opted into the
- Channel Revenue Management functional area and the Deductions and Settlement feature, then this feature is automatically available to you.
Tips And Considerations
- Manage Receipt Application Exception Rules should not have exception rules with overlapping or duplicate conditions.
- User review required of Manage Receipt Application Exception Rules is not supported for Channel Revenue Management Integration scenarios and hence should not be enabled for rules, which have Transaction Claim as an action.
- Additional steps and considerations are documented in Receivables for claim creation and settlement for Lockbox receipts.
Key Resources
- Watch Expanded Deductions and Settlement Readiness Training
- For more information on Channel Revenue Management, refer to the Oracle Cloud Readiness content for Order Management
- For more information on the Channel Revenue Management Integration with Receivables, refer to the Oracle Cloud Readiness content for Financials
- Oracle SCM Cloud: Using Oracle Channel Revenue Management Cloud, available on the Oracle Help Center
- Oracle SCM Cloud: Implementing Oracle Channel Revenue Management Cloud, available on the Oracle Help Center
- Oracle SCM Cloud: REST API for Oracle SCM Cloud, available on the Oracle Help Center
Role Information
No additional role is required in AR.
Schedule Internal Sales Orders from External Source Systems
Some ERP systems, such as Oracle E-Business Suite, use internal sales orders to initiate transfers of material within a business. These internal sales orders link to internal requisitions for the supply to be transferred.
Oracle Cloud Supply Chain Management manages transfers differently, using transfer orders that can be scheduled as sales orders within Oracle Order Management Cloud. Previously there was no way to import the internal sales order and internal requisition document types from external systems to global order promising in the Cloud, preventing E-Business Suite users from being able to view and reschedule their internal transfers in the Oracle Cloud solution.
With this update, the collections process is enhanced to import internal sales orders and internal requisitions from external source systems. It maps them to sales order demands and transfer supplies respectively, enabling global order promising to view and reschedule transfers from external systems like other sales orders.
Note: Extraction of internal sales orders is not included in the E-Business Suite to Oracle Cloud Supply Chain Planning sample integration. You must develop your own extracts to populate the sales order comma-separated value file with the additional internal sales order details.
Watch a Demo
If you use Oracle Cloud Order Management with an external inventory management solution, you can now view and reschedule your internal sales orders along with your customer sales orders in the Cloud, better utilizing available supply to fulfill both types of demand.
Steps to Enable
To enable the Schedule Internal Sales Orders from External Source Systems, proceed with the following steps:
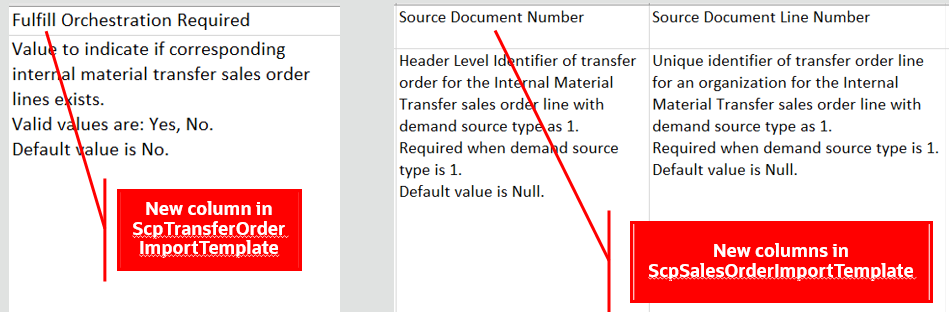
Use the latest version of the file-based data import (FBDI) template for the Transfer Order entity for populating details in the Fulfill Orchestration Required column.
Use the latest version of the file-based data import (FBDI) template for the Sales Orders entity for populating details in the Demand Source Type, Source Document Number, and Source Document Line Number columns.
Tips And Considerations
-
For a transfer order for which an internal sales order exists, you must set the Fulfill Orchestration Required column to Yes in the ScpTransferOrderImportTemplate.xlsm template.
- Only orders of type 94, the Transfer Order order type, that are open or not fully shipped, are considered when collecting their corresponding internal sales order.
-
You must set the Sales Order Demand Source Type to 1, 1 means internal material transfer fulfillment line, in the ScpSalesOrderImportTemplate.xlsm template for the demand to be considered as an internal sales order during data collection.
- Establish the link between internal sales order and its corresponding transfer order by providing corresponding values:
- The value of the Transfer Order Header Number in the Transfer Order FBDI template as the value for the Source Document Number column in the Sales Order FBDI template
- The value of the Transfer Order Line Number in the Transfer Order FBDI template as the value for the Source Document Line Number column in the Sales Order FBDI template
- Provide matching quantities for the transfer order and its corresponding internal sales order.
Key Resources
Role Information
You have a couple of options for giving people access to this feature, depending on whether you're assigning them predefined job roles or your own configured job roles.
Users who are assigned any of these predefined job roles are automatically able to access this feature:
- Order Promising Manager (ORA_MSC_ORDER_PROMISING_MANAGER_JOB)
- Backlog Manager (ORA_MSC_BACKLOG_MANAGER_JOB)
Users who are assigned configured job roles that contain these privileges are able to access this feature:
- Monitor Order Promising Work Area (MSC_MONITOR_ORDER_PROMISING_WORK_AREA_PRIV)
- Monitor Backlog Management Work Area (MSC_MONITOR_BACKLOG_MANAGEMENT_WORK_AREA_PRIV)
Access Tasks as Quick Actions on a Home Page
With this update, specific tasks are more immediately available as quick actions on the home page, so you don’t have to first navigate to the global order promising work area to take an action.
Several tasks that previously were only accessible using the tasks panel drawer in the global order promising work area are now also available from the home page. You can select the Show More link on the home page to display all the available quick actions for which you have access.
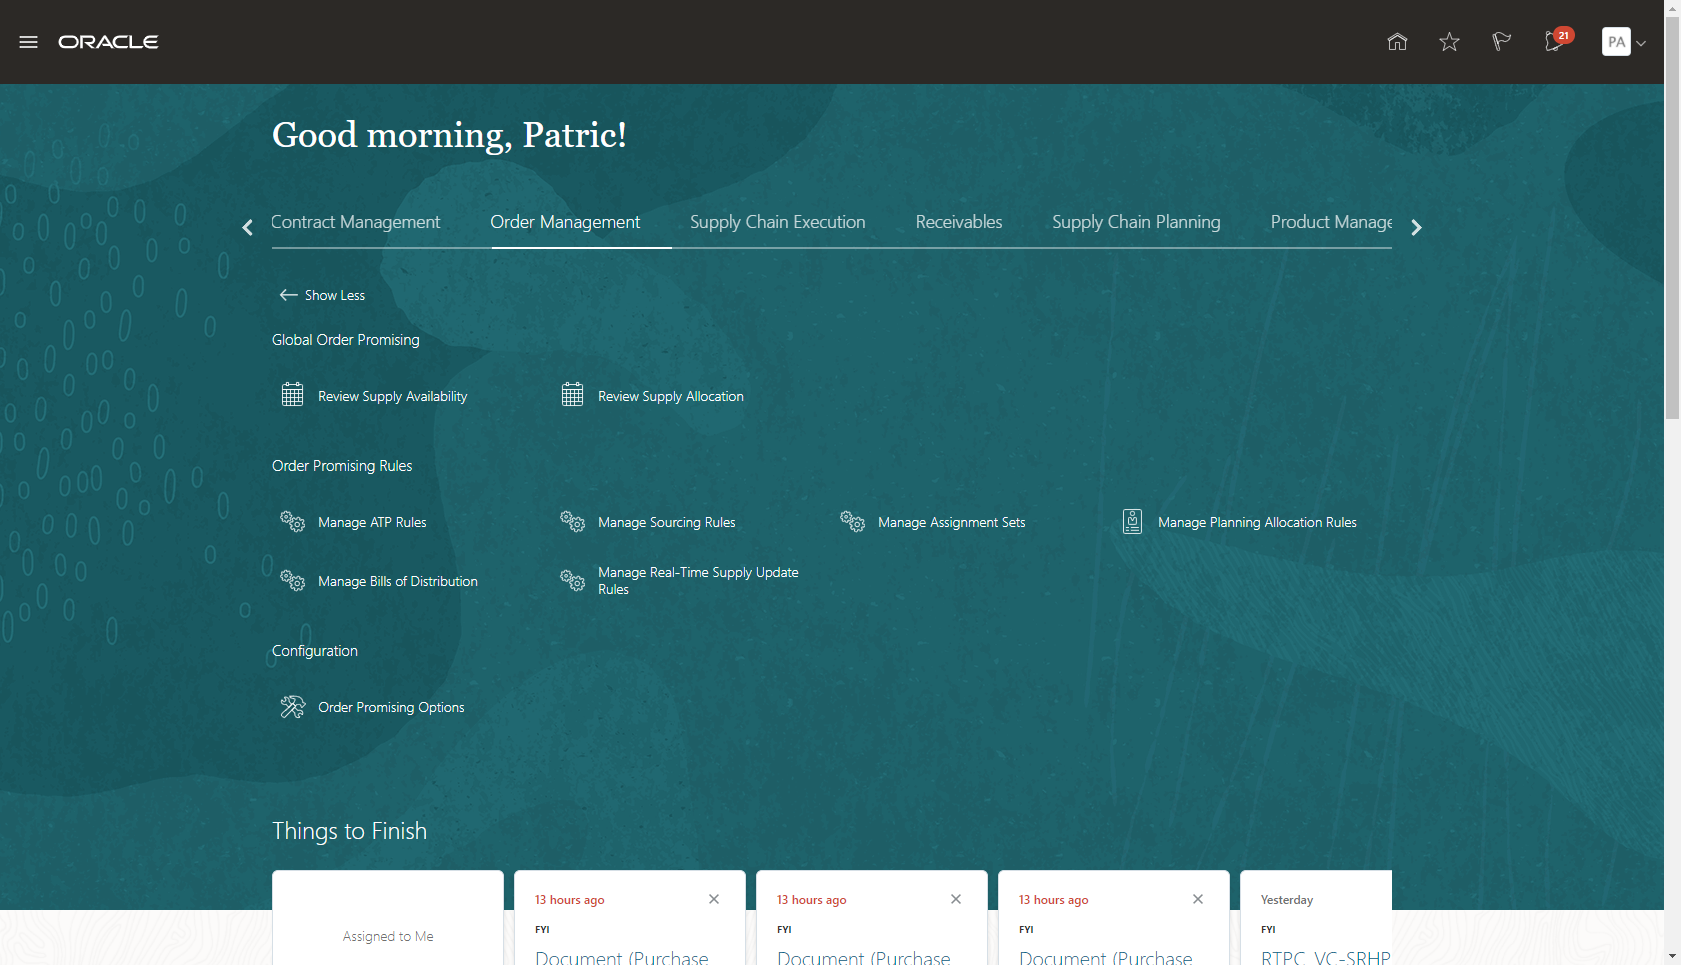
Order Management Quick Actions
Access specific tasks more readily by using quick actions made available to you on the home page.
Steps to Enable
You don't need to do anything to enable this feature.
Tips And Considerations
- Quick actions are only visible if you have the applicable privilege to the task. For example, if you have the Manage Planning Sourcing privilege, then you should see the Manage Sourcing Rules task in both the tasks panel drawer in the work area (as was previously available), and as a quick action on the Supply Chain Planning or Order Management (in the case of Global Order Promising) home pages.
- When you close out of a task that was initiated from the Order Management home page, you'll be returned to the Order Management home page.
Key Resources
- The Access Tasks as Quick Actions on a Home Page readiness training available on Oracle Cloud Readiness for Supply Chain Planning.
Role Information
You have a couple options for giving people access to this feature, depending on whether you're assigning them predefined job roles or your own configured job roles.
Users who are assigned any of these predefined job roles are automatically able to access this feature:
- Order Promising Manager (ORA_MSC_ORDER_PROMISING_MANAGER_JOB)
Users who are assigned configured job roles that contain these privileges are able to access this feature:
- View Supply Availability Report (MSP_VIEW_SUPPLY_AVAILABLITY_REPORT_PRIV)
- View Supply Allocation Report (MSP_VIEW_SUPPLY_ALLOCATION_REPORT_PRIV)
- View Available-to-Promise Rule (MSP_VIEW_AVAILBLE_TO_PROMISE_RULE_PRIV)
- Manage Available-to-Promise Rule (MSP_MANAGE_AVAILBLE_TO_PROMISE_RULE_PRIV)
- View Planning Sourcing Rule (MSP_VIEW_PLANNING_SOURCING_RULE_PRIV)
- Manage Planning Sourcing (MSP_MANAGE_PLANNING_SOURCING_PRIV)
- Manage Planning Sourcing Assignment (MSP_MANAGE_PLANNING_SOURCING_ASSIGNMENT_PRIV)
- View Planning Allocation Rule (MSP_VIEW_PLANNING_ALLOCATION_RULE_PRIV)
- Manage Planning Allocation Rule (MSP_MANAGE_PLANNING_ALLOCATION_RULE_PRIV)
- View Planning Sourcing Rule (MSP_VIEW_PLANNING_SOURCING_RULE_PRIV)
- Manage Planning Sourcing (MSP_MANAGE_PLANNING_SOURCING_PRIV)
- Manage Planning Allocation Rule (MSP_MANAGE_PLANNING_ALLOCATION_RULE_PRIV)
- View Planning Supply Availability (MSP_VIEW_PLANNING_SUPPLY_AVAILABLITY_PRIV)
- View Planning Supply Availability (MSC_VIEW_PLANNING_SUPPLY_AVAILABLITY_PRIV)
Sequence Planning Processes Using Job Sets
Planning processes, such as data collections and plan run, typically occur in sequence, and it’s highly desirable to automate these processes so that they run in sequence one after the other. Oracle Cloud enables the configuration of job sets, a collection of scheduled processes that are run in sequence. With this update, you can configure job sets that contain multiple supply chain planning scheduled processes.
Create job sets for scheduling planning process using the Manage Enterprise Scheduler Job Definitions and Job Sets for Financial, Supply Chain Management, and Related Applications task in the Setup and Maintenance work area. Add sequencing steps, as either serial or parallel, for planning processes in a job set.

Scheduled Processes
Use job sets to enhance your automation of planning technical processes.
Steps to Enable
You don't need to do anything to enable this feature.
Tips And Considerations
- What you can select for the plan type and plans for the Batch Run Plan, Copy Plan, and Release Plan jobs depends on which job role and privileges you have.
- When you submit the collection job set from the Scheduled Processes page, the collection template is a required parameter.
- You can configure scheduling and notifications options for individual planning processes on the Scheduled Processes page in the Schedule Processes work area.
- You can also configure scheduling and notifications options for job sets with multiple planning processes on the Scheduled Processes page in the Schedule Processes work area.
Key Resources
- The Sequence Planning Processes Using Job Sets readiness training available on Oracle Cloud Readiness for Supply Chain Planning.
Role Information
You have a couple of options for giving people access to this feature, depending on whether you're assigning them predefined job roles or your own configured job roles.
Users who are assigned any of these predefined job roles are automatically able to access this feature:
- Materials Planner (ORA_MSC_MATERIALS_PLANNER_JOB)
- Supply Chain Planner (ORA_MSC_SUPPLY_CHAIN_PLANNER_JOB)
- Demand and Supply Planner(ORA_MSC_DEMAND_AND_SUPPLY_PLANNER_JOB)
- Demand Planner (ORA_MSC_DEMAND_PLANNER_JOB)
- Sales and Operations Planner (ORA_MSC_SALES_AND_OPERATIONS_PLANNER_JOB)
- Replenishment Planner (ORA_MSC_REPLENISHMENT_PLANNER_JOB)
- Order Promising Manager (ORA_MSC_ORDER_PROMISING_MANAGER_JOB)
- Backlog Manager (ORA_MSC_BACKLOG_MANAGER_JOB)
Users who are assigned configured job roles that contain these privileges are able to access this feature:
- Monitor Supply Planning Work Area (MSC_MONITOR_SUPPLY_PLANNING_WORK_AREA_PRIV)
- Monitor Demand and Supply Planning Work Area (MSC_MONITOR_DEMAND_AND_SUPPLY_PLANNING_WORK_AREA_PRIV)
- Monitor Demand Management Work Area (MSC_MONITOR_DEMAND_MANAGEMENT_WORK_AREA_PRIV)
- Monitor Sales and Operations Planning Work Area (MSC_MONITOR_SALES_AND_OPERATIONS_PLANNING_WORK_AREA_PRIV)
- Monitor Replenishment Planning Work Area (MSC_MONITOR_REPLENISHMENT_PLANNING_WORK_AREA_PRIV)
- Monitor Order Promising Work Area (MSC_MONITOR_ORDER_PROMISING_WORK_AREA_PRIV)
- Monitor Backlog Management Work Area (MSC_MONITOR_BACKLOG_MANAGEMENT_WORK_AREA_PRIV)
Order promising is a critical business process that must scale with demand and continue to operate even if hardware failures occur. Recent changes to Global Order Promising provide a scale-out architecture for availability checking and scheduling requests across a horizontal grid, enhancing capacity and resilience. The new architecture also reduces operational overhead, making supply and reference data updates immediately available, and eliminating the need to refresh/restart the order promising server.
Migration to the new architecture is continuing over several updates. In the interim, Global Order Promising will automatically route some special case requests to the prior memory-resident C++-based solution. This section captures features that were in the prior solution that are now available in the new one.
Determine Consideration of Supplier Capacity for Database-Centric Order Promising
Model and upload supplier capacity for item-supplier combinations using the file-based data import (FBDI) process and the Supply Chain Planning Approved Supplier Capacity FBDI template. Supplier capacity represents the number of items that a supplier has available to supply on a daily basis. Supplier capacities can be defined for end items (drop ship) as well as component items that are purchased directly from suppliers.
Use the Consider infinite supplier capacity option on the Order Promising Options page to determine whether database-centric Global Order Promising considers supplier capacity as infinite or not. Enable this option if you want supplier capacity considered infinitely available. By default, this option is disabled and Global Order Promising considers supplier capacity, if supplier capacity is defined. If you want order promising to ignore supplier capacity, even when it's been defined and uploaded, then enable this option.
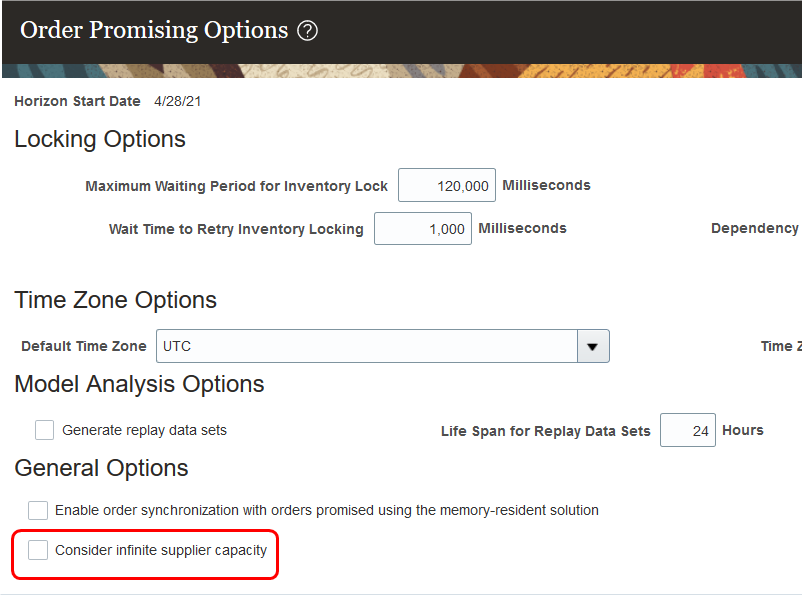
The Consider Infinite Supply Capacity Option on the Order Promising Options Page (Navigation: Global Order Promising work area > Order Promising Options task)
Model supplier capacity to improve the reliability of promise dates and make your supply chain more efficient.
Steps to Enable
You can find setup details in the release training for New Architecture Enhancements for Global Order Promising, Update 20D. If you've already performed those setup steps, you don't need to perform them again.
Other Global Order Promising Changes in This Update
This section includes details about additional changes in this update that can change the way Oracle Global Order Promising Cloud works.
Enable Splits for Data Store XML Files Larger than 2GB
In this update, you can configure Global Order Promising to automatically split large XML input files into multiple files. For more information, see the "Enable Splits for Data Store XML Files Larger than 2GB" section in the topic titled How you Manage Planning Profile Options, available in the Implementing Supply Chain Planning guide on the Oracle Help Center.
Bug reference: 32042201