
- Revision History
- Overview
- Pre-Update and Post-Update Tasks
- Optional Uptake of New Features (Opt In)
- Feature Summary
- Order Management
- IMPORTANT Actions and Considerations
This document will continue to evolve as existing sections change and new information is added. All updates appear in the following table:
| Date | Product | Feature | Notes |
|---|---|---|---|
| 18 NOV 2021 | Cross-Product Enhancements | Access SCM Application Pages Using Quick Actions | Updated document. Revised feature information. |
| 30 JUL 2021 | Cross-Product Enhancements | Access SCM Application Pages Using Quick Actions | Updated document. Revised feature information. |
| 28 JUN 2021 | Order Management | Use Your Customer's Part Number to Manage Sales Orders | Updated document. Revised Steps to Enable. |
| 25 JUN 2021 | Order Management | Use Your Customer's Part Number to Manage Sales Orders | Updated document. Revised feature information. |
| 25 JUN 2021 | Channel Revenue Management | Other Channel Revenue Management Changes in This Update | Updated document. Added a section. |
| 25 JUN 2021 | Pricing | Other Pricing Changes in This Update | Updated document. Added a section. |
| 18 JUN 2021 | Created initial document. |
This guide outlines the information you need to know about new or improved functionality in this update, and describes any tasks you might need to perform for the update. Each section includes a brief description of the feature, the steps you need to take to enable or begin using the feature, any tips or considerations that you should keep in mind, and the resources available to help you.
SECURITY AND NEW FEATURES
The Role section of each feature identifies the security privilege and job role required to use the feature. If feature setup is required, then the Application Implementation Consultant job role is required to perform the setup, unless otherwise indicated. (If a feature doesn't include a Role section, then no security changes are required to use the feature.)
If you have created job roles, then you can use this information to add new privileges to those roles as needed. For details about how to compare your configured job roles to predefined job roles and add security artifacts to your configured job roles, see the Security Console and Roles and Role Assignments chapters in the Oracle SCM Cloud: Securing SCM guide on the Oracle Help Center.
GIVE US FEEDBACK
We welcome your comments and suggestions to improve the content. Please send us your feedback at oracle_fusion_applications_help_ww_grp@oracle.com.
Pre-Update and Post-Update Tasks
Depending on the features you're using in your Cloud applications, you may be required to perform certain steps immediately before or after your quarterly update. For details of these pre-update and post-update steps and the product areas that are affected, refer to Oracle SCM Cloud: Performing Your Quarterly Update (doc ID 2337485.1) on My Oracle Support.
Optional Uptake of New Features (Opt In)
Oracle Cloud Applications delivers new updates every quarter. This means every three months you'll receive new functionality to help you efficiently and effectively manage your business. Some features are delivered Enabled meaning they are immediately available to end users. Other features are delivered Disabled meaning you have to take action to make available. Features delivered Disabled can be activated for end users by stepping through the following instructions using the following privileges:
- Review Applications Offering (ASM_REVIEW_APPLICATIONS_OFFERINGS_PRIV)
- Configure Oracle Fusion Applications Offering (ASM_CONFIGURE_OFFERING_PRIV)
Here’s how you opt in to new features:
- Click Navigator > My Enterprise > New Features.
- On the Features Overview page, select your offering to review new features specific to it. Or, you can leave the default selection All Enabled Offerings to review new features for all offerings.
- On the New Features tab, review the new features and check the opt-in status of the feature in the Enabled column. If a feature has already been enabled, you will see a check mark. Otherwise, you will see an icon to enable the feature.
- Click the icon in the Enabled column and complete the steps to enable the feature.
In some cases, you might want to opt in to a feature that's not listed in the New Features work area. Here's how to opt in:
- Click Navigator > My Enterprise > Offerings.
- On the Offerings page, select your offering, and then click Opt In Features.
- On the Opt In page, click the Edit Features (pencil) icon for the offering, or for the functional area that includes your feature.
- On the Edit Features page, complete the steps to enable the feature.
For more information and detailed instructions on opting in to new features for your offering, see Offering Configuration.
Opt In Expiration
Occasionally, features delivered Disabled via Opt In may be enabled automatically in a future update. This is known as an Opt In Expiration. If your cloud service has any Opt In Expirations you will see a related tab in this document. Click on that tab to see when the feature was originally delivered Disabled, and when the Opt In will expire, potentially automatically enabling the feature. You can also click here to see features with Opt In Expirations across all Oracle Cloud Applications.
Column Definitions:
Report = New or modified, Oracle-delivered, ready to run reports.
UI or Process-Based: Small Scale = These UI or process-based features are typically comprised of minor field, validation, or program changes. Therefore, the potential impact to users is minimal.
UI or Process-Based: Larger Scale* = These UI or process-based features have more complex designs. Therefore, the potential impact to users is higher.
Features Delivered Disabled = Action is needed BEFORE these features can be used by END USERS. These features are delivered disabled and you choose if and when to enable them. For example, a) new or expanded BI subject areas need to first be incorporated into reports, b) Integration is required to utilize new web services, or c) features must be assigned to user roles before they can be accessed.
| Ready for Use by End Users Reports plus Small Scale UI or Process-Based new features will have minimal user impact after an update. Therefore, customer acceptance testing should focus on the Larger Scale UI or Process-Based* new features. |
Customer Must Take Action before Use by End Users Not disruptive as action is required to make these features ready to use. As you selectively choose to leverage, you set your test and roll out timing. |
|||||
|---|---|---|---|---|---|---|
| Feature |
Report |
UI or |
UI or |
|
||
Control the Display of Hidden Transactional Item Attributes on the Configurator Review Page |
||||||
Display the Item Organization When Adding a Model Item or Snapshot to a Workspace |
||||||
Configure Available-to-Promise Time Fence to Conserve Existing Supply |
||||||
Access SCM Application Pages Using Quick Actions
In this update, Oracle Supply Chain Management Cloud delivers new quick actions that provide easy navigation from the home page directly to specific application pages without using the menu structure. With a single click, you can initiate tasks from the home page.
Each tab group on the home page displays an initial set of quick actions that are based on your function security privileges. The actions available to you are controlled by the job roles you're assigned. Click Show More to see all of the quick actions that are available to you in that tab group:
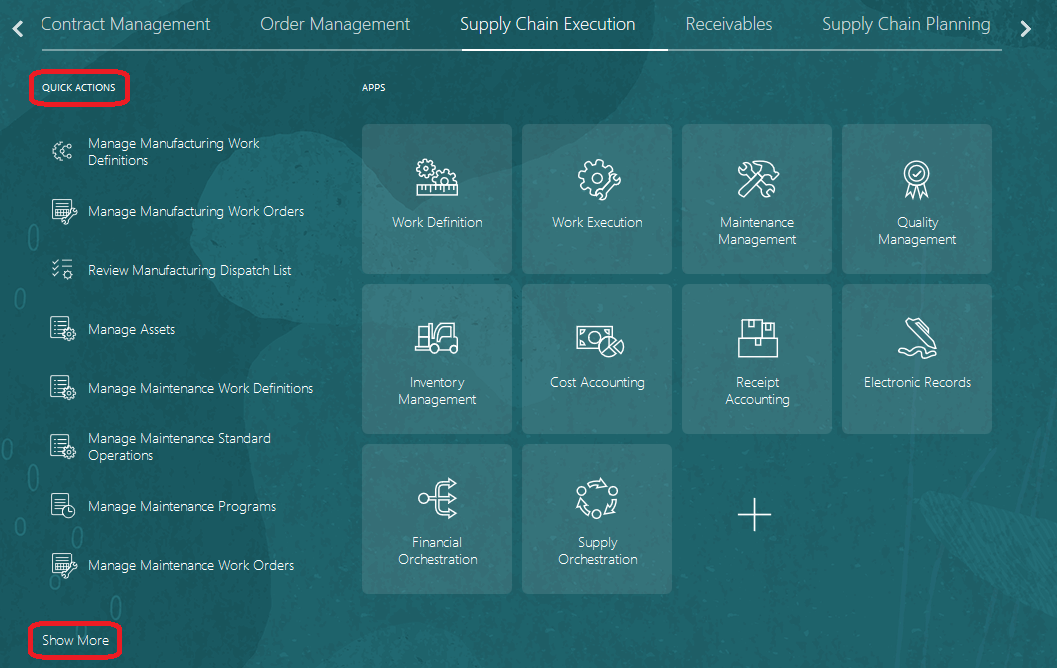
Quick Actions on the Home Page for the Supply Chain Execution Tab Group
Quick actions are automatically available if your environment has a theme that includes the news feed layout on the home page. See the Tips and Considerations section for additional details.
Steps to Enable
You don't need to do anything to enable this feature.
Tips And Considerations
- To see quick actions, your environment must have a theme that includes the news feed layout on the home page, such as the Redwood theme, which was the default theme as of update 20C. If your administrator created and applied a configured theme to your environment, however, the Redwood theme won’t override your configured theme. Administrators can use the Themes page of the Appearance work area to manage environment themes.
- Users who are assigned the predefined Application Implementation Consultant job role, or a similar configured job role, can perform selected configurations of the Quick Action links. For details and instructions, see Configure Quick Actions on the Oracle Help Center.
Use Your Customer's Part Number to Manage Sales Orders
Use the Customer Item attribute to represent the item number that your customer uses when that number is different from what Oracle Fusion uses. For example, assume you set up an item in the Product Information Management work area and set the Item attribute to AS54888. You add the AS54888 to an order line when you create a sales order. However, your customer, Computer Service and Rentals, uses their own part number to brand AS54888. They use part number STELLAR1000. You also sell the AS54888 to another customer, ABC Telecommunications, but they use the value 2021-BIG-DESKTOP to brand the AS54888. STELLAR1000 and 2021-BIG-DESKTOP are each an example of a customer item.
You can use whatever value for the customer number that your supply chain requires, such as a trading partner item.
Use this feature so you can:
- Use the customer item when you search for and add an item to an order line in the Order Management work area.
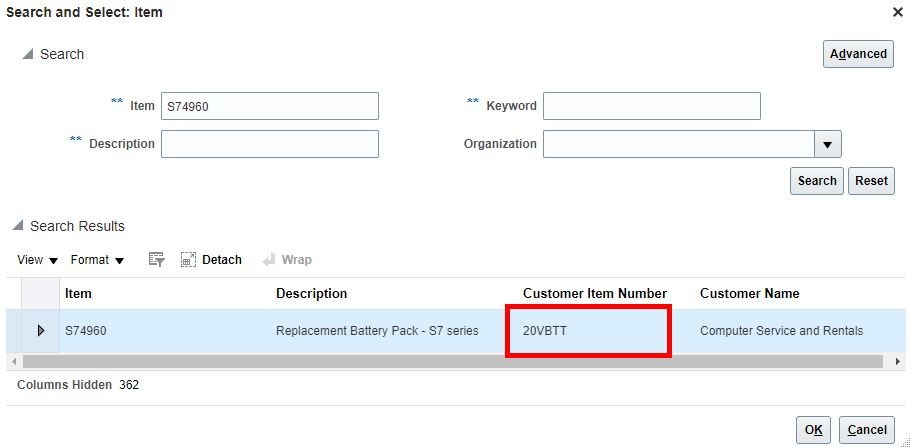
Item Search and Select Window
- View the customer item on an order line.
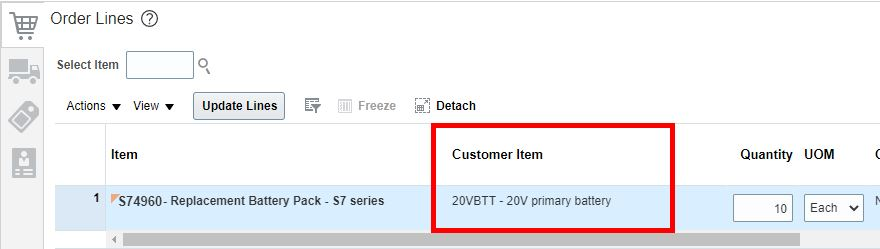
Order Line
- Use the customer item when you search for sales orders and order fulfillment lines.
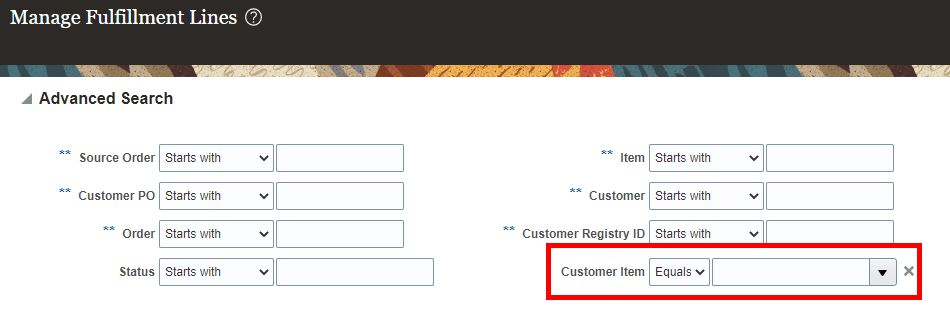
Manage Fulfillment Lines Search Page
- Reduce the amount of time you need to create each sales order.
- Reduce the errors that might occur when you create a sales order.
- Search for sales orders more efficiently.
- Track orders in order fulfillment more efficiently.
Steps to Enable
Use the Opt In UI to enable this feature. For instructions, refer to the Optional Uptake of New Features section of this document.
Offering: Order Management
Tips And Considerations
When you opt in to use this feature, you'll need to opt in to two features:
- Use Your Customer's Part Number to Manage Sales Orders
- Search and Select Items More Efficiently
You can opt in using the Order Management offering in the New Features work area or the Offerings work area. If you use the Offerings work area, you can find these features in the Items functional area.
Additional considerations:
- Order Management displays details about the customer item according to the value that you set in the Customer attribute on the order header. If an item:
- Doesn't have a customer item for this customer. The Customer Item Number column will be empty in the search results section of the search and select dialog.
- Has more than one customer item for this customer. The search results displays a separate row for each customer item.
- The Customer Item column on the order line displays the customer item number and the customer item description, separated by a hyphen. For example, if the customer item number is 20VBTT and the customer item description is 20V Replacement Battery, then the Customer Item column displays 20VBTT - 20V Replacement Battery.
- Use View > Columns to display the Customer Item column in Order Management pages the first time that you log in after you turn on the feature.
- As in prior updates, in this update you can continue to use the order import service, REST API, or File-Based Data Import (FBDI) to import and revise sales orders with customer items in Order Management.
- You can continue to send customer items from Order Management to Oracle Fusion Shipping and, for drop shipments, to Oracle Fusion Procurement.
- This feature includes other item search improvements that you might find useful. For details, see the Product Hub feature named Filter Your Item Selections for Transactions Using Automatic Suggestions.
- If you have a sales order that's open, then don't delete or end date the customer item relationship in Product Information Management until you close the order.
- If your item isn't configured, then the search and select dialog will display the customer item. If your item is configured as an assemble-to-order item, pick-to-order item, or a kit, then only the top model can include the customer item. You can't include the customer item in any child lines.
Create Your Customer Item
You use the Product Information Management work area to create a customer item. For example, assume you already created the AS54888 item in the V1 organization, and now need to add the STELLAR1000 customer item for your Computer Service and Rentals customer.
- Go to the Product Information Management work area and click Tasks > Manage Trading Partner Items.
- On the Manage Trading Partners Items page, click Create Trading Partner Items, set the values, then click Save > Done.
Attribute Value Trading Partner Item
STELLAR1000
Type
Customer
Trading Partner
Computer Service and Rentals
Add the STELLAR1000 customer item to the AS54888 item.
- Expand Relationships, then click Actions > Create.
- In the Create Customer Item Relationship dialog, set the values, then click OK > Save.
Attribute Value Organization
V1 Item
AS54888
Key Resources
- For details about how to set up and use this feature, see these chapters on Oracle Help Center:
- For more information about the improvements in searching and selecting items in transactions, refer to the Filter Your Item Selections for Transactions Using Automatic Suggestions feature in the Oracle Product Lifecycle Management What's New, Update 21C.
Validate Advanced Shipment Notices in Drop Ship Flows
In update 21B, you can use the Recover Order action or run the Recover Errors scheduled process to recover sales orders that fail because of technical problems that come up while processing an advance shipment notice in a drop ship flow.
Starting with update 21C, Order Management will automatically attempt to recover errors on the order when you:
- Receive an advance shipment notice but the sales order and purchase order aren't synchronized with each other.
- Receive an advance shipment notice but the purchase order details aren't available on the sales order.
- Attempt to process an advance shipment notice while someone is revising the sales order or when a change on the purchase order hasn't finished.
Order Management will automatically attempt to fix the problem five times in approximately 120 minutes. Each attempt will try to recover from these errors that occur when processing the advance shipment notice. If the retries fail, then you can use the Recover Order action or the Recover Errors scheduled process.
Use this feature to prevent order lines from being stuck when Order Management processes an advance shipment notice.
Steps to Enable
You don't need to do anything to enable this feature.
Tips And Considerations
You can only recover some errors when you use the Recover Order action. If you can't use Recover Order, then run the Recover Errors scheduled process.
Key Resources
- See the Indicate an Ownership Change During Drop Ship topic, available on the Oracle Help Center.
Role Information
- Order Administrator
Control the Display of Hidden Transactional Item Attributes on the Configurator Review Page
Control how the Configurator Review page displays transactional item attributes. You specify the item class when you create the item in the Product Information Management work area. If you enable the Hidden attribute for transactional item attributes on the Edit Item Class page in the Setup and Maintenance work area, then the host application that displays your configurator model doesn't display the transactional item attributes that are part of that item class. However, the Configurator Review page does display them even if you enable the Hidden attribute. You can now specify whether the Configurator Review page displays or hides transactional item attributes.
Use this feature to hide transactional item attributes on the Configurator Review page so you have a cleaner interface and a more consistent user experience across all configurator pages in the host application. The host application usually sends transactional item attributes to a downstream application. For example, Order Management Cloud is a host application, and it uses transactional item attributes to send shipping details to Oracle Fusion Shipping. Your users might need to see and use these attributes. You now have the option to display or not display them on the Review page.
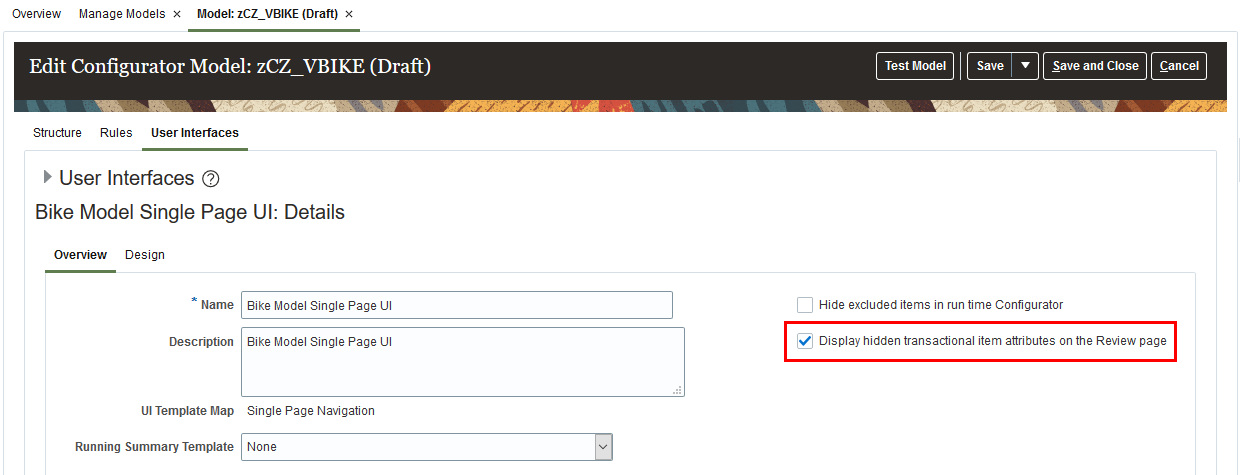
Display or hide transactional item attributes on the Review page
Steps to Enable
You don't need to do anything to enable this feature.
Tips And Considerations
Here's how you set the option.
- Go to the Configurator Models work area.
- Click Tasks > Manage Models.
- On the Manage Models page, search for and open your model.
- On the Edit Configurator Model page, click User Interfaces, then enable the option.
Display hidden transactional item attributes on the Review page
Key Resources
- See the Create and Maintain Configurator Models topic, available on the Oracle Help Center.
Role Information
- Job Role and Code:
- Product Configurator Manager (ORA_CZ_PRODUCT_CONFIGURATOR_MANAGER_JOB)
Display the Item Organization When Adding a Model Item or Snapshot to a Workspace
Display the Organization Name attribute and the Organization attribute when you add a model or snapshot to a workspace.
Display the Organization Name attribute and the Organization attribute to help you make sure the models and item snapshots that you add to a workspace are part of the organization that you expect.
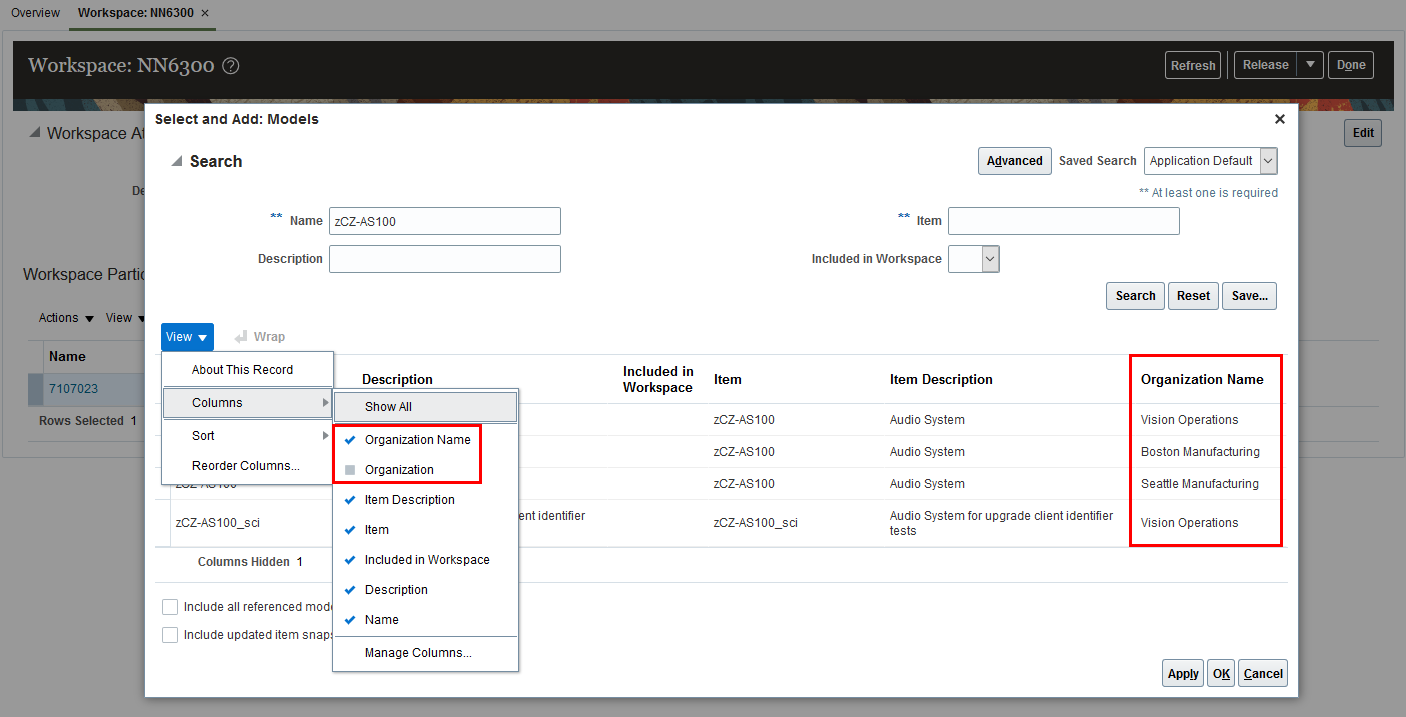
Display the Item Organization When You Add a Model Item or Snapshot to a Workspace
Steps to Enable
You don't need to do anything to enable this feature.
Tips And Considerations
Try it.
- Go to the Configurator Models work area.
- On the Overview page, click Tasks > Manage Workspaces.
- On the Manage Workspaces page, search for and open your workspace or create a new one.
- On the Workspace page, click Actions > Select and Add > Models.
- In the Select and Add dialog, click View > Columns, then click Organization Name. Repeat this step to display the Organization attribute.
Key Resources
- See the Overview of Workspaces topic on the Oracle Help Center.
Role Information
- Job Role and Code:
- Product Configurator Manager (ORA_CZ_PRODUCT_CONFIGURATOR_MANAGER_JOB)
Creates and administers supplier trade programs, optimizing the execution and impact of programs and promotions across the demand chain.
Import Supplier Invoices from a CSV File
You can now import supplier invoices from a CSV file using Import Management. Channel Revenue Management uses this information to determine available rebate accruals according to the terms of the agreement with the supplier. You can:
- Track supplier rebate accruals in the supplier and program checkbooks, and on a claim.
- View supplier program performance in the program checkbook based on the purchase order, item, bill-to, and ship-to locations.
- Create and approve adjustments to a supplier rebate accrual.
The upload of the CSV file creates a batch of transactions for processing. Validations are in place to identify any errors which need to be fixed. You can fix the errors and upload again.
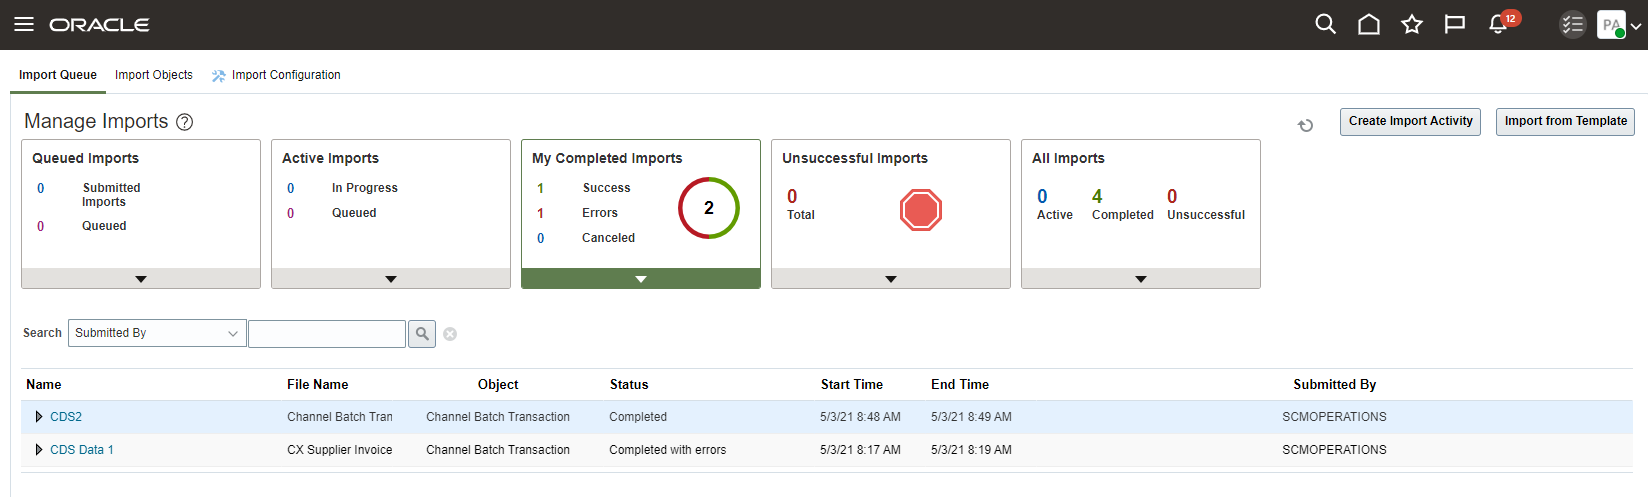
Manage Imports of Supplier Invoices
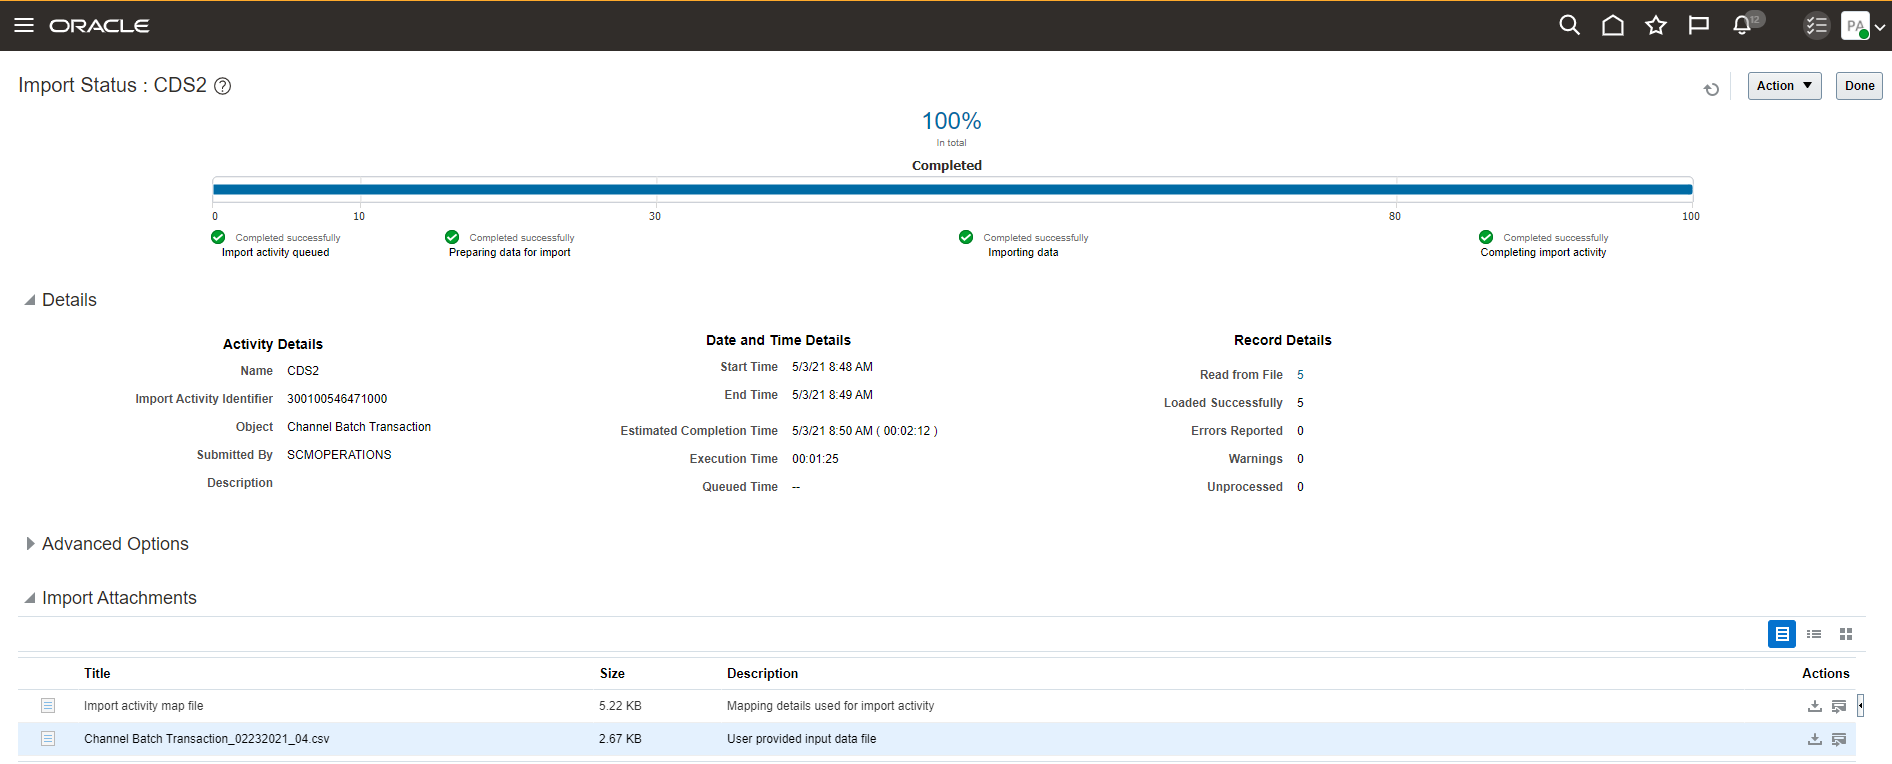
Status During Import

Summarized Accruals by Ship-to Location in Program Checkbook
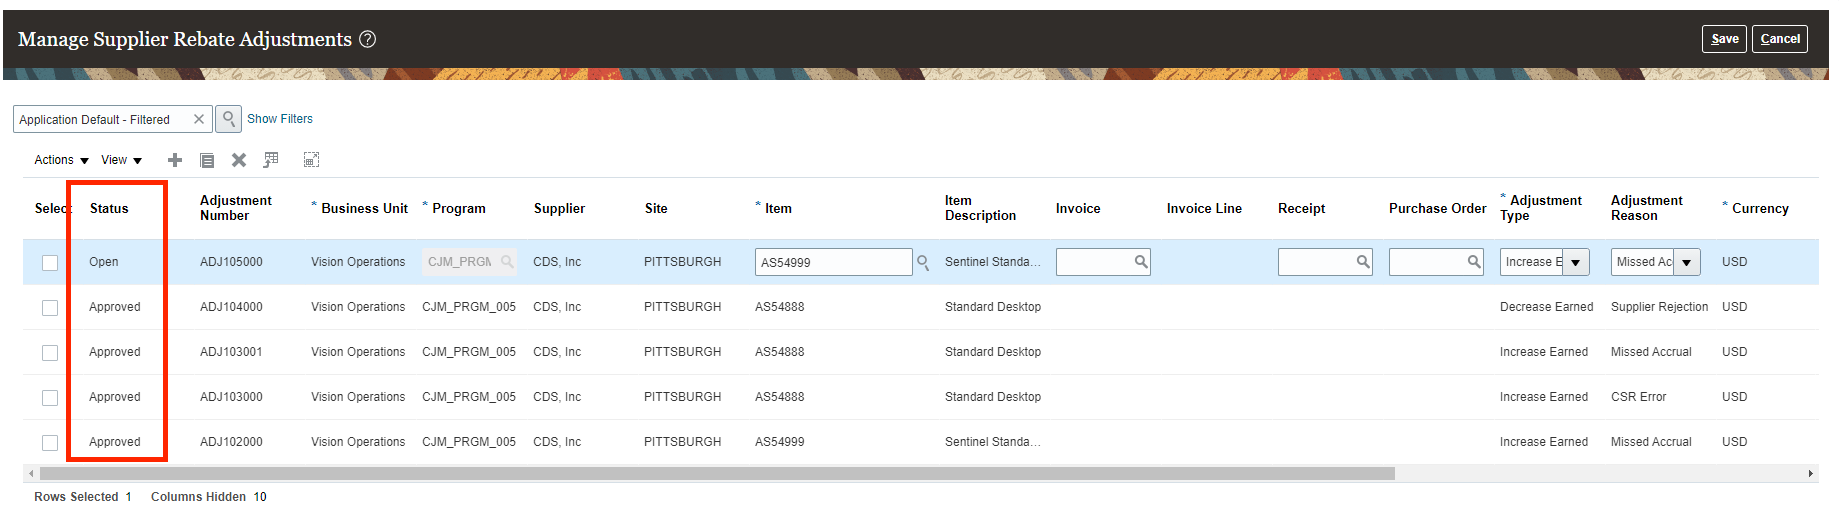
Approvals for Supplier Rebate Adjustments
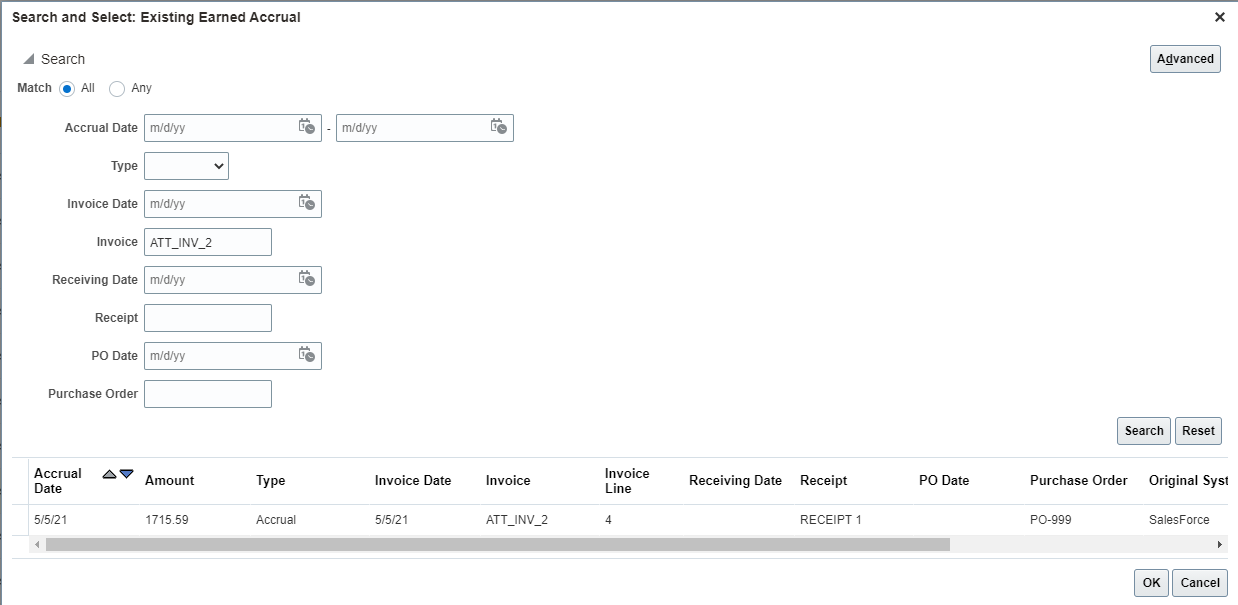
Select Existing Earned Accrual to Adjust
- Centralize accrual tracking, claims processing, and channel accounting based on supplier invoices from 3rd party Payables.
Steps to Enable
Use the Opt In UI to enable this feature. For instructions, refer to the Optional Uptake of New Features section of this document.
Offering: Order Management
- You must opt in to the functional area named: Channel Revenue Management. Then opt in to the feature named: Supplier Channel Management. Opting into this feature area enables all of the Supplier Rebate features described here.
- If you previously opted into the
- Channel Revenue Management functional area and the Supplier Channel Management feature, then this feature is automatically available to you.
Tips And Considerations
Error handling tips:
- Errors will provide users with an error.csv file and a reject.csv file for a given import.
- All the errors are in the error.csv file.
- The reject.csv file is a copy of your source CSV with additional columns with error messages.
- Correct the errors in the reject.csv file. Remember to remove the first and last columns containing error messages, and save as a new CSV file.
- Import the new CSV file.
Key Resources
- Watch Supplier Rebates Readiness Training.
- Oracle SCM Cloud: Using Oracle Channel Revenue Management Cloud, available on the Oracle Help Center.
- Oracle SCM Cloud: Implementing Oracle Channel Revenue Management Cloud, available on the Oracle Help Center.
- Oracle SCM Cloud: REST API for Oracle SCM Cloud, available on the Oracle Help Center.
Role Information
- Users who are assigned these predefined job roles are automatically able to access this feature:
- Supply Chain Application Administrator (ORA_RCS_SUPPLY_CHAIN_APPLICATION_ADMINISTRATOR)
- Supply Chain Integration Specialist (ORA_RCS_SUPPLY_CHAIN_INTEGRATION_SPECIALIST)
- Supplier Channel Manager (ORA_CJM_SUPPLIER_CHANNEL_MANAGER)
Capture Notes and Attachments for Supplier Programs
You can now add notes and attachments to supplier rebate programs to capture additional information about the program.
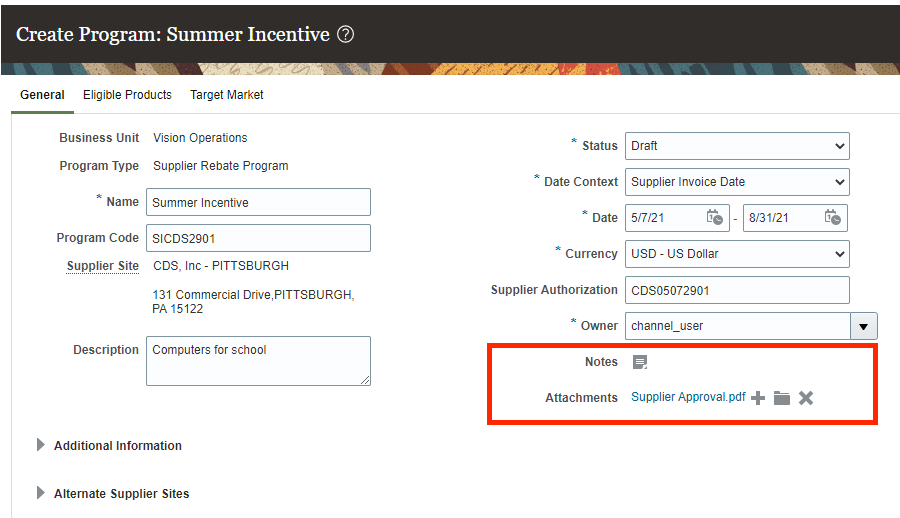
Notes and Attachments for Supplier Rebate Programs
- Auditable program administration
Steps to Enable
Use the Opt In UI to enable this feature. For instructions, refer to the Optional Uptake of New Features section of this document.
Offering: Order Management
- You must opt in to the functional area named: Channel Revenue Management. Then opt in to the feature named: Supplier Channel Management. Opting into this feature area enables all of the Supplier Rebate features described here.
- If you previously opted into the
- Channel Revenue Management functional area and the Supplier Channel Management feature, then this feature is automatically available to you.
Key Resources
- Watch Supplier Rebates Readiness Training.
- For more information on Channel Revenue Management, refer to the Oracle Cloud Readiness content for Order Management
- Oracle SCM Cloud: Using Oracle Channel Revenue Management Cloud, available on the Oracle Help Center.
- Oracle SCM Cloud: Implementing Oracle Channel Revenue Management Cloud, available on the Oracle Help Center.
- Oracle SCM Cloud: REST API for Oracle SCM Cloud, available on the Oracle Help Center.
Role Information
You have a couple of options for giving people access to this feature, depending on whether you're assigning them predefined job roles or your own configured job roles.
- Users who are assigned any of these predefined job roles are automatically able to access this feature:
- Supplier Channel Manager (ORA_CJM_SUPPLIER_CHANNEL_MANAGER_JOB)
- Users who are assigned configured job roles that contain these privileges are able to access this feature:
- Manage Supplier Programs (CJM_MANAGE_SUPPLIER_PROGRAMS_PRIV)
Export Supplier Rebate Claims to Microsoft Excel
You can now provide supporting claim details to your supplier to justify the monies owed by them. Claim details, including the associated purchase order, inventory receipts, and supplier invoices details, accruals and settlement details, are exported to a spreadsheet using BI Publisher. You can give this file to the supplier in support of the claim. The predefined claim template can be configured based on your business requirements. BI Publisher supports multiple output formats including XLS, CSV, PDF, RTF and XML.
- Fast, accurate claims processing with fewer disputes.
Steps to Enable
Use the Opt In UI to enable this feature. For instructions, refer to the Optional Uptake of New Features section of this document.
Offering: Order Management
- You must opt in to the functional area named: Channel Revenue Management. Then opt in to the feature named: Supplier Channel Management. Opting into this feature area enables all of the Supplier Rebate features described here.
- If you previously opted into the
- Channel Revenue Management functional area and the Supplier Channel Management feature, then this feature is automatically available to you.
Tips And Considerations
The accruals supporting each claim can also be exported at any time, and can be a helpful export in your internal business processes, prior to sending the claim to the supplier.
- The predefined BI Publisher template Supplier Rebate Claim Detail Extract Report is located under Supply Chain Management > Channel Revenue Management > Supplier Channel Management > Claims.
- Configure the predefined claim template to Excel using BI Publisher to make it your own.
- Decide which columns you want to include in the export file and create a BI Publisher template for it.
- The default format for Date attributes is ‘YYYY/MM/DD’.
- The default format for Timestamp attributes is ‘YYYY/MM/DD HH24:MI:SS’.
Key Resources
- Watch Supplier Rebates Readiness Training.
- Oracle SCM Cloud: Using Oracle Channel Revenue Management Cloud, available on the Oracle Help Center.
- Oracle SCM Cloud: Implementing Oracle Channel Revenue Management Cloud, available on the Oracle Help Center.
- Oracle SCM Cloud: REST API for Oracle SCM Cloud, available on the Oracle Help Center.
Role Information
You have a couple of options for giving people access to this feature, depending on whether you're assigning them predefined job roles or your own configured job roles.
- Users who are assigned any of these predefined job roles are automatically able to access this feature:
- Supplier Channel Manager (ORA_CJM_SUPPLIER_CHANNEL_MANAGER_JOB)
- Users who are assigned configured job roles that contain these privileges are able to access this feature:
- Manage Supplier Claims (CJM_MANAGE_SUPPLIER_CLAIMS_PRIV)
- Extract Supplier Claims (CJM_EXTRACT_SUPPLIER_CLAIMS_PRIV)
Capture Distributor Locations as Alternate Supplier Sites on Your Supplier Rebate Programs Using a REST Service
Certain industries negotiate directly with manufacturers for rebates but purchase from distributors. To ensure that any purchases from the distributor are eligible for a supplier rebate, you can use a REST API to add distributor locations as alternate supplier sites for your supplier rebate programs.
- Support complex supplier rebate agreements with manufacturers that are honored even when they are purchased through distributors.
Steps to Enable
Use the Opt In UI to enable this feature. For instructions, refer to the Optional Uptake of New Features section of this document.
Offering: Order Management
- You must opt in to the functional area named: Channel Revenue Management. Then opt in to the feature named: Supplier Channel Management. Opting into this feature area enables all of the Supplier Rebate features described here.
- If you previously opted into the
- Channel Revenue Management functional area and the Supplier Channel Management feature, then this feature is automatically available to you.
Key Resources
- Watch Supplier Rebates Readiness Training.
- Oracle SCM Cloud: Using Oracle Channel Revenue Management Cloud, available on the Oracle Help Center.
- Oracle SCM Cloud: Implementing Oracle Channel Revenue Management Cloud, available on the Oracle Help Center.
- Oracle SCM Cloud: REST API for Oracle SCM Cloud, available on the Oracle Help Center.
Role Information
You have a couple of options for giving people access to this feature, depending on whether you're assigning them predefined job roles or your own configured job roles.
- Users who are assigned any of these predefined job roles are automatically able to access this feature:
- Supplier Channel Manager (ORA_CJM_SUPPLIER_CHANNEL_MANAGER_JOB)
- Users who are assigned configured job roles that contain these privileges are able to access this feature:
- Manage Channel Program Types using REST Service (CJM_MANAGE_CHANNEL_PROGRAM_TYPE_REST_SERVICE_PRIV)
- Manage Channel Programs using REST Service (CJM_MANAGE_CHANNEL_PROGRAMS_REST_SERVICE_PRIV)
Provides research, administration, analysis, and settlement functionalities to quickly resolve deductions and settle claims, improving customer relationships and overall financial performance.
Create Customer Claims Using a REST Service
Use a REST API to create a manual claim for a customer dispute. You can use a REST API to resolve or disposition a customer dispute, submit it for approval, and settle.
To further centralize customer disputes, we have extended the REST service to create manual claims. This can be leveraged by 3rd party customer systems to bring in disputes or to migrate existing short pays at the start of an implementation.

Create Manual Claims via a REST Service
Centralize the management of customer disputes from third party customer systems.
- Control and accountability to claims processing
- Auditable claims processing
Steps to Enable
Use the Opt In UI to enable this feature. For instructions, refer to the Optional Uptake of New Features section of this document.
Offering: Order Management
- You must opt in to the functional area named: Channel Revenue Management. Then opt in to the feature named: Deductions and Settlement. Opting into this functional area enables all of the Deductions and Settlement features described here.
- Under the offering named: Financials and functional area named: Receivables, go to a task named: Manage Receivables System Options. Search for and select your business unit. Click the Cash Processing tab. Select the Enable channel revenue management integration check box, and click Save.
- If you previously opted into the
- Channel Revenue Management functional area and the Deductions and Settlement feature, then this feature is automatically available to you.
Key Resources
- For more information on Channel Revenue Management, refer to the Oracle Cloud Readiness content for Order Management
- For more information on the Channel Revenue Management Integration with Receivables, refer to the Oracle Cloud Readiness content for Financials
- Oracle SCM Cloud: Using Oracle Channel Revenue Management Cloud, available on the Oracle Help Center
- Oracle SCM Cloud: Implementing Oracle Channel Revenue Management Cloud, available on the Oracle Help Center
- Oracle SCM Cloud: REST API for Oracle SCM Cloud, available on the Oracle Help Center
Role Information
You have a couple of options for giving people access to this feature, depending on whether you're assigning them predefined job roles or your own configured job roles.
- Users who are assigned any of these predefined job roles are automatically able to access this feature:
- Channel Claims Manager (ORA_CJM_CLAIMS_MANAGER_JOB)
- Users who are assigned configured job roles that contain these privileges are able to access this feature:
- Manage Channel Claims using REST Service (CJM_MANAGE_CHANNEL_CUSTOMER_CLAIM_REST_SERVICE_PRIV)
Standardize Customer Claim Reasons
Some customers will have their own set of reason codes for raising a dispute or short paying you. Standardize customer claim reasons by translating the reason for the dispute provided by your customers to a standard set of reason codes. You can create a mapping between your claim reasons, and those provided by your customers, that can be used to automatically categorize the reason for the claim.
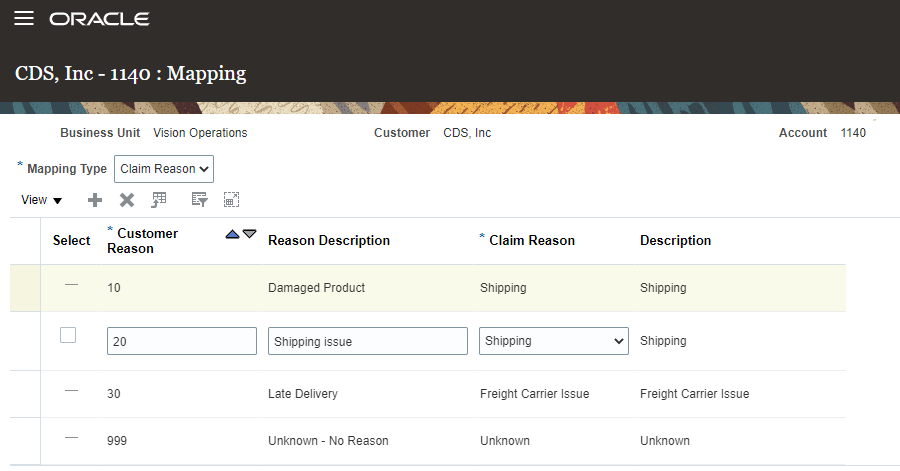
Mapping Customer Claim Reasons
Mapping incoming customer disputes:
- Streamlines the initial classification of claims for immediate visibility into queues of work
- Closes customer disputes faster when claims can be classified to the correct department for investigation
- Reduces cost of administering customer disputes
Steps to Enable
Use the Opt In UI to enable this feature. For instructions, refer to the Optional Uptake of New Features section of this document.
Offering: Order Management
- You must opt in to the functional area named: Channel Revenue Management. Then opt in to the feature named: Deductions and Settlement. Opting into this functional area enables all of the Deductions and Settlement features described here.
- Under the offering named: Financials and functional area named: Receivables, go to a task named: Manage Receivables System Options. Search for and select your business unit. Click the Cash Processing tab. Select the Enable channel revenue management integration check box, and click Save.
- If you previously opted into the
- Channel Revenue Management functional area and the Deductions and Settlement feature, then this feature is automatically available to you.
Additional Steps:
- Manage Claim Reasons
- Manage Customer Trade Profiles
- Mapping
- Customer Reasons
- Mapping
Tips And Considerations
Some customers will have their own set of customer reasons. Set up these mappings in the Customer Trade Profile of the customer. Make sure your internal claim reasons are set up first.
Key Resources
- For more information on Channel Revenue Management, refer to the Oracle Cloud Readiness content for Order Management
- For more information on the Channel Revenue Management Integration with Receivables, refer to the Oracle Cloud Readiness content for Financials
- Oracle SCM Cloud: Using Oracle Channel Revenue Management Cloud, available on the Oracle Help Center
- Oracle SCM Cloud: Implementing Oracle Channel Revenue Management Cloud, available on the Oracle Help Center
- Oracle SCM Cloud: REST API for Oracle SCM Cloud, available on the Oracle Help Center
Role Information
You have a couple of options for giving people access to this feature, depending on whether you're assigning them predefined job roles or your own configured job roles.
- Users who are assigned any of these predefined job roles are automatically able to access this feature:
- Channel Claims Manager (ORA_CJM_CLAIMS_MANAGER_JOB)
- Users who are assigned configured job roles that contain these privileges are able to access this feature:
- Manage Customer Claims (CJM_MANAGE_CUSTOMER_CLAIMS_PRIV)
Capture Notes for Customer Claims
You can now add notes to a customer claim to capture additional information about the claim. You can quickly navigate via a link to the Accounts Receivable receipt or invoice, to research the claim. Upon settlement, you can to drill down to settlement artifacts like credit memos directly from the claim.
Additionally, we support saved searches in the Manage Claims user interface.
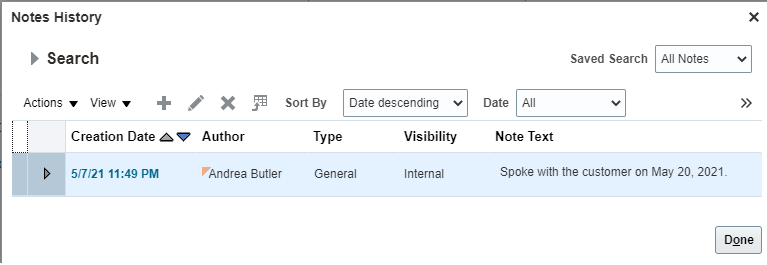
Notes for Customer Claims
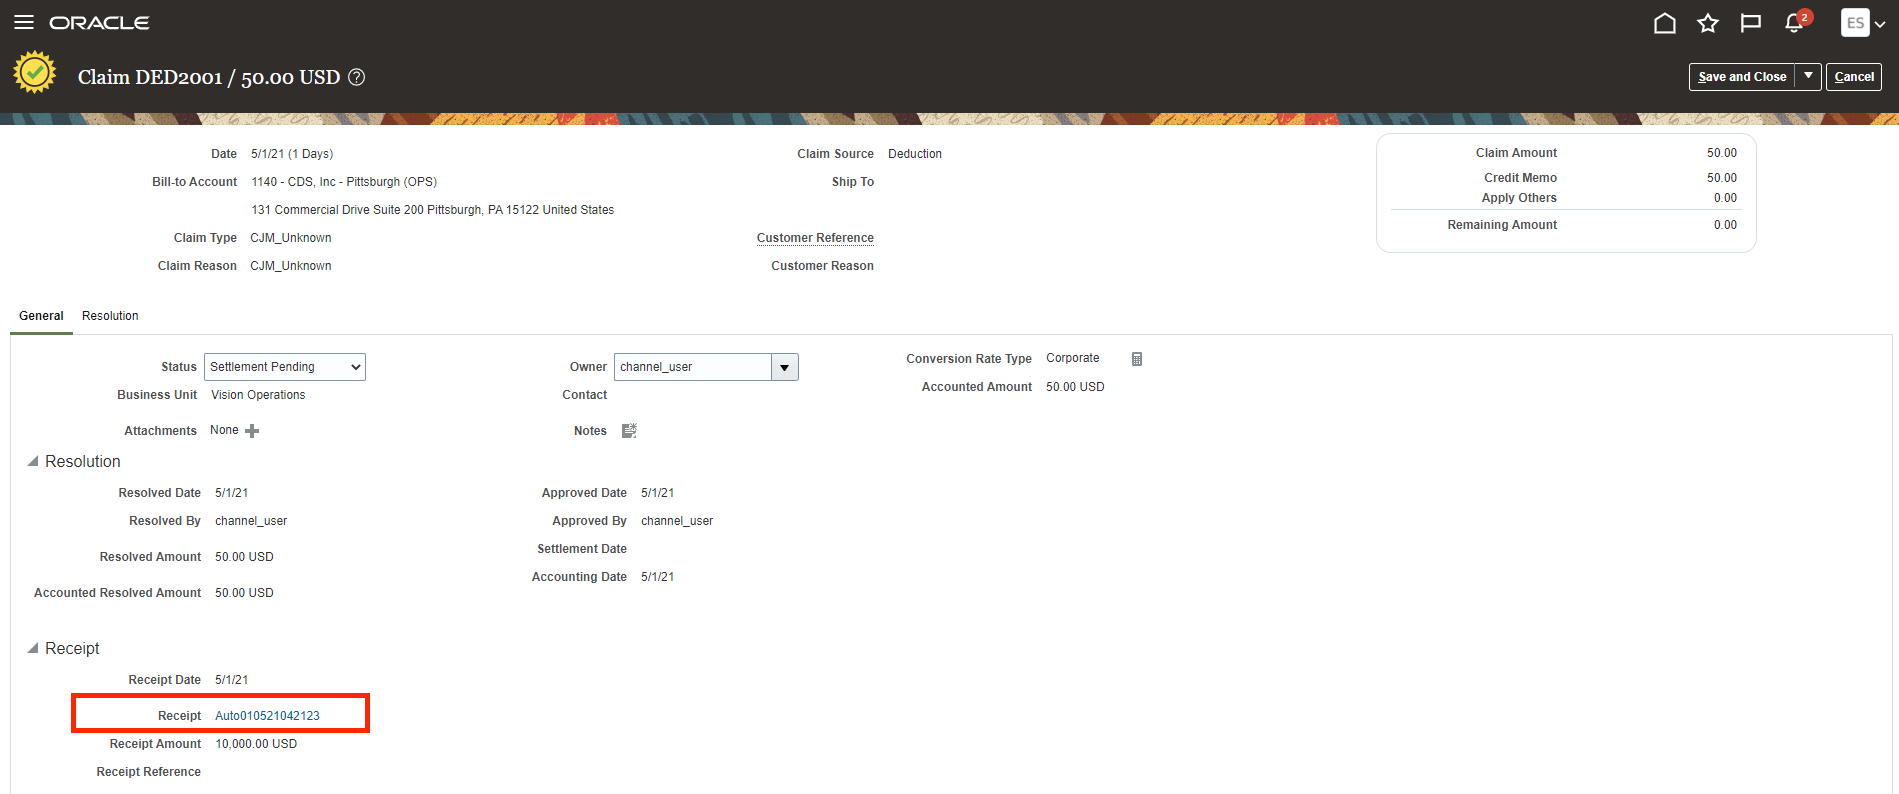
Drill Down to Receivables Receipt from Claim
- Auditable claims processing.
- Improved user experience and productivity.
Steps to Enable
Use the Opt In UI to enable this feature. For instructions, refer to the Optional Uptake of New Features section of this document.
Offering: Order Management
- You must opt in to the functional area named: Channel Revenue Management. Then opt in to the feature named: Deductions and Settlement. Opting into this functional area enables all of the Deductions and Settlement features described here.
- Under the offering named: Financials and functional area named: Receivables, go to a task named: Manage Receivables System Options. Search for and select your business unit. Click the Cash Processing tab. Select the Enable channel revenue management integration check box, and click Save.
- If you previously opted into the
- Channel Revenue Management functional area and the Deductions and Settlement feature, then this feature is automatically available to you.
Key Resources
- For more information on Channel Revenue Management, refer to the Oracle Cloud Readiness content for Order Management
- For more information on the Channel Revenue Management Integration with Receivables, refer to the Oracle Cloud Readiness content for Financials
- Oracle SCM Cloud: Using Oracle Channel Revenue Management Cloud, available on the Oracle Help Center
- Oracle SCM Cloud: Implementing Oracle Channel Revenue Management Cloud, available on the Oracle Help Center
- Oracle SCM Cloud: REST API for Oracle SCM Cloud, available on the Oracle Help Center
Role Information
You have a couple of options for giving people access to this feature, depending on whether you're assigning them predefined job roles or your own configured job roles.
- Users who are assigned any of these predefined job roles are automatically able to access this feature:
- Channel Claims Manager (ORA_CJM_CLAIMS_MANAGER_JOB)
- Users who are assigned configured job roles that contain these privileges are able to access this feature:
- Manage Customer Claims (CJM_MANAGE_CUSTOMER_CLAIMS_PRIV)
- View Receivables Receipt (AR_VIEW_RECEIVABLES_RECEIPT_PRIV)
- View Receivables Invoice (AR_VIEW_RECEIVABLES_INVOICE_PRIV)
- View Receivables Credit Memo (AR_VIEW_RECEIVABLES_CREDIT_MEMO_PRIV)
Other Channel Revenue Management Changes in This Update
This section includes details about additional changes in this update that can change the way Oracle Channel Revenue Management Cloud works.
Related Opt-In Feature: Search and Select Items More Efficiently
You can optionally take advantage of improvements in searching and selecting items in transactions. To do so, use the Offerings work area to opt in to the feature named Search and Select Items More Efficiently. This feature is available in the Items functional area of the Order Management offering.
For more information about the improvements in searching and selecting items in transactions, refer to the Filter Your Item Selections for Transactions Using Automatic Suggestions feature in the Oracle Product Lifecycle Management What's New, Update 21C.
Load Planning Data for a Selected Group of Organizations
In many companies the frequency and timing of the supply and demand data collection processes can’t be coordinated across functional organization boundaries. Previously, supply and demand data loaded using file-based data import (FBDI) with the targeted refresh option would wipe out the data for the other organizations whose data was not in the file. With this update, the data for only those organizations that are in the load file will be purged prior to the load of the new data.
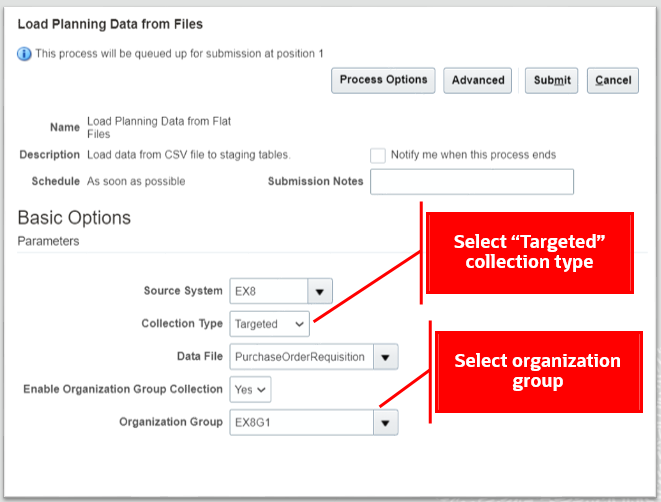
Ensure supply and demand data integrity in Oracle Cloud Supply Chain Planning by organization when using the targeted refresh data load option.
Steps to Enable
You don't need to do anything to enable this feature.
Tips And Considerations
- The organization groups you can select for a source system are set up using the Manage Organization Groups in Maintain Supply Network Model task.
- You can collect supplies and demands entities using file-based data import (FBDI) in targeted collection type in an organization group for organizations from external and SCM cloud source.
- Demand management collection entities like history, measure, and price list aren't supported for using load data for selected group of organizations.
Key Resources
- The Load Planning Data for a Selected Group of Organizations readiness training available on Oracle Cloud Readiness for Supply Chain Planning.
Role Information
You have a couple of options for giving people access to this feature, depending on whether you're assigning them predefined job roles or your own configured job roles.
- Users who are assigned any of these predefined job roles are automatically able to access this feature:
- Materials Planner (ORA_MSC_MATERIALS_PLANNER_JOB)
- Supply Chain Planner (ORA_MSC_SUPPLY_CHAIN_PLANNER_JOB)
- Sales and Operations Planner (ORA_MSC_SALES_AND_OPERATIONS_PLANNER_JOB)
- Replenishment Planner (ORA_MSC_REPLENISHMENT_PLANNER_JOB)
- Order Promising Manager (ORA_MSC_ORDER_PROMISING_MANAGER_JOB)
- Backlog Manager (ORA_MSC_BACKLOG_MANAGER_JOB)
- Users who are assigned configured job roles that contain any of these privileges are able to access this feature:
- Monitor Supply Planning Work Area (MSC_MONITOR_SUPPLY_PLANNING_WORK_AREA_PRIV)
- Monitor Demand and Supply Planning Work Area (MSC_MONITOR_DEMAND_AND_SUPPLY_PLANNING_WORK_AREA_PRIV)
- Monitor Sales and Operations Planning Work Area (MSC_MONITOR_SALES_AND_OPERATIONS_PLANNING_WORK_AREA_PRIV)
- Monitor Replenishment Planning Work Area (MSC_MONITOR_REPLENISHMENT_PLANNING_WORK_AREA_PRIV)
- Monitor Order Promising Work Area (MSC_MONITOR_ORDER_PROMISING_WORK_AREA_PRIV)
- Monitor Backlog Management Work Area (MSC_MONITOR_BACKLOG_MANAGEMENT_WORK_AREA_PRIV)
Configure Color by Measure to Display in a Graph
When you configure graphs, you might want to have a consistent color for a specific measure in your graphs. For example, if you have multiple graphs that display the forecast, it can help you and other planners who use the graphs to quickly identify the forecast measure if the same color is used for the measure in all of the graphs. Previously, the measure color was automatically selected.
To select a graph color for a specific measure for all graphs, select the graph color on the Edit Measure page.

Graph Color Field on the Edit Measure Page (Navigation: Manage Planning Measures > Select a measure > Edit Measure)
To add a graph color for a specific measure for a specific graph, select the graph color for the measure on the Format Measures page.
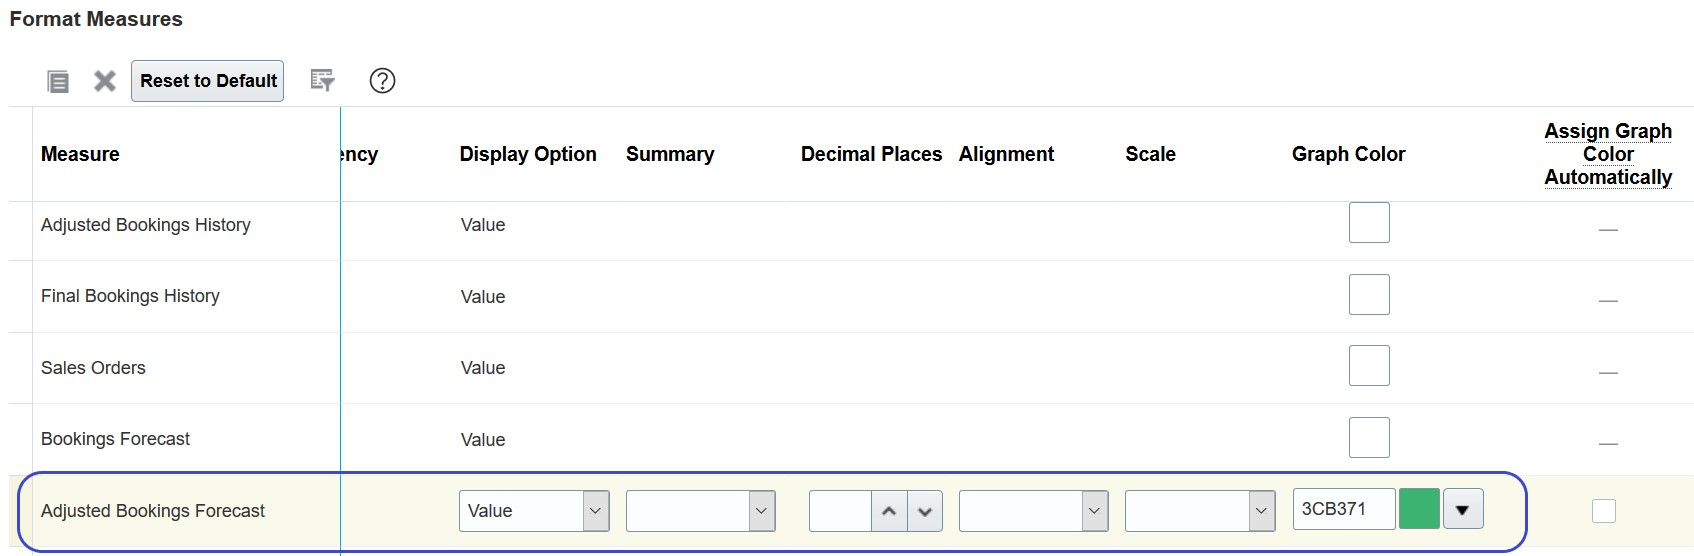
Graph Color Column on the Format Measures Page (Navigation: When viewing a graph or table, click View Menu > Select Format Measures)
If a graph color has been configured for a measure for all graphs, but you want the graph color assigned automatically for that measure for a specific graph, then select the Assign Graph Color Automatically option on the Format Measures page.
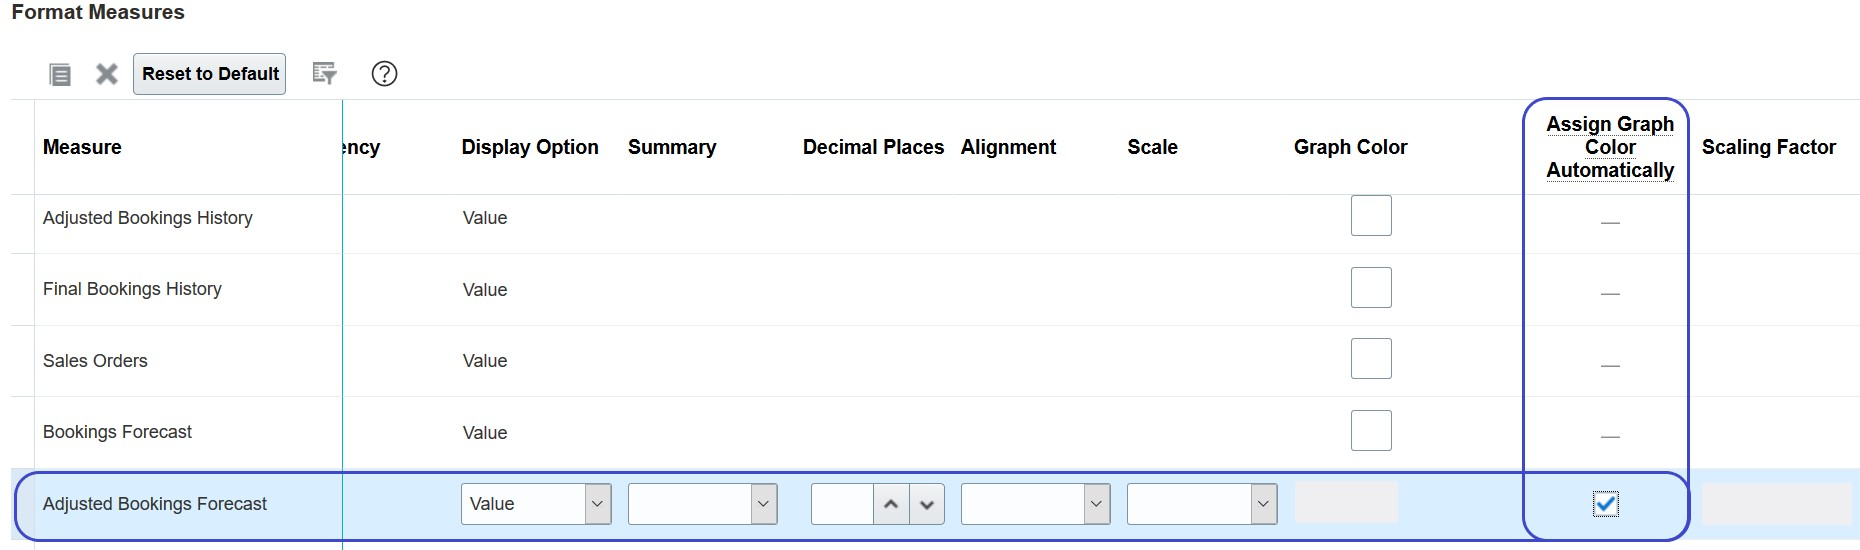
Assign Graph Color Automatically Column on the Format Measures Page (Navigation: When viewing a graph or table, click View Menu > Select Format Measures)
Improve consistency when viewing the same measure in multiple graphs and highlight the impact of the measure.
Steps to Enable
You don't need to do anything to enable this feature.
Tips And Considerations
- You may have to change which color you select for a measure. If the color you configure for a measure is the same color as one of the colors automatically assigned to a measure in a specific graph, then you have to select a different color for the measure you're configuring.
- In bar, line and radar graphs, a measure must be the only one located in the Y-Axis to display the configured graph color.
- Plan Comparison: The configured measure color in the graph is honored for only the measure itself and not for measures that represent the compared plans.
- Archive Plan: When using Waterfall Analysis or Trend Analysis graphs, the configured measure color is honored for only the measure itself and not for the measures that represent the archive.
- Export and Import: Graph color settings are kept when exporting and importing a measure from different environments.
Key Resources
- The Configure Color by Measure to Display in a Graph readiness training available on Oracle Cloud Readiness for Supply Chain Planning.
Role Information
You have a couple of options for giving people access to this feature, depending on whether you're assigning them predefined job roles or your own configured job roles.
- Users who are assigned any of these predefined job roles are automatically able to access this feature:
- Supply Chain Planner (ORA_MSC_SUPPLY_CHAIN_PLANNER_JOB)
- Materials Planner (ORA_MSC_MATERIALS_PLANNER_JOB)
- Demand Planner (ORA_MSC_DEMAND_PLANNER_JOB)
- Sales and Operations Planner (ORA_MSC_SALES_AND_OPERATIONS_PLANNER_JOB)
- Replenishment Planner (ORA_MSC_REPLENISHMENT_PLANNER_JOB)
- Users who are assigned configured job roles that contain these privileges are able to access this feature:
- Maintain Planning Tables (MSC_MAINTAIN_PLANNING_TABLES_PRIV)
Order promising is a critical business process that must scale with demand and continue to operate even if hardware failures occur. Recent changes to Global Order Promising provide a scale-out architecture for availability checking and scheduling requests across a horizontal grid, enhancing capacity and resilience. The new architecture also reduces operational overhead, making supply and reference data updates immediately available, and eliminating the need to refresh/restart the order promising server.
Migration to the new architecture is continuing over several updates. In the interim, Global Order Promising will automatically route some special case requests to the prior memory-resident C++-based solution. This section captures a feature in the prior solution that is now available in the new one.
Configure Available-to-Promise Time Fence to Conserve Existing Supply
Because global order promising promises orders on a first-come, first-serve basis, it sometimes results in supplies being used up for longer term orders because they were scheduled earlier by global order promising. The available-to-promise (ATP) time fence setting in a Supply-Availability-Search-Based ATP rule helps to preserve ATP supply for short term orders. With this setting, for orders with requested dates within the time fence setting, global order promising will search preferentially for ATP supply. Beyond this time fence global order promising will search preferentially for supply through new supply creation.
Improve efficiency of your supply chain, reduce inventory carrying costs, and reduce the overheads associated with monitoring and managing the promised order backlog.
Steps to Enable
You can find setup details in the readiness training for New Architecture Enhancements for Global Order Promising, Update 20D. If you've already performed those setup steps, you don't need to perform them again.
Other Pricing Changes in This Update
This section includes details about additional changes in this update that can change the way Oracle Pricing Cloud works.
Related Opt-In Feature: Search and Select Items More Efficiently
You can optionally take advantage of improvements in searching and selecting items in transactions. To do so, use the Offerings work area to opt in to the feature named Search and Select Items More Efficiently. This feature is available in the Items functional area of the Order Management offering.
For more information about the improvements in searching and selecting items in transactions, refer to the Filter Your Item Selections for Transactions Using Automatic Suggestions feature in the Oracle Product Lifecycle Management What's New, Update 21C.
IMPORTANT Actions and Considerations
REPLACED OR REMOVED FEATURES
From time to time, Oracle replaces existing Cloud service features with new features, or removes existing features. Replaced features may be put on a path to removal. As a best practice, you should use the newer version of a replaced feature as soon as the newer version is available.
This section identifies the features in this Cloud service that have been replaced or will be removed.
| Product | Removed Feature | Target Removal | Replacement Feature | Replaced In | Additional Information |
|---|---|---|---|---|---|
| Pricing | Price Request SOAP Service |
22D | Document Prices REST API |
19A | No additional enhancements have been made to the Price Request SOAP service since update 19A. Until the SOAP service is removed in 22D, it will continue to work, but you should migrate to the Document Prices REST API at your earliest convenience. For details about the Document Prices REST API, refer to the REST API for Oracle Supply Chain Management Cloud documentation, available on the Oracle Help Center. |