- Revision History
- Overview
- Pre-Update and Post-Update Tasks
- Optional Uptake of New Features (Opt In)
- Feature Summary
- Supply Chain Orchestration
- Collaboration Messaging Framework
- Order Management
- IMPORTANT Actions and Considerations
Update 24B
Revision History
This document will continue to evolve as existing sections change and new information is added. All updates appear in the following table:
| Date | Module | Feature | Notes |
|---|---|---|---|
| 28 JUN 2024 | IMPORTANT Actions and Considerations | Updated document. Added more info about changes to applying holds on sales orders. | |
| 07 JUN 2024 | IMPORTANT Actions and Considerations | Updated document. Added details about a new Oracle Order Management parameter for future use. | |
| 24 MAY 2024 | IMPORTANT Actions and Considerations | Updated document. Added details about: using only supported public view objects in order management extensions, changes to hold codes, and changes to applying holds on sales orders. | |
| 24 MAY 2024 | SCM Common Components | Extend SCM Redwood Application Pages Using Visual Builder Studio | Updated document. Revised feature description and key resources. |
| 13 MAR 2023 | IMPORTANT Actions and Considerations | Updated document. Added details about changes to the integration from Shipping and Receivables to Order Management. |
|
| 11 MAR 2024 | SCM Common Components | Extend SCM Redwood Application Pages Using Visual Builder Studio | Updated document. Revised feature description. |
| 01 MAR 2024 | Created initial document. |
Overview
 HAVE AN IDEA?
We’re here and we’re listening. If you have a suggestion on how to make our cloud services even better then go ahead and tell us. There are several ways to submit your ideas, for example, through the Ideas Lab on Oracle Customer Connect. Wherever you see this icon after the feature name it means we delivered one of your ideas.
GIVE US FEEDBACK
We welcome your comments and suggestions to improve the content. Please send us your feedback at oracle_fusion_applications_help_ww_grp@oracle.com.
DISCLAIMER
The information contained in this document may include statements about Oracle’s product development plans. Many factors can materially affect Oracle’s product development plans and the nature and timing of future product releases. Accordingly, this Information is provided to you solely for information only, is not a commitment to deliver any material, code, or functionality, and should not be relied upon in making purchasing decisions. The development, release, and timing of any features or functionality described remains at the sole discretion of Oracle.
This information may not be incorporated into any contractual agreement with Oracle or its subsidiaries or affiliates. Oracle specifically disclaims any liability with respect to this information. Refer to the Legal Notices and Terms of Use for further information.
Pre-Update and Post-Update Tasks
Depending on the features you're using in your Cloud applications, you may be required to perform certain steps immediately before or after your quarterly update. For details of these pre-update and post-update steps and the product areas that are affected, refer to Oracle Fusion Cloud SCM: Performing Your Quarterly Update (doc ID 2337485.1) on My Oracle Support.
Optional Uptake of New Features (Opt In)
Oracle Cloud Applications delivers new updates every quarter. This means every three months you'll receive new functionality to help you efficiently and effectively manage your business. Some features are delivered Enabled meaning they are immediately available to end users. Other features are delivered Disabled meaning you have to take action to make available. Features delivered Disabled can be activated for end users by stepping through the following instructions using the following privileges:
- Review Applications Offering (ASM_REVIEW_APPLICATIONS_OFFERINGS_PRIV)
- Configure Oracle Fusion Applications Offering (ASM_CONFIGURE_OFFERING_PRIV)
Here’s how you opt in to new features:
- Click Navigator > My Enterprise > New Features.
- On the Features Overview page, select your offering to review new features specific to it. Or, you can leave the default selection All Enabled Offerings to review new features for all offerings.
- On the New Features tab, review the new features and check the opt-in status of the feature in the Enabled column. If a feature has already been enabled, you will see a check mark. Otherwise, you will see an icon to enable the feature.
- Click the icon in the Enabled column and complete the steps to enable the feature.
In some cases, you might want to opt in to a feature that's not listed in the New Features work area. Here's how to opt in:
- Click Navigator > My Enterprise > Offerings.
- On the Offerings page, select your offering, and then click Opt In Features.
- On the Opt In page, click the Edit Features (pencil) icon for the offering, or for the functional area that includes your feature.
- On the Edit Features page, complete the steps to enable the feature.
For more information and detailed instructions on opting in to new features for your offering, see Configure Offerings.
Opt In Expiration
Occasionally, features delivered Disabled via Opt In may be enabled automatically in a future update. This is known as an Opt In Expiration. If your cloud service has any Opt In Expirations you will see a related tab in this document. Click on that tab to see when the feature was originally delivered Disabled, and when the Opt In will expire, potentially automatically enabling the feature. You can also click here to see features with Opt In Expirations across all Oracle Cloud Applications.
Feature Summary
Column Definitions:
Features Delivered Enabled
Report = New or modified, Oracle-delivered, ready to run reports.
UI or Process-Based: Small Scale = These UI or process-based features are typically comprised of minor field, validation, or program changes. Therefore, the potential impact to users is minimal.
UI or Process-Based: Larger Scale* = These UI or process-based features have more complex designs. Therefore, the potential impact to users is higher.
Features Delivered Disabled = Action is needed BEFORE these features can be used by END USERS. These features are delivered disabled and you choose if and when to enable them. For example, a) new or expanded BI subject areas need to first be incorporated into reports, b) Integration is required to utilize new web services, or c) features must be assigned to user roles before they can be accessed.
| Ready for Use by End Users Reports plus Small Scale UI or Process-Based new features will have minimal user impact after an update. Therefore, customer acceptance testing should focus on the Larger Scale UI or Process-Based* new features. |
Action is Needed BEFORE Use by End Users Not disruptive as action is required to make these features ready to use. As you selectively choose to leverage, you set your test and roll out timing. |
|||||
|---|---|---|---|---|---|---|
| Feature |
Report |
UI or |
UI or |
|
||
Streamline Your B2B Setup for the Avalara and TIE Kinetix Service Providers |
||||||
Extend SCM Redwood Application Pages Using Visual Builder Studio |
||||||
Update Attributes on Split Order Lines for Partial Drop Shipments |
||||||
Cancel Sales Order Backorders Automatically and Enforce Single Shipment |
||||||
Import Types and Rates of Consumption for Manufacturing Components, Materials, and Resources |
||||||
Consume Resource Capacity Only After Components are Available |
||||||
Supply Chain Orchestration
Use Redesigned Pages to View Supply Requests
Use redesigned pages to view supply requests and their details on your desktop, tablet, or mobile device. You can now use the supply request reference, supply order, supply document, or item to search for your supply requests. Create and save your own default searches. Filter search results according to the supply's requested date, requested delivery date, request status, and so on. View recommended actions that you need to take to remove exceptions. View the supply documents that Oracle Supply Chain Orchestration created for each request. View details about request lines and take actions.
To use this feature, go to the Supply Orchestration work area, click Tasks > Supply Requests, then search for your supply request.
Improve your efficiency when you search for and view supply requests.
Steps to Enable
Use the Opt In UI to enable this feature. For instructions, refer to the Optional Uptake of New Features section of this document.
Offering: Manufacturing and Supply Chain Materials Management
Tips And Considerations
Use these attributes to search for your supply requests:
- Supply Request Reference
- Supply Order
- Supply Document
- Item
Use these attributes to filter your search results:
- Supply Requested Date
- Requested Delivery Date
- Supply Status
- Supply Type
- Business Flow
Do more:
- View details about the supply documents for each supply request.
- Create and save your own search. Make that search your default search.
- Drill into into the supply request to get details about the supply request and any exception messages that might exist.
- If a supply request is in exception, then you can view a recommended action to fix it.
- Do various actions on each supply request.
Key Resources
- See Using Supply Chain Orchestration and Supply Chain Orchestration on Oracle Help Center.
Access Requirements
You have a couple of options for giving people access to this feature, depending on whether you're assigning them predefined job roles or your own configured job roles.
- Users who are assigned any of these predefined job roles can access this feature:
- Supply Chain Operations Manager (ORA_DOS_SUPPLY_CHAIN_OPERATIONS_MANAGER_JOB)
- Users who are assigned a configured job role that contains these privileges can access this feature:
- Process Supply Order Interface (DOS_PROCESS_SUPPLY_ORDER_INTERFACE_PRIV)
- View Supply Orders (DOS_VIEW_SUPPLY_ORDERS_PRIV)
- Manage Supply Request Exceptions (DOS_MANAGE_SUPPLY_REQUEST_EXCEPTIONS_PRIV)
- View Supply Order Exceptions and Status (DOS_VIEW_SUPPLY_ORDER_EXCEPTIONS_AND_STATUS_PRIV)
If you're maintaining your own job roles, no new privileges were introduced to support this feature.
Collaboration Messaging Framework
Streamline Your B2B Setup for the Avalara and TIE Kinetix Service Providers
The process for B2B setup has been streamlined for the Avalara and TIE Kinetix predefined service providers. If you are subscribed to their services, you can connect with your trading partners and exchange messages with greater ease.
The endpoints for these service providers are predefined, and a new simplified process is provided to streamline the B2B setup in the Collaboration Messaging work area.
Steps to Enable
At a high level, to set up these service providers:
- Configure the service providers to exchange messages with your trading partners.
- Create trading partners.
- Associate the trading partners with your customers or suppliers and select the documents you want to exchange.
These steps are detailed in the Configuring and Managing B2B Messaging for Oracle Fusion Cloud SCM guide.
Configure the Predefined Service Providers Avalara or TIE Kinetix to Exchange Messages with Your Trading Partners.
- Select Manage Collaboration Messaging Service Providers from the Tasks panel tab, search for either Avalara or TIE Kinetix and select Actions > Edit.
The overview tab displays the following details about the service provider:
- Connection type that is configured, Test or Production.
- A check box to indicate whether credentials are configured or not.
- The number of trading partners configured for the service provider.
- The number of trading partners with override message definitions.
- The number of customers that are setup with the service provider.

Service Provider Overview for TIE Kinetix
- Select Actions > Manage Delivery Settings to configure the settings for outbound message delivery.
-
- Select Test or Production in the Outbound Delivery Connection Type drop-down to reflect the environment you're setting up.
-
- Enter the username and password provided by Avalara or TIE Kinetix for sending messages to their network in the Service Provider User Name and Password fields.
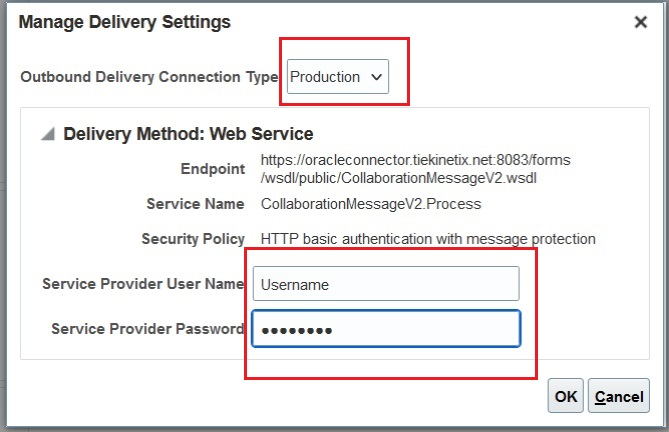
Manage Delivery Settings
- Select the Outbound Message Setup tab to activate the outbound messages:
The outbound messages available for Avalara are:
- Invoice
The outbound messages available for TIE Kinetix are:
- Invoice
- Purchase Order
- Change Purchase Order
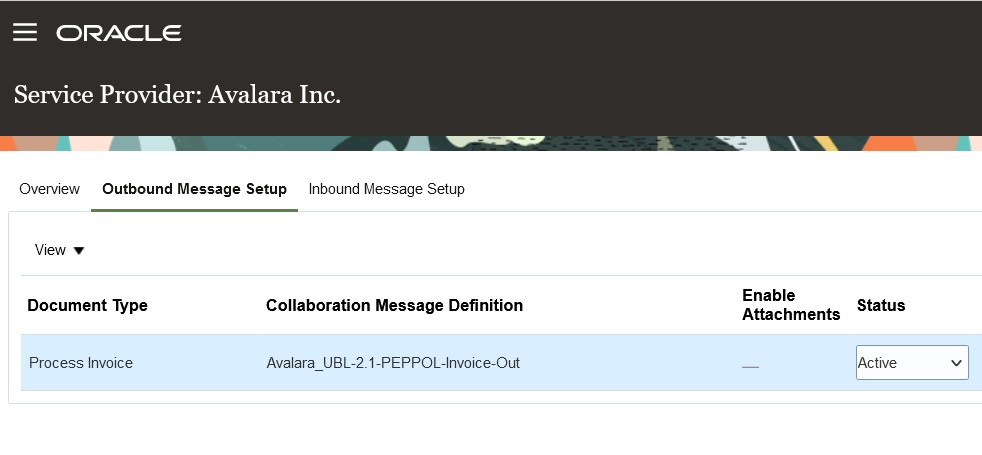
Avalara– Outbound Message Setup
- Select the Inbound Message Setup tab to activate the inbound purchase order.
The inbound messages available for Avalara are:
- Acknowledge Invoice
- Invoice
The inbound messages available for TIE Kinetix are:
- Acknowledge Invoice
- Acknowledge Purchase Order
- Invoice
- Shipment
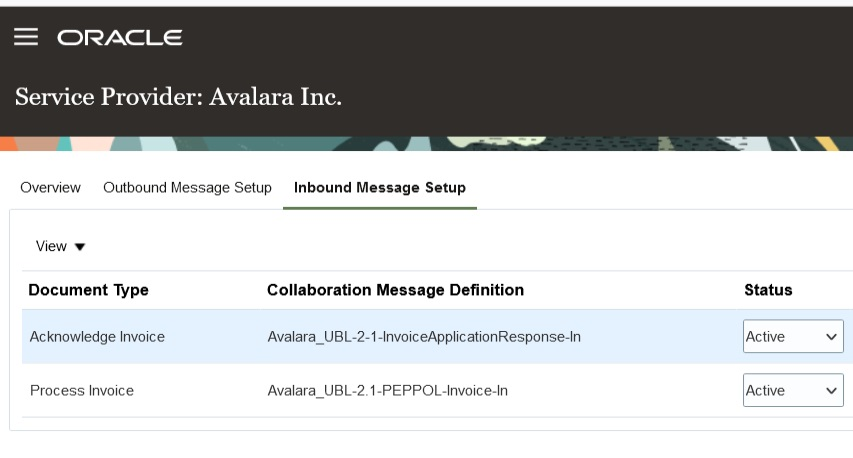
Avalara- Inbound Message Setup
Create Trading Partners
After completing the service provider setup, create your trading partners.
- Select Manage B2B Trading Partners on the Tasks panel tab.
- On the Manage B2B Trading Partners page, select Actions > Create, and add your trading partners.
- Select Avalara or TIE Kinetix as the service provider you're using.
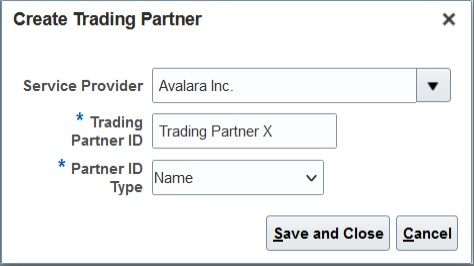
Create a Trading Partner
Associate Trading Partners with Your Customers
Next, associate the trading partners with your customers and select the documents you plan to exchange.
- Select Manage Customer Account Collaboration Configuration on the Tasks panel tab, and search for your customers.
- Select a customer and then select Edit Collaboration Configuration.
- In the Associated Service Providers section of the Edit Customer Account Collaboration Configuration page, select Actions > Add Row to add a trading partner and the service provider.
- In the Collaboration Documents for Service Provider section, select Actions > Add Row, add the documents you want to exchange and set their Association Status to Enabled.
Both the Avalara and TIE Kinetix service providers have the following documents available:
- Invoice Acknowledgement Inbound
- Invoice Outbound
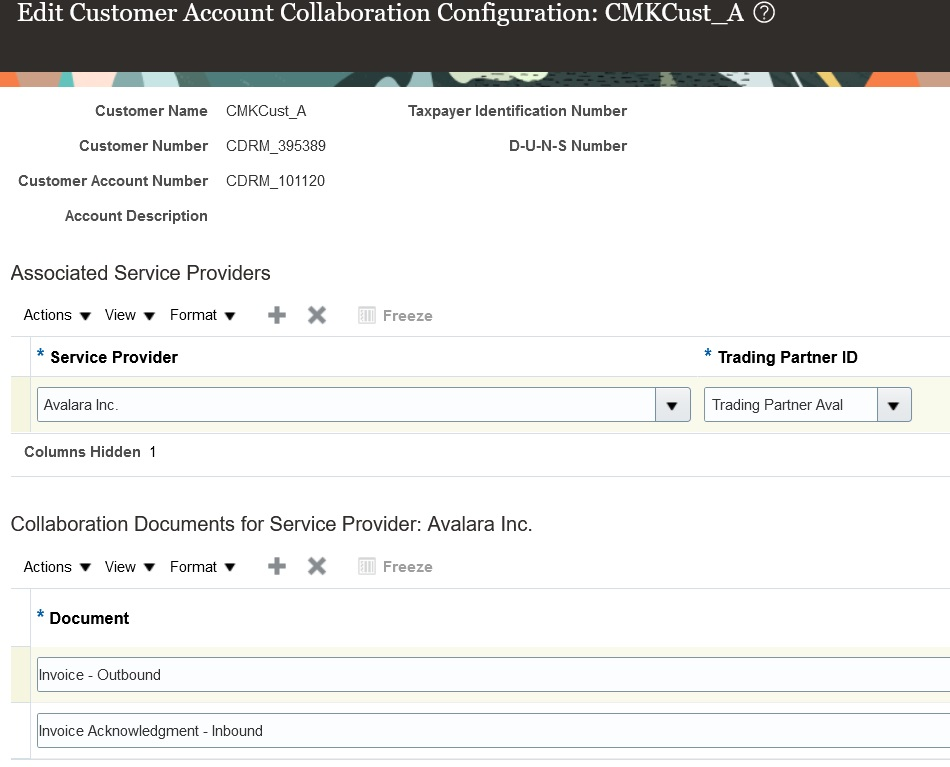
Customer Account Collaboration Configuration
Associate Trading Partners with Your Suppliers
- Select Manage Supplier B2B Configuration on the Tasks panel tab, and search for your suppliers.
- Select a supplier and then select Edit Supplier B2B Configuration.
- On the Edit Supplier B2B Configuration page, select the Trading Partner Assignment tab and click Actions > Add Row to add a trading partner and either the Avalara or TIE Kinetix service provider.
The Avalara service provider has the following document available for setup:
- Invoice - Inbound
The TIE Kinetix service provider has the following documents available for setup.
- Advance Ship Notice – Inbound
- Purchase Order Acknowledgement – Inbound
- Invoice – Inbound
- Purchase Order – Outbound
- Purchase Order Change – Outbound

Document Setup for Supplier Sites
Tips And Considerations
If you used TIE Kinetix services prior to this release, you’ll notice that your message definition names are now prefixed with 'TIEKinetix_'. You can select TIE Kinetix from the list of service providers in the Manage Collaboration Message Definitions task to search for your message definitions.
Key Resources
- Refer to the Configuring and Managing B2B Messaging for Oracle Fusion Cloud SCM guide on the Oracle Help Center.
Access Requirements
Users who are assigned a configured job role that contains these privileges can access this feature:
- Manage B2B Customer Trading Partners (CMK_B2B_CUSTOMER_TRADING_PARTNERS_PRIV)
- Manage Customer Account Collaboration Configuration (CMK_B2B_CUSTOMER_ACCOUNT_TRADING_PARTNERS_PRIV)
- Manage B2B Trading Partners (CMK_B2B_TRADING_PARTNERS_PRIV)
- Manage Service Provider (CMK_MANAGE_SERVICE_PROVIDER_PRIV)
These privileges were available prior to this update.
Transmit a Purchase Order as a PDF File
You can use the Transmit the PO PDF as an unzipped file when it’s the only attachment check box to send a PO as an uncompressed PDF file by email to your suppliers. This option is applicable when the PO is the only attachment available for the message.
This feature makes it easier for smaller suppliers who don’t have automated systems to read the POs they receive.
Steps to Enable
The email delivery method may be configured for a service provider or a trading partner to transmit the PO PDF as an unzipped file. To enable this option,
- Select Manage Collaboration Messaging Service Providers from the Tasks panel tab, and search for the service provider you're using to deliver your B2B messages. If you don’t use a service provider for sending and receiving messages, select Manage B2B Trading Partners from the Tasks panel.
- Select the Delivery Methods tab, and on the email delivery method, select the Transmit the PO PDF as an unzipped file when it’s the only attachment check box.

Transmit the PO PDF as an Unzipped File When It’s the Only Attachment on the Delivery Methods Tab
3. Select Save and Close.
Tips And Considerations
The PO PDF is sent as an uncompressed file if it's the only attachment for the message. If there are additional attachments, all attachments including the PO PDF will be compressed and sent as a ZIP file. If your suppliers can’t receive a ZIP file, you can use the File Extension field on the email delivery method to set the extension of the file that is sent by email.
Key Resources
-
Refer to the Configuring and Managing B2B Messaging for Oracle Fusion Cloud SCM guide on the Oracle Help Center.
Access Requirements
Users who are assigned a configured job role that contains these privileges can access this feature:
- Manage B2B Trading Partners (CMK_B2B_TRADING_PARTNERS_PRIV)
- Manage Service Provider (CMK_MANAGE_SERVICE_PROVIDER_PRIV)
These privileges were available prior to this update.
Order Management
SCM Common Components
Extend SCM Redwood Application Pages Using Visual Builder Studio
Tailor a seamless experience for the users in your enterprise using Oracle Visual Builder Studio. You can use business rules in Visual Builder Studio’s Express mode to:
- Make the fields and regions on a page required or optional.
- Make the fields and regions on a page read-only or editable.
- Show or hide fields and regions depending on specific criteria.
- Configure Redwood pages to best meet your specific business needs. For example, you can control which actions are visible on the Receipt Deliveries page, or you can set the default date range that's available on the PAR Counts Overview page.
The types of changes you can make to a page depend on the page you're modifying.
NOTE: In this update, business rules aren't yet supported on all SCM Redwood pages.
To determine whether you can extend a specific page using Visual Builder Studio, go to the page and open the Setting and Actions menu. Look for the Edit Page In Visual Builder Studio task:
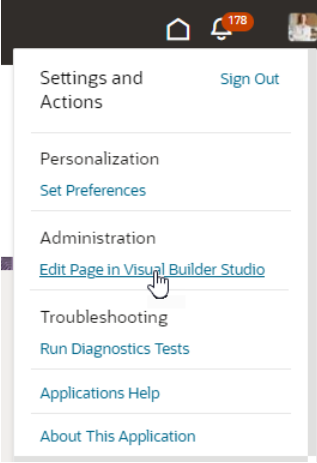
Settings and Actions Menu
If you don’t see the Edit Page in Visual Builder Studio task, then you can’t use Visual Builder Studio to edit the page, either because you're not assigned the necessary privilege to edit pages in VB Studio, or because the page can't currently be edited in VB Studio.
When you open a page in Visual Builder Studio, use only the Express mode to extend the page. Advanced mode isn’t supported. If Express mode isn't available when you open the page in VB Studio, then you can't extend the page in VB Studio. You can find the Express mode in the Visual Builder Studio header region:

Header Region in Visual Builder Studio
See Extending Oracle Cloud Applications in Visual Builder Studio Express Mode for details about how to extend your application pages in Express mode.
Steps to Enable
Leverage the Visual Builder Studio to expose your applications. To learn more about extending your application using Visual Builder, visit Oracle Help Center > your apps service area of interest > Books > Configuration and Extension.
Before you can start working with Visual Builder Studio, a systems administrator must complete some initial setup. For instructions, see Set Up VB Studio to Extend Oracle Cloud Applications.
Tips And Considerations
Keep the Pages list closed while you work in Visual Builder Studio Express mode. Closing the list gives you a cleaner view of the page you’re extending.
In Visual Builder Studio Express mode, you might see capabilities that support defaulting and validation of field values. The features aren't supported in SCM Redwood pages in update 24B. You'll be able to use defaulting and validation for selected SCM Redwood pages in future updates.
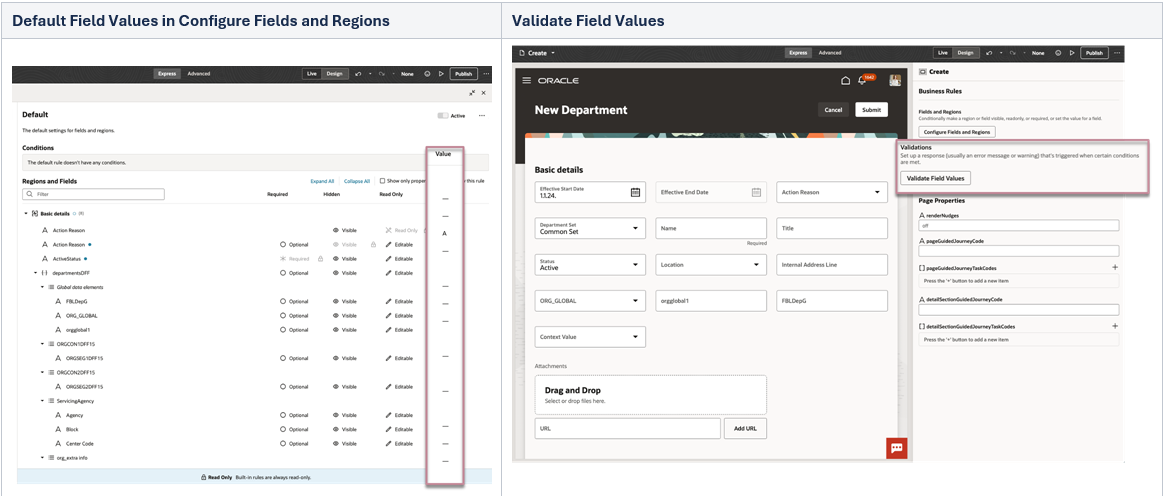
Default Field Values and Validate Field Values in VB Studio Express Mode
Key Resources
To start extending your application pages in Visual Builder Studio, follow the instructions to access Visual Builder Studio. As you’re working, you can find additional information in these resources:
- Extend Oracle Cloud Applications in Visual Builder Express Mode
- Oracle Fusion Cloud HCM and SCM: Extending Redwood Applications for HCM and SCM Using Visual Builder Studio
Access Requirements
To extend application pages using Visual Builder Studio, you must be assigned a configured job role that contains this privilege:
-
Administer Sandbox (FND_ADMINISTER_SANDBOX_PRIV)
This privilege was available prior to this update.
Order Management
Update Attributes on Split Order Lines for Partial Drop Shipments
Update attributes on a split order line that Oracle Order Management creates when a supplier ships part of an order line in a drop shipment flow. If only some of the quantity on the order line is currently available on the requested date, then your drop ship supplier might ship that quantity, and Order Management will split the order line for the remaining quantity. Starting with update 24B, you can update attributes on the split fulfillment line.
Use this feature so you can update attributes on a split order line that Order Management creates when Oracle Procurement ships part of an order line in a drop shipment flow.
All the following usages described in this document involve split lines that you ship in a drop shipment.
Scenario
A supplier can ship part of a fulfillment line that you drop ship to help meet customer demand. If only some of the quantity on the order line is currently available on the requested date, then the supplier ships the quantity that's available to ship, and Order Management will create a split order line for the remaining quantity. You now have a new fulfillment line that has the remaining quantity that the supplier still needs to ship.
You might need to update attributes on the new split line in Order Management after the supplier ships part of the order line. For example, assume you know that supplier B has enough supply to fulfill the line that hasn't shipped. If you revise the supplier and supplier site attributes on that line to supplier B and submit your revision, then Order Management will send these details to Procurement so Procurement can create a new purchase order for supplier B, and supplier B can fulfill the request.
Update Attributes on Split Order Lines
You can:
- Modify the quantity, scheduled date, shipping location, shipping method, supplier, or supplier site.
- Modify the price of a purchase order line, through an extensible flexfield on the order line.
- Unschedule the line or substitute the item.
- Schedule or split the line when it's in Manual Scheduling Required status.
You can update an attribute's value on a split line in Order Management, and then use that value to:
- Reprice and recalculate tax.
- Fulfill, recognize revenue, and bill the split lines.
- Cost the transaction and recognize the cost of goods sold for the split lines in Oracle Cost Management.
- Orchestrate financial details and process the transaction in Oracle Supply Chain Financial Orchestration for the split lines.
Do these updates in the Order Management work area, through REST API, or through some other application, such as Oracle Backlog Management or Oracle Global Order Promising.
Update Attributes on Purchase Orders
You can update attributes on a purchase order's partially shipped line:
- Modify the promised dates, shipping method or quantity.
- Split the schedule on the line.
- Cancel a line on the purchase order.
You can update attributes on a line that Procurement never received in a purchase order, and when the line contains a configured item, a kit, or the item is part of a shipment set:
- Modify the quantity or split the schedule.
- Cancel a line on the purchase order.
Do these updates in Procurement, through REST API, or through Oracle Supplier Portal.
Use Order Management
You can now update one or more attributes on an order line that you split and ship through a drop shipment:
- Update line attributes just like you do when you update attributes on a line that isn't split and when the line is awaiting shipping. You can also use actions in a fulfillment view to do this.
- As an option, use the Update Lines action to update attributes on all the lines that you select at the same time. If you opt into this feature, then you can use this action for the split lines and for the order lines that you backorder in Procurement.
- Update an attribute on the order header, and Order Management will cascade your update to all the split lines that you haven't overridden. You can also use the Override Order Line action to update an attribute on the split line.
- Use an order management extension or posttransformation rule to update an attribute on a split line.
NOTE:
- If you ship lines in a shipment set, and if you partially ship or don't ship at least one of these lines, then Order Management removes the lines that you haven't shipped from the set. You can now update attributes on the removed lines just like you do on a line that isn't in a shipment set.
If you update an attribute on a split through REST API, or through some other application, such as Backlog Management, Global Order Promising, and so on, but it’s a split line that Order Management doesn't allow you to update, then you will receive an error.
If you do an unschedule action for one or more split lines, and if the fulfillment tolerance on at least one of the lines that you select isn’t 0, then Order Management will ask you to confirm the action. For background, see Guidelines for Setting Up Shipment Tolerances.
If you use an action in a fulfillment view to update the split lines, and if your selection includes:
- Only the split lines that Order Management can’t update. Order Management will display the same error that it displays when you don't use this feature.
- Split lines that Order Management can update. Order Management will update them, and won't update the split lines that it can't update.
You can’t update an attribute if:
- It’s on a remnant line of a configured item.
- It’s on a line that Order Management created when Oracle Receiving partially received a return line.
- It’s on a sales order that you submitted before you opted into the Update Attributes on Split Order Lines for Partial Drop Shipments feature. You can update attributes on a split line that you drop ship only on a sales order that you submit after you opt into the feature.
How Order Management Processes Change
Order Management User Updates an Attribute
Order Management processes change on a split line similar to how it processes change on a line that isn't split and that's awaiting shipping. You can use different compensation patterns according to the attributes that you update or according to the fulfillment task that Order Management is compensating.
If you update an attribute on a split line, and if the orchestration process uses that attribute to identify change for a fulfillment task, then the orchestration process sends the updated attribute value on the split line to Procurement. For example, if you update attributes such as the ordered quantity, shipping method, scheduled dates, shipping location and so on a split line, then Order Management compensates the procurement task and sends the updated attribute value to Procurement.
- The orchestration process compensates all of its fulfillment tasks, then sends the split line to Procurement.
- You can cancel a split line on a sales order or fulfill it without updating any attribute just like you did before you could use this feature. Procurement will close the purchase order line that fulfills the split line.
- Order Management no longer compensates the parent line of a split line when you cancel that split line for a partial shipment.
If you substitute an item, do an unschedule action, or change the fulfillment from a drop shipment to a standard warehouse flow or to a back-to-back flow, then Order Management will send a request to Procurement to close the purchase order.
- For example, if you substitute an item, then Procurement will close the old purchase order and create a new purchase order for the new item.
- If you unschedule a split line, then you can reschedule the line to a new supplier or warehouse.
- If you revise the split line to remove the supplier and add a warehouse, then Procurement will close the purchase order and order management will interface the line to your warehouse for fulfillment.
Buyer or Supplier in Procurement Updates an Attribute
Here are some examples of how Order Management processes an update on a purchase order when Procurement has received only part of the quantity, and a buyer or supplier updates an attribute on a split line in Procurement.
| What You Do in Procurement |
What Order Management Does |
|---|---|
| Reduce the quantity on the purchase order line. |
If you reduce the purchase order quantity to:
|
| Cancel the schedule on the purchase order line. |
If you set the Cancel Unfulfilled Demand attribute to:
If your item is a configured item, kit, or shipment set, then you can cancel the entire purchase order but not the purchase order line and schedule. |
| Update the promised ship date or the promised delivery date on the schedule. |
Update the scheduled ship date or the scheduled arrival date on the backordered fulfillment line. |
| Split the purchase order's schedule into more than one schedule, and then update the promised dates after Procurement receives the remaining quantity |
Split the line into more than one line, and then update the scheduled ship date or the scheduled arrival date on these lines. |
How Procurement Processes Change
Here are some examples of how Procurement processes an update that you make on an attribute on a split line on a sales order in Order Management when Procurement has received only part of the schedule.
| What You Do in Order Management |
What Procurement Does |
|---|---|
| Modify the quantity. |
|
| Modify the scheduled date |
|
| Add a new price for the purchase order through an extensible flexfield on the sales order line. |
|
| Modify the shipping method. |
|
| Modify the shipping location |
|
| Unschedule the line |
Close the purchase order with the quantity that Procurement already received. |
| Substitute the item, or modify the supplier or supplier site. |
|
How Supply Chain Financial Orchestration and Cost Management Process Change
Assume you add a new price for the purchase order through an extensible flexfield on the order line in Order Management, and then Procurement updates the price on the purchase order line:
- Financial Orchestration will calculate the transfer price according to the price on the updated purchase order line for each subsequent drop shipment.
- Cost Management will use the new price when it processes each subsequent drop shipment. It will also adjust the price on each prior drop shipment according to the new price on the purchase order line.
- If you modify the supplier or supplier site on the sales order line, then Procurement will create a new purchase order, and Financial Orchestration will create a new financial agreement for each subsequent drop shipment.
Assume on-hand supply becomes available, so you update the supply details on the sales order line and ship the remaining quantity that you haven't shipped yet from the warehouse. This modification will change the sales order's flow from a drop shipment to a standard flow or to an intercompany transfer. Financial Orchestration and Cost Management will use the new flow when they process and cost each subsequent shipment.
Realize these benefits:
- Update attributes on an order line after you ship part of a drop shipment line.
- Avoid having to cancel split lines and manually recreate new ones when all you want to do is update attributes on the shipment line.
- Reduce the number of steps and the time you need to process change on an order line after you ship part of that line.
- Improve efficiency and accuracy of change processing on the line after you ship part of the line.
- Improve tracking and reporting for lines that you fulfill in more than one shipment.
- Increase customer satisfaction.
Steps to Enable
Use the Opt In UI to enable this feature. For instructions, refer to the Optional Uptake of New Features section of this document.
Offering: Order Management
Tips And Considerations
- You can't opt out of the Update Attributes on Split Order Lines for Partial Drop Shipments feature after you opt in and submit a sales order. At this point, you're committed to using the feature.
- You can update attributes on a split line, that you drop ship, and that has a configured item or a kit just like you do when you update attributes on a line that isn’t split and that’s awaiting shipping, but you can’t modify the configured item on a split line.
- If you update an attribute on a split line, then Oracle Pricing reprices the line just like it does when you update an attribute on a line that isn't split and that's awaiting shipping.
- If you drop ship a split line in a standard or in a back-to-back flow, then you can set the supplier and the supplier site on the split line.
- If you substitute the item on a split line, or unschedule it, and if the fulfillment tolerance on the line isn’t 0, then the fulfillment system will apply the fulfillment tolerance on the split order line, but it won't consider the cumulative quantity that you already shipped across all of the order line's fulfillment lines. Instead, the fulfillment system will consider only the quantity on the fulfillment line that you're shipping.
- You can’t use a web service from Application Development Framework to update an attribute on a split line that you drop ship.
Here's a summary of what the buyer or supplier can do on a purchase order line when Procurement has received only part of the quantity.
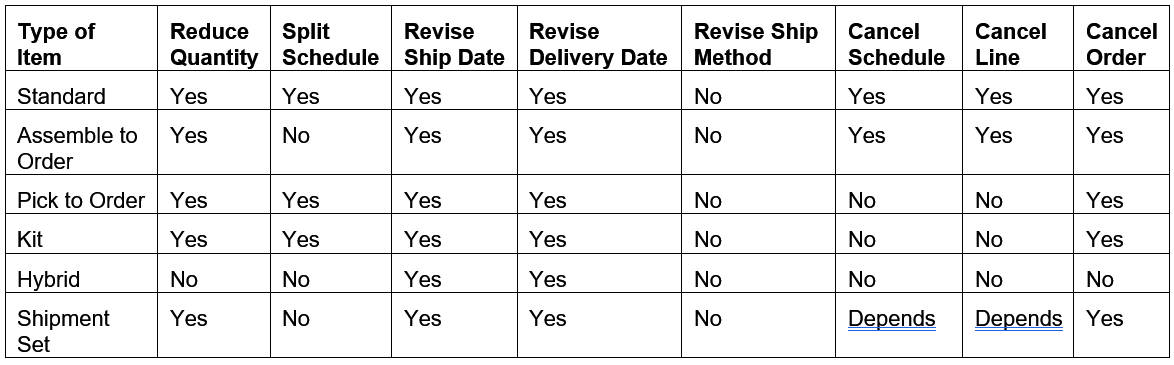
Summary of Buyer and Supplier Changes Supported on Backordered Lines
NOTE:
- Depends means Yes, but only for standard or assemble-to-order items.
If the item is a configured item, kit, or shipment set, and if you modify the date or shipment method, then you must apply the same date or shipment method across all the lines that are part of the configured item, kit, or set.
If Procurement hasn't received any of the quantity, then you can still make all of the same modifications that you can make when Procurement has received only part of the quantity, except for these differences with a shipment set.

If Procurement Hasn't Received Any of the Quantity, Then You Can Still Make All of the Same Modifications That You Can Make When Procurement Has Received Only Part of the Quantity Except for These Differences with a Shipment Set.
Key Resources
- For background details, see:
- For more, see these books on Oracle Help Center:
- Implementing Order Management
- Implementing Manufacturing and Supply Chain Materials Management
- Implementing Cost Accounting
- Using Cost Accounting and Receipt Accounting
- Using Supply Chain Orchestration
- Using Functional Setup Manager
Access Requirements
You have a couple of options for giving people access to this feature, depending on whether you're assigning them predefined job roles or your own configured job roles.
- Users who are assigned configured job roles that contain these privileges are able to access this feature:
- Initiate Order (FOM_CREATE_ORDER_PRIV)
- Revise Order (FOM_REVISE_ORDER_PRIV)
- View Orders (FOM_VIEW_ORDERS_PRIV)
- Change Purchase Order (PO_CHANGE_PURCHASE_ORDER_PRIV)
- Maintain Supply Chain Financial Orchestration Flow (FOS_MAINTAIN_SUPPLY_CHAIN_FINANCIAL_TRADE_AGREEMENT_PRIV)
- Create Cost Accounting Distributions (CST_CREATE_COST_DISTRIBUTIONS_PRIV)
- Review Cost Distribution (CST_REVIEW_COST_DISTRIBUTIONS_PRIV)
If you're maintaining your own job roles, no new privileges were introduced to support this feature.
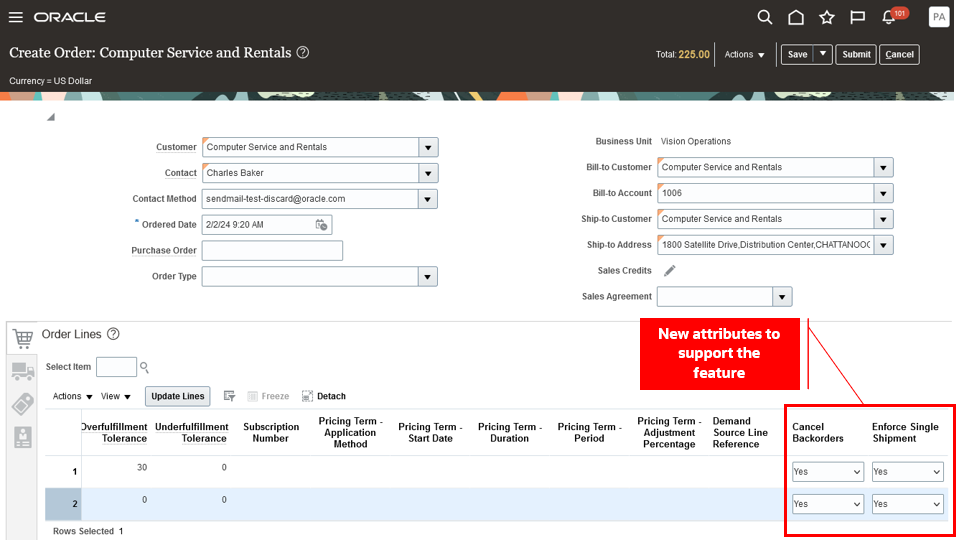
Cancel Sales Order Backorders Automatically and Enforce Single Shipment
In many industries, customer contracts dictate specific fulfillment terms which can include whether or not the customer accepts backorders or multiple shipments. Prior to this update, if your customer didn't accept backorders or multiple shipments, you'd have to manually cancel quantities you couldn't fulfill by the promised delivery date. Now you have the option to automatically cancel any quantity that can't be fulfilled due to on-hand quantity shortages during pick confirm or ship confirm. Additionally, you can choose to automatically cancel any remaining open quantity after the first shipment even if you have the available on-hand quantity to fulfill the order, for instances where your customer only accepts a single shipment per order.
With this feature, these attributes are added in Oracle Order Management and Oracle Shipping:
- Cancel Backorders: Set this option to Yes if you want to automatically cancel any quantity that can't be fulfilled due to on-hand quantity shortages while releasing picks, confirming picks, confirming shipments, or creating outbound shipment requests to the external execution system.
- Enforce Single Shipment: Set this option to Yes if you want to automatically cancel any remaining open quantity on the order after the first shipment is confirmed and closed.
You can set these attributes on an order line using the Create Order page in the Order Management work area, Order Management extension, Sales Orders for Order Hub Requests REST API, or Import Sales Orders File-Based Data Import (FBDI through REST backend).
Create Order
Once the line is interfaced with Shipping, you can view the attribute values on the Manage Shipment Lines page in the Inventory Management work area.
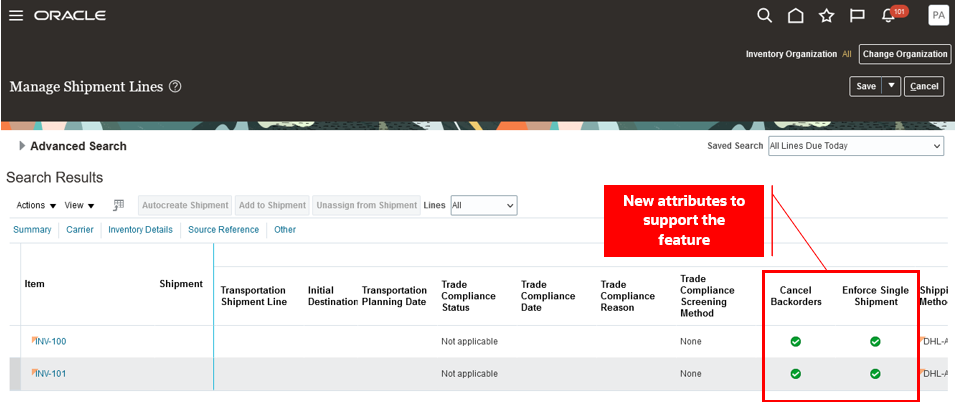
Manage Shipment Lines Page
When a line is set to Cancel Backorders:
- The Create Pick Wave process automatically cancels any shipment lines that are backordered due to on-hand quantity shortages.
- The Generate Shipment Request process automatically cancels any shipment lines that can't be interfaced with the WMS or 3PL due to on-hand quantity shortages.
- If the Enforce Shipment Set shipping parameter is enabled for the organization and a line within the shipment set is canceled due to on-hand quantity shortages, all lines within the shipment set will be canceled.
- During pick confirmation, if less than the requested quantity is picked and the quantity exception reason is of the backorder type, the remaining quantities will be canceled.
- Any quantities specified as backordered on the shipment line will be canceled when shipments are confirmed.
- When a shipment line is interfaced with WMS or 3PL and the Shipment Line Change Requests REST API is used to backorder a shipment line, the backordered quantities will be canceled.
- When a shipment line is interfaced with WMS or 3PL and the Shipment Transaction Requests REST API or Perform Shipping Transaction Import FBDI is used to perform shipping transactions, any quantities specified to be backordered will be canceled.
These scenarios outline instances where setting the line to cancel backorders won't result in the cancellation of the shipment line:
- When the shipment lines belonging to a PTO model or kit are partially backordered.
- When the shipment line is part of a shipment set and is backordered during pick confirmation.
- When the shipment line is backordered using the Backorder or Submit for Cycle Count action on the Manage Shipment Line and Shipment pages.
When the lines in an order are set to Enforce Single Shipment:
- In the event of partial shipment of an order, any unshipped quantities and lines within the order will be canceled.
- In scenarios involving WMS or 3PL, if the order is partially shipped using the Shipment Transaction Requests REST API or Perform Shipping Transaction Import FBDI, any shipment lines not interfaced with WMS/3PL will be canceled. However, if a shipment line is already interfaced with WMS/3PL, it won't be canceled.
- Shipment confirmation, sending manifest requests, and fiscal document generation aren't allowed when multiple shipments are assigned to an order.
- When utilizing Oracle Transportation Management or other transportation management systems for transportation shipment planning, assigning multiple transportation shipments to the order isn't allowed.
Once the shipment line is canceled in Shipping, the Process Responses from Order Fulfillment scheduled process is initiated to update the cancellation details on the fulfillment line.
- Ordered and canceled quantities are updated on the order. A seeded cancellation reason Cancel Backorders is used for cancellations initiated from Shipping.
- The charge components for the order line are recomputed with the new order quantity.
- The order header totals are updated by running or scheduling the Update Sales Order Totals scheduled process.
- If credit authorizations are applicable for the order lines, the amounts are adjusted based on the new ordered quantity. The Adjust Amounts for Credit Authorizations scheduled process should be run or scheduled to adjust the customer credit amounts.
- If the Cancel Supply When Canceling Backorders Order Management parameter is set to Yes, the supply orders are updated in the case of partial cancellation. Cancel or close the supply order and also the backing supply documents like purchase order and work order for the pending quantities.
- If the Cancel Backorders business event is enabled in the Manage Business Event Trigger Points task, then an event will be raised when the cancellation is initiated from Shipping.
This feature makes it easier for you to comply with your customer's fulfillment contracts by automatically canceling unfulfilled quantities and reducing your manual effort.
Steps to Enable
Use the Opt In UI to enable this feature. For instructions, refer to the Optional Uptake of New Features section of this document.
Offering: Manufacturing and Supply Chain Materials Management No Longer Optional From: Update 24D
Tips And Considerations
- The Cancel Backorders and Enforce Single Shipment options can only be set at the line level and can't be defaulted from the header.
- Once the order is submitted, you can't update the Cancel Backorders and Enforce Single Shipment settings. However, you can add a new line and set the attributes as needed.
- If a custom orchestration process is utilized, you must include Canceled along with Shipped in the exit criteria for the Shipment Wait task. Otherwise, the Shipment Wait task instance may remain active in the case of full cancellation.
- Once the shipment line is canceled in Shipping, the Process Responses from Order Fulfillment scheduled process is initiated to update the cancellation details on the fulfillment line. If the process isn't automatically submitted, check if the user performing the Create Pick Wave, Generate Shipment Request, Pick Confirm, and Ship Confirm actions is assigned to a configured job role containing one of the following privileges:
- Manage Shipment Interface (WSH_MANAGE_DELIVERY_INTERFACE_PRIV)
- Process Fulfillment Response (DOO_PROCESS_FULFILLMENT_RESPONSE_PRIV)
- If the Process Responses from Order Fulfillment scheduled process couldn't update the cancellation detail on the order, resubmit the scheduled process. We recommend that you set up the process to run on a schedule at regular intervals to process the cancellation details that couldn't be processed from the Oracle Order Management interface tables when it was initially submitted.
- Set the Task Type to Shipment
- Set the Record Set to Process Records That Failed
Key Resources
- Oracle Fusion Cloud SCM: Implementing Manufacturing and Supply Chain Materials Management guide, available on the Oracle Help Center.
- Oracle Fusion Cloud SCM: Using Shipping guide, available on the Oracle Help Center.
- Oracle Fusion Cloud SCM: Implementing Order Management guide, available on the Oracle Help Center.
- Oracle Fusion Cloud SCM: Using Order Management guide, available on the Oracle Help Center.
- Watch the Cancel Sales Order Backorders Automatically and Enforce Single Shipment Demo.
Access Requirements
Users who are assigned a configured job role that contains these privileges can access this feature:
- Create Pick Wave (WSH_CREATE_PICK_WAVE_PRIV)
- Confirm Pick Slip (INV_CONFIRM_PICK_SLIP_PRIV)
- Generate Shipment Request (WSH_GENERATE_SHIPMENT_REQUEST_PRIV)
- Manage Shipment (WSH_MANAGE_DELIVERY_PRIV)
- Manage Shipments and Shipment Lines (WSH_MANAGE_SHIPMENT_AND_SHIPMENT_LINE_PRIV)
- Manage Shipment Interface (WSH_MANAGE_DELIVERY_INTERFACE_PRIV)
- Process Fulfillment Response (DOO_PROCESS_FULFILLMENT_RESPONSE_PRIV)
These privileges were available prior to this update.
Selected Order Management Bug Fixes in This Update
This update includes some bug fixes that can change the way Oracle Order Management works. This isn't a full list of all the bug fixes in this update. This list includes the bug fixes that can cause a noticeable change in application behavior.
Validate Freeze Attributes When Processing Order Revisions
If your sales order contains price details and you don't want to recalculate or reevaluate them, then you can set the Freeze Pricing, Freeze Shipping Charge, and Freeze Tax attributes to Yes when you submit the order. Before Update 24B, when you submitted an order revision, you had to make sure that the freeze attribute's values matched the values that you used when you submitted the initial order. For example, if you set the Freeze Pricing attribute to Yes when you submitted the initial order, then you had to check and make sure that Freeze Pricing contained Yes in every subsequent order revision that you submitted.
Starting in Update 24B, if you modify the value in a freeze attribute when you submit an order revision, then Oracle Order Management will display an error and ask you to change the attribute back to its original value.
For details about revising, see Revise Sales Orders That You Already Submitted.
Oracle reference: 36038237
Include Pricing Data When You Freeze Pricing During Import
Before Update 24B, if you froze pricing during import but didn’t include all the pricing values that you need in your import payload, then you might have encountered a problem in your downstream fulfillment system. For example, Oracle Order Management might have encountered an error when it prepared to send the order line to accounts receivable.
Starting with Update 24B, if you freeze pricing, freeze shipping charge, or freeze tax in your import payload, and if you don’t include values in the Header Currency Unit Price attribute and the Header Currency Extended Amount attribute in that payload, then Order Management will reject your import.
For details about how to freeze price during import, Freeze Price on Sales Orders.
Oracle reference: 35851319
Recover from Errors That Involve Purchase Order Events
Oracle Procurement raises the REQ_LINE_CANCEL event when a buyer returns or cancels a requisition from Oracle Self Service Procurement. Before update 24B, if a failure happened when Order Management received this event, then you ended up with a stuck sales order. To fix the problem, you had to get payloads and data fixes from Oracle Support. Starting with update 24B, you can use the Recover Order action or run the Recover Errors scheduled process to fix the problem. For background details, see Fix Errors in All Sales Orders. For details about these events, see How Drop Ship Works in Order Management.
Oracle reference: 35264467
Steps to Enable
You don't need to do anything to enable this feature.
Pricing
Apply Discounts According to the Item's Category
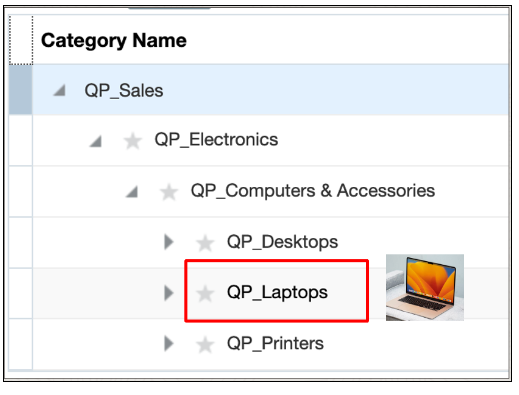
Apply a discount according to one or more categories in a catalog. Starting with update 24B, you can now set up a pricing matrix on a discount list that prices according to an attribute in a category.
Assume you have a Sales catalog, it contains a Computers category, and the Computers category contains three child categories: Desktops, Laptops, and Printers. Each child contains items. For example, Desktops contains the AS54888 Computer. You can create a rule that applies a discount for items in the child Desktops category. You can also create a rule that applies a discount for all items that are in the parent Computers category, such as all desktops, laptops, and printers.
Try It
This topic uses example values. You might need different values, depending on your business requirements.
Go to the Product Information Management work area, then set up the category's hierarchy and assign the ABC Laptop item to the QP_Laptops category. For example:
Run the Refresh Product Hub Snapshots scheduled process.
Go to the Setup and Maintenance work area, search for and open the Manage Pricing Parameters page, then use the Product Catalogs parameter to specify the product catalogs that you want Pricing to use when it calculates each item's discount.
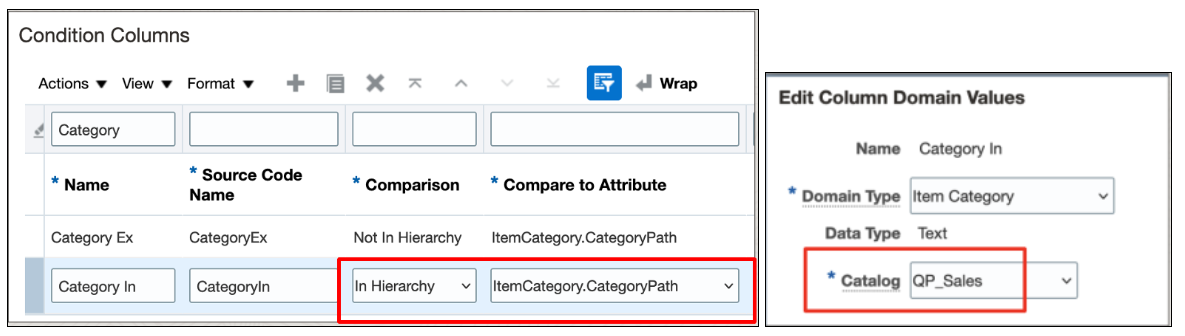
Use the Manage Matrix Classes page to set up your pricing matrix. Use these values:
| Attribute | Value |
|---|---|
| Comparison | In Hierarchy |
| Compare to Attribute | ItemCategory.CategoryPath |
| Domain Type | Item Category |
| Catalog | QP_Sales |
For example:
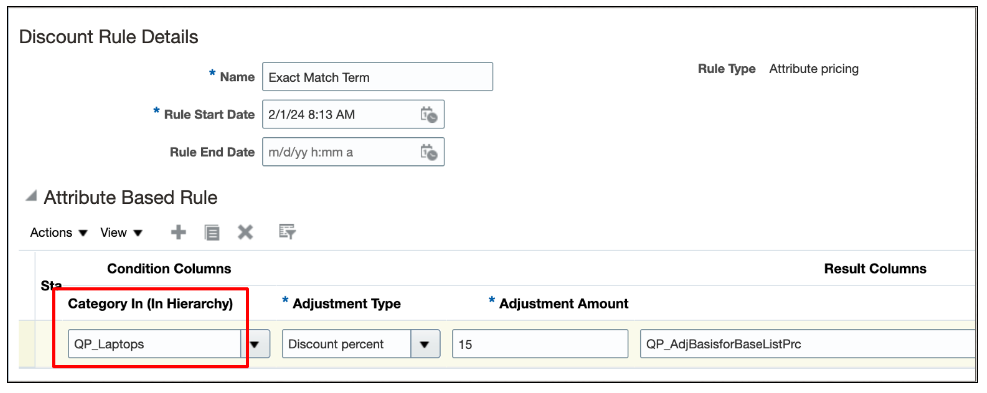
Create your rule on a discount list. Use the Category In condition that you created earlier in this procedure. In this example, every item that's in the Laptops category is eligible for a 15% discount. Set these values:
| Attribute | Value |
|---|---|
| Category In | QP_Laptops |
| Adjustment Type | Discount Percent |
| Adjustment Amount | 15 |
For example:
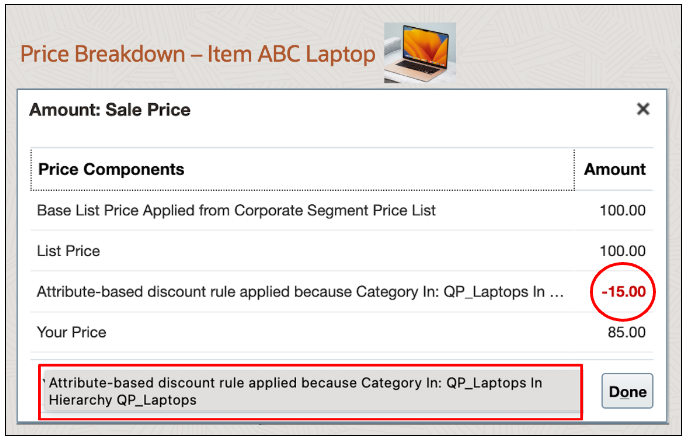
Test your work. Go to the Order Management work area, create a sales order, add your item to an order line, then examine the price breakdown. Notice that the breakdown says:
Attribute-based discount rule applied because Category In: QP_Laptops In Hierarchy QP_Laptops
For example:
Apply Discount According to a Category Hierarchy
You can set up your rule so it uses a parent category as a condition. For example, if the Laptops category is a child of the parent Computers & Accessories category, then apply a 10% discount on the ABC Laptop item:
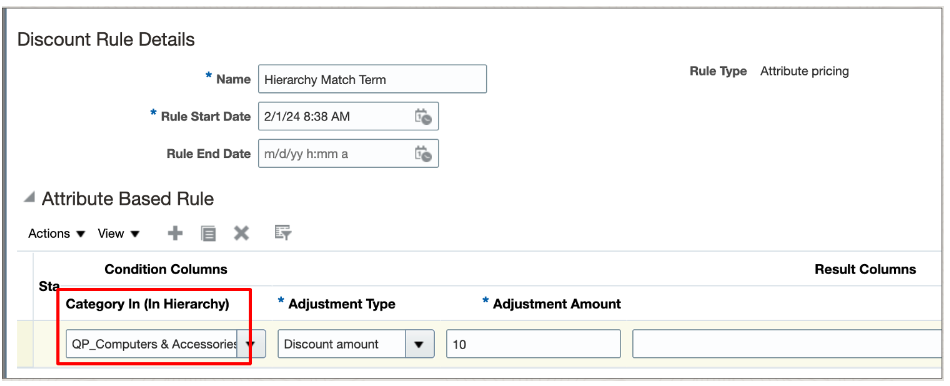
Set Up Your Rule So It Uses a Parent Category As a Condition
Notice that the breakdown says:
Attribute-based discount rule applied because Category In: QP_Laptops In Hierarchy QP_Computers & Accessories
For example:
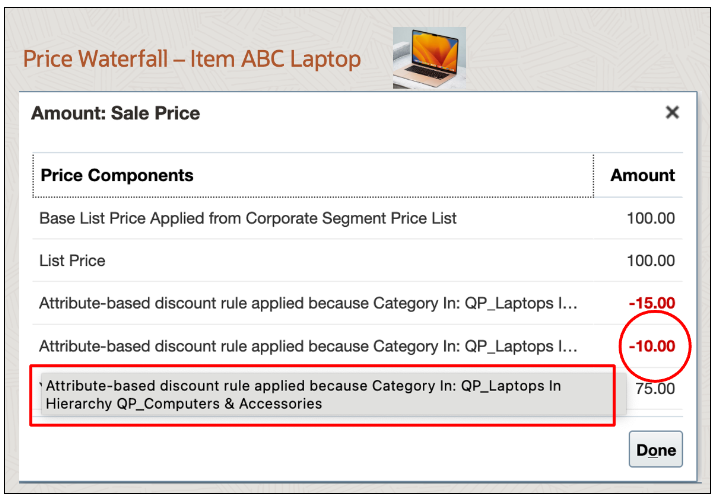
Notice What the Breakdown Says
Exclude a Category
Assume you have a discount rule for Computers & Accessories and you need to exclude the Printers category. You need to apply a 12% discount on the ABC Laptop item, but don't apply a discount on the ABC Printer item.
Set these values:
| Attribute | Value |
|---|---|
| Category Ex | QP_Printers |
| Category In | QP_Computers & Accessories |
| Adjustment Type | Discount Percent |
| Adjustment Amount | 15 |
For example:
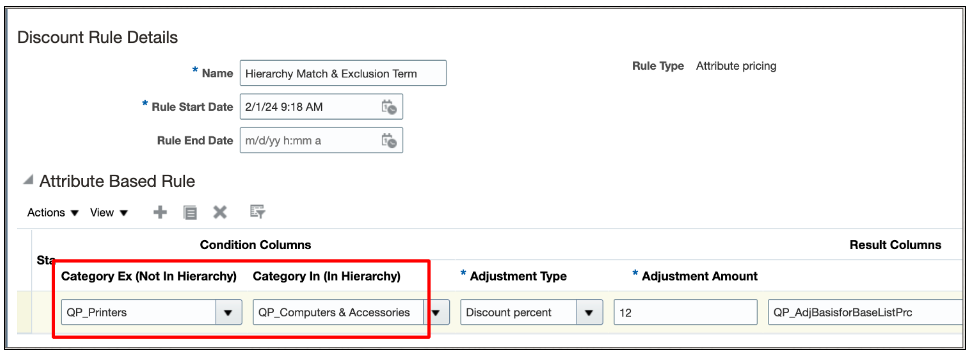
Exclude a Category
Reference a Category
You can also set up your rule so it references another category. For example, you reference the New Releases category from the condition that you specify on the discount rule from the Laptops category. At run time, apply the discount from the New Releases category to the ABC Laptop.
Realize these benefits:
- Track your category discounts more efficiently.
- Improve financial and pricing analytics.
- Meet more complex pricing requirements.
- Improve decision making that involve category pricing.
Steps to Enable
- Set up the category's hierarchy and assign the item to the category.
- Run the Refresh Product Hub Snapshots scheduled process.
- Use the Product Catalogs pricing parameter to assign the catalog that you want to use with your rule.
- Use the Manage Matrix Classes page to set up your pricing matrix.
- Create your rule on a discount list.
Tips And Considerations
You must:
- Use the new Item Category domain type when you create your condition on the Manage Matrix Classes page.
- Set the Comparison attribute to In Hierarchy or to Not In Hierarchy on your rule.
- Assign the catalog to the condition name so that the Pricing Administration work area displays the relevant categories when you set up your rule.
Other details:
-
You can use the Pricing Administration work area, file-based data import, or REST API to manage your matrix adjustment rules.
-
If more than one matrix rule is eligible to apply the discount, then Pricing will use the rule that has deepest category in the hierarchy when it prices the item.
Access Requirements
Users who are assigned a configured job role that contains these privileges can access this feature:
- Manage Discount Lists (QP_MANAGE_DISCOUNT_LISTS)
- Manage In-Progress Discount Lists (QP_MANAGE_IN_PROGRESS_DISCOUNT_LISTS)
- View Discount Lists (QP_VIEW_DISCOUNT_LISTS)
- Approve Discount Lists (QP_APPROVE_DISCOUNT_LISTS)
- Import Discount Lists (QP_DISCOUNT_LIST_IMPORT)
- Import Approved Discount Lists (QP_DISCOUNT_LIST_APPROVED_IMPORT)
- Manage Matrix Classes (QP_MANAGE_MATRIX_CLASS)
These privileges were available prior to this update.
Adjust Price According to the Item's Category
Adjust price on a price list according to one or more categories in a catalog through a price adjustment matrix. Assume you have a Sales catalog, it contains a Computers category, and the Computers category contains three child categories: Desktops, Laptops, and Printers. Each child contains items. For example, Desktops contains the AS54888 Computer. You can create a rule that adjusts price only for items in the child Desktops category. You can also create a rule that adjusts price for all items in the parent Computers category, such as all desktops, laptops, and printers.
- Improve financial and pricing analytics.
- Meet more complex pricing requirements.
- Improve decision making that involve category pricing.
Steps to Enable
- Set up the category's hierarchy and assign the item to the category.
- Run the Refresh Product Hub Snapshots scheduled process.
- Use the Product Catalogs pricing parameter to assign the catalog that you want to use with your rule.
- Use the Manage Matrix Classes page to set up your pricing matrix.
- Create your rule on a price list.
Tips And Considerations
This feature is nearly identical to the Apply Discounts According to the Item's Category feature. For example, you can adjust price on a price list according to an attribute, a category's hierarchy, exclude a category, or reference a category just like you can on a discount list. The main difference is you do your set up on a price list instead of a discount list.
You must:
- Use the new Item Category domain type when you create your condition on the Manage Matrix Classes page.
- Set the Comparison attribute to In Hierarchy or to Not In Hierarchy on your rule.
- Assign the catalog to the condition name so that the Pricing Administration work area displays the relevant categories when you set up your rule.
Other details:
-
You can use the Pricing Administration work area, file-based data import, or REST API to manage your matrix adjustment rules.
-
If more than one matrix rule is eligible to apply the discount, then Pricing will use the rule that has deepest category in the hierarchy when it prices the item.
Access Requirements
Users who are assigned a configured job role that contains these privileges can access this feature:
- Manage Price Lists (QP_MANAGE_PRICE_LISTS)
- Manage In-Progress Price Lists (QP_MANAGE_IN_PROGRESS_PRICE_LISTS)
- View Price Lists (QP_VIEW_PRICE_LISTS)
- Approve Price Lists (QP_APPROVE_PRICE_LISTS)
- Import Approved Price Lists (QP_PRICE_LIST_APPROVED_IMPORT)
- Import Price Lists (QP_PRICE_LIST_IMPORT)
- Manage Matrix Classes (QP_MANAGE_MATRIX_CLASS)
- Manage Pricing Parameter Values (QP_MANAGE_PRICING_PARAMETER_VALUES)
- View Pricing Parameter Values (QP_VIEW_PRICING_PARAMETER_VALUES)
These privileges were available prior to this update.
Channel Revenue Management
Redwood Experience
These features were built in Redwood, Oracle’s next-generation user experience. Redwood brings state-of-the-art, consumer-grade user experiences across devices to the sophisticated enterprise scenarios that Oracle enables.
Define Channel Revenue Management Users as Workers
Define Channel Revenue Management users as workers to support supervisor-based approvals. Users can view, search, and assign owners to supplier and customer programs, supplier and customer claims, and supplier adjustments based on name and email address.
This release mandates owners as HCM workers.
Claim Owner List of Values
Program Owner List of Values
Search by Owner Name or Email
This feature:
- Supports supervisor-based BPM approvals.
Steps to Enable
Use the Opt In UI to enable this feature. For instructions, refer to the Optional Uptake of New Features section of this document.
Offering: Order Management
- Run the Validate Channel Owner Data process to report on owners who aren't HCM workers. Leave the Owner User Name parameter blank to identify all owners who aren't HCM workers.
- Ensure all owners are HCM workers.
- Create minimal HCM workers via Navigator > My Team > Users and Roles > Create, if you aren't licensed for HCM.
Tips And Considerations
Before this release, the application displays a warning message when you navigate to a claim, program, or adjustment if the owner wasn't set up as an HCM worker.
Key Resources
- For more information, refer to the Scheduled Processes for SCM guide > Order Management Scheduled Processes > Channel Revenue Management > Validate Channel Owner Data.
- For more information, refer to the Securing SCM guide > Application User Management > Create Users.
- For more information on creating a minimal HCM worker, refer to the Securing HCM guide > Create Oracle HCM Cloud Users Using the Create User Task.
Access Requirements
- Users who are assigned a configured job role that contains this privilege can run the scheduled process:
- Validate Channel Owner Data (CJM_VALIDATE_CHANNEL_OWNER_DATA_PRIV)
This privilege was available before this update.
- Users who are assigned a configured job role can create HCM workers:
- Human Resources Specialist job role
This role was available before this update.
Customer Channel Management
Creates and administers customer trade programs, which optimizes the execution and impact of programs and promotions across the supply chain.
Manage Customer Co-op Programs
Co-op advertising is an arrangement between a manufacturer or distributor and their channel partners. With co-op programs you can accrue rebates based on your sales, spanning the effective date of the program. This program type is a variation of an annual program. It applies to all customers, and rebates are defined for each product rule. You can define product eligibility by item, category, or for all items. Product eligibility supports exclusions by item or category. Eligible sales are obtained from sales orders, which are imported through a CSV file.
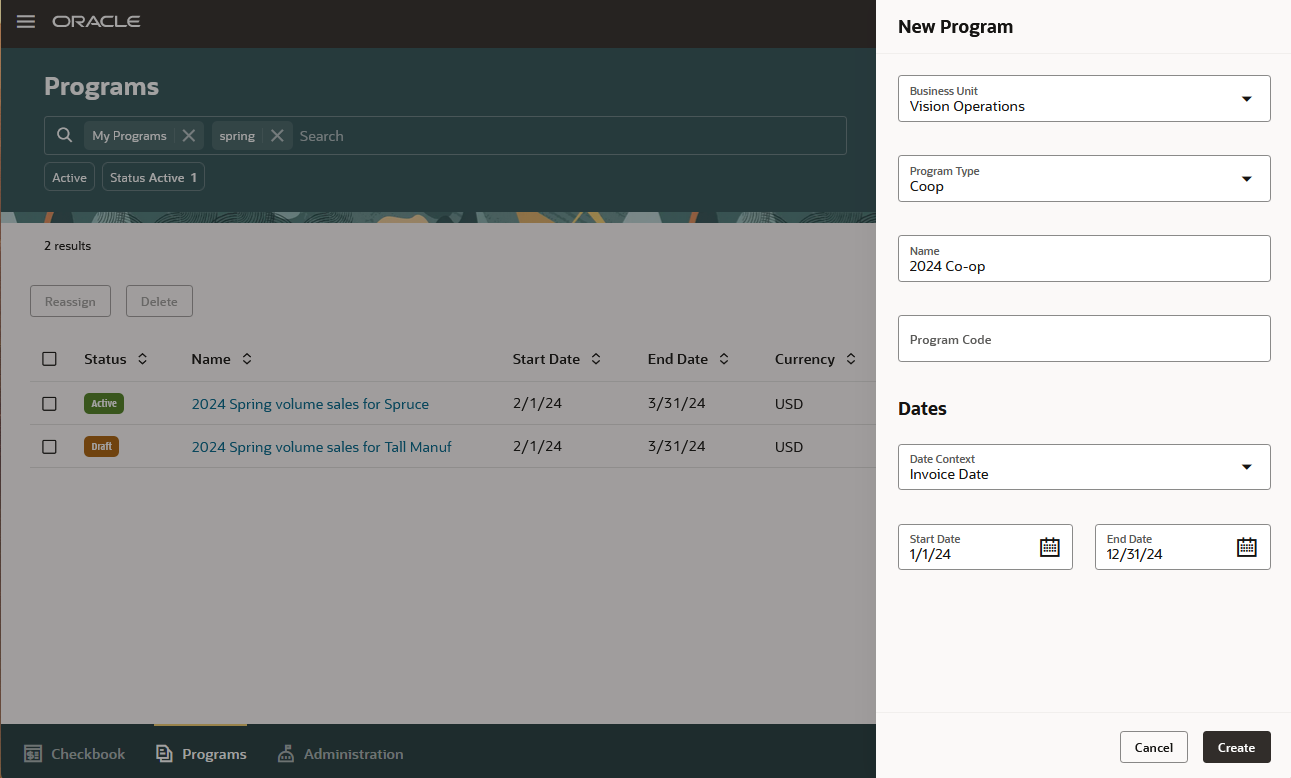
Create Co-op Program

Co-op Program
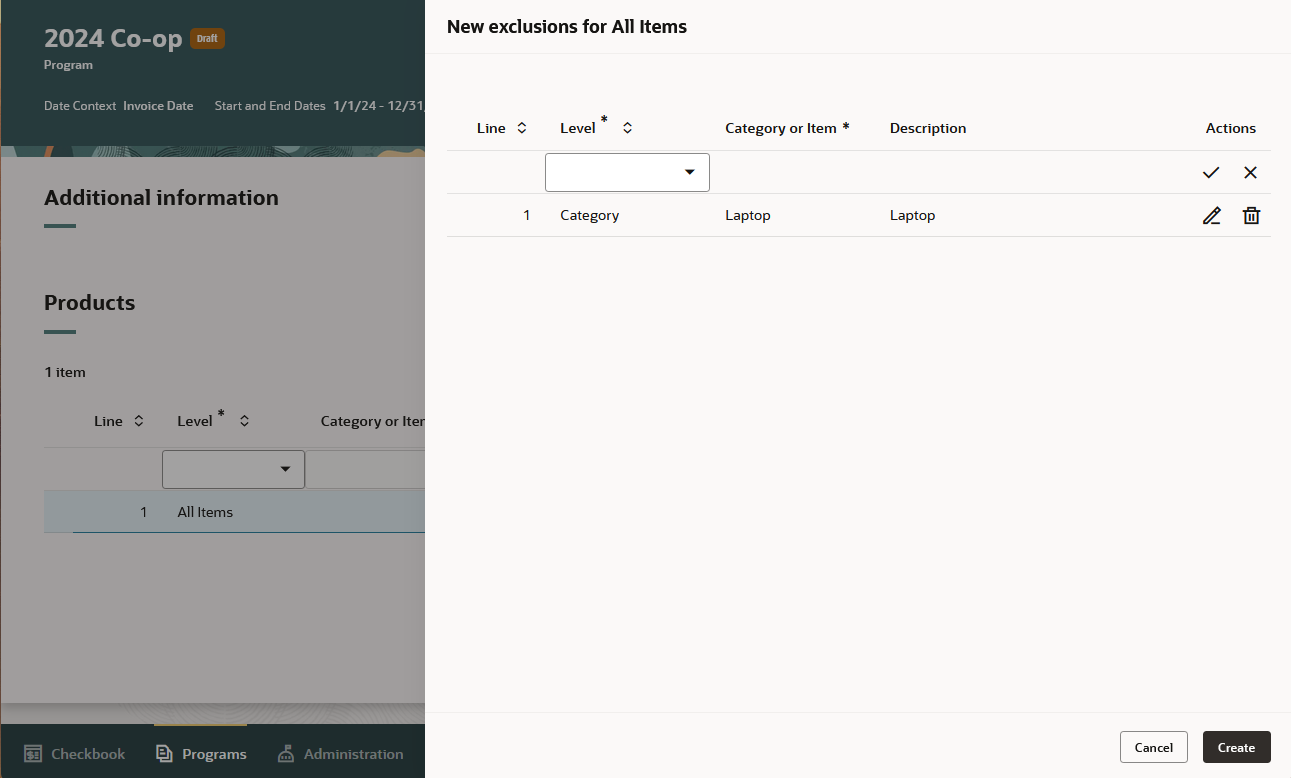
Product Exclusions
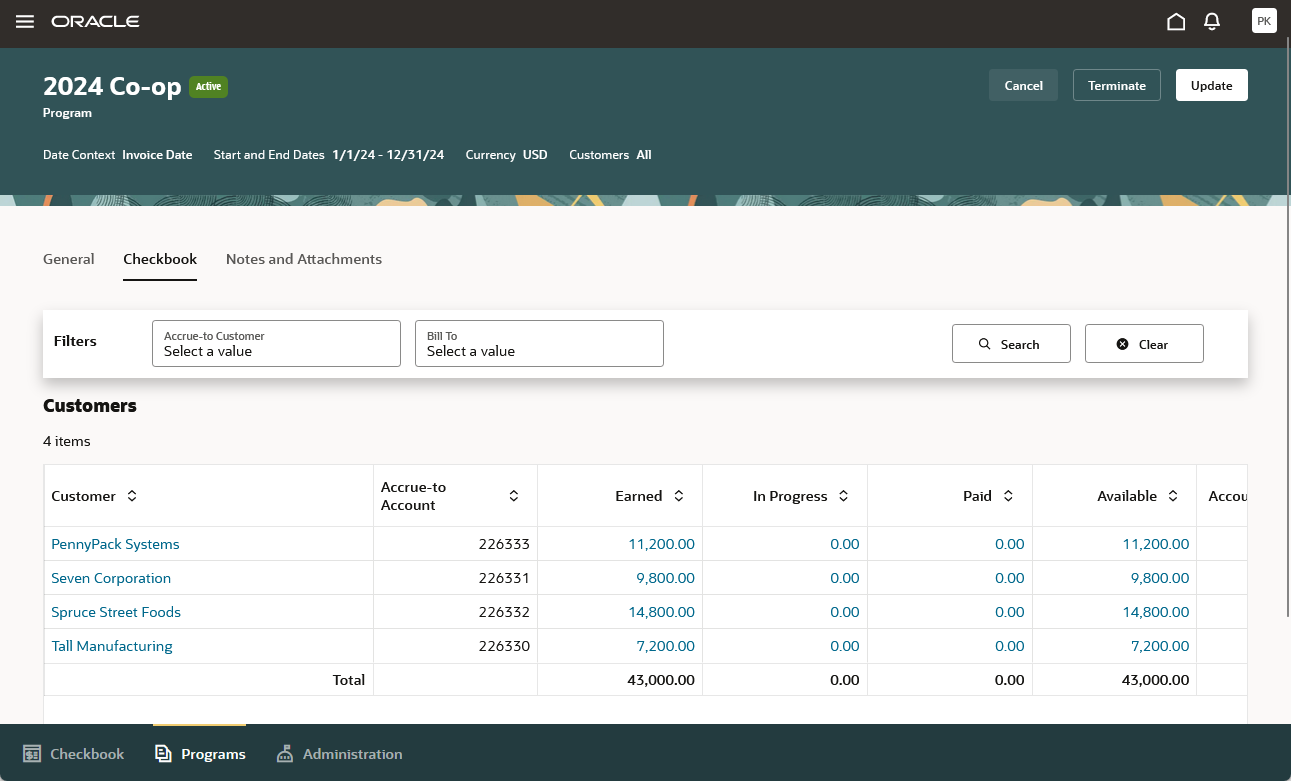
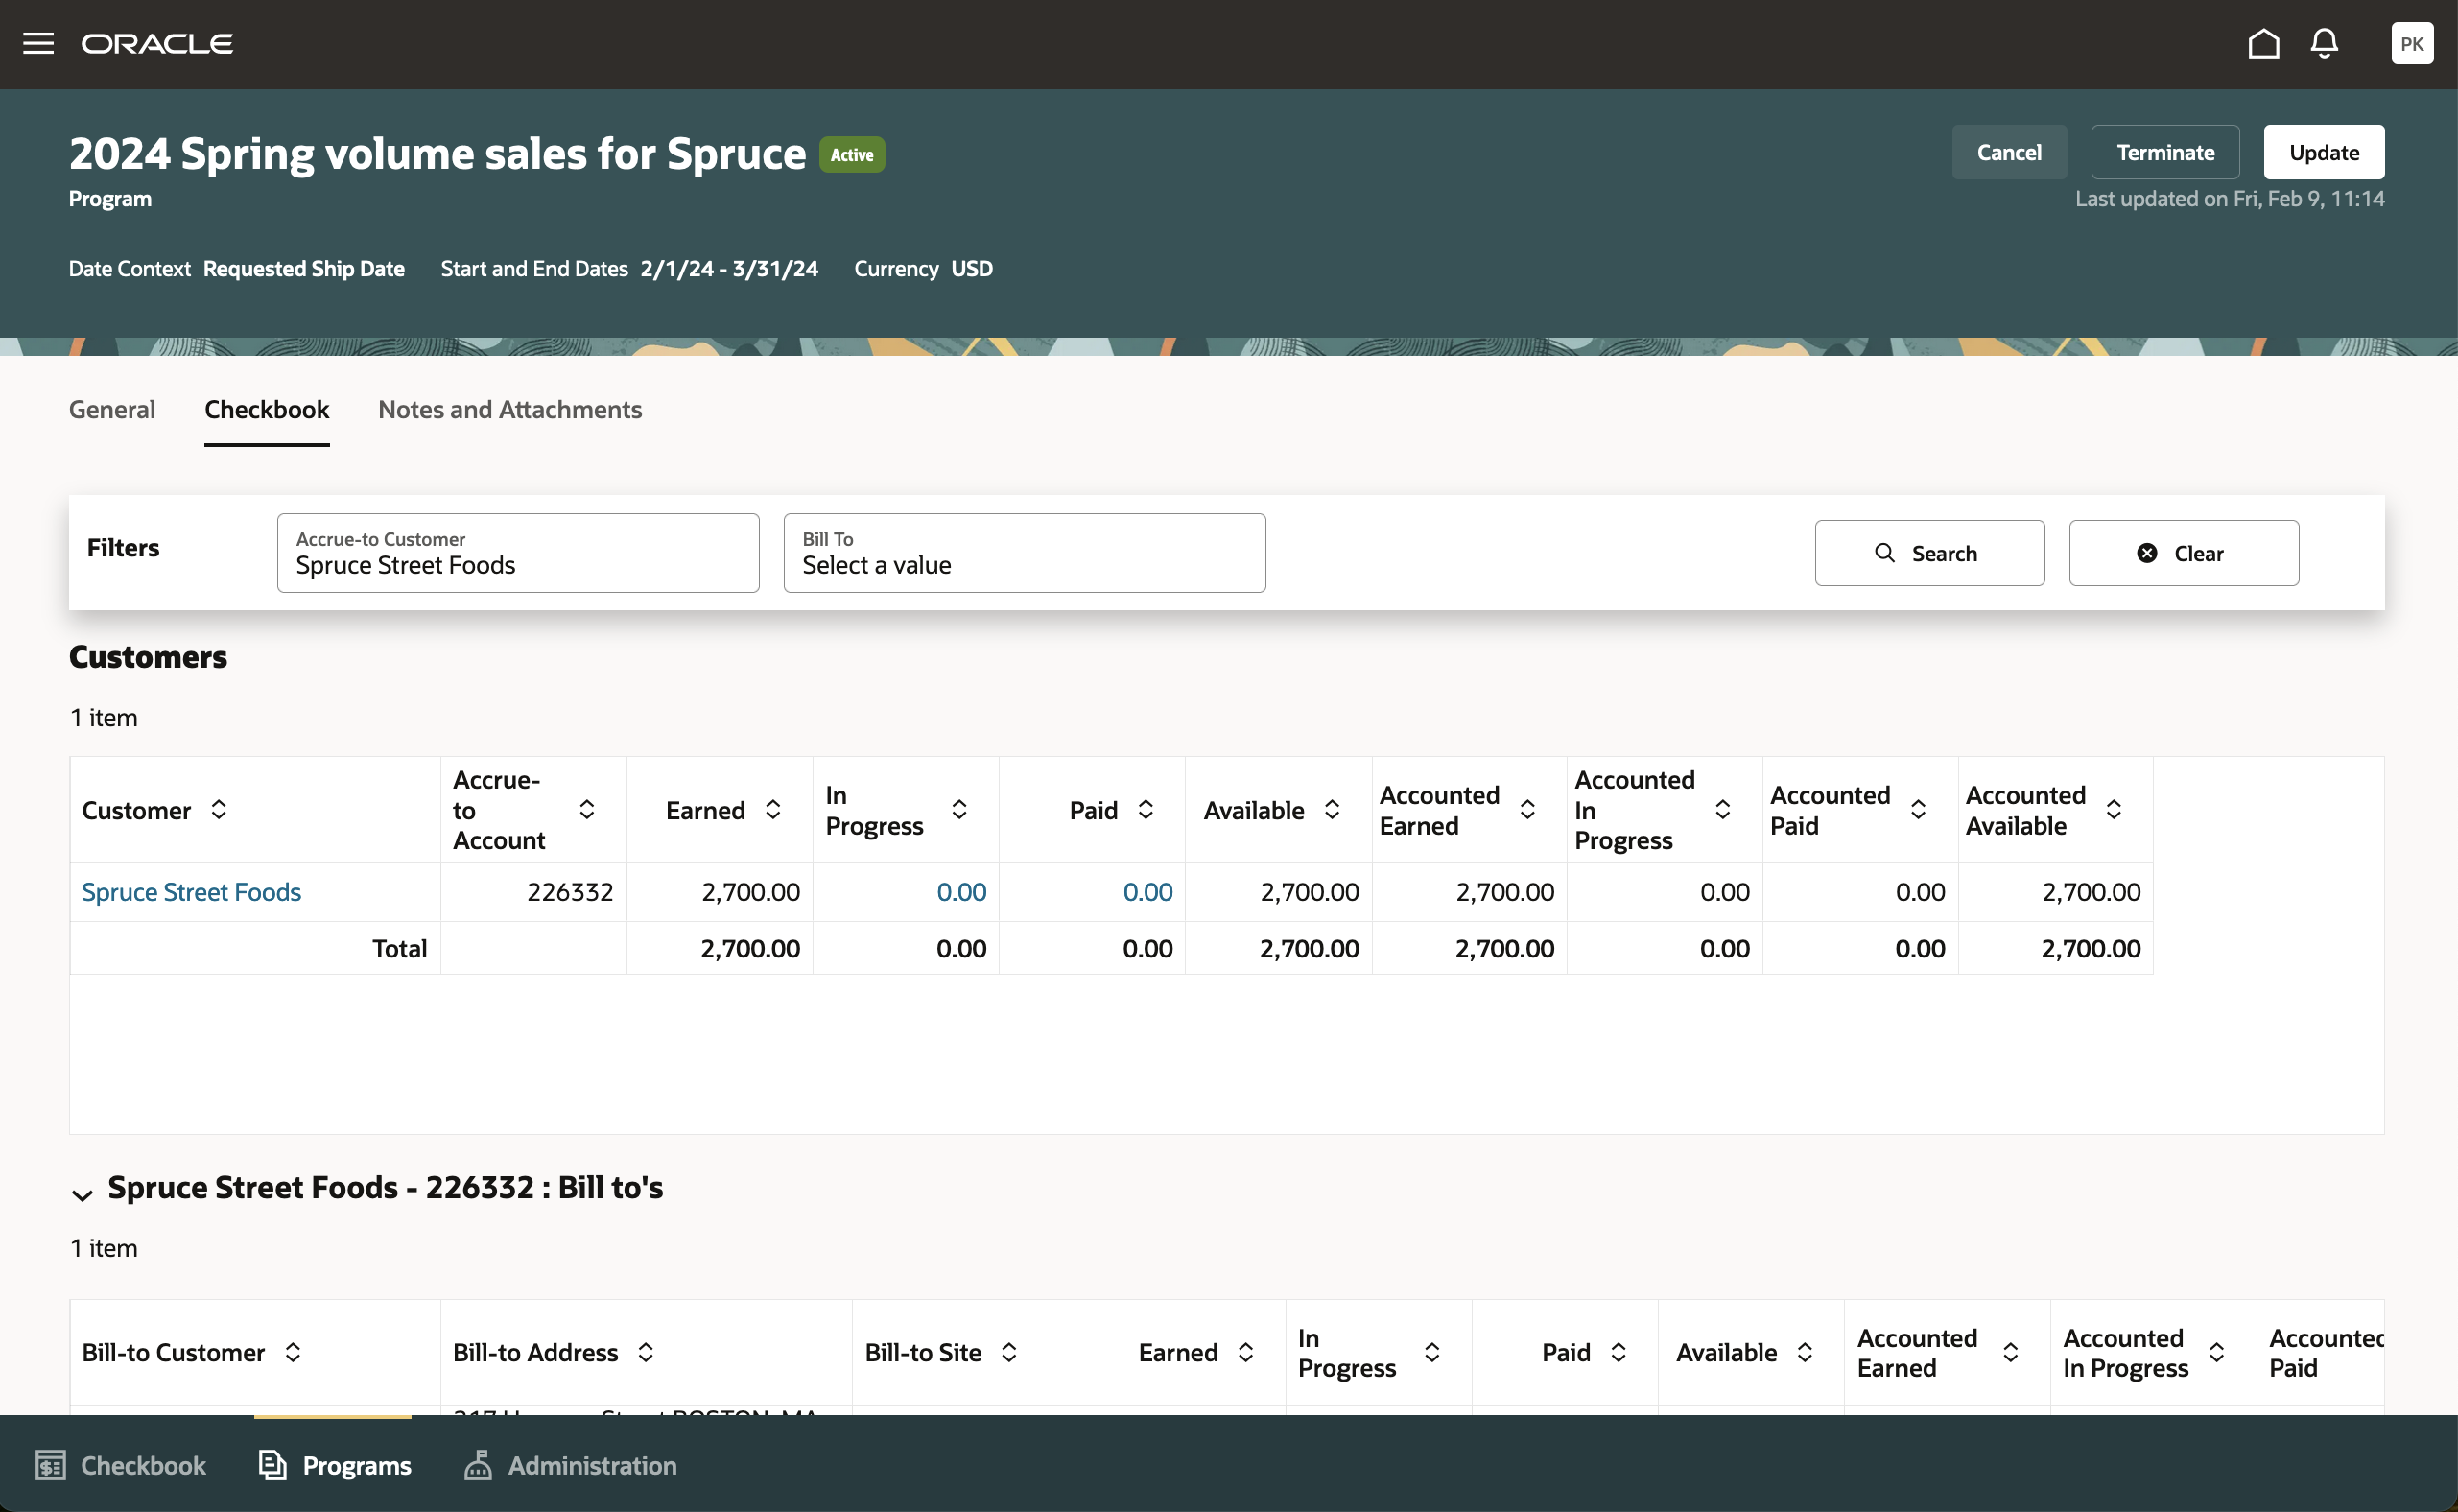
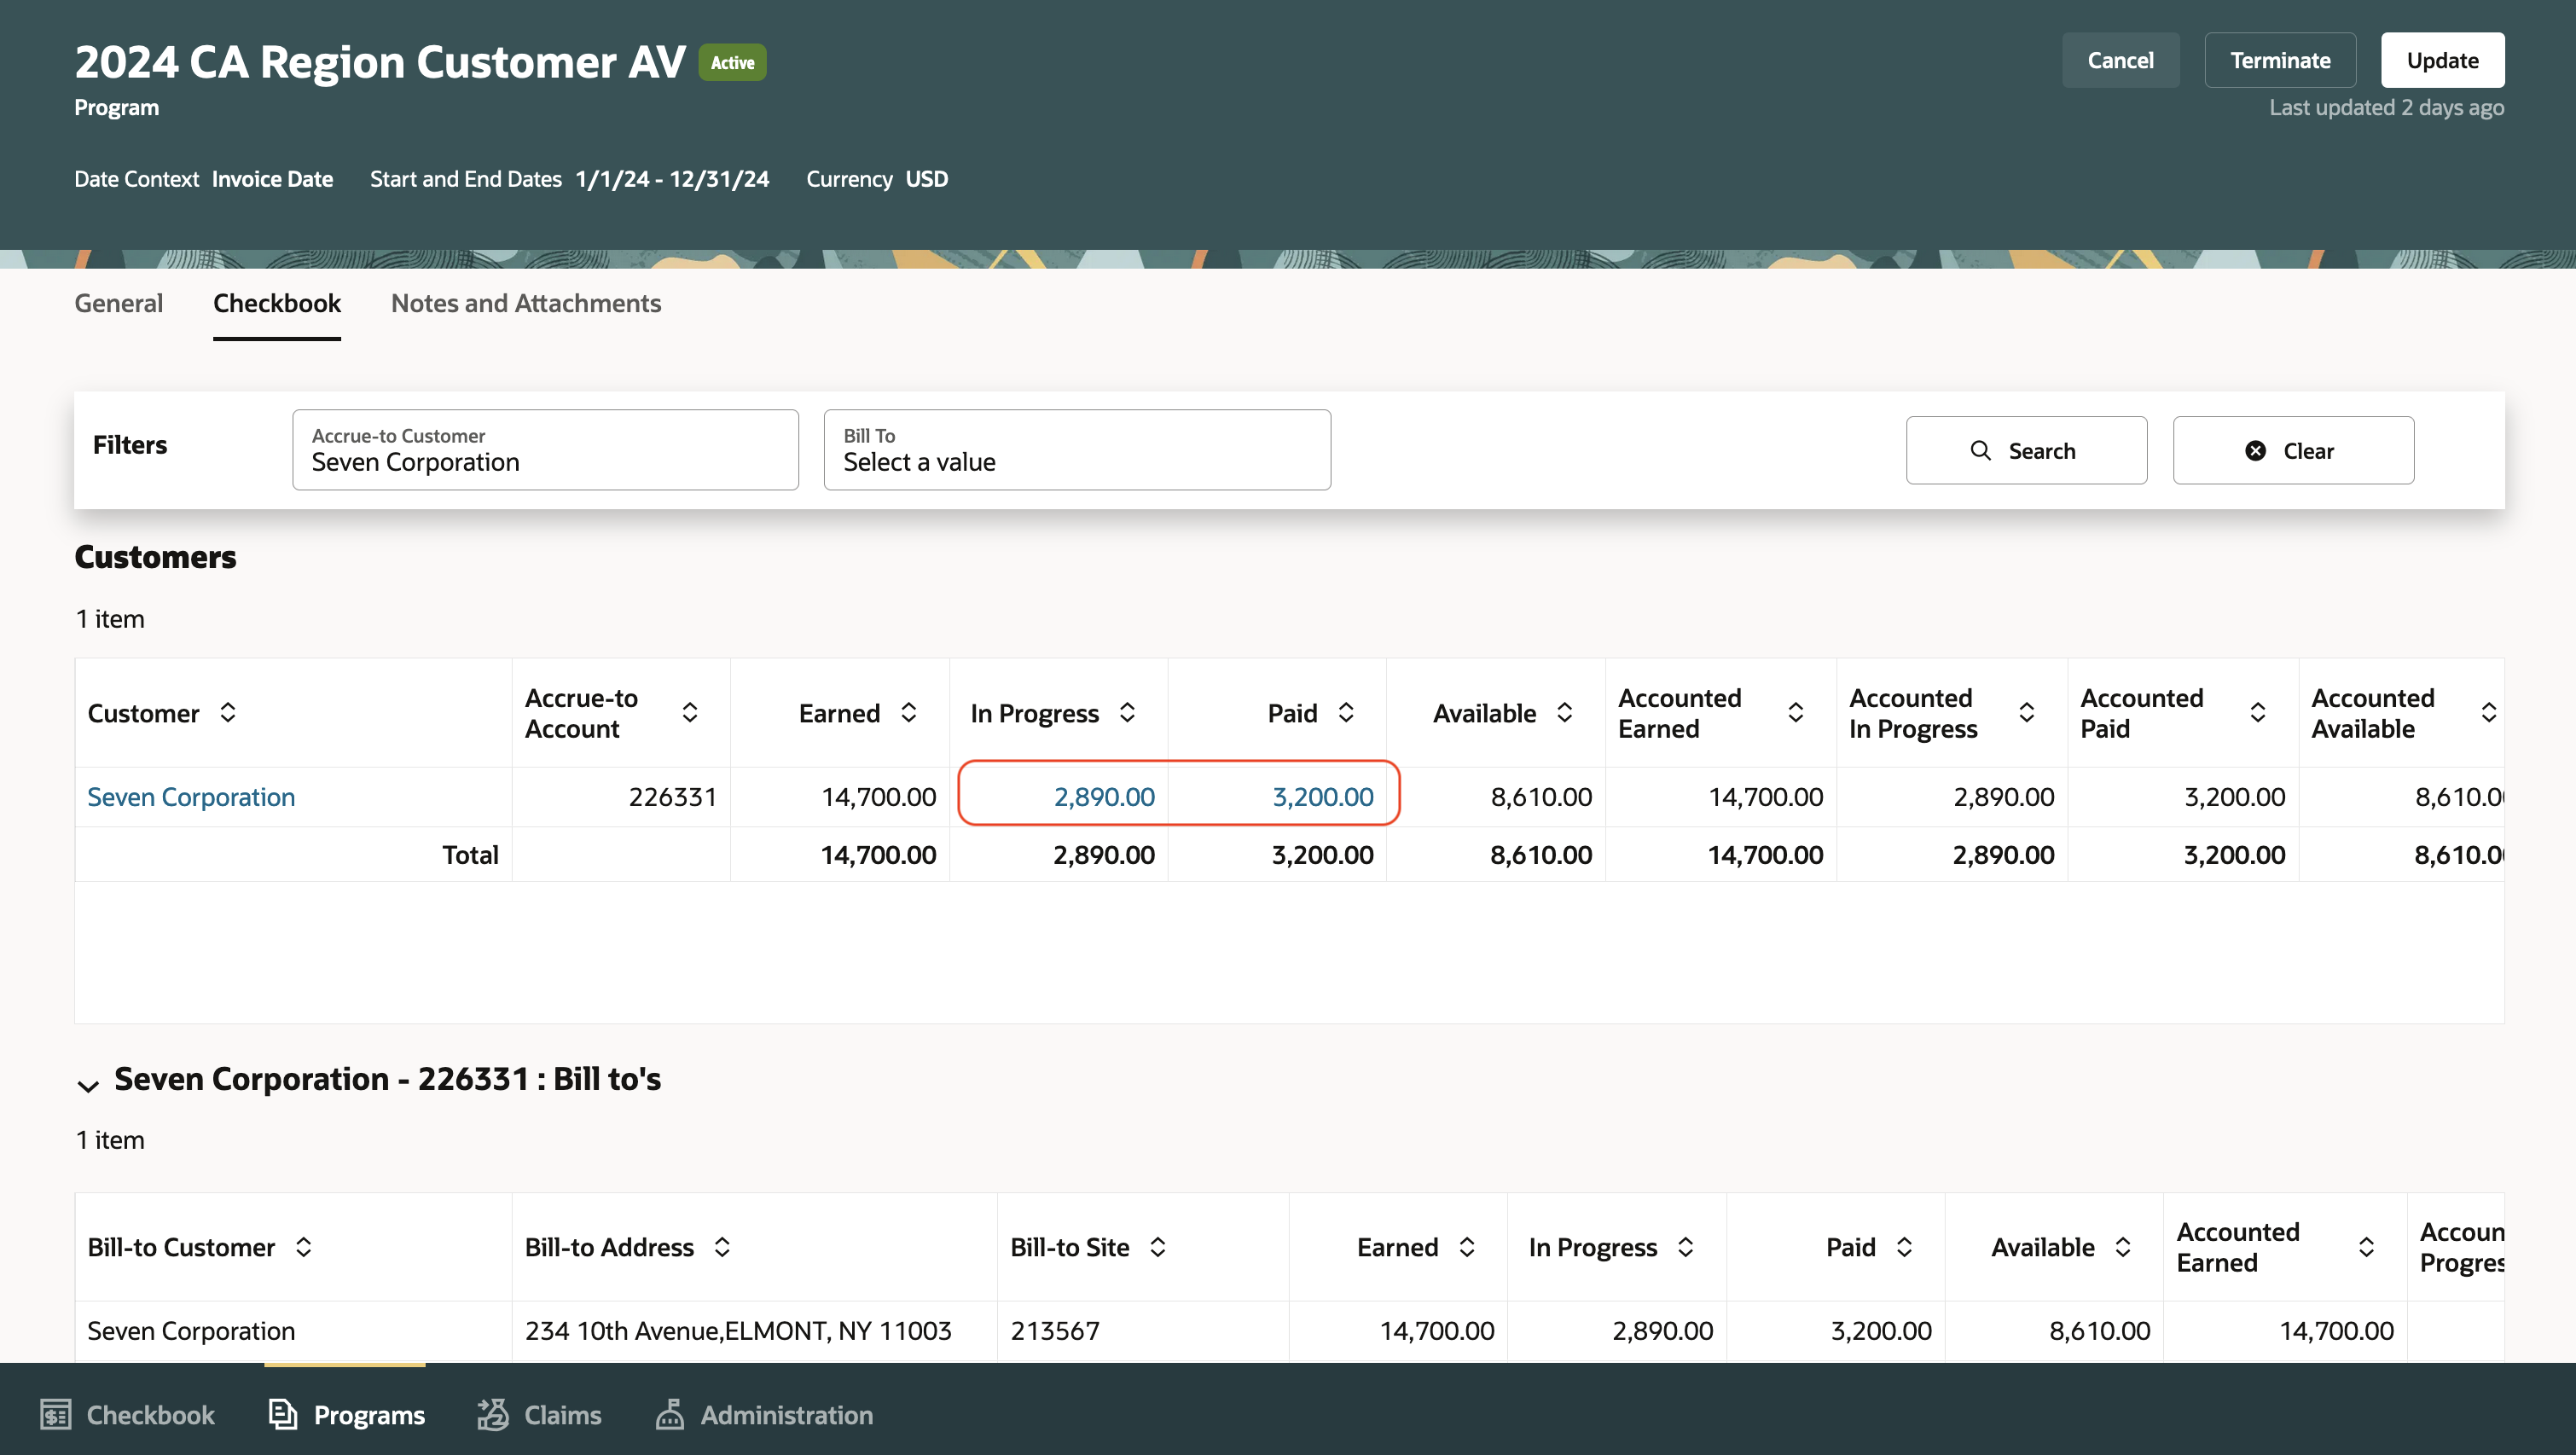
Program Checkbook
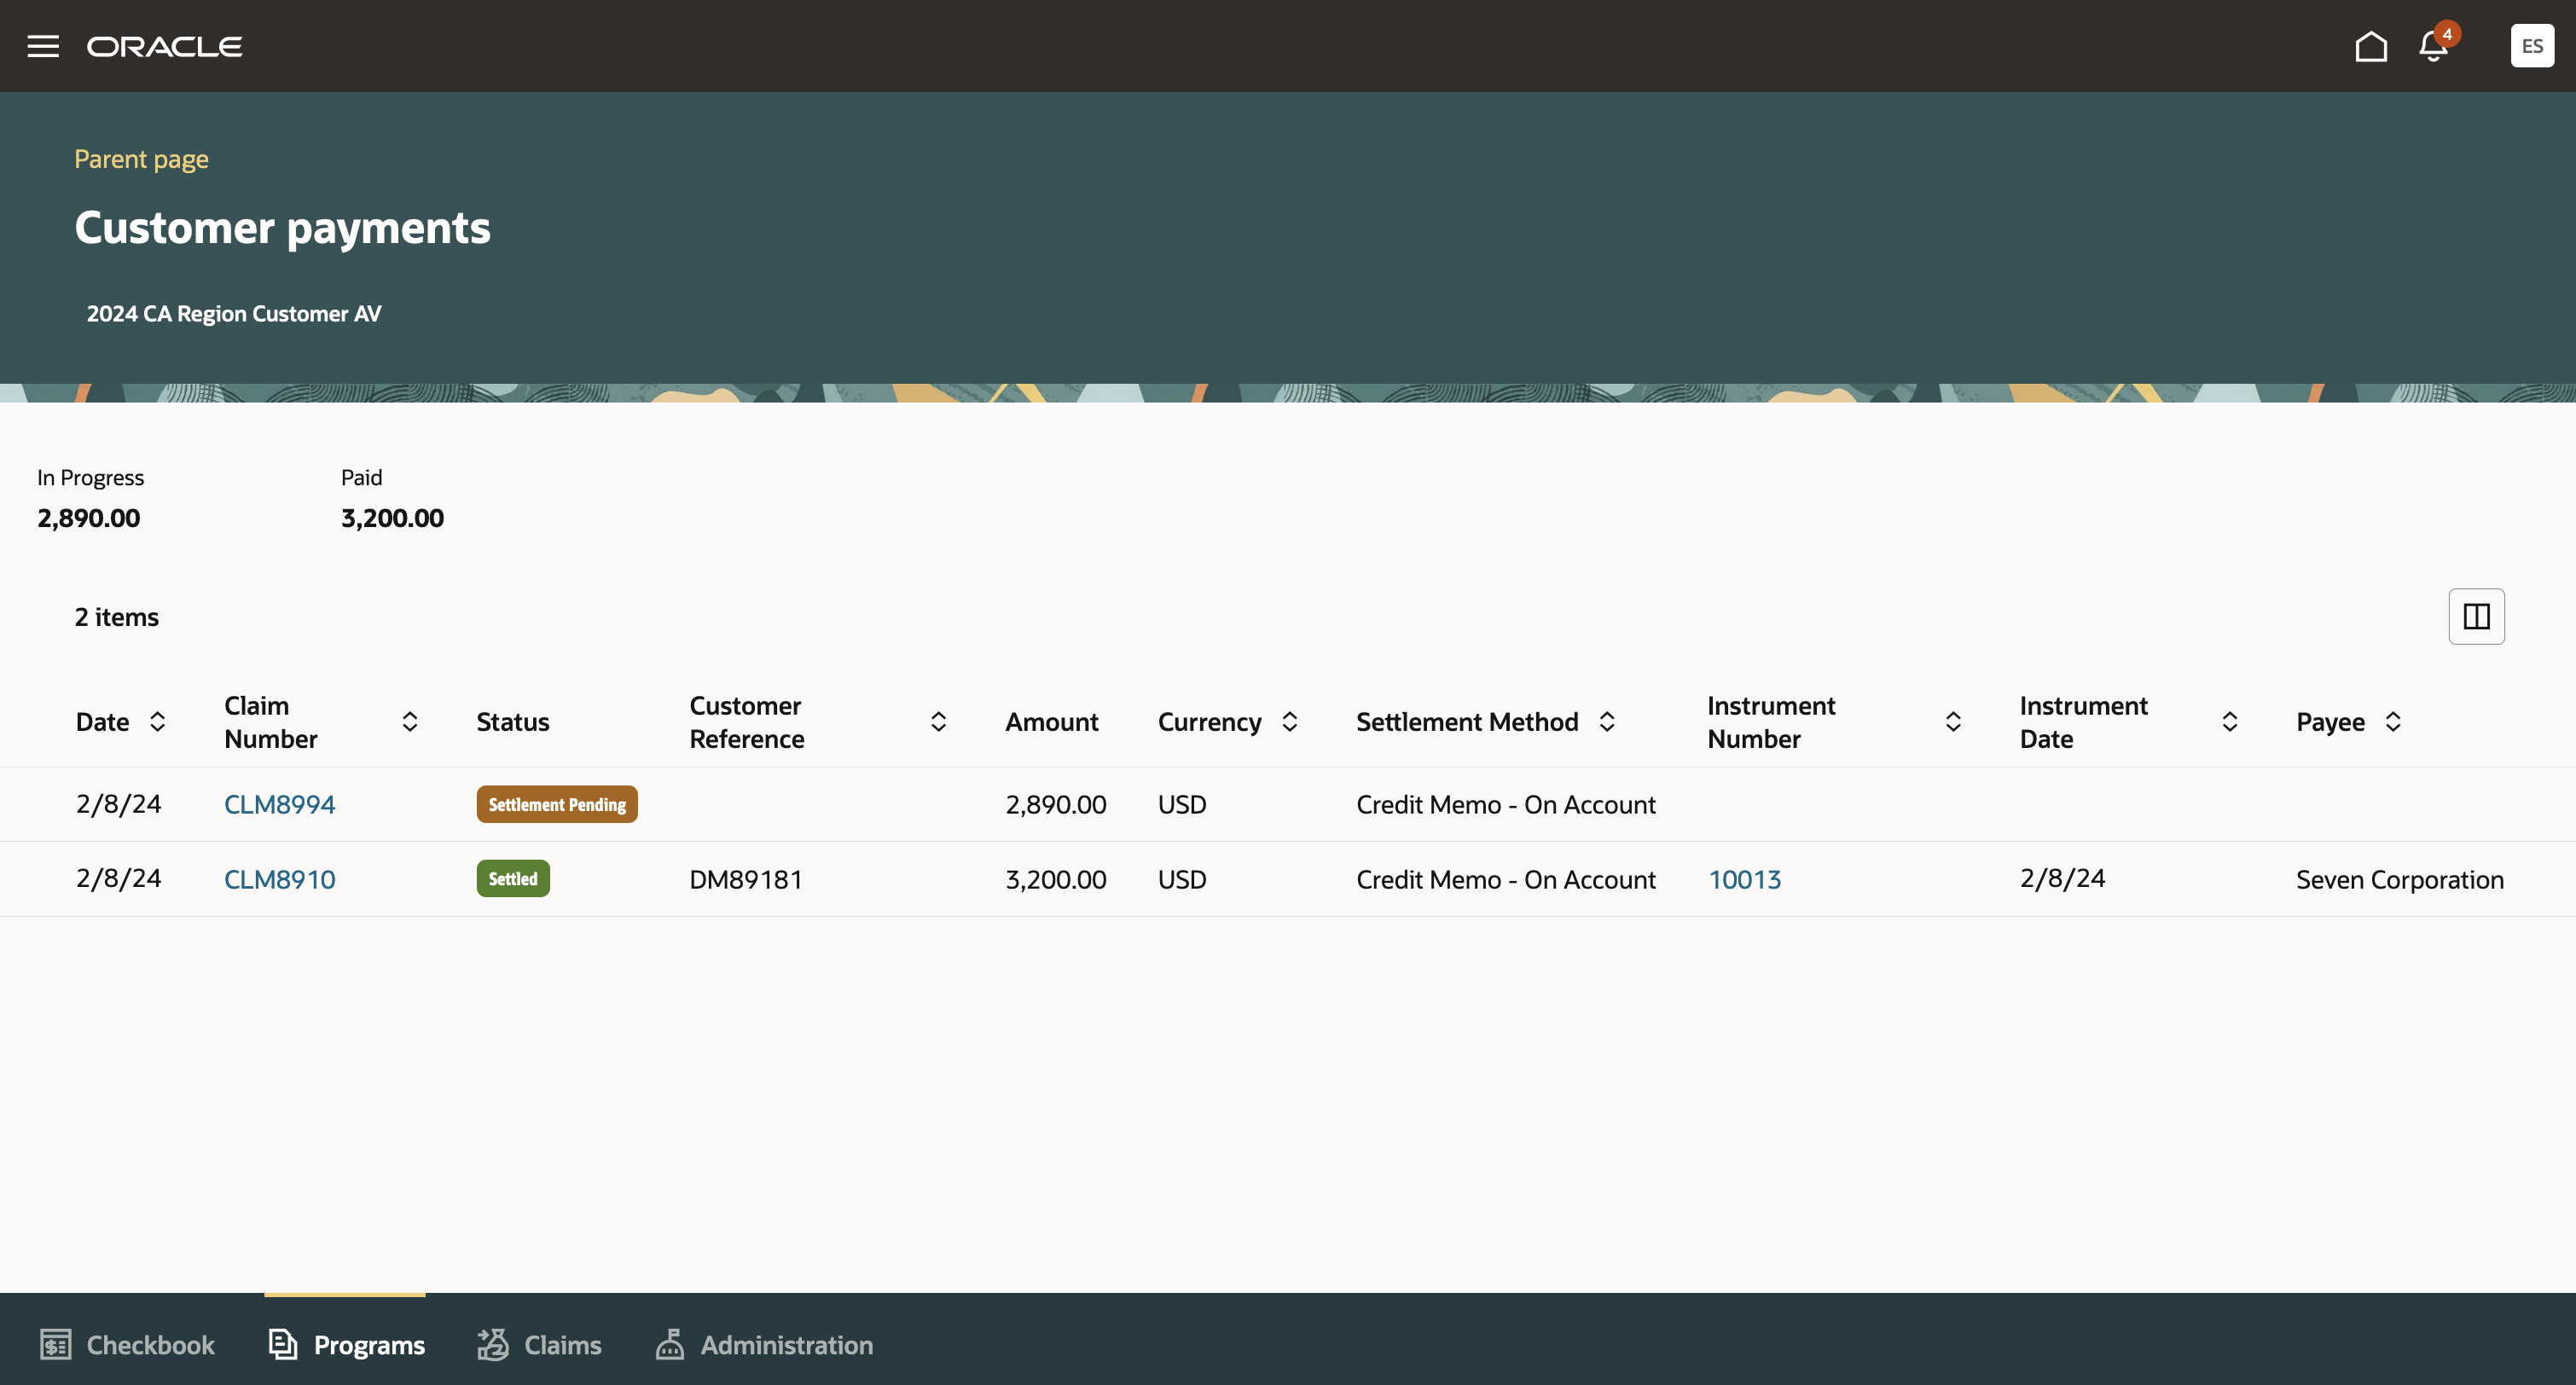
In Progress and Paid Drill Downs to Customer Payments
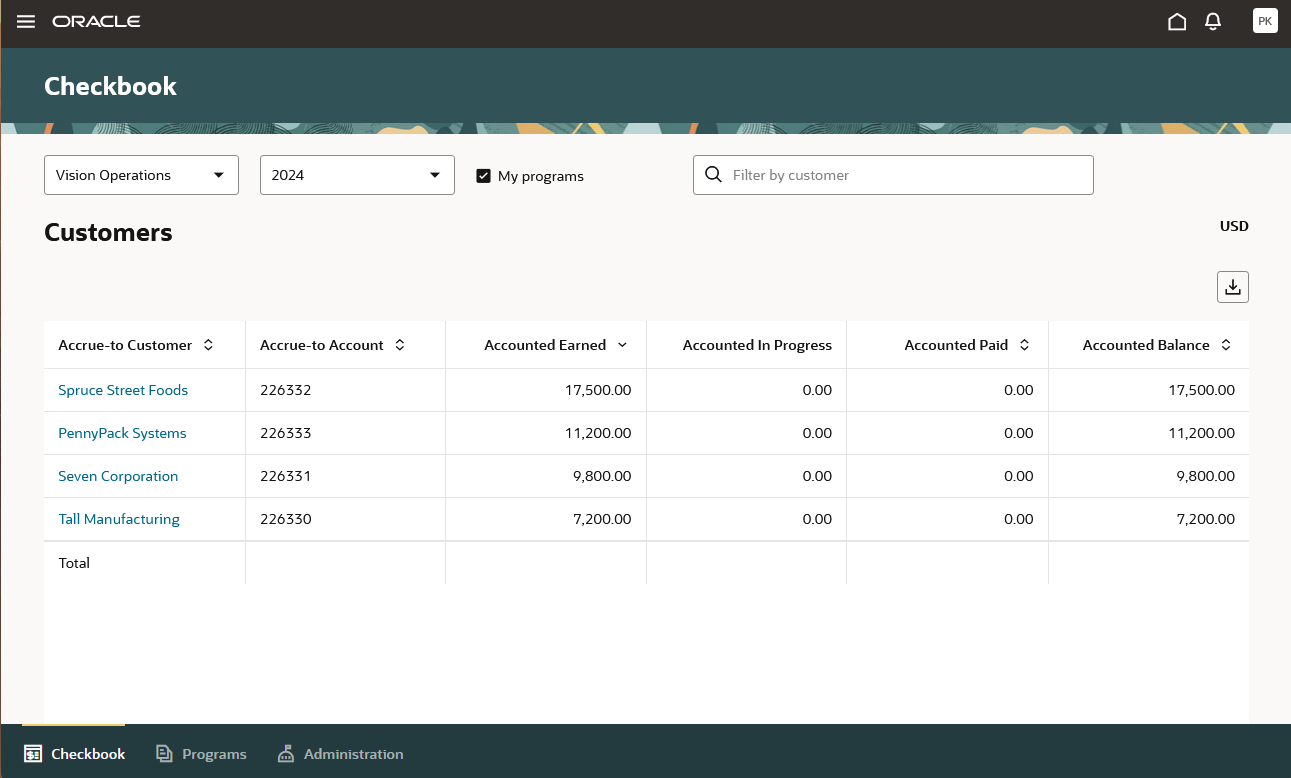
Customer Checkbook
This feature:
- Improves differentiation and channel awareness of a manufacturer or distributor's products and services
- Streamlines and automates tracking and payment of co-op marketing funds
- Improves financial visibility to co-op program liabilities
Steps to Enable
Use the Opt In UI to enable this feature. For instructions, refer to the Optional Uptake of New Features section of this document.
Offering: Order Management
If you haven't implemented Customer Channel Programs, then refer to the Roadmap for Setting Up Customer Promotions chapter in the implementation guide, Implementing Channel Revenue Management.
After you implement Customer Channel Programs:
- Setup up a catalog in Fusion Product Information Management
- Configure Calendar used to identify periods for aggregating co-op sales transactions
- Set up the channel settings Calendar under category = Customer Channel
- Configure Catalog used to identify categories leveraged in product rules
- Set up the channel settings Catalog under category = Customer Channel
- Note that all date effectivity in a catalog is ignored, and only leaf node categories can be assigned to a product rule.
- Configure one or many program types based on the Customer Co-op Program template.
- Define programs based on the configured program type.
- Schedule the Create Accruals for Co-op Programs process, typically monthly.
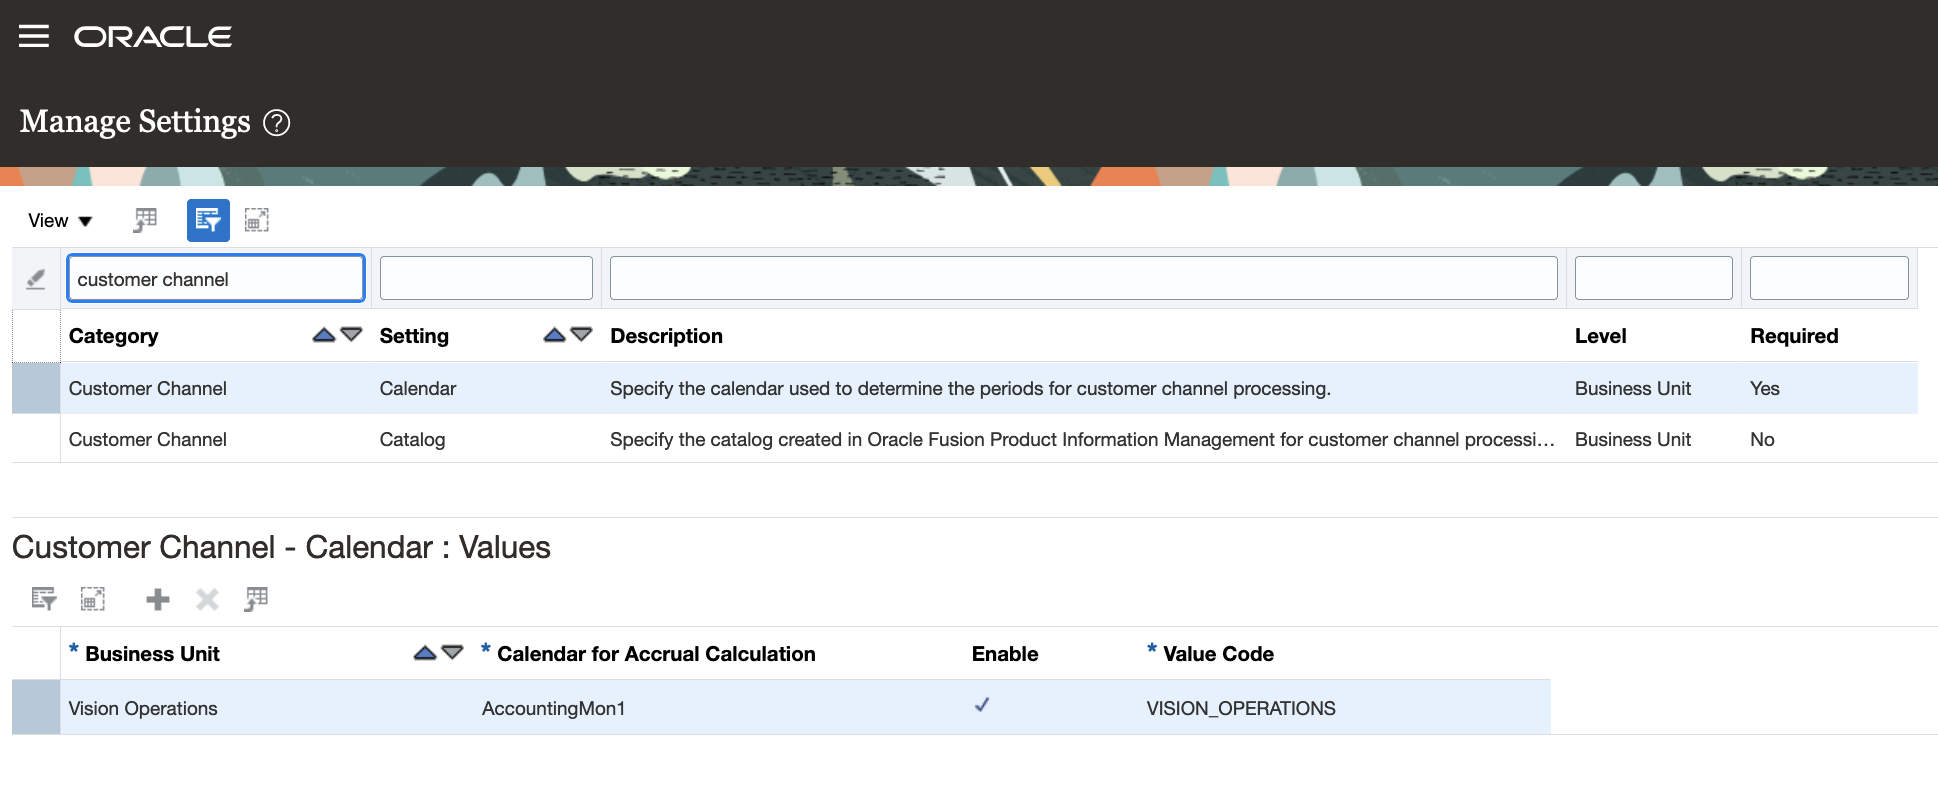
Calendar and Catalog Channel Settings
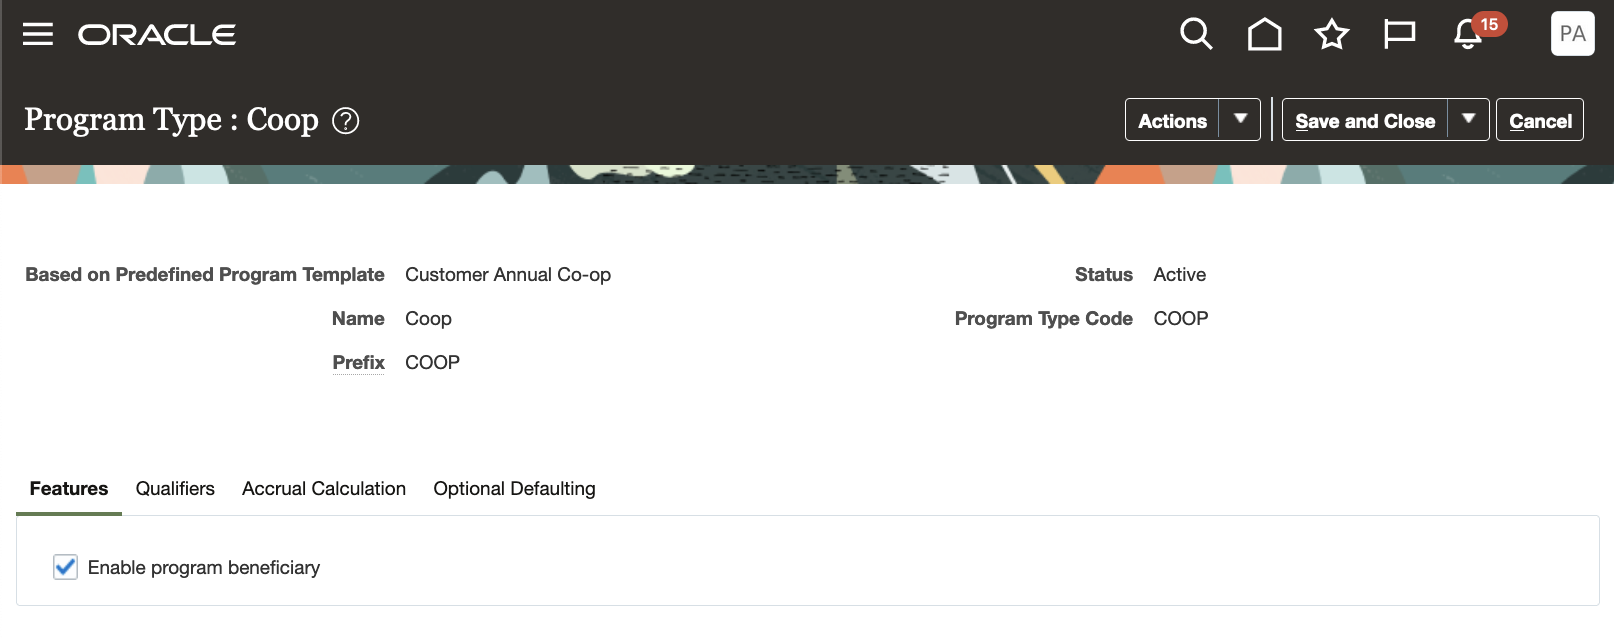
Features Tab of Co-op Program Type

Qualifiers Tab of Co-op Program Type
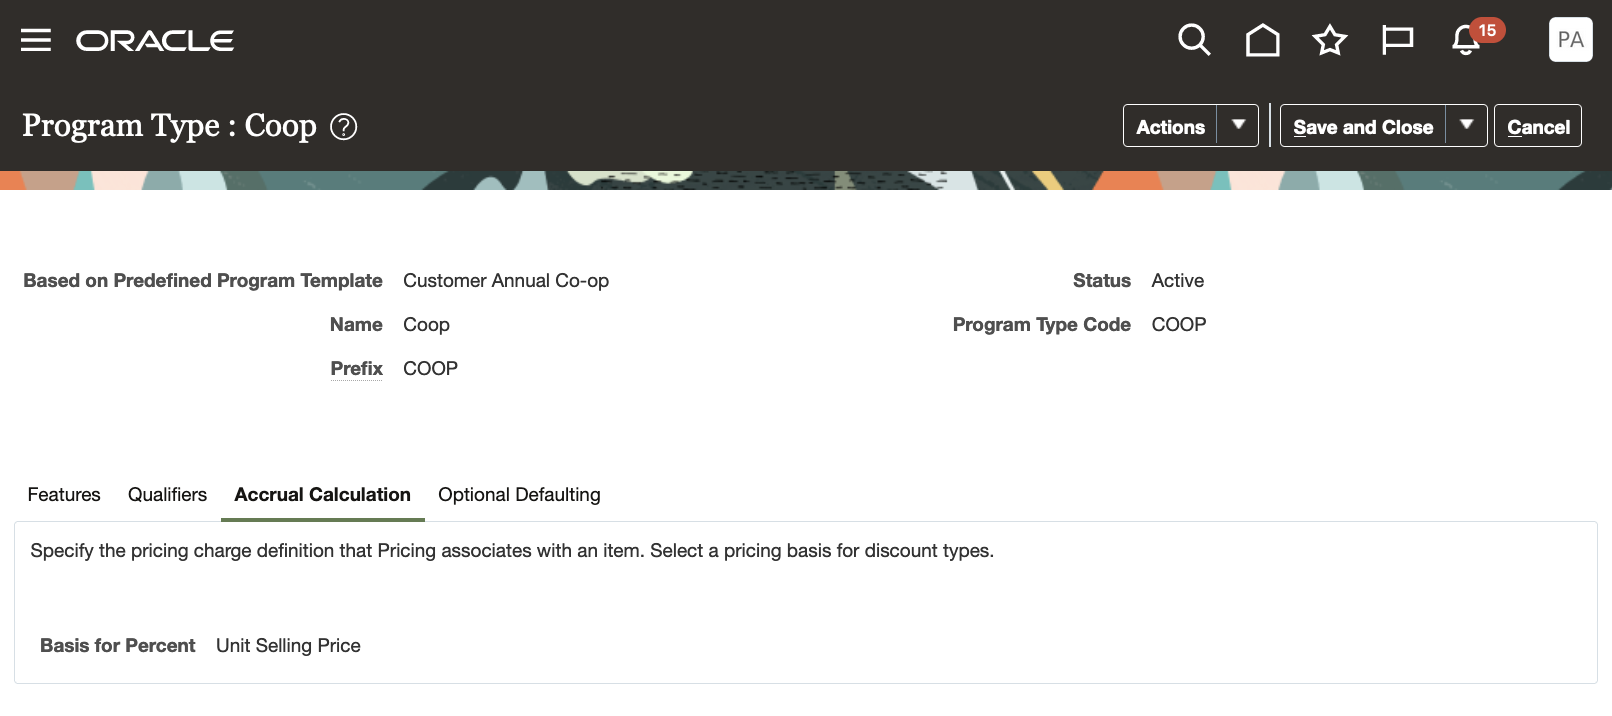
Accrual Calculation Tab of Co-op Program Type
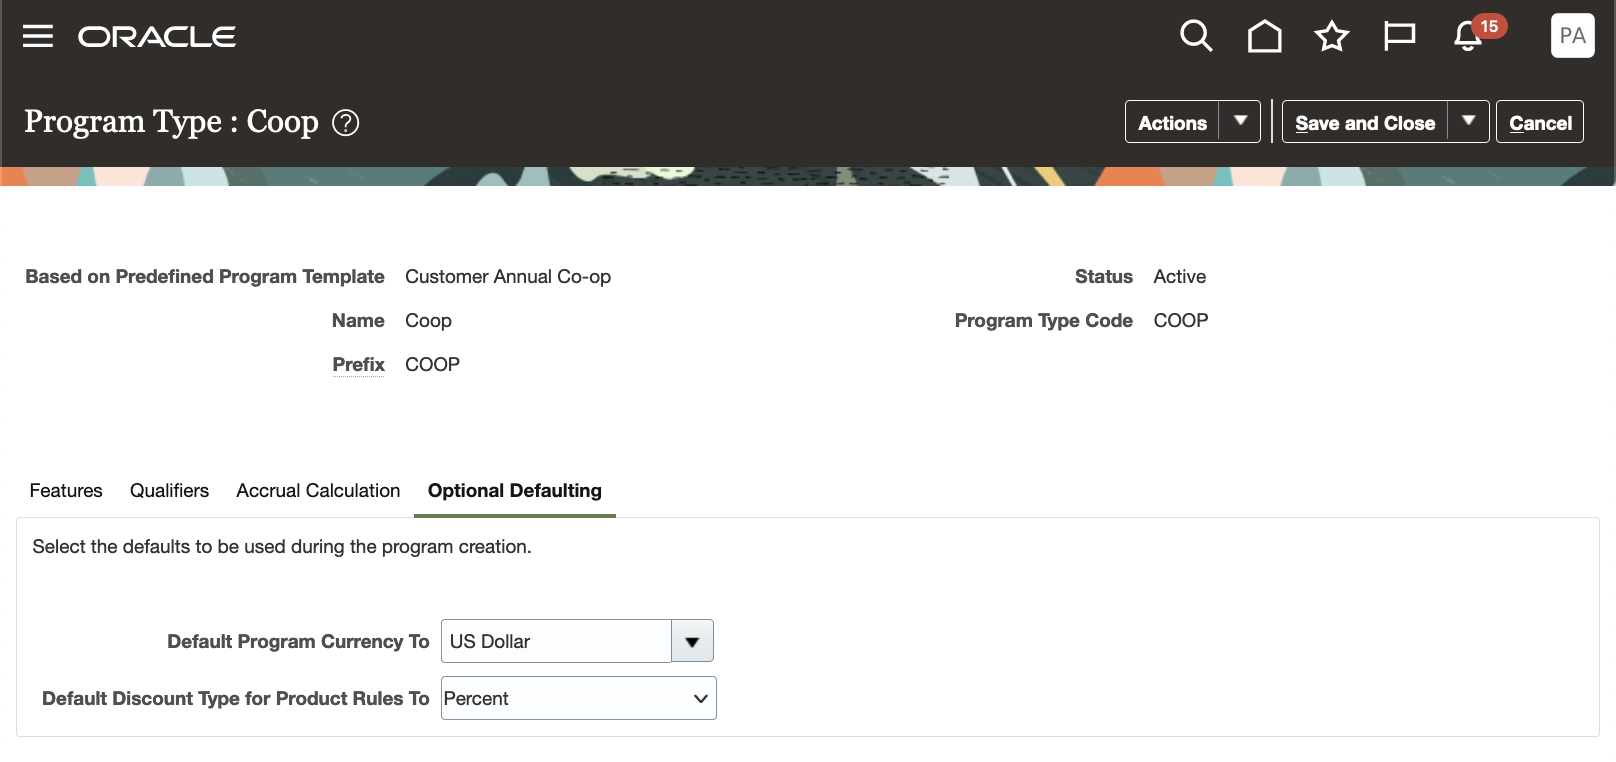
Optional Defaulting Tab of Co-op Program Type
Tips And Considerations
Please note that the drill downs from in progress and paid amounts in the program checkbook to customer payments are available for all sell side programs (not only for customer volume programs).
Key Resources
- Watch the Manage Customer Co-op Programs Demo.
- Watch Introduction to Customer Channel Management.
- For more information on Channel Revenue Management, refer to the Oracle Cloud Readiness content for Order Management.
- Oracle SCM Cloud: Using Oracle Channel Revenue Management Cloud, available on the Oracle Help Center.
- Oracle SCM Cloud: Implementing Oracle Channel Revenue Management Cloud, available on the Oracle Help Center.
- Oracle SCM Cloud: REST API for Oracle SCM Cloud, available on the Oracle Help Center.
Access Requirements
- Users who are assigned a configured job role that contains this privilege can submit the program for approval:
- Manage Customer Programs (CJM_MANAGE_CUSTOMER_PROGRAMS_PRIV)
This privilege was available before to this update.
- Users who are assigned a configured job role that contains this privilege can view the program:
- View Customer Programs (CJM_VIEW_CUSTOMER_PROGRAMS_PRIV)
This privilege was available before this update.
- You must turn on the feature Approve Customer Programs with BPM Workflow to enable workflow based approvals.
To manage task configurations for the ChannelCustomerProgramsApprovalTask task, you need a custom role that includes the BPM Workflow System Admin Role (BPMWorkflowAdmin).
Program approvers who are assigned a configured job role that contains this privilege can view the approval notification:
- Approve Customer Programs (CJM_APPROVE_CUSTOMER_PROGRAMS_PRIV)
This privilege was available before this update.
Manage Customer Volume Programs
Manage customer volume rebate programs to accrue rebates based on cumulative sales volumes across orders. You can define percentage rebates based on sales value attainment tiers, or amount per unit rebates based on sold quantity attainment tiers. Retrospective calculations are supported, and you can define product eligibility by item, or for all items with exclusions. Eligible sales are obtained from sales orders, which are imported through a CSV file.
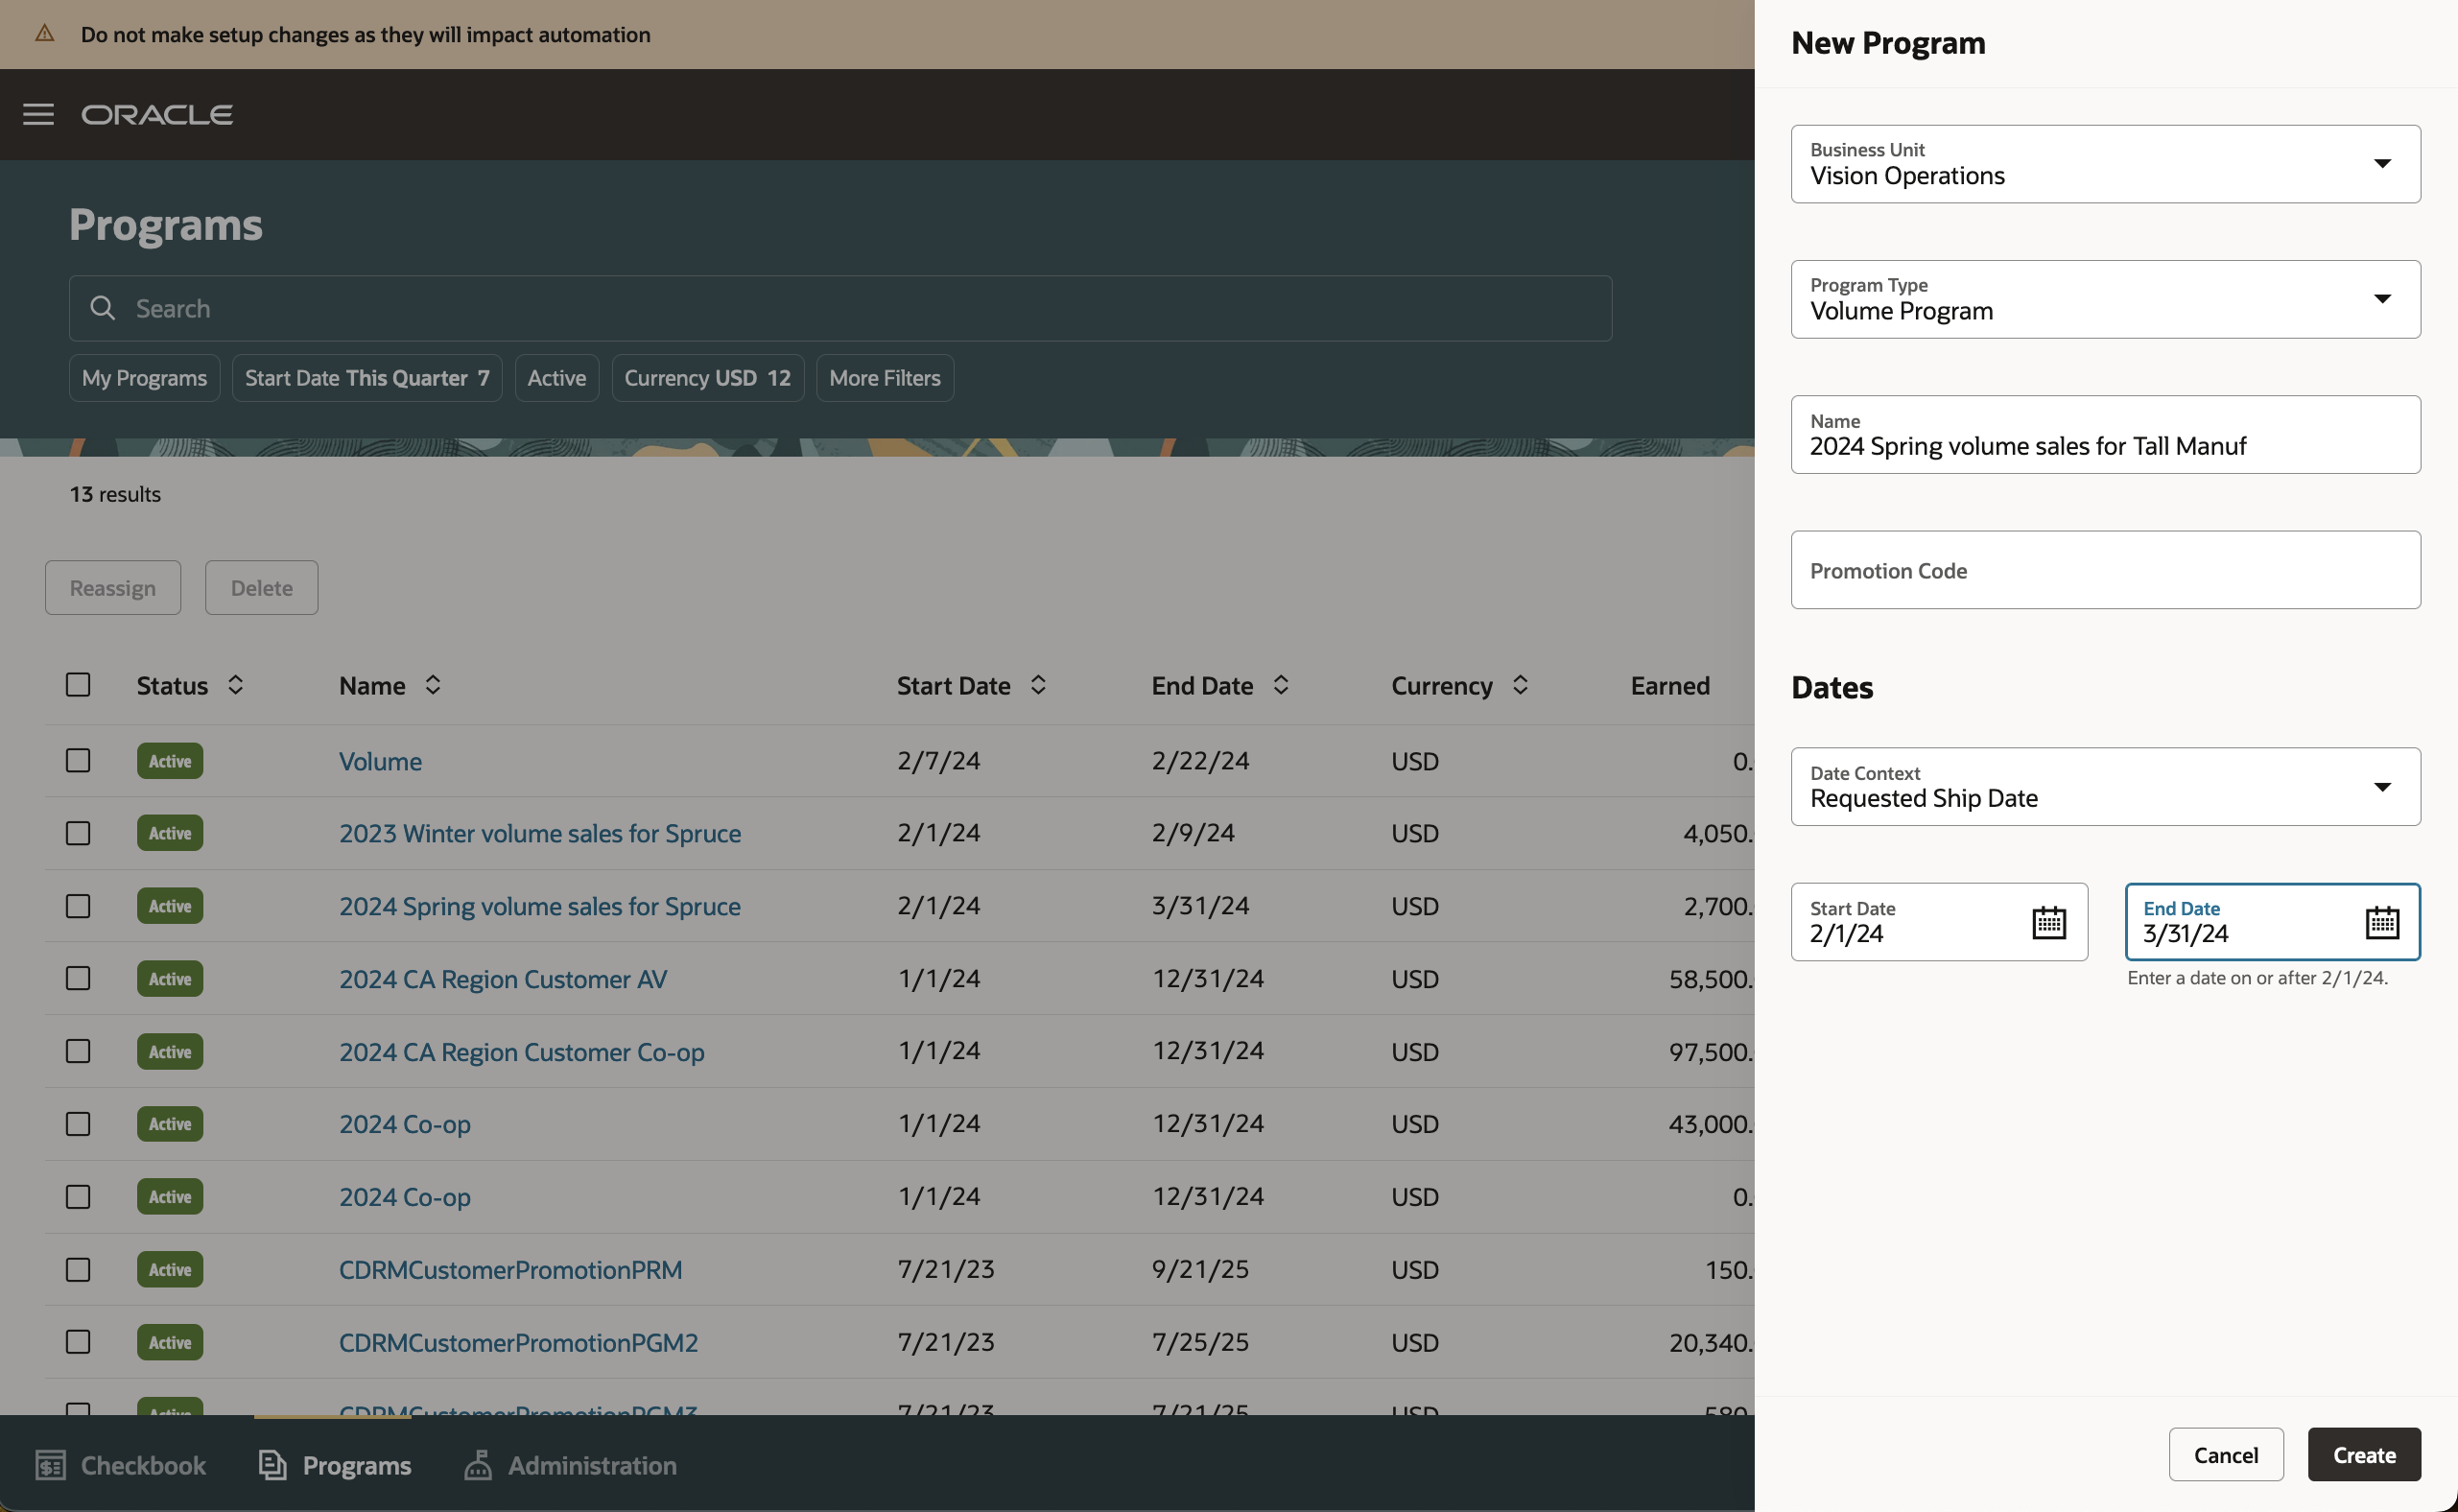
Create Volume Program
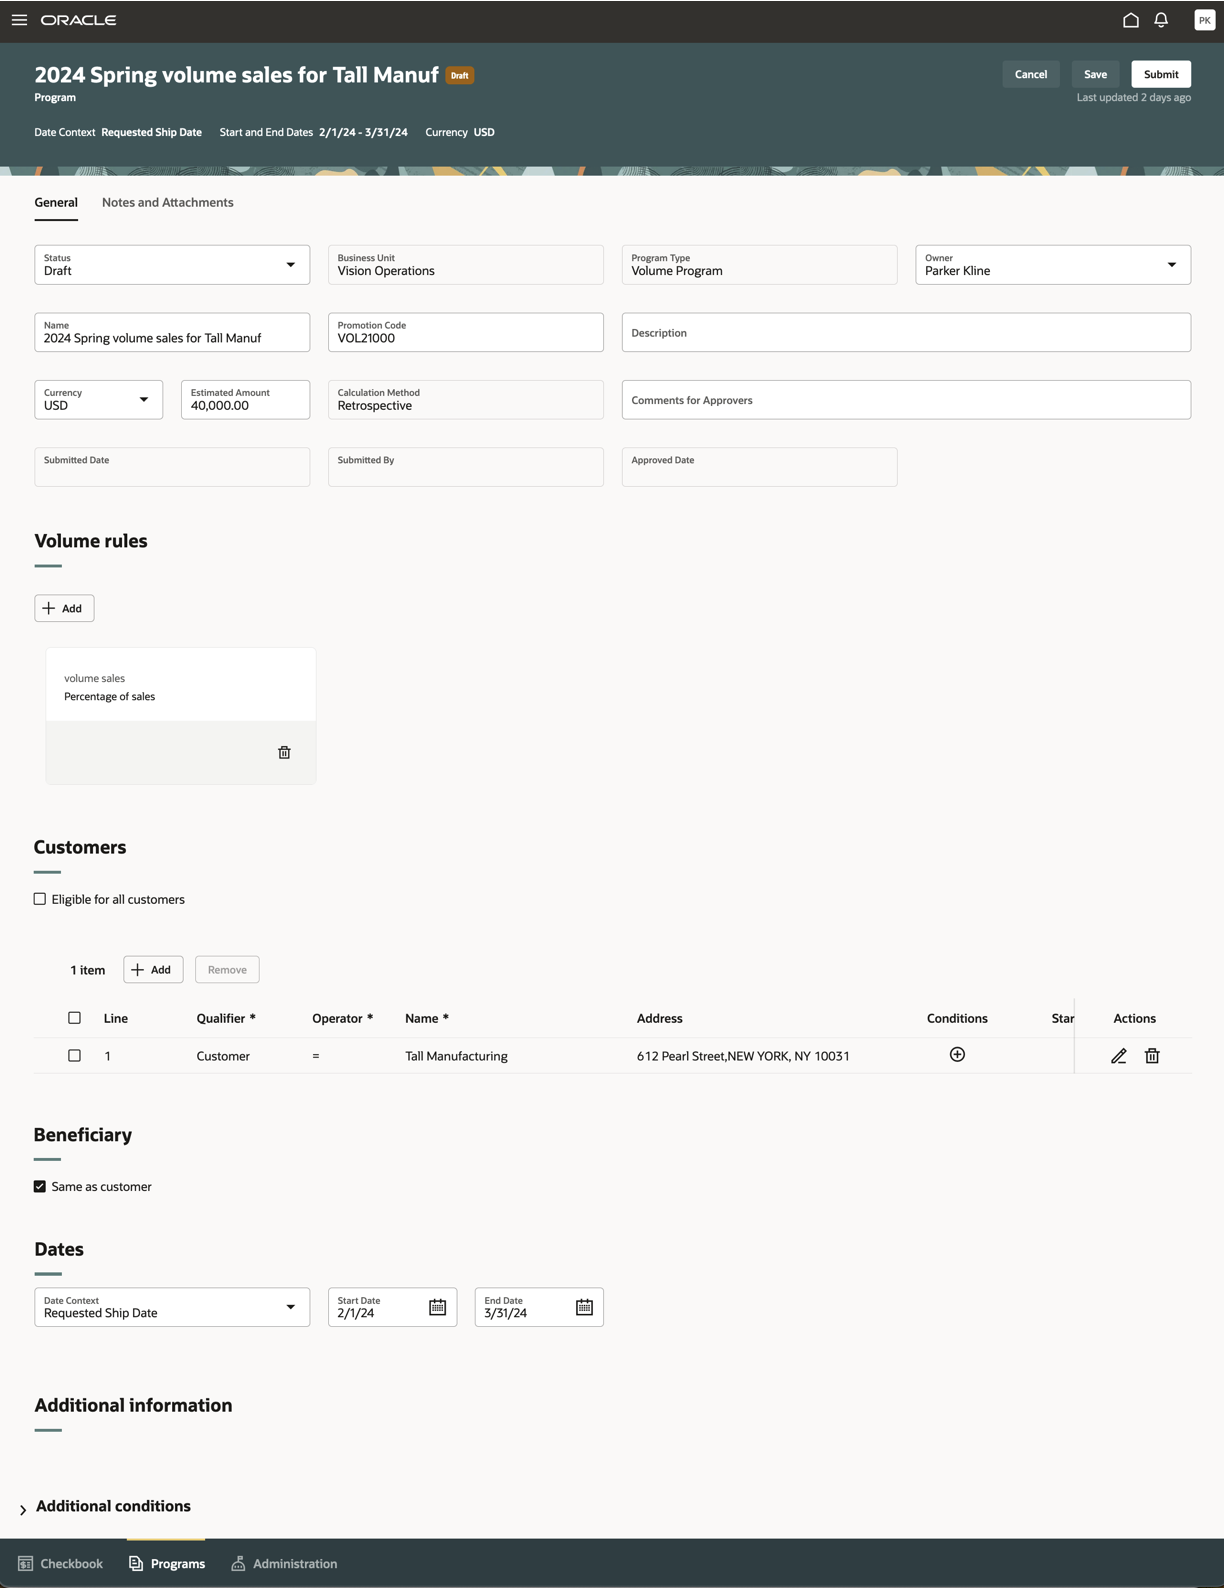
Volume Program
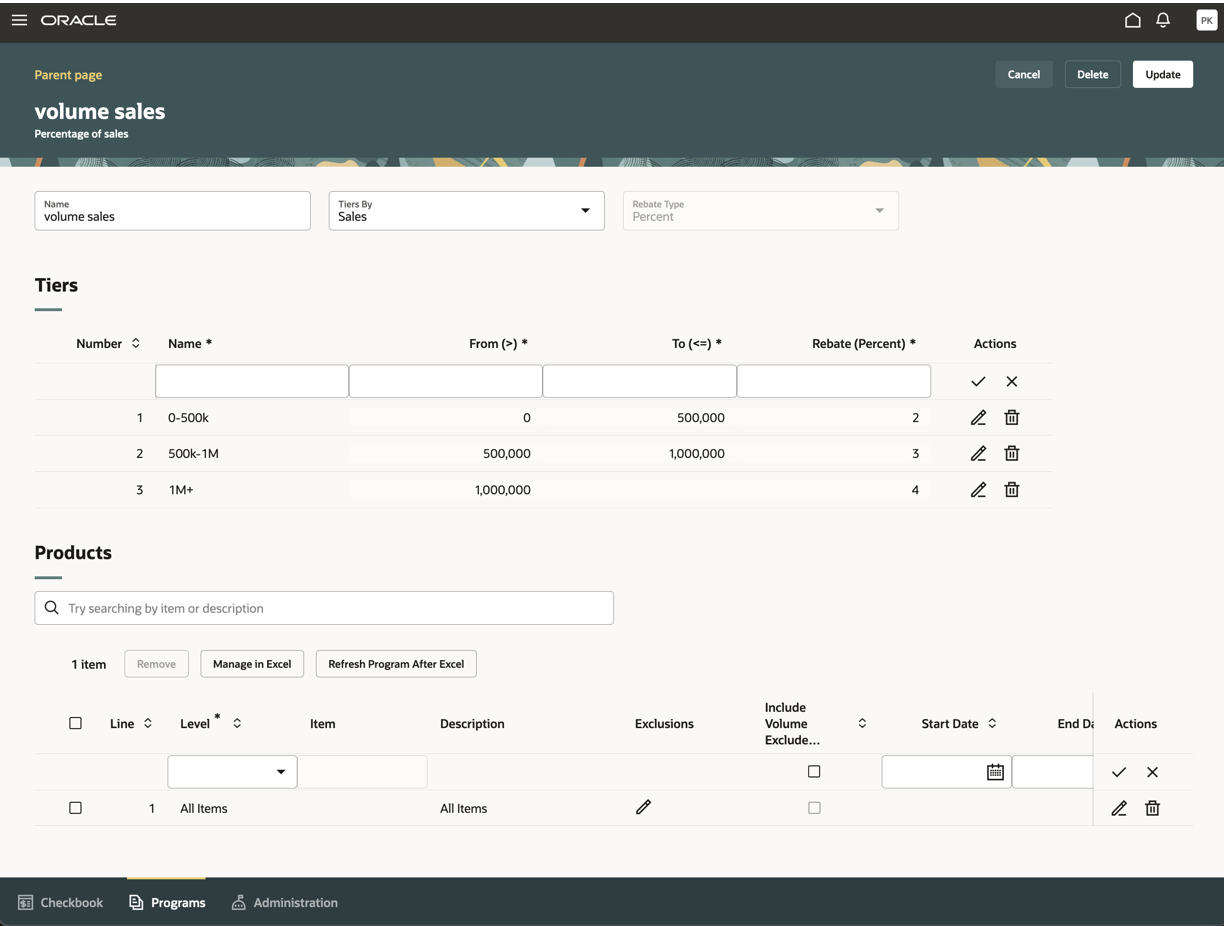
Tiered Volume Rule
You can import and export product rules from Excel for both customer volume, and customer annual volume programs.
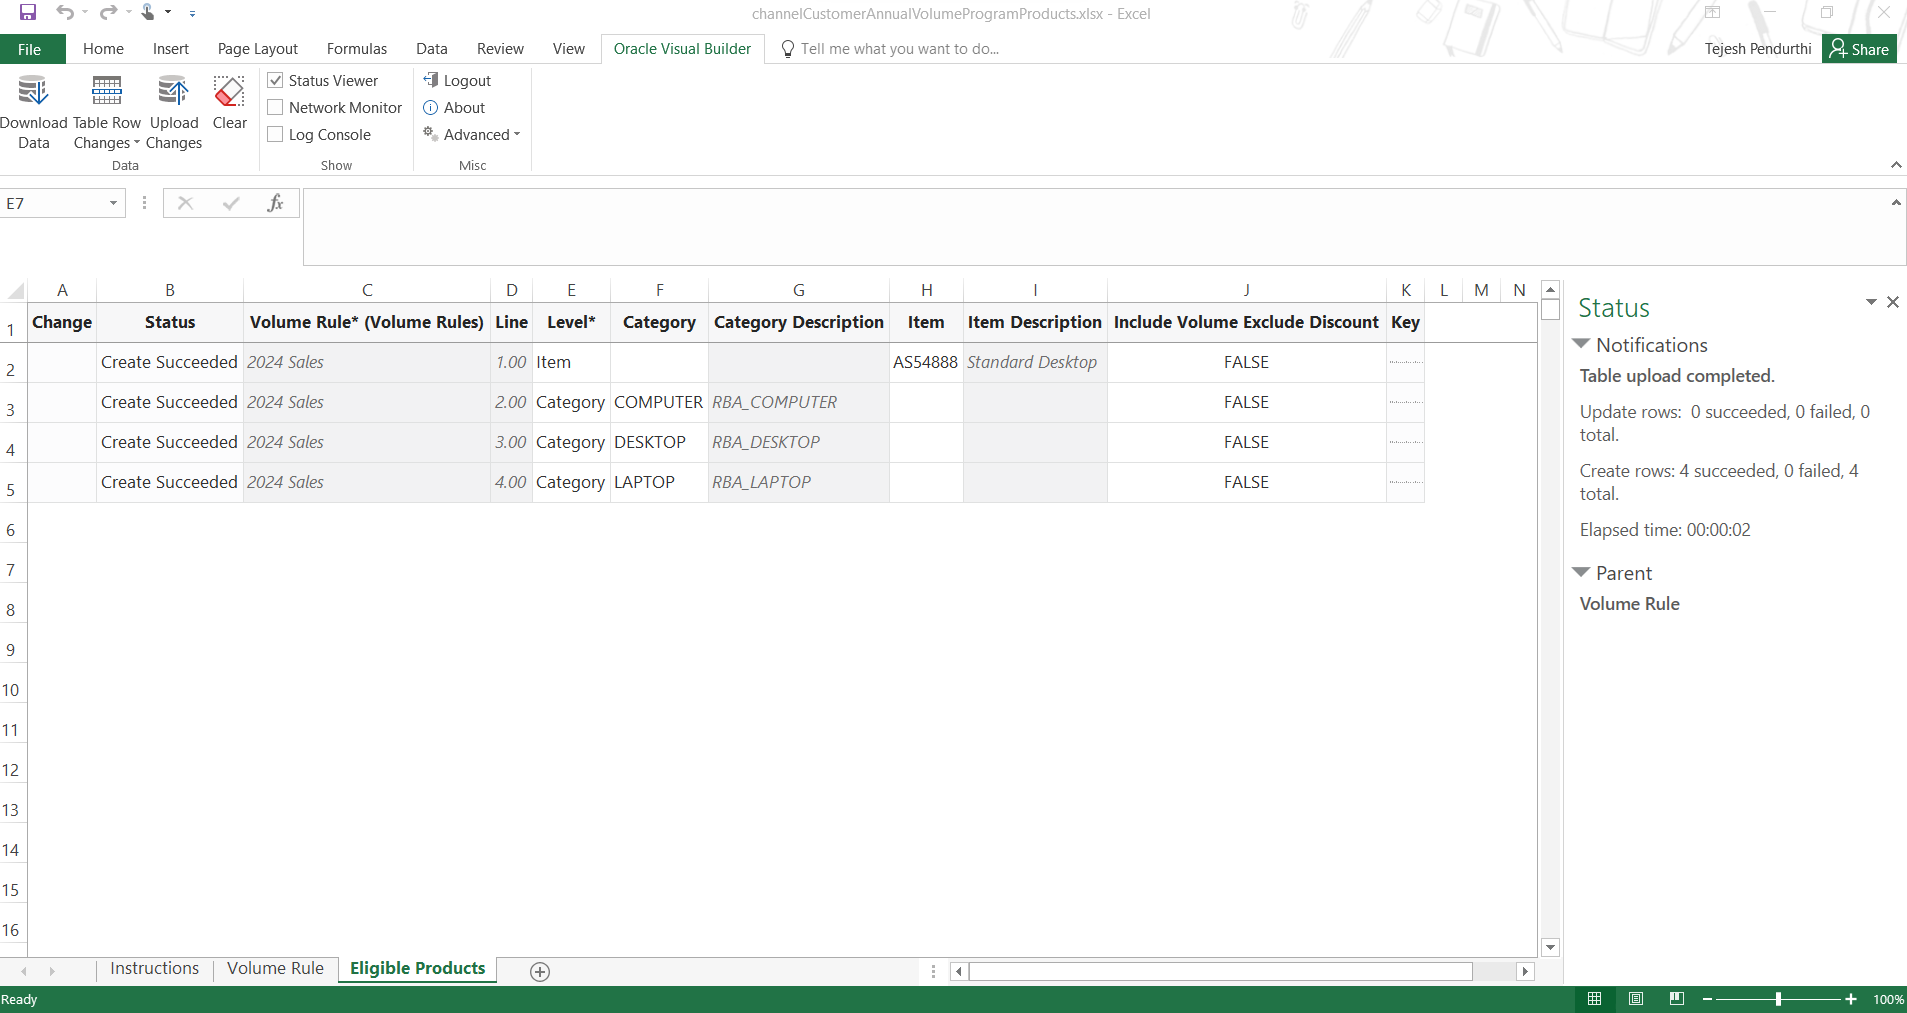
Successful Upload of Product Rules from Excel for a Customer Annual Volume Program
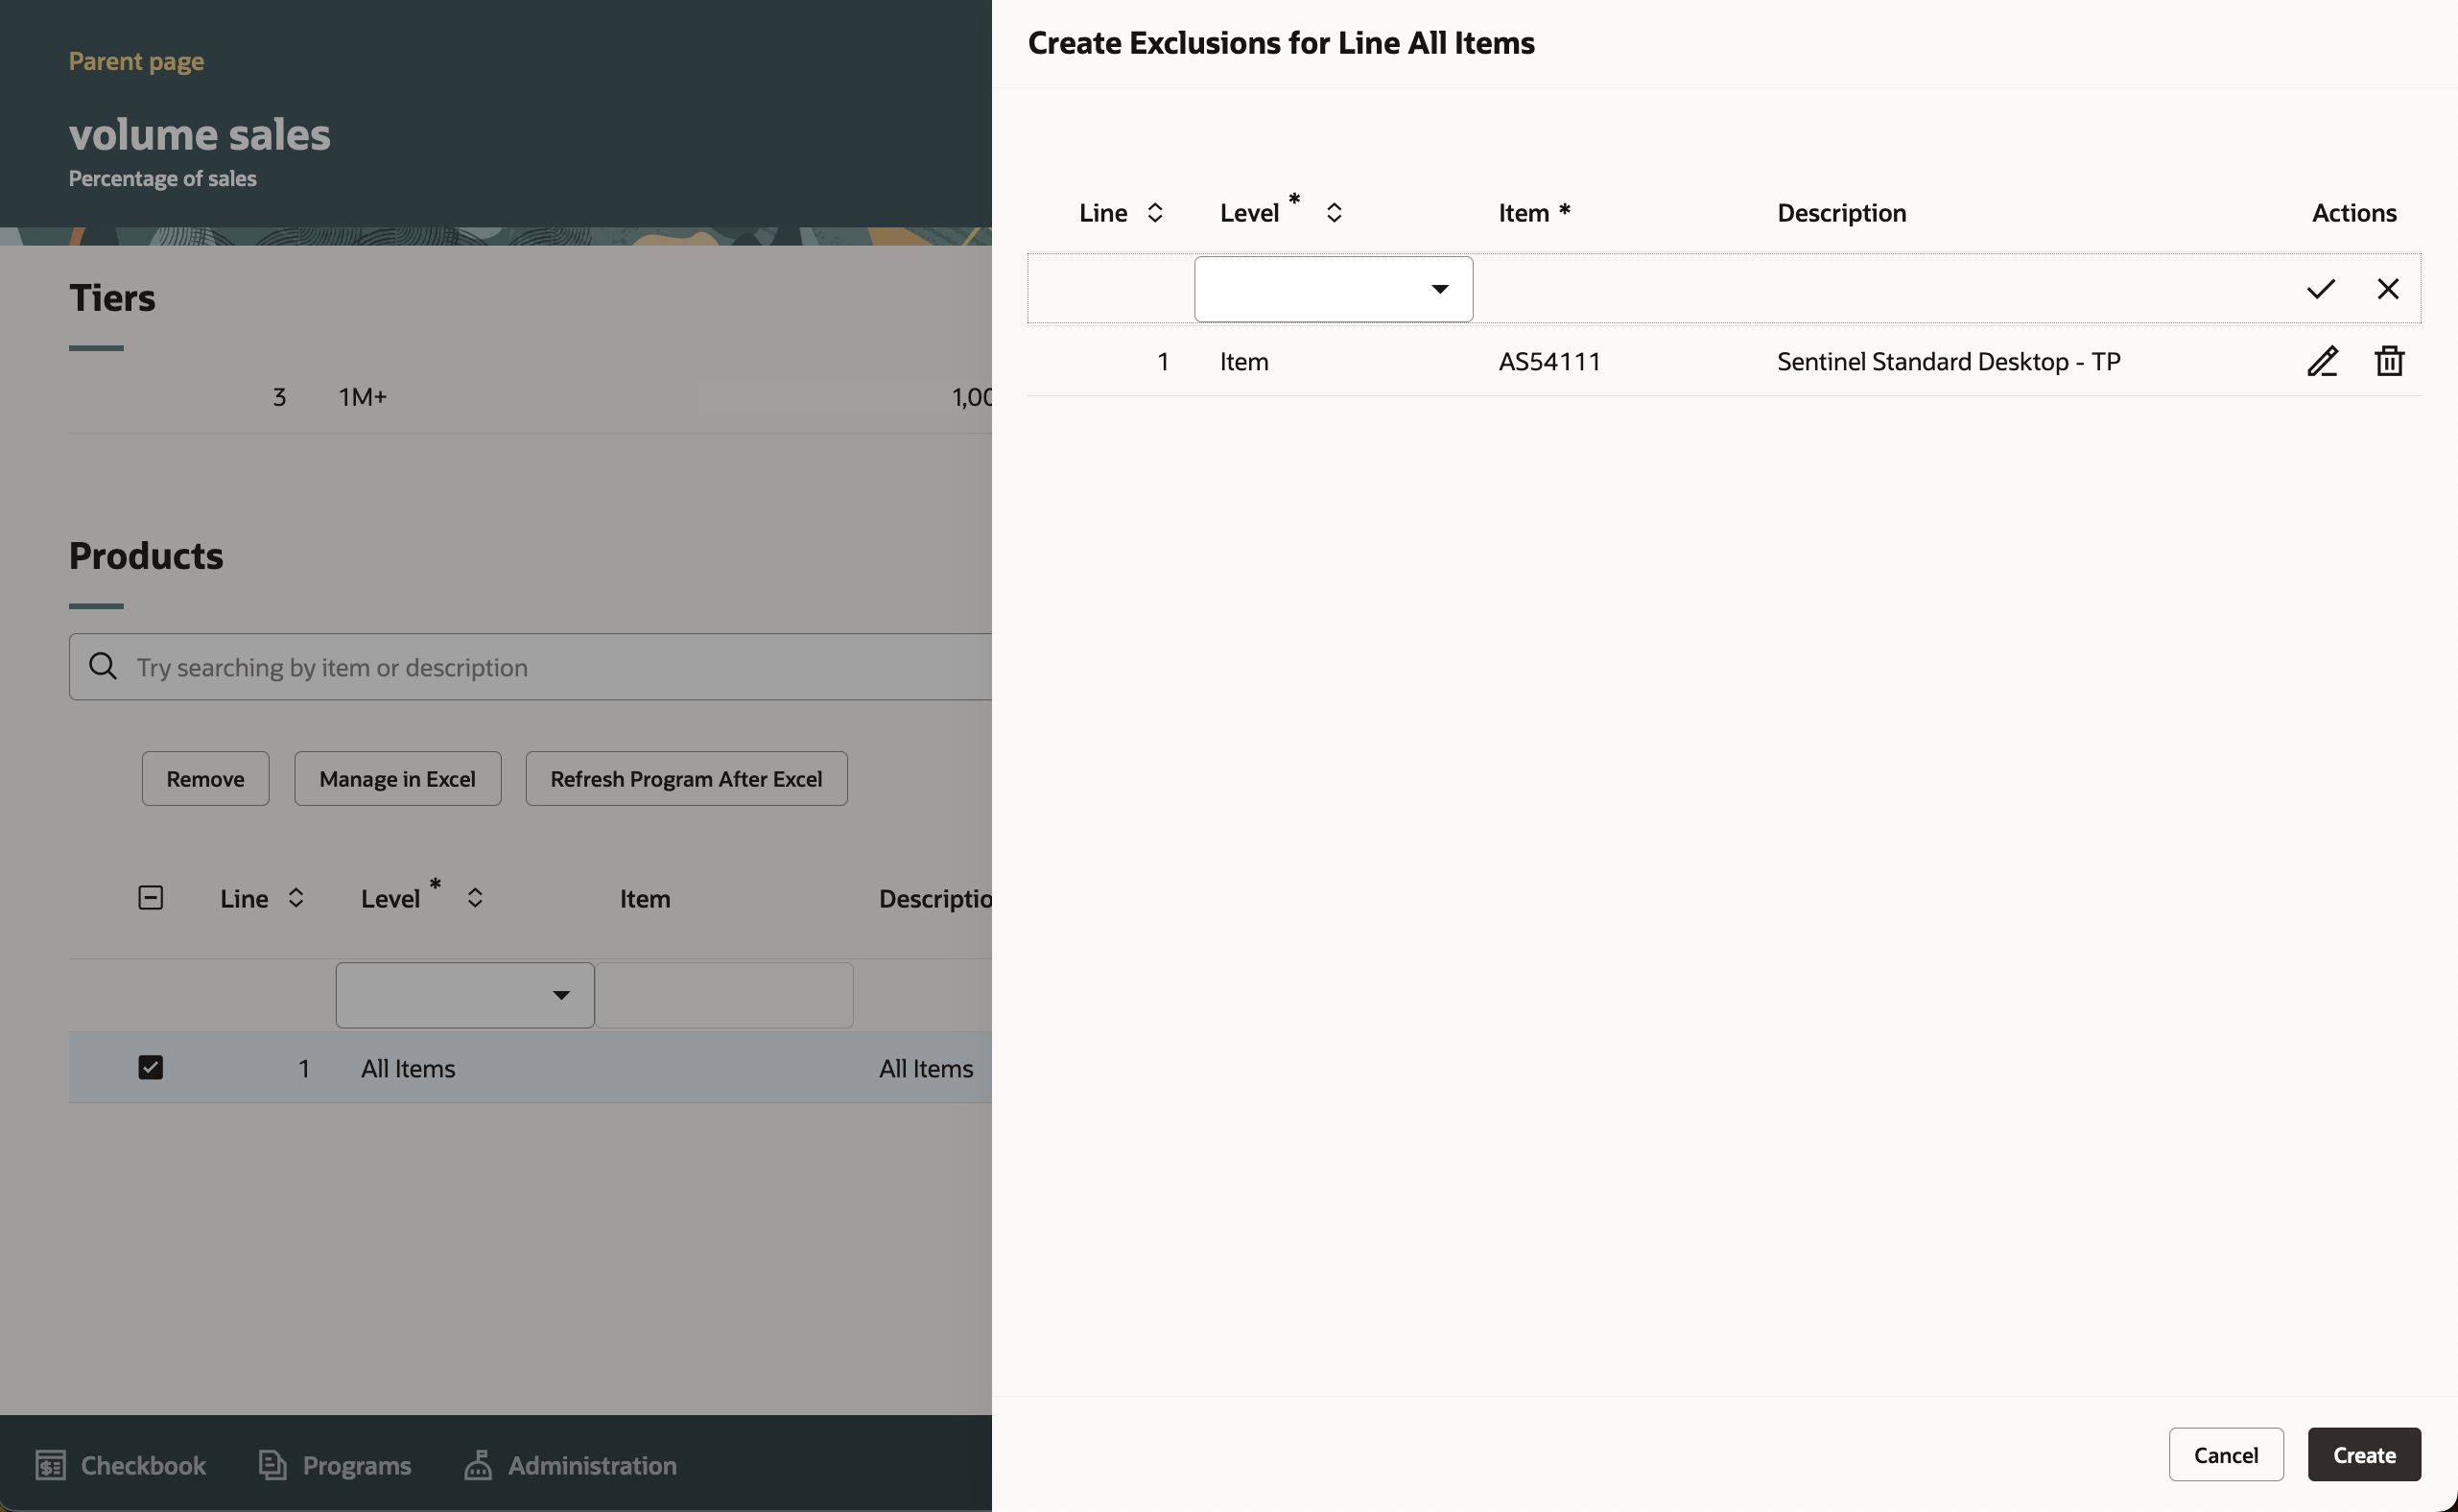
Exclusions
Program Checkbook
In Progress and Paid Drill Down to Customer Payments from Program Checkbook
Customer payments for a specific program are available for all sell side programs.

Customer Payments for a Program
Customer Checkbook
This feature:
- Incentivizes channel customer to reach predefined purchasing volume levels.
- Streamlines and automates tracking and payment of volume rebates.
- Improves financial visibility to volume program liabilities.
Steps to Enable
Use the Opt In UI to enable this feature. For instructions, refer to the Optional Uptake of New Features section of this document.
Offering: Order Management
If you haven't implemented Customer Channel Programs, then refer to the Roadmap for Setting Up Customer Promotions chapter in the implementation guide, Implementing Channel Revenue Management.
After you implement Customer Channel Programs:
- Configure one or many program types based on the Customer Volume Program template.
- Define and activate programs based on the configured program type.
- Schedule the Create Accruals for Channel Batch process, typically nightly. Note that this will process supplier rebates, customer programs, and customer volume programs.
Features Tab of Volume Program Type

Qualifiers Tab of Volume Program Type
Accrual Calculation Tab of Volume Program Type

Optional Defaulting Tab of Volume Program Type
Tips And Considerations
Customer volume programs are similar to our customer annual volume programs except that instead of aggregating monthly sales transactions, each sales transaction is calculated separately.
Please note that the drill downs from in progress and paid amounts in the program checkbook to customer payments are available for all sell side programs (not only for customer volume programs).
Please note the product rules import/export to Excel is available for both customer volume and customer annual volume programs. This is supported in the Windows operating system only. We are leveraging the Oracle Visual Builder Excel Add-in, which is a one-time installation before use.
- Click Manage in Excel in the Products region to implicitly save the program, and download the spreadsheet.
- Follow the Instructions tab on how to install the add-in, and use the spreadsheet.
- Download the volume rule to the spreadsheet via the Oracle Visual Builder menu > Download Data action . The Volume Rule tab is read only, but provides the name of the volume rule to copy from when identifying the volume rule of a product rule.
- In the Product Rules tab, enter your product rules, and upload them via the Oracle Visual Builder menu > Upload Changes action. A status of the upload is provided in Excel, along with any validation errors to address.
- Click Refresh Program After Excel to view the uploaded products in the program UI.
It is a good practice to download a new spreadsheet each time with each new release to ensure the REST services being invoked are in synch. If you don't download the spreadsheet each time, then you must save the volume rule before creating product rules via Excel. Each spreadsheet session requires authentication through login.

Refreshed Product Rules After Excel Upload

Read Only Volume Rule Tab is Populated After Download
Spreadsheet with Filled In Product Rules Before Uploading Changes

Successfully Created Product Rules After Uploading Changes
Key Resources
- Watch the Manage Customer Volume Programs Demo.
- Watch Introduction to Customer Channel Management.
- For more information on Channel Revenue Management, refer to the Oracle Cloud Readiness content for Order Management.
- Oracle SCM Cloud: Using Oracle Channel Revenue Management Cloud, available on the Oracle Help Center.
- Oracle SCM Cloud: Implementing Oracle Channel Revenue Management Cloud, available on the Oracle Help Center.
- Oracle SCM Cloud: REST API for Oracle SCM Cloud, available on the Oracle Help Center.
Access Requirements
- Users who are assigned a configured job role that contains this privilege can submit the program for approval:
- Manage Customer Programs (CJM_MANAGE_CUSTOMER_PROGRAMS_PRIV)
This privilege was available before this update.
- Users who are assigned a configured job role that contains this privilege can view the program:
- View Customer Programs (CJM_VIEW_CUSTOMER_PROGRAMS_PRIV)
This privilege was available before this update.
- Program approvers who are assigned a configured job role that contains this privilege can view the approval notification:
- Approve Customer Programs (CJM_APPROVE_CUSTOMER_PROGRAMS_PRIV)
To manage task configurations for the ChannelCustomerProgramsApprovalTask task, you need a custom role that includes the BPM Workflow System Admin Role (BPMWorkflowAdmin).
This privilege was available before this update.
Deductions and Settlement
Provides research, administration, analysis, and settlement functionalities to quickly resolve deductions and settle claims, improving customer relationships and overall financial performance.
Extend Customer Claim Settlement Methods
Extend claim settlement options to create a settlement method for manual claims that is unique to your business process. For example, for claims created via an external application, use this feature to settle those claims in an external Accounts Receivable or Accounts Payable application.
The custom settlement method is available for promotional or nonpromotional manual claims. For promotional claims, custom settlement methods also handle channel revenue accounting for you.
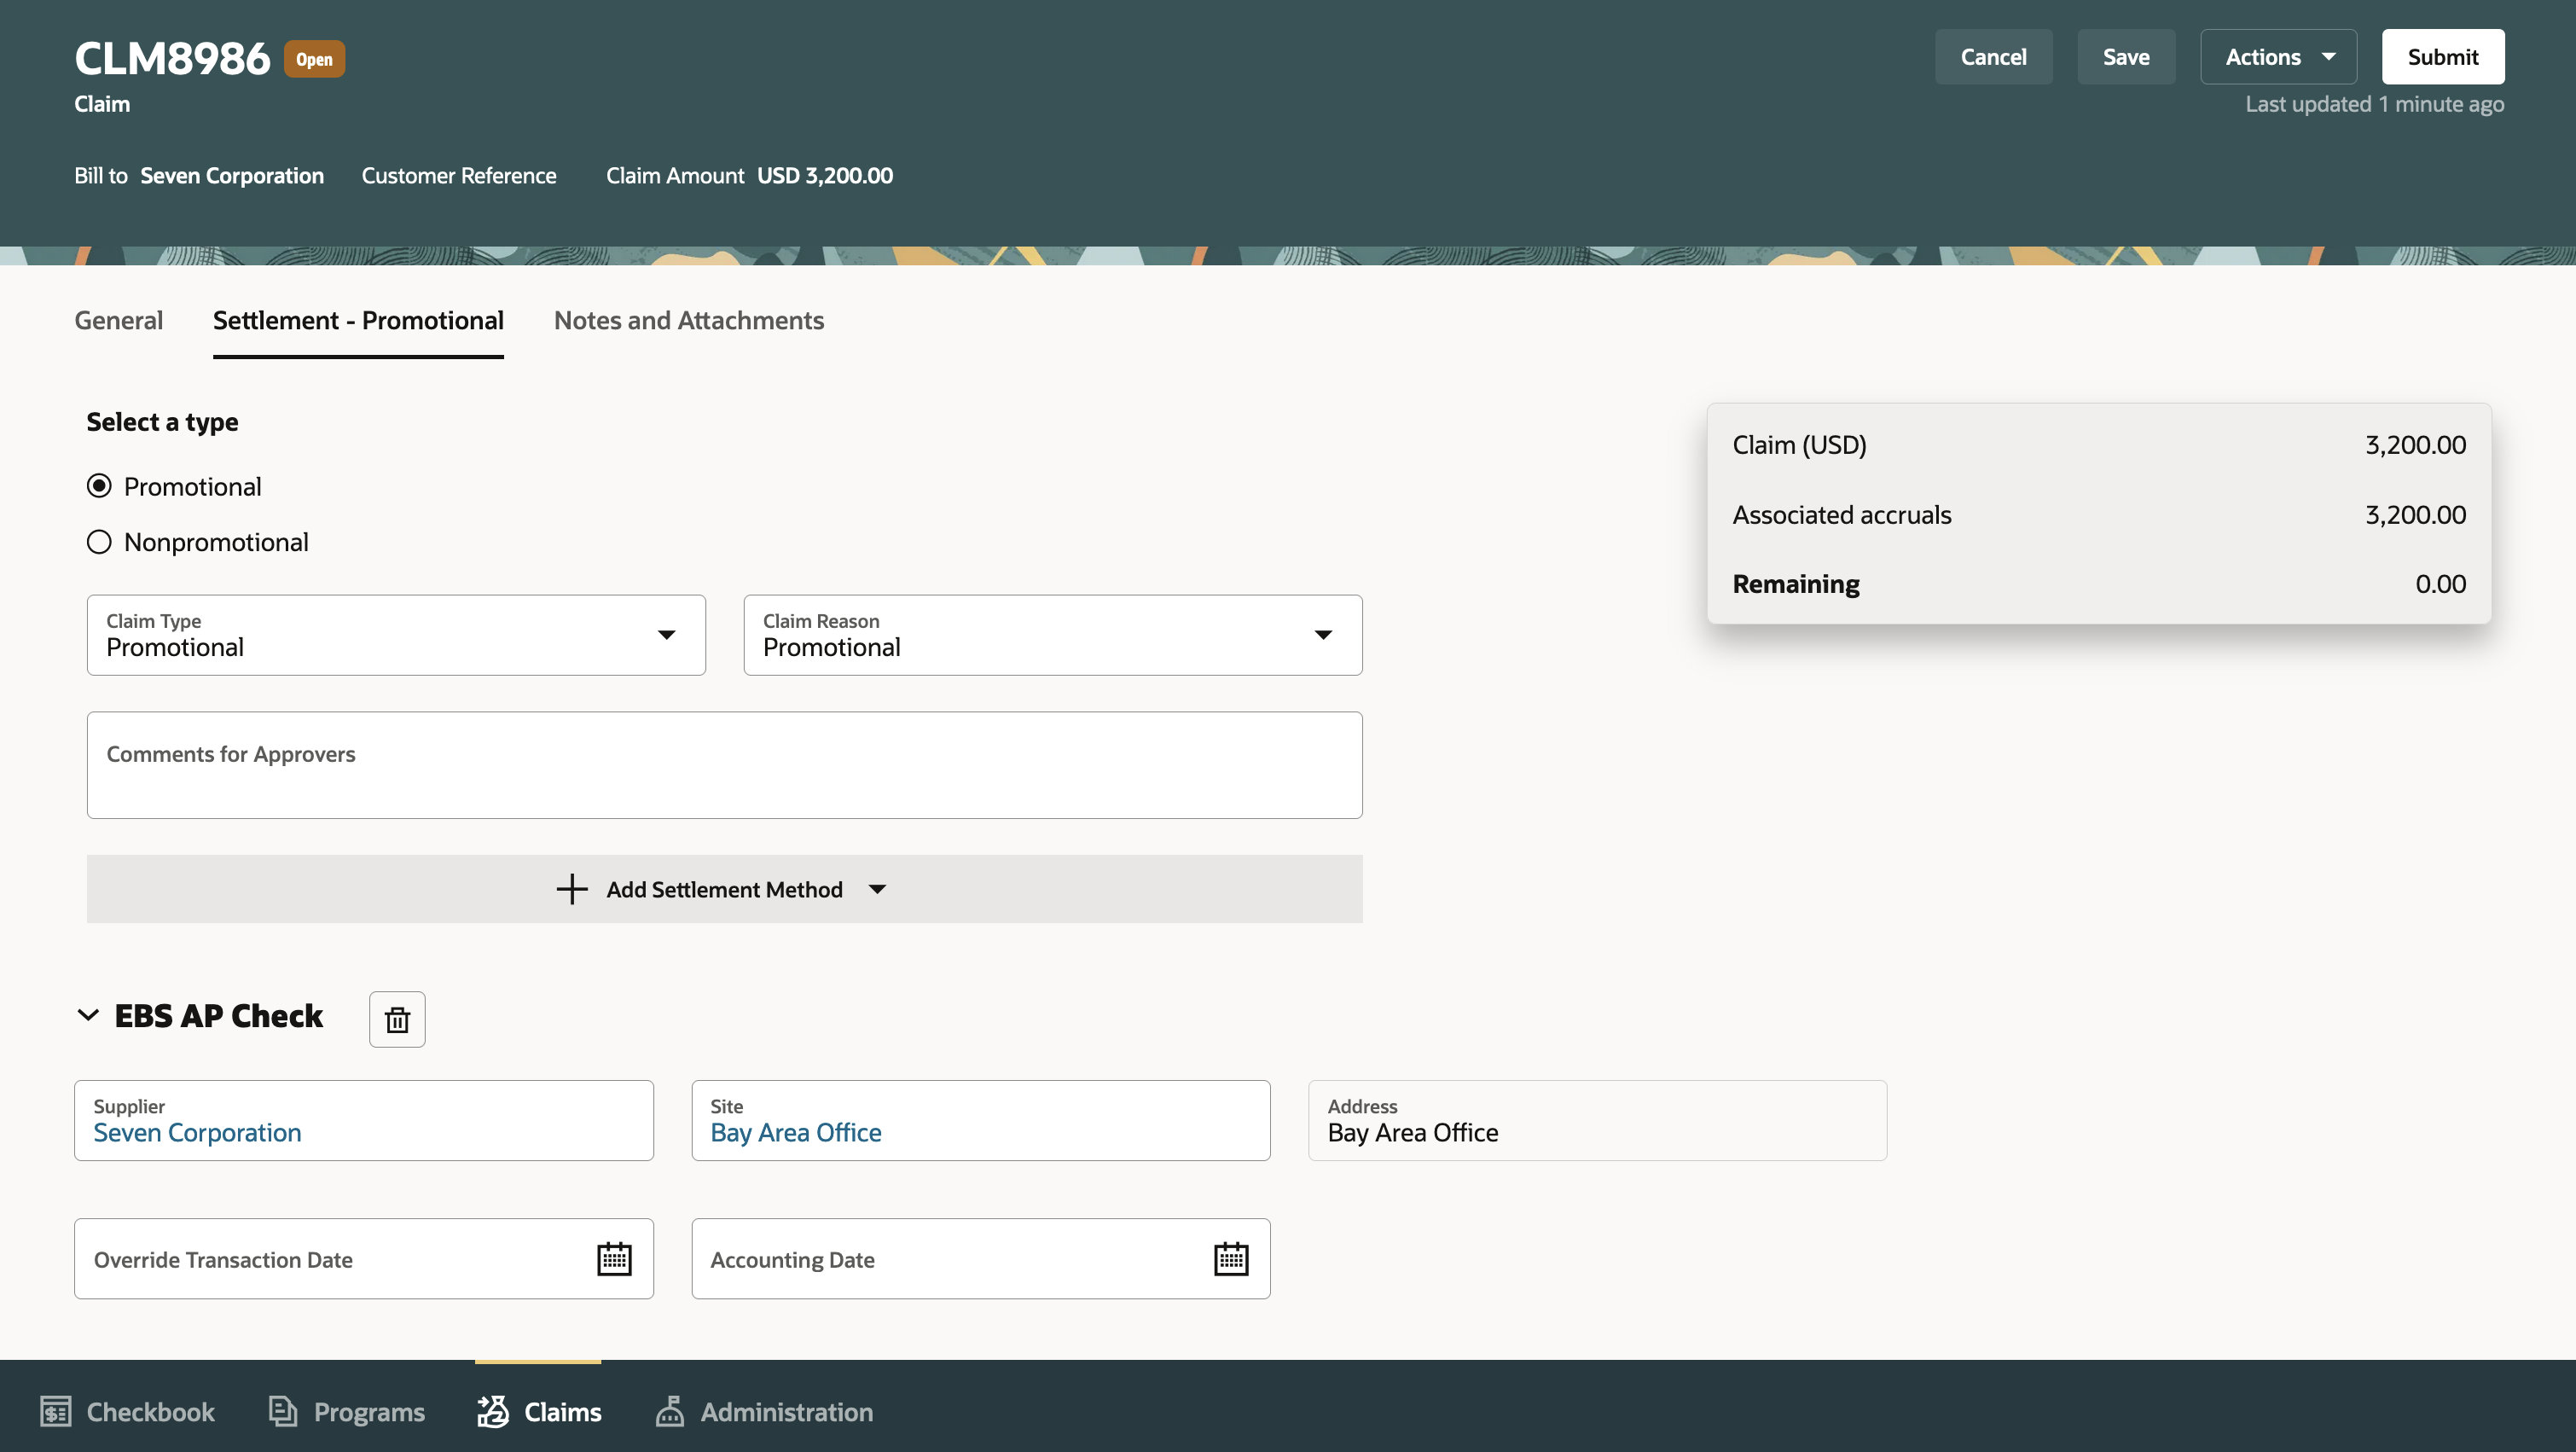
EBS AP Check as a Custom Settlement Method
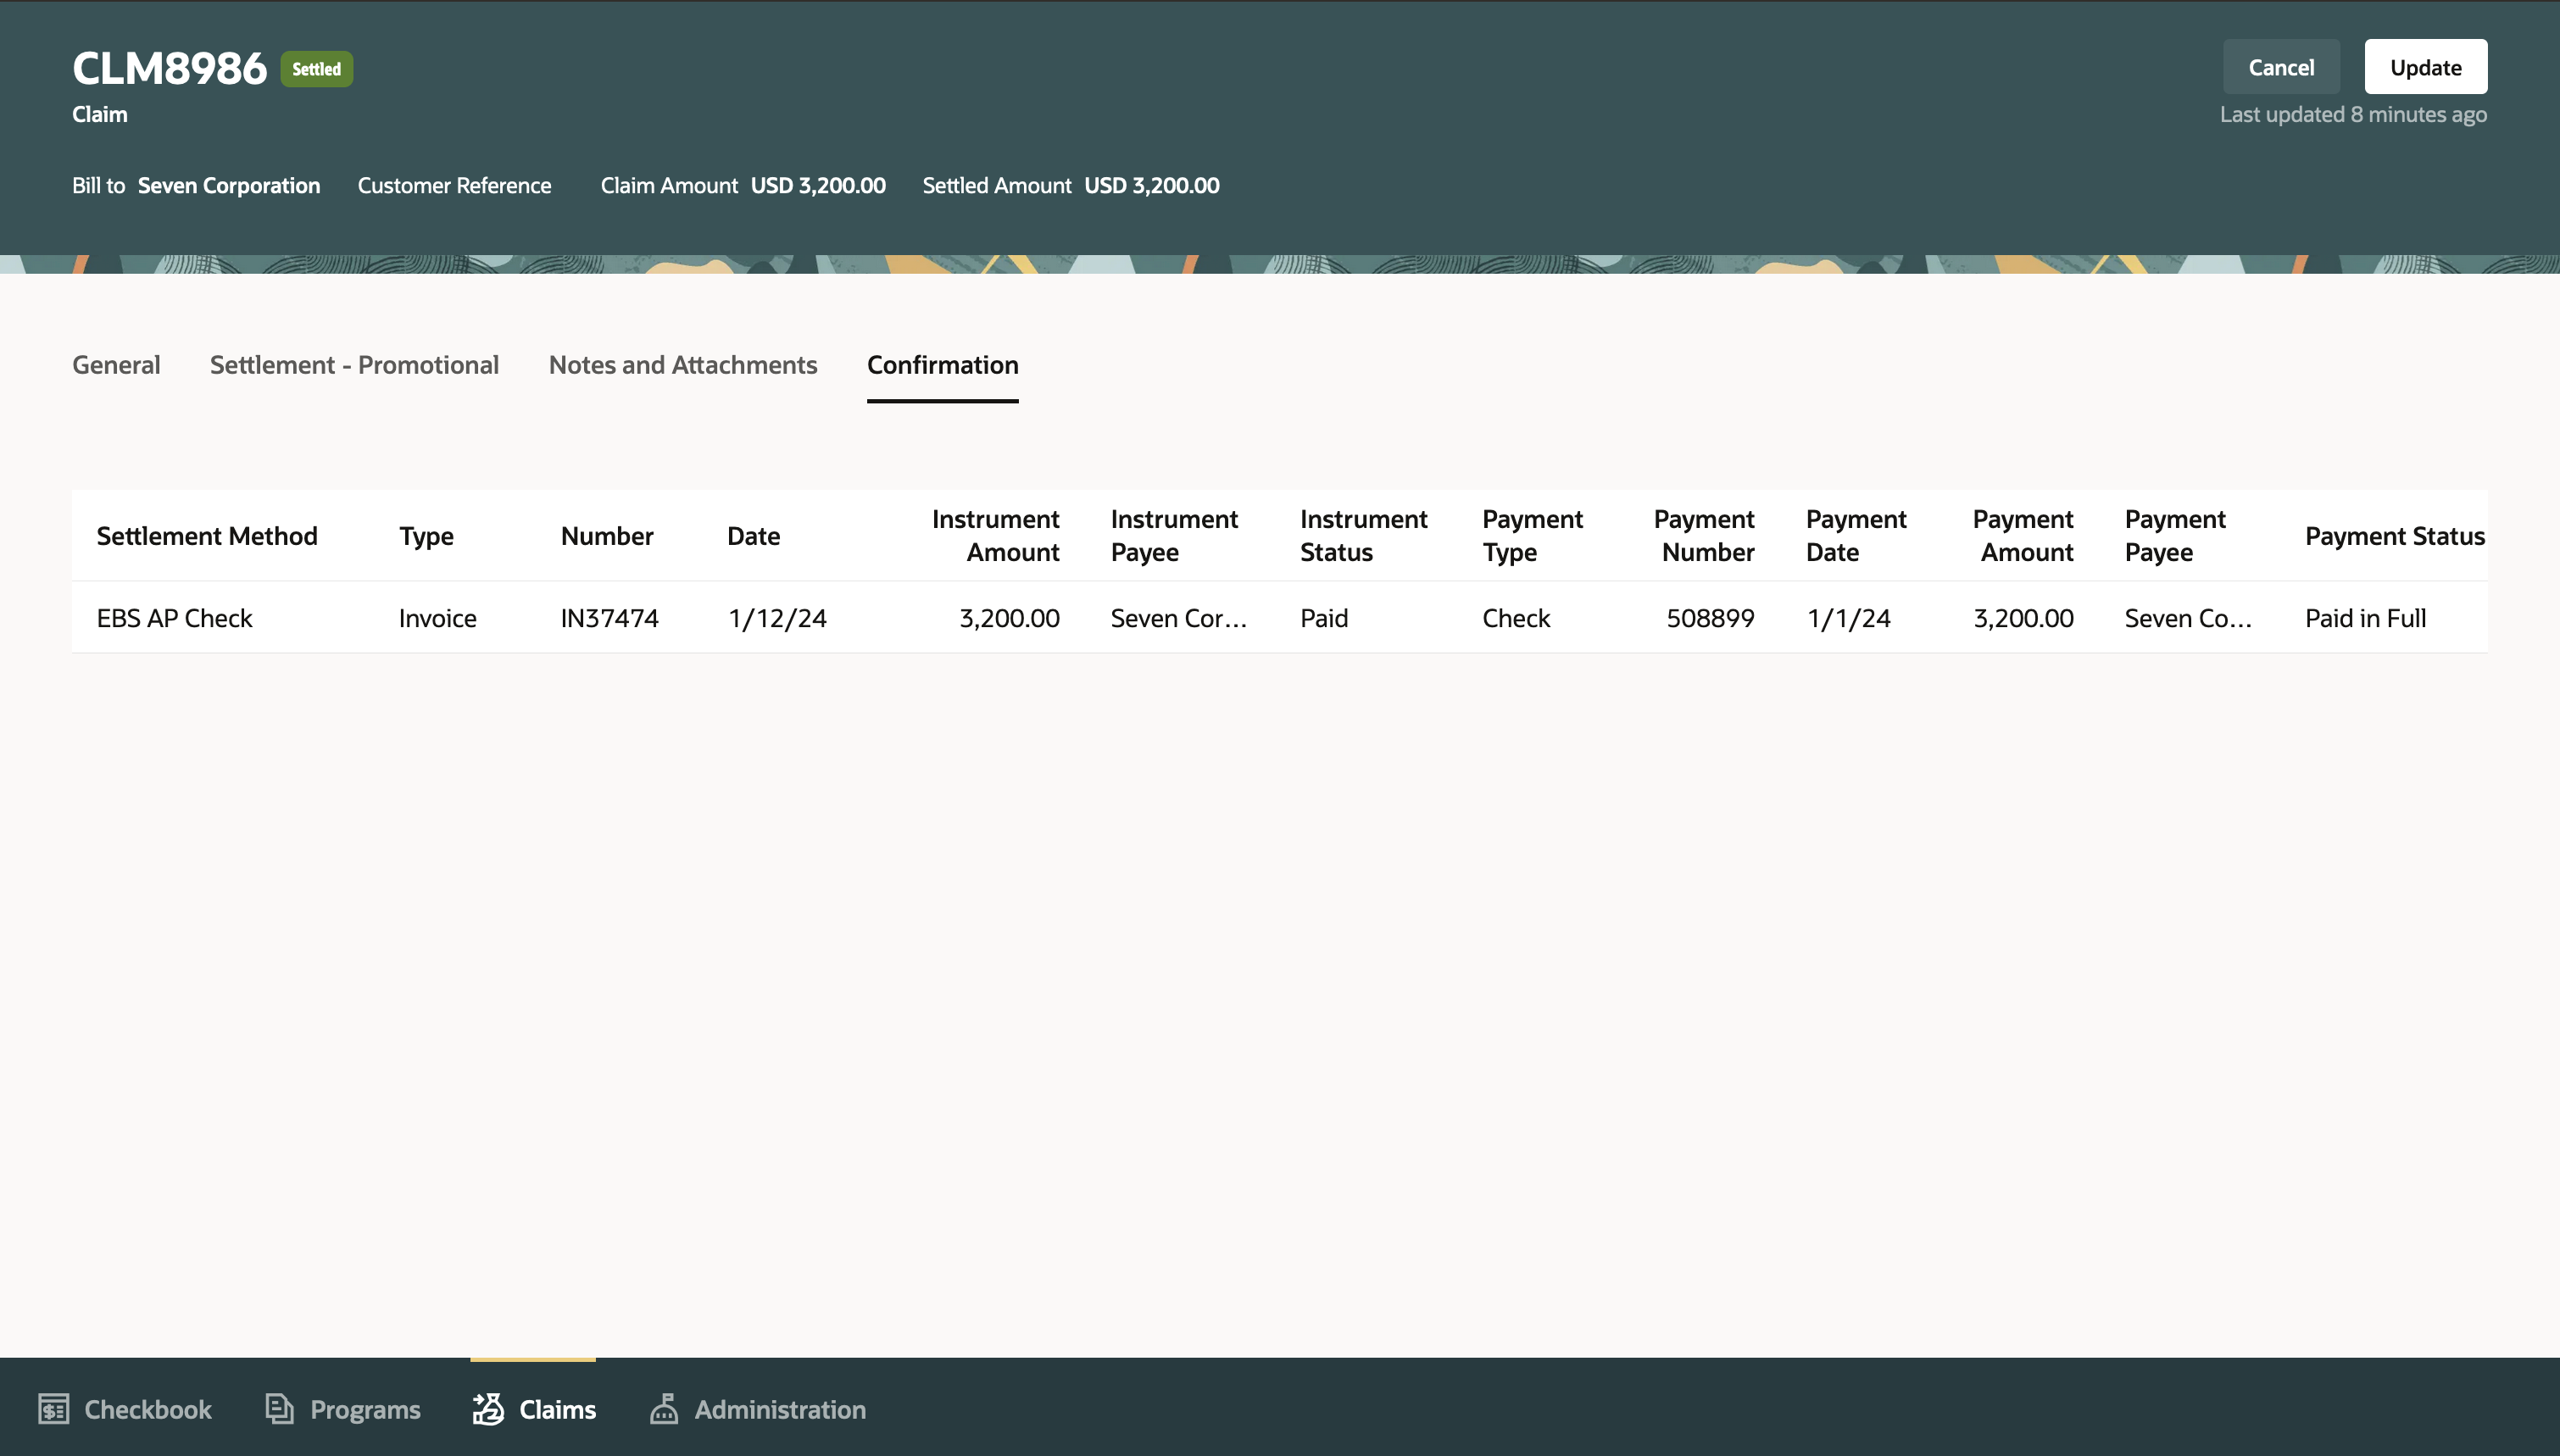
Confirmation of Claim Settlement by Custom Settlement Method
If you don't want the application to generate a claim number, you can provide one for a manual claim. Two additional source fields have been added to manual claims UI to capture the source system, and the claim number from the source system.

Manual Claim with 2 Source Fields and Editable Claim Number
This feature reduces the time and effort to integrate the settlement of claims in a third party financials system or deductions management system.
The current customer claims functionality provides ready-to-use integrations to the Fusion Financials Cloud for a host of ways to settle claims. However, you may have additional settlement requirements.
Here are some common scenarios where you can use custom settlement methods:
- Process settlement in legacy or third-party financial systems.
- Settle with an AR document for overpayment (akin to a negative chargeback, where an AR transaction is used to give money back to customers who have overpaid).
- Pay by wire transfer or EFT, as is common practice settling with European customers.
- Settle with free goods, if you issue free goods to your customers against their claims. Custom settlement can support sales order settlement in your order management system for claims.
Steps to Enable
Use the Opt In UI to enable this feature. For instructions, refer to the Optional Uptake of New Features section of this document.
Offering: Order Management
If you haven't implemented Customer Channel Claims in Redwood, then refer to the Roadmap for Setting Up Customer Claims chapter in the implementation guide, Implementing Channel Revenue Management.
- Add a new custom settlement method to the ORA_CJM_SETTLEMENT_METHOD lookup.
- In the Setup and Maintenance work area, go the the Manage Channel Lookups in the Channel Revenue Management functional area.
- Search for lookup type, ORA_CJM_SETTLEMENT_METHOD.
- Add a new lookup code representing the new settlement method.
- Configure custom settlement method under its applicable claim source.
- In the Setup and Maintenance work area, go to the Manage Claim Sources task in the Channel Revenue Management functional area.
- Select an applicable claim source, and add a custom settlement method.
- Configure Sub Ledger Accounting rules.
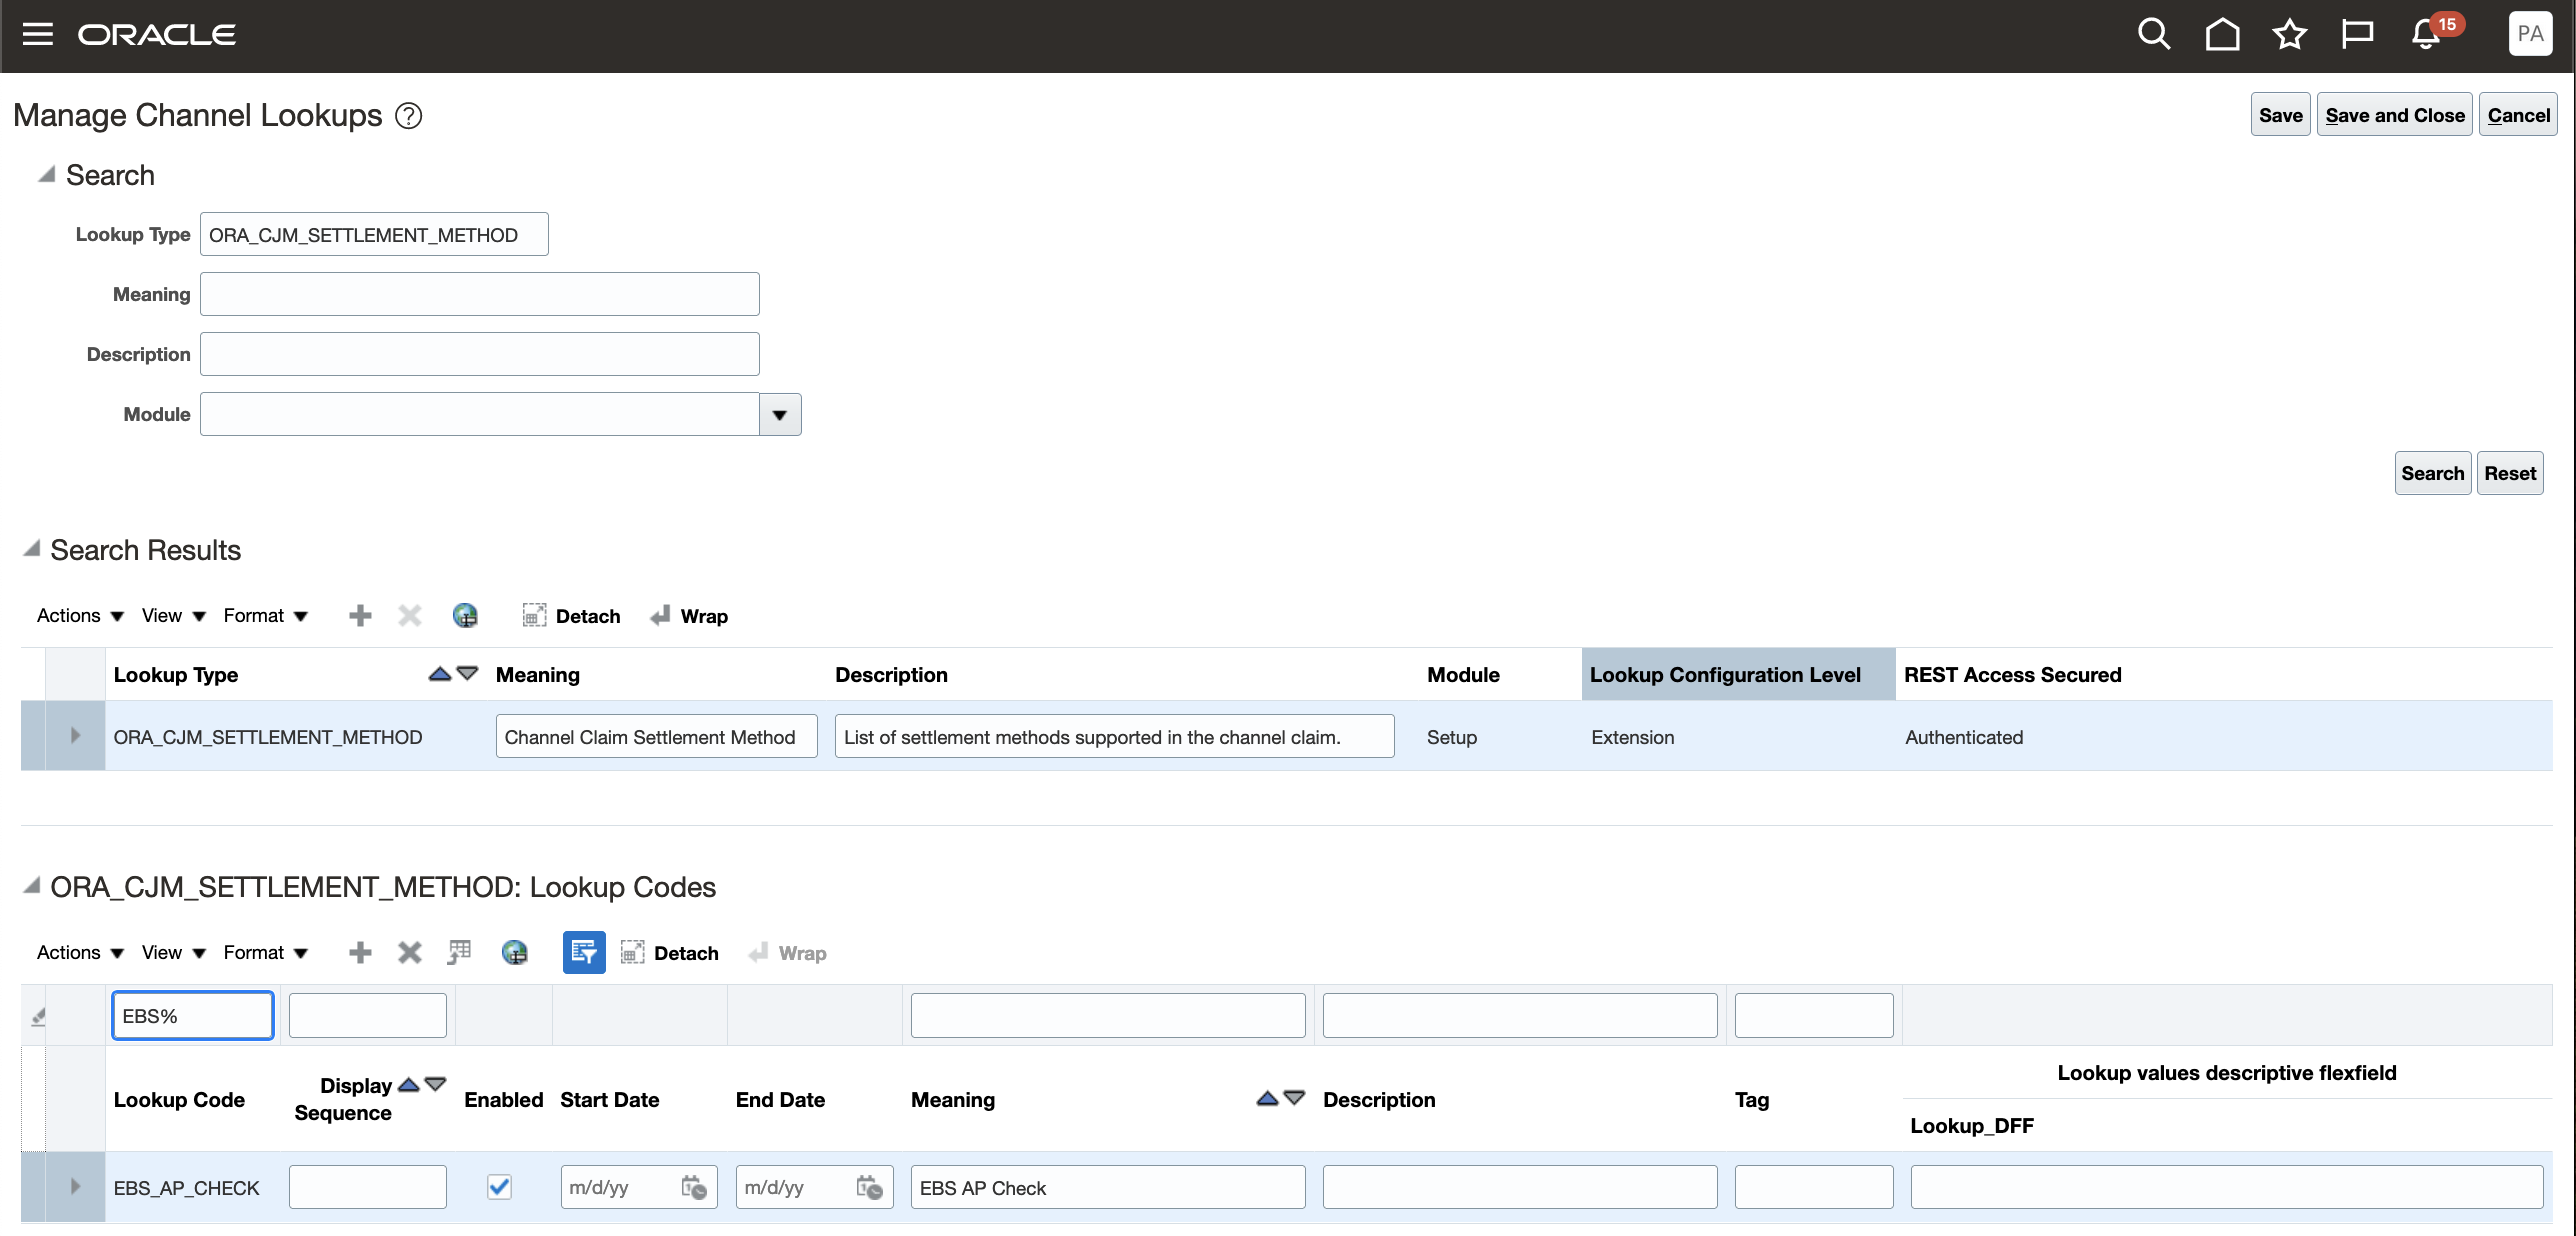
Add Custom Settlement Method to ORA_CJM_SETTLEMENT_METHOD Lookup
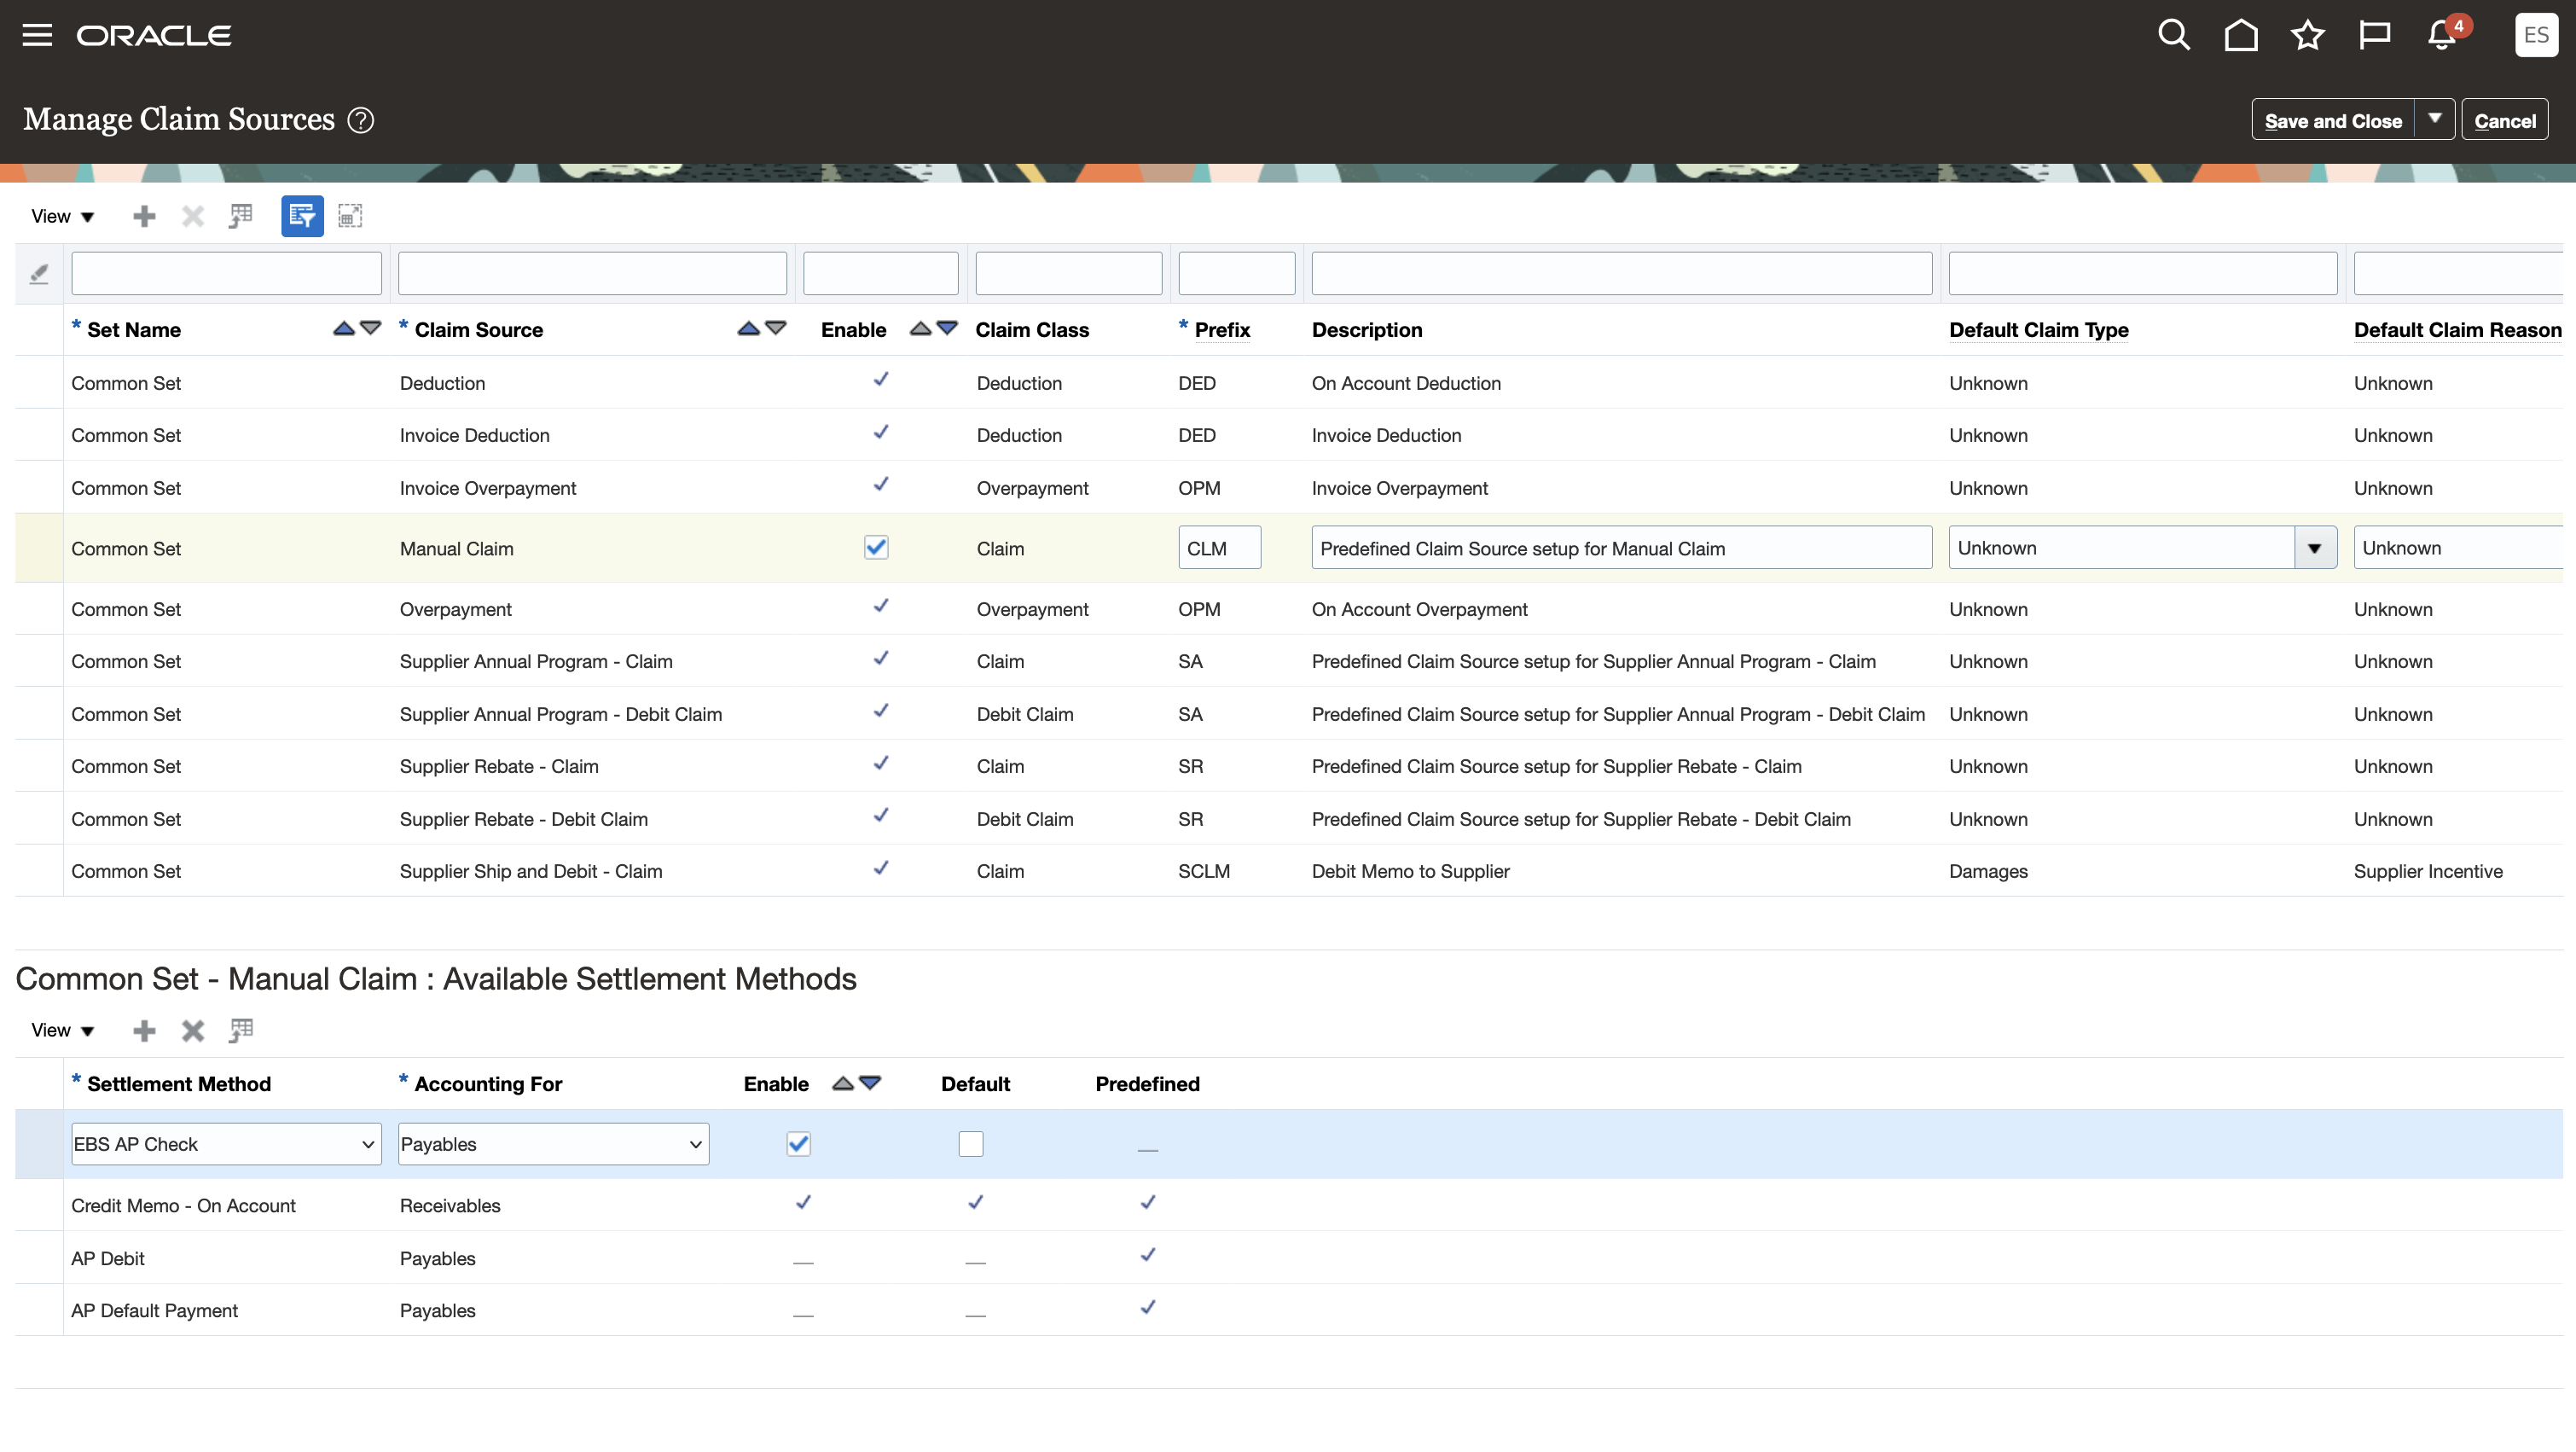
Configure Custom Settlement Method for Manual Claims
Tips And Considerations
Implementation Decision Tree for a Third-party Receivables System:
NOTE: Only 1 instrument per claim is supported. The instrument is the AR transaction in the third-party Receivables system. This maps to the instruments child resource of the channelCustomerClaims REST.
- The payments child resource of channelCustomerClaims REST isn't applicable, because payments aren't applicable to Receivables.
- Integration must derive the third-party instrument customer from the claim customer.
- The following instruments details are passed back to Channel:
- InstrumentType or InstrumentTypeCode (required)
- InstrumentNumber (required)
- InstrumentDate (required)
- InstrumentAmount (required)
- InstrumentTax (optional)
- InstrumentStatus (required)
- The instrument is issued to the Bill To on the manual claim.
Implementation Decision Tree for a Third-party Payables System:
NOTE: Multiple payments for a single instrument per claim are supported. The instrument is the AP transaction in the third-party Payables system. A payment is a check or EFT, and so on. This maps to the instruments and payments child resources of the channelCustomerClaims REST.
- Are you already managing your suppliers in Fusion?
- If not, then the integration must derive the instrument supplier from the claim customer.
- If yes, then during investigation you can specify the supplier site. The integration can then derive the third-party instrument payee from the provided supplier site.
- The following instruments details are passed back to Channel:
- InstrumentType or InstrumentTypeCode (required)
- InstrumentNumber (required)
- InstrumentDate (required)
- InstrumentAmount (required)
- InstrumentStatus (required)
- If claim analyst pass a supplier site during investigation, then ThirdPartyInstrumentPayeeName is optional.
- If the integration derives the instrument supplier from the claim customer, then the ThirdPartyInstrumentPayeeName is mandatory free form text field.
- If the integration derives the instrument supplier from the claim customer, but maintains a mapping back to the Fusion supplier site, then the integration can pass back the supplier details in the instrument.
- The following payments details are passed back to Channel:
- PaymentMethod or PaymentMethodCode (required)
- PaymentNumber (required)
- PaymentDate (required)
- PaymentAmount (required)
- PaymentStatus (required)
- PayeeSupplier
- PayeeSupplierSite
- PayeeSupplierSiteId
- PayeeParty
- PayeePartyId
- PayeePartySite
- PayeePartySiteId
- ThirdPartyPayeeName
Build the integration to settle in the Third-party system:
- Bring in manual claims from the third-party system via the POST action of the channelCustomerClaims REST.
- Claim analysts settle a third-party manual claim in the Redwood UI with a custom settlement method.
- On a periodic basis, minimally nightly, get manual claims in Settlement Pending status with a custom settlement method, for the third-party system to process. Use the GET action against the channelCustomerClaims REST to gather claim details to process.
- Process these claims in the third-party system.
- Upon successful settlement in the third-party system, the integration must call the PATCH action against the channelCustomerClaims REST to pass the settlement instrument and payment details back to Channel.
- Use the settleCustom action against the channelCustomerClaims REST to split any remaining amount to a child claim, and move the claim to Settled status.
- If the third-party system fails to process settlement of the claim, the integration should call the reopenCustom action against the channelCustomerClaims REST to re-open the claim, and reverse the claim accounting events.
Key Resources
- For more information on Channel Revenue Management, refer to the Oracle Cloud Readiness content for Order Management.
- For more information on the Channel Revenue Management Integration with Receivables, refer to the Oracle Cloud Readiness content for Financials.
- Oracle SCM Cloud: Using Oracle Channel Revenue Management Cloud, available on the Oracle Help Center.
- Oracle SCM Cloud: Implementing Oracle Channel Revenue Management Cloud, available on the Oracle Help Center.
- Oracle SCM Cloud: REST API for Oracle SCM Cloud, available on the Oracle Help Center.
Access Requirements
- Users who are assigned a configured job role that contains this privilege can submit the claim for approval:
- Manage Customer Claims (CJM_MANAGE_CUSTOMER_CLAIMS_PRIV)
This privilege was available before this update.
- Users who are assigned a configured job role that contains this privilege can view the claim:
- View Customer Claims (CJM_VIEW_CUSTOMER_CLAIMS_PRIV)
This privilege was available before this update.
- Claim approvers who are assigned a configured job role that contains this privilege can view the approval notification:
- Approve CustomerClaims (CJM_APPROVE_CUSTOMER_CLAIMS_PRIV)
To manage task configurations for the ChannelCustomerClaimsApprovalTask task, you need a custom role that includes the BPM Workflow System Admin Role (BPMWorkflowAdmin).
This privilege was available before this update.
Global Order Promising
Import Types and Rates of Consumption for Manufacturing Components, Materials, and Resources
Previously, you could configure fixed setup and variable cycle times for each manufacturing operation by collecting values from Oracle Manufacturing work definitions. If your organization doesn’t use Oracle Manufacturing, you can now update the types and rates of consumption through a file-based data import (FBDI) process as well.
Use the Supply Chain Planning Bill Of Resources FBDI template to load bills of resources for assembly items with components and resources that have fixed and variable usage quantities. The Basis Type column in the template indicates whether a component item or resource usage quantity is variable or fixed. Multiple instances of the same component or resource can be modeled with different basis type information in the bills of resources.

Supply Chain Planning Bills of Resources FBDI Template ScpBillOfResourcesImportTemplate.xlsm
After loading the data from files, you can review bills of resources in the Aggregate Bill of Resource table in the Plan Inputs work area.

Aggregate Bill of Resource Table in the Plan Inputs Work Area
Global Order Promising consumes the component and resource usage quantities by considering the basis type information defined in the bills of resources.
Steps to Enable
You don't need to do anything to enable this feature.
Tips And Considerations
- You can use the Create Bills of Resources scheduled process to generate bills of resources from routing and item structure data loaded from a legacy system. Global Order Promising uses the bill of resources to determine the quantities of the components and resources it needs to meet demand. See Create a Bill of Resources.
- You can load bills of resources data for implementations that don’t use Oracle Manufacturing.
- The Supply Chain Planning Bills of Resources FBDI template (ScpBillOfResourcesImportTemplate.xlsm) continues to support date effectivity for components and resources in assembly items.
- You can’t define components or resources with overlapping effective dates.
- You can define fixed or variable basis types for one or more instances of components and resources used in making a subassembly or an assembly item.
Key Resources
- See the Vary the Type and Rate of Consumption for Manufacturing Components, Materials, and Resources in the Bill of Resources feature readiness training, which is available beginning with update 24A for Global Order Promising on Oracle Cloud Application Update Readiness.
Access Requirements
Users who are assigned a configured job role that contains these privileges can access this feature:
- Perform Order Orchestration and Planning Data Load (MSP_PERFORM_ORDER_ORCHESTRATION_AND_PLANNING_DATA_LOAD_PRIV)
- Monitor Order Promising Work Area (MSC_MONITOR_ORDER_PROMISING_WORK_AREA_PRIV)
- View Bills of Resources (MSC_VIEW_BILLS_OF_RESOURCES_PRIV)
- Schedule Fulfillment Line (MSP_SCHEDULE_ORCHESTRATION_ORDER_FULFILLMENT_LINE_PRIV)
These privileges were available prior to this update.
Consume Resource Capacity Only After Components are Available
Oracle Global Order Promising can schedule more than one material and component to manufacture an item in parallel. However, all the materials and components may need be on hand before some manufacturing resources can perform their operations. To prevent unplanned idle time, starting with this update, you can now choose to delay the resource consumption date until after all components and materials are available.
Use this feature when you need promising results that consider your components' availability first, and then your resources' availability, instead of considering component and resource availability at the same time. Before update 24B, Oracle Global Order Promising consumed resource capacity and accumulated each component's supply at the same time, resulting in some dates that it promised too early.
Starting with update 24B, you can set up Promising so it starts consuming resources only after your factory has all the components it needs to begin manufacturing. The component's availability will determine the manufacturing start date, resulting in a more realistic promise date.
Lead Time
The component that has the longest lead time in your bill of resources helps to determine manufacturing's start date. Here's how Promising uses lead time with this feature:
- Uses the postprocessing lead time to help calculate the lead time offset.
- Makes sure the start date for each resource happens on or after the component's start date.
-
Makes sure the lead time for each resource results in a manufacturing end date that meets the sales order's due date.
- Creating the bill of resources doesn't include the processing lead time for the parent assembly of a critical resource when it calculates the lead time offset. This helps to make sure each resource's end date aligns with manufacturing's end date.
For background details, see:
- Set Postprocessing Lead Times
- Set Up Your Items in Product Information Management
- Overview of Using Bills of Resources with Promising
Examples
Assume your bill of resources has this hierarchy:

Assume:
- The Create Bills of Resources scheduled process uses this hierarchy. Promising considers only the resources and components. It doesn't consider the operations.
- Today's date is April 1.
- The lead time for C1 is 10 days, and it's also 10 days for C2.
- R1 consumes 2 hours to create 1 unit.
- R2 consumes 3 hours to create 1 unit.
Specify Lead Time for Components, No Lead Time for Resources, and Don't Constrain Availability
Assume:
- April 15 is the requested date for sales order SO1.
- Postprocessing lead time is 0.
- Resource lead times are 0 in the bill of resources.
Promising will use the data from the bill of resources and the quantity for SO1 to calculate the component quantities and resource quantities that manufacturing needs to build the Glorious Bouquet. Assume you need a quantity of 10 bouquets.
Promising uses the bill of resources to determine the quantities that manufacturing will need to build 10 bouquets for sales order SO1 according to the lead times:
| Components and Resources |
Lead Time Days in Bill of Resources |
Quantity Manufacturing Will Need |
| C1 |
10 |
10 |
| C2 |
12 |
20 |
| R1 |
0 |
50 hours |
| R2 |
0 |
20 hours |
Consider this availability:

where
- Green is component consumption.
- Blue is resource consumption.
- Available quantities are cumulative, counting in reverse. For example, a quantity of 20 is available on April 3 for C2 (5 on April 3, plus 5 on April 2, plus 10 on April 1).
Here's how Promising determines those consumption dates:
- Sets the requested date to April 15.
- Sets manufacturing's end date to April 15, which is the due date minus the bouquet's postprocessing lead time.
- Determines manufacturing's start date. Promising starts at April 15 and works backward to find the earliest manufacturing start date that it can use and still meet the lead time requirements for the components and resources:
- Identifies the component or resource that has the largest lead time. C2 has the largest lead time, which is 12 days.
- Sets manufacturing's start date to April 3 (April 15 minus C2's 12 day lead time).
- Makes sure components are available on April 3. Manufacturing needs a quantity of 10 for C1 and a quantity of 20 for C2. In this example, a cumulative quantity of 11 is available for C1 on April 3, and a quantity of 20 is available for C2, so we're good to go.
- Makes sure resources are available from April 3 through April 15. Manufacturing needs 50 hours of R1, and 20 hours of R2. Resource lead times are zero, and the end date to consume resources is April 15. R1 has 130 hours available on April 15, and R2 has 39 hours available, so there's enough cumulative resource hours available on April 15 to meet demand.
- If Promising found that manufacturing didn't have the quantity it needed for each component and resource, then it would use the next day as manufacturing's end date, and try again.
- Finalizes the result:
| Attribute | Day |
|---|---|
| Manufacturing Start Date | April 3 |
| Manufacturing End Date | April 15 |
| C1 and C2 Start Date | April 3 |
| R1 Start Date | April 11 |
| R2 Start Date | April 9 |
| R1 End Date and R2 End Date | April 15 |
| Scheduled Ship Date | April 15 (on time) |
Specify Lead Time for Components and Resources, and Don't Constrain Availability
Assume:
- April 15 is the requested date for sales order SO2.
- Postprocessing lead time is 0.
Promising will use the data from the bill of resources and the quantity for SO2 to calculate the component quantities and resource quantities that manufacturing will need to build the bouquet. Assume you need a quantity of 10 bouquets.
Here are the quantities that Promising calculates manufacturing will need to build 10 bouquets for sales order SO2 according to the lead times:
| Components and Resources |
Lead Time in Bills of Resources |
Quantity Manufacturing Will Need |
| C1 |
10 |
10 |
| C2 |
12 |
20 |
| R1 |
13 |
50 hours |
| R2 |
9 |
20 hours |
Consider this availability:

Here's how Promising determines those consumption dates:
- Sets the requested date to April 15.
- Sets manufacturing's end date to April 15, which is the due date minus the bouquet's postprocessing lead time.
- Determines manufacturing's start date. Promising starts at April 15 and works backward to find the earliest manufacturing start date that it can use to meet the lead time requirements for the components and resources:
- Identifies the component or resource that has the largest lead time. R1 has the largest lead time, which is 13 days.
- Sets manufacturing's start date to April 2 (April 15 minus R1's 13 day lead time).
- Makes sure components and resources are available on April 2. Manufacturing needs a quantity of 10 for C1. However, C1 only has a cumulative quantity of 9 on April 2, so Promising moves on to the next day and tries again.
- In the next iteration, Promising sets manufacturing's end date to April 18 and R1's end date to April 5 (April 18 minus R1's 13 day lead time). R1 has enough capacity to meet the required 50 hours of demand, and R1's start date is calculated as April 1. However, C1 has 0 quantity and C2 only has a quantity of 10 on April 1, so Promising discards the results and moves on to the next day.
- Promising iterates through this process until it finds a date that meets manufacturing's demand for components and resources. For each iteration, it applies the lead times and checks availability for each component and resource to see whether it can meet demand for manufacturing's end date and start date.
- After a few more iterations, Promising:
- Sets manufacturing's end date to April 20.
- Sets R1's end date to April 7 (April 20 minus R1's 13 day lead time), and R1's start date to April 3.
- Sets R2's end date to April 11 (April 20 minus R2's 9 day lead time).
- Confirms that C1 and C2 both have enough quantity on April 3 to start production, so it finalizes the result:
| Attribute | Day |
|---|---|
| Manufacturing Start Date | April 3 |
| Manufacturing End Date | April 20 |
| C1 Start Date and C2 Start Date | April 3 |
| R1 Start Date | April 3 |
| R1 End Date | April 7 |
| R2 Start Date | April 5 |
| R2 End Date | April 11 |
| Scheduled Ship Date | April 20 (5 day delay) |
Specify Lead Time for Components and Resources, and Constrain Availability
Assume:
- April 10 is the requested date for sales order SO3.
- Postprocessing lead time is 0.
Here are the quantities that Promising calculates manufacturing will need to build 10 bouquets for sales order SO3 according to the lead times:
| Components and Resources |
Lead Time in Bills of Resources |
Quantity Manufacturing Will Need |
| C1 |
5 |
10 |
| C2 |
2 |
20 |
| R1 |
5 |
50 hours |
| R2 |
3 |
20 hours |
Consider this availability:

Here's how Promising determines those consumption dates:
- Sets the requested date to April 10.
- Sets manufacturing's end date to April 10, which is the due date minus the bouquet's postprocessing lead time.
- Determines manufacturing's start date. Promising starts at April 10 and works backward to find the earliest manufacturing start date that it can use to meet the lead time requirements for the components and resources:
- Identifies the component or resource that has the largest lead time. R1 has the largest lead time, which is 5 days.
- Sets manufacturing's start date to April 5 (April 10 minus R1's 5 day lead time).
- Makes sure components and resources are available on April 5. Manufacturing needs 50 hours of R1, and 20 hours of R2. However, R1 only has a cumulative quantity of 7 hours on April 5, and R2 only has a cumulative quantity of 14 hours on April 5, so Promising moves on to the next day and tries again.
- Iterates through this process. Eventually, Promising sets manufacturing's end date to April 16, which results in manufacturing's start date of April 11, and an R1 start date of April 4. Resources are available on April 4 but components aren't. Manufacturing needs a quantity of 10 for C1 and 20 for C2. However, C1 only has a cumulative quantity of 5 on April 4, and C2 only has a quantity of 12, so Promising continues to iterate the process.
- After a few more iterations, Promising sets manufacturing's end date to April 20, which results in manufacturing's start date of April 15, and an R1 start date of April 9. C2's start date on April 9 has enough quantity to meet demand. All the components and resources that manufacturing needs are available, this iteration meets the lead time requirements, so Promising finalizes the result.
| Attribute | Day |
|---|---|
| Manufacturing State Date | April 9 |
| Manufacturing End Date | April 20 |
| C1 and C2 Start Date | April 9 |
| R1 Start Date | April 9 |
| R1 End Date | April 15 |
| R2 Start Date | April 11 |
| R2 End Date | April 17 |
| Scheduled Ship Date | April 20 (10 day delay) |
Steps to Enable
Go to the Order Promising work area, click Tasks > Order Promising Options, then add a check mark to the Consider Resources After Components Are Available option:

Tips And Considerations
- Manufacturing can begin building the assembly item on or after the date that Promising sees availability for all components.
- Promising applies the same logic with alternate resources or substitute components. Promising will use the primary, alternate, or substitute to make sure it promises the sales order on time or with minimum delay.
- If you need slightly faster performance and less accurate promising results, such as when you use a bill of resources with critical components and resources that skip levels of the hierarchy, then don't use this feature. You can continue to promise according to the default behavior.
Bill of Resources
- Promising marks each subassembly, component, and resource that the factory needs to build the final item in your bill of resources. This makes sure Promising considers each of these subassemblies, components, and resources.
- If you use file-based data import (FBDI) to import your bill of resources, then Promising uses the lead times that you specify in the import file.
- You don't have to rerun the Create Bills of Resources scheduled process each time you enable or disable this feature.
- If your bill of resources includes more than one organization, and if it has a subassembly that isn't critical and that belongs to an upstream organization, then your components or resources might have longer lead times, and that might lead to a later promise date. Assume a resource is available in the manufacturing organization, the component for that resource comes from your upstream organization, and that component has a long transit time. This could result in a component's lead time in the bill of resources that's longer than the resource's lead time. Promising might move the promise date to a later date until it meets the component's lead time requirements. To avoid this scenario, mark the subassembly item as critical in the upstream organization, then rerun the Create Bills of Resources scheduled process.
- The Create Bills of Resources scheduled process uses your postprocessing lead time. In a future release, you will be able to create an equation that uses a different lead time, such as fixed lead time, plus quantity, multiplied by variable lead time.
Key Resources
- Overview of Using Bills of Resources with Promising
- Support Capable-to-Promise for Manufactured Items 22A Global Order Promising Training in Oracle Application Update Readiness
Access Requirements
Users who are assigned a configured job role that contains these privileges can access this feature:
- Schedule Fulfillment Line (MSP_SCHEDULE_ORCHESTRATION_ORDER_FULFILLMENT_LINE_PRIV)
- Edit Bills of Resources (MSC_EDIT_BILLS_OF_RESOURCES_PRIV)
- View Bills of Resources (MSC_VIEW_BILLS_OF_RESOURCES_PRIV)
These privileges were available prior to this update.
Secure Plan Data Considering Unassigned Entities
Secure plan data providing visibility to unassigned members at the lowest level of the hierarchy for the customers, suppliers, organizations, or products dimension. With this update, you can provide visibility to data that’s currently not applicable to a dimension. For example, by assigning a particular organization to a user, you can now provide visibility to measures that aren’t striped by organization, such as supplier capacity.
You can configure planning data security with an enhanced option to include unassigned members of the Product, Organization, Customer, and Supplier entities. Doing so allows you to access measures that don’t use a dimension’s hierarchy levels. For example, the Supplier Capacity Available measure includes the Product, Organization, Supplier, and Time dimensions. The measure is computed at the Item, Supplier-Supplier site, and Day levels of the Product, Supplier, and Time dimensions. Because the measure value isn’t specific to an Organization, the Organization level isn’t included in the measure’s computation. In such a scenario, you can set up a data access set to get access to specific organizations as well as measures that aren’t specific to an organization (such as Supplier Capacity Available).
The following are examples of Supply Planning measures that can now display values by configuring data security with the Organization entity that has the Include unassigned planning level member check box selected:
- Supplier Capacity Available
- Supplier Capacity Required
- Net Supplier Capacity Available
- Supplier Capacity Utilization Percentage
- Supplier Capacity Required by Supplier Capacity Constraint Date
- Additional Capacity Required by Supplier Capacity Constraint Date
Secure Plans Considering Unassigned Entities applies at the lowest level of the hierarchies for the Product, Organization, Customer, and Supplier dimensions. It is applicable to views displaying measures and planning analytics details for the Product, Organization, Customer, and Supplier dimensions in Supply Planning, Demand Planning, Demand and Supply Planning, Sales and Operations Planning, Replenishment Planning, Global Order Promising, and Backlog Management.
The Administer Data Security view has been enhanced as follows:
- The data access set condition configuration has a new Include unassigned planning level member check box. You can select this check box only when the condition being created includes the Product, Organization, Customer, or Supplier entities at their lowest hierarchy level.
- You can select the Include unassigned planning level member check box along with other lowest-level members of the Product, Organization, Customer, and Supplier hierarchies.
Perform the following steps to secure plan data with unassigned members:
- Select Product, Organization, Customer, or Supplier as an entity in a data access set.
- Select the lowest level for Product, Organization, Customer, or Supplier.
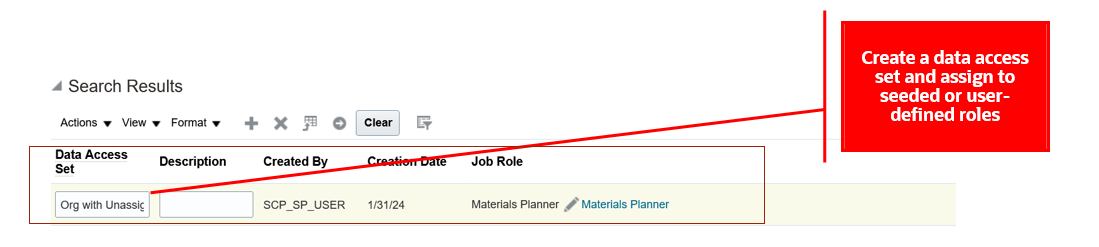
Create a Data Access Set on the Administer Planning Security page
- Select the Create action to create a condition for Condition Name and select the Include unassigned planning level member check box.
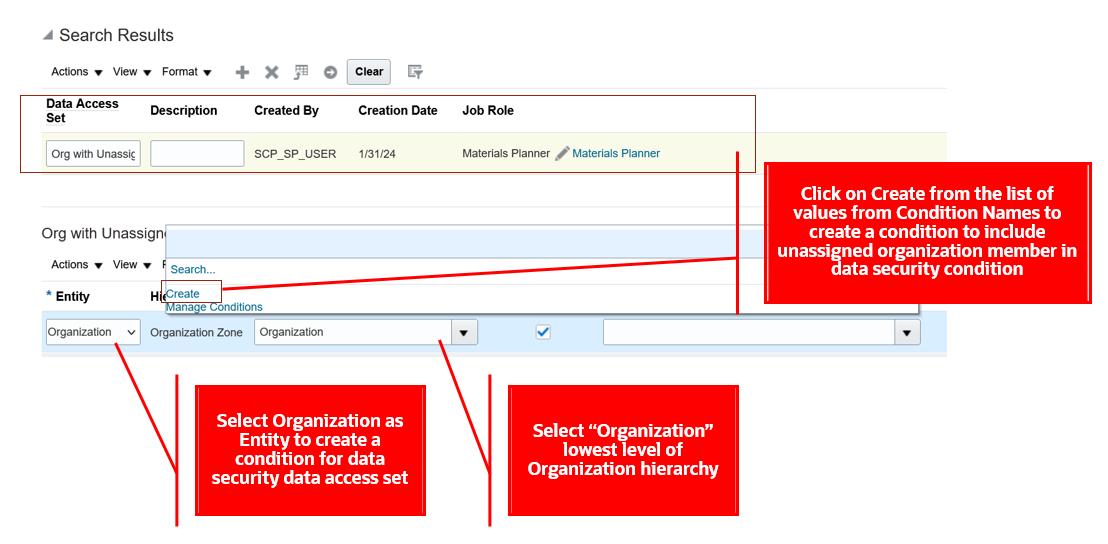
Create a Condition for an Organization Entity
- Create a condition by providing a Condition Name and selecting the Include unassigned planning level member check box. Add other level members if required to configure the data condition.
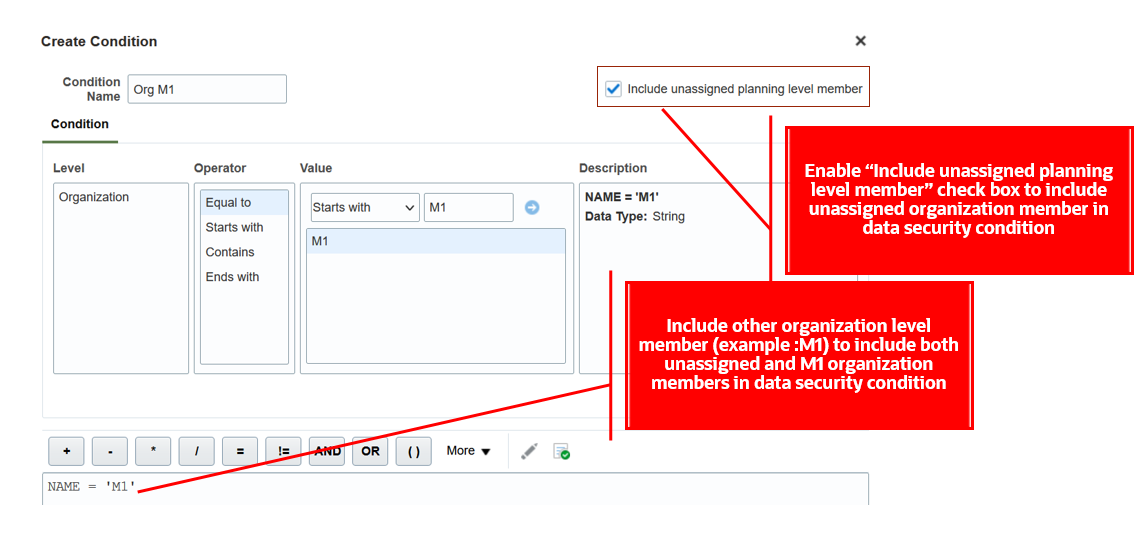
New Include Unassigned Planning Level Member Check Box
- Save the condition and assign it to the selected entity.
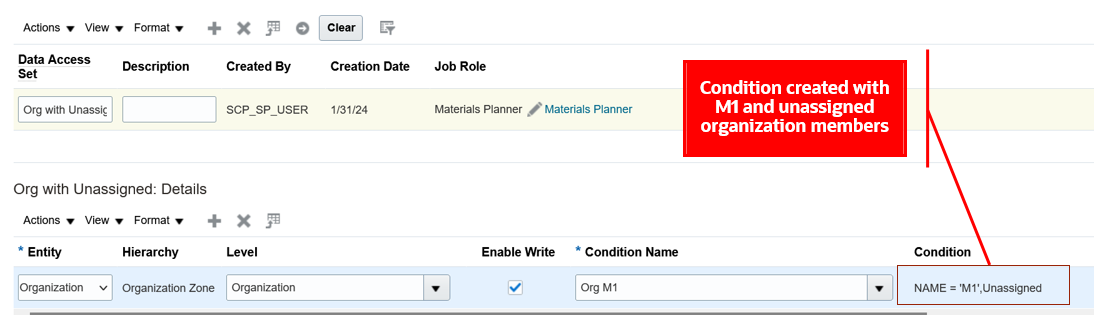
Assign the Condition to the Organization Entity
Let’s walk through some examples of Supplier Capacity measure details displayed when the Include unassigned planning level member check box is selected in the Supply Planning work area.
We will see how the data access set configured in the preceding screenshot is applied to the measure values in a table. The following pivot table shows Planned Orders measure values for organization-level members M1 and M2 and Supplier Capacity measure values for the unassigned organization-level member. The example shows a data security condition is created with organization-level members M1 and M2, and the Include unassigned planning level member check box is selected.

Pivot Table Created with Organization-Level Members
Let’s see what happens when we configure a data access set with the Include unassigned planning level member check box selected and with other lowest level members. Data security applies an In condition. In the following screenshot, a data security condition was created by selecting Include unassigned planning level member, M1, and M2 for an Organization. The condition applies data security for measures where the organization value can be unassigned, M1, or M2.
The pivot table shows values for Planned Orders and Supplier Capacity Available measures when the data security condition is configured with M1, M2, and unassigned organization-level members.
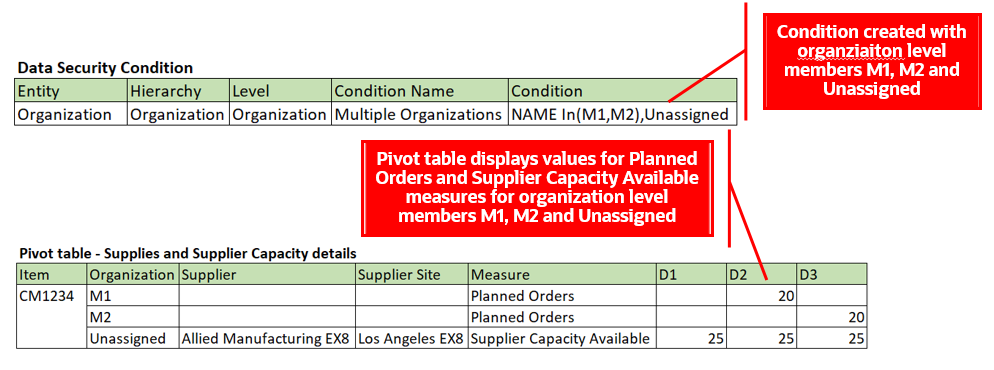
Data Security Condition for Organization-Level Members and Pivot Table Details
You can enable Include unassigned planning level member across multiple entities within a data access set. When enabled within a data access set, security is applied as an "AND" condition.
When Include unassigned planning level member is selected for an Organization and Customer entity, data security is applied and displayed for the measures when both Organization and Customer combinations are unassigned in a pivot table.
The pivot table shows values for user-defined measures with unassigned-level members for organization and customer entities.
Data Security Condition for Organization- and Customer-Level Members and Pivot Table Details
When you enable Include unassigned planning level member across data access sets, security is applied as a "OR" condition.
In the following example, enabling Include unassigned planning level member for Item in data access set1 and Organization entity in data access set 2, data security is applied and displayed for users for the measures when either Item or Organization have unassigned as lowest-level members in a pivot table.
The pivot table displays values for user-defined measures with unassigned level members for organization or customer entities.
Data Security Conditions for Data Sets and Pivot Table Details
Steps to Enable
You don't need to do anything to enable this feature.
Tips And Considerations
- Oracle Global Order Promising respects data security for the Organization entity only.
- Customer and Supplier data security configurations are applied for planning analytics user interfaces like pivot tables or graphs in these work areas: Supply Planning, Demand Planning, Demand and Supply Planning, Sales and Operations Planning, and Replenishment Planning.
- You can’t enable Include unassigned planning level member for existing data conditions. You must create a new data condition to enable it.
- You can delete data conditions with Include unassigned planning level member using Manage Conditions only if the condition isn’t assigned to an entity across a data access set.
Access Requirements
Users who are assigned a configured job role that contains this privilege can access this feature:
- Administer Planning Security (MSC_ADMINISTER_PLANNING_SECURITY_PRIV)
This privilege was available prior to this update.
IMPORTANT Actions and Considerations
Replaced and Removed Features
From time to time, Oracle replaces existing Cloud service features with new features, or removes existing features. Replaced features may be put on a path to removal. As a best practice, you should use the newer version of a replaced feature as soon as the newer version is available.
This section identifies the features in this Cloud service that have been replaced or will be removed.
| Module | Removed Feature | Target Removal | Replacement Feature | Replaced In | Additional Information |
|---|---|---|---|---|---|
| Global Order Promising | Available Supplies REST API Order Promises REST API |
25C | Global Order Promises REST API | 20D | No additional enhancements will be made to the Available Supplies and Order Promises REST services. The services will continue to work until they're removed in 25C, but you should move to the replacement Global Order Promises service at your earliest convenience. The Global Order Promises REST service provides more comprehensive access to order promising features, including availability checking, allocation rules, order scheduling, and supply information. It also delivers higher performance. For details about the Global Order Promises service, see REST API for Oracle Fusion Cloud SCM, available on the Oracle Help Center. |
Use Only Supported Public View Objects in Your Order Management Extensions
Before update 24C, if you use a public view object (PVO) in an order management extension to get data from an Oracle application, then Oracle Order Management doesn't look to see whether it supports that PVO when you validate your extension.
Starting with update 24C, Order Management will make sure it supports that PVO when you validate your extension. You must use only the PVOs that Oracle supports. To prepare for this change, you should use only supported PVOs in your extensions starting in update 24B.
For a list of supported PVOs, see Public View Objects in Oracle Applications Cloud (Document ID 2386411.1) on My Oracle Support. For additional details, see Guidelines for Using Extensions to Get Data from Oracle Applications.
Changes to Pricing Algorithms
Some algorithms in Oracle Pricing have changed in this update, and the changes may require you to take action.
Modified Algorithms
| Pricing Process |
Algorithm Name |
Description of Change |
| Get Sales Pricing Strategy |
Get Sales Pricing Strategy |
Support Id to Value conversions for returning DefaultCurrencyName, PricingSegment, and PricingStrategyName. |
| Price Sales Transaction |
Create Zero Charge |
Updated algorithm to address rollup charges for subscription models termination flow. |
| Price Sales Transaction |
Process Line Currency Conversion |
Added mode to perform header currency conversion for prepriced tax-only case. |
| Price Sales Transaction |
Calculate Tax Cost and Margin |
Invoke process line currency conversion for prepriced tax-only case. |
| Price Sales Transaction |
Apply Matrices |
Enhanced to support item category-based price adjustments and category-based attribute discounting rules in matrices. |
| Price Sales Transaction |
Aggregate Roll Up Charge Components |
Enhanced to support item category-based price adjustments and category-based attribute discounting rules in matrices. |
New Algorithm
| Pricing Process |
Algorithm Name |
Description |
| Price Sales Transaction |
Get Item Categories |
Populates item categories data from PIM into the PriceRequest DataObject to support category based pricing. |
In addition, refer to the topic Promote Pricing Algorithms into the Current Release in Oracle Fusion Cloud SCM: Administering Pricing on the Oracle Help Center. Oracle recommends that you review and promote algorithms in every quarterly update.
Changes to File-Based Data Import (FBDI) Templates
Some Supply Chain Planning FBDI templates have changed in this update. For details of the specific changes, refer to the Instructions tab of these FBDI templates:
- ATP Rules (ScpATPRulesImportTemplate)
- Bill of Resources (ScpBillOfResourcesImportTemplate)
- Purchase Order Shipments Receipt History (ScpPurchaseOrderRcvHistoryImportTemplate)
You can find the latest templates in the Supply Chain Planning section of Oracle Fusion Cloud SCM: File-Based Data Import (FBDI) for SCM, available on the Oracle Help Center.
Changes to the Integration from Shipping and Receivables to Order Management
Starting with update 24B, the integration from Oracle Shipping and Oracle Receivables to Oracle Order Management now goes through an interface table. The Process Responses from Order Fulfillment scheduled process now comes predefined to automatically process data in the table. It runs one time every day with the Record Set parameter set to Process Records That Failed, and with the Task Type parameter set to one of these values:
- Invoice
- Shipment
One instance of the scheduled process runs for invoices and another instance runs for shipments. Both instances start at 00:00:00 AM UTC.
During any given day, Shipping confirms shipments and Receivables invoices sales orders. The Manage Shipment Interface scheduled process stores data in the interface table when Shipping confirms the shipment, and the Notify Feeder System of Receivables Transactions scheduled process stores data in the table when Receivables invoices the sales order.
Over time, a large number of failed records might accumulate in the table. These records might prevent fulfillment from moving order lines past the shipment step in your orchestration process when Shipping confirms the shipment, or past the invoice step when Receivables invoices the sales order. Failed records might also degrade performance when Process Responses from Order Fulfilment must process a lot of them simultaneously. Running the Process Responses from Order Fulfilment scheduled process one time each day helps to prevent these problems. You can modify how frequently it runs according to your daily volume and the time of day when you notice that records typically fail.
Changes to Hold Codes
Starting in update 24C, to avoid problems when processing holds, Oracle will update hold codes so you can't include a comma ( , ) or an apostrophe ( ' ) in the Code attribute. If you currently have a comma or an apostrophe in the Code attribute in your 24B implementation, then we recommend that you end date that hold code so it’s no longer available to apply on sales orders. Create a new hold that doesn't include a comma or apostrophe in the Code attribute. This change applies whether you import the hold code or define it in the Setup and Maintenance work area. For details, see Use Holds to Stop Orchestration Processes.
Changes to Applying Holds on Sales Orders
Starting in update 24B, Oracle has improved performance and reliability for placing holds on sales orders. Use these guidelines to make sure your holds work successfully.
Guidelines
- If you apply a hold on a change order, then we recommend you apply it only after you receive the Compensation Completed event for the change order from Order Management. Order Management won't hold any task that it's currently compensating. For background, see Overview of Managing Change That Happens During Order Fulfillment.
- Order Management won't process a hold request or release a hold request on a sales order or order line that's in error recovery. You must fix the error, then retry the hold.
If a hold request fails, and if the response from the hold request contains the FOM-4515574 error code, then make sure:
- You aren't currently updating the order line.
- The orchestration process is currently on a wait step and it isn't attempting to process the line.
- The order line isn't in an error status.
Use an Extension or REST API
You can use an order management extension or REST API to apply your hold.
| If You Apply the Hold |
Then |
| Immediately after you create a new sales order, and then submit it. |
Use an Order Management Extension. For more, see Use Order Management Extensions to Apply Holds. |
| Immediately after you revise a sales order, and then submit it. |
Use REST API. For more, see Use REST API to Apply and Release Holds. |
Use Your Own Task Type
If you use your own task type:
- You must use a wait step. For more, see Guidelines for Setting Up Holds on Sales Orders.
- Apply the hold only after you send an immediate response, and then wait for at least two minutes. For more, see Overview of Connecting Order Management to Your Fulfillment System.
- Examine the response and make sure it's successful. If the response fails, then resend it.
For more information, see Use Your Own Task Type to Apply Holds.
Operations to Be Deprecated
Oracle will deprecate the RequestHold operation and the ReleaseHold operation in the Receive Order Request SOAP service starting in update 24C. If you're currently using those operations, then we recommend that you start using the Apply Hold and Release Hold actions in the Sales Orders for Order Hub REST resource instead. To use the Apply Hold and Release Hold actions in the REST resource, you must first create and enable a specific profile option. For instructions, see Use REST API to Apply and Release Holds.
For details about the Sales Orders for Order Hub REST resource, see REST API for Oracle Fusion Cloud SCM, available on the Oracle Help Center.
New Order Management Parameter
Don't use the Cascade Order Header Values to Order Lines parameter in Oracle Order Management until further notice. This parameter is for future use.