
- Revision History
- Overview
- Feature Summary
- Sales Automation Core Common
-
- CX Foundation
- CRM Common Components
-
- Use Date Variables in Routine Actions
- Use Additional Fields for Mass Update in Workspace
- Select both Date and Time to Filter Date-Time Fields in Workspace and Work Areas Supported by Adaptive Search
- View Near Real-Time Smart List Saved Searches in Workspace
- Receive Email Notifications for Publish Jobs
-
- Accounts, Contacts, and Households
- Simplified Setup
- Import/Export Management
- Sales Automation Foundation Common
-
- Leads and Opportunities
- Sales Catalog
- CX Sales Mobile
-
- Disable App Screen Recording or Taking Screenshots of the App
- Use Filters On Dynamic Choice List Field Pickers on Mobile App
- Display the News Feed on the Home Page for a User's Most Relevant Accounts
- Remember the Last Used Saved Search on Dynamic Choice List Pickers
- Choose to Enable or Disable Confirmation Messages Globally, by Region, and by Role
-
- Sales Analytics
-
- Drill Down to User, Manager, Region, and Role in Application Usage Insights
- View Payment Balances by Earning Type Using the Incentive Compensation Analyst Dashboard
- Support Renewal Forecasting Enhancements in Sales Forecast Reporting
- Presentation Column Accurately Captures Product Group Deletion Values
-
- Subscription Management
-
-
-
- Update Pricing Terms for Multiple Subscriptions
- Enable Proration of One-Time Charges
- Override Renewal Duration at Subscription and Subscription Product Levels
- View And Override Close Credit Amount
- Analyze Subscription Trends for a Cohort of Customers
- Improve ASC606 Compliance During Subscription Life Cycle
- Analyze Coverage Entitlements and Adjustments
- Undo Close
-
-
- Partner Relationship Management
This document will continue to evolve as existing sections change and new information is added. All updates appear in the following table:
| Date | Product | Feature | Notes |
|---|---|---|---|
| 29 JUL 2022 | Created initial document. |
 HAVE AN IDEA?
We’re here and we’re listening. If you have a suggestion on how to make our cloud services even better then go ahead and tell us. There are several ways to submit your ideas, for example, through the Ideas Lab on Oracle Customer Connect. Wherever you see this icon after the feature name it means we delivered one of your ideas.
GIVE US FEEDBACK
We welcome your comments and suggestions to improve the content. Please send us your feedback at oracle_fusion_applications_help_ww_grp@oracle.com.
DISCLAIMER
The information contained in this document may include statements about Oracle’s product development plans. Many factors can materially affect Oracle’s product development plans and the nature and timing of future product releases. Accordingly, this Information is provided to you solely for information only, is not a commitment to deliver any material, code, or functionality, and should not be relied upon in making purchasing decisions. The development, release, and timing of any features or functionality described remains at the sole discretion of Oracle.
This information may not be incorporated into any contractual agreement with Oracle or its subsidiaries or affiliates. Oracle specifically disclaims any liability with respect to this information. Refer to the Legal Notices and Terms of Use for further information.
Column Definitions:
Report = New or modified, Oracle-delivered, ready to run reports.
UI or Process-Based: Small Scale = These UI or process-based features are typically comprised of minor field, validation, or program changes. Therefore, the potential impact to users is minimal.
UI or Process-Based: Larger Scale* = These UI or process-based features have more complex designs. Therefore, the potential impact to users is higher.
Features Delivered Disabled = Action is needed BEFORE these features can be used by END USERS. These features are delivered disabled and you choose if and when to enable them. For example, a) new or expanded BI subject areas need to first be incorporated into reports, b) Integration is required to utilize new web services, or c) features must be assigned to user roles before they can be accessed.
Support Delete and Restore of Predefined Data
Support delete and restore options for predefined data, such as custom resource role and relationship type. This feature helps you to temporarily hide certain listed data and also re-instate them back later, if needed.
Setup and Maintenance tasks let you filter records based on active or inactive status. Deleted records appear in search results with a status of inactive. The Restore button also appears when you search for inactive status records. Selected records can be restored using the restore option.
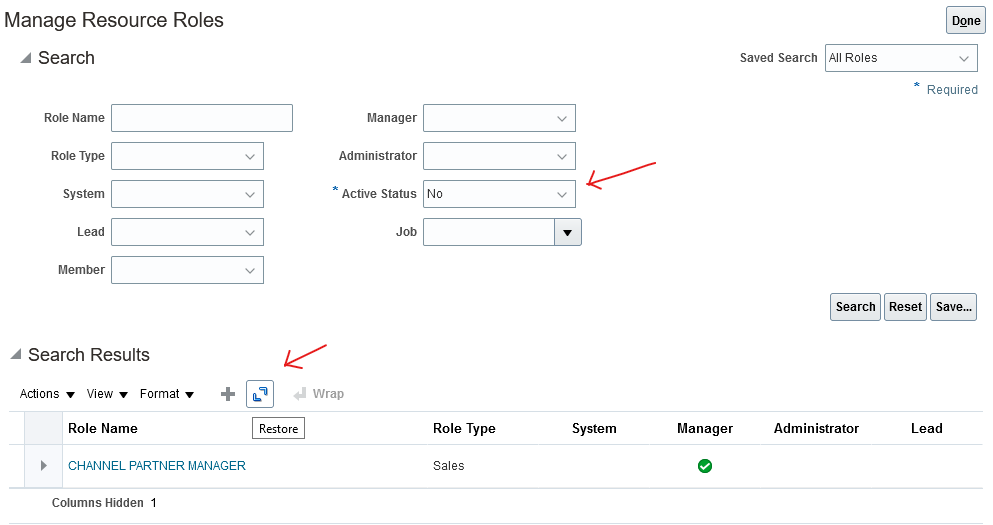
Restore Deleted Resource Roles
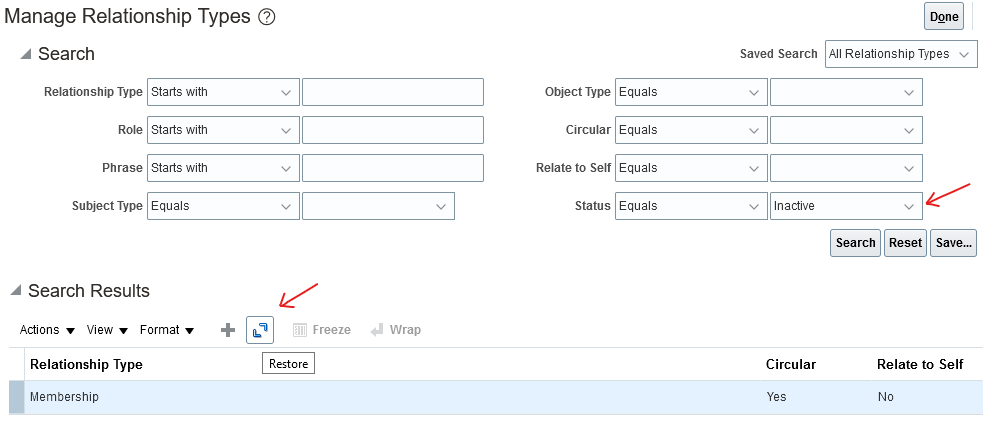
Restore Deleted Relationship Types
You can easily manage set up data to hide lookup values, if they're no longer needed, and revert them back later. This helps you to restore accidentally deleted data.
Steps to Enable
You don't need to do anything to enable this feature.
Key Resources
- See the "Sales Resources, Roles, and Organizations" chapter in the Implementing Sales guide.
- See the "Relationships" chapter in the Implementing Customer Data Management for CX Sales and B2B Service guide.
Use Date Variables in Routine Actions
Routines let you specify date variables to calculate the date based on the routine run date, plus or minus a specific number of days in integer format. For example, for the Update Field and Create Task actions you can create a task or update a field with a due date of the routine run date plus 7 days. This means that if all routines rules are met, the routine will continue to process and update records 7 days past the specified due date.
Creating routines with dynamic dates eliminates the need for periodic updates to routine actions.
Steps to Enable
You don't need to do anything to enable this feature.
Key Resources
- See the “Routines” chapter in the Implementing Sales guide.
Role Information
This feature is available to the following roles:
- Application Implementation Consultant
- Sales Administrator
- Customer Relationship Management Application Administrator
Use Additional Fields for Mass Update in Workspace
You can now mass update additional fields on multiple records. These additional fields include choice list fields based on objects that aren't available in Adaptive Search.
This enhancement makes the mass update feature more usable and complete.
Steps to Enable
You don't need to do anything to enable this feature.
Key Resources
- See the "Workspace and Work Areas Search" chapter in the Using Sales guide.
Role Information
This feature is available for all roles.
Select both Date and Time to Filter Date-Time Fields in Workspace and Work Areas Supported by Adaptive Search
You can now select both date and time filters on specific date and time fields to narrow down your list of search results. This saves you time, because you can conduct more focused searches.
This feature lets users do more granular time-based filtering.
Steps to Enable
You don't need to do anything to enable this feature.
Key Resources
- See the "Workspace and Work Areas Search" chapter in the Using Sales guide.
View Near Real-Time Smart List Saved Searches in Workspace
View near real-time smart list saved searches in Workspace. The user context engine now delivers near real-time user context, and in turn drives smart lists to display the most relevant and contextual records once every 10 minutes.
This feature:
- Provides near real time user context reducing the refresh rates from once every 3hrs to ~10min. It also drives My Smart Lists to display your most relevant and contextual records
- Reduces navigation and search, bringing in efficiencies to Improve Sales user Productivity
Steps to Enable
To enable the near-real-time user contextual relevancy:
-
In Setup and Maintenance, open the Manage Administrator Profile Values task.
- Offering: Sales
- Functional Area: Sales Foundation
- Task: Manage Administrator Profile Values
- In the Manage Administrator Profile Values page, search by the profile option name, Enable Near Real Time User Context Relevancy, or by the code, ORA_ZCA_UC_ENABLE_NRT.
- Click the profile option name link.
- Set the profile option value to Y.
- Save your changes.
Key Resources
- See the "Adaptive Search and Workspace" chapter in the Implementing Sales guide.
Receive Email Notifications for Publish Jobs
You can receive email notifications about the status of completed Publish jobs for Adaptive Search. For example, you're notified about the successful completion of published processes or receive an alert of failed processes that might be causing issues with data access. This helps administrators to better manage the Adaptive Search publishing process.
Email notifications about Publish jobs lets you know the status of completed jobs and alerts you if a job fails.
Steps to Enable
You don't need to do anything to enable this feature.
Key Resources
- See the "Adaptive Search and Workspace" chapter in the Implementing Sales guide.
Role Information
This feature is available for all administrative roles that can do an Adaptive Search Publish.
Accounts, Contacts, and Households
Use Auditing to See Who Deleted Household Records and When
Track deleted household object records using the Audit reporting tool. This feature is supported from all channels, including changes made in the UI, using REST, and using Import Management. You may have to perform certain configuration steps for the Household object and for specific fields to enable auditing.
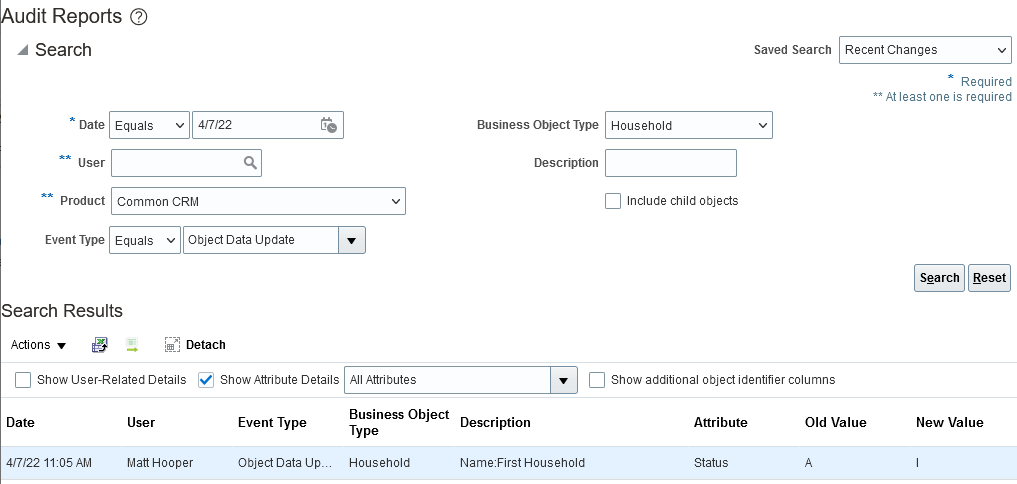
Audit Report: Deleted Household
You can now audit the deleted Household records.
Steps to Enable
- In the Setup and Maintenance work area, use the Manage Audit Policies task:
- Offering: Sales
- Functional Area: Sales Foundation
- Task: Manage Audit Policies
- Click Configure Business Object Attributes in the Oracle Fusion Applications section.
- Select Common CRM as the product.
- Expand Audit Top Node.
- Click to select Household under Customer.
- In the Household: Audited Attributes panel, click the add icon to enable the Status field for auditing. Enable more fields for auditing as required and click OK.
- Click Save and Close.
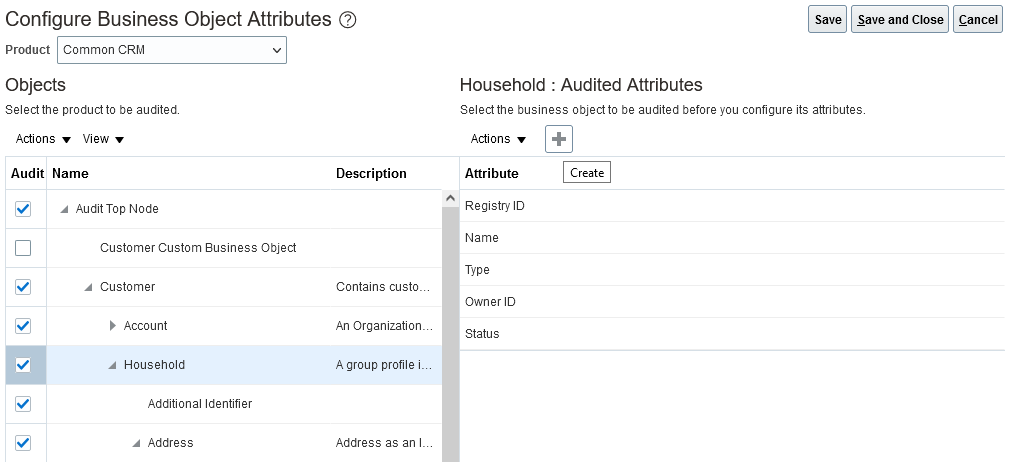
Configuration in Manage Audit Policies for Household
Key Resources
- See the "Application Change Auditing" chapter in the Implementing Sales guide.
Undo Enrichment of a DataFox-Enriched Account
The feature disables enrichment for a Sales account record that's been enriched from Oracle DataFox. Users can later enrich the account record to re-create the association with the Oracle DataFox record.
In certain scenarios, you may have to undo the enrichment of an existing account and associate it again with a new Oracle DataFox company to get the right updates for your account. For example, in a rare case, enrichment can result in an incorrect operation and a Sales account is updated with incorrect Oracle DataFox company data. In such cases, you can undo the existing enrichment and redo it so that the right data is updated in the Sales account records.
Steps to Enable
The Undo Enrichment option is available only for accounts enriched by Dun & Bradstreet (D&B) or Oracle DataFox. The action can be found in the Actions menu of the Edit Account page of an already enriched account. This option isn't available for accounts that are not yet enriched.
Tips And Considerations
- After you undo the enrichment, your account unlinks from the account in D&B or Oracle DataFox, but the old data remains. Redo the enrichment so that the latest data from D&B or Oracle DataFox replaces the old data.
- The enrichment sync jobs won't run for accounts unlinked from enrichment.
Key Resources
See this content:
- The "Accounts and Contacts" chapter in the Implementing Sales guide.
- The "Accounts, Contacts, and Households" chapter in the Using Sales guide.
Use New Task for Data Enrichment
As announced in the Release Readiness documents in Update 22B, we have removed the following two deprecated Functional Setup Manager tasks from the Sales application:
- Manage DataFox Data Enrichment Integration
- Manage Integration with Oracle Data as a Service
The tasks have been replaced by the task, Manage Data Enrichment Integration. Use the Manage Data Enrichment Integration task for configuring enrichment credentials.
Basic Authentication in following tasks has also been disabled, and you're advised to start using OAuth Authentication (for DaaS Credentials in Manage Data Enrichment Integration and address verification credentials in Manage Integration with Oracle Verification Services).
There's no need to maintain multiple Setup and Maintenance tasks to manage the same configuration. We have consolidated two Setup and Maintenance tasks and created a new task in Update 22C, Manage Data Enrichment Integration. The deprecated tasks need to be removed.
OAuth Authentication is the recommended method to store connection credentials, so we're deprecating Basic Authentication for DaaS credentials in Manage Data Enrichment Integration and for address verification credentials in Manage Integration with Oracle Verification Services.
Steps to Enable
You don't need to do anything to enable this feature.
Tips And Considerations
- Use the new task, Manage Data Enrichment Integration, to specify Oracle DataFox and Oracle DaaS credentials, and set authentication to OAuth Authentication.
- Use the existing task, Manage Integration with Oracle Verification Services, to configure verification services with OAuth Authentication.
NOTE: You can go to these tasks from the Setup and Maintenance work area:
-
Offering: Sales
-
Functional Area: Integrations
Key Resources
See this content:
- The "Accounts and Contacts" chapter in the Implementing Sales guide.
- The "Accounts, Contacts, and Households" chapter in the Using Sales guide.
Review the Status of Your Sales Setup
Customers starting a sales implementation can review the status of the required initial setup tasks by running a report from within the Setup Assistant. The report confirms which tasks have been completed and recommends actions for those that haven't. You can rerun the status check at any point.
The setup check saves time by providing a quick snapshot of your setups in a single view, rather than requiring you to check each setup individually.
Steps to Enable
You don't need to do anything to enable this feature.
Key Resources
- See the "Run Setup Assistant" chapter in the Getting Started with Your Sales Implementation guide.
For information on using Import and Export Management, see the Understanding Import and Export Management for CX Sales and B2B Service guide.
Save the Advanced Options in Import and Export Management
You can now save the import and export job advanced options for subsequent reuse on the Import and Export Management user interface.
This feature:
- Provides a quick and easy method for reusing advanced options without having to provide inputs again
- Decreases the time taken to perform import and export tasks by reducing the number of clicks
Steps to Enable
You don't need to do anything to enable this feature.
Tips And Considerations
- We recommend that you check the Advanced Option values before running an import or export job.
- To overwrite the current set of advanced options, you must click Save Advanced Options again.
- The application will save the options, even if the import or export job doesn't complete.
Key Resources
- See the "Import Data" and "Export Data" sections in the Understanding Import and Export Management guide.
Use Specific Alternate Keys to Link Objects on Data Import
You can use specific applicable alternate keys, such as Public Unique Identifier (PUID) or a combination of Original System and Original System Reference value, to uniquely identify and link objects based on pre-defined relationships on data import.
This feature:
- Lets you use Public Unique Identifier (PUID) or a combination of Original System and Original System Reference value attributes as alternate keys, so that you can link data import into an object related to another object:
- If related as a Dynamic Choice List (DCL) attribute
- If defined as part of a 1:M relationship
- Reduces the need to query primary key information of an imported object out of the system before re-importing the data to ensure that the data is uniquely identified and linked.
Steps to Enable
You don't need to do anything to enable this feature.
Key Resources
- See the "How You Import Custom Objects" topic in the "Import Custom Objects" chapter in the Understanding Import and Export Management guide.
Sales Automation Foundation Common
Access to Opportunity Team Members for Partner Users
Partner users can now access all opportunity team members, subject to resource security. For example, you can allow or restrict partner users to view only a subset of resources based on their roles or access groups they belong to.
This feature gives you the flexibility to control how partner users view, add, and modify opportunity team members.
Steps to Enable
You don't need to do anything to enable this feature.
Key Resources
See the "Can partner users view, add, and modify opportunity team members?" topic in the "Opportunities" chapter in the Implementing Sales guide.
Role Information
- Partner user with access to opportunities
See Product Changes in Audit History
View the audit history of changes users make to Product fields and attachments for products. Administrators select which fields to track the audit history for and then view the audit history report. For each change made, the audit history reports such information as:
- Field name
- Date and time of the change
- Original field value
- New field value
- User who made the change
This feature lets you see the history of changes made to product fields and the specifics of those changes for auditing and tracking purposes.
Steps to Enable
To enable and configure auditing on products, first enable auditing for the business object:
NOTE: Administrators must have the Manage Sales Audit Policies (FND_MANAGE_SALES_AUDIT_POLICIES_PRIV) privilege to perform these steps.
- Go to Navigator > Setup and Maintenance.
- Search for the Manage Audit Policies task.
- In the Oracle Fusion Applications region of the Manage Audit Policies page, click Configure Business Object Attributes.
- From the Product list, select Sales Catalog.
- Select the objects (product and/or item attachments) that you want to audit.
- Select the attributes to audit.
- Save your changes.
To view product audit reports:
NOTE: Users must have the View Sales Audit History (FND_VIEW_SALES_AUDIT_HISTORY_PRIV) privilege to view product audit reports.
- Go to Tools > Audit Reports.
- From the Product list, select Sales Catalog.
- Select the Business Object Type (product and/or item attachments).
- Select other report filter criteria, as needed.
- Click Search.
Tips And Considerations
- Use this feature to audit changes made to the attributes of a product and the attachments of that product.
- This feature audits changes made within the Sales application. It doesn't audit changes made to products in the Oracle Product Information Management (PIM) module, including the PIM changes that are synced with Sales.
Key Resources
- See the "Application Change Auditing" chapter in the Implementing Sales guide.
Role Information
- Sales Administrator
Disable App Screen Recording or Taking Screenshots of the App
Use your corporate Mobile Device Management software, or the CX Sales mobile configuration app, to configure CX Sales Mobile so that users can't record the CX Sales Mobile app pages or take screenshots of the app. This helps prevent data from being copied and viewed outside of the app, making the data secure. This feature is currently available only for Android devices.
This feature allows you to manage a more secure mobile deployment by preventing the screen capture of data displayed on the mobile app.
Steps to Enable
Leverage Application Composer to expose and adjust page layout and attributes. To learn more about extending your application using Application Composer, visit Oracle Help Center > your apps service area of interest > Books > Configuration and Extension.
Here's how you can disable screen recording and screenshot capture:
- Navigate to Mobile Application Setup in Application Composer.
- Click the CX Sales Mobile Composer tab and then click Settings in the Application Features pane.
- Expand the Security Settings and enable the Disable Cut, Copy, Paste and Disable Screen Capture option.
- Click Save and publish the sandbox.
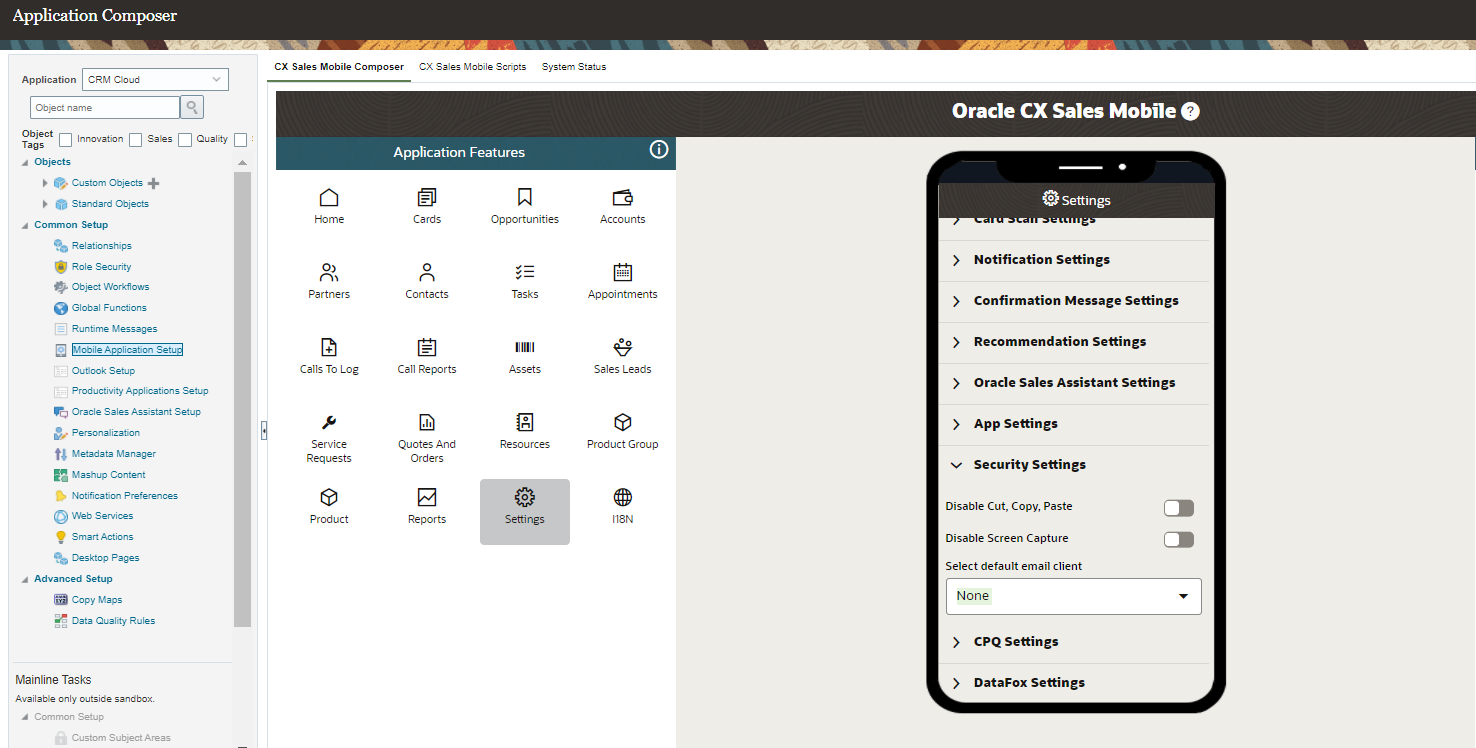
Disable Screen Capture
Tips And Considerations
Due to differences in platform support, this feature is currently only supported on Android devices.
Key Resources
- See the "CX Sales Mobile" chapter in the Implementing Sales guide.
Role Information
- Sales Administrator
Use Filters On Dynamic Choice List Field Pickers on Mobile App
Use simple or advanced filters on dynamic choice list fields, so that the corresponding object picker displays a filtered set of records. When users use the object picker, they see the records that meet the filter criteria, so that they choose from the correct set of records.
This feature lets users view the records that meet the filter criteria, so that they choose from the right set of records.
Steps to Enable
Leverage Application Composer to expose and adjust page layout and attributes. To learn more about extending your application using Application Composer, visit Oracle Help Center > your apps service area of interest > Books > Configuration and Extension.
Here's how you enable the feature:
- Navigate to Mobile Application Setup in Application Composer.
- Click on the Edit layout of the object that you want to add a dynamic choice list field to.
- Clone the default layout, or select an existing layout to configure.
- Add the dynamic choice list field, if it's not already in the layout.
- Hover over the dynamic choice list field and click the pencil icon to view the options.
- Configure the following dynamic choice list settings:
- Use Filter Criteria: Enable this option to use the filter criteria of the dynamic choice list. If it's not enabled, CX Sales Mobile uses the Workspace saved search associated with the dynamic choice list target object.
- Show List by Default: Enable this option to display the list of records by default when the user taps the picker.
- Choose Search Field: Select which field is used when the user searches for a record.
- Choose Search Operator: Select the appropriate search operator.
- Save your changes.
- Check your updates by force closing the CX Sales Mobile app, opening the app again, and verifying that the dynamic choice list filters are being used correctly.
- Publish the sandbox to make the change available to all users.
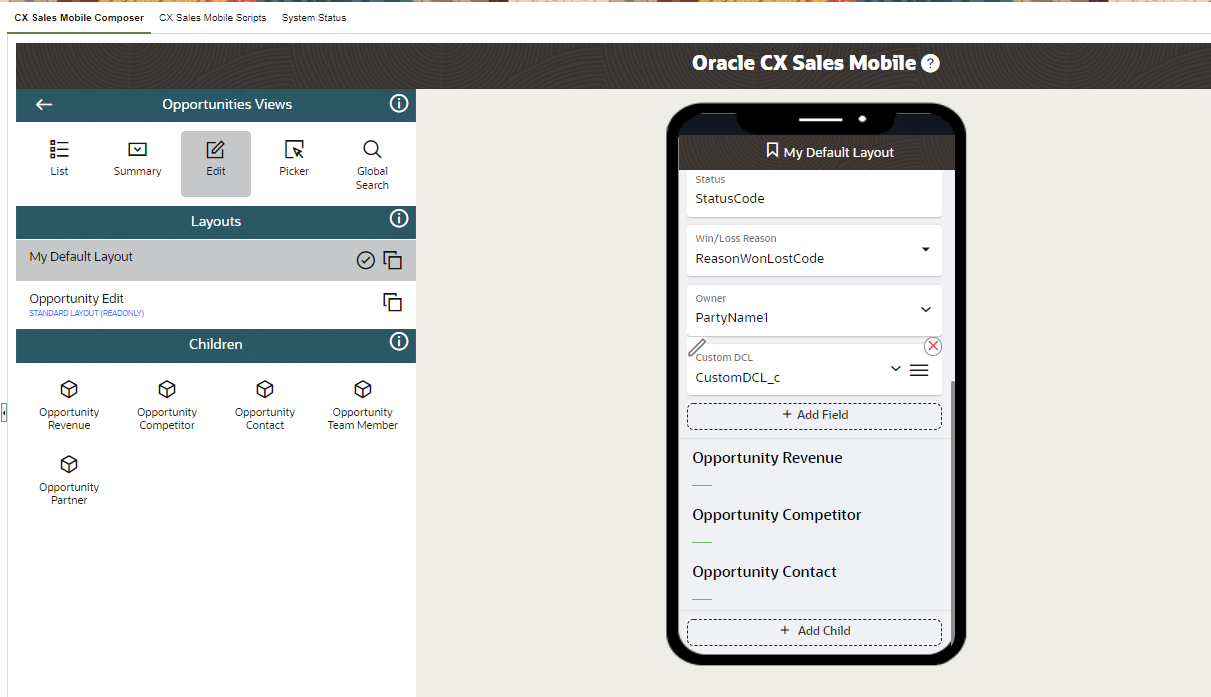
Dynamic Choice List Field Filters
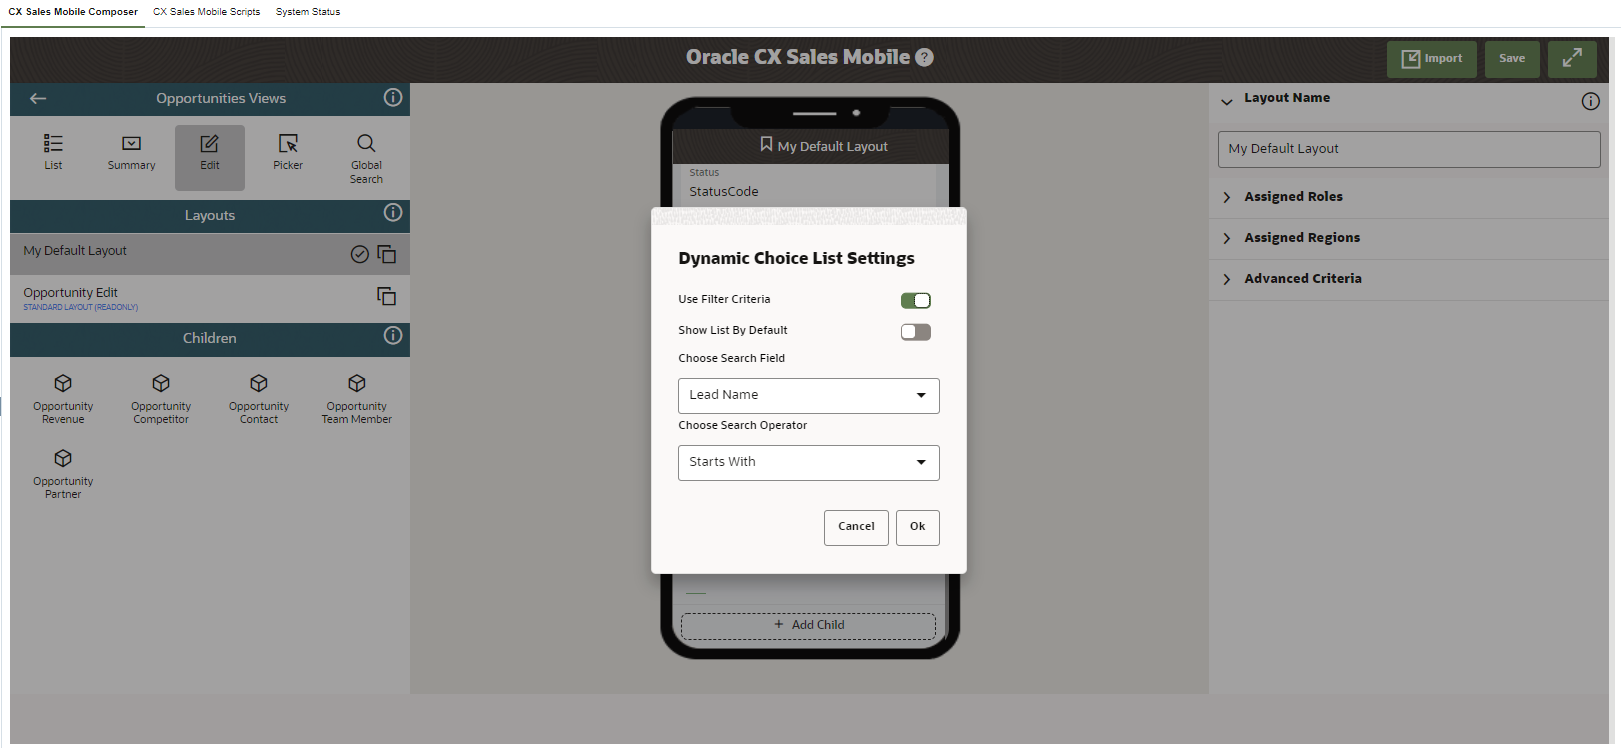
Dynamic Choice List Fields Configuration Options
Tips And Considerations
- Account or contact dynamic choice list fields don't support dynamic choice list filters. Instead, they use Workspace saved searches.
- When using dynamic choice list filters, consider performance when deciding whether to display a list by default.
- If you have existing layouts with dynamic choice list fields and you want to use the new dynamic choice list options, you must remove the dynamic choice list field from the existing layout, and then add the field back to the layout to start using the new options.
- If you don't make any updates to your dynamic choice list fields, they will continue to use Workspace saved searches.
Key Resources
- See the "CX Sales Mobile" chapter in the Implementing Sales guide for information about configuring the app.
Role Information
- Sales Administrator
Display the News Feed on the Home Page for a User's Most Relevant Accounts
Provide sales representatives and managers with timely news about their accounts on their CX Sales Mobile home page. This information is curated by Oracle DataFox so that salespeople reduce time spent on account research and meeting preparation. Sellers can quickly browse the recent news highlights, read the news articles of further interest, and have handy access to the related accounts to take notes or update contacts. Accounts that receive news are sourced from the "My Smart List for Accounts Workspace" search, so that users only see signals related to their priority customers.
This feature can:
- Reduce the time spent on customer research by bringing account news directly to the mobile seller.
- Increase top-of-funnel opportunity count and quality with insights into what drives customer buying decisions.


Account News Feed
Steps to Enable
Prerequisites:
- If you've not done so already, follow the steps to Integrate DataFox with Oracle CX Sales.
- Enable Smart Lists in Workspace as indicated in the Smart Lists topic.
CX Sales Mobile Setup:
- Navigate to Mobile Application Setup in Application Composer.
- Click the CX Sales Mobile Composer tab, and then click Cards in the Application Features pane.
- Select the layout(s) where you want to display Account News.
- If the selected layout was cloned from the Sales Rep or Sales Manager Card Layout, then do the following:
- Select the Account News Card.
- Under DataFox card settings, select Show so the card is no longer greyed out.
- If the selected layout was cloned from the Default Navigator Layout, then do the following:
- Scroll to the bottom of the list and select Add Custom Card.
- Select DataFox.
- Choose a Saved Search (My Smart List for Accounts is recommended, if you've enabled it in your instance).
- Save your changes.
Tips And Considerations
- News is provided for the the top 10 account records that have associated DataFox Company IDs.
- The default news age limit is 4 days. Sales administrators can change the age limit by layout to any value between 1 and 30 days.
- The Account News feed shows up to 20 recent articles that meet the filters.
Key Resources
See this content:
- "Integrate with Oracle CX Sales" topic in the Using DataFox for Sales and Marketing guide
- "Smart Lists" topic in the Implementing Sales guide
Role Information
- Sales Administrator
- Sales Manager
- Sales Representative
Remember the Last Used Saved Search on Dynamic Choice List Pickers
Dynamic choice list pickers now retain the last used saved search on each picker separately from the list view for the object. With this enhancement, when you use a saved search on a dynamic choice list picker to filter the records displayed on a picker, each field retains the last used saved search by the user.
You can now have multiple dynamic choice list fields with each using a different saved search. This way, users don't have to toggle between different saved searches for dynamic choice list fields.
Steps to Enable
Leverage Application Composer to expose and adjust page layout and attributes. To learn more about extending your application using Application Composer, visit Oracle Help Center > your apps service area of interest > Books > Configuration and Extension.
Here's how to enable this feature:
- Within a sandbox, navigate to Mobile Application Setup.
- Click the CX Sales Mobile Composer tab and then click Settings in the Application Features pane.
- Expand Dynamic Choice List Settings.
- Enable Use last used saved search.
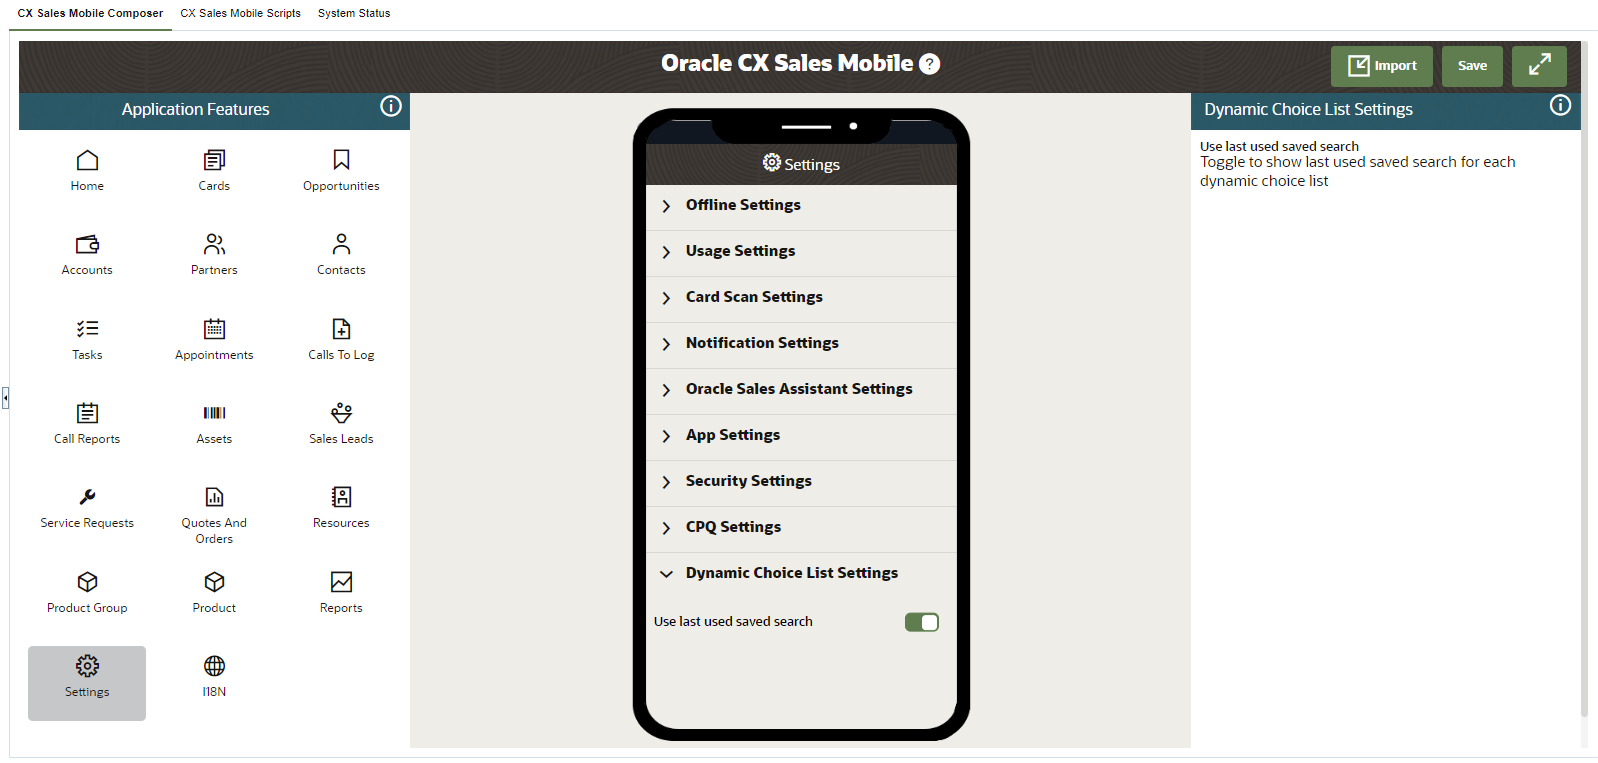
Enable Option to Remember Last Used Saved Search for Dynamic Choice List Fields
Key Resources
See the "CX Sales Mobile" chapter in the Implementing Sales guide for information about configuring the app.
Role Information
- Sales Administrator
Choose to Enable or Disable Confirmation Messages Globally, by Region, and by Role
Configure which roles and regions receive confirmation messages when a record is created or a lead is converted. Alternatively, you can disable these messages for all users.
This feature empowers sales administrators to choose which roles and locales see confirmation messages when records are created, or leads are converted.
Steps to Enable
Leverage Application Composer to expose and adjust page layout and attributes. To learn more about extending your application using Application Composer, visit Oracle Help Center > your apps service area of interest > Books > Configuration and Extension.
Here's how to specify which roles and regions receive confirmation messages, or disable confirmation messages for everyone:
- Navigate to Mobile Application Setup in Application Composer.
- Click the CX Sales Mobile Composer tab and then click Settings in the Application Features pane.
- Expand Confirmation Message Settings and select which roles and regions receive the Confirmation Messages in CX Sales Mobile. Alternatively, disable globally.
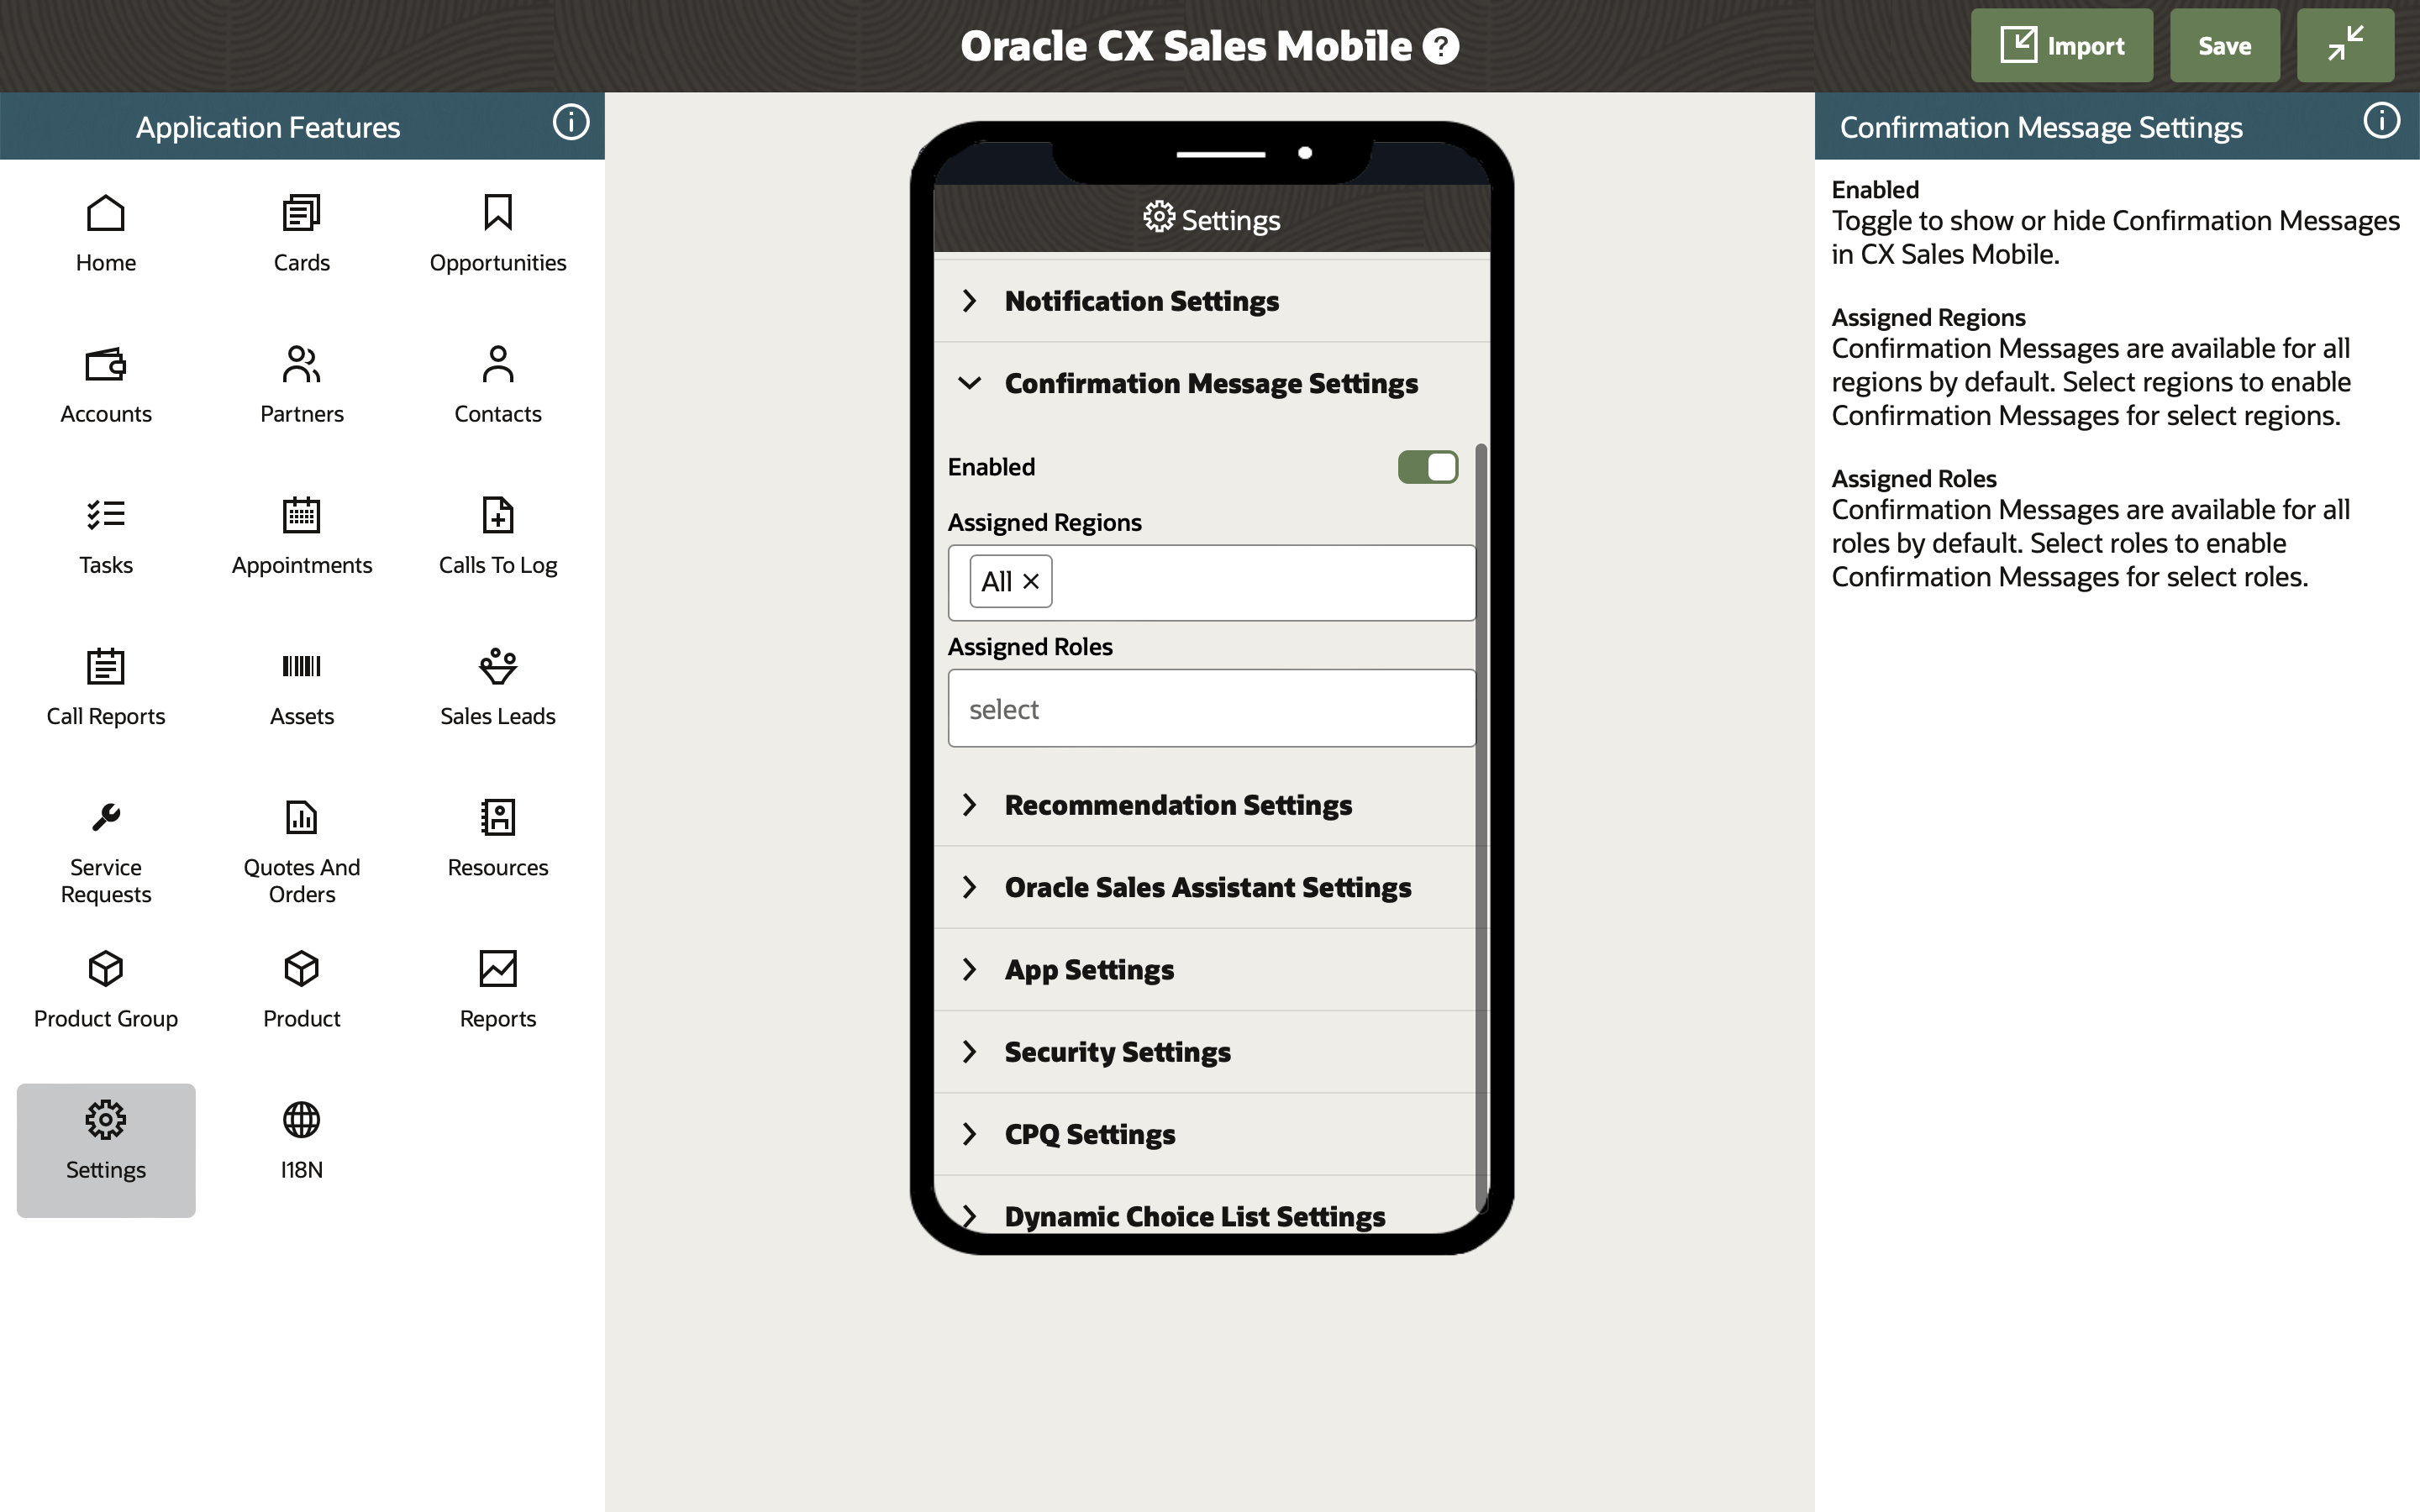
Confirmation Message Settings
Tips And Considerations
Your organization will continue to receive confirmation messages if you choose not to disable them for your organization, or for particular roles or regions.
Key Resources
- See the "CX Sales Mobile" chapter in the Implementing Sales guide for information about configuring the app.
Role Information
- Sales Administrator
Drill Down to User, Manager, Region, and Role in Application Usage Insights
In Application Usage Insights you can now drill down from an organization or team view to insights for a specific user, manager, region, or role. Page filter labels are also updated with the terms "Enterprise” and “My Organization”. Sales administrators will typically use "Enterprise", whereas sales teams will typically use "My Organization".
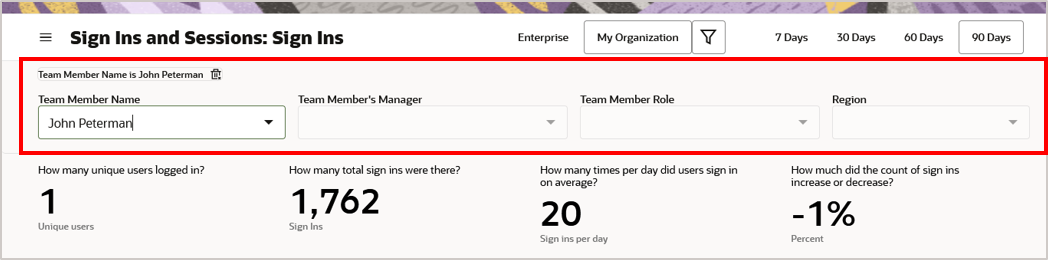
Selectable Filters

Insights for Selected User
The drill-down features enable sales managers to view more granular usage insights targeting specific users, managers, regions, and roles within the Sales hierarchy.
Steps to Enable
You don't need to do anything to enable this feature.
Tips And Considerations
To accommodate the differing insight needs of sales managers and sales administrators, Application Usage Insight pages have two page filters.
- The Enterprise filter displays usage data aggregated for the entire organization, and is typically used by sales administrators.
- The My Organization filter restricts data to only the user's specific organization, based on user login, and is typically used by sales managers.The ability to drill into user, manager, region, and role is available when using the My Organization filter. It's not available when using the Enterprise filter.
Key Resources
- See the "Application Adoption and Usage Reporting" chapter in the Creating and Administering Analytics guide.
Role Information
- Sales Administrator
- Sales Manager
View Payment Balances by Earning Type Using the Incentive Compensation Analyst Dashboard
Use the earning type filter in the Incentive Compensation Analyst Dashboard to view participant payment balances by Earning Type.
Earning Type and Description attributes have been added to the Incentive Compensation Participant Balances Real Time Subject Area to more clearly display balances by Earning Type.
This feature lets you easily review participant balances of different earning types.
Steps to Enable
You don't need to do anything to enable this feature.
Key Resources
- See the "Participant Balances Real Time" topic in the Subject Areas for Transactional Business Intelligence guide.
Role Information
- Compensation Administrator
- Compensation Manager
- Compensation Analyst
Support Renewal Forecasting Enhancements in Sales Forecast Reporting
To protect your growth and reduce churn, analyzing your business for risk should be at the forefront of your renewal forecast process. Renewal forecasting reports enable sales managers and sales staff to manage their renewal subscription forecasts. This enhancement is added to the Sales CRM Forecasting and Pipeline Revenue Real Time subject areas.
The following new presentation tables are added:
Renewal Quantity Forecast Facts
- Renewal Adjusted Quantity
- Renewal Latest Adjusted Quantity
- Renewal Quantity
- Renewal Latest Quantity
Renewal Revenue Forecast Facts
- Renewal Adjusted Best Case Forecast
- Renewal Adjusted Forecast
- Renewal Adjusted Worst Case Forecast
- Renewal Forecasted Open
- Renewal Latest Adjusted Best Case Forecast
- Renewal Latest Adjusted Forecast
- Renewal Latest Adjusted Worst Case Forecast
- Renewal Latest Forecasted Open
- Renewal Won - Forecasted
- Renewal Latest Won - Forecasted
Forecast Item - Dimension enhancements
- Forecast Item Category
- Forecast Item Category Code
- Revenue Type Category
- Revenue Type Category Code
Opportunity - Dimension enhancements :
- Renewal Process
- Renewal Process Code
- Opportunity Type
- Opportunity Type Code
This enhancement lets sales users:
- Report on renewal forecast metrics
- Display forecast items
- View forecast category indicator for renewal items
- Enable more granular reporting capabilities
Steps to Enable
You don't need to do anything to enable this feature.
Tips And Considerations
This release only supports Forecast Item Category of type "Renewal".
Key Resources
- See the "Sales CRM Forecasting and Pipeline Revenue Real Time" topic in the Subject Areas for Transactional Business Intelligence guide.
Presentation Column Accurately Captures Product Group Deletion Values
Product group deletion attributes exist in sales subject areas and aren't showing correct, meaningful values. Instead of changing the values of the existing presentation column, the product deletion identifier has been hidden, and a new Active identifier attribute has been introduced. This identifier shows the active status of product groups accurately, inline with application interface.
This feature lets you to use the product group active identifier to get the status of product groups accurately, inline with the application interface.
Steps to Enable
You don't need to do anything to enable this feature.
Key Resources
- See the "Sales - CRM Opportunities and Products Real Time" topic in the Subject Areas for Transactional Business Intelligence guide.
Update Pricing Terms for Multiple Subscriptions
You can update the pricing method and the percentage adjustment of the pricing term for multiple subscriptions at once.
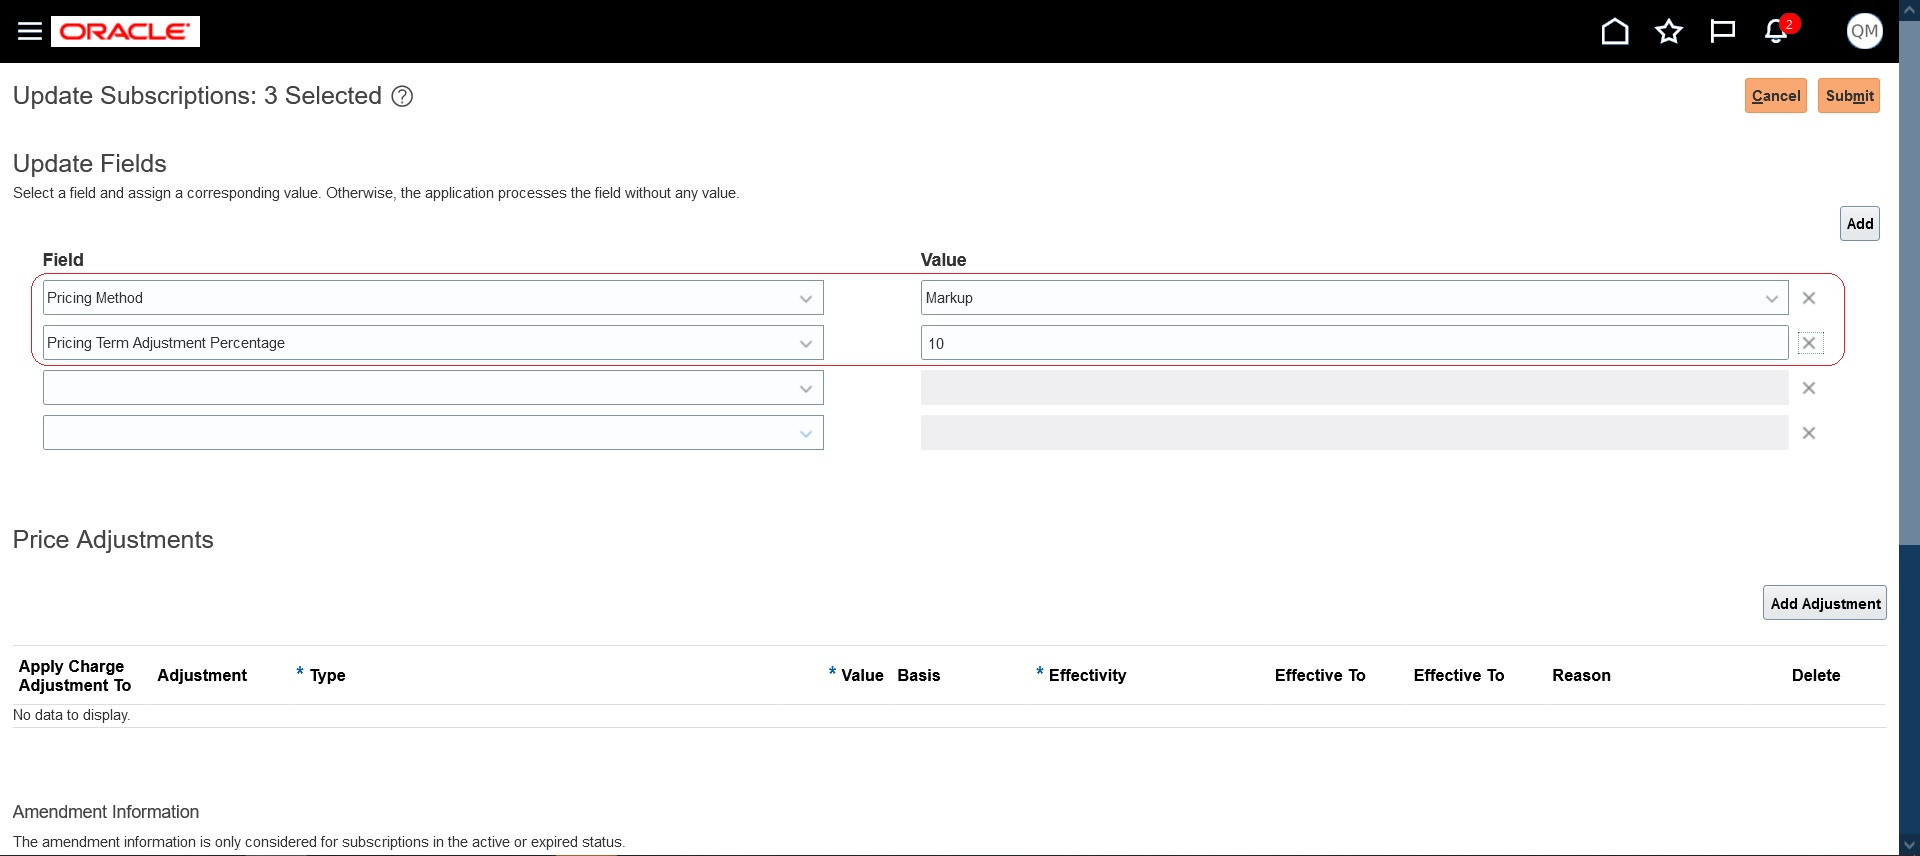
Update Pricing Terms for Multiple Subscriptions
Instead of updating pricing term information individually, this feature lets sales representatives update the same for multiple subscriptions at once.
Steps to Enable
You don't need to do anything to enable this feature.
Key Resources
- See the "Pricing Term" topic in the "Introduction to Subscriptions" chapter in the Using Oracle Subscription Management guide.
Enable Proration of One-Time Charges
Prorate one-time charges and return credit for one-time charges when a subscription product is closed. You can select the Enable Proration check box for a one-time charge on the Edit Product page. This lets you prorate and return credit for that one-time charge.
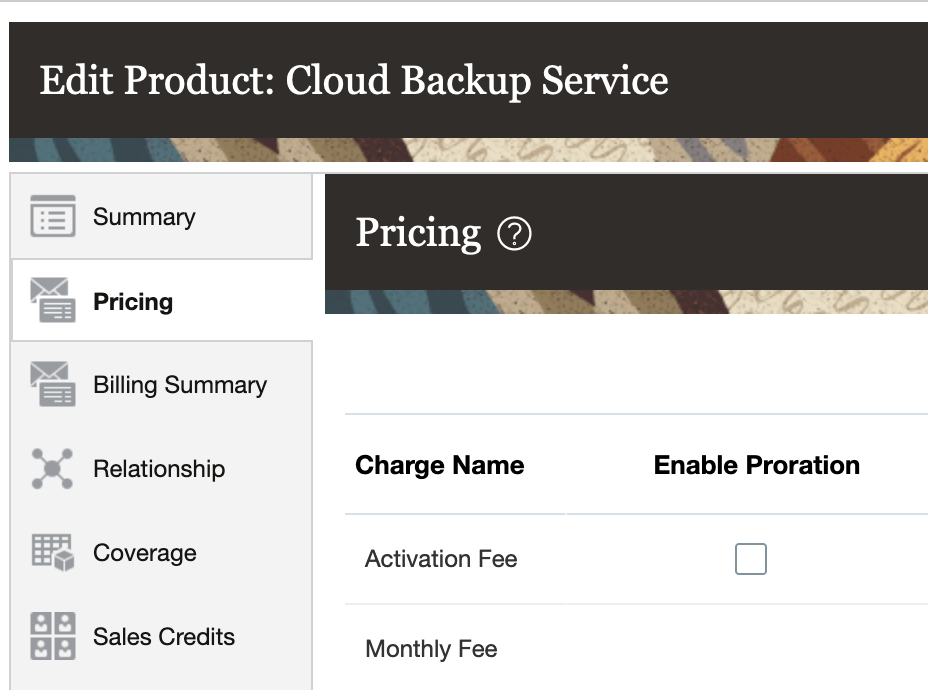
Enable Proration
To prorate one-time charges when closing, you can enable this check box and close a product using either the Prorate with credit or the Prorate without credit close credit methods. If the line has been interfaced to Receivables and you use Prorate with credit, the appropriate credit will be returned for one-time charges. If you use Prorate without credit, no credit will be issued for one-time charges. If the bill line hasn't been interfaced to Receivables, it will be prorated based on the Close date.
You can return credit for one-time charges when you close a subscription product. This gives you added flexibility in how you can bill your customers.
Steps to Enable
You don't need to do anything to enable this feature.
Tips And Considerations
- You can’t enable proration for one-time charges if the product doesn’t have an end date.
- If the one-time charge is recognized immediately in Revenue Management, the revenue contract is revised on close to reflect the prorated amount. If the one-time charge is recognized periodically, the revenue contract line is revised as it is for a recurring charge
Key Resources
See this content in the Using Oracle Subscription Management guide:
- "Subscription Termination" in the "Introduction to Subscriptions" chapter
- "Enable Proration of One-time Charges" in the "Subscription Pricing and Billing" chapter (topic available after Update 22C general availability on July 1)
Override Renewal Duration at Subscription and Subscription Product Levels
Specify an override for the renewal duration at the subscription level, as well as at the subscription-product level, and have the renewal consider that override. Automatic and manual renewals uniformly apply a rule-based renewal duration for all the eligible subscription or subscription products. This feature lets you override the renewal duration at the subscription and at the subscription product level.
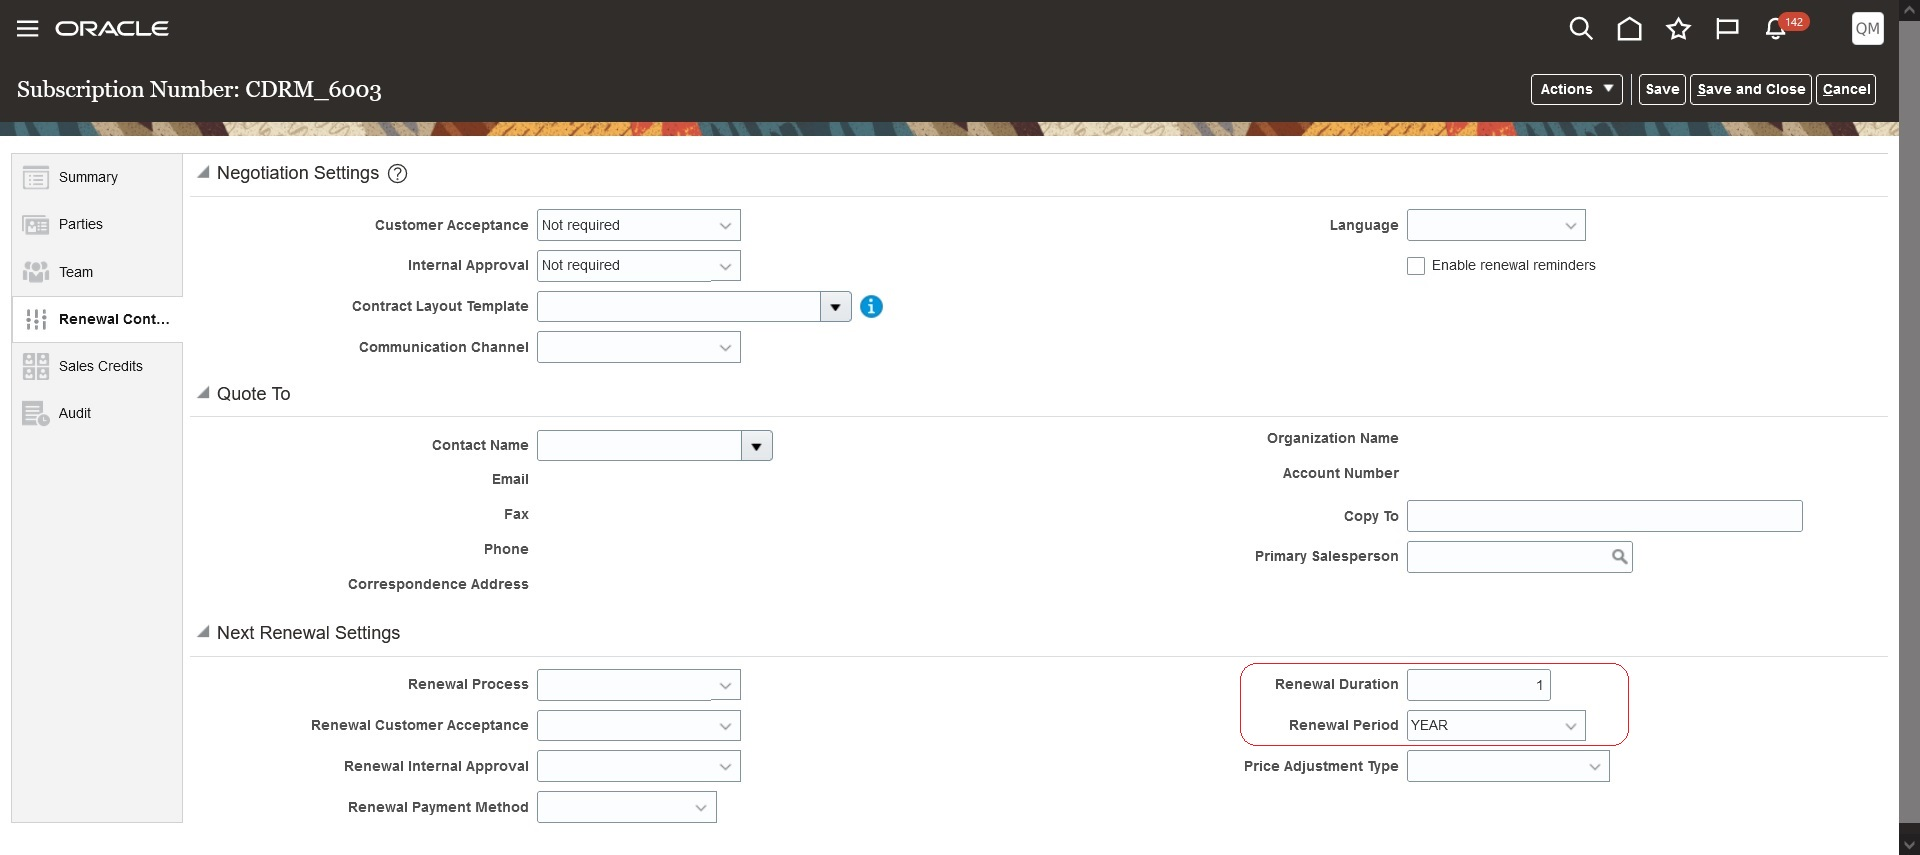
Subscription-Level Renewal Duration Override
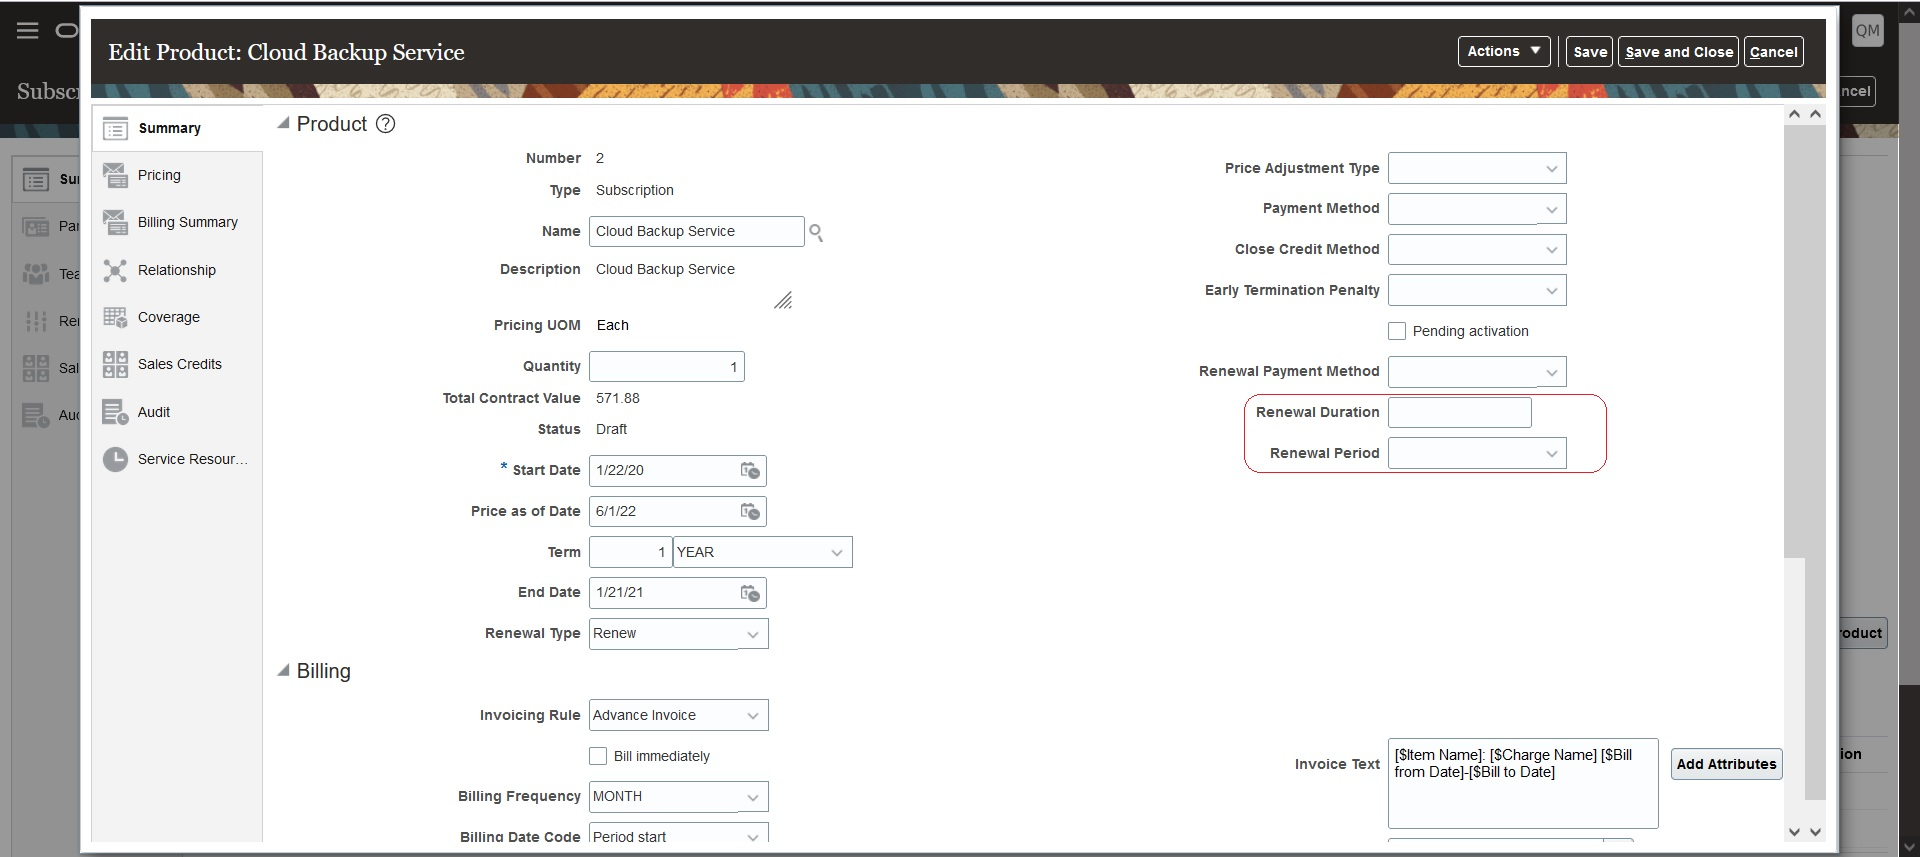
Subscription Product-Level Renewal Override
This feature gives you the ability to handle special cases of different renewal durations.
Steps to Enable
You don't need to do anything to enable this feature.
Key Resources
- See "Renew Subscriptions" in the "Manage Subscriptions" chapter in the Using Oracle Subscription Management guide.
View And Override Close Credit Amount
View and override the credit provided when a subscription is closed. You can use the Calculated Credit Amount field to view the credit that will be issued as a part of close and override the credit using the Override Credit Amount field.
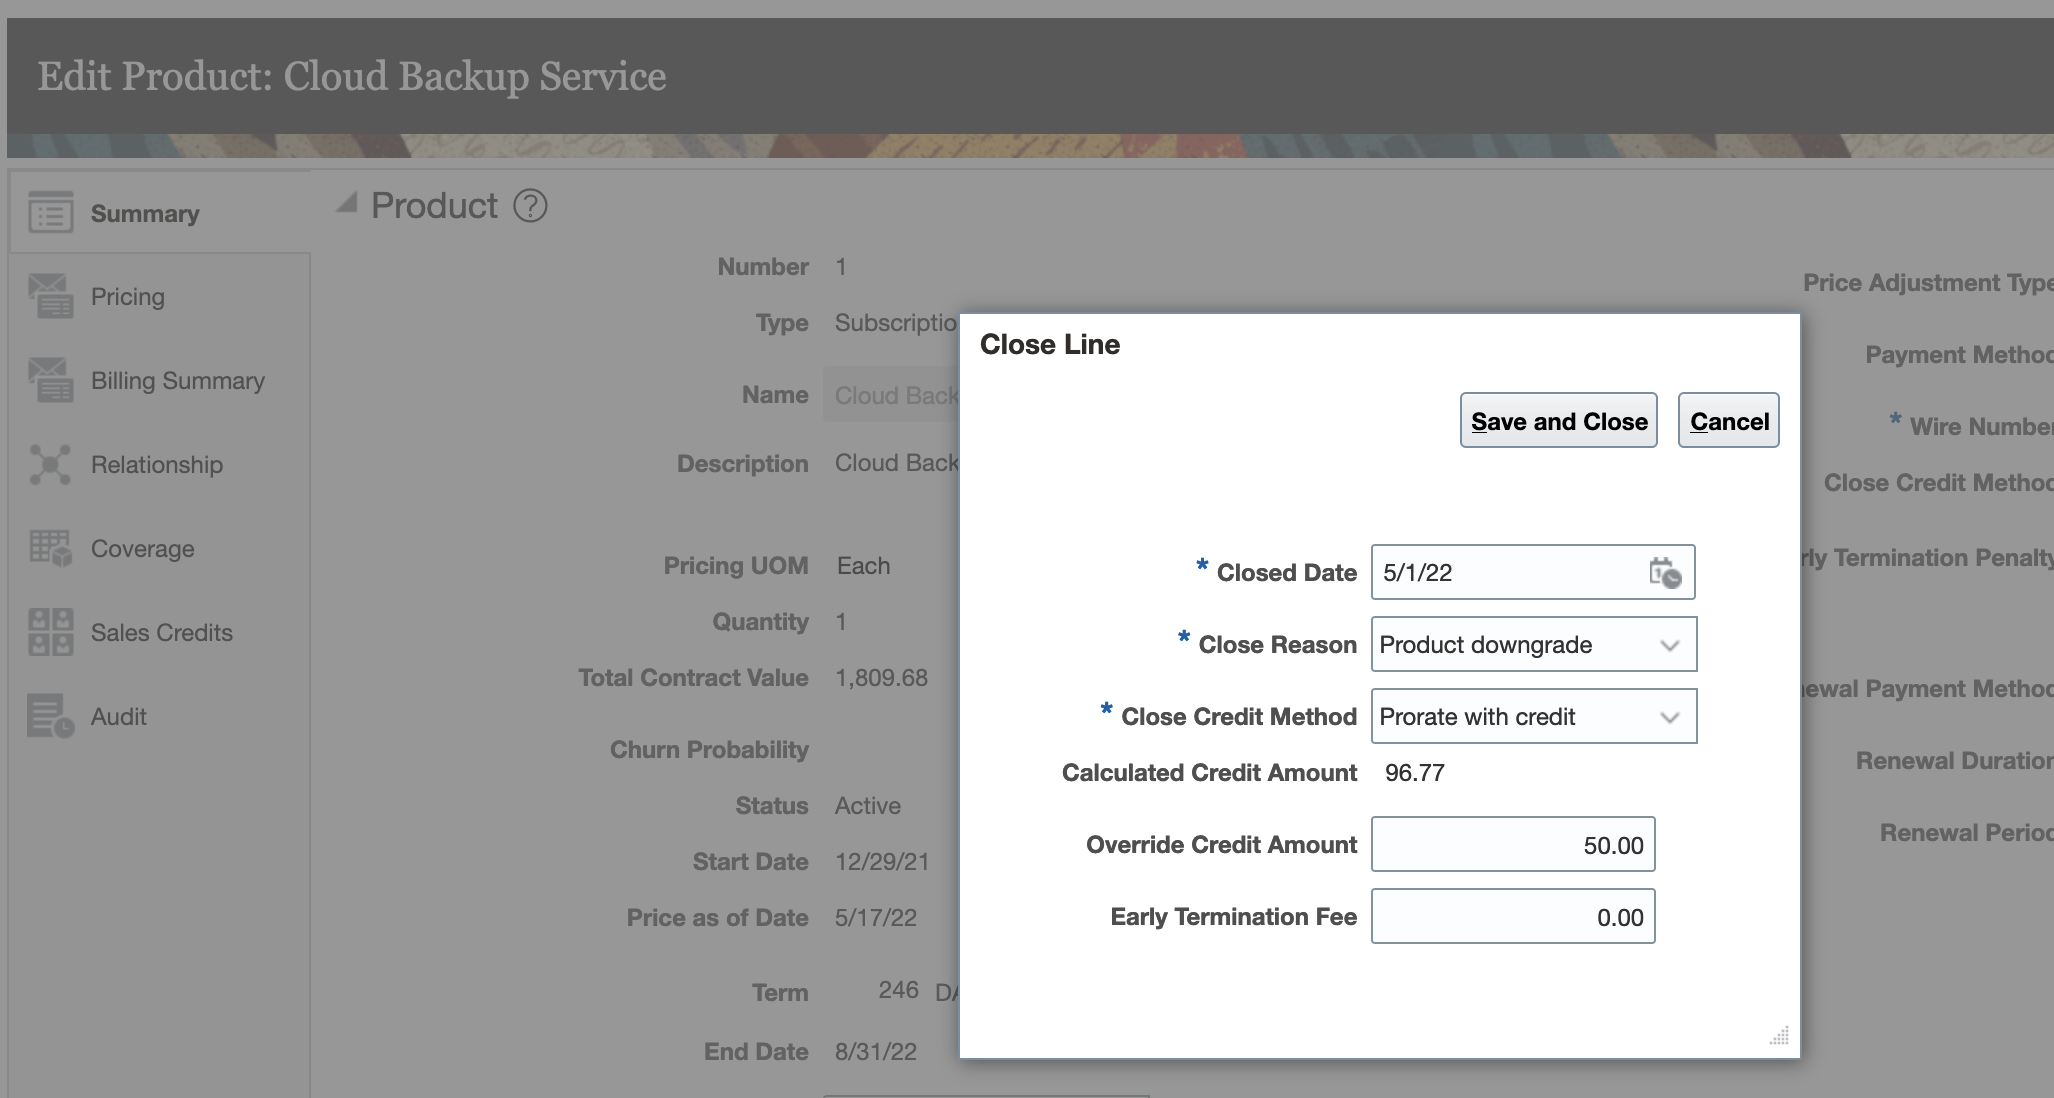
View and Override Close Credit
If you choose to override the credit amount, the amount for credit memo billing lines is computed as follows:
Overridden Credit Memo Bill line amount = Original Credit Line Amount x Overridden Credit Amount/Calculated Credit Amount
Let's consider a subscription product starting 1 Aug 2021 with a duration of 4 months and a $1000 monthly charge. Here's the billing summary
| Period | Charge | Bill-from Date | Bill-to Date | Amount | Interfaced |
|---|---|---|---|---|---|
| 1 | Monthly Fee | 1-Aug 21 | 31-Aug 21 | 1000 | Yes |
| 2 | Monthly Fee | 1-Sep 21 | 30-Sep 21 | 1000 | Yes |
| 3 | Monthly Fee | 1-Oct 21 | 31-Oct 21 | 1000 | Yes |
| 4 | Monthly Fee | 1-Nov 21 | 30-Nov 21 | 1000 | Yes |
If this product line is closed on 16-Oct 21 with Prorate with credit as the close credit method, credit memos would be created against two billing lines. The total credit issues would be $1516.13 in this case and the billing summary would be:
| Period | Charge | Bill-from Date | Bill-to Date | Amount | Interfaced |
|---|---|---|---|---|---|
| 1 | Monthly Fee | 1-Aug 21 | 31-Aug 21 | 1000 | Yes |
| 2 | Monthly Fee | 1-Sep 21 | 30-Sep 21 | 1000 | Yes |
| 3 | Monthly Fee | 1-Oct 21 | 31-Oct 21 | 1000 | Yes |
| 3 | Monthly Fee | 16-Oct 21 | 31-Oct 21 | -516.13 | |
| 4 | Monthly Fee | 1-Nov 21 | 30-Nov 21 | 1000 | Yes |
| 4 | Monthly Fee | 1-Nov 21 | 30-Nov 21 | -1000 |
If you choose to override credit in this case and enter 1000 as the override credit amount then the billing summary would look as follows:
| Period | Charge | Bill-from Date | Bill-to Date | Amount | Interfaced | Comments |
|---|---|---|---|---|---|---|
| 1 | Monthly Fee | 1-Aug 21 | 31-Aug 21 | 1000 | Yes | |
| 2 | Monthly Fee | 1-Sep 21 | 30-Sep 21 | 1000 | Yes | |
| 3 | Monthly Fee | 1-Oct 21 | 31-Oct 21 | 1000 | Yes | |
| 3 | Monthly Fee | 16-Oct 21 | 31-Oct 21 | -340.43 | 1000/1516.13*516.13 | |
| 4 | Monthly Fee | 1-Nov 21 | 30-Nov 21 | 1000 | Yes |
|
| 4 | Monthly Fee | 1-Nov 21 | 30-Nov 21 | -659.57 | Yes |
1000/1516.13*1000 |
In this example, the overridden credit amount will proportionally change the amount for credit memo bill lines.
You can view the credit amount given to the customer when you close a product, and you can override this credit amount with the amount you negotiate with your customer when they close a subscription. This gives you added billing flexibility to handle the credit amounts issued to your customers.
Steps to Enable
You don't need to do anything to enable this feature.
Tips And Considerations
- You can't use a negative amount at the Override Credit Amount.
- You can't override the credit amount with another amount if the calculated credit amount is 0.
Key Resources
- See "Override Close Credit Amount" in the "Create and Update Subscriptions" chapter in the Using Oracle Subscription Management guide (topic available after Update 22C general availability on July 1).
Analyze Subscription Trends for a Cohort of Customers
Analyze subscription trends for a cohort of customers. You can use the Cohort Overview Dashboard to analyze trends for a cohort of customers who had active subscriptions in the past month, and track the trend of Monthly Recurring Revenue (MRR), Total Contract Value, MRR churn, and renewal rates for this cohort. You can also analyze the list of customers in a given cohort that churned.
When you analyze the Cohort Retention Dashboard, click on any cell that you wish to analyze further and it will bring up the Cohort Overview Dashboard.
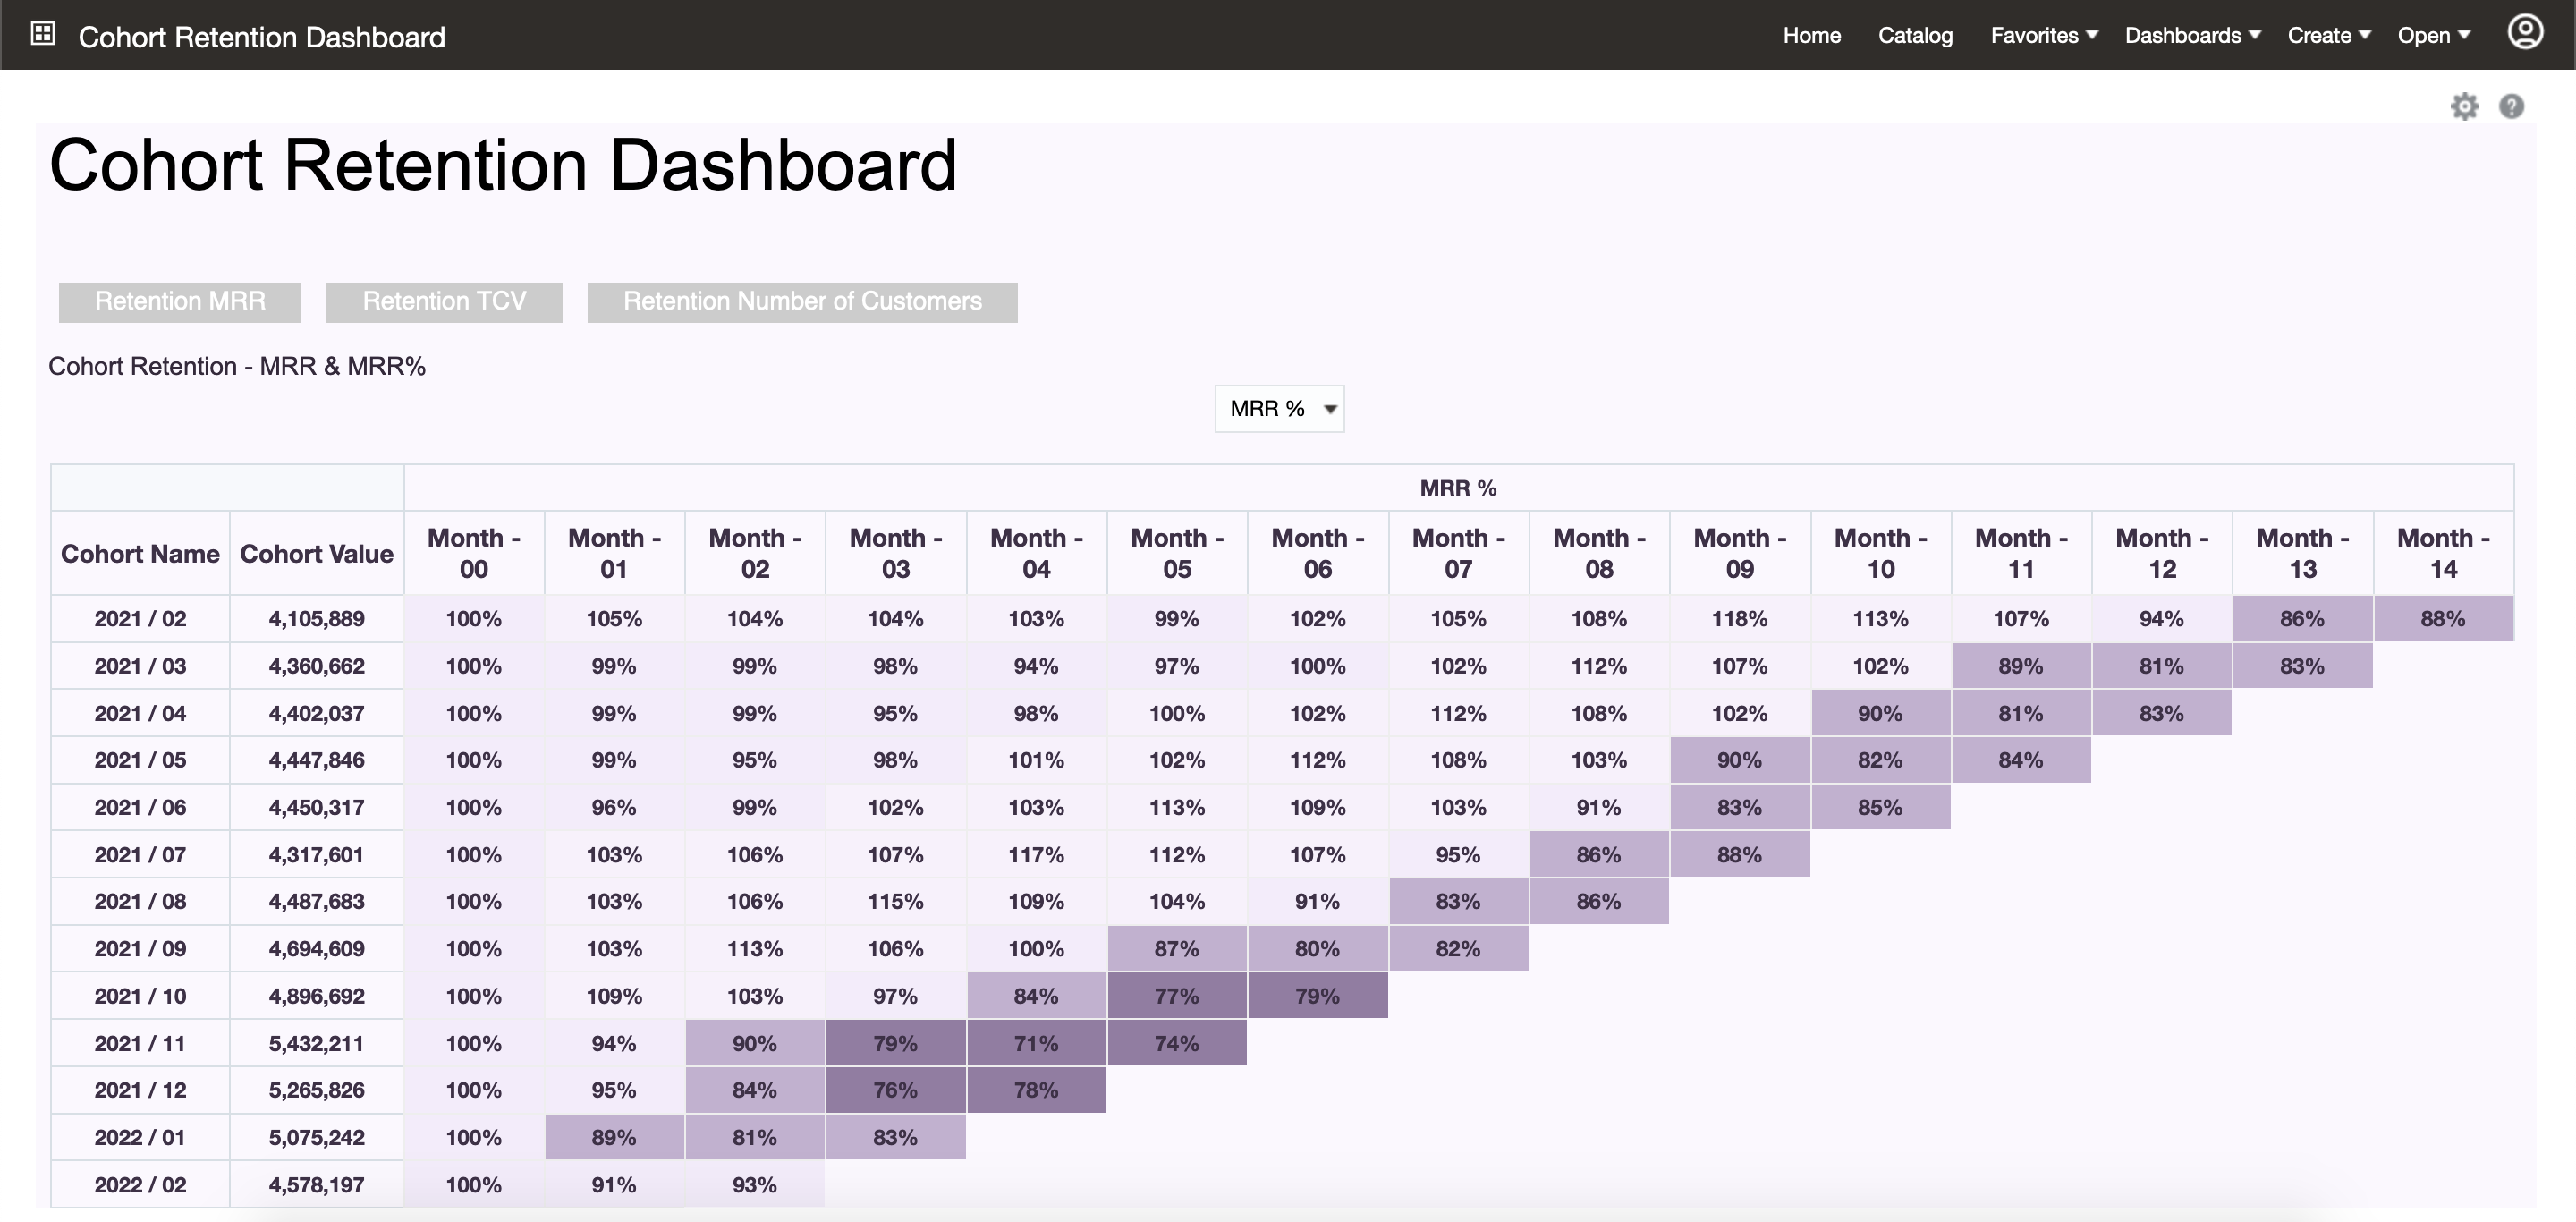
Cohort Retention Dashboard
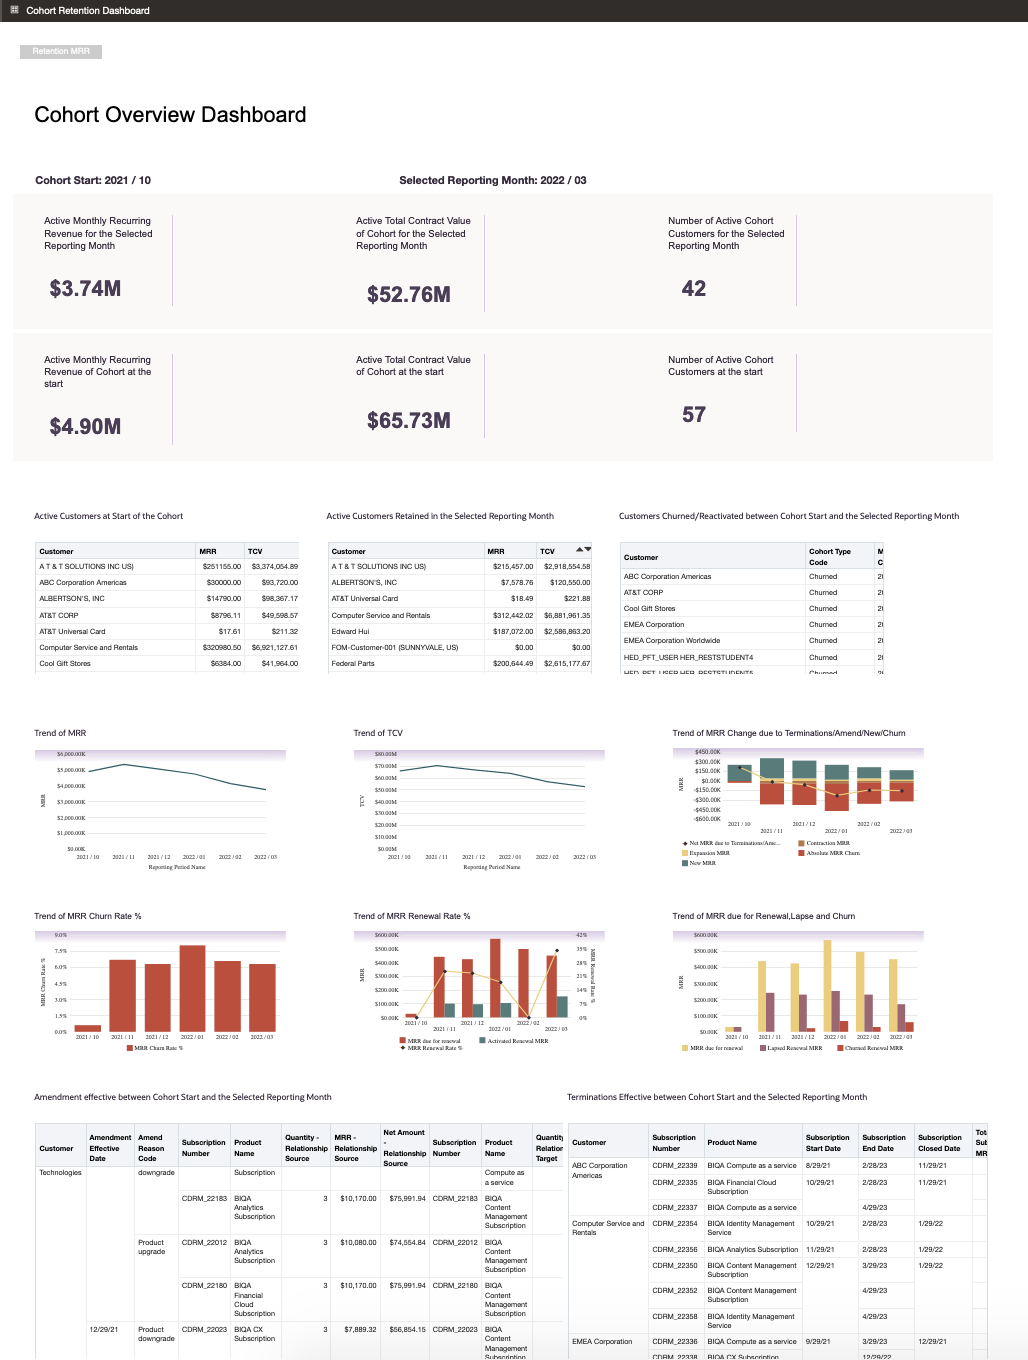
Cohort Overview Dashboard
You can use the Cohort Overview Dashboard to analyze the retention of Monthly Recurring Revenue and Customers over time. You can easily identify which customers churned and in how many months.
Steps to Enable
You don't need to do anything to enable this feature.
Improve ASC606 Compliance During Subscription Life Cycle
Choose how your revenue contracts are accounted for during the life cycle of a subscription. You can determine how subscription amendments, renewals, and pricing terms are accounted for in Oracle Revenue Management. You can use the Revenue Management Rule for Amendment and Revenue Management Rule for Renewal attributes in subscription profiles to choose how to manage revenue when a subscription is amended or renewed. For each rule, you can either create new performance obligations or create a new revenue contract in compliance with ASC606 regulations.

Revenue Management attributes in Subscription profile
This feature is enabled by setting the profile option Enable Addition to Revenue Contract to Yes. On doing so you will notice a new field Revenue Management Rule in the Amendment and Renewal UIs.
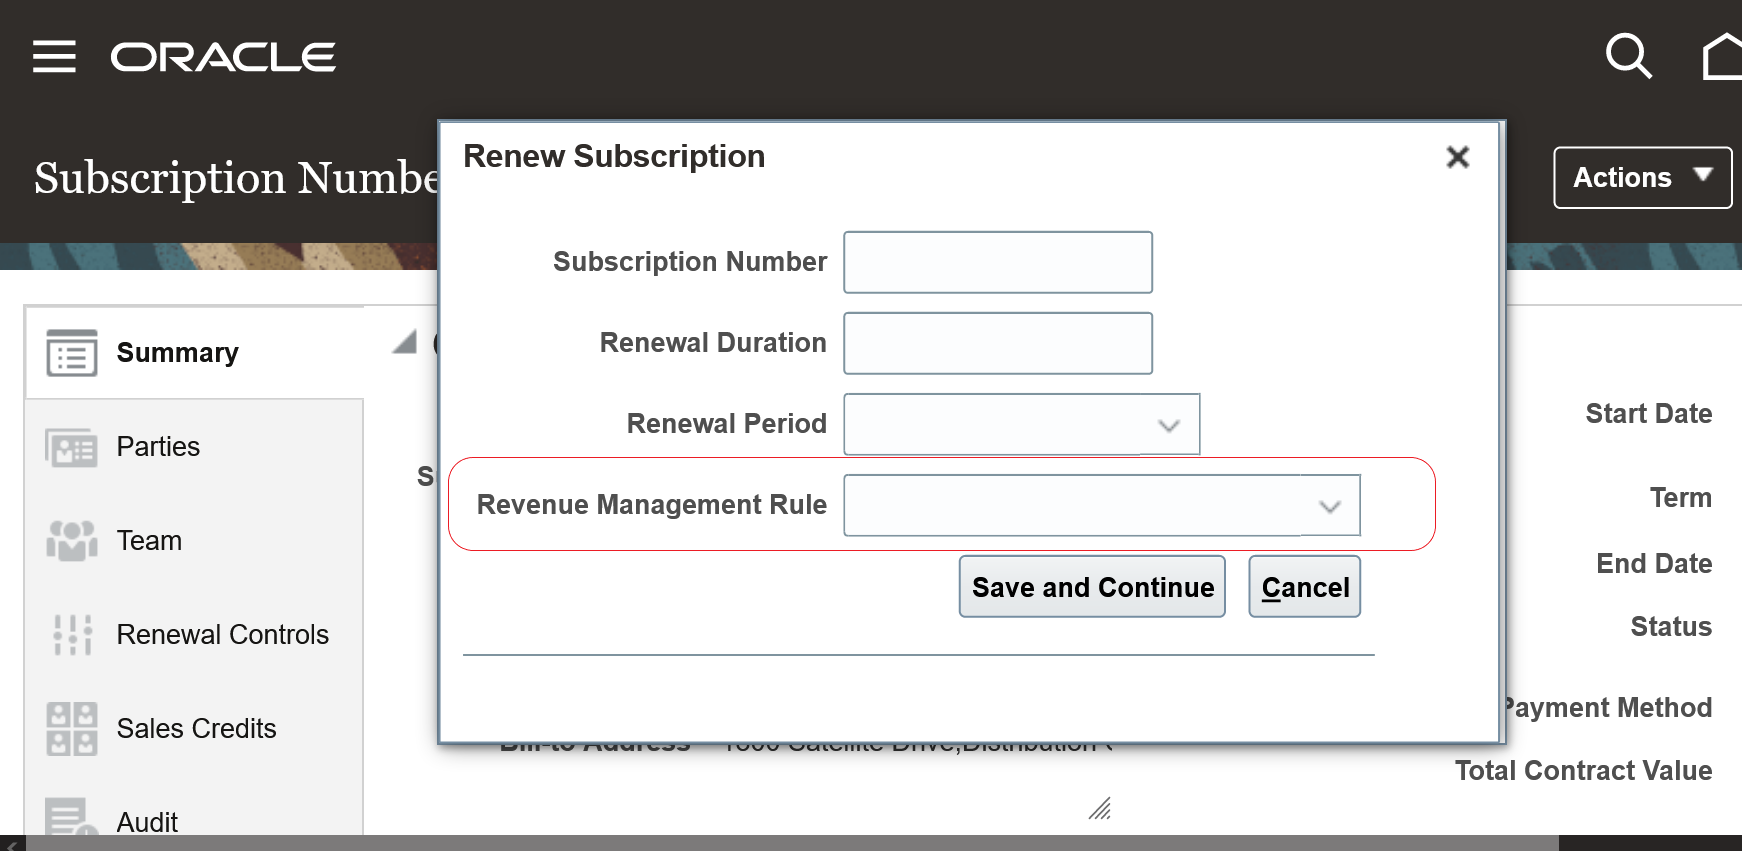
Renew Subscription
The value of this field defaults from the Revenue Management Rule for Renewal attribute in the Subscription profile. When the subscription is automatically renewed the same Subscription profile attribute is used to determine how the revenue contract is to be created.
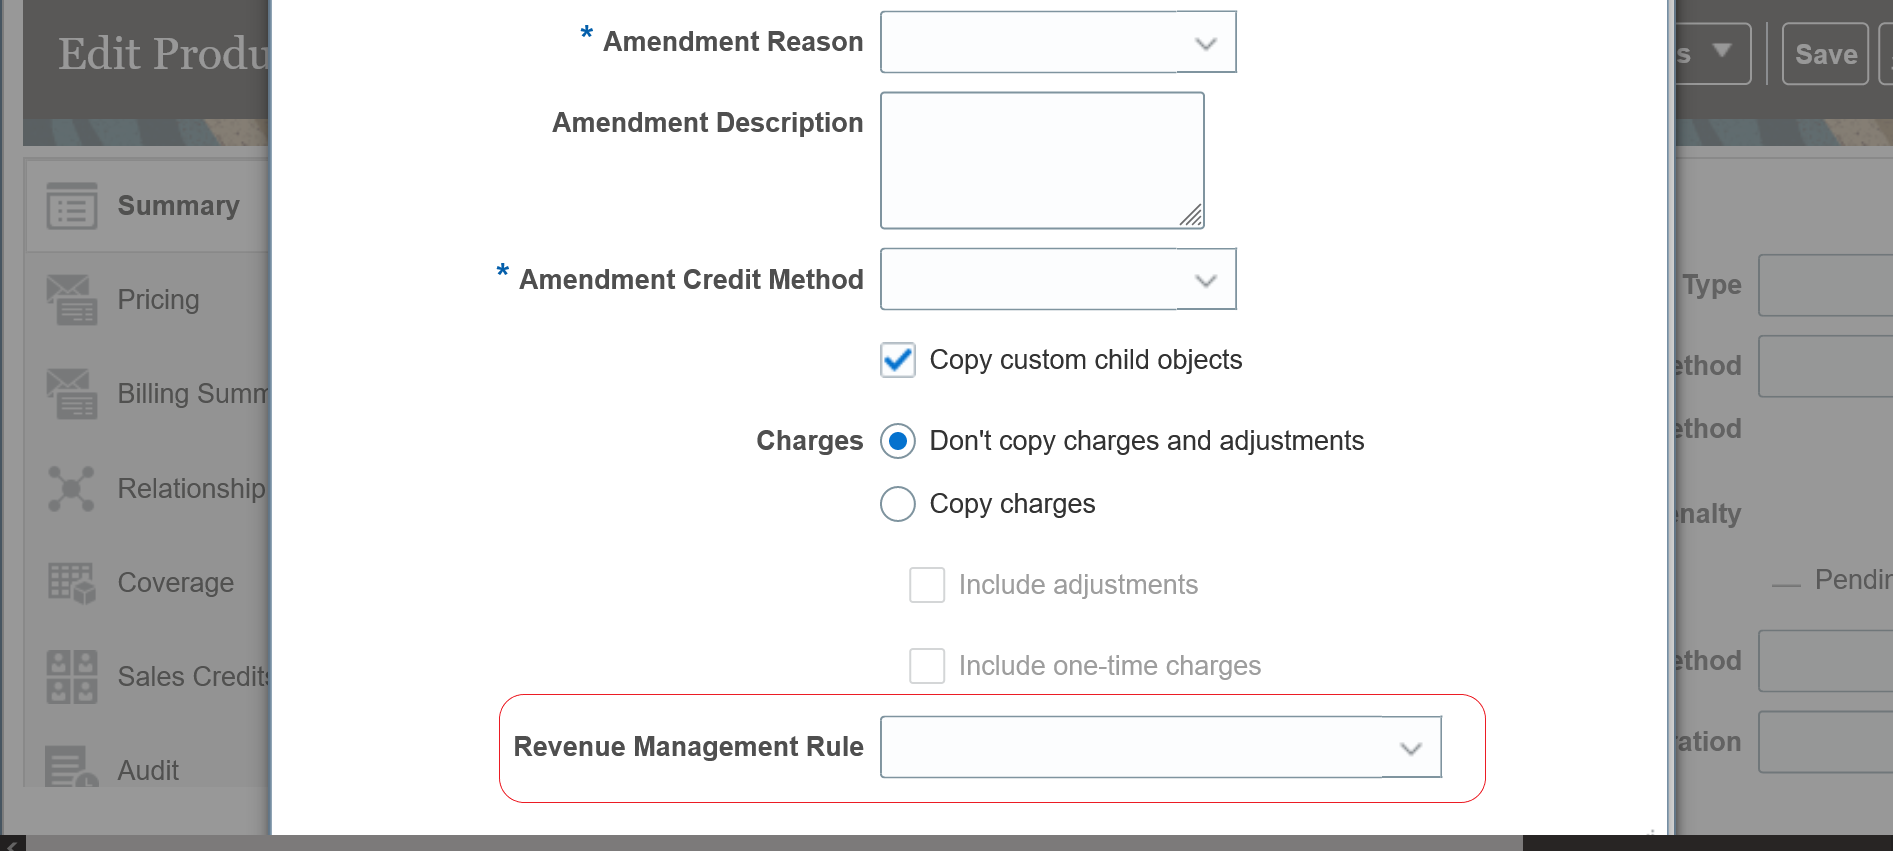
Amend Subscription
The value of this field defaults from the Revenue Management Rule for Amendment attribute in the Subscription profile. This Subscription profile attribute also determines how the revenue contract should be created when there is a Pricing term in the subscription.
You can choose how to manage revenue from subscriptions when a subscription is amended or renewed.
Steps to Enable
Leverage Application Composer to expose and adjust page layout and attributes. To learn more about extending your application using Application Composer, visit Oracle Help Center > your apps service area of interest > Books > Configuration and Extension.
- Go to Manage Algorithms in Subscription Configuration.
- Select Algorithm Subscription Management and RMCS Integration.
- Create new version of the algorithm. A new version should be created after selecting the 0th version of the algorithm.
- Click on the Variables tab page.
- Add a CustomizationFlag for the Algorithm Subscription Management Integration for Revenue Management. and set its Default Expression value to true.
- Save and publish the algorithm.
- Go to Setup and Maintenance.
- Click on Tasks > Search.
- Search for task Manage Administrator Profile Values.
- Search for Profile Option Code ORA_OSS_ADD_TO_REV_CONTRACT.
- Set the Profile Value to Yes at Site level.
Tips And Considerations
- Algorithm changes are not sandbox-aware. Any changes you make will be applicable outside of the sandbox, too.
- When an environment is provisioned, the algorithm will be in version 0.
- You cannot create a new version of an algorithm from version 0 until you promote the algorithm first.
- Once you promote, then version 1 of the algorithm is created, which is the predefined algorithm, and you cannot edit version 0.
Key Resources
See this content:
- "Renew Subscriptions" and "Amend Subscriptions" in the "Manage Subscriptions" chapter in the Using Oracle Subscription Management guide
- "Enable Revenue Management Rules" in the "Integrate Revenue Management" chapter in the Implementing Oracle Subscription Management guide (topic available after Update 22C general availability on July 1)
Analyze Coverage Entitlements and Adjustments
You can use the Subscription Management - Coverage Entitlements and Adjustments Real Time subject area to create Oracle Transactional Business Intelligence (OTBI) reports that are needed for analyzing coverage entitlements and adjustments.
You can use the Subscription by Entitlements and Adjustments dashboard to create reports on the list of coverage subscriptions or covered levels that are covered by specified entitlements or adjustments.
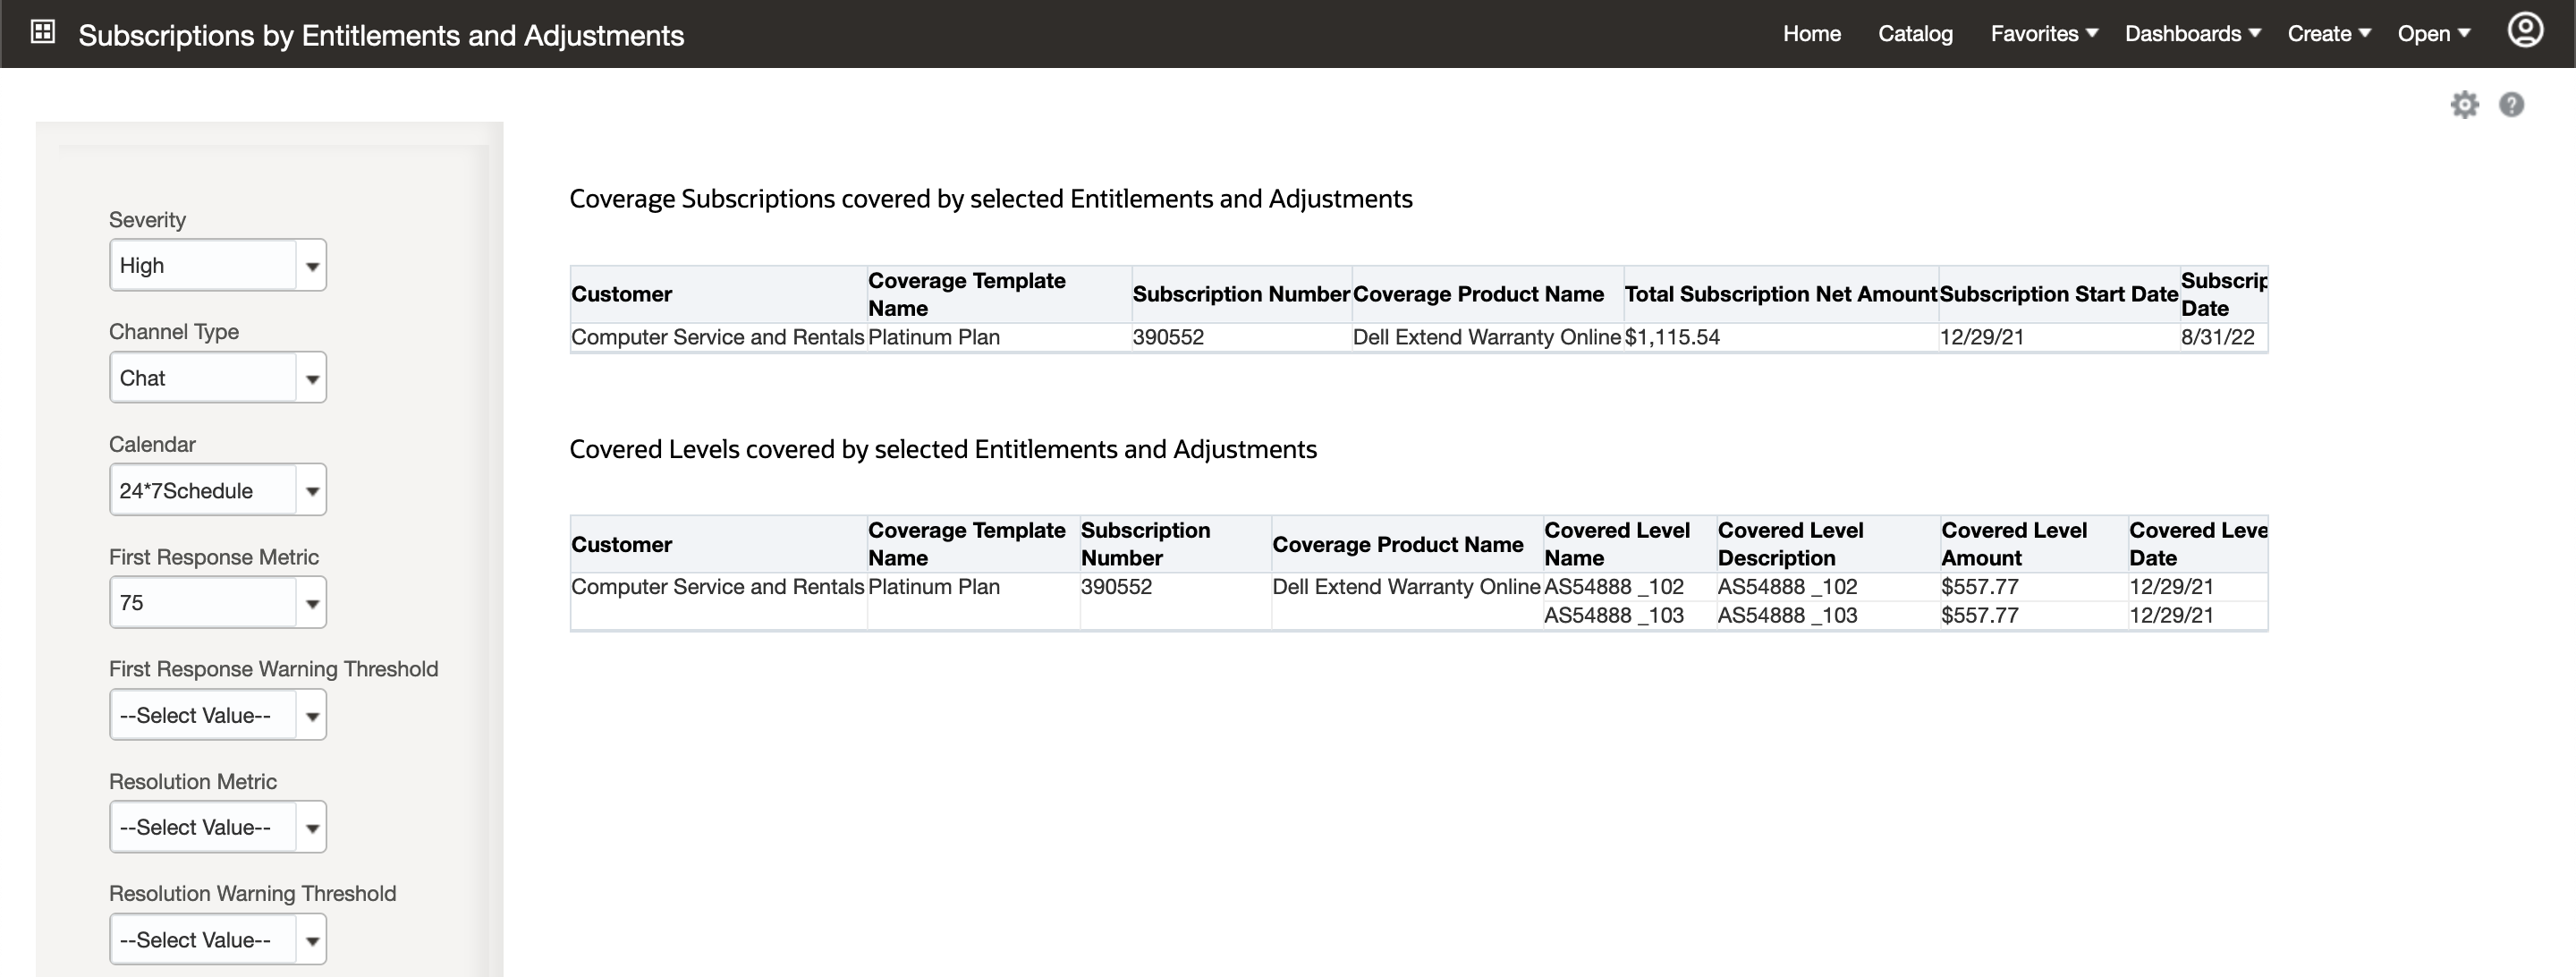
Subscriptions by Entitlements and Adjustments Dashboard
You can use Subscription Management - Coverage Entitlements and Adjustments Real Time subject area to create reports on the covered levels that are covered by a coverage which entitles your customer to certain service request milestone or billing adjustments.
Steps to Enable
Leverage new subject area(s) by adding to existing reports or using in new reports. For details about creating and editing reports, see the Creating and Administering Analytics and Reports book (available from the Oracle Help Center > your apps service area of interest > Books > Administration).
Tips And Considerations
You can use the Subscription Management - Coverage Entitlements and Adjustments Real Time subject area to report on the standard fields available for entitlements and adjustments for a coverage. You can't report on custom entitlement or adjustment fields.
Key Resources
- See "Analyze Subscription Trend Reports" in the "Configure Subscriptions" chapter in the Implementing Oracle Subscription Management guide.
Undo the closing of a previously closed subscription. You can use the Undo Close action from the Edit Product page of subscription-type products. This lets you return the subscription to the status it was in prior to the closing of the subscription, and undo any billing changes that occurred due to the closing.
Additionally, you can enable Withhold proration of usage charges for a subscription profile. This lets you disable the proration of usage charges and no credit is issued for the usage charges that have been billed when you close a subscription product.
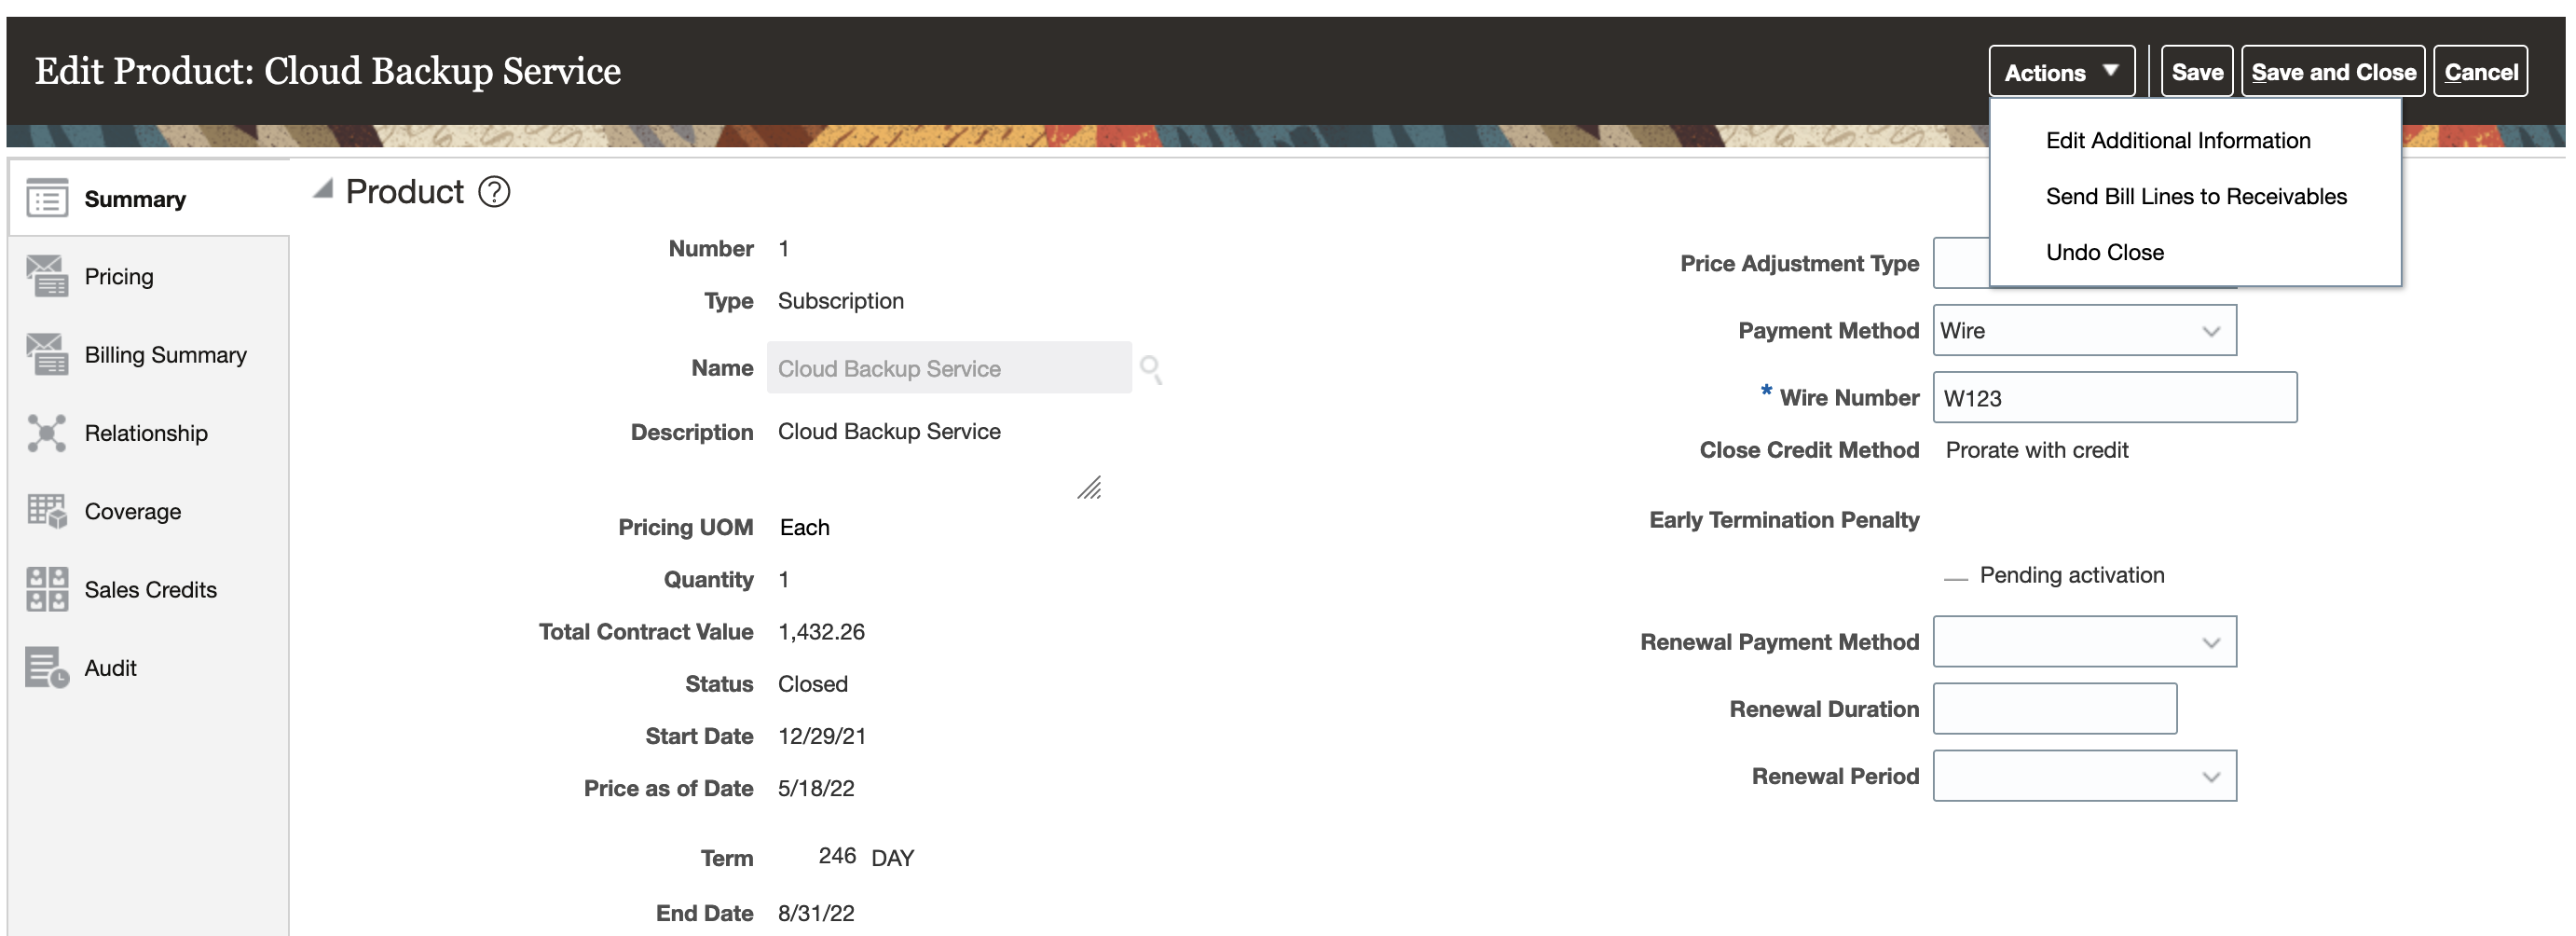
Undo Close
You can undo close of a subscription product that was closed by error or was closed with wrong details such as an incorrect close date or close credit method.
Steps to Enable
You don't need to do anything to enable this feature.
Tips And Considerations
NOTE: You can't undo close of a subscription product in the following scenarios:
-
The billing impacted by close has already been sent to Receivables
-
The product has a usage based charge and proration of usage charges hasn't been withheld
-
The product has a usage based charge that is billed based on estimated usage
-
The close occurred as a part of an amendment or suspension
-
The product was closed in a release prior to 22C
Key Resources
- See "Subscription Termination" in the "Introduction to Subscriptions" chapter in the Using Oracle Subscription Management guide.
Partner Relationship Management
New Privilege to Identify Fusion PRM for Partners Users
We have introduced a new privilege, Identify Partner Users (ZPM_PARTNER_USER_PRIV), to identify users of the Fusion Partner Relationship Management for Partners Cloud Service (Fusion PRM for Partners). This privilege will be required in a future release for users of Fusion PRM for Partners functionality. In Update 22C, this privilege will automatically be included in the standard Partner Sales Representative, Partner Sales Manager, and Partner Administrator roles via the upgrade process. However, users who have cloned these roles or created a custom role will need to manually add this new privilege to the role. This new privilege will be used to count Fusion PRM for Partners deployments. Use of this privilege is not required in 22C; however users are encouraged to uptake it in 22C to prepare for the future release where it will be required.
Introducing this privilege improves the management, access, and counting of Fusion PRM for Partners users.
Steps to Enable
You don't need to do anything to enable this feature.
Tips And Considerations
- This new privilege is required only for Fusion PRM for Partners functionality. It is not required for other Fusion PRM solutions.
- Users are encouraged to uptake this new privilege in Update 22C in order to prepare for the future release when it is required. This privilege is automatically added to relevant predefined user roles. However users must manually add this new privilege to custom roles or cloned roles intended for Fusion PRM for Partners usage.
- The Fusion PRM for Partners is intended for external partner users exclusively.
- The Oracle Fusion Service Descriptions document is updated with product usage clarifications for the Fusion PRM for Partners. Refer to the latest Oracle Fusion Service Descriptions Description document for additional details.
Key Resources
See this content:
- Security Reference for CX Sales and B2B Service guide. See the Partner Sales Representative, Partner Sales Manager and Partner Administrator sections.
- Oracle Fusion Service Description. See Fusion Partner Relationship Management for Partners Cloud Service section.
Role Information
- Partner Sales Representative
- Partner Sales Manager
- Partner Administrator