
- Revision History
- Overview
- Feature Summary
- Sales Automation Foundation Common
- Subscription Management
-
- Subscription Management
-
- Retain Subscription Number During Renewal
- Edit Standard Coverage of Subscriptions with Included Warranty
- Use Milestones to Bill Subscriptions and Recognize Revenue
- Select Charge Adjustment Reason from a List
- Add Custom Subscription Validations
- Capture Reason Description for Cancel and Close
- Apply Price Adjustments to Multiple Subscriptions
- Retrieve Additional Credit Card Details
-
- Subscription Management
- Sales Automation Core Common
- Partner Relationship Management
This document will continue to evolve as existing sections change and new information is added. All updates appear in the following table:
| Date | Module | Feature | Notes |
|---|---|---|---|
| 14 NOV 2022 | Search | My Smart List Saved Searches Renamed to My List |
Removed feature from update 22D. |
| 15 SEP 2022 | Created initial document. |
 HAVE AN IDEA?
We’re here and we’re listening. If you have a suggestion on how to make our cloud services even better then go ahead and tell us. There are several ways to submit your ideas, for example, through the Ideas Lab on Oracle Customer Connect. Wherever you see this icon after the feature name it means we delivered one of your ideas.
GIVE US FEEDBACK
We welcome your comments and suggestions to improve the content. Please send us your feedback at oracle_fusion_applications_help_ww_grp@oracle.com.
DISCLAIMER
The information contained in this document may include statements about Oracle’s product development plans. Many factors can materially affect Oracle’s product development plans and the nature and timing of future product releases. Accordingly, this Information is provided to you solely for information only, is not a commitment to deliver any material, code, or functionality, and should not be relied upon in making purchasing decisions. The development, release, and timing of any features or functionality described remains at the sole discretion of Oracle.
This information may not be incorporated into any contractual agreement with Oracle or its subsidiaries or affiliates. Oracle specifically disclaims any liability with respect to this information. Refer to the Legal Notices and Terms of Use for further information.
Column Definitions:
Report = New or modified, Oracle-delivered, ready to run reports.
UI or Process-Based: Small Scale = These UI or process-based features are typically comprised of minor field, validation, or program changes. Therefore, the potential impact to users is minimal.
UI or Process-Based: Larger Scale* = These UI or process-based features have more complex designs. Therefore, the potential impact to users is higher.
Features Delivered Disabled = Action is needed BEFORE these features can be used by END USERS. These features are delivered disabled and you choose if and when to enable them. For example, a) new or expanded BI subject areas need to first be incorporated into reports, b) Integration is required to utilize new web services, or c) features must be assigned to user roles before they can be accessed.
Sales Automation Foundation Common
Capture Competitor Details in Leads
This feature lets you track competitors for a lead and identify one of them as a primary competitor. When you convert a lead to an opportunity, the mapped competitor information is automatically carried over to the opportunity
Tracking competitor data provides you with useful insights for your leads and prospects. For example, you can plan appropriate sales strategies to help close deals more effectively.
Steps to Enable
Here are the high-level steps to expose the Competitor subtab in the Leads page.
- Ensure you're working in an active sandbox.
- Navigate to Application Composer, in the Configuration category.
- In the navigation tree, expand Standard Objects, expand Sales Lead, and click Pages.
- In the Details Page Layouts region, click the duplicate icon.
- From the Configure Subtabs dialog window, move Competitor from the Available Subtabs to the Selected Subtabs window.
- Click OK.
- Publish the sandbox.
Here's how to enable the Primary Competitor field to allow salespeople enter a competitor for a lead.
- In an active sandbox, use Navigator to go to Configuration > Application Composer > Sales Lead > Pages.
- Add the Primary Competitor field to the Edit Lead page layout.
- Save your changes and publish the sandbox.
Key Resources
See this content:
- "Leads" chapter in the Using Sales guide
- "Competitors" chapter in the sales Implementation Reference guide
Role And Privileges
- All users who have access to leads
Use Natural Language Processing to Recommend Actions from Meeting Summary Minutes
You can enable the app to use natural language capabilities to analyze meeting minutes and suggest follow-up appointments and tasks, or to create contacts. Salespeople can accept the suggestion and take action on it, or dismiss the suggestion. This feature frees up salespeople's time and assists with day-to-day sales activities. As an administrator, you can decide which fields are analyzed and which follow-up actions are recommended.
This feature saves salespeople from having to manually perform many follow-up activities that are almost always required after a meeting with their customers. It also ensures that opportunities to pursue follow-up activities aren't missed.
Steps to Enable
Leverage Application Composer to expose and adjust page layout and attributes. To learn more about extending your application using Application Composer, visit Oracle Help Center > your apps service area of interest > Books > Configuration and Extension.
Here are the high-level steps to enable the feature:
IMPORTANT: It's recommended that you follow the detailed steps in the "Use Natural Language Processing to Recommend Actions from Meeting Summary Minutes" topic in the "CX Sales Mobile" chapter of the Implementing Sales guide.
- Set up Oracle Sales Assistant following the steps in the "Sales Assistant" chapter in the sales Implementation Reference guide. If Oracle Sales Assistant is already set up, you can skip this step.
- In Oracle Digital Assistant, create a Webhook Channel and assign it to the Sales Skill imported from the Skill store.
- Enter the Webhook URL and Secret key obtained in the previous step, into the Configure Text Analysis task.
- Create a profile option named CXM_ENABLE_RECOMMENDATION and set the profile value to Yes.
- Navigate to the CX Sales Mobile configuration tool and enable the options for recommendations in the Settings.
- Test the setup with a sample call report, or update an appointment description by entering sample meeting minutes and ensure that you see recommendations for follow-up activities in the app.
Tips And Considerations
- Since the feature uses natural language processing to identify intents and entities from meeting minutes, there may be cases where recommendations are generated by mistake, or they aren't generated when they should be. If this happens, please contact My Oracle Support and share the text that didn't work as expected, so that we can use that to train the model for natural language processing.
- This feature currently only supports text entered in English.
- Here are some sample utterances that generate recommendations:
- Examples of text that generate the create task recommendations:
- Send email with notes.
- Email Jenn the implementation plan.
- Plan is to follow up in two week to close open items in the pilot.
- Action item: Share the deck with John.
- Call Joe on Friday.
- Send quote to Blake next week.
- Send email today to Marcellus.
- Examples of text that generate the create appointment recommendation:
- Send an invite to Jessi for next week.
- Need to setup a call for the demo.
- Schedule follow up with Bake and Jason next Friday.
- Schedule follow up call on April 3 at 3pm.
- Next step is to schedule follow up meeting next Friday at 4:00 pm.
- Examples of text that generate the create task recommendations:
Key Resources
- See the "Use Natural Language Processing to Recommend Actions from Meeting Summary Minutes" topic in the "CX Sales Mobile" chapter of the Implementing Sales guide.
Role And Privileges
- Sales Administrator to enable the feature
- Sales Representatives or Sales Managers who will see recommendations on their mobile devices
Display Workspace-Based Visualizations in Home Cards and the Reports List
Enhance the level of insight available to sales representatives and managers by displaying data visualizations based on Workspace lists on home page cards and in the reports list. Tapping a segment of a parent report reveals a list of records associated with the respective segment. Selecting a list item reveals its associated record.
Help sellers and managers turn insight to focused action on new leads, aging tasks, key opportunities, and other important items in Oracle Sales.
Watch the below videos for more information:
Steps to Enable
Leverage Application Composer to expose and adjust page layout and attributes. To learn more about extending your application using Application Composer, visit Oracle Help Center > your apps service area of interest > Books > Configuration and Extension.
- In Workspace, create the search that will be used to find and filter the data for the visualization (if that search doesn't already exist).
- While outside of a sandbox, navigate to Application Composer > Visualization Configuration.
- Click Add.
- Under Source Type, select Adaptive Search.
- Under Source, search for and select the preferred saved search.
- Choose dimensions and other preferences for the visualization.
- In the Drill Down section, change Action from None to Link.
- Set Status to Active and click Save.
- Return to the Oracle Sales home page and create or enter a sandbox.
- Add visualizations to the Reports List in the same way as other visualizations are added.
- Add visualizations to the Mobile home page by following these steps:
- Navigate to the Cards section of the mobile configuration tool in Application Composer and either select a custom layout, or clone a standard layout.
- Scroll to the bottom of the layout and select + Add Custom Card.
- Select the Visualizations tab.
- Select and add the preferred visualization.
Tips And Considerations
-
To configure and deliver search-based visualizations, the saved search must be made visible to the roles of the user performing configurations and to the users who will consume the visualizations.
- The Reports List supports both OTBI and search-based visualizations. The home page supports only search-based visualizations to keep the experience as performant as possible.
-
Attribute dimensions for search-based visualizations are determined by what is made available for Group By under Manage Adaptive Search in Setup and Maintenance.
-
Search-based visualizations use Count of results as their measure dimensions.
Key Resources
- See the "Display Workspace-Based Visualizations in Home Cards and the Reports List" topic in the "CX Sales Mobile" chapter in the Implementing Sales guide for more information.
Role And Privileges
- Sales Administrator
- Sales Manager
- Sales Representative
Enable Record-Based Visualizations that Drill-Down to OTBI Reports
Embed visualizations related to a record in its detail page, such as Account 360 reports. Utilize any page value that matches a report prompt, such as PartyID, to ensure relevance of insights. Enhance granularity of insights by enabling drill-down to Oracle Transactional Business Intelligence (OTBI) reports from visualizations that appear in both record detail pages and in the reports list.
Enable sales representatives to improve outcomes of customer interactions by having customer and deal 360 views available in any setting.
- Demo Video: Create and Add Record-Based Drill-Down Reports
- Demo Video: Record-Based Report Experience
Steps to Enable
Leverage Application Composer to expose and adjust page layout and attributes. To learn more about extending your application using Application Composer, visit Oracle Help Center > your apps service area of interest > Books > Configuration and Extension.
- Navigate to Oracle Transactional Business Intelligence.
- Create a top-level report that the record-based visualization will reference.
- Optional: Add a prompted filter. For example, the organization might want to see reports on the Account detail page that only show information related to the displayed account. To do this, add the Customer Row ID column to the report, and enable it as a filter where Operator is set to is prompted. This will allow the Account Party ID to be passed to the report as a filter value.
- Save the top-level report.
- Without navigating away from the top-level report, click Save As, and change the name to represent the drill-down report.
- Add additional columns to the report table, as needed, to provide sales users with more granular insights.
- Add additional prompts that represent the fields that delineate the elements of the top-level report. For example, if the top-level report will be visualized as a bar graph where the X-axis is Enterprise Quarter and the series is Product Group, add both of these as filters where the Operator equals is prompted.
- Save the drill-down report once all your changes are made.
- Outside of a sandbox, navigate to Application Composer > Visualization Configuration.
- Select Add.
- Under Source Type, select OTBI Analysis. Under Source, find and select the top-level report that you have just created.
- Select Visualization Type and select details as needed.
- For Drill Down, change Action from None to Link.
- Search for and select the drill-down report you just created.
- Set the Status to Active and then save.
- Enter a sandbox and navigate to the mobile configuration tool in Application Composer.
- Select the object's Summary page layout where the report will be added.
- Duplicate the standard layout or choose a custom layout.
- Scroll to the Reports section of the layout preview and select + Select and Re-Order Reports.
- Select + Add Report.
- Choose the top-level visualization created above.
- Ensure this report is selected on the page preview and click Report Filters.
- Select the prompted field from the report that will receive a filter value from the page. For the example above, this would be the Customer Row ID field.
- Select the object field whose value will be passed to the report. For the example above, this would be the PartyId field.
- Click Save.
Tips And Considerations
- Only OTBI analysis-based visualizations can be added to record summary pages. Adaptive Search-based visualizations can't be added to these pages.
- Filter prompts are added in OTBI to ensure that insights displayed in the visualization are related to the record shown on the summary page. In cases where this filtering is not necessary, filter prompts on top-level reports don't need to be created.
- Drill-down reports are created for cases when a user wants more granular insights based on what was gleaned from the top-level report. In cases where drill down isn't necessary, skip these steps in OTBI and in Visualization Configuration.
Key Resources
- See the "Enable Record-Based Visualizations that Drill-Down to OTBI Reports" topic in the "CX Sales Mobile" chapter in the Implementing Sales guide for more information.
Role And Privileges
- Sales Administrator
Report on Total Payment Amount in Home Currency Using the New Column in the Paysheet Subject Area
You can now report on total payment amount in your home currency using the new column added to the subject area, Incentive Compensation - Paysheet Summary Real Time. This new column lets you report on total payment amounts in your participant home currency. The new column is called Total Amount in Home Currency.
This feature provides:
- Simplified reporting for multi-currency payments
- Easier troubleshooting of payments
Steps to Enable
You don't need to do anything to enable this feature.
Key Resources
- See the Incentive Compensation - Paysheet Summary Real Time section in the Oracle Fusion Cloud Customer Experience: Subject Areas for Transactional Business Intelligence in Sales and B2B Service guide.
Role And Privileges
- Compensation Administrator
- Compensation Manager
- Compensation Analyst
Application Usage Insights Redesigned for Enhanced User Experience
The Application Usage Insights interface is redesigned for a new and modern user experience. All visualizations are now available from a single page providing easier, faster, and more intuitive access to usage insights. A single click expands each visualization with quick facts and more detail. You still get all the great features from the previous versions, such as filters, drill-downs, and access to custom objects, but with easier access.
The new user experience delivers easier access to more complete user adoption insight targeted to each specific user.
Steps to Enable
With this enhancement, here's how you add custom objects as selectable in the Objects view:
- Enable the ORA_ZCA_APPLICATION_USAGE_INSIGHTS_MANAGE_CUSTOM_OBJECTS privilege for the Sales Administrator.
- Navigate to the Objects view, and select the plus (+) icon next to the Object Name drop-down list.
- Select the custom object to add from the Custom Objects Record List, and press OK.
- The custom object will now appear in the Object Name drop-down list.
Tips And Considerations
As an end user:
- Press the Zoom icon on the upper right of each card to expand visualization and see Quick Facts.
- Press the filter icon on the upper left of the Application Usage Insights page to display page filtering and drill-down options.
Key Resources
- See the "Application Usage Insights" section of the "Application Adoption and Usage Reporting" chapter in the Creating and Administering Analytics guide.
Role And Privileges
- Sales Administrator
- Sales Manager
Click History Logging and Application Usage Insights Charts Disabled by Default
Click history logging is disabled by default beginning in Update 22D and must be enabled for use. This setup step impacts click history reporting in Application Usage Insights and for the CRM – CRM Click History subject area in Oracle Transactional Business Intelligence (OTBI). All charts within Application Usage Insights are also disabled by default beginning in Update 22D. Automatically disabling these items delivers improved system performance and efficiency. If you want to use click history reporting or Application Usage Insights you can enable them by changing the ORA_ZCA_CH_DISABLE profile option value to No. If you've already been using these features, you'll find them disabled in Update 22D and must re-enable them, as a one-time step.
Disabling these capabilities by default improves system performance and overall efficiency, particularly for customers with larger data volumes. When disabled, background processing on data isn't performed for customers not using these capabilities. Background processing is only performed for customers using click history reporting or Application Usage Insights.
Steps to Enable
Change the ORA_ZCA_CH_DISABLE profile option value from Yes to No. This setting enables click history logging and all charts in Application Usage Insights.
Tips And Considerations
- You must enable click history logging and Application Usage Insights as a one-time step beginning in Update 22D. Afterwards, the solution will be enabled automatically when upgrading to future releases. If you were already using these solutions prior to Update 22D, you must re-enable them in Update 22D. If you're not yet using them, you must enable them for the first time in Update 22D if you want to use them.
- For some pods, click history data for the full 90-day maximum lookback period won't exist initially, once you've re-enabled them. Click history data will be collected and incremented daily over time until the full 90 day lookback is achieved.
Key Resources
- See the "Application Usage Insights" section in the "Application Adoption and Usage Reporting" chapter in the Creating and Administering Analytics guide.
Role And Privileges
- Sales Administrator
- Sales Manager
Retain Subscription Number During Renewal
Use the Renewed Subscription Number and Number Separator attributes when you create or edit a renewal rules template, to create the subscription number of the renewed subscription.
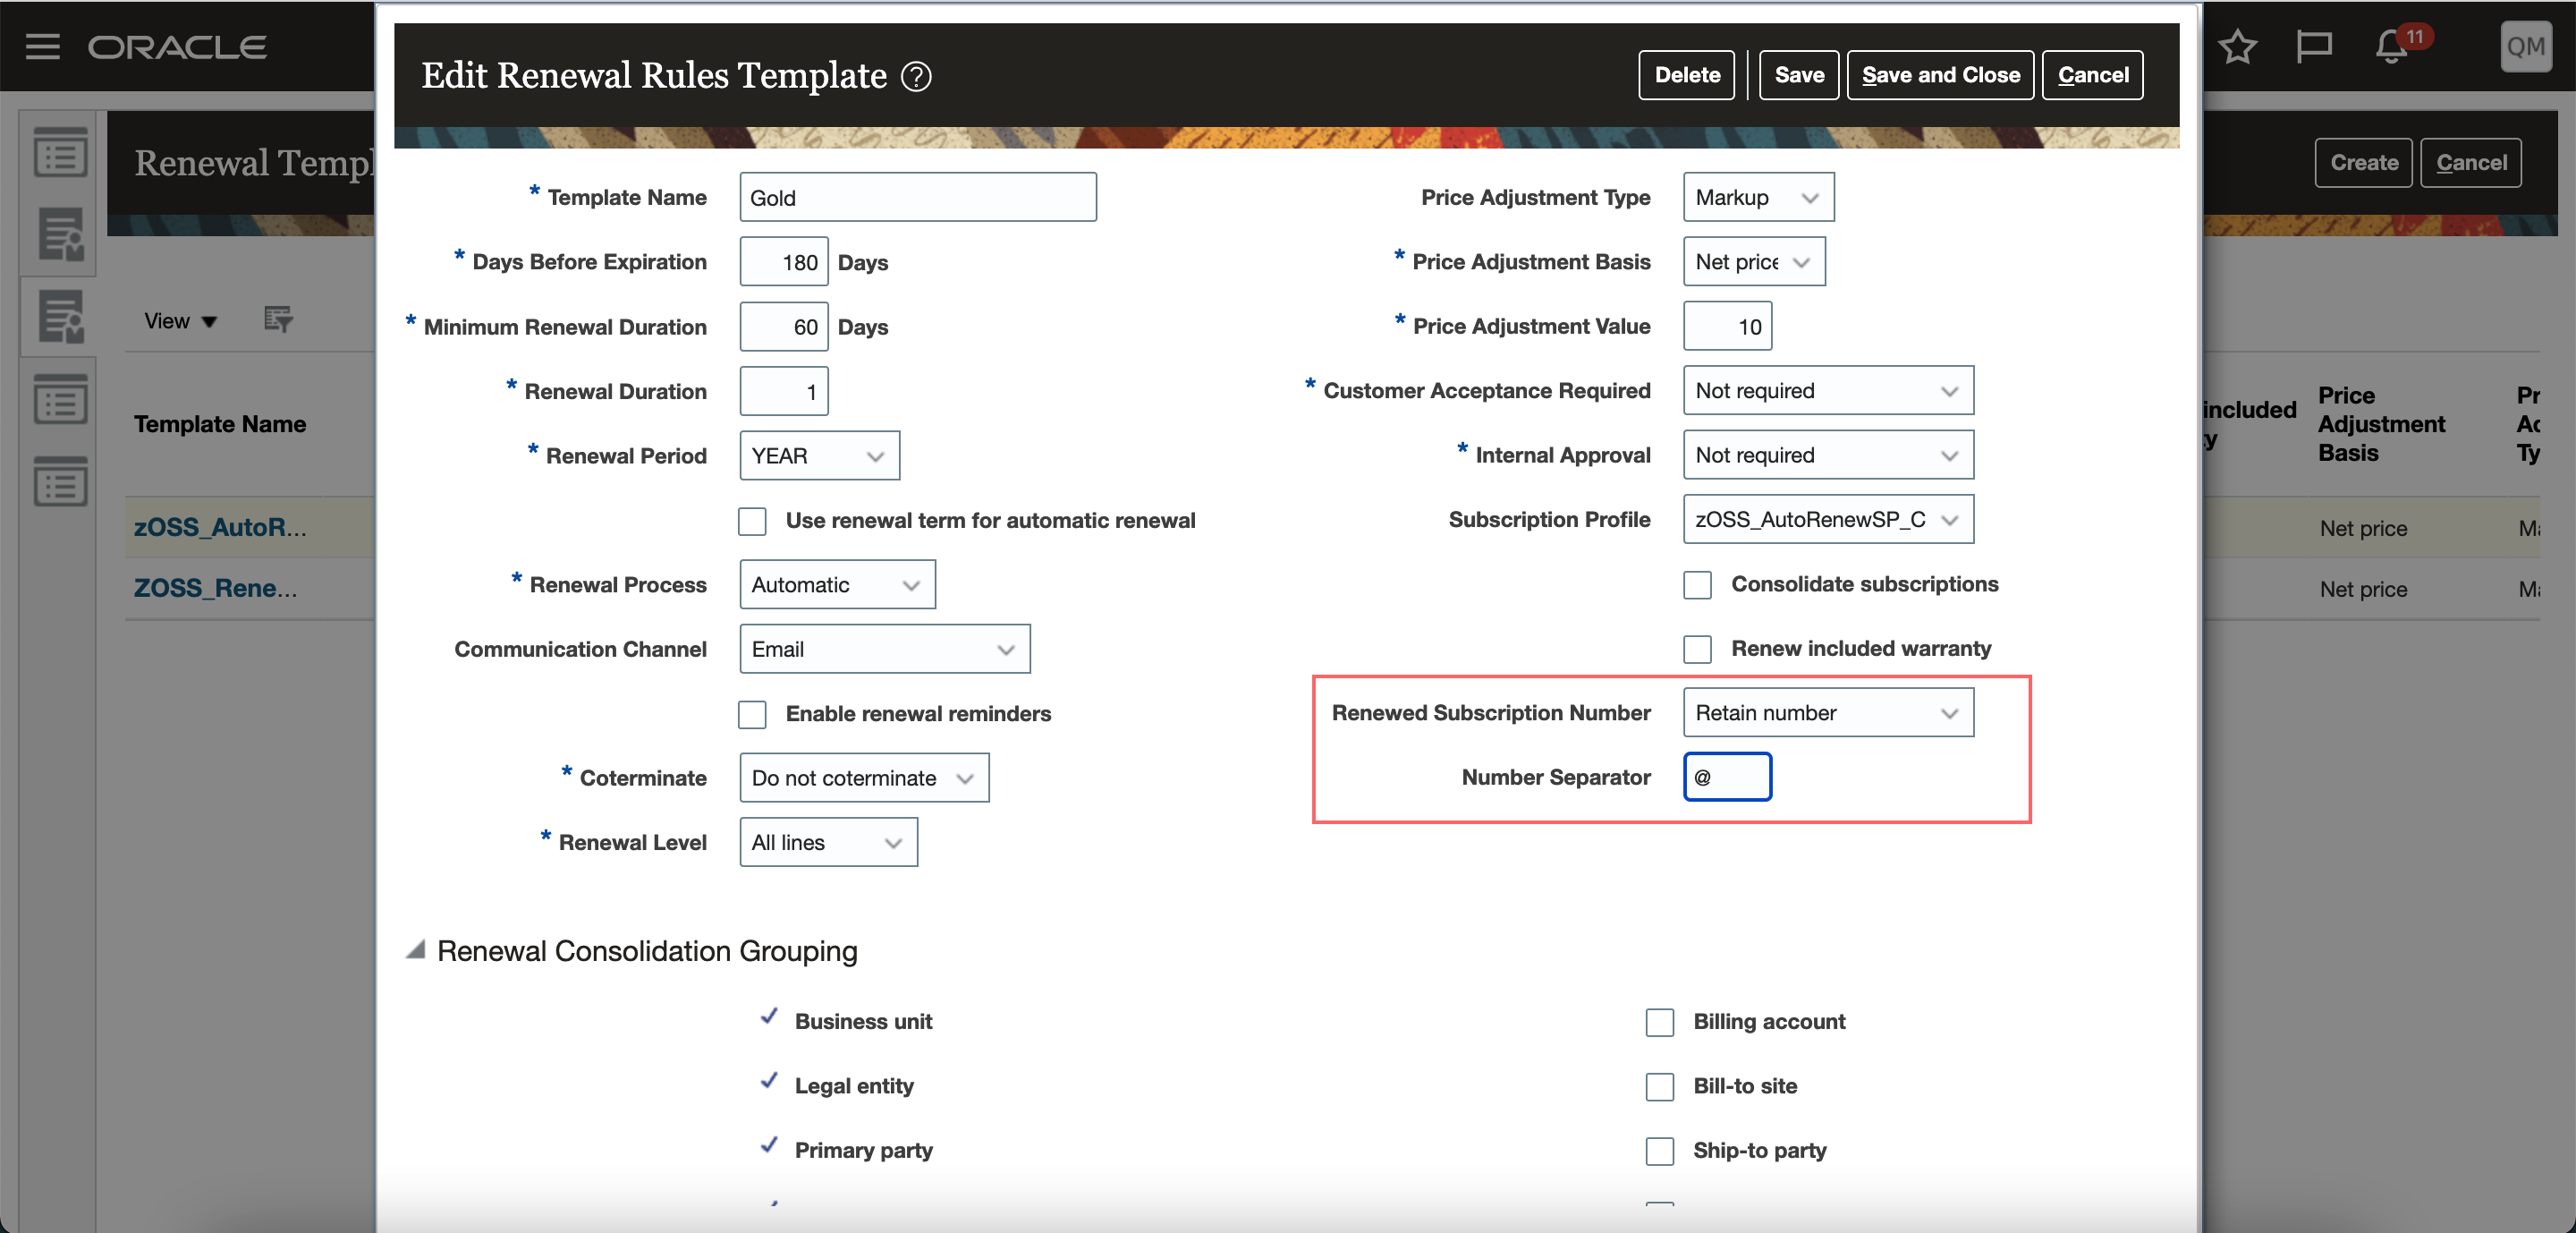
Renewal Template
The new subscription number includes the combination of the retained subscription number, the number separator value, and a running number sequence.
Steps to Enable
You don't need to do anything to enable this feature.
Edit Standard Coverage of Subscriptions with Included Warranty
Convert a standard coverage template from the Coverage tab of a subscription with included warranty. When you edit a standard coverage template, the application converts it into a nonstandard template.
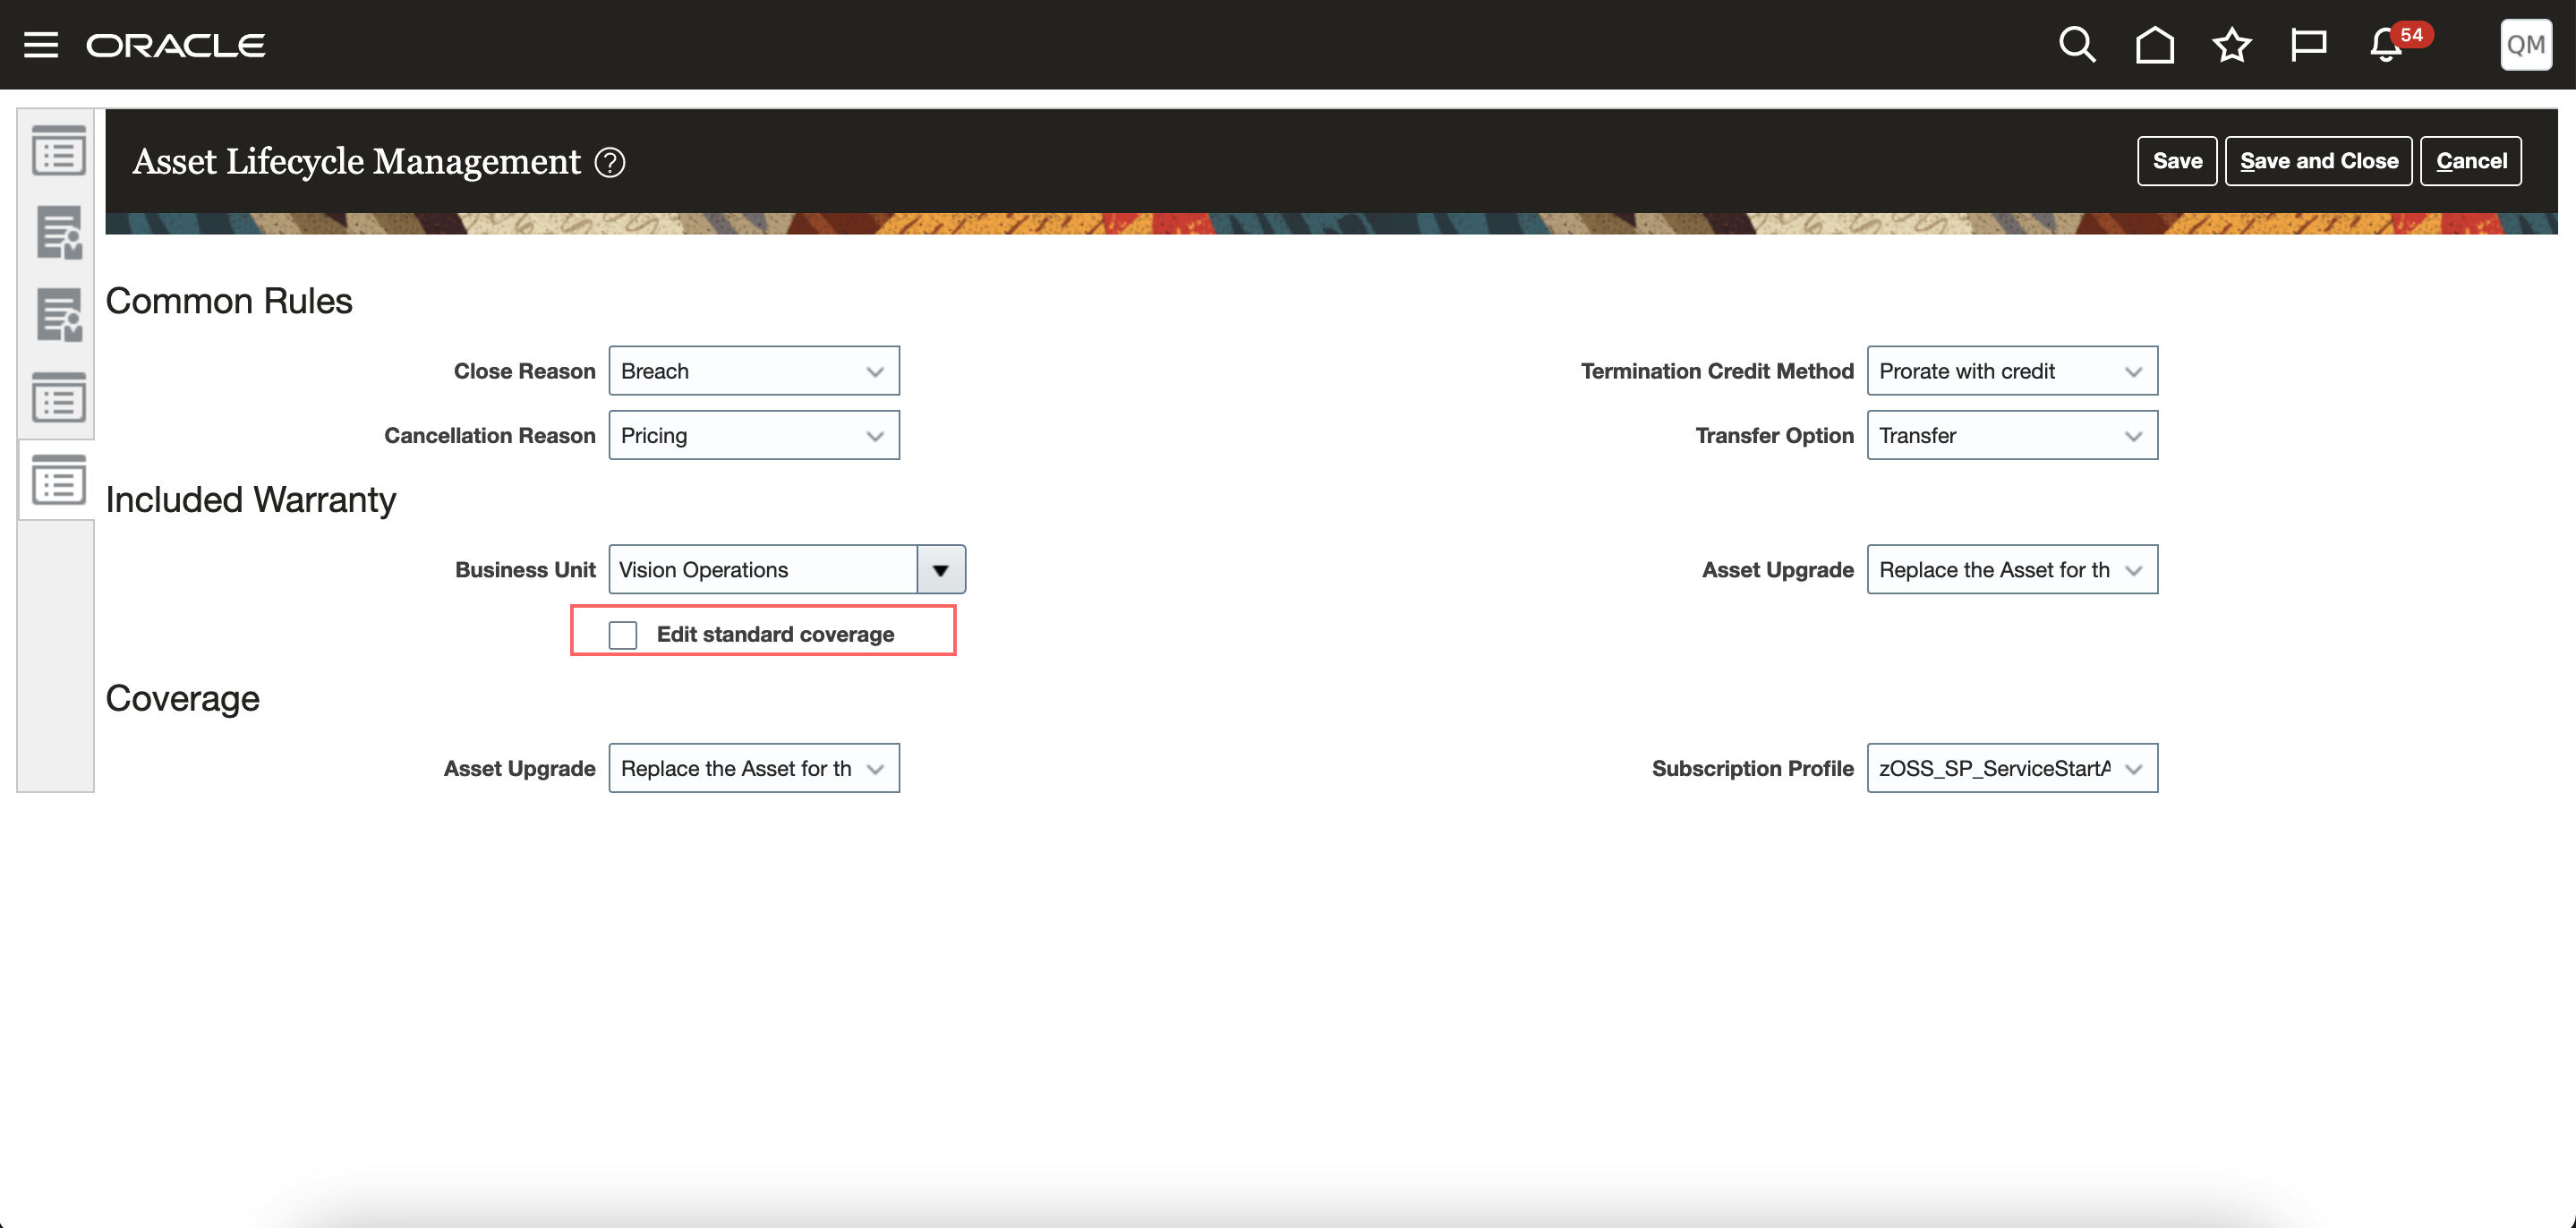
Asset Lifecycle Management
You can now customize the standard coverage of a subscription with included warranty. You can modify customer specific entitlements.
Steps to Enable
You don't need to do anything to enable this feature.
Use Milestones to Bill Subscriptions and Recognize Revenue
Use mutually agreed upon milestones to bill your customers and recognize revenue based on milestones prescribed by your finance team. You can define milestones according to your business needs while configuring subscriptions. This lets you associate a milestone template with a one-time charge for a subscription product, which is billed when you and your customer both agree that the milestone has been reached. You can define revenue recognition milestones and capture their completion dates when the milestones are reached. You can track these milestones through the lifecycle of a subscription using Import Management, REST APIs, or from the UI.
The milestones are defined using a Billing and Revenue Recognition Milestone Template under Subscription configuration.
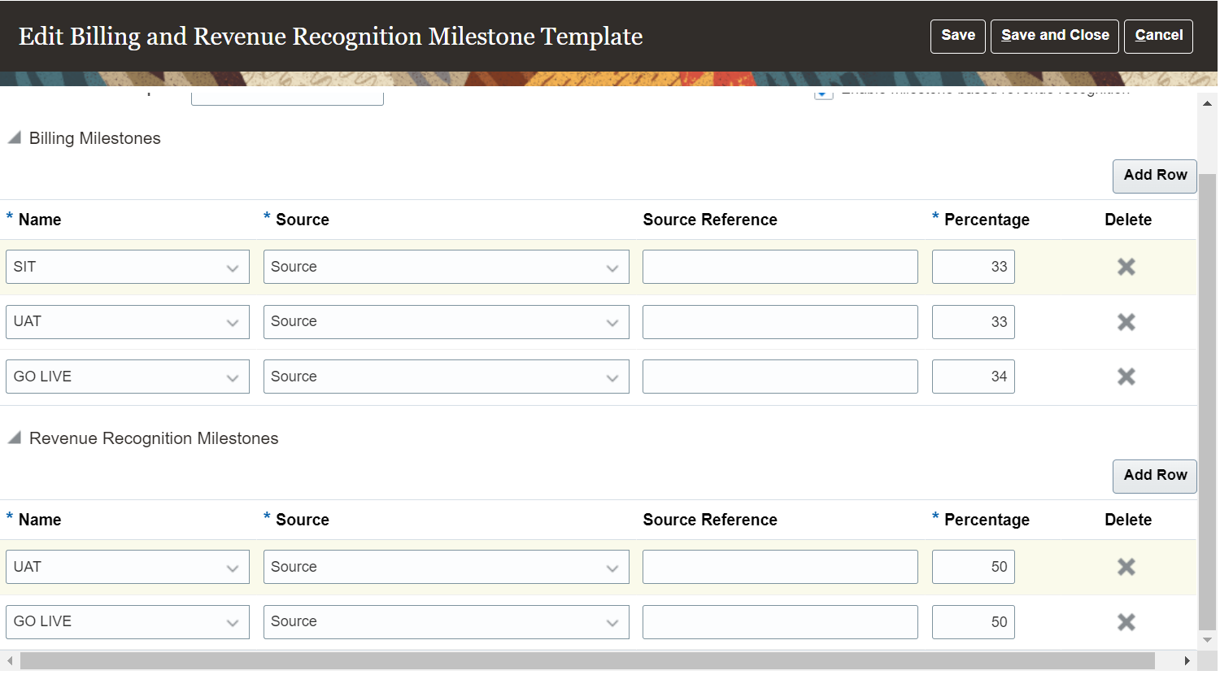
Billing and Revenue Recognition Milestone Template
In a subscription, the template be can selected for a one-time charge. The template can be specific to the subscription, thereby creating a template instance.
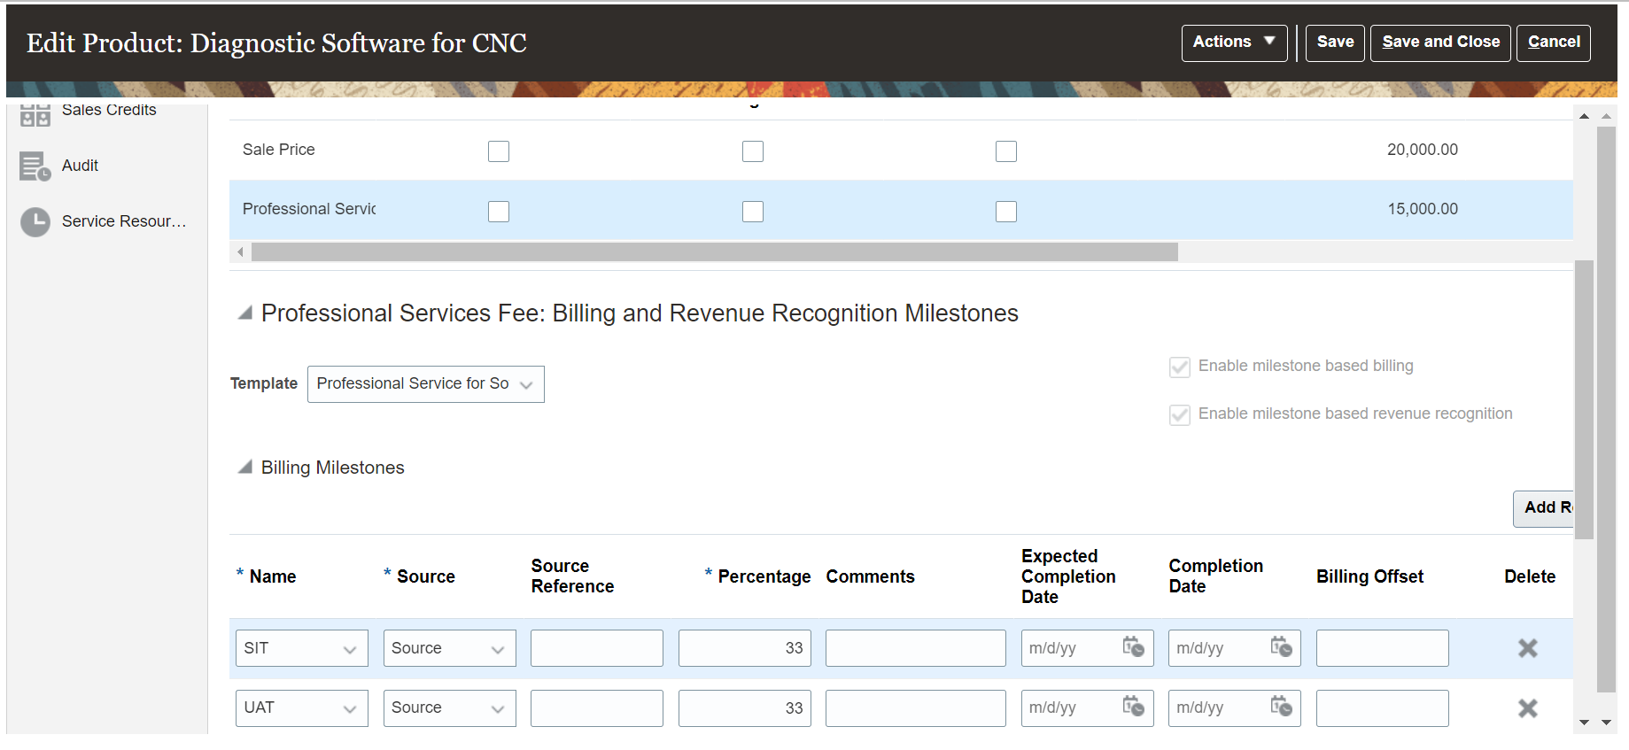
Editing a Template in a Subscription
You can change the percentages and milestones for both billing and revenue recognition. On completion of a milestone, the Completion Date can be populated to set the Interface Date for billing. The Completion Date for Revenue milestone is considered as the satisfaction event date, since each milestone is a satisfaction event in Oracle Revenue Management Cloud.
This feature lets you:
- Bill customers based on completion of milestones, especially for professional services and projects, without the overhead of setting up a project-based billing application.
- Recognize revenue based on milestones identified by the finance department in your organization.
- Define milestone templates according to your business needs, and tailor them for specific subscriptions.
Steps to Enable
You don't need to do anything to enable this feature.
Tips And Considerations
- Identify all of your billing and revenue recognition milestones and create them in the lookup type, Name of the Milestone, under Setup and Maintenance > Manage Standard Lookups.
- Identify all of your billing and revenue recognition milestone sources and create them in the lookup type, Source of the Milestone, under Setup and Maintenance > Manage Standard Lookups.
Select Charge Adjustment Reason from a List
Capture a reason for a charge adjustment from a finite list of options.
With the reason description, it's not possible to summarize why the charge adjustments were given. Capturing a coded reason helps with reporting and analysis.
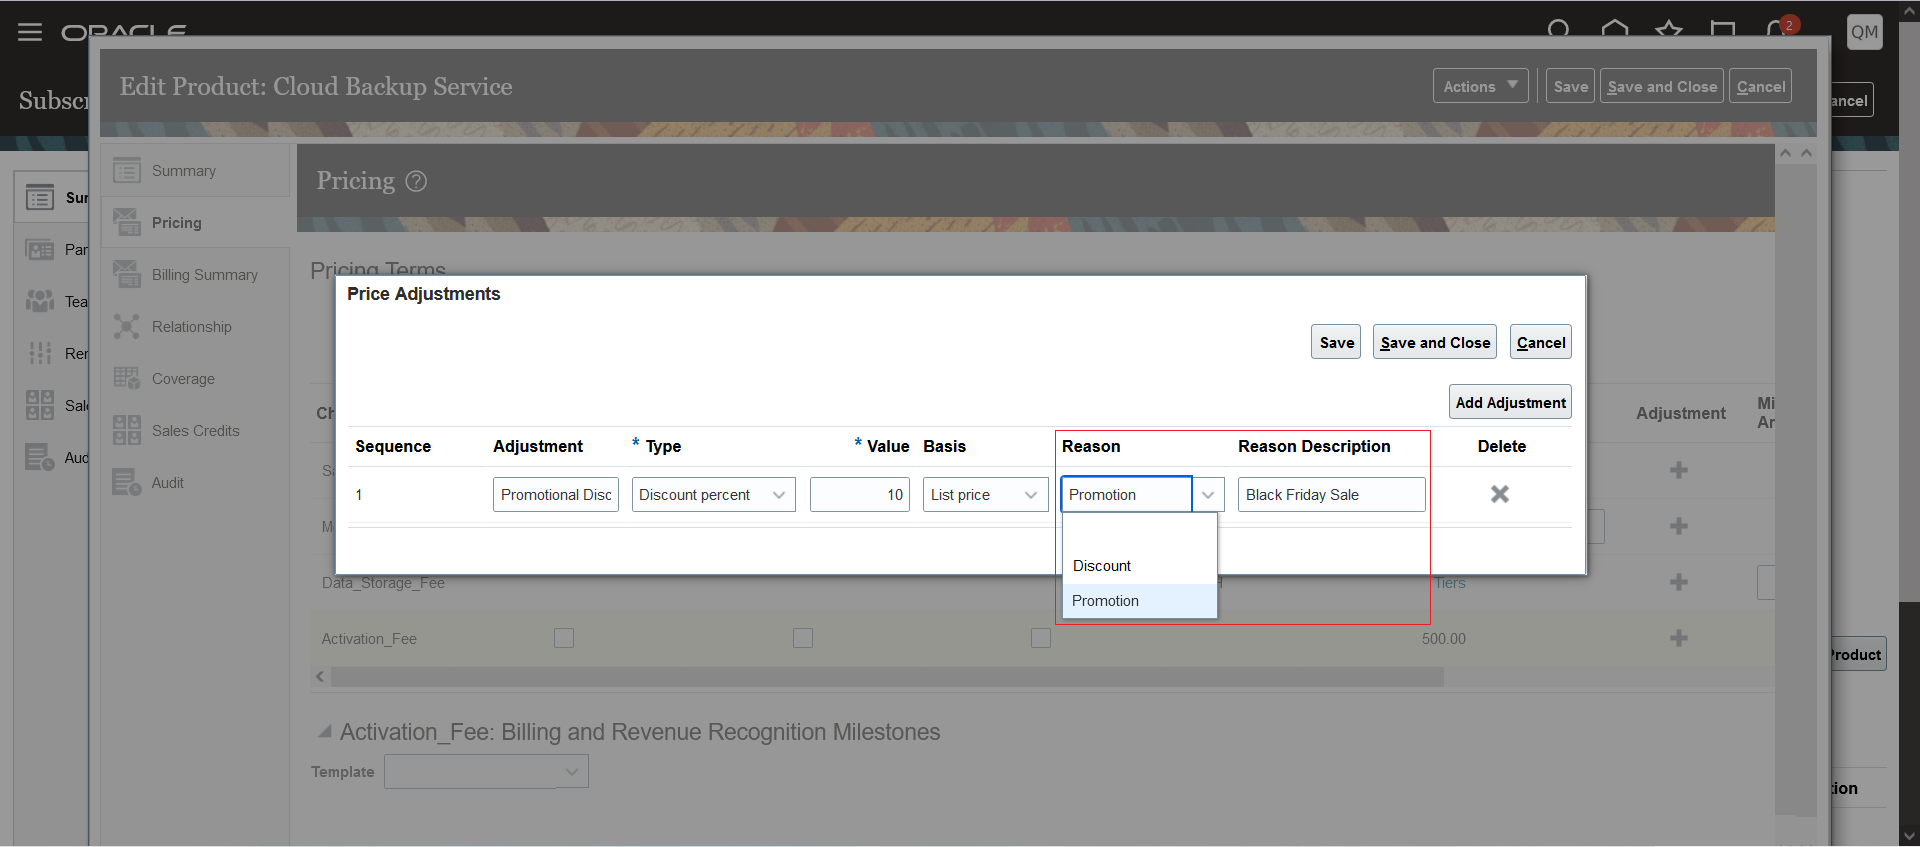
Coded Adjustment Reason
Capturing a coded reason helps with the reporting and analysis.
Steps to Enable
You don't need to do anything to enable this feature.
Add Custom Subscription Validations
Add custom subscription validations that cater to your individual business needs using the object functions in Application Composer.
For example, you could create validations that specify:
- The application enables a custom field if the product is x
- A line can't be pending activation if its Bill Immediately is enabled
This enhancement gives you the flexibility to create and use custom subscription validations.
Steps to Enable
Leverage Application Composer to expose and adjust page layout and attributes. To learn more about extending your application using Application Composer, visit Oracle Help Center > your apps service area of interest > Books > Configuration and Extension.
Here's how to create custom subscription validations:
- From the Application Composer, pick the Subscriptions object and create an object function with the name customSubscriptionValidations.
- Write Groovy scripts for each of the custom validations intended. For these custom validations, use the addCustomValidationResults or addBulkCustomValidationResults function, depending upon the volume of the data considered for validation.
- Invoke the custom validations within the object function customSubscriptionValidations.
Capture Reason Description for Cancel and Close
Capture a reason description that explains why a subscription, a subscription product, or a covered level is being closed or cancelled. This additional description can be useful for future reviews.
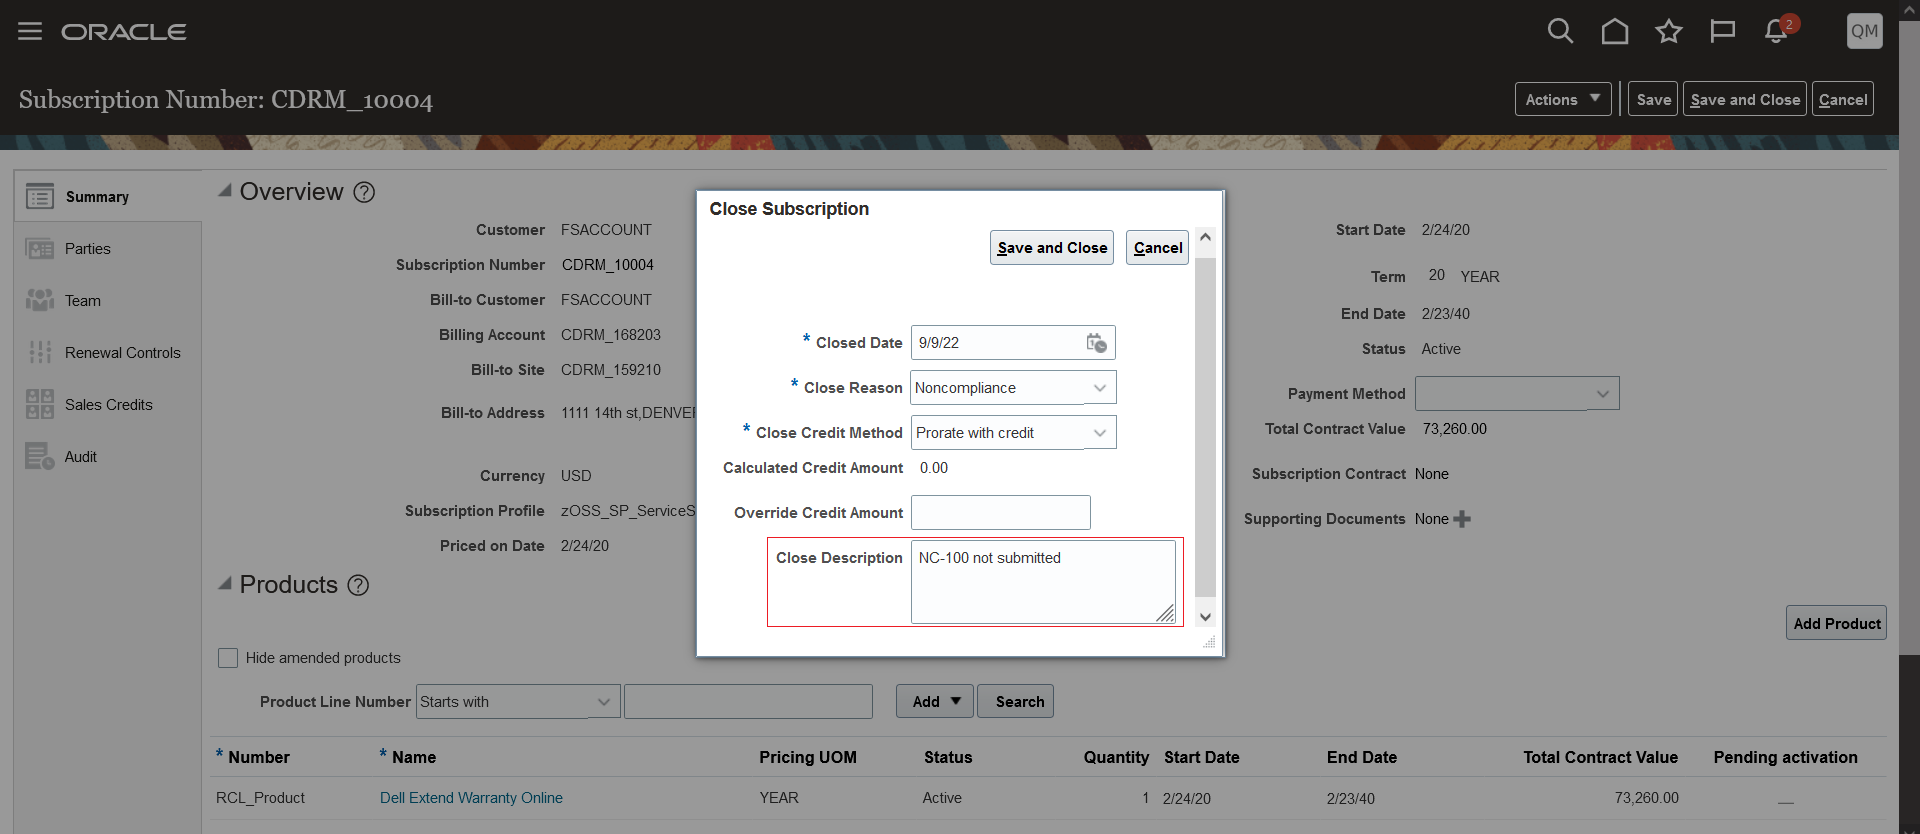
Close Subscription
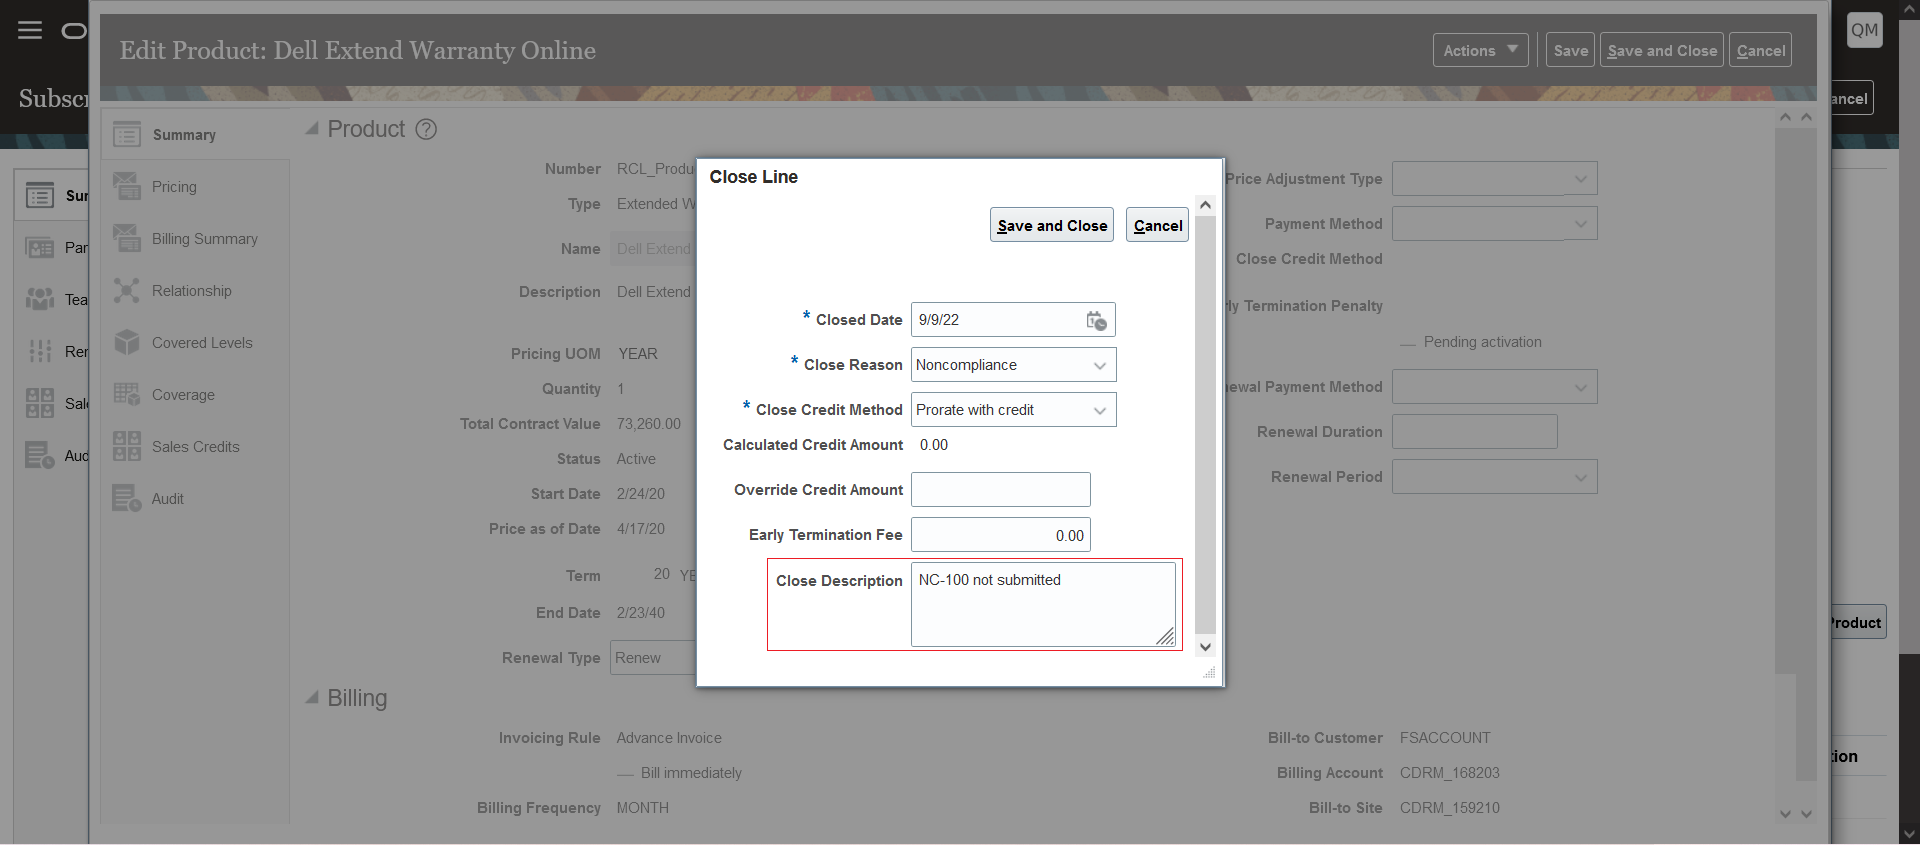
Close Product

Close Covered Level
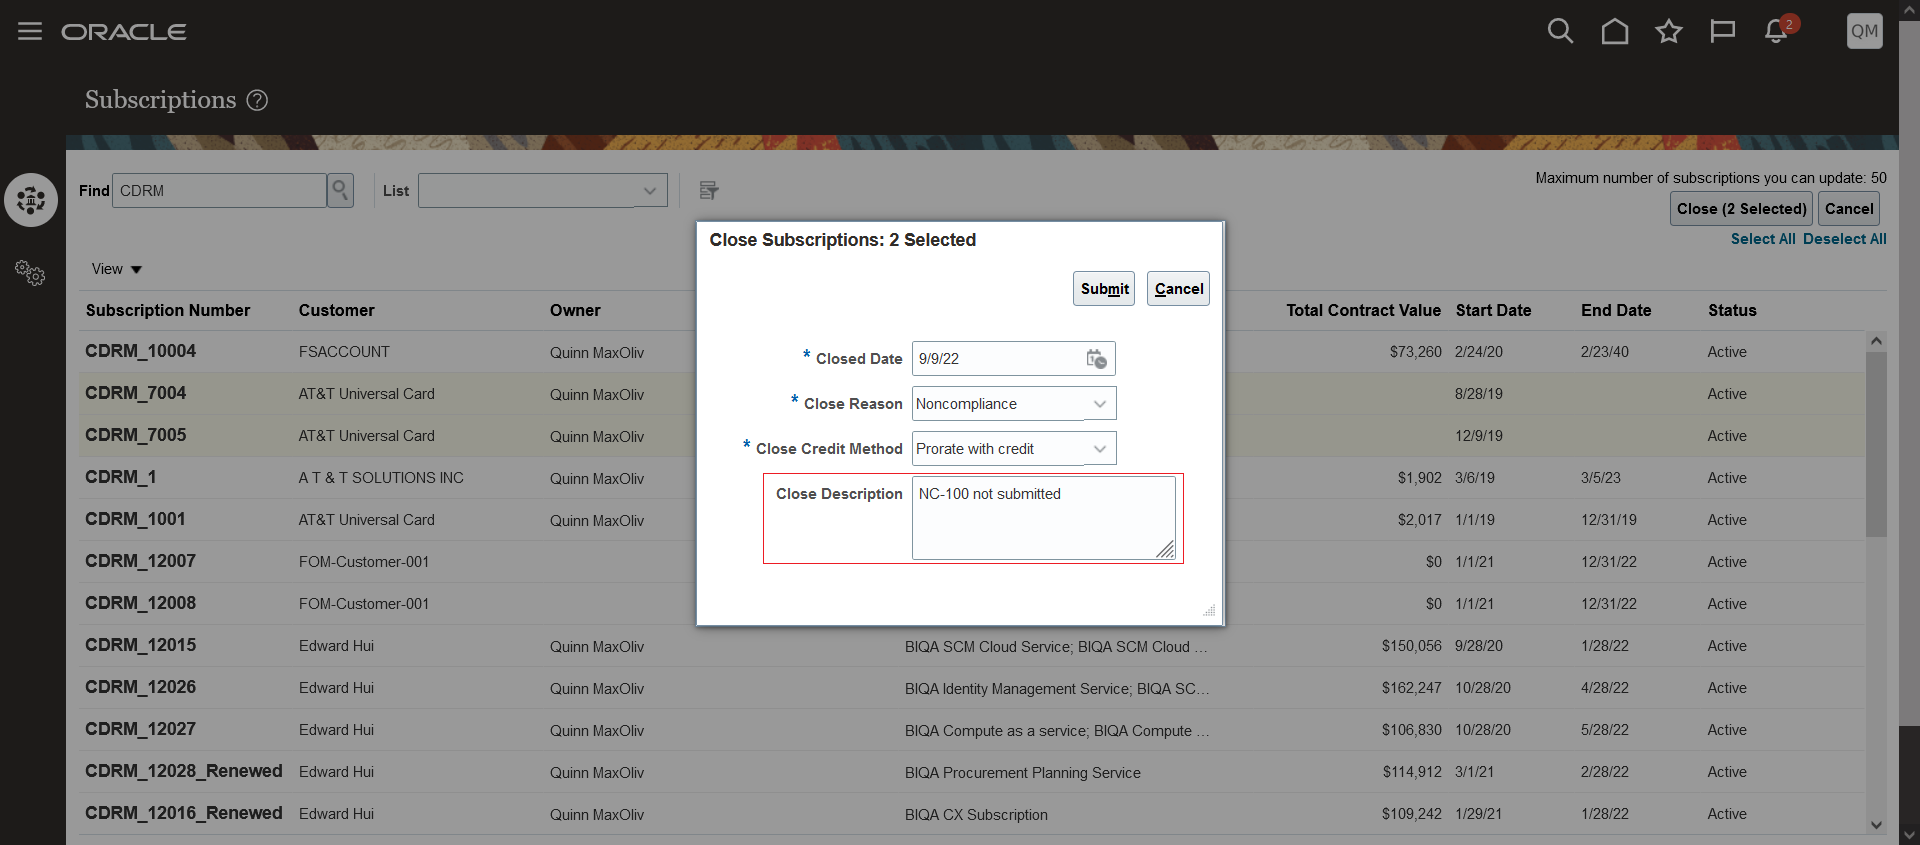
Mass Update - Close
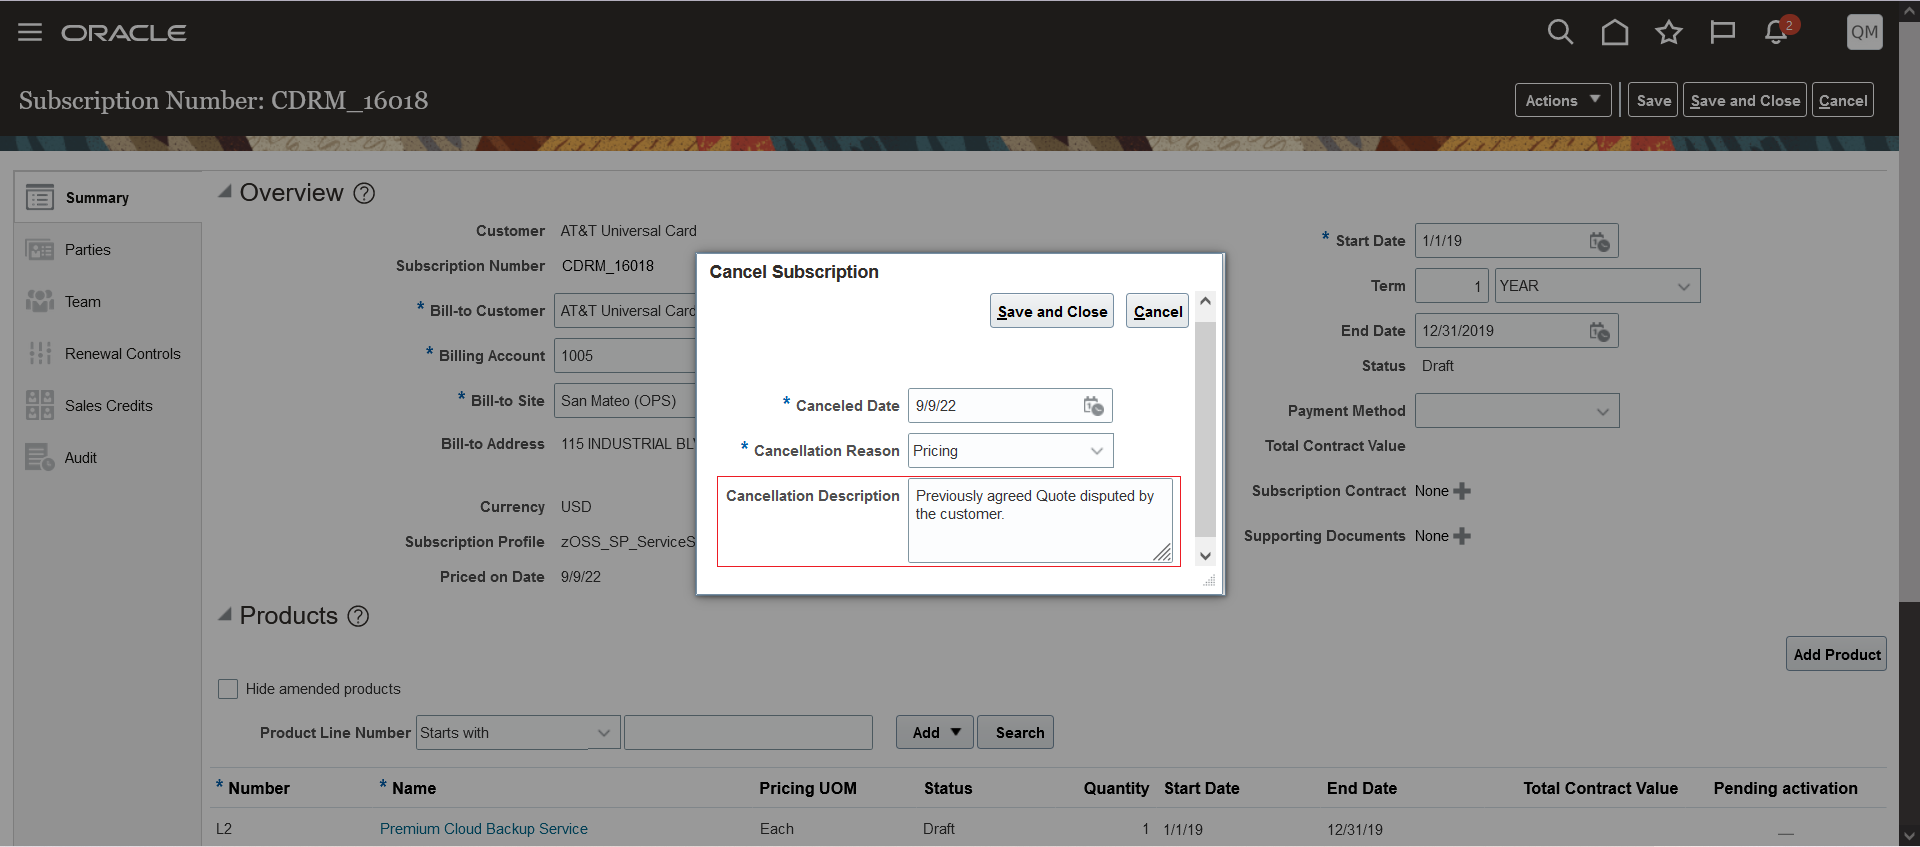
Cancel Subscription

Cancel Product
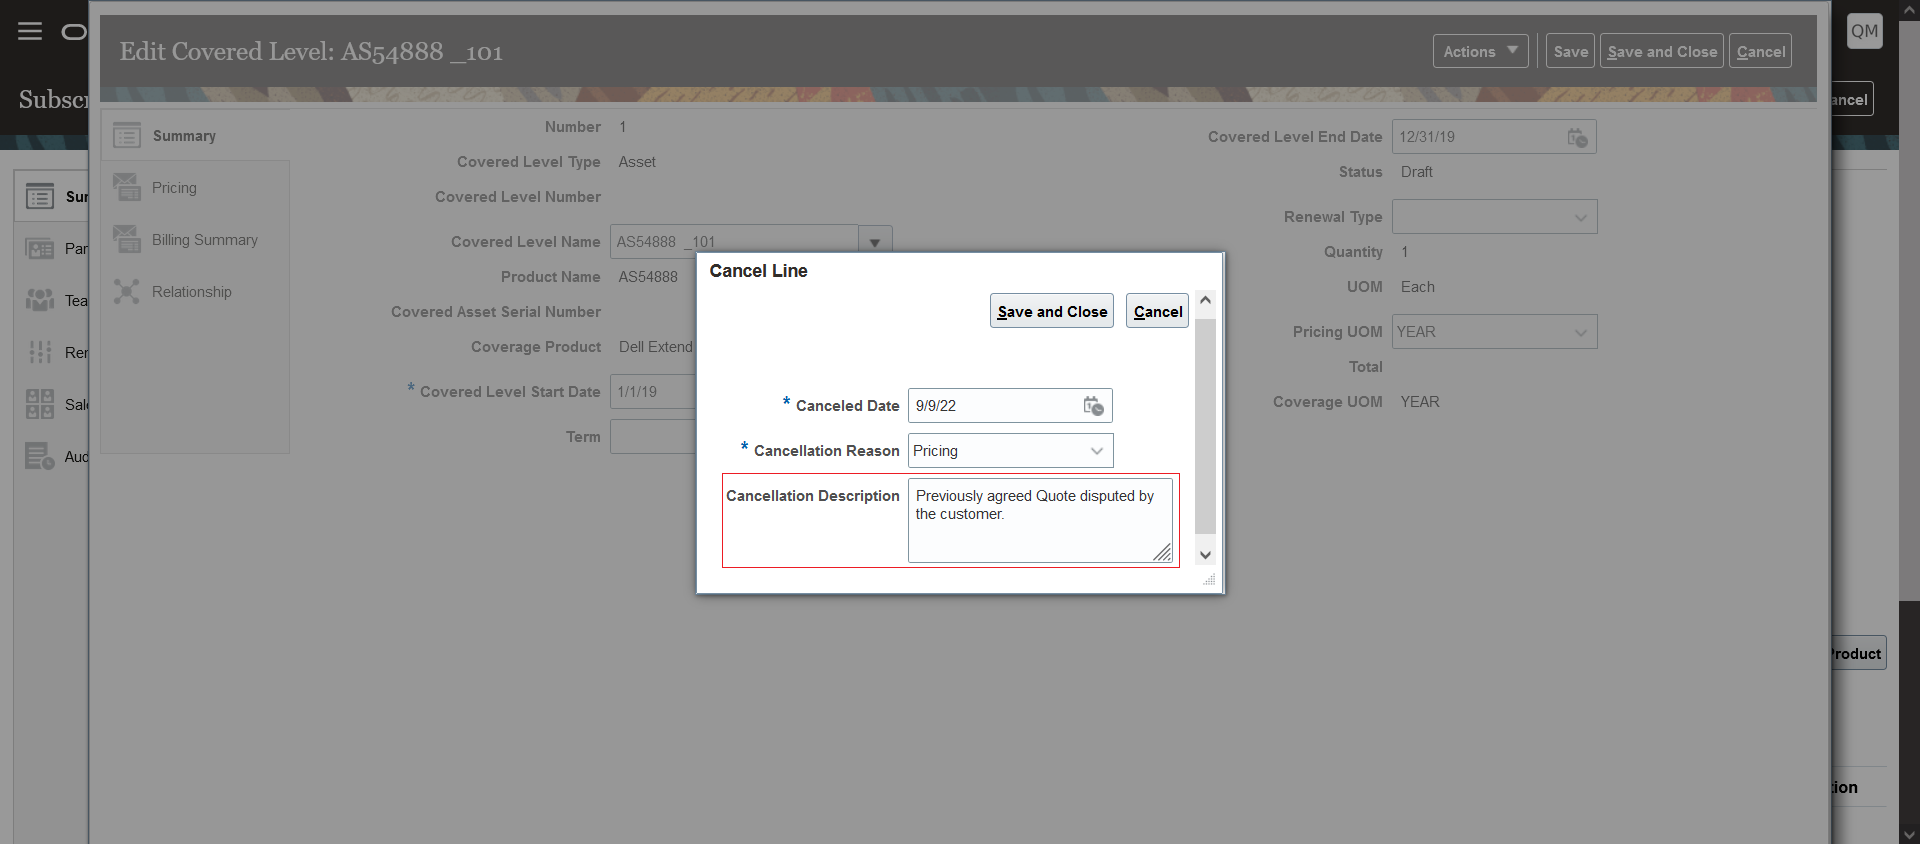
Cancel Covered Level
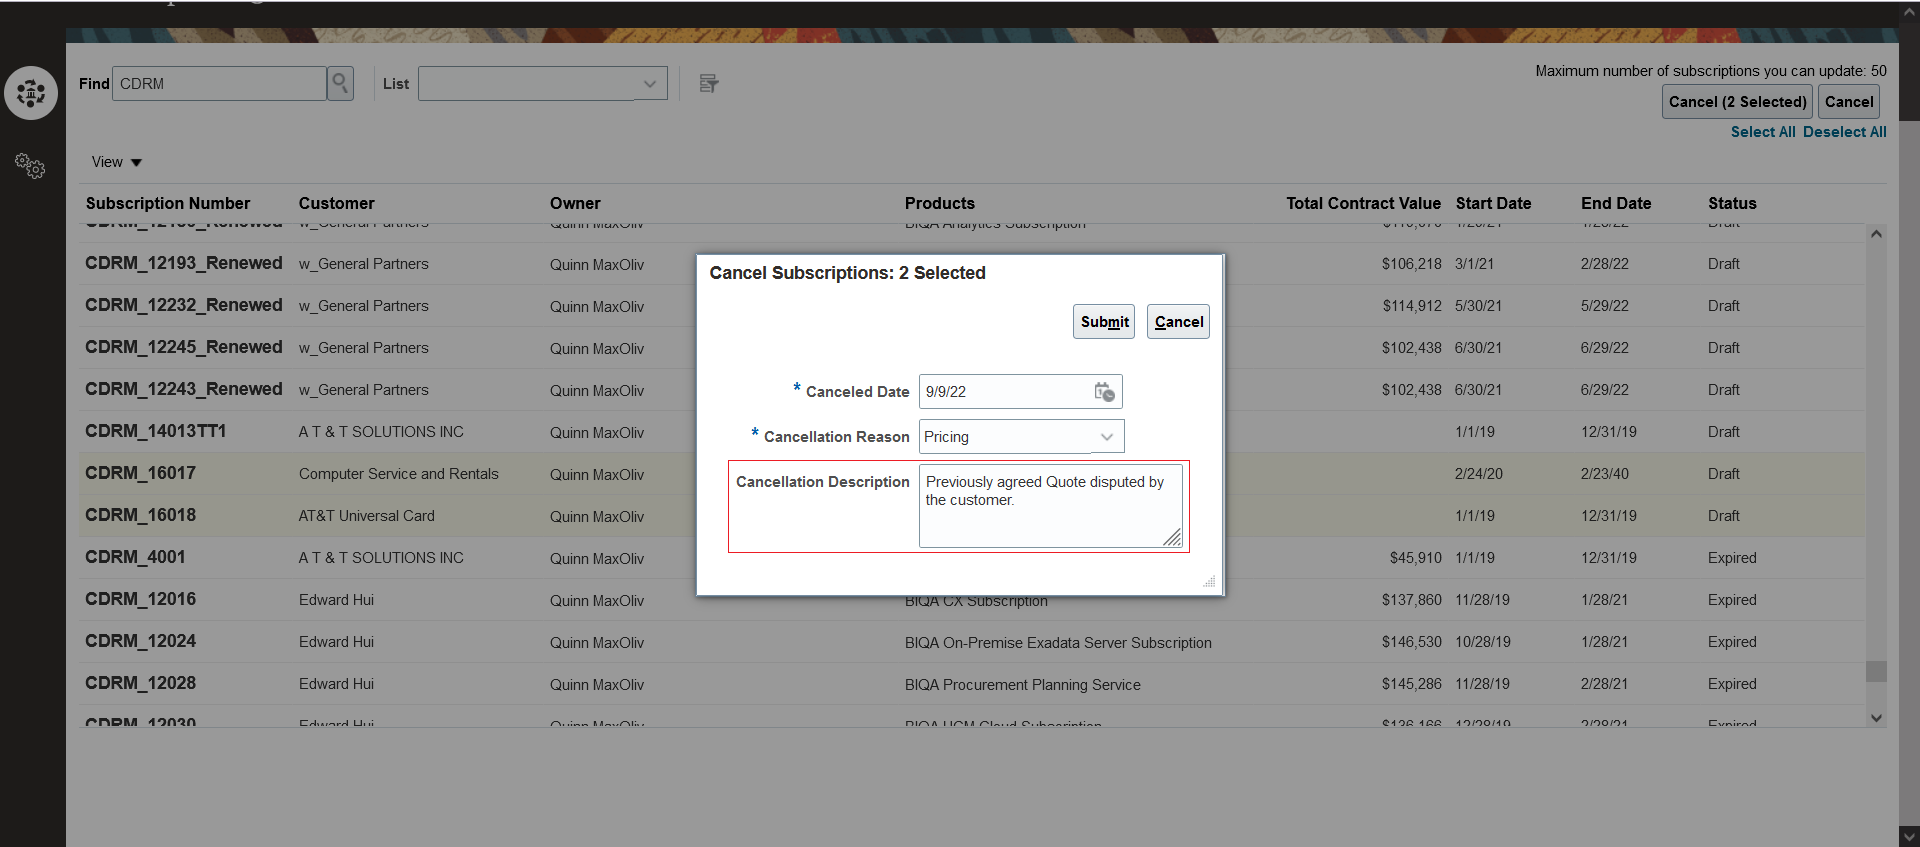
Mass Update - Cancel
This enhancement lets you enter detailed justification or notes for why you're canceling or closing a subscription, a subscription product, or a covered level.
Steps to Enable
You don't need to do anything to enable this feature.
Apply Price Adjustments to Multiple Subscriptions
Apply price adjustments to recurring, one-time, or usage charges for multiple subscriptions. Additionally, you can also specify subscription products that should be included or excluded from the update. The price adjustments can be performed on subscriptions in Draft and Active status. All the adjustments on Active subscriptions are considered as subscription amendments. Any price adjustments applied will also be applicable for the covered levels in case of coverage subscription products. All changes are recorded for audit reporting.
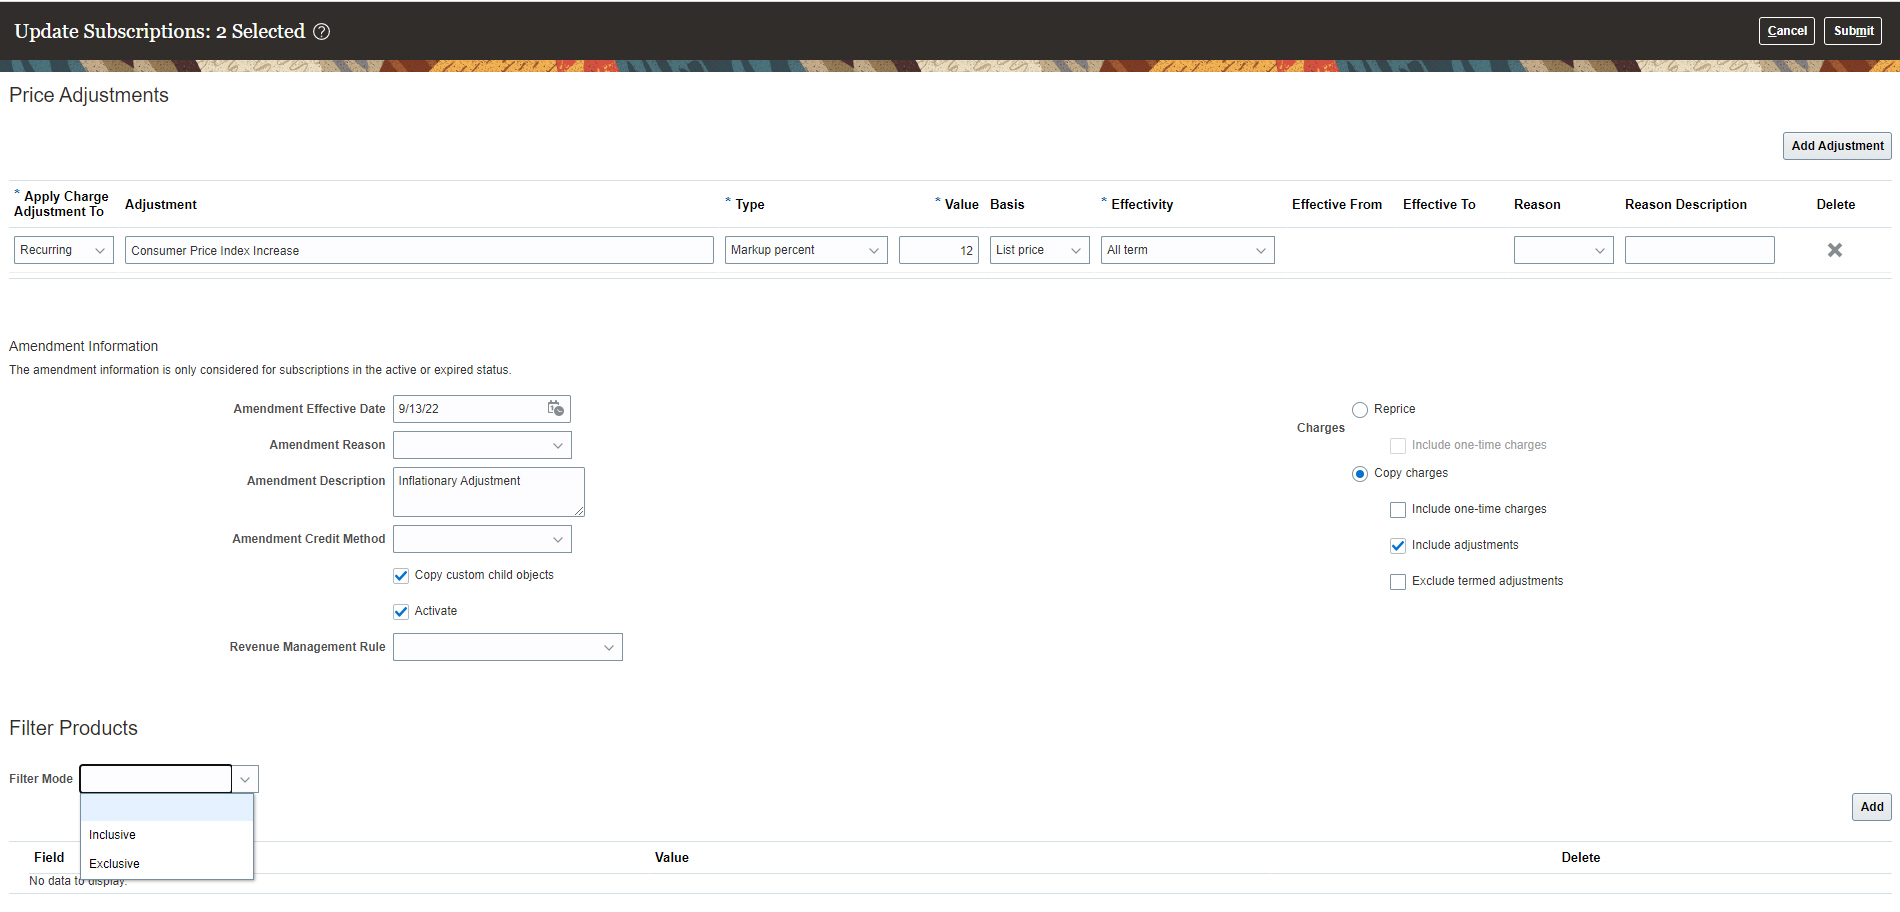
Mass Price Change
It is common that subscription prices are periodically adjusted due to inflation, deflation or consumer price index changes. You can save time by using the feature to mass change prices across multiple subscription instead of individually amending every subscription.
Steps to Enable
You don't need to do anything to enable this feature.
Tips And Considerations
- Ensure that you choose the right conditions so that you get the correct of subscriptions to be updated.
-
Charge adjustments are not applied to one-time charge if it has a Milestone Billing template.
-
Filter conditions of same type are matched using OR operator.
-
Filter conditions using different types are matched using AND operator.
Retrieve Additional Credit Card Details
You can retrieve information such as card holder name, expiration date, and card billing address about the credit card used as the payment method for a subscription. You can also use the Add to Billing Account field in REST to add a new credit card as a payment instrument for the billing account of a product instead of the billing site.
Currently, all credit card records captured during the subscription ordering process are always created as a payment method at the customer site level. Using this feature, you can choose to create the customer payment method either at the customer account level or the customer account site level.
Steps to Enable
You don't need to do anything to enable this feature.
Support Purged Worker Sync Using the Maintain Party and Location Current Record Information Scheduled Process
Use the Maintain Party and Location Current Record Information scheduled process to sync purged worker type records in Human Capital Management (HCM) to Customer Data Management person party records. In HCM, terminated and canceled hire persons can be purged using Remove Person. These, when synced into person parties, ensure that synched details like name (first, middle, last), and contact (phone, email) are deleted or masked based on update in HCM.
The employee and contingent worker related usages on the person party record are also end dated, if still active. In a scenario where a person party doesn't have other active usages, even the person party is inactivated.
Steps to Enable
You don't need to do anything to enable this feature.
Key Resources
- See the "Maintain Party and Location Current Record Information" topic in "Sales and B2B Service Scheduled Processes" chapter in the Understanding Scheduled Processes guide.
Purge Inactive Sales Households
Purge household data from your test and production instances, rather than retaining the information in an inactive state. You can purge these records to adhere to data protection regulations and as part of housekeeping activities.
You can purge records based on filter criteria that you specify for the newly supported Household object.
Steps to Enable
Set the existing purge profile options to enable the purge functionality. The purge functionality is disabled by default.
Key Resources
- See the "Purge Inactive Party Records" topic in the in the "Sales and B2B Service Scheduled Processes" chapter in the Understanding Scheduled Processes guide.
Manage and Use Custom Territory Attributes for Territory-Based Assignments
Sales operations teams can assign territories using custom territory attributes. For example, organizations might want to track revenue by different groups of sales representatives within their territories. One group might focus on new customers while another group focuses on renewal of current subscriptions. Using the custom attribute territory feature, you can separately track revenue for both groups of sales representatives. This means that records are matched with the revenue based on a new territory or a renewal territory.
You now have more flexibility to use territory-based assignment by creating custom territory attributes or custom dimensions.
Steps to Enable
You don't need to do anything to enable this feature.
Key Resources
- See the "Configure and Extend Application Pages for Territories" topic in the "Extend Territory Management" chapter in the sales Implementation Reference guide.
Role And Privileges
- Sales Administrator
Expand Scheduling Options for Routines
You can now schedule routines to run hourly. Hourly routines are limited to 250 records per run. This option is available to all administrators with access to routines.
You can also schedule routines to run across all data for an object. You must assign the privilege, ZCA_SCHEDULE_ROUTINE_APPID, to an administrator. Once assigned, the administrator will see the option during routine creation.
Providing more scheduling options gives you more flexibility to run routines. For example:
- You can use an hourly option when you need to run a routine several times within a day. This option is available to anyone with access to Routines.
- You can assign a privilege to administrators to allow them to run a routine across all data for an object. This is useful if you need to enforce processes across regions managed by different administrators and you don't want to create a separate routine for each region.
Steps to Enable
Make the feature accessible by assigning or updating privileges and/or job roles. Details are provided in the Role section below.
To use this feature, you must have the appropriate privileges and job roles.
- You must already have access to Routines via the privilege, ZCA_MANAGE_ROUTINES.
- Assign the privilege, ZCA_SCHEDULE_ROUTINE_APPID, to the desired role.
During routine creation, the trigger step will have an option to schedule the routine to run across all data.
Tips And Considerations
You can't toggle the option to run a routine across all data. For example, once set, the routine will always run across all data.
Key Resources
- See the "Routines" chapter in the Implementing Sales guide.
Role And Privileges
The ability to manage routines is configured for the following roles:
- Application Implementation Consultant
- Sales Administrator
- Customer Relationship Management Application Administrator
The Routines dashboard now has an option to run on demand. Use this option to run a routine immediately when you need to view the results or to re-run a routine after correcting errors.
Run a routine to schedule a one-off run. This is useful during testing on when a routine has errors and needs to run prior to the next recurring period.
Steps to Enable
You don't need to do anything to enable this feature.
Key Resources
- See the "Routines" chapter in the Implementing Sales guide.
Role And Privileges
- Sales Administrator
Create Quote from an Opportunity Automatically
You can enable the automatic creation of a quote in Oracle Configure, Price, and Quote (Oracle CPQ) from an opportunity by using rules so that salespeople can access the quote directly without having to manually create it.
This feature lets you automate the process of creating quotes from opportunities based on predefined rules.
Steps to Enable
- Assign administrative privileges to an Oracle CPQ user to allow the automatic creation of a quote from an opportunity.
- Set up the CX Sales to Oracle CPQ configuration. See the CX Sales Configuration Steps topic in the Integrating CX Sales with Oracle CPQ guide.
- Go to the Manage Oracle CX Sales to Oracle CPQ Cloud Integration page and complete these steps:
- Click the Set Up link under the Authorization column.
- Select oracle/wss_username_token_over_ssl_client_policy for Security Policy.
- Enter the user name and password for Single Sign-on.
- Set up routines on the Opportunity object, select the Create Quote action, and define the rules. See the Overview of Routines topic to learn more.
Key Resources
- See the "Enable Creating a Quote Automatically from an Opportunity" topic in the "Quotes and Orders" chapter in the Implementing Sales guide.
Role And Privileges
- Sales Administrator for the setup and error handling.
- Salespeople and sales managers for using the quotes to move the deal to closure.
View and Search Dynamic Choice List Field Values Based on Resource Object
You can view, search, and add filters on all dynamic choice list fields for the Resource object using Adaptive Search. A dynamic choice list is a field that contains a list of values that are populated from the actual data of another object. This feature lets you use resource-based filters to return a set of search records that best suits your requirements.
This feature lets you view and search on values of dynamic choice list fields that are based on the Resource object.
Steps to Enable
No steps are required to enable this feature.
Key Resources
- See the "Workspace and Work Areas Search" chapter in the Using Sales guide.
Role And Privileges
- Workspace and Adaptive Search users
Click Refresh Icon in Workspace to View Latest Search Results
Users can now simply click the new Refresh icon in Workspace to get the latest data in Workspace without having to reload their browser page.
This enhancement improves the user's experience while working with Workspace.
Steps to Enable
You don't need to do anything to enable this feature.
Key Resources
- See the "Workspace and Work Areas Search" chapter in the Using Sales guide.
Role And Privileges
- Workspace and Adaptive Search users
Use Domestic and Global Ultimate Oracle DataFox Identifiers in Account Import
Use additional account hierarchy information, such as top hierarchy account, and identifiers from Oracle DataFox, such as domestic ultimate and global ultimate identifier, in Account Import Management.
Here are the new attributes for the Account import object that provide additional information on an account hierarchy:
- DomesticUltimateDatafoxId
- GlobalUltimateDatafoxId
Steps to Enable
You don't need to do anything to enable this feature.
Key Resources
- See the "Accounts" section in the Understanding Import and Export Management for CX Sales and B2B Service guide.
Use Hierarchy-Related Top Account and Oracle DataFox Identifiers in Accounts REST API
Use additional account hierarchy information, such as top hierarchy account, and identifiers from Oracle DataFox, such as domestic ultimate and global ultimate identifier, in the Accounts REST API.
Here are the new attributes exposed on the Accounts REST API:
- TotalAccountsInHierarchy
- TotalChildAccounts
- ParentAccountList
- PrimaryContactDoEmailFlag
- PrimaryContactDoCallFlag
- TotalImmediateChildAccounts
- UltimateParentFlag
- GlobalUltimateFlag
- DomesticUltimateFlag
- UltimateIdentifierSource
- DomesticUltimateDatafoxId (editable)
- GlobalUltimateDatafoxId (editable)
- ProfileQualityScore
Most of the fields are read-only, except the ones marked as editable. The read-only fields are calculated, derived, or auto-populated from system processes.
Steps to Enable
Review the REST service definition in the REST API guides, available from the Oracle Help Center > your apps service area of interest > REST API. If you're new to Oracle's REST services you may want to begin with the Quick Start section.
Key Resources
- See the REST API for CX Sales and B2B Service guide.
Partner Relationship Management
Partner Relationship Management
New Privilege to Identify Fusion PRM for Partners Users
We have introduced a new privilege, Identify Partner Users (ZPM_PARTNER_USER_PRIV), to identify users of the Fusion Partner Relationship Management for Partners Cloud Service (Fusion PRM for Partners). This privilege is required for users of Fusion PRM for Partners functionality as of Update 22D. This privilege was added to the standard Partner Sales Representative, Partner Sales Manager, and Partner Administrator roles via the Update 22C upgrade process. Users who have cloned these roles or created a custom role need to manually add this new privilege to the roles. This new privilege is used to count Fusion PRM for Partners usage.
Introducing this privilege improves the management, access, and counting of Fusion PRM for Partners users.
Steps to Enable
Make the feature accessible by assigning or updating privileges and/or job roles. Details are provided in the Role section below.
You will need to add this privilege to any role you have cloned or created using PRM for Partners Cloud Service functionality. You don't need to add this privilege if you are using PRM for Partners Cloud Service via the standard Partner Sales Representative, Partner Sales Manager, and Partner Administrator roles.
Tips And Considerations
- This new privilege is required only for Fusion PRM for Partners Cloud Service functionality. It is not required for other Fusion PRM solutions.
- Users are required to uptake this new privilege in 22D. This privilege is automatically added to relevant predefined user roles. However users must manually add this new privilege to custom roles or cloned roles intended for Fusion PRM for Partners usage.
- The Fusion PRM for Partners is intended for external partner users exclusively.
- The Oracle Fusion Service Descriptions document is updated with product usage clarifications for the Fusion PRM for Partners. Refer to the latest Oracle Fusion Service Descriptions Description document for additional details.
Key Resources
See this content:
- Security Reference for CX Sales and B2B Service guide. See the Partner Sales Representative, Partner Sales Manager and Partner Administrator sections.
- Oracle Fusion Service Description. See Fusion Partner Relationship Management for Partners Cloud Service section.
Role And Privileges
- Partner Sales Representative
- Partner Sales Manager
- Partner Administrator