
- Revision History
- Overview
- Optional Uptake of New Features (Opt In)
- Feature Summary
- Procurement Common
- Collaboration Messaging Framework
- Procurement
-
- Complex Work Procurement
- Purchasing
- External Purchase Prices
-
- Map a Source UOM to Different UOM Codes
- Manage Prices for the Same Manufacturer Part Number from Different Manufacturers
- Import Supplier Parts for Lines with Item Number Without Defining a Trading Partner Relationship
- Configure Supplier Site Mapping with Procurement BU
- Derive Line Type from Configure Procurement Business Function Setup
- Item Replacement
- Supplier Model
- Sourcing
- Supplier Qualification Management
- Spend Classification
- Procurement Contracts
This document will continue to evolve as existing sections change and new information is added. All updates appear in the following table:
| Date | Product | Feature | Notes |
|---|---|---|---|
| 07 SEP 2022 | Purchasing | Selected Purchasing Bug Fixes in This Update | Updated document. Revised feature description. |
| 07 SEP 2022 | Procurement Contracts | Use DocuSign OAuth 2.0 Authentication When Signing Contracts | Updated document. Revised steps to enable. |
| 25 JUL 2022 | Sourcing | Configure Sender Name and Email in Sourcing Notifications | Updated document. Updated links to help topics. |
| 15 JUL 2022 | Purchasing | Use the Deliver-to Inventory Organization Time Zone When Fulfilling Supply Chain Demand | Updated document. Revised screenshots. |
| 15 JUL 2022 | Purchasing | Selected Purchasing Bug Fixes in This Update | Updated document. Revised feature description. |
| 15 JUL 2022 | Purchasing | Add New Approved Back-to-Back Requisitions to Open Purchase Orders | Updated document. Delivered new feature that is from a customer submitted idea. |
| 15 JUL 2022 | Common Procurement | Integrate and Extend Procurement Using REST Services | Updated document. Revised feature description. |
| 15 JUL 2022 | Supplier Qualification Management | Configure Sender Name and Email in Supplier Qualification Notifications | Updated document. Updated links to help topics. |
| 15 JUL 2022 | Supplier Model | Configure Sender Name and Email in Supplier Management Notifications | Updated document. Updated links to help topics. |
| 22 JUN 2022 | Purchasing | Use the Deliver-to Inventory Organization Time Zone When Fulfilling Supply Chain Demand | Updated document. Revised feature description. |
| 17 JUN 2022 | Created initial document. |
 HAVE AN IDEA?
We’re here and we’re listening. If you have a suggestion on how to make our cloud services even better then go ahead and tell us. There are several ways to submit your ideas, for example, through the Ideas Lab on Oracle Customer Connect. Wherever you see this icon after the feature name it means we delivered one of your ideas.
GIVE US FEEDBACK
We welcome your comments and suggestions to improve the content. Please send us your feedback at oracle_fusion_applications_help_ww_grp@oracle.com.
DISCLAIMER
The information contained in this document may include statements about Oracle’s product development plans. Many factors can materially affect Oracle’s product development plans and the nature and timing of future product releases. Accordingly, this Information is provided to you solely for information only, is not a commitment to deliver any material, code, or functionality, and should not be relied upon in making purchasing decisions. The development, release, and timing of any features or functionality described remains at the sole discretion of Oracle.
This information may not be incorporated into any contractual agreement with Oracle or its subsidiaries or affiliates. Oracle specifically disclaims any liability with respect to this information. Refer to the Legal Notices and Terms of Use for further information.
Optional Uptake of New Features (Opt In)
Oracle Cloud Applications delivers new updates every quarter. This means every three months you'll receive new functionality to help you efficiently and effectively manage your business. Some features are delivered Enabled meaning they are immediately available to end users. Other features are delivered Disabled meaning you have to take action to make available. Features delivered Disabled can be activated for end users by stepping through the following instructions using the following privileges:
- Review Applications Offering (ASM_REVIEW_APPLICATIONS_OFFERINGS_PRIV)
- Configure Oracle Fusion Applications Offering (ASM_CONFIGURE_OFFERING_PRIV)
Here’s how you opt in to new features:
- Click Navigator > My Enterprise > New Features.
- On the Features Overview page, select your offering to review new features specific to it. Or, you can leave the default selection All Enabled Offerings to review new features for all offerings.
- On the New Features tab, review the new features and check the opt-in status of the feature in the Enabled column. If a feature has already been enabled, you will see a check mark. Otherwise, you will see an icon to enable the feature.
- Click the icon in the Enabled column and complete the steps to enable the feature.
In some cases, you might want to opt in to a feature that's not listed in the New Features work area. Here's how to opt in:
- Click Navigator > My Enterprise > Offerings.
- On the Offerings page, select your offering, and then click Opt In Features.
- On the Opt In page, click the Edit Features (pencil) icon for the offering, or for the functional area that includes your feature.
- On the Edit Features page, complete the steps to enable the feature.
For more information and detailed instructions on opting in to new features for your offering, see Offering Configuration.
Opt In Expiration
Occasionally, features delivered Disabled via Opt In may be enabled automatically in a future update. This is known as an Opt In Expiration. If your cloud service has any Opt In Expirations you will see a related tab in this document. Click on that tab to see when the feature was originally delivered Disabled, and when the Opt In will expire, potentially automatically enabling the feature. You can also click here to see features with Opt In Expirations across all Oracle Cloud Applications.
Column Definitions:
Report = New or modified, Oracle-delivered, ready to run reports.
UI or Process-Based: Small Scale = These UI or process-based features are typically comprised of minor field, validation, or program changes. Therefore, the potential impact to users is minimal.
UI or Process-Based: Larger Scale* = These UI or process-based features have more complex designs. Therefore, the potential impact to users is higher.
Features Delivered Disabled = Action is needed BEFORE these features can be used by END USERS. These features are delivered disabled and you choose if and when to enable them. For example, a) new or expanded BI subject areas need to first be incorporated into reports, b) Integration is required to utilize new web services, or c) features must be assigned to user roles before they can be accessed.
Integrate and Extend Procurement Using REST Services
In this update, Oracle Fusion Cloud Procurement and Oracle Fusion Cloud Self Service Procurement deliver new and modified REST APIs to enable and simplify integration with external systems.
The new REST API introduced in this update is:
- Browsing Categories
The following REST APIs are enhanced:
- Purchase Requisitions
- GET is supported for Action Required and Action Required Code for requisition lines.
- GET is supported for the flag, Has Action Required Lines, for requisition headers.
- POST and PATCH are enhanced to accept the Requested Delivery Date in the local time zone of the inventory organization.
- POST and PATCH are supported for Justification at the header level and Note to Buyer, Note to Supplier and Note to Receiver at the line level.
- Requisitioning Processing Requests
- POST is enhanced to support adding back-to-back requisition lines to open purchase orders.
- Purchase Orders
- GET is supported for U.S. Federal attributes.
You can use these modified REST services to simplify integrations and support standards-based interoperability with your other applications and external systems.
Steps to Enable
Review the REST service definition in the REST API guides, available from the Oracle Help Center > your apps service area of interest > REST API. If you're new to Oracle's REST services you may want to begin with the Quick Start section.
Key Resources
- Refer to the REST API for Oracle Procurement Cloud documentation available on the Oracle Help Center.
Role And Privileges
- Refer to the Job Roles and Privileges section in the REST API for Oracle Procurement Cloud documentation, available on the Oracle Help Center.
Collaboration Messaging Framework
Collaboration Messaging Framework
Retrieve Large Purchase Order Payloads for B2B Messaging
Configure Oracle Collaboration Messaging Framework to process large purchase orders (typically more than 2,000-lines) when you initiate B2B communication. The payload for a large purchase order is retrieved in small parts from Oracle Purchasing and then combined and delivered as one purchase order, resulting in improved performance.
After you enable the feature, enter a value in the Large PO Processing section of the Manage Collaboration Messaging Configuration page in the Large PO Minimum Line Count field to specify the minimum number of lines in a large PO. Then enter a value in the PO Lines Retrieved in a Single Query field to specify the number of lines to retrieve from Oracle Purchasing in each part (1000 lines by default). The values you set in the Large PO Delivery Duration (30 minutes by default) and Large PO Delivery Attempt Interval (3 minutes by default) fields indicate how long and how often to attempt delivery of the PO.
NOTE: This feature was also made available in the May monthly update of 22B.

Large Purchase Order Processing in Manage Collaboration Messaging Configuration
Steps to Enable
Use the Opt In UI to enable this feature. For instructions, refer to the Optional Uptake of New Features section of this document.
Offering: Order Management
Tips And Considerations
In general, a purchase order with more than 2,000 lines is considered a large purchase order, but you can determine the minimum line count for your large purchase orders based on your specific business needs.
Key Resources
- Oracle Supply Chain Management Cloud: Configuring and Managing B2B Messaging guide available on Oracle Help Center.
Role And Privileges
You have a couple of options for giving people access to this feature, depending on whether you're assigning them predefined job roles or your own configured job roles.
- Users who are assigned this predefined job role can access this feature:
- B2B Administrator (ORA_CMK_B2B_ADMINISTRATOR_ABSTRACT)
- Users who are assigned configured job roles that contain this privilege are able to access this feature:
- Manage Collaboration Messaging Configuration (CMK_MANAGE_COLLAB_MESG_CONFIG_PRIV)
Send UBL PEPPOL Invoice Responses to Suppliers
Use the new predefined message definition UBL-2-1-InvoiceApplicationResponse-Out to send details about rejected invoices in the UBL PEPPOL format to your suppliers.
Enable the procure-to-pay business process to exchange the associated document, Invoice Acknowledgment-Outbound.
Set up this message definition as an outbound collaboration message for a trading partner and then associate the trading partner, and the Invoice Acknowledgment-Outbound document with a supplier using the Manage Supplier B2B Configuration task in the Collaboration Messaging work area.
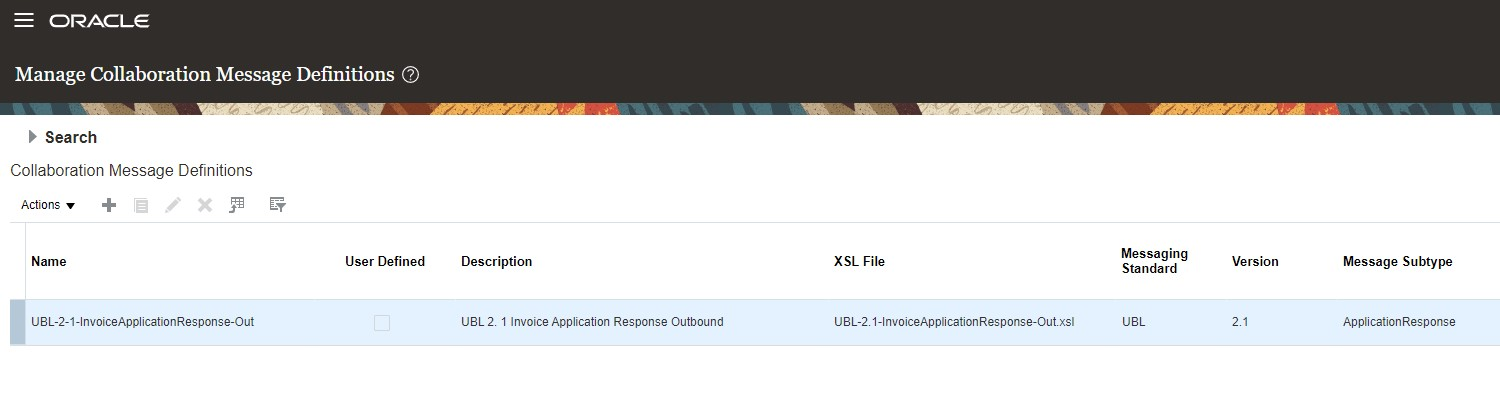
UBL-2-1-InvoiceApplicationResponse-Out Message Definition
Enables automated invoice status communication using the UBL PEPPOL application response message.
Steps to Enable
You don't need to do anything to enable this feature.
Key Resources
- Configuring and Managing B2B Messaging for Oracle Applications Cloud guide available on the Oracle Help Center.
Role And Privileges
You have a couple of options for giving people access to this feature, depending on whether you're assigning them predefined job roles or your own configured job roles.
- Users who are assigned any of these predefined job roles can access this feature:
- Supply Chain Application Administrator (ORA_RCS_SUPPLY_CHAIN_APPLICATION_ADMINISTRATOR_JOB)
- Users who are assigned a configured job role that contains these privileges can access this feature:
- Manage B2B Supplier Trading Partners (CMK_B2B_SUPPLIER_TRADING_PARTNERS_PRIV)
- Manage B2B Trading Partners (CMK_B2B_TRADING_PARTNERS_PRIV)
Complex Work Procurement is an end-to-end integrated solution across the Oracle Procurement Cloud, Oracle Financials Cloud, and Oracle Supply Chain Management Cloud applications. This solution is designed to model procurement of complex contracts in industries such as construction, consulting, and professional services. Complex work contracts tend to have high dollar values and long lead times, and are governed by complex payment terms. You can use Complex Work Procurement to manage various aspects of the acquisition processes involved in procuring complex work.
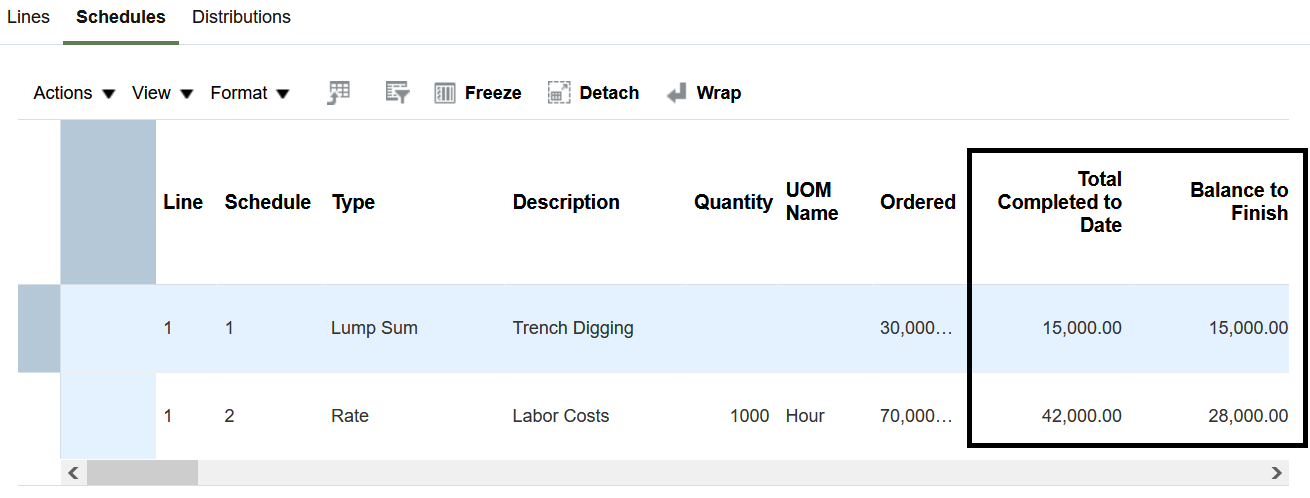
View Work Confirmation Summary in the Order Life Cycle
View work confirmations summary in the order life cycle for progress payment schedules. In update 22B, the Purchase Order Life Cycle and Schedule Life Cycle pages could only show details of the receipt generated from an approved work confirmation. In this update, these pages now show additional information such as work performed in the current period, work approved in earlier periods, total work completed, and remaining balances for the progress payment schedules. These details are also available on the View Order page.
These screenshots illustrate the feature.
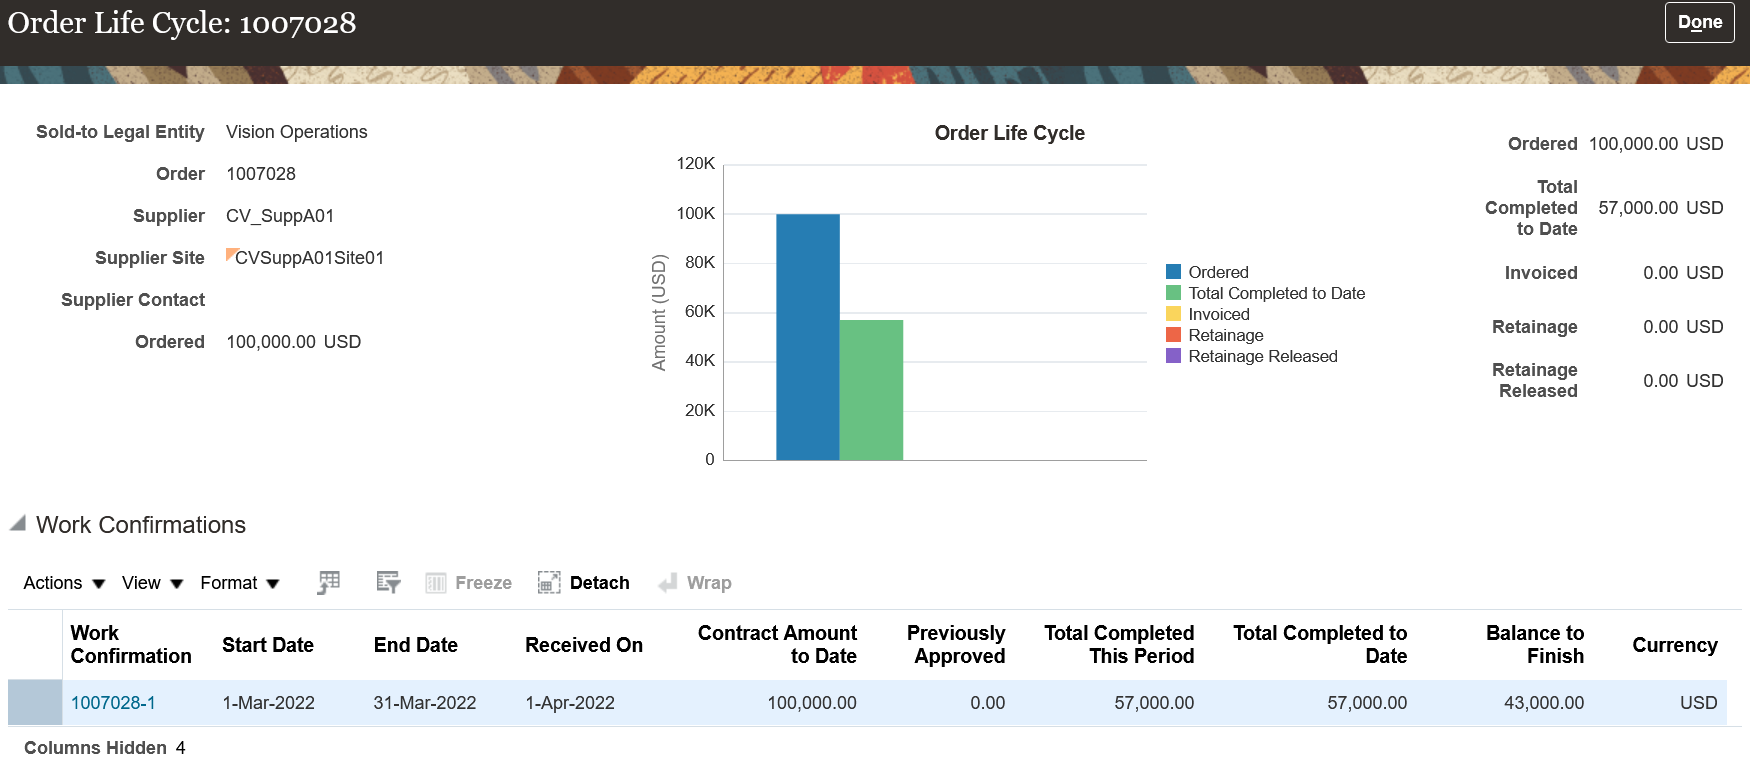
Order Lifecycle Page of a Complex Work Purchase Order with Work Confirmations
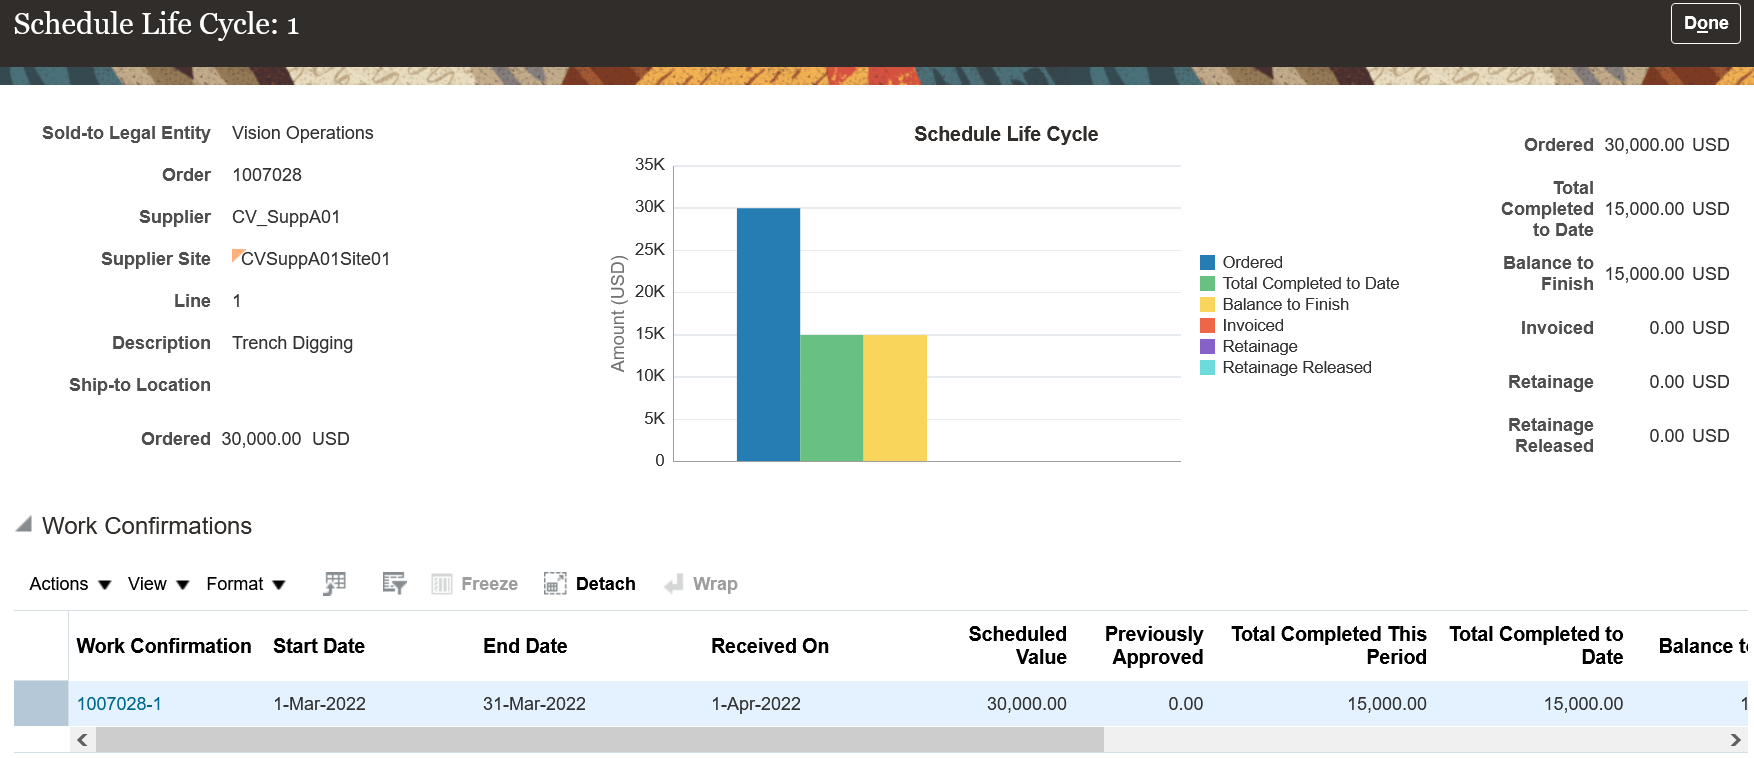
Schedule Lifecycle Page of a Lumpsum Schedule

Schedule Lifecycle Page of a Rate-Based Schedule
View Work Confirmation Attributes on the PO Schedules from the View Purchase Order Page
Steps to Enable
Prerequisite: To manage search capabilities for work confirmations and purchase orders, submit the ESS job to create index definition and perform initial ingest to OSCS scheduled job. Use these index names when submitting the process:
- Purchase Orders: fa-prc-po
- Work Confirmations: fa-prc-wc
Enable work confirmation on the seeded Complex Work Style if there are no receipts for the purchase orders of that style. Otherwise, create a new document style and enable work confirmation.
To enable work confirmation on a new document style, follow these steps:
- In the Setup and Maintenance work area, select:
- Procurement offering
- Procurement Foundation functional area
- Manage Document Styles task
- Create a new document style.
- Set Work Confirmation Enabled to Yes.
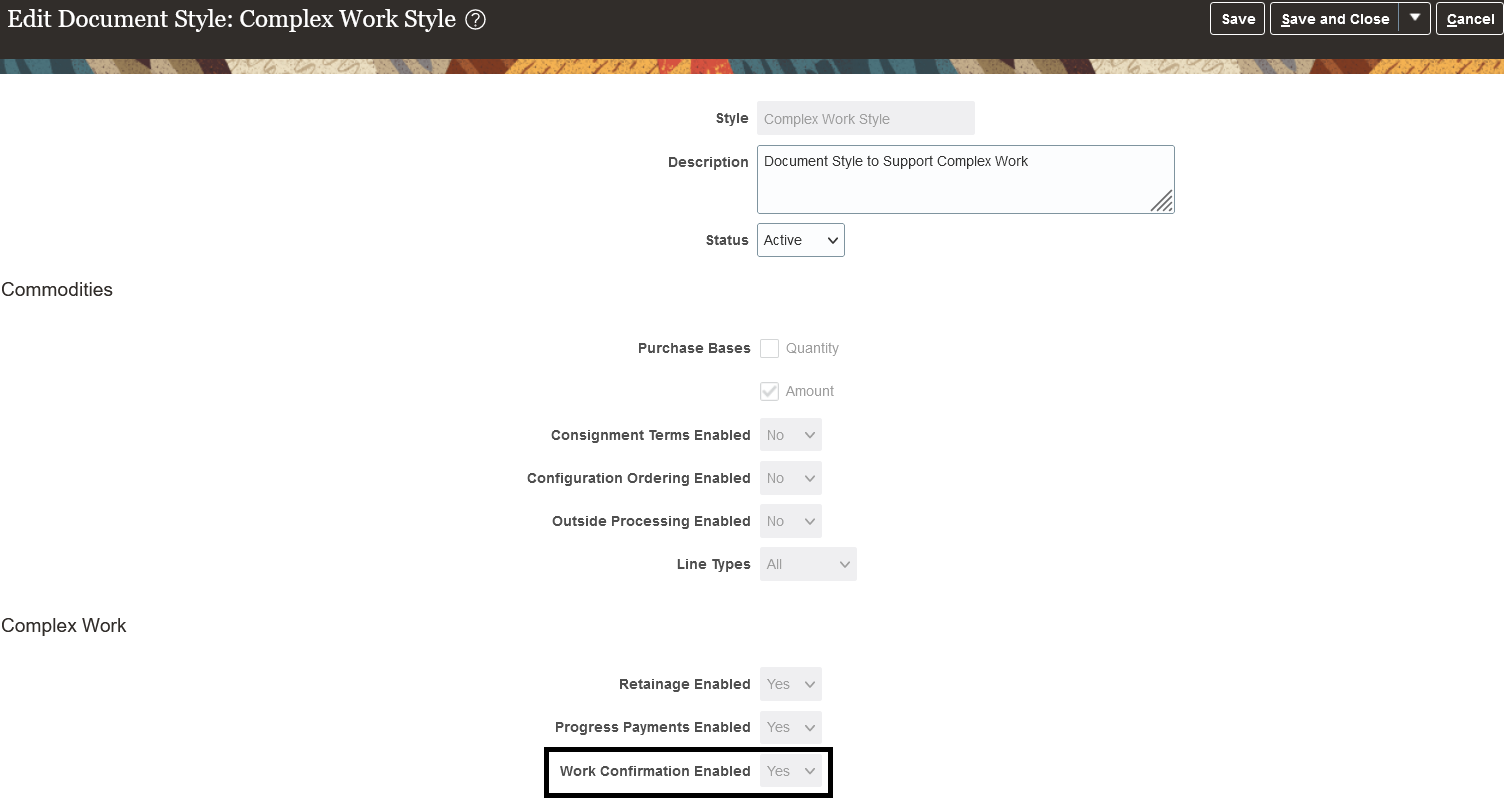
Seeded Complex Work Style with Work Confirmation Enabled
Tips And Considerations
- To expose the work confirmation attributes on the View Purchase Orders page, use the View > Columns menu on the Schedules tab.
- If the document style of the purchase order has work confirmations enabled, the work confirmation summary will be displayed on the Life Cycle pages.
- You can delete lines from incomplete, withdrawn, or rejected work confirmations.
- You can cancel work confirmations that are in pending approval, withdrawn, or rejected status.
Key Resources
- To know how to create work confirmations for purchase orders with progress payments schedule, refer to the Create Work Confirmations for Purchase Orders with Progress Payments Schedule topic available on the Oracle Procurement Cloud Using Procurement guide.
Role And Privileges
You have a couple of options for giving people access to set up and use this feature, depending on whether you're assigning them predefined job roles or your own configured job roles.
To set up this feature, here's what you need:
- Users who are assigned this predefined job role are automatically able to set up this feature:
- Procurement Application Administrator (ORA_PO_PROCUREMENT_APPLICATION_ADMIN_JOB)
- Users who are assigned configured job roles that contain these privileges are able to set up this feature:
- Manage Purchasing Document Style (PO_MANAGE_PURCHASING_DOCUMENT_STYLE_PRIV)
- Manage Scheduled Job Definition (FND_MANAGE_SCHEDULED_JOB_DEFINITION_PRIV)
To use this feature, here's what you need:
- Users who are assigned configured job roles that contain either of the below duty rules are able to access this feature:
- Work Confirmation Management as Buyer (ORA_PO_WORK_CONFIRM_MGMT_AS_BUYER)
- Work Confirmation Management as Supplier (ORA_PO_WORK_CONFIRM_MGMT_AS_SUPPLIER)
- Work Confirmation Management as Procurement Requester (ORA_PO_WORK_CONFIRM_MGMT_AS_REQUESTER)
- Users who are assigned configured job roles that contain these privileges are able to access this feature:
- Create Work Confirmation (PO_CREATE_WORK_CONFIRMATION_PRIV)
- Search Work Confirmation (PO_SEARCH_WORK_CONFIRMATION_PRIV)
- View Work Confirmation (PO_VIEW_WORK_CONFIRMATION_PRIV)
- Create Work Confirmation as Supplier (PO_CREATE_WORK_CONFIRMATION_SUPPLIER_FACING_PRIV)
- Search Work Confirmation as Supplier (PO_SEARCH_WORK_CONFIRMATION_SUPPLIER_FACING_PRIV)
- View Work Confirmation as Supplier (PO_VIEW_WORK_CONFIRMATION_SUPPLIER_FACING_PRIV)
- Create Work Confirmation as Procurement Requester (PO_CREATE_WORK_CONFIRMATION_AS_PROCUREMENT_REQUESTER_PRIV)
- Search Work Confirmation as Procurement Requester (PO_SEARCH_WORK_CONFIRMATION_AS_PROCUREMENT_REQUESTER_PRIV)
- View Work Confirmation as Procurement Requester (PO_VIEW_WORK_CONFIRMATION_AS_PROCUREMENT_REQUESTER_PRIV)
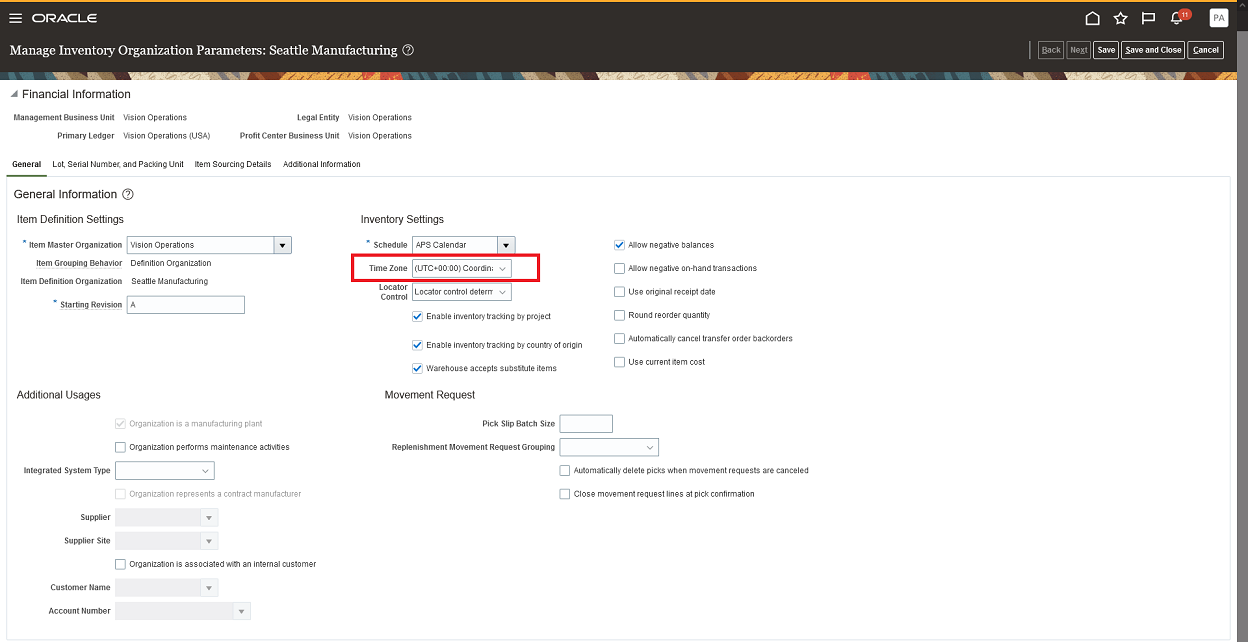
Use the Deliver-to Inventory Organization Time Zone When Fulfilling Supply Chain Demand
Use the time zone specified on the inventory organization definition for deriving the local time zone for delivery and shipping locations. With this feature, Oracle Order Management back-to-back sales orders, Oracle Supply Planning, and Oracle Manufacturing can communicate the requested delivery or shipping dates to Procurement in the time zone of the deliver-to and ship-to organizations. In addition, requisitions sourced from min-max planning and PAR replenishment are now created in the time zone associated with the inventory organization. This ensures that the requested dates on purchase requisitions aren’t past dates as per the time zone specified in the deliver-to organization in the upstream applications.
Using this feature, the requested dates on purchase requests from external applications and those entered manually in UIs will be validated to ensure that they aren't past dates as per the current date in the time zone of the deliver-to organization. Also, the delivery and ship dates on related purchase orders will reflect the ship-to location local time zone.
These screen captures illustrates the feature for a back-to-back requisition and purchase order line:
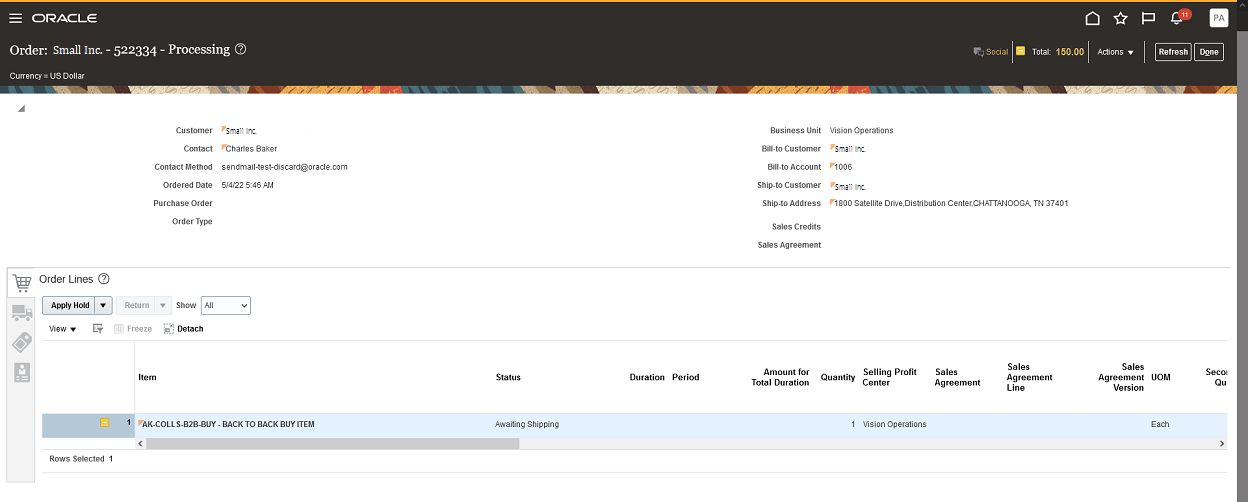
Back-to-Back Sales Order Entered on Same Time Zone as Supply Warehouse
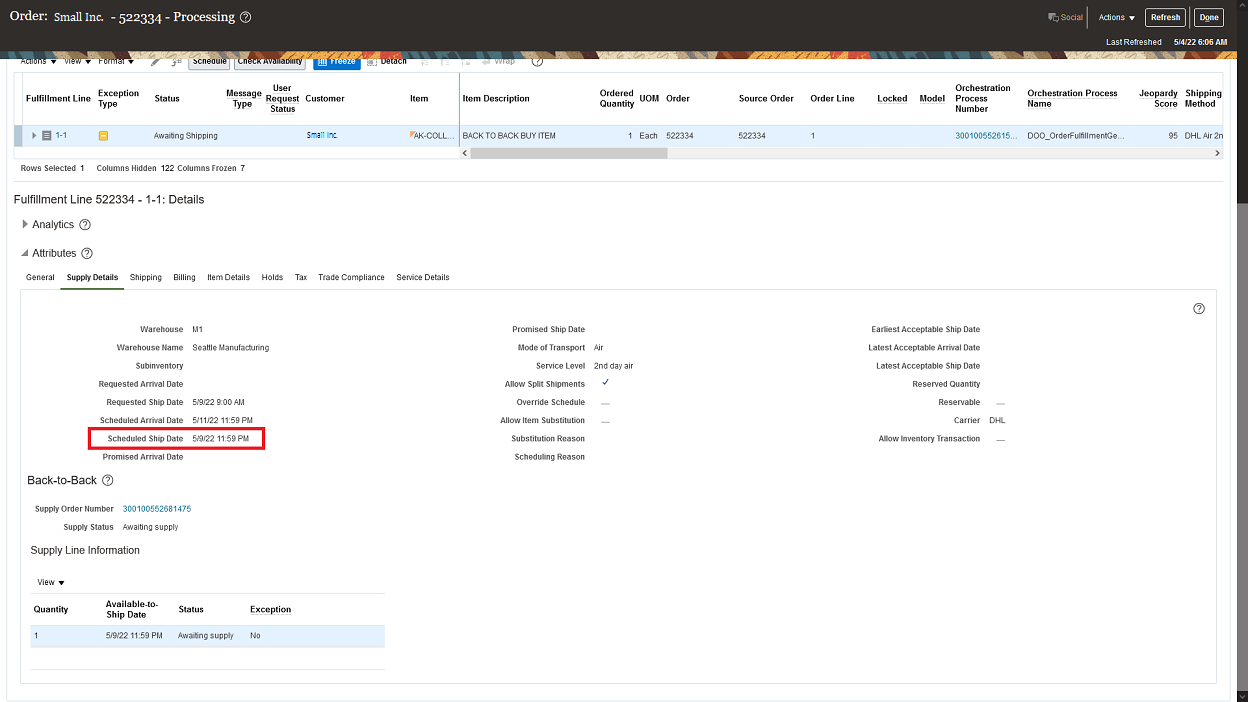
Supply Details on the Sales Order Fulfillment View Show the Schedule Ship Date on Warehouse Time Zone
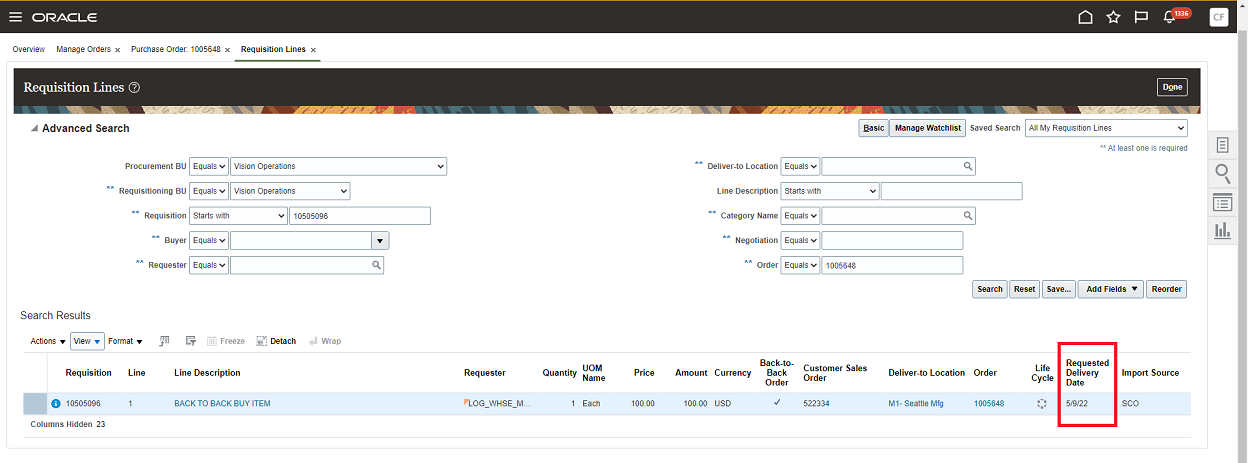
Back-to-Back Requisition Line Shows the Requested Delivery Date on the Delivery-to Location Local Time Zone

Purchase Order for Back-to-Back Requisition Line Shows the Requested Delivery Date and Promised Delivery Date on the Ship-to Location Local Time Zone
Steps to Enable
Use the Opt In UI to enable this feature. For instructions, refer to the Optional Uptake of New Features section of this document.
Offering: Procurement
Define a Time Zone for the Inventory Organization in Setup and Maintenance > Manage Inventory Organizations > Manage Inventory Organization Parameters:
Manage Organization Parameters
Tips And Considerations
- In the requisition import program (FBDI or Purchase Request Web Service), the requested delivery date and requested ship date are validated according to the local time zone of the destination inventory organization. If the inventory organization time zone isn't defined, the program assumes the UTC zone. In REST APIs and UIs, only the requested delivery date is supported and is validated in the same manner.
- The requested delivery date also defaults for requisitions created using the requisition import program or manually entered in UIs. The default date is the current date in the destination inventory organization time zone plus the number of days in the offset profile: POR: Requested Delivery Date Offset.
- For requisitions for one-time locations, the requested delivery date is according to the time zone of the default deliver-to organization in the Requisitioning BU.
- You can't use this feature for purchase requests for drop ship sales orders. For drop ship sales orders, the requested delivery and ship dates are currently validated according to the time zone of the legal entity of the inventory organization. If the legal entity time zone isn't enabled, the date validation is based on the UTC.
- For internal material transfers, the requested delivery date of the requisition line is converted from the inventory organization's local time zone to the UTC zone for transfer order creation.
Role And Privileges
You have a couple of options for giving people access to this feature, depending on whether you're assigning them predefined job roles or your own configured job roles.
- Users who are assigned any of these predefined job roles can access this feature:
- For creating requisitions using the UI:
- Procurement Requester (ORA_POR_PROCUREMENT_REQUESTER_ABSTRACT) or
- Procurement Preparer (ORA_POR_PROCUREMENT_PREPARER_ABSTRACT)
- For creating requisitions using the requisition import process (FBDI or Purchase Request Web Service):
- Procurement Integration Specialist (ORA_PO_PROCUREMENT_INTEGRATION_SPECIALIST_JOB)
- Buyer (ORA_PO_BUYER_JOB)
- Procurement Manager (ORA_PO_PROCUREMENT_MANAGER_JOB)
- For creating requisitions using the REST API:
- Refer to the Job Roles and Privileges section in the REST API for Oracle Procurement Cloud documentation, available on the Oracle Help Center.
- For creating purchase orders from requisitions:
- Buyer (ORA_PO_BUYER_JOB)
- For creating requisitions using the UI:
If you're maintaining your own configured job roles: no new privileges were introduced to support this feature.
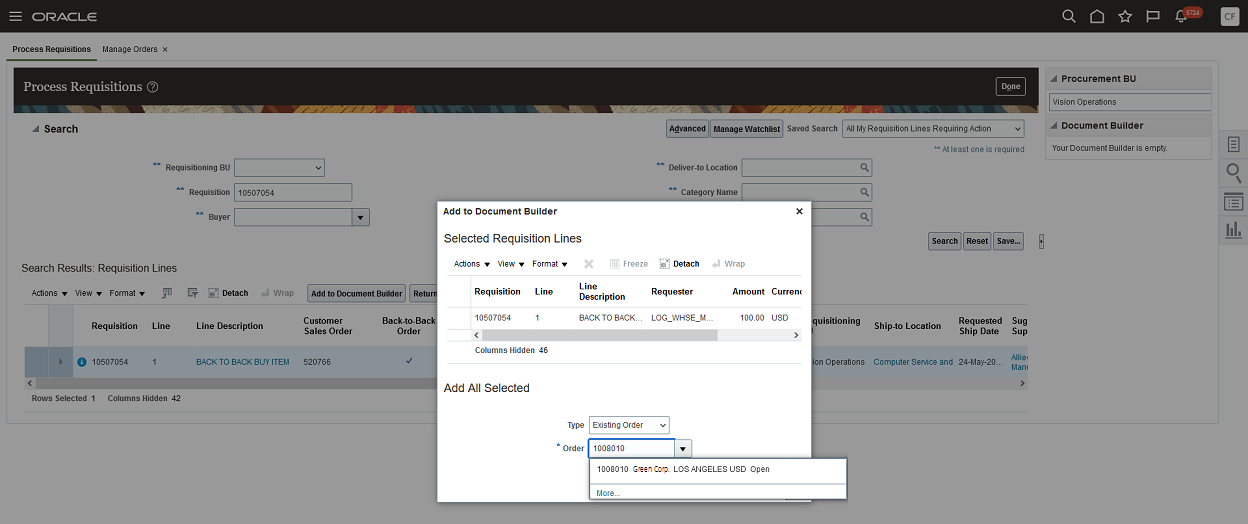
Add New Approved Back-to-Back Requisitions to Open Purchase Orders
Add new approved back-to-back purchase requisition lines to existing open purchase orders. You can now add a back-to-back requisition line to an existing open purchase order instead of creating a separate purchase order for the requisition. In 20A, requisition lines tied to back-to-back sales orders couldn't be added to existing open purchase orders. In this update, this restriction is lifted.
This screen capture illustrates the feature.
Display of Open Purchase Orders in the Existing Order Search

A Change Order is Created When Adding Back-to-Back Requisition Lines to an Existing Open Purchase Order
Steps to Enable
Use the Opt In UI to enable this feature. For instructions, refer to the Optional Uptake of New Features section of this document.
Offering: Procurement
To use this feature, you must opt in to the Add New Approved Requisitions to Existing Open Purchase Orders feature. If you previously opted in to the Add New Approved Requisitions to Existing Open Purchase Orders feature, then this feature is automatically enabled.
Tips And Considerations
- You can't add approved back-to-back requisition lines to existing open purchase orders shipped to a third party or open purchase orders created from sourcing negotiations.
- You can use the Requisition Processing Requests REST APIs to add back-to-back requisition lines to open purchase orders.
Role And Privileges
You have a couple of options for giving people access to this feature, depending on whether you're assigning them predefined job roles or your own configured job roles.
- Users who are assigned this predefined job role can access this feature in Purchasing:
- Buyer (ORA_PO_BUYER_JOB)
- Users who are assigned a configured job role that contains this privilege can access this feature in Purchasing:
- Create Purchase Order from Requisitions (PO_CREATE_PURCHASE_ORDER_FROM_REQUISITIONS_PRIV)
U.S. Federal Purchase Order Attributes
Assign U.S. Federal attributes on purchase orders for Government wide Treasury Account Symbol Adjusted Trial Balance System (GTAS) and Data Act Reporting.
The purchase order attributes are required for order headers, order schedules and order distributions. These attributes will be supported as global descriptive flexfield (GDF) attributes at the order header, order schedule, and order distribution level. These attributes need to be defaulted, populated, and validated for orders entered manually or created by import processing. The content has to be validated and revalidated when the transaction is submitted for approval.
Below is the list of attributes captured while creating an order manually or importing it.
Attributes captured at order header level:
| Attribute Name | Column Name |
|---|---|
| Enable for DATA Act reporting |
GLOBAL_ATTRIBUTE1 |
| DATA Act Award Type |
GLOBAL_ATTRIBUTE2 |
| PIID | GLOBAL_ATTRIBUTE3 |
| Parent Award ID |
GLOBAL_ATTRIBUTE4 |
| FAIN | GLOBAL_ATTRIBUTE5 |
| URI | GLOBAL_ATTRIBUTE6 |
Attributes captured at order schedule level:
| Attribute Name | Column Name |
|---|---|
| Trading Partner TAS |
GLOBAL_ATTRIBUTE_NUMBER1 |
| Trading Partner BETC |
GLOBAL_ATTRIBUTE1 |
Attributes captured at order distribution level:
| Attribute Name | Column Name |
|---|---|
| BETC | GLOBAL_ATTRIBUTE1 |
The U.S. Federal Purchase Order Attributes feature provides the capability to capture the required attributes on a purchase order (either created manually or imported) that are needed for Governmentwide Treasury Account Symbol Adjusted Trial Balance System (GTAS) and Data Act Reporting.
Steps to Enable
U.S. Federal Financials must be enabled.
Key Resources
- For more information on Federal Purchase Order attributes, refer to the Implementing U.S. Federal Financials and Using U.S. Federal Financials guides.
Role And Privileges
Use the existing role, Financial Application Administrator.
Selected Purchasing Bug Fixes in This Update
This update includes some bug fixes that can change the way Oracle Purchasing works. This isn't a full list of all the bug fixes in this update. This list includes the bug fixes that can cause a noticeable change in application behavior.
Update Base Price According to UOM Conversions
Before update 22C, if you changed the UOM for an item for which the UOM conversion was defined, the system didn't reflect the change in the base price. But the resultant price (determined by applying a discount to the base price) was calculated accurately. After you update to 22C, when you change the UOM for an item and a UOM conversion exists, the system recalculates and updates the base price according to the defined UOM conversion rate.
Oracle reference: 33918728
Prevent Non-Negotiated Emergency Requisitions from Bypassing Approvals
Before update 22C, if your procurement business unit was configured to bypass approvals for automatically submitted orders created from negotiated requisitions, POs created from emergency requisitions that weren't negotiated were also bypassing approvals. After you update to 22C, touchless POs created from non-negotiated emergency requisitions won't bypass approvals.
Oracle reference: 33734642
Validate Deliver-to Location Upon PO Submission
Before update 22C, you could submit POs without specifying a deliver-to location for each distribution. After you update to 22C, you must provide a deliver-to location to submit the PO for approval.
Oracle reference: 33482572
Document History Captures Wrong Name for PO Cancellation
In prior updates, whenever a purchasing document was canceled, the document history incorrectly recorded the original creator of the purchasing document as the person who canceled the document. After you update to 22C, the document history correctly records and reflects the name of the person who performed the document cancellation.
Oracle reference: 33436366
Performance Improvements to the Buyer LOV UI Widget
To address performance issues on the pages with the Buyer List of Values Choice List , you can change the List of Values Choice List to a List of Values by setting the ORA_PO_DISPLAY_BUYER_AS_INPUTLOV profile option to Y. By default, the profile option is set to N. In the Setup and Maintenance work area, use the Manage Administrator Profile Values task to control the display of this field on these pages:
- Create PO or Create PA
- Edit PO or Edit PA
- Import Orders, Import Blanket Agreements, Import Contract Agreements
- Reassign Purchasing Documents
- Configure Procurement Business Function
- Communicate Purchasing Documents
Oracle reference: 33928654
Allow Deletion and Cancellation of Draft Work Confirmation
Before update 22C, you couldn't delete lines from a withdrawn or rejected work confirmation. You also couldn't cancel a rejected work confirmation. After this update, you can delete lines from withdrawn and rejected work confirmations, and cancel a rejected work confirmation.
Steps to Enable
You don't need to do anything to enable this feature.
Map a Source UOM to Different UOM Codes
Configure units of measurement by mapping the same source UOM to different UOM codes for different source suppliers.
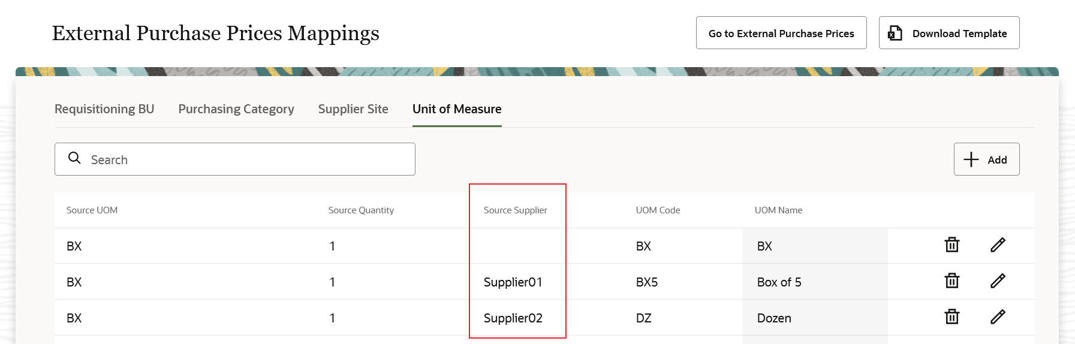
UOM Mapping
At times, the same source UOM may refer to different UOMs for different suppliers in Oracle Cloud. You can now optionally specify the source supplier when defining the UOM mapping using a free text field. While importing the external purchase prices, the UOM mapping row where the source supplier is specified is given precedence over the mapping row without a supplier.
Steps to Enable
You don't need to do anything to enable this feature.
Role And Privileges
Users who are assigned the Purchase Pricing Manager (ORA_SCH_PURCHASE_PRICING_MANAGER_JOB) job role are automatically able to access this feature.
Manage Prices for the Same Manufacturer Part Number from Different Manufacturers
Manage different external purchase prices for the same manufacturer part number from different manufacturers by treating them as different manufacturer part numbers.
It’s possible that if two different manufacturers had the same manufacturer part numbers, they could be referring to two completely different items in Oracle Cloud. With this update, external purchase lines with the same manufacturer part number when belonging to different manufacturers will be treated as different parts. An external purchase price will be selected for the combination of manufacturer, manufacturer part number, and unit of measure for each requisitioning business unit and a purchase agreement line will be created for the selected lines.
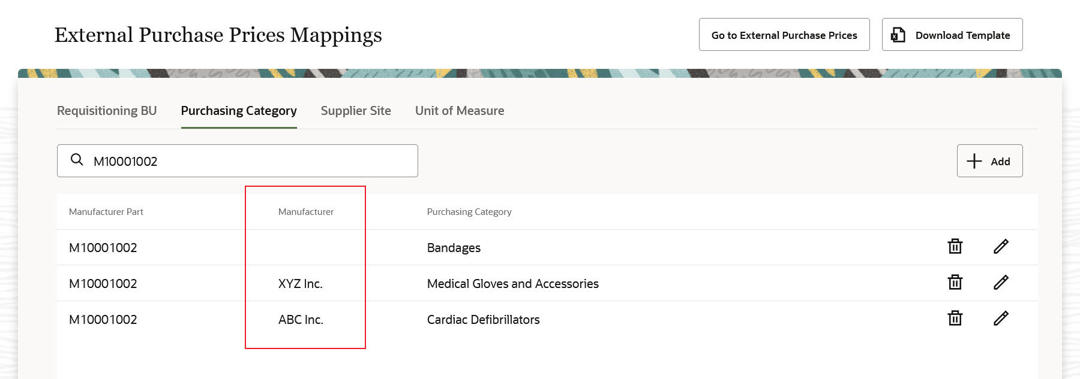
Purchasing Category Mapping
You can now optionally specify the manufacturer when defining the purchasing category mapping. While importing the external purchase prices, the purchasing category mapping row where the manufacturer is specified is given precedence over the mapping row without a manufacturer.
Steps to Enable
You don't need to do anything to enable this feature.
Role And Privileges
Users who are assigned the Purchase Pricing Manager (ORA_SCH_PURCHASE_PRICING_MANAGER_JOB) job role are automatically able to access this feature.
Import Supplier Parts for Lines with Item Number Without Defining a Trading Partner Relationship
Import supplier part numbers for external purchase prices with item number, even without defining a trading partner relationship. Include supplier part number in purchase agreement lines containing item number.
With this update, it’s no longer mandatory to have a trading partner relationship defined between the item and supplier part number for external purchase price lines with item number in case a supplier part number was specified in the interface. You can import such external purchase price lines even without defining a trading partner relationship. The supplier part numbers when passed in the interface will be visible in both external purchase prices and purchase agreements for all type of lines.
You can import such external purchase price lines even without defining a trading partner relationship. The supplier part numbers when passed in the interface will be visible in both external purchase prices and purchase agreements for all type of lines.
Steps to Enable
You don't need to do anything to enable this feature.
Role And Privileges
Users who are assigned the Purchase Pricing Manager (ORA_SCH_PURCHASE_PRICING_MANAGER_JOB) job role are automatically able to access this feature.
Configure Supplier Site Mapping with Procurement BU
Configure supplier site mapping for a source supplier by assigning the source supplier value to multiple different supplier sites where the supplier sites belong to different procurement business units.
While importing the external purchase prices, the procurement business unit in the supplier site mapping row is matched with the procurement business unit in the interface data to derive the supplier site.
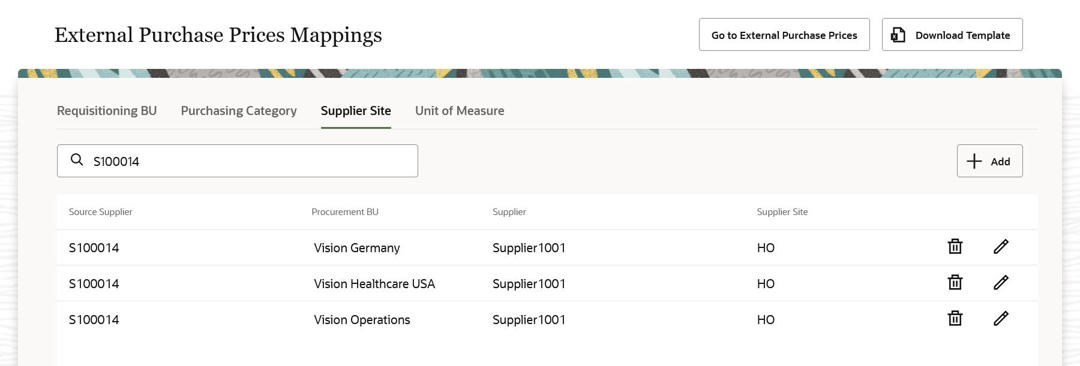
Supplier Site Mapping
You can now define multiple rows with the same source supplier with different procurement business units thereby avoiding creation of duplicate vendor records in the source system when the supplier is used by more than one procurement business unit.
Steps to Enable
You don't need to do anything to enable this feature.
Role And Privileges
Users who are assigned the Purchase Pricing Manager (ORA_SCH_PURCHASE_PRICING_MANAGER_JOB) job role are automatically able to access this feature.
Derive Line Type from Configure Procurement Business Function Setup
Derive the line type for purchase agreements created by external purchase prices from the default line type defined in the Configure Procurement Business Function task. This task in the Setup and Maintenance work area is a part of the Procurement offering in the Procurement Foundation functional area.
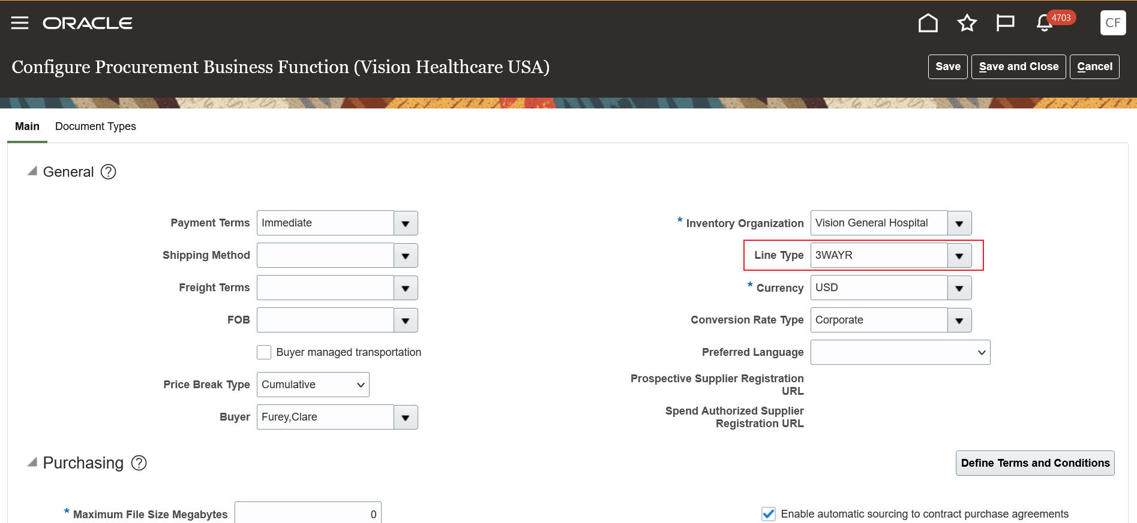
Line Type in Configure Procurement Business Function Setup
With this update, you'll be able to determine the line type used for the purchase agreements created from external purchase prices.
Steps to Enable
You don't need to do anything to enable this feature.
Role And Privileges
Users who are assigned the Purchase Pricing Manager (ORA_SCH_PURCHASE_PRICING_MANAGER_JOB) job role are automatically able to access this feature.
Review Purchase Orders Impacted by Mass Replacement
When you mass replace unfulfilled purchase order lines, it’s important to know the purchase order lines that get impacted, the attributes that change, and the new purchase order lines that get created in this process. With this update, you can review this information on the replacement details page after a mass replacement is performed.
The replacement details page has two new sections, Replacement POs and Reinstatement POs. These sections show purchase order lines that have undergone mass updates during the replacement phase and reinstatement phase respectively.
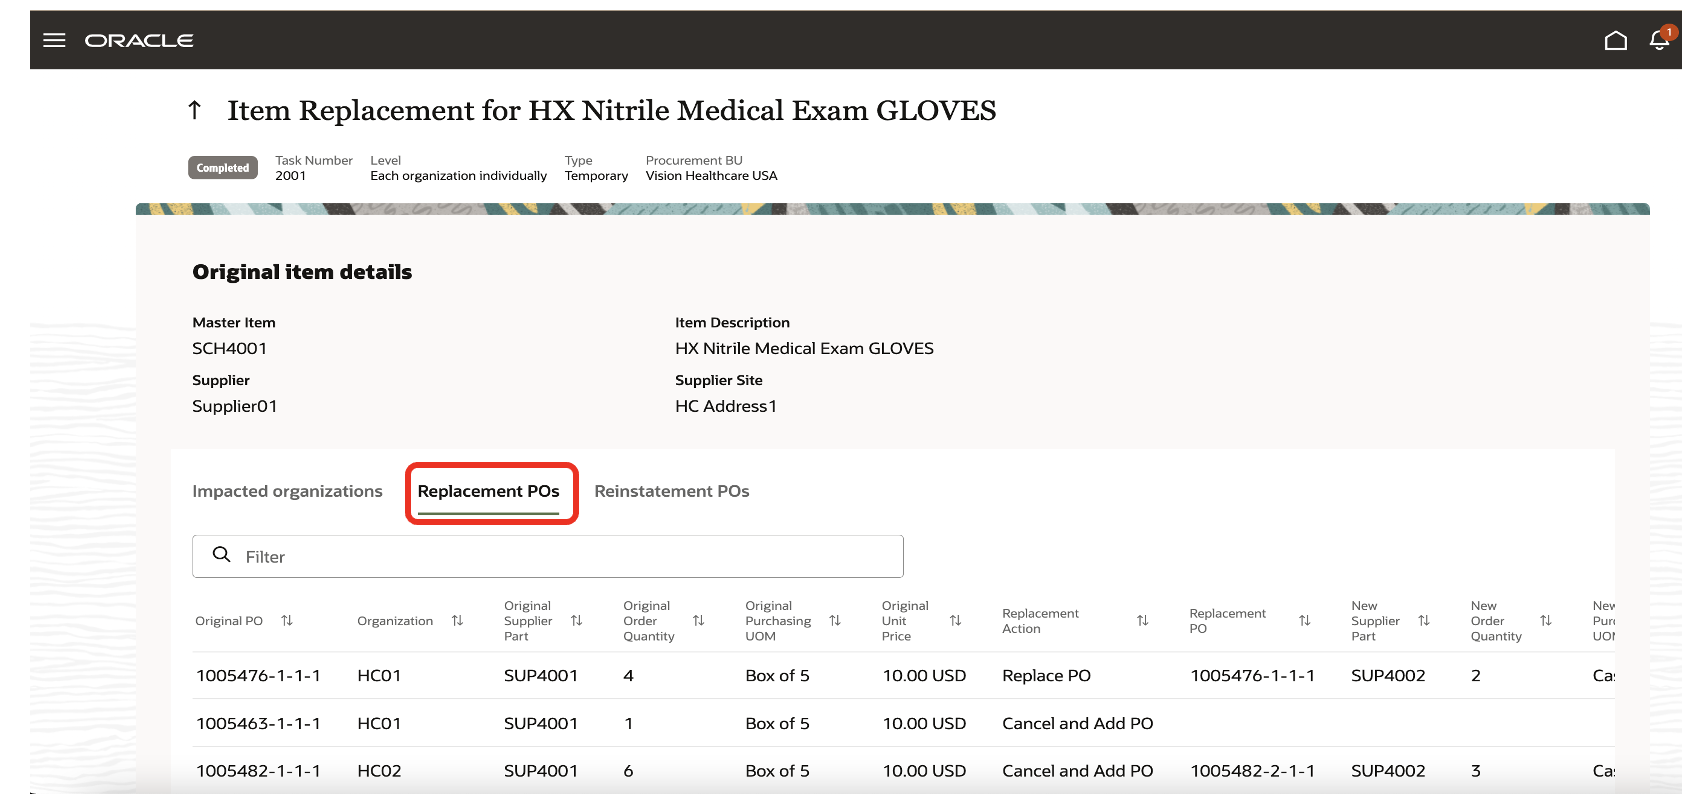
Summary of Purchase Orders Impacted by Mass Replacement
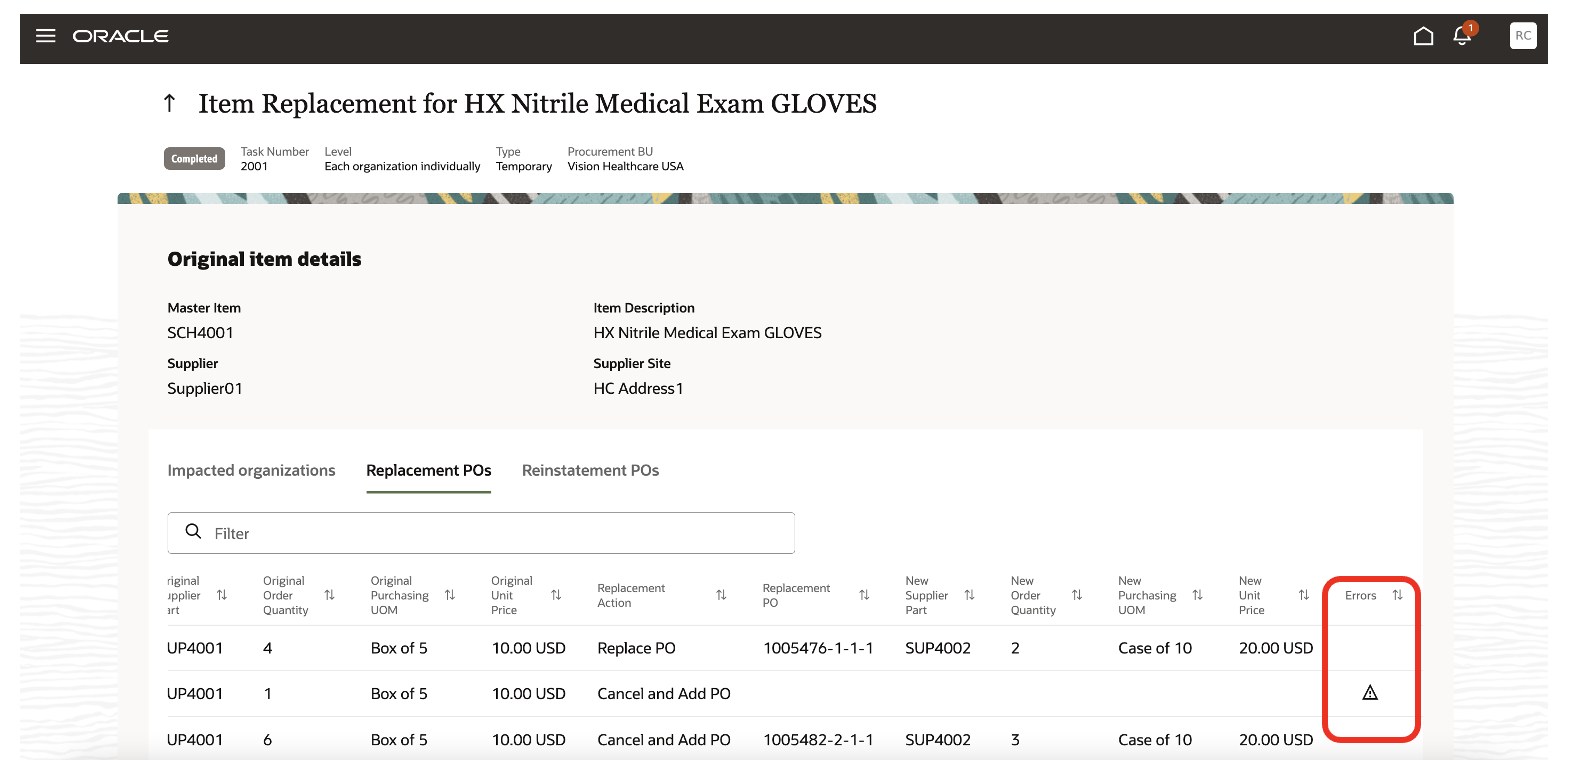
On this page, you can review attributes like document number, supplier part number, order quantity, purchasing unit of measure, and unit price derived for a PO line during the mass replacement against the original purchase order line attributes. You can also view the replacement action taken against each PO line as a historical reference. Any exception for a PO line during the mass replacement is highlighted against the respective PO line to indicate that the change isn't implemented on that line.
With this summarized view, you can view the purchase orders impacted by mass replacement. You can also track the replacement actions taken against each PO line and the attributes changed on the purchase order lines as a part of mass update.
Steps to Enable
Make the feature accessible by assigning or updating privileges and/or job roles. Details are provided in the Role section below.
You don't need to do anything to enable this feature.
Key Resources
- Refer to the Item Replacement chapter in Oracle Procurement Cloud documentation, available in the Oracle Help Center.
Role And Privileges
These are the requirements for giving people access to this feature:
- Users who are assigned the Buyer job role can access this feature. The user must also be defined as a procurement agent with access to Manage Orders for the procurement business units in which they want to manage item replacement tasks.
- Users who are assigned a configured job role that contains the privilege SCH_MANAGE_ITEM_REPLACEMENT (Manage Item Replacement) can access the Manage Item Replacement feature.
Configure Sender Name and Email in Supplier Management Notifications
It's important for your suppliers to trust notifications sent from your Oracle Procurement application. By configuring the From and Reply To email address for supplier onboarding and profile management notifications supplier contacts will recognize them as coming from your organization. Setting the sender email helps avoid registration-related notifications landing in the spam folder of new suppliers. It also enables you to monitor out-of-office emails from suppliers by receiving auto-replies, and bounce-back emails if delivery to a supplier contact isn't successful.
In this example, the supplier user is notified that their supplier registration is approved. The From email address helps the supplier contact identify the company they had registered with, Vision Corporation.
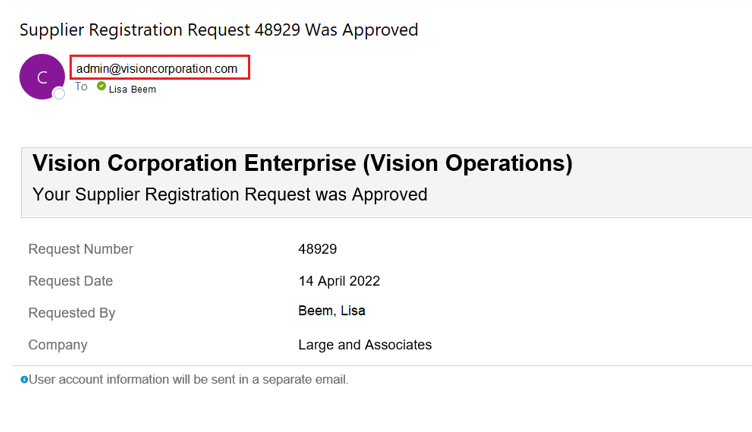
Supplier Registration Approved Email
In another example, an email was sent to the supplier contact to notify them of an expired business classification. However, the email got bounced back because the contact is no longer with the company and the email is invalid. This alerts you to follow up with your supplier to update their contacts to ensure they receive future communications.
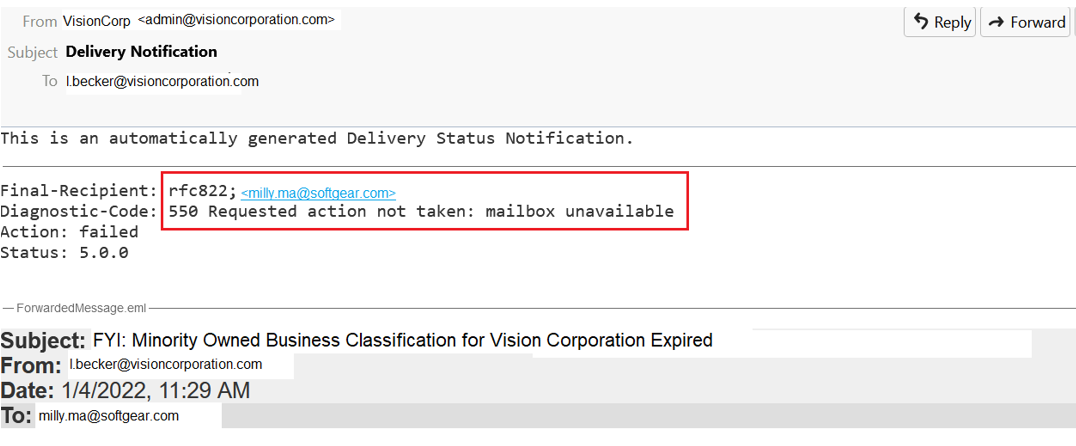
Bounce Back Notification for Expired Business Classification FYI
Steps to Enable
You must configure the Sender Policy Framework (SPF) to use this feature. Refer to the Configure SPF documentation available on the Oracle Help Center.
To configure From and Reply To address and Email “From:” Display Name follow these steps:
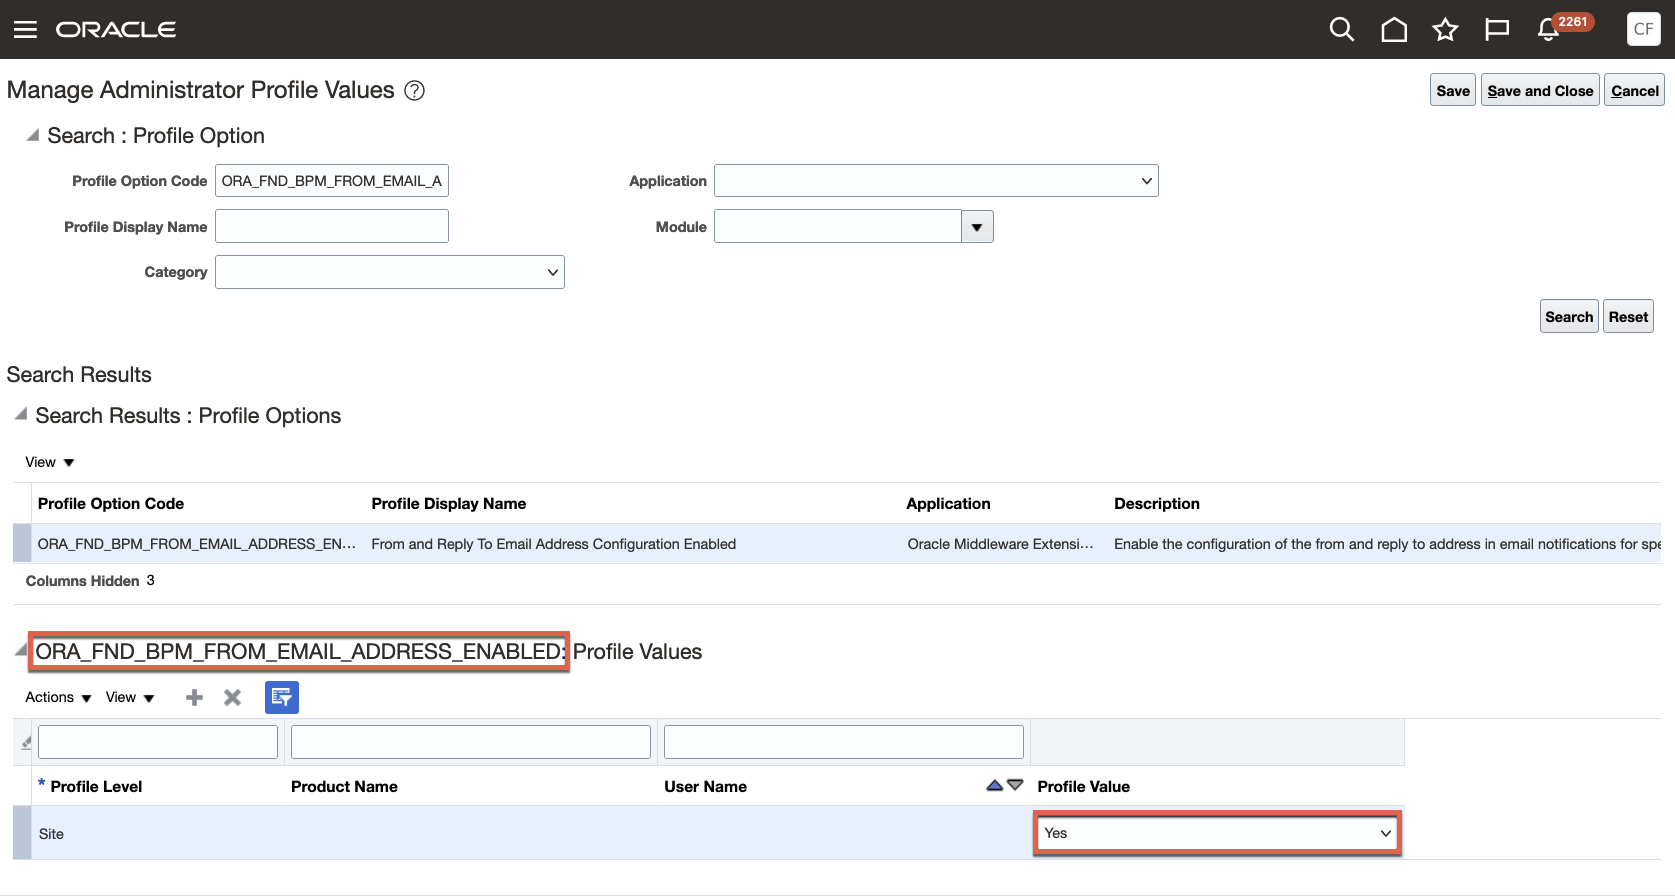
- In the Setup and Maintenance work area, go to the Manage Applications Core Administrator Profile Values task.
- Search for the profile option ORA_FND_BPM_FROM_EMAIL_ADDRESS_ENABLED and set the profile value to Yes at the Site level. This profile option needs to be enabled only once for all the Fusion Cloud Application products.
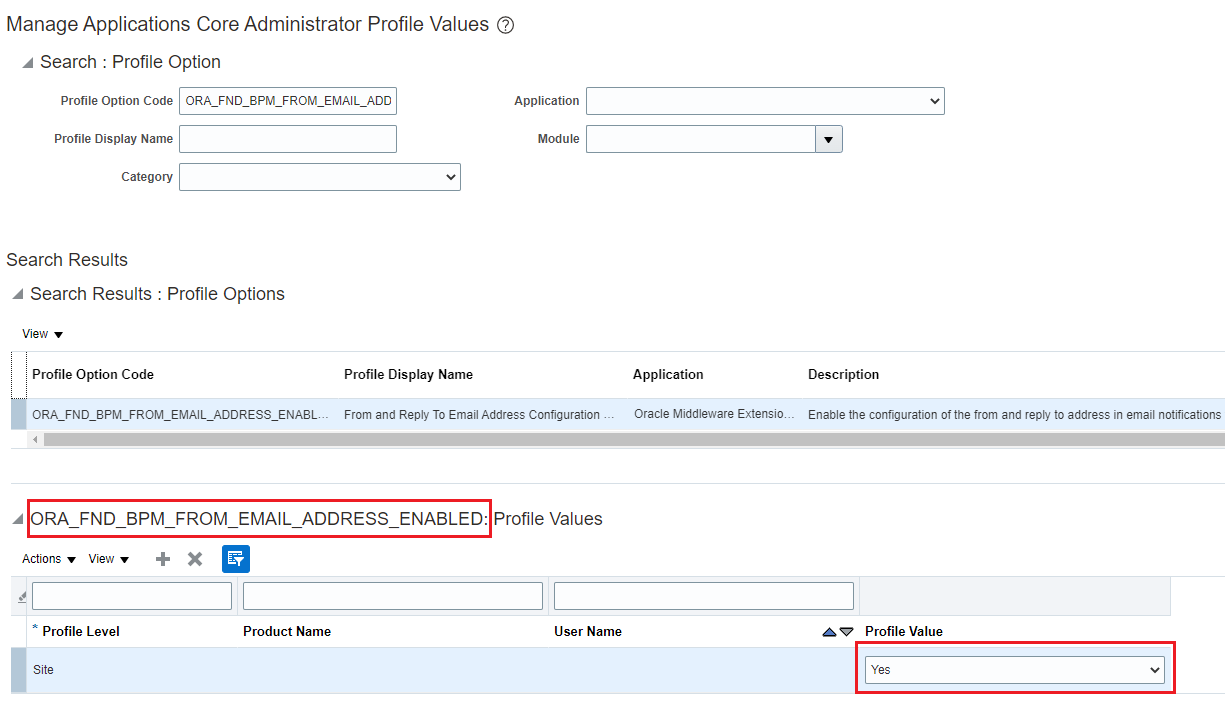
Enable the Feature Using the Setup Task Manage Applications Core Administrator Profile Values
- In BPM Worklist, click the Task Configuration tab, select workflow task such as BusinessClassificationExpireFYI.
Here's a list of BPM tasks for supplier profile related notifications for which you can configure to specify From and Reply To address and From Display Name for your communications with supplier users:
- Supplier Profile Change Request Approved/Rejected/Canceled - ProfileChangeRequestSupplierFYI
- Supplier User Account Created - UserAccountCreateFYI
- Supplier User Account Updated - UserAccountUpateFYI
- Supplier User Account Inactivated - UserAccountInactiveFYI
- Supplier Business Classification Expiring or Expired - BusinessClassificationExpireFYI
- Click the Edit task icon in the Tasks to be configured toolbar.
- Open the Notifications subtab.
- Open the Notifications subtab, click the Expand More icon. For this feature to work properly, follow the configuration in the next two steps.
- For the options under Email: From and Reply To address, select the last one to specify the email address. Enter your value in quotes, for example: "admin@visioncorporation.com".
- For the options under Email: “From:” Display Name, select to specify the text to display. Enter your value in quotes, for example: "VisionCorp".
- Click the Commit task icon in the Tasks to be configured toolbar when you're ready to roll out your changes.
NOTE: Provide a single email address and a single display name as described above. Selecting other options won't change the sender name and email in supplier management notifications.
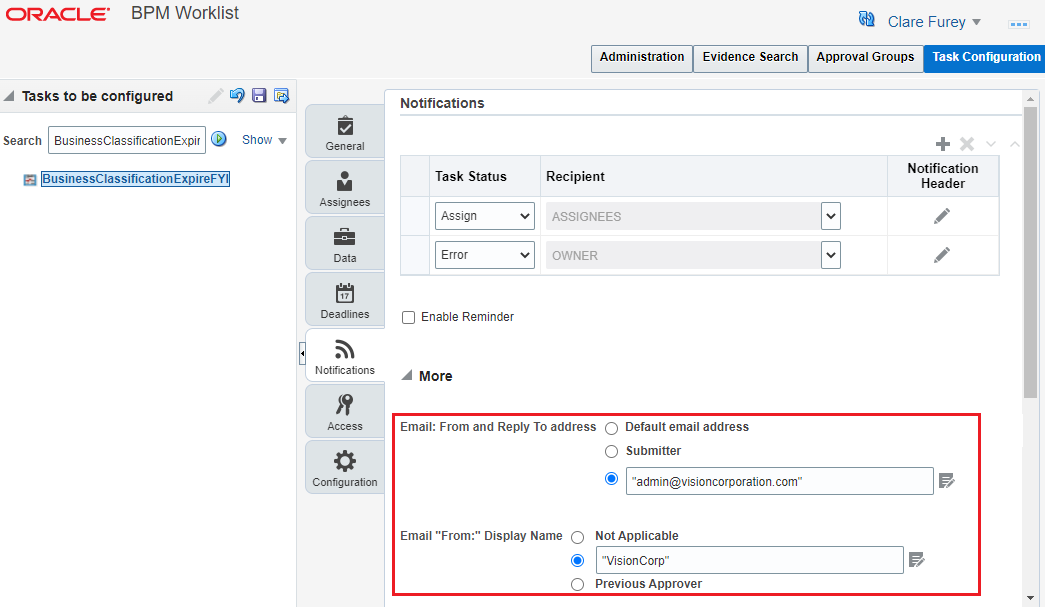
Set the From and Reply To Address, From Display Name in BPM Worklist
Supplier Registration
Here's a list of notifications you can specify a From and Reply To email address for your communications with supplier contacts during registration:
- Supplier Registration Approved
- Supplier Registration Rejected
- Supplier Registration Save for Later
- Supplier Registration Request to Resubmit
- New Supplier Notification (for newly approved spend authorized suppliers)
Setup steps differ from BPM notification tasks since the supplier contact is not a user in supplier portal during registration. To configure the From and Reply To email address for the supplier registration notifications, follow these steps:
-
In the Setup and Maintenance work area, go to the Manage Supplier Profile Options task.
-
For profile option ORA_POZ_FROM_EMAIL_ADDRESS, specify the email address as the profile value at the Site level.
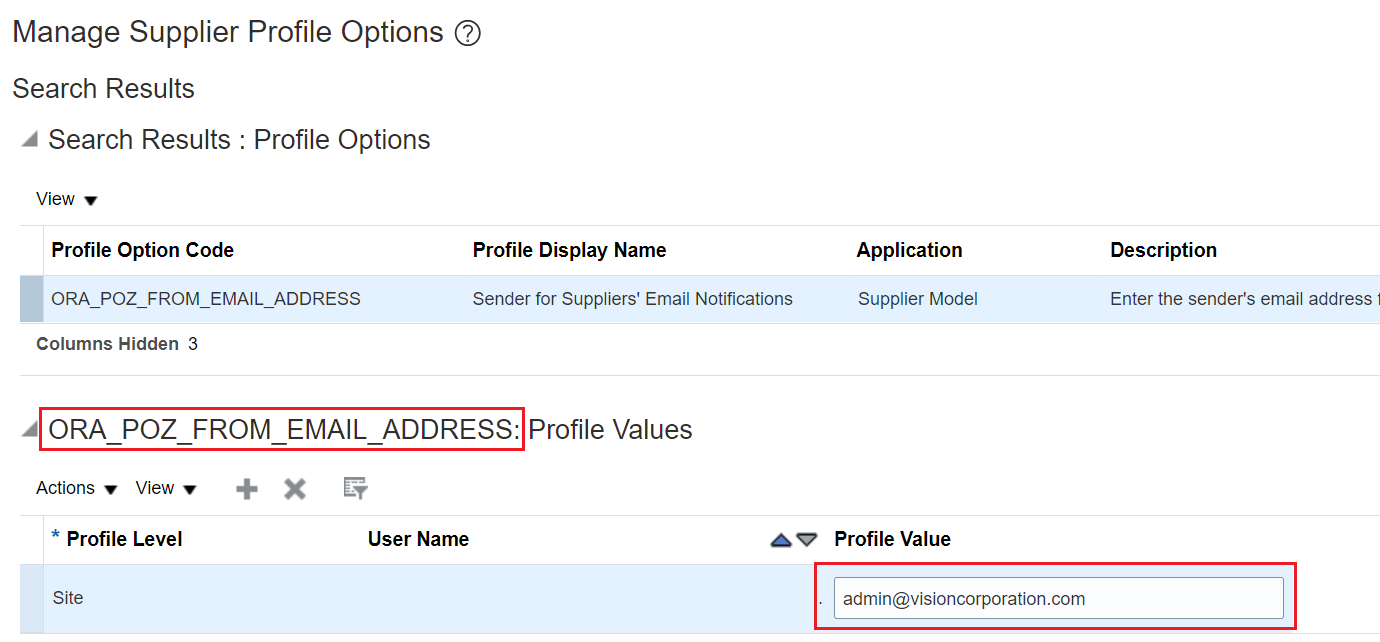
Specify From and Reply To Address Using the Setup Task Manage Supplier Profile Options
User Management Notifications
The Security Console controls user management notifications sent to supplier users, such as New User Account, Password Expiration, etc. To configure the sender email for these notifications you need to log a Service Request to enable DomainKeys Identified Mail (DKIM). Refer to the Configure Email Security documentation for details. Note that this is available only for pods in Oracle Cloud Infrastructure (OCI).
Tips And Considerations
- After completing all the setup, test and ensure your supplier emails are delivered to the inbox of a separate email domain other than your own company's domain. Incorrect or incomplete setup may lead to email delivery to the spam folder or stop the email delivery to your suppliers.
- On updating the profile option ORA_FND_BPM_FROM_EMAIL_ADDRESS_ENABLED, you may notice some time lag in setting to take effect in the BPM Worklist.
Key Resources
- Refer to the Configure SPF documentation available on the Oracle Help Center.
- For best practice on email security, refer to the Configure Email Security documentation on the Oracle Help Center.
- Refer to the Set Up the From Display Name in Workflow Email Notifications on the Oracle Help Center.
Role And Privileges
To set up this feature, you'll need this predefined job role:
- Procurement Application Administrator (ORA_PO_PROCUREMENT_APPLICATION_ADMIN_JOB)
Maintain Multiple Supplier Emails for Communicating Purchase Orders
Suppliers often require purchase orders be emailed to multiple contacts. However, manually adding supplier email addresses on each purchase order can be error prone, which risks supplier communication and limits touchless buying goals. Maintaining multiple supplier email recipients on supplier sites for communicating purchase orders automates the process. The correct emails are automatically added to the purchase order when created with no manual intervention. This results in seamless communication of new orders to suppliers thereby reducing fulfillment delays and improving transaction efficiency.
You can add multiple email addresses for a supplier site using: the Edit Supplier Site page, Supplier Site Import, and the Suppliers REST service when email is set as the communication method for the site. Use commas to separate multiple email addresses.
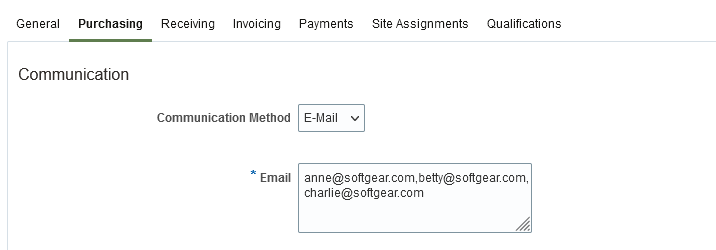
Enter Multiple Communication Emails on Supplier Site
Steps to Enable
You don't need to do anything to enable this feature.
Tips And Considerations
-
When the supplier site emails don't default to the purchase order, and if the supplier site address has an associated contact (referred to as an address contact in the supplier profile), then that contact's email is defaulted onto the purchase order instead. If the site address has no contact or multiple contacts then the supplier site emails will default.
-
Purchase agreements don't support multiple communication emails. When defaulting from the supplier site, if multiple supplier site emails exist, then only the first email is defaulted. Otherwise, the defaulting behavior described in the preceding paragraph for the purchase order applies.
Key Resources
- Refer to the What's New and Readiness Training for the Communicate Purchase Orders to Multiple Email Recipients feature. This is a Purchasing feature in update 21A.
Role And Privileges
You have a couple of options for giving people access to this feature, depending on whether you're assigning them predefined job roles or your own configured job roles.
- Users who are assigned any of these predefined job roles can access this feature:
- Supplier Manager (ORA_POZ_SUPPLIER_MANAGER_ABSTRACT)
- Supplier Administrator (ORA_POZ_SUPPLIER_ADMINISTRATOR_ABSTRACT)
- Users who are assigned a configured job role that contains these privileges can access this feature:
- Maintain Supplier (POZ_MAINTAIN_SUPPLIER_PRIV)
- Maintain Supplier Site (POZ_MAINTAIN_SUPPLIER_SITES_PRIV)
- Maintain Supplier Site Purchasing Information (POZ_MAINTAIN_SUPPLIER_PURCHASING_INFORMATION_PRIV)
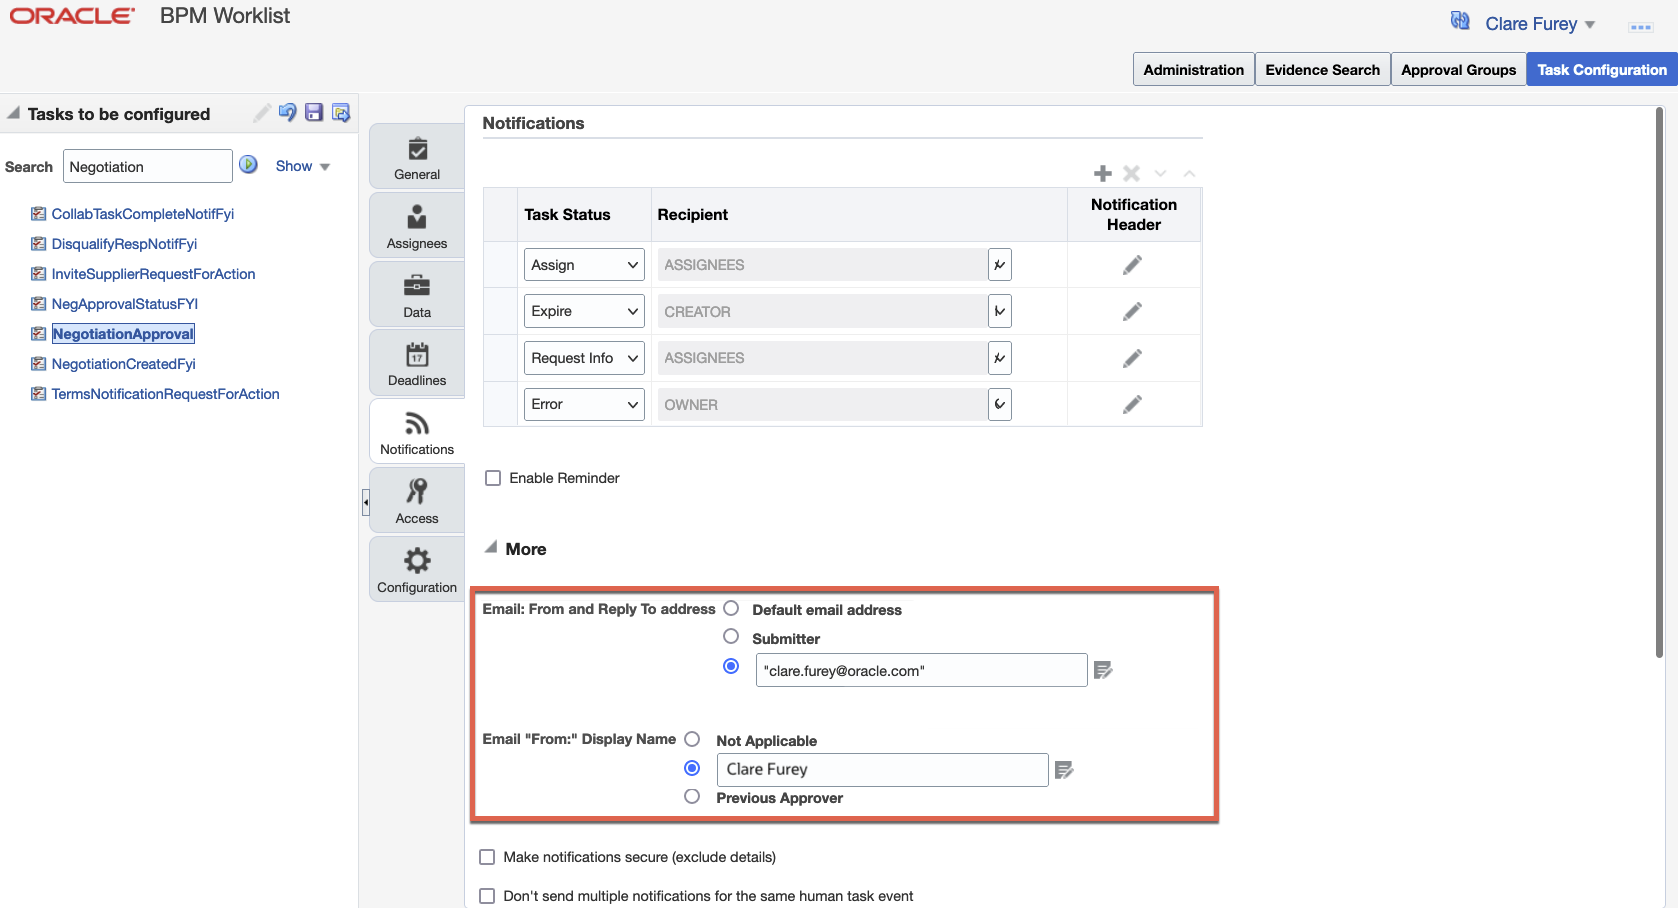
Configure Sender Name and Email in Sourcing Notifications
Category managers communicate with suppliers through notification emails sent by the application throughout the negotiation process. These are time sensitive notifications like invitation or award decisions. Therefore, it’s important they receive an out-of-office reply if supplier contact is out of the office or a bounce back (delivery failure) email if delivery isn't successful. Alerting category managers is critical so they can reach out to alternate supplier contacts to ensure invitations are communicated so suppliers can submit their bids on time.
The notifications sent by the application must also identify the organization, and the category manager who is initiating these emails. This feature allows you to configure the From and Reply To email address as category manager’s email, or a generic email if you don’t wish to expose category manager’s details, so they're recognized as coming from your organization. You can then monitor out-of-office emails and bounce back emails from suppliers by receiving auto replies. As a category manager, you can then take follow-up action for time-sensitive supplier notifications like Supplier Invitation or Negotiation Award.
Similar capability is also available for supplier contacts who don't have a user account but have a valid email address, or for suppliers invited using additional email addresses.
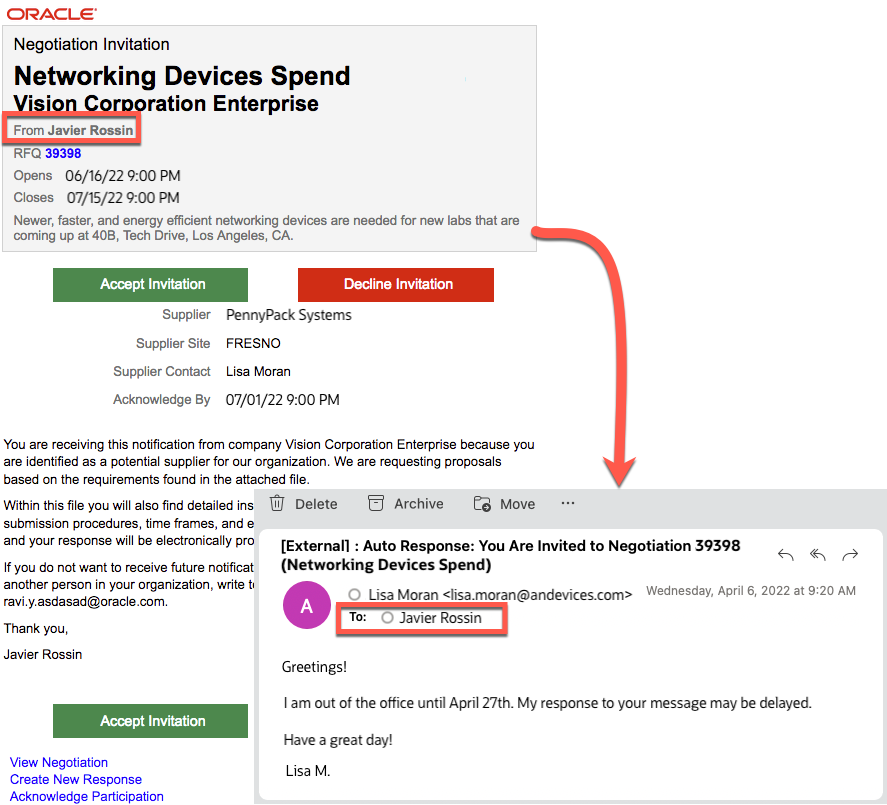
Supplier's Out-of-Office Email
Steps to Enable
After completing all the setup, test and ensure your supplier emails are delivered to the inbox of a separate email domain other than your own company's domain. Incorrect or incomplete setup may lead to email delivery to the spam folder or stop the email delivery to your suppliers.
You must configure the Sender Policy Framework (SPF) to use this feature. Refer to the Configure SPF documentation available on the Oracle Help Center.
To configure From and Reply To address, follow these steps:
- In the Setup and Maintenance work area, go to the Manage Applications Core Administrator Profile Values or Manage Administrator Profile Values task.
- Search for the profile option ORA_FND_BPM_FROM_EMAIL_ADDRESS_ENABLED and set the profile value to Yes at the Site level. This profile option needs to be enabled only once for all the Fusion Cloud Application products. On updating the profile option, you may notice some time lag in setting to take effect in the BPM Worklist.
- In BPM Worklist, on the Task Configuration tab, select the workflow task of the notification you want to configure, for example, InviteSupplierRequestForAction.
- On the Tasks to be configured toolbar, click the Edit task icon .
- Open the Notifications subtab and then click the Expand More icon.
- Select one of the Email: From and Reply To address options.
- Select Submitter to show the category manager’s email address. If submitter's address can't be determined, the default email address is used.
- Select to specify the email address to display. Enter your value in quotes, for example “procurement.team@oracle.com”. This option allows you to set a group or generic email if you don't wish to expose the buyer’s email address to suppliers.
- When you're ready to roll out your changes, on the Tasks to be configured toolbar, click the Commit task icon.
To configure Email “From:” Display Name, follow these steps:
- In BPM Worklist, on the Task Configuration tab, select workflow task such as InviteSupplierRequestForAction.
- On the Tasks to be configured toolbar. click the Edit task icon .
- Open the Notifications subtab and then click the Expand More icon.
- Select to specify the text to display as Email “From:” Display Name. Enter your value in quotes, for example "Oracle", or leave blank if you want nothing to appear in the From field. You can also select task:creator in the expression builder to show the task creator's username.
- When you're ready to roll out your changes, on the Tasks to be configured toolbar, click the Commit task icon.
Enable the Feature Using the Setup Task Manage Administrator Profile Values
Set the From and Reply To Address in BPM Worklist
Additionally, to configure the From and Reply To address for the notifications sent to supplier contacts who don't have a user account, but have an email on their profile, or who have an additional email address specified on the negotiation invitation, follow these steps:
- In the Setup and Maintenance work area, go to the Manage Administrator Profile Values task.
- Search for the profile option ORA_PON_FROM_EMAIL_ADDRESS and set the profile value to one of these options at the Site level.
- Select Automatic to show the email address on the application preferences that apply to all workflow tasks.
- Select Buyer to show the category manager’s email address.
- Select Specified Email Address to specify the email address to display.
- If you selected Specified Email Address, search for the profile option ORA_PON_SPECIFIED_EMAIL_ADDRESS and set the profile value to an email address of choice, for example clare.furey@oracle.com.
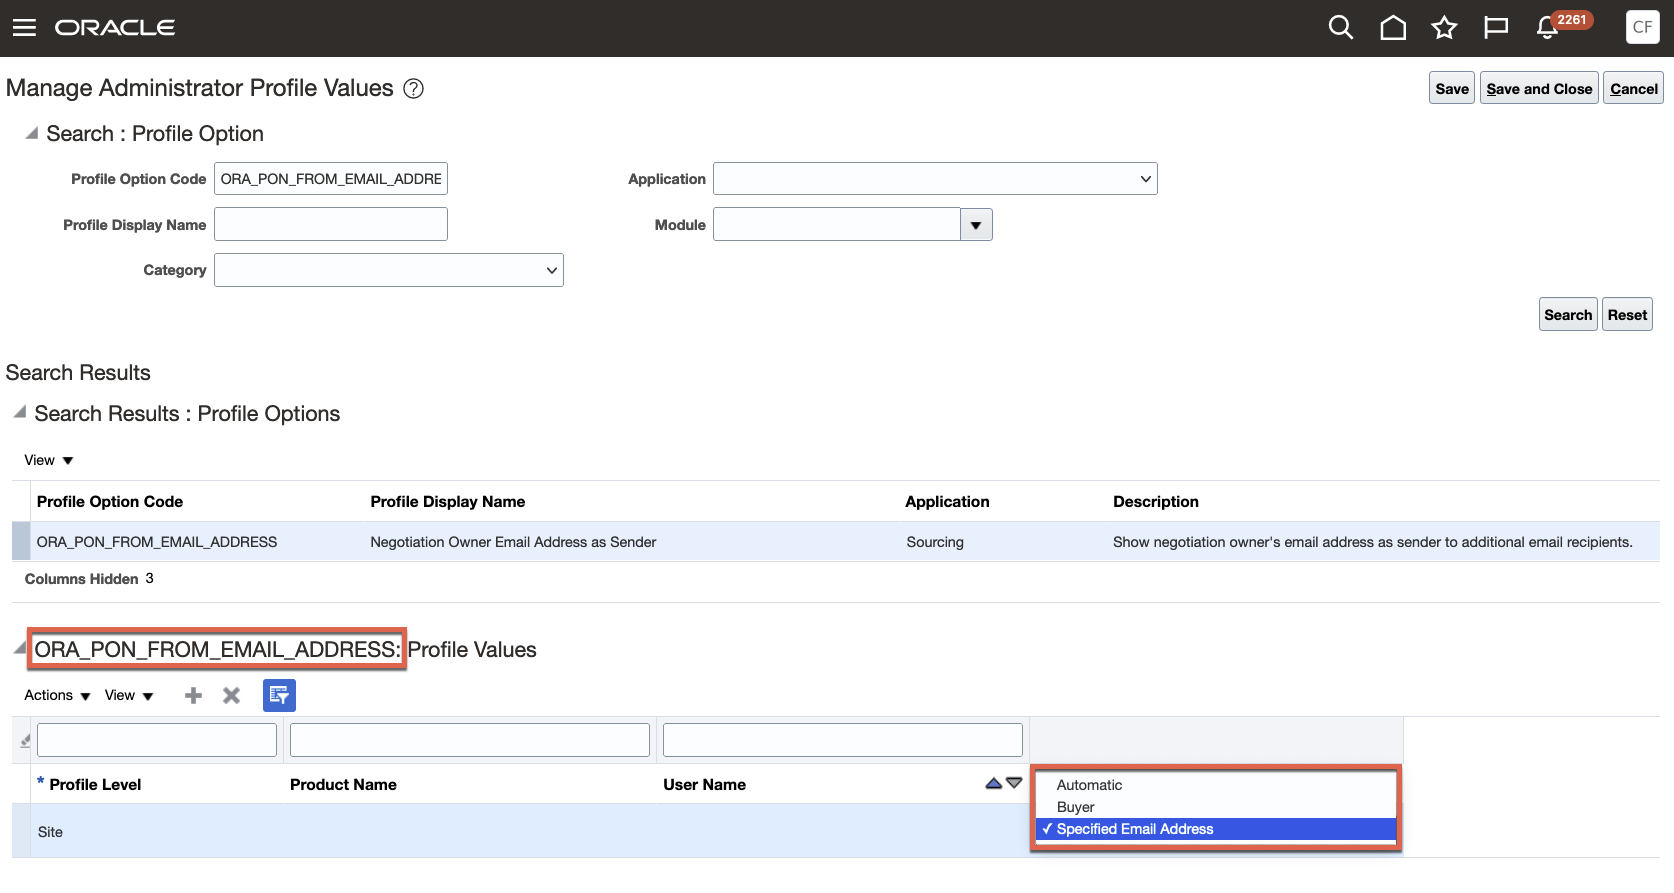
Enable the Feature Using the Setup Task Manage Administrator Profile Values

Set the From and Reply To Address Using the Setup Task Manage Administrator Profile Values
Tips And Considerations
- On updating the profile option ORA_FND_BPM_FROM_EMAIL_ADDRESS_ENABLED, you may notice some time lag in setting to take effect in the BPM Worklist.
- We recommend that you use this configuration for these key notifications sent to suppliers:
- Negotiation Invitation – InviteSupplierRequestForAction
- Terms Notification - TermsNotificationRequestForAction
- Award Decision Notification - AwardDecisionNotifFyi
- Negotiation Response Disqualified - DisqualifyRespNotifFyi
- Make sure that the sender name and email address make sense together in the From field. For example, if you've already set up the sender name to be the category manager's name, you should set up the From field to show the category manager's email address.
Key Resources
- Set Up Sender Policy Framework (SPF)
- Set Up the From Field in Workflow Email Notifications
- For best practice on email security, refer to the Configure Email Security documentation available on the Oracle Help Center.
Role And Privileges
To set up this feature, you'll need this predefined job role:
- Procurement Application Administrator (ORA_PO_PROCUREMENT_APPLICATION_ADMIN_JOB)
Send Invitation Email to Supplier Contacts with No User Account
Some supplier contacts may not have a supplier portal user account as they may be new and not yet onboarded to supplier portal. If such supplier contacts are invited to a negotiation without specifying an additional email, then the negotiation invitation email isn't sent.
Now, if you invite a contact who doesn't have a supplier portal user account, the contact will receive the negotiation invitation email along with the PDF.
These suppliers can then submit their quotes offline and the Category manager can use the surrogate response functionality to record their responses, or if the supplier contacts receive their user accounts, they can submit their quotes directly in the supplier portal.
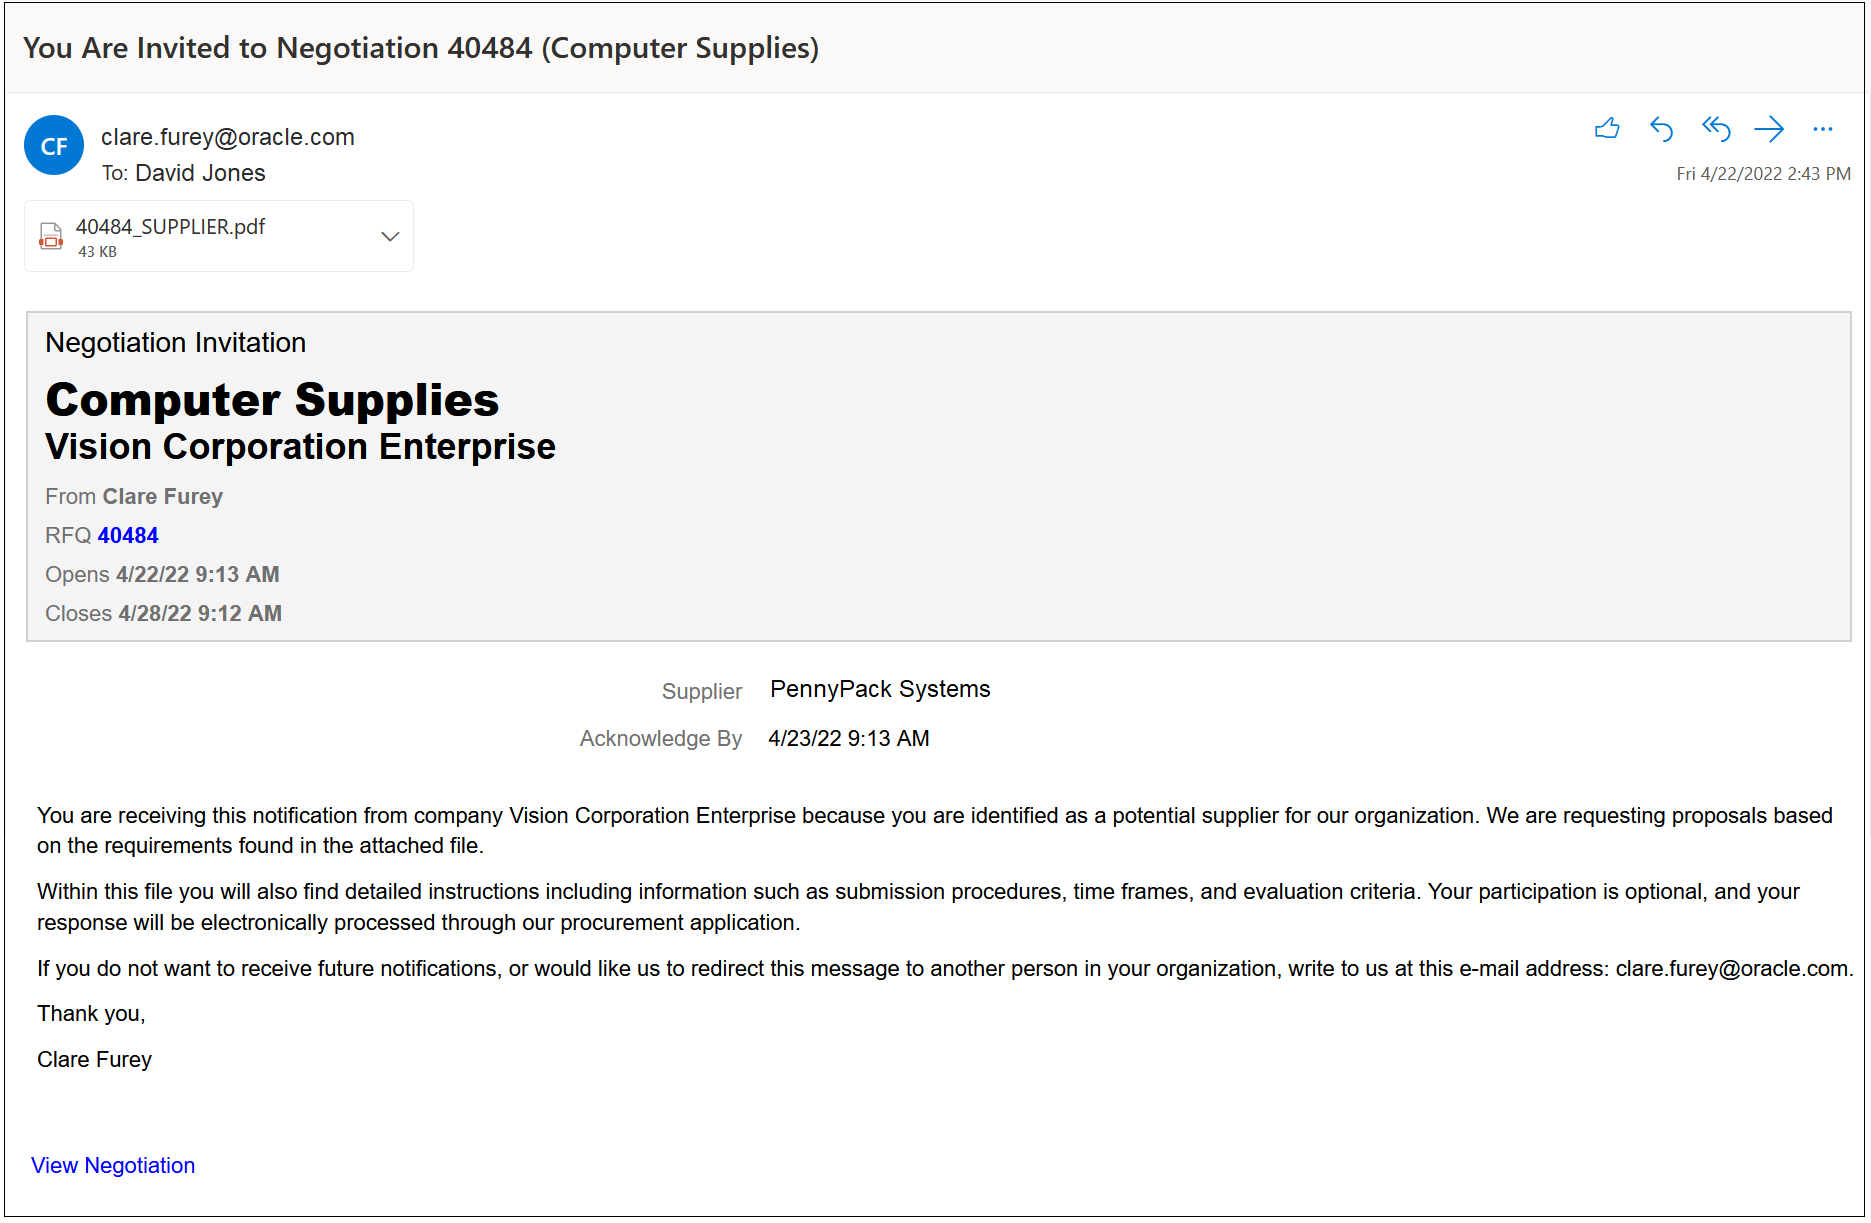
Negotiation Invitation Email
Ensure that negotiations are communicated to supplier contacts that don't have a supplier portal user account. The negotiation invitation and PDF will now be emailed to any selected supplier contact.
Steps to Enable
You don't need to do anything to enable this feature.
Role And Privileges
You have a couple of options for giving people access to this feature, depending on whether you're assigning them predefined job roles or own configured job roles.
- Users who are assigned any of these predefined job roles can access this feature:
- Category Manager (ORA_PON_CATEGORY_MANAGER_JOB)
- Sourcing Project Collaborator (ORA_PON_SOURCING_PROJECT_COLLABORATOR_ABSTRACT)
- Users who are assigned a configured job role that contains these privileges can access this feature:
- Manage Negotiation Supplier Invitation (PON_MANAGE_NEGOTIATION_SUPPLIER_INVITATION_PRIV)
- Create Supplier Negotiation (PON_CREATE_SUPPLIER_NEGOTIATION_PRIV)
- Edit Supplier Negotiation (PON_EDIT_SUPPLIER_NEGOTIATION_PRIV)
Selected Sourcing Bug Fixes in This Update
This update includes some bug fixes that can change the way Oracle Sourcing works. This isn't a full list of all the bug fixes in this update. This list includes the bug fixes that can cause a noticeable change in application behavior.
Notifications Will Not Be Sent to Locked-Out Suppliers
Suppliers can't be removed once you have invited them, but can be locked-out, so that they can't see or respond to the negotiation. Currently, a locked-out supplier receives some notifications during the negotiation process.
With this change, negotiation life-cycle notifications such as pause, resume, close date changes, or amendments won't be sent to the suppliers if they are locked-out. The notifications are resumed if the supplier is unlocked from the Monitor Supplier Activities page.
Oracle reference: 33549433
Steps to Enable
You don't need to do anything to enable this feature.
Supplier Qualification Management
Access Initiatives Using Deep Links
New deep links provide direct access to initiatives without having to navigate through the menu structure. You can use these deep links in business intelligence reports as well as third-party application pages.
When adding deep links to reports or third-party application pages, users simply click the link of the initiative they wish to open in Oracle Fusion Cloud Procurement, without any additional navigation clicks. When clicking a deep link, the user's security assignment is honored; that is, users can access application pages only if they're assigned a job role that allows them access.
Steps to Enable
You can find the complete list of available deep links in the Deep Links work area (Navigator > Tools > Deep links). The initiative deep link supports two actions View & None.
The initiative deep link can be configured to open a specific initiative using the ‘VIEW’ action.
E.g., https://pod.oraclecloud.com/fndSetup/faces/deeplink?objType=INITIATIVE&objKey=initiativeId=<initiativeID>&action=VIEW
The initiatives deep link can also be configured to open the Manage Initiatives page using the ‘NONE’ action.
Refer to the documentation listed in the Key Resources section for more information and instructions.
Key Resources
- For details about how to work with deep links, refer to the Procurement Guide:
Role And Privileges
You have a couple of options for giving people access to the Deep Links work area, depending on whether you're assigning them predefined job roles or your own configured job roles.
- Users who are assigned any of these predefined job roles are automatically able to access the Deep Links work area:
- Application Implementation Consultant (ORA_ASM_APPLICATION_IMPLEMENTATION_CONSULTANT_JOB)
- Procurement Application Administrator (ORA_PO_PROCUREMENT_APPLICATION_ADMIN_JOB)
- Users who are assigned configured job roles that contain this privilege are able to access the Deep Links work area:
- View Administration Link (FND_VIEW_ADMIN_LINK_PRIV)
If you're using deep links specifically for reports, here are the privileges you need For Business Intelligence Publisher and Oracle Transactional Business Intelligence (OTBI):
- BI Author Role (BIAuthor)
- BI Consumer Role (BIConsumer)
Configure Sender Name and Email in Supplier Qualification Notifications
Qualification managers communicate with suppliers through notification emails sent by the application throughout the supplier qualification process. These are time-sensitive notifications such as Respond to Questionnaire or Response Resubmission Required which need to get delivered to your suppliers. You can now configure the From and Reply To name and email address on supplier notifications so they're recognized as coming from your organization and don't get stuck in spam folders. Setting the From and Reply To email address also enables you to monitor out-of-office emails from suppliers by receiving autoreplies as well as bounce-back emails if delivery to a supplier contact isn't successful. This reduces potential delays or miscommunications on time-sensitive supplier qualification notifications.
In this example, the From and Reply To name and email are configured to be John Smith who's the initiative owner. He's notified that the supplier contact, Jane Doe is out of the office when a questionnaire was sent which triggered the automatic reply.
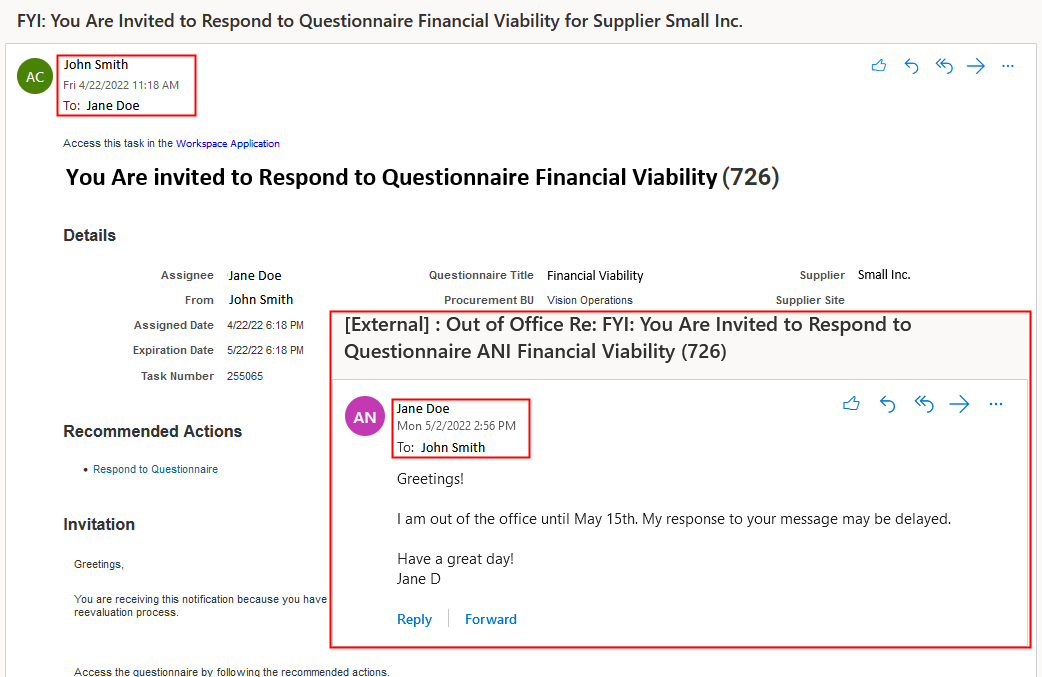
Out of Office Email from Supplier
Steps to Enable
You must configure the Sender Policy Framework (SPF) to use this feature. Refer to the Configure SPF documentation available on the Oracle Help Center.
To enable the profile option: (Enable only once for all the Oracle Fusion Cloud Application products)
- In the Setup and Maintenance work area, go to the Manage Applications Core Administrator Profile Values task.
- Search for profile option code: ORA_FND_BPM_FROM_EMAIL_ADDRESS_ENABLED.
- Set the profile value to Yes for Site Profile Level and save changes. On updating the profile option, you may notice some time lag in setting to take effect in the BPM Worklist.

Enable the Profile Option
To configure Email: From and Reply To address, follow these steps:
- In BPM Worklist, go to the Task Configuration tab.
- Search for the task and in the Tasks to be configured toolbar, click the Edit task icon. Here's a list of BPM tasks for which you can configure to specify From email address and From display name for your communication with supplier users:
- Invitation to respond to questionnaire (RespondToQstnrFyi)
- Questionnaire is canceled (QnnaireCanceledFyi)
- Go to the Notifications subtab. Click the Expand More icon.
- In the options for Email: From and Reply To address, select the last one to specify the email address. Enter your value in quotes, for example "qual.manager@VisionCorporation.com".
- In the options for Email “From:” Display Name, select to specify the text to display. Enter your value in quotes, for example "John Smith".
- Click the Save and Commit icons on the Tasks to be configured toolbar.
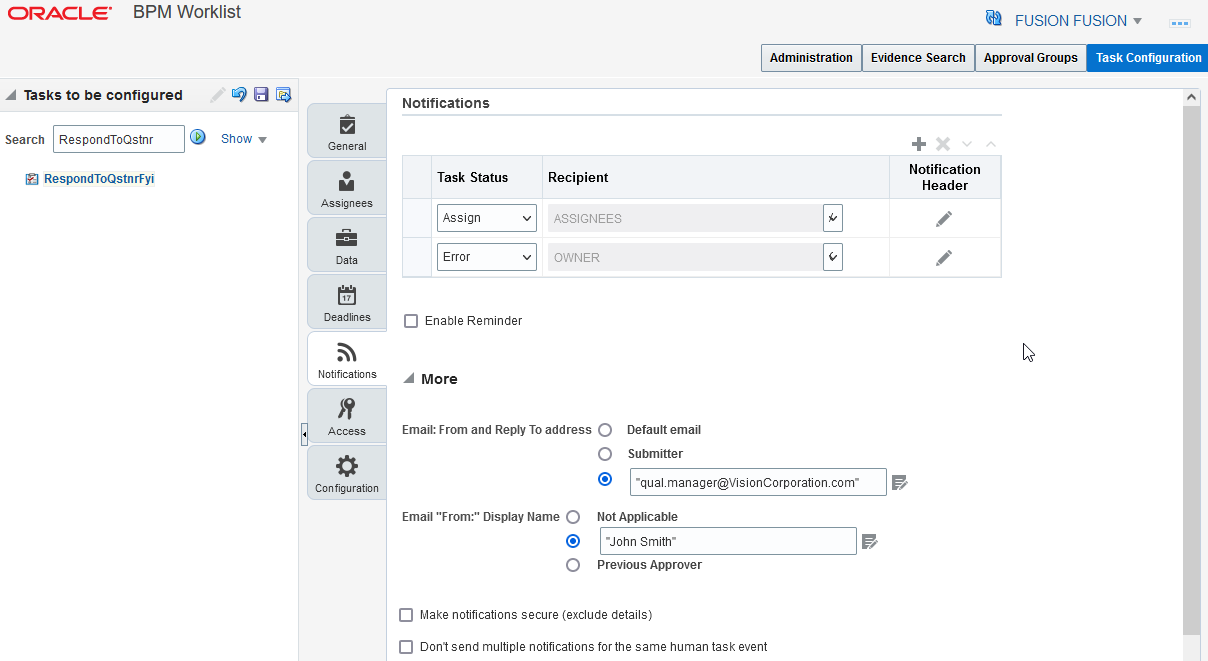
Set the From and Reply To Address in BPM Worklist
Tips And Considerations
- After completing all the setup, test and ensure your supplier emails are delivered to the inbox of a separate email domain other than your own company's domain. Incorrect or incomplete setup may lead to email delivery to the spam folder or stop the email delivery to your suppliers.
- On updating the profile option ORA_FND_BPM_FROM_EMAIL_ADDRESS_ENABLED, you may notice some time lag for the setting to take effect in the BPM Worklist.
- If you configure the From and Reply To to be a free form email, you can specify the Email From display name to be the person who owns this email address.
- If you use the Submitter option for From and Reply to address, you can use the Not Applicable option for the Email From display name. In this case, the submitter's name will be used for the Email From display name.
Key Resources
- You must configure the Sender Policy Framework (SPF) to use this feature. Refer to the the Configure SPF documentation available on the Oracle Help Center.
- For best practice on email security, refer to the Configure Email Security documentation available on the Oracle Help Center.
- Refer to the Set Up the From Display Name in Workflow Email Notifications on the Oracle Help Center.
Role And Privileges
To set up this feature, you'll need this predefined job role:
- Procurement Application Administrator (ORA_PO_PROCUREMENT_APPLICATION_ADMIN_JOB)
Selected Supplier Qualification Management Bug Fixes in This Update
This update includes some bug fixes that can change the way Oracle Supplier Qualification Management works. This isn't a full list of all the bug fixes in this update. This list includes the bug fixes that can cause a noticeable change in application behavior.
Apply Application Limits for Large Initiatives
Limits are now enforced on the number of suppliers, internal responders, and qualifications that can be added to an initiative to address performance issues.
Here are the volume limits enforced on Supplier Qualification initiatives:
- Maximum number of suppliers you can add to an initiative: 400
- Maximum number of internal responders you can add for each supplier in survey initiatives: 25
- Maximum number of qualifications an initiative can generate: 2000
NOTE: The number of qualifications equals the number of suppliers times the number of qualification areas. You can split the suppliers and create a new initiative when you need to create more than 2000 qualifications.
Oracle reference: 33575190
Steps to Enable
You don't need to do anything to enable this feature.
Create a New Data Set from an Existing One
Copy an existing data set to create a new data set. This action is available for user generated data sets and not for seeded data sets, such as Requisitions, Purchase Orders, Invoices, and Expenses. This reduces the effort that would otherwise be spent uploading using an FBDI template. Additionally, you can now edit the purpose of an existing data set from the data sets tab.
Here’s how you create a copy of an existing data set:
- In the data set menu options, click Copy.
- Enter the name and select a purpose for the new data set and click Create.
- Once the process of creating the new data set is completed, you can see it in the list of data sets by refreshing the Configuration page.
Click the edit icon to change the purpose of a data set.
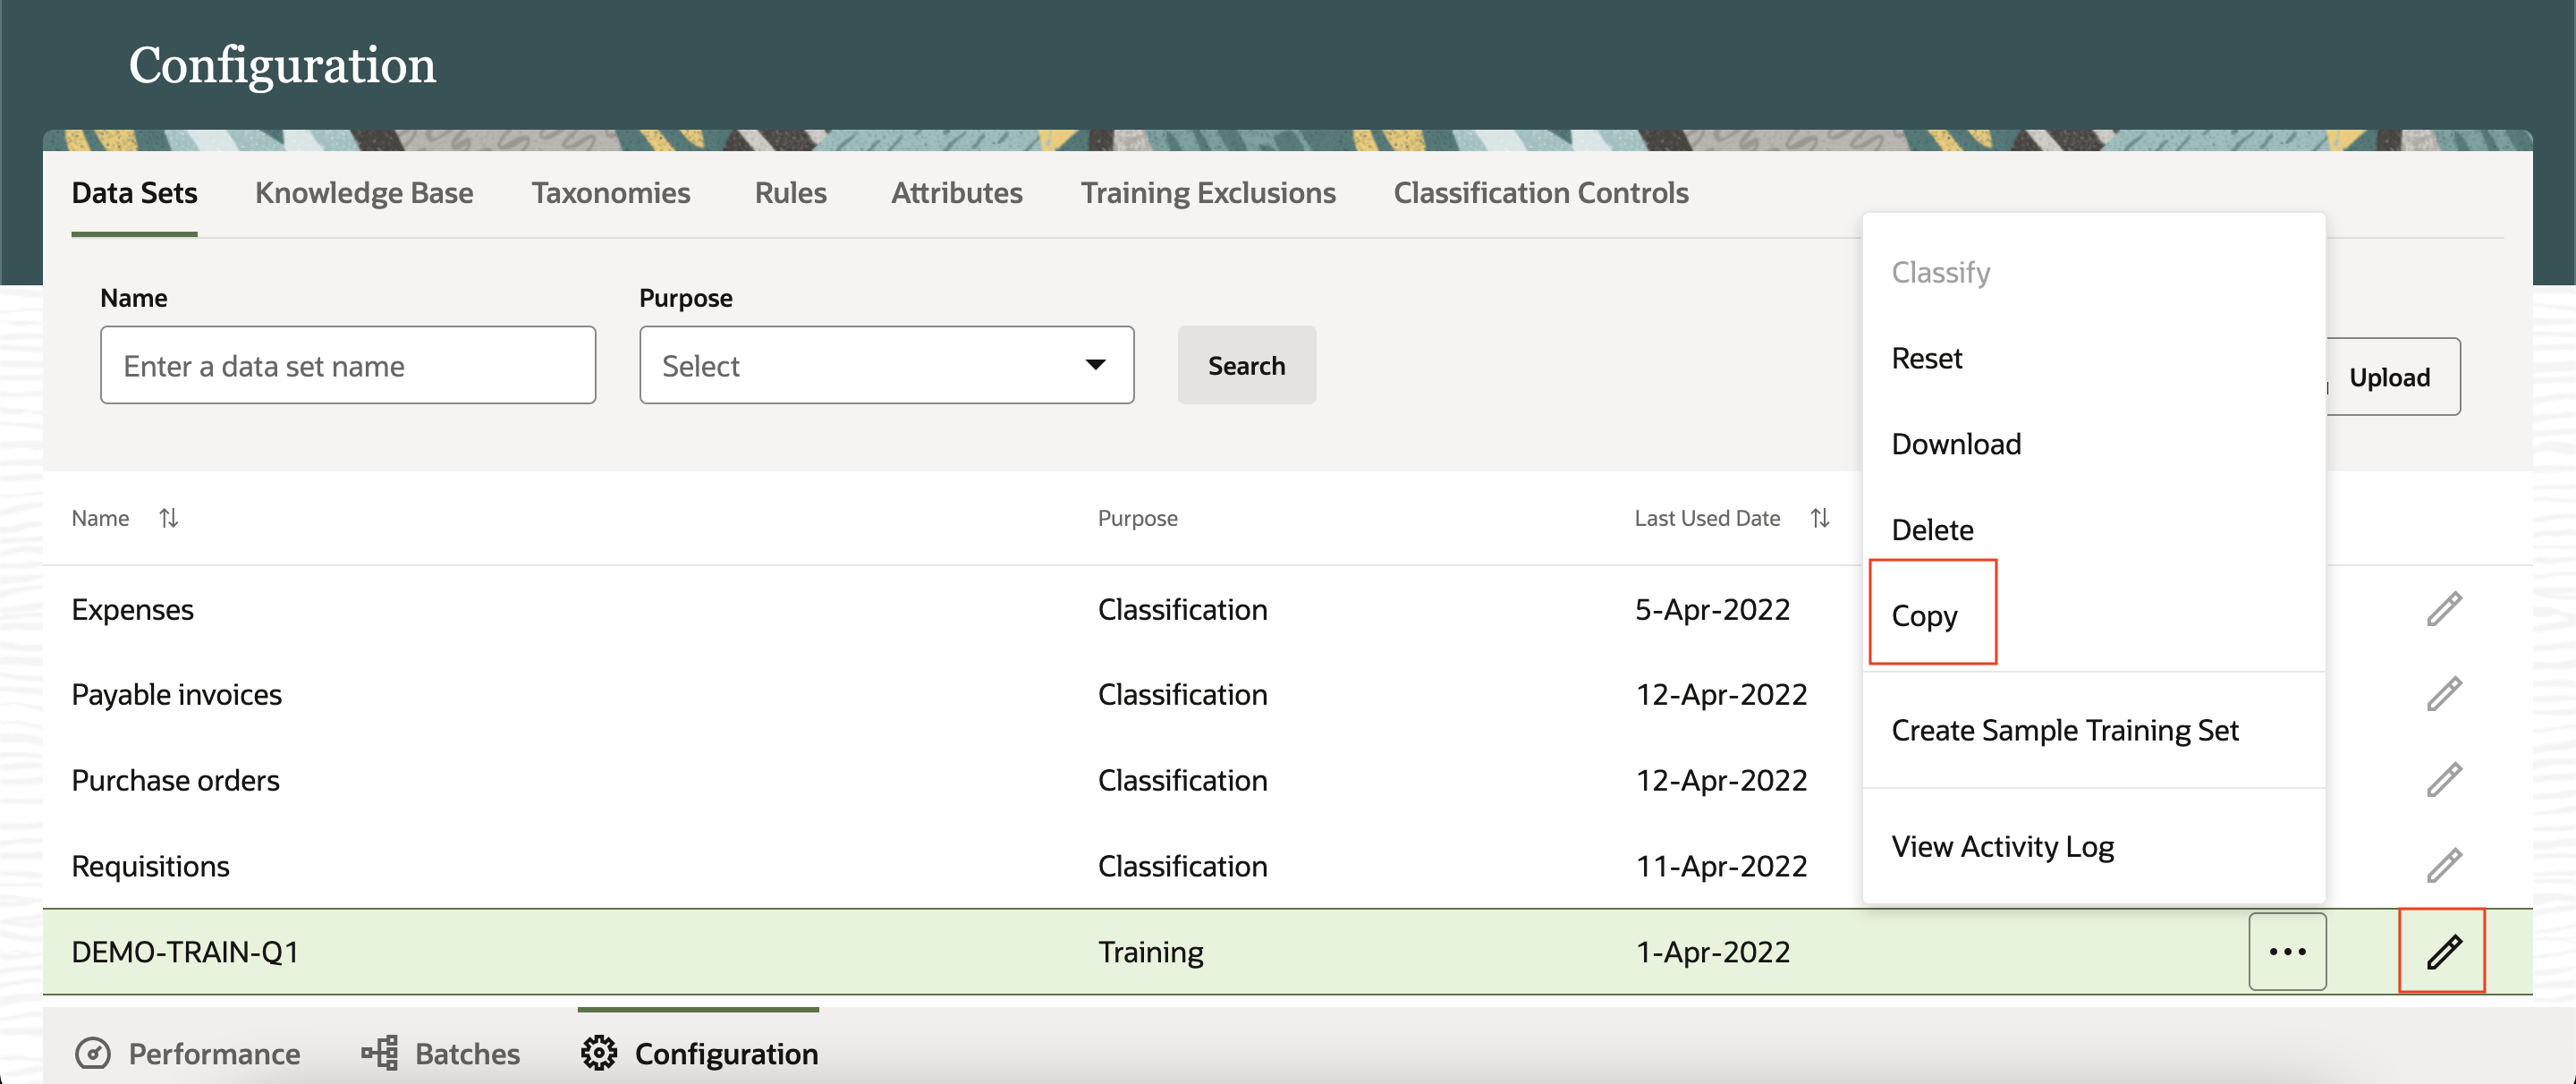
Copy Data Set
Save time during initial configuration and during iterative improvement of the knowledge base. Also use the simplified edit feature to change the purpose of the data set.
Steps to Enable
You don't need to do anything to enable this feature.
Key Resources
- Refer to the Spend Classification chapter in Oracle Procurement Cloud documentation, available in the Oracle Help Center.
Role And Privileges
This feature is available without additional setup to users who have access to spend classification.
You have a couple of options for giving people access to Spend Classification, depending on whether you're assigning them predefined job roles or your own configured job roles.
- Users who are assigned this predefined job role can access this feature:
- Procurement Data Analyst (ORA_POI_PROCUREMENT_DATA_ANALYST_ABSTRACT)
- Users who are assigned a configured job role that contains these privileges can access this feature:
- Administer Spend Classification Application (POI_ADMINISTER_SPEND_CLASSIFICATION_PRIV)
- Manage Spend Classification Batch (POI_MANAGE_SPEND_CLASSIFICATION_BATCH_PRIV)
- View Spend Classification Work Area (POI_SPEND_CLASSIFICATION_WORKAREA_PRIV)
Track Progress of the Classification Process for a Batch
Estimate the time in which the classification process is expected to be completed. The batch summary now shows a visual percentage indicator that refreshes periodically to track progress of the classification process.
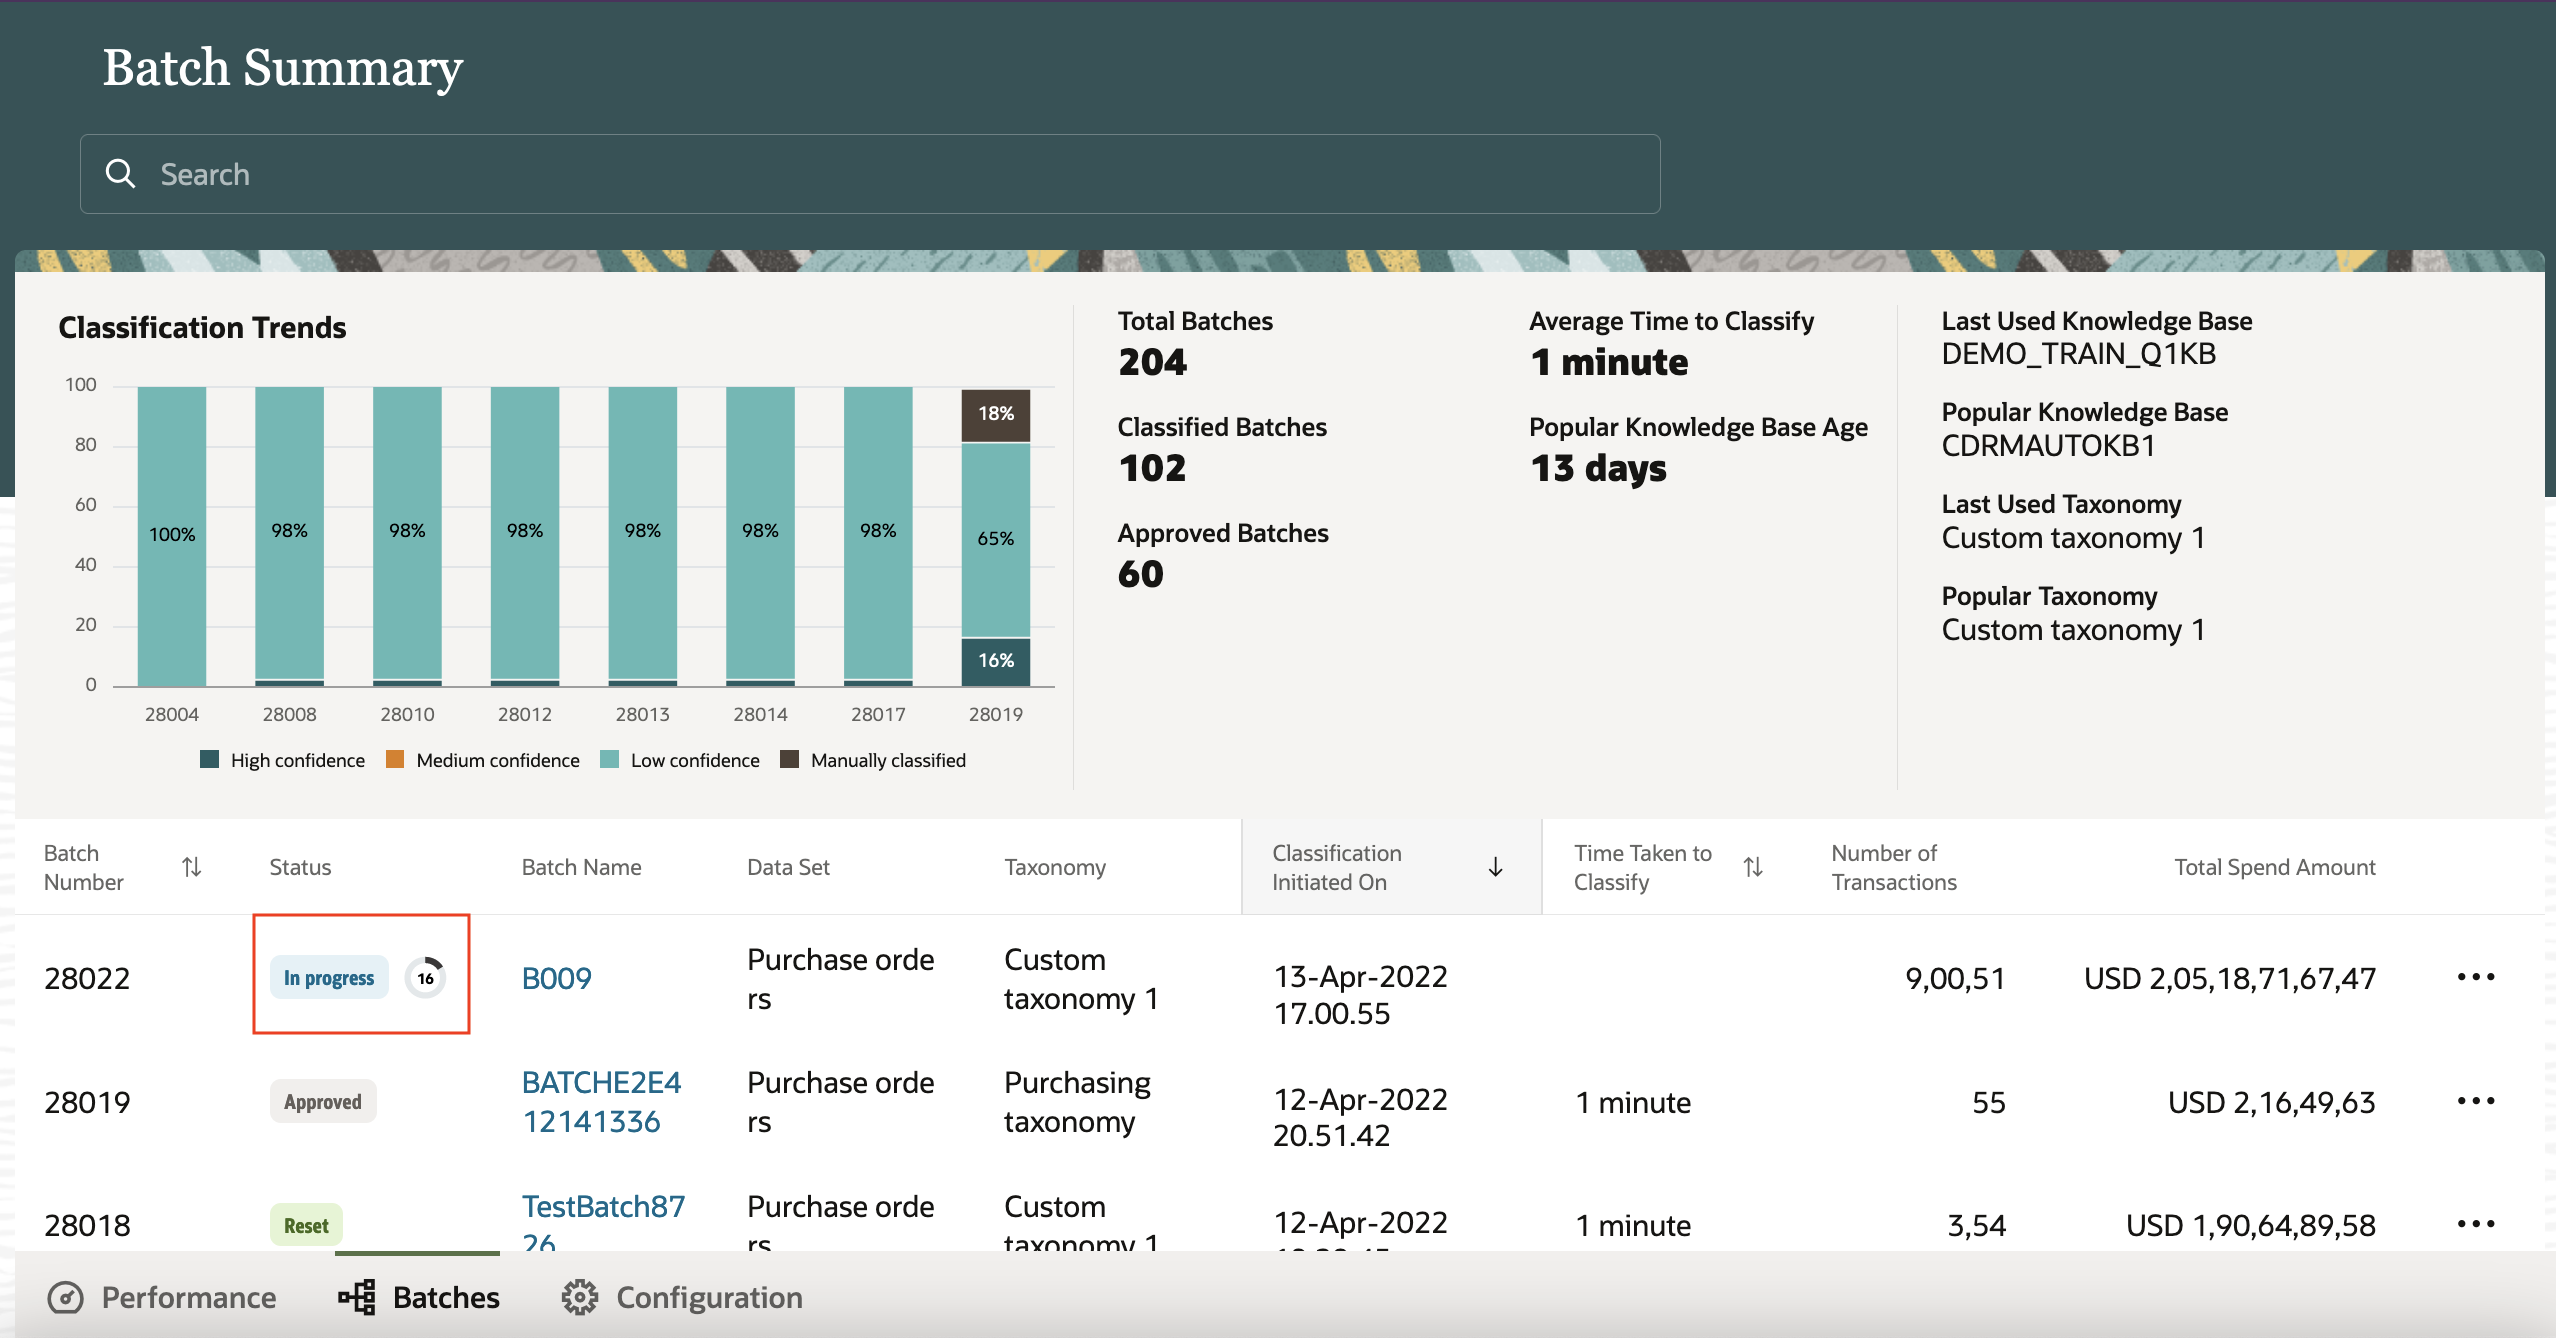
With the information about progress of the classification, you can decide if you want to wait for the process to complete or not. This percentage indicator helps you plan your activities when a batch is being classified, especially during the iterative process of improving the knowledge base and testing with new training data.
Steps to Enable
You don't need to do anything to enable this feature.
Key Resources
- Refer to the Spend Classification chapter in Oracle Procurement Cloud documentation, available in the Oracle Help Center.
Role And Privileges
This feature is available without additional setup to users who have access to spend classification.
You have a couple of options for giving people access to Spend Classification, depending on whether you're assigning them predefined job roles or your own configured job roles.
- Users who are assigned this predefined job role can access this feature:
- Procurement Data Analyst (ORA_POI_PROCUREMENT_DATA_ANALYST_ABSTRACT)
- Users who are assigned a configured job role that contains these privileges can access this feature:
- Administer Spend Classification Application (POI_ADMINISTER_SPEND_CLASSIFICATION_PRIV)
- Manage Spend Classification Batch (POI_MANAGE_SPEND_CLASSIFICATION_BATCH_PRIV)
- View Spend Classification Work Area (POI_SPEND_CLASSIFICATION_WORKAREA_PRIV)
Create Focused Sample Training Sets
Refine and create a focused sample training set with the Create Sample Training Set action. The filters, transaction dates and business unit provide a guided flow for creating a sample training set with clear indicators and help for default and advanced settings.
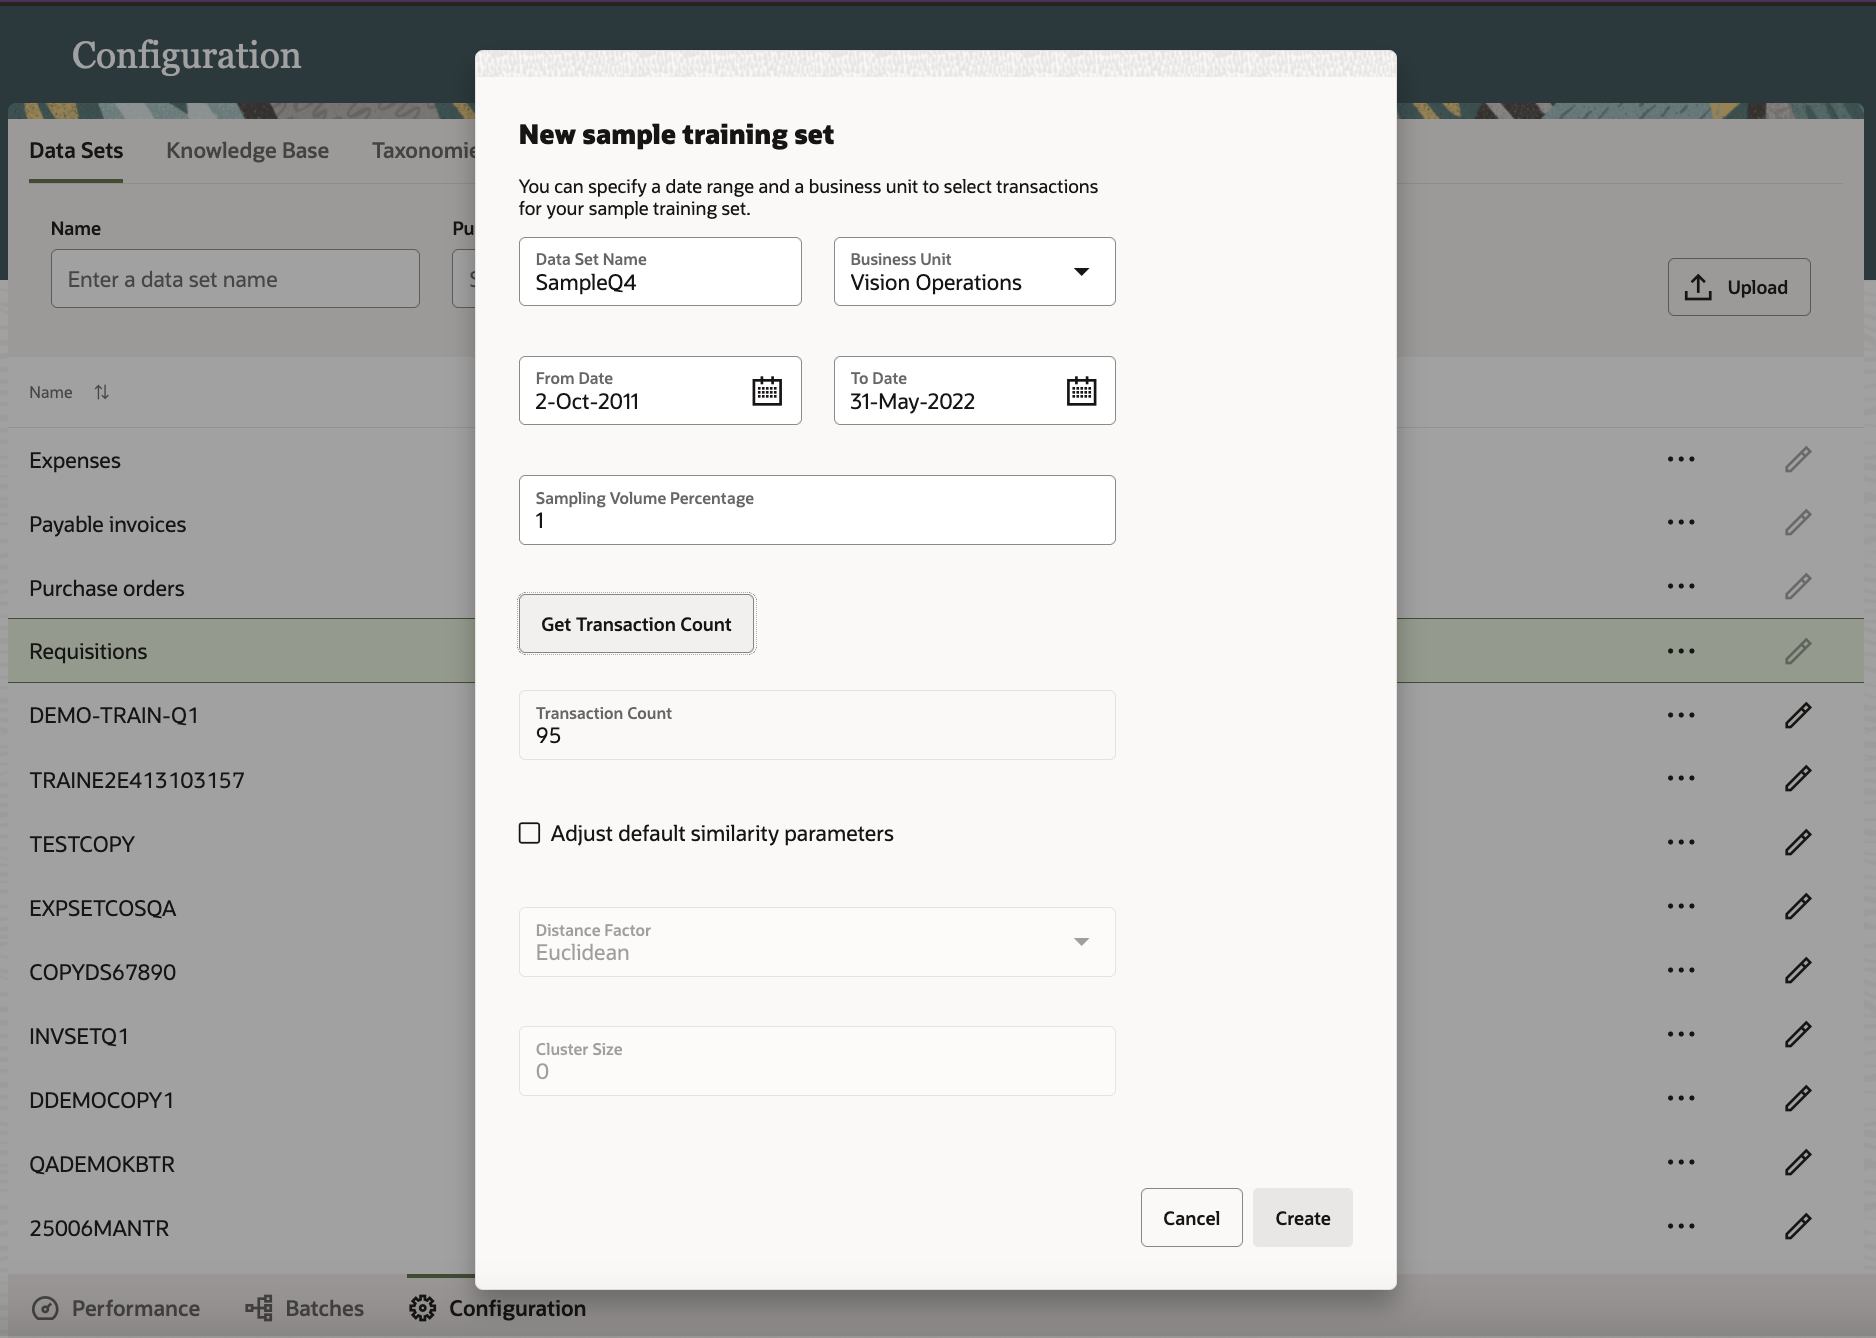
Create Sample Training Set
Now enable the powerful sample training set creation to focus on data for a specific period and business unit. This allows you to further control the data you extract and use for training the spend classification engine.
Determine whether you want to adjust the similarity parameters or use the default settings. For more information about these parameters, refer to the Data Sets topic in Oracle Help Center.
Steps to Enable
You don't need to do anything to enable this feature.
Key Resources
- Refer to the Spend Classification chapter in Oracle Procurement Cloud documentation, available in the Oracle Help Center.
Role And Privileges
This feature is available without additional setup to users who have access to spend classification.
You have a couple of options for giving people access to Spend Classification, depending on whether you're assigning them predefined job roles or your own configured job roles.
- Users who are assigned this predefined job role can access this feature:
- Procurement Data Analyst (ORA_POI_PROCUREMENT_DATA_ANALYST_ABSTRACT)
- Users who are assigned a configured job role that contains these privileges can access this feature:
- Administer Spend Classification Application (POI_ADMINISTER_SPEND_CLASSIFICATION_PRIV)
- Manage Spend Classification Batch (POI_MANAGE_SPEND_CLASSIFICATION_BATCH_PRIV)
- View Spend Classification Work Area (POI_SPEND_CLASSIFICATION_WORKAREA_PRIV)
Determine the Batch Source and Transaction Period Within a Batch
Use the timestamps of the earliest and latest records that are now available in the batch details, to help you determine the time period of the transactions in a batch. The name of the data set from which the batch was created is also available as part of the batch details.
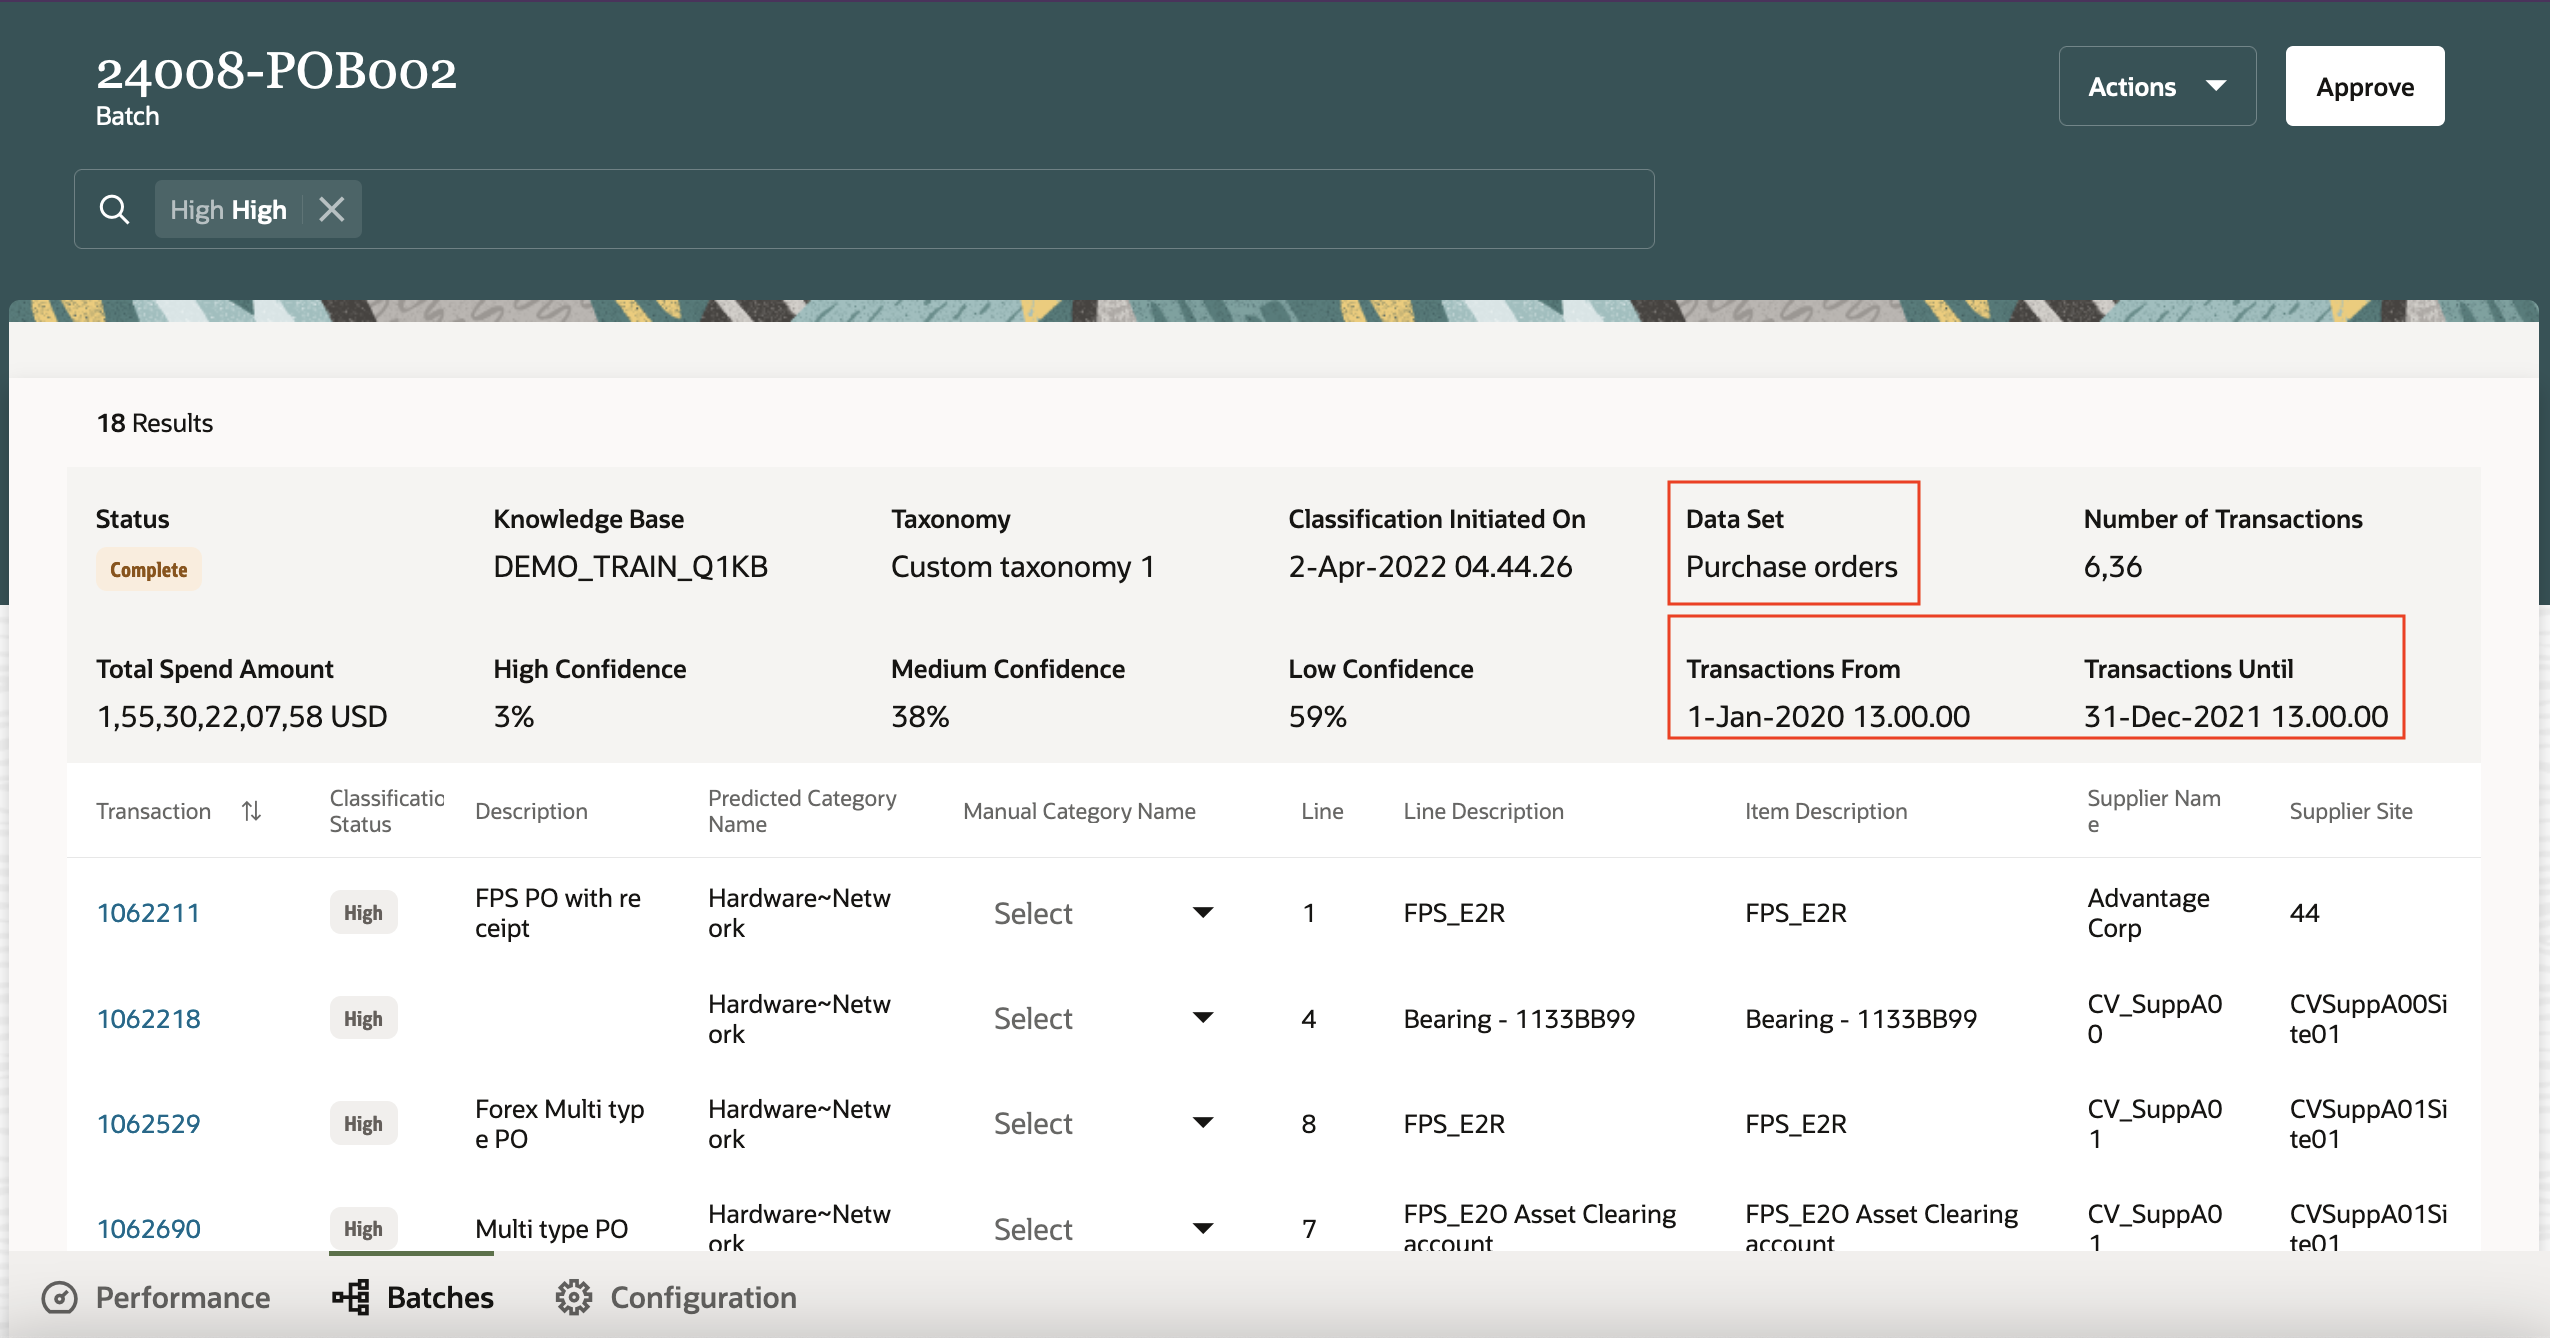
Batch Details
The information about the purpose and period of transactions within a batch is available to you, and helps you determine the next classification run. It also provides you the opportunity to compare data from same time periods across different years.
The nature of transactions can be determined regardless of the batch name, For example, the data set shown in the image above is for purchase orders.
Steps to Enable
You don't need to do anything to enable this feature.
Key Resources
- Refer to the Spend Classification chapter in Oracle Procurement Cloud documentation, available in the Oracle Help Center.
Role And Privileges
This feature is available without additional setup to users who have access to spend classification.
You have a couple of options for giving people access to Spend Classification, depending on whether you're assigning them predefined job roles or your own configured job roles.
- Users who are assigned this predefined job role can access this feature:
- Procurement Data Analyst (ORA_POI_PROCUREMENT_DATA_ANALYST_ABSTRACT)
- Users who are assigned a configured job role that contains these privileges can access this feature:
- Administer Spend Classification Application (POI_ADMINISTER_SPEND_CLASSIFICATION_PRIV)
- Manage Spend Classification Batch (POI_MANAGE_SPEND_CLASSIFICATION_BATCH_PRIV)
- View Spend Classification Work Area (POI_SPEND_CLASSIFICATION_WORKAREA_PRIV)
Notify When Contracts Are Shared in the Supplier Portal
Contract managers can notify suppliers when they share the contract for their review. The Share externally check box on the Edit Contract page indicates if the contract is already shared. To share a contract, use the Share in Supplier Portal action from the Edit Contract page.

Share in Supplier Portal action from Edit Contract Page
You can also search for the contract and use the Share in Supplier Portal action from the Search page.
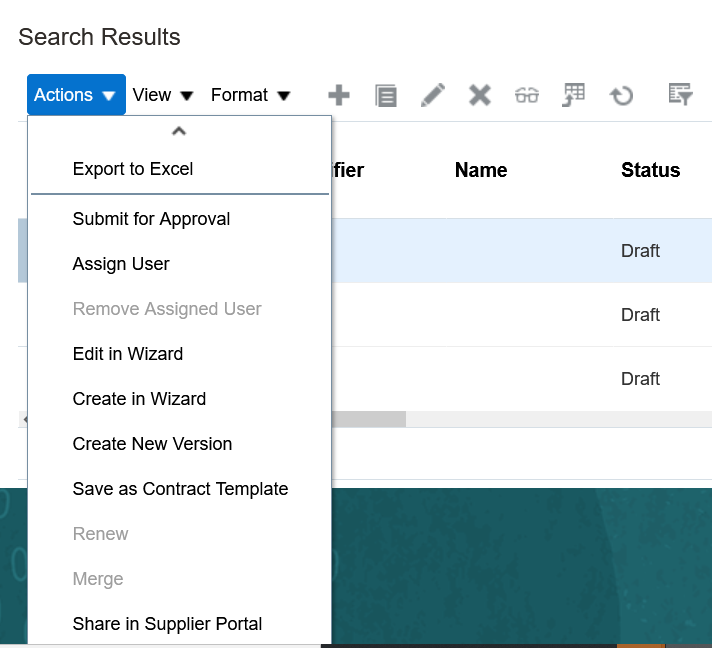
Share in Supplier Portal Action from Search Results
On the Share Contract in Supplier Portal page, you can preview the documents you're about to share in addition to the contract and edit the notification you're sending to your supplier contact.
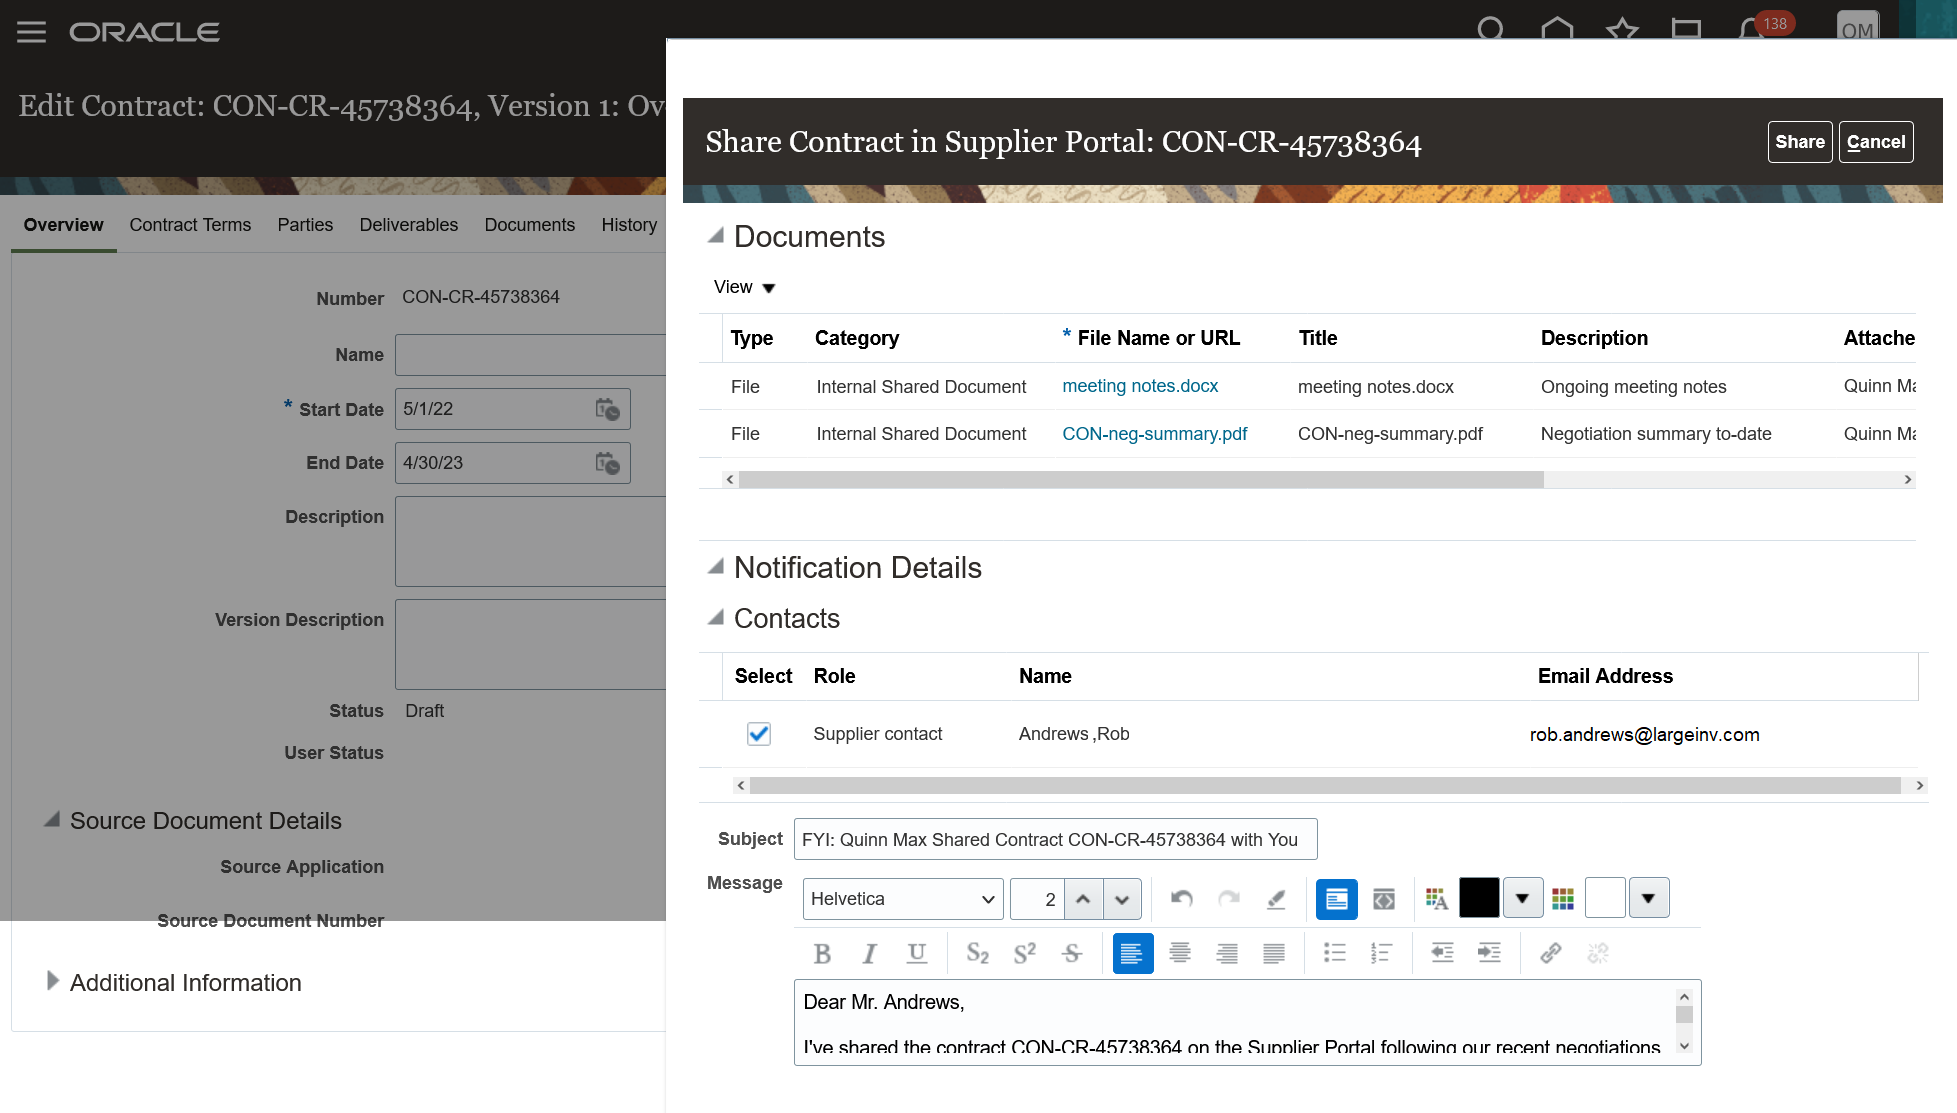
Share Contract in Supplier Portal
By default, no supplier contacts are checked to receive a notification. You may choose to share a contract without sending a notification, but you'll see a warning after you press the Share button.
After you've shared the contract, a confirmation is displayed, and the Share externally check box on the Edit Contract page is checked.
If you'd like to stop the contract from being shared at a later time, you can uncheck the Share externally check box on the Edit Contract page. No notifications are sent when you stop sharing a contract.
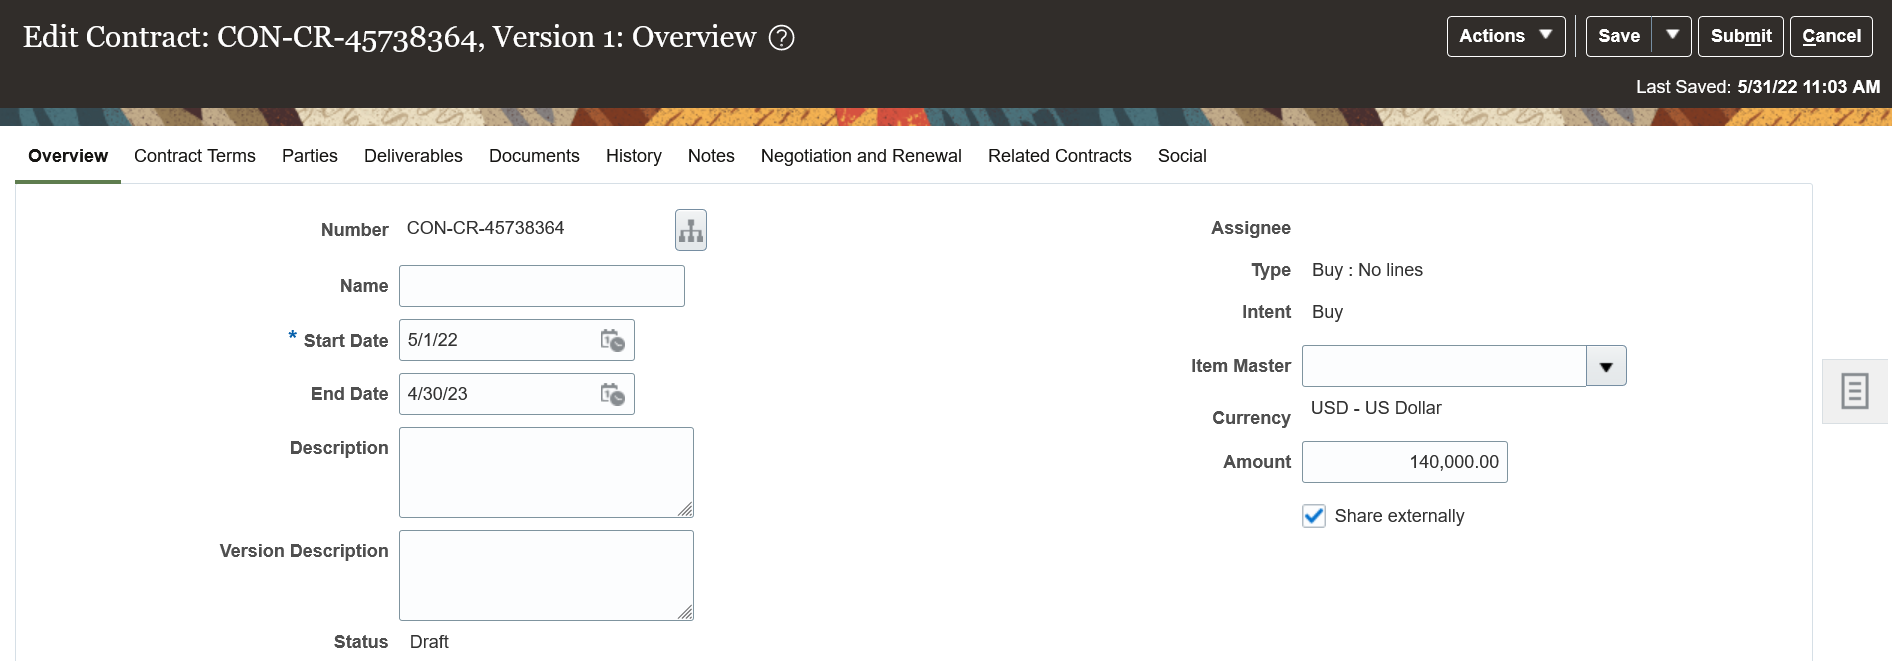
Share Externally Check Box on Edit Contract Page
The supplier contact receives a notification in the Supplier Portal.
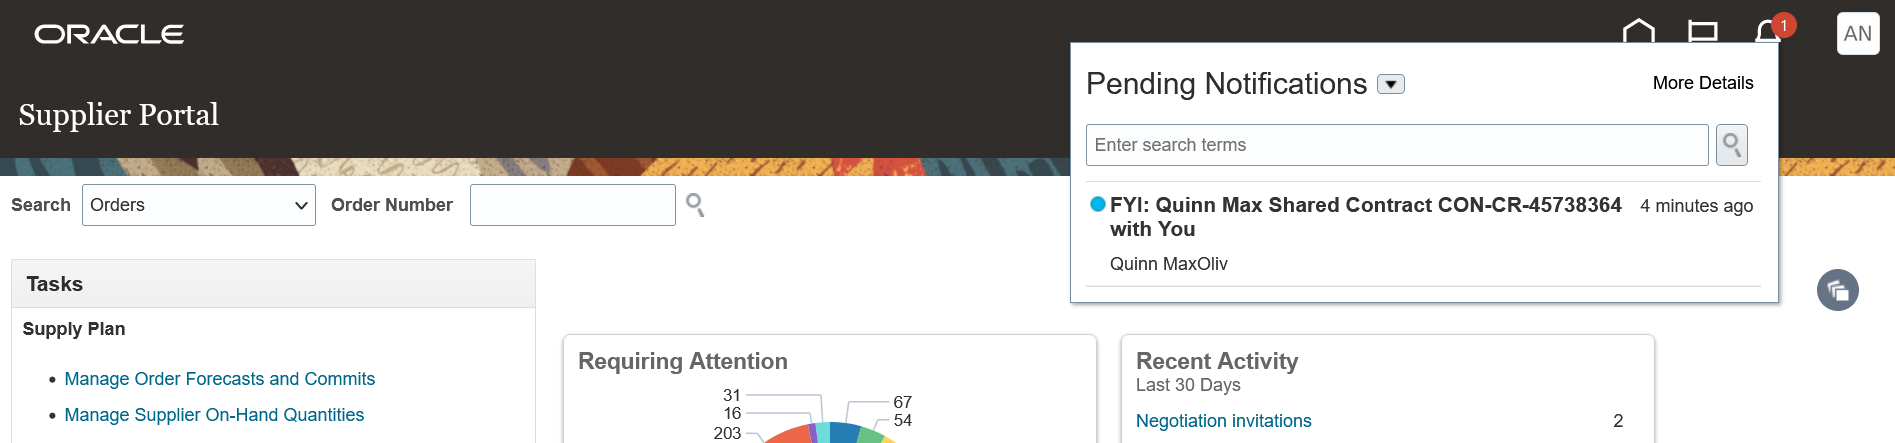
Send Notification in Supplier Portal Worklist
They'll receive a more detailed notification message through email.
Once your supplier makes changes and uploads contract documents back to you, they can notify you using the Send Notification action from the Manage Contracts page in the Supplier Portal.

Send Notification from Manage Contracts
The supplier can review the documents they're sharing and write a custom notification message.

Send Notification
They'll see a confirmation that the notification was sent.
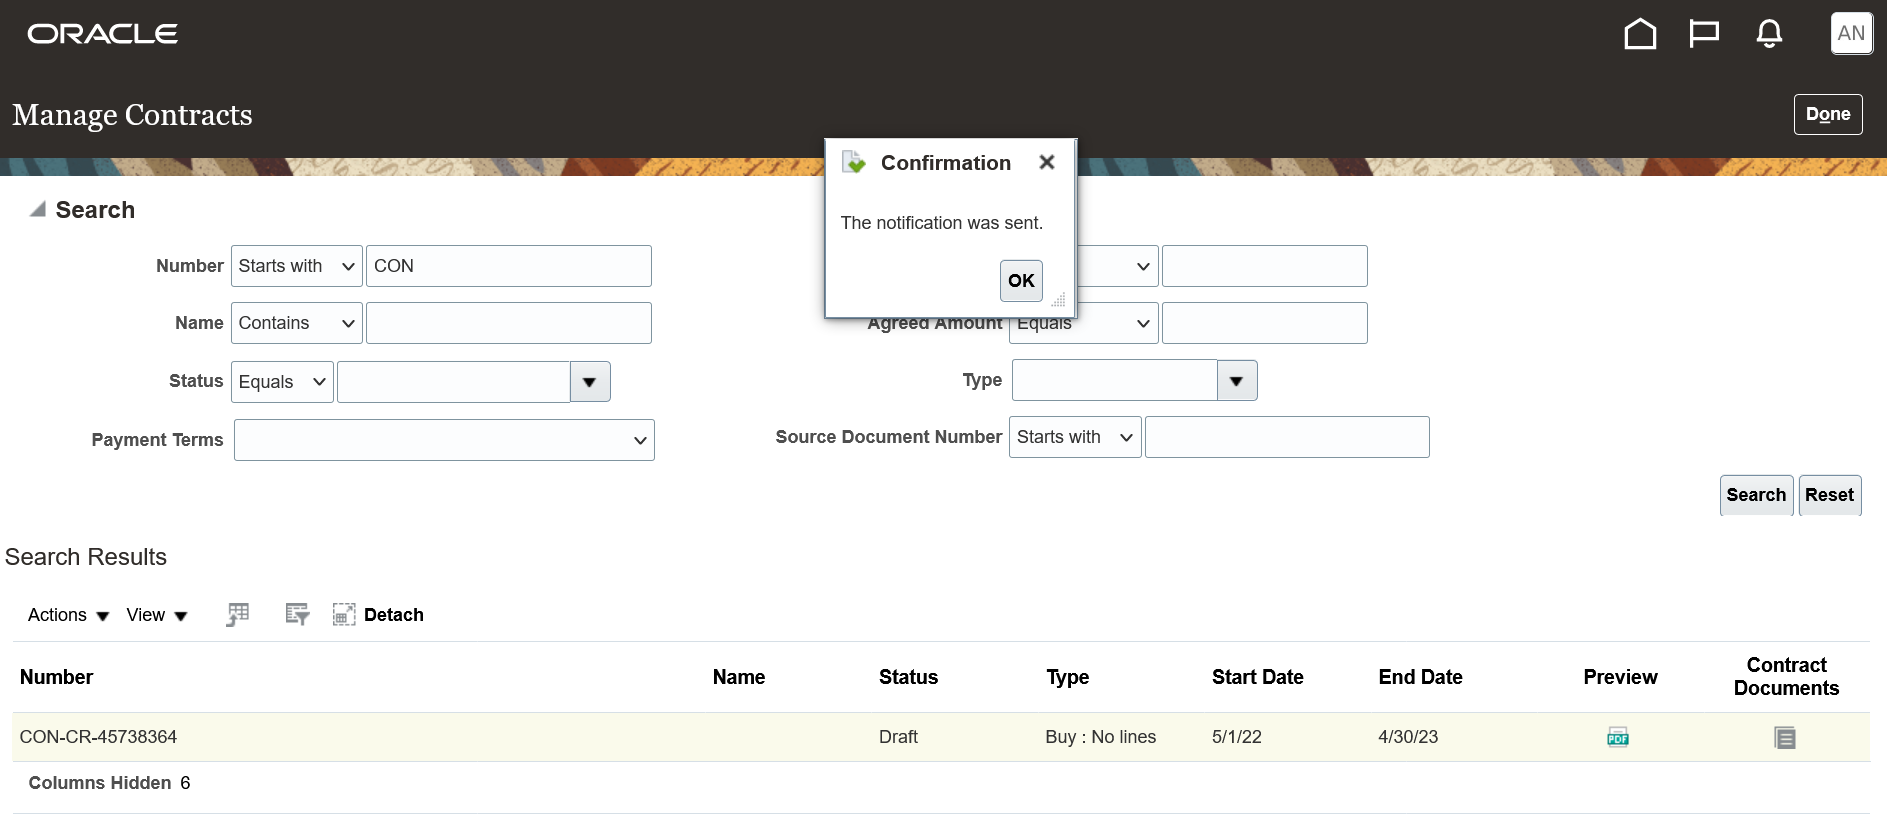
Send Notification Confirmation
Similar to the supplier contact, you'll receive a notification and a detailed message through email.
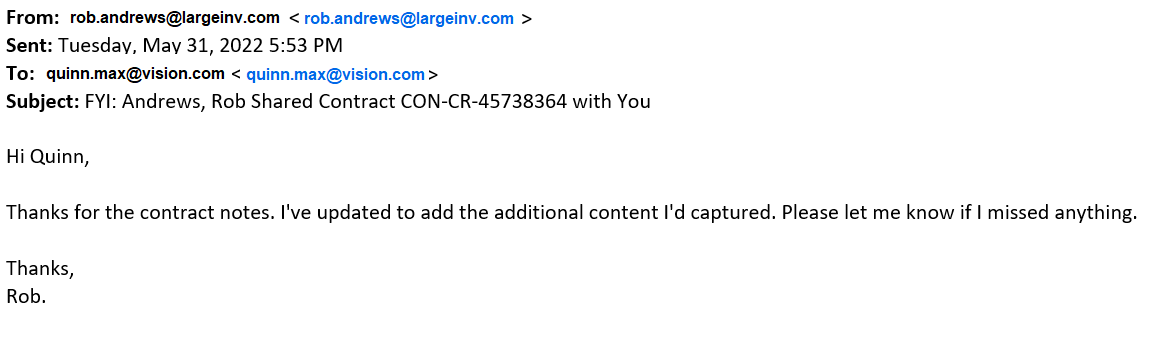
Email Notification from Supplier Contact
With this feature, communication between your organization and your suppliers is streamlined, and you can work together to process negotiation rounds more efficiently.
Steps to Enable
Use the Opt In UI to enable this feature. For instructions, refer to the Optional Uptake of New Features section of this document.
Offering: Enterprise Contracts
Using the Manage Administrator Profile Values task in Setup and Maintenance, enter the email you'd like to present as the From address in the profile option, Reply Email for Share Notifications.
Tips And Considerations
Use the Opt In UI and enable Share Enterprise Contracts in Supplier Portal to use this feature.
In addition to opting in, the Share in Supplier Portal action is displayed when:
- You have edit access to the contract
- The contract is of Buy intent
- The contract is in Draft or Under amendment status
Key Resources
- See the "Share Contracts" topic in the "Create Procurement Contracts" chapter in the Using Procurement Contracts guide.
Use DocuSign OAuth 2.0 Authentication When Signing Contracts
Sign contracts electronically with OAuth 2.0 authentication. When you sign a contract, the process uses OAuth 2.0 authentication when the envelope is submitted to DocuSign.
When you first sign a contract with this feature, you'll be redirected to DocuSign after selecting the Sign action to provide one-time consent to use the integration between Oracle Enterprise Contracts and DocuSign.
To view the signature history for your contract, use the Manage Signatures action or View Envelope Details from the History tab of the Edit Contract page. Then from the DocuSign envelope details, use the View History action.
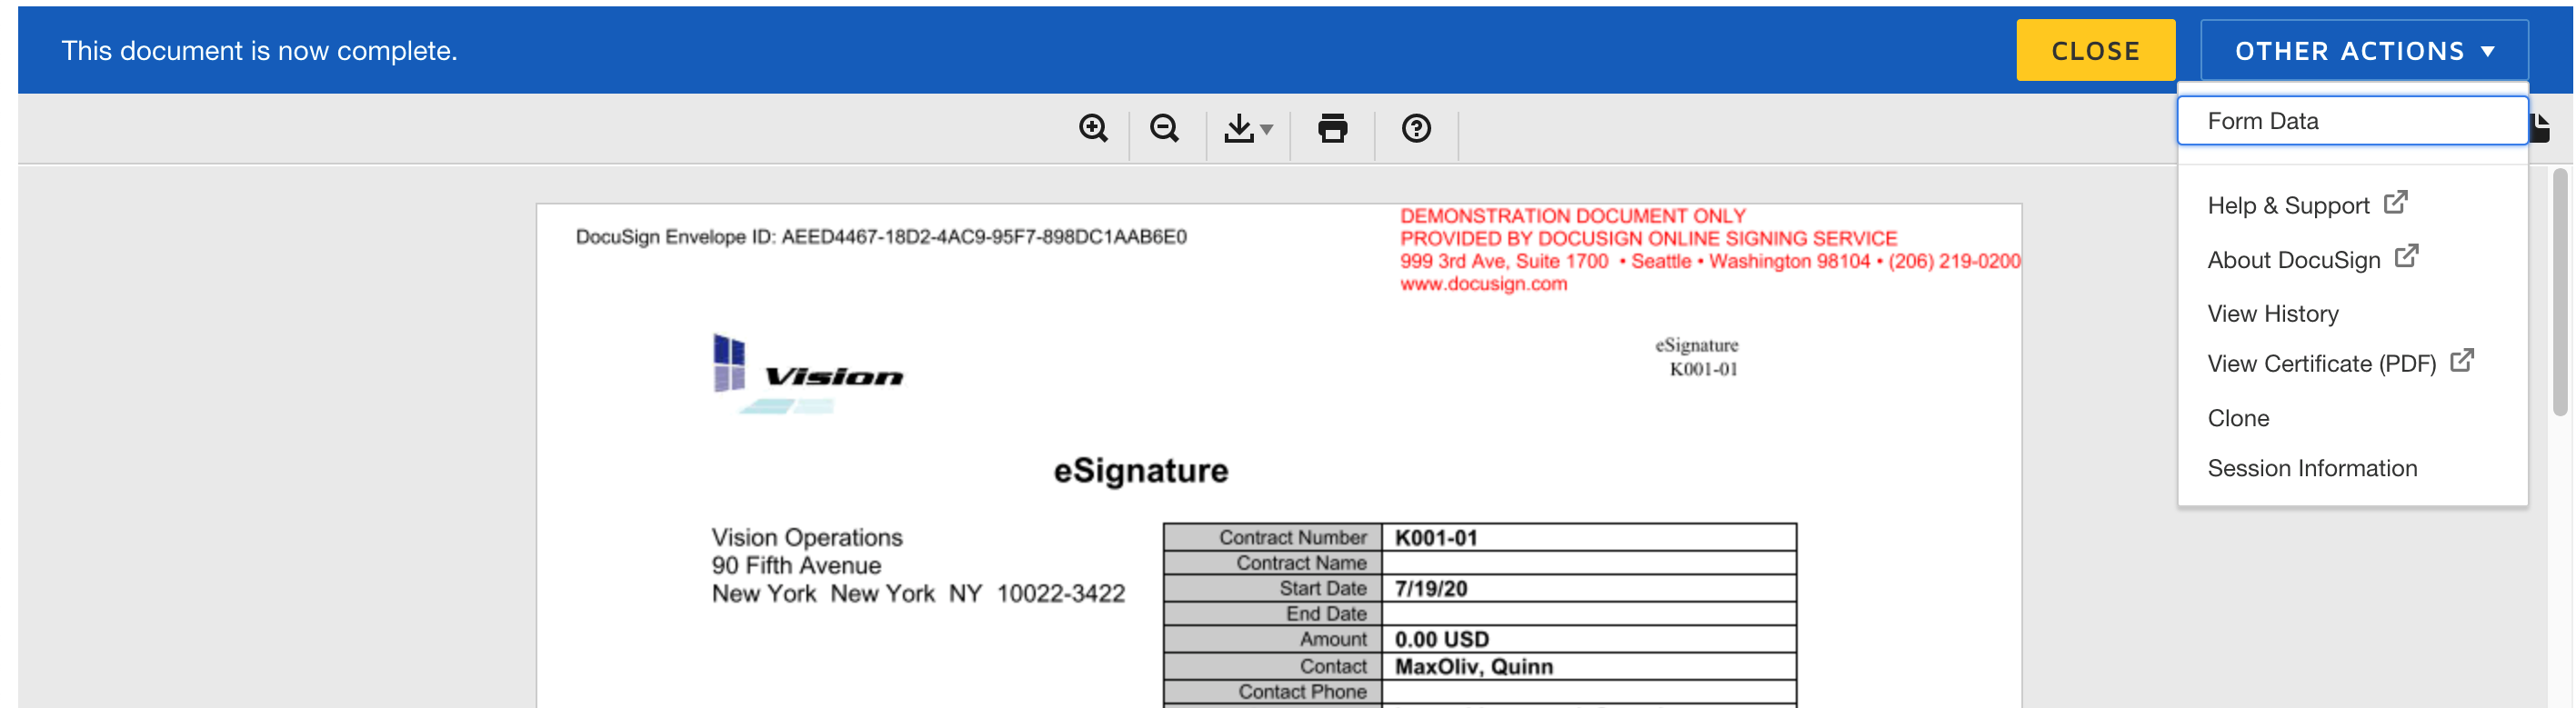
View History
Signing contracts with OAuth 2.0 authentication provides better security and reduces the compliance risks associated with liability and privacy law.
Steps to Enable
IMPORTANT: You'll be able to use the same DocuSign account, but to sign your contracts electronically with OAuth 2.0 instead of using a username and password, you'll need to make the changes described below in the Manage Electronic Signature page. If you don't see the revised Manage Electronic Signature page, you must first set the profile option, OKC_DOCUSIGN_OAUTH_DISABLED, to N. To understand how to do that, refer to Doc ID 2891012.1 available on My Oracle Support.
- In DocuSign, enter the User ID associated with the user profile that has administrator privileges. This user must be the one who completes all the steps below to grant consent and validate the integration.
- Enter the Account ID and Endpoint URL. These are the API Account ID and Account Base URL, respectively, on your DocuSign account.
- Provide the OAuth URL for the DocuSign instance to which you intend to connect when submitting your contracts for electronic signing. This could either be your development or production instance of DocuSign:
- Development Account: https://account-d.docusign.com
- Production Account: https://account.docusign.com
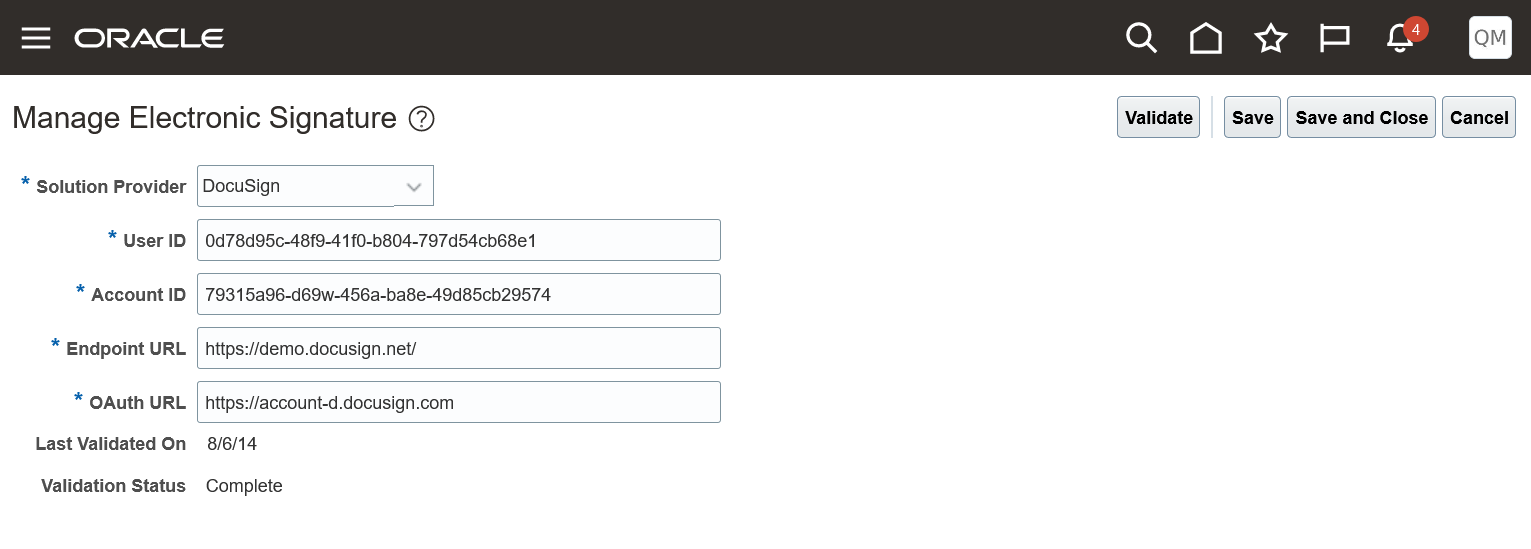
Manage Electronic Signature Page
- Use the Validate action to provide one-time user consent to use DocuSign integration. The user who performs this step must be the same user identified by the user ID entered in step 1 in the Manage Electronic Signature page.
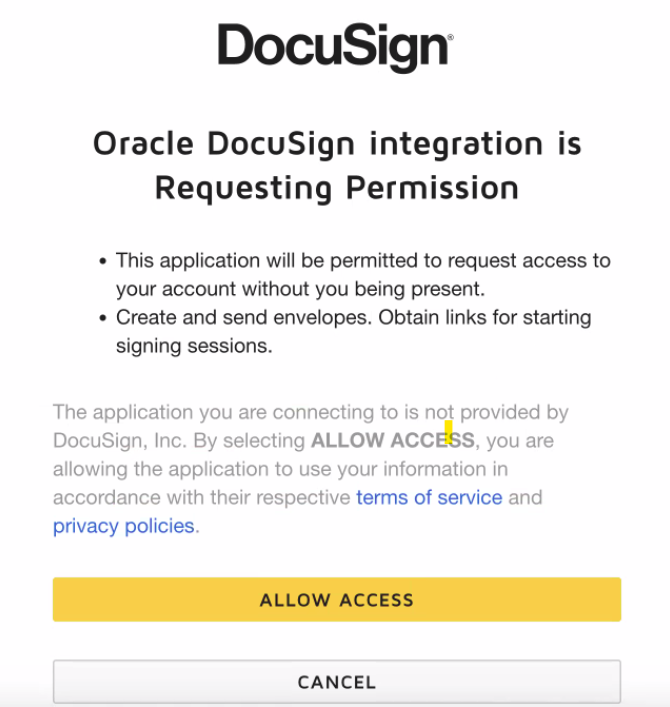
Validate Consent
- Click on the Allow Access button to grant consent.
- You'll see a message confirming the link between Oracle Enterprise Contracts and DocuSign.

Thank You Confirmation
-
IMPORTANT: Make sure you press Validate once again to save the changes.
Key Resources
- See the "Set Up Electronic Signature" topic in the "Enterprise Contracts Setup Checklist" chapter in the Implementing Enterprise Contracts guide.
- 22C - Issue with DocuSign OAuth 2.0 Authentication for Contracts (Doc ID 2891012.1)