
- Revision History
- Overview
- Feature Summary
- Permitting and Licensing
-
- Permitting and Licensing Common
-
- Load Contractor Contacts From File
- Contractor License Validation in Applications
- Parcel and Address Conditions in Import Tool
- Support Sketch Widget
- Support Print Widget
- Primary Contact Selection
- Attach Documents to an Ad Hoc Message
- Final Document Check Box for Attachments
- Display or Hide Inspection Functionality
- Grid Personalization Additional Pages
- Agency Default Settings for Grid Personalization
- Intake Form Grids
- Display Options for Intake Form Grids
- Intake Form Versioning and Effective Dating
- Intake Form Designer Groovy Icon
- Default Group Box Display
- Legacy Permit and Planning Transaction Deletion and Updates
- Financial Framework
- System Administration
-
- Permits and Inspections
- Code Enforcement
-
- Responsible Party Attachment Upload
- Autoassignment of Officer on Case Based on Job Attributes
- Automatically Apply Code Case Condition
- Notice Template Updates
- Property Link to Code Cases
- All Tasks Tab from the Worklist
- Workflow Task Reassignments
- Search, Sort, Filter, and Export for Code Enforcement Pages
-
- Business Licensing
- Permitting and Licensing Common
- IMPORTANT Actions and Considerations
This document will continue to evolve as existing sections change and new information is added. All updates appear in the following table:
| Date | Product | Feature | Notes |
|---|---|---|---|
| 17 JUN 2022 | Created initial document. |
 HAVE AN IDEA?
We’re here and we’re listening. If you have a suggestion on how to make our cloud services even better then go ahead and tell us. There are several ways to submit your ideas, for example, through the Ideas Lab on Oracle Customer Connect. Wherever you see this icon after the feature name it means we delivered one of your ideas.
GIVE US FEEDBACK
We welcome your comments and suggestions to improve the content. Please send us your feedback at oracle_fusion_applications_help_ww_grp@oracle.com.
DISCLAIMER
The information contained in this document may include statements about Oracle’s product development plans. Many factors can materially affect Oracle’s product development plans and the nature and timing of future product releases. Accordingly, this Information is provided to you solely for information only, is not a commitment to deliver any material, code, or functionality, and should not be relied upon in making purchasing decisions. The development, release, and timing of any features or functionality described remains at the sole discretion of Oracle.
This information may not be incorporated into any contractual agreement with Oracle or its subsidiaries or affiliates. Oracle specifically disclaims any liability with respect to this information. Refer to the Legal Notices and Terms of Use for further information.
Column Definitions:
Report = New or modified, Oracle-delivered, ready to run reports.
UI or Process-Based: Small Scale = These UI or process-based features are typically comprised of minor field, validation, or program changes. Therefore, the potential impact to users is minimal.
UI or Process-Based: Larger Scale* = These UI or process-based features have more complex designs. Therefore, the potential impact to users is higher.
Features Delivered Disabled = Action is needed BEFORE these features can be used by END USERS. These features are delivered disabled and you choose if and when to enable them. For example, a) new or expanded BI subject areas need to first be incorporated into reports, b) Integration is required to utilize new web services, or c) features must be assigned to user roles before they can be accessed.
| Ready for Use by End Users Reports plus Small Scale UI or Process-Based new features will have minimal user impact after an update. Therefore, customer acceptance testing should focus on the Larger Scale UI or Process-Based* new features. |
Customer Must Take Action before Use by End Users Not disruptive as action is required to make these features ready to use. As you selectively choose to leverage, you set your test and roll out timing. |
|||||
|---|---|---|---|---|---|---|
| Feature |
Report |
UI or |
UI or |
|
||
Expand Usage of Existing Business Rules Framework Actions to All Applicable Resources |
||||||
Business Rules Framework Expands Scope of Apply Condition Action |
||||||
Require Comments for Workflow, Plan Reviews, and Inspections |
||||||
Plan Review Workload Display for Assignment and Reassignment |
||||||
Permitting and Licensing Common
Load Contractor Contacts From File
Agencies can use a batch process to load contact information for contractor licenses from a file. These contacts can then be selected as contractor license contacts in permit and planning applications. The contractor contacts that were added using the batch process are identified in the list of contacts in the license details.
This allows agencies to store the contractor's contact information in the contractor list.
Steps to Enable
To use this feature, the integration must be configured on the Contractor License Options page. Please refer to the technical information on My Oracle Support (Document ID: 2759502.1)
- Integration Name = PSCR_CONT_BATCH_LOAD
- Integration Parameter = DataSource,MergeOption,LastUpdated,DataToLoad
This integration supports batch load for both contractor licenses and contact information.
Key Resources
- See Using Community Development Permits, "Managing Contractor Information," Adding Contractor License Contacts on the Oracle Help Center (available July 1, 2022).
- See Implementing Your Agency, "Setting Up Contractor Licenses," Loading Contractor Licenses and Contacts on the Oracle Help Center (available July 1, 2022).
Role Information
The following roles can configure this feature:
- Agency administrators
- Business analysts
Contractor License Validation in Applications
Validations can now run on the contractor license information to ensure that contractors comply with specific requirements when an application is submitted.
The agency configures the contractor criteria required for a permit type and determines whether to prevent application submittal if the criteria aren't met. Criteria can be based on the license type, insurance, license classification, and license expiration. Each requirement can apply to all contractors added to a permit or each license. At least one contractor added to the permit must satisfy the requirement. However, the license expiration requirement applies to all contractors. Setup for the insurance validation can include the insurance expiration as well as the different insurance types.
The Contractors page in the permit details also lists any missing requirements, which also appear when contractors are added to the application after it's been submitted.
This example illustrates a requirement not met when adding a contractor to an application:
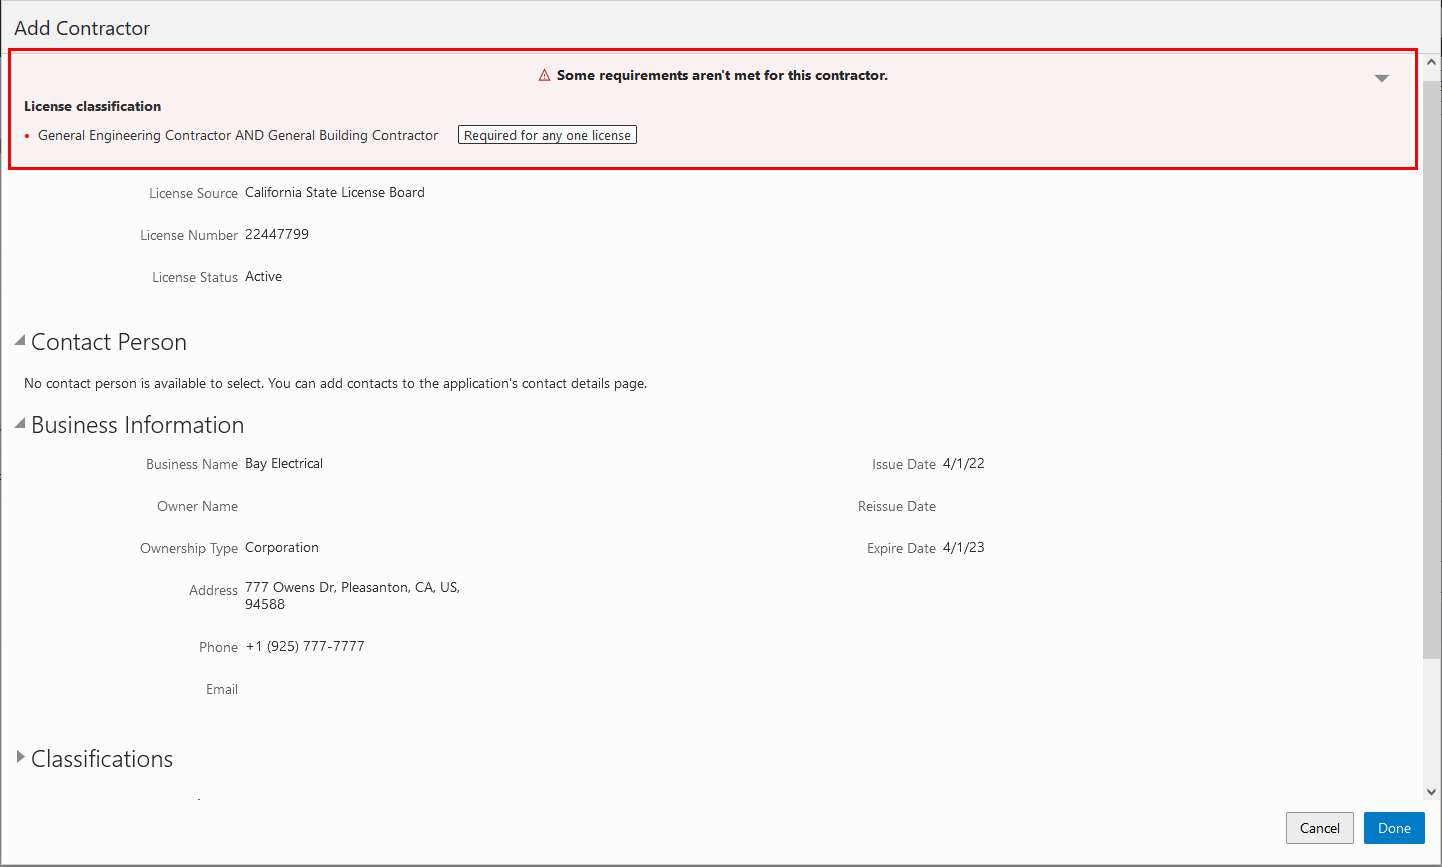
Add Contractor Modal Page on the Application Intake Form
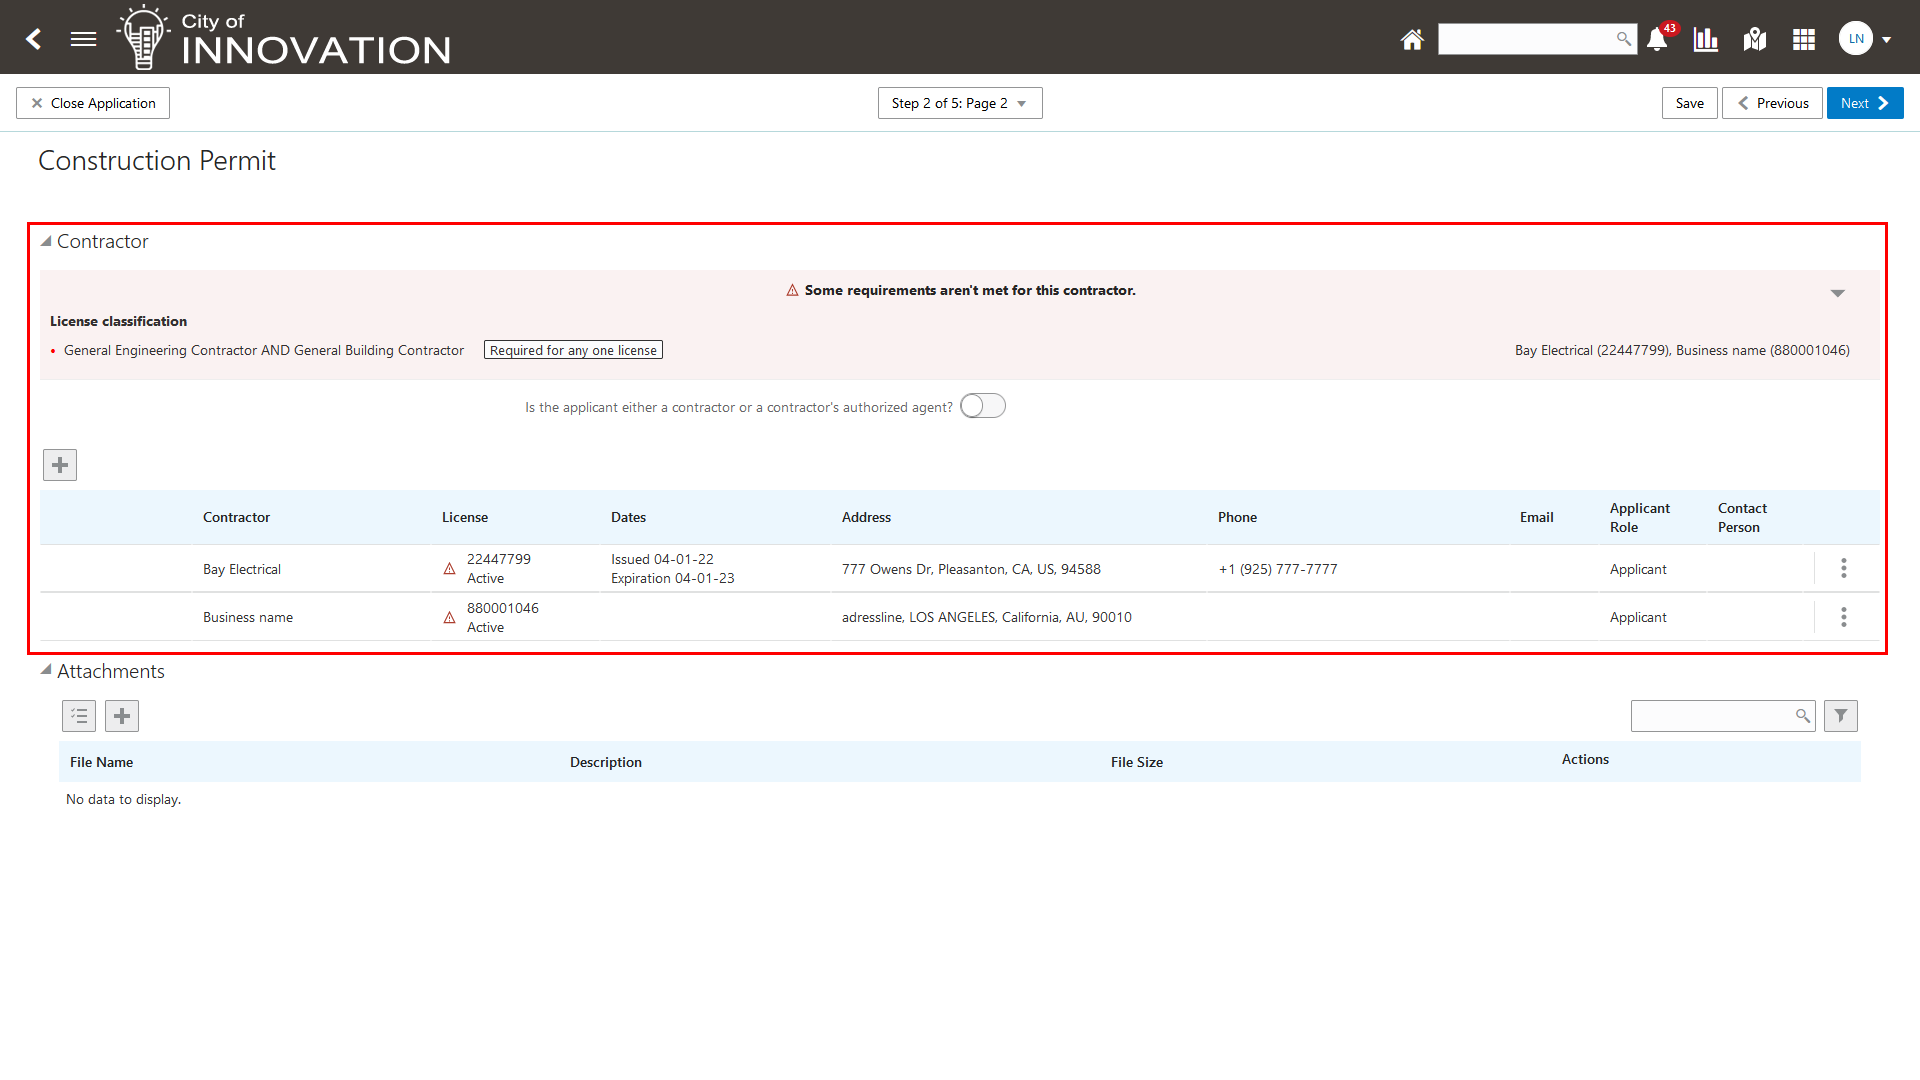
Contractor Element on the Application Intake Form Showing 2 Contractors Selected with Missing Requirements
This provides agency staff the ability and flexibility to define contractor validation requirements at the permit type level. These validation requirements include license type, classification, expiration and insurance attributes. Agency staff can optionally prevent application submittal when validation fails on the intake form.
Steps to Enable
To enable contractor validation checking on the permit application you must complete the following:
- Set up a validation group and options.
- Add the validation group to the permit type.
See Key Resources for the location of the documentation on the Oracle Help Center.
Key Resources
-
See Implementing Permitting and Licensing, "Setting Up Application Validations," Setting Up Contractor Validation Groups on the Oracle Help Center (available July 1, 2022).
-
See Using Community Development Permits, "Applying for a Permit," Adding Contractor Licenses on the Oracle Help Center (available July 1, 2022).
Role Information
The following roles can configure this feature:
- Agency Administrators
- Business Analysts
Parcel and Address Conditions in Import Tool
The Parcel Import Options page has two new conditions for importing files:
- Parcel
- Address
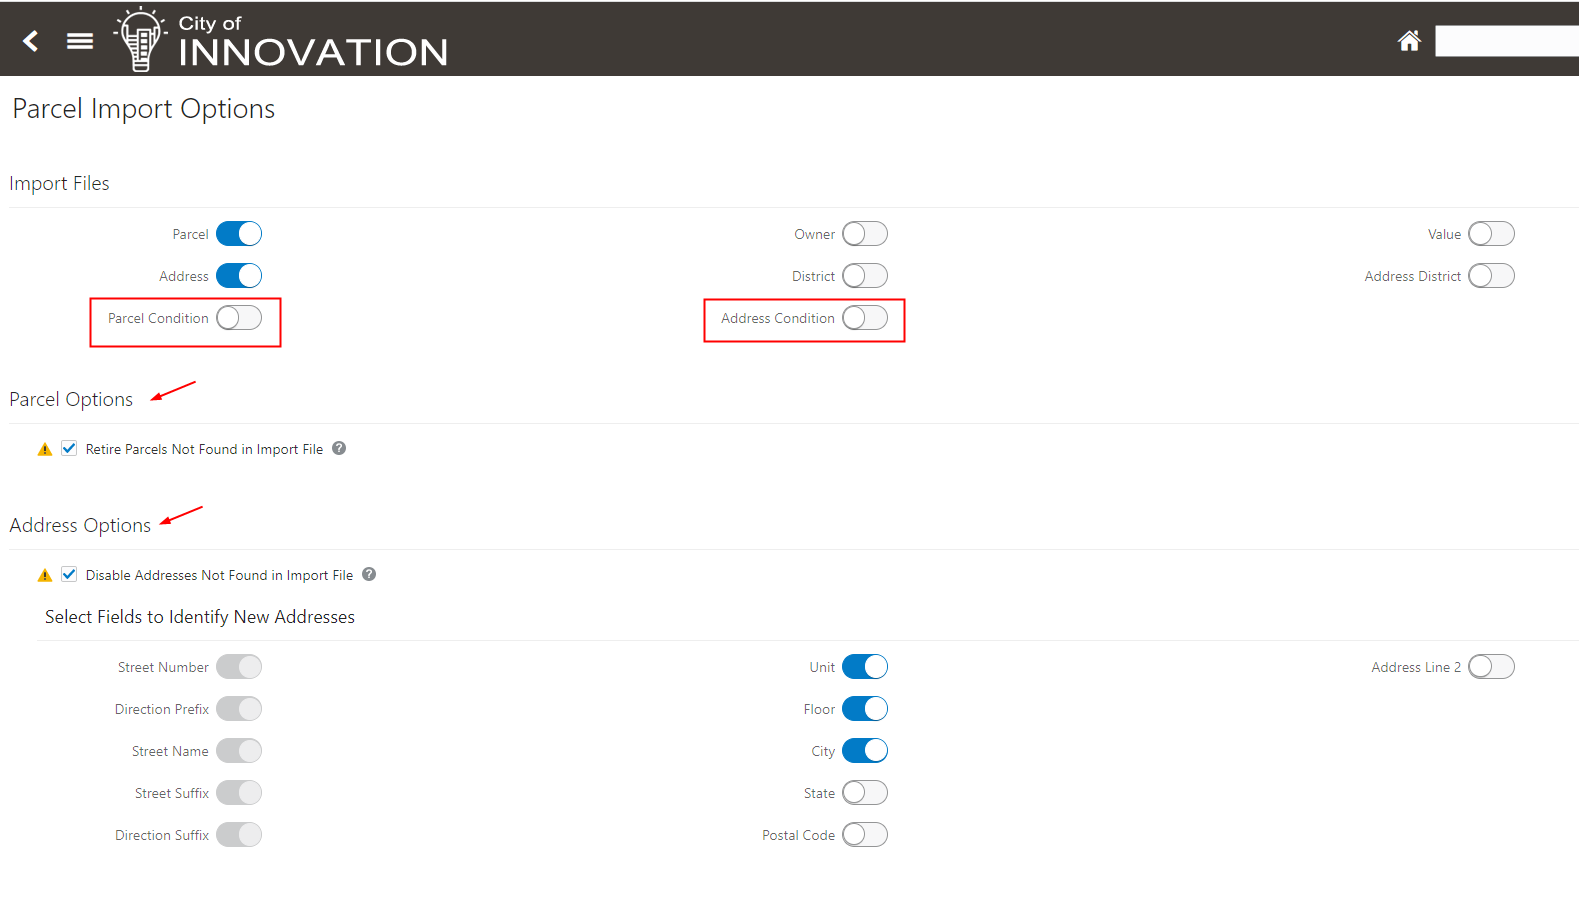
Parcel Import Options
Expands the data import tool to support agency-defined parcel and address-based conditions.
Steps to Enable
To enable this feature you must complete the following steps:
- Set up conditions.
- Set up parcel import options.
See the Key Resources for documentation located on the Oracle Help Center.
Tips And Considerations
An additional Conditions file is included when running the APO Import job.
When the Resolve Parcel Conditions Not Found in Import File Switch is on, all parcel conditions that are missing in the import file will be resolved automatically. To avoid unwanted mass resolutions, you can run the import process in a Preview Mode and not make updates to the database, by setting the Preview Mode switch on the Parcel Import Options page to ON. You can then review the import log and verify condition resolutions before running the import process in update mode.
Key Resources
- See Implementing Your Agency, "Migrating APO Data," APO Import Options on the Oracle Help Center (available on July 1, 2022).
- See Implementing Your Agency, "Setting Up Conditions" on the Oracle Help Center (available on July 1, 2022).
Role Information
- System administrators can utilize this feature.
Agencies can now enable the sketch widget on a map in the map profile. When the sketch widget is available, agency staff and registered users can draw points, polylines, polygons, circles, and rectangles on the transaction property map and save the sketch with a description.
This example illustrates the sketch widget, a fence line sketch on the property map page of a planning application, and the saved sketch.
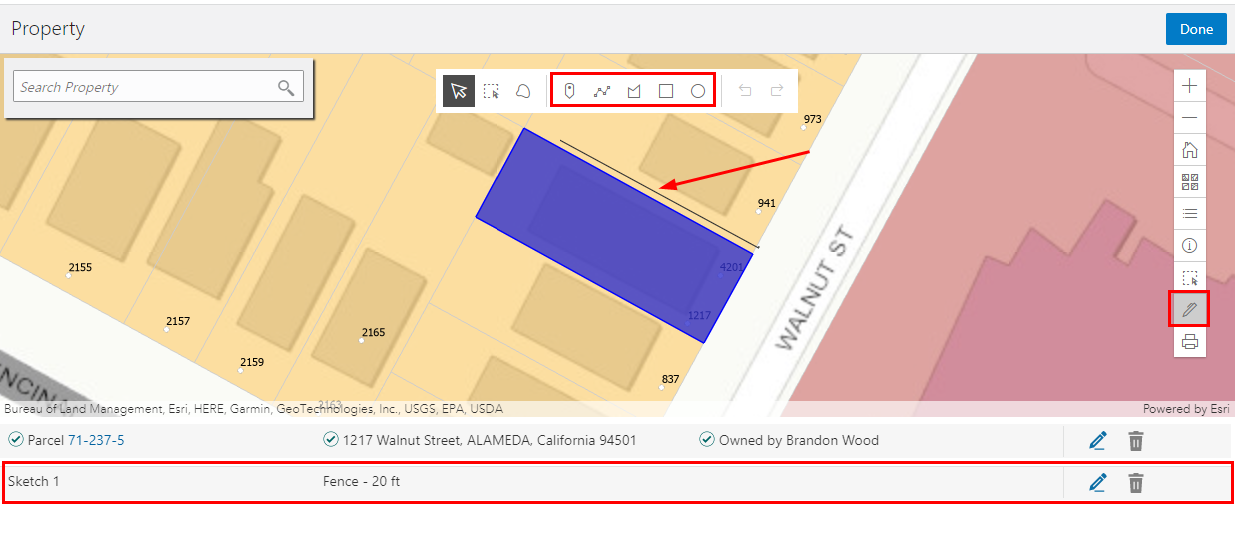
Property Page in the Planning Application Details
This provides agency staff and public users the ability to draw a sketch on various map pages. The sketch is stored and persisted as part of the application.
Steps to Enable
You don't need to do anything to enable this feature.
Key Resources
- See Implementing Your Cloud Integrations, "Setting Up GIS," Setting Up Map Profiles on the Oracle Help Center (available July 1, 2022).
- See Using Community Development Planning and Zoning, "Working with Maps," Using the Map Toolbar on the Oracle Help Center (available July 1, 2022).
Agencies can now provide a print service URL and enable the print widget on a map in the map profile. When the print widget is available on a map, agency staff and registered users can print the content displayed in the map viewer. You can select the print output file format from the options provided by the print service, enter a file name, and save the file as an attachment in the application details.
This example illustrates the map on the Property page of a planning application, with the print selection button and Export modal page highlighted.
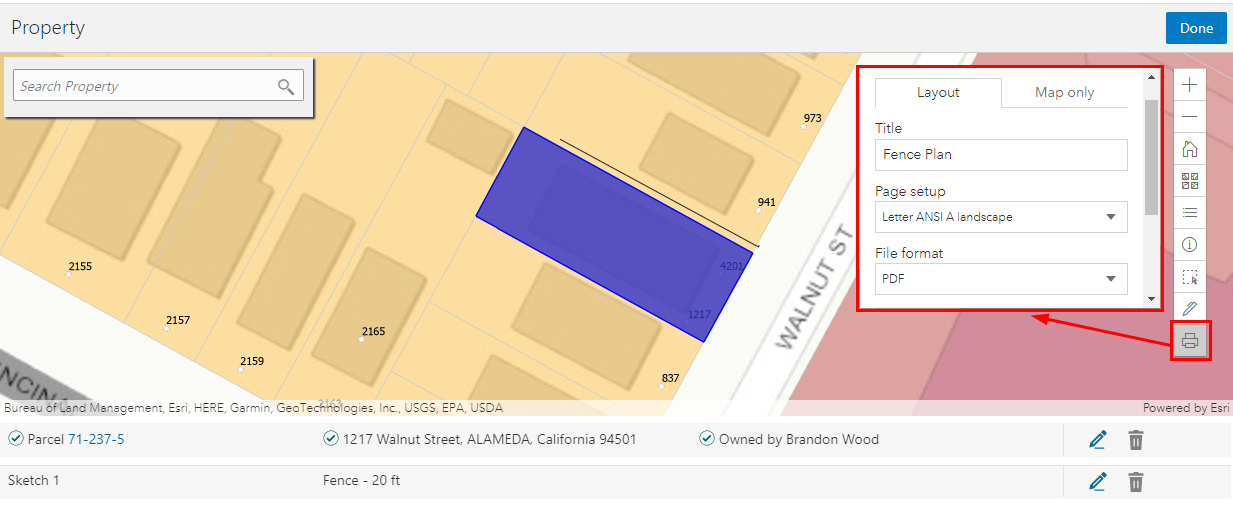
Property Page in the Application Details
This example illustrates the file saved as an attachment in the planning application details.
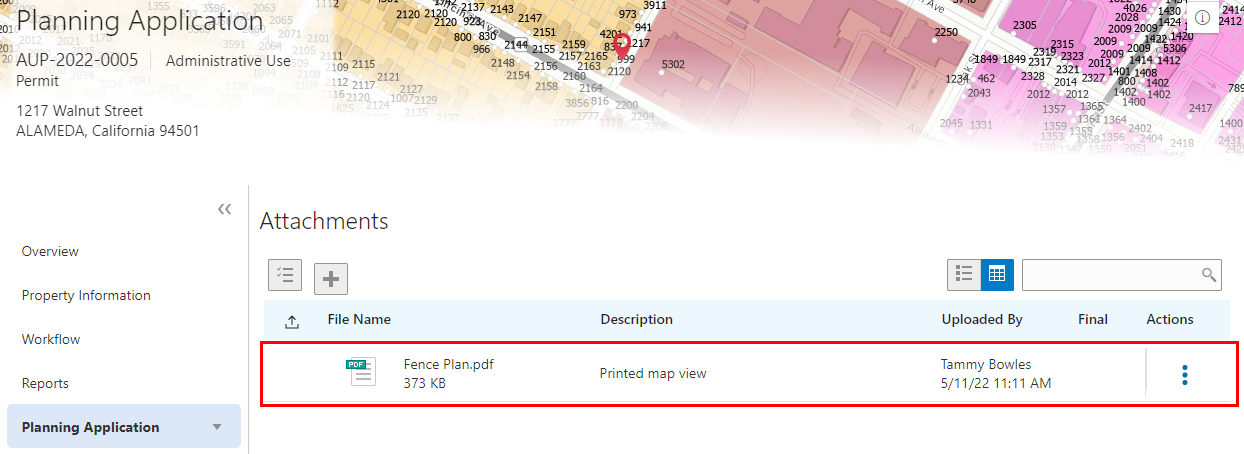
Attachments Page in the Application Details
This provides agency staff and public users the ability to generate a printer-ready version of the map. Users can specify the print output file formats that can be selected based on the options available from the print service.
Steps to Enable
You must have a map print service URL to set up the print widget. See below for documentation located on the Oracle Help Center.
Key Resources
- See Implementing Your Cloud Integrations, "Setting Up GIS," Setting Up Map Profiles on the Oracle Help Center (available July 1, 2022).
- See Using Community Development Planning and Zoning, "Working with Maps," Using the Map Toolbar on the Oracle Help Center (available July 1, 2022).
When an applicant starts an application, they are automatically added as the primary contact in the Contacts section of the intake form. However, the applicant can add or select a different primary contact on the intake form or on the Contacts page in the application details after submittal.
The applicant will always be identified with the new, system-delivered Applicant contact type. The primary contact has the same application access as the applicant regardless of the access defined for their assigned contact type.
When agency staff make a copy of an application, the source applicant is the default selection but can be changed.
This allows the applicant or agency to identify any contact as the primary contact and not just the applicant.
Steps to Enable
You don't need to do anything to enable this feature.
Tips And Considerations
A new contact type “Applicant” is added to the contact type setup table and cannot be changed.
On transactions, the applicant information is copied as the applicant contact in the contact grid with the contact type of "Applicant" and the applicant flag set to Yes. The primary flag is set to Yes if a primary contact record does not exists, otherwise, the primary flag is set to No.
Key Resources
- See Using Community Development Permits, "Managing Permits," Completing an Application and Working with Application Contacts on the Oracle Help Center (available July 1, 2022).
Attach Documents to an Ad Hoc Message
Now Agency Staff can attach documents from their local device to an ad hoc message.

Ad Hoc Message Page
Ad hoc messages are more complete when staff can share any document they desire with their recipients.
Steps to Enable
You don't need to do anything to enable this feature.
Key Resources
- See Using Community Development Permits, “Managing Permits,” Working with Application Communications on the Oracle Help Center (available July 1, 2022).
Final Document Check Box for Attachments
Agency staff can now designate a permit attachment as a final document. This aids agency staff with identifying the final, approved document among different versions. Only system administrators can remove the final notation or delete a final document.
This example illustrates the page where agency staff can turn on the Final switch for a document. The final status appears in the list of permit attachments.
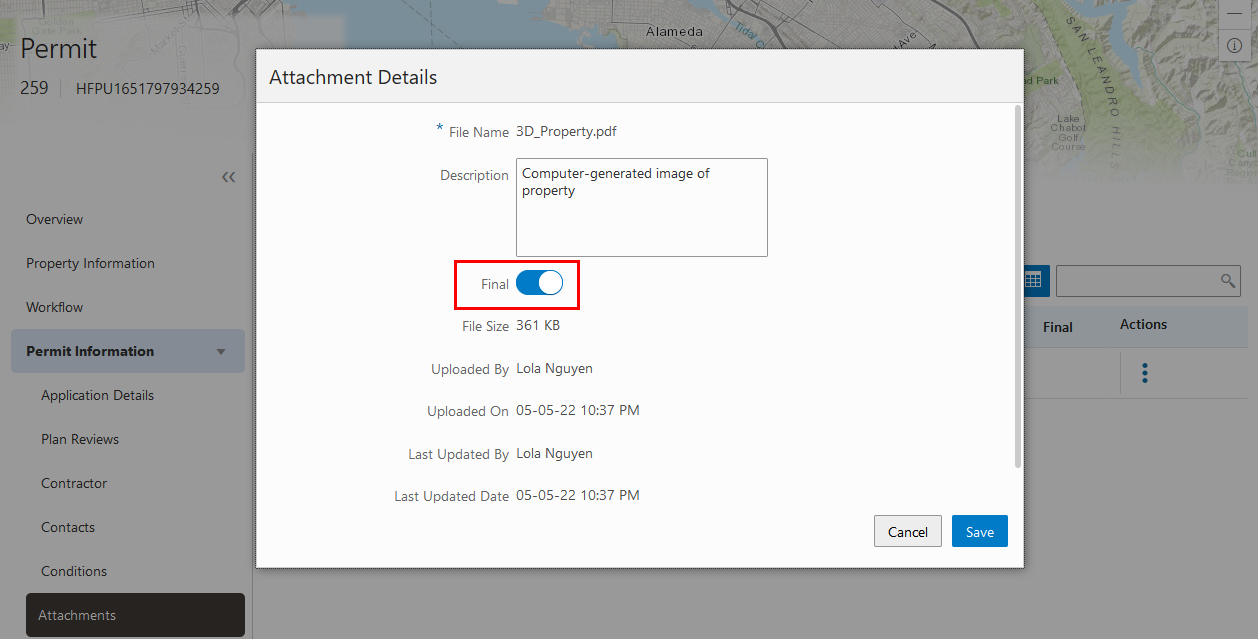
Attachment Details Page
By designating one or more permit attachment as final, agency staff can differentiate from other documents.
Steps to Enable
You don't need to do anything to enable this feature.
Tips And Considerations
An example use case is a plan coordinator can mark one or more attachments as final, indicating the document versions approved during plan review.
Key Resources
- See Using Community Development Permits, "Managing Permits," Working with Attachments on the Oracle Help Center (available July 1, 2022).
Display or Hide Inspection Functionality
Agencies can now set up their system to opt in or out of the Inspections functionality. When inspections aren't implemented using Functional Setup Manager, you won't see:
- The navigation to inspection setup and transaction pages.
- The Inspections section on the Overview page in the permit and planning application details.
- The Inspections page in the permit and planning application details.
This example illustrates the Functional Setup Manager with Inspections enabled for Public Sector Permits.

Functional Setup Manager - Opt In Page
For agencies that choose not to use Oracle's inspection functionality, the inspection pages are not shown.
Steps to Enable
You don't need to do anything to enable this feature.
Key Resources
- See Implementing Your Agency, "Implementing Permitting and Licensing Using Functional Setup Manager," Setting Up Transactions Using Functional Setup Manager on the Oracle Help Center (available July 1, 2022).
Grid Personalization Additional Pages
User experience enhancements continue to roll out for grids with personalization options.
Each agency staff member can now personalize expanded grids to display information in a manner that suits their own requirement. The flexibility that the display settings offer is now available on the following pages:
- All pages in Code Officer Worklist
- All pages in Code Technician Worklist
- Cases page
- Incidents page
- Planner Worklist
Staff can modify their display settings in a consistent way to optimize their daily activities across different pages.
Steps to Enable
You don't need to do anything to enable this feature.
Agency Default Settings for Grid Personalization
Additional user experience enhancements are available for grids by supporting an agency-default personalization option. Administrators can now set up grid information in a way that serves as the default display for all agency staff. Agency administrators will need to individually access the pages that are using the flat grid to set up the Agency Default personalization for that grid.
Agency staff will view grids as set up by their administrators, which they can override and personalize to suit their own requirements.
This example shows the personalization options used on the Fee and Payments page:
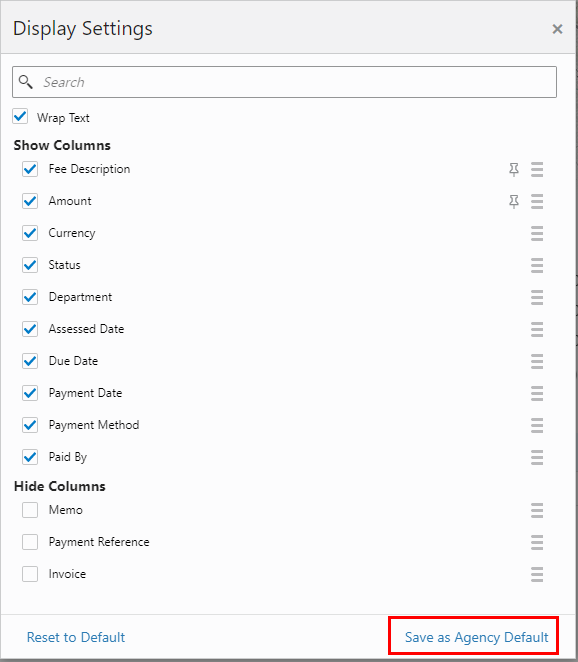
Fee and Payments Page – Personalization Display Settings
Setup a default page layout display which can then be further personalized by staff.
Steps to Enable
You don't need to do anything to enable this feature.
To collect and display data in a tabular fashion, with rows and columns, you can now add grids to your intake form designs. Drag the grid element onto a page in the intake form, and then drag the fields onto the grid to create grid columns.
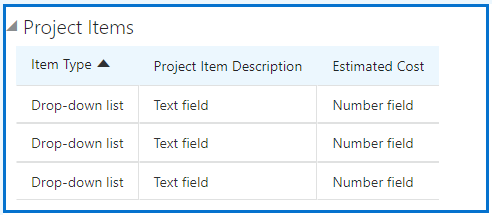
Project Items
At run time, you can add rows to the grid using a modal dialog that enables you to select or enter values for each column in a grid row. To make adding multiple rows more efficient, select the Add another row option to keep the modal dialog open after you've added a row.
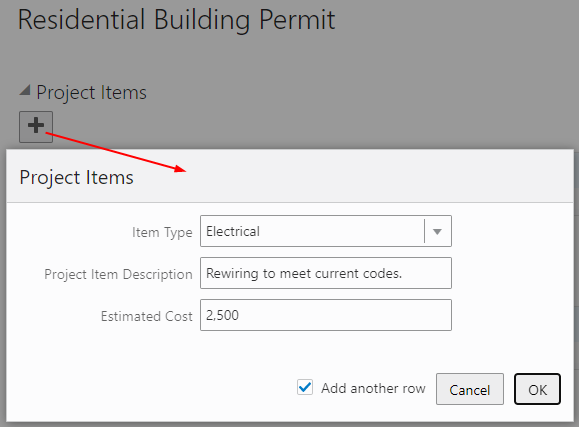
Project Items Dialog Box
Grids enable you to capture and display intake form data with a tabular page control. When creating intake forms for Permits or Planning and Zoning, you can now add grids to your pages.
Steps to Enable
You don't need to do anything to enable this feature.
Tips And Considerations
Drag the grid element onto your form design just as you would a group box or a field, and drag fields into the grid element to create grid columns. These elements are available by default.
Key Resources
- See Implementing Permitting and Licensing, "Creating Intake Forms," Working with Grids on the Oracle Help Center (available July 1, 2022).
Display Options for Intake Form Grids
When you've added a grid to an intake form, you can set display attributes to enhance user experience. At the grid level, you can set the initial sorting of the grid display by selecting the column for the initial runtime sort and the sort order, either ascending or descending.
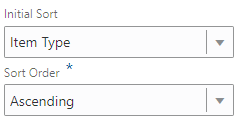
Initial Sort Order
At the grid column level, you can set text fields and drop-down lists to wrap the field content so that all the required text is visible to users.
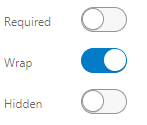
Wrap Field Content
When adding grids to an intake form design, you can set runtime display options, such as the initial sorting column and whether to wrap data entered into columns.
Steps to Enable
You don't need to do anything to enable this feature.
Key Resources
- See Implementing Permitting and Licensing, "Creating Intake Forms," Working with Grids on the Oracle Help Center (available July 1, 2022).
Intake Form Versioning and Effective Dating
In the Intake Form Designer, you can create new versions of the intake form layout.
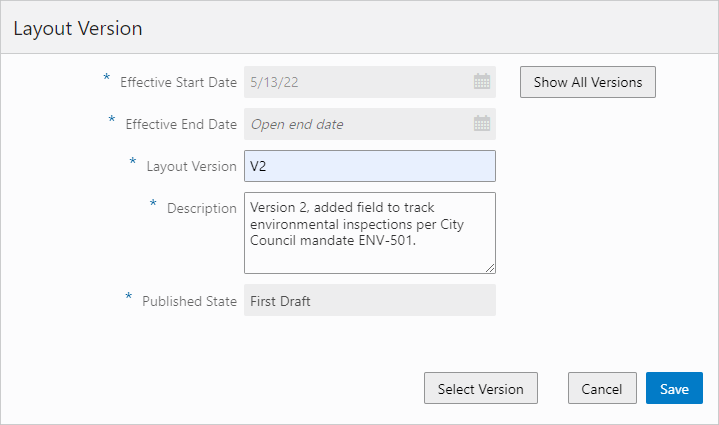
Create New Version
The effective start date for the new version, becomes the end date for current version. After creating a naming convention, you need to specify the version, such as V2, to differentiate it from the existing version. After creating the version, click Select Version, to open that version in the Intake Form Designer and begin making your changes, while the previous version remains as is.
Click Show All Versions to view all of the versions for an intake form and switch between different versions if needed.
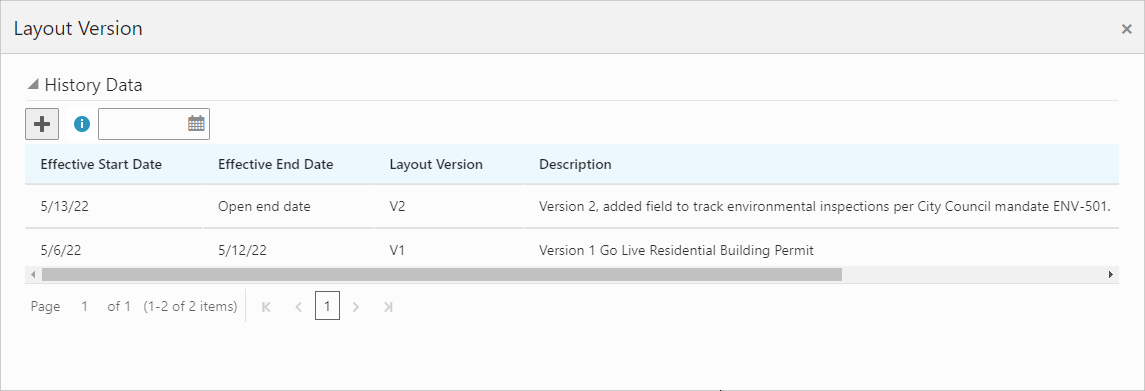
Show All Versions
You can now create and manage multiple versions of intake forms and apply effective dating to control when versions become active or inactive. This enables you to make changes to form designs to address current and future business needs while maintaining the integrity of historical and in-process transactions.
Steps to Enable
You don't need to do anything to enable this feature.
Intake Form Designer Groovy Icon
To help you locate where you have added business logic to your intake forms, a Groovy icon now appears to indicate where your logic is.
If you've added Groovy logic at the object level, the icon appears on the Add Logic button at the top of the form design.
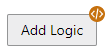
Add Logic Button
If you've added Groovy logic at the field level, the icon appears next to the field where you've added Groovy logic.

Logic Icon
When adding Groovy to your intake forms, the Intake Form Designer now displays an icon to indicate which elements have Groovy business logic. The Groovy icon lets you find your business logic quickly to assist development and troubleshooting efforts.
Steps to Enable
You don't need to do anything to enable this feature.
Tips And Considerations
- If the Groovy is written at the object level, the icon appears next to the Add Logic button for the intake form.
- If the Groovy is written at the field level, the icon appears next to the individual fields.
Key Resources
- See Implementing Permitting and Licensing, "Creating Intake Forms," Adding Logic on the Oracle Help Center (available July 1, 2022).
Role Information
Agency staff will be able to utilize this feature.
When you have enabled a group box on your intake form design to be collapsible, you can also turn on the Collapsed attribute so that the initial display of the group box is collapsed. The applicant can expand the group box to view the contents as needed.
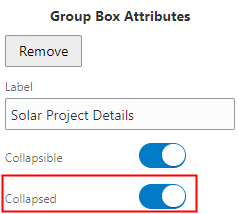
Group Box Actions
When agency staff designs intake forms, the default display of group boxes can be set to be either expanded or collapsed to improve user experience.
Steps to Enable
You don't need to do anything to enable this feature.
Tips And Considerations
Having group boxes collapsed, streamlines the initial display of the intake form.
Key Resources
- See Implementing Permitting and Licensing, "Creating Intake Forms," Working with Group Boxes on the Oracle Help Center (available July 1, 2022).
Legacy Permit and Planning Transaction Deletion and Updates
Agency administrators can import, review results, and now delete migrated data for Permits, Planning and Zoning, and Code Enforcement. Administrators can run the Delete Migrated Data process iteratively as part of their legacy data migration effort until they are satisfied with the quality of the migrated data.
This allows agency administrators to delete and update migrated permits and related objects to support data migration iterations. You can delete imported transactions for each test run prior to converting to a production environment.
Steps to Enable
An ESS job is delivered for you to run the delete process. The process of importing, reviewing results, deleting migrated data and re-running the import will be an iterative process executed a number of times by implementers until they are satisfied with the quality of the migrated data. See the documentation links below.
Key Resources
- See Implementing Licensing and Permitting, "Migrating Legacy Data" on the Oracle Help Center (available July 1, 2022).
Deposit Account Creation, Ownership, Payments, and Deposits
Cities may want to establish deposit accounts (also known as trust or escrow accounts) based on the potential for exceptional or unusual costs being incurred by the city. For example, for big sewer or utilities projects that require reviews by civil engineers, traffic or land use planners, or other consulting professionals, cities want to be assured that they will get paid for their review and processing of applications.
Agency staff can:
- Create deposit accounts with an owner being an individual registered in Permit and Licensing or an unregistered business.
- Replace existing owners or add additional owners.
- Migrate active accounts with positive balances using a REST API.
- Inactivate, close, or delete deposit accounts.
- Specify an initial deposit amount and minimum deposit increments.
- Specify a minimum balance that must be maintained for each account.
- Add or update any letter of credit details associated with an account.
- Print statements for deposit accounts for a date range.
- Add, inactivate, or delete authorized users.
- Grant or revoke access to authorized users to make deposits, receive balance notifications, pay fees, print statements.
- Assign projects and transactions to deposit accounts.
- Inactivate or delete project assignments and transaction assignments from deposit accounts.
- Record or reverse deposits recorded against deposit accounts.
- Manually pay fees with the balance in a deposit account.
- Run a process to pay fees with the balance in a deposit account.
- Reverse fees paid with the balance in a deposit account.
- Refund the balance in a deposit account.
- Send a notification if an account balance falls below the minimum balance.
- Create accounting entries for deposits received, reversals, fees paid, reversals of fees, refunds of fees and balances.
Authorized public users can:
- View deposit account information.
- Update the name and description on the deposit account information.
- Add or update the letter of credit details associated with an account.
- Fund a deposit account.
- Manually pay fees with the balance in a deposit account.
- Print statements for deposit accounts for a date range.
Trust account creation, ownership, balance display for deposits, and payment draw downs. Includes assigning transactions and projects to deposit accounts.
Steps to Enable
There are two new accounting event definitions: Payments and PaymentRefunds. You should enable these accounting events and create relevant accounting rules if you want to generate accounting for the deposit account activities.
Complete the following steps:
- Enable the accounting events "Payments" and "PaymentRefunds".
- Create accounting rules applicable to trust account activities.
- Run Generate Accounting process periodically.
Key Resources
- See Implementing Your Financials Framework, “Setting Up Deposit Accounts” on the Oracle Help Center (available July 1, 2022).
Fee Calculation Based on Reusable Custom Field Value
You can now include user-defined reusable fields on the intake forms in fee calculations.
The decision models that process the fee calculations in the Oracle Integration Cloud will include the values entered by applicants in your reusable fields.
This example shows a reusable user-defined field that will be used in fee calculations:
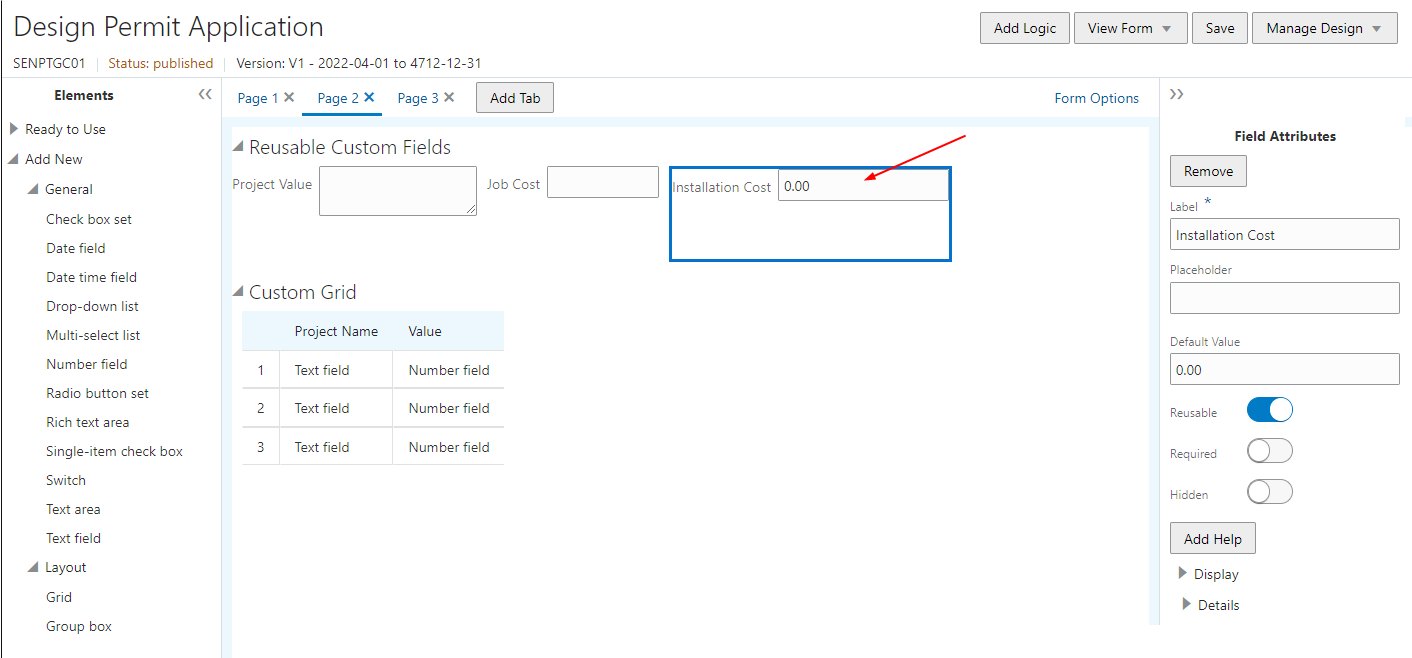
Design Permit Application Page
The calculation of fees uses values entered in reusable agency-defined custom fields.
Steps to Enable
You don't need to do anything to enable this feature.
Tips And Considerations
The Reusable Custom Field needs to be mapped using the same Fee Mapping page as in the Form Designer. They will be available just like other delivered and custom fields.
Permit Contacts to Make Fee Payments
All registered users, including applicants and contacts with the appropriate application access, can now make payments for permit applications using the Make a Payment page.
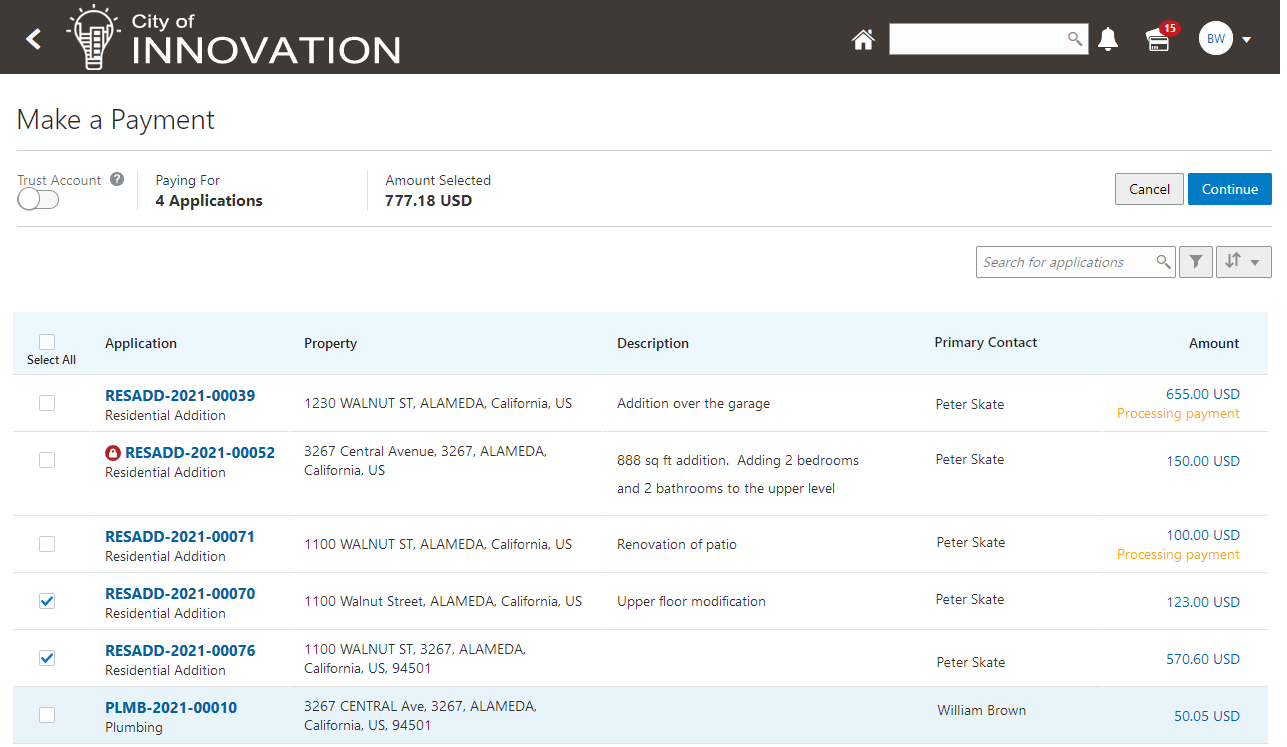
Make a Payment Page
Whether you're an applicant or contact you'll have the same experience when paying fees.
Steps to Enable
You don't need to do anything to enable this feature.
Key Resources
- See Using Community Development Planning and Zoning, "Making Payments" on the Oracle Help Center (available July 1, 2022).
New Relay to OIC Action for Business Rules Framework
Relay to Oracle Integration Cloud (OIC) action is available for all resources and events. Use this action to have your business rule send an event payload to an existing integration defined in Oracle Integration Cloud.
When setting up your business rule, select the Relay to OIC action, and specify the Oracle Integration Cloud endpoint for your integration.
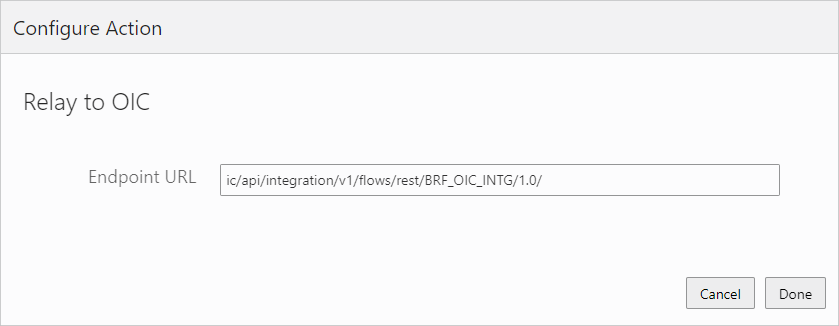
Relay to OIC
Extends integration abilities by leveraging existing Business Rule Framework events to trigger outbound integrations defined in Oracle Integration Cloud.
Steps to Enable
ICS endpoint(s) in OIC need to be created and configured first. The Action configuration in Business Rules Framework will require a portion of the URL created by ICS. See the documentation referenced in Key Resources for more information.
Tips And Considerations
The number of ICS endpoints required is up to the agency. Each Rule can utilize the same or different endpoint. Business Rules Framework will simply pass the request payload it received on to the endpoint configured in the rule.
Key Resources
- See Implementing Permitting and Licensing, "Implementing the Business Rules Framework," Setting Up Relay to OIC Actions on the Oracle Help Center (available July 1, 2022).
Role Information
Agency staff and implementers can utilize this feature.
Expand Usage of Existing Business Rules Framework Actions to All Applicable Resources
When setting up business rules in the Business Rules Framework, you will find that for most of the resources the amount of actions available to trigger by your business rules has increased.
For example, for the Inspections resource if you select the Inspection Requested event for a business rule, in previous releases it triggered these actions:
- Send Communication
- Add Fee
In this release, you can trigger these actions as well, using the same resource and event:
- Apply Parcel Condition
- Apply Transaction Condition
- Relay to OIC
The actions available for a resource are determined by the attributes on a resource, so a larger set of actions will be available for most resource events.
Steps to Enable
You don't need to do anything to enable this feature.
Tips And Considerations
Available actions within a rule are now derived from the attributes on the resource. If the resource has the require attribute fields for an action it will display in the available actions list in the rule. Actions are no longer controlled by seed data.
Key Resources
- See Implementing Permitting and Licensing, "Implementing the Business Rules Framework," Business Rules Framework Overview on the Oracle Help Center (available July 1, 2022).
Role Information
Agency staff and implementers can utilize this feature.
Business Rules Framework Expands Scope of Apply Condition Action
In previous releases, the Business Rules Framework provided the Apply Condition action. In this release, applying conditions has become more flexible and expansive. When defining your business rule, you can now select these condition-specific actions:
- Apply Parcel Condition
- Apply Address Condition
- Apply Transaction Condition
NOTE: The Apply Condition action from previous releases has been renamed to Apply Transaction Condition.
The types of conditions you can apply based on the criteria defined in your business rule, depend on the selected resource.
For example, for the Inspections resource when an inspection is cancelled, you can apply a parcel or a transaction condition, while if a case is created in Code Enforcement, you can apply a parcel or an address condition.
When applying non-transaction conditions, such as person, parcel, or address. You can also elect to apply the condition to associated future and in-process transactions.
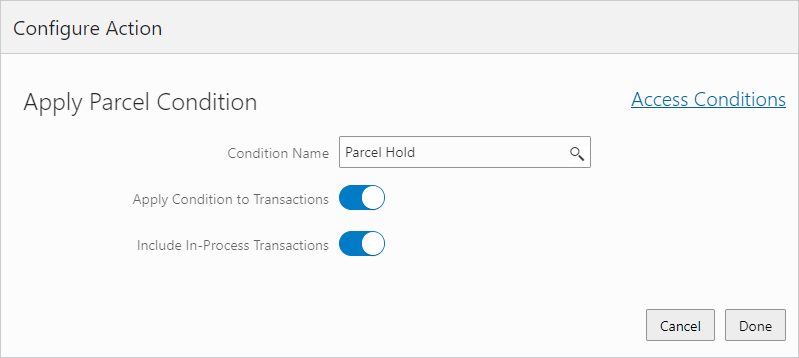
Apply Parcel Condition page
Access Conditions now will take you to the view the condition details directly for the condition name selected on the page. If no condition name is selected, the Access Conditions will continue to go to the condition list.
Expands Business Rules Framework Apply Condition action to support applying conditions to an address, a parcel, a contractor license, and a person.
Steps to Enable
You don't need to do anything to enable this feature.
Tips And Considerations
New condition types of transaction, address, and parcel will appear in the available action list where the resource for the event has the attributes required to support them.
Key Resources
- See Implementing Permitting and Licensing, "Implementing the Business Rules Framework," Setting Up Apply Condition Actions on the Oracle Help Center (available July 1, 2022).
Role Information
Agency staff and implementers can utilize this feature.
Require Comments for Workflow, Plan Reviews, and Inspections
You can now require comments to be added when you update the workflow status on the Workflow tab. You enable this feature using custom properties added to the underlying workflow process defined in Oracle Integration Cloud.
Your agency may also require comments for plan reviews and inspections based on review decisions or inspection results, as well as cancellations and withdrawals. You can require options for:
- Plan review cycle cancellations and plan review decisions with a negative or qualified outcome (Approved with Comments, Rejected, or Revision Required)
- All plan review decisions and cancellations
- Inspection cancellations and failed results
- All inspection results and cancellations
You set up these requirements in the agency-level permit and planning application options. Comments are optional unless the agency elects to require comments.
This example illustrates comments entered on the Workflow page in the application details.
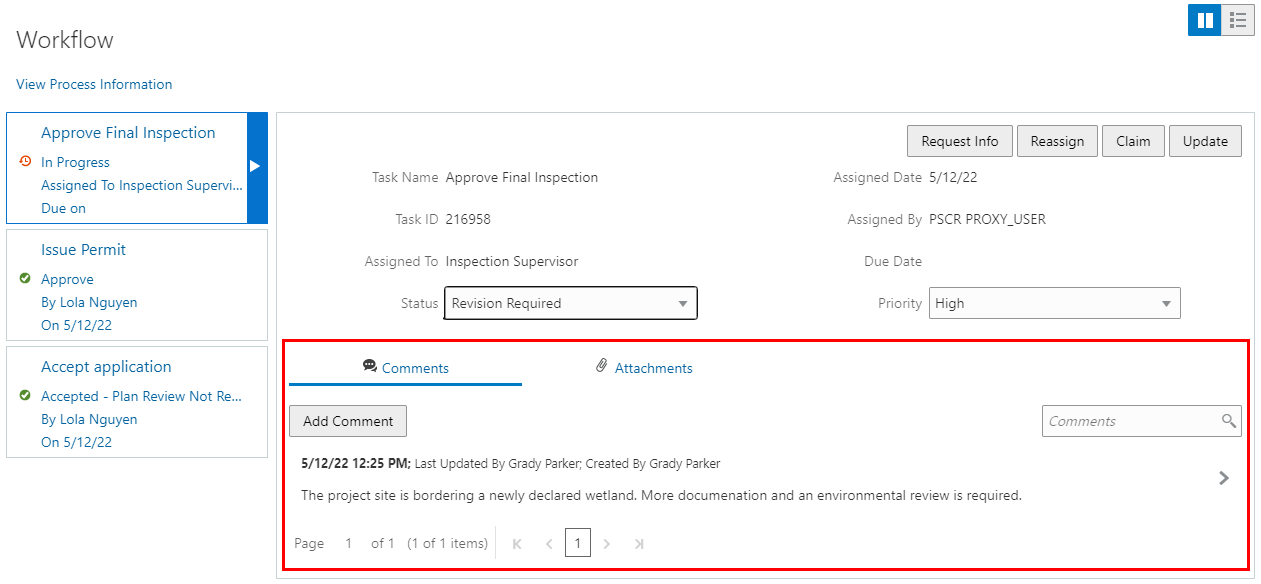
Workflow Page
This provides configurability to require a comment when certain predefined statuses occur in workflow, plan review, and inspections.
Steps to Enable
To use this feature customer properties needs to be configured in the Process definition. Please refer the documentation to set up these customer properties:
- PSC_WFACTION_COMMENT
- PSC_WFACTION_SELECTIVE
Tips And Considerations
An agency can make comments optional, required in all cases, or required for negative statuses, including canceled inspections. Comments are collected when plan review decisions are made, plan review cycles are canceled, inspections are canceled, and inspection results are provided.
Key Resources
- See Implementing Your Cloud Integrations, “Setting Up Workflow,” Using Custom Properties on the Oracle Help Center (available July 1, 2022).
- See Implementing Permitting and Licensing, "Setting Up Permits," Setting Up Agency-Level Options for Permits on the Oracle Help Center (available July 1, 2022).
Final Inspection and Required Inspection Logic
When setting up inspections for a permit, agencies can now designate a final inspection that is always required. All other required inspections must be completed with a passing or corrected result before agency staff can schedule the final inspection.
Agency staff can also customize which inspections are required. You can set up selected inspection types in the inspection group for a permit or planning application type to be required. Agency staff can override the agency settings when requesting an inspection.
This example illustrates an inspection group set up with required and final inspection types.
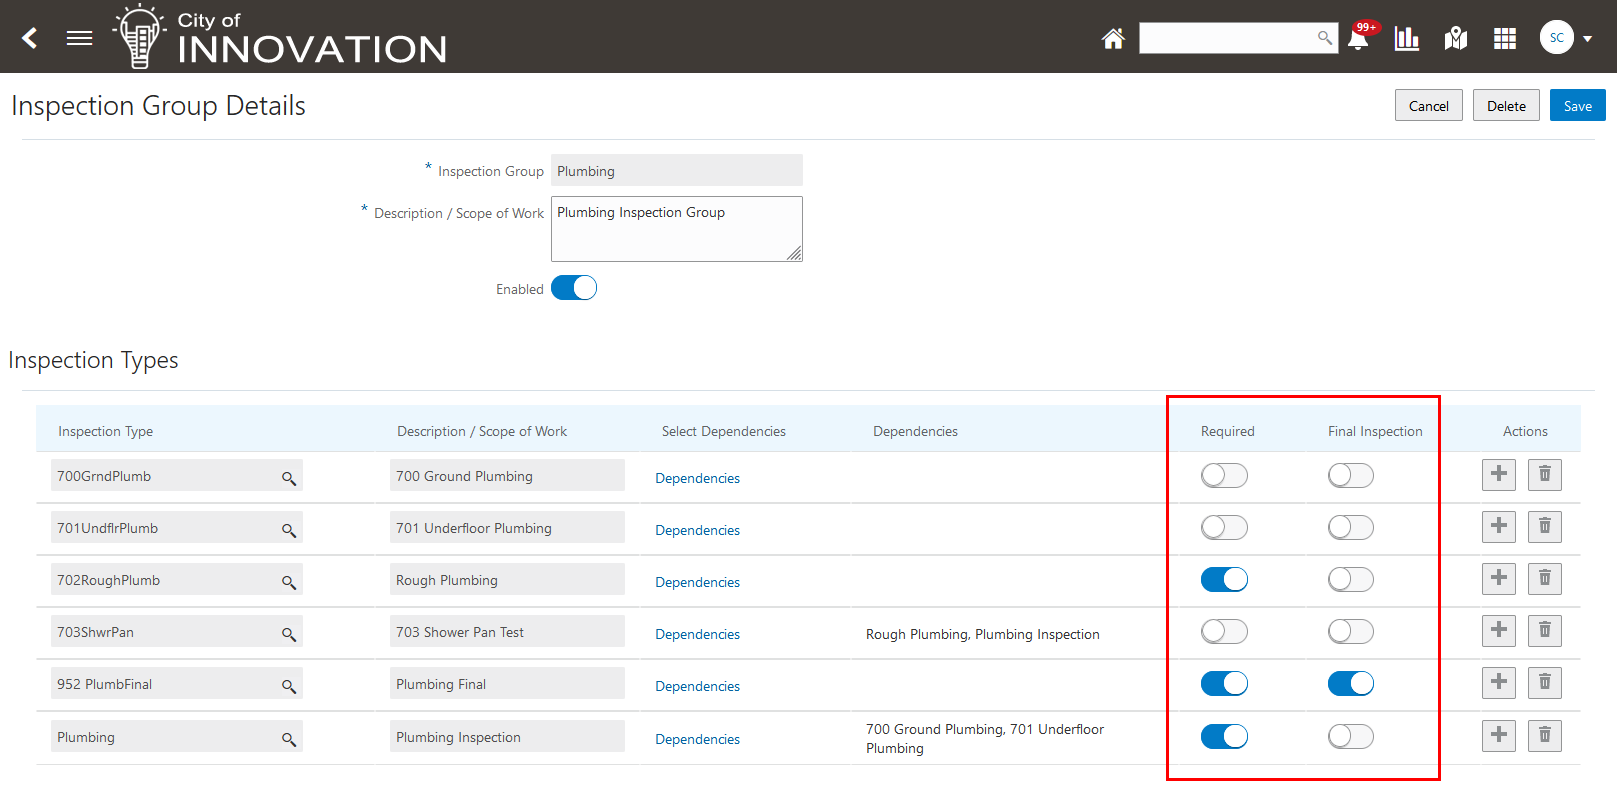
Inspection Group Details Setup Page
This example illustrates a required inspection on the inspection request page in the permit details.
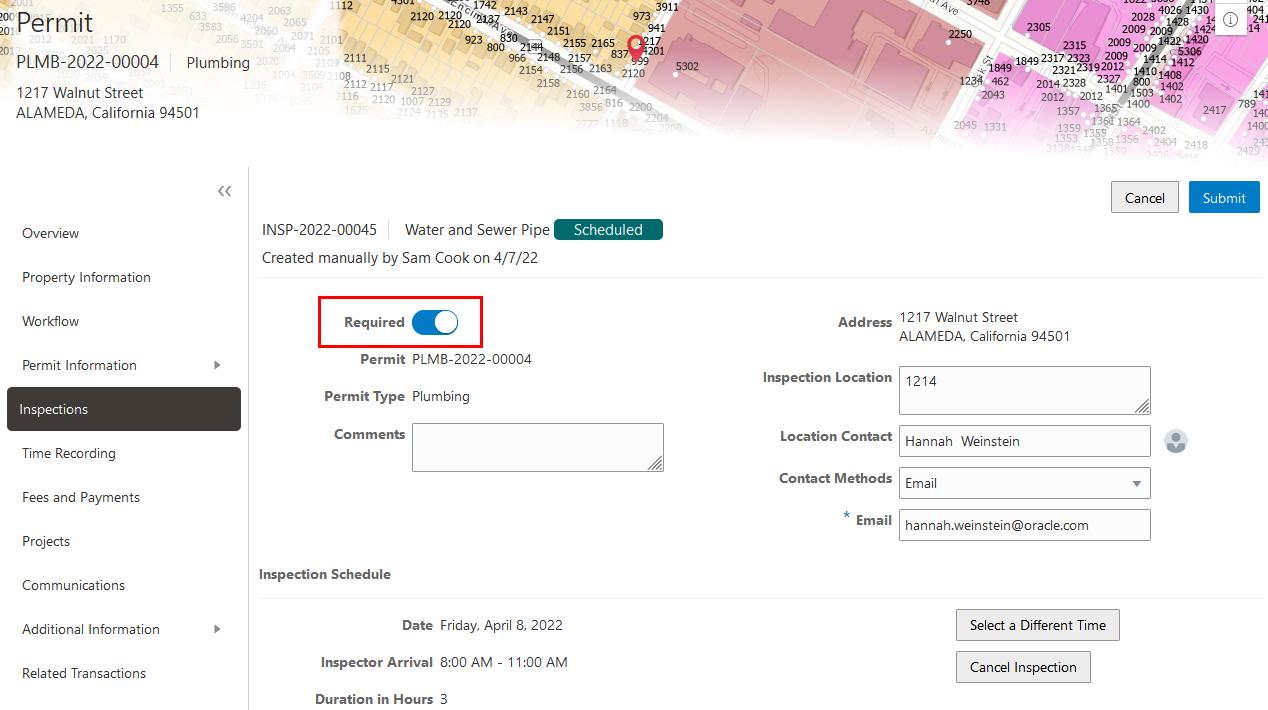
Inspection Request in the Permit Details
Extends final inspection flag to enforce required inspections be completed prior to the final inspection.
Steps to Enable
You don't need to do anything to enable this feature.
Key Resources
- See Implementing Licensing and Permitting, “Setting Up Inspections," Setting Up Inspection Groups on the Oracle Help Center (available July 1, 2022).
- See Using Community Development Permits, "Working with Permit Inspections," Requesting Inspections on the Oracle Help Center (available July 1, 2022).
Plan Reviewer Workload Visualization
Plan coordinators can now view reviewer workload in a calendar view, featuring a bar chart of daily assignments by reviewer and department, and indicators with total and overdue counts. You can access the Reviewer Workload calendar view on the Add Reviewers page when assigning reviewers, and on the new Reviewer Workload page in the Plan Review Console:
- In the Reviewers section on the Plan Reviews page in the permit or planning application details, click the Assign Reviewers button.
- For a plan review on the Unassigned Reviews page in the Plan Review Console.
- For a plan review on the new Reviewer Workload page in the Plan Review Console.
You can also switch between the Grid View and the Calendar View on the new Reviewer Workload page in the Plan Review Console.
This example illustrates the Reviewer Workload tab on the Add Reviewers page, accessed by clicking Add Reviewers from the application details.

Add Reviewers Page, Reviewer Workload Tab
This example illustrates the calendar view on the new Reviewer Workload page in the Plan Review Console.
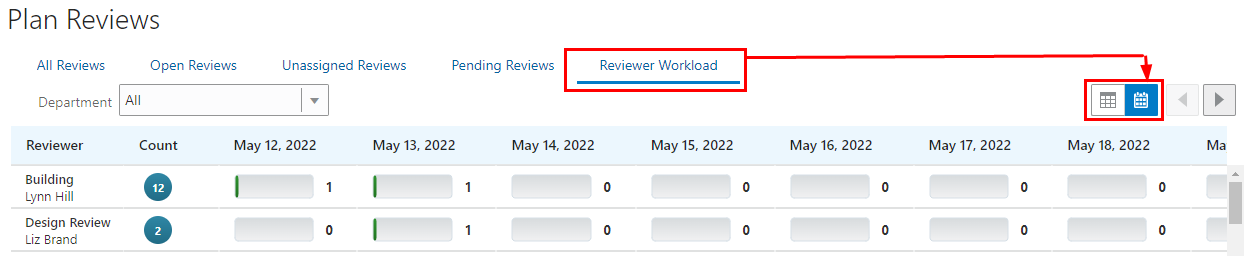
Plan Review Console: Calendar View of the Plan Reviews - Reviewer Workload Page
This example illustrates the grid view on the new Reviewer Workload page in the Plan Review Console.
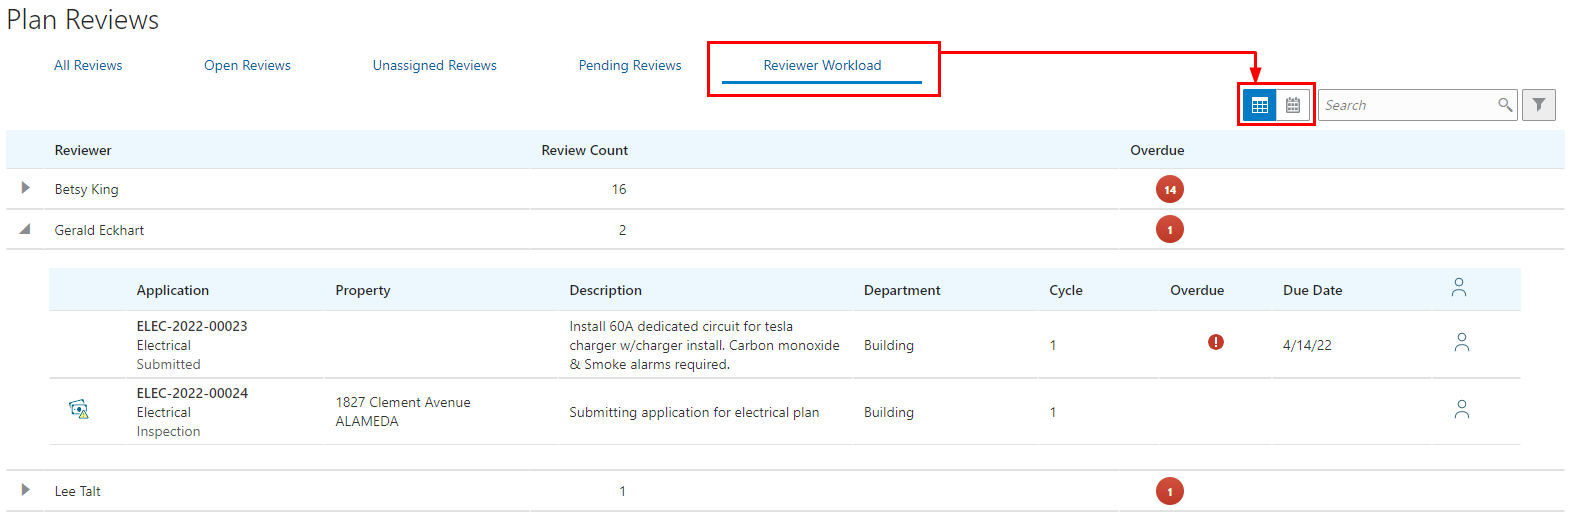
Plan Review Console: Grid View of the Plan Reviews - Reviewer Workload Page
This provides a visual representation of reviewer workload data when adding a reviewer, including assigned reviewer information in the context of the number of reviews that are due each day. In addition, the Plan Review Console is expanded to include a reviewer workload page, including a list of reviewers with the total count of reviews assigned and the applications they are assigned to.
Steps to Enable
You don't need to do anything to enable this feature.
Tips And Considerations
The new Reviewer Workload page in the Plan Review Console displays reviewers based on the plan coordinator's assigned plan reviewer departments and application types in the agency staff job attributes.
Key Resources
- See Using Community Development Permits, "Managing Plan Reviews," Using the Plan Review Console on the Oracle Help Center (available July 1, 2022).
- See Using Community Development Permits, "Managing Plan Reviews," Managing Plan Reviewers on the Oracle Help Center (available July 1, 2022).
Plan Review Workload Display for Assignment and Reassignment
The Reviewers field used to reassign plan reviews is enhanced to display a drop-down list of available reviewers that includes the total number of plan reviews assigned to each reviewer. You can reassign reviewers on these pages:
Click the Reviewer row to open the Reviewer Details page.
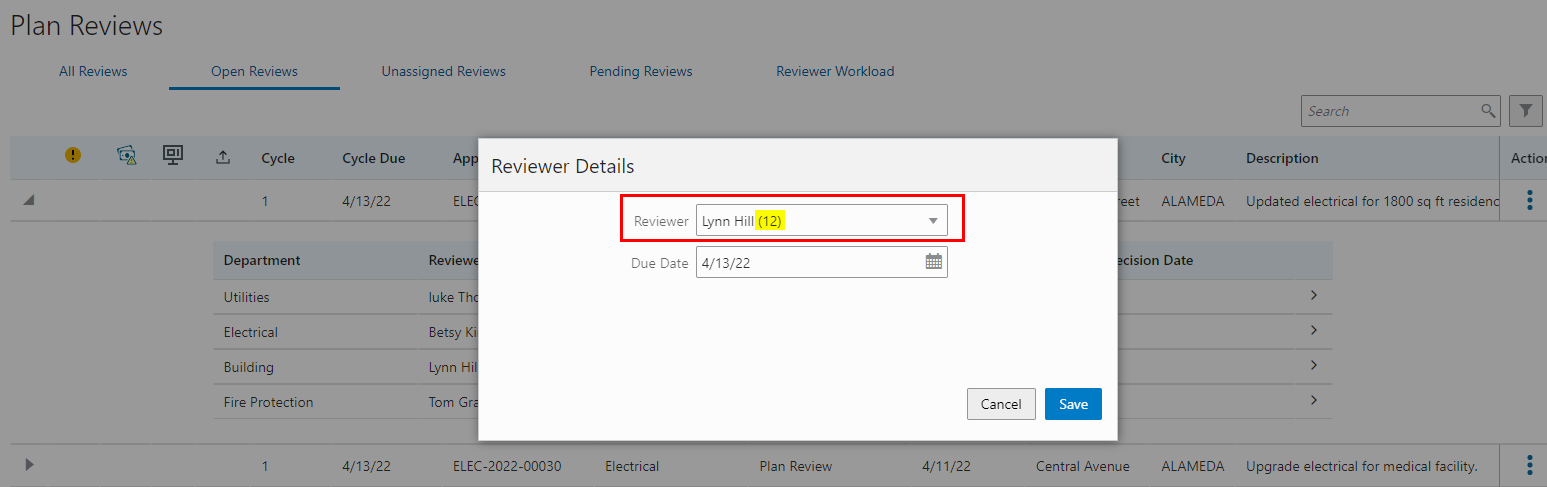
Plan Review Console: Plan Reviews - Open Reviews Page
Click the View More Details button for a reviewer to open the Plan Review Decision Details page.
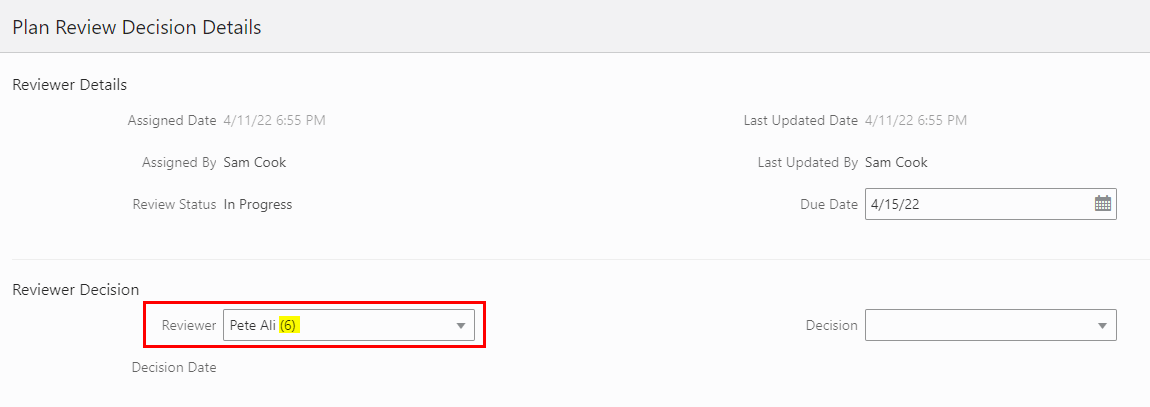
Plan Reviews Page in the Application Details
The currently assigned reviewer is displayed by default.
This displays a count of plan reviews assigned to each reviewer across permits and planning applications on the Plan Review Console and on permits in the Plan Review Decision Details. Viewing the workload helps to facilitate plan review assignment and reassignment.
Steps to Enable
You don't need to do anything to enable this feature.
Key Resources
- See Using Community Development Permits, "Managing Plan Reviews," Managing Plan Reviewers on the Oracle Help Center (available July 1, 2022).
All Permit Statuses View in Plan Review Console
The All Reviews page in the Plan Review Console now displays a filter to show plan reviews for permits and planning applications in all statuses. Plan coordinators can turn on the switch to view plan reviews for applications in a terminal status, such as withdrawn, completed, and certificate, in addition to the other statuses.
This example illustrates the list of plan reviews for applications in all statuses, including a withdrawn permit.
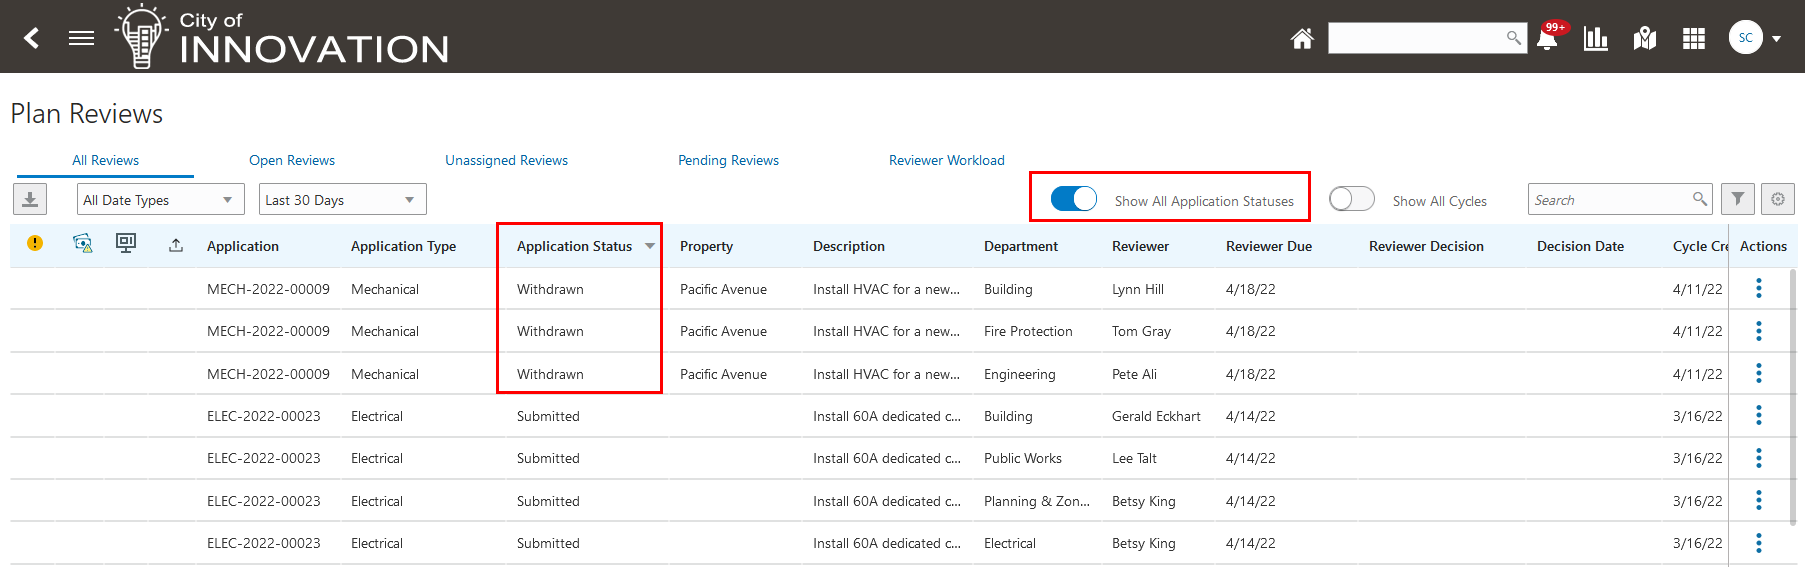
Plan Review Console: Plan Reviews - All Reviews Page
Agency staff can quickly access plan reviews when the cycle is closed or when the application is in a status other than plan review, including terminal status.
Steps to Enable
You don't need to do anything to enable this feature.
Key Resources
- See Using Community Development Permits, "Managing Plan Reviews," Using the Plan Review Console on the Oracle Help Center (available July 1, 2022).
Responsible Party Attachment Upload
While resolving an issue, a responsible party can now upload an attachment. This attachment can also be viewed by both the agency staff and the responsible party on the Case Details - Attachments page.
This example illustrates a Resolve Issue page with option to add attachments.
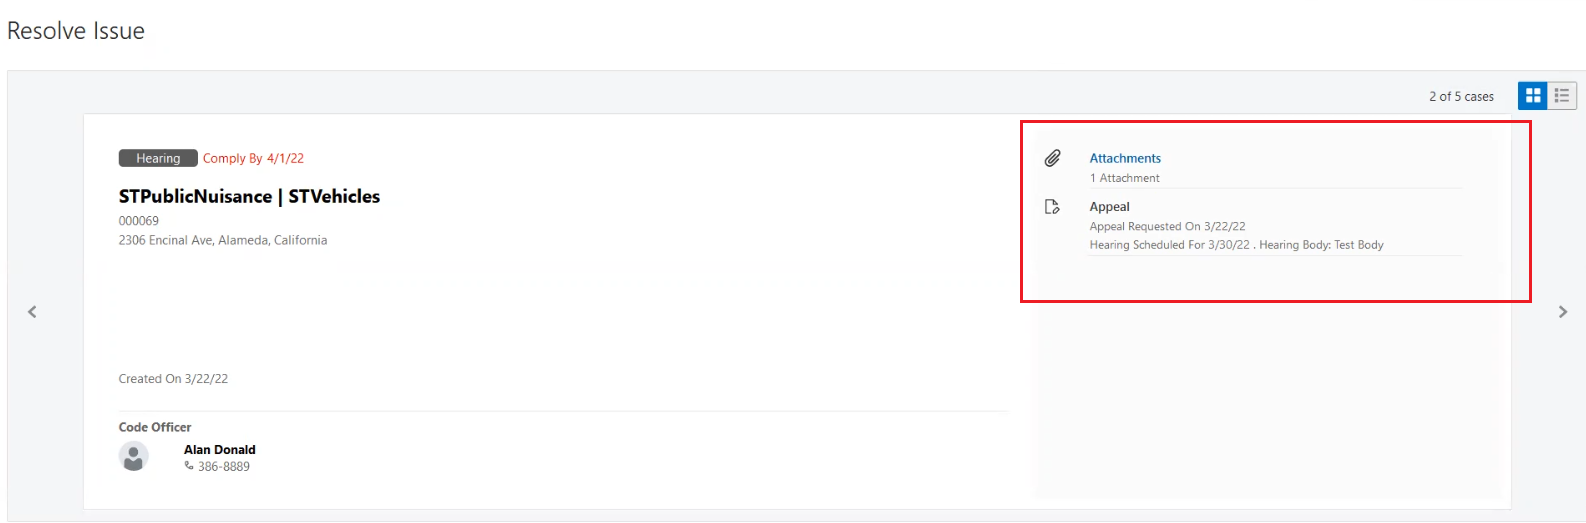
Resolve Issue Page
This example illustrates an agency staff's Case Detail - Attachments page which shows an attachment uploaded by the responsible party.
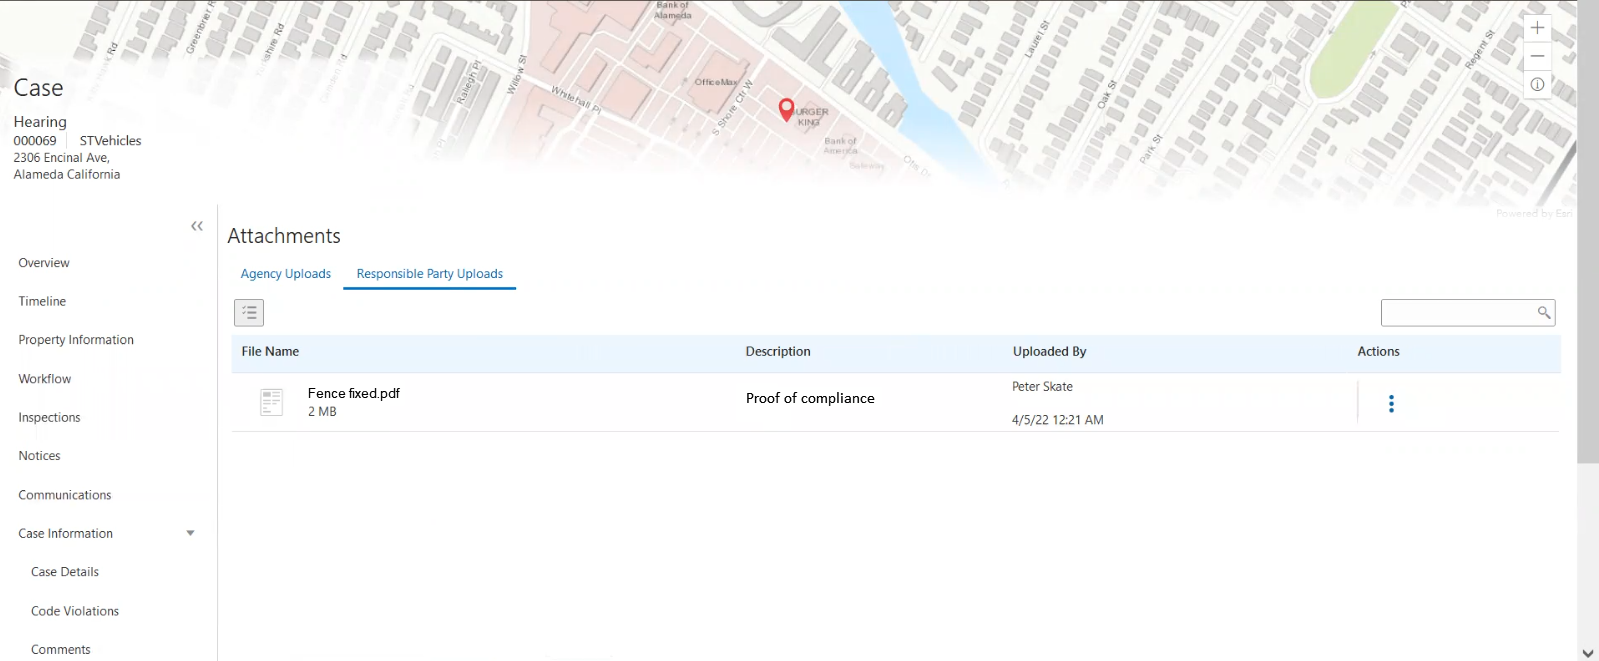
Case Detail - Attachment Page
Responsible party can upload an attachment (for example, photos showing evidence of compliance) in the responsible party online page.
Steps to Enable
You don't need to do anything to enable this feature.
Key Resources
- See Using Community Development Code Enforcement, "Resolving Issues", Resolving Issues on the Oracle Help Center (available July 1, 2022).
Autoassignment of Officer on Case Based on Job Attributes
Agencies can now enable the autoassignment of an officer to a newly created case in a particular district and district type. The autoassignment of officers works based on their job attribute values of District and District Type. If the district and district type of the newly created case matches with the job attributes of a code officer, the officer gets auto-assigned to the case. If there are more than one officer available for a district and district type, then autoassignment does not occur.
Automatically route code cases to a Code Officer.
Steps to Enable
You don't need to do anything to enable this feature.
Tips And Considerations
- The Code Officer must have the District and District Type values associated in the Job Attribute of the Agency Staff page.
- The autoassignment option must be enabled at the agency-level settings - Code Enforcement Options page.
- Autoassignment of the code officer will happen only if a single code officer is associated with the district and district type. If more officers are available in the district and district type, the case has to be manually assigned to an officer.
Key Resources
- See Implementing Your Agency, "Setting Up Agency Staff" on the Oracle Help Center (available July 1, 2022).
- See Implementing Licensing and Permitting, "Setting Up Agency-Level Options for Code Enforcement" on the Oracle Help Center (available July 1, 2022).
- See Using Community Development Code Enforcement, "Autoassigning Cases to Code Officers" on the Oracle Help Center (available July 1, 2022).
Automatically Apply Code Case Condition
Three new Code Enforcement events are delivered with the Business Rules Framework to track code cases by automatically placing conditions on parcels and addresses. You can use the Business Rules Framework to set the criteria for triggering these conditions. The new Code Enforcement events delivered in this release are:
- Case Created
- Case Location Updated
- Case Status Updated
Track code cases by automatically placing conditions on parcel or addresses. Use the Business Rules Framework to set the criteria for triggering the conditions.
Steps to Enable
You must use the Business Rules Framework to set the criteria for triggering these conditions. See the documentation links below.
Key Resources
- See Implementing Permitting and Licensing, Implementing the Business Rules Framework, "Business Rules Framework Event Details" on the Oracle Help Center (available July 1, 2022)
Agency staff now has the ability to change the template of a notice before generating a notice.
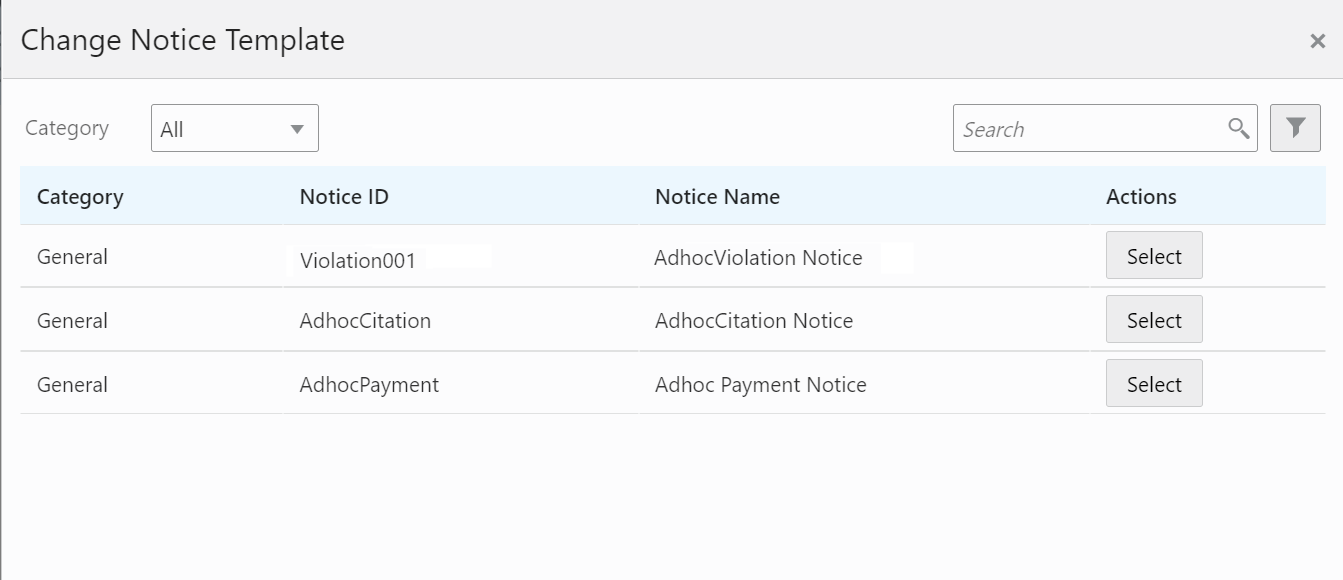
Change Notice Template
This is an easy way to select a different notice layout to replace the standard layout when needed.
Steps to Enable
You don't need to do anything to enable this feature.
Key Resources
- See Using Community Development Code Enforcement, "Working with Notices" on the Oracle Help Center (available July 1, 2022).
Agency staff can now easily access all property information related to an incident or case. If the incident address and parcel ID exists in the system, the agency staff can use the hyperlinks to access the relevant pages. They can also use the Edit button near the Incident Address and Parcel ID fields to make any changes to these. The Location, Edit, and Select from Parcel buttons also allow to search for, update, and select parcels from the system.
This example shows an Incident Detail - Property Information page.

Incident Detail - Property Information Page
Code Enforcement staff can easily access reference parcel info from a code case.
Steps to Enable
You don't need to do anything to enable this feature.
Key Resources
-
See Using Community Development Code Enforcement, "Working with Incident Details", Using the Property Information Tab on the Oracle Help Center (available July 1, 2022).
-
See Using Community Development Code Enforcement, "Working with Case Property Information" on the Oracle Help Center (available July 1, 2022).
All Tasks Tab from the Worklist
Code officers and technicians can view a list of all the tasks that they are associated with.
Their tasks – all inspections, incidents, notices, hearings, and access requests – are organized in separate tabs and their subtabs.
A code officer views all their tasks including the tasks in the district or district type that they are assigned to. A code technician views all their tasks including the tasks with the issue type or subtype that they are assigned to.
This example shows the all-task tabs in the Code Officer Worklist.
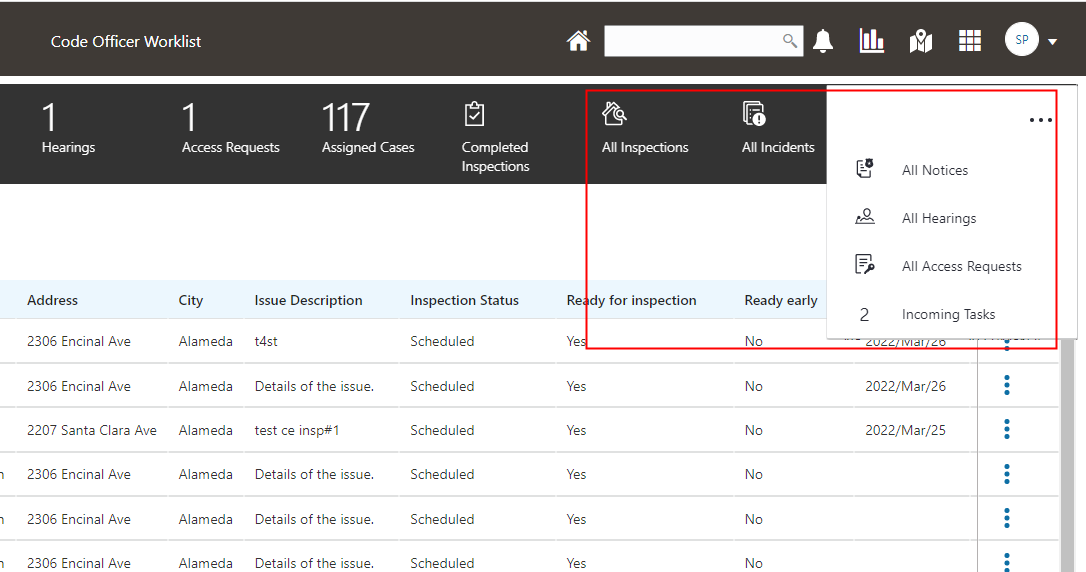
Code Officer Worklist
Each tab and subtab show the count of task records listed on the page, based on any applied filters. You can use the grid-level filters to list tasks for code officers or technicians that you select.
This example shows the Incidents tab listing the number of incidents for two selected code officers:
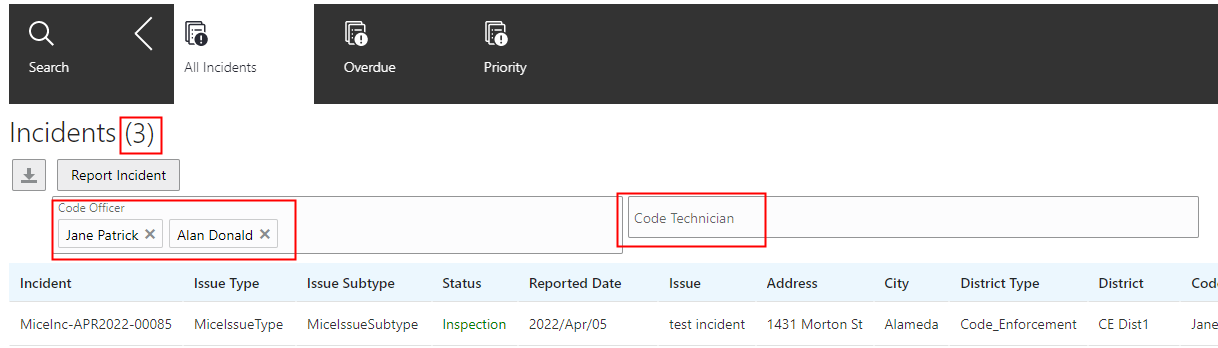
Incidents Tab
Staff can quickly access and complete individual from other staff without the need for reassigning the case.
Steps to Enable
You don't need to do anything to enable this feature.
When an incident or case gets reassigned to a code officer or technician, any assigned and pending workflow tasks are also automatically reassigned to the newly assigned user. The workflow tasks assigned to others remain unchanged.
When a technician is reassigned on an incident and/or case, the assigned workflow tasks will also be automatically reassigned to the newly assigned user.
Steps to Enable
You don't need to do anything to enable this feature.
Key Resources
- See Using Community Development Code Enforcement, "Using Workflow", Using the Stage View or Milestone View in Workflow for Code Enforcement on the Oracle Help Center (available July 1, 2022).
Search, Sort, Filter, and Export for Code Enforcement Pages
This feature extends the Search, Sort, and Filter capabilities to Code Enforcement pages, including Worklists, Case, and Incident pages.
Use a consistent way to Search, Sort, and Filter Inspection Lists for Property for Code Enforcement pages including Worklists, Case, and Incident pages.
Steps to Enable
You don't need to do anything to enable this feature.
Business Licenses Subject Area
OTBI Business License subject area provides agencies with analytical information about their licensed businesses and real-time dashboards.
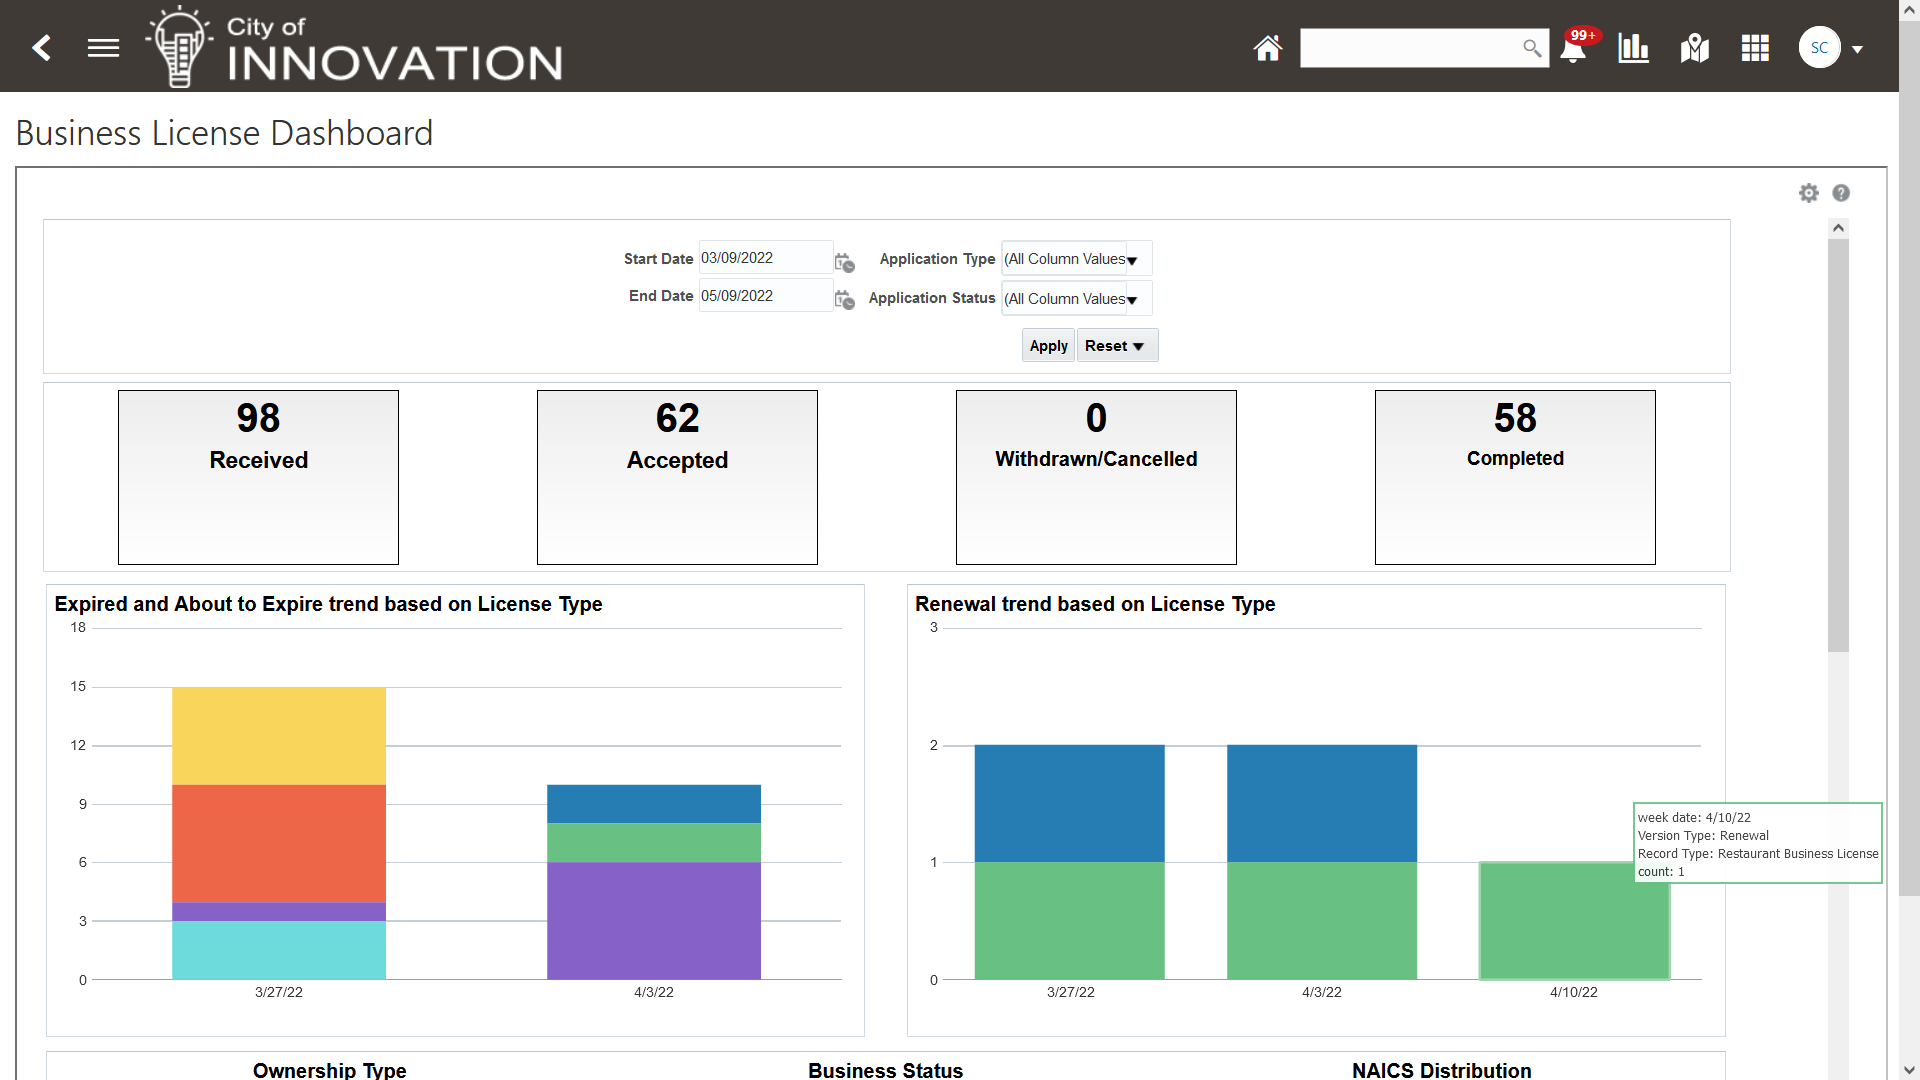
Business License Dashboard Page
Agencies are interested in analytical information about their licensed businesses. An OTBI subject area for business licenses enables customers to demonstrate these rich capabilities using real-time dashboards.
Steps to Enable
Leverage new subject area(s) by adding to existing reports or using in new reports. For details about creating and editing reports, see the Creating and Administering Analytics and Reports book (available from the Oracle Help Center > your apps service area of interest > Books > Administration).
Key Resources
- See Implementing Your Agency, "Setting Up Analytics," Setting Up Dashboards on the Oracle Help Center (available July 1, 2022).
Business Licenses Communication Events
You can use the communication events of the Business Rules Framework to send notifications to specialists and applicants when there are updates to consultation meetings and business licenses. Two new communication events are being delivered:
- Business Consultation Meeting Rescheduled
- Business Consultation Meeting Invitee Added
Communication events to trigger communication at critical milestones of the business license application process.
Steps to Enable
You will need to set up communication events.
- The Business License communication events are added to allow agencies to send communications when the Business License application status is changed. The workflow tasks will need to be added to trigger the communications. The communication template also needs to be set up.
- The Permit, Planning and Zoning, and Business License expiration events are updated so that agency can configure the communication template to send the communications to the contacts listed on the application. The template will list the available contact types. Expiration communication template needs to be updated.
IMPORTANT Actions and Considerations
UPGRADE ACTIONS
With every upgrade, make sure to complete the following steps in the Initial Set Up functional area in Functional Setup Manager. This process ensures all new security definitions, such as job roles, duty roles, privileges, and so on, are included in your implementation.
- Run Public Sector Security Setup Process
- Manage Custom Roles
REST Backward Compatibility
Public Sector Permitting and Licensing updates REST APIs from release to release. Our goal is to not create APIS that are incompatible from one release to the next. However, due to circumstances and security impacts this may not be feasible.
For the most current information, see My Oracle Support Document ID: 2853758.1.
Documentation for all REST APIs included in Public Sector Permitting and Licensing can be found on the Oracle Help Center.
REPLACED OR REMOVED FEATURES
On occasion, Oracle replaces existing features with new features or removes existing features altogether. When a feature is replaced, the older version may be removed immediately or in the future. As a best practice, you should use the new version of a replaced feature as soon as the newest version is available.
| Removed Feature | Target Removal | Replacement Feature | Replaced In | Additional Information |
|---|---|---|---|---|
| LNPFeePaid (Accounting Event) |
22D | FeeReceipts FeeRefunded |
22A (for Permitting and Licensing Accounting Framework customers) 22B (for Financials Cloud Subledger Accounting customers) |
The LNPFeePaid accounting event will be deprecated and no longer available for use in 22D. You will need to transition to the new accounting events BEFORE you upgrade to 22D. For instructions on how to move to the new accounting event, see My Oracle Support Document ID: 2851069.1 |
DEPRECATED REST APIs
At times, REST APIs will be deprecated and no longer available for public use. For the most current information, see My Oracle Support Document ID: 2853758.1.
| REST API | Deprecated Release | Comments |
|---|---|---|
| Payment Accounts (publicSectorPaymentAccounts) |
22C | This API will be deprecated in 22C. Trust account information is being moved to new trust account structures. You should start planning to no longer use this resource and find alternatives. |
| Trust Account Notifications (publicSectorTrustAccountNotifications) |
22C | This API will be deprecated in 22C. Trust account information is being moved to new trust account structures. You should start planning to no longer use this resource and find alternatives. |