

This document will continue to evolve as existing sections change and new information is added. All updates appear in the following table:
| Date | Update Version | Notes |
|---|---|---|
| 21 SEP 2018 | Update 18C | Delivered new features in update 18C. |
| 20 APR 2018 | Update 18B | Delivered new features in update 18B. |
| 19 JAN 2018 | Update 18A | Delivered new features in update 18A. |
This document will continue to evolve as existing sections change and new information is added. All updates appear in the following table:
| Date | Feature | Notes |
|---|---|---|
| 21 SEP 2018 | Created initial document. |
This guide outlines the information you need to know about new or improved functionality in this update, and describes any tasks you might need to perform for the update. Each section includes a brief description of the feature, the steps you need to take to enable or begin using the feature, any tips or considerations that you should keep in mind, and the resources available to help you.
Security and New Features
The Role section of each feature identifies the security privilege and job role required to use the feature. If feature setup is required, then the Application Implementation Consultant job role is required to perform the setup, unless otherwise indicated. (If a feature doesn't include a Role section, then no security changes are required to use the feature.)
If you have created job roles, then you can use this information to add new privileges to those roles as needed.
Give Us Feedback
We welcome your comments and suggestions to improve the content. Please send us your feedback at oracle_fusion_applications_help_ww_grp@oracle.com.
Optional Uptake of New Features (Opt In)
We continue to add many new features to the Oracle Cloud Applications, and for some features, you can take advantage of new functionality at a pace that suits you by “opting in” to the feature when you’re ready. You can opt in to a feature in two ways: by using the New Features work area, or by using the Setup and Maintenance work area.
To opt in using the New Features work area:
- Click the Navigator, and then click New Features (under the My Enterprise heading).
- On the New Features page, select the offering that includes new features you’d like to review.
- Click Go to Opt In for any feature that you want to opt in to.
- On the Edit Features page, select the Enable option for the feature, and then click Done.
To opt in using the Setup and Maintenance work area:
- Click the Navigator, and then click Setup and Maintenance.
- On the Setup page, select your offering, and then click Change Feature Opt In.
- On the Opt In page, click the Edit Features icon.
- On the Edit Features page, select the Enable option for any feature you want to opt in to. If the Enable column includes an Edit icon instead of a check box, then click the icon, select your feature options, and click Save and Close.
- Click Done.
Column Definitions:
Report = New or modified, Oracle-delivered, ready to run reports.
UI or Process-Based: Small Scale = These UI or process-based features are typically comprised of minor field, validation, or program changes. Therefore, the potential impact to users is minimal.
UI or Process-Based: Larger Scale* = These UI or process-based features have more complex designs. Therefore, the potential impact to users is higher.
Opt In Only = These features are made available for use via Opt In. No additional setup steps are required.
Opt In, Plus Additional Steps Required = To use these features you must first Opt In, then perform additional setup steps.
Steps Required (No Opt In) = Setup steps must be performed before these features can be used. For example, new or expanded BI subject areas need to first be incorporated into reports. Integration is required to utilize new web services.
| New Features Delivered Ready to Use Reports plus Small Scale UI or Process-Based new features will have minimal user impact after an update. Therefore, customer acceptance testing should focus on the Larger Scale UI or Process-Based* new features. |
New Features That Customer Must Take Action to Use (Delivered Disabled) Not disruptive as action is required to make these features ready to use. As you selectively choose to leverage, you set your test and roll out timing. |
|||||
|---|---|---|---|---|---|---|
| Feature |
Report |
UI or |
UI or |
Customer Action: |
Customer Action: |
Customer Action: |
 |
||||||
|
||||||
|
||||||
Print E-Signature History in E-Record
Include e-signatures and comments from each reviewer at the end of an electronic record report.
The Signature Manifestations section of the US Food and Drug Administration’s (FDA) 21 CFR Part 11 mandates that the signed electronic records shall contain information associated with the signing that clearly indicates all of the following:
- The printed name of the signer.
- The date and time when the signature was executed.
- The meaning (such as review, approval, responsibility, or authorship) associated with the signature.
The Electronic Record Signature History section is now automatically added to the electronic records stored in the application after they are either approved or rejected. The signature history prints the name of the signer, the signature meaning, response, signed date, and the comments entered, if any, when the electronic signature is added.
Printing the electronic signatures in the electronic records results in compliance with the US Food and Drug Administration’s (FDA) 21 CFR Part 11 regulations for storing electronic records. Electronic signatures are linked to their respective electronic records to ensure that the signatures cannot be excised, copied, or otherwise transferred to falsify an electronic record.
The following screenshot shows the electronic signature history in an electronic record for a work order operation transaction.

Steps to Enable
No steps are required to enable this feature.
Key Resources
- Oracle Supply Chain Management Cloud: Using E-Signatures and E-Records Guide, available on the Oracle Help Center.
Role Information
- Privilege Name and Code:
- Add Electronic Signatures (EDR_ADD_ESIGNATURES_TRANSACTIONS_PRIV)
- Job Role Name and Code:
- All roles provisioned with the Add Electronic Signatures (EDR_ADD_ESIGNATURES_TRANSACTIONS_PRIV) privilege. Existing roles applicable to the supply chain management transactions that use e-signatures and e-records are provisioned by default.
- Privilege Name and Code:
- View Electronic Records and Signatures (EDR_VIEW_RECORDS_ESIGNATURES_PRIV)
- Job Role Name and Code:
- Compliance Business Analyst (ORA_EDR_COMPLIANCE_BUSINESS_ANALYST_JOB
Review E-Record and E-Signature Details Inline
Review electronic record and electronic signature details for inline approvals in a PDF file on the E-Signature page.
Users reviewing an electronic record before adding their electronic signatures need not click on a link to open or download the electronic record. The application displays electronic records on the E-Signature page.
The Electronic Record area on the E-Signature page that displays the electronic record in a PDF file allows users to navigate, search, zoom, and download the electronic record. For inline signature transactions, the electronic record is displayed inline in approval notifications too.
The following screenshot shows the electronic record in the E-Signature page.

Steps to Enable
No steps are required to enable this feature.
Key Resources
- Oracle SCM Cloud: Using E-Signatures and E-Records Guide, available on the Oracle Help Center.
Role Information
- Privilege Name and Code:
- Add Electronic Signatures (EDR_ADD_ESIGNATURES_TRANSACTIONS_PRIV)
- Job Role Name and Code:
- All roles provisioned with the Add Electronic Signatures (EDR_ADD_ESIGNATURES_TRANSACTIONS_PRIV) privilege. Existing roles applicable to the supply chain management transactions that use e-signatures and e-records are provisioned by default.
- Privilege Name and Code:
- View Electronic Records and Signatures (EDR_VIEW_RECORDS_ESIGNATURES_PRIV)
- Job Role Name and Code:
- Compliance Business Analyst (ORA_EDR_COMPLIANCE_BUSINESS_ANALYST_JOB
Capture User Name with E-Signature
Capture user name and password while generating an e-signature for inline and deferred transactions. During the signing process, you are now required to enter the user name along with the password for two distinct identification components of the e-signature.
The US Food and Drug Administration’s (FDA) 21 CFR Part 11 requires employing at least two distinct identification components such as the identification code and password when obtaining an e-signature.
Starting with this update, signers should enter their user name in addition to the password when adding e-signature to a transaction. Both the user name and the password of the signer is validated before recording their approval or rejection of the electronic record. Error messages are displayed if either the user name or the password does not match with that of the signer.
The user name is captured for electronic records approved through the inline signature page and also when the electronic records are captured through approval notifications.
The following screenshot shows the capture of both user name and password when approving an operation transaction.

Steps to Enable
No steps are required to enable this feature.
Key Resources
- Oracle SCM Cloud: Using E-Signatures and E-Records Guide available on the Oracle Help Center.
Role Information
- Privilege Name and Code:
- Add Electronic Signatures (EDR_ADD_ESIGNATURES_TRANSACTIONS_PRIV)
- Job Role Name and Code:
- All roles provisioned with the Add Electronic Signatures (EDR_ADD_ESIGNATURES_TRANSACTIONS_PRIV) privilege. Existing roles applicable to the supply chain management transactions that use e-signatures and e-records are provisioned by default.
- Privilege Name and Code:
- View Electronic Records and Signatures (EDR_VIEW_RECORDS_ESIGNATURES_PRIV)
- Job Role Name and Code:
- Compliance Business Analyst (ORA_EDR_COMPLIANCE_BUSINESS_ANALYST_JOB
This document will continue to evolve as existing sections change and new information is added. All updates appear in the following table:
| Date | Feature | Notes |
|---|---|---|
| 20 APR 2018 | Created initial document. |
This guide outlines the information you need to know about new or improved functionality in this update, and describes any tasks you might need to perform for the update. Each section includes a brief description of the feature, the steps you need to take to enable or begin using the feature, any tips or considerations that you should keep in mind, and the resources available to help you.
Security and New Features
The Role section of each feature identifies the security privilege and job role required to use the feature. If feature setup is required, then the Application Implementation Consultant job role is required to perform the setup, unless otherwise indicated. (If a feature doesn't include a Role section, then no security changes are required to use the feature.)
If you have created job roles, then you can use this information to add new privileges to those roles as needed.
Customers Upgrading from Release 12
If you're upgrading from Release 12 to Release 13, then you should review all of the release readiness content for Release 13 (updates 17B - 17D, as well as, updates 18A - 18B) to learn about all of the features available in release 13.
Give Us Feedback
We welcome your comments and suggestions to improve the content. Please send us your feedback at oracle_fusion_applications_help_ww_grp@oracle.com.
Optional Uptake of New Features (Opt In)
We continue to add many new features to the Oracle Cloud Applications, and for some features, you can take advantage of new functionality at a pace that suits you by “opting in” to the feature when you’re ready. You can opt in to a feature in two ways: by using the New Features work area, or by using the Setup and Maintenance work area.
To opt in using the New Features work area:
- Click the Navigator, and then click New Features (under the My Enterprise heading).
- On the New Features page, select the offering that includes new features you’d like to review.
- Click Go to Opt In for any feature that you want to opt in to.
- On the Edit Features page, select the Enable option for the feature, and then click Done.
To opt in using the Setup and Maintenance work area:
- Click the Navigator, and then click Setup and Maintenance.
- On the Setup page, select your offering, and then click Change Feature Opt In.
- On the Opt In page, click the Edit Features icon.
- On the Edit Features page, select the Enable option for any feature you want to opt in to. If the Enable column includes an Edit icon instead of a check box, then click the icon, select your feature options, and click Save and Close.
- Click Done.
| Action Required to Enable Feature |
|||||
|---|---|---|---|---|---|
| Feature |
None (Automatically Available) |
Enable via Opt In UI Only |
Enable via Opt In UI Plus Additional Steps |
Not Enabled via Opt In UI but Setup Required |
Issue Service Request |
|
|||||
Manage Electronic Signature Organizations Using a REST Service |
|
||||
Audit E-Signatures and E-Records Setup
Enable audit for the e-signatures and e-records setup. You can track the history of changes that have been made to the configure e-signature preferences setup in the Audit Reports work area. The Audit Reports work area includes information such as what operation was performed, when it was performed, and how the value was changed.
Audit trail is a key requirement of the Food and Drug Administration’s (FDA) regulation on electronic records and signatures, called Code of Federal Regulations Title 21, Part 11. It includes tracking the change history of a business object and its attributes, including all executed operations, such as create, update, and delete. You can initiate audit using the Configure Electronic Signature preferences setup task. The change history of the tracked transactions is available in the Audit Reports work area.
The following figure shows the audit report for the electronic signature preferences business object type.
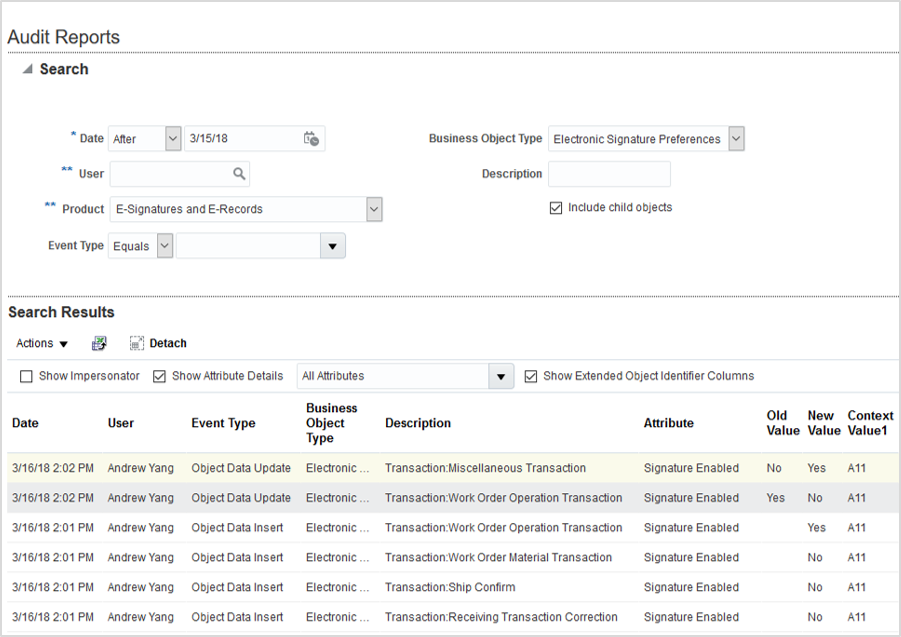
Audit Report for Electronic Signature Preferences
Steps to Enable
Enable audit for electronic signature preferences using the Manage Audit Policies task in the Setup and Maintenance work area.
Role Information
- Job Role Name and Codes:
- Application Administrator (ORA_FND_APPLICATION_ADMINISTRATOR) to access 'Manage Audit Policies' setup through Functional Setup Manager.
- Internal Auditor (ORA_FND_INTERNAL AUDITOR) to access 'Audit Reports' through the Navigator.
Manage Electronic Signature Organizations Using a REST Service
Use the Electronic Signature Preferences REST service to retrieve electronic signature preferences for supply chain management transactions from the setup.
You can use the Electronic Signature Preferences REST API in external applications to retrieve the e-signature preferences for supply chain transactions. You can query the REST API using organization or transaction type as input. Since, transaction type is a child resource, you can use an e-signature transaction type to query the e-signature used for the transaction type in an organization or all organizations.
The following figure shows a sample payload for the Electronic Signature Preferences REST service.
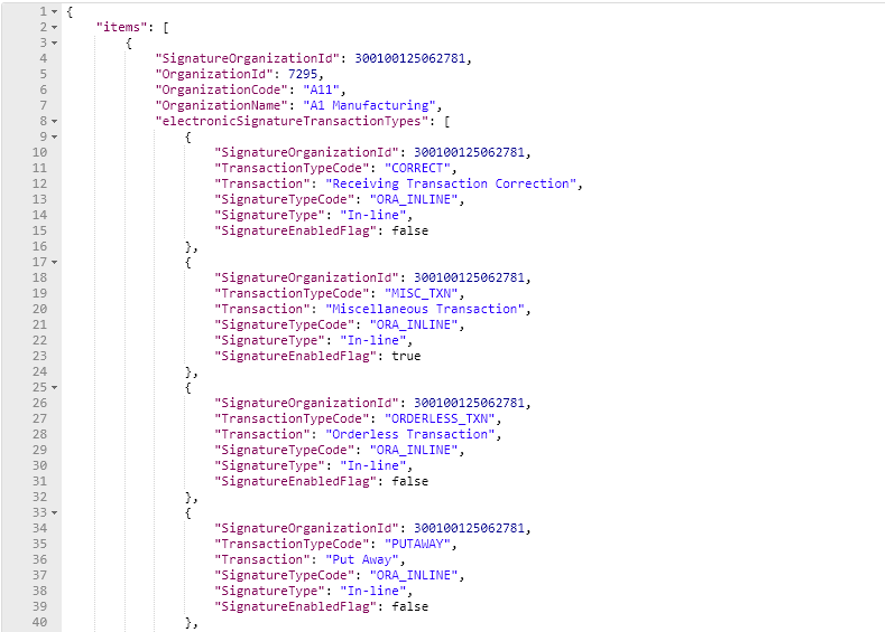
Sample Payload of the Electronic Signature Preferences REST Service
Steps to Enable
No steps are required to enable this feature.
Key Resources
- Refer to the REST APIs for Oracle SCM Cloud documentation available on the Oracle Help Center.
Role Information
- Privilege Name and Code:
- Get Electronic Signature Preferences by Service (EDR_GET_ESIGNATURE_PREF_SERVICE)
- Job Role Name and Code:
- Compliance Business Analyst (ORA_EDR_COMPLIANCE_BUSINESS_ANALYST)
This document will continue to evolve as existing sections change and new information is added. All updates appear in the following table:
| Date | Feature | Notes |
|---|---|---|
| 19 JAN 2018 | Created initial document. |
This guide outlines the information you need to know about new or improved functionality in this update, and describes any tasks you might need to perform for the update. Each section includes a brief description of the feature, the steps you need to take to enable or begin using the feature, any tips or considerations that you should keep in mind, and the resources available to help you.
Security and New Features
The Role section of each feature identifies the security privilege and job role required to use the feature. If feature setup is required, then the Application Implementation Consultant job role is required to perform the setup, unless otherwise indicated. (If a feature doesn't include a Role section, then no security changes are required to use the feature.)
If you have created job roles, then you can use this information to add new privileges to those roles as needed.
Customers Upgrading from Release 12
If you're upgrading from Release 12 to Release 13, then you should review all of the release readiness content for Release 13 (updates 17B - 17D, as well as, updates 18A - 18B) to learn about all of the features available in release 13.
Give Us Feedback
We welcome your comments and suggestions to improve the content. Please send us your feedback at oracle_fusion_applications_help_ww_grp@oracle.com.
Optional Uptake of New Features (Opt In)
We continue to add many new features to the Oracle Cloud Applications, and for some features, you can take advantage of new functionality at a pace that suits you by “opting in” to the feature when you’re ready. You can opt in to a feature in two ways: by using the New Features work area, or by using the Setup and Maintenance work area.
To opt in using the New Features work area:
- Click the Navigator, and then click New Features (under the My Enterprise heading).
- On the New Features page, select the offering that includes new features you’d like to review.
- Click Opt In for any feature that you want to opt in to.
- On the Edit Features page, select the Enable option for the feature, and then click Done.
To opt in using the Setup and Maintenance work area:
- Click the Navigator, and then click Setup and Maintenance.
- On the Setup page, select your offering, and then click Change Feature Opt In.
- On the Opt In page, click the Edit Features icon.
- On the Edit Features page, select the Enable option for any feature you want to opt in to. If the Enable column includes an Edit icon instead of a check box, then click the icon, select your feature options, and click Save and Close.
- Click Done.
| Action Required to Enable Feature |
|||||
|---|---|---|---|---|---|
| Feature |
None (Automatically Available) |
Enable via Opt In UI Only |
Enable via Opt In UI Plus Additional Steps |
Not Enabled via Opt In UI but Setup Required |
Issue Service Request |
|
|||||
|
|||||
Identify Meanings of Signature Entries
Select the meaning associated with a signature in a separate field while approving a signature. The options available are Review, Approval, Responsibility, and Authorship. Previously, the meaning associated with a signature was captured as a comment.
In the self approval region, a new field is added to select the signature meaning. The value defaults to Authorship. If required, you can select a different value before approving the electronic record.
The following figure illustrates the Signature Meaning field in the Initiator Approval region on the E-Signature page that displays during inline e-signature capture.

Initiator Approval for a Work Order Material Transaction
The signature meaning can also be updated in the approvals task received as a notification. In the approval task form, the signature meaning value defaults to Approval, which can be updated by the signer before approving the e-record.
The following figure illustrates the Signature Meaning field in the approval task form.

Approval Task Form for a Work Order Material Transaction
The signature meanings selected by the signers during approval are stored along with the e-records. You can view them in the signature history region on the Electronic Records page. You can also search for electronic records using the signer and the signature meaning as search criteria.
The following figure illustrates the signature meanings stored in the signature history of an e-record.
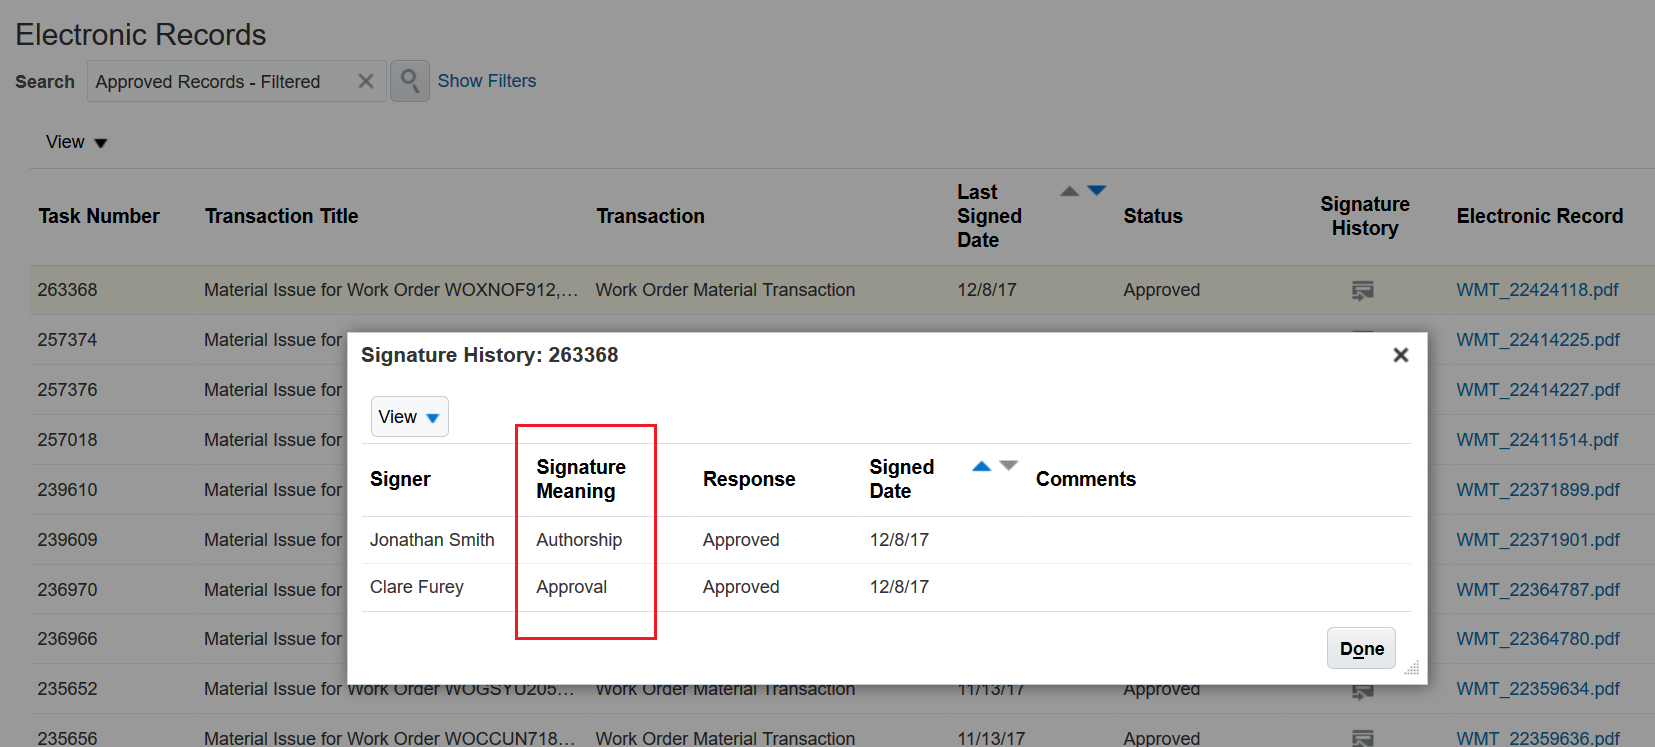
Signature History for a Work Order Material Transaction
Steps to Enable
No steps are required to enable this feature.
Role Information
- Privilege Name and Code: Add Electronic Signatures (EDR_ADD_ESIGNATURES_TRANSACTIONS_PRIV)
- Job Role Name and Code: All roles provisioned with the Add Electronic Signatures (EDR_ADD_ESIGNATURES_TRANSACTIONS_PRIV) privilege. Existing roles applicable to the supply chain management transactions that use e-signatures and e-records are provisioned by default.
- Privilege Name and Code: View Electronic Records and Signatures (EDR_VIEW_RECORDS_ESIGNATURES_PRIV)
- Job Role Name and Code: Compliance Business Analyst (ORA_EDR_COMPLIANCE_BUSINESS_ANALYST_JOB
Search Electronic Record Details and Signatures
Use the details in an electronic record's body and signature as search criteria. In official or mock audits, it is critical to provide confirmation of a transaction by retrieving all matching records. Previously, you could search for records using only the information from an electronic record's heading as the search criteria.
You can use the new search filter, Electronic Records Content, to search with any complete or partial attribute value. The search results will display all e-records that use the attribute value in the header or body.
The Synchronize Electronic Records scheduled process indexes the e-record content to enable this search. You must run this process before you can use the e-record content as a search filter. The Synchronize Electronic Records process can also be scheduled to run automatically at predefined intervals.
The e-record indexes may get fragmented over time and affect the search performance. You can run the Optimize Electronic Records scheduled process periodically to defragment the e-record indexes.
In addition, you can also search e-records by signer and signature meaning. The following figure illustrates the use of partial component description to search for a work order material transaction e-record.
The following figure illustrates searching an electronic record for a work order material transaction using a part of the component description as search filter.

New Search Filters in Electronic Records Search Page
Steps to Enable
No steps are required to enable this feature.
Tips And Considerations
You must run the Synchronize Electronic Records scheduled process before you can use the electronic record content as a search filter.
Role Information
- Privilege Name and Code: View Electronic Records and Signatures (EDR_VIEW_RECORDS_ESIGNATURES_PRIV)
- Job Role Name and Code: Compliance Business Analyst (ORA_EDR_COMPLIANCE_BUSINESS_ANALYST_JOB)
---

Copyright © 2018, Oracle and/or its affiliates. All rights reserved.
This document is provided for information purposes only, and the contents hereof are subject to change without notice.This document is not warranted to be error-free, nor subject to any other warranties or conditions, whether expressed orally or implied in law, including implied warranties and conditions of merchantability or fitness for a particular purpose. We specifically disclaim any liability with respect to this document, and no contractual obligations are formed either directly or indirectly by this document. This document may not be reproduced or transmitted in any form or by any means, electronic or mechanical, for any purpose, without our prior written permission.
Oracle and Java are registered trademarks of Oracle and/or its affiliates. Other names may be trademarks of their respective owners.
Intel and Intel Xeon are trademarks or registered trademarks of Intel Corporation.All SPARC trademarks are used under license and are trademarks or registered trademarks of SPARC International, Inc. AMD, Opteron, the AMD logo, and the AMD Opteron logo are trademarks or registered trademarks of Advanced Micro Devices. UNIX is a registered trademark of The Open Group.
