

This document will continue to evolve as existing sections change and new information is added. All updates appear in the following table:
| Date | Update Version | Notes |
|---|---|---|
| 13 DEC 2018 | Update 17D | Revised update 17D. |
| 01 SEP 2017 | Update 17C | Delivered new features in update 17C. |
| 11 MAY 2018 | Update 17B | Revised update 17B. |
This document will continue to evolve as existing sections change and new information is added. All updates appear in the following table:
| Date | Feature | Notes |
|---|---|---|
| 13 DEC 2018 | Cloud Payroll Processing for Paysheets | Updated document. Removed feature from update 17D. |
| 02 NOV 2018 | Extensible Single-Value Search and Select Dialog (Picker) | Updated document. Feature delivered in update 17D. |
| 05 MAR 2018 | Commit Transactions and Navigate to Create or Edit Pages Using Custom Actions | Updated document. Feature delivered in update 17D. |
| 05 FEB 2018 | Asset-Based Service Contract Coverage Entitlements | Updated document. Removed feature from update 17D. |
| 11 JAN 2018 | UI Approval History for MDF Requests and Claims | Updated document. Revised feature information. |
| 21 NOV 2017 | Opportunities: Optimized Search for Opportunities and Leads | Updated document. Feature delivered in update 17D. |
| 21 NOV 2017 | Territory Management: Toggle Dimensional Data Display in Classic UI | Updated document. Feature delivered in update 17D. |
| 21 NOV 2017 | Territory Management: Manage Proposals Enhancement | Updated document. Feature delivered in update 17D. |
| 21 NOV 2017 |
Sales Analytics: Account Business Plan Reporting | Updated document. Revised feature information. |
| 21 NOV 2017 | Core Sales Force Automation: Add Search to Standard and Custom Subtabs | Updated document. Revised feature information. |
| 21 NOV 2017 |
Assessments: Assessment Object Workflow | Updated document. Revised feature information. |
| 21 NOV 2017 |
Customer Data Management: Batch Export and SOAP Services for Duplicate Resolution | Updated document. Revised feature information. |
| 21 NOV 2017 |
Accounts, Contacts, and Households: Capability to DrillDown from Relationships Subtab and Account Hierarchy | Updated document. Revised feature information. |
| 21 NOV 2017 |
Accounts, Contacts, and Households: Multiple Value Group UI Pattern for Account Industries | Updated document. Revised feature information. |
| 21 NOV 2017 |
Accounts, Contacts, and Households: Integration of LInkedIn Sales Navigator with Contacts | Updated document. Revised feature information. |
| 21 NOV 2017 |
Incentive Compensation: Cloud Payroll Processing for Paysheets | Updated document. Revised feature information. |
| 21 NOV 2017 |
Application Composer: Dynamic Filtering Criteria Based on Many-to-Many Relationships | Updated document. Revised feature information. |
| 21 NOV 2017 |
CX Mobile: Service Requests in Mobile | Updated document. Revised feature information. |
| 21 NOV 2017 |
Sales Analytics: System Usage Reporting | Updated document. Revised feature information. |
| 21 NOV 2017 |
Partner Relationship Management: UI Approval History for MDF Requests and Claims | Updated document. Revised feature information. |
| 21 NOV 2017 |
CX Foundation: Larger Display Available in User Interface | Updated document. Revised feature information. |
| 06 OCT 2017 | Created initial document. |
This guide outlines the information you need to know about new or improved functionality in this update, and describes any tasks you might need to perform for the update. Each section includes a brief description of the feature, the steps you need to take to enable or begin using the feature, any tips or considerations that you should keep in mind, and the resources available to help you.
GIVE US FEEDBACK
We welcome your comments and suggestions to improve the content. Please send us your feedback at SALESCLOUD-PRODEX_WW@ORACLE.COM.
Optional Uptake of New Features (Opt In)
We continue to add many new features to the Oracle Cloud Applications, and for some features, you can take advantage of new functionality at a pace that suits you by "opting in" to the feature when you're ready. You can opt in to a feature in two ways: by using the New Features work area, or by using the Setup and Maintenance work area.
To opt in using the New Features work area:
- Click the Navigator, and then click New Features (under the My Enterprise heading).
- On the New Features page, select the offering that includes new features you'd like to review.
- Click Opt In for any feature that you want to opt in to.
- On the Edit Features page, select the Enable option for the feature, and then click Done.
To opt in using the Setup and Maintenance work area:
- Click the Navigator, and then click Setup and Maintenance.
- On the Setup page, select your offering, and then click Change Feature Opt In.
- On the Opt In page, click the Edit Features icon.
- On the Edit Features page, select the Enable option for any feature you want to opt in to. If the Enable column includes an Edit icon instead of a check box, then click the icon, select your feature options, and click Save and Close.
- Click Done.
This section gives you information to help you plan, deploy, and validate your update. We make frequent additions to this document, so don’t forget to check back and get the latest information before your update starts.
Use the following resource to prepare for, deploy, and validate your Oracle Engagement Cloud upgrade to Release 13:
- Read the Oracle Sales and Engagement Cloud: Performing Your Release 13 Upgrade (Doc ID 2253572.1) on My Oracle Support to learn how to prepare for, validate, and deploy Release 12.
- If you have not yet done so, review the introduction guide to upgrades: Release Upgrade Planning (Doc ID 2016981.1) on My Oracle Support
- Review the latest Known Issues and Update Documents for this release (Doc ID 1603154.1) on My Oracle Support.
| Action Required to Enable Feature |
|||||
|---|---|---|---|---|---|
| Feature |
None (Automatically Available) |
Enable via Opt In UI Only |
Enable via Opt In UI Plus Additional Steps |
Not Enabled via Opt In UI but Setup Required |
Issue Service Request |
 |
|||||
|
|||||
|
|||||
Support for Knowledge Locales in Service Request Knowledge Panel and My Knowledge |
|
||||
|
|||||
|
|||||
|
|||||
Capability to Drilldown from Relationships Subtab and Account Hierarchy |
|
||||
|
|||||
|
|||||
|
|||||
|
|||||
|
|||||
|
|||||
|
|||||
|
|||||
|
|||||
|
|||||
|
|||||
|
|||||
|
|||||
|
|||||
|
|||||
|
|||||
|
|||||
|
|||||
|
|||||
|
|||||
|
|||||
|
|||||
|
|||||
|
|||||
|
|||||
Dynamic Filtering Criteria Based On Many-to-Many Relationships |
|
||||
|
|||||
Commit Transactions and Navigate to Create or Edit Pages Using Custom Actions |
|
||||
|
|||||
|
|||||
|
|||||
|
|||||
|
|||||
|
|||||
|
|||||
|
|||||
|
|||||
|
|||||
|
|||||
|
|||||
Ability to Drill Down and Act from Activity Notifications
You can use Activity Notifications to drill down directly to an activity from the notification.In addition, the enhanced notifications feature also enables you to take quick actions on the activity. For example, you can accept or reject an appointment or complete a task directly from the notification.
You can drill down to an appointment from a notification list and also accept or reject the appointment.

Actions for an appointment in list notification
You can accept or reject an appointment from your email or navigate to the appointment from the email notification.

Email notification for an appointment
You can drill down to a task from a notification list and also mark the task as complete.

Actions for a task in list notification
You can mark a task as complete from your email or navigate to the task from the email notification.

Notification email for a task
Steps to Enable
To enable enhanced notifications perform the following steps:
- Sign in to the application as a setup or implementation user.
- Go to the Setup and Maintenance work area and select the Sales offering.
- In the Sales offering, select the Sales Foundation functional area.
- Click the drop down arrow corresponding to Sales Foundation and select Change Feature Selection.
- On the Edit Features: Sales Foundation page, enable the Activity Drill-down and Actionable Notification feature.
- Click Done.
To set the applicable profile options, perform the following steps:
- On the Setup: Sales page, search for the Manage Administrator Profile Values task and go to the task page.
- Search for the following profile options and set the values as listed:
- ZMM_ACTIVITY_TASK_NOTIFICATIONS: Set the site level value to Yes. Used for task notifications.
- ZMM_ACTIVITY_APPT_NOTIFICATIONS: Set the site level value to Yes. Used for appointment notifications.
- ZMM_ACTIVITY_TASK_NOTIF_LIST_EMAIL: Set user level profile option to Yes. Used for list and email notification for tasks.
- ZMM_ACTIVITY_APPT_NOTIF_LIST_EMAIL: Set user level profile option to Yes. Used for list and email notification for appointments.
Add Search to Standard and Custom Subtabs
Provides the ability to search on standard and custom subtabs. In addition to a single default filter, you can add more filters to narrow the set of records displayed on the subtab.

Search for Contacts within the Contacts Subtab
Steps to Enable
No steps are required to enable this feature.
Larger Display Available in User Interface
Improve the usability of UI by optimizing the usage of vertical and horizontal space on the browser. The application displays optimum content on the landing and detail pages to avoid unnecessary scrolling.

Application Showing More Content on the Landing Page

Application Showing More Content on the Details Page
This feature supports better alignment of content and layout, subtab labels, and scrolling of vertical subtabs for enhanced readability and user experience.
Steps to Enable
This feature, with the exception of vertical space optimization, is available on the Chrome, Firefox, and Safari browsers, by default.
Enable the vertical space optimization feature with the ZCA_ADVANCED_RESPONSIVE_UI profile option. To enable this feature, do the following:
- Sign in to the application as a system administrator.
- Go to the Setup and Maintenance and select the Sales offering.
- Search for the task Manage Administrator Profile Values and go to the task page.
- On the Manage Administrator Profile Values page, search for the profile option code ZCA_ADVANCED_RESPONSIVE_UI.
- Set the site level profile value to Yes.
- Click Save and Close.
NOTE: Internet Explorer browser does not support vertical space optimization.
Support for Knowledge Locales in Service Request Knowledge Panel and My Knowledge
Enables you to select a locale to view the search results in the selected locale. The single select locale list is available on service request knowledge panel and My Knowledge page and displays the active locales supported in service request knowledge panel and Engagement Cloud Knowledge Management

Select Locale to View Search Results
Steps to Enable
No steps are required to enable this feature.
Extensible Single-Value Search and Select Dialog (Picker)
The new extensible single-value Search and Select dialog (picker) enhances the search capabilities for custom object dynamic choice lists by providing a superior user experience on searches. For example, the new extensible picker lets the administrator configure search operators, set role-based dynamic layouts, and show/hide the create button for the Search and Select dialog layouts.
Custom dynamic choice lists pointing to custom objects now look the same as custom dynamic choice lists pointing to standard objects. Custom dynamic choice lists pointing to custom objects now display a dropdown list with a search link, instead of a magnifying glass icon, to search for records.
Steps to Enable
No steps are required to enable this feature.
Accounts, Contacts, and Households
Integration of LinkedIn Sales Navigator with Contacts
View relevant information from LinkedIn Sales Navigator in your Contact Profile page. With the necessary LinkedIn Sales Navigator license, you can:
- Gather icebreakers to identify mutual interests between you and your prospects.
- Get useful updates like news mentions or role changes while viewing contacts.
- Find the best way to get introduced to target contacts.
- Discover new contacts through recommendations.

LinkedIn Sales Navigator Showing Contact Details
Steps to Enable
- Sign in to the application as a system administrator.
- Go to Application Composer.
- Expand the Contact standard object.
- Click Pages to go to the Contact: Pages page.
- In the Edit Contact section, click the applicable layout to go to Details Layout page.
- Go to the Profile subtab.
- Enable the widget by setting the LinkedIn Sales Navigator to Show.
- Click Done.
Multiple Value Group UI Pattern for Account Industries
Enables you to select and view multiple industry values per account, with enhanced usability and performance.

Multiple Industries per Account
Steps to Enable
No steps are required to enable this feature.
Capability to Drilldown from Relationships Subtab and Account Hierarchy
Drill down directly to an account or contact from the relationships subtab without having to exit the relationship view. Similarly, you can directly drill down into an account from the account hierarchy to get a quick view of related accounts.
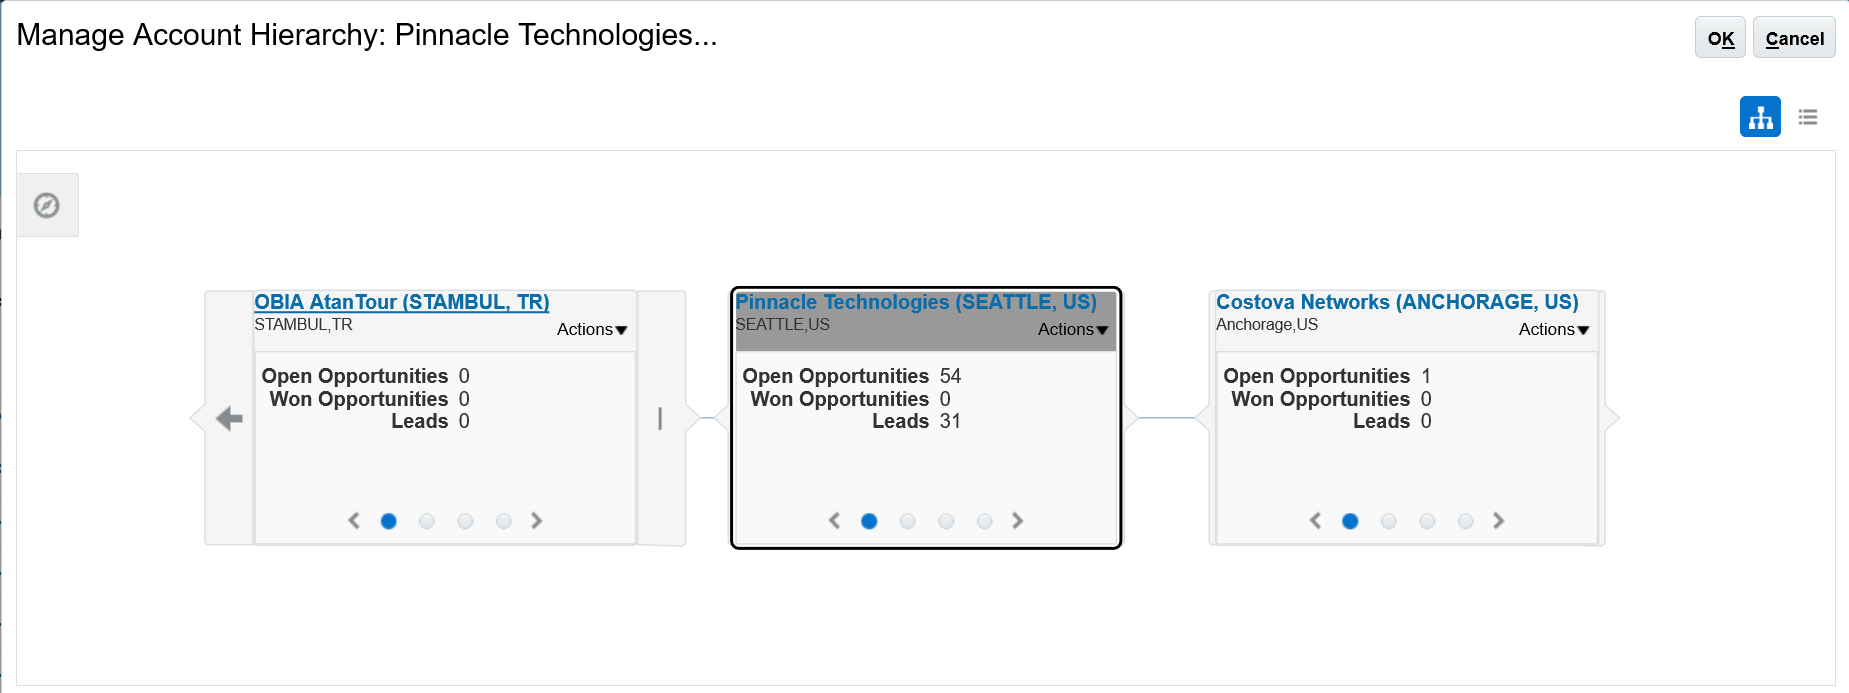
Manage Account Hierarchy
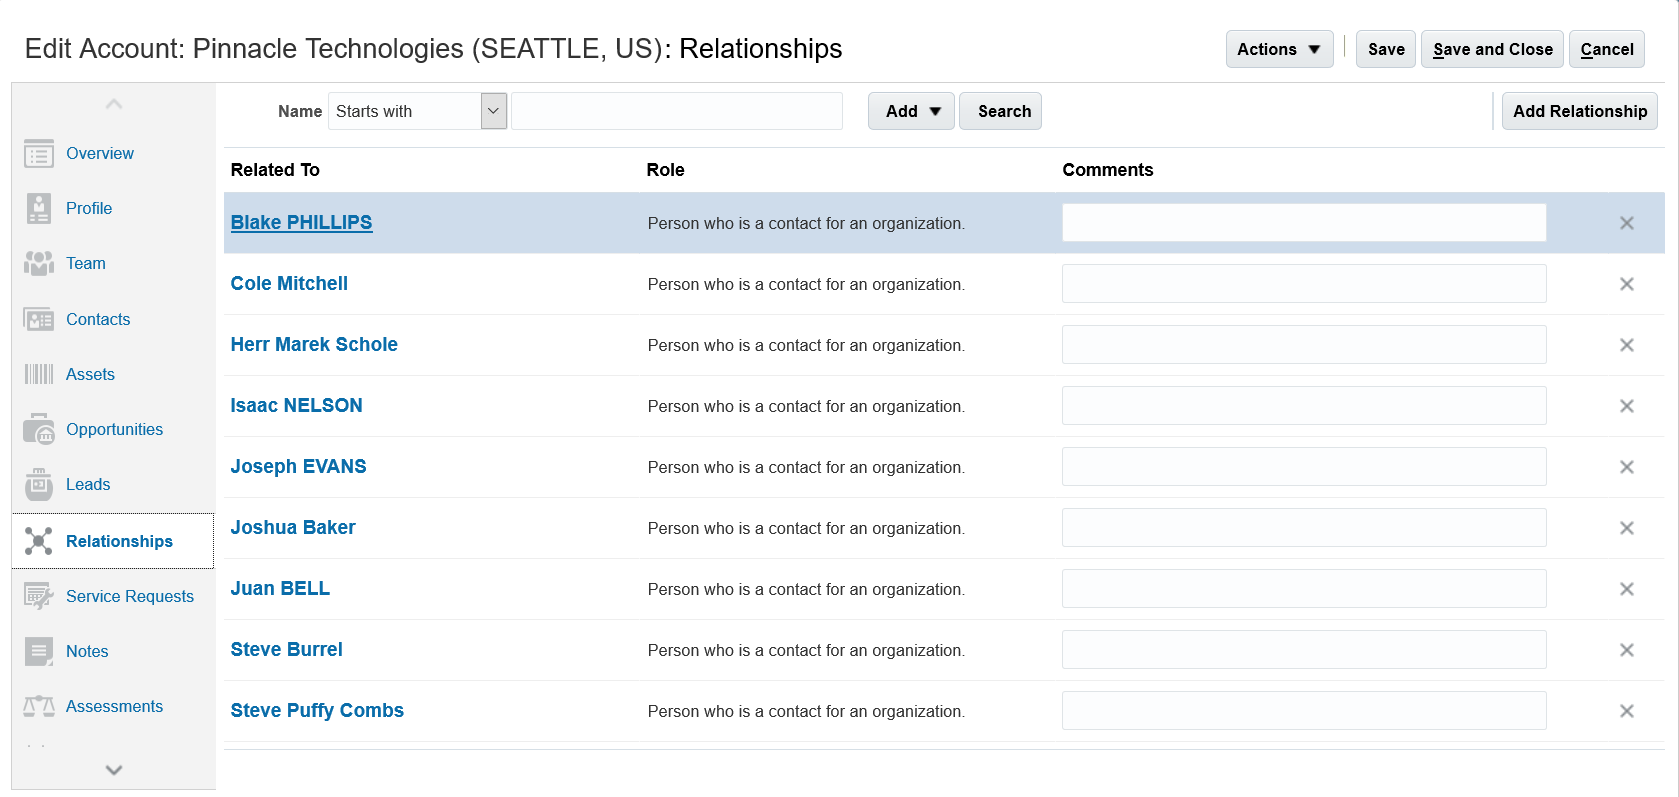
Relationships Subtab
Steps to Enable
No steps are required to enable this feature.
Optimized Search for Opportunities and Leads
Improve opportunity and lead search performance by leveraging consolidated security conditions. The conditions associated with the standard Sales Representative, Sales Manager, Sales VP, or the Sales Restricted User roles have been streamlined.
Use the following condition to search for opportunities:
-
Where they are member or in management chain of opportunity sales team with view, edit or full access, member of territory team or upward territory hierarchy.
-
Where they are member or in management chain of opportunity account team, account territory team or upward territory hierarchy.
Use the following condition to search for leads:
- Where they are member or in management chain of lead sales team, member of territory team or upward territory hierarchy.
Steps to Enable
No steps are required to enable this feature on the predefined Sales Representative, Sales Manager, Sales VP and Sales Restricted User roles.
If you want to use this feature for your user-defined roles, please refer Oracle Sales Cloud Security Upgrade Guide..
Leverage object workflow and groovy scripts based on the assessment object.

Create Object Workflow
For example, set up an object workflow and scripting to have the application automatically enable the Budgeted indicator when a budget is approved.
Steps to Enable
No steps are required to enable this feature.
Supports following extensibility features:
- Make the Product and Price Book standard attributes conditionally required and updateable.
- Customize the required property of standard Dynamic Choice Lists (DCL) attributes in Product and Price Book.
- Add buttons to the Products table on the Edit Price Book page.

Extending the Sales Catalog
Steps to Enable
No steps are required to enable this feature.
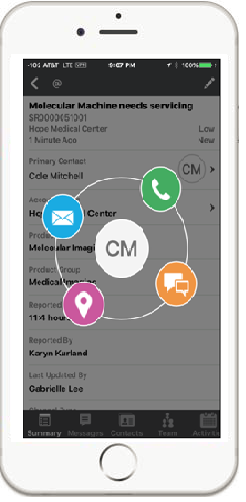
CX Cloud Mobile - Service Request
Create, edit, and escalate service requests from a mobile device.
Users have the ability to add capture service request details and add internal notes to the service request to facilitate better communication and collaboration. You can also perform the following actions:
- View service request status and updates
- Create and edit a service request
- Create and edit a service request team
- Create and edit messages and view attachments
- Add avatar profile picture
- Provide swipe action on list views, for example to escalate the service request
- View, edit and create activities.

You Can View, Edit and Create Service Request

You Can Edit Service Request, Contacts, Messages, View Interactions and Milestones
Steps to Enable
No steps are required to enable this feature.
Auto Capture Outbound Text Messages as Activities
Auto-capture outbound text messages as completed tasks associated with a customer. An automatic prompt to log the activity appears immediately after sending an SMS text message, increasing the likelihood that the sales rep will update their sales cloud sooner. With increased visibility into sales activities as soon as they occur, a sales manager can more accurately forecast future revenue.

Log Text Prompt
Steps to Enable
ADD TEXT AS AN ACTIVITY TYPE
- Navigate to the Setup and Maintenance work area.
- Search for the "Manage Activity Standard Lookups" task.
- Click on the task name link in the search results.
- Drill down on ZMM_ACTIVITY_TYPE
- Check the Enabled check box to implement auto capturing of texts.
- Click Save and Done
SET UP AUTO CAPTURE OF OUTBOUND TEXT MESSAGES
- Navigate to the Setup and Maintenance work area.
- Search for the "Manage Administrator Profile Values" task.
- Click on the task name link in the search results.
- In the Profile Display Name field, enter "Log Calls Automatically" and then click Search.
- In the Profile Values region, enter either AUTOMATIC (enables automatic call/email/text logging) or CONFIRM (requires user confirmation before logging the call/email/text).
Role Information
- Sales Representative
- Sales Manager
- Sales VP
- Sales Admin
- Customer Service Manager
- Customer Service Representative
Account Business Plan Reporting
CREATE REPORTS ON BUSINESS PLANS FOR ACCOUNTS OR CUSTOMERS
A new dimension, Customer, is added to the Business Plan subject area to enable you to create reports for Account/Customer Business plan.

Business Plan for Customer

Account Business Plan Report Showing Business Plan Objectives and Their Values
Account Planning allows you to maximize revenue from key accounts by taking a systematic approach in identifying account potential, enhancing relationships and pursuing opportunities. This helps you analyze sales better.
Steps to Enable
No steps are required to enable this feature.
Enables creation of reports with Resource as a primary object.
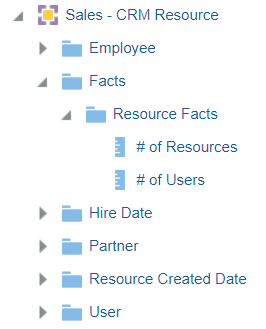
Resource Subject Area
This subject area is built around the resource object and provides necessary information for the Resource as a primary object. Using this subject area, You can create reports to show information of the resources, their business units, the preferences they have for Oracle Sales Cloud and so on.

User Status and Preferences
A business unit head can create report to see all the resources part of his business unit and the Opportunities closed to derive the revenue per head for the business unit.

Revenue per Head Report
Steps to Enable
No steps are required to enable this feature.
Enables sales administrator and managers to create the system usage reports to understand the adoption of the system by different users.
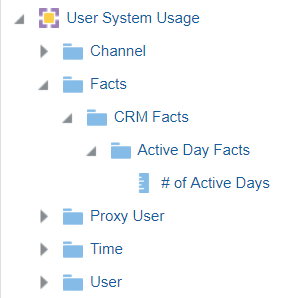
User System Usage Subject Area
The User System Usage subject area provides insight into the user activity in the system and enables sales administrator and sales manages analyze the usage of the application and take key business decisions based on the analysis. Sales Administrators can create reports to see the details of users and the number of days they have been active on the system for a given time period. The subject area also provides impersonator details when another user logs into the system on behalf of a particular user and can be used to enhance the security of the system.

Users and Number of Days Active Report

Active Days by Channel and Top Active Users Report
Steps to Enable
- Sign in to the application as a system administrator.
- Go to the Setup and Maintenance work area and select the Sales offering.
- Search for the Manage Administrator Profile Values task and go to the task page.
- On the Manage Administrator Profile Values page, search for the profile option code FND_TRACK_USER_ACTIVITY.
- Set the site level profile value to Enabled.
- Click Save and Close.
Role Information
Access to the subject area User System Usage is restricted to the BI duty role “BI User System SA Access”.
Partner Relationship Management
Create a group of partner related tasks using pre-configured task templates. For example, you can create a task template for partner recruitment that displays a set of tasks that you need to perform while recruiting a partner.
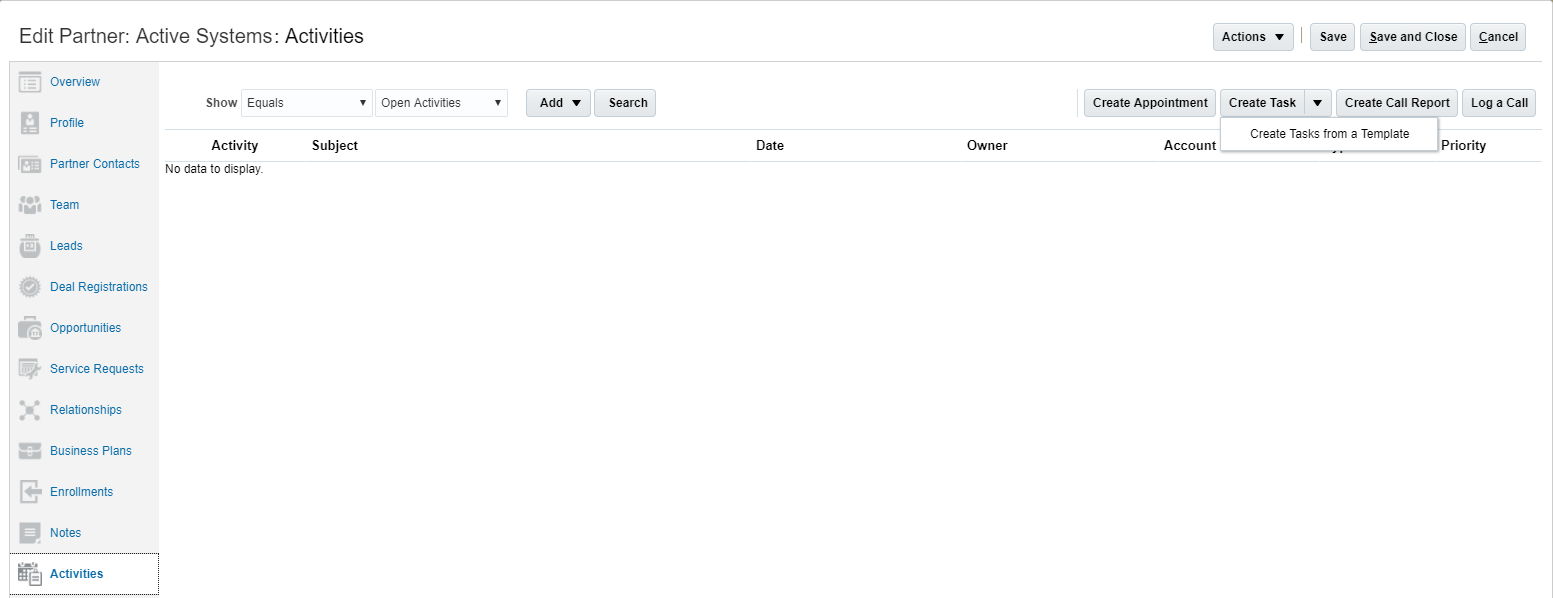
"Create Tasks from a Templates" Button

Create Task from a Task Template
The tasks generated from the templates are accessible in the Activities tab within the Partner work area.
Steps to Enable
To create task template and make them available to channel managers and partner administrator, perform the following steps:
- Create the task template and the individual tasks for the template.
- Expose the "smart" Create Task button on the Embedded task list page of the Activity object.
CREATING A PARTNER TASK TEMPLATE
Users with the Customer Relationship Management Application Administrator or Application Implementation Consultant job roles can use these steps to create task templates for partners.
- Sign in with your Customer Relationship Management Application Administrator or Application Implementation Consultant credentials.
- Go the the Setup and Maintenance work area and select the Sales offering.
- Search for and select the Manage Partner Task Template setup task.
- On the Manage Partner Task Template page, click the Create icon.
- On the Create Template pop-up, provide necessary information and click OK.
- To create tasks for the task template, click the Create icon in the Details section.
- On the Create Task pop-up, provide necessary information and click OK.
- Click Save and Close to save your work.
ADDING THE SMART CREATE TASK BUTTON TO ACTIVITY PAGES
Use these steps to replace the Create Task button with the "smart" Create Task button on Activity pages.
- Sign in with your Sales Administrator credentials.
- Ensure you are in a sandbox.
- Go to Application Composer.
- From the list of Standard objects, expand Activity.
- Click the Pages link.
- In the Activity Pages list, scroll down to the Embedded Task List Overview page.
- Duplicate the standard layout and click Create and Edit.
- On the Edit Layout page for your duplicate layout, click the Edit icon for the Embedded Task List Overview Table.
- In the Configure Detail Form: Buttons and Actions area, move the Create Task + Create Task From Template button from the Available Buttons column to the Selected Buttons column.
- In the Configure Detail Form: Buttons and Actions area, move the Create Task button from the Selected Buttons column to the Available Buttons column.
- Click Save and Close and click Done to save your work.
- Publish your sandbox.
Role Information
- Channel Account Manager
- Channel Sales Manager
- Channel Operations Manager
- Partner Administrator
Browse Catalog in Deal Registration
Enables you to browse the sales catalog when selecting products while in the context of deal registration.

Browse the Sale Sales Catalog
Steps to Enable
- Sign in to the application as a system administrator.
- Activate a sandbox.
- Go to Application Composer.
- Search for the Deal Registration standard object.
- Click Deal Registration Pages.
- Create a duplicate of the Details Page Standard Layout and go to that page.
- Edit the Products section.
- In the Configure Detail Form: Buttons and Actions section move Browse Catalog from the Available Buttons section to the Selected Buttons section.
- Click Done.

Browse Catalog Button in Application Composer
UI-Based Approval for MDF Requests and Claims
Use the Actions menu on the Edit MDF Request or Edit MDF Claim pages to submit, return, approve, reject, return, or withdraw MDF requests or claims. You can also enter reject reason, return reason, and approval comments.

MDF Request Showing Approval Information
Steps to Enable
- Sign in to the application as a system administrator.
- Activate a sandbox
- Go to Application Composer.
- Search for MDF Request or MDF Claim standard object.
- Click Pages.
- Create a duplicate of the Details Page Standard Layout and go to that page.
- Option 1: Add to Summary section:
- Click the pencil icon to edit the Summary section.
- Move the Approval Comments, Return Reason, and Reject reason attributes from the Available Fields section to the Selected Fields section.
- Option 2: Add as a Field Group
- Click Add Field Groups.
- Enter a name of the section.
- Add Approval Comments, Return Reason or Reject Reason.

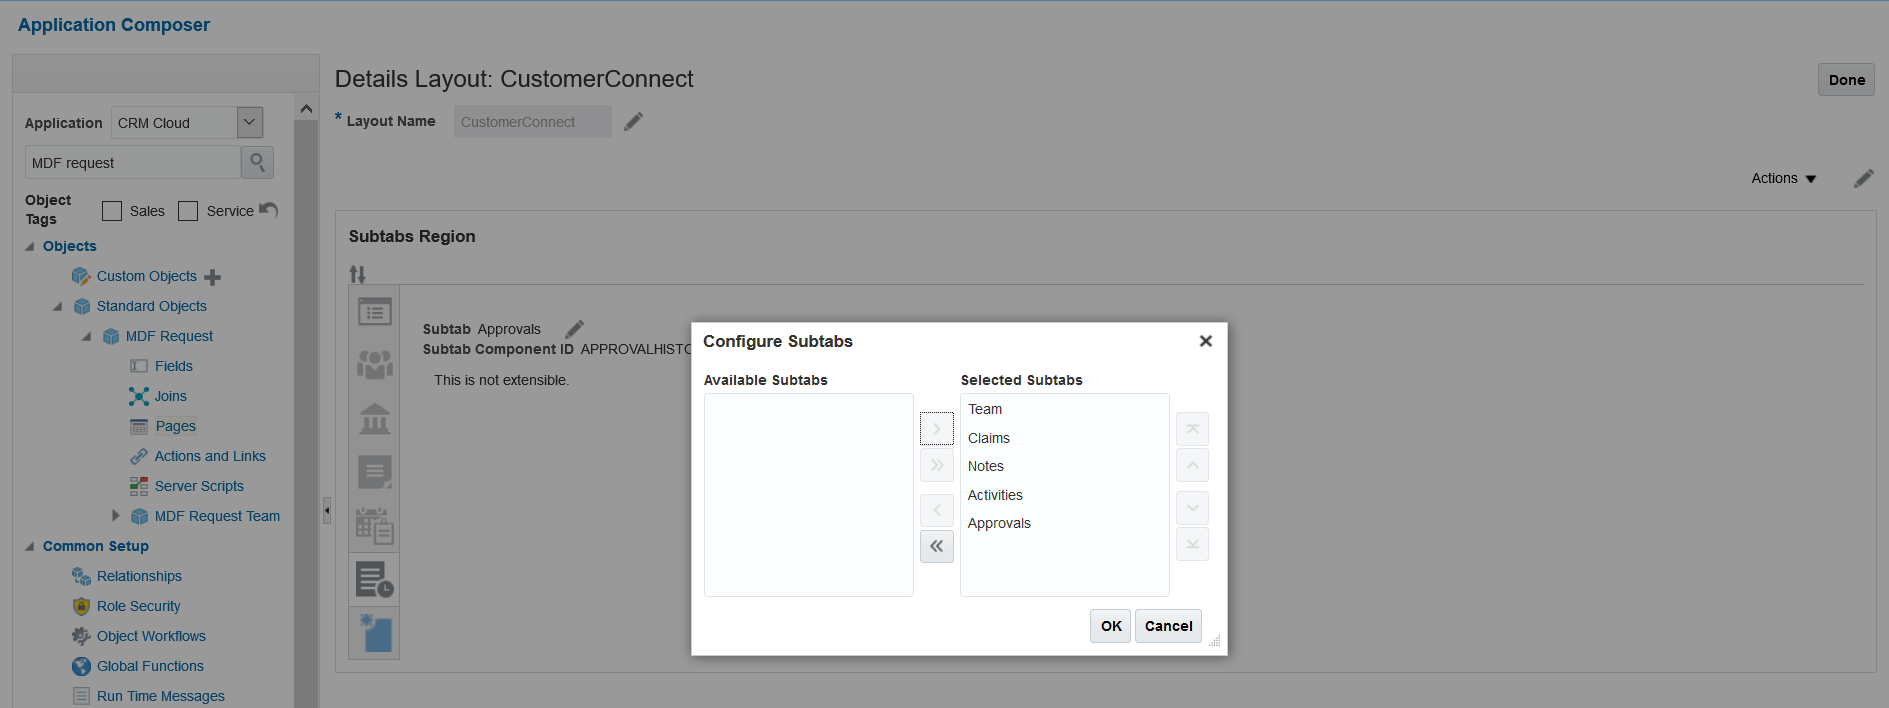
UI Approval History for MDF Requests and Claims
Enables you to track the end-to-end approval flow of transactions related to MDF requests and claims.
When exposed as a subtab, the approval history displays key information such as:
- Who submitted the transaction.
- Who took an action.
- Rejection reason.
- Approval comments.

Approval History of an MDF Request
Steps to Enable
- Sign in to the application as a system administrator.
- Activate a sandbox.
- Go to Application Composer.
- Search for the MDF Request or MDF Claim standard object.
- Click Pages.
- Create a duplicate of the Details Page Standard Layout and go to that page.
- Click the icon that allows you to hide, show, or reorder subtabs.
- Move the Approvals subtab to the Selected Subtabs section..
- Click OK.
- Click Done.
Account and Contact Simplified Views
Enables you to import bank-related attributes including Branch Number, Branch Code, Bank Code, and Branch flag for account simplified view. Also, you can import the "Do Not Enable" related flags including Do Not Call, Do Not Contact, Do Not Email and Do Not Mail contact simplified view.
Steps to Enable
No steps are required to enable this feature.
Create Merge Business Events on Accounts and Contracts
Provides an exit route from Customer Data Management to transfer master account and contract information to the subscribing applications through Integration Cloud Service.
Steps to Enable
No steps are required to enable this feature.
Batch Export and SOAP Services for Duplicate Resolution
Provides an exit route from Customer Data Management to transfer customer information to the subscribing applications.
Steps to Enable
No steps are required to enable this feature.
Toggle Dimensional Data Display in Classic UI
Added the Show Dimensions and Hide dimensions buttons to control the display of dimensions on the Classic UI.
The dimensional data is hidden by default in the Territory Management Classic UI to improve load time and performance of the application. You can see information related to dimensional data by clicking the Show Dimensions button.

Show Dimensions
Once you click Show Dimensions, the application changes the button to Hide Dimensions.
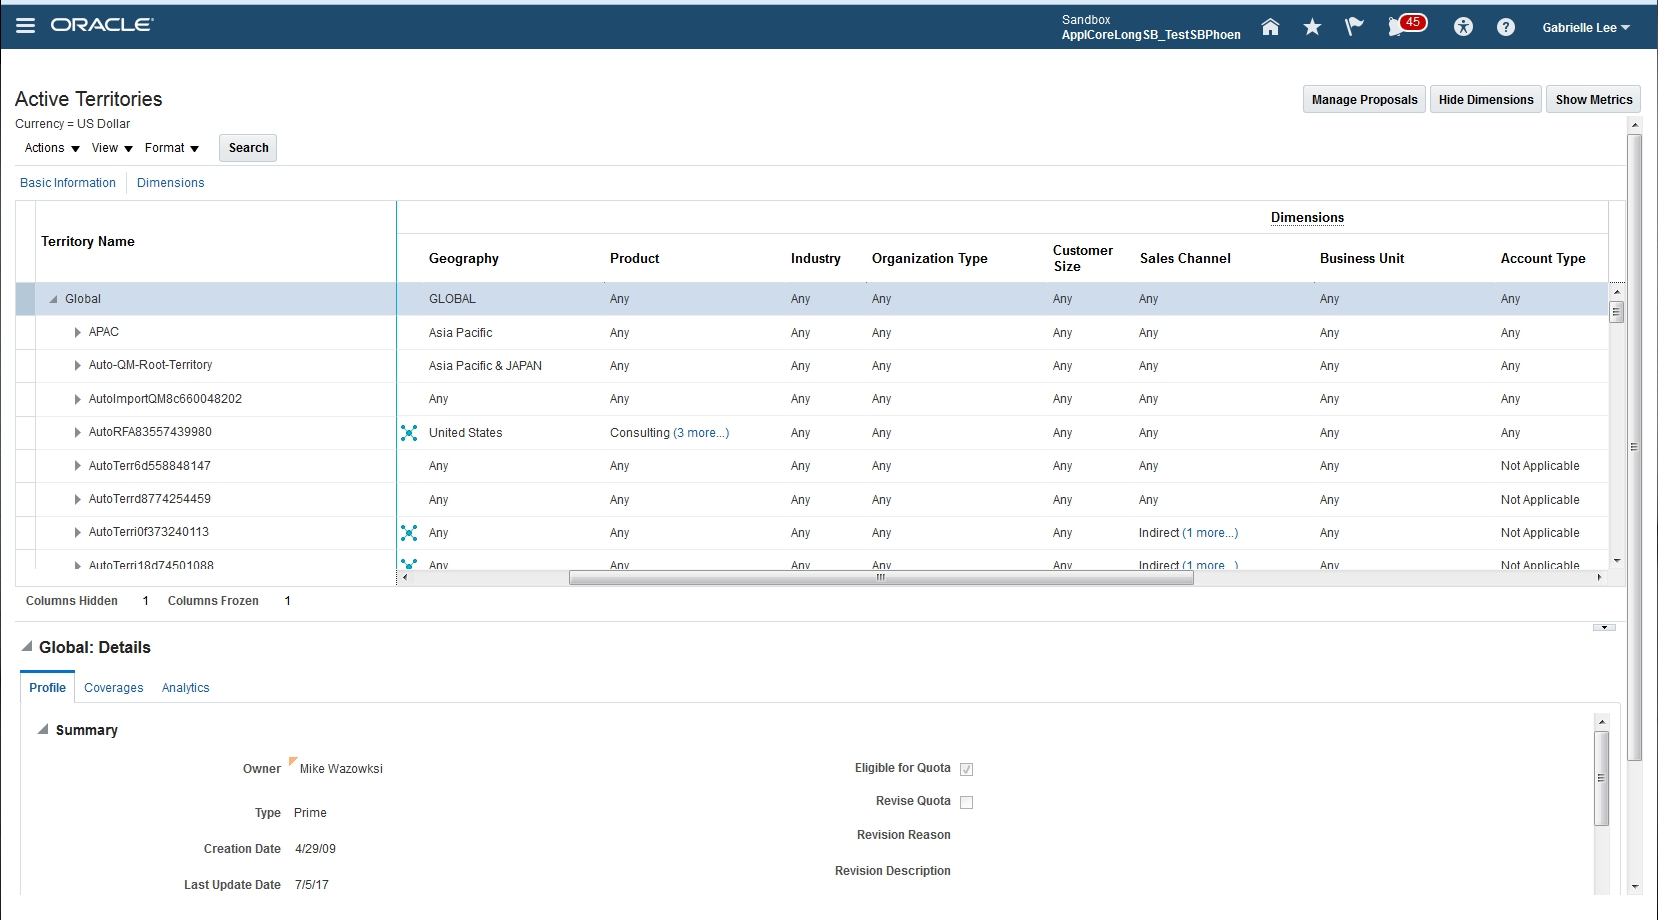
Hide Dimensions
Steps to Enable
No steps are required to enable this feature.
Removed the side bar in the Classic UI. The links that were available on the side bar in the Classic UI and now available in the following places:
-
The Enable Dimensions and Metrics link is available on the Setup and Maintenance work area.
-
The Manage Territory Proposals link is now available as a button on the Active Territories page, called Manage Proposals. Use this button to navigate to the Manage Proposals page.

Manage Proposals
Steps to Enable
No steps are required to enable this feature.
New Look-and-Feel for Incentive Compensation Administration
Embodies a simple design aesthetic on top of the existing incentive compensation application.
Other than the aesthetic, the most noticeable change is accessing the task menu on the right side of the overview page. The tasks are available on demand and when not needed, they hide way in the panel drawer giving more page space to the overview information.
The following work areas have the new look:
- Compensation Plans
- Credit and Earnings
- Participant Assignments
- Participant Snapshot
- Payments
Steps to Enable
No steps are required to enable this feature.
Web Services to Build and Maintain Business Objects
Enable users to build and maintain their compensation plans and role based assignments using these RESTful services:
- Compensation Plans: Create and maintain compensation plans and assign roles and plan components to the compensation plans.
- Plan Components: Create and maintain plan components and assign performance measures, rate tables and their input expressions and incentive formulas to the plan components.
- Performance Measures: Create and maintain performance measures and assign scorecards and their input expressions, credit categories, measure formulas and goals to the performance measures.
- Credit Categories: Create and maintain credit categories.
- Rate Tables: Create and maintain rate tables and assign rate dimensions to the rate tables.
- Rate Dimensions: Create and maintain rate dimensions and assign tiers to the rate dimensions.
- Roles: Create and maintain roles and assign participants to the roles.
- Participants: Maintain participants and assign roles and participant details to the participants.
Steps to Enable
No steps are required to enable this feature.
Asset-Based Service Contract Coverage and Entitlements
Define standard coverage for coverage-based service products such as an included warranty or an extended warranty, and then associate that coverage with the coverage product definition in a product master. Having mapped the coverage definition to the coverage product, you can sell service coverage in a contract, and track entitlements against the assets covered under that coverage item.
Steps to Enable
No steps are required to enable this feature.
Support for Employee Contracts
Create contracts with your employees as parties to the contract. For example, track employment agreements.
Steps to Enable
No steps are required to enable this feature.
Combine two or more contracts and let your sales representatives renew contracts manually. You can choose all or select lines to be merged or renewed.
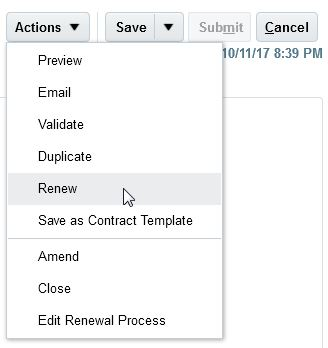
Renew Contract Navigation

Renewing a contract

Merge Contract Navigation

Merging Contracts
Steps to Enable
No steps are required to enable this feature.
Track the Migration Status of Contracts
Track the status of project contracts, under migration, so that revenue recognition and invoicing can be stalled until the migration is complete.
Steps to Enable
You can indicate the contracts for which billing is to be held by enabling the “Migration in progress” option.
You can enable this using the following options:
- Contract import or Web services when migrating your contracts.
- Manually set this on the Billing tab on the Edit Contract page
NOTE: This is applicable only to Project Contract types.
Web Services for Managing Repository Contract Documents
Additional operations were added to web services to manage the documents that are attached to repository contracts. You can also delete a contract party that is associated to the contract.
Steps to Enable
No steps are required to enable this feature.
Configurable Contract Event Model
Configure the the contract event model to meet specific needs.
You can now handle state transitions using web services. As part of a state transition you can open the contract validation user interface. You can also remove or change the severity of optional seeded contract validations.
Steps to Enable
Configure the contract event model using the Event Models task in the Contracts work area. You can access the contract validation UI, as part of a state transition, by setting up the “Manage Contract User Statuses and Transitions” task.
Refer the Implementing Enterprise Contracts Guide for more details on configuring the event model and user statuses.
Key Resources
Configuration and Customization
Dynamic Filtering Criteria Based On Many-to-Many Relationships
Added dynamic filtering criteria for custom relationships, including a custom dynamic choice list or reference relationship, based on a many-to-many relationship. For example, you can now filter contacts by a given account, while each contact can belong to multiple accounts and each account can have many contacts.

Dynamic Filtering for Custom Dynamic Choice Lists

Dynamic Filtering for Custom Reference Relationships

Dynamic Filtering for Related Objects
Steps to Enable
No steps are required to enable this feature.
Customize a copy map template to meet specific business needs by creating a duplicate standard map. Nine standard maps are available, and administrators can use one of the standard maps or define custom maps to use for common flows such as copying an opportunity or converting a lead to an opportunity.
Steps to Enable
No steps are required to enable this feature.
Commit Transactions and Navigate to Create or Edit Pages Using Custom Actions
Assign new runtime behaviors to script-based custom actions of top-level custom objects. You can create custom actions that do the following:
- Run a custom script.
- Commit open transactions.
- Automatically navigate from the details or create pages to the landing page, from the create page to the details page, or stay on the details page to continue to edit.
You can add these custom actions to top-level custom object record details (edit) and creation pages.

Configuration Options
Steps to Enable
No steps are required to enable this feature.
Quick Setup Templates are designed to speed up your deployment of Oracle Sales Cloud by providing a launching pad with links to the setup tasks you carry out from the Setup and Maintenance work area, Scheduled Processes, and other work areas.
There are two variations of the implementation project available for you to choose from:
- Quick Setup Core Sales: Use this implementation project for setting up account, contact, opportunity and territory management.
- Quick Setup Sales: Use this implementation project to set up sales campaigns, leads, sales quotas and sales forecasting in addition to the core sales features.
You can use the implementation projects as-is or tailor them to your specific deployment needs.
Steps to Enable
Download the implementation project to your computer from Oracle Sales Cloud: Getting Started with Your Implementation: Quick Import Macros (Doc ID 2229503.1) available on My Oracle Support. Then follow the instructions in the Getting Started with Sales guide to import the template into your environment.
Key Resources
- Oracle Sales Cloud: Getting Started with Your Implementation: Quick Import Macros (Doc ID 2229503.1) available on My Oracle Support.
- Getting Started with Your Sales Cloud Implementation
Quick Import Macros are designed to speed up and simplify the import of small data sets of key objects (up to 1000 records) for your on-boarding needs. The macros help you by validating your data entries, providing list of values, and automatically populating constant values. After you enter your data, you can create the import activity directly from the macro and also monitor the progress from within the macro itself.
Macros are available for importing data for the following objects:
- Sales Users
- Products and product groups
- Accounts
- Contacts
- Account Hierarchy
- Leads
- Opportunities
You can also extend the macros to include additional standard and custom fields. The macros can also serve as a learning tool for more complex import.

Use the Microsoft Excel Macro to Import Data into Oracle Sales Cloud
Quick Import Macros were first introduced in Release 11 and were enhanced to support:
- Create the root product group and product groups simultaneously.
- Import multiple addresses for accounts.
- Associate the appropriate owner with accounts, contacts, and opportunity records using the owner email address instead of Party ID or Party Number.
- Add contact name prefix and flag the primary contact for an account when importing contact records.
Steps to Enable
Download the macro and the required mapping files from Oracle Sales Cloud: Getting Started with Your Implementation: Quick Import Macros (Doc ID 2229503.1) available on My Oracle Support. Instructions for using the Excel macros are included in the Getting Started with Sales guide.
Key Resources
- Oracle Sales Cloud: Getting Started with Your Implementation: Quick Import Macros (Doc ID 2229503.1) available on My Oracle Support.
- Getting Started with Your Sales Cloud Implementation
Digital Customer Service Enhancements
This release of Digital Customer Service makes finding Knowledge and creating Service Requests even easier.
ENHANCED PRODUCT AND CATEGORY SELECTION
- In this release, product and category selectors used in knowledge and Service Requests have been revamped to show a hierarchical view of products and categories. Use the type ahead feature to quickly find the product or category you are looking for. Expand or collapse product groups and category groups to navigate through the hierarchies. You can select a category at any level in the hierarchy for Knowledge and Service Requests. The product selector for Knowledge allows you to filter your search based on products as well as product groups. The product selector for Service Requests requires that you select a product. This feature makes creating Service Requests and filtering Knowledge articles even easier for your customers.

Use Type Ahead to Quickly Find Your Product

Select From a Hierarchy to Find the Product You Are Looking For
AUTOMATIC LINKING OF KNOWLEDGE ARTICLE IDENTIFIERS
- Knowledge article IDs referenced in Service Request messages are automatically hyperlinked to the Knowledge article details. Knowledge in Oracle Engagement Cloud currently supports two Knowledge content types: Frequently Asked Questions (FAQ) and Solutions (SOL). Knowledge article IDs are of the format FAQ123 or SOL456. Digital Customer Service now automatically provides hyperlinks to Knowledge articles from within SR messages if the message text contains FAQ or SOL followed by one or more numbers. This make it easier for your customers to quickly access the knowledge they need.

Automatic Linking of Knowledge Article Identifiers
Steps to Enable
SETUP FOR ENHANCED PRODUCT AND CATEGORY SELECTION
- Products and categories must be created in Oracle Engagement Cloud. For information on how to set up products and categories for use in Digital Customer Service, see the topic Setting Up Products, Categories and Knowledge Articles for Digital Customer Service: Explained in the chapter Getting Started with Digital Customer Service in the Oracle Engagement Cloud Implementing Digital Customer Service documentation.
SETUP FOR AUTOMATIC LINKING OF KNOWLEDGE ARTICLE IDENTIFIERS
- Author Knowledge articles for your customers to view. For more information, on how to author knowledge articles for use in Digital Customer Service, see the topic Setting Up Products, Categories and Knowledge Articles for Digital Customer Service: Explained in the chapter Getting Started with Digital Customer Service in the Oracle Engagement Cloud Implementing Digital Customer Service documentation.
Key Resources
For more information see the topic Setting Up Products, Categories and Knowledge Articles for Digital Customer Service: Explained in the chapter Getting Started with Digital Customer Service in the Oracle Engagement Cloud Implementing Digital Customer Service documentation.
Agent Productivity - Dynamic Links for Service Requests
This release of Engagement Cloud introduces Dynamic Links for Service Requests, which is a significant usability enhancement to Service Request Management. With the addition of this new feature, users benefit from the following new capabilities:
- As a user, when you enter text such as "SR1234" into the body of an SR Message, the system can automatically determine that this references a specific Service Request and creates a dynamic link to that record from the message contents.
- As an Administrator, you have the ability within Setup & Maintenance to configure the terminology that is specific to your organization. For example, if your organization uses the term "Case" instead of "Service Request", you can configure the system such that an entry of "Case1234" is interpreted as the dynamic link.
Through the use of these automatic deep links, agents can quickly and easily provide a reference URL with minimal key strokes, thus improving both data consistency and the user experience.
Steps to Enable
In order to specify the specific key terms that will be used for dynamic link identification, an Administrator will need to use Setup and Maintenance, and perform the following actions:
- Select the Service offering
- Select Productivity Tools
- Show "All Tasks"
- Select Manage Service Request Dynamic Links
Object Types:
Administrators have the ability to change the format of the dynamic links for Service Request, HR Help Desk Service Request and Knowledge Article Links.
To update the format for Service Request from "SR" to "Case" you must update the Pattern to reflect the following:
(?i)\b(Case)([0-9]{10})\b
If you want to use this same mechanism to create deep links for both service requests and bugs, you can enter the following text in pattern. In this example if the Agent enters the keyword SR 1231231234 - or - the keyword Bug 1231231234 the system will interpret that as a deep link as it has to have 10 digits which is defined within { } i.e 10.
(?i)\b(SR|Bug)([0-9]{10})\b
Within these strings, the [0-9] represents the number of range of digits allowed. The entry {10} is actually the number of digits that the system is expecting. If the system does not get the correct number of digits, it will not interpret this as a dynamic link.

Manage Service Request Dynamic Links FSM Page
Key Resources
For details about how to configure the CTI Integration in Oracle Engagement Cloud, reference the online documentation here: http://docs.oracle.com/cloud/latest/salescs_gs/docs.htm
Service Entitlements Enhancements
This release of Engagement Cloud introduces the ability to supplement the out-of-the-box milestones (that track first response and resolution times) with additional milestones you define according to your business rules.
New milestones are added using the same milestone configuration setup task that is used to configure the prebuilt milestones, including the specification of start, pause, and completion criteria. Once configured, your new milestones can be added to existing global or customer coverages to specify commitment times, warning thresholds, and application criteria, and the milestone will be applied to service requests according to those rules. Finally, the newly-defined milestones will be monitored for warning and expiration alongside the existing out-of-the-box milestones, and can be included in reports using the existing analytics subject area.
Steps to Enable
No steps are required to enable this feature.
Key Resources
For details about how to define new milestones for service requests, reference the online documentation section entitled "Setting Up Service Entitlements" here: http://docs.oracle.com/cloud/latest/salescs_gs/docs.htm
OmniChannel Real-Time Channel Enhancements
In this release we are providing the ability to use the OmniChannel framework for routing real-time channel work. This allows for channels (for example a Chat channel) to have multiple Queues set up with assignment rules that can be used to provide a more granular assignment to a specific Queue/team.
The Omnichannel support for real time work includes interactive work offer notifications, so agents will be offered new work (for example a Chat) whereby the agent can choose to accept or reject the work offer.
Steps to Enable
ENABLE OMNICHANNEL ROUTING WITHIN SETUP AND MAINTENANCE
- Navigate to the Setup and Maintenance work area and select the Service offering
- In the Administration section, click Actions and select Change Configuration
- Select the Enable for Implementation check box for Communication Channels
- Click on the Feature pencil icon for Communication Channels
- Enable the Omni-Channel Routing check box
- Set the implementation status to In Progress or Implemented
- Click Action and then select Go to Offerings
WITHIN THE SERVICE OFFERING
- In the Administration section, click Setup
- Click on Communication Channels and select Manage OmniChannel profile options from the Task list
- Enable the following Profile Options:
- SVC_ENABLE_OMNI
- SVC_OMNICHANNEL_BROWSER_NOTIFICATION_ENA
- SVC_OMNICHANNEL_DESKTOP_NOTIFICATION_ENA
- SVC_OMNICHANNEL_BROWSER_NOTIFICATION_AUTO_INT
Configure assignment rules to automatically assign work to service queues.
For this release, several usability enhancements were incorporated into the MCA (Multichannel Adapter) Framework which is used for 3rd party telephony integration.
ENHANCEMENTS TO SCREEN POP LOGIC:
- Additional hashmap parameters have been added that will allow for the creation of a new contact or account during the initial screen pop. This allows your organization greater flexibility when defining communication flows. By allowing the creation of a new contact or account during the initial screen pop, organizations can save several clicks, and reduce the amount of time required to begin working on the customer issue.
ENHANCED WRAP UP FUNCTIONALITY:
- Additional time tracking for wrap up can be used as part of omni-channel operational reporting. This provides service organizations with a means of performing detailed analytical reporting on the amount of time agents are taking to perform the wrap up process. With this insight, your organization can better optimize the service process by identifying process issues that may be affecting agent wrap up .
- Wrap up information is automatically written to the Service Request Messages for easy access when doing a review. Additionally, if the wrap up has been edited after the initial submission, any new wrap up information will also be written to the SR Messages. This feature provides managers and agents with a single location to reference the key details pertaining to a customer communication.
- User interface enhancements have been made to the wrap up page to improve usability and reduce the time to resolution.
Steps to Enable
CTI Integration is a Functional Area that must be enabled under the Service Offering Communication Channels. When this Functional Area is enabled, administrators can see the task required to setup and configure the MCA Framework for 3rd party telephony integration.
- Navigate to the Setup and Maintenance work area and select the Service offering.
- In the Administration section, click Actions -> Change Configuration.
- Under the Service Offering, select Communication Channels Feature,
- Ensure that CTI toolbar is clicked Enable for Implementation.
- Set the implementation status to In Progress or Implemented.
To setup or modify your screen pop logic configuration to create a Contact or Account on a screen pop, perform the following actions:
Under the Service Offering, Navigate to Communication Channels. On the right side of your screen, select Show - All Tasks. Locate Screen Pop Configuration.
- From the Screen Pop Configuration Page:
- Rules Tab: Select and highlight the rule set name that you want to use.
- The rules for that rule set will be shown below
- Select the Token that you want to use for the screen pop logic. For example, you can select Contact Phone Number to drive the reverse look up and screen pop logic.
- Under the Page to Pop - here you will select Create Account or Create Contact.
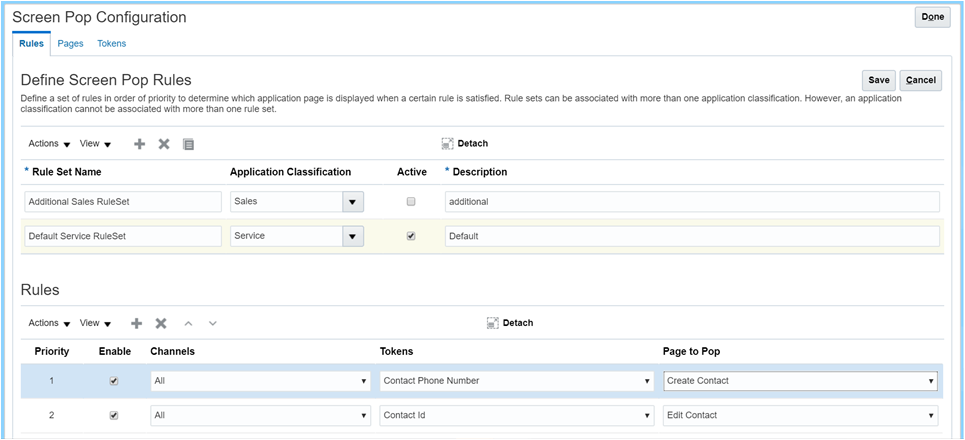
Screen Pop Configuration Page - Rules Tab
To enable the enhanced wrap up functionality - no additional setup or configuration steps are necessary.
Key Resources
For details about how to configure the CTI Integration in Oracle Engagement Cloud, reference the online documentation here: http://docs.oracle.com/cloud/latest/salescs_gs/docs.htm.
Role Information
- To setup and configure the CTI telephony integration through the MCA framework, Administrative privileges are required.
- To utilize the CTI Integration, the user's role must include SVC_ACCESS_PARTNER_MEDIA_TOOLBAR_PRIV privilege.
In many cases, Engagement Cloud will not initially know the social handle of a contact or prospective customer, for example if you have never interacted with that contact over a social channel in the past. This can cause a challenge when creating a new service request from a social post, since the system would not be able to identify the primary contact for the service request from the existing contact data.
With this release of Engagement Cloud, while working on the service request, when the agent identifies the primary contact and associates it with the service request, at this same time, the agent will also have the option to add the handle of the social post author as a new contact point for the CRM contact record.
From this point on, all future social service requests from that contact will automatically match to a primary contact.

Social Contact Point Creation
Steps to Enable
There are no specific steps required to enable this feature. When adding a primary contact to a service request, the user can decide to create a contact point using the Create Contact Point dialog.
When an agent is responding to a contact over an email channel, the agent now has the option to preview the draft response before sending the message, in order to see how the message will appear when it is received by the contact. The email preview can be accessed by clicking the "Preview Email" button on the compose response UI.

Email Response Preview
Steps to Enable
No steps are required to enable this feature.
Chat Integration with Screen Pop Rules
Using Chat within Oracle Engagement Cloud, you can integrate with MCA Framework to perform reverse lookup and define screen-pop rules:
- Using this framework, the system can perform a reverse lookup against CRM data to automatically identify contacts, accounts, and specific transactions.
- As an example, reverse lookup could take place and identify the contact using an email address stored in the system.
- Following the reverse lookup, the agent would be presented with a contact verification page, which allows the agent to confirm the contact information of the contact requesting the chat. If this is not the correct contact, the agent can search again to locate for the correct person, and then continue with the verification process. (See image)
- Once the contact has been verified by the agent, the system will then perform the screen pop logic, and present the agent with the correct page to begin their interaction with the customer.
- It is also possible to configure screen pop rules based on data passed by Digital Customer Service (DCS).

Reverse Lookup of Contact
Steps to Enable
Within the Service Offering as part of Setup and Maintenance, the following setup tasks need to be performed:
- Manage Business Object Configuration: This task will enable you manage the business objects that can be used for reverse lookup and screen pop logic
- Manage Lookup Filters: This setup task allows you to specify which lookup filters should be used for reverse lookup
- As an example, reverse lookup could take place for contact verification. The agent can then continue with the screen-pop to the contact record or search again.
- Screen pop Configuration Rules: As part of this task you will define the logic that determines the correct page to screen pop.
OmniChannel Analytics enables customer service managers to monitor work assignments across queue, agent, and channel to identify bottlenecks and take corrective action where necessary. By tracking agents’ presence, availability and current workload, managers can improve resource utilization leading to higher operational efficiencies. Close attention to key indicators such as average times to offer, assign and accept work, as well as agent and queue wait times across the OmniChannel framework can help to better manage customer wait times.
A new subject area, ‘CRM – CRM Omni Channel Events Real Time’ enables creation of ad hoc analyses to obtain deep and comprehensive insight across key dimensions of employee, queue, work objects, OmniChannel events, and time.
The pre-built example dashboards included with this feature are:
- OmniChannel Queue Assignments
- OmniChannel Agent Assignments
- OmniChannel Assignments
Steps to Enable
No steps are required to enable this feature.
Create, edit, and escalate service requests from a mobile device.
You have the ability to add capture service request details and add internal notes to the service request to facilitate better communication and collaboration. You can also perform the following actions:
- View service request status and updates
- Create and edit a service request
- Create and edit a service request team
- Create and edit messages and view attachments
- Add avatar profile picture
- Provide swipe action on list views, for example to escalate the service request
- View, edit and create activities.

View Service Requests

Edit Service Request
Steps to Enable
No steps are required to enable this feature.
This document will continue to evolve as existing sections change and new information is added. All updates appear in the following table:
| Date | Feature | Notes |
|---|---|---|
| 01 SEP 2017 | Created initial document. |
This guide outlines the information you need to know about new or improved functionality in this update, and describes any tasks you might need to perform for the update. Each section includes a brief description of the feature, the steps you need to take to enable or begin using the feature, any tips or considerations that you should keep in mind, and the resources available to help you.
GIVE US FEEDBACK
We welcome your comments and suggestions to improve the content. Please send us your feedback at SALESCLOUD-PRODEX_WW@ORACLE.COM.
Optional Uptake of New Features (Opt In)
We continue to add many new features to Oracle Cloud Applications and we now give you the option to take advantage of new functionality at a pace that suits you. The ‘New Features UI’ is available to you from your cloud homepage, where you can make your choices and do any configuration necessary.
This section gives you information to help you plan, deploy, and validate your update. We make frequent additions to this document, so don’t forget to check back and get the latest information before your update starts.
Use the following resource to prepare for, deploy, and validate your Oracle Engagement Cloud upgrade to Release 13:
- Read the Oracle Sales and Engagement Cloud: Performing Your Release 13 Upgrade (Doc ID 2253572.1) on My Oracle Support to learn how to prepare for, validate, and deploy Release 12.
- If you have not yet done so, review the introduction guide to upgrades: Release Upgrade Planning (Doc ID 2016981.1) on My Oracle Support
- Review the latest Known Issues and Update Documents for this release (Doc ID 1603154.1) on My Oracle Support.
| Action Required to Enable Feature |
||||
|---|---|---|---|---|
| Feature |
Automatically Available |
End User Action Required |
Administrator Action Required |
Oracle Service Request Required |
|
||||
|
||||
|
||||
|
||||
|
||||
|
||||
|
||||
|
||||
|
||||
|
||||
|
||||
|
||||
Deal Registration Analytics Subtab Including Drilldown Support |
||||
|
||||
|
||||
|
||||
Improved Field Selection for Duplicate Identification Batch Creation |
||||
|
||||
Option to Search Multiple Addresses From Address Verification |
||||
|
||||
|
||||
Additional Dynamic Choice List Fields Available as Related Objects for Custom Subject Areas |
||||
Delete Option for Unpublished Layouts, Field Groups and Subtabs |
||||
|
||||
Predefined Role Provisioning Rule for Sales Restricted User Role |
|
|||
|
||||
|
||||
|
||||
|
||||
|
||||
|
||||
Create reports on Sales Campaign standard and custom attributes.
Sales Campaign is included as a new dimension folder in the subject areas that has Marketing source as a dimension. You can now see all the custom attributes created for Sales campaign that can be included in the reports created from BI answers.

Sales Campaign and Extension Dimension
Steps to Enable
No steps are required to enable this feature.
New Asset Attributes for Sales Predictor Rules
Define prediction and eligibility rules for the Asset object and related asset attributes. These rules allow recommendations by a combination of Asset, Account, Product and Opportunities.

You Can Define a Prediction Rule that Allows Recommendation.
Steps to Enable
No steps are required to enable this feature.
Role Information
Sales Analyst
Accounts, Contacts, and Households
Option to Add Accounts From Data Cloud
Search for and add new accounts from Data Cloud accounts from within Oracle Sales Cloud. Using the new Add Accounts from Data Cloud option, you can add a new account and related contacts that include valuable Dunn and Bradstreet data attributes such as name, industry, revenue and location.
Steps to Enable
No steps are required to enable this feature.
Navigate directly to an account from the account hierarchy. Links on account names allow you to drill down from within the account hierarchy or parent account in order to view or update account details.
Steps to Enable
No steps are required to enable this feature.
Integration of Business Plans with Oracle Social Network
Collaborate in a social network by sharing business plan information. The integration of Business Plans with Oracle Social Network offers contextual based social collaboration, providing the ability for users to create a business plan and engage within a social wall and participate in related conversations directly from within the Business Plan sub-tab.
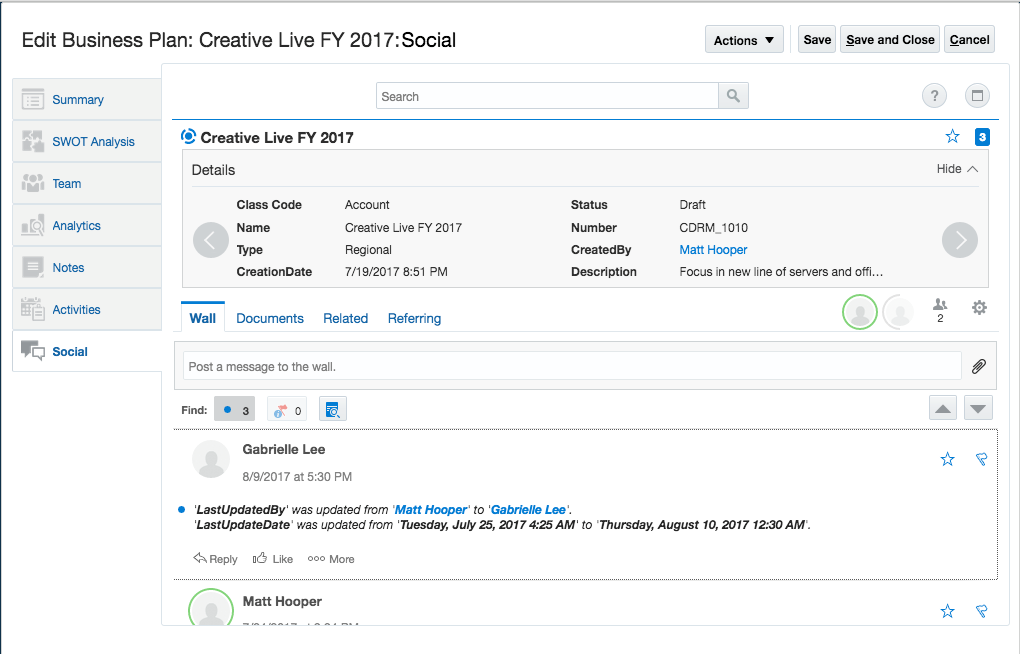
You Can Collaborate in a Social Network by Sharing Business Plan Information
Steps to Enable
No steps are required to enable this feature.
Create Business Plans for Accounts. Account Planning allows you to maximize revenue from key accounts by taking a systematic approach in identifying account potential, enhancing relationships and pursuing opportunities. It also lets sales teams focus their efforts where the greatest ROI is expected. Account business plan objectives, that represent measurable targets for any plan, allow you to track attainment and specify targets broken out by time periods, product lines, geographies and accounts.

You Can Create and Update a Business Plan for an Account.
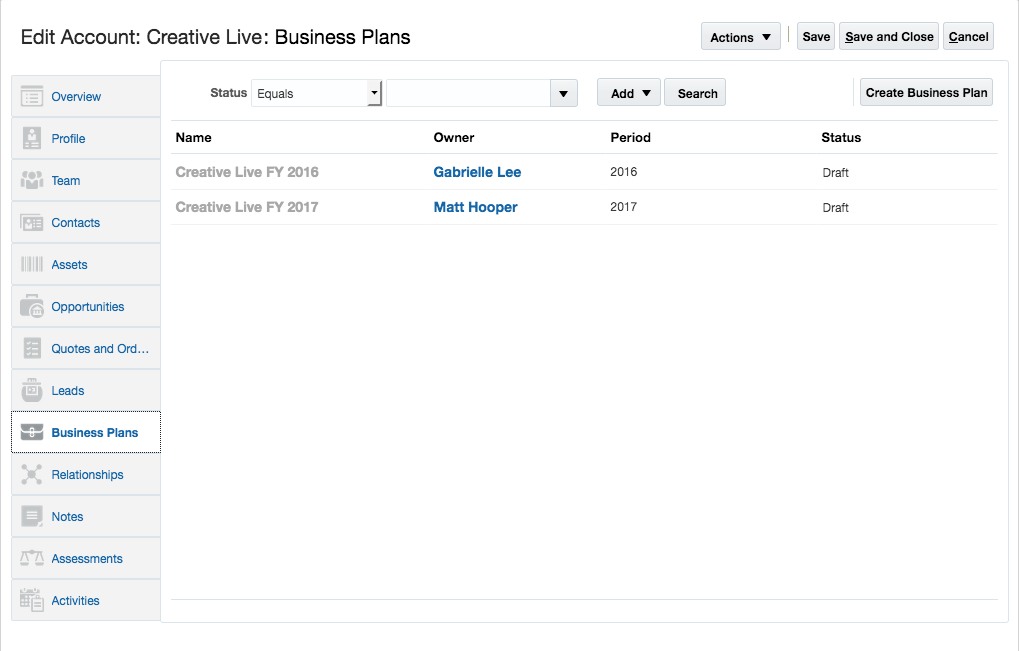
You Can See a List of the Business Plan Associated with an Account
Steps to Enable
No steps are required to enable this feature.
Groovy Scripts for Assessments
Use Groovy scripts and object workflow to add logic to assessments. The power of Groovy scripts allows validation rules and triggers to be defined to meet your assessment business needs.
Steps to Enable
No steps are required to enable this feature.
Accurately copy opportunity data and use it effectively to create new opportunities quickly. The copy map allows you to map the child objects and attributes in the source opportunity to objects and attributes in the new opportunity. You can also leverage expressions and conditions to populate attributes.
Steps to Enable

You Can Map the Child Objects and Attributes in the Source Opportunity to Objects and Attributes in a New Opportunity.
View and enter opportunity revenue line items efficiently. The Product subtab displays the opportunity revenue table, allowing you to see more revenue line items at a glance.

You can view and enter opportunity revenue line items on the Products subtab.
Steps to Enable
You can expose the Product subtab from the Opportunity Detail page layout.
- Login to the application as an administrator.
- Go to the Application Composer.
- Go to Opportunity > Pages > Details Layout.
- Create a duplicate layout and navigate to that layout.
- In the Subtabs Regions click the Edit icon.
- In the Configure Subtabs window, move Products from the Available Subtabs region to the Selected Subtabs region.
- Click OK.
Add a child object to the Product object from within Application Composer. Once added, the child object appears as a subtab on the Product page. The child object offers create, update and delete operations through the user interface, REST services and import / export.

Once Added, You Can See the Service Requests Subtab on the Product Page
Steps to Enable
- Login to the application as an administrator.
- Go to the Product:Overview page.
- Create a child object for Product.
- Create a subtab in the Edit Product Details custom layout using the child object you created.
- Add applicable fields in the subtab.
- Select applicable actions.
- Click Save and Close.
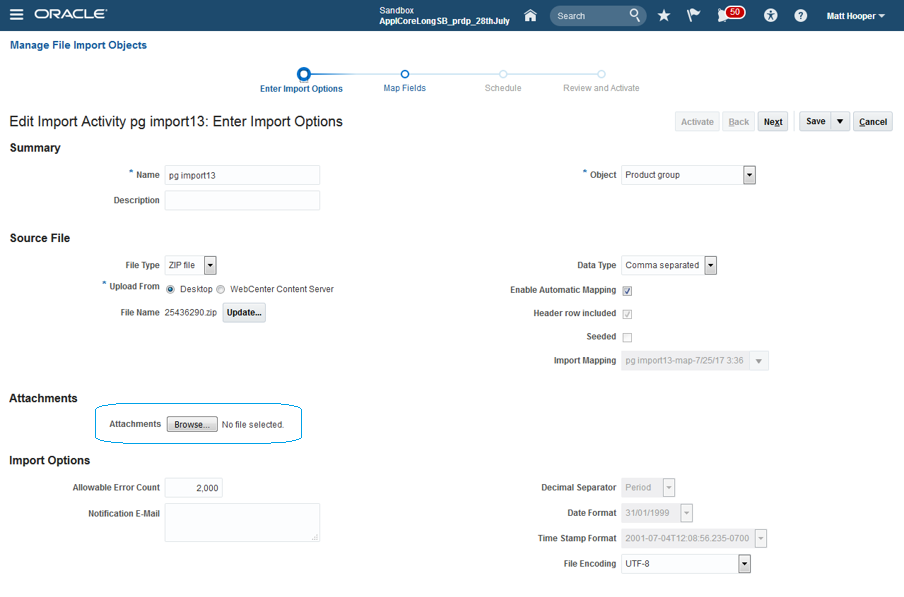
User-Friendly Display Names for Import
Map user-friendly display names to target attributes for Import. When creating import maps, you can now see display names that you can use to map target attributes for the Product Group, Product, and Price Book objects to columns in the import file within the import activity setup task.

You Can See User-Friendly Target Attribute Names for Product Mapping
Steps to Enable
No steps are required to enable this feature.
Use import to associate, update and delete image attachments for products and product groups.
Steps to Enable
No steps are required to enable this feature.
Customize call report create and edit views that are used in the Oracle CX Cloud Mobile app. Using the Mobile App Composer, you can add custom fields and remove both standard and custom objects related to the Activity object.

You Can Edit the Sales Rep Layout and Add Applicable Fields to the Layout.
Steps to Enable
No steps are required to enable this feature.
Define country-specific page layouts for the Oracle CX Cloud Mobile App. Sales representatives can see the appropriate page layout in the mobile app, based on their country preference setting.

You Can See a Layout that is Specifically Designed for the Region that You Belong To.
Steps to Enable
No steps are required to enable this feature.
Complete Offline Read and Write
Use the Oracle CX Cloud Mobile Application in areas with poor or no network connectivity. You can view records from Sales Cloud or Engagement Cloud which are stored locally on your smartphone. You can also create or update contacts, opportunities or custom objects . When you reconnect to the network, all offline changes are then synced to Oracle Sales Cloud.
The data stored by the Oracle CX Cloud Mobile application is stored secured and associated to logged-in user. If your business requires that a different user be able to access the data on the device, the user must have privileged access granted through the security console. If a different user without privileged access attempts to log into the device, then all data on the device will be erased.

You Can Create and Update Records Even When There is No Connectivity.
Steps to Enable
No steps are required to enable this feature.
Navigation Panel Customization
Customize the navigation panel in Oracle CX Cloud Mobile. You can add new menu items or remove existing menu items that appear on the side navigation panel.

You Can Add New Menu Items or Remove Existing Menu Items that Appear on the Side Navigation Panel
Steps to Enable
No steps are required to enable this feature.
CX Cloud Mobile - Service Request
The Oracle CX Cloud Mobile application enables sales and service representatives, managers, and partner representatives to create, edit, and escalate service requests from a mobile device.
You can add service request details and internal notes to the service request to facilitate better communication and collaboration. In addition, mobile users have access to the following actions:
- View service request status and updates
- Create and edit a service request
- Create and edit a service request team
- Create and edit messages and view attachments
- Add an avatar profile picture
- Provide swipe action on list views, for example to escalate the service request
- View, edit and create activities.

You Can View, Edit and Create Service Requests

You Can Edit Service Requests and Contacts

You Can Call, SMS or Email the Customer Using the Mobile App
Steps to Enable
No steps are required to enable this feature.
Partner Relationship Management
Partner Relationship Management
Pending My Approval Record Set for MDF Requests and Claims
Efficiently find MDF requests and claims that are pending your approval. The advanced search section of the MDF request and the MDF claim pages now include Pending My Approval record sets. These new record sets allow approvers to create saved searches and quickly locate the MDF requests and the MDF claims that are pending approval.

You can search for MDF requests and claims that are pending for your approval.
Steps to Enable
No steps are required to enable this feature.
Export Market Development Funds (MDF) budget, request and claim data from Oracle Sales Cloud to a text file. You can select a parent, child or custom object and output a zip file containing a separate file for each MDF object selected. The output data contains only those records matching the specified filter criteria.

You can export all the transactions of an MDF object.
You can export:
- MDF Budgets
- MDF Budget Countries
- MDF Budget Team
- MDF Requests
- MDF Request Team
- MDF Claims
- MDF Claims
- MDF Claim settlements

You can extract MDF data from Oracle Sales Cloud so that you can use the data in a external application.
Steps to Enable
No steps are required to enable this feature.
Role Information
- Channel Operations Manager
- Sales Administrator
Benefit from global search to find one or multiple MDF records regardless of which UI you are on. If enabled, you can search for MDF budget, MDF request and MDF claim records. Make your search more efficient by using filters and limiting the objects that will be searched. Once you get the search results, you can quickly drill down to a specific record to obtain more details.

You can quickly search for MDF-related records in the global area.
Steps to Enable
- Activate MDF Claims for global search.
- Login as sales administrator and go to the Setup and Maintenance work area.
- Select the Sales offering.
- Search for the Manage Search View Objects task and go to the task.
- Select the row corresponding to the MDF Claims object and click Activate.
- Manage the display of search result attributes that determine how accurately you can identify the transactions. You can add or remove attributes to make sure your users identify the transactions as quickly as possible.
- Click MDF Claims to go to the Edit Search View Object: MDF Claims page.
- Configure Title, fixed Content, and Body.
- Define the search schedule and period to determine how updated the global search results are.
- Configure Index Schedule and Index Period.
Role Information
- Channel Account Manager
- Channel Sales Manager
- Channel Operations Manager
- Partner Administrator
- Partner Sales Manager
- Sales Administrator
Partner Contacts Global Search
Search and access partner contacts from global search directly. Users can now search for partner contacts in global search and can also filter the global search results by Partner Contacts category. This enables the users to access partner contacts from anywhere within the application improving user experience and efficiency.
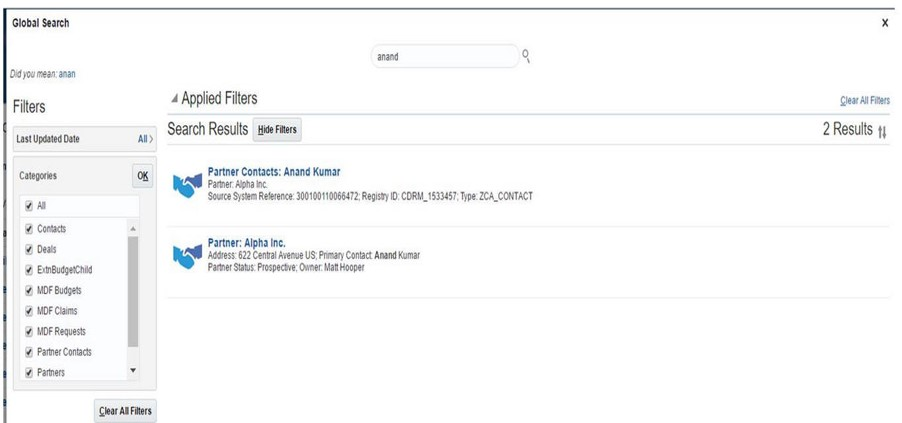
You can search for partner contacts in global search.
Steps to Enable
- Activate Partner Contacts for global search.
- Login as sales administrator and go to the Setup and Maintenance work area.
- Select the Sales offering.
- Search for the Manage Search View Objects task and go to the task.
- Select the row corresponding to the Partner Contacts object and click Activate.
- Manage the display of search result attributes that determine how accurately you can identify the transactions. You can add or remove attributes to make sure your users identify the transactions as quickly as possible.
- Click Deals to go to the Edit Search View Object: Partner Contacts page.
- Configure Title, fixed Content, and Body.
- Define the search schedule and period to determine how updated the global search results are.
- Select the Frequency Type of the Index Schedule.
Tips And Considerations
- Managing display of search result attributes will determine how accurately users can identify the partner contact the user is searching for.
- Defining Index Schedule and Period for will determine how updated the global search results are.
Role Information
- Channel Account Manager
- Channel Operations Manager
- Channel Sales Manager
- Partner Administrator
Deal Registration in Global Search
Allows the search for one or multiple deal registration records by entering keywords in the global search box in the global area.

You Can Quickly Search for Deal Registration Related Records in the Global Area
Steps to Enable
- Activate Deals for global search.
- Login as sales administrator and go to the Setup and Maintenance work area.
- Select the Sales offering.
- Search for the Manage Search View Objects task and go to the task.
- Select the row corresponding to the Deals object and click Activate.
- Manage the display of search result attributes that determine how accurately you can identify the transactions. You can add or remove attributes to make sure your users identify the transactions as quickly as possible.
- Click Deals to go to the Edit Search View Object: Deals page.
- Configure Title, fixed Content, and Body.
- Define the search schedule and period to determine how updated the global search results are.
- Select the Frequency Type of the Index Schedule.
Role Information
- Channel Account Manager
- Channel Sales Manager
- Channel Operations Manager
- Partner Administrator
- Partner Sales Manager
- Sales Administrator
Deal Registration Territory Customization
The Deal Registration Territory table on the Team sub tab (Territory show filter) can now be customized through Application Composer to add or remove out of the box standard fields.

You can configure the Deal Territory table.
Steps to Enable
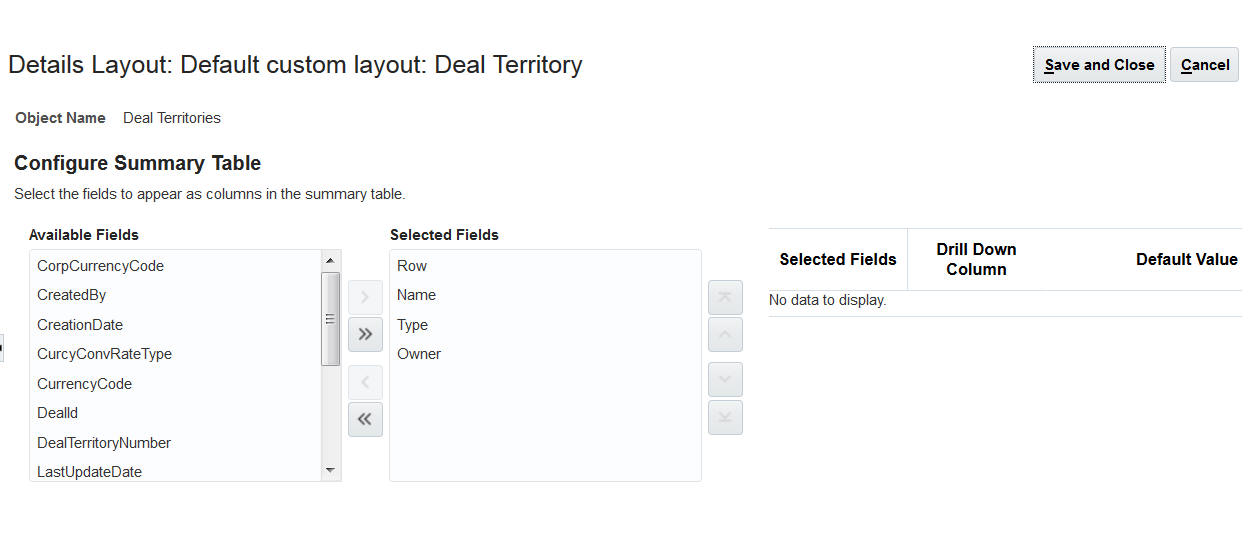
You can add or remove standard fields.
Deal Registration Analytics Subtab Including Drilldown Support
Support the ability to add the Analytics sub tab to the Deal Registration landing list and Edit Deal Registration pages, and allow drill down from BI report to transaction pages.

You can analytics related to deal registrations.
Steps to Enable
You can expose the Deal Registration Analytics subtab on the Edit Deal Registration page through the Application Composer.

To add report contact to the Analytics sub tab go to the Page Composer. Click Add Content and select the appropriate reports to show.

You can also expose the Analytics sub tab on the Deal Registration landing page. This is done through Tools > Structure. Set the Analytics sub tab Visible setting to Yes.

Channel users can now invoke territory assignment for a partner account from within the partner object user interface. The list of assigned territories can be viewed on the partner teams tab.

You can assign territories to a team.
Steps to Enable
No steps are required to enable this feature.
Role Information
Channel Account Manager
Channel Sales Manager
Channel Operations Manager
Option to Add Fields for Party Selection
Enable data stewards to find and select the correct party members when creating account hierarchies. You now have the option to add more attributes from the account, contact and household objects to the Search and Select picker on the Create Hierarchy page. You can add both standard and custom fields to the Search section or the Result section of the Add Members page.
Steps to Enable
No steps are required to enable this feature.
Primary Name Only for Address Geography Selection
Display only the primary names for geographies in the list of values for address selection. A new profile option makes it possible to disable alternate names for address geographies so the list of values is uncluttered and it is easy for reps to find the correct geography.

When You Enter an Address, You See the Primary Name
Steps to Enable
Enable the profile, HZ_ADDRESS_DISABLE_ALT_NAMES, to see the primary name in the address geography list. By default the value is 'No'.
All Activities Record Set Available at User Level
Offer specific users access to the All Records I Can See record set. A new profile option allows you to enable all records at the user level in addition to the site level. This advanced search option is helpful for those in senior roles like VPs or Executives, offering them on overview of activities in the entire sales organization.
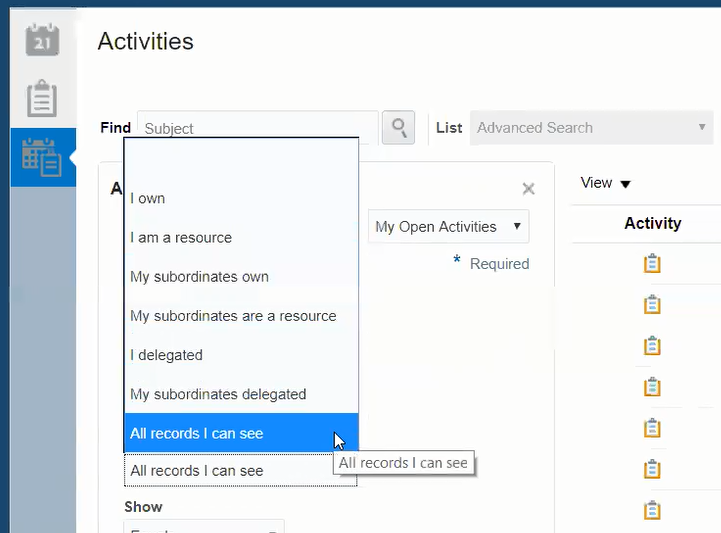
If Set by Your Administrator, then You Can See the All Activities Record Set
Steps to Enable
- Login to the application as an administrator.
- Go to the Setup and Maintenance work area.
- Select Sales as the setup.
- Search for the Manage Activity Profile Options task and go to the task page.
- On the Manage Activity Profile Options page, select the ZMM_ACTIVITY_ENABLE_ALL_RECORDS profile option.
- Add a row.
- In the new row:
- Select User as the Profile Level.
- Select a user in the User Name field.
- Set the Profile Value to Yes.
- Click Save and Close.
Improved Field Selection for Duplicate Identification Batch Creation
Use additional standard or custom fields of an account or contact to define a batch of records for duplicate identification. Add the required fields to two new lookups, ZCH_MATCH_OBJ_PERSON and ZCH_MATCH_OBJ_ORGANIZATION. These fields will be available for selection when creating a duplicate identification batch.
Steps to Enable
No steps are required to enable this feature.
Simplified Setup for Attribute Survivorship Rules
Choose from seeded attribute survivorship rules for accounts and contacts. Survivorship Rules are an integral part of any deduplication and cleanup process. You can get your survivorship rules set up quickly and reduce ramp up time using a new set of seeded Set Attribute rules for either Organization and Person.
Steps to Enable
No steps are required to enable this feature.
Option to Search Multiple Addresses From Address Verification
Allow sales representatives to search and select from multiple similar addresses when verifying account or contact addresses using Data Cloud Address Verification Service.

You Can Select the Most Appropriate Address from a List of Similar Verified Addresses
Steps to Enable
No steps are required to enable this feature.
Automatic Activation of Future Dated Proposals
Territory proposals that are future dated will be automatically activated on that future date. You don't need to remember to schedule the Run Territory Proposal Activation process. When a proposal is scheduled for the future, the proposal activation job will be scheduled automatically.
Steps to Enable
No steps are required to enable this feature.
Contract Expert Using Web Services
Leverage the strength of Contract Expert functionality by running it using a web service from other applications. Contract Expert uses a rules-based engine to automatically assess and apply additional clauses that are required for a contract and returns relevant terms and conditions.
Use a web service to return contract terms and conditions in HTML and RTF format. This allows you to take advantage of terms created using Enterprise Contracts in your external applications.
Steps to Enable
No steps are required to enable this feature.
You can now select contract lines individually and cancel them without canceling the entire contract.

To Cancel a Contract Line Select Cancel from the Actions Menu

You Can the Status of a Cancelled Line
Steps to Enable
No steps are required to enable this feature.
Configuration and Customization
Additional Dynamic Choice List Fields Available as Related Objects for Custom Subject Areas
Create custom subject areas with activity, sales lead or opportunity as the primary object and have the option to select the standard dynamic choice list fields from that primary object as related objects . When creating a custom subject area, you can do the following:
- Add account, contact, household, opportunity, sales lead, or owner as related objects when activity is the primary object of the custom subject area.
- Add owner as a related object when sales lead or opportunity is the primary object of the custom subject area.

Dynamic Choice Lists as Related Objects While Creating Custom Subject Area
Steps to Enable
No steps are required to enable this feature.
Tips And Considerations
This is available only when activities, leads or opportunities are selected as the Primary objects
Sales and Service Tags for Objects
See which objects are for sales cloud and which are for service cloud. Standard objects are now shipped designated with sales or service tags. You can filter the objects displayed in the object tree in Application Composer by these tags. You can also add sales and service tags to custom objects.

If Appropriately Tagged, then You Can See Which are for Sales Cloud and Which are for Service Cloud
Steps to Enable
No steps are required to enable this feature.
Links in Approval Notifications
For custom approval processes, the approval notification now contains a link to the details page of the record to be approved. Approvers can drill down and view the details before approve or reject the request.
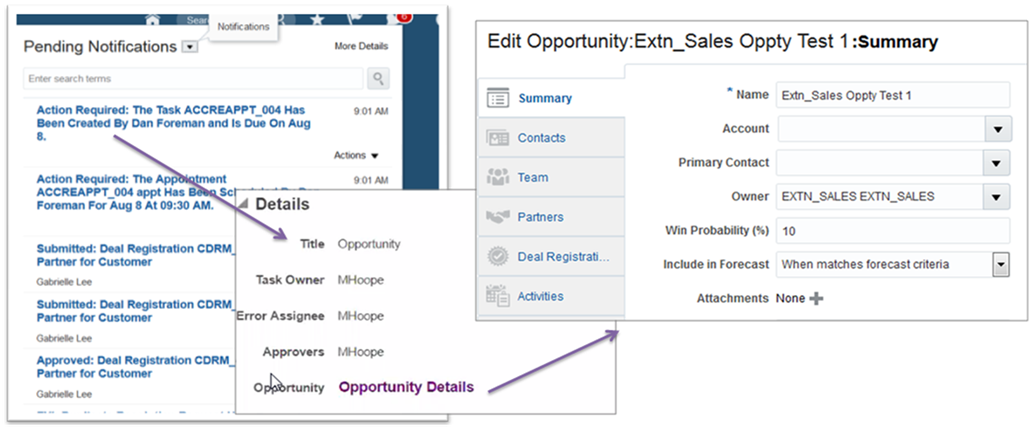
You Can Go to an Opportunity from a Custom Approval Notification
Steps to Enable
No steps are required to enable this feature.
Delete Option for Unpublished Layouts, Field Groups and Subtabs
Delete unpublished dynamic layouts, field groups or subtabs from the sandbox. This allows you to remove unwanted page configurations in the current sandbox before it is published to mainline. Published and standard content cannot be deleted.

You Can Delete a Subtab from the Sandbox
Steps to Enable
No steps are required to enable this feature.
Dynamic Filtering for Custom Subtabs
Apply page context driven search criteria on the target object in a custom one-to-many or many-to-many relationship. This allows you to constrain the number of records the user can add to a sub tab built on that relationship. These constraints are helpful in showing reps only what they are allowed to add to a sub tab. For example, when users add a product to log a trouble ticket, they can only choose from assets of the account.

You Can Apply a Page Context Driven Search Criteria on the Target Object in a Custom One-to-Many or Many-to-Many Relationship.
Steps to Enable
No steps are required to enable this feature.
Asset Standard Object Business Event
Customer can build integrations for the Asset object using Oracle Integration Cloud Service. In addition to Oracle’s core integration capabilities such as Web services and file import and export, you can build integrations for CRUD operations using the new Asset standard public business events using Oracle Integration Cloud Service.
Steps to Enable
No steps are required to enable this feature.
File-Based Data Import / Export
Multiple Files for Exports that Exceed Maximums
The export function generates an output file containing all records matching the requested export criteria. In some cases this can result in output files that exceed the maximum number of rows allowed in external tools. Sales Cloud now has a maximum number of records allowed in a single output file. If the selected export criteria exceed this value, Sales Cloud will split the results into multiple files. For example, if the threshold is 1 million records and the selected export criteria result in 1.3 million records, Sales Cloud will generate two export files (e.g. MyResults_001.csv containing 1 million records, and MyResults_002.csv containing 300k records).
Steps to Enable
No steps are required to enable this feature.
Predefined Role Provisioning Rule for Sales Restricted User Role
Provide view-only access to data in Oracle Sales Cloud through the Sales Restricted User Resource role. The new role provisioning rule for the Sales Restricted User Resource role offers predefined role mapping that maps the Sales Restricted User Resource Role to the Sales Restricted user Job role. Users mapped to this resource role can now get limited edit access to Sales Cloud data and functions and read access to all Sales Cloud data.

The New Role Provisioning Rule Maps the Sales Restricted User Resource Role to the Sales Restricted User Job Role.
Steps to Enable
For CRM only implementation, the role provisioning rules are created at the time of provisioning their environment. However, if you have purchased licenses for multiple cloud products, then you must create these rules manually.
To create the role provisioning rule manually for sales restricted user resource role, you need to execute the following steps.
- From Users and Security Functional Area in the Sales Offering, launch the Manage HCM Role Provisioning Rules task.
- Enter the Sales Restricted User as the Mapping Name.
- In the Conditions section, choose Active as the HR Assignment Status and Sales Restricted User as the Resource Role.
- In the Associated Roles section, add Sales Restricted User application job role and the resource job role.
- Save your changes.
This release of Oracle Engagement Cloud introduces several usability enhancements to Service Request Management including:
- Using the employee user interface end users can personalize the layout of columns on the Service Request list.
- Create a new internal note or response message from the top level action menu on the Service Request page.
- Edit the text of previously posted service request messages (internal note and customer entry)
- From the SR List, open the asset associated with a service request as a top-level tab within the Service workspace.
- From the SR Summary, click on the asset associated with the service request to open it inline within the Service workspace.
- Deep links can be used to edit or create a Service Request; additionally, you can specify parameters to populate the account, contact, and product
- Administrators can configure the order of the Status field values on the Service Request page.
- Enhanced functionality for viewing attached images in SR messages
- Agents can mark a linked knowledge article as having resolved an issue
Steps to Enable
1. Using the employee user interface end users can personalize the layout of columns on the Service Request list.
- User can select the additional column(s) from the View menu to display on the SR list
- To persist this new view, users should save this layout as part of the saved search
2. Create a new internal note or response message from the top level action menu on the Service Request page.
- No additional setup is required for this feature.
3. Edit the text of previously posted service request messages (internal note and customer entry)
- To use this feature, the profile option SVC_ENABLE_MESSAGE_CORRECTION must be enabled.
4. From the SR List, open the asset associated to a service request as a top-level tab within the Service workspace.
- To utilize this feature, the Asset must be exposed on the Service Request
- An asset must be associated with the service request
- The Asset column must be exposed on the SR list.
5. From the SR Summary, click on the asset associated to the service request to open it inline within the Service workspace.
- To utilize this feature, the Asset must be exposed on the Service Request
- An asset must be associated with the service request
6. Deep links can be used to edit or create a Service Request; additionally you can specify parameters to populate the account, contact and product
- Please reference the documentation for the setup and configuration of deep links
7. Administrators can configure the order of the Status field values on the Service Request page.
- To specify the order of the Status field values, utilize the Ranking field under Manage Service Request Status Values in FSM.
- Access this page through
- Setup and Maintenance
- Service Offering
- Service Request functional area
- Manage Service Request Status Values page
8. Enhanced functionality for viewing attached images in SR messages
- No additional setup or configuration are required for this feature.
9. Agents can mark a linked knowledge article as having resolved an issue
- Knowledge must be enabled and configured within Engagement Cloud
- For this particular feature, no additional setup or configuration are required.
Key Resources
- For details about how to configure Service Request Management, reference the online documentation at http://docs.oracle.com/cloud/latest/salescs_gs/docs.htm .
Engagement Cloud enables you to define any number of queues to organize your service requests and associate your service resources with each queue, either directly or as a Resource Group. Using the OmniChannel framework, queues can be setup for automatic push distribution, enabling service requests to be assigned to available resources automatically based on each resource's capacity to take on new service requests.
This release enables you to monitor your queues and service request distribution to resources with a near-real-time queues dashboard. The Queues Dashboard enables administrators to view queue statistics such as average wait time, number of available resources per queue, number of assigned requests vs. waiting requests as well as available capacities per queue. Queues Dashboard also equips administrators and supervisors with basic monitoring abilities to move service requests between queues or assign those requests to a specific resource or resource group without navigating to individual service request screens.
This release expands Service Queues area to include Queues Dashboard.
On the top of the screen, choose a time interval to filter the queue statistics and choose an auto-refresh interval to refresh those.


Queues table has been expanded to display other important statistics such as number of Service Requests received, assigned and abandoned per queue, in addition to available capacities.

Choosing a specific queue in queues table will display Service Requests from that queue that are waiting to be assigned. You can choose one or more Service Requests in order to move those to another queue or assign directly to an agent.

Steps to Enable
OmniChannel framework needs to be enabled and configured in order to start using Queues Dashboard. Please refer OmniChannel Framework.
Oracle Engagement Cloud now supports monitoring of social posts on popular social networks such as Facebook and Twitter, capturing service-related posts as service requests, and routing these to available agents for resolution. A pre-built integration to Oracle Social Relationship Management (SRM) using Oracle Integration Cloud Service powers the social monitoring channel. Social listening capabilities from Oracle SRM enable the service organization to proactively monitor the world's most popular social networks along with thousands of other public sources. Advanced natural language processing automatically identifies the social posts most likely to be related to a service issue, saving the organization significant time by screening out messages that are not service related.
The social monitoring process allows service agents to:
- View full conversations in Oracle Engagement Cloud.
- Respond to social media posts from Oracle Engagement Cloud.
- Use private and public channels in media such as Facebook and Twitter.
Key Benefits
- Social service requests are routed in real time to available agents using OmniChannel routing, ensuring that customers receive prompt responses.
- Service agents can respond to social media using the full functionality of Oracle Engagement Cloud, including smart text and the knowledge base with just a few clicks.
- Service agents use the same console to interact in social media conversations along with other support channels such as email and phone.
- Automatic contact matching reduces duplicate contacts and automates mapping social interactions to real customer profiles.
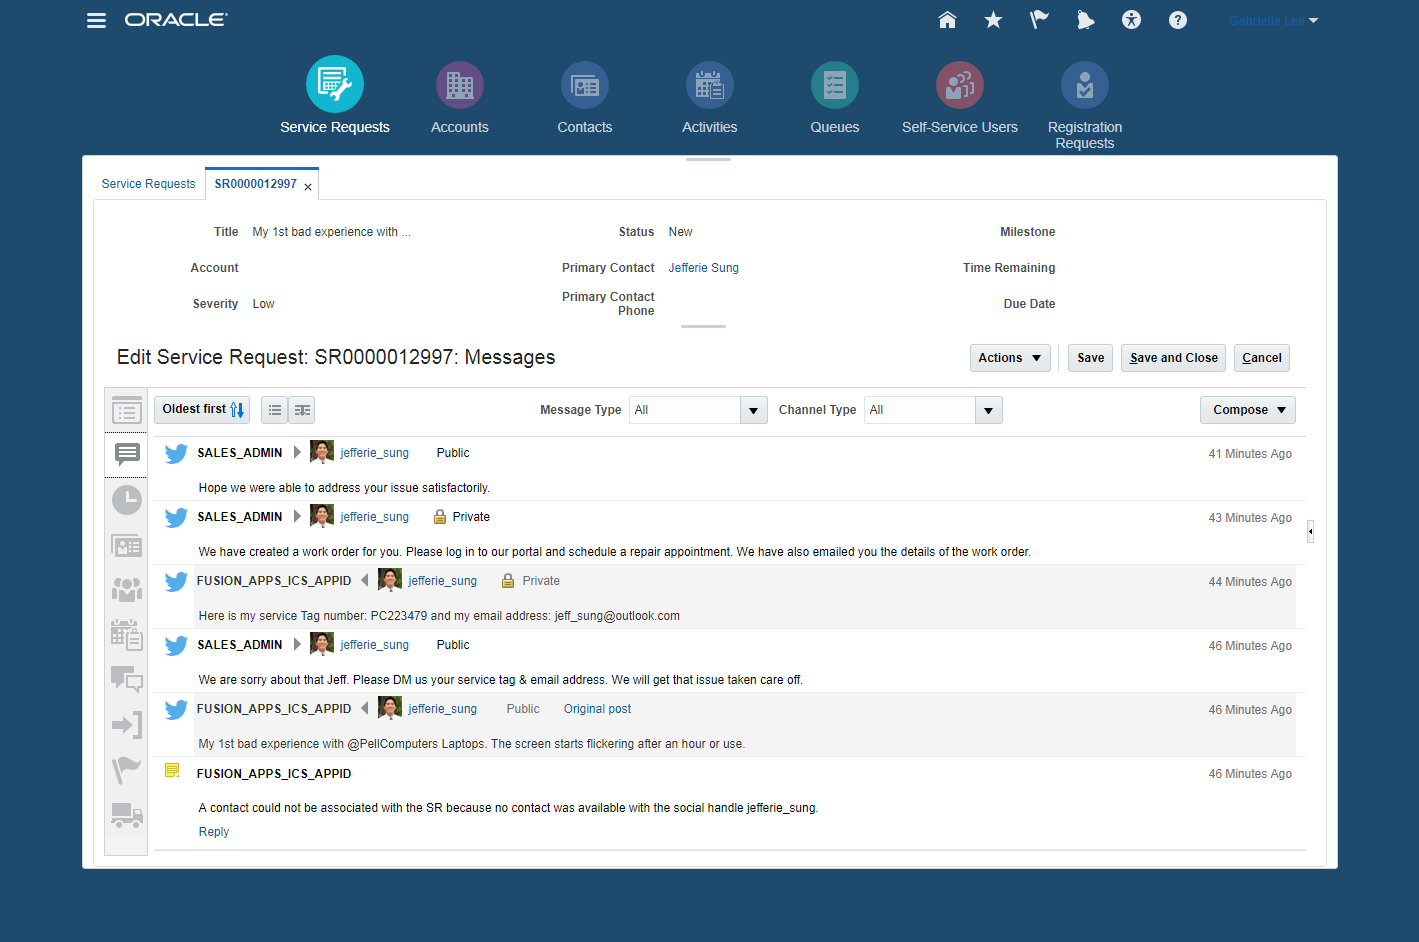
Social Engagement
Steps to Enable
Enable the Social Networks Feature
- Navigate to the Setup and Maintenance work area and select the Service offering.
- Click on Change Feature Opt In.
- Click on Features for Communication Channels.
- Enable the Social Networks Feature.
- Click Done.
Tips And Considerations
This feature also requires subscriptions to Oracle Social Relationship Management and Oracle Integration Cloud Service.
Key Resources
This feature integrates Oracle Engagement Cloud with Oracle Social Cloud using Oracle Integration Cloud Service to provide the social engagement capabilities.To implement this feature review the following sections of the documentation:
- Setting up Social Channels (Implementation guide)
- Integrating Engagement Cloud with Oracle Social Relationship Management: Procedure (User guide)
In this release of Engagement Cloud, numerous enhancements have been made to the Multi-channel Adaptor (MCA) framework for CTI integration. These enhancements include:
- Enhanced CTI support for Sales
- Out-of-box support enabling the administrative configuration of sales objects such as leads and opportunities for the purpose of screen pop logic
- Configurable support for enabling and disabling the automatic logging of an activity as part of a voice interaction
- CTI Framework Enhancements
- Support for auto-answer so that an organization can automatically push calls to an available agent without an accept/reject option
- Configurable contact picker that provides greater flexibility to define the display of contact search attributes
- Automatic creation of a service request internal note from wrap-up information providing a quick and easy means of analyzing communication history
- Enhanced call transfer functionality
- Extensibility enhancements to Wrap Up
Steps to Enable
CTI Integration is a functional area that must be enabled under the Service Offering in Setup and Maintenance. When this functional area is enabled, administrators can see the tasks required to manage Communication Channels.
- Navigate to the Setup and Maintenance work area and select the Service offering.
- In the Administration section, click Actions -> Change Configuration.
- Under the Service Offering, select Communication Channels Feature,
- Ensure that CTI toolbar is clicked Enable for Implementation.
- Set the implementation status to In Progress or Implemented.
Next, under the Service Offering, search for the task Define Communication Channel Configuration. The following task steps will be need to be configured to enable the CTI Integration:
- Manage Media Toolbar Configuration: In this task you will enter the URL for the 3rd party media toolbar, and enable it
- Configure Call Flow Parameters: This task allows you to specify any options you might want to enable such as the contact verification page as well as the Call Wrap Up.
- Manage Application Classification: If your organization is using more than one application with the CTI integration (such as sales and service), you can use application classifications to specific specific screen pop logic for each application.
- Manage Business Object Configuration: This task will enable you manage the business objects that can be used for reverse lookup and screen pop logic
- Manage Lookup Filters: This setup task allows you to specific which lookup filters should be used for reverse lookup
- Screen pop Configuration Rules: As part of this task you will define the logic that will be used for screen pops.
To enable the CTI integration, you must first set the following profile option to True:
SVC_PARTNER_MEDIA_TOOLBAR_ENABLED
Key Resources
For details about how to configure the CTI Integration in Oracle Engagement Cloud, reference the online documentation here: http://docs.oracle.com/cloud/latest/salescs_gs/docs.htm.
Inbound Email Analytics enables customer service managers to understand the nature of inbound service emails better. A new pre-built analytic subject area, Service - CRM Inbound Messages Real Time, enables building of custom reports and analytics, providing the service organization with additional insight into emails received.. The following email attributes are available for reporting purposes: Subject, Sender, Channel, Service Request Reference Number (if available), Service Request Created Date (if available), Message Created Date, Acknowledgement Date, Known/Unknown Sender, and Status.
Inbound Email Analytics enables the service organization to answer questions such as:
- How many emails are we receiving over time?
- What is the current count of inbound email requests by status and mailbox?
- How many messages resulted in new service request creation vs. update to existing service request?
- How many emails came from known vs. unknown contacts?
- Is the service organization effectively handling new emails in the appropriate timeframe?
A pre-built infolet provides visibility into inbound email activity that has occurred in the last 30 days. You can drill down into a report that shows details of each email.

Inbound Emails Infolet
Steps to Enable
No steps are required to enable this feature.
Role Information
This feature is available to the Customer Service Manager and Administrator roles (Sales Administrator, Customer Relationship Management Application Administrator)
Social Customer Service Analytics
Social Customer Service Analytics' enables service managers to understand the efficiency and effectiveness of social media channels in generating service requests. A new pre-built analytic subject area provides the service organization with the ability to analyze service requests based on the identity of the sender, social network source, the specific channel or fan page of the post, and whether the post came from a public or private channel.
Social Customer Service Analytics enables the service organization to answer questions such as:
- How many social posts are we receiving over time?
- What is the current count of inbound social requests by status and social channel?
- How many messages resulted in new service request creation vs. how many messages resulted in an update to an existing service request?
- How many social posts came from known vs. unknown contacts?
- Is the service organization effectively handling new social service requests in the appropriate timeframe?
A pre-built infolet provides visibility into inbound social post activity that has occurred in the last 30 days. You can drill down into a report that shows details of each social post.
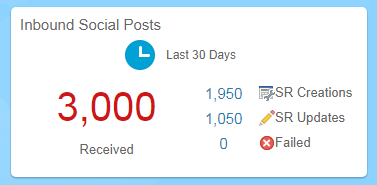
Inbound Social Post Infolet
Steps to Enable
No steps are required to enable this feature.
Role Information
This feature is available to the Customer Service Manager and Administrator roles (Sales Administrator, Customer Relationship Management Application Administrator)
Service Request Summary Analytics
Service Request Summary Analytics enables customer service managers to obtain a complete picture of SR performance as it relates to interactions and compliance. Interaction information is captured whenever an inbound or outbound communication occurs between an agent and a customer. This release expands the real-time reporting of service interactions by providing additional summary metrics and pre-built reports. The added analytic capabilities provide valuable insight, helping service organizations assess the volume and effectiveness of their channel interactions in resolving service issues. Similarly, the release takes SR-compliance analysis a step further by delivering a comprehensive view of SR milestone attainments and compliance. Customer Service Managers and Executives can gain visibility into the diverse factors affecting compliance, identify patterns for a better understanding of this key area of service performance, and then take corrective action.
The new subject areas introduced to support the analysis mentioned above are:
- CRM - CRM Service Request Summary
- CRM - CRM Interaction Aggregate
These subject areas and the pre-built metrics therein help in answering business questions such as:
- How often do communications cross channels to get to a resolution?
- What percent of communications are resolved the first time, through one channel?
- What are the number of interactions by channel, agent, and time period?
- How often are communications transferred between agents?
- How many interactions, on average, are required to resolve an issue?
- What is the average length of time of an interaction (by agent and channel)?
- What product lines have a higher percentage of non-compliant SRs open?
- How is the percentage of compliant SRs trending month over month, quarter over quarter?
- Where are the outliers, when it comes to compliance?
- Are we keeping the number of non-compliant SRs in check for our most valuable customers?
The pre-built example infolets and reports included in this area are:
Interactions reports
- Channel of Resolution
- Interactions by Channel
- Interactions Without an SR
- Avg # of Interactions to Resolve an SR
- Avg # of Interactions to Close an Issue SR
- Closure on First Interaction
Compliance Infolets and Reports
- My SR Compliance
- Team SR Compliance
Steps to Enable
There are no steps to enable the Subject Area as such, however in order for the subject area to fetch persisted data, an ESS job needs to be scheduled in order to extract and populate back end tables.
To configure an ESS job, do the following.
- Sign in to Engagement Cloud as an Administrator
- From the Navigator options, select Tools --> Scheduled Processes.
- On the Scheduled Process screen, click Schedule New Process.
- On the Schedule New Process dialog box, select Job as Type.
- In the Name field, search for and select the process 'Aggregate Service Requests'.
- On the Process Details screen for the job, click Advanced.
- In the Schedule tab, select a schedule, set a frequency for the job.Suggested frequency is one hour*.
- Select the start and end date for the job.
- Click Submit to submit the changes
NOTE: If faster refreshes of data are needed, increase the frequency but please note that this has a performance impact on the transaction system.
This document will continue to evolve as existing sections change and new information is added. All updates appear in the following table:
| Date |
Feature |
Notes |
|---|---|---|
| 11 MAY 2018 | Migrate Classic Dashboard to Sales Infolet/Sales Pages | Updated document. Feature delivered in update 17B. |
| 20 APR 2018 | Oracle Sales Cloud for Office 365 | Updated document. Removed feature from update 17B. |
| 07 MAR 2018 | Streamlined Sales Offering | Updated document. Revised feature information. |
| 05 FEB 2018 |
Updated document. Revised feature information. |
|
| 28 NOV 2017 |
Updated document. Revised feature information. |
|
| 13 SEP 2017 |
Full Offline Create and Edit |
Updated document. Removed feature from update 17B. |
| 13 SEP 2017 |
CX Enterprise Mobile for Tablets |
Updated document. Removed feature from update 17B. |
| 13 SEP 2017 |
Tablet App Composer |
Updated document. Removed feature from update 17B. |
| 25 AUG 2017 |
Enhanced Search Result Order |
Updated document. Removed feature from update 17B. |
| 21 APR 2017 |
Created initial document. |
As part of the Customer Experience suite, Oracle Engagement Cloud combines sales and service capabilities in one solution with a unique combination of sales automation, service request management and knowledge management. Using Engagement Cloud, sales and service professionals can deliver consistent answers to customer questions and ensure that issues are resolved efficiently and effectively. Organizations can improve customer satisfaction and loyalty while enabling up-sell opportunities, particularly for high-touch and high-value customer engagements.
Engagement Cloud Release 13 includes digital customer service, multi-channel interactions, field service integration as well as enhancements to the CX Enterprise Mobile application and Sales Data Visualization. Engagement Cloud also includes a new email integration option for sales teams using Outlook 365, more advanced content and list management and an array of new capabilities that increase sales rep productivity.
This guide outlines the information you need to know about new or improved functionality in this update, and describes any tasks you might need to perform for the update. Each section includes a brief description of the feature, the steps you need to take to enable or begin using the feature, any tips or considerations that you should keep in mind, and the resources available to help you.
GIVE US FEEDBACK
We welcome your comments and suggestions to improve the content. Please send us your feedback at SALESCLOUD-PRODEX_WW@ORACLE.COM.
Optional Uptake of New Features (Opt In)
We continue to add many new features to Oracle Cloud Applications and we now give you the option to take advantage of new functionality at a pace that suits you. The ‘New Features UI’ is available to you from your cloud homepage, where you can make your choices and do any configuration necessary.
This section gives you information to help you plan, deploy, and validate your update. We make frequent additions to this document, so don’t forget to check back and get the latest information before your update starts.
Use the following resource to prepare for, deploy, and validate your Oracle Engagement Cloud upgrade to Release 13:
- Read the Oracle Sales and Engagement Cloud: Performing Your Release 13 Upgrade (Doc ID 2253572.1) on My Oracle Support to learn how to prepare for, validate, and deploy Release 12.
- If you have not yet done so, review the introduction guide to upgrades: Release Upgrade Planning (Doc ID 2016981.1) on My Oracle Support
- Review the latest Known Issues and Update Documents for this release (Doc ID 1603154.1) on My Oracle Support.
| Action Required to Enable Feature |
||||
|---|---|---|---|---|
| Feature |
Automatically Available |
End User Action Required |
Administrator Action Required |
Oracle Service Request Required |
|
||||
|
||||
|
||||
|
||||
|
||||
|
||||
|
||||
|
||||
|
||||
|
||||
|
||||
|
||||
|
||||
|
||||
|
||||
|
||||
|
||||
|
||||
|
||||
|
||||
|
||||
|
||||
|
||||
|
||||
|
||||
|
||||
|
||||
|
||||
|
||||
|
||||
|
||||
|
||||
|
||||
|
||||
Embedded Conversations Related to Partners and Deal Registrations |
|
|||
|
||||
|
||||
|
||||
|
||||
|
||||
|
||||
|
||||
|
||||
|
||||
|
||||
Enhanced Security for Personally Identifiable Information (PII) |
|
|||
|
||||
|
||||
|
||||
|
||||
|
||||
|
||||
|
||||
|
||||
Auditing for Credit Rules, Participant Goals and Participants |
|
|||
|
||||
|
||||
|
||||
|
||||
|
||||
|
||||
|
||||
|
||||
|
||||
|
||||
|
||||
|
||||
|
||||
|
||||
|
||||
|
||||
|
||||
|
||||
Dynamic Choice Lists Auto-Suggest Supports “Contains” for Custom Objects |
|
|||
|
||||
|
||||
|
||||
|
||||
|
||||
|
||||
|
||||
|
||||
|
||||
|
||||
|
||||
|
||||
|
||||
|
||||
|
||||
|
||||
|
||||
|
||||
|
||||
|
||||
|
||||
|
||||
|
||||
|
||||
|
||||
|
||||
|
||||
|
||||
|
||||
|
||||
|
||||
|
||||
|
||||
|
||||
Oracle Sales Cloud offers embedded sales analytics to drive business decisions, identify key events, guide sales activities and improve deal performance.
Enhanced Sales Data Visualization
Enable quick access to sales data with the new, prebuilt Data Visualization content pack for Sales VPs. The new content pack includes quarterly business reviews, pipeline analysis, product line reviews, competitor analysis, sales team performance analytics and more.
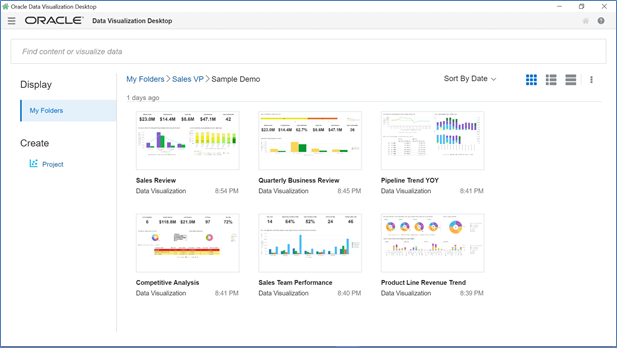
You Can View These Reports That You Can Use to Jumpstart Data Visualizations
Additional enhancements to Sales Data Visualization include the following:
- Data connectors for additional data sources such as Salesforce, IBM DB2 and Microsoft SQL Server
- More chart types that provide a rich palette of visualizations
- Advanced analytic functions such as forecasts and trend lines
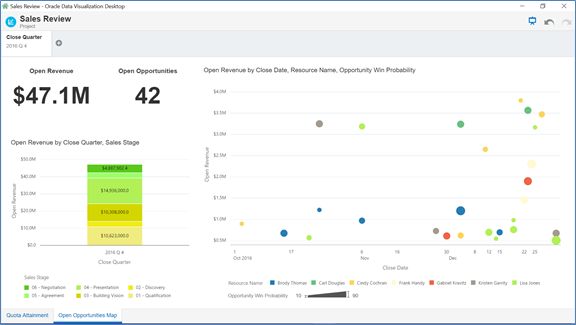
You Can See Information Related to Open Opportunities
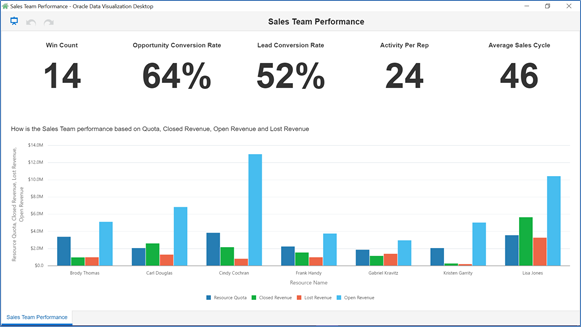
You can see your team’s performance and measure it against respective quotas.
NOTE: Data Visualization is not available by default. It requires a separate license.
Steps to Enable
- Importing the Data Visualization Application (dva) file
- Download the desired content pack zipped file. Extract the contents of the zipped files into a folder on your local drive, if you have not already done so.
- Ensure that the extracted files contain a .dva file. This is the data visualization file that we will import into Oracle Data Visualization Desktop.
- Start Data Visualization Desktop. Go to Start -> Programs -> Oracle Data Visualization Desktop.
- Once Data Visualization Desktop is open, import the dva file that you extracted from the zipped file.
- You will be required to provide a password at the time of import. The password for these dva files is “welcome”, all lower case.
- Extract Web Catalog into the Cloud OTBI instance (for customer deployments only)
- Extract the web catalog (.catalog file) into the OTBI instance at the predefined folder location: /Shared Folders/Custom/Data Visualization Applications/CX. Create the folders Data Visualization Applications/CX if they do not exist.
- Update Source Connections
- After importing the Data Visualization Application (.dva file), you will need to first update the connections to the OTBI cloud instance prior to opening the individual projects.
- Within the Oracle Data Visualization Desktop application, navigate to Data Sources and click on Connections.
- Select the desired connection, based on the persona of the application file (For example, a Sales VP persona will be mapped to Oracle Sales Cloud – Sales VP). Click on “Edit”.
- This will provide the configuration window to update the analytics URL, user name and password associated with the Sales Cloud OTBI environment. Enter the details and click on Save to connect to OTBI & test the connection.
- Next, select the data sources associated with that connection and reload the data. Once the reload is successful you are now ready to use the sample content pack with the OTBI connections restored.
- If the connections were successful, the canvas for these DV projects will light up with data.
Key Resources
- For a demonstration of this enhancement, see the Sales Analytics release training on the Customer Experience Release Readiness page.
Report Drill Down from Sidetabs
View report details by drilling down to view underlying data. Reports embedded within sidetabs on list pages and subtabs on edit pages now offer drilldown capabilities.

You can view object records from the BI report without having to go to the corresponding object’s page and search for that record.
Steps to Enable
You can set up the Report Drill Down feature from BI Answers.
- Select column Properties for an attribute in BI report.
- Go to the Interactions tab.
- Add ADF Contextual Action as an Action Link.
Tips And Considerations
Make sure that the object unique ID (Opportunity Id) in case of Opportunity object is added to the report for ADF contextual event to work.(It can be hidden in the results, but is required)
Key Resources
- For a demonstration of this enhancement, see the Sales Analytics release training on the Customer Experience Release Readiness page.
Create reports that include data currently associated with a CX Sales user. The Resource/Employee dimension is now extended to make the following attributes visible:
- Current User Status
- User Address Location
- Hire Date
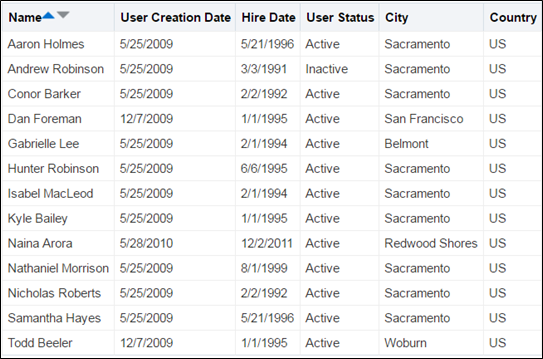
You can create reports for all the resources for a specific city or country or create reports based on the resource status.
Steps to Enable
No steps are required to enable this feature.
Tips And Considerations
For a demonstration of this enhancement, see the Sales Analytics release training on the Customer Experience Release Readiness page.
Key Resources
- For a demonstration of this enhancement, see the Sales Analytics release training on the Customer Experience Release Readiness page.
Account and Contact Reporting When No Relationship Exists
Analyze accounts and contacts that have no relationship to other accounts and contacts and no associated revenue. With this change, all accounts and contacts created in the system are displayed in reports, such as reports that display the number of accounts and contacts created for a given time period.

You can now develop custom reports providing comprehensive details on accounts and contacts. You can also provide information on accounts and contacts that have no association with any other objects.
Steps to Enable
No steps are required to enable this feature.
Key Resources
- For a demonstration of this enhancement, see the Sales Analytics release training on the Customer Experience Release Readiness page.
Migrate Classic Dashboard to Sales Infolet/Sales Pages
The Dashboard page in the Sales offering is not supported. You must move your Business Intelligence (BI) content from the Sales Dashboard pages to the Sales pages before you begin your upgrade.
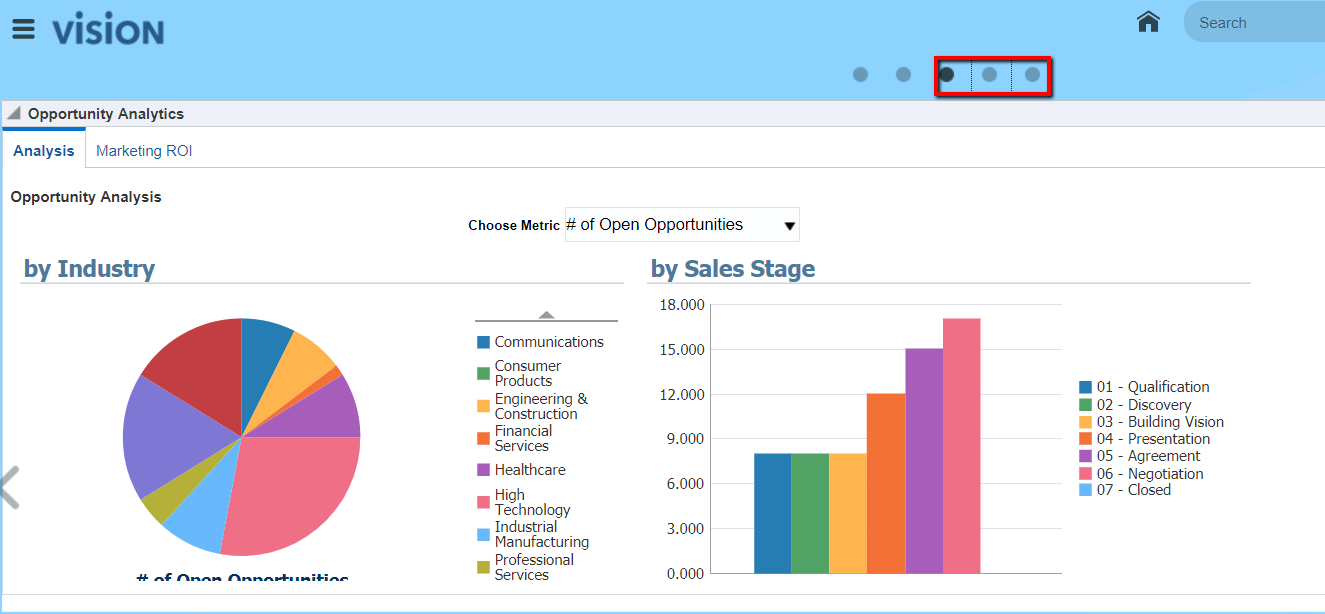
Sales Pages
Steps to Enable
- In an active sandbox, go to Navigator > Structure.
- There are five Sales pages available. Select the Sales Pages that you want to enable.

Enable Sales Pages
Tips And Considerations
- Refer the document Oracle Sales and Engagement Cloud: Performing Your Release 13 Upgrade (Doc ID 2253572.1)
- Under the section "BEFORE YOUR UPGRADE"; refer the sub-section: "Move your sales users from the desktop (classic) pages to the streamlined simplified pages"
- Refer Simplified Pages: Transitioning to Simplified Pages (Oracle Sales Cloud) (Doc ID 1663336.1) on this new documentation link
Key Resources
Please refer the Release 12 document for the Sales Pages details
CX Foundation for sales offers a full spectrum of core sales force automation capabilities that enable sales teams to manage the entire sales lifecycle including leads, opportunities, assets, accounts, contacts, activities, assessments and more. Sales reps and managers can monitor forecasts, leverage content across teams with Sales Lightbox and leverage in-context collaboration tools within Oracle Sales Cloud.
Global Search and List Management
Find critical sales information using global search or list management to create your own lists.
Manage the columns displayed in lists. Sales reps can display, hide and reorder columns and save column configurations using the Manage Columns option. They can also save their changes using the Save Search with Layout option. Sales reps can manage list columns for top-level standard or custom objects.
Within Application Composer, sales administrators can define the default column order, select the columns that sales reps can manage and can define which columns are hidden for each object.

You can show, hide, and reorder columns and save column configuration.
Steps to Enable
No steps are required to enable this feature.
Key Resources
- For a demonstration of this enhancement, see the Global Search and List Management release training on the Customer Experience Release Readiness page.
Option to Disable Fuzzy Search
Disable similar spelling in search results, called fuzzy search, for all objects in Oracle Sales Cloud. A new profile option, ZCA LM FUZZY SEARCH, allows you to enable or disable similar spelling results for searches using the Contains operator. The default value for this new profile option is ‘Yes’, which enables similar spelling search by default. 
You can disable similar spelling search result. For example, the application does not displays search results similar to “Martha”. 
You can enable similar spelling search result. For example, the application also displays search results similar to “Martha”.
Steps to Enable
To disable fuzzy search perform the following:
- Login to the application as a sales administrator.
- Go to the Setup and Maintenance work area.
- Search for and go to the Manage Administrator Profile Value task.
- Search for the Include Similar Results in Searches (ZCA_LM_FUZZY_SEARCH) profile option.
- Set the value to No.
- Click Save and Close.
Key Resources
- For a demonstration of this enhancement, see the Global Search and List Management release training on the Customer Experience Release Readiness page.
Add Current User as a search operator for the Created By and Last Updated By fields for both standard and custom objects and for resource searches in custom dynamic choice list fields. The Current User search operator enables sales reps to create saved searches to find records created or recently updated by the current user or find the current user in custom dynamic choice list fields for resources.
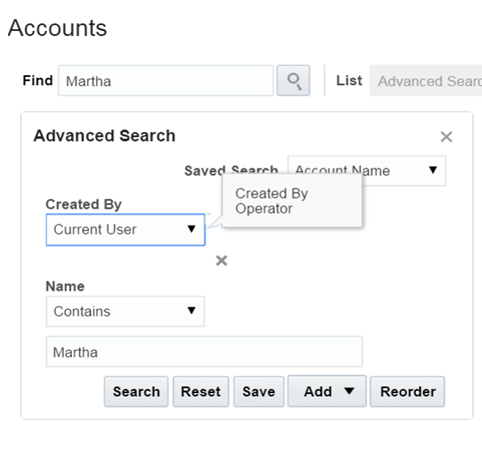
You can search more efficiently using the Current User option.
Steps to Enable
No steps are required to enable this feature.
Key Resources
- For a demonstration of this enhancement, see the Global Search and List Management release training on the Customer Experience Release Readiness page.
Additional Search Operators for Text and Choice List Fields
Provide additional search options by configuring the following operators for these non-mandatory, standard or custom field types:
-
Text fields: Is Blank and Is Not Blank operators
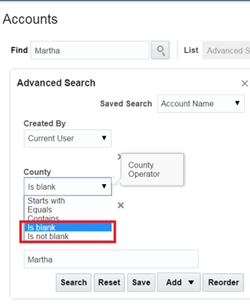
You can search using the "Is blank" and "Is not blank" search operators.
-
Fixed Choice List and Dynamic Choice List fields: Is Blank, Is Not Blank, and Does Not Equal operators
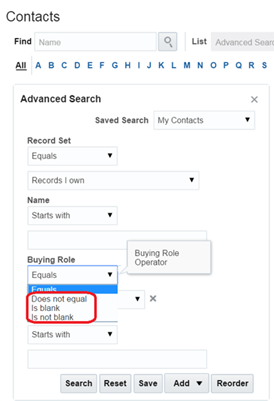
You can search using the Fixed Choice List and Dynamic Choice List fields.
Steps to Enable
- Login to the application as a sales administrator.
- Go to the Setup and Maintenance work area.
- Search for the Manage Administrator Profile Values task.
- Set these following profile options to Yes:
- ZCA_ENABLE_ADDITIONAL_TEXT_OPERATORS
- ZCA_ENABLE_ADDITIONAL_LOV_OPERATORS
- Click Save and Close.
Key Resources
- For a demonstration of this enhancement, see the Sales Analytics release training on the Customer Experience Release Readiness page.
Provide search flexibility with rolling time filters. These new date operators include: yesterday, today, tomorrow, last week, this week, next week, last month, this month, and next month.
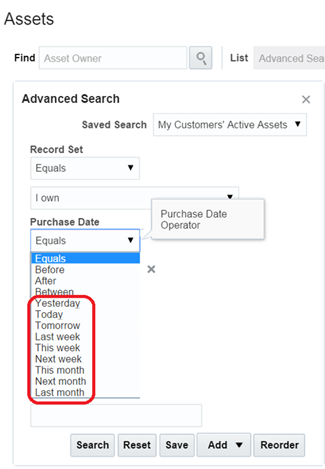
You can search using the rolling time filters.
Steps to Enable
- Login to the application as a sales administrator.
- Go to the Setup and Maintenance work area.
- Search for the Manage Standard Lookups task.
- Search for the ORA_ZCA_ROLLING_TIME lookup type.
- Enable or disable appropriate lookup codes as required by your business.
- Click Save and Close.
Key Resources
- For a demonstration of this enhancement, see the Sales Analytics release training on the Customer Experience Release Readiness page.
Update one or more fields for multiple records at once from within list pages. Sales reps and managers can select list rows for update and edit updatable fields for accounts, contacts, assets, activities and custom objects in real time. Mass update for leads and opportunities is available as part of a previous CX Sales release.
Administrators can enable the Update button for list pages and can configure which fields are available for mass update for each object. See the Configuration and Customization section for information about Mass Update Configuration.
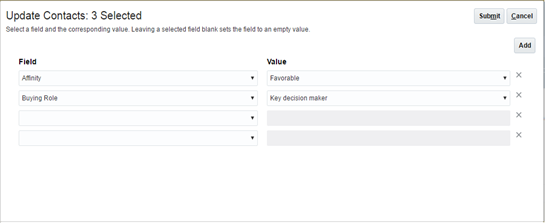
You can select multiple rows and update their values.
Mass update is available for Accounts, Contacts, Opportunities, Leads, Activities, Assets, and Custom objects.
Steps to Enable
Configure the landing page layouts in application composer.
- Go to the lading page layout of the object where you want to enable Mass Update.
- In the Configure Detail Form: Buttons and Action section, move Update from the Available Actions to the Selected Actions region.
- In the Configure Mass Update Fields section, move the required fields from the Available Fields to the Selected Fields region.
Configure the following profile options that control the maximum number of records that can be updated in a single mass update operation:
- Accounts: ZCM_MASS_UPDATE_ACCOUNT_THRESHOLD
- Contacts: ZCM_MASS_UPDATE_CONTACT_THRESHOLD
- Leads: MKL_MASS_UPDATE_LEAD_THRESHOLD
- Opportunities: MOO_MASS_UPDATE_OPTY_THRESHOLD
- Activities: ZMM_MASS_UPDATE_THRESHOLD
NOTE: By default these profile options have a value of 25
Tips And Considerations
You should limit the number of records that can be updated. By default, the application is set up to mass update 25 records. Since this is a synchronous operation, you should retain this limit to avoid excessive wait time for the Mass Update action to complete.
Make only those fields visible that are modified in Mass Updates. If there are cross-attribute dependency, then make all the relevant attributes visible on Mass Updates.
Key Resources
- For a demonstration of this enhancement, see the Global Search and List Management release training on the Customer Experience Release Readiness page.
See the number of records indexed for a search view object in order to debug if issues arise with indexing or crawling in global search. View the number of indexed records for each search object within the Manage Search View Objects table within the Setup and Maintenance pages. The search index number will update automatically when the table is refreshed.
Steps to Enable
No steps are required to enable this feature.
Key Resources
- For a demonstration of this enhancement, see the Global Search and List Management release training on the Customer Experience Release Readiness page.
Accounts, Contacts, and Households
Build trust and cultivate positive business relationships when you have a complete and accurate view of your accounts, contacts and households.
Data or information that is used to uniquely identify, contact or locate a person is called Personally Identifiable Information (PII). This information includes data such as social security number, home address and phone numbers, and more. New privileges are now available that allow you to protect the Mobile Phone field data.
For more information, see Customer Data Management > Enhanced Security for Personally Identifiable Information.
Rule Filtering for Account Assignment
Define an order of precedence in order to determine which territory is assigned to an account. When organizations require that only one sales territory is assigned to each account, territory assignment and rule filtering can be used together to ensure that only one territory is assigned, even when overlapping territories exist. Rule filtering does not apply to partner territories.

You can define an order of precedence on territories to ensure that only one territory is assigned to an account.
Steps to Enable
- Go to Setup and Maintenance > Manage Customer Center Assignment Rules and add your business specific rule sets.
- Go to the Manage Administrator Profile Values task and set the ZCA_ACCOUNT_TERRITORY_ASSIGNMENT_RULE to “Account Territory Rule Category”.
Key Resources
- For a demonstration of this enhancement, see the Accounts release training on the Customer Experience Release Readiness page.
Effectively manage your time and coordinate with your team when you can see all activities in one place. Sales reps and managers can quickly add appointments, create tasks and log calls related to accounts, contacts, households, partners, leads and opportunities.
View all appointments related to an asset in order to help team members better coordinate sales activities. With the asset calendar you can perform the following:
- View a calendar that displays the schedule of all upcoming appointments related to the asset.
- Save the asset to a list for quick calendar access.
- Determine the owner of each appointment on the calendar.
- Switch between calendar views (day, week and month) with ease.
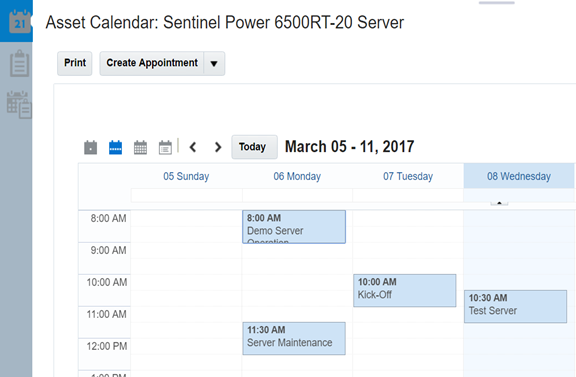
You can view all appointments related to an asset in a single-calendar view.
Steps to Enable
The Asset Calendar is not enable by default. You must create an appointment and then associate an asset to that appointment. Once you accomplish this task, then the Asset Calendar is available to all the users.
Key Resources
- For a demonstration of this enhancement, see the Calendar and Activities release training on the Customer Experience Release Readiness page.
Create and manage call reports efficiently. Designed for optimal productivity, ad hoc call reporting enables sales reps and managers to perform the following:
- View call reports within the Complete Activities and All Activities lists.
- Create call reports from Activities list pages.
- Create call reports from tasks.
- View reports.
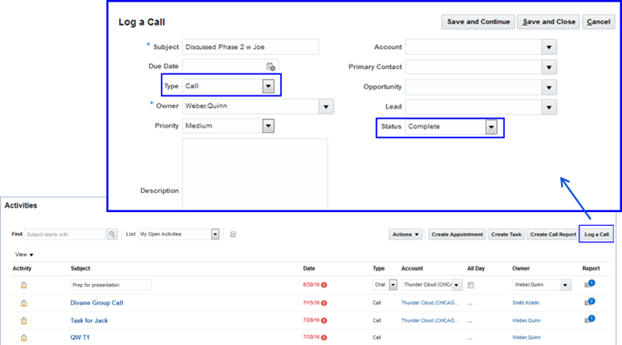
You can create a task from the task list using the Log a Call button.
Steps to Enable
No steps are required to enable this feature.
Key Resources
- For a demonstration of this enhancement, see the Calendar and Activities release training on the Customer Experience Release Readiness page.
View the assets owned by your customers and allow sales reps to add team members, contacts, service requests, leads, opportunities and activities to manage assets and identify new sales opportunities with expiring assets.
Manage assets within Oracle CX Sales. Now available as a standard object within Application Composer, you can perform the following:
- Hide or display the Assets icon on the homepage.The Assets icon is displayed by default.
- Create dynamic page layouts for assets, by using role or other criteria.
- Configure analytics subtabs for assets.Three subtabs are available, one is displayed by default.
- Associate assets with custom objects and standard objects, including the contacts, leads, opportunities, service request, team and attachments objects.
- Add a custom child object for Asset to store 1:M Asset relationships.
- Import or export asset records.
- Integrate assets in Oracle Sales Cloud using SOAP and RESTful Web services.

You can use Application Composer to extend the Assets object such as creating dynamic layout, custom relationships, and so on.
Sales reps can:
- View the Assets list from the Assets page, if enabled.
- Search for Assets, create or update saved searches and export assets.
- Create and edit assets and associate accounts, contacts and households to assets.
- Manage related service requests, leads, opportunities, contacts, teams from subtabs within the Assets Edit page.
- Access standard reports for assets.
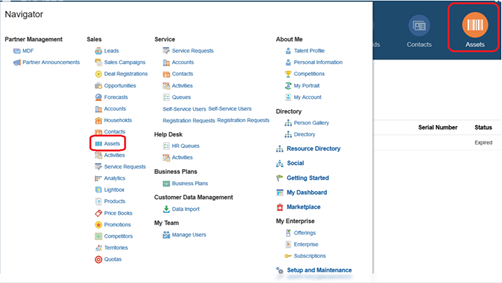
You can go to Assets from the Navigator menu.
Sales reps can access assets owned by their customer from a single list view. They can also customize the view to organize the layout for enhanced productivity.
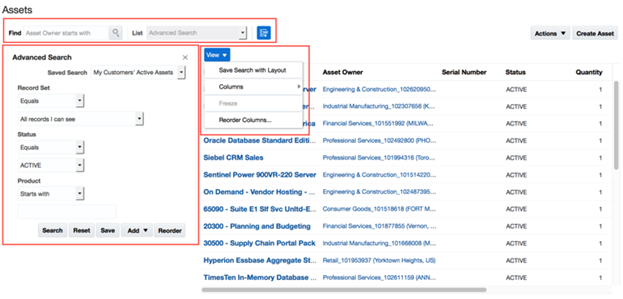
You can see a list of asset from the Assets landing page.
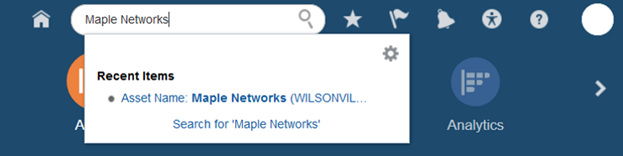
You can search for assets from the Global Search box.
Steps to Enable
- Log in to the application as sales administrator.
- Go to Tools > Structure and exposer the Assets springboard icon and Navigator menu entry.
- Expand Sales and drill down on Assets.
- Make Assets in the Navigator visible by setting the Navigator option to Yes.
- Make Assets on the springboard visible by setting the Springboard option to Yes.
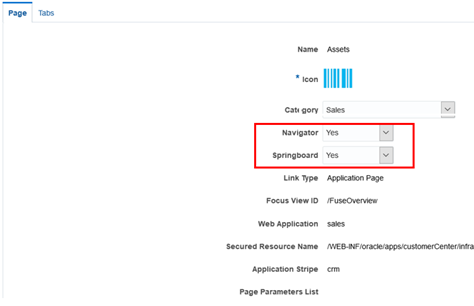
-
Go to Application Composer and make the related subtabs for Team, Contacts, Opportunities, Leads, and Service Request visible.
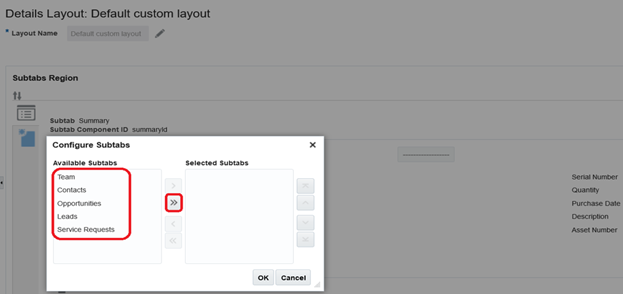
Key Resources
- For a demonstration of this enhancement, see the Assets release training on the Customer Experience Release Readiness page.
Manage the entire life cycle of sales leads from the initial contact to conversion.
Enhanced Lead-to-Opportunity Conversion
Configure and copy all notes, attachments and activities from the lead record to the opportunity record during conversion. Enhanced conversion automatically transfers all activities, notes and attachments related to the lead to the opportunity in order to maintain all history. Additionally, you can configure the Convert Lead dialog box to allow sales reps to change the values of data they transfer to the opportunity record during conversion.
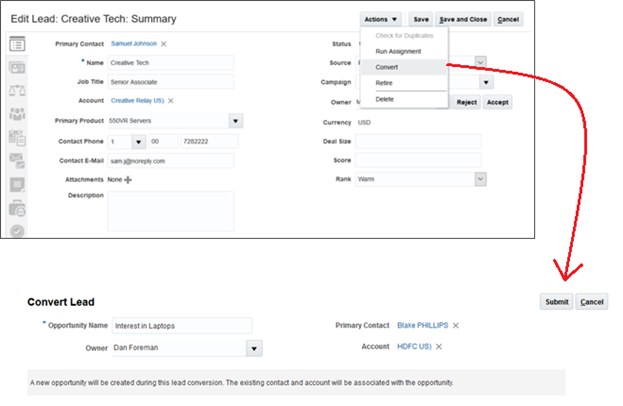
You can edit the values prepopulated from the Lead Record before submitting. Click Submit to create a new opportunity from the Lead.
Steps to Enable
- Login to the application as a sales administrator.
- Go to the Setup and Maintenance work area.
- Search for and go to the Manage Sales Lead Administrator Profile Values task.
- Modify the following profile option with the value Reference Copy Lead to Opportunity Map:
- Direct Lead to Opportunity Mapping (MKL_DIRECT_LEAD_TO_OPTY_MAPPING_NAME)
- Partner Lead to Opportunity Mapping (MKL_PARTNER_LEAD_TO_OPTY_MAPPING_NAME)
- Click Save and Close.
- Go to the Application composer and select the Sales application.
- On the Sales Lead Simplified page, edit the Mass Lead Convert and Lead Convert page layouts.
- Enable the relevant fields by moving them from the Available fields to the Selected Fields region.
- Click Save and Close on the Edit Layout page and then click Done.
- Click Copy Maps in the Advanced Setup menu.
You must do this to map a custom fields with an out-of-the-box field.
- Click Reference Copy Lead to Opportunity Map.
This is the default mapping for creating an opportunity from a lead.
- Select the row where “To” is Opportunity and “From” is Sales Lead.
- Add a row in the Attribute Mapping section.
- Click Save and Close after adding the mapping.
Key Resources
- For a demonstration of this enhancement, see the Leads release training on the Customer Experience Release Readiness page.
Create a group of tasks for a lead with one click using predefined templates. You can set up task templates and make the ‘Create Tasks from a Template’ option visible on the Activities subtab for leads.

You can add a preconfigured group of tasks to the Lead record.
Steps to Enable
- Login to the application as a sales administrator.
- Go to the Application Composer and select the Sales application.
- On the Activity object, select Pages.
- Create a default custom layout and edit that layout of the Embedded Activity Summary Layout.
- Replace Create Task with the Create Task + Create Task from Template option in the Selected Buttons column.
- Click Done.
- Go to the Setup and Maintenance work area and ensure that there are tasks configured for Manage Sales Lead Task Template.
Key Resources
- For a demonstration of this enhancement, see the Leads release training on the Customer Experience Release Readiness page.
Territory Based Resource Assignment Option
Prevent additions to the opportunity team during assignment. The Territory Based Resource Assignment Style profile now includes an additional option: Exclude All. This new option designates that territory members are not be added to the opportunity team during assignment.
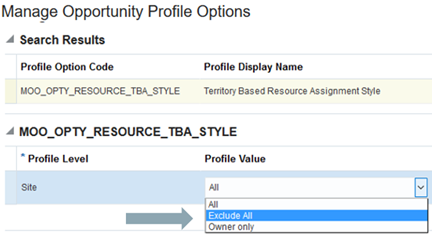
Selecting the “Exclude All” option prevents territory members from being added to an opportunity during assignment.

The Territory Based Resource Assignment profile option enables sales admins to determine which territory members are automatically added to an opportunity.
Steps to Enable
No steps are required to enable this feature.
Key Resources
- For a demonstration of this enhancement, see the Opportunities release training on the Customer Experience Release Readiness page.
With a single click, ensure that all products included in an opportunity are eligible for selection. Eligibility is dependent on the eligibility criteria defined by the organization.
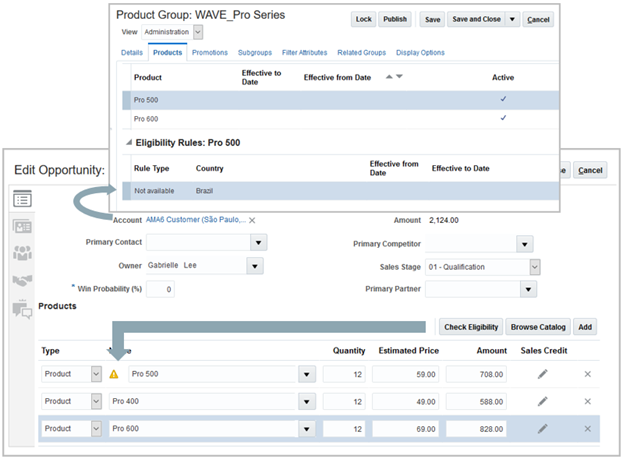
You can prevent invalid products from being added to an opportunity.
Steps to Enable
- Log in to the application as a sales administrator.
- Go to the Setup and Maintenance work area.
- Search for and go to the Manage Product Groups task.
- Go to the Products tab.
- Select the relevant product and add an eligibility rule for that product.
- Click Save and Close.
- Go the Eligibility Behavior Default profile option.
- Set the value as applicable:
- Show products: Products with no eligibility rules are displayed.
- Do not show products: Products with no eligibility are not displayed.
- Make the Check Eligibility button visible.
- Go to Application Composer.
- On the Edit Revenue Table page move Check Eligibility from the Available Buttons to the Selection Buttons region.
Key Resources
- For a demonstration of this enhancement, see the Opportunities release training on the Customer Experience Release Readiness page.
Leverage assessments to evaluate leads, opportunities, accounts, contacts and households.
Create multiple versions of assessments from the same template and save the completed assessments with the leads, opportunities and accounts. Multiple assessments allow sales reps to submit quarterly assessments to evaluate account health and complete monthly partner assessments using the same questionnaire template.
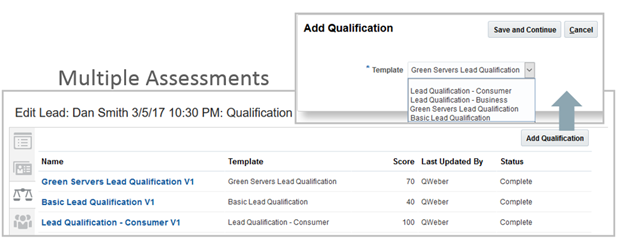
You can add multiple qualifications to a lead.
Using multiple assessments you can run qualification templates more than once and also see each qualification run in a standard list view.
Steps to Enable
- Login to the application as a functional setup manager.
- Go to the Setup and Maintenance work area.
- Search for and go to the Manage Opportunity Profile Options task.
- Enable the following profile options:
- Enable Multiple Assessment Per Assessment Template
- Enable Multiple Qualifications Per Qualification Template

Enable the profile option as shown in the figure.
Key Resources
- For a demonstration of this enhancement, see the Assessments release training on the Customer Experience Release Readiness page.
Accurately estimate sales and make informed business decisions when you can view, manage and submit forecasts from your desktop or mobile devices. Oracle Sales Cloud offers enterprise-level forecasting capabilities and embedded forecast analytics that provide an accurate view of the entire business.
Simplified Forecasting Administration
Enable forecasting for new implementations with a single click. Simplified forecasting administration enables you to configure a set of default options that can be altered as needed and includes the option to schedule one background process that automatically runs all background tasks required for forecasting.
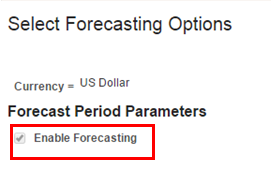
You can set up forecasting with the most commonly used options. This results in all background processed being scheduled automatically.
Steps to Enable
- Go to the setup Forecasting page.
- Enable the Enable Forecasting option in the Period Parameters section.
Once you enable this option, then the application present other forecasting-related options that you can configure.
Key Resources
- For a demonstration of this enhancement, see the Forecasting release training on the Customer Experience Release Readiness page.
Submit forecasts for more than one forecasting period at the same time. You can define the number of forecast periods that are both editable and viewable at the same time.
For example, if the forecasting period is a quarter and the number of concurrent forecasts is two, then reps can submit forecasts for both this quarter and next quarter.
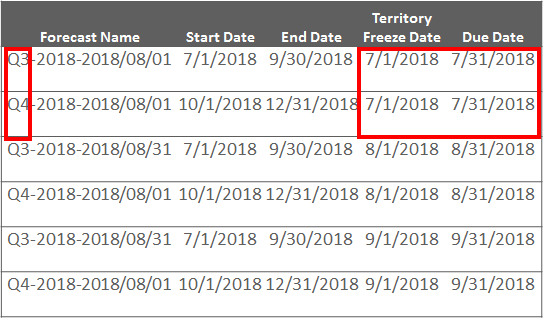
You can simultaneously manage forecasts for multiple periods.
Steps to Enable
- Enable Forecasting, as described in the Simplified Forecasting Administration section.
- Enter a number, greater than one, in the Number of Concurrent Forecasts field. Ensure that this number is less than what is entered in the Number of Scheduled Forecasts field.
- Click Submit on the Setup Forecasting Options page.
Key Resources
- For a demonstration of this enhancement, see the Forecasting release training on the Customer Experience Release Readiness page.
Forecast Item Snapshot History
View changes to forecast items over time. You can identify changes to the revenue amount, product quantity, win probability and close date and can see adjustments. The snapshot history enables sales managers to focus their attention on opportunities that have been pulled in, pushed out or changed and helps them have the right conversation with sales reps.
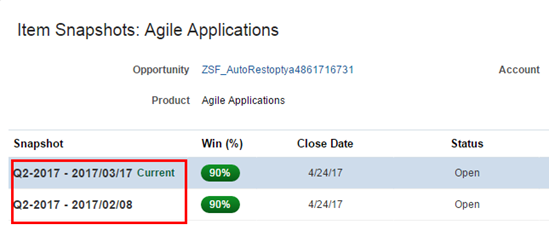
You can configure the application to display a history of a forecast item.
Steps to Enable
No steps are required to enable this feature.
Forecast Search by Territory Owner
Search for past, active or future forecasts by territory owner. This forecast search option makes it easy to find forecasts by sales territory.
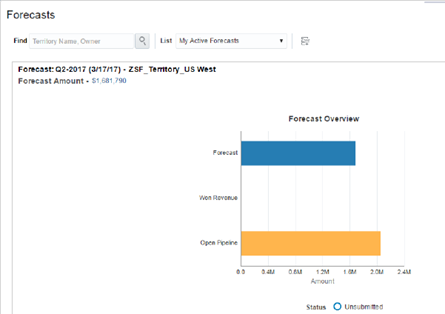
You can now search for a forecast by a territory or the territory owner.
Steps to Enable
No steps are required to enable this feature.
Key Resources
- For a demonstration of this enhancement, see the Forecasting release training on the Customer Experience Release Readiness page.
Sales Lightbox makes it easy to share content amongst sales teams. Content sharing enables sales teams to leverage high-quality content, ensure brand consistency and reinforce product terminology. Sales Lightbox allows sales reps and managers to upload, search, view, download and share slide presentations, PDF documents, HTML5 microsites and images using a simple shopping cart experience.
Create custom reports and dashboards to review content owned by or assigned to your team. New custom subject areas and reports enable managers to view all content created for a product or service or all documents that meet reporting criteria, such as those that have been published or archived. 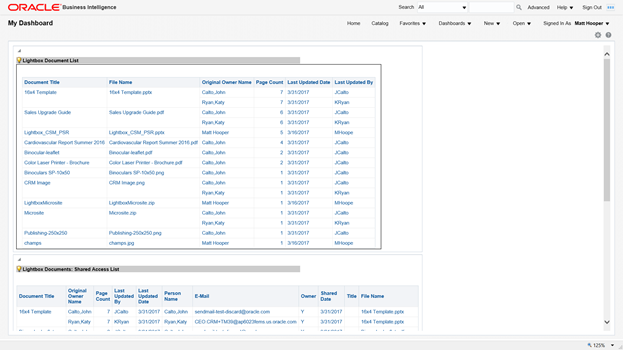
You can use custom reports and dashboards to review information.
Steps to Enable
No steps are required to enable this feature.
See a list of the individuals that have shared access to your content. The list displays the primary content owner, individuals with owner-level access, and individuals with shared access.
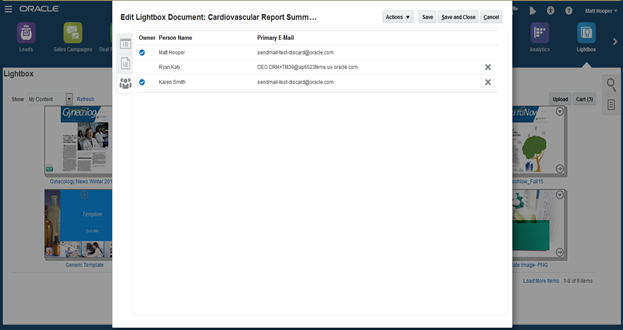
You can see a list of users who have access to your content.
Steps to Enable
No steps are required to enable this feature.
Split PDF documents into individual pages and add selected pages to the cart to assemble a new PDF document from multiple documents. View, store and edit information for each page through standard or custom fields.
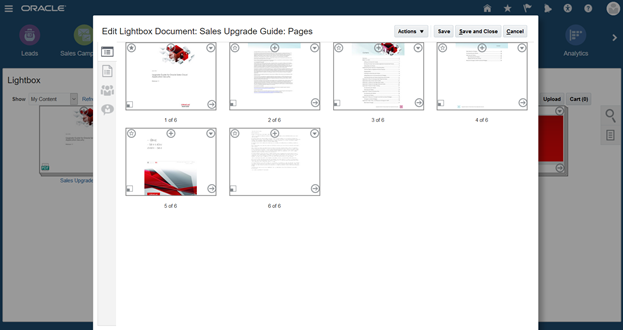
You can split PDF documents into individual pages and assemble them into separate documents.
Steps to Enable
No steps are required to enable this feature.
Add subtabs to Sales Lighbox documents or pages in order to view or capture related information. Related object subtabs may be used for standard or custom objects.
Steps to Enable
No steps are required to enable this feature.
Feedback for Lightbox Documents and Pages
View and edit feedback captured during sales presentations. Feedback capabilities within Sales Lightbox enable sales teams to perform the following:
- View and edit comments and ratings related to documents and pages.
- Review details about the presentation, including attendees and duration of presentation attended by each customer contact.
- Download, upload, and capture feedback for documents and pages using REST APIs.
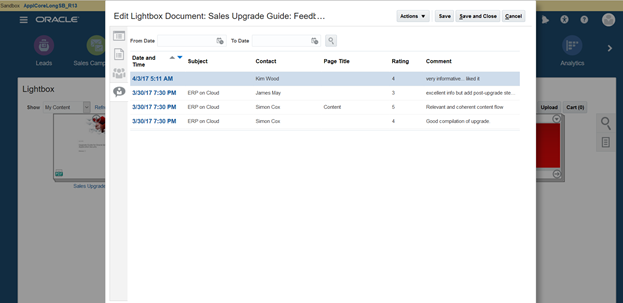
You can view and edit feedback captured during presentations.
Steps to Enable
No steps are required to enable this feature.
Create a catalog of products for sales reps to select from when they enter opportunities and leads. Products and promotions help sales teams streamline orders and offer the flexibility to manage new product offerings as well as discontinued products.
Restrict the products available for selection by using the country associated with the opportunity account. You can specify the eligible list of countries for a product within product group setup. You can also use the Eligibility Engine at the product group usage level to further control the product eligibility setup.

You can prevent invalid products from being added to an opportunity.
Steps to Enable
- Log in to the application as a sales administrator.
- Go to the Setup and Maintenance work area.
- Search for and go to the Manage Product Groups task.
- Go to the Products tab.
- Select the relevant product and add an eligibility rule for that product.
- Click Save and Close.
- Go the Eligibility Behavior Default profile option.
- Set the value as applicable:
- Show products: Products with no eligibility rules are displayed.
- Do not show products: Products with no eligibility are not displayed.
- Make the Check Eligibility button visible.
- Go to Application Composer.
- On the Edit Revenue Table page move Check Eligibility from the Available Buttons to the Selection Buttons region.
Key Resources
- For a demonstration of this enhancement, see the Sales Catalog release training on the Customer Experience Release Readiness page.
Designate the product groups available for selection from the browse catalog or product group search results. Product groups with the Allow Selection field unchecked within product group setup will not be available for selection within the browse catalog and will not return in search results.
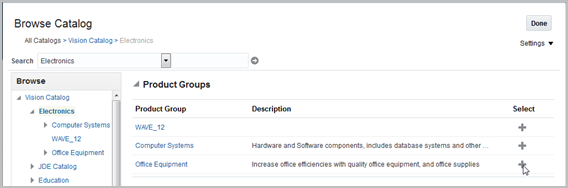
The Browse Catalog displays higher-level product groups in the product hierarchy but you cannot select them.
Furthermore, the Allow Selection field will be used to allow or disallow product group selection for the browse catalog and product group search only when the Enforce Product Group Selection flag, in the product group usage setup, is set to 'Yes'.

The Product Group search hides the product groups that are not allowed for selection in the search result.
Steps to Enable
- Log in to the application as a sales administrator.
- Go to the Setup and Maintenance work area.
- Search for and go to the Manage Product Group Usage task page.
- In the Manage Product Group Usage page, select the Base usage.
- In the Base: Details region, go to the Miscellaneous subtab.
- Set the Enforce Product Group Selection option to Yes..
This enforces the Allow Selection setup.
- Click Save and Close.
- Search for and go to the Manage Product Groups task page.
- In the Manage Product Group page, select the relevant product group.
- In the Details tab of that product group, clear the Allow Selection check box.
This disallows a user from selecting a product group in the Browse Catalog page and product group search.
- Click Save and Close.
Key Resources
- For a demonstration of this enhancement, see the Sales Catalog release training on the Customer Experience Release Readiness page.
Make the Territory filter option checked or unchecked by default for product group search, product search or the browse catalog. You can use the new Filter by Territory display option for the territory engine function at the product group usage level. The following options control the territory filter:
- Display choice - checked by default – The Filter by Territory checkbox in the browse catalog, product search or product group search will be checked by default, so the territory filter will be on.
-
Display choice - unchecked by default – The Filter by Territory checkbox in the browse catalog, product search or product group search will be unchecked by default, so the territory filter will be off.
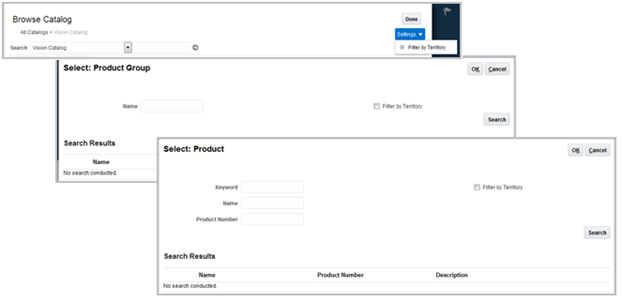
The Filter by Territory check box is cleared by default because now the administrator has the option to set it up.
Steps to Enable
- Log in to the application as a sales administrator.
- Go to the Setup and Maintenance work area.
- Search for and go to the Manage Product Group Usage task page.
- In the Manage Product Group Usage page, select the Base usage.
- In the Base: Details region, go to the Functions subtab.
- Set the Territory engine option, corresponding to the Opportunity Management mode, to “Display choice – unchecked by default”.
- Click Save and Close.
Key Resources
- For a demonstration of this enhancement, see the Sales Catalog release training on the Customer Experience Release Readiness page.
Enlarge product images to make it easier to find the right products. You can now click the image in the edit product user interface to enlarge product images.
Steps to Enable
No steps are required to enable this feature.
Sales reps often want to use familiar tools and functionality so there is less disruption in daily routines. With Oracle Sales Cloud for Outlook, IBM Notes, Gmail, and Office 365 you can access your sales data within your email application.
Manage your sales contacts, tasks, appointments, accounts, leads and opportunities from within Microsoft Outlook.
Monitor who is using CX Sales for Outlook and see how often they are using it. Enable the health monitor task in order to view the status of synchronizations for all members of the sales team.
The Outlook Health Monitor enables you to perform the following and more:
- View the client binary and metadata package versions installed on individual computers.
- View the client user name and the client host name.
- View the status of synchronizations for all members of the sales team.
- View how often and when the last synchronization occurred
- View the number of transactions synchronized.
- View the errors that prevented successful synchronizations, due to synchronization issues, duplicates, conflicts, or deletes.

You can view the list of Oracle Sales Cloud for Outlook clients deployed in your organization and monitor the health and performance of the clients.
The Health Monitor also enables the administrators to ensure that sales reps are upgraded to the latest version of the application.
Steps to Enable
- Go to Application Composer.
- Click Outlook Setup in the Common Setup menu.
- Select Enable monitoring of the Outlook Clients as Report Generation Level.
- Click Save Settings.
- Go to the Setup and Maintenance work area.
- Search for the ZOE_OUTLOOK_PURGE_DURATION profile option in the Manage Administrator Profile Values task.
- Set an appropriate value for this profile option. This option sets the number of days that you want the Outlook Health Monitor to retain the log history. Depending on the duration, the application purges the log history from the Monitor Outlook Clients at the end of the duration.
NOTE: You can also purge data from the Scheduled Processes page. Run the Purge Clients Events and Logs job to purge Outlook data.
- Click Save.
Key Resources
- For a demonstration of this enhancement, see the Oracle CX Sales for Outlook release training on the Customer Experience Release Readiness page.
Configuration and Customization Options
Use Application Composer to perform the following:
- Make accounts and contacts read-only.
- Designate address fields as required within Outlook, by using sales profile options.
NOTE: Administrators restrict users to create, update, and delete records on Sales Cloud objects.

Sales adminstrators can enforce better business rules by enforcing access controls. For example, sales reps can only view opportunities.
Steps to Enable
No steps are required to enable this feature.
Key Resources
- For a demonstration of this enhancement, see the Sales Analytics release training on the Customer Experience Release Readiness page.
Partner Relationship Management
One-Step Active Partner Creation
Create and activate partners in one step, with minimal information. Channel managers can create an active partner with a primary partner contact in a single screen. 
Create an active partner along with a primary partner contact
Steps to Enable
No steps are required to enable this feature.
Comply with industry and company audit policies with full audit capabilities for Marketing Development Funds (MDF) and deal registrations. Full audit capabilities include audit configuration for objects and attributes, general audit capture, impersonation audit and audit reporting.
Steps to Enable
No steps are required to enable this feature.
Embedded Conversations Related to Partners and Deal Registrations
Engage in conversations related to partner accounts and deal registrations. Channel managers and other approvers can now start Oracle Social Network conversations within the context of the partner or deal registration record, enabling channel sales teams to track and find conversations easily.
Steps to Enable
No steps are required to enable this feature.
Enable partners to track the same goals and metrics as channel account managers and channel sales managers so they can work together to close deals faster. New, prebuilt tiles and detailed reports give partner sales reps and partner sales managers access to critical data from the configurable homepage.
- Won Revenue – Number of won opportunities owned by the logged in user and closed in the current quarter.
- Top Open Opportunities – Number of open opportunities owned by the logged in user that have a win probability greater than 70% and are expected to close in the current quarter.
- Stalled Opportunities – Number of open opportunities owned by the logged in user that have been in the latest sales stage longer than the stipulated number of days, and are expected to close in the current quarter.
- Open Opportunities – Number of open opportunities owned by the logged in user that are expected to close in the current and the next quarter.
- Open Leads, Age 0-3 Months – Number of qualified and unqualified leads owned by the logged in user, with an age between 0 and 3 months.
- Open Deal Registrations – All deal registrations that are pending approval or returned, as well as those that are approved and expiring within 30 days.
- MDF Requests (Partner Sales Manager only) - Number and amount of MDF requests accessible by the logged in user that are pending approval.
- MDF Claims (Partner Sales Manager only) - Number and amount of MDF claims accessible by the logged in user that are pending approval.
- Business Plan Objectives (Partner Sales Manager only) - Objectives associated to all approved business plans that are owned by the logged in user.
Steps to Enable
The reports for Partners are available in the BI Catalog under /Shared Folders/Sales/Embedded Content folder but by default these reports are hidden from the Partner Users. Sales Administrators or Channel Operations Manager have access to these reports.Copy these reports to the partner-specific custom folder.
Refer “Enabling Partner Access to BI Content: Explained” in the http://docs.oracle.com/cloud/latest/salescs_gs/FAPRM/FAPRM2137216.htm
Enhancements to business plans allow you to do the following:
- Embed reports within the analytics subtabs on Business Plan pages.
- Copy an existing business plan, with the option to copy all associated objectives.
- Split objective targets and save the split criteria as a split template, to be used for new objectives.
- Create reports showing business plan objective split details.
- Adjust the objective level target, attainment and split values within the Splits subtab.
- Build and integrate with applications using RESTful services for business plans, business plan objectives and notes.
- Raise public events for business plans that invoke integration flows in ICS.
- Import and export partner business plans.
Steps to Enable
No steps are required to enable this feature.
Deal Registration Total Amount Calculation
Get a calculated total deal amount automatically when you create and update the list of products on a deal registration. You can enter a revised total to override the total amount of the deal registration. The deal total is recalculated when you add or remove products or change the price or quantity of any product. This solution automates deal registration total calculation and enables the flexibility to change the system-calculated amount.
Steps to Enable
No steps are required to enable this feature.
Save time by copying existing deal registrations. Partner and channel users now can copy an existing deal registration with one click and start editing it immediately. You can configure which fields are copied from the source deal registration into the new registration.
Steps to Enable
No steps are required to enable this feature.
Pending My Approval List in Deal Registration
View a list of deal registrations pending your approval using the Pending My Approval list. This list displays only those deal registrations that you must approve. It does not display deal registrations that you have access to view but do not require your approval. The Pending My Approval list enables reviewers to easily track the deal registrations pending their review.
Steps to Enable
No steps are required to enable this feature.
Link partners to assets in Oracle Sales Cloud so that channel account managers can begin to define the assets associated with each partner. The Assets subtab is hidden by default, but can be exposed for your partners and channel managers with minor configuration using Application Composer.
Steps to Enable
No steps are required to enable this feature.
Partner Contact Hierarchy Management
Manage changes to head of partner contact hierarchy. Channel managers and partner administrators can update the head of partner contact hierarchy by promoting another partner contact with a managerial resource role to the head of hierarchy.

You can update the head of partner contact hierarchy.
Steps to Enable
No steps are required to enable this feature.
View channel territories assigned to a Partner Account. Channel Managers and Partner Administrators can now view the territories assigned to a partner account from the Team Subtab.
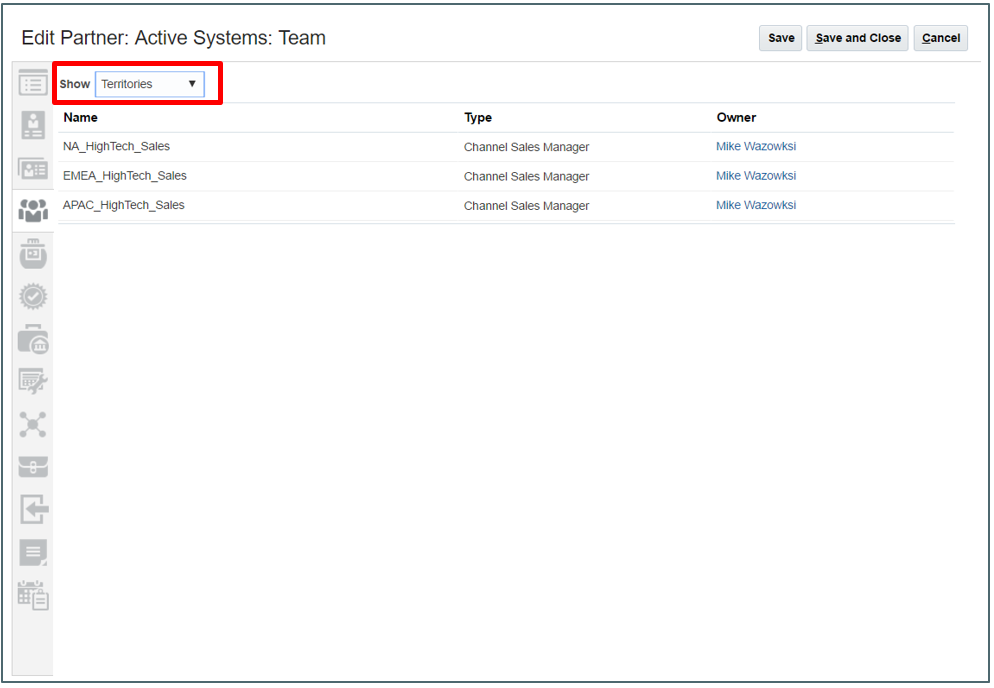
You can view channel territories that are assigned to a partner account.
Steps to Enable
No steps are required to enable this feature.
Oracle Customer Data Management allows organizations to consolidate and maintain a best version customer profile that sales reps and sales managers can trust. Organization can then leverage clean, consistent and consolidated data across multiple systems.
Create and adjust match rules and scores. You can use a custom method that meets your organization’s data match requirements.

Steps to Enable
- Go to Setup and Maintenance work area.
- Search for an go to the Manage Enterprise Data Quality Matching Configurations task.
- Go to the Manage Match Rules section.
- Review, modify, and add custom rule.
Optional Exact Name Match for Accounts and Contacts
Disable exact name match for accounts and contacts when Data Quality is turned on. Two new profile options allow you to ensure that the Data Quality engine does not return an exact name match when you create new accounts or contacts.
Steps to Enable
No steps are required to enable this feature.
Export account hierarchy information for use in other systems. With Parent Account Party ID available as an attribute for the Account Profile export object, you can export account hierarchy information and recreate account hierarchies within other applications. Any account that does not have a parent ID has a null value.
Steps to Enable
No steps are required to enable this feature.
Enhanced Security for Personally Identifiable Information (PII)
Secure data or information that is used to uniquely identify, contact or locate a person. Personally Identifiable Information (PII) includes data such as social security number, home address, bank account numbers, home phone and more. These enhancements provide additional security to protect confidential and sensitive contact data and prevent unauthorized use.
The following two new data security privileges allow you to secure Mobile Phone Number data:
- View Trading Community Person Mobile Phone Number
- Manage Trading Community Person Mobile Phone Number
All the standard (non-custom) sales job roles have access to the data in the Mobile Phone Number field by default. You have the option to remove access for any job role.

Steps to Enable
After upgrade to Release 13, users with any of the standard (non-custom) sales job roles continue to have access to the data in the Mobile Phone Number field by default. However, users with custom job roles see masked data in the Mobile Phone Number field.
To expose PII data for Mobile Phone Number to users with custom job roles, add the following data security privileges to custom job role or individual user:
- HZ_VIEW_TRADING_COMMUNITY_PERSON_MOBILE_PHONE_DATA
- HZ_MANAGE_TRADING_COMMUNITY_PERSON_MOBILE_PHONE_DATA
Key Resources
- For information on assigning PII privileges, see Oracle Sales Cloud Assigning Personally Identifiable Information Privileges Using Security Console (Doc ID 2224401.1) on My Oracle Support.
Maintain a set of valid keys as part of the configuration lifecycle. Incremental key generation will help to fill the key generation gaps created by users disabling real-time key generation processes.
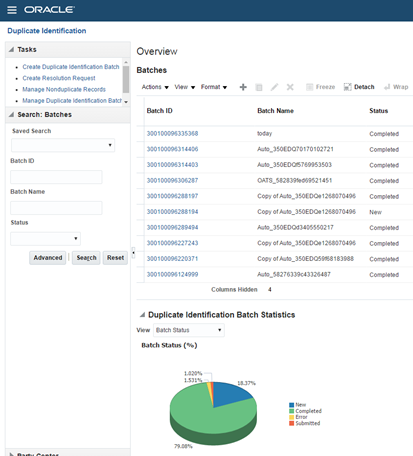
You can maintain a set of valid keys as part of the match configuration lifecycle.
Steps to Enable
No steps are required to enable this feature.
Merge Performance Improvements
Match and merge large volumes of data with greater efficiency. Oracle Customer Data Management offers improved merge performance and faster cycle time for merge requests. You can also tune auto-merge performance through profile options.
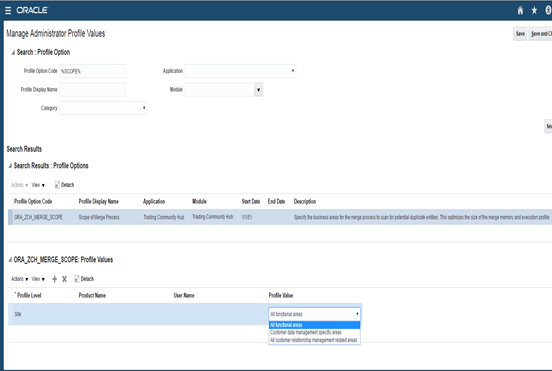
You can improve auto-merge performance by controlling scope of merge through the profile options.
Steps to Enable
- Go to the setup and Maintenance work area.
- Search for an go to the Manage Administrator Profile Values task.
- Search for the Scope of Merge Process (ORA_ZCH_MERGE_SCOPE) profile value.
- Update the value as per your business requirement.
For example, if you select "Customer data management specific areas", then the merge scope is restricted to customer party objects.
Sales Performance Management (SPM) enables companies to improve sales effectiveness, optimize sales coverage, drive sales behavior, streamline incentive compensation and better align quotas to sales strategy.
Incentive Compensation empowers organizations to streamline the rollout of new plan initiatives, provides productivity tools to reduce administrative costs and presents relevant business insights to drive sales performance.
Enhanced Collection for New Participants
Use mappings, rules and a new process to populate attributes for new participants. The following three main components offer enhanced collection for new participants:
- Define a mapping from source work assignment objects and attributes to participant attributes. For example, you can map the participant cost center to the department cost center.
- Define reusable rules with selection criteria for persons and parties qualified to be collected as new participants.
- Use a new process that collects the qualifying persons and parties based on your selection rules and creates them as participants. The process also uses the defined mapping to populate the participant attributes for the new participants.

You can define mapping between source and participant object attributes.
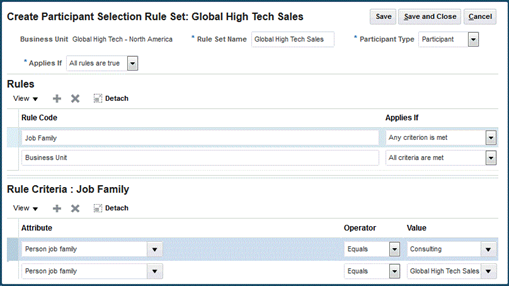
You can define rules for selecting persons and parties.
Steps to Enable
- Navigate to Setup and Maintenance, Manage Participant Import Mappings task to define the mapping between source object attributes and the participant attributes for the business unit.
- Navigate to Setup and Maintenance, Manage Participant Selection task to define the rules for selecting persons and parties for participant import.
Key Resources
- For a demonstration of this enhancement, see the Incentive Compensation release training on the Customer Experience Release Readiness page.
Enhanced Collection for Participant Updates
Streamline the collection of person work assignment updates and corrections from HCM Cloud and the collection of file-based participant updates. With HCM Cloud integration, you can define a mapping from source work assignment objects and attributes to participant attributes. For example, you can map the participant cost center to the department cost center. A new process runs all participant processes with a single submission. The process reviews the work assignment updates provided by HCM web services and updates existing participant attributes where their work assignment changed. The process also collects files that you have uploaded to the participant Web Center folder.
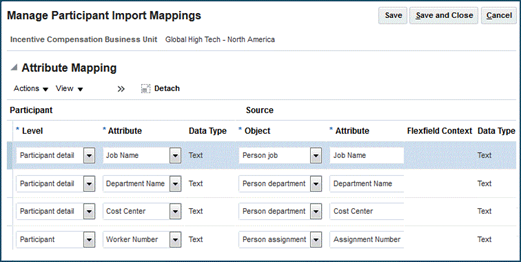
You can define mapping between the source and participant object attributes.
Steps to Enable
Navigate to Setup and Maintenance, Manage Participant Import Mappings task to define the mapping between source object attributes and the participant attributes for the business unit.
Key Resources
- For a demonstration of this enhancement, see the Incentive Compensation release training on the Customer Experience Release Readiness page.
Automated Participant Termination Processing
Streamline the participant termination process when an employee's work assignment ends. You can select options to determine the participant assignment end dates. A new process reviews the termination information provided by HCM web services and end-dates existing participants and their assignments based on the options you selected. Alternately, a new method is available for the incentive compensation participant version 2 web service for participant terminations.

You can enable automated termination process by selecting the end-date options.
Steps to Enable
Navigate to Setup and Maintenance, Manage Parameters task to enable automated termination processing to select the end-date option.
Key Resources
- For a demonstration of this enhancement, see the Incentive Compensation release training on the Customer Experience Release Readiness page.
Automate the assignment of participants to incentive roles using rules based assignment for participant information such as job code, country, and department. Using the role assignment process you can perform the following:
- Bring new participants on board quickly and manage their assignments to compensation and payment plans effectively.
- Automate the end-to-end process that imports participants, assigns roles, and assigns the participants to various compensation objects
- Configure to include manual reviews of the proposed role changes before they become effective.

You can automate the assignment of participants to incentive roles using rules based assignment.
Steps to Enable
Navigate to Setup and Maintenance, Manage Parameters to review or change the following parameters:
- Review and Approval of Role Assignment Proposals for New Participants
- Review and Approval of Role Assignment proposals for Existing Participants
These two parameters enables you to see what type of changes require review and acceptance.
Key Resources
- For a demonstration of this enhancement, see the Incentive Compensation release training on the Customer Experience Release Readiness page.
Efficiently process payments with the following enhancements:
- Participant home currency changes – New options make it easier to handle changes to participant home currency. You can use the participant's currency as of the event date or you can convert payment transactions to the participant's latest currency (as of the pay date).
- Additional Details on the Manage Paysheet page – Additional columns offer more paysheet information directly within the Manage Paysheet search area. You can view more information without having to drill into each paysheet. New labels for existing columns better reflect the information displayed.

You can now configure the home currency in payment parameters.
Steps to Enable
Navigate to Setup and Maintenance, Manage Parameters to review or change the Home Currency.
Key Resources
- For a demonstration of this enhancement, see the Incentive Compensation release training on the Customer Experience Release Readiness page.
Individualized Plan Document Text
Gives you precise control on the written communication going out to your sales teams by adding personalized text on their plan document. It also allows you to add a common default text if you don’t want to personalize the text for any sales representative. For example, individualized text may be a specific list of accounts or territories, specific legal content, payment draws, or caps unique to a sales representative.
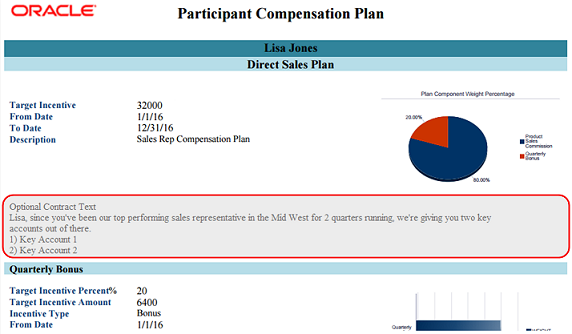
You can see individualized plan document text in the Participant Compensation plan report above.
Steps to Enable
- Go to Setup and Maintenance work area.
- Search for the Create/Manage Plan Terms and Conditions task.
- Select the Individualized Optional Text option in the Create/Manage Plan Terms and Conditions task.
Key Resources
- For a demonstration of this enhancement, see the Incentive Compensation release training on the Customer Experience Release Readiness page.
Auditing for Credit Rules, Participant Goals and Participants
Audit transaction records for credit rules, participant goals and participant-related business objects. For each of these objects, you can audit specific attributes or all attributes and can see changes to the attributes, including record creation, updates and deletions. You can monitor attribute changes using the Audit History tool.
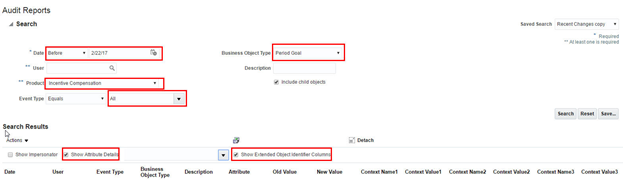
You can view inserts, updates, deletes to a record of the audit-enabled business object.
Steps to Enable
Set up audit, go to the setup and Maintenance, Manage Audit Policies page, and perform the following:
- Set the audit level for Oracle Fusion Application to Auditing.
- Click Configure Business Object Attributes, to go to the Configure Business Object Attributes page.
- Select Incentive Compensation in the Application drop-down list.
- In the Objects tree-view, expand Participant, Credit Rules, or Participant Compensation Plans node to display child nodes that represent the business object.
- Select the option to enable auditing of the default attributes of those objects.
- Click Save on each page to save the audit configuration.
Key Resources
- For a demonstration of this enhancement, see the Incentive Compensation release training on the Customer Experience Release Readiness page.
Import Participant Plan Updates
Use file-based data import to make bulk updates to the following fields within the Individualized Compensation Plan object:
- Individualize Target Incentive
- Target Incentive

You can import participant plan updates through the Oracle Sales Cloud file import framework.
Steps to Enable
Navigate to Setup and Maintenance, Manage Parameters to review or change the Home Currency.
Key Resources
- For a demonstration of this enhancement, see the Incentive Compensation release training on the Customer Experience Release Readiness page.
Flexfields for Participant Plans
Add flexfields to capture additional information for the participant plan. Once enabled, the fields can be updated within the Participant Snapshot work area. You can also update the values using a web service or file-based data import.
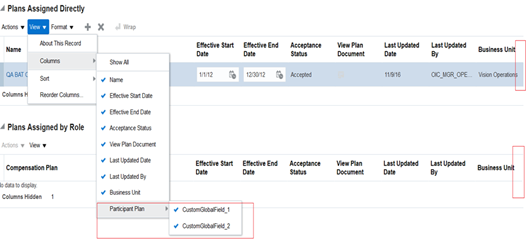
You can view the additional flexfields via the view columns option.
Steps to Enable
- Go to the Setup and Maintenance work area.
- Search for the Manage Descriptive Flexfied task.
- Search for Participant Plan.
- Click Edit to go to the Edit Descriptive Flexfield: Participant Plan page.
- Add fields.
- Click Save and Close.
Key Resources
- For a demonstration of this enhancement, see the Incentive Compensation release training on the Customer Experience Release Readiness page.
Participant and Participant Manager Infolets
Monitor earnings and attainment using the configurable homepage. New, analytics pages with prebuilt infolets deliver key performance indicators specifically designed for Incentive Compensation participants and participant managers and offer one-click access to detailed reports.
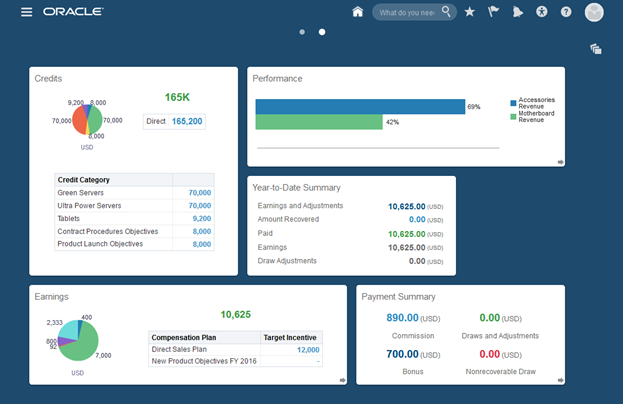
You can view credits, earnings, performance, and payment summary using the default infolet.
Steps to Enable
- Select the Tools – Structure from the Navigator menu.
- Click Edit.
- On the Sandbox required dialog box, click Activate Sandbox.
- Select a sandbox and set it as active.
- On the Structure page, click Set System Options.
- Select Enable Infolets.
- Click Save and Close.
- Publish the Sandbox.
Key Resources
- For a demonstration of this enhancement, see the Incentive Compensation release training on the Customer Experience Release Readiness page.
Territory and Quota Management
Model and evaluate sales territories and define sales objectives and quotas to ensure optimal territory coverage. Use advanced modeling and analytics to evaluate and affect sales performance.
Grouping for Split Geographies
Define territories based on postal codes with ease. You can now group the dedicated master geography level, such as postal codes, making it possible for your territory definitions to reference the whole postal codes rather than many individual postal code splits. This enhancement includes changes in the following functional areas:
- Master Geographies – Designate which of the master geography structure levels is subject to grouping.
- Territory Geographies – Start geography groupings to create grouping zones.
- Territory Management – Define territories referencing the newly created grouping zones rather than split geographies.
- Business Plans and Objectives – Define objectives splits using grouping zones rather than split geographies.
- Analytics – Create territory reports based on the grouping zones rather than split geographies.
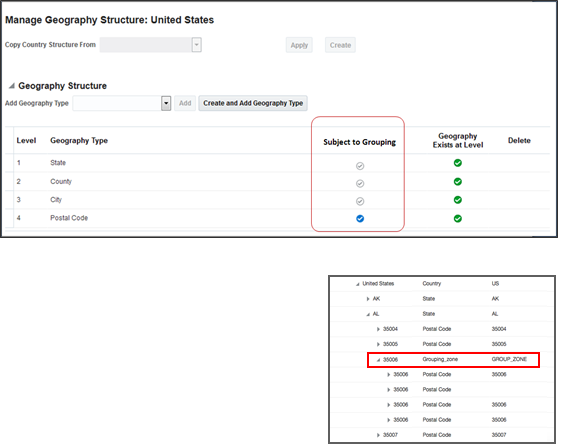
You can create a rule to group cities by postal codes.
Steps to Enable
To manage geography:
- Go to the Setup and Maintenance work area.
- Search for and go to the Manage Geographies task.
- In the Manage Geography Structure page, enable the Subject to Grouping option for that geography that relevant to your business.
NOTE: You can group geographies based on a single rule.
To initiate grouping:
- Click Initiate Grouping on the Manage Territory Geographies task page.
Key Resources
- For a demonstration of this enhancement, see the Territory and Quota Management release training on the Customer Experience Release Readiness page.
Move territories from one territory hierarchy to another by changing the parent territory using Oracle Sales Cloud’s simplified pages. You can simply change the parent territory by searching for and associating the new parent territory in the Parent Territory field.
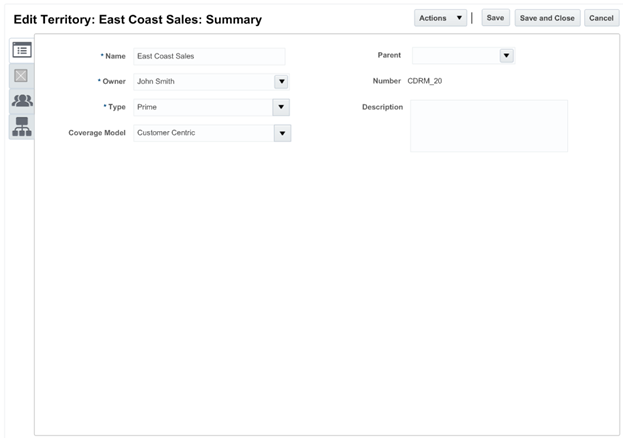
You can move a territory by changing the parent territory.
Steps to Enable
No steps are required to enable this feature.
Key Resources
- For a demonstration of this enhancement, see the Territory and Quota Management release training on the Customer Experience Release Readiness page.
Quickly find the right territory team members so you can view and update their membership. With simplified team member management, you can search for a specific team member and make updates with ease.

You can search for team members from a list of territory team members and then make updates.
Steps to Enable
No steps are required to enable this feature.
Key Resources
- For a demonstration of this enhancement, see the Territory and Quota Management release training on the Customer Experience Release Readiness page.
Create reports, analytics and infolets that include territories with associated named accounts. New BI metrics include data for named accounts that are included in the territory by inclusion or exclusion.
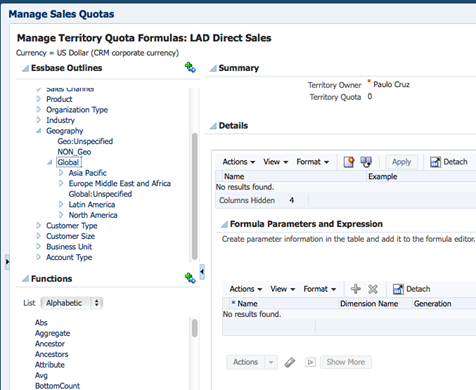
Additional dimension are visible in formula builder.
Steps to Enable
No steps are required to enable this feature.
Key Resources
- For a demonstration of this enhancement, see the Territory and Quota Management release training on the Customer Experience Release Readiness page.
Simplified Territory Forecast Enablement
Create territories with forecasting enabled by default. Easy-to-understand fields make it easy to select the right forecasting options for your territories.
- Enable Forecasting – Indicates the forecasting is enabled for the territory. There are four options to select for forecasting enablement:
- Prime only – Revenue forecasting. This is the default option selected.
- Overlay only – Non-revenue forecasting
- Prime and Overlay – Revenue and non-revenue forecasting
- Disabled – No forecasting
- Forecast Invisible to Owner - Indicates that the forecast is not visible to the owner of this territory, but is visible to parent territories only.
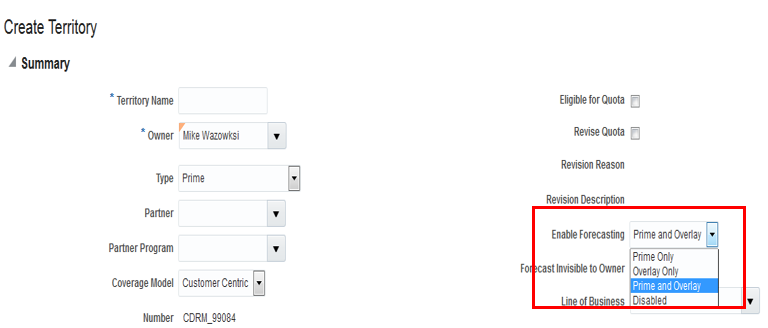
You can create territories that has forecast enabled by default.
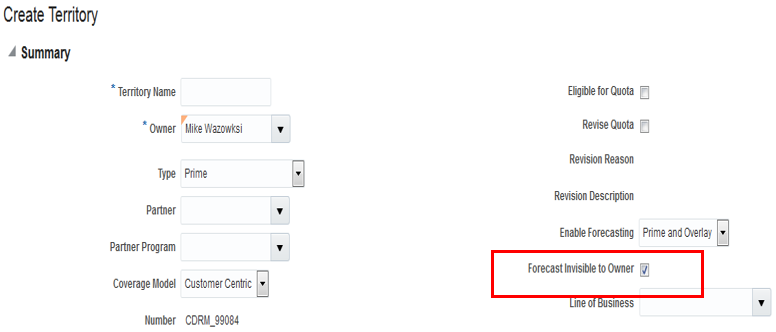
You can enable the "Forecast Invisible to Owner" option that enables the application to not display the forecast to the owner but display it at the parent territory level.
Steps to Enable
No steps are required to enable this feature.
Key Resources
- For a demonstration of this enhancement, see the Territory and Quota Management release training on the Customer Experience Release Readiness page.
Oracle Enterprise Contracts provides a comprehensive solution for managing sales agreements and contracts. With an automated contract management process in place, you can ensure consistency and compliance and establish a proactive approach to renewals.
Simplified Terms and Conditions Authoring
Manage your legal language as a single Word document to simplify the terms authoring process. If you do not need to track individual clause usage or report clause deviations, then you can simply use your existing Word document template and embed variables to merge the legal template with your contract details. You do not have to break your established terms templates into individual clauses in the Terms Library.
Steps to Enable
No steps are required to enable this feature.
Minimize effort required to generate recurring revenue by proactively processing contract renewals. Automated contract renewal is organized around sales timing, early quote delivery, renewal notifications, and scheduled price markups, which make the renewal process easy and ensure a consistently high rate of renewals.
Steps to Enable
No steps are required to enable this feature.
Keep track of who changed the status of the contract. Contract history displays the name of the user that initiated the status change, such as who put the contract on hold.
Steps to Enable
No steps are required to enable this feature.
Create clauses in the Terms Library using an XML file import process. Having created your XML file with your clause data, place it in a Universal Content Management (UCM) account where you can import it to your Terms Library.
Steps to Enable
No steps are required to enable this feature.
Use contract Web services to perform the following:
- Manage contracts from external systems using RESTful Web services.
- Complete the round-trip movement of contracts.In addition to the ability to create contracts and author negotiated terms and conditions within Enterprise Contracts or using Web services, you can now use Web services to return the final Primary Contract Document to an external application.
- Take advantage of an expanded set of attribute name and ID pairs to pass either the record identifier or name as the input parameter of the Web service. For example, you can now send either the status of the contract as displayed on the user interface or you can send the status code to create or update a contract.
Steps to Enable
No steps are required to enable this feature.
Use file-based data import to migrate existing sales agreements from your external systems to Oracle Engagement Cloud so you can continue to edit and manage them in your contract repository.
Steps to Enable
No steps are required to enable this feature.
Configuration and Customization
Oracle's standards-based, open, flexible and unified CX platform makes it easy for developers to rapidly build and deploy a wide variety of applications or to integrate with and extend Oracle Sales Cloud.
Oracle CX Application Composer is a tool that enables you to extend and customize the application to meet the unique needs of your business.
Enhanced Field Constraints for Standard Fields
Define field constraints to ensure that sales reps complete and update the right fields. Within Application Composer, you can now use the following options:
- Conditionally Required and Updatable Fields – Designate constraints for standard fields that allow them to be dynamically updatable or required, based on conditions defined with Groovy script. For example, you can make Win Probability (%) a required field when the opportunity reaches a particular sales stage.
- Required Dynamic Choice List fields – Make standard Dynamic Choice List fields required. You can make any non-required field, such as the account field for opportunities, a required field by simply designating a field constraint.
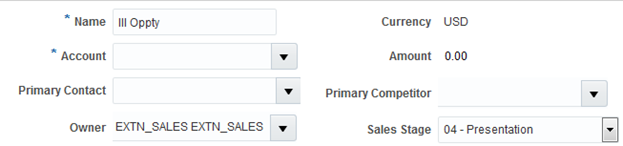
You can write a groovy script whereby Account becomes mandatory.
Steps to Enable
No steps are required to enable this feature.
Default Parent Context to Custom Subtabs
Save time when creating new records for standard sales objects in custom subtabs. When created from custom subtabs, information from the parent record can be passed to the appropriate fields within the new record through Groovy scripting.

The fields on the custom subtabs based on OOTB object are prefilled with the source object contextual data. For example, the Parent Dealership name and address are filled by default.
Steps to Enable
No steps are required to enable this feature.
Enable mass update and define which fields are available for mass update within standard or custom object pages. You can configure dynamic layouts for standard or custom objects to include the Mass Update action. Once the Mass Update action is selected, you can perform the following to configure mass update fields.
- Select standard or custom fields for mass update from a list of updatable fields available for standard objects.
- Select custom fields for mass update from a list of updatable fields available for custom objects.
- Define role-based dynamic layouts to offer mass update fields relevant to each job role.
Only those fields selected are available when sales reps or managers start the mass update action.
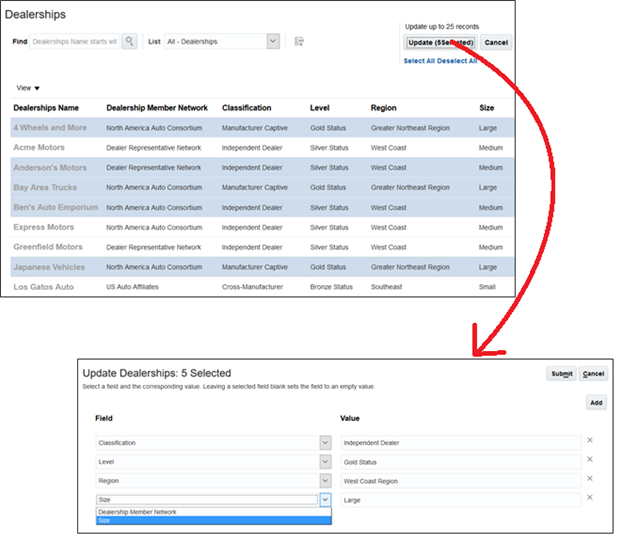
You can simultaneously update multiple fields for multiple records.
Steps to Enable
No steps are required to enable this feature.
Dynamic Filtering Criteria for Custom Relationships
Construct dynamic search criteria for custom dynamic choice lists or reference relationships to filter data based on current record context. Advanced Mode enables you to define data filters that allow sales reps to perform the following:
- Select assets for an opportunity, based on the assets associated with the account.
- Add contacts for a custom object from within the Contacts subtab, based on the contacts for the account associated with the custom object.

Dynamic Choice list invokes a picker where the records are filtered by dynamic criteria based on the object context.
Existing filter mode allows filtering custom dynamic choice list records using predefined named view criteria that simplify common searches. For example, Accounts dynamic choice list fields can use predefined view criteria called “AllAccounts” to exclude Competitors, Suppliers, Partners.
Steps to Enable
No steps are required to enable this feature.
Dynamic Choice Lists Auto-Suggest Supports “Contains” for Custom Objects
Configure auto-suggest for dynamic choice lists to use the Contains operator, rather than the Starts With operator. For example, the custom object ‘Airport’ stores airport names starting with country code, airport code and then city name. Using the Contains operator for auto-suggest, you can narrow the suggested shipping locations by typing in the city name.
NOTE: The Contains operator is supported only for dynamic choice lists of custom object and not standard objects.
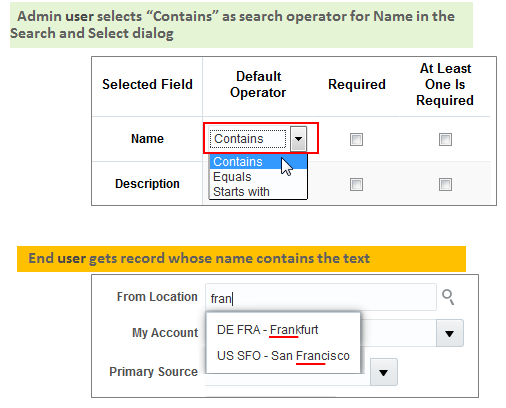
You can directly enter text in dynamic choice lists and the application suggests potential matches whose name “contains” the text that you have entered.
Steps to Enable
No steps are required to enable this feature.
Custom Subject Area Enhancements
Take advantage of more comprehensive reporting with the following enhancements to custom subject areas:
- Currency Support for Custom Currency Fields: When creating a custom subject area for a custom object, the currency code field is now available for custom subject areas and reporting.

The application supports Currency code in the custom subject areas and reporting for custom objects.
- Improved Reporting on Fixed Choice Lists: When filters are used on a custom fixed choice list field in a report, filtering is automatically based on the Lookup Code. Filtering on lookup code is especially important and efficient for multi-language support. This applies to all custom fixed choice lists and custom and standard subject areas.

In a report, when filters are used on a custom fixed choice list, the filtering is based on the Lookup code.
Steps to Enable
No steps are required to enable this feature.
In addition to providing a wide set of prebuilt integrations, Oracle also provides an extensive set of tools and capabilities for building custom integration flows.
Integrate Oracle Sales Cloud with other customer experience and on-premises applications. In addition to Oracle’s core integration capabilities such as Web services and file import and export, you can build integrations using Oracle’s Integration Cloud Service (ICS). To communicate with ICS, CRUD operations in the application now raise public events that invoke integration flows in ICS. Events for ICS integrations are available for the following sales objects:
- Activities
- Assets
- Notes
- Opportunity Notes
- Partner Notes
- Leads Notes
- DealRegistration Notes
- Business Plans
Steps to Enable
No steps are required to enable this feature.
Build custom applications, such as mobile apps or custom UIs, and integrate with a wide array of applications using RESTful Web services. New RESTful Web service APIs for Oracle Sales Cloud make it possible to do the following:
- Assets
- Find, create, update and delete assets
- Territories
- Create, read, update and delete sales territories
- Territory Proposals
- Create, read, update and delete territory proposals
- Sales Objectives
- Create, read, update and delete sales objectives
Steps to Enable
No steps are required to enable this feature.
Groovy Script Actions in Object Workflows
Invoke Groovy script as an object workflow action to call an external Groovy object function. For example, you can trigger a Groovy action to close all open tasks for an opportunity when the opportunity is closed. You can create a new object function method or select an existing method. To invoke Groovy script, the visibility field on the method needs to be set to Callable by External Systems.

You can configure Groovy script action in an object workflow.
Steps to Enable
No steps are required to enable this feature.
Oracle's Setup and Maintenance tools offer easy-to-use tools to accelerate your implementation.
File-Based Data Import / Export
Import data from external sources and export data from Oracle Sales Cloud using CSV or XML files.
Map import data with ease using friendly display names within the import user interface. Easy-to-understand field names allow you to more accurately complete the import activity and reduce mapping errors.

You can use friendly display names when mapping import data.
Steps to Enable
No steps are required to enable this feature.
Key Resources
For a demonstration of this enhancement, see the Setup and Maintenance release training on the Customer Experience Release Readiness page.
Alternate Keys for Custom Objects and Relationships
Use alternate keys to link source and destination objects. Alternative keys allow you to save time by eliminating the need to match records to system-generated ID values.
Using alternate keys instead of record ID values, you can perform the following:
- Update and associate custom object records
- Import and update custom attributes
- Import 1:M and M:1 relationships
Steps to Enable
No steps are required to enable this feature.
Key Resources
- For a demonstration of this enhancement, see the Setup and Maintenance release training on the Customer Experience Release Readiness page.
Maximum Record Count Functional Limiter
Ensure that import actions do not exceed the functional capabilities of the application. Functional limiters offer clear guidance on the maximum number of records that can be imported in a single batch.
Steps to Enable
No steps are required to enable this feature.
Key Resources
- For a demonstration of this enhancement, see the Setup and Maintenance release training on the Customer Experience Release Readiness page.
Import data directly into intersection tables to define many-to-many relationships between records.
Steps to Enable
No steps are required to enable this feature.
Key Resources
- For a demonstration of this enhancement, see the Setup and Maintenance release training on the Customer Experience Release Readiness page.
Import-Based Assignment Using Email Address
Associate an account to an owner based on email address using File Based Data Import. Previously, the owner’s party ID was needed to assign an account to an owner. Now that assignment can be done using email address.
Steps to Enable
No steps are required to enable this feature.
Efficiently complete import mapping for accounts and contacts. The simplified object model limits the set of target objects and target attributes exposed within the import tool.
Steps to Enable
No steps are required to enable this feature.
Review input files to help troubleshoot import issues. The input file is now available for download from the Import Status page.
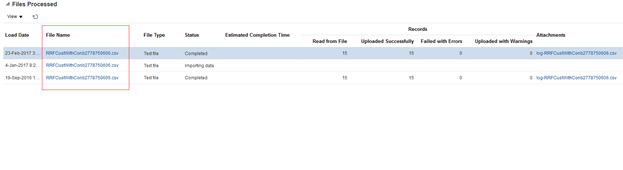
You can now review the input file to process any errors.
Steps to Enable
No steps are required to enable this feature.
Key Resources
- For a demonstration of this enhancement, see the Setup and Maintenance release training on the Customer Experience Release Readiness page.
Enhanced Import/Export for Accounts and Contacts
mport standard attributes, extensible attributes and related custom objects for accounts and contacts. The following standard child objects for account and contacts offer simplified import: address, sales team, classification, relationships, and attachments. The simplified import view offers field label consistency between the import and end user interfaces, clear validation error messages and improved performance.
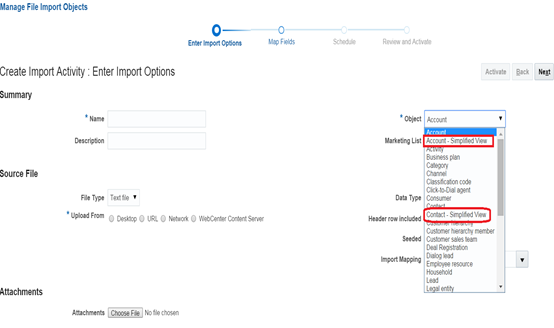
You can import standard and extensible attributes for accounts and contacts in a simplified view.
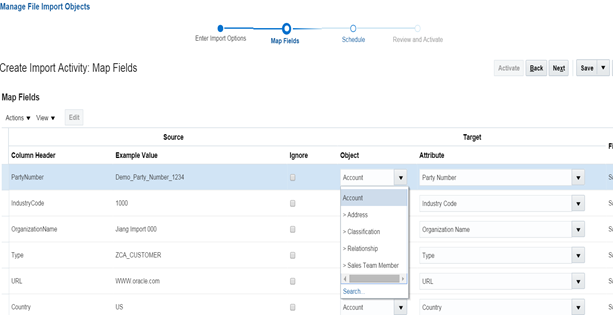
The import provides field label consistency, clear validation messages, and offers improved performance.
In addition, you can take advantage of simplified export for account and contact child objects and can export standard and custom attributes such as address, sales team, classification and sales team member.

You can import standard and extensible attributes for accounts and contacts in a simplified view.
Steps to Enable
No steps are required to enable this feature.
Enhanced Templates for Opportunity Import
Leverage seeded import mappings in order to simplify import mappings for the opportunity object. The following additions and changes to seeded templates make it easier to import opportunity details:
- Transactions/Recurring Revenue template
- New template with parent schedule line attributes that can be used to irevenue line items for
- All Related Objects template
- Opportunity deal object attribute added
- Product Group Internal Name and Revenue Amount attributes included
- References and responses attributes removed.
- Opportunity Revenue-Customer Party Number attribute removed
- Opportunity Resource Revenue template
- Opportunity Revenue-Customer Party Number attribute removed
- Product Group Internal Name and Revenue Amount attributes included
- All templates
- Organization Party Number attribute removed
Steps to Enable
No steps are required to enable this feature.
Oracle continues to invest in best practices and technologies that can simplify application setup and implementation.
Take advantage of the new, streamlined sales offering in Oracle Sales Cloud Setup and Maintenance page. The new offering includes 16 functional areas, corresponding to key features in Oracle Sales Cloud. Each functional area displays required tasks in the order of execution. Optional tasks are easy to access by changing the view to All Tasks.
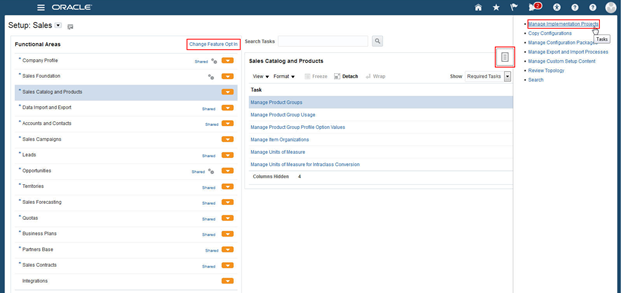
The Sales Setup Page Displays the Functional Areas and the Tasks for Each Functional Area
Steps to Enable
You must sign in as a user with an administrator role to perform these steps.
- From the landing page, select My Enterprise and Offerings.

- In the Offerings page, select the Sales offering.
 In the right panel, Status of the Sales Offering is displayed as Not Enabled.
 - Click the Opt-In Features button to enable the Sales offering.
- In the Opt In: Sales page, select the first check box to enable the Sales offering and the additional check boxes based on your business needs. For example if you plan do not plan to use sales campaigns and leads initially, you can leave them unchecked.

- Click Done to return to the Offerings page.
- To disable the Obsolete: Sales Offering, click the Opt In Features button.

- Deselect the Enable checkbox in the first row to disable the Obsolete: Sales offering.
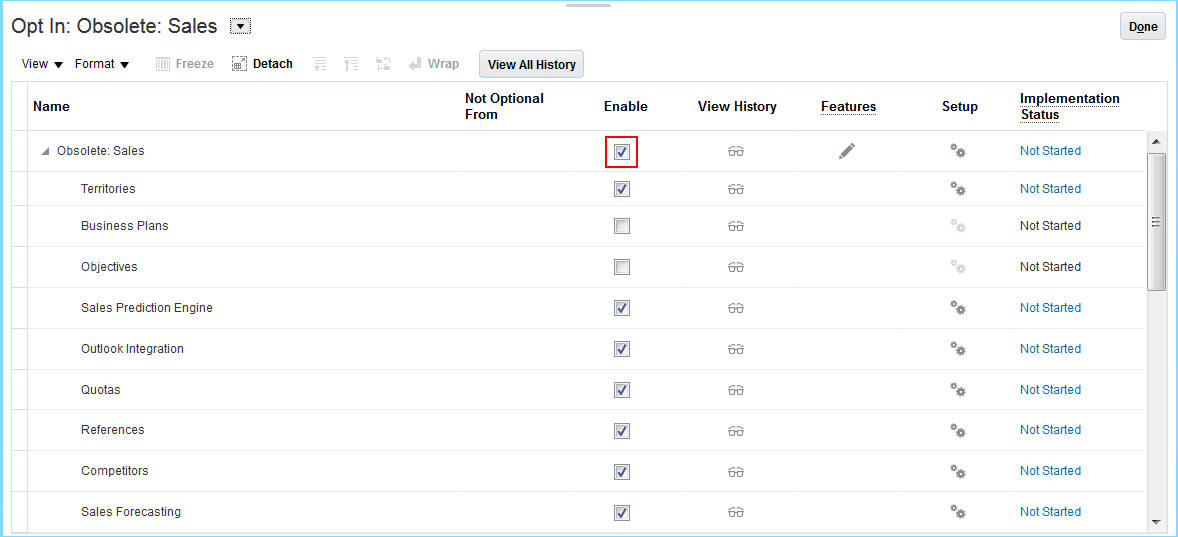
- Click Yes on the warning message that is displayed.
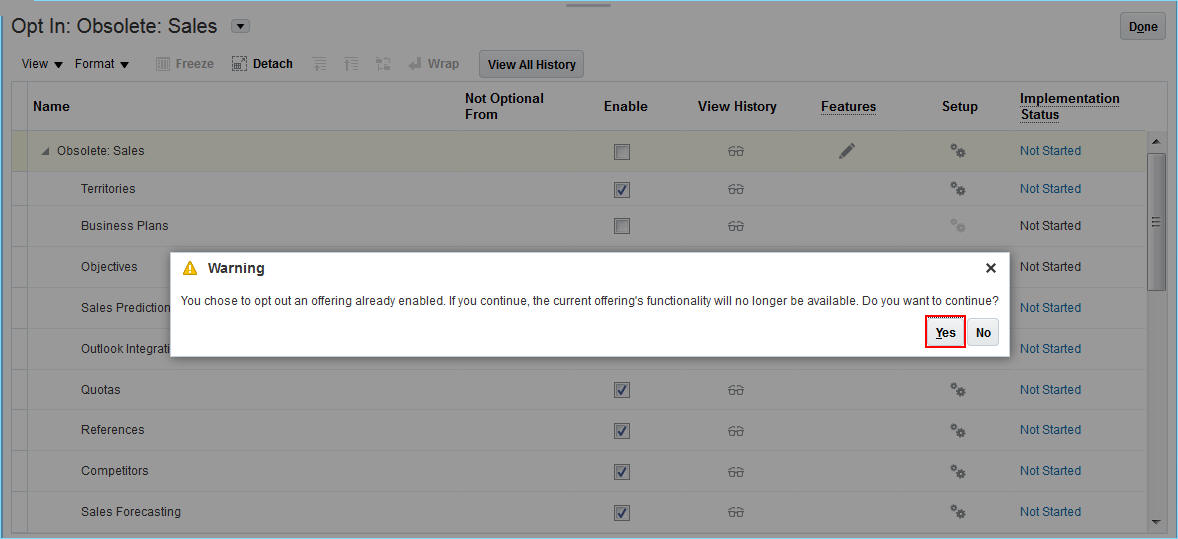
- Click Done to return to the Offerings page.
Efficiently run core setup tasks using Quick Setup pages. Enabled for three functional areas (company profile, sales foundation and opportunities), Quick Setup enables you to administer these core tasks:
- Review company information
- Change default corporate currency
- Schedule work area search
- Change the default sales method
- Configure opportunity close behavior
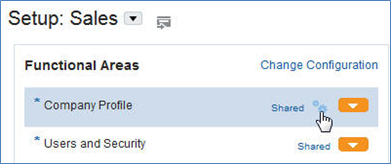
Click the Setup icon to go the quick setup pages.

For example, you can review your company information and select the currency for your sales transactions.
Steps to Enable
No steps are required to enable this feature.
Nokia Geography Data Enhancements
Load enhanced master geography data through the Import Nokia Data option. The Nokia data set now includes the following:
- Refreshed data for the United States, the United Kingdom, France, Germany and the Netherlands
- Alternative names to prevent geography conflicts between various data providers
- An updated source, from user defined to Navteq
Steps to Enable
No steps are required to enable this feature.
Sales and Service Role Mappings
Setup sales and service roles efficiently using the following new role mappings:
- Service Roles - Provide seed data for the Customer Service Representative role and the Customer Service Manager roles to simplify the on-boarding experience for Oracle Engagement Cloud deployment.
- Sales Roles – Provide seed data for the new Chief Executive Officer role and the Sales Setup User role to expedite the creation of setup users and the CEO user.
Steps to Enable
No steps are required to enable this feature.
Oracle Applications Security provides a single console where IT Security Managers and Administrators can perform various functions including user lifecycle management, role definition, security policy management (both functional and data), role hierarchy maintenance, username and password policy administration, and certificate management. The console also enables users to simulate the effect of security changes, to run security reports, and download a connector for integration with Microsoft Active Directory.
Predefined Role for Read-Only Access
Grant limited access to Oracle Engagement Cloud with the predefined, read-only job role: Sales Restricted User. This new role offers the following access:
- View accounts, contacts, leads and opportunities.
- Create and modify reports and analytics.
- Update, create and manage service requests and other non-sales data, such as HCM data.
- Edit forecasts.
- Access content in Lightbox.
- Create, update and delete notes, tasks and activities.
This predefined role is designed to meet the needs of the following user groups:
- Back office users in accounting and finance can view reports and edit forecasts and legal users can view activities and interactions.
- Field service reps can view customer 360 information and can see leads and opportunities.
- Seasonal administrative users, such as those in the retail and higher education industries can view leads and opportunities
Steps to Enable
No steps are required to enable this feature.
With Digital Customer Service, you can empower your customers to find the right answers to their inquiries and easily interact with your brand. The new Digital Customer Service solution provides an extensible pre-built reference application for common self-service tasks combined with a robust platform to extend and customize the user experience. This dual approach accelerates your time-to-value with a pre-built example application without sacrificing the flexibility you need in order to create a compelling end user experience.
Digital Customer Service comes with a fully functional reference implementation that allows your end customers to:
- Search and view knowledge articles
- Create, view, and edit Service Requests
- Use the Engagement Cloud Chat and Co-browse channels
- Self-register and create a user account for ongoing use
Digital Customer Service is built on top of the Visual Builder Cloud Service platform, making it easy to extend the pre-built reference implementation with additional application functionality. The easy-to-use, drag-and-drop designer enables both business users and web developers to quickly make changes, and the template designer enables you to exactly match the look-and-feel of your brand.
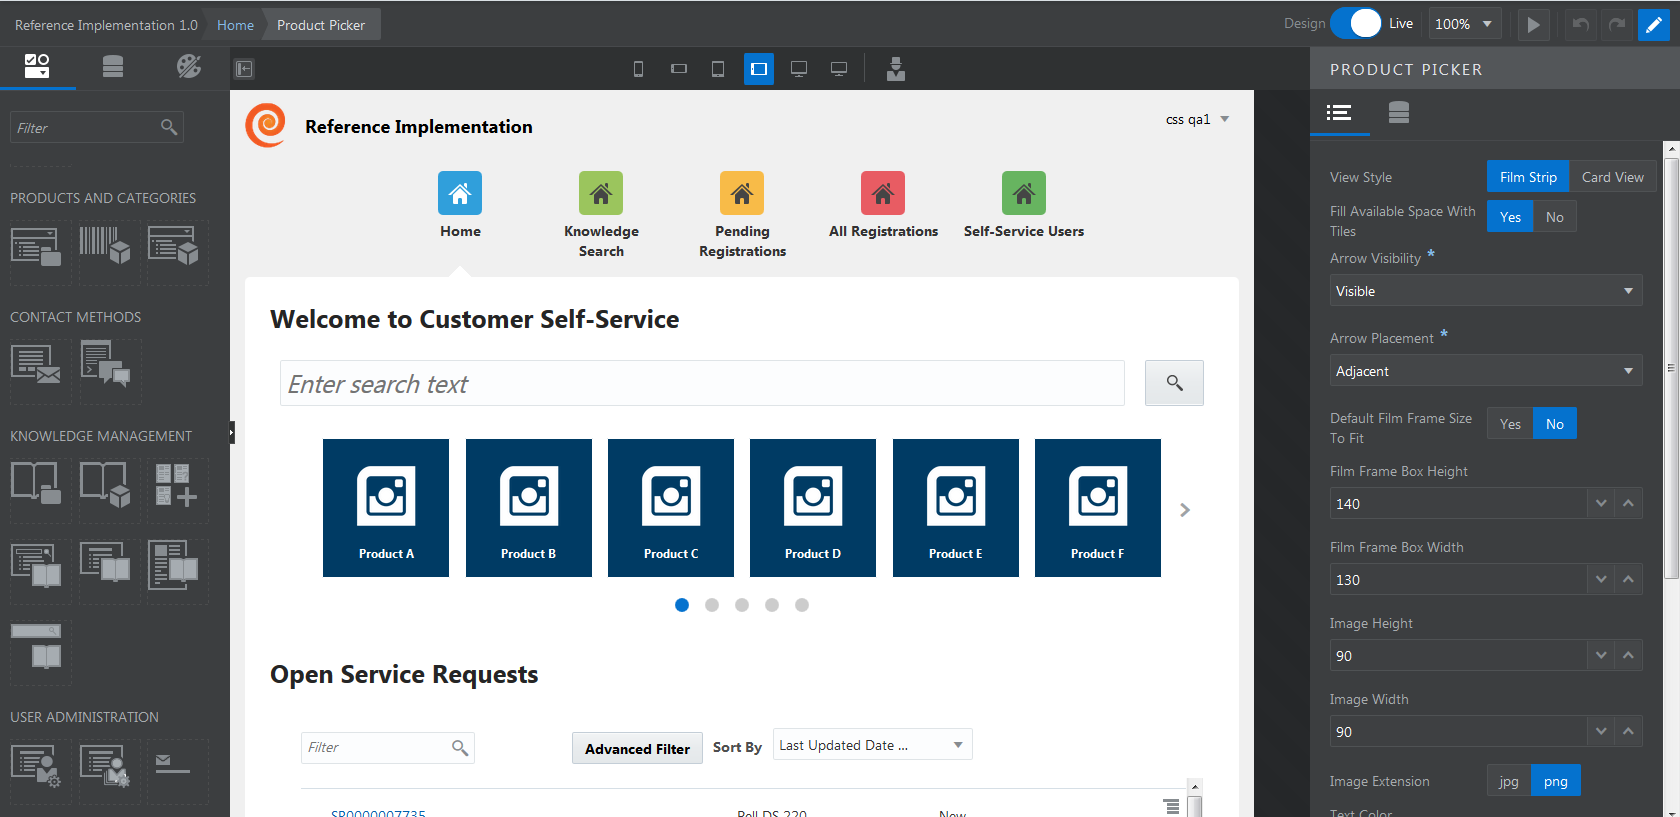
The highly extensible framework enables you to extend the library of pre-built components with your own custom components that can access additional data and expose new features to your end users. Custom components that you create can be easily reused across pages and shared with other users and applications.
The Digital Customer Service application is responsive to a wide variety of web and mobile devices, enabling customers to access answers and service interactions anytime, anywhere. Digital Customer Service provides support for 22 languages.
Steps to Enable
- Enable Digital Customer Service tasks
- Navigate to the Setup and Maintenance work area.
- Click the arrow at the top left of the screen and select the Service offering.
- Click the Change Feature Opt In link.
- Click on the Features pencil icon for Service.
- Enable the Customer Self-Service checkbox.
- Manage Customer Self-Service Registration Profile Options
- Navigate to the Setup and Maintenance work area.
- Click the arrow at the top left of the screen and select the Service offering.
- Select the Users and Security functional area.
- In the Users and Security task area, select Show All Tasks.
- Select Manage Customer Self-Service Registration Profile Options task.
- Select the profile option that you want to edit and click the pencil icon.
- Manage Customer Self-Service Account Setup Profile Options
- From the Users and Security task area, select the Manage Customer Self-Service Account Setup Profile Options task.
- Select the profile option that you want to edit and click the pencil icon.
- Create a Digital Customer Service Application
Improve the speed and consistency of agents working on service requests through the use of SmartText. The SmartText feature enables service agents to quickly and easily insert pre-defined blocks of text into service request messages and problem descriptions. SmartTexts can include merge field variables to automatically populate information about the customer and service request to quickly personalize a message. Supervisors or managers can define public SmartText entries that can be shared with the entire service organization, and agents (with permissions) can define their own SmartTexts for their personal use.
Steps to Enable
To enable the SmartText feature, you must have the following profile option set:
SVC_ENABLE_STD_TEXT_IN_SR
Key Resources
- For details about how to configure Service Request Management, reference the online documentation at http://docs.oracle.com/cloud/latest/salescs_gs/docs.htm .
Keyboard shortcuts enhance agent usability by reducing the number of keystrokes and UI navigation. This release of Engagement Cloud extends the common set of keyboard shortcuts with additional shortcuts for frequent service request actions. Examples of new keyboard shortcuts include actions to compose SR responses, add SR internal notes, mass update of selected SRs, 'Assign to me' to claim ownership of an SR, copy an SR, run queue assignment, launch co-browse, and so on. Administrators have the ability to configure the mapping of letters and keys for specific shortcuts to ensure there are no conflicts with keystrokes that are reserved by different browser applications.
Steps to Enable
To enable Keyboard Shortcuts, you must have the following profile option enabled:
SVC_ENABLE_KEYBOARD_SHORTCUTS_IN_SR
Key Resources
- For details about how to configure Service Request Management, reference the online documentation at http://docs.oracle.com/cloud/latest/salescs_gs/docs.htm.
This release of Engagement Cloud introduces many other usability enhancements to Service Request Management including:
- The ‘Assign to Me’ action is available on the Service Request list page
- A new action on the Service Request action menu allows the user to grab the SR deeplink URL
- Agents can reply inline to internal notes on the SR messages page
- More fields are available for mass update on the SR list page
- Color coding of SR status field on the SR list page is configurable
- Audit log of SR field changes is viewable by employees from the service request
- The spotlight region in Service Requests workspace is extensible in Application Composer to modify the field layout
Steps to Enable
In order to enable the color coding on SR Severity, you must have the following profile option set:
SVC_ENABLE_SEVERITY_COLOR_IN_SR
In order to enable the Audit functionality on the service request, you must have the following profile option set:
SVC_ENABLE_AUDIT_IN_SR
Key Resources
- For details about how to configure Service Request Management, reference the online documentation at http://docs.oracle.com/cloud/latest/salescs_gs/docs.htm.
Define and manage Service Level Agreements (SLAs) that identify the response and resolution times committed to your customers when they request service from your organization. These agreements are tracked as milestones on every service request, and are managed automatically based on coverages you set up for the different levels of service you provide.
As an example, you might set up Standard Support coverage providing a basic level of service during working hours, while some customers will receive Gold Support that would provide an enhanced level of service, perhaps working 24 hours a day, 7 days a week. In addition to varying work hours, coverages can also specify different commitment times depending on service request criteria, for example, highest severity issues might have shorter times than normal severity.
Once applied, milestones will automatically be managed based on criteria you set up, including whether the milestone should pause counting down (for example, when the service request is waiting on a customer response), when it is considered complete, and when and if stakeholders should be warned that a milestone is close to reaching its expiration time or has passed the due date.
An analytics subject area dedicated to real-time reporting on service request milestones allows agents to quickly see when they have service requests that require immediate action because they have missed, or are close to missing, the required service level agreement. Managers can look across the organization to view the types of issues that are most often missing associated milestones and take action to improve team performance in those areas.
Steps to Enable
Service Entitlements is a Functional Area that must be enabled under the Service Offering in Setup and Maintenance. When this Functional Area is enabled, administrators can see the task required to Manage Service Milestone Configuration, which specifies when each milestone starts, the conditions under which it pauses, and when it is considered complete.
- Navigate to the Setup and Maintenance work area and select the Service offering.
- In the Administration section, click Actions -> Change Configuration.
- For the Service Entitlements Functional Area line item under the Service Offering, click Enable for Implementation
- Set the implementation status to In Progress or Implemented.
Key Resources
- For details about how to configure milestone definitions, coverage setup options, and workflows options for configuring Service Request pages to show milestone information, please see the Release 13 Implementation Guide, Service Entitlements setup section>.
Configure assignment rules to automatically assign service request to service queues. Use any attribute of Service Request to define criteria for assigning Service Requests to Queues. Use Queues to group and track Service Request performance for a department or a product line or for any other categorization. Use numerous operators and rule sets for easier definition and management of Service Request assignment rules.
Release 13 introduces multiple rule categories to allow maintaining service request assignment to service queues separately from internal help desk requests assignment to help desk queues.
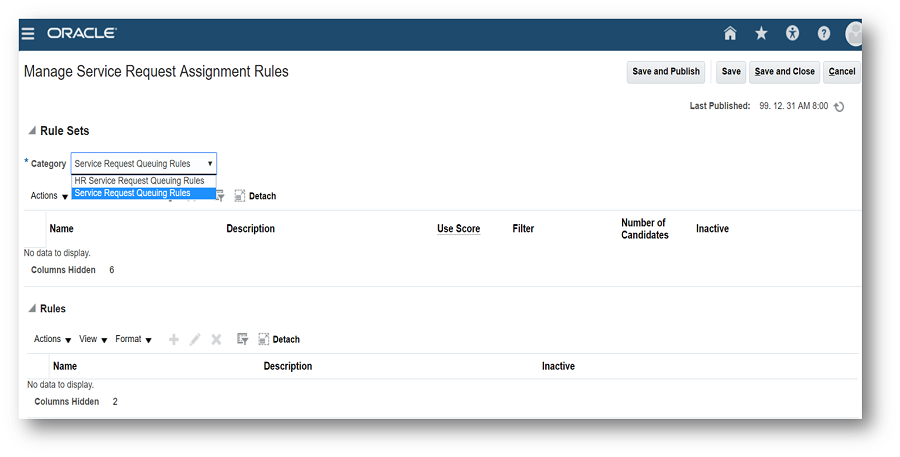
Managing Service Assignment Rules
Steps to Enable
No steps are required to enable this feature.
OmniChannel provides automatic, real-time agent assignment of communication channels used by your service processes. This is standardized assignment is managed through the use of a new Universal Work Object that is populated with data acquired from each channel communication, and is then passed to the Assignment Engine for routing.
For any new Service Request, once the assignment manager rules select the most qualified Queue, then the OmniChannel framework will be used to locate an agent that is present and is available for new work.
Agents’ availability for new work is dependent on the following factors:
- Agents have set their OmniChannel Presence to Available via the Settings and Actions menu

- Agents have also made themselves available for new work via their Availability Group icons on the new OmniChannel toolbar

- The maximum capacity for the interaction type has not exceeded the number defined in the Manage Capacity administration user interface
OmniChannel Capacity will be determined based upon the defined maximum number of active business objects a user has assigned or the concurrent number of interactions that are assigned. These setups are:
BUSINESS OBJECT CAPACITY
Business Object Capacity will be administered in a new user interface where Administrators will be set the maximum active assignable objects. Each Business Object, in addition to the maximum assignable objects, will have the Status values selected that will be used to determine if the object is active. Only active Status values will be used in the Business Object Capacity calculations.
INTERACTION CAPACITY
Interaction Capacity (real-time interactions) will be administered in the same new user interface as Business Object Capacity. Administrators will be able to set a default maximum amount of simultaneous Interactions for each channel that has been defined.
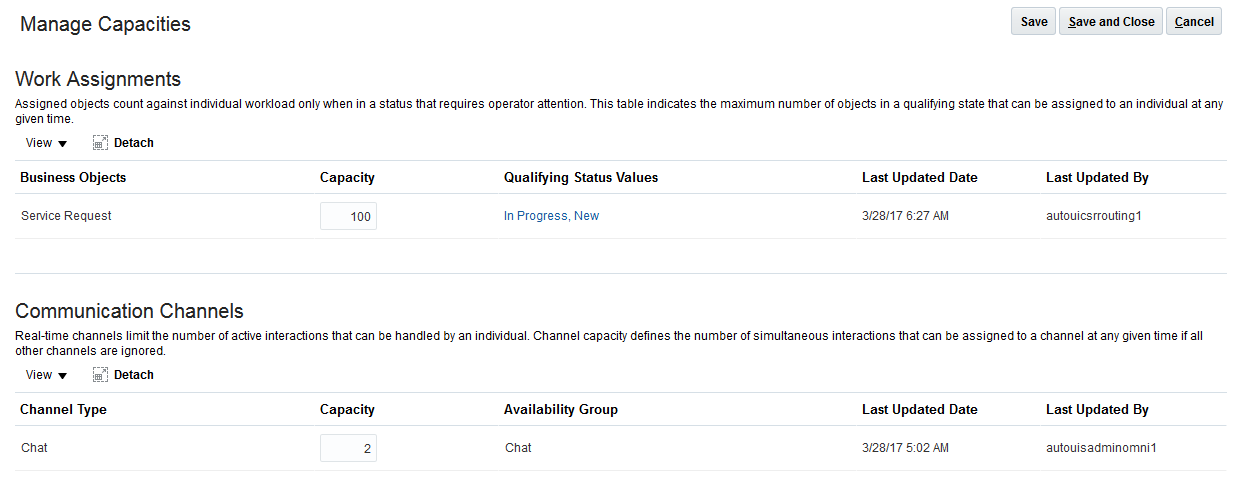
Steps to Enable
Navigate to Setup and Maintenance
- Navigate to the Setup and Maintenance work area and select the Service offering
- In the Administration section, click Actions and select Change Configuration
- Select the Enable for Implementation check box for Communication Channels
- Click on the Feature pencil icon for Communication Channels
- Enable the Omni-Channel Routing check box
- Set the implementation status to In Progress or Implemented
- Click Action and then select Go to Offerings
Within the Service offering
- In the Administration section, click Setup
- Click on Communication Channels and select Manage OmniChannel profile options from the Task list
- Enable the following Profile Options:
- SVC_ENABLE_OMNI
- SVC_OMNICHANNEL_BROWSER_NOTIFICATION_ENA
- SVC_OMNICHANNEL_DESKTOP_NOTIFICATION_ENA
- SVC_OMNICHANNEL_BROWSER_NOTIFICATION_AUTO_INT
Engagement Cloud enables you to define any number of queues to organize your service requests and associate your service resources with each queue. Associate Service Resources to queues directly or as a Resource Group. Configurable assignment rules offer the option to automatically assign service requests to the appropriate queue. When a service request is assigned to a queue, any available resource associated with the queue can search for and view open service requests, take ownership and begin resolving the issue.
Release 13 enhances queues with the option to enable automatic push distribution based on the Omnichannel framework, enabling service requests to be assigned to available resources automatically based on each resource's capacity to take on new service requests.
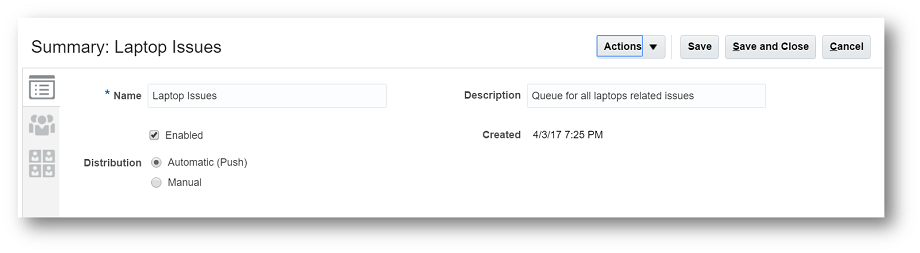
Setting up 'Automatic' queues
Steps to Enable
No steps are required to enable this feature.
In addition to sending outbound email responses, new inbound email capabilities in Release 13 make it easier to capture, route, and manage inbound service emails. The following are some of the important capabilities supported by service email:
- Set up one or more service mailboxes to receive email
- Automatically create service requests when new email inquiries are received, and use routing rules to assign SRs to the right queue and available agents
- Use automation rules to help match inbound emails to existing contacts in your database
- Set up email filters to reject unacceptable emails
- Capture subsequent interactions into a consolidated service request history
- Leverage Application Composer to customize service request creation
- Leverage SmartText to quickly compose responses to frequent customer questions
- Use branded HTML templates to format responses to customers
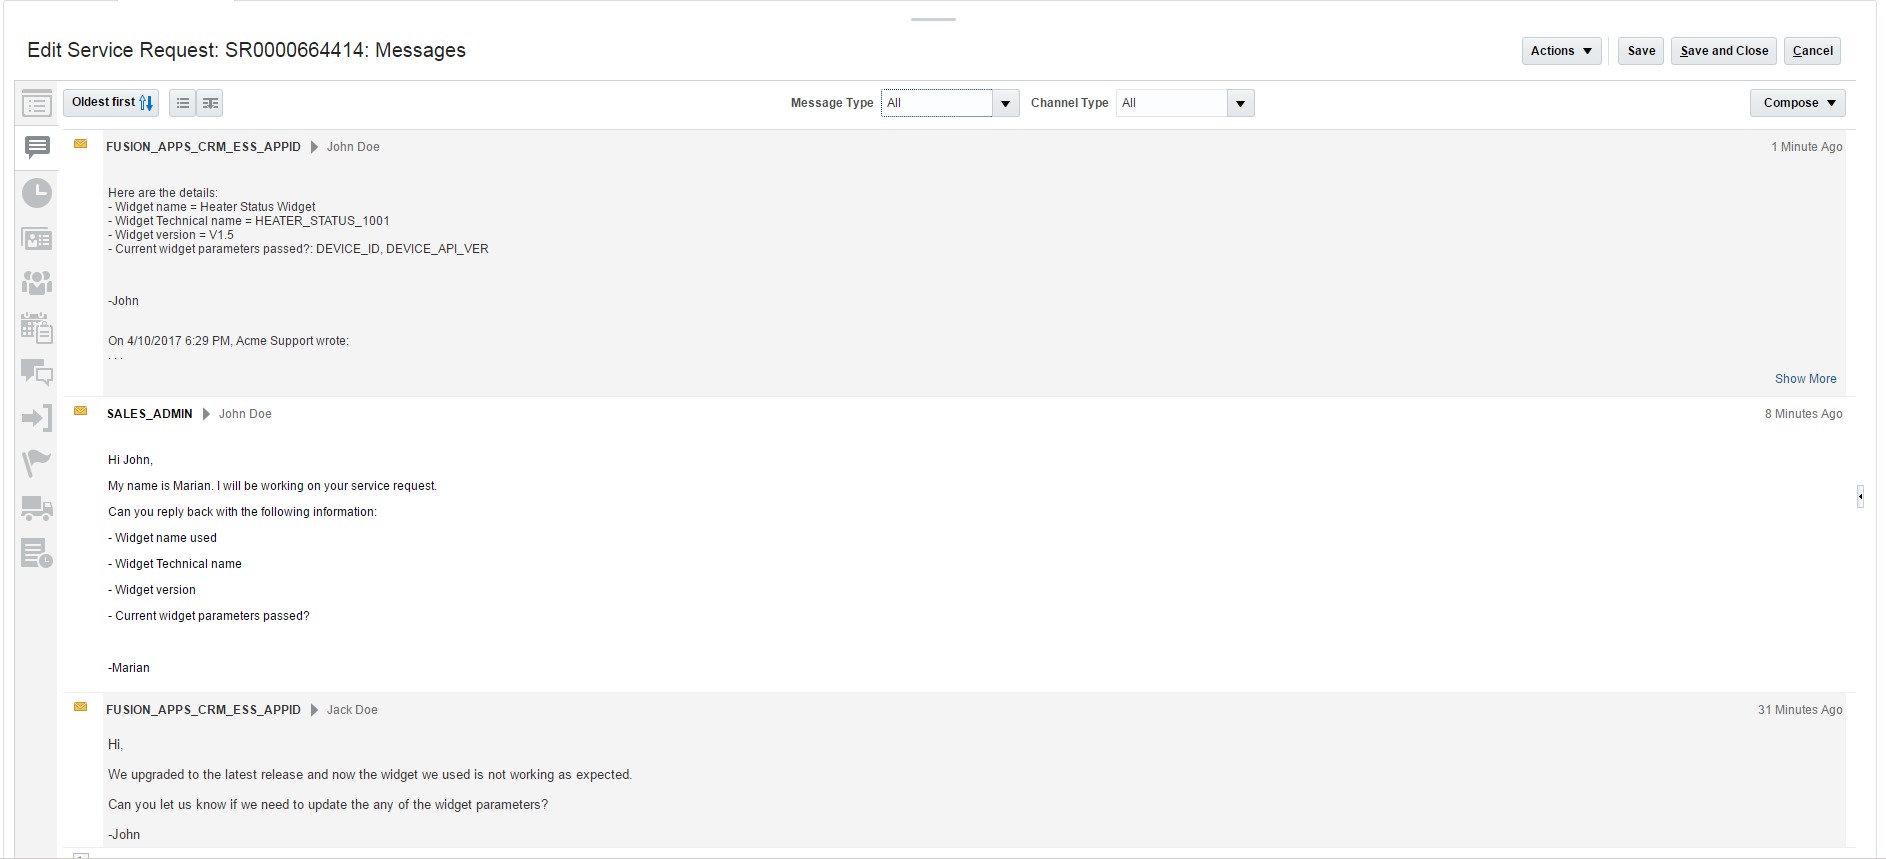
Email conversation between the customer and the brand company agent.
Steps to Enable
- Navigate to the Setup and Maintenance work area and select the Service offering.
- Click Features for the Service offering.
- Enable Service Request Outbound E-mail.
- Click Done.
- Click Features for Communication Channels.
- Enable the Email Communications Feature.
- Click Done.
Additionally, your company will need to setup a redirect rule on your company email system to direct incoming email messages to the Oracle Engagement Cloud email system.
Improve agent productivity and customer experience with Computer Telephony Integration (CTI). Engagement Cloud now provides a framework to enable quick and easy integration of third-party telephony providers to route interactions to the right user within the Engagement Cloud employee user interface. As part of this framework, your company can configure screen pop rules to navigate sales and service users to the appropriate pages based on the information gathered by the IVR and routing system. This allows you to streamline call flows and offer access to critical sales and service information quickly and easily.
Using CTI within Oracle Engagement Cloud, you can:
- Offer extensible, configurable caller verification and guided wrap up steps. Perform reverse lookup against CRM data to automatically identify contacts, accounts, and specific transactions.
- Configure screen pop rules based on tokens passed by the CTI system.
- Capture all inbound and outbound interactions as part of the customer history, including transfers between agents.
- Measure interaction metrics such as number of interactions by channel and average length of interaction.
- Enable UI regions to embed third-party media toolbars and call controls.
- Integrate with any third-party CTI provider through the open, connector-less interface.
Steps to Enable
CTI Integration is a Functional Area that must be enabled under the Service Offering in Setup and Maintenance. When this Functional Area is enabled, administrators can see the task required to Manage Work Orders and the Field Service Integration.
- Navigate to the Setup and Maintenance work area and select the Service offering.
- In the Administration section, click Actions -> Change Configuration.
- Under the Service Offering, select Communication Channels Feature,
- Ensure that CTI toolbar is clicked Enable for Implementation.
- Set the implementation status to In Progress or Implemented.
Next, under the Service Offering, search for the task Define Communication Channel Configuration.
The following task steps will be need to be configured to enable the CTI Integration:
- Manage Media Toolbar Configuration: In this task you will enter the URL for the 3rd party media toolbar, and enable it
- Configure Call Flow Parameters: This task allows you to specify any options you might want to enable such as the contact verification page as well as the Call Wrap Up.
- Manage Application Classification: If your organization is using more than one application with the CTI integration (such as sales and service), you can use application classifications to specific specific screen pop logic for each application.
- Manage Business Object Configuration: This task will enable you manage the business objects that can be used for reverse lookup and screen pop logic
- Manage Lookup Filters: This setup task allows you to specific which lookup filters should be used for reverse lookup
- Screen pop Configuration Rules: As part of this task you will define the logic that will be used for screen pops.
To enable the CTI integration, you must first set the following profile option to True:
SVC_PARTNER_MEDIA_TOOLBAR_ENABLED
Key Resources
- For details about how to configure the CTI Integration in Oracle Engagement Cloud, reference the online documentation here: http://docs.oracle.com/cloud/latest/salescs_gs/docs.htm.
View past interactions for accounts, contacts, and service requests. Interaction summary analytics offer the ability to measure the distribution of service interactions across channels and the time that service representatives are spending handling interactions. In addition to analytics, the embedded Interaction History sub-tab shows the history of interactions for the parent object, such as:
- The total number of interactions and the interactions in the last seven days
- A list of all interactions for the associated account, contact, or service request
- The direction of the communication (inbound or outbound)
- The start time, end time and duration of the communication
- The contact and internal resource who participated in the interaction
Steps to Enable
No additional setup or configuration is required to utilize the Interaction History view.
Key Resources
- For additional information on setup and configuration of Service Request Management, please reference the online documentation available here: http://docs.oracle.com/cloud/latest/salescs_gs/docs.htm.
Engagement Cloud Chat provides real-time communication via instant messaging between users in a service web instance and a service agents. Chat provides an easy and effective way to engage customers in the purchase process or when they need assistance solving an issue. Chat sessions strengthen the customer relationship and agent productivity is improved by handling simultaneous customer interactions. Chat is embedded as a standard pre-built component with Digital Customer Service. By connecting each live chat with the complete customer profile, answers can be delivered both in context and with an eye toward the overall customer experience.
Steps to Enable
The chat feature enables you to interact with customers through chat and help resolve their issues from the chat window. The chat service is integrated with the Digital Customer Service. A customer can initiate a chat from the DCS portal, and the assigned service representative can then respond to the customer using the chat window provided on the Engagement Cloud home screen.
Ensure that you enable desktop notifications so that you don't miss chat notifications. When a customer initiates a chat request, the chat notification displays on the top right header in Engagement Cloud home screen. In addition to this, an HTML notification is also present on the lower right-hand corner of the screen. After a representative accepts the chat, the agent can engage in a conversation with the customer.
You must enable the chat function before you can use it. To use chat, you must also have Omnichannel enabled.
The chat function enables a customer to connect with a service representative. The customer initiates the chat from the Digital Customer Service, and a notification is sent to the available representatives in Engagement Cloud. To enable the chat functionality, do the following:
-
Set the profile option SVC_ENABLE_CHAT to Y in Setup and Maintenance.
-
If you are using the Digital Customer Service as your consumer application, ensure that a user exists with the role ORA_SVC_CUSTOMER_SELF_SERVICE_USER_ABSTRACT and the privilege SVC_REQUEST_FOR_CHAT.
-
Sign in to the application and place the cursor on the chat icon displayed to the left of your login name.
The help text Available for chat interactions appears.
-
Click the chat icon to be available for chat.
Engagement Cloud Release 13 provides out-of-the-box support for cobrowsing. Oracle CoBrowse enables agents to see a customer's screen in real time during a sales or service call. During a cobrowsing interaction, agents can:
- Quickly understand and solve customer questions and problems
- Guide customers through complex web and mobile activities
- Shop online with customers to create strong sales opportunities
- Deliver personal and efficient service to ensure customer satisfaction
With just the click of a button on your website or mobile application, customers can start a secure cobrowsing interaction with an agent in seconds. There are no downloads or executables required to start cobrowsing. Additional security settings can be applied to further protect customer privacy, such as:
- Defining specific web pages and/or domains that can be cobrowsed or that should be blocked during cobrowsing
- Defining specific desktop applications that can be visible during cobrowsing
- Defining specific form fields that should be blocked during cobrowsing (e.g., SSN or credit card numbers)
Steps to Enable
- Enable Cobrowse on the Agent Profile
- Administrator must grant SVC_ACCESS_COBROWSE_PRIV to the appropriate agent profiles
- Setup the Cobrowse service (full instructions are located here.)
- Configure the Cobrowse UI
- Configure Privacy & Security Settings
- Configure Cobrowse Deployment
- Deploy Cobrowse on your Website
- Deploy Cobrowse in your Mobile Application
Tips And Considerations
- Clearly define goals and measurement methodologies
Cobrowsing has the potential to significantly improve many of the key performance indicators important to your organization. The first step in adding any new channel to your customer experience is to clearly define the business problem you want to solve and the associated success criteria. It is important that all stakeholders agree on a common set of objectives and measurements, and that this information be clearly communicated. Some common success metrics for Cobrowse include:
- Increased sales conversion rates
- Improved first contact resolution rates
- Increased CSAT/NPS
- Increase in use of self-service tools
- Reduced handling time
- Design a simple, brand-aligned customer experience
One of the most important steps in deploying Cobrowse successfully is careful planning around the customer launch point and User Interface. Starting a cobrowse session requires that customers click a launch button, referred to as the Cobrowse Launcher. The Cobrowse Launcher can be displayed and designed in a multitude of ways, similar to the many ways Live Chat can be presented on a website: as a link, a button, or an icon. Create a launch experience that is easy to find, understand and use. The best practice recommendation is to use the default "hovering button" launch that enables customers to access Cobrowse from the page they are on when they need help.
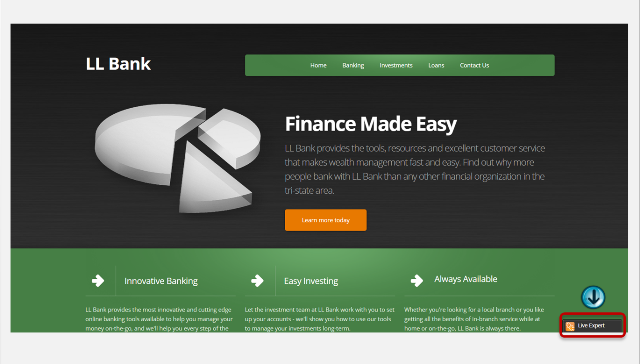
- Equip your agents with solid Cobrowse training
Roll out Cobrowse with a well-defined set of use cases that agents can be trained on. Cobrowse isn't needed on every call, but agents should understand the use case scenarios where it can make a huge impact, such as:
- Making sure the customer can quickly find what they’re looking for on a web site
- Helping a customer through a complex buying decision
- Filling out complex web forms or applications
- On-boarding new accounts to web platforms and online services
- Helping customers find and understand web-based support information for complex products/services
- Training customers how to utilize new online products or self-service capabilities
- Make sure your customers are comfortable cobrowsing
There are a number of simple things an agent can do to make a customer feel more comfortable with the co-browsing experience:
- Leverage the Cobrowse UI to share Terms & Conditions or other key information about the Cobrowse service
- Train agents to communicate about the security and privacy settings you've put in place (e.g., “I will only be able to see our website in your browser – if you show anything else on your screen, it will be blocked from my view”)
- Train agents to use their mouse to trigger dynamic pop-ups or drop-downs for the customer, and once the mouse is in the correct position, instruct the customer to click or type where indicated
- Ensure agents communicate with the customer throughout the interaction
- Train agents to move deliberately if they take control and to teach the customer how to do what they are doing
- Instruct agents to always end the co-browsing session prior to ending the phone or chat interaction
Key Resources
Custom channel types can be added when your company needs to integrate a channel type that does not come pre-built with Engagement Cloud.For example, a custom channel type can be created to integrate with an SMS communication tool. Administrators can create a new channel type and channel within Setup & Maintenance, which makes the channel available through the REST API for integration purposes. Administrators can also use Application Composer to extend the attributes of the Channel object, for example, to add custom fields needed for data integration with a third-party tool.

Service Channel List
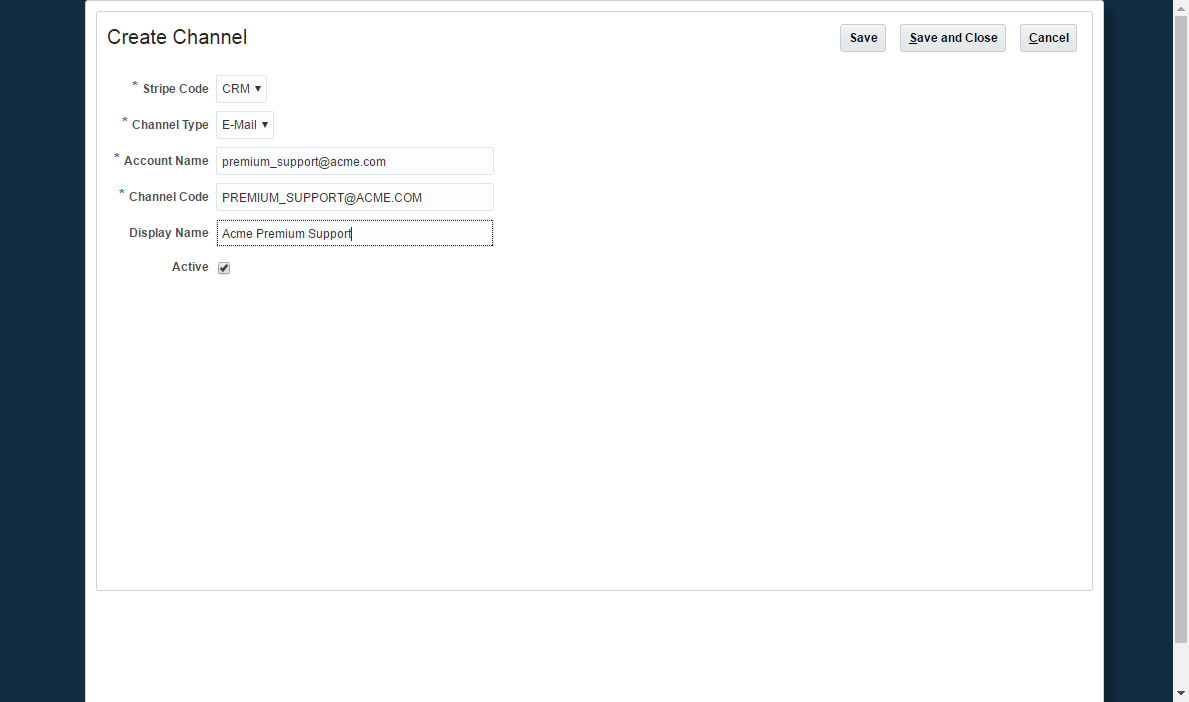
Create a Service Channel
Steps to Enable
- Navigate to the Setup and Maintenance work area and select the Service offering.
- Click Features for Communication Channels.
- Enable the Email Communications Feature
- Click Done.
Configurable Knowledge Homepage
Provide a searchable knowledgebase to your employee community with the new My Knowledge page. This configurable knowledge landing page offers employees the ability to search and browse available knowledge at any time (not specific to a particular service request). Using natural language search an employee can search the knowledgebase to find the most relevant articles matching his or her question, including the option to search across one or multiple languages.
Steps to Enable
The My Knowledge homepage is enabled by default, and can be turned on or off via profile options in Setup and Maintenance.
Key Resources
- For details about how to configure the My Knowledge homepage, reference the online documentation at http://docs.oracle.com/cloud/latest/salescs_gs/docs.htm.
Enhanced Knowledge Administration
Enhanced administration provides the knowledge manager additional control of the end user experience for service representatives using knowledge to research problems and resolve issues. Administrators can use the enhanced knowledge setup, configuration, operations, and management capabilities to do the following:
- Enable or disable the My Knowledge page on the Navigation menu
- Turn Knowledge access on or off in the Service Request side panel
- Enable or disable the following Knowledge features for support representatives:
- Adding articles to a personalized list of favorites (bookmarking)
- Linking articles to Service Requests
- Filter search and browse lists by Locale, Product, and Category
- Display article snippets in search results
Steps to Enable
Knowledge administration features are available via profile options in Setup and Maintenance.
Key Resources
- For details about how to configure Knowledge administrative options, reference the online documentation at http://docs.oracle.com/cloud/latest/salescs_gs/docs.htm.
Interaction Analytics provides a powerful mechanism for measuring the operational effectiveness of your contact center. With the addition of this analytics feature, service personnel can know the popular channels used by customers to contact them, the contact purpose - i.e., for issues or questions, issue resolution rates and efficiencies for the service provider’s low and high cost channels and many such insights that enable making better channel strategy decisions.
This release introduces two new subject areas to build ad hoc analysis:
- CRM - CRM Interaction Service Requests Real Time
- CRM - CRM Interactions Real Time
Steps to Enable
No steps are required to enable this feature.
Service Request Milestone Analytics
Service Request Milestone analytics enables customer service personnel to understand service quality delivery versus organizational commitments. The pre-built analytic content provides insight into how the service organization is performing with respect to meeting SR milestones across key business entities such as customers, coverage levels, products, regions and service teams. Milestone targets met and missed, product or customer segments that need attention, areas of shortfall are some of the key analysis areas covered.
This release introduces two new subject areas to build ad hoc analysis:
- Service - CRM Customer Coverage Real Time
- Service - CRM Service Request Milestones Real Time
Steps to Enable
No steps are required to enable this feature.
Within Service Request Management, agents often need to dispatch field service technicians to resolve customer issues. The Oracle Engagement Cloud Field Service integration leverages Oracle Integration Cloud Service (ICS) to enable service agents to capture and submit work orders to Oracle Field Service Cloud for dispatch and full activity execution. Service Agents can easily define a work order including verifying the customer location and contact information, indicating the appropriate work order type, and associating assets and case notes for reference by the field service technicians. Agents have the option to choose a desired date and time slot manually, or the system can automatically schedule the work order based on the service request resolution milestone.
Oracle Integration Cloud Service provides a configurable process to exchange real time updates between Engagement Cloud and Oracle Field Service Cloud. This ensures that field service technicians continue to receive updated information prior to starting the activity, and service agents within Engagement Cloud get real time visibility on the status of work orders as they are fulfilled by field technicians.
The following events are supported in the pre-built integration flows for exchanging work order updates, and additional events can be configured through Integration Cloud Service:
- Oracle Engagement Cloud
- Created
- Updated
- Rescheduled
- Canceled
- Oracle Field Service Cloud
- Updated
- Started
- Suspended
- Canceled
- Not Done
- Completed
- Moved
Steps to Enable
Field Service Integration is a Functional Area that must be enabled under the Service Offering in Setup and Maintenance. When this Functional Area is enabled, administrators can see the task required to Manage Work Orders and the Field Service Integration.
- Navigate to the Setup and Maintenance work area and select the Service offering.
- In the Administration section, click Actions -> Change Configuration.
- For the Work Orders Functional Area line item under the Service Offering, click Enable for Implementation.
- Set the implementation status to In Progress or Implemented.
Tips And Considerations
Subscriptions to the following Oracle services are required for field service integration:
- Oracle Field Service Cloud
- Oracle Integration Cloud Services
The Integration Cloud Service pre-built flows can be downloaded from My Oracle Support by searching for document id 2247612.1 or the flows can be installed through Oracle Marketplace.
Key Resources
- For details about how to configure the field service integration in Oracle Engagement Cloud, Oracle Field Service Cloud and Integration Cloud Service, see the Integrating Oracle Engagement Cloud with Oracle Field Service Cloud guide under Customizations at http://docs.oracle.com/cloud/latest/salescs_gs/docs.htm .
---

Copyright © 2018, Oracle and/or its affiliates. All rights reserved.
This document is provided for information purposes only, and the contents hereof are subject to change without notice.This document is not warranted to be error-free, nor subject to any other warranties or conditions, whether expressed orally or implied in law, including implied warranties and conditions of merchantability or fitness for a particular purpose. We specifically disclaim any liability with respect to this document, and no contractual obligations are formed either directly or indirectly by this document. This document may not be reproduced or transmitted in any form or by any means, electronic or mechanical, for any purpose, without our prior written permission.
Oracle and Java are registered trademarks of Oracle and/or its affiliates. Other names may be trademarks of their respective owners.
Intel and Intel Xeon are trademarks or registered trademarks of Intel Corporation.All SPARC trademarks are used under license and are trademarks or registered trademarks of SPARC International, Inc. AMD, Opteron, the AMD logo, and the AMD Opteron logo are trademarks or registered trademarks of Advanced Micro Devices. UNIX is a registered trademark of The Open Group.
