

This document will continue to evolve as existing sections change and new information is added. All updates appear in the following table:
| Date | Update Version | Notes |
|---|---|---|
| 19 JAN 2018 | February Maintenance Pack for 17D | Delivered new features in February Maintenance Pack for 17D. |
| 19 JAN 2018 | Update 17D | Revised update 17D. |
| 08 DEC 2017 | Update 17B | Revised update 17B. |
February Maintenance Pack for 17D
This document will continue to evolve as existing sections change and new information is added. All updates appear in the following table:
| Date | Feature | Notes |
|---|---|---|
| 19 JAN 2018 | Created initial document. |
Oracle HCM Cloud release documents are delivered in five functional groupings:
Suggested Reading for all HCM Products:
- HCM Cloud Common Features (This document pertains to all HCM applications. It is the base human resource information for all products and HCM Tools.)
- Global Human Resources Cloud (Global Human Resources contains the base application in which other application use for common data such as workforce structures and person information. Regardless of what products you have implemented you may want to see the new features for Global Human Resources that could impact your products.)
NOTE: Not all Global Human Resource features are available for the base Talent and Compensation stand alone applications.
Optional Reading for HCM Products (Depending on what products are in your cloud service):
- Talent Management Cloud (All Talent applications)
- Workforce Rewards Cloud (Compensation, Benefits, Payroll and Global Payroll Interface)
- Workforce Management Cloud (Absence Management and Time and Labor)
Additional Optional Reading:
- Common Technologies and User Experience (This documents the common features across all Cloud applications and is not specific to HCM)
NOTE: All of these documents can be found on the Oracle Help Center at: https://cloud.oracle.com/saasreadiness/hcm under Human Capital Management Release Readiness.
Disclaimer
The Information contained in this document may include statements about Oracle’s product development plans. Many factors can materially affect Oracle’s product development plans and the nature and timing of future product releases. Accordingly, this Information is provided to you solely for information only, is not a commitment to deliver any material, code, or functionality, and should not be relied upon in making purchasing decisions. The development, release, and timing of any features or functionality described remains at the sole discretion of Oracle.
This information may not be incorporated into any contractual agreement with Oracle or its subsidiaries or affiliates. Oracle specifically disclaims any liability with respect to this information. Refer to the Legal Notices and Terms of Use for further information.
| Action Required to Enable Feature |
|||||
|---|---|---|---|---|---|
| Feature |
Automatically Available |
End User Action Required |
Administrator Action Required |
Oracle Service Request Required |
|
 |
|||||
|
|||||
HCM Data Loader (HDL) provides a flexible and efficient method of bulk loading business object data for data-migration and on-going incremental updates to Oracle Human Capital Management Cloud.
For worker records that you load using HCM Data Loader, you can create user accounts in bulk. On occasion, you may want to delete those accounts. For example, you may have created them by mistake or created their user names in the wrong format. You can now delete user accounts using HCM Data Loader by including a DELETE instruction in the User.dat file for each user account to be deleted. For example:
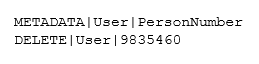
Delete Instruction for the User Object
The DELETE instruction is processed when you next run the Send Pending LDAP Requests process. You can delete user accounts in both test and production environments. Accounts to be deleted can be in any status.
Steps to Enable
No steps are required to enable this feature.
Tips And Considerations
- The User and Role Provisioning options have no effect on user-account deletion. For example, deletion requests cannot be suppressed.
- The user is deleted from both the LDAP directory and the PER_USERS, PER_USER_ROLES, and PER_USER_HISTORY records. Therefore, you can reuse the user name. You can recreate the user account on the Security Console, using the Manage Users task, or by loading the User object.
New Business Objects Supported
You can now load data for these business objects using HCM Data Loader:
| Business Object | Description |
|---|---|
| Legacy Learning Item | An Oracle Learning Cloud object representing a completed course or offering that you want to include in a learner's learning history |
| Succession Plan | A Talent Management object that identifies workers who are ready now, or can develop the necessary skills, to replace key workers |
Steps to Enable
No steps are required to enable this feature.
Tips And Considerations
You can load these objects using either HCM Data Loader or HCM Spreadsheet Data Loader.
Key Resources
For more information, go to Applications Help for the following topics:
- Loading Legacy Learning Items: Examples
- Succession Management: Explained
This document will continue to evolve as existing sections change and new information is added. All updates appear in the following table:
| Date | Feature | Notes |
|---|---|---|
| 19 JAN 2018 | HCM Common Features: Reduce Transfer Time by Compressing and Encrypting Extracts | Document updated. Added feature delivered in update 17D. |
| 06 OCT 2017 | Created initial document. |
his guide outlines the information you need to know about new or improved functionality in Oracle HCM Cloud Release 13. Each section includes a brief description of the feature, the steps you need to take to enable or begin using the feature, any tips or considerations that you should keep in mind, and the resources available to help you.
Oracle HCM Cloud release documents are delivered in five functional groupings:
Suggested Reading for all HCM Products:
-
HCM Cloud Common Features (This document pertains to all HCM applications. It is the base human resource information for all products and HCM Tools.)
-
Global Human Resources Cloud (Global Human Resources contains the base application in which other application use for common data such as workforce structures and person information. Regardless of what products you have implemented you may want to see the new features for Global Human Resources that could impact your products.)
NOTE: Not all Global Human Resource features are available for Talent and Compensation products.
Optional Reading for HCM Products (Depending on what products are in your cloud service):
-
Talent Management Cloud (All Talent applications)
-
Workforce Rewards Cloud (Compensation, Benefits, Payroll and Global Payroll Interface)
-
Workforce Management Cloud (Absence Management and Time and Labor)
Additional Optional Reading:
-
Common Technologies and User Experience (This documents the common features across all Cloud applications and is not specific to HCM)
NOTE: All of these documents can be found on the Oracle Help Center at: https://cloud.oracle.com/saasreadiness/hcm under Human Capital Management Release Readiness.
Give Us Feedback
We welcome your comments and suggestions to improve the content. Please send us your feedback at oracle_fusion_applications_help_ww_grp@oracle.com. Indicate you are inquiring or providing feedback regarding the Global HR Cloud What’s New for Release 13 in the body or title of the email.
| Action Required to Enable Feature |
|||||
|---|---|---|---|---|---|
| Feature |
None (Automatically Available) |
Enable via Opt In UI Only |
Enable via Opt In UI Plus Additional Steps |
Not Enabled via Opt In UI but Setup Required |
Issue Service Request |
|
|||||
|
|||||
|
|||||
Secure Access to Position Records Using Areas of Responsibility or the HCM Position Hierarchy |
|
||||
|
|||||
|
|||||
HCM Data Loader provides a flexible and efficient method of bulk loading business-object data for data migration and on-going incremental updates to Oracle Human Capital Management Cloud.
Ability to Load Multiple Owners for a Bank Account
You can now define multiple owners for an external bank account that you create or manage using HCM Data Loader. One of the account owners must be the primary owner. You set the PrimaryFlag attribute of the relevant External Bank Account Owner component to identify the primary owner.
Steps to Enable
No steps are required to enable this feature.
Key Resources
For more information, go to Applications Help for the following topic:
- Loading External Bank Accounts: Explained
Extract Integration and User Key Values
Use of source keys when updating records is always recommended, as not all objects support update when you supply only user keys. However, some objects are created without source keys. For example, you cannot specify source keys for any objects that you create in the user interface. Also, you can create many objects using HCM Data Loader without specifying source keys. For objects without source keys, default source keys are generated automatically. So that you can obtain the values of source keys that were generated automatically and use them when updating objects, a new HCM extract is provided.
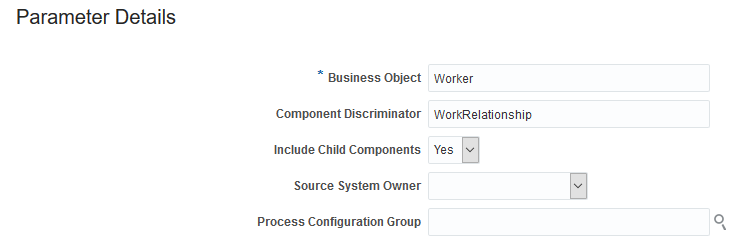
The Integration Object User Key Map Extract extracts the Oracle Fusion GUIDs, source keys, surrogate IDs, and user keys for a specified business object. For example, you can extract all key values for all instances of the Worker business object. To identify the business object, you specify its file discriminator. You can limit the extract to specific components of the business object by specifying a component file discriminator value. For example, you could specify the WorkRelationship file discriminator to extract keys for the Work Relationship component of the Worker business object. You can also:
- Include or exclude child components.
- Restrict the extract to just those objects with a specific source system owner. All key types are extracted, but only for those object instances with the specified source system owner.
Before each use of this extract, you must submit the Integration Object User Key Refresh extract to retrieve latest values of user keys for relevant objects.
Submitting the Integration Object User Key Map Extract
Steps to Enable
Before first use of both extracts, you copy the predefined extracts, configure the copies, and define a delivery option.
Key Resources
For more information, go to Applications Help for the following topics:
- HCM Data Loader Extracts: Explained
- Copying an HCM Data Loader Extract: Procedure
- Configuring a Copied HCM Data Loader Extract: Procedure
- Submitting an HCM Data Loader Extract: Procedure
Test HCM Data Loader Process Flow and Connections
In a new environment, you may want to test HCM Data Loader end-to-end processing without creating unwanted data. Once you are sure that HCM Data Loader processing and connections are working as expected, you can load your own data with confidence. To enable you to perform this testing, HCM Data Loader provides:
- A new process, Test HCM Data Loader Process Flow and Connections, which you run in the Scheduled Processes work area
- A new object, Example Object
When you run the Test HCM Data Loader Process Flow and Connections process, it:
- Generates a file of MERGE instructions for the Example Object
- Adds the ExampleObject.dat file to the Example Object||<date and time>||.zip file
- Uploads the .zip file to the hcm/dataloader/import directory on the Oracle WebCenter Content server
- Initiates HCM Data Loader to import and load the file
- Provides a log file
The Example Object data is committed to its own tables, and no data is committed to the application tables. Some objects fail to load, so that error reporting is also tested. You can view progress and results on the Import and Load Data page.
You should also run this process after testing to delete the test data and associated data sets. In this case, the process generates a file of DELETE instructions, adds the file to the DeleteExampleObject||<date and time>||.zip file, and uploads it.
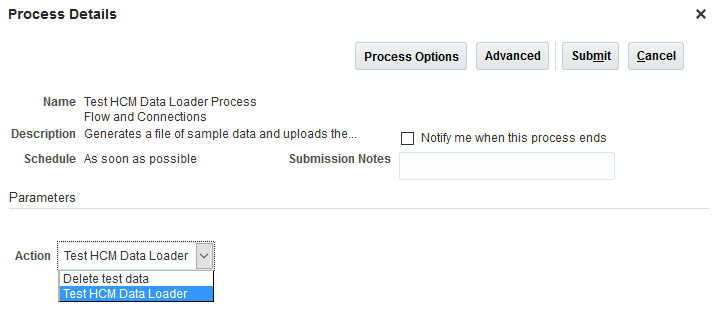
Submitting the Test HCM Data Loader Process Flow and Connections Process
You can review the structure and attributes of the Example Object on the Business Object Details page in the Data Exchange work area.
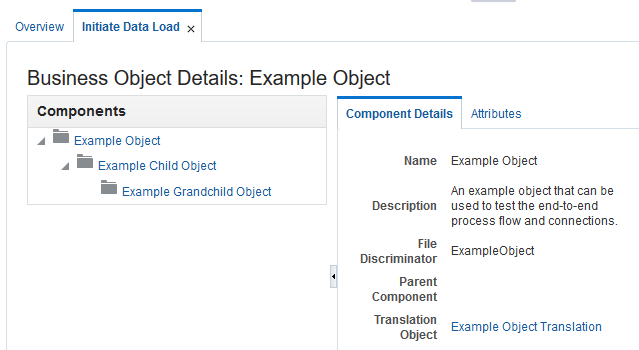
The Component Hierarchy of the Example Object
The example object:
- Has child and grandchild components and a translation object
- Is integration enabled
- Supports Create and Delete actions
- Has attributes of all data types, except BLOB and CLOB
- Has lookup-validated attributes
You can also generate a template file for the example object.
Steps to Enable
No steps are required to enable this feature.
Tips And Considerations
Although an Example Object Translation object exists, no translation data is generated.
This section covers features used across all HCM Applications.
Secure Access to Position Records Using Areas of Responsibility or the HCM Position Hierarchy
For improved performance, you can secure access to position records using areas of responsibility. The position security profile pages now include an Area of Responsibility section, where you select the responsibility type and a single responsibility scope. For example, you could set Responsibility Type to Human resources representative and Scope of Responsibility to Department.
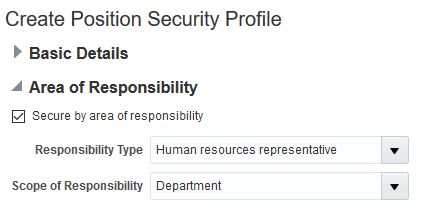
The Area of Responsibility Section in the Position Security Profile
If a worker later becomes responsible for positions in a different instance of the same scope (for example, a different department), then you need to update only that worker's area of responsibility. The position security profile remains valid without update. You can also create a single HCM data role to include a position security profile of this type and assign it to multiple representatives. In addition:
- The option to secure access by position list remains available, which enables you to refine further the list of positions that users can access.
- The Basic Details sections of the Create Position Security Profile and Edit Position Security Profile pages now include a Description field, where you can provide a description of the security profile.
Creating a position security profile is now a two-step process. Once you have defined your security criteria, you click Next to open the Create Position Security Profile: Preview page. You can review the automatically generated SQL predicate for your security criteria on the SQL Predicate for Position Access tab on this page.
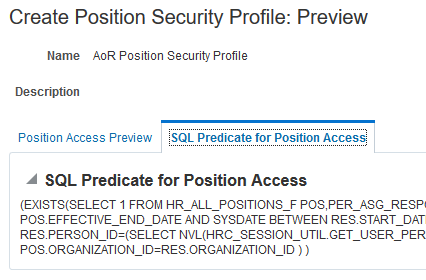
The SQL Predicate for Position Access Tab
You can also test the access provided by the security profile before you save it. On the Position Access Preview tab of the Create Position Security Profile: Preview page, you can select a user and click Preview to see the number of position records that this security profile enables the user to access. You also see the name and type of the user's areas of responsibility, if any. You can then identify individual position records to which the security profile provides access by searching for them. The search is based on criteria such as position name, business unit, and incumbent, and is performed within the set of position records that was returned by the Preview action.
Note that the results from the Position Access Preview are based on the current position security profile only. Users may have many roles that provide access to other position records.
When you create position security profiles in HCM data roles, you can secure access to position records using areas of responsibility. The Position sections of the Create Data Role: Security Criteria and Assign Data Role: Security Criteria pages now include the option to secure access by area of responsibility.
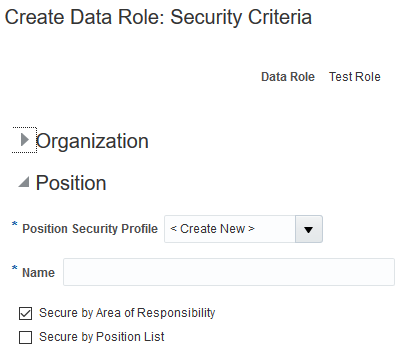
The Position Section of the Create Data Role Task Flow
Related import and export services and audit of position security profiles also support areas of responsibility.
Depending on the setting of the Position Hierarchy Configuration options on the Manage Enterprise HCM Information page, you can secure access to position records using the HCM Position Hierarchy.
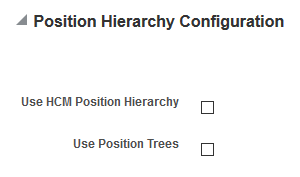
Position Hierarchy Configuration Options
The settings of these options determine which fields appear in the Position Hierarchy section of the Create Position Security Profile page.
- If you select only Use HCM Position Hierarchy, then the Position Tree field is hidden.
- If you select only Use Position Trees, then the Position Tree field appears.
- If you select both options, then a new Hierarchy Type field appears, where you can select either the HCM Position Hierarchy or the position tree.
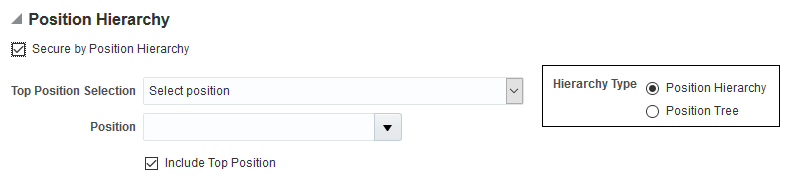
The Hierarchy Type Field in the Position Hierarchy Section
When you edit an existing position security profile, the enterprise options have no effect. If the existing position security profile:
- Is based on the position tree, then only the Position Tree field appears
- Is based on the HCM Position Hierarchy, then only the position hierarchy fields appear
When you secure by position hierarchy, you can specify the top position in the hierarchy. More options for specifying the top position are available in this release. This enhancement enables you to specify the top position more precisely.
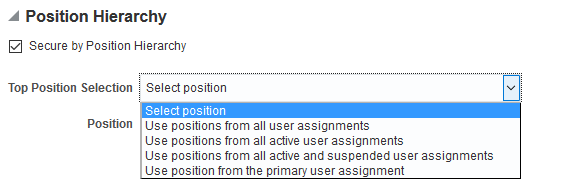
Top Position Selection
Steps to Enable
No steps are required to enable this feature.
Tips And Considerations
Existing position security profiles are unaffected by the enhancements to support areas of responsibility. Customers upgrading to Release 13 continue to see all sections of the position security profile pages, plus the new Area of Responsibility section. When you select the Area of Responsibility section in a new or existing position security profile, the Position Hierarchy and Workforce Structures sections become unavailable. These criteria are incompatible with securing by area of responsibility.
The values that you select in the Position Configuration Options section on the Manage Enterprise HCM Information page determine which fields appear in the Position Hierarchy section of the Create and Edit Position Security Profile pages.
Securing access to position records using position trees will be deprecated in a future release, so consider moving to the HCM Position Hierarchy as soon as your plans allow.
Reduce Transfer Time by Compressing and Encrypting Extracts
Use the new values in the Compress field when delivering files to compress and encrypt your extracts more efficiently.
The Yes Compress First option is the most efficient way to ensure your extract runs quicker because the compression results in a smaller file which allows the virus scan to run effectively therefore reducing the overall time it takes to transmit the file to its final destination. With this option the application compresses the file first and then encrypts it.
The Yes Encrypt First option is existing behavior for delivery options that have both encryption and compression options set up. With this option, the application encrypts the file first and then compresses it.
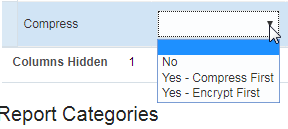
Manage HCM Extract Definition Delivery Options User Interface with Compress List of Values
Steps to Enable
No steps are required to enable this feature.
Tips And Considerations
It is an Oracle best practice to choose the Yes Compress First option.
Regenerate Multiple HCM Data Roles
You must regenerate an HCM data role if changes are made to the role hierarchy of its inherited job role. Regenerating a role updates its data security policies to reflect the latest role hierarchy. If you fail to do this, then users may not have the required data access. For example, if you remove an aggregate privilege from a custom job role, then you must regenerate any data role that inherits that job role. Similarly, if a predefined role is updated to support new functionality, then you must regenerate any associated data roles when you upgrade. This requirement applies also to any changed abstract role, whether custom or predefined, that has directly assigned security profiles.
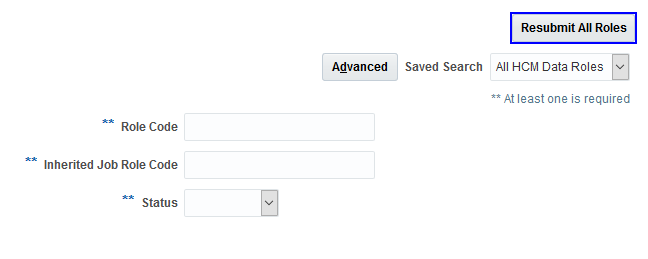
Until now, you could regenerate data and abstract roles individually by editing them on the Manage Data Roles and Security Profiles page. From this upgrade, you can regenerate data and abstract roles in bulk using the Process Grants Regeneration process. To run this process, you click the Resubmit All Roles button on the Manage Data Roles and Security Profiles page.

Resubmit All Roles on the Manage Data Roles and Security Profiles Page
NOTE: The Resubmit All Roles button does not appear by default. You must configure the page to add the button.
When you click Resubmit All Roles:
- The Process Flow page opens. Click the Process Grants Regeneration process name on that page to open the Schedule: Process Grants Regeneration page.
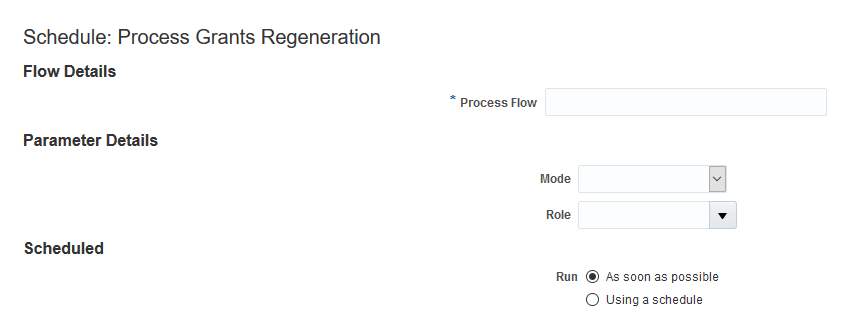
The Schedule: Process Grants Regeneration Page
- In the Process Flow field, you can supply any value that helps you to identify this run of the process. For example, enter Regenerate All Human Resource Specialist Data Roles.
- In the Mode field, identify the roles to regenerate. Using this process, you can regenerate:
- Any data role that inherits a specified job role directly. For example, you can regenerate any data role that inherits the Human Resource Specialist job role directly.
- A specified data role.
- A specified abstract role.
- All roles with assigned security profiles.
- If you are regenerating a named role, then identify it in the Role field.
- Select a Run value and click Submit.
On the Process Flow page, the processing information refreshes automatically while the process is running. When the process completes, click the process run name to see the results. The Process Flow page shows the name that you specified for this run. The Process Results section of the page lists all roles that were processed and indicates whether the regeneration succeeded.
For enterprises with many data roles, this process is a major enhancement. It enables you to both perform the regeneration task efficiently and be sure that all data roles requiring regeneration are identified. The post-upgrade task of regenerating updated, predefined roles is also now much easier to complete. For example, if the predefined Benefits Specialist role is updated in an upgrade, then you can easily regenerate any data role that inherits that job role.
Steps to Enable
You enable users to run the Process Grants Regeneration process by adding the Resubmit All Roles button to the Manage Data Roles and Security Profiles page. Follow these steps:
- Sign in with these roles or privileges:
- IT Security Manager
- Application Implementation Consultant or Human Capital Management Application Administrator
- Create and activate a sandbox.
- In the Navigator, select Workforce Structures.
- In the Tasks panel tab of the Workforce Structures work area, select the Manage Data Roles and Security Profiles task. (Do not select this task in the Setup and Maintenance work area. You must select it in the Workforce Structures work area.)
- In the Settings and Actions menu in the global header, select Customize Pages... to open the Page Composer.
- In the Customize Pages dialog box, select the Site layer and click OK.

The Customize Pages Dialog Box
- From the View menu in the Page Composer, select Source. This option opens a source-code section at the bottom of the page.
- Expand the source-code section to show more of the content.
- Move the cursor to the Manage Data Roles and Security Profiles page header and left-click. In the warning about editing a shared component, click Edit. (You are not editing the page header, but this approach provides a quick way to find the Resubmit All Roles button in the source code.)
- The toolbar component that contains the Resubmit All Roles button opens in the source-code section.

The Source-Code Section Showing the Resubmit All Roles Button
- In the source-code section, right-click the commandToolbarButton: Resubmit All Roles entry and select Show Component. The Resubmit All Roles button now appears on the Manage Data Roles and Security Profiles page.
Resubmit All Roles on the Manage Data Roles and Security Profiles Page
- Close the Page Composer.
- Select the sandbox, click More, and publish your changes.
The Resubmit All Roles button is now available to all users of the Manage Data Roles and Security Profiles page to regenerate data and abstract roles.
Tips And Considerations
You can continue to regenerate data and abstract roles individually by editing them on the Manage Data Roles and Security Profiles page. Alternatively, you can use the Process Grants Regeneration process to regenerate one or more roles.
If you regenerate all roles, then the secured access for all roles is recalculated and the secured access of all users is refreshed. If you made changes to a role hierarchy previously but did not regenerate the role, then any associated changes in access will take effect when the regeneration of all roles completes.
Key Resources
For more information, go to Applications Help for the following topics:
- Regenerating Roles: Explained
- Enabling the Grants Regeneration Process: Procedure
- Regenerating Multiple Data and Abstract Roles: Procedure
This document will continue to evolve as existing sections change and new information is added. All updates appear in the following table:
| Date | Feature | Notes |
|---|---|---|
| 08 DEC 2017 | HCM Common Features: Transaction Console | Document updated. Added feature delivered in update 17B. |
| 07 APR 2017 | Created initial document. |
This guide outlines the information you need to know about new or improved functionality in Oracle HCM Cloud Release 13. Each section includes a brief description of the feature, the steps you need to take to enable or begin using the feature, any tips or considerations that you should keep in mind, and the resources available to help you.
Oracle HCM Cloud release documents are delivered in five functional groupings:
Suggested Reading for all HCM Products:
- HCM Cloud Common Features (This document pertains to all HCM applications. It is the base human resource information for all products and HCM Tools.)
- Global Human Resources Cloud (Global Human Resources contains the base application in which other application use for common data such as workforce structures and person information. Regardless of what products you have implemented you may want to see the new features for Global Human Resources that could impact your products.)
NOTE: Not all Global Human Resource features are available for Talent and Compensation products.
Optional Reading for HCM Products (Depending on what products are in your cloud service):
- Talent Management Cloud (All Talent applications)
- Workforce Rewards Cloud (Compensation, Benefits, Payroll and Global Payroll Interface)
- Workforce Management Cloud (Absence Management and Time and Labor)
Additional Optional Reading:
- Common Technologies and User Experience (This documents the common features across all Cloud applications and is not specific to HCM)
NOTE: All of these documents can be found on the Oracle Help Center at: https://cloud.oracle.com/saasreadiness/hcm under Human Capital Management Release Readiness.
GIVE US FEEDBACK
We welcome your comments and suggestions to improve the content. Please send us your feedback at oracle_fusion_applications_help_ww_grp@oracle.com. Indicate you are inquiring or providing feedback regarding the Global HR Cloud What’s New for Release 13 in the body or title of the email.
| Action Required to Enable Feature |
||||
|---|---|---|---|---|
| Feature |
Automatically Available |
End User Action Required |
Administrator Action Required |
Oracle Service Request Required |
|
||||
|
||||
|
||||
|
||||
|
||||
|
||||
Oracle Fusion Applications Security provides a single console where IT Security Managers and IT Security Administrators can perform various functions including user lifecycle management, role definition, security policy management(both functional and data), role hierarchy maintenance, user name and password policy administration, and certificate management. The console also enables users to simulate the effect of security changes, to run security reports, and download a connector for integration with Microsoft Active Directory.
Database Resource Perspective of Data Security Policies
You can analyze data security policies by database resource. You can view the roles that are authorized to the database resource and the users that are authorized to the database resource. You can export the information displayed in the tables.
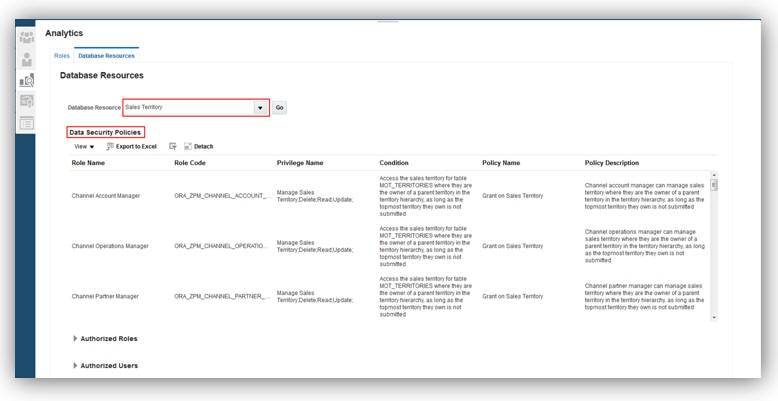
Database Resources Page Showing Data Security Policies
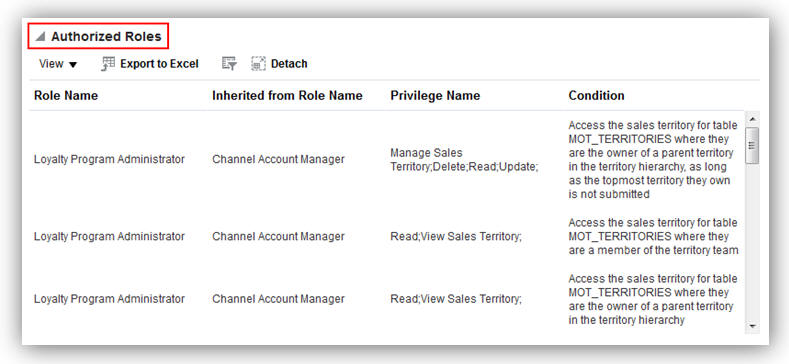
Database Resources Page Showing Authorized Roles
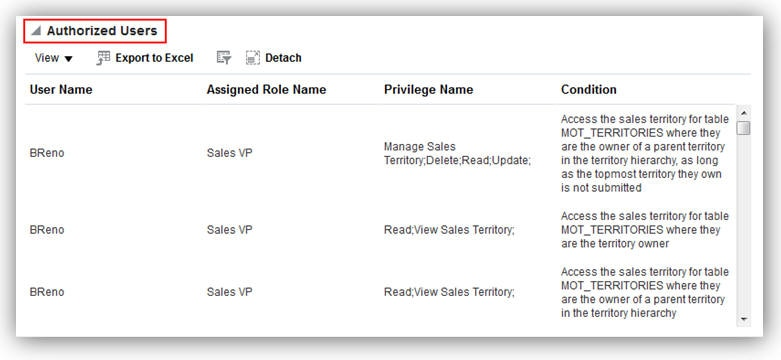
Database Resources Page Showing Authorized Users
Steps to Enable
No steps are required to enable this feature.
You can copy function and data security policies from the first role to the second role during role comparison. You can export the data displayed in the role comparison results table.

Move Function and Data Security Policies from First Role to Second Role
Export of Role Comparison Results
Steps to Enable
No steps are required to enable this feature.
Tips And Considerations
Add to Second Role button is enabled only on the following conditions:
- Second Role is a custom role
- User has Edit Role privilege
- Filter Criteria does not include “Role hierarchy”
- Show is “Only in first role”
HCM Data Loader provides a flexible and efficient method of bulk loading business-object data for data migration and on-going incremental updates to Oracle Human Capital Management Cloud.
Automatic Calculation of the Optimal Load Group Size
When you load business objects using HCM Data Loader, the load-group size is the number of business objects processed as a single unit of work on a single thread. In Release 12, you could specify a default load-group size for the enterprise on the Configure HCM Data Loader page.
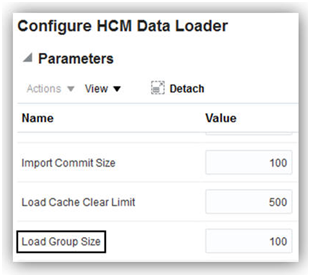
Load Group Size on the Release 12 Configure HCM Data Loader Page
You could also override the enterprise load-group size on the Schedule Request page for individual import and load requests.
To reduce the elapsed time for a load to complete, the objects to be processed must be distributed evenly among the available threads. From Release 13, you no longer need to set the Load Group Size parameter in an attempt to achieve this even distribution. The optimal load-group size can now be calculated automatically based on the number of objects to process and the available concurrent threads. To enable automatic calculation of the load-group size, you set the Enable Load Group Size Calculation parameter to Yes on the Configure HCM Data Loader page.
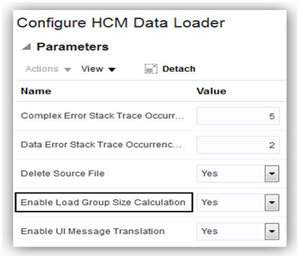
Enable Load Group Size Calculation on the Release 13 Configure HCM Data Loader Page
When Enable Load Group Size Calculation is set to Yes, the size of the load group is calculated automatically and the Load Group Size parameter does not appear on the Schedule Request page. The default Load Group Size value is ignored. Otherwise, Load Group Size continues to appear on the Schedule Request page. You can still specify a LoadGroupSize parameter on the importAndLoadData web service. In this case, any value that you supply is used.
Steps to Enable
No steps are required to enable this feature.
Tips And Considerations
You are recommended always to allow the load-group size to be calculated automatically.
Message Display in User’s Language
Until this release, all HCM Data Loader messages on the Import and Load Data page were displayed in the language of the user who submitted the relevant request. For example, if a user whose session language was American English submitted an import and load request, then any associated messages were in American English, regardless of the language of the user viewing those messages.
From this release, HCM Data Loader messages can appear in the language of the signed-in user. For example, if the signed-in user is French, then HCM Data Loader messages can appear in French, regardless of the language of the user who submitted the relevant request. To enable messages to appear in the language of the signed-in user, you set the Enable UI Message Translation parameter on the Configure HCM Data Loader page to Yes.
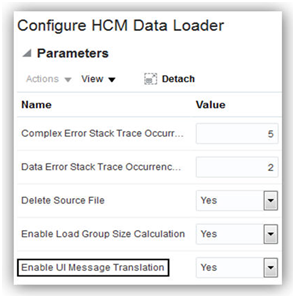
Enable UI Message Translation on the Configure HCM Data Loader Page
Steps to Enable
No steps are required to enable this feature.
Tips And Considerations
Users can select a session language and see the default language by selecting Set Preferences from the Settings and Actions menu in the global header.
This section covers features used across all HCM Applications.
The Feedback feature enables users to provide recognition or send real time feedback using Person Spotlight or the person smart navigation window.
You can create feedback for yourself or any other person to whom you have data security access. You can edit and delete feedback that you create. When you create a note, you set the visibility to one of the following:
- Everyone - A public note visible to any person in the organization
- Managers only - Managers in the hierarchy of the worker about whom the Feedback is created
- Managers and the worker - Managers in the hierarchy of the worker and the worker who receives the feedback
- Only Me - A private note created by a manager or worker about themselves or another person visible only to the author
A person who receives feedback and the HR specialist who has administrative oversight of the person can hide feedback, if the content isn't appropriate. The person who hides the note can unhide the note, but no one else can unhide it. The note author can view the note and see that it's hidden.
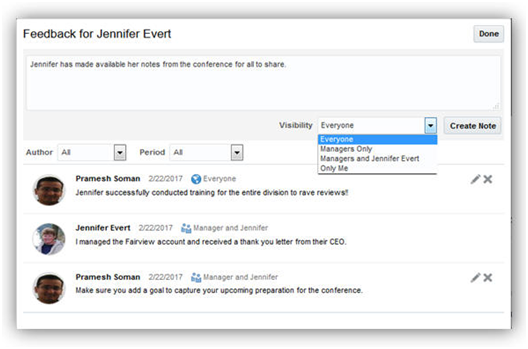
Anyone can Enter Feedback about a Worker and Set the Visibility for the Appropriate Audience
You can configure the application to notify workers and their managers when workers receive feedback. Use the Manage Talent Notifications task to enable or disable notifications sent to the manager or worker. The settings affect all workers and managers throughout the application.
You can also create and manage feedback in the following business processes:
- Performance management
- Talent review
- Succession management
Steps to Enable
No steps are required to enable this feature.
Tips And Considerations
- You can create or view feedback for yourself or any other person whom you have authorization to view
- HR Specialists can view all feedback except that with the Only Me visibility setting
- You can edit and delete feedback that you create
Key Resources
For more information, see the following topics in Applications Help:
- Feedback: Explained
The Transaction Console provides enhanced diagnostic information and superior search capabilities that enables HCM Administrators to:
- See the current status of all of the approval tasks in the system.
- Monitor tasks that have errored out, and take appropriate actions like withdraw or reassign to resolve stuck transactions.
- Search approval tasks based on user defined criteria.
- Save search criteria.
- Export the queried results to a spreadsheet.
- Set up approval rules and routing policies.
- Set up transaction flows to bypass approvals.
Steps to Enable
No steps are required to enable this feature.
Role Information
Role: Human Capital Management Application Administrator
Privileges:
- Perform HCM Approval Transaction Actions & PER_PERFORM_APPROVAL_TRANSACTION_ACTIONS
- Manage Approval Rules & PER_MANAGE_APPROVAL_RULES
- Review HCM Approval Transactions & PER_REVIEW_APPROVAL_TRANSACTIONS
- Configure Approval Notification & PER_CUSTOMIZE_APPROVAL_NOTIFICATION
For some Release 13 functions, new aggregate privileges, function security privileges, and transaction analysis duty roles have been added to predefined roles, such as Employee and Human Resource Specialist.
If you are not using the predefined roles, then you need to add the new security privileges to your custom roles. Details of this step are provided for each function.
If you are using the predefined roles and plan to use the new functions, then you must regenerate the relevant predefined roles to update their data security policies. You need to perform this step for:
- Predefined abstract roles, such as Employee and Line Manager, to which aggregate privileges have been added.
- HCM data roles that include job roles to which aggregate privileges have been added.
- Any job roles to which aggregate privileges have been added and to which HCM security profiles are assigned directly. You do not need to regenerate job roles to which HCM security profiles have not been assigned.
Key Resources
For instructions on regenerating roles, see the Securing Oracle HCM Cloud guide on the Oracle Help Center.
---

Copyright © 2018, Oracle and/or its affiliates. All rights reserved.
This document is provided for information purposes only, and the contents hereof are subject to change without notice.This document is not warranted to be error-free, nor subject to any other warranties or conditions, whether expressed orally or implied in law, including implied warranties and conditions of merchantability or fitness for a particular purpose. We specifically disclaim any liability with respect to this document, and no contractual obligations are formed either directly or indirectly by this document. This document may not be reproduced or transmitted in any form or by any means, electronic or mechanical, for any purpose, without our prior written permission.
Oracle and Java are registered trademarks of Oracle and/or its affiliates. Other names may be trademarks of their respective owners.
Intel and Intel Xeon are trademarks or registered trademarks of Intel Corporation.All SPARC trademarks are used under license and are trademarks or registered trademarks of SPARC International, Inc. AMD, Opteron, the AMD logo, and the AMD Opteron logo are trademarks or registered trademarks of Advanced Micro Devices. UNIX is a registered trademark of The Open Group.
