

This document will continue to evolve as existing sections change and new information is added. All updates appear in the following table:
| Date | Update Version | Notes |
|---|---|---|
| 21 FEB 2018 | Update 17D | Revised update 17D. |
| 01 SEP 2017 | Update 17C | Delivered new features in update 17C. |
| 21 APR 2017 | Update 17B | Delivered new features in update 17B. |
This document will continue to evolve as existing sections change and new information is added. All updates appear in the following table:
| Date | Feature | Notes |
|---|---|---|
| 21 FEB 2018 | Demand Management: Aggregate Data for Non-Key Customers |
Updated document. Revised feature delivered in update 17D. |
| 21 FEB 2018 | Sales and Operations Planning: Aggregate Data for Non-Key Customers |
Updated document. Revised feature delivered in update 17D. |
| 21 FEB 2018 | Supply Planning: Aggregate Data for Non-Key Customers | Updated document. Revised feature delivered in update 17D. |
| 21 FEB 2018 | Planning Central: Aggregate Data for Non-Key Customers | Updated document. Revised feature delivered in update 17D. |
| 20 OCT 2017 | Created initial document. |
This guide outlines the information you need to know about new or improved functionality in this update, and describes any tasks you might need to perform for the update. Each section includes a brief description of the feature, the steps you need to take to enable or begin using the feature, any tips or considerations that you should keep in mind, and the resources available to help you.
Security and New Features
The Role section of each feature in this guide identifies the security privilege and job role required to use the feature. If feature setup is required, then the Application Implementation Consultant job role is required to perform the setup unless otherwise indicated.
If you have created custom job roles, then you can use this information to add new privileges to those roles as needed.
GIVE US FEEDBACK
We welcome your comments and suggestions to improve the content. Please send us your feedback at oracle_fusion_applications_help_ww_grp@oracle.com.
Optional Uptake of New Features (Opt In)
We continue to add many new features to the Oracle Cloud Applications, and for some features, you can take advantage of new functionality at a pace that suits you by “opting in” to the feature when you’re ready. You can opt in to a feature in two ways: by using the New Features work area, or by using the Setup and Maintenance work area.
To opt in using the New Features work area:
- Click the Navigator, and then click New Features (under the My Enterprise heading).
- On the New Features page, select the offering that includes new features you’d like to review.
- Click Opt In for any feature that you want to opt in to.
- On the Edit Features page, select the Enable option for the feature, and then click Done.
To opt in using the Setup and Maintenance work area:
- Click the Navigator, and then click Setup and Maintenance.
- On the Setup page, select your offering, and then click Change Feature Opt In.
- On the Opt In page, click the Edit Features icon.
- On the Edit Features page, select the Enable option for any feature you want to opt in to. If the Enable column includes an Edit icon instead of a check box, then click the icon, select your feature options, and click Save and Close.
- Click Done.
This section gives you information to help you plan, deploy, and validate your update. We make frequent additions to this document, so don’t forget to check back and get the latest information before your update starts.
| Action Required to Enable Feature |
|||||
|---|---|---|---|---|---|
| Feature |
None (Automatically Available) |
Enable via Opt In UI Only |
Enable via Opt In UI Plus Additional Steps |
Not Enabled via Opt In UI but Setup Required |
Issue Service Request |
 |
|||||
|
|||||
|
|||||
|
|||||
|
|||||
|
|||||
|
|||||
|
|||||
|
|||||
|
|||||
|
|||||
Monitor Planning Processes and Improve Planning Data Quality |
|
||||
|
|||||
|
|||||
Collaborate with Suppliers by Start Dates of Forecasted Orders |
|
||||
|
|||||
Analyze Configure-to-Order Model Forecast and Sales Orders Together |
|
||||
Publish Order Forecast to Oracle Supply Chain Collaboration Cloud in One Step |
|
||||
|
|||||
|
|||||
|
|||||
|
|||||
|
|||||
Monitor Planning Processes and Improve Planning Data Quality |
|
||||
|
|||||
Forecast Unique Demand Segments
While a given forecast model may result in enhanced forecast accuracy for one product segment (group of items), the same forecast model may actually result in reduced accuracy for another segment. This is because the demand patterns are completely different.
You can now define a forecast model that is best suited for the historical patterns of an item or a particular group of items. The set of items that you want to include for a particular statistical forecasting model can be established using a query that is the best for the forecasting model profile that you have established. For example, you can create a forecast profile that works well for items with intermittent demand patterns. You can then associate the forecast profile you created with a named query (analysis set) in a plan that isolates items with intermittent demand patterns.
With this feature, you can control how statistical forecasts are generated at a granular level. You can gain all the benefits associated with enhanced forecast accuracy, which is one of the cornerstones of effective supply chain management.
Steps to Enable
To forecast unique demand segments, do the following in the Demand Management work area:
- Create a forecasting profile for every unique demand segment using the Manage Forecasting Profiles task.
- Create analysis sets to identify the combinations of items, organizations, and so on to use for each segment.
- On the Demand tab of a plan, select the relevant analysis set when adding forecasting profiles to the plan.
Tips And Considerations
- Forecasting profiles setup
- When using multiple forecasting profiles, the forecasting engine runs the profiles in the order they appear. On the Demand tab of a plan, use the Move Up and Move Down buttons to reorder the profiles, if necessary.
- Analysis sets setup
- Ensure that the members of the analysis set do not overlap. If there are overlaps, the most recently run profile will overwrite the existing forecast for the overlapping members.
Key Resources
Oracle Supply Chain Management Cloud - Release Readiness, available on the Oracle Help Center.
Role Information
Access to this feature is available through the following shipped job roles:
- Demand Planner
- Demand and Supply Planner
- Sales and Operations Planner
Events that affect demand, such as a competitive pricing, and demand shaping activities, such as sales and marketing tactics, are typically complex to analyze. For example, separating the effects of an event activity from the baseline demand changes can be difficult. This feature provides additional preconfigured measures and forecasting profiles to analyze the effects of a demand event activity. This feature also provides new decomposition group definitions to help you visualize the baseline forecast and the effect of the event activity. You can now explore and choose the best options to perform an analysis.
Steps to Enable
To foresee the impact of events, do the following in either the Demand Management or the Demand and Supply Planning work area:
- Populate values for either the Discounted Price or Discount Percentage measure to reflect temporary reductions in price.
- Populate a value for the Event Type measure to indicate the type of event activity. The valid values for the Event Type measure are:
- None
- Feature Only
- Display Only
- Feature and Display
- Temporary Price Reduction
- Generate a demand forecast using either the Forecast Shipments Including Event Activity or Forecast Bookings Including Event Activity forecasting profile.
- Open the Shipments Forecast Causal Decomposition or Bookings Forecast Causal Decomposition graph to view the resulting demand forecast. The portion of the total forecast attributed to the event activity is shown as Event Decomposition Group.
Tips And Considerations
- Do not populate both the Discounted Price and Discount Percentage measures for the same item, customer site, organization, demand class, and day combination.
- Populate the Discounted Price measure if you want to provide the actual reduced price (that is, $1.99 sale price).
- Populate the Discount Percentage measure if you want to provide the percentage reduction in price (that is, 20% discount).
- Populate values both in history and in the future.
- Populate the Discounted Price or Discount Percentage measure to reflect the actual temporary price reductions in history and planned temporary price reductions in the future.
- Populate the Event Type measure to indicate the actual event activity in history and planned event activity in the future.
Key Resources
Oracle Supply Chain Management Cloud - Release Readiness, available on the Oracle Help Center.
Role Information
Access to this feature is available through the following shipped job roles:
- Demand Planner
- Demand and Supply Planner
Maintain Audit Trail on Measure Updates
Monitoring key metrics, such as forecast accuracy is not enough; monitoring should also provide accountability. You need to be able to trace changes made in a plan, including who made the changes, why they were made, and when they were made. With this release, you can audit changes made to the data in a plan.
This feature enables you to monitor changes, allowing you to follow best practices to increase forecast accuracy, reduce inventory, and make better planning decisions over time.
Steps to Enable
To view the audit trail for a measure, do the following in a Supply Chain Planning work area:
- In a plan, click the Open button, and then select a pane.
- In the Open Table, Graph, or Tile Set dialog box, search for Audit Trail of Measure Updates.
- Select the Audit Trail of Measure Updates table and click OK.
Tips And Considerations
- Each row in the Audit Trail of Measure Updates table corresponds to a change that was made to a measure value.
- Click the Details icon for an audit entry to view information on the level members for which the change was made.
Key Resources
Oracle Supply Chain Management Cloud - Release Readiness, available on the Oracle Help Center.
Role Information
Access to this feature is available through the following shipped job roles:
- Demand Planner
- Supply Planner
- Demand and Supply Planner
- Sales and Operations Planner
Aggregate Data for Non-Key Customers
It is important that the data used for planning is accurate and organized for efficient business analysis. Sometimes, only a small fraction of the customers of an enterprise is important for supply chain planning processes. You can now mark the most important customers for planning by uploading your key customers in a file using a predefined file template. The customers not identified in the uploaded key customer data file are grouped into an All Others category. When analyzing forecasts and other data, the key customers and the All Others group are displayed.
This feature helps you:
- Organize important customers that are required for planning.
- Save time by collecting only the required data from Oracle Supply Chain Management Cloud.
- Aggregate data in the plan for analysis.
Steps to Enable
To enable this feature:
- Determine which customers are key customers; the key customers will be visible in a plan.
- Populate and load the ScpKeyCustomerOptionsImportTemplate.xlsm file with the key customers, and the aggregation level of customer data that will be available for plan creation.
- Select the Aggregate non-key customer data to an All Other level member check box in the Demand tab of individual plans.
Tips And Considerations
- The Aggregate non-key customer data to an All Other level member check box is available to select in the Demand tab of a plan. The default state of the check box is as follows:
- When you create or copy a plan, you select the check box when key customers have been identified and you want the non-key customers aggregated to the All Other level member.
- For backward compatibility of existing plans, the check box inherits the state from the existing plans.
- For copied plans, the check box inherits the state from the copied plans.
- For new plans, if the ScpKeyCustomerOptionsImportTemplate.xlsm file is used to set the aggregation level to Level 1 (keep all customers, and also aggregate non-key customers), or Level 2 (aggregate all non-key customers), then the check box is selected by default.
- If the ScpKeyCustomerOptionsImportTemplate.xlsm file is used to set the aggregation level to Level 3 (no aggregation of customers) for all plans, the following validation is run:
- If any existing plans use the aggregated customer data, there is an error in the scheduled process. The log file contains the names of the plans that have the check box selected. The check box must be deselected for these plans to successfully set the aggregation level to Level 3.
- If the validation is successful, that is no plans use aggregated customer data, and the check box is not selected for any plans, then all the existing aggregated data is deleted and the check box is disabled.
- For any of the demand plans used as demand schedules that have the Aggregate non-key customer data to an All Other level member checkbox selected, the Ship-to Consumption Level plan option will not have the Customer and Customer Site values. The forecast processing engine does not support customer or customer site level consumption for the following plan types when you select the Aggregate non-key customer data to an All Other level member check box:
- Demand and Supply plans in the Demand and Supply Planning, and Planning Central work areas
- Supply plans in the Demand and Supply Planning, Planning Central, and Supply Planning work areas
- In all the Oracle Supply Planning Cloud's transactional tables (Supplies and Demands, Demand Fulfillment, Exceptions, etc.) and setup dialog boxes (Sourcing, etc.), all customers and customer sites, including the non-key customers, continue to be visible in both search criteria and results. However, in pivot tables, the non-key customers are represented by a customer member named All Other.
- When you drill from a pivot table or a graph with the customer context, the navigation context will continue to pass the customer context as per the current behavior. However, when you drill from the non-key aggregate customer member named All Other, all non-key customers, which are represented by the customer member All Other, are visible in the transactional table.
Key Resources
- Oracle Supply Chain Management Cloud - Using Demand Management Guide, available on the Oracle Help Center.
Role Information
Access to this feature is available through the following shipped job roles:
- Demand Planner
- Supply Planner
- Demand and Supply Planner
- Sales and Operations Planner
Import Data at Aggregate Levels
When you need to load external data into an Oracle Supply Chain Planning Cloud application, the data may be at a more aggregate level than the level at which the data is stored in the application. For instance, data in the application may be stored at the item, day, and organization level, while some external data such as a financial forecast is available at the product category, month, and region level. In this case, you need to first disaggregate the external data.
In this release, you can load data at more aggregate levels. The application automatically disaggregates the external data to the more granular stored level. With this enhancement, you can easily import and analyze data from a wider range of external data sources.
Steps to Enable
To load data at aggregate levels:
- Download the File-Based Data Import template for Supply Chain Planning Measures or Supply Chain Planning Forecast Measures.
- For each dimension, populate the Level Name and Level Member Name columns in the template with the hierarchy level at which the data is being provided. For example, if you want to load data at the Category level instead of at the Item level for the Product dimension, populate the Product Level Name column with category and the Product Level Member Name column with the name of the category.
Tips And Considerations
Importing data at the aggregate levels is not supported for shared measures, such as Shipments History and Bookings History. Shared measures must be loaded at the lowest levels.
Key Resources
- Oracle Supply Chain Management Cloud - Release Readiness, available on the Oracle Help Center.
- File-Based Data Import templates are available at File-Based Data Import for Oracle Supply Chain Management Cloud.
Role Information
Access to this feature is available through the following shipped job roles:
- Demand Planner
- Supply Planner
- Demand and Supply Planner
- Sales and Operations Planner
Collect and Manage Planning Data More Efficiently
Have a simplified user experience while collecting data from Oracle Fusion source systems, in addition to improved data management with added flexibility and reliability.
You can use the following predefined collection templates based on your business requirements:
- Complete Refresh
- Static Data for Supply Planning
- Static Data for Demand Planning
- Static Data for Sales and Operations Planning
- Dynamic Data for Supply Planning
- Demand Planning and Sales and Operations Planning
- Data for Advanced Execution Flows
Each predefined collection template represents a selection of business entities that matches the most commonly performed collection tasks.
You can also purge the existing data you collected, with reduced risk of losing data integrity. The inbuilt intelligence manages purging of the dependent data entities automatically, and retains the essential data needed for maintaining seamless integration with your execution system.
You can leverage the Automatic Selection collection type to enable the collection process to determine whether to collect only the incremental changes or the entire data for a business entity.
New collection filters for Customer Class and Country provide more flexibility by enabling you to collect only the customer and geography-related information that you are interested in. The new collection filters help you manage data, and improve collection efficiency.
Steps to Enable
In the Demand Management work area, do the following:
- In the Tasks panel drawer, click the Collect Planning Data task.
- From the Source System drop-down list, select the Oracle Fusion source system from which you want to collect the planning data.
- From the Collection Type drop-down list, select a collection type that suits your business requirements.
- From the Collection Templates drop-down list, select a predefined collection template.
- Click Submit.
Tips And Considerations
Select the collection template that best matches your current business or product data requirements.
Key Resources
Oracle Supply Chain Management Cloud - Release Readiness, available on the Oracle Help Center.
Role Information
Access to this feature is available through the following shipped job roles:
- Materials Planner
- Supply Chain Administrator
- Order Promising Manager
- Demand and Supply Planner
In certain circumstances, such as when the plan calculations take a long time to complete, scheduling the plan run to occur during off-peak hours can enable planners to use their time more efficiently. This feature enables you to schedule the technical process involved in running a plan. For example, you can plan to run a scheduled process overnight, allowing your planners to focus on solving planning problems.
Steps to Enable
- In the Run Plan dialog box, after specifying the parameters, go to the Schedule tab, and click the Using a schedule option.
- From the Frequency drop-down list, select a frequency and configure the schedule.
- Click OK.
The process will then be scheduled to run according to the specified schedule as a background job.
Tips And Considerations
- After scheduling a process, you can view the process status using the Process ID.
- You can edit the schedule and change the frequency for the planning processes. In the Scheduled Processes work area, search for and select the process, and click the Edit Schedule button in the process details section.
Key Resources
- The Oracle Supply Chain Management Cloud - Using Demand Management Guide available on the Oracle Help Center.
Role Information
Access to this feature is available through the following shipped job roles:
- Material Planner
- Supply Planner
- Demand Planner
- Demand and Supply Planner
- Sales and Operations Planner
Aggregate Data for Non-Key Customers
It is important that the data used for planning is accurate and organized for efficient business analysis. Sometimes, only a small fraction of the customers of an enterprise is important for supply chain planning processes. You can now mark the most important customers for planning by uploading your key customers in a file using a predefined file template. The customers not identified in the uploaded key customer data file are grouped into an All Others category. When analyzing forecasts and other data, the key customers and the All Others group are displayed.
This feature helps you:
- Organize important customers that are required for planning.
- Save time by collecting only the required data from Oracle Supply Chain Management Cloud.
- Aggregate data in the plan for analysis.
Steps to Enable
To enable this feature:
- Determine which customers are key customers; the key customers will be visible in a plan.
- Populate and load the ScpKeyCustomerOptionsImportTemplate.xlsm file with the key customers, and the aggregation level of customer data that will be available for plan creation.
- Select the Aggregate non-key customer data to an All Other level member check box in the Demand tab of individual plans
Tips And Considerations
- The Aggregate non-key customer data to an All Other level member check box is available to select in the Demand tab of a plan. The default state of the check box is as follows:
- When you create or copy a plan, you select the check box when key customers have been identified and you want the non-key customers aggregated to the All Other level member.
- For backward compatibility of existing plans, the check box inherits the state from the existing plans.
- For copied plans, the check box inherits the state from the copied plans.
- For new plans, if the ScpKeyCustomerOptionsImportTemplate.xlsm file is used to set the aggregation level to Level 1 (keep all customers, and also aggregate non-key customers), or Level 2 (aggregate all non-key customers), then the check box is selected by default.
- If the ScpKeyCustomerOptionsImportTemplate.xlsm file is used to set the aggregation level to Level 3 (no aggregation of customers) for all plans, the following validation is run:
- If any existing plans use the aggregated customer data, there is an error in the scheduled process. The log file contains the names of the plans that have the check box selected. The check box must be deselected for these plans to successfully set the aggregation level to Level 3.
- If the validation is successful, that is no plans use aggregated customer data, and the check box is not selected for any plans, then all the existing aggregated data is deleted and the check box is disabled.
- For any of the demand plans used as demand schedules that have the Aggregate non-key customer data to an All Other level member checkbox selected, the Ship-to Consumption Level plan option will not have the Customer and Customer Site values. The forecast processing engine does not support customer or customer site level consumption for the following plan types when you select the Aggregate non-key customer data to an All Other level member check box:
- Demand and Supply plans in the Demand and Supply Planning, and Planning Central work areas
- Supply plans in the Demand and Supply Planning, Planning Central, and Supply Planning work areas
- In all the Oracle Supply Planning Cloud's transactional tables (Supplies and Demands, Demand Fulfillment, Exceptions, etc.) and setup dialog boxes (Sourcing, etc.), all customers and customer sites, including the non-key customers, continue to be visible in both search criteria and results. However, in pivot tables, the non-key customers are represented by a customer member named All Other.
- When you drill from a pivot table or a graph with the customer context, the navigation context will continue to pass the customer context as per the current behavior. However, when you drill from the non-key aggregate customer member named All Other, all non-key customers, which are represented by the customer member All Other, are visible in the transactional table.
Key Resources
- Oracle Supply Chain Management Cloud - Using Demand Management Guide, available on the Oracle Help Center.
Role Information
Access to this feature is available through the following shipped job roles:
- Demand Planner
- Supply Planner
- Demand and Supply Planner
- Sales and Operations Planner
Import Data at Aggregate Levels
When you need to load external data into an Oracle Supply Chain Planning Cloud application, the data may be at a more aggregate level than the level at which the data is stored in the application. For instance, data in the application may be stored at the item, day, and organization level, while some external data such as a financial forecast is available at the product category, month, and region level. In this case, you need to first disaggregate the external data.
In this release, you can load data at more aggregate levels. The application automatically disaggregates the external data to the more granular stored level. With this enhancement, you can easily import and analyze data from a wider range of external data sources.
Steps to Enable
To load data at aggregate levels:
- Download the File-Based Data Import template for Supply Chain Planning Measures or Supply Chain Planning Forecast Measures.
- For each dimension, populate the Level Name and Level Member Name columns in the template with the hierarchy level at which the data is being provided. For example, if you want to load data at the Category level instead of at the Item level for the Product dimension, populate the Product Level Name column with category and the Product Level Member Name column with the name of the category.
Tips And Considerations
Importing data at the aggregate levels is not supported for shared measures, such as Shipments History and Bookings History. Shared measures must be loaded at the lowest levels.
Key Resources
- Oracle Supply Chain Management Cloud - Release Readiness, available on the Oracle Help Center.
- File-Based Data Import templates are available at File-Based Data Import for Oracle Supply Chain Management Cloud.
Role Information
Access to this feature is available through the following shipped job roles:
- Demand Planner
- Supply Planner
- Demand and Supply Planner
- Sales and Operations Planner
Collect and Manage Planning Data More Efficiently
Have a simplified user experience while collecting data from Oracle Fusion source systems, in addition to improved data management with added flexibility and reliability.
You can use the following predefined collection templates based on your business requirements:
- Complete Refresh
- Static Data for Supply Planning
- Static Data for Demand Planning
- Static Data for Sales and Operations Planning
- Dynamic Data for Supply Planning
- Demand Planning and Sales and Operations Planning
- Data for Advanced Execution Flows
Each predefined collection template represents a selection of business entities that matches the most commonly performed collection tasks.
You can also purge the existing data you collected, with reduced risk of losing data integrity. The inbuilt intelligence manages purging of the dependent data entities automatically, and retains the essential data needed for maintaining seamless integration with your execution system.
You can leverage the Automatic Selection collection type to enable the collection process to determine whether to collect only the incremental changes or the entire data for a business entity.
New collection filters for Customer Class and Country provide more flexibility by enabling you to collect only the customer and geography-related information that you are interested in. The new collection filters help you manage data, and improve collection efficiency.
Steps to Enable
In the Sales and Operations Planning work area, do the following:
- In the Tasks panel drawer, click the Collect Planning Data task.
- From the Source System drop-down list, select the Oracle Fusion source system from which you want to collect the planning data.
- From the Collection Type drop-down list, select a collection type that suits your business requirements.
- From the Collection Templates drop-down list, select a predefined collection template.
- Click Submit.
Tips And Considerations
Select the collection template that best matches your current business or product data requirements.
Key Resources
Oracle Supply Chain Management Cloud - Release Readiness, available on the Oracle Help Center.
Role Information
Access to this feature is available through the following shipped job roles:
- Materials Planner
- Supply Chain Administrator
- Order Promising Manager
- Demand and Supply Planner
In certain circumstances, such as when the plan calculations take a long time to complete, scheduling the plan run to occur during off-peak hours can enable planners to use their time more efficiently. This feature enables you to schedule the technical process involved in running a plan. For example, you can plan to run a scheduled process overnight, allowing your planners to focus on solving planning problems.
Steps to Enable
- In the Run Plan dialog box, after specifying the parameters, go to the Schedule tab, and click the Using a schedule option.
- From the Frequency drop-down list, select a frequency and configure the schedule.
- Click OK.
The process will then be scheduled to run according to the specified schedule as a background job.
Tips And Considerations
- After scheduling a process, you can view the process status using the Process ID.
- You can edit the schedule and change the frequency for the planning processes. In the Scheduled Processes work area, search for and select the process, and click the Edit Schedule button in the process details section.
Key Resources
- The Oracle Supply Chain Management Cloud - Using Sales and Operations Planning Guide available on the Oracle Help Center.
Role Information
Access to this feature is available through the following shipped job roles:
- Material Planner
- Supply Planner
- Demand Planner
- Demand and Supply Planner
- Sales and Operations Planner
Monitor Planning Processes and Improve Planning Data Quality
When you launch a plan, the planning process generates numerous technical processes on the Oracle Supply Chain Planning Cloud server. If an error occurs or the plan results are abnormal, it becomes very difficult to analyze all the log files to trace the source of the error. Analyzing all the log files can lead to loss of time and productivity, especially when you can fix the root cause by making minor modifications to the data.
The new Review Planning Messages page allows you to review important information generated by the planning process in the course of running the plan. For example, you may have a situation in which there is no effective sourcing rule to satisfy demand. In such a situation, a message on this page will enable you to learn about the issue immediately. This Review Planning Messages page significantly reduces the time required to fix errors. It provides key information to act upon without the need to contact the Oracle technical support team.
Steps to Enable
You can navigate to the Review Planning Messages page in the following ways:
- From a plan
- From the Manage Plans page
To navigate to the Review Planning Messages page from a plan, do the following:
- In the Navigator, click the Sales and Operations Planning work area link.
- Open a plan, click the Open button, and then select Full Pane.
- In the Open Table, Graph, or Tile Set dialog box, search for and select the table named Review Plan Messages.
- Click OK.
To navigate to the Review Planning Messages page from the Manage Plans page, do the following:
- In the Navigator, click the Sales and Operations Planning work area link.
- In the Tasks panel drawer, click the Manage Plans link.
- Select a plan and do the following:
- In the Search Results region, from the Actions menu, select Review Plan Messages.
Tips And Considerations
Planners should review the messages periodically to ensure that data is not missing in the plan. For example, a plan may be recommending make planned orders, but there is no valid work definition collected from Oracle Manufacturing Cloud.
Key Resources
Oracle Supply Chain Management Cloud - Release Readiness, available on the Oracle Help Center.
Role Information
Access to this feature is available through the following shipped job roles:
- Materials Planner
- Demand and Supply Planner
- Supply Chain Administrator
Maintain Audit Trail on Measure Updates
Monitoring key metrics, such as forecast accuracy is not enough; monitoring should also provide accountability. You need to be able to trace changes made in a plan, including who made the changes, why they were made, and when they were made. With this release, you can audit changes made to the data in a plan.
This feature enables you to monitor changes, allowing you to follow best practices to increase forecast accuracy, reduce inventory, and make better planning decisions over time.
Steps to Enable
To view the audit trail for a measure, do the following in a Supply Chain Planning work area:
- In a plan, click the Open button, and then select a pane.
- In the Open Table, Graph, or Tile Set dialog box, search for Audit Trail of Measure Updates.
- Select the Audit Trail of Measure Updates table and click OK.
Tips And Considerations
- Each row in the Audit Trail of Measure Updates table corresponds to a change that was made to a measure value.
- Click the Details icon for an audit entry to view information on the level members for which the change was made.
Key Resources
Oracle Supply Chain Management Cloud - Release Readiness, available on the Oracle Help Center.
Role Information
Access to this feature is available through the following shipped job roles:
- Demand Planner
- Supply Planner
- Demand and Supply Planner
- Sales and Operations Planner
Plan for Rework and Transform Work Orders
Rework and transformation of on-hand inventory to fix quality issues or for other reasons is a common activity in the manufacturing facilities. For example, a manufacturing supervisor on seeing excess inventory of one product may decide to transform this inventory to another similar product for which there is demand. The product that has demand may not have enough supply, so the manufacturing supervisor may issue the components required for this transformation and mark the quantity of components that will be returned back to the inventory. In these situations, the facility issues a rework or transform work order.
With this release, Oracle Planning Central Cloud and Oracle Supply Planning Cloud can recognize rework and transform work orders as sources of supply (firm work orders of nonstandard type) to fulfill demand. Additionally, Planning Central and Supply Planning can plan for the dependent demand of the components required for a rework or transform work order and the component supply that will be returned back to the inventory as part of the transform or rework process.
Considering rework and transform work orders during the planning process ensures that all possible sources of supply and demand are included in the plan.
Steps to Enable
- Create rework and transform work orders in Oracle Manufacturing Cloud.
- Collect planning data.
- Use the Plan Inputs work area to verify that the rework and transform work orders are collected as nonstandard work orders.
- Define and run a supply plan.
- Verify that the rework and transform work orders are seen as sources of supply.
- Verify that the component requirements attached to the rework and transform work orders appear as demands in the plan.
- Verify that the products created during the rework or transform process are seen as nonstandard work orders by product supplies in the plan.
Tips And Considerations
- Rework and transform work orders are considered as nonstandard work orders during the planning process; they are always treated as firm. However, they do not participate in the creation of natural time fences.
- Rework and transform work definitions are not collected into the planning data repository. Supply Planning will not plan for new rework and transform activities.
Key Resources
- Oracle Supply Chain Management Cloud - Release Readiness, available on the Oracle Help Center.
Role Information
Access to this feature is available through the following shipped job roles:
- Materials Planner
- Supply Chain Administrator
Collaborate with Suppliers by Start Dates of Forecasted Orders
In some industries, such as semiconductor manufacturing, components procured from suppliers have a long lead time, usually measured in months. Additionally, inefficiencies that are typically seen in such manufacturing processes lead to a portion of the production quantity getting scrapped (also known as shrinkage). This shrinkage results in the quantities yielded at the end of the process being less than the start quantities. Planning systems need to recognize the long lead times and shrinkage so that the supplier can plan the required quantities in time to meet the downstream demand for a component. This feature allows you to:
- Calculate the start date for the anticipated orders based on the lead time to manufacture at the supplier site.
- Estimate start quantities based on the shrinkage rate of an item.
- Communicate the requirements to the supplier (using Oracle Supply Chain Collaboration Cloud), receive the commits, and recognize where there are shortages relative to the requested quantity.
Collaborating with suppliers on this information allows you to plan your downstream supply chain activities efficiently. In addition to providing accurate requirements to the supplier, this feature enables you to shape demand when there are supply shortages.
Steps to Enable
- Create organizations to represent suppliers with whom you want collaborate.
- In the Maintain Supply Network Model page, associate a supplier and supplier site to the organization that you created.
- Define items, shrinkage rates, item structures, and sourcing rules in the supplier organizations.
- Collect planning data.
- Include the supplier organizations in the plan and run the plan.
- Publish order forecasts to the supplier with the basis as start date.
- Receive supply commits from the suppliers.
Tips And Considerations
- Supplier commits received for order forecasts on start dates are for the start quantities of the jobs.
- Supply commits are treated as supplier capacity and are consumed on the dock date only by orders of purchased items. Supply orders for Make items will not consume supplier capacity.
- Configure the material plan to view time-phased start quantities on the start dates by including Supply Start Quantity as a measure.
- When releasing planned orders for execution, the start quantity is released.
- Use item organizations instead of inventory organizations to represent suppliers if there is no business need to track and manage transactional details, such as on hand balances and work in process for that supplier. Item organizations are easier to setup and maintain than inventory organizations.
Key Resources
- Oracle Supply Chain Management Cloud - Release Readiness, available on the Oracle Help Center.
Role Information
Access to this feature is available through the following shipped job roles:
- Materials Planner
- Supply Chain Administrator
Publish Detailed Order Information to Suppliers
Providing visibility into the expected demand of critical components to the supplier goes a long way towards enabling a responsive supply chain. In some situations, the supplier benefits from a granular breakdown of the demand, including what is on order in various statuses and the net additional demand.
This feature allows you to publish the forecast and open orders in various statuses (purchase requisition, purchase order, shipment in transit, and shipment in receiving) to Oracle Supply Chain Collaboration Cloud so that the supplier has full visibility into the forecast and firm orders. This enhanced visibility allows the supplier to make decisions related to supply commits by considering all the available information. This feature enables both you and your critical suppliers to make the right decisions to enable high customer service levels.
Steps to Enable
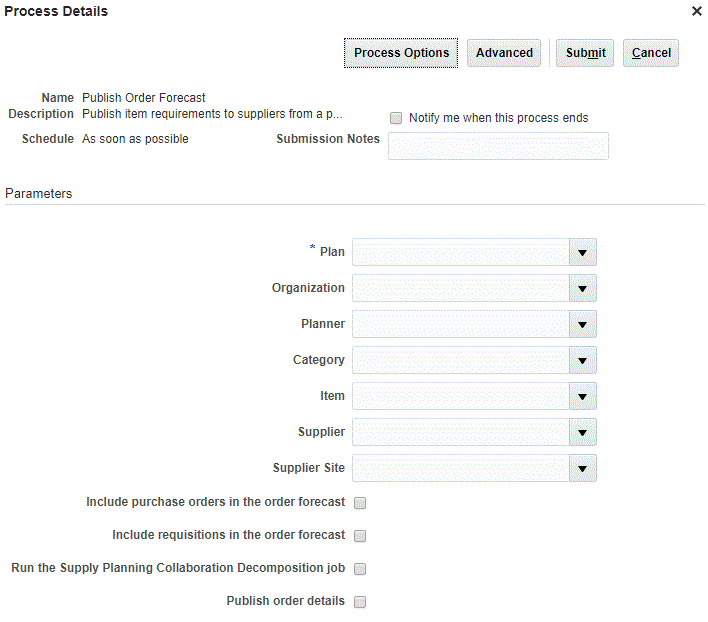
- In the Setup and Maintenance work area, on the Scheduled Processes Overview page, click the Schedule New Process button.
- In the Schedule New Process dialog box, search for and select the scheduled process named Publish Order Details.
- Click OK.
- In the Process Details dialog box, select the Publish order details check box to publish the following supply orders along with the order forecast:
- Purchase order
- Purchase requisition
- Shipment in receiving
- In-transit shipment
- Click Submit.

Process Details Dialog Box for the Publish Order Forecast Scheduled Process
Tips And Considerations
- Orders are aggregated by date, item, organization, supplier, and supplier site.
- All your suppliers may not be interested in receiving information about all types of open orders. It is recommended to first discuss with your suppliers on the types of open orders they are interested in receiving information about, and then publish the order details accordingly.
Key Resources
- Oracle Supply Chain Management Cloud - Release Readiness, available on the Oracle Help Center.
Role Information
Access to this feature is available through the following shipped job roles:
- Materials Planner
- Supply Chain Administrator
Analyze Configure-to-Order Model Forecast and Sales Orders Together
In the configure-to-order process, a configured item is transacted in the execution systems using a unique item identifier, which is different from the model item identifier. To make effective planning decisions, you may need to view the orders (both supply and demand) represented by multiple unique item identifiers and the model forecast together. This is now possible using the Material Plan page. You can bring in supply and demand data for a model, regardless of the unique item identifiers used for transacting a specific order.
This enhancement allows planners to analyze and make effective supply and demand decisions in a configure-to-order environment.
Steps to Enable
To analyze model forecast and sales orders together:
- In a Supply Chain Planning work area, open a plan, and click the Open button.
- In the Open Table, Graph, or Tile Set dialog box, search for Material Plan.
- Select the Material Plan table and click OK.
- On the Material Plan page, click the Selector Tool - View Table Configuration icon in the material plan toolbar.
- In the Measures tab, move the Configured Item Sales Orders measure from the Available Measures pane to the Selected Measures pane.
- Click Apply and Close.
Key Resources
Oracle Supply Chain Management Cloud - Release Readiness, available on the Oracle Help Center
Role Information
Access to this feature is available through the following shipped job role:
- Supply Planner
Publish Order Forecast to Oracle Supply Chain Collaboration Cloud in One Step
Prior to this update, publishing order forecasts was a two-step process, which was initiated using a separate scheduled process. With this update, you can publish the order forecasts from Planning Central or Supply Planning to Supply Chain Collaboration in one step. Order forecast can be published from:
- A plan
- The Supplies and Demands page
- The Items page
You can also run the Publish Order Forecast scheduled process from the Scheduled Processes work area as you would in a prior release.
Additionally, you no longer need to save a plan to publish the component order forecast to Supply Chain Collaboration. This feature increases your productivity by streamlining the integration with Supply Chain Collaboration.
Steps to Enable
After reviewing the supplies, demands, and material plan for an Item Organization on the Supplies and Demands page, from the Actions menu, select Publish Order Forecast.

Publish Order Forecast From the Supplies and Demands Page
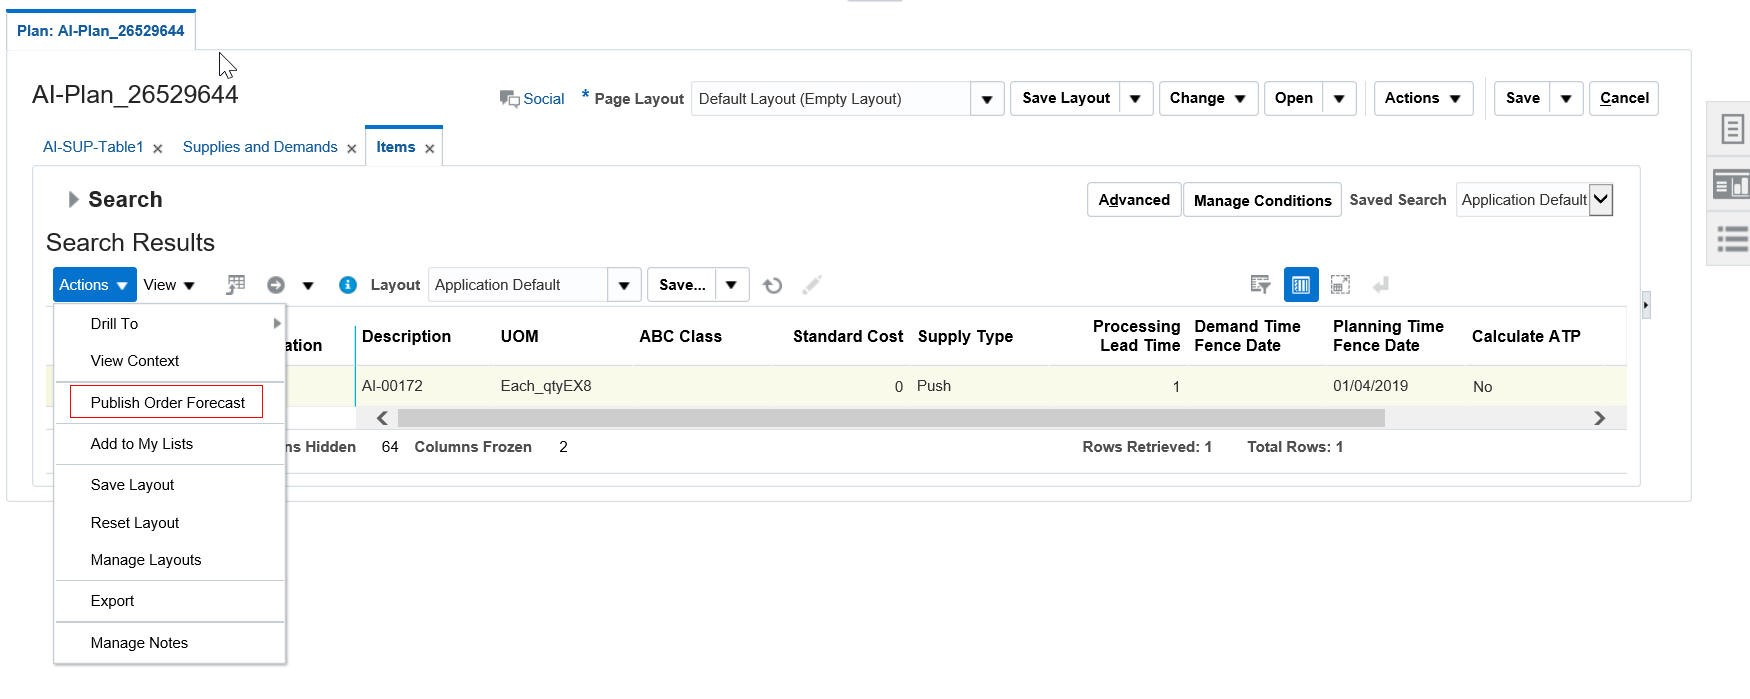
After reviewing the supplies, demands, and material plan for a set of items, on the Items page, from the Actions menu, select Publish Order Forecast.

Publish Order Forecast From the Items Page
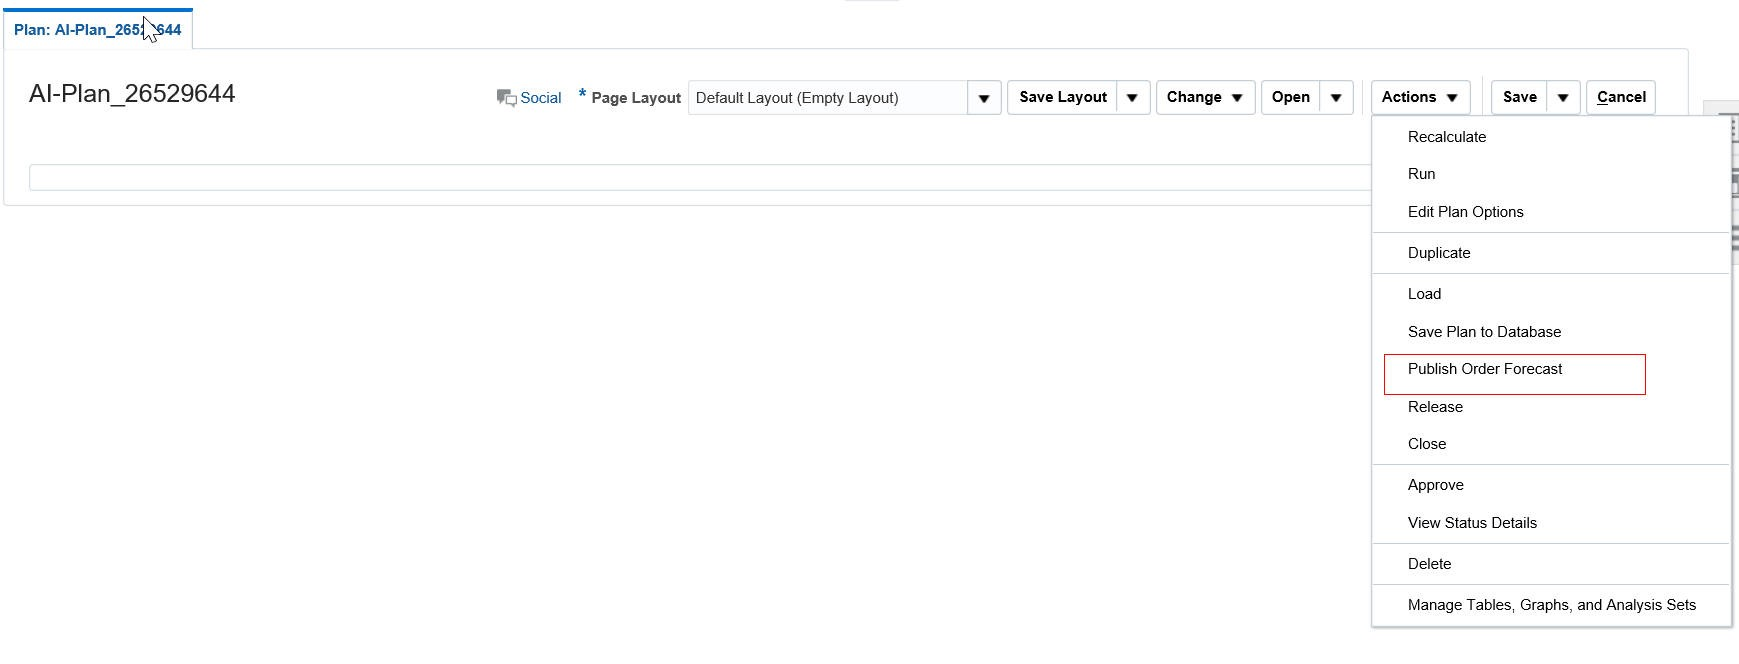
To publish all orders within a plan, from the Actions menu, select Publish Order Forecast.

Publish Order Forecast From a Plan
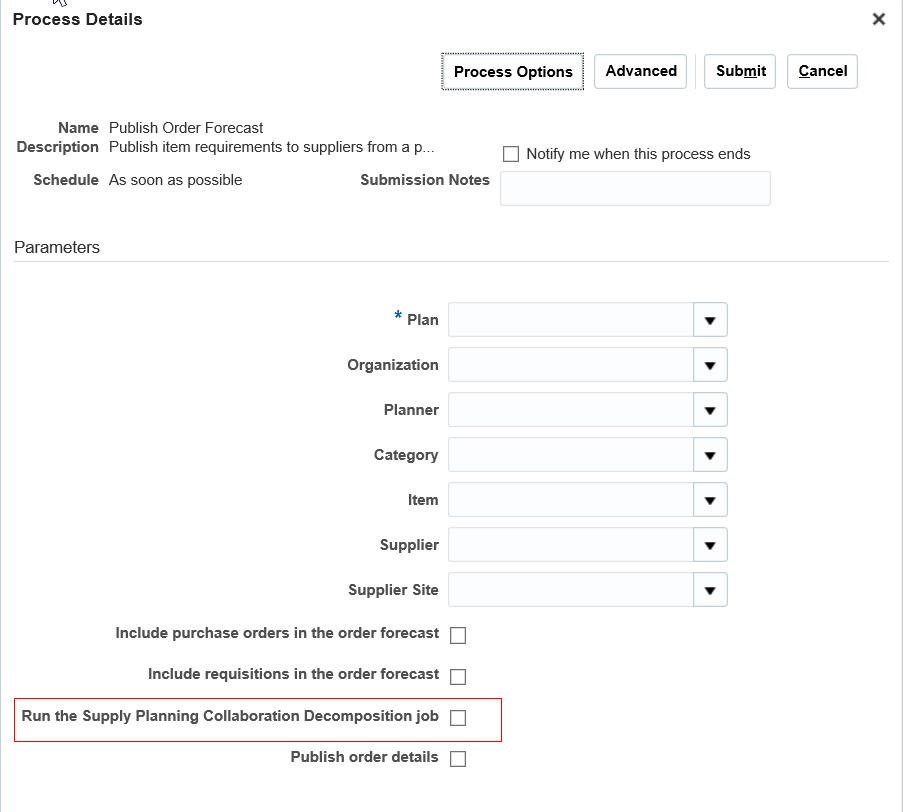
You can also run the Publish Order Forecast scheduled processes from the Scheduled Processes work area. To run the Supply Planning Collaboration Decomposition scheduled process along with the Publish Order Forecast scheduled process, select the Run the Supply Planning Collaboration Decomposition job check box in the Process Details dialog box for the Publish Order Forecast scheduled process.

Run the Publish Order Forecast and Supply Planning Collaboration Decomposition Scheduled Processes Together
Tips And Considerations
- It is recommended to inform the Supply Chain Collaboration planner before publishing the order forecast.
- Use the Publish Order Forecast option on the Supplies and Demands page and Items page when you want to publish the order forecast for only one organization or item at a time.
- To include parameters, such as Publish Order details and Include purchase orders in the order forecast while publishing the order forecast, launch the Publish Order Forecast scheduled process from the Scheduled Processes work area.
Key Resources
- Oracle Supply Chain Management Cloud - Release Readiness, available on the Oracle Help Center.
Role Information
Access to this feature is available through the following shipped job roles:
- Materials Planner
- Supply Chain Administrator
Maintain Audit Trail on Measure Updates
Monitoring key metrics, such as forecast accuracy is not enough; monitoring should also provide accountability. You need to be able to trace changes made in a plan, including who made the changes, why they were made, and when they were made. With this release, you can audit changes made to the data in a plan.
This feature enables you to monitor changes, allowing you to follow best practices to increase forecast accuracy, reduce inventory, and make better planning decisions over time.
Steps to Enable
To view the audit trail for a measure, do the following in a Supply Chain Planning work area:
- In a plan, click the Open button, and then select a pane.
- In the Open Table, Graph, or Tile Set dialog box, search for Audit Trail of Measure Updates.
- Select the Audit Trail of Measure Updates table and click OK.
Tips And Considerations
- Each row in the Audit Trail of Measure Updates table corresponds to a change that was made to a measure value.
- Click the Details icon for an audit entry to view information on the level members for which the change was made.
Key Resources
Oracle Supply Chain Management Cloud - Release Readiness, available on the Oracle Help Center.
Role Information
Access to this feature is available through the following shipped job roles:
- Demand Planner
- Supply Planner
- Demand and Supply Planner
- Sales and Operations Planner
Aggregate Data for Non-Key Customers
It is important that the data used for planning is accurate and organized for efficient business analysis. Sometimes, only a small fraction of the customers of an enterprise is important for supply chain planning processes. You can now mark the most important customers for planning by uploading your key customers in a file using a predefined file template. The customers not identified in the uploaded key customer data file are grouped into an All Others category. When analyzing forecasts and other data, the key customers and the All Others group are displayed.
This feature helps you:
- Organize important customers that are required for planning.
- Save time by collecting only the required data from Oracle Supply Chain Management Cloud.
- Aggregate data in the plan for analysis.
Steps to Enable
To enable this feature:
- Determine which customers are key customers; the key customers will be visible in a plan.
- Populate and load the ScpKeyCustomerOptionsImportTemplate.xlsm file with the key customers, and the aggregation level of customer data that will be available for plan creation.
- Select the Aggregate non-key customer data to an All Other level member check box in the Demand tab of individual plans.
Tips And Considerations
- The Aggregate non-key customer data to an All Other level member check box is available to select in the Demand tab of a plan. The default state of the check box is as follows:
- When you create or copy a plan, you select the check box when key customers have been identified and you want the non-key customers aggregated to the All Other level member.
- For backward compatibility of existing plans, the check box inherits the state from the existing plans.
- For copied plans, the check box inherits the state from the copied plans.
- For new plans, if the ScpKeyCustomerOptionsImportTemplate.xlsm file is used to set the aggregation level to Level 1 (keep all customers, and also aggregate non-key customers), or Level 2 (aggregate all non-key customers), then the check box is selected by default.
- If the ScpKeyCustomerOptionsImportTemplate.xlsm file is used to set the aggregation level to Level 3 (no aggregation of customers) for all plans, the following validation is run:
- If any existing plans use the aggregated customer data, there is an error in the scheduled process. The log file contains the names of the plans that have the check box selected. The check box must be deselected for these plans to successfully set the aggregation level to Level 3.
- If the validation is successful, that is no plans use aggregated customer data, and the check box is not selected for any plans, then all the existing aggregated data is deleted and the check box is disabled.
- For any of the demand plans used as demand schedules that have the Aggregate non-key customer data to an All Other level member checkbox selected, the Ship-to Consumption Level plan option will not have the Customer and Customer Site values. The forecast processing engine does not support customer or customer site level consumption for the following plan types when you select the Aggregate non-key customer data to an All Other level member check box:
- Demand and Supply plans in the Demand and Supply Planning, and Planning Central work areas
- Supply plans in the Demand and Supply Planning, Planning Central, and Supply Planning work areas
- In all the Oracle Supply Planning Cloud's transactional tables (Supplies and Demands, Demand Fulfillment, Exceptions, etc.) and setup dialog boxes (Sourcing, etc.), all customers and customer sites, including the non-key customers, continue to be visible in both search criteria and results. However, in pivot tables, the non-key customers are represented by a customer member named All Other.
- When you drill from a pivot table or a graph with the customer context, the navigation context will continue to pass the customer context as per the current behavior. However, when you drill from the non-key aggregate customer member named All Other, all non-key customers, which are represented by the customer member All Other, are visible in the transactional table.
Key Resources
- Oracle Supply Chain Management Cloud - Using Demand Management Guide, available on the Oracle Help Center.
Role Information
Access to this feature is available through the following shipped job roles:
- Demand Planner
- Supply Planner
- Demand and Supply Planner
- Sales and Operations Planner
Import Data at Aggregate Levels
When you need to load external data into an Oracle Supply Chain Planning Cloud application, the data may be at a more aggregate level than the level at which the data is stored in the application. For instance, data in the application may be stored at the item, day, and organization level, while some external data such as a financial forecast is available at the product category, month, and region level. In this case, you need to first disaggregate the external data.
In this release, you can load data at more aggregate levels. The application automatically disaggregates the external data to the more granular stored level. With this enhancement, you can easily import and analyze data from a wider range of external data sources.
Steps to Enable
To load data at aggregate levels:
- Download the File-Based Data Import template for Supply Chain Planning Measures or Supply Chain Planning Forecast Measures.
- For each dimension, populate the Level Name and Level Member Name columns in the template with the hierarchy level at which the data is being provided. For example, if you want to load data at the Category level instead of at the Item level for the Product dimension, populate the Product Level Name column with category and the Product Level Member Name column with the name of the category.
Tips And Considerations
Importing data at the aggregate levels is not supported for shared measures, such as Shipments History and Bookings History. Shared measures must be loaded at the lowest levels.
Key Resources
- Oracle Supply Chain Management Cloud - Release Readiness, available on the Oracle Help Center.
- File-Based Data Import templates are available at File-Based Data Import for Oracle Supply Chain Management Cloud.
Role Information
Access to this feature is available through the following shipped job roles:
- Demand Planner
- Supply Planner
- Demand and Supply Planner
- Sales and Operations Planner
Collect and Manage Planning Data More Efficiently
Have a simplified user experience while collecting data from Oracle Fusion source systems, in addition to improved data management with added flexibility and reliability.
You can use the following predefined collection templates based on your business requirements:
- Complete Refresh
- Static Data for Supply Planning
- Static Data for Demand Planning
- Static Data for Sales and Operations Planning
- Dynamic Data for Supply Planning
- Demand Planning and Sales and Operations Planning
- Data for Advanced Execution Flows
Each predefined collection template represents a selection of business entities that matches the most commonly performed collection tasks.
You can also purge the existing data you collected, with reduced risk of losing data integrity. The inbuilt intelligence manages purging of the dependent data entities automatically, and retains the essential data needed for maintaining seamless integration with your execution system.
You can leverage the Automatic Selection collection type to enable the collection process to determine whether to collect only the incremental changes or the entire data for a business entity.
New collection filters for Customer Class and Country provide more flexibility by enabling you to collect only the customer and geography-related information that you are interested in. The new collection filters help you manage data, and improve collection efficiency.
Steps to Enable
In the Supply Planning work area, do the following:
- In the Tasks panel drawer, click the Collect Planning Data task.
- From the Source System drop-down list, select the Oracle Fusion source system from which you want to collect the planning data.
- From the Collection Type drop-down list, select a collection type that suits your business requirements.
- From the Collection Templates drop-down list, select a predefined collection template.
- Click Submit.
Tips And Considerations
Select the collection template that best matches your current business or product data requirements.
Key Resources
Oracle Supply Chain Management Cloud - Release Readiness, available on the Oracle Help Center.
Role Information
Access to this feature is available through the following shipped job roles:
- Materials Planner
- Supply Chain Administrator
- Order Promising Manager
- Demand and Supply Planner
In certain circumstances, such as when plan calculations take a long time to complete, scheduling the plan run to occur during off-peak hours can enable planners to use their time more efficiently. This feature enables you to schedule the technical process involved in running a plan. For example, you can plan to run a scheduled process overnight, allowing your planners to focus on solving planning problems.
Steps to Enable
- In the Run Plan dialog box, after specifying the parameters, go to the Schedule tab, and click the Using a schedule option.
- From the Frequency drop-down list, select a frequency and configure the schedule.
- Click OK.
The process will then be scheduled to run according to the specified schedule as a background job.
Tips And Considerations
- After scheduling a process, you can view the process status using the Process ID.
- You can edit the schedule and change the frequency for the planning processes. In the Scheduled Processes work area, search for and select the process, and click the Edit Schedule button in the process details section.
Key Resources
- The Oracle Supply Chain Management Cloud - Using Supply Planning Guide available on the Oracle Help Center.
Role Information
Access to this feature is available through the following shipped job roles:
- Material Planner
- Supply Planner
- Demand Planner
- Demand and Supply Planner
- Sales and Operations Planner
Monitor Planning Processes and Improve Planning Data Quality
When you launch a plan, the planning process generates numerous technical processes on the Oracle Supply Chain Planning Cloud server. If an error occurs or the plan results are abnormal, it becomes very difficult to analyze all the log files to trace the source of the error. Analyzing all the log files can lead to lost time and productivity, especially when you can fix the root cause by making minor modifications to the data.
The new Review Planning Messages page allows you to review important information generated by the planning process in the course of running a plan. For example, you may have a situation in which there is no effective sourcing rule to satisfy demand. In such a situation, a message on the Review Planning Messages page will enable you to learn about the issue immediately. This Review Planning Messages page significantly reduces the time required to fix errors. It provides key information to act upon, without contacting the Oracle technical support team.
Steps to Enable
You can navigate to the Review Planning Messages page in the following ways:
- From a plan
- From the Manage Plans page
To navigate to the Review Planning Messages page from a plan, do the following:
- In the Navigator, click the Supply Planning work area link.
- Open a plan, click the Open button, and then select Full Pane.
- In the Open Table, Graph, or Tile Set dialog box, search for and select the table named Review Plan Messages.
- Click OK.
To navigate to the Review Planning Messages page from the Manage Plans page, do the following:
- In the Navigator, click the Supply Planning work area link.
- In the Tasks panel drawer, click the Manage Plans link.
- Select a plan and do the following:
- In the Search Results region, from the Actions menu, select Review Plan Messages.
Tips And Considerations
Planners should review the messages periodically to ensure that data is not missing in the plan. For example, a plan may be recommending Make planned orders, but there is no valid work definition collected from Oracle Manufacturing Cloud.
Key Resources
Oracle Supply Chain Management Cloud - Release Readiness, available on the Oracle Help Center.
Role Information
Access to this feature is available through the following shipped job roles:
- Materials Planner
- Supply Chain Administrator
Reduce the burden of maintaining the data required for planning processes to ensure an effective plan. This feature simplifies the management of material planners, which is a core setup task in Oracle Supply Planning Cloud, and is required for the proper analysis and execution of a plan. With this release, you can create a planner code just once, without having to establish detailed valid planner and organization combinations. You can now either manually define planners in the application using the Manage Planners task, or you can upload predefined file templates to define planners. This reduces the time you need to spend in managing material planners and increases your productivity.
Steps to Enable
In the Supply Planning work area, select the Manage Planners task. Add the planners you will need for the Supply Chain Planning Cloud applications. You will only need to add a planner once and then each planner is enabled for all organizations and for all source systems.
Tips And Considerations
With the global planners feature, you only need to create a planner once to use the planner in any item-organization association in Oracle Product Model Cloud.
This feature is also applicable to Oracle Planning Central Cloud.
Key Resources
- Oracle Supply Chain Management Cloud - Release Readiness, available on the Oracle Help Center.
Role Information
Access to this feature is available through the following shipped job roles:
- Materials Planner
- Supply Chain Administrator
Plan for Rework and Transform Work Orders
Rework and transformation of on-hand inventory to fix quality issues or for other reasons is a common activity in the manufacturing facilities. For example, a manufacturing supervisor on seeing excess inventory of one product may decide to transform this inventory to another similar product for which there is demand. The product that has demand may not have enough supply, so the manufacturing supervisor may issue the components required for this transformation and mark the quantity of components that will be returned back to the inventory. In these situations, the facility issues a rework or transform work order.
With this release, Oracle Planning Central Cloud and Oracle Supply Planning Cloud can recognize rework and transform work orders as sources of supply (firm work orders of nonstandard type) to fulfill demand. Additionally, Planning Central and Supply Planning can plan for the dependent demand of the components required for a rework or transform work order and the component supply that will be returned back to the inventory as part of the transform or rework process.
Considering rework and transform work orders during the planning process ensures that all possible sources of supply and demand are included in the plan.
Steps to Enable
- Create rework and transform work orders in Oracle Manufacturing Cloud.
- Collect planning data.
- Use the Plan Inputs work area to verify that the rework and transform work orders are collected as nonstandard work orders.
- Define and run a supply plan.
- Verify that the rework and transform work orders are seen as sources of supply.
- Verify that the component requirements attached to the rework and transform work orders appear as demands in the plan.
- Verify that the products created during the rework or transform process are seen as nonstandard work orders by product supplies in the plan.
Tips And Considerations
- Rework and transform work orders are considered as nonstandard work orders during the planning process; they are always treated as firm. However, they do not participate in the creation of natural time fences.
- Rework and transform work definitions are not collected into the planning data repository. Supply Planning will not plan for new rework and transform activities.
Key Resources
- Oracle Supply Chain Management Cloud - Release Readiness, available on the Oracle Help Center.
Role Information
Access to this feature is available through the following shipped job roles:
- Materials Planner
- Supply Chain Administrator
Collaborate with Suppliers by Start Dates of Forecasted Orders
In some industries, such as semiconductor manufacturing, components procured from suppliers have a long lead time, usually measured in months. Additionally, inefficiencies that are typically seen in such manufacturing processes lead to a portion of the production quantity getting scrapped (also known as shrinkage). This shrinkage results in the quantities yielded at the end of the process being less than the start quantities. Planning systems need to recognize the long lead times and shrinkage so that the supplier can plan the required quantities in time to meet the downstream demand for a component. This feature allows you to:
- Calculate the start date for the anticipated orders based on the lead time to manufacture at the supplier site.
- Estimate start quantities based on the shrinkage rate of an item.
- Communicate the requirements to the supplier (using Oracle Supply Chain Collaboration Cloud), receive the commits, and recognize where there are shortages relative to the requested quantity.
Collaborating with suppliers on this information allows you to plan your downstream supply chain activities efficiently. In addition to providing accurate requirements to the supplier, this feature enables you to shape demand when there are supply shortages.
Steps to Enable
- Create organizations to represent suppliers with whom you want collaborate.
- In the Maintain Supply Network Model page, associate a supplier and supplier site to the organization that you created.
- Define items, shrinkage rates, item structures, and sourcing rules in the supplier organizations.
- Collect planning data.
- Include the supplier organizations in the plan and run the plan.
- Publish order forecasts to the supplier with the basis as start date.
- Receive supply commits from the suppliers.
Tips And Considerations
- Supplier commits received for order forecasts on start dates are for the start quantities of the jobs.
- Supply commits are treated as supplier capacity and are consumed on the dock date only by orders of purchased items. Supply orders for Make items will not consume supplier capacity.
- Configure the material plan to view time-phased start quantities on the start dates by including Supply Start Quantity as a measure.
- When releasing planned orders for execution, the start quantity is released.
- Use item organizations instead of inventory organizations to represent suppliers if there is no business need to track and manage transactional details, such as on hand balances and work in process for that supplier. Item organizations are easier to setup and maintain than inventory organizations.
Key Resources
- Oracle Supply Chain Management Cloud - Release Readiness, available on the Oracle Help Center.
Role Information
Access to this feature is available through the following shipped job roles:
- Materials Planner
- Supply Chain Administrator
Publish Detailed Order Information to Suppliers
Providing visibility into the expected demand of critical components to the supplier goes a long way towards enabling a responsive supply chain. In some situations, the supplier benefits from a granular breakdown of the demand, including what is on order in various statuses and the net additional demand.
This feature allows you to publish the forecast and open orders in various statuses (purchase requisition, purchase order, shipment in transit, and shipment in receiving) to Oracle Supply Chain Collaboration Cloud so that the supplier has full visibility into the forecast and firm orders. This enhanced visibility allows the supplier to make decisions related to supply commits by considering all the available information. This feature enables both you and your critical suppliers to make the right decisions to enable high customer service levels.
Steps to Enable
- In the Setup and Maintenance work area, on the Scheduled Processes Overview page, click the Schedule New Process button.
- In the Schedule New Process dialog box, search for and select the scheduled process named Publish Order Details.
- Click OK.
- In the Process Details dialog box, select the Publish order details check box to publish the following supply orders along with the order forecast:
- Purchase order
- Purchase requisition
- Shipment in receiving
- In-transit shipment
- Click Submit.
Publish Order Forecast
Tips And Considerations
- Orders are aggregated by date, item, organization, supplier, and supplier site.
- All your suppliers may not be interested in receiving information about all types of open orders. It is recommended to first discuss with your suppliers on the types of open orders they are interested in receiving information about, and then publish the order details accordingly.
Key Resources
- Oracle Supply Chain Management Cloud - Release Readiness, available on the Oracle Help Center.
Role Information
Access to this feature is available through the following shipped job roles:
- Materials Planner
- Supply Chain Administrator
Analyze Configure-to-Order Model Forecast and Sales Orders Together
In the configure-to-order process, a configured item is transacted in the execution systems using a unique item identifier, which is different from the model item identifier. To make effective planning decisions, you may need to view the orders (both supply and demand) represented by multiple unique item identifiers and the model forecast together. This is now possible using the Material Plan page. You can bring in supply and demand data for a model, regardless of the unique item identifiers used for transacting a specific order.
This enhancement allows planners to analyze and make effective supply and demand decisions in a configure-to-order environment.
Steps to Enable
To analyze model forecast and sales orders together:
- In a Supply Chain Planning work area, open a plan, and click the Open button.
- In the Open Table, Graph, or Tile Set dialog box, search for Material Plan.
- Select the Material Plan table and click OK.
- On the Material Plan page, click the Selector Tool - View Table Configuration icon in the material plan toolbar.
- In the Measures tab, move the Configured Item Sales Orders measure from the Available Measures pane to the Selected Measures pane.
- Click Apply and Close.
Key Resources
Oracle Supply Chain Management Cloud - Release Readiness, available on the Oracle Help Center
Role Information
Access to this feature is available through the following shipped job role:
- Supply Planner
Publish Order Forecast to Oracle Supply Chain Collaboration Cloud in One Step
Prior to this update, publishing order forecasts was a two-step process, which was initiated using a separate scheduled process. With this update, you can publish the order forecasts from Oracle Planning Central Cloud or Oracle Supply Planning Cloud to Oracle Supply Chain Collaboration Cloud in one step. Order forecast can be published from:
- A plan
- The Supplies and Demands page
- The Items page
You can also run the Publish Order Forecast scheduled process from the Scheduled Processes work area as you would in a prior release.
Additionally, you no longer need to save a plan to publish the component order forecast to Supply Chain Collaboration. This feature increases your productivity by streamlining the integration with Supply Chain Collaboration.
Steps to Enable
After reviewing the supplies, demands, and material plan for an Item Organization on the Supplies and Demands page, from the Actions menu, select Publish Order Forecast. 
Publish Order Forecast From the Supplies and Demands Page
After reviewing the supplies, demands, and material plan for a set of items, on the Items page, from the Actions menu, select Publish Order Forecast.
Publish Order Forecast From the Items Page
To publish all orders within a plan, from the Actions menu, select Publish Order Forecast.
Publish Order Forecast From a Plan
You can also run the Publish Order Forecast scheduled processes from the Scheduled Processes work area. To run the Supply Planning Collaboration Decomposition scheduled process along with the Publish Order Forecast scheduled process, select the Run the Supply Planning Collaboration Decomposition job check box in the Process Details dialog box for the Publish Order Forecast scheduled process.
Run the Publish Order Forecast and Supply Planning Collaboration Decomposition Scheduled Processes Together
Tips And Considerations
- It is recommended to inform the Supply Chain Collaboration planner before publishing the order forecast.
- Use the Publish Order Forecast option on the Supplies and Demands page and Items page when you want to publish the order forecast for only one organization or item at a time.
- To include parameters, such as Publish Order details and Include purchase orders in the order forecast while publishing the order forecast, launch the Publish Order Forecast scheduled process from the Scheduled Processes work area.
Key Resources
- Oracle Supply Chain Management Cloud - Release Readiness, available on the Oracle Help Center.
Role Information
Access to this feature is available through the following shipped job roles:
- Materials Planner
- Supply Chain Administrator
Maintain Audit Trail on Measure Updates
Monitoring key metrics, such as forecast accuracy is not enough; monitoring should also provide accountability. You need to be able to trace changes made in a plan, including who made the changes, why they were made, and when they were made. With this release, you can audit changes made to the data in a plan.
This feature enables you to monitor changes, allowing you to follow best practices to increase forecast accuracy, reduce inventory, and make better planning decisions over time.
Steps to Enable
To view the audit trail for a measure, do the following in a Supply Chain Planning work area:
- In a plan, click the Open button, and then select a pane.
- In the Open Table, Graph, or Tile Set dialog box, search for Audit Trail of Measure Updates.
- Select the Audit Trail of Measure Updates table and click OK.
Tips And Considerations
- Each row in the Audit Trail of Measure Updates table corresponds to a change that was made to a measure value.
- Click the Details icon for an audit entry to view information on the level members for which the change was made.
Key Resources
Oracle Supply Chain Management Cloud - Release Readiness, available on the Oracle Help Center.
Role Information
Access to this feature is available through the following shipped job roles:
- Demand Planner
- Supply Planner
- Demand and Supply Planner
- Sales and Operations Planner
Aggregate Data for Non-Key Customers
It is important that the data used for planning is accurate and organized for efficient business analysis. Sometimes, only a small fraction of the customers of an enterprise is important for supply chain planning processes. You can now mark the most important customers for planning by uploading your key customers in a file using a predefined file template. The customers not identified in the uploaded key customer data file are grouped into an All Others category. When analyzing forecasts and other data, the key customers and the All Others group are displayed.
This feature helps you:
- Organize important customers that are required for planning.
- Save time by collecting only the required data from Oracle Supply Chain Management Cloud.
- Aggregate data in the plan for analysis.
Steps to Enable
To enable this feature:
- Determine which customers are key customers; the key customers will be visible in a plan.
- Populate and load the ScpKeyCustomerOptionsImportTemplate.xlsm file with the key customers, and the aggregation level of customer data that will be available for plan creation.
- Select the Aggregate non-key customer data to an All Other level member check box in the Demand tab of individual plans.
Tips And Considerations
- The Aggregate non-key customer data to an All Other level member check box is available to select in the Demand tab of a plan. The default state of the check box is as follows:
- When you create or copy a plan, you select the check box when key customers have been identified and you want the non-key customers aggregated to the All Other level member.
- For backward compatibility of existing plans, the check box inherits the state from the existing plans.
- For copied plans, the check box inherits the state from the copied plans.
- For new plans, if the ScpKeyCustomerOptionsImportTemplate.xlsm file is used to set the aggregation level to Level 1 (keep all customers, and also aggregate non-key customers), or Level 2 (aggregate all non-key customers), then the check box is selected by default.
- If the ScpKeyCustomerOptionsImportTemplate.xlsm file is used to set the aggregation level to Level 3 (no aggregation of customers) for all plans, the following validation is run:
- If any existing plans use the aggregated customer data, there is an error in the scheduled process. The log file contains the names of the plans that have the check box selected. The check box must be deselected for these plans to successfully set the aggregation level to Level 3.
- If the validation is successful, that is no plans use aggregated customer data, and the check box is not selected for any plans, then all the existing aggregated data is deleted and the check box is disabled.
- For any of the demand plans used as demand schedules that have the Aggregate non-key customer data to an All Other level member checkbox selected, the Ship-to Consumption Level plan option will not have the Customer and Customer Site values. The forecast processing engine does not support customer or customer site level consumption for the following plan types when you select the Aggregate non-key customer data to an All Other level member check box:
- Demand and Supply plans in the Demand and Supply Planning, and Planning Central work areas
- Supply plans in the Demand and Supply Planning, Planning Central, and Supply Planning work areas
- In all the Oracle Supply Planning Cloud's transactional tables (Supplies and Demands, Demand Fulfillment, Exceptions, etc.) and setup dialog boxes (Sourcing, etc.), all customers and customer sites, including the non-key customers, continue to be visible in both search criteria and results. However, in pivot tables, the non-key customers are represented by a customer member named All Other.
- When you drill from a pivot table or a graph with the customer context, the navigation context will continue to pass the customer context as per the current behavior. However, when you drill from the non-key aggregate customer member named All Other, all non-key customers, which are represented by the customer member All Other, are visible in the transactional table.
Key Resources
- Oracle Supply Chain Management Cloud - Using Demand Management Guide, available on the Oracle Help Center.
Role Information
Access to this feature is available through the following shipped job roles:
- Demand Planner
- Supply Planner
- Demand and Supply Planner
- Sales and Operations Planner
Import Data at Aggregate Levels
When you need to load external data into an Oracle Supply Chain Planning Cloud application, the data may be at a more aggregate level than the level at which the data is stored in the application. For instance, data in the application may be stored at the item, day, and organization level, while some external data such as a financial forecast is available at the product category, month, and region level. In this case, you need to first disaggregate the external data.
In this release, you can load data at more aggregate levels. The application automatically disaggregates the external data to the more granular stored level. With this enhancement, you can easily import and analyze data from a wider range of external data sources.
Steps to Enable
To load data at aggregate levels:
- Download the File-Based Data Import template for Supply Chain Planning Measures or Supply Chain Planning Forecast Measures.
- For each dimension, populate the Level Name and Level Member Name columns in the template with the hierarchy level at which the data is being provided. For example, if you want to load data at the Category level instead of at the Item level for the Product dimension, populate the Product Level Name column with category and the Product Level Member Name column with the name of the category.
Tips And Considerations
Importing data at the aggregate levels is not supported for shared measures, such as Shipments History and Bookings History. Shared measures must be loaded at the lowest levels.
Key Resources
- Oracle Supply Chain Management Cloud - Release Readiness, available on the Oracle Help Center.
- File-Based Data Import templates are available at File-Based Data Import for Oracle Supply Chain Management Cloud.
Role Information
Access to this feature is available through the following shipped job roles:
- Demand Planner
- Supply Planner
- Demand and Supply Planner
- Sales and Operations Planner
Collect and Manage Planning Data More Efficiently
Have a simplified user experience while collecting data from Oracle Fusion source systems, in addition to improved data management with added flexibility and reliability.
You can use the following predefined collection templates based on your business requirements:
- Complete Refresh
- Static Data for Supply Planning
- Static Data for Demand Planning
- Static Data for Sales and Operations Planning
- Dynamic Data for Supply Planning
- Demand Planning and Sales and Operations Planning
- Data for Advanced Execution Flows
Each predefined collection template represents a selection of business entities that matches the most commonly performed collection tasks.
You can also purge the existing data you collected, with reduced risk of losing data integrity. The inbuilt intelligence manages purging of the dependent data entities automatically, and retains the essential data needed for maintaining seamless integration with your execution system.
You can leverage the Automatic Selection collection type to enable the collection process to determine whether to collect only the incremental changes or the entire data for a business entity.
New collection filters for Customer Class and Country provide more flexibility by enabling you to collect only the customer and geography-related information that you are interested in. The new collection filters help you manage data, and improve collection efficiency.
Steps to Enable
In the Planning Central work area, do the following:
- In the Tasks panel drawer, click the Collect Planning Data task.
- From the Source System drop-down list, select the Oracle Fusion source system from which you want to collect the planning data.
- From the Collection Type drop-down list, select a collection type that suits your business requirements.
- From the Collection Templates drop-down list, select a predefined collection template.
- Click Submit.
Tips And Considerations
Select the collection template that best matches your current business or product data requirements.
Key Resources
Oracle Supply Chain Management Cloud - Release Readiness, available on the Oracle Help Center.
Role Information
Access to this feature is available through the following shipped job roles:
- Materials Planner
- Supply Chain Administrator
- Order Promising Manager
In certain circumstances, such as when the plan calculations take a long time to complete, scheduling the plan run to occur during off-peak hours can enable planners to use their time more efficiently. This feature enables you to schedule the technical process involved in running a plan. For example, you can plan to run a scheduled process overnight, allowing your planners to focus on solving planning problems.
Steps to Enable
- In the Run Plan dialog box, after specifying the parameters, go to the Schedule tab, and click the Using a schedule option.
- From the Frequency drop-down list, select a frequency and configure the schedule.
- Click OK.
The process will then be scheduled to run according to the specified schedule as a background job.
Tips And Considerations
- After scheduling a process, you can view the process status using the Process ID.
- You can edit the schedule and change the frequency for the planning processes. In the Scheduled Processes work area, search for and select the process, and click the Edit Schedule button in the process details section.
Key Resources
- The Oracle Supply Chain Management Cloud - Using Planning Central Guide available on the Oracle Help Center.
Role Information
Access to this feature is available through the following shipped job roles:
- Material Planner
- Supply Planner
- Demand Planner
- Demand and Supply Planner
- Sales and Operations Planner
Monitor Planning Processes and Improve Planning Data Quality
When you launch a plan, the planning process generates numerous technical processes on the Oracle Supply Chain Planning Cloud server. If an error occurs or the plan results are abnormal, it becomes very difficult to analyze all the log files to trace the source of the error. Analyzing all the log files can lead to loss of time and productivity, especially when you can fix the root cause by making minor modifications to the data.
The new Review Planning Messages page allows you to review important information generated by the planning process in the course of running a plan. For example, you may have a situation in which there is no effective sourcing rule to satisfy demand. In such a situation, a message on the Review Planning Messages page will enable you to learn about the issue immediately. This Review Planning Messages page significantly reduces the time required to fix errors. It provides key information to act upon, without contacting the Oracle technical support team.
Steps to Enable
You can navigate to the Review Planning Messages page in the following ways:
- From a plan
- From the Manage Plans page
To navigate to the Review Planning Messages page from a plan, do the following:
- In the Navigator, click the Planning Central work area link.
- Open a plan, click the Open button, and then select Full Pane.
- In the Open Table, Graph, or Tile Set dialog box, search for and select the table named Review Plan Messages.
- Click OK.
To navigate to the Review Planning Messages page from the Manage Plans page, do the following:
- In the Navigator, click the Planning Central work area link.
- In the Tasks panel drawer, click the Manage Plans link.
- Select a plan and do the following:
- In the Search Results region, from the Actions menu, select Review Plan Messages.
Tips And Considerations
Planners should review the messages periodically to ensure that data is not missing in the plan. For example, a plan may be recommending make planned orders, but there is no valid work definition collected from Oracle Manufacturing Cloud.
Key Resources
Oracle Supply Chain Management Cloud - Release Readiness, available on the Oracle Help Center.
Role Information
Access to this feature is available through the following shipped job roles:
- Materials Planner
- Supply Chain Administrator
Reduce the burden of maintaining the data required for planning processes to ensure an effective plan. This feature simplifies the management of material planners, which is a core setup task in Oracle Planning Central Cloud, and is required for the proper analysis and execution of a plan. With this release, you can create a planner code just once, without having to establish detailed valid planner and organization combinations. You can now either manually define planners in the application using the Manage Planners task, or you can upload predefined file templates to define planners. This reduces the time you need to spend in managing material planners and increases your productivity.
Steps to Enable
In the Planning Central work area, select the Manage Planners task. Add the planners you will need for the Supply Chain Planning Cloud applications. You will only need to add a planner once and then each planner is enabled for all organizations and for all source systems.
Tips And Considerations
With the global planners feature, you only need to create a planner once to use the planner in any item-organization association in Oracle Product Model Cloud.
This feature is also applicable to Oracle Supply Planning Cloud.
Key Resources
- Oracle Supply Chain Management Cloud - Release Readiness, available on the Oracle Help Center.
Role Information
Access to this feature is available through the following shipped job roles:
- Materials Planner
- Supply Chain Administrator
This document will continue to evolve as existing sections change and new information is added. All updates appear in the following table:
| Date | Feature | Notes |
|---|---|---|
| 01 SEP 2017 | Created initial document. |
This guide outlines the information you need to know about new or improved functionality in this update, and describes any tasks you might need to perform for the update. Each section includes a brief description of the feature, the steps you need to take to enable or begin using the feature, any tips or considerations that you should keep in mind, and the resources available to help you.
SECURITY & NEW FEATURES
If your system has modified security structures, you may need to advise your security administrator of new features you would like to take advantage of.
GIVE US FEEDBACK
We welcome your comments and suggestions to improve the content. Please send us your feedback at oracle_fusion_applications_help_ww_grp@oracle.com.
Optional Uptake of New Features (Opt In)
We continue to add many new features to Oracle Cloud Applications and we now give you the option to take advantage of new functionality at a pace that suits you. The ‘New Features UI’ is available to you from your cloud homepage, where you can make your choices and do any configuration necessary.
This section gives you information to help you plan, deploy, and validate your update. We make frequent additions to this document, so don’t forget to check back and get the latest information before your update starts.
| Action Required to Enable Feature |
||||
|---|---|---|---|---|
| Feature |
Automatically Available |
End User Action Required |
Administrator Action Required |
Oracle Service Request Required |
|
||||
Use Oracle Sales and Operations Planning Cloud Measures in Oracle Demand Management Cloud |
|
|||
|
||||
|
||||
Use Oracle Sales and Operations Planning Cloud Measures in Oracle Demand Management Cloud |
|
|||
|
||||
|
||||
|
||||
Calculate Channel-Specific Planning Percentages
Configure to Order manufacturing has grown in complexity leading to many planning challenges. Manufacturers frequently encounter situations where the planning percentages for the options vary based on demand class (a construct typically used to model different customer channels). This new feature set allows you to:
- Calculate planning percentages based on history derived on the demand class in addition to item and organization. You can optionally choose to manually override these calculated planning percentages.
- Use planning percentages to explode the model forecasts down to the dependent demand forecasts.
Additional enhancements in Oracle Supply Planning Cloud allow you to use both the model and exploded option forecast to plan effectively.
These improvements enhance customer satisfaction by allowing you to offer extensively customizable products, while still being able to fulfill orders at the intended service levels with minimal impact to inventory holding costs.
Steps to Enable
You setup the calculation of channel-specific planning percentages when creating or editing a plan. Channel is referred to as the Demand Class dimension in Oracle Demand Management Cloud.
To enable calculation of planning percentage by item, organization, and demand class:
- In the Demand Management work area, click the Manage Plans task.
- Do one of the following:
- If you are creating a plan, in the Create Plan dialog box, click the Demand tab, and then click the Select Advanced Options button.
- If you are editing a plan, in the Edit Plan Options dialog box, click the Demand tab, and then click the Select Advanced Options button.
- In the Demand: Advanced Options dialog box, select Item, Organization and Demand Class from the Planning Percentage Calculation Level drop-down list.
- Click Done.
Tips And Considerations
Channel is referred to as the Demand Class dimension in Demand Management.
Key Resources
- The Oracle Supply Chain Management Cloud - Using Demand Management guide, available on the Oracle Help Center.
Role Information
Access to this feature is available through the following shipped job role:
- Demand Planner
Use Oracle Sales and Operations Planning Cloud Measures in Oracle Demand Management Cloud
To execute on your sales and operations plan you will want visibility into the sales and operations plan in your tactical demand management process. For example, you would want to see your sales and operations planning (S&OP) consensus forecast when manually adjusting the demand forecast in Oracle Demand Management Cloud, based on new information available between S&OP cycles.
With this release, you can view S&OP plan measures while using Demand Management by exporting measures from Oracle Sales and Operations Planning Cloud to Demand Management. This visibility allows demand planners to make tactical adjustments to plans while respecting decisions made during the S&OP process.
Steps to Enable
- In the Sales and Operations Planning work area, click the Load Measures from Other Plans task.
- On the Load Measures from Other Plans page, select a From Plan and To Plan.
- In the Available Measures pane, select the measures you want to load from Sales and Operations Planning to Demand Management, and move them to the Selected Measures pane.
- Click Save and Close. A scheduled process copies the measure data from the source sales and operations plan to the target demand plan.
After the scheduled process has completed, you can verify that the planning measure data has been loaded into Demand Management by opening a table or graph that is configured with the loaded measures.
Tips And Considerations
- When you select a sales and operations plan from the Plan drop-down list in the From Plan section, you see:
- Plans that have been run without errors.
- Public and private plans for which you are a member.
- When you select a demand plan from the Plan drop-down list in the To Plan section, you see plans that have been run without errors.
- The Plan drop-down lists in the From Plan and To Plan sections show the first ten plan names sorted alpha-numerically. Click Search… in the Plan drop-down list to search for plans in the Search and Select: Plan dialog box.
- When you select plans in the From Plan and To Plan sections, the Available Measures pane lists only those measures that are common to the source sales and operations plan and target demand plan. The measures in the Available Measures pane are common to the source and target plans.
- To avoid looking through all the predefined measure groups in the Available Measures pane, create a custom measure group with all the measures that you will be using for the integration.
Key Resources
- Oracle Supply Chain Management Cloud – Release Readiness, available from the Oracle Help Center.
Role Information
Access to this feature is available through the following shipped job roles:
- Demand Planner
- Supply Chain Planning Administrator
- Integrated Demand and Supply Planner
Compare Plan Versus Actuals In Real Time
Sharing key information from planning applications, combined with real-time execution data, such as orders, with a wider audience is critical to escalate and solve business issues. With this release, you can create and run your own reports using Oracle Transactional Business Intelligence with additional measures that reflect the current consensus forecast. Additionally, this data can be combined with the sales data from Oracle Order Management Cloud. This allows planners and executives to monitor the plan against the actual realized orders without data latency. Planners and executives can also make expedient decisions that do not have to wait for the next run of the planning processes to refresh the data.
Steps to Enable
- To use a specific demand plan for reporting, select the Enable for OTBI Reporting check box and run the plan.
- On the Configure Planning Analytics page, set up the dimension catalog named Reporting Catalog to include the required product and time hierarchies.
- In the Reports and Analytics work area, use the Supply Chain Planning Real Time subject area to create the required reports and save them into the Reports Components folder. Only those reports that you save in the Reports Components folder are available in the Demand Management work area.
Tips And Considerations
- Plan data is visible for reporting only when you run the plans in batch mode, not interactive mode.
- When creating reports across the Supply Chain Planning Real Time subject area and other subject areas, you must use the following conforming hierarchies in the Product and Time dimensions:
- Product dimension: Inventory Item hierarchy
- Time dimension: Date hierarchy
The other hierarchies, such as Planning Item 1, 2, 3, 4, and 5 or Planning Date 1, 2, 3, 4, and 5 do not conform with other subject areas. Hence, it is not recommended to use them for cross-subject area reports.
Key Resources
- Oracle Supply Chain Management Cloud - Release Readiness, available on the Oracle Help Center.
Role Information
Access to this feature is available through the following shipped job role:
- Demand Planner
Manage Data Using Sales Organization Dimension
A forecast from the sales team is a key input to the demand management and sales and operations planning (S&OP) processes. The ability to import, view, or edit the sales forecast and related data at a granular level, such as a regional manager’s level or even an individual sales representative’s territory level is usually required as part of the demand management and S&OP processes.
In this release, a new sales organization dimension is available for representing the sales territory hierarchy of a company. You can manage sales forecasts down to the individual territory level and view forecasts with other data, such as sales orders and forecast accuracy. You can set up the data for this hierarchy in Oracle Sales Cloud as part of the Internal Organization hierarchy definition or collect the data using flat file interfaces.
With this feature, planners can pinpoint problems, discuss forecasts with sales colleagues, and fine-tune forecasts as needed.
Steps to Enable
- In the Sales and Operations Planning work area, click the Configure Planning Analytics task.
- In the Dimension Catalogs tab, select the dimension catalog name to which you want to add the Sales Organization hierarchy.
- In the Available Hierarchies pane, expand the Sales Organization hierarchy, and move the Sales Organization hierarchies from the Available Hierarchies pane to the Selected Hierarchies pane.
- Click Save and Close.
Tips And Considerations
-
Do not add the Sales Organization hierarchy to an existing dimension catalog if it has been assigned to plans. This will have an adverse impact on plans that are already using the existing dimension catalog.
-
To upload data for the Sales Organization hierarchy, ensure that you select the Enable sales organization hierarchy collection check box on the Demand Planning Data tab in the Collect Planning Data dialog box.
Key Resources
- Oracle Supply Chain Management Cloud – Release Readiness, available from the Oracle Help Center.
Role Information
Access to this feature is available through the following shipped job roles:
- Sales and Operations Planner
- Supply Chain Planning Administrator
Use Oracle Sales and Operations Planning Cloud Measures in Oracle Demand Management Cloud
To execute on your sales and operations plan you will want visibility into the sales and operations plan in your tactical demand management process. For example, you would want to see your sales and operations planning (S&OP) consensus forecast when manually adjusting the demand forecast in Oracle Demand Management Cloud, based on new information available between S&OP cycles.
With this release, you can view S&OP plan measures while using Demand Management by exporting measures from Oracle Sales and Operations Planning Cloud to Demand Management. This visibility allows demand planners to make tactical adjustments to plans while respecting decisions made during the S&OP process.
Steps to Enable
- In the Sales and Operations Planning work area, click the Load Measures from Other Plans task.
- On the Load Measures from Other Plans page, select a From Plan and To Plan.
- In the Available Measures pane, select the measures you want to load from Sales and Operations Planning to Demand Management, and move them to the Selected Measures pane.
- Click Save and Close. A scheduled process copies the measure data from the source sales and operations plan to the target demand plan.
After the scheduled process has completed, you can verify that the planning measure data has been loaded into Demand Management by opening a table or graph that is configured with the loaded measures.
Tips And Considerations
- When you select a sales and operations plan from the Plan drop-down list in the From Plan section, you see:
- Plans that have been run without errors.
- Public and private plans for which you are a member.
- When you select a demand plan from the Plan drop-down list in the To Plan section, you see plans that have been run without errors.
- The Plan drop-down lists in the From Plan and To Plan sections show the first ten plan names sorted alpha-numerically. Click Search… in the Plan drop-down list to search for plans in the Search and Select: Plan dialog box.
- When you select plans in the From Plan and To Plan sections, the Available Measures pane lists only those measures that are common to the source sales and operations plan and the target demand plan. The measures in the Available Measures pane are common to the source and target plans.
- To avoid looking through all the predefined measure groups in the Available Measures pane, create a custom measure group with all the measures that you will be using for the integration.
Key Resources
- Oracle Supply Chain Management Cloud – Release Readiness, available on the Oracle Help Center.
Role Information
Access to this feature is available through the following shipped job roles:
- Demand Planner
- Supply Chain Planning Administrator
- Integrated Demand and Supply Planner
Compare Plan Versus Actuals In Real Time
Sharing key information from planning applications, combined with real-time execution data, such as orders, with a wider audience is critical to escalate and solve business issues. With this release, you can create and run your own reports using Oracle Transactional Business Intelligence with additional measures that reflect the current consensus forecast. Additionally, this data can be combined with the sales data from Oracle Order Management Cloud. This allows planners and executives to monitor the plan against the actual realized orders without data latency. Planners and executives can also make expedient decisions that do not have to wait for the next run of the planning processes to refresh the data.
Steps to Enable
- To use a specific sales and operations plan for reporting, select the Enable for OTBI Reporting check box and run the plan.
- On the Configure Planning Analytics page, set up the dimension catalog named Reporting Catalog to include the required product and time hierarchies.
- In the Reports and Analytics work area, use the Supply Chain Planning Real Time subject area to create the required reports and save them into the Reports Components folder. Only those reports that you save in the Reports Components folder are available in the Sales and Operations Planning work area.
Tips And Considerations
- Plan data is visible for reporting only when you run the plans in batch mode, not interactive mode.
- When creating reports across the Supply Chain Planning Real Time subject area and other subject areas, you must use the following conforming hierarchies in the Product and Time dimensions:
- Product dimension: Inventory Item hierarchy
- Time dimension: Date hierarchy
The other hierarchies, such as Planning Item 1, 2, 3, 4, and 5 or Planning Date 1, 2, 3, 4, and 5 do not conform with other subject areas. Hence, it is not recommended to use them for cross-subject area reports.
Key Resources
- Oracle Supply Chain Management Cloud - Release Readiness, available on the Oracle Help Center.
Role Information
Access to this feature is available through the following shipped job role:
- Sales and Operations Planner
Plan for Configured Product Fulfillment Using Drop Ship
Configure to Order (CTO) manufacturing processes have grown in complexity leading to many visibility and planning challenges. For example, contract manufacturers can fulfill CTO orders by shipping directly to the customers. Usually, the contract manufacturer requires visibility into the expected demand not only of the model, but also the options. This enables contract manufacturers to effectively fulfill their obligations related to lead times. This set of Oracle Supply Planning Cloud enhancements in conjunction with the Oracle Demand Management Cloud enhancements allows you to:
- Consume the forecasted demand for the options with the sales orders that specify the same option (explode then consume)
- Plan for the net expected demand of the model and options that will be shipped directly from the contract manufacturer to the customer
- Collaborate with the contract manufacturer on the model and option order forecasts using Oracle Supply Chain Collaboration Cloud
These improvements enhance customer satisfaction by allowing you to offer extensively customizable products, while still fulfilling orders at the intended service levels with minimal impact to the inventory holding costs, and utilizing the most efficient fulfillment method.
Steps to Enable
- Create organizations to represent suppliers with whom you want to perform enhanced forecast collaboration and drop ship fulfillment.
- In the Maintain Supply Network Model page, associate a supplier and supplier site to the organization that you have created.
- Define items, item structures, and sourcing rules for the model, option class, and option items in supplier organizations.
- Collect planning data. During collections, for suppliers that are modeled as organizations, the drop ship sales order and sales order history are collected into the supplier organizations. For suppliers that are not modeled as organizations, the drop ship sales order and sales history are collected into the drop ship validation organization.
- Include the supplier organizations in the plan and run the plan.
- Analyze forecast consumption and planned order generation in the plan.
- Publish order forecasts for models and options to suppliers.
- Receive supply commits for models and options from suppliers.
Tips And Considerations
- Create separate organizations to represent drop ship suppliers only if there is a need for visibility and supplier collaboration of both model and option forecast for that supplier
- If this enhanced visibility and collaboration is not required, you can continue to use the drop ship validation organization to plan sales orders and forecasts for that supplier
- Use item organizations instead of inventory organizations to represent suppliers, if there is no business need to track and manage transactional details such as on hand balances and work in process for that supplier
- Item organizations are easier to setup and maintain than inventory organizations
Key Resources
- Oracle Supply Chain Management Cloud - Release Readiness, available on the Oracle Help Center.
Role Information
Access to this feature is available through the following shipped job roles:
- Materials Planner
- Supply Chain Administrator
Plan for Configured Product Fulfillment Using Drop Ship
Configure to Order (CTO) manufacturing processes have grown in complexity leading to many visibility and planning challenges. For example, contract manufacturers can fulfill CTO orders by shipping directly to the customers. Usually, the contract manufacturer requires visibility into the expected demand not only of the model, but also the options. This enables contract manufacturers to effectively fulfill their obligations related to lead times. This set of Oracle Planning Central Cloud enhancements in conjunction with the Oracle Demand Management Cloud enhancements allows you to:
- Consume the forecasted demand for the options with the sales orders that specify the same option (explode then consume)
- Plan for the net expected demand of the model and options that will be shipped directly from the contract manufacturer to the customer
- Collaborate with the contract manufacturer on the model and option order forecasts using Oracle Supply Chain Collaboration Cloud
These improvements enhance customer satisfaction by allowing you to offer extensively customizable products, while still fulfilling orders at the intended service levels with minimal impact to the inventory holding costs, and utilizing the most efficient fulfillment method.
Steps to Enable
- Create organizations to represent suppliers with whom you want to perform enhanced forecast collaboration and drop ship fulfillment.
- In the Maintain Supply Network Model page, associate a supplier and supplier site to the organization that you have created.
- Define items, item structures, and sourcing rules for the model, option class, and option items in supplier organizations.
- Collect planning data. During collections, for suppliers that are modeled as organizations, the drop ship sales order and sales order history are collected into the supplier organizations. For suppliers that are not modeled as organizations, the drop ship sales order and sales history are collected into the drop ship validation organization.
- Include the supplier organizations in the plan and run the plan.
- Analyze forecast consumption and planned order generation in the plan.
- Publish order forecasts for models and options to suppliers.
- Receive supply commits for models and options from suppliers.
Tips And Considerations
- Create separate organizations to represent drop ship suppliers only if there is a need for visibility and if you need to collaborate with that supplier for both model and option forecast.
- If this enhanced visibility and collaboration with the supplier is not required, you can continue to use the drop ship validation organization to plan your sales orders and forecasts.
- Use item organizations instead of inventory organizations to represent suppliers if there is no business need to track and manage transactional details, such as on hand balances and work in process for that supplier.
- Item organizations are easier to set up and maintain than inventory organizations.
Key Resources
- Oracle Supply Chain Management Cloud - Release Readiness, available on the Oracle Help Center.
Role Information
Access to this feature is available through the following shipped job roles:
- Materials Planner
- Supply Chain Administrator
This document will continue to evolve as existing sections change and new information is added. All updates appear in the following table:
| Date | Feature | Notes |
|---|---|---|
| 21 APR 2017 | Created initial document. |
This guide outlines the information you need to know about new or improved functionality in this update, and describes any tasks you might need to perform for the update. Each section includes a brief description of the feature, the steps you need to take to enable or begin using the feature, any tips or considerations that you should keep in mind, and the resources available to help you.
Security & New Features
If your system has modified security structures, you may need to advise your security administrator of new features you would like to take advantage of. Appendix A provides details of the security attributes needed to employ the new features after you have decided to implement them.
GIVE US FEEDBACK
We welcome your comments and suggestions to improve the content. Please send us your feedback at oracle_fusion_applications_help_ww_grp@oracle.com.
Optional Uptake of New Features (Opt In)
We continue to add many new features to Oracle Cloud Applications and we now give you the option to take advantage of new functionality at a pace that suits you. The ‘New Features UI’ is available to you from your cloud homepage, where you can make your choices and do any configuration necessary.
This section gives you information to help you plan, deploy, and validate your update. We make frequent additions to this document, so don’t forget to check back and get the latest information before your update starts.
Demand Management brings multiple demand signals together to help you better understand demand for your products, channels, segments and anticipate customer needs. Built-in analytics reveal demand patterns and identify changes in real time so you can respond to them.
Manage Multiple Demand Signals
To better understand customer demand, you need to capture, align, and analyze both internal business data and external market information.
You can use Demand Management to:
- Bring in a variety of internal (for example, shipments and bookings) and external (for example, market and syndicated data) demand signals relevant for your industry. The internal demand signals can be collected automatically from Oracle SCM Cloud or imported by way of flat files into predefined measures. The external demand signals can also be imported by way of flat files into custom measures with desired dimensionality.
- View and compare the demand signals in a consistent unit or currency of your choice at any level in the hierarchy. Various internal sales and marketing stakeholders, as well as your key customers, can access the same information that is tailored to their specific needs.
- Understand demand trends and relative contribution of various demand signals to enable revenue growth programs for specific products or product categories.
- Monitor changes in demand signals real time via exceptions and thresholds to understand recent customer behavior and initiate suitable remedial action.
This allows you to get better and timelier visibility to changes in customer demand.
Steps to Enable
No steps are required to enable this feature.
Tips And Considerations
- If you plan to compare predefined and custom measures, it may be beneficial to define the new measure on the same dimensionality.
- You can modify a predefined plan summary to meet specific business needs.
Key Resources
- For more information, see the Release Training for Oracle Demand Management Cloud: Sense Demand.
To gain deeper insights into demand trends for specific products or customer segments, you need comprehensive analytics and visualization tools, which can summarize business conditions, uncover in-depth trends, and help you conduct further analysis to see which segments are out-performing or under-performing.
You can use Demand Management’s analytics capability to quickly analyze demand signals and also get in-depth views using a personalized user interface, which includes:
- Summary analysis – A row of infotiles in the plan summary view provides an at-a-glance summary of the health of your demand plan and one-click access to charts and graphs that can help you uncover demand insights. For example, ‘forecast comparison’ highlights gaps between shipments and sales forecasts, ‘forecast MAPE (mean absolute percentage error)’ identifies areas of poor accuracy, and ‘history comparison’ identifies disconnects between bookings and shipments. You can easily configure these infotiles, charts, and graphs to get a focused view with your selection of measures, performance indicators, and hierarchy levels. To investigate further, you can navigate from the summary charts into multidimensional analysis workbenches.
- Multidimensional analysis workbench – You can readily use preconfigured pivot tables and graphs with common hierarchies, measures, exceptions, and calculations to analyze large data sets. You can slice and dice the data further to look into details and reveal patterns, for example, identifying which SKUs have significant demand changes year-over-year or week-to-week. You can also compare demand signals to better understand customer behaviors, for example, if bookings history is slightly ahead of shipments in recent weeks, that might indicate a demand uptrend. This analysis is possible by way of preconfigured worksheets, for example, ‘history analysis ’, ‘forecast analyses’, ‘statistical analysis’, and so on. To personalize the workbench to meet your needs, you can:
- Create new worksheets or reuse existing ones.
- Include data visualization tools, such as tree maps, charts, and line and bar graphs in these worksheets to facilitate easy problem identification.
- Customize measures, calculations, and exceptions to support your analysis.
- Configure navigation between charts and graphs to guide navigation and speed up identification of detailed problem areas.
- Assign user access permissions and maintain data security, so users can only see or edit data that matches their privileges.
With the aid of the intuitive user interface, you can analyze demand signals quickly and proactively anticipate customer needs.
The following screenshot is a predefined layout of the Demand Plan Summary page:

Demand Plan Summary: Shipments History Comparison
The following screenshot shows a specific infotile with the underlying panes showing detailed information:

Demand Plan Summary: New Product Forecast
Steps to Enable
No steps are required to enable this feature.
Tips And Considerations
- You can modify predefined layouts and infotiles per your business requirements.
- Any information you see in a table or graph can be summarized as quick reference in an infotile.
- Apply appropriate selection filters on customer infotiles to ensure that they show relevant information.
Key Resources
- For more information, see the Release Training for Oracle Demand Management Cloud: Sense Demand.
Your internal organization is also an invaluable source of demand information and their inputs need to be captured alongside all demand signals.
Using Demand Management:
- Sales, marketing and other stakeholders can manually enter or upload their forecast. They can also enter forecast on the go, using mobile devices. Such input can be provided at any level in the hierarchy. As an example, sales can enter a forecast at customer account and item level, while marketing can enter data at product category and month level.
- Demand planners can start a social conversation with select focus groups to get qualitative input in a specific business context.
- Participants in demand management process can annotate the data with notes to document changes and assumptions.
By capturing all interdepartmental forecasts, you get different perspectives of the forecasts, which helps drive a collaborative demand planning process.
Use Oracle Social Network to discuss projects, plans, and issues.
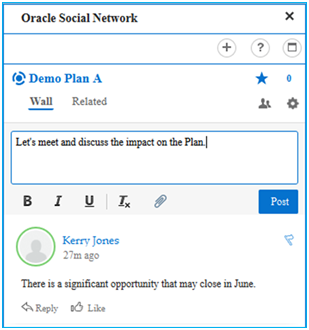
Oracle Social Network: Conversation Example
- To collaborate on a specific plan, open the plan and click the ‘Social’ icon.
- For a general conversation (not specific to a plan), click the ‘Social’ icon on the Planner Workbench.
Use Notes to add comments to plans, planning level members (such as items, organization, and customers), planning combinations (such as a specific item-organization-date-measure combination), and exceptions.
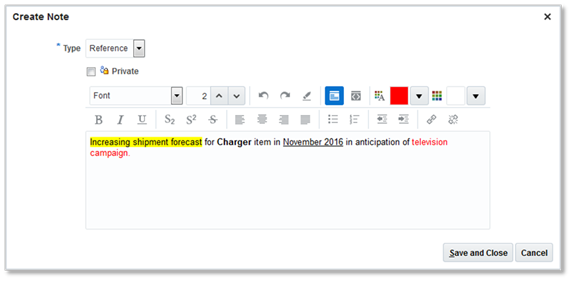
Notes: Create Note Example
Steps to Enable
No steps are required to enable this feature.
Tips And Considerations
- If a plan is copied, all notes associated with the plan are also copied.
- Notes created on level members are not plan-specific.
- If a note is created on a planning combination and the associated measure is shared across plans, then the note is not plan-specific.
- If a note is created on a planning combination and the associated measure is not shared across plans, then the note is plan-specific.
- If a plan is copied, all plan-specific notes on planning combinations are also copied.
- Notes on exceptions persist across plan runs.
- Once an exception is resolved, all notes associated with the exception are deleted.
Key Resources
- For more information, see the Release Training for Oracle Demand Management Cloud: Sense Demand.
Demand Management accurately predicts your product’s forecast by incorporating cause-and-effect correlation of demand to external and internal influencing factors and tribal business knowledge into history-based statistical forecasts.
Generate Statistical Forecasts
To anticipate customer demand, you need an automated way to generate baseline forecast, by leveraging multiple demand signals and using data-driven statistical algorithms.
You can use Demand Management’s forecasting engine to automatically detect demand patterns, trends, seasonality, and intermittence for every demand signal. The engine cleanses historical demand signals, such as shipments and bookings, to detect outliers and fills in missing data to minimize forecast error. The forecasting engine can predetermine the hierarchy levels where the forecast is statistically significant and can blend different forecast models to produce a more reliable statistical forecast. Forecast is regenerated for each product and location during every planning cycle and proactively adjusts to changing market conditions.
You can also correlate forecast to a number of predictive causal factors and leading indicators, such as price, seasonality, holidays, and weather. You can also use other measures relevant for your business as causals and immediately see their impact on the forecast.
Although the statistical forecasting engine is self-maintained, with one-click, you can simulate changes and model forecasting scenarios. Using the sophisticated statistical engine, you can:
- Visualize constituents of the generated statistical forecast, including the baseline, trend, seasonality effects, and the contribution of individual causal factors.
- See how multiple forecast methods contributed to the blended forecast. You can get a detailed view of the combined forecast and the individual forecast method contributions side-by-side.
- Change forecast configurations to derive a statistical forecast more attuned to your needs.
- Vary the length of history used, change sensitivity of trend detection, and enable intermittency or select forecasting profiles based on shipments, bookings, or other measures.
The simplicity of one-click statistical forecasting combined with the sophistication of predictive correlations offers you a good baseline demand plan.
The following screenshot shows the selection of forecasting methods and parameters for a Forecast Profile:

Statistical Forecasting Method Settings for a Forecast Profile
The following screenshot shows the configuration of Decomposition Groups for a Forecast Profile:

Controls for Decomposition Groups and Causal Factors for a Forecast Profile
The following screenshot shows the Decomposition Groups information after generating a forecast:
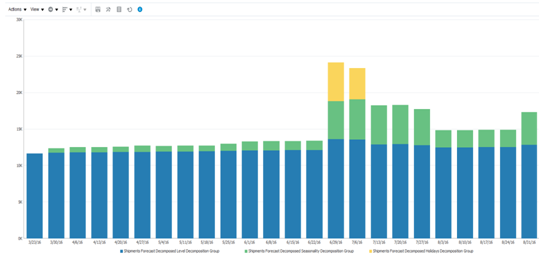
Causal Factor Forecast Decomposition Output
The following screenshot shows the configuration of Forecasting Parameters for a Forecast Profile:

Statistical Forecasting Parameter Settings for a Forecast Profile
To generate a statistical forecast:
- In the Demand Management work area, click the Manage Plans task.
- Search for and select a demand plan. From the Actions menu, select Run.
- On the Run Plan dialog, click Details to expand and show all available options.
- Choose one or more forecasting profiles.
- To enable forecasting methods, select the Include details of forecast methods check box.
- To enable causal factor decomposition, select the Include details of causal factors check box.

Run Plan: Details
Steps to Enable
No steps are required to enable this feature.
Tips And Considerations
- The forecasting profiles available in a demand plan are controlled from the Plan Options page.
- During plan execution, you can select the forecasting parameters that will be executed during the plan run.
- Predefined forecasting profiles cannot be edited. You can duplicate a predefined profile and modify it per your business requirements.
Key Resources
- For more information, see the Release Training for Oracle Demand Management Cloud: Predict Demand.
Establish a Robust Demand Plan
You need to enrich the data-driven statistical baseline forecast with business insights to make it more realistic.
Using Demand Management, you can incorporate additional business insights by adjusting the forecast at any level in the hierarchy by way of tailored views of the multidimensional workbench. To facilitate quick edits, you can adjust forecast across various weeks as a percentage increase or decrease, value increase or decrease, or set to a particular value. You can also use custom exceptions, for example, ‘forecast to order comparison’ to see instances where the forecast does not cover open orders, and make adjustments if required. The adjusted forecast can be intelligently disaggregated to the required level using historical or other proportions. The manually entered forecasts are monitored independently of the statistical forecasts to maintain data accuracy for measurement purposes. You can disable manual entry for the time periods where it is not advisable to change the forecasts.
Besides the powerful editing capability, you can put qualitative comments in notes, to help other users understand your assumptions and reasons for the modifications. You can associate notes with a plan, data in a plan (such as items, organizations, or customers), or in a pivot table that contains planning combinations. With the ability to incorporate business insights, you can quickly develop a robust demand plan.
Use a predefined table or new table to adjust the forecast measures. For Shipments data, use the ‘Adjusted Shipments Forecast’ predefined measure. For Bookings data, use the ’Adjusted Bookings Forecast’ predefined measure. The following screenshot is an example of forecast modification using the Edit Data capability.
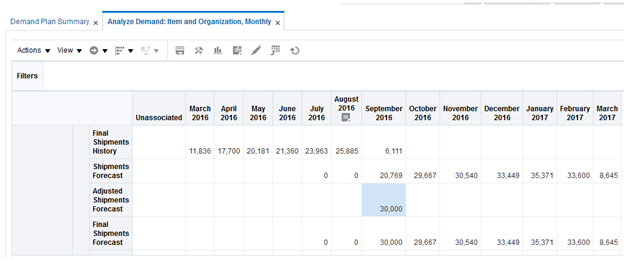
Editing ‘Adjusted Shipments Forecast’ in a Table
Steps to Enable
To define custom exceptions:
- In the Demand Management work area, click the Configure Exceptions task.
- On the Configure Exceptions page, click Actions > New.
- Use the Level tab on the Create Exception page to define new exceptions with the conditions you want on specific levels.
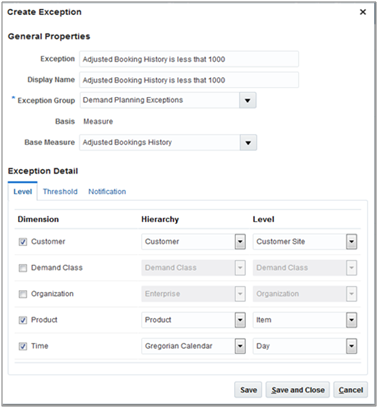
Create Exception: Levels
- Use the Threshold tab to define the exception’s condition calculation.
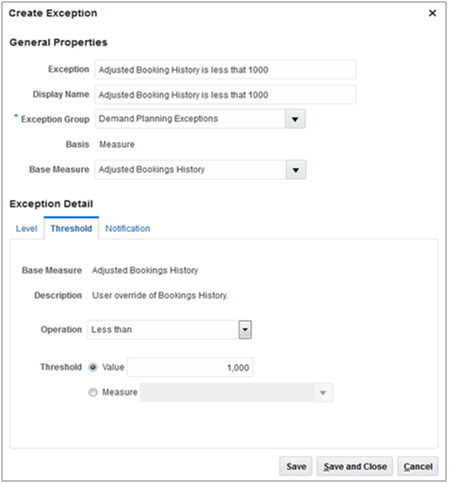
Create Exception: Threshold
- Add the exception to an exception set on the Create Exception Set page.

Create Exception Set: Exceptions
- On the Plan Options page, associate the exception set to a plan.

Plan Options
- Run the plan.
Tips And Considerations
Custom exceptions can be viewed in the predefined table called Exception.
Key Resources
- For more information, see the Release Training for Oracle Demand Management Cloud: Predict Demand.
Forecast Configure-to-Order Products
Forecasting for configure-to-order products is a two-level planning problem. That is, create forecast for pick-to-order (PTO) and assemble-to-order (ATO) models, and then derive demand for options or features of those models based on attach rates (known as planning percentages).
With Demand Management, you can use existing attach rates specified in the bill of material, input the attach rates manually, or predict attach rates based on the historical trend in options’ mix. The models’ demand, option’s model-dependent demand, and options’ independent demand are calculated when you generate the statistical forecast and when you run the plan on demand. You can have these demands calculated real time when you modify demand for base model or option demand and the attach rates. A special bill of material view shows the model, option classes, and options in a hierarchy, along with the associated forecast.
By calculating detailed forecasts for your product mix and configurations, you can better understand customer preferences, and can better position finished good and options’ inventory to meet their needs.
The following screenshot shows a three-level bill of material view with planning percentages and dependent demand: 
Configure-To-Order Bill of Material View Display in a Table
Steps to Enable
To collect dependent demand and calculate attach rates:
- In the Demand Management work area, click the Collect Planning Data task.
- On Collect Planning Data dialog, Parameters tab > Demand Planning Data sub tab, select the appropriate options for Collect Configure to Order Data.

Collect Configure to Order Data
- From the Actions menu, click Edit Plan Options.
- Click the ‘Demand’ tab and select Advanced Options.
- Select the Include Dependant Demand check box.
- Define the number of periods to be used for the attach rate calculation.
- Choose the measure to be used for the dependent demand.
- Choose the data aggregation level for the planning percentage calculation.
- Click the ‘Demand’ tab and select Advanced Options.

CTO Options
- Run the plan.
Tips And Considerations
- Historical planning percentages are calculated during plan run.
- Historical planning percentage calculation is calculated at item or item-organization level.
- Historical planning percentages are configured to be either based on shipments history or bookings history.
Key Resources
- For more information, see the Release Training for Oracle Demand Management Cloud: Predict Demand.
To achieve continuous improvements to your demand plan, you need to measure your forecasts versus actuals, and identify areas for improvement.
Demand Management enables you to:
- Understand the plan’s overall performance by measuring forecast accuracy in a variety of ways, including mean absolute percentage error (MAPE), mean absolute deviation (MAD), and forecast bias, measured for any of the demand signals.
- Get an aggregate understanding of the forecast accuracy for your previous plan, and then use visualization to drill down into product segments that would need additional attention and analysis.
- Determine root causes by reviewing the historical forecast error analysis (waterfall report), which shows how archived forecasts compare to actual results. The waterfall report focuses your attention on the categories and customers where accuracy is deteriorating and requires more investigation.
- Inspect the constituents of the forecast, and reconfigure forecast parameters to resolve issues.
- By measuring forecast accuracy, and resolving the root cause of accuracy issues, you can achieve higher forecast accuracy and as a result, higher customer service levels and lower inventory.
By measuring forecast accuracy, and resolving the root cause of accuracy issues, you can achieve higher forecast accuracy and as a result, higher customer service levels and lower inventory.
The following screenshot shows the definition of the predefined ‘Final Bookings Forecast 3 Month MAPE’ measure:
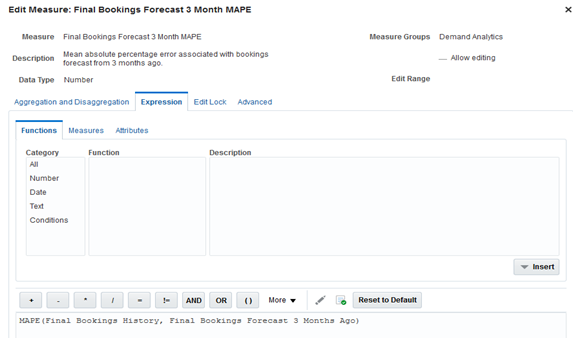
Definition of Measure Final Booking Forecast 3 Month MAPE
The following screenshot shows the display of predefined forecast accuracy measures in a table: 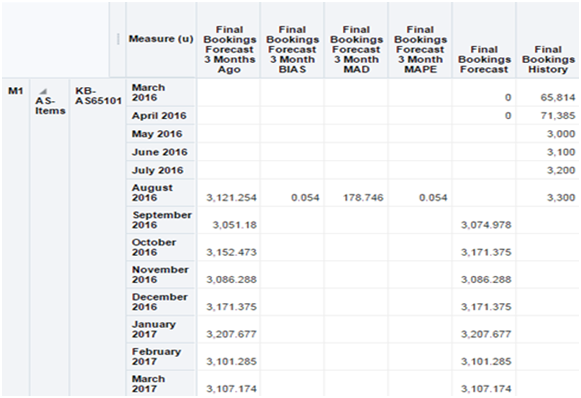
Accuracy Measures Incorporated Into a Table
Steps to Enable
No steps are required to enable this feature.
Tips And Considerations
- For forecasting error measures to show values, a plan archive, which includes the relevant measures, must be executed.
- Predefined forecasting error measures are a starting point, which you can modify per your business requirements.
- Select a lag which is most relevant to your business for forecast accuracy tracking. This is often one or three months. The longer the lags, the more time your system must be active with archiving enabled before values are available.
- To see the waterfall analysis as soon as you open the table, select the Automatically display waterfall analysis check box under the ‘Comparison Options’ tab.If this check box is not selected, click the Analysis icon and select the table or graph for waterfall analysis.
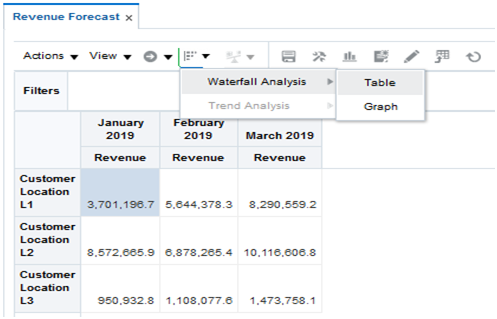
Waterfall Analysis
Key Resources
- See the Forecast Analysis and Approval chapter in Oracle SCM Cloud: Using Demand Management, available on the Oracle Help Center.
- See the Release Training for Oracle Demand Management Cloud: Predict Demand.
To shape demand and profitably achieve revenue goals, you need to optimize new product introductions, simulate forecast scenarios, collaborate with stakeholders, and synchronize demand plans.
To execute your new product introduction strategy, you need the ability to accurately forecast new products and successfully plan the launch for chosen customer segments or geographies.
Demand Management enables you to:
- Forecast new products either based on history of a like product or directly use the forecast of a like product.
- Make volume adjustments and specify the percentage of history or forecast needed to meet the product launch requirements.
- Customize your product launch by setting the launch date, the customer zones or specific customers, and product categories or specific items.
- Use the New Product Information summary analysis to gauge the contribution of new product revenue to the overall product portfolio and determine whether it meets corporate targets.
- Collaborate with marketing, reconcile with their forecasts, and incorporate any other executive feedback to fine-tune the new product forecast.
By forecasting new products and collaborating with other stakeholders, you can better align inventory, launch products successfully, and prevent out of stocks situations.
Steps to Enable
No steps are required to enable this feature.
Tips And Considerations
- If the new product is expected to have higher or lower demand with the same selling pattern of the source product, enter the Factor in percentage under the Measures tab.
- A new product must be available in PIM to be available in the Manage Product Launch page.
- Until demand is available for a new product, Manage Product Launch is the mechanism used to make it available for demand and supply planning.
Key Resources
- See the Forecast New Products chapter in Oracle SCM Cloud: Using Demand Management, available on the Oracle Help Center.
- See the Release Training for Oracle Demand Management Cloud: Shape Demand.
To understand the impact of business decisions, you need what-if analysis capability to see how influencing factors can have positive or negative impacts on demand and key business performance metrics, before finalizing forecast changes.
Demand Management enables you to:
- Run an unlimited number of forecast simulations to see impacts of changes in the price, running a marketing campaign, shift in weather, demand upside request, and so on.
- Simulate how changes to forecasting models and parameters have an immediate impact on the statistical forecast.
- Simulate changes to attach rates or change the independent option forecast for configure-to-order items.
- Simulate the impact of introducing new products in particular geographic areas.
- Perform side-by-side analysis of any number of scenarios, and see the impact on operational and financial objectives.
By simulating and understanding the impact of your decisions, you can make confident decisions, and in turn, meet your business objectives.
The following screenshot shows the results of running a simulation in both a tabular and graphical format:

Simulation Results in a Table and a Graph
Steps to Enable
No steps are required to enable this feature.
Tips And Considerations
- Predefined forecasting profiles are not editable. You must duplicate predefined forecasting profiles to modify a forecasting profile’s definitions.
- Predefined measures with the prefix ‘simulation’ have been created to store the output of simulations and allow review in parallel with other scenarios. If you want more than two simulation scenarios at the same time, you can create additional measures.
- Changes made to a forecasting profile during simulation impact all future runs using that simulation profile. You may want to create a separate forecasting profile for each planner executing simulations.
Key Resources
- See the Simulate Forecast Scenarios chapter in Oracle SCM Cloud: Using Demand Management, available on the Oracle Help Center.
- See the Release Training for Oracle Demand Management Cloud: Shape Demand.
Collaborate On and Synchronize Demand Plans
To have your organization march towards an agreed upon demand plan, you need the ability to reconcile forecasts, resolve issues by collaborating with stakeholders, and escalating issues to executives, as necessary.
You can use Demand Management to facilitate reconciliation and agreement of cross-functional forecasts by using the following capabilities:
- Forecast reconciliation – You can view a forecast captured from cross-functional teams at both aggregate and at the most detailed level (which has been automatically disaggregated). You can:
- Compare forecast at the plan level, and show the variance over a period of time or across different product segments.
- Leverage built-in exceptions, such as ‘deviation between sales and final shipments forecast’ to reconcile the sales forecast with your estimates.
- Use custom exceptions and calculations to find more specific issues that fit your evaluation criteria.
- Use conditional formatting to identify which specific weeks or items have a problem at a glance.
- Forecast review and approval – You might need to involve executives and other stakeholders to get additional guidance on strategic issues. The demand plan is readily available in Oracle Sales and Operations Planning Cloud’s Demand Review section. Anyone who has access can indicate the action items and resolution expected from all stakeholders. You can make forecast adjustments based on executive decisions and approve the plan for use by supply planning.
By collaborating with stakeholders from different departments and jointly resolving forecast discrepancies, you can achieve a one-number forecast and plan the inventory needed to meet customer demand.
Steps to Enable
No steps are required to enable this feature.
Tips And Considerations
-
When approving forecast data, the process also updates the approval attributes in the Manage Plan page. To view the approval attributes, navigate to View > Columns > Manage Columns. Add the following three attributes to the visible columns
- Approval Status
- Last Approved By
- Last Approved Date.
- Approving forecast data copies data from the ‘Final Bookings Forecast’ measure to the ‘Approved Final Bookings Forecast’ measure and also from the ‘Final Shipments Forecast’ measure to the ‘Approved Final Shipments Forecast’ measure
- You can reset a forecast approval status from the Actions menu.
Key Resources
- For more information, see the Release Training for Oracle Demand Management Cloud: Shape Demand.
Additional Demand Management Enhancements
Integrate with Supply Chain Management Cloud and Other Sources
To reduce implementation timelines and reduce total cost of ownership, you can use prebuilt integration between Demand Management and other Oracle Supply Chain Management (SCM) Cloud applications. You can also incorporate data from other external data sources.
Features in this release allow you to:
- Collect data from Oracle SCM Cloud products
- Prebuilt integration to seamlessly get product, customer, and other master data as well as sales orders into Demand Management.
- Targeted data collection where data represents a business entity, or use net change data collection, importing data that changed since the last run.
- Filters to collect a subset of the data. For example, to reduce the number of items collected, you can filter according to the organizations being planned, or to reduce the order history collected, you can filter according to date ranges.
- Load data from external data sources - To improve decision making in Demand Management, you can import data from other sources by way of flat file integration. You can upload forecasts (if you use another system for forecasting), include sales forecasts, marketing forecasts, and external causal factors. You can also input customers, product hierarchies, shipments, and bookings.
By integrating with Oracle SCM Cloud and external applications, you and other stakeholders have visibility to all required data in a single place to drive the business process, resulting in an accurate demand plan.
To define the date ranges for data collection and the order types to include in demand history, navigate to the ‘Demand Planning Data’ tab of the Collect Planning Data page.

Collect Planning Data: Demand Planning Data
Steps to Enable
No steps are required to enable this feature.
Tips And Considerations
It is recommended to set ‘Collection Type’ parameter as ‘Net Change’, as setting it up as ‘Targeted’ will purge the existing data and load the entire data again.
Key Resources
- See the Run Collections chapter in Oracle SCM Cloud: Using Planning Central, available on the Oracle Help Center.
- See the Release Training for Oracle Demand Management Cloud: Integrate with Oracle Supply Chain Management Cloud and Other Sources.
Oracle Sales and Operations Planning Cloud provides a complete sales and operations planning (S&OP) solution for aligning organizations around an integrated operating plan to meet their strategic business goals. Using rich analytics and simulation capabilities, companies can monitor performance, simulate alternative what-if plans, and respond to changing market conditions. Sales and Operations Planning’s powerful process support and collaboration capabilities enable companies to reach consensus across Sales, Marketing, Finance, and Operations. Sales and Operations Planning’s integration with other Oracle Supply Chain Planning Cloud applications means that you can drive S&OP strategic decisions seamlessly into tactical planning and execution processes.
Analyze to Make Better Decisions
Sales and Operations Planning offers comprehensive analytics capabilities, exception management features, Microsoft Excel integration, and waterfall analysis so that you can evaluate plan performance relative to your targets and how your plans are changing over time.
Analyze Plan Performance with Best Practice S&OP Dashboards, Layouts, and Reports
S&OP is an executive management process requiring a big picture view of how a company is doing with respect to its business goals, and at the same time, requiring very detailed analysis in support of the process. Often S&OP software tools fail to cover the necessary spectrum from detailed analysis to high-level management reporting. As a result, you often must do extra work creating summary reports to present in S&OP review meetings.
Oracle Sales and Operations Planning Cloud addresses this problem with a set of configurable S&OP graphical dashboards, layouts, and detailed reports supporting different levels of analysis during the S&OP process. For each of the five standard stages of S&OP -- product review, demand review, supply review, financial review, and executive review -- a summary dashboard is available with a ribbon of graphical KPI (Key Performance Indicator) charts across the top for monitoring performance. You can click on each KPI to see more detailed charts and tables, with links to even more detailed and editable pivot table reports. Example KPIs by review stage include:
- Product review: New Product Vitality, Days of Cover for End of Life Items
- Demand review: Unconstrained Plan versus Forecast, Stakeholder Forecast MAPE
- Supply review: Demand and Supply, Resource Overloading
- Financial review: Plan versus Forecast, Gross Margin
- Executive review: Revenue and Margin, Unmet Revenue
By combining rich summary graphical views with detailed analysis capabilities, you can monitor overall company performance, drill down into detail to understand the root cause of performance shortfalls, and change plans accordingly.
Steps to Enable
To enable archival based measures like Consensus Forecast Value Change, Consensus Forecast MAPE and Sales Forecast MAPE in the Demand Review Summary dashboard, ensure that steps 1 and 2 are completed.
- The default S&OP Archive Catalog includes all of the measures required to populate the seeded dashboards, layouts, and reports that use archived data. When using a custom measure catalog for archival, ensure that all the measures that are relevant for archival are added to the list of selected measures under the custom measure catalog.
- The Supply Chain Application Administrator must run the Build Plan Archive job.
To enable the Product Review Summary dashboard, ensure that attribute LIFE_CYCLE_PHASE is set correctly as per steps 3, 4, and 5.
- Ensure that the attribute is associated with Items in Oracle Product Information Management Cloud. When Items are collected into Supply Chain Planning, this attribute is collected as well.
- The default dimension catalog includes the LIFE_CYCLE_PHASE attribute as a selected hierarchy. When using a custom dimension catalog, ensure that the LIFE_CYCLE_PHASE hierarchy is added to the list of selected hierarchies.
- Ensure that the LIFE_CYCLE_PHASE attribute is added in the Levels and Attributes tab for the Item hierarchy Catalog. The LIFE_CYCLE_PHASE can be viewed as an Item Attribute, and it is used as a report filter in the Product Review Summary dashboard. The dashboard only considers the following values of this attribute: Prelaunch, Postlaunch, Growth and Decline.
No setup steps are required for any other dashboards.
Tips And Considerations
You cannot change the attribute value in the products associated with Oracle Supply Chain Planning Cloud.
Key Resources
- Release Training – Introduction to Sales and Operations Planning: Product Overview and Analyzing to Make Better Decisions, available at Oracle Cloud: Supply Chain Management Release Readiness.
Configure Analytics to Meet Your Unique Needs
While Sales and Operations Planning comes with numerous predefined reports and charts, most companies have unique needs that require analysis tailored to their businesses.
With the Oracle solution you can make a variety of configurations, such as:
-
Configure the layout of the screen to meet your preferences. You can identify multiple tables and charts to be displayed on the screen to facilitate holistic analysis. For example, you might configure the screen to analyze the material plan and the resource plan at the same time

Custom Layout and Reports
- Configure planning dimensions and hierarchies. You can quickly analyze large data sets through a common set of planning dimensions and hierarchies (such as product, customer, geography, zone, resources, supplier, and time) that support aggregate data analysis.
-
Configure tables for multidimensional data analysis. You can analyze demand, inventory, and supply data measures in a single table to enable consistent views, comparison, and analysis, including alternate units of measure and monetary value.

Configurable Pivot Tables - Sales and Operations Plan Table
-
Configure measures. Sales and Operations Planning comes with numerous seeded measures (such as, consensus forecast, and projected available balance) to support S&OP best practices. Predefined measures are available in the subject areas of Demand Analytics and Forecasting, Inventory Analysis, Overall Plan Health, Manufacturing Efficiency, Supply Chain Costs, and Profitability. However, you can add custom measures to meet unique customer needs. You can configure goals, conditional formatting, and edit locking for all measures.

Manage Planning Measures – Seeded and Custom Measures
- Create new data analysis worksheets. You can create new worksheets using data visualization tools like treemaps, sunburst charts, line graphs, bar charts, and tables or use existing worksheets as the baseline to construct variants that meet specific planning needs. You can share these variants with other users or make them private.
- Configure guided navigation. You can define which worksheets you can drill down to with context from an existing worksheet or graph element (for example, right-clicking on a resource in the top overloaded resources chart and navigating to the resource plan table in order to diagnose the source of the problem).
- Configure favorite lists, saved query criteria, and analysis sets. You can reduce the time required to bring the right data into worksheets for further analysis.
With the above configuration capabilities, you will have the ability to enable an S&OP process that is tailored to the unique needs of your organization.
Steps to Enable
No steps are required to enable this feature.
Tips And Considerations
You can specify level member filters for tile type reports. Before configuring a tile type report, ensure that measure goals have been specified for the measures used in the report.
Key Resources
- Release Training – Introduction to Sales and Operations Planning: Product Overview and Analyzing to Make Better Decisions, available at Oracle Cloud: Supply Chain Management Release Readiness.
Manage by Exception to Focus on What’s Most Important
S&OP processes can often get bogged down by addressing too many issues in too much detail. To be most effective, you must focus on those issues that will yield the biggest bang for the buck. Management by exception is key to doing so.
Sales and Operations Planning allows you to identify variances from performance thresholds so you can focus on the most important issues. You can define exception criteria for seeded measures and custom measures for graphic display. Exception detection is run immediately upon running a plan. Features include:
- Configure the reporting on exceptions. You can specify the hierarchy levels and the thresholds for reporting on exceptions. You can configure which users or roles receive notifications.
- Configure exception sets. Identify the exceptions that are important for your plan in an exception set. Only these exceptions are calculated and reported.
- Analyze plan exceptions graphically. Review the exceptions and directly drill down from the exception to relevant data to understand the circumstances behind the exception and formulate an action plan to resolve it.
With these exception management features, you can focus on those issues with the biggest potential impact on your key performance indicators and overall business results.
Steps to Enable
To define custom exceptions:
- In the Tasks panel drawer, click the Configure Exceptions link.
- On the Configure Exceptions page, expand Demand Planning Exceptions or Sales and Operations Planning Exceptions.
- Click the New icon to add a custom exception and then specify general properties. Select Exception Group and Base Measure from the dropdown.
- Specify the level at which the exception has to be created and its threshold and notification settings. Click Save.
- You can add the custom exceptions to the Exception Set and then point the Exception Set in the Plan Options screen. For more details on this step, refer to the What’s New document for Planning Central.
Tips And Considerations
- Predefined exceptions in Sales and Operations Planning highlight instances of low forecast accuracy, demand fulfillment shortfalls, inventory shortages, significant deviations between the current and prior sales and operations plan, and significant deviations between the sales and operations parts of the plan.
- The types of exceptions and their calculation logic are predefined, but the conditions under which they are generated are configurable. You can ensure that exceptions highlight only significant deviations.
- Include only the exceptions that are used in the planning process. Remove unused exceptions to improve plan run performance.
- Measure-based exceptions are supported. Count and Quantity attributes are generated by these exceptions. Metrics associated with exceptions can be viewed as Tables or Graphs at different hierarchical levels. You can view the exceptions as a Graph or drill to exception details from other graphs. You can enter Plan Comparison mode and compare exceptions across plan runs.
- You can assign a custom exception to one or more exception groups, but this is not supported for predefined exceptions.
- Planners can create notification rules for exceptions. Notifications are sent automatically at the end of the plan run. They can also be manually invoked for a specific exception from the Exceptions UI.
- The Exception Set enables you to restrict the generation of exceptions to specified Organizations, Categories, Suppliers and Customers. You can then point to the Exception Set in Plan Options.
- After you adjust the Resource Availability and Supplier Capacity Available measures, the Resource Overloading and Supplier Overloading exceptions in Supply Review Summary dashboard are not recalculated automatically. To recalculate exceptions, run the plan.
Key Resources
- Release Training – Introduction to Sales and Operations Planning: Product Overview and Analyzing to Make Better Decisions, available at Oracle Cloud: Supply Chain Management Release Readiness.
Integrate with Microsoft Excel
Most S&OP data analysis can be done within the Oracle solution. However, there will be times when you want to analyze data in a spreadsheet. You might also want to bring external data into the Oracle solution.
Sales and Operations Planning allows you to use Microsoft Excel to analyze, edit, and update planning data. For instance, you can:
- Analyze plans offline. Download data from a table for offline analysis.
- Import financial plan data. Populate financial forecast and budget data in an Excel template and then load the data into Sales and Operations Planning.
With the ability to export and import data to and from spreadsheets, you can take advantage of the inherent flexibility of spreadsheets and analyze while offline. You can also include external data, such as financial data, into your analysis.
Steps to Enable
No steps are required to enable the Export feature in tables for offline analysis.
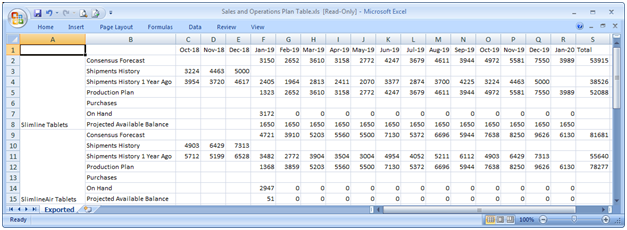
Exported Sales and Operations Plan Table
To import data including predefined and custom measures:
- Go to docs.oracle.com and search for File-Based Data Import for Oracle Supply Chain Management Cloud.
- Download the .xlsm templates for data import such as MeasuresImportTemplate.
- Open the Excel template and follow the instructions for the data required by each column.
- After entering data, follow the instructions on the first tab of the template to generate a .csv file.
- Create a .zip file containing .csv files to import.
- In the Navigator, click the File Import and Export tool to upload the .zip file.
- Select the Upload action, choose the .zip file, and specify the account scm/planning/DataLoaderImport.
- From the Plan Inputs work area, click Load Planning Data From Files in the Tasks panel drawer.
- Select the Source System and Collection Type. Select the uploaded .zip file as the Data File and submit the process.
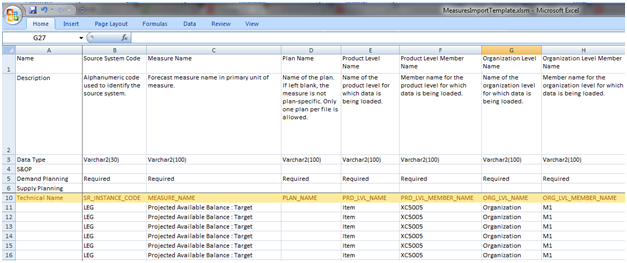
Measures Import Template
Tips And Considerations
You must create custom measures in Manage Planning Measures before you can load data for them. Use the MeasuresImportTemplate to load data for both predefined and custom measures. Add new measures to a measure catalog to associate with plans.
Key Resources
- Release Training – Introduction to Sales and Operations Planning: Product Overview and Analyzing to Make Better Decisions, available at Oracle Cloud: Supply Chain Management Release Readiness.
Understand How Plans Have Changed Using Waterfall Charts
With every S&OP planning cycle, your operating plan will change. It’s important to understand how the plan has changed. You also want to be able to compare past plans with actual performance. What’s needed is a set of reports to automatically make such comparisons.
Sales and Operations Planning provides waterfall analysis to compare current plan data with previous plan data. For example, you can easily toggle the display in a supply review table or graph to show changes in planning data for production plan, supplier capacity required, total supply, resource requirements, and projected available balance measures to observe where changes have occurred. Using the same waterfall capability, you can compare actual history with past plans.
With these waterfall analyses, you have visibility as how to realign your business with each new S&OP plan. By comparing plans with actual performance, you can pinpoint problem areas in your planning process.
Steps to Enable
No steps are required to enable this feature. It is available after archives have been created for the plan.
With Plan Archival, you can archive plan measures at a point in time. This enables you to compare the current plan data to past versions of the plan, and to see the changes in the plan over time. You can create archives as needed. The Supply Chain Application Administrator can create archives on a scheduled basis with MAPE error statistics included.
- In Plan Options Advanced Options, check the Enable for archiving
- Select a measure catalog containing the measures to include in the archive.
- Select the Time hierarchy and Level at which the archived data will be stored. Month and Week are the valid levels.
- Select archive deletion parameters to manage the number of archives being stored.
- Run the plan with the Archive Plan option selected to build the archive.
- For Waterfall Analysis, create or edit a graph or table. Select the archives to use on the Comparison Options tab.
Tips And Considerations
- Waterfall and Trend analyses use the plan archives to create the waterfall or trend table and graph.
- If the measures selected in the Measures tab are not included in the archives created for the plan, a message is displayed to that effect.
- The Supply Chain Planning Application Administrator creates the archives that are used to calculate error statistics, such as MAPE. These archives can be accessed by Waterfall Analysis and Trend Analysis by checking the Use MAPE calculations check box.
- Planners can create their own archives on demand. These are accessed for the analysis when the Use MAPE calculations check box is not selected.
- For Waterfall Analysis, archives are retrieved based on the timestamp of the archive. For example, 4 Weeks ago retrieves the archive created approximately 4 weeks ago.
- For Trend Analysis, the number of archives retrieved is based on the number of versions selected in the Trend Analysis form.
Key Resources
- Release Training – Introduction to Sales and Operations Planning: Product Overview and Analyzing to Make Better Decisions, available at Oracle Cloud: Supply Chain Management Release Readiness.
Align the Enterprise with Best Practice Process Management and Collaboration Features
Oracle Sales and Operations Planning Cloud helps you follow a best practices S&OP process to collaborate and reach consensus among sales, marketing, finance, and operations so that your entire organization is marching in step to meet its business goals.
Enable Best Practices with S&OP Process Management
Many companies’ S&OP processes fall short of recognized best practices, resulting in disappointing business benefits. Even companies that have defined a best practices process often struggle to automate the process with spreadsheets or S&OP software applications.
Sales and Operations Planning is designed to help your company quickly adopt a step-by-step best practice approach to S&OP. Each user has a personalized starting page outlining the overall S&OP calendar and progress to date, tasks assigned to them, and a contact list of colleagues involved in the S&OP process. From this page, users can navigate to tabs for each of the five standard stages of S&OP -- product review, demand review, supply review, financial review, and executive review. Each of these tabs provides the following:
- A seeded and editable list of standard tasks for each of the five stages, with the ability to associate each task with an owner, due date, status, and relevant dashboard or report to carry out each task.
- A contact list of colleagues involved in each stage.
- A list of action items assigned during that stage.
- A list of decision items that are being escalated for discussion in a review meeting.
With these features, Sales and Operations Planning helps companies quickly adopt a best practice S&OP process that will help them achieve the greatest possible benefits.
Steps to Enable
To create a planning cycle:
- Click Manage Planning Cycles in the Tasks panel drawer.
- Select Create from the Actions menu.
- Select an existing planning cycle to copy. You can use the default planning cycle.
- Provide a name and set both the start date and end date for the planning cycle. Associate at least one plan with the planning cycle, if available, to provide a plan target for drill-down links. You can also edit the planning cycle later to associate one or more plans.
- Update the list of participants by process stage.
- Update activities and tasks, setting owners and assignees by process stage.
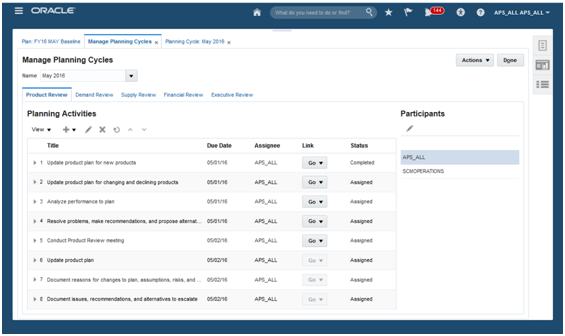
Manage Planning Cycles
- Click Open Planning Cycle in the Tasks panel drawer and complete the new planning cycle.
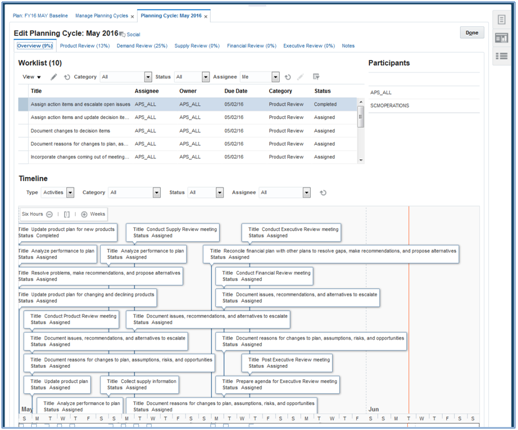
Open Planning Cycle
Tips And Considerations
Use process management activities and tasks to ensure adherence to Sales and Operations Planning procedures. To enforce accountability, process activities and tasks in a planning cycle require both owners and assignees.
A participant’s scope of the process is limited to the stages they belong to. Similarly, if a process stage is not implemented, then do not include any participants in that stage. For example, if your existing Sales and Operations Planning process includes the Demand Review, Supply Review, and Executive Review, then maintain these planning cycle tabs. When you implement a formal Product Review, you can augment your planning cycle template to include those participants, activities, and tasks.
Key Resources
- Release Training – Introduction to Sales and Operations Planning: Align the Enterprise with Best Practices Process Management, available at Oracle Cloud: Supply Chain Management Release Readiness.
Arrive at a Consensus One-Number Enterprise Operating Plan
In your S&OP process, you will want to design an operating plan that everyone can agree to. What’s needed is a way to gather input from key stakeholders, turn this input into an unconstrained consensus forecast, and have that forecast as the basis for your constrained operating plan.
Sales and Operations Planning combines multiple stakeholder forecasts from sales, marketing, and operations, all developed according to the product and location hierarchies most meaningful to each stakeholder group. A weighted average is determined using configurable percentage weightings that you can override. The resulting final unconstrained consensus forecast from the demand review process becomes the basis for developing a constrained operating plan that everyone can agree to. With this consensus planning feature, you can come up with a one-number plan with buy-in from the organization and maximum possible accuracy.
Steps to Enable
No steps are required to enable this feature.
Tips And Considerations
- The Consensus Forecast calculation depends on the Weighted Forecast measure. The Weighted Forecast in turn depends on the Final Shipments Forecast, Final Sales Forecast, and Final Marketing Forecast and their corresponding forecast weights. By default, the Weighted Forecast is equal to the Final Shipments Forecast. To consider the Final Sales Forecast and Final Marketing Forecast in the Weighted Forecast, enter values for the Final Sales Forecast Weight and Final Marketing Forecast Weight measures.
- The unconstrained Consensus Forecast is the output of the Demand Review stage. This includes adjustments to the weighted Consensus Forecast. This is input for the Supply Review.
- Supply Review output includes the operating plan. Further refinements to the plan may be made if supply constraints cannot be resolved. Furthermore, the operating plan is compared to the financial forecast in the Financial Review and may require more demand and supply shaping. The process is repeated until the feasible consensus plan is approved for execution.
Key Resources
- Release Training – Introduction to Sales and Operations Planning: Align the Enterprise with Best Practices Process Management, available at Oracle Cloud: Supply Chain Management Release Readiness.
Collaborate with Stakeholders on Plans Using Oracle Social Network
Resolving issues requires effective collaboration on a communication platform that provides the right context, history, and tools, and connects people without introducing another standalone social networking tool. In this release, you can use Oracle Social Network to leverage the power of social collaboration that is directly built into Sales and Operations Planning to:
- Stay connected with plans and planning cycles to get updates.
- Start a conversation and collaborate in real time and in multiple threads with key stakeholders.
- Resolve planning issues and share recommended practices through social collaboration.
All communications are maintained with the proper business context and team engagement using Oracle Social Network, effectively closing the collaboration gap.
Steps to Enable
To socialize a planning cycle as a conversation in Oracle Social Network:
Click Open Planning Cycle in the Tasks panel drawer and open a planning cycle.
- Click the Social link to the right of the Edit Planning Cycle title.
- Click the Share button to create the conversation associated with the planning cycle.
To socialize a planning cycle stage as a conversation in Oracle Social Network:
- Click Open Planning Cycle in the Tasks panel drawer and open a planning cycle.
- Click a tab for one of the process stages, such as Product Review.
- Click the Social link to the right of the Planning Activities title.
- Click the Share button to create the conversation associated with the Product Review.

Planning Cycle – Product Review Conversation
Tips And Considerations
In order to collaborate in Oracle Social Network, each stakeholder must have a person type of Employee.
Key Resources
- Release Training – Introduction to Sales and Operations Planning: Align the Enterprise with Best Practices Process Management, available at Oracle Cloud: Supply Chain Management Release Readiness.
Ensure Continuity and Provide Accountability Using Planning Notes
During the S&OP process, there is a need to document decisions made, changes to the plan, and the assumptions, risks, and opportunities associated with those decisions and changes. With such documentation, you can understand why decisions were made and who made them.
Using Sales and Operations Planning, you can attach notes to objects such as plans, product categories, organizations, and customers, or in a table containing specific planning combinations. For example, you can attach a note to a shipment forecast for an item-organization in a specific week so your peers know the assumptions behind the forecast change. Documenting such qualitative information ensures S&OP participants understand the context behind the plan. It also provides accountability for actions made during the S&OP process, so that, for example, if a boost to planned demand turns out to be a mistake, there is a record of why the change was made in the first place.
Steps to Enable
No steps are required to enable this feature.
Tips And Considerations
The author of a planning note is based on the employee information of the person who created the note. In order for a note to display the correct author, the creator of the note must have a person type of Employee.
Planning notes created on level members such as product category are not plan-specific. This means that a note associated with a level member is visible from any plan containing that member. Notes for product level members (above the item level) can be managed in an open planning cycle as well as in a pivot table.

Manage Notes in a Planning Cycle – Notes Tab

Manage Notes in a Pivot Table
Key Resources
- Release Training – Introduction to Sales and Operations Planning: Align the Enterprise with Best Practices Process Management, available at Oracle Cloud: Supply Chain Management Release Readiness.
Act by Creating New Plans and Connecting Plans with Execution
To determine the right plan, it is often necessary to simulate alternative what-if plans, and then determine and select the best one for execution. Oracle Sales and Operations Planning Cloud provides aggregate planning and simulation capabilities so you can evaluate different plans to balance supply with demand and meet your business objectives. Seamless integration among S&OP, tactical planning, and execution systems ensures that the S&OP process starts out with the most up-to-date information. Strategic decisions you make during the S&OP process can easily be driven back into your tactical planning systems for execution.
Plan at an Aggregate Level for Strategic Time Horizons
For long-term strategic planning, you will want to plan at an aggregate level to address big picture questions related to issues such as resource and workforce needs and adequacy of procurement and transportation contracts. It’s important to plan at an aggregate level so you are not overwhelmed with unnecessary detail, and thus slowing down the planning process with unnecessary complexity.
Tactical planning is often done at an item, site, and daily level, with a typical time horizon of three to 18 months. With Sales and Operations Planning, you can plan at an aggregate level, for example, at the product category and month level, focusing on critical components and resources over strategic time horizons that are typically 18 months to five years out. With aggregate planning capability, you can address long-term strategic planning quickly and effectively and help your organization have the right capacity to profitably meet its long-term goals.
Steps to Enable
To run an aggregate plan:
- Open the Sales and Operations Plan Options.
- In the Scope tab, select a Planning Time Level of Week, Months, or Fiscal Periods.
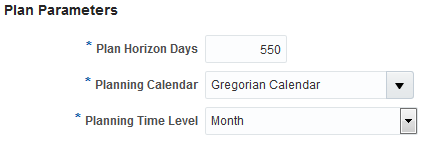
Selecting a Time Level for Aggregate Planning
- In Plan Options, Supply tab, General sub-tab, select the Product Level and Customer Level in the Aggregate Plan Attributes.

Selecting the Product and Customer Levels for Aggregate Planning
- Run the plan.
Tips And Considerations
The Bill of Resources must be loaded in order to run any Sales and Operations Plan, including an Aggregate Plan. The assignment set also must be consistent with the plan. For example, a Category Level plan requires Category level sourcing assignments.
Key Resources
- Release Training – Introduction to Sales and Operations Planning: Creating Plans and Connecting Plans with Execution, available at Oracle Cloud: Supply Chain Management Release Readiness.
Run Quick Demand Simulations to Reflect Changed Assumptions
While the demand forecast is sometimes taken as a given at the outset of the S&OP process, you might want to update the forecast to reflect changing assumptions, such as a change in pricing. In that case, you will want to update the demand forecast from within the S&OP application. If you subscribe to either Oracle Planning Central Cloud or Oracle Demand Management Cloud, Sales and Operations Planning allows you to run demand simulations from within Sales and Operations Planning, using the forecasting capabilities of those other services.
In contrast to rerunning the demand forecast in a separate demand application and bringing it back into the S&OP application, the ability to run demand simulations within the S&OP application gives you a seamless user experience. It also has the benefit of reducing data latency and speeding up your S&OP analysis by minimizing the movement of demand plan data between applications.
Steps to Enable
To include a forecasting profile in a plan:
- Click Manage Plans in the Tasks panel drawer.
- Click Create from the Actions menu to create a new plan or Edit Plan Options to edit plan options for an existing plan.
- Click the Demand tab in plan options.
- In the Forecast Profiles area, click Add Row from the Actions menu to add a forecasting profile.
- Select Forecast Shipments or Forecast Bookings. You can add another row to select both profiles in plan options.

Forecasting Profiles in Plan Options
- Click the Save and Run button.
- Click to include the forecasting profile in Demand Plan Run Options.

Demand Plan Run Options
- Click OK to run the plan.
Tips And Considerations
Data edits made to Adjusted Shipments History and Adjusted Bookings History measures in Sales and Operations Planning are considered for demand simulations when running a plan with the data refresh option set to Do not refresh with current data. These edits are overwritten when running a plan with the data refresh option set to Refresh with current data.
Key Resources
- Release Training – Introduction to Sales and Operations Planning: Creating Plans and Connecting Plans with Execution, available at Oracle Cloud: Supply Chain Management Release Readiness.
Run Rapid Supply Simulations to Balance Supply with Demand
During the supply review stage, you will want to run alternative what-if supply plans within the S&OP application to balance supply with demand in the most profitable way. Long plan runtimes will limit the number of alternatives you can consider. What you need is the ability to run what-if plans as quickly as possible.
With Sales and Operations Planning, you can run supply simulations from within the application with quick in-memory processing. You can model supply scenarios to accommodate an increase in demand, or see the impact of changes to any of the following supply parameters:
- Resource availability for a planning resource in an organization
- Supplier capacity available for a supplier item
- Purchasing cost, to evaluate changes in supply chain costs
- Item lead times
- Item prices to evaluate changes in revenue
- Safety stock to evaluate changes in projected inventory
- Sourcing percentages
- Usage quantities and effective dates in the bill of resources
With rapid supply simulation available in Sales and Operations Planning, you can be more responsive to changing demand conditions and easily evaluate multiple supply plan alternatives so that you can pick the most attractive one.
Steps to Enable
To run a supply simulation in a plan:
- After making edits to demand forecasts and supply data in an open plan tab, click the Save button.
- Select Run from the Actions menu.
- Expand the Details area in Run Plan and make the following selections:
- Data Refresh Options = Do not refresh with current data
- Scope Options = Plan supply
- Do not include forecasting profiles in Demand Plan Run Options
- Supply Plan Run Options = Interactive
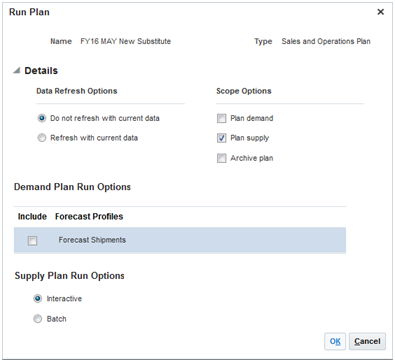
Run What-if Supply Simulation
- Click OK.
Tips And Considerations
Edits made to demand forecasts and supply data are considered for supply simulations when running a plan with the data refresh option set to Do not refresh with current data. While demand forecast overrides are retained, supply data edits are overwritten when running a plan with the data refresh option set to Refresh with current data. You can reuse some edits made to supply data in the Items and Bill of Resources tables by copying those changes to a simulation set.
Key Resources
- Release Training – Introduction to Sales and Operations Planning: Creating Plans and Connecting Plans with Execution, available at Oracle Cloud: Supply Chain Management Release Readiness.
Select the Best Plan with Plan Over Plan Comparison
In order to evaluate what-if plans, you need to be able to easily compare plans, such as an alternative plan with the current operating plan, or one alternative plan with another. Sales and Operations Planning supports the ability to compare plans side by side. Comparison measures calculate the differences between plan values to highlight changes so you can consider the pros and cons of each plan. With plan-over-plan comparison, you can quickly and easily determine which alternative plan yields the best business results.

Plan Comparison
Steps to Enable
No steps are required to enable this feature.
Tips And Considerations
- The measure and dimension catalogs of the plans being compared must be the same in order for plan comparison to work.
- The planning calendar and planning time level must be the same for the plans being compared.
- The metrics used to show the differences between plan values are selected in the Comparison Options tab when creating or editing the table or graph.Selecting one or more metrics enables the Show Difference icon on the toolbar, which toggles between showing and not showing the differences between plans.
Key Resources
- Release Training – Introduction to Sales and Operations Planning: Creating Plans and Connecting Plans with Execution, available at Oracle Cloud: Supply Chain Management Release Readiness.
Link Tactical Planning with S&OP
To link your tactical supply chain planning with your S&OP process, you will want to use your tactical plans as the starting point for S&OP. Sales and Operations Planning is integrated with Oracle’s Supply Chain Planning Cloud tactical planning applications. You can view demand and supply measures from Oracle Planning Central Cloud, demand measures from Oracle Demand Management Cloud, and supply measures from Oracle Supply Planning Cloud. Then, you can do aggregate analysis of this information directly in Sales and Operations Planning. With this integration, your S&OP process starts off with the most accurate information, ensuring that decisions reflect the most current information about your business.
Steps to Enable
- In the Tasks panel drawer, click the Load Measures from Other Plans link. Select From Plan (source plan name) and To Plan (Target plan name) in this page.
- Select the measures you want to load from Planning Central, Supply Planning, or Demand Management to Sales and Operations Planning.
- Click Save and Close. A scheduled process starts automatically. This process copies the data from the source Planning Central, Supply Planning or Demand Management plan into the Sales and Operations Planning plan.

Loading Measures From Other Plan Types Into Sales and Operations Planning
- After the scheduled process has completed, you can verify that the planning measure data has been loaded into Sales and Operations Planning by opening a table or graph that is configured with the loaded measures.
Tips And Considerations
- When you select a Planning Central, Demand Management, Supply Planning or Integrated Supply Demand plan name from the From Plan list, the values are filtered for loaded plans with status = Completed. This means that the plan has been run without errors. The values are also filtered to Public plans and Private plans for which you are a member.
- When you select a Sales & Operations Planning plan name from the To Plan list, the values are filtered for loaded plans with status = Completed. This means that the plan has been run without errors.
- From Plan and To Plan show the first ten plan names sorted alphanumerically with a Search… option link at the bottom. Clicking the link opens the Search and Select Plan dialog. You can filter the search using either plan name or plan type (Demand, Supply, and Demand and Supply fields).
- You can select measures from Available Measures to load measures from the measure catalog of the selected plan and add them to the list of Selected Measures for loading data into the Sales & Operations Planning plan. Available Measures are filtered for measures that are common to the Planning Central, Supply Planning, or Demand Management source plan and the Sales & Operations Planning target plan. The list of measures must belong to both source and target plans.
- If you define a custom measure group that contains the list of measures to be used in Integration, then you do not need to look through all of the predefined groups for the available measures.
Key Resources
- Release Training – Introduction to Sales and Operations Planning: Creating Plans and Connecting Plans with Execution, available at Oracle Cloud: Supply Chain Management Release Readiness.
Link S&OP Plans Back to Tactical Planning
After you have an approved S&OP strategic plan, you will want this plan to drive your tactical supply planning applications for S&OP plan execution. Because Sales and Operations Planning is integrated with Oracle Planning Central Cloud and Oracle Supply Planning Cloud, the approved S&OP demand forecast can automatically become the demand schedule for planning supply in those latter two applications. These applications spread and consume the aggregate S&OP forecast. With integration between S&OP and tactical planning applications, you can drive strategic decisions made as part of the S&OP process seamlessly into tactical planning processes so that strategic decisions are executed upon.
Steps to Enable
- Ensure that within the Sales & Operations Planning Plan Options, the Planning Product Level is set to Item.
- If the Planning Product Level within the Sales & Operations Planning Plan Options is set to Item and Planning Customer Level is set to Customer Site, you must have the following measure level settings within the Plan Options for the Planning Central or Supply Planning plan:
- Product Hierarchy = Product and Product Level = Item
- Organization Hierarchy = Enterprise and Organization Level = Organization
- Customer Hierarchy = Customer and Customer Level = Customer Site
- Demand Class Hierarchy = Demand Class and Demand Class Level = null
- Time Hierarchy = Planning Calendar and Time Level = Planning Time Level
- If Planning Product Level is set to Item, and the Planning Customer Level is set to Zone in Sales & Operations Planning Plan Options, then the following measure level settings must be specified within the Plan Options for the Planning Central or Supply Planning plroduct Hierarchy = Product and Product Level = Item
- Organization Hierarchy = Enterprise and Organization Level = Organization
- Customer Hierarchy = Customer Zone and Customer Level = Zone
- Demand Class Hierarchy = Demand Class and Demand Class Level = null
- Time Hierarchy = Planning Calendar and Time Level = Planning Time Level
- Ensure that in Planning Central or Supply Planning, the Sales & Operations Planning plan has been selected as a Demand Schedule. You can specify either Consensus Forecast or Approved Consensus Forecast from the Sales & Operations Planning Plan in the Demand Plan Output field.
- Ensure that in the Ship-to Consumption Level field, you have selected Item, Customer Site, or Zone.
Tips And Considerations
To use Sales & Operations Planning plans in tactical planning, you must ensure that within Sales & Operations Planning Plan Options, the Planning Product Level is set to Item. If Planning Product Level is set to Category, then Sales & Operations Planning demand forecasts cannot be used in tactical planning.
Key Resources
- Release Training – Introduction to Sales and Operations Planning: Creating Plans and Connecting Plans with Execution, available at Oracle Cloud: Supply Chain Management Release Readiness.
Integrate with Oracle Supply Chain Management Cloud and Other Sources
To reduce implementation timelines and reduce total cost of ownership, you can use prebuilt integration between Sales and Operations Planning and other Oracle Supply Chain Management Cloud applications. You can also incorporate data from other external data sources.
Collect Data From Oracle Supply Chain Management Cloud Applications
If you are using Oracle Supply Chain Management Cloud applications, you will want the ability to integrate those applications with Sales and Operations Planning. Because Sales and Operations Planning is integrated with Supply Chain Management Cloud, you can:
- Use prebuilt integration to seamlessly obtain product, customer, and other master data as well as transactions data into Sales and Operations Planning.
- Use targeted data collection where data represents a business entity, or you can use net change data collection, importing data that changed since the last run.
- Use filters to collect a subset of the data. For example, to reduce the number of items collected, you can filter according to the organizations being planned; or, to reduce the order history collected, you can filter according to date ranges.
By integrating with Supply Chain Management Cloud, you and other stakeholders have visibility to all required data necessary for an effective S&OP process.
Steps to Enable
- Navigate to the Collect Planning Data page by selecting the corresponding task name in the Oracle Sales and operations Planning work area.
- Select the parameters, such as source system from which to collect and Targeted or Net Change collection type.
- Use the collection filters popup to select appropriate filters, such as Organizations and Catalogs to collect.
- In the Reference Data tab, select business objects to collect by moving them from the Reference Entities box to the Selected Entities box.
- In the Demand Planning Data tab, use a date filter to specify a date range to collect order history data, and then select the shipment history and booking history related data to collect.
- In Supply Planning Data tab, select business objects to collect, such as On Hand, Purchase Orders and Requisitions by moving them to the Selected Entities box.
- Save selections in the form of a collection template if needed. For subsequent collections submissions, using a saved template enables you to skip steps 3 through 6.
- Optionally, set collections to run at any frequency or time in the Schedule tab.
- Start the collections process and record the request ID generated.
- Monitor the request status by using the scheduled processes page. You can access this page by going to Navigator,selecting Tools, and then selecting Scheduled Processes.
- Review the log files to pinpoint data validation errors, if any.
- Review the collected data in the Oracle Sales and Operation Planning work area.
Tips And Considerations
- Consider data dependencies if just a few business objects are to be collected. For example, Subinventory data should be loaded prior to On Hand data. The data collection process loads business entities in the correct sequence if they are part of the same collection cycle.
- Start data collections after ensuring that the requisite data setups are complete in Oracle Supply Chain Management Cloud.
Key Resources
- Release Training – Introduction to Sales and Operations Planning: Integrate with Oracle Supply Chain Management Cloud, available at Oracle Cloud: Supply Chain Management Release Readiness.
Integrate with Your Existing Third-Party Systems
If you are not using Oracle Supply Chain Management Cloud applications, you will want to integrate Sales and Operations Planning with existing systems. Sales and Operations Planning supports loading external data such as master data, hierarchies data, and transactions data by way of flat files. Types of data imported by way of flat files include:
- Production history
- Inventory history
- Backlog history
- Financial forecast value
- Budget value
- Supplier sales forecast
- Manufacturing forecast
- Custom measures
With this integration, you can use Sales and Operations Planning seamlessly with existing systems.
Steps to Enable
- For existing measures, download the measure template and populate the template with appropriate data. For a custom measure, download and populate the Measure Import Template. Complete the templates required to specify all of your Sales and Operations Planning input data, as follows.
Data Type
Collection Entities
XLSM File Name
Reference Data
Items
ItemImportTemplate.xlsm
Item Costs
ItemCostImportTemplate.xlsm
Catalogs, Categories, and Item Categories
CatalogImportTemplate.xlsm
Bill of Resources
BillofResourcesImportTemplate.xlsm
Customers and Customer Sites
CustomerImportTemplate.xlsm
Regions
RegionsImportTemplate.xlsm
Zones
ZonesImportTemplate.xlsm
Region-Zone Mapping
RegionZoneMappingImportTemplate.xlsm
Locations and Region-Location Mapping
LocationsImportTemplate.xlsm
Organizations and Organization Sites
OrganizationImportTemplate.xlsm
Suppliers and Supplier Sites
SupplierImportTemplate.xlsm
Item Suppliers (Approved Supplier List)
ApprovedSupplierListImportTemplate.xlsm
Currencies and Currency Conversions
CurrencyImportTemplate.xlsm
Units of Measure and Unit of Measure Conversions
UOMImportTemplate.xlsm
Calendars, Calendar Exceptions, Shifts, Shift Workday Pattern, Week Start Dates and Period start Dates
CalendarImportTemplate.xlsm
Calendar Associations
CalendarAssignmentsImportTemplate.xlsm
Carrier, Ship Mode of Transport and Ship Class of Service
CarrierImportTemplate.xlsm
Demand Planning Data
Booking History
BookingHistoryImportTemplate.xlsm
Shipment History
ShipmentHistoryImportTemplate.xlsm
Price Lists
PriceListImportTemplate.xlsm
Forecast Measures
ForecastMeasureImportTemplate.xlsm
Fiscal Calendars
FiscalCalendarImportTemplate.xlsm
Custom Measures, Sales and Operations Planning – Backlog, Inventory, and Production History
CustomMeasuresImportTemplate.xlsm
Supply Planning Data
Supplier Capacity
ApprovedSupplierCapacityImportTemplate.xlsm
Resources, Resource Shifts
ResourcesImportTemplate.xlsm
Resource Availability
ResourceAvailabilityImportTemplate.xlsm
Sourcing Rule and Assignments
SourcingImportTemplate.xlsm
- Navigate to the File Import and Export screen from the Navigator.
- Click the + icon and select the files created in the first step. For Account, select scm/planning/DataLoaderImport. Click Save and Close.
- From the Plan Inputs Work Area, select Load Planning Data from Files.
- Enter the required parameters to Load Planning Data from Files including Source system, Collection Type, and Data file uploaded in the previous steps. Click Submit and record the request ID.
- Monitor the request status by using the scheduled processes page. You can access this page by going to Navigator, selecting Tools, and then selecting Scheduled Processes.
- Review the log files to pinpoint data validation errors, if any.
- Review the collected data in the Oracle Sales & Operations Planning work area.
Tips And Considerations
Ensure that you have the proper external source system configured. The two types of external source systems are:
- External with no data uploaded to Oracle Cloud Applications except for Oracle Supply Chain Planning Cloud.Support for this type of external system is new in this release.
- Partially external with some data uploaded to Oracle Cloud applications. Support for this type of external system is available with Release 12. Refer to Release 12 documentation for more information.
- External system data for items, item structures, and catalogs is uploaded to Oracle Product Data Model Cloud.
- External system data for customers, customer sites, regions and zones is uploaded to Oracle Trading Community Model Cloud.
- External system data for sales orders is uploaded to Oracle Order Management Cloud.
Key Resources
- Release Training – Introduction to Sales and Operations Planning: Integrate with Oracle Supply Chain Management Cloud, available at Oracle Cloud: Supply Chain Management Release Readiness.
Oracle Supply Planning Cloud enhances operational efficiency and customer satisfaction. With Supply Planning, you can plan item, material, and component supply, monitor supply performance, and respond to demand, availability, and resource issues as they occur. Supply Planning builds upon Oracle Planning Central Cloud, Oracle’s Cloud-based foundation for supply planning. With Supply Planning, you can review supply and demand changes and simulate actions to minimize risk and cost. You can also significantly improve both the speed and the quality of decisions using social collaboration, embedded analytics, and intelligent recommendations, since supply planning presents complex supply chain information in a simple and business focused format. Seamless integration with other Oracle Supply Chain Management (SCM) Cloud applications bridges the gap between planning and execution by automatically triggering material transfers, manufacturing work orders, and purchase requisitions based upon your actions in Supply Planning.
Your transition from Oracle Planning Central Cloud to Oracle Supply Planning Cloud plus Oracle Demand Management Cloud is seamless. Your existing Planning Central plans are automatically available for you to view, edit, and rerun in Supply Planning (and will produce the same planning results.) The tables and graphs that you configured for use within Planning Central can be easily reconfigured for use in Supply Planning as well. Similarly, your favorite page layouts of tables, graphs, and planning analysis views from Planning Central can be reused in Supply Planning.
The fundamental objective of supply planning is to reduce inventory levels while increasing customer service levels by planning your entire supply chain. Supply Planning supports this across a variety of production models and fulfillment strategies.
You want to create supply plans that convert current and expected demand forecasts into a supply plan that reduces inventory while preventing out-of-stock situations. This action is a complex balancing act that requires a combination of powerful numerical techniques together with abilities to clearly communicate the plan results and the issues to be resolved to the planner. Oracle Supply Planning Cloud contains an advanced supply planning engine combined with advanced analytical and visualization capabilities. These capabilities allow you, the planner, to quickly identify situations across your entire supply chain where there is supply-demand imbalance and to rapidly resolve them.
Features in this release include:
- Model global supply chain. Plan for the entire supply chain using flexible sourcing rules while taking into consideration calendars for shipping, receiving, and manufacturing.
- Spread and consume demand forecasts. Use the forecasts from Oracle Demand Management Cloud, Oracle Sales and Operations Planning Cloud, or other sources; spread forecasts when the granularity of demand planning time buckets is at a higher level than that of supply planning and consume these forecasts with sales orders to obtain the net demand picture.
- Recommend new supplies and reschedule or cancel existing supply orders. Supply Planning plans to the schedule date on the order and recommends new supply orders, rescheduling or cancelling existing supply orders after netting orders from forecasts and using the lead times on the item. The recommendations include purchase orders to source material from a supplier, transfer orders to move material from another organization in your supply chain, and manufacturing orders to manufacture the product. The dates calculated for replenishment respect various calendars including shipping, receiving, and carrier schedules.
- Respect business rules related to supply. Supply Planning honors effectivity dates on components, expiration dates on inventory lots and reservations of on-hand inventory, work orders, purchase orders, and transfer order to sales orders.
- Automate calculation of resource requirements. Plan and analyze resource requirements taking into account the work definition in Oracle Manufacturing Cloud. The combination of the manufacturing calendars and resource exceptions allows Oracle Supply Planning Cloud to recognize resource availability and report exceptions when requirements exceed capacity.
Steps to Enable
To plan supply, define and launch a supply plan.
The plan options allow you to control the scope of planning and influence the behavior of the planning processes. These options specify the scope of the plan in terms of items, organizations, time horizon, planning measures, and supply planning behavior.
- In the Supply Planning work area, navigate to the Manage Plans page, and click the Create icon. The Create Plan page opens.
- Define the plan options.

Scope Tab of Plan Options
Tips And Considerations
- Define plans with a ‘best practice’ choice for number of days. Choose a number of days that is relevant to the typical lead times and time frame in which you make decisions without defining a plan that is too large.
- In the plan options, use the ‘Demand plan items only’ item selection criterion or a similar criterion (as opposed to ‘All planned items’) to minimize the plan size.
- Initially, in the plan options, select all of the organizations in your supply chain. Include source and destination organizations for material transfers so that the plan has a complete picture of your supply chain. Later, if required, you can choose to segment your supply chain into multiple plans.
Key Resources
- Release Training – Introduction to Supply Planning: Product Overview and Plan Supply, available at Oracle Cloud: Supply Chain Management Release Readiness.
Calculate and Plan Safety Stock
Safety stock is a hedge against unexpected variations in demand that might otherwise impact customer service levels, but as such, it is a cost to be minimized. Supply Planning can calculate the required buffer stock and ensure that the projected inventory balance over time is not less than the calculated or specified inventory stocking levels. You can:
- Automatically calculate safety stock levels. Supply Planning considers demand variability when it calculates safety stock. To arrive at the safety stock levels, Supply Planning uses MAD (mean absolute deviation forecast error), MAPE (mean absolute percentage error), or arrival rate forecast errors, and the service levels that are defined for an item at a facility or alternatively a common service level for the entire plan.
- Manually set safety stock levels. You can manually set safety stock levels for an item, either in the Product Information Management work area or in Supply Planning, when an automated calculation is not appropriate. Supply Planning can also use a “days of cover” paradigm to calculate a safety stock level that varies according to time. Additionally, you can import safety stock levels if you calculate them elsewhere.
Steps to Enable
Use any one of the four following methods to plan safety stock:
- Specifying a constant (non-time varying) safety stock quantity – You can manually specify safety stock quantities in the Items Page Simulation Set mode.
- Set item/org attribute Safety Stock Planning Method to Not MRP Planned in the Specifications tab.

Item Organization Specifications Tab in the Product Information Management Work Area
- Set the supply planning plan option Safety Stock Planning Method to Use safety stock quantities in the Supply: Advanced Options window of the Supply tab on the Plan Options page.

Oracle Supply Planning Cloud Advanced Plan Options
- If both the item-org attributes, Safety Stock Quantity Override and Safety Stock Quantity are null, then the collected safety stock levels are used which can be time phased.
- Uploading time-phased safety stock levels – You can upload time-phased safety stock levels to the planning tables via a CSV file.
- Specify Period Start Date and Safety Stock Quantity.

Upload Template for Time-Phased Safety Stocks
- Set item/org attribute Safety Stock Planning Method to Not MRP Planned.
- Set the supply Planning plan option Safety Stock Planning Method to Use Safety Stock Quantities.
The time-phased safety stock levels are only displayed in the Horizontal Plan, not the Items page.
- Statistical Safety Stock Levels – Oracle Planning Central Cloud and Oracle Supply Planning Cloud applications can calculate statistical safety stock levels if safety stock parameters are specified in the Safety Stock tab of the Plan Options.
- Set the item/org attribute Safety Stock Planning Method to Not MRP Planned.
- Set the supply planning plan option Safety Stock Planning Method to Use Safety Stock Quantities.
- Select Calculate new safety stock quantities for end items in the Safety Stock tab on the Plan Options page.
- Specify safety stock planning parameters in the Safety Stock tab on the Plan Options page.
If the Plan Options parameters are blank, then Supply Planning does not call the new safety stock planning tool to calculate safety stock levels. Else, it calculates item-org safety stock levels.
- Check the Recalculate safety stock check box in the Run Plan window.
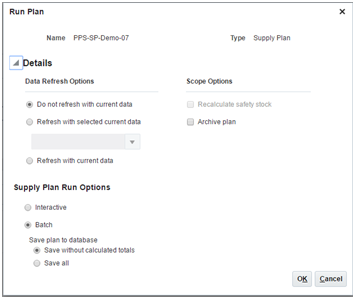
Run Plan Window
NOTE: If the Recalculate safety stock check box is not selected, then the new values are not calculated for safety stock levels based on the parameters in the Safety Stock tab on the Plan Options page.
- Days of Cover – Safety stock levels can also be calculated based on days of cover and demand period.
- Set the item/org attribute Safety Stock Planning Method’ to Days of Cover in the Specifications tab.
- Specify values for Demand Period and Days of Cover.

Oracle Product Information Management Item Organization Specifications Tab
- Set the supply Planning plan option Safety Stock Planning Method to Use Safety Stock Quantities.
Tips And Considerations
If you do not select the Recalculate safety stock checkbox in the Run Plan window, then the plan does not calculate the new safety stock values based on the statistical safety stock parameters. Its supplies are planned based on the values specified in the Safety Stock Quantity or Safety Stock Quantity Override fields.
Key Resources
- Release Training – Introduction to Supply Planning: Product Overview and Plan Supply, available at Oracle Cloud: Supply Chain Management Release Readiness.
Tailor the Scope of Plans to Your Business Needs
Control the scope of planning to match your business needs. Easily change the scope to adapt to changing business conditions.
- Create named plans. Create a named plan and identify the locations and items, along with the hierarchies that you will use for data analysis.
- Define planning scope. Plan supply based upon sales orders and one or more forecasts (demand schedules) from Oracle Demand Management Cloud, Oracle Sales and Operations Planning Cloud, or external systems. Alternatively, you can use a manufacturing plan to plan detail below a leveled production plan.
- Enforce fine-grained access control. Restrict access to individual plans based upon user, and limit access across plans to the data within a planner’s scope of responsibility.

Supply Plan Definition Via the Plan Options Page
Steps to Enable
No steps are required to enable this feature.
Tips And Considerations
Before creating new supply plans, you must setup and configure the following e to define new supply plans:
- Collect or Load Planning Data: Collect reference and transaction data using the Collect Planning Data or ‘Load Planning Data from Files’ task.
- Sourcing Assignment Sets: Create sourcing rules and set up assignment sets using Manage Sourcing Rules and Manage Assignment Sets tasks.
- Dimension Catalog: Update the dimension catalog to use appropriate calendars.
- Sizing: Based on plan horizon and volume, ensure that the Supply Planning Engine Server is sized appropriately.
Key Resources
- Release Training – Introduction to Supply Planning: Product Overview and Plan Supply, available at Oracle Cloud: Supply Chain Management Release Readiness.
Plan for Configure-to-Order Products
Planning for configure-to-order products introduces special considerations related to the dependent demand of product options and the different methods of fulfilling configured products. To attain high customer service levels while reducing the inventory of finished goods and components, Supply Planning in a configure-to-order environment allows you to:
- Consume forecasts for models. Consume orders for the configured product from model forecasts.
- Plan component requirements. Derive the demand on lower level options and option classes according to planning percentages. The planning percentages can either be defined in the work definition or determined based on historical ordering patterns of options when using an integrated demand and supply plan.
- Plan resource requirements. Derive the resource requirements according to planning percentages defined on the work definition. This allows you to identify potential resource overloads by deriving the load on the resources required to manufacture the assembly that might be dependent on selected options.
- Identify supplier capacity overloads. Gain visibility to potential supply issues at supplier sites by consuming the supply requirements for the configured items from the supplier capacity defined at the model level.
- Plan option-dependent lead time. Ensure that options are available to manufacture the configured product at the planned time by offsetting the required component lead times.
Steps to Enable
- Create and configure a sales order for the Model.
- Create a manufacturing work definition for the Model item.
- Collect data from the source systems into Supply Planning, including the item structure, work definition, and sales order entities.
- Create a new plan. In the Plan Options page, specify the plan type as either Supply Plan or Demand and Supply Plan.

Setting the Plan Type in Plan Options
- Check the plan option ‘Explode model forecasts’ in the Supply tab to enable the forecast explosion process within Supply Planning

Setting the Explode Model Forecasts Control in Plan Options
- If the plan type is ‘Demand and Supply Plan’ you can optionally check the ‘Use forecasted planning percentages instead of collected data’ option to use the forecasted planning percentages to perform the forecast explosion in Supply Planning

Configuring Supply Planning to Use Calculated Instead of Item Structure Planning Percentages
- Run the plan to verify that the model forecast is consumed by the sales order for the configured item and the unconsumed model forecast is exploded down to the underlying option classes and options using lead time offsets
Tips And Considerations
- Supply Planning respects the assignments between the first level components of a Model item and the operations of the Model item’s work definition. Any operation assignments made to lower level components of the Model item, within the Work Definition screen in Manufacturing, are ignored by Supply Planning. In such cases, Supply Planning will associate the first level component to the first operation of the Model item’s work definition.
- You have to use the plan option ‘Explode model forecasts’ to control the forecast explosion process within Supply Planning. The item attribute “Forecast Control” is not used in Supply Planning.
Key Resources
- Release Training – Introduction to Supply Planning: Product Overview and Plan Supply, available at Oracle Cloud: Supply Chain Management Release Readiness.
Plan for Multiple Fulfillment Strategies
Modern businesses use a variety of fulfillment strategies, such as contract manufacturing, drop-shipment and back-to-back order flows, which are often interchangeable based on customer or order-specific situations. While this approach can deliver flexibility and cost advantages, it further complicates the planning problem. To fully support these strategies in an optimal way, Supply Planning allows you to:
- Plan for contract manufacturing. Plan outsourced manufacturing locations as if they were in-house manufacturing plants. Plan for supply, taking into consideration work-in-process and on-hand inventory at the contract manufacturer so customer service levels remain high. Plan for the components you supply to the contract manufacturer. Automatically create the documentation that is required to manufacture the product at the contract manufacturer when you release the planned supply orders.
- Plan for drop shipments. Consume drop-shipped orders from the forecast, and honor supply reservations for them. Plan the transit time between the supplier and customer site, taking the supplier, supplier shipping, carrier, and customer receiving calendars into account.
- Plan back-to-back orders. Consume the back-to-back orders from forecasts, and honor supply reservations for them. Plan the transit time between the supplier and the receiving organization, taking the supplier, carrier, receiving organization, and customer calendars into account.
- Plan for outside processing operations. Plan for supply using the appropriate lead times required for processing material at a third party, based upon the manufacturing work definition.
- Support expense destination transfers. Consider expense destination transfers as independent demand, so all demand is accounted for in the planning process.
Steps to Enable
To enable planning for contract manufacturing:
- Collect data for the contract manufacturing organization.
- Include the contract manufacturing organization in your plan.
- Create sourcing rules for the contract manufactured items and components. The work orders are planned by Supply Planning. Component demand is created, which leads to the selection or creation of supplies for the lower level components.
To enable planning for drop shipments:
- Define an item organization with any organization code, which can be referred to as the drop shipment validation organization and can be used only for planning.
- Designate the drop ship validation organization in the Manage Source Systems form.
- Add your drop ship items to the drop ship validation organization.
- Set the planning method to MPS Planned or MRP planned.
- Set up drop shipment sourcing by defining a global sourcing rule and specify a Buy From supplier and supplier site.
- Assign the global sourcing rule to an assignment level of item or category.
- Optionally assign it to a customer or zone.
- In the Setup and Maintenance work area in Manage Transit Times, define transit times between suppliers and customers as:
- From zones, regions, and supplier sites
- To zones, regions, and customer sites
- Collect sales orders and purchase orders, which will include the drop ship sales orders and drop ship purchase orders.
- In the collected data, the collected drop ship sales orders show the ship-from organization as the drop ship validation organization.
- In the collected data, the collected drop ship purchase orders show the ship-to organization as the drop ship validation organization.
- Collecting drop shipments also creates a pseudo reservation between the drop ship sales order and purchase order, which is only visible in Supply Chain Planning Cloud.
- In Oracle Demand Management Cloud, optionally create forecasts for drop shipments using collected sales order history, which includes your drop shipments.
- Optionally define an approved supplier list entry for the drop ship supplier and upload supplier capacity via CSV files to Supply Chain Planning Cloud.
- Create a plan and in the Advanced Options dialog box, and select the Include drop ship demands and supplies check box. Selecting the check box automatically includes the drop ship validation organization in the plan organizations list.
- If you want to view drop shipment sales orders in the plan, in the Scope tab, set Supply Planned Items to one of the options which includes sales orders.
- Launch the plan. Note that drop shipment supplies pegged to forecasts cannot be released.
To enable planning for back-to-back:
- Set the Planning Method item-organization attribute to either MRP Planned or MPS Planned to include the back-to-back item in plans.
- Define sourcing for the back-to-back items and include the sourcing rule in your Oracle Global Order Promising Cloud assignment set.
- Oracle Global Order Promising Cloud schedules the sales order and at the same time creates a supply recommendation, which is passed to Oracle Supply Chain Orchestration Cloud.
- Oracle Supply Chain Orchestration Cloud selects a supply, or creates a supply if it’s not available.
- Supply Chain Orchestration creates a reservation between the supply and the sales order for the back-to-back item.
- For your plan, include organizations with back-to-back items, sales orders, and supplies.
- Launch your supply plan.
- Analyze supply shortages and capacity overloads or your back-to-back items using any of the standard planning tools.
- Supply Planning respects the reservation between the back-to-back sales order and supply.
- New supplies for back-to-back sales orders cannot be released from planning. Only Global Order Promising can manage back-to-back sales orders and send the recommendations to Supply Chain Orchestration.
To enable planning for outside processing:
- For an item which has outside processing steps, set the Planning Method item-organization attribute to either MRP Planned or MPS Planned.
- Define a work definition to include an outside processing operation, specifying the fixed and variable lead times.
- Collect work definitions and review them in the collected data UI to confirm that the outside processing operation is collected with the lead times.
- In the plan, include the organization which has outside processing operations in the work definitions.
- Run the plan.
- After the plan run completes, check an item with an outside processing step.
- Navigate to the resource requirements for a work order or planned make order for the item.
- In the Resource Requirements page, outside processing operations are shown with the Resource name as Outside Processing.
- The start date and end date of the outside processing operation are calculated using the fixed and variable lead time values specified for the operation.
- Planned orders for items that include outside processing operations in their work definitions can be marked for release and then released. Work orders created in Manufacturing Cloud will include the outside processing operations.
To enable planning for expense destination transfers:
- For an item which has expense destination transfers, set the Planning Method item-organization attribute to either MRP Planned or MPS Planned.
- Collect transfers from the source. Expense destination transfers are automatically included.
- Define and launch a plan for organizations which have items with expense destination transfers.
- The plan recognizes the expense destination transfer as a demand at the source organization and it is displayed as a sales order.
- There is a new column called Expense Destination Transfer in the Supplies and Demands page, which is set to ‘Yes’ for these transfers.
- The plan does not include the expense destination transfer as a supply at the destination organization.
- Shipments of expense destination transfers are not collected and are not included in the plan as a supply at the destination organization.
Key Resources
- Release Training – Introduction to Supply Planning: Product Overview and Plan Supply, available at Oracle Cloud: Supply Chain Management Release Readiness.
Monitor Supply Chain Performance
The prior generation of supply planning systems has required a great deal of specialized skills combined with “tribal knowledge” to identify and resolve issues. Oracle Supply Planning Cloud is designed to reduce the need for insider knowledge, improve planner productivity, and reduce the time required to identify and prioritize supply chain problems.
Monitor Plan Performance at the Aggregate Level
With Supply Planning’s visual summaries of plan data, you can evaluate enterprise plan performance at a glance and clearly reveal trends and highlight deviations from enterprise goals. With Supply Planning, you can:
- Review a plan summary. Model future business performance and narrow down issues at a high level, with one-click access to supporting charts and graphs that can help you understand the root cause.
- Use seeded info tiles to explore your plan. Access seeded info tiles that present a snapshot of plan performance, including revenue, margin, forecast attainment, demand at risk, inventory turns, lead time compression, utilization, capacity, excess inventory, and obsolescence.
- Use configured info tiles to explore your plan. Create your own info tiles representing plan performance. In addition to using predefined metrics, you may also derive plan performance metrics using measures that are unique to your enterprise.

Seeded Plan Summary
Steps to Enable
No steps are required to enable predefined plan summaries.
To create a custom plan summary:
- In the plan tab in the Supply Planning work area, navigate to Actions > Manage Tables, Graphs, and Analysis Sets > Create icon > select Table or Graph to define your tables and graphs.
- To define tiles, navigate to Actions > Manage Tables, Graphs, and Analysis Sets > Create icon > select Tile. This definition includes the performance measures to be displayed in a tile in the top row of the Plan Summary, as well as the supporting tables and graphs shown at the bottom of the Plan Summary when that tile is selected.
- To define a tile set, navigate to Actions > Manage Tables, Graphs, and Analysis Sets > Create icon > select Tile Set. A tile set groups multiple tiles into a complete plan summary.
- Open plan summary from the Open menu by searching for and then selecting the name of the tile set.
Key Resources
- Release Training – Introduction to Supply Planning: Monitor Supply Chain Performance, available at Oracle Cloud: Supply Chain Management Release Readiness.
Use Guided Navigation to Analyze Root Causes
To reduce the time required to analyze the root cause of issues and support corporate reporting tasks, you can use over 50 prepackaged tables and graphs that you can change to suit your requirements. With Supply Planning Cloud, you can:
- Analyze root causes. Drill down from aggregate-level info tiles to detailed worksheets that help you understand the issue better. All the seeded worksheets provide in-context navigation to related data to validate any hypothesis you may have.
- Analyze, update, and review forecast changes. View and update data at multiple levels of the hierarchy through the seeded Forecast Analysis worksheet.
- Analyze, update, and review supply and demand in aggregate time buckets. Understand where and when supply and demand is out of balance with the seeded Material Plan worksheet. You can clearly see projected supply and demand trends in aggregate time buckets, including forward looking inventory positions.
- Optimize resource usage. Review resource requirements and availability with the Resource Plan worksheet. This table helps you understand resource utilization over time and take remedial action for over-capacity and under-capacity situations.
- Analyze, update, and review supply and demand in detail. Analyze demand and supply pegging at the most detailed level (sales orders, purchase orders, transfer orders, and planned orders) using the Supplies and Demands screen.
- Analyze supply pegging. Easily visualize how supply at multiple levels is pegged to demand using the Supply Pegging screen. The pegging analysis allows you to easily understand demand separated out on various dimensions such as time, order types, or customers and visualize the pegging of not just the top level assemblies but also the associated components.
- Analyze plan master data. Analyze items, item structures (bills of material), work definitions, resources, resource capacity, resource requirements, supply chain bills, suppliers, and supplier capacity through other worksheets.

Material Plan
Steps to Enable
No steps are required to enable this feature.
Tips And Considerations
- You cannot modify seeded worksheets and analytics. However, you can duplicate and then configure them.
- You can create custom worksheets and analytics with personalized formatting to suit specific business requirements. You can also create links to and from these worksheets for contextual navigation from other worksheets.
Key Resources
- Release Training – Introduction to Supply Planning: Monitor Supply Chain Performance, available at Oracle Cloud: Supply Chain Management Release Readiness.
Supply Planning’s build plan allows you to simultaneously view resource and material requirements in the context of demand for an assembly on a time-bucketed basis, thereby reducing supply and resource bottlenecks. The build plan allows you to:
- Get a 360 degree view of supply and demand. Review time-bucketed supplies, demands, and resource utilization for any assembly or subassembly and its related components and resources.
- Understand the imbalance in component supply. Highlight the supplies (of components) offset in time for a selected demand.
- Review order details. For the selected aggregate demand or supply quantity in any bucket, identify the individual orders that make up the quantity in the bucket.
- Focus your view. Configure the layout of the analysis to show only the components, resources, and the measures that are of interest aggregated in time buckets such as weeks or months selected by you.

Build Plan
Steps to Enable
To configure and view a build plan:
- In a plan tab in the Supply Planning work area, click Open, and click Full Pane to search for and open the table named Build Plan.
- When you open Build Plan, there is no context on which items you want to see. To select the items for which you want to view the Build Plan, click the Criteria drop-down and click Manage.
Selecting Context Criteria for the Build Plan
- The Manage Criteria dialog box allows you to create, read, update, or delete a named criteria, which determine the end items, components and resources that are displayed in Build Plan. You can either choose an item or a category of items as your end items. Optionally, you can filter to show only the build plan of an item/organization combination. Once you select the end item criteria, click the Refresh lists button. This action builds a list of components and resources that are used in the assembly of the selected end item or category.

Configuring the Items and Resources to Display in the Build Plan
- After selecting the required criteria, the screen displays the end items, components, and resources identified in the criteria.
- Select the measures and time buckets to display by clicking Manage in the Layout drop-down.
Selecting a Layout for the Build Plan
- The Manage Layouts dialog box is a structure similar to the Manage Criteria dialog box. You can create, read, update, and delete layouts.
- Click the Add (‘+’) icon to insert a row into the table.
- Provide a name for the layout.
- Select the time bucket type (period, week, or day) that will be used in the Build Plan.
- Select the measures to include in the layout. You can select different measures to display for end items, components, and resources.

Configuring the Measures to Display in the Build Plan
- After you have selected the criteria, expand the root node and see the measures included in the layout as well as the selected time level used for the columns.

Configured Build Plan
Key Resources
- Release Training – Introduction to Supply Planning: Monitor Supply Chain Performance, available at Oracle Cloud: Supply Chain Management Release Readiness.
Configure Embedded Analytics and Navigation to Suit Your Needs
Increase your productivity with a visual, fully configurable user interface. With Supply Planning, you can:
- Configure the workspace to organize your analysis. Choose which tables and charts to display on the screen to facilitate holistic analysis, for example, analyze the material plan and the resource plan at the same time. This allows you to analyze and manage aggregate and detail information in one screen without having to switch back and forth.
- Configure planning dimensions and hierarchies. Quickly analyze large data sets in terms of common planning dimensions and hierarchies (product, customer, geography, resources, supplier, and time). View data measures at any combination of dimensions, at any hierarchy level.
- Configure tables for multidimensional data analysis. Combine demand, inventory, and supply data measures in a single table to enable consistent views, comparison and analysis, including alternate units of measure and monetary value.
- Create new data analysis worksheets. Create new worksheets using data visualization tools like tree maps, sunburst charts, line graphs, bar charts, and tables or use existing worksheets as the baseline to construct variants that meet specific planning needs. You can share these variants with other users or make them private.
- Configure navigation between charts and graphs and enable guided navigation. Define which worksheets you can drill down to with context from an existing worksheet or graph element.
- Configure favorite lists, saved query criteria, and analysis sets. Reduce the time required to bring the right data into worksheets for further analysis.
Steps to Enable
No steps are required to enable this feature.
Tips And Considerations
- You can reuse page layouts across plans, simulation sets, and plan inputs.
- Consider creating multiple layouts that are specific to a task rather than creating one layout that opens multiple tables and graphs.
Key Resources
- Release Training – Introduction to Supply Planning: Monitor Supply Chain Performance, available at Oracle Cloud: Supply Chain Management Release Readiness.
Tailor the User Interface to Your Enterprise Standards and Processes
To adapt the system to your specific requirements, you can personalize the user experience using Oracle Page Composer. This tool allows you to change and update the style of field labels, adjust column sorting in tables, and show or hide fields. For example, you can change the label on a field from “Item” to “SKU,” or hide certain plan options so planners can’t select them. The resulting user experience is tailored to your enterprise standards and processes, improving accuracy, efficiency, and user acceptance.
The following screenshot shows the ’Customize Pages’ task that you can use to customize the user interface:
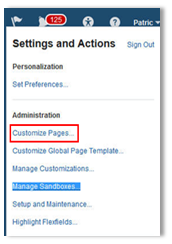
Accessing Page Composer
Steps to Enable
No steps are required to enable this feature.
Tips And Considerations
- It is recommended not to use the Page composer to modify the views in pivot tables or graphs in the Supply Planning work area. Such changes will not be specific to the selected pivot table or graph, but will impact all pivot tables and graphs.
- It is recommended to use the Page Composer’s ‘Select’ mode instead of ‘Design’ mode to modify the page content.
Key Resources
- Release Training – Introduction to Supply Planning: Monitor Supply Chain Performance, available at Oracle Cloud: Supply Chain Management Release Readiness.
Analyze Plans Using Your Own Measures and Hierarchies
Align your planning activities with your business objectives by incorporating the business metrics that matter to your business in the planning process and analyzing using custom hierarchies. With Supply Planning, you can:
- Create new measures. Create new measures that are the result of mathematical operations on other measures, or completely independent data measures whose data is manually entered or imported by way of flat files.
- Aggregate measure data. Control the aggregation of these measures from the lowest levels of its data dimensions.
- Disaggregate measure data. Control how Oracle Supply Planning Cloud disaggregates data down to the lower levels along the different hierarchies when data is manually entered at aggregate level.
The following screenshot shows the Manage Planning Measures task that you can use to define and manage measures:

Manage Planning Measures Page
Custom hierarchy definitions can be either collected from the source system or uploaded using files from an external source.
Steps to Enable
No steps are required to enable this feature.
Tips And Considerations
- Measures can be grouped into appropriate functional groupings to manage them better.
- While creating custom measures, the ‘stored level’ can be set appropriately to avoid redundant data granularity. This can be set during measure definition as shown in the following screenshot:
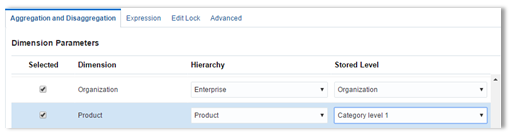
Setting the Stored Level for Each Dimension of a Measure
This can be set by users only for custom measures but not seeded measures.
- After the custom measures are created, they are not enabled by default in all plans. They can be added by adding them to a Measure Catalog that can then be assigned to a Plan. When including a custom measure in the measure catalog, it is important to ensure that all the base measures used in the calculation of the custom measure’s expression, if any, are also included in the measure catalog.
- After custom hierarchy definitions are uploaded or collected, you can enable them in plans by including them in the appropriate Dimension catalog. They are not included by default.
- Editable custom measures can be configured to use different disaggregation rules as specified in the measure definition in the following screenshot:
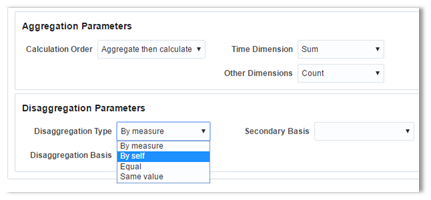
Configuring How Measure Values Entered at Aggregate Levels are Disaggregated to Lower Levels
Key Resources
- Release Training – Introduction to Supply Planning: Monitor Supply Chain Performance, available at Oracle Cloud: Supply Chain Management Release Readiness.
While Supply Planning contains a great many tools to display and analyze data, many planners also make use of spreadsheets for both offline analysis and to update the plan data. To seamlessly support this interaction you might:
- Analyze your plan offline. Download data from any table for off-line analysis.
- Edit the plan and synchronize changes back to the system. Edit the downloaded data and make mass updates in Microsoft Excel™ and upload changes back. This capability is available for data downloaded from the Supplies and Demands screen and items.
The following screenshot shows the ‘Edit in Spreadsheet’; functionality that you can access from the Supplies and Demands page using the Actions menu. 

Editing Supplies and Demands in a Spreadsheet
Steps to Enable
You must perform the following setup steps to enable the ‘Edit in spreadsheet’ feature:
- The client device must have Oracle’s Desktop integration plug-in installed along with the spreadsheet software.Click ‘Download Desktop Integration’ to download Oracle’s Desktop integration plug-in from the Application Navigator’s Tools menu as shown in the following screenshot
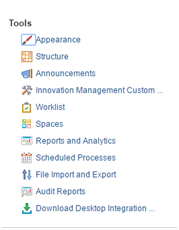
Downloading the Desktop Integration Plug-In
This plug-in is not required for the ‘Export’ functionality for exporting data from any table for offline analysis.
Tips And Considerations
- Expressions in Pivot Tables: The ’Export’ feature exports data from the cells/columns as values and not expressions in case of calculated measures.
- Data Security: The ‘Edit in Spreadsheet’ feature uses the same data security rules that are setup and configured in the Supply Planning work area.
Key Resources
- Release Training – Introduction to Supply Planning: Monitor Supply Chain Performance, available at Oracle Cloud: Supply Chain Management Release Readiness.
Respond to Changing Conditions
However good your plans are, things change and you need to respond to the changes in demand and supply. Quick and efficient response to these changes requires you to evaluate what-if situations, identify further opportunities to improve performance, and to prioritize actions to minimize disruption and maximize business impact. Supply Planning was designed specifically to deliver these capabilities.
Simulate Changes and Identify Opportunities
Simulation of different scenarios allows you to investigate different courses of action when encountering supply chain issues. With Supply Planning, you can:
- Simulate changes to the supply chain. Identify best course of action for longer term supply chain issues by simulating changes to your sourcing rules.
- Simulate dynamic changes to plan data. Compare baseline and simulation plans to evaluate the impact of plan changes. Make changes to supply and demand dates and quantities, item attributes that affect planning, item structures (bills of material), work definitions, resource attributes (including resource availability), operation-resource attributes, and supplier attributes (including supplier capacity) at aggregate and detailed level and monitor its effect on the plan.
- Apply simulation edits consistently across planning scenarios. Define simulation sets to manage plan changes on an ongoing basis or apply them to multiple named plans. You can associate a simulation set with any affected plan that requires evaluation, and copy any changes you make in a plan into a simulation set. Simulation changes include supply and demand dates and quantities, item attributes that affect planning, item structures (bills of material), work definitions, resource attributes (including resource availability), operation-resource attributes and supplier attributes (including supplier capacity).
- Analyze demands at risk. Identify the most important orders that are at risk of being late. Oracle Supply Planning Cloud prioritizes recommended supply order changes based upon their demand impact. You can accept some or all of the recommendations and then rerun the plan to ensure that there are no other issues before releasing changes back to the execution system.
- Simulate hot demand. Understand the impact of accepting a hot demand by injecting the simulated order into the plan and seeing the effects on resources and material requirements.
- Simulate order pull-in. Assess the feasibility of pulling in existing orders to meet corporate financial targets.
Steps to Enable
No steps are required to enable this feature.
Tips And Considerations
- You can evaluate the ability of a supply chain to respond to sudden, high priority demands, commonly known as hot demands by adding manual demands.
- In the Demand Fulfillment page, you can accept recommendations to expedite supplies or add capacity, and then rerun the plan with the ‘Do not refresh with current data’ option selected.
Key Resources
- Release Training – Introduction to Supply Planning: Respond to Changing Conditions, available at Oracle Cloud: Supply Chain Management Release Readiness.
Plan comparison allows you to holistically measure and judge the effect of changes by copying a plan to a simulation plan and then comparing the effect of changes with the baseline plan. With Supply Planning, you can:
- Compare aggregate plan metrics. You can compare two plans and understand what changed at an aggregate level. For example, you can compare metrics, such as revenue, demand at risk, exception count, and so on.
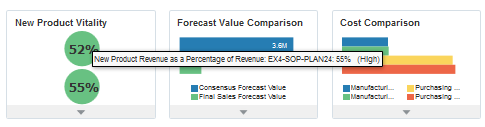
- Compare plans at detail level. You can query the supplies and demands when something is different between two plans using the Order Comparison screen. For example, you can compare the baseline plan with the simulation plan and filter to show only those orders where the suggested due date changed by more than a specified number of days.

Order-Level Comparison Between Two Plans
Steps to Enable
No steps are required to enable this feature.
Tips And Considerations
When using the Compare Plan action to compare metrics in two plans:
- The measure and dimension catalogs of the plans being compared should be the same for the plan comparison to work.
- The planning calendar and planning time level need to be the same for the plans being compared with plan comparison.
- The metrics used to show the differences between plan values are selected in the ‘Comparison Options’ tab when creating or editing a table or graph.Selecting one or more metrics enables the ‘Show Difference’ icon on the toolbar that allows toggling between hiding and showing the differences between plans.
When using the Order Comparison report to compare orders in two plans:
- The majority of the search panel fields are filtering based on values from the current plan, such as item, organization, customer, and supplier.For example, when filtering by item, the system uses the item from the current plan.
- following search panel fields in the Order Comparison report are based on the comparison between plans:
- Changed Demands tab: At-risk order comparison
- Changed Supplies tab: Suggested due date change
Key Resources
- Release Training – Introduction to Supply Planning: Respond to Changing Conditions, available at Oracle Cloud: Supply Chain Management Release Readiness.
All plans generate exceptions. Without effective exception management, the planner can be buried in a mass of minutiae without the tools to identify and resolve the “keystone” issues. Oracle Supply Planning Cloud has exception management that enables you to set performance thresholds, directing you to those which are the most important. With Supply Planning, you can:
- Configure the thresholds for reporting on exceptions. Report on over 20 types of predefined exceptions, based upon thresholds that you specify.
- Configure exception sets. Identify the exceptions that are important for your plan in an exception set. Only these exceptions are calculated and reported.
- Summarized exception reports. Use summarized reports of exceptions on items, resources, suppliers, and customers to understand where and when planning exceptions are occurring.
- Analyze plan exceptions. Directly drill down from exception summary views to relevant data to understand root causes and formulate action plans. Navigation options include the Material Plan, Supplies and Demands, and Exception Details screens, all of which you can configure to your requirements.
- Configure your own exceptions. Identify variances of the plan from performance thresholds for situations that are unique to your business. For example, you can set up a new exception that alerts you when the percentage of demand that is at risk of being late exceeds a threshold you set. You can set custom exception thresholds on any measure.
Steps to Enable
- Mandatory setup
- Associate a plan with an Exception Set in its Plan Options. Only those exceptions that are specified in the Exception Set are generated by the plan.

Setting an Exception Set in Plan Options
- If you do not see the exceptions table in your default page layout, select it by clicking the ‘Open’ button in the Planner Workbench.
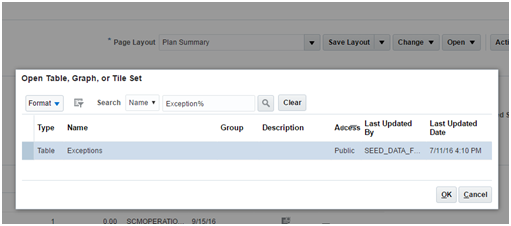
Opening an Exceptions Table
- Optional setup
- Configure your own exception set and exceptions using the Configure Exceptions and Configure Exception Sets configuration tasks.
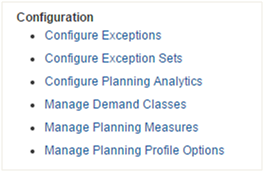
Configuration Task Menu
The Configure Exceptions Sets task allows you to specify the exceptions that will be calculated by the Supply Plan. You can use the Filters tab to restrict the exceptions to specific organizations, suppliers, categories, or customers.
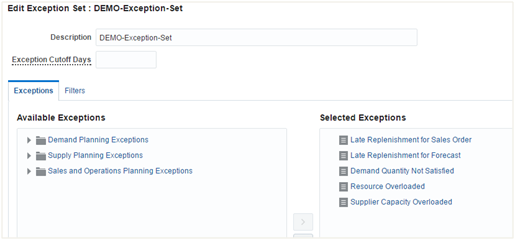
Selecting the Exceptions to Be Calculated in a Supply Plan
You can configure your own exceptions or change the thresholds used for calculating the existing exceptions using the ‘Configure Exceptions’ task. For example, for an existing exception, such as ’Item Below Safety Stock’, you can specify thresholds in terms of its value, number of days, or quantity.
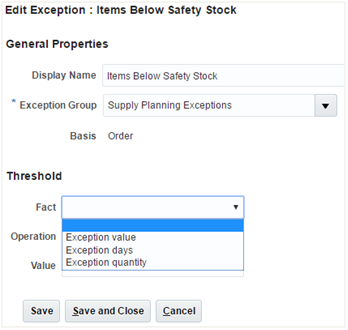
Setting an Exception Threshold
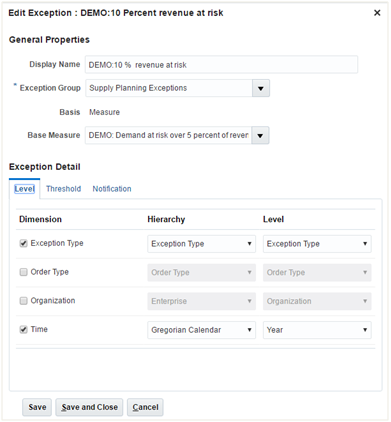
Creating a Custom Exception
- To view exception data, item, resource, and supplier quickly and easily, group the related exceptions together within separate views as shown in the following figure. For example, ’Item Exceptions’ shows you all the item-related exceptions in a single page.
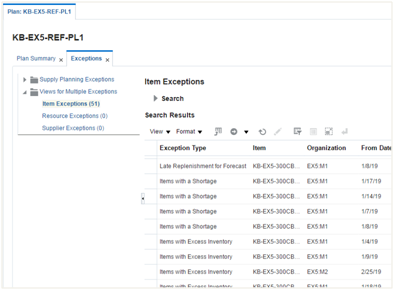
Item Exceptions
- Configure drills from exceptions to other plan views using the Manage Links action. Drills to useful pages, such as Supplies and Demands and others are already enabled by default for every seeded exception.

Creating a Link From an Exception to Another Plan Data View
Tips And Considerations
- Use the Configure Exceptions Set task to specify the list of exceptions that are evaluated by the Supply Plan. You can use the following predefined exceptions to get started quickly on identifying problems:
Seeded Exception
Demand Quantity Not Satisfied
Demand At Risk Due to Insufficient Lead Time
Demand At Risk Due to Resource Shortage
Demand At Risk Due to Supplier Capacity Shortage
Items Below Safety Stock
Items with Excess Inventory
Items with Expired Lots
Items with a Shortage
Late Replenishment for Sales Order
Late Replenishment for Forecast
Late Supply Pegged to Sales Order
Late Supply Pegged to Forecast
Order Sourced from Alternate Facility
Order Sourced from Alternate Supplier
Orders to be Canceled
Orders to be Rescheduled In
Orders to be Rescheduled Out
Orders with Insufficient Lead Time
Past Due Orders
Past Due Sales Orders
Planned Order Uses Alternate Work Definition
Resource Overloaded
Supplier Capacity Overloaded
- Configure exception thresholds to highlight problems that are really important.
- Use the Configure Planning Analytics task to configure exceptions as Analytics (tables or graphs). This allows you to view exception-related data (number of exceptions, quantity, value, and so on) at higher aggregation levels.
Key Resources
- Release Training – Introduction to Supply Planning: Respond to Changing Conditions, available at Oracle Cloud: Supply Chain Management Release Readiness.
Prioritize Work Orders with Ready-to-Build Status
Typically, it is undesirable to release a work order to the shop floor if all of the material will not be available. To improve shop floor productivity by prioritizing planned work orders for release that meet this criteria, Supply Planning provides information on the quantity as well as the percentage of the recommended planned order quantity that can be built using on-hand stock. You can then decide whether to release the work order at all or to release only the quantity that can be built using on-hand component inventory.
Steps to Enable
The following setup is required for prioritizing a work order with Ready-to-Build status:
- Access the Items page and set the item/org attribute Consider in Clear-to-Build to Yes for the component items that you want to include in the calculation of Ready-to-Build Quantity for the parent’s assembly supplies.

Marking the Items to Consider for the Ready-to-Build Calculations
Tips And Considerations
Ready-to-Build Quantity and Ready-to-Build percentage are calculated only for supplies of Make items. They are calculated both for planned orders as well as for existing work orders.
Key Resources
- Release Training – Introduction to Supply Planning: Respond to Changing Conditions, available at Oracle Cloud: Supply Chain Management Release Readiness.
Informed planning decisions require an understanding of the constraints faced at a supplier site. Supply Planning, in conjunction with Oracle Supply Chain Collaboration Cloud, allows you to publish a statement of requirements as determined by the plan to a supplier and receive a commitment against this forecast. This commitment is recognized as supplier capacity in Supply Planning. Planners can then monitor requirements against this commitment and be alerted when requirements exceed supplier capacity.
Steps to Enable
- Mandatory setup
- Setup the Approved Supplier Lists, or ASLs, for component items and collect them using the Manage Data Collection task.
- Launch a Supply Planning plan to plan for component requirements from suppliers. The plan must be saved to the database using the ’Save Plan to Database’ option to publish requirements to Oracle Supply Chain Collaboration Cloud.
- On the Oracle Supply Chain Collaboration Cloud, create a Collaboration plan and associate it with the Supply Planning Plan.
- Publish component requirements using the Publish Order Forecast ESS request, followed by the Supply Planning Collaboration Decomposition ESS request.
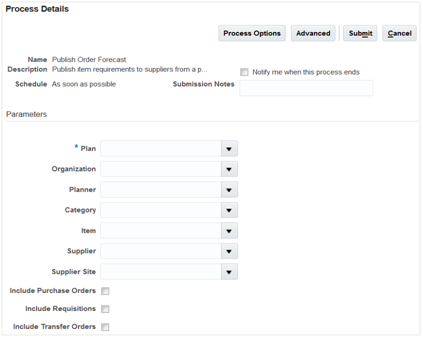
Publish Order Forecast ESS Request
- The component requirements against suppliers will now be visible within Supply Chain Collaboration on the Manage Order Forecasts and Commits page, in the Order Forecast measure.
- Suppliers can now update their commitments against the Order Forecast within Supply Chain Collaboration by updating the ‘Supply Commit’ measure.
- Supply Commits can be received into Supply Planning using the “Receive Supplier Commits” ESS request. This is seen as supplier capacity by the Supply Planning plan when it is launched the next time. If the supplier commits are lower than their requirements, supplier-related exceptions are created by the supply plan.

Receive Supplier Commits ESS Request
- Optional Setup
- To publish order forecast for contract manufactured assemblies to contract manufacturers (Suppliers), associate the supplier that represents the contract manufacturer with the contract manufacturing organization using the ‘Manage Supply Network’ task in Supply Planning.
Tips And Considerations
- Order Forecast data can be published only for organizations that are ’Inventory Organizations’ type of organizations, not ‘Item Organizations’ type of organizations.
- You can choose to exclude existing transactional documents like purchase orders and purchase requisitions by not selecting them in the ‘Publish Order Forecast’ ESS request’s parameters.
- You can publish order forecast for contract manufactured items also. Planned transfer orders created between the contract manufacturing organization and the enterprise’s organization are used to determine the requirements that must be placed on the contract manufacturing supplier.
- Order forecast is published from an arrival date perspective (also referred to as Dock Date) that is, the date on which a component is required to be available at your dock.
- Collaboration-related data measures (order forecast and supply commit) are only visible within the Supply Chain Collaboration, not within Supply Planning.
- Supply commits that are received as supplier capacity using the ‘Receive Supplier Commits’ ESS request are only visible to the specific plan into which they are received – this data is not accessible to other plans.
- Order forecast data is published by organization and supply commits are also received by organization. However, the supply commits that are received are aggregated to supplier site level within the supply plan.
Key Resources
- Release Training – Introduction to Supply Planning: Respond to Changing Conditions, available at Oracle Cloud: Supply Chain Management Release Readiness.
Collaborate with Stakeholders on Plans Using Oracle Social Network
Resolving issues requires effective collaboration on a communication platform that provides the right context, history, and tools, and connects people without introducing another standalone social networking tool. In this release, you can use Oracle Social Network to leverage the power of social collaboration that is directly built into Supply Planning to:
- Start a conversation centered on a named plan. Planners can start a conversation centered on a plan.
- Start a conversation centered on an identified order. To resolve issues around a particular work order, transfer order, purchase order, sales order, or purchase requisition, you can start a conversation on a selected order and obtain feedback from the extended community.
- Add comments. You can add a comment to an Oracle Social Network conversation on the plan when working in Supply Planning.
All communications are maintained with the proper business context and team engagement using Oracle Social Network, effectively closing the collaboration gap.
Steps to Enable
Setup to enable Oracle Social Network is performed in the Setup and Maintenance work area. To enable Oracle Social Network for plans, log into the Setup and Maintenance work area with administration privileges. Tasks associated with the setup are:
- Log into Setup and Maintenance work area.
- Search for Manage Oracle Social Network.
- Click the Go to Task icon for Manage Oracle Social Network Supply Chain Management.
- Expand the Planning Common business object and highlight PLAN.
- Click the Enable Object button and select MANUAL in the dialog box.
- Click the + (plus) icon in the ‘Plan Attributes’ toolbar.
- Select the Enable checkbox for Compile Designator, and then click OK.
- Click Save. A confirmation dialog box is displayed. The plan is now enabled as a social object.
- Once plans are enabled for Oracle Social Network by the administrator, click the Social icon in the Plans tab to share a plan or join a plan’s conversation.
To collaborate on Oracle Social Network on a particular demand or supply:
- Open the Supplies and Demands view.
- Search for one of the following supported order types:
- Work order
- Transfer order
- Purchase order
- Sales order
- Purchase requisition
- Highlight the order you wish to collaborate on, and then click the Social icon in the toolbar.

Social Icon in the Supply Planning Toolbar
- The Oracle Social Network window opens displaying the order number and order type. You can begin a conversation.
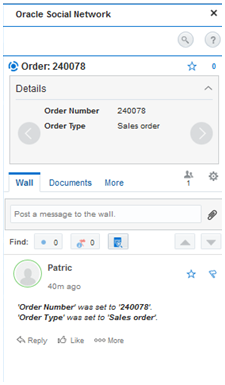
Oracle Social Network Popup
Key Resources
- Release Training – Introduction to Supply Planning: Respond to Changing Conditions, available at Oracle Cloud: Supply Chain Management Release Readiness.
Collaborate with Other Planners Using Notes
Planning decisions are often complex and require additional information to be stored as the issues are discussed and resolved with the planning community. The notes capability in Supply Planning allows you to annotate key data changes to help other users understand your assumptions and reasons for changes. You can associate notes with a plan, with items, organizations, or customers referred to in a plan, or with a table containing specific planning combinations. For example, you can attach a note to a shipment forecast for an item-organization in a specific week so your peers know why the forecast was changed.

Create Note Dialog Box
Steps to Enable
No steps are required to enable this feature.
Tips And Considerations
- If a plan is copied, all Notes associated with the plan are also copied.
- Notes created on level members are not plan-specific.
- If a note is created on a Planning Combination and the associated measure is shared across plans, then the note is not plan-specific.
- If a note is created on a planning combination and the associated measure is not shared across plans, then the note is plan-specific.
- If a plan is copied, all the plan-specific notes on planning combinations are also copied.
- Notes on exceptions persist across plan runs.
- Once an exception is resolved, all notes associated with the exception are removed.
Key Resources
- Release Training – Introduction to Supply Planning: Respond to Changing Conditions, available at Oracle Cloud: Supply Chain Management Release Readiness.
Integrate Planning and Execution
The Achilles heel of many planning systems is the ineffective way that they are integrated with the execution system. To reduce implementation timelines and the total cost of ownership, Supply Planning comes integrated and ready-to-use with the other Oracle Cloud applications for both collections and the release of make, buy, or transfer supply orders. You are also able to incorporate supplementary data from other data sources.
Collect Data from Oracle Cloud
Reduce implementation complexity and latency between execution and planning systems using predefined mappings and a multithreaded process to speed up data synchronization. With Supply Planning, you can:
- Import data with preconfigured integration. Use data required for planning from Oracle Supply Chain Management Cloud, including Oracle Product Master Data Management Cloud, Oracle Manufacturing Cloud, Oracle Procurement Cloud, Oracle Inventory Management Cloud, and Oracle Order Management Cloud.
- Reduce planning cycle time by optimizing data collections. Perform both targeted collections that import all data representing a business entity and net change collections that gather only the data that has changed since the last run, as needed. You can also collect a subset of the data by using filters to specify the data to be collected. Examples of filter criteria include reducing the number of items collected based on the organizations planned. Another example is reducing the order history collected based on date ranges.
You can use the out-of-box integration with Oracle Supply Chain Management Cloud to drive supply planning activities, including forecast generation and advanced fulfillment flows like Cconfigure to order, drop ship, and back to back.
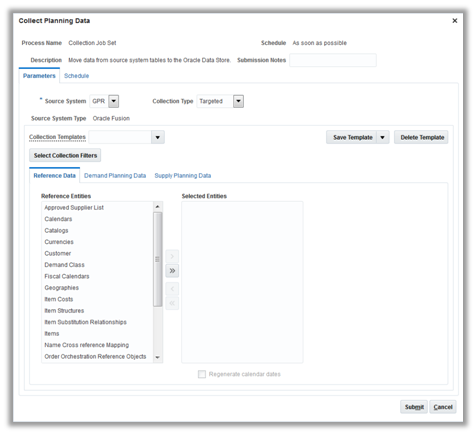
Leverage Built-In Integration with Supply Chain Management
Steps to Enable
No steps are required to enable this feature.
Tips And Considerations
- Take into consideration data dependencies if just a few business objects are to be collected. For example, subinventory data should be loaded prior to on hand data. The data collection process loads business entities in the correct sequence if they are part of the same collection cycle.
- Launch data collections after ensuring that the requisite data setups are complete in Oracle Supply Chain Management Cloud.
- Save selections of entities to be collected in a collection template. For subsequent collections submissions, use a saved template to skip selecting the entities again.
- Optionally, set collections to run at any frequency or time in the Schedule tab.
- Launch the collections process and note down the request ID generated. Monitor the request status using the ‘Scheduled Processes’ page by navigating to Navigator > Tools > Scheduled Processes.
- Review the log files to pinpoint data validation errors, if any.
- Review collected data in the Oracle Supply Planning work area.
Key Resources
- Release Training – Introduction to Supply Planning: Integrate Planning and Execution, available at Oracle Cloud: Supply Chain Management Release Readiness.
Collect Data from External Data Sources
Most enterprises have a variety of demand fulfillment systems they must plan, including from systems other than the Oracle Supply Chain Management Cloud. You can load the external data from other systems so you can plan for the facilities managed on these external systems by way of flat files. Key data that can be loaded from other systems include:
- Reference data. Organizations, currencies, units of measure, calendars, shipping networks, and items.
- Order management data. Open sales orders.
- Manufacturing data. Routings, resources, work orders, and related manufacturing data.
- Inventory data. On-hand inventory and transfer orders between locations.
- Purchasing data. Suppliers, supplier sites, item suppliers, purchase orders, and purchase requisitions.
Steps to Enable
There are two types of external systems and the setup steps are slightly different for each type. The two types of external source systems are:
- External with no data uploaded to Oracle Cloud Applications except for Oracle Supply Chain Planning Cloud.Support for this type of external system is new in this release.
- Partially external with some data uploaded and linked to Oracle Cloud applications. Support for this type of external system is available with Release 12. Refer to Release 12 documentation for more information.
- External system data for items, item structures, and catalogs is uploaded to Oracle Product Data Model Cloud.
- External system data for customers, customer sites, regions, and zones is uploaded to Oracle Trading Community Model Cloud.
- External system data for sales orders is uploaded to Oracle Order Management Cloud.
To collect data from external source systems:
- Define the external source system in Manage Trading Community Source Systems and enable it for Order Orchestration and Planning.
- Define the same source system in Manage Planning Source Systems page and set version to External.
- Upload all reference, order management, manufacturing, inventory, and purchasing data using the planning file upload feature.
- Define and launch plans for the external source system.
You can load the following entities from external systems into Oracle Supply Planning Cloud, using the identified XLSM file templates.
| Data Type |
Collection Entities |
XLSM File Name |
|---|---|---|
| Reference Data |
Items |
ItemImportTemplate.xlsm |
| Item Costs |
ItemCostImportTemplate.xlsm |
|
| Customer Specific Item Relationships |
ItemSubstituteImportTemplate.xlsm |
|
| Catalogs, Categories, and Item Categories |
CatalogImportTemplate.xlsm |
|
| Item Structures |
BillofMaterialImportTemplate.xlsm |
|
| Bill of Resources |
BillofResourcesImportTemplate.xlsm |
|
| Planners |
PlannersImportTemplate.xlsm |
|
| Customers and Customer Sites |
CustomerImportTemplate.xlsm |
|
| Regions |
RegionsImportTemplate.xlsm |
|
| Zones |
ZonesImportTemplate.xlsm |
|
| Region-Zone Mapping |
RegionZoneMappingImportTemplate.xlsm |
|
| Locations and Region-Location Mapping |
LocationsImportTemplate.xlsm |
|
| Organizations and Organization Sites |
OrganizationImportTemplate.xlsm |
|
| Subinventories |
SubInventoryImportTemplate.xlsm |
|
| Suppliers and Supplier Sites |
SupplierImportTemplate.xlsm |
|
| Item Suppliers (Approved Supplier List) |
ApprovedSupplierListImportTemplate.xlsm |
|
| Interlocation Shipping Networks and Transit Times |
InterLocationShipMethodsImportTemplate.xlsm |
|
| Currencies and Currency Conversions |
CurrencyImportTemplate.xlsm |
|
| Units of Measure and Unit of Measure Conversions |
UOMImportTemplate.xlsm |
|
| Calendars, Calendar Exceptions, Shifts, Shift Workday Pattern, Week Start Dates, and Period Start Dates |
CalendarImportTemplate.xlsm |
|
| Calendar Associations |
CalendarAssignmentsImportTemplate.xlsm |
|
| Demand Classes |
DemandClassImportTemplate.xlsm |
|
| Carrier, Ship Mode of Transport and Ship Class of Service |
CarrierImportTemplate.xlsm |
|
| Supply Planning Data |
Forecasts |
ExternalForecastImportTemplate.xlsm |
| Sales Orders |
SalesOrderImportTemplate.xlsm |
|
| Safety Stock Levels |
SafetyStockLevelImportTemplate.xlsm |
|
| Supply Reservations to Sales Orders |
ReservationImportTemplate.xlsm |
|
| On Hand |
OnhandImportTemplate.xlsm |
|
| Purchase Orders, Purchase Requisitions, PO in Receiving, In Transits |
PurchaseOrderRequisitionImportTemplate.xlsm |
|
| Transfer Orders (including expense type transfers) |
TransferOrderImportTemplate.xlsm |
|
| Supplier Capacity |
ApprovedSupplierCapacityImportTemplate.xlsm |
|
| Resources, Resource Shifts |
ResourcesImportTemplate.xlsm |
|
| Resource Availability |
ResourceAvailabilityImportTemplate.xlsm |
|
| Routings (including mapping between BOM and Routing), Routing Operations, Routing Operation Resources |
RoutingsImportTemplate.xlsm |
|
| Work Order Supply |
WorkOrderSuppliesImportTemplate.xlsm |
|
| Work Order Material Requirements |
WIPComponentDemandsImportTemplate.xlsm |
|
| Work Order Resource Requirements |
WIPOperationResourceImportTemplate.xlsm |
|
| Planned Order Supplies |
PlannedOrderSupplyImportTemplate.xlsm |
|
| Sourcing Rule and Assignments |
SourcingImportTemplate.xlsm |
|
| Custom Measures |
CustomMeasuresImportTemplate.xlsm |
For more information, refer to the What’s New in Release 13 for Oracle Planning Central Cloud.
Key Resources
- Release Training – Introduction to Supply Planning: Integrate Planning and Execution, available at Oracle Cloud: Supply Chain Management Release Readiness.
Integrate with Oracle Sales and Operations Planning Cloud
Best practice sales and operations planning process requires seamlessly integrating and exchanging demand and supply plan data between the sales and operations planning (S&OP) process and detailed demand and supply planning. With Supply Planning, you can:
- Use a demand schedule from Oracle Sales and Operations Planning Cloud or from Oracle Demand Planning Cloud to plan supply.
- Have visibility to the supply plan Oracle Sales and Operations Planning Cloud.
- Use a measure, such as planned orders from a named plan, and use that data in Oracle Sales and Operations Planning Cloud.
Steps to Enable
No steps are required to enable this feature.
Tips And Considerations
- Define a custom measure group that contains the list of measures to be used in the integration. You can then avoid having to look through all the seeded groups for the available measures when configuring which external plan measures to load into Oracle Sales and Operations Planning (S&OP) Cloud.
- To use S&OP plans in Oracle Supply Planning Cloud, you must ensure that within S&OP plan options the Planning Product Level is set to Item. If Planning Product Level is set to Category, then S&OP demand forecasts cannot be used in Supply Planning.
Key Resources
- Release Training – Introduction to Supply Planning: Integrate Planning and Execution, available at Oracle Cloud: Supply Chain Management Release Readiness.
Integrate with Oracle Demand Management Cloud
Best practice demand and supply planning process requires seamlessly integrating demand plans as drivers to the supply planning process. You can include the demand schedules from Oracle Demand Management Cloud in your supply plan. Alternatively, you can have a single plan for both demand and supply planning, allowing you to monitor and manage demand and supply plans in one single named plan.
Steps to Enable
No steps are required to enable this feature.
Tips And Considerations
- You have the option to calculate the Planning Percentages for the options of CTO and PTO models. Alternatively, you can use the Planning Percentages that are specified in the model item structures.
- The calculation of planning percentages is enabled only if the plan type is ‘Demand and Supply Plan’.
Key Resources
- Release Training – Introduction to Supply Planning: Integrate Planning and Execution, available at Oracle Cloud: Supply Chain Management Release Readiness.
Integrate with Oracle Global Order Promising Cloud
Oracle Global Order Promising Cloud maintains a real-time picture of all available sources of supply. As orders arrive, Global Order Promising selects the best fulfillment location based upon current and future supply availability. Future supply might also include planned manufacturing work orders or planned purchase orders that have not yet been released or executed. To provide more accurate promise dates that include this planned supply, Oracle Supply Planning Cloud can provide this information to Oracle Global Order Promising Cloud.
Steps to Enable
- You must save a Supply Planning plan to the database using the Save Plan to Database planner action within Supply Planning. Plan data is visible to Global Order Promising only after a plan is saved.
- Specify the Supply Planning plan in the Plan Names attribute in the Refresh and Start the Order Promising Server scheduled process.

Refresh and Start the Order Promising Server Request Page
Tips And Considerations
- You can select multiple plans to be published to Oracle Global Order Promising Cloud, but you must ensure that these plans are functionally distinct. If there are common items and organizations across multiple plans, Global Order Promising aggregates their planned order supply.
- You must ensure that planned orders in a Supply Planning plan are feasible before publishing them as supply to Global Order Promising.
Key Resources
- Release Training – Introduction to Supply Planning: Integrate Planning and Execution, available at Oracle Cloud: Supply Chain Management Release Readiness.
Release Recommendations to Execution
When you are satisfied with your supply plan, you can release its planned orders to execution, so they take effect. With Supply Planning, you can:
- Automatically release orders for execution. Release orders to execution when the supply planning cycle completes based on predefined parameters.
- Manually release orders. Change key information such as due dates and quantities prior to release.
- Export Plan. Export new planned orders and changes to a file in a predetermined format that can then be integrated with your enterprise systems not on Oracle Applications Cloud.
The Plan Recommendations graph prioritizes Supply Planning recommendations for immediate analysis, so that you can quickly see and act on the most time-sensitive recommendations.
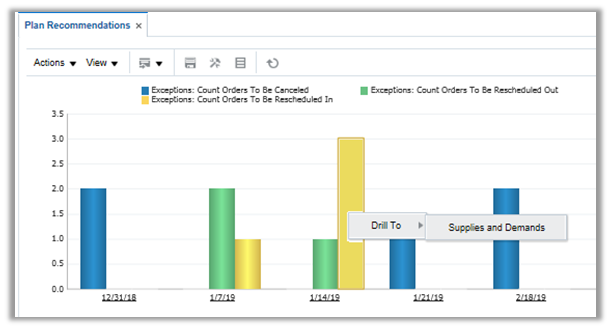
Plan Recommendations Graph Shows Orders to Be Rescheduled In, Out, or Cancelled Across Time Buckets
Steps to Enable
- Automated Release
- Use the plan option settings in a Supply Planning plan to enable automatic release of planned orders and supply reschedules. This sets up release of supply planning recommendations to be carried out as part of the plan run itself.
- Manual Release
- Once the plan run is complete, navigate to the Supply and Demand page in the plan context or use the drill-to capabilities from the Plan Recommendations graph.
- Select one or more recommendations for release.
- Navigate to the Actions menu in the search results pane and select Mark for Release.
- Navigate to the Actions menu and select ‘Release’ to initiate the enterprise scheduler request for release.
- Note down the request ID generated and monitor request status using the scheduled processes page by navigating to Navigator > Tools > Scheduled Processes.
Tips And Considerations
Set the release time fence when enabling automated release.
Key Resources
- Release Training – Introduction to Supply Planning: Integrate Planning and Execution, available at Oracle Cloud: Supply Chain Management Release Readiness.
Report Using Oracle Transactional Business Intelligence
With Supply Planning, you can run planning reports without incurring the lead time involved in the extract-load-transform processes required with traditional business intelligence applications. You can create reports and analyze live planning data. The following capabilities are available in Supply Planning:
- Prebuilt reports. Use predefined summary reports for orders to be released for execution, build plan, and exception summary.
- Custom reports. Create your own reports on live data using intuitive graphical tools.

Sample OTBI Report in the Supply Planning Work Area
Steps to Enable
To enable planning reports for Supply Plans:
- Enable Supply Plan for OTBI Reporting.

Configuring Plan Options to Enable a Plan for OTBI Reporting
- In the Configure Planning Analytics task, update the seeded Reporting Dimension Catalog (‘Reporting Catalog’) to include the product and time hierarchies to be used for reporting.
Tips And Considerations
- View reports from OTBI in the Supply Planning work area: By default the Open Table/Graph wizard in the Supply Planning work area does not list the OTBI Reports. The reports need to be enabled in search.
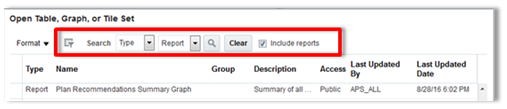
Selecting the Include Reports Search Parameter When Opening an OTBI Report
- Default product hierarchy and calendar for reporting: By default, the seeded OTBI Reports use the default product hierarchy and calendar setup in the reporting catalog.
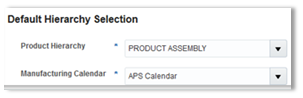
Reporting Product and Time Hierarchy Selections in Plan Options
- Common dimensions: The Supply Chain Planning subject area in OTBI is enabled with common dimensions that conform to other Supply Chain Management subject areas only in the default hierarchies of Product, Organization, and Date. The common dimensions are inventory item, inventory organization, and date. Inventory item and date use the default product hierarchy and manufacturing calendar selected in Plan Options.

Dimensions in the Supply Chain Planning Subject Area in OTBI
- Other hierarchies in the Product and Time dimensions, such as planning item 1, 2, 3, and so on and planning date 1, 2, 3, and so on, do not conform to other subject areas and cannot be used in cross subject-area joins in OTBI.These hierarchies are derived from the hierarchies enabled in the Reporting Dimension catalog.
Key Resources
- Release Training – Introduction to Supply Planning: Integrate Planning and Execution, available at Oracle Cloud: Supply Chain Management Release Readiness.
Enhance Planning for Configure-to-Order Products
Effective planning of configure-to-order products is challenging due the different methods of fulfilling the order and the variable nature of the dependent demand. To attain high customer service levels, while reducing the inventory of finished goods and components when using a configure-to-order model, the following capabilities have been added to this release of Planning Central:
- Plan pick-to-order products. Forecast for the pick-to-order model. Consume orders for the configured product from model forecasts and plan component requirements.
- Plan resource requirements. Derive the resource requirements according to planning percentages defined on the work definition. This derivation allows you to identify potential resource overloads on resources whose use may be dependent on selected options.
- Identify supplier capacity overloads. Gain visibility to potential supply issues at supplier sites by consuming the supply requirements for the configured items from the supplier capacity defined at the model level.
Steps to Enable
To enable planning for pick to order (PTO) products, you must complete setup steps outside of Oracle Planning Central Cloud.
- Set the Planning Method item-organization attribute to either MRP Planned or MPS Planned for the PTO model. (Note that for a PTO model, the item-organization attribute Pick Components is Yes.)
- Complete the other setups, such as Item Structure for the PTO model and option classes. Define the options as planned items.
- Collect items and item structures.
- Define sourcing for the back-to-back items and include the sourcing rule in your GOP assignment set.
- Include the items and organizations in your plan.
To enable planning for resource requirements for ATO models, you must complete several setup steps when defining the work definition.
- Set the Planning Method item-organization attribute for the CTO model to either MRP Planned or MPS Planned.
- On the CTO model work definition, for each operation set the planning percentages that can be less than 100.
- Collect items and work definitions.
- Launch a supply plan that includes organizations with CTO model forecasts.
- Verify that the total resource requirements for each operation are calculated as planned order quantity multiplied by resource requirement multiplied by operation planning percentage.
To enable planning for supplier capacity for purchased ATO models, you must complete several setup steps.
- Set the Planning Method item-organization attribute for the ATO model to either MRP Planned or MPS Planned.
- In purchasing, define an Approved Supplier List (ASL) for the ATO model.
- Upload a CSV file for the ASL with defined supplier capacity for the ATO model.
- Launch a plan and include the ATO models and sales orders. Supplier capacity for an ATO model is consumed by sales orders for configured items for that model.
- Review the supplier capacity for the ATO model and check on supplier capacity violations.
Tips And Considerations
If an option class or option in a pick to order model is not planned, then everything below that option class or option is not planned.
Key Resources
- Oracle Supply Chain Management Cloud – Release Readiness, available from the Oracle Help Center.
Plan for Multiple Fulfillment Strategies
Most businesses now use a combination of insourced and outsourced fulfillment strategies, which complicates the planning process. To reduce cycle times, deliver an excellent customer experience, and increase revenues using a variety of fulfillment strategies, this release adds the support for the following scenarios:
- Plan for outside processing operations. Plan for supply using the appropriate lead times required for processing material at a third party, based upon the manufacturing work definition.
- Support expense destination transfers. Consider expense destination transfers as independent demand so that all demand is accounted for in the planning process.
Steps to Enable
PLAN FOR OUTSIDE PROCESSING OPERATIONS
- Define a Manufacturing work definition for the item.
-
Include one or more operations within the work definition with Operation Type set to Supplier. These are the Outside Processing operations within the Work Definition. Specify the Supplier Operation details, including fixed and variable lead times.
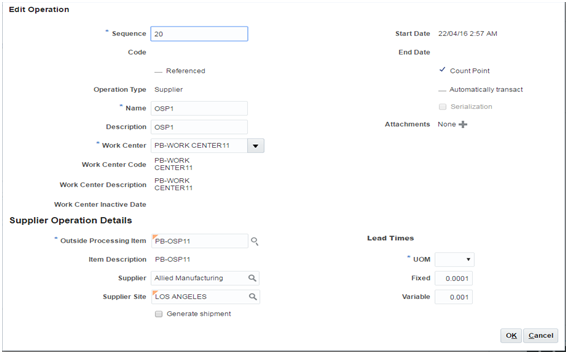
Definition of a Work Definition Operation with Operation Type of Supplier
- Collect data from source systems into Supply Planning, selecting Work Definition as a collected entity.
- Define and run a supply plan.
-
Verify that the Routings screen within Planning Central shows the operation details for the Supplier operations.
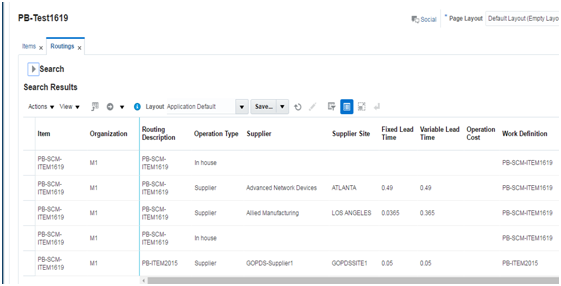
Planning Central Routings View
-
Verify that the supply for the item includes resource requirements corresponding to the Supplier operations. Verify that the duration of the Supplier Operation is based on the specified fixed and variable lead time values.

Planning Central Resource Requirements View
- Release the planned order to Manufacturing.
SUPPORT FOR EXPENSE DESTINATION TRANSFERS
To enable planning for expense destination transfers, you must complete the following steps.
-
For an item that has expense destination transfers, set the Planning Method item-organization attribute to either MRP Planned or MPS Planned.
- Collect transfers from the source. Expense destination transfers are automatically included.
- Define and run a plan for organizations that have items with expense destination transfers.
- The plan recognizes the expense destination transfer as a demand at the source organization. The expense destination transfer is displayed as a sales order.
- The supplies and demands page has a new column titled Expense Destination Transfer, which is set to Yes for these transfers.
- The plan does not include the expense destination transfer as a supply at the destination organization.
- Shipments of expense destination transfers are not collected and are not included in the plan as a supply at the destination organization.
Tips And Considerations
PLAN FOR OUTSIDE PROCESSING OPERATIONS
The operation cost of the Supplier operation is the standard cost of the Outside Processing item attached to the Supplier operation in the work definition. The supply quantity multiplied with the operation cost determines the manufacturing cost of the Supplier operation.
Key Resources
- Oracle Supply Chain Management Cloud – Release Readiness, available from the Oracle Help Center.
Collaborate with Stakeholders on Plans Using Oracle Social Network
Resolving issues requires effective collaboration on a communication platform that provides the right context, history, and tools, and connects people without introducing another standalone social networking tool. In this release, you can use Oracle Social Network to leverage the power of social collaboration to:
- Start a conversation centered on an identified order. To resolve issues around a particular work order, transfer order, purchase order, sales order, or purchase requisition, you can start a conversation on a selected order and obtain feedback from the extended community.
- Collaborate in real time and in multiple threads with key stakeholders.
- Resolve issues and share recommended practices through social collaboration.
All communications are maintained with the proper business context and team engagement using Oracle Social Network, effectively closing the collaboration gap.
Steps to Enable
No steps are required to enable this feature.
Key Resources
- Oracle Supply Chain Management Cloud – Release Readiness, available from the Oracle Help Center.
Integrate with Oracle Supply Chain Collaboration Cloud
Informed planning decisions require an understanding of the constraints faced at a supplier site. Planning Central, in conjunction with Oracle Supply Chain Collaboration Cloud (a new Oracle SCM Cloud service delivered in this release), allows you to publish a statement of requirements as determined by the plan to a supplier and receive a commitment against the forecast. This commitment is recognized as supplier capacity in Oracle Supply Planning Cloud. Planners can then monitor requirements against this commitment and be alerted when requirements exceed supplier capacity.
Steps to Enable
MANDATORY SETUP:
- Set up Approved Supplier Lists (ASLs) for Items and collect them through the Manage Data Collection task.
- Run a Planning Central plan that plans for component requirements from Suppliers. Use the Save Plan to Database action to save the plan to the database and make the plan data accessible to subsequent processes.
- In Oracle Supply Chain Collaboration Cloud, create a Collaboration Plan and associate it with the Planning Central Plan.
- After the plan has been saved, publish your requirements using the Publish Order Forecast ESS request, followed by the Supply Planning Collaboration Decomposition ESS request.

Publish Order Forecast ESS Request
- The component requirements against Suppliers will now be visible in the Order Forecast data measure within the Manage Order Forecasts and Commits screen of Oracle Supply Chain Collaboration Cloud.
- Suppliers publish their data with Oracle Supply Chain Collaboration Cloud in the Supply Commit data measure.
- Supply commits from suppliers can be received into the Oracle Planning Central Cloud using the Receive Supplier Commits ESS request. This is considered as Supplier Capacity by the Planning Central plan, and is used to generate supplier capacity related exceptions.

Receive Supplier Commits ESS Request
OPTIONAL SETUP:
To publish order forecasts for contract manufactured assemblies to your contract manufacturers (suppliers), you must associate the supplier that represents the contract manufacturer with the Contract Manufacturing organization using the Manage Supply Network task in the Oracle Planning Central Cloud.
Tips And Considerations
- Order Forecast data can be published only at Organizations that are Inventory Organizations, not Item Organizations.
- You can exclude existing transactional documents like Purchase Orders and Purchase Requisitions by not selecting them in the Publish Order Forecast ESS requests parameters
- You can also publish order forecasts for contract manufactured Items. Planned transfer orders created between the Contract Manufacturing organization and the enterprise’s Organization determine the requirements that must be placed on the Contract Manufacturing supplier.
- Order Forecast data are published only on the Arrival Date (also referred to as Dock Date). This is the date on which a component is required to be available at the Organization.
- Supply Commits received for assembled items in a contract manufacturing scenario are not read by the Planning Central Plan as supplier capacity. Supply commits are read in as supplier capacity only for components.
- Collaboration related data measures (Order Forecast and Supply Commit) are only visible within the Oracle Supply Chain Collaboration Cloud, not within Oracle Planning Central Cloud.
- Supply Commits that are received as Supplier Capacity using Receive Supplier Commits ESS requests are only visible to the specific plan into which they are received. These data are not accessible to other plans.
- Order Forecast data is published by Organization and Supply Commit data are also received by Organization. However, Oracle Planning Central Cloud aggregates the Supply Commit data and stores them as Supplier Capacity at the Supplier-Site level. (Supplier Capacity is represented in Planning Central by Supplier Site and not at each Organization.)
Key Resources
- Oracle Supply Chain Management Cloud – Release Readiness, available from the Oracle Help Center.
Integrate with Oracle Sales and Operations Planning Cloud
Oracle Sales and Operations Planning Cloud (new in this release) has been designed to enable a best practice sales and operations planning process. To support this process, Planning Central seamlessly integrates demand and supply plan data with Sales and Operations Planning. You can use a demand schedule from Sales and Operations Planning to plan supply and also have visibility to the supply plan in Sales and Operations Planning. As part of your Sales and Operations Planning process, a Sales and Operations Planning analyst can select a measure (such as planned orders) from a named plan and use the data in the Sales and Operations Planning plan.
Steps to Enable
To load measures from Planning Central to Sales and Operations Planning:
- In the Navigator, click the Sales and Operations Planning work area.
- Click the Load Measures from Other Plans task. Select the From Plan (source plan name) and To Plan (target plan name) in this page.
- Select the measures you want to load from Planning Central to Sales and Operations Planning.
- Click Save and Close. A scheduled process is launched automatically. This process copies the data from the source Planning Central plan into the Sales and Operations Planning plan.
- After the scheduled process has completed, you can verify that the planning measure data has been loaded into Sales and Operations Planning by opening a table or graph that is configured with the loaded measures.
To use approved Sales and Operations Planning demand forecast as a demand schedule in Planning Central, complete the following steps:
- Ensure that within Sales and Operations Planning Plan Options, the Planning Product Level is set to Item.
- If the Planning Product Level within the Sales and Operations Planning Plan Options is set to Item and Planning Customer Level is set to Customer Site,” specify the following measure level settings within the Planning Central plan’s Plan Options:
- Product Hierarchy = Product and Product Level = Item
- Organization Hierarchy = Enterprise and Organization Level = Organization
- Customer Hierarchy = Customer and Customer Level = Customer Site
- Demand Class Hierarchy = Demand Class and Demand Class Level = null
- Time Hierarchy = Planning Calendar and Time Level = Planning Time Level
- If Planning Product Level is set to Item and the Planning Customer Level is set to Zone in Sales and Operations Planning Plan Options, specify the following measure level settings within the Planning Central plan’s Plan Options:
- Product Hierarchy = Product and Product Level = Item
- Organization Hierarchy = Enterprise and Organization Level = Organization
- Customer Hierarchy = Customer Zone and Customer Level = Zone
- Demand Class Hierarchy = Demand Class and Demand Class Level = null
- Time Hierarchy = Planning Calendar and Time Level = Planning Time Level
- Ensure that in Planning Central, the Sales and Operations Planning Sales and Operations Planning
- Ensure that in the Ship-to Consumption Level field, you have selected Item, Customer Site, or Zone.
Tips And Considerations
- You must select a Planning Central plan name from the From Plan list of values. The values are filtered for loaded plans with status = Completed (meaning that the plan has been run without errors). The list shows only Public plans and Private plans for which you are a member.
- You must select a Sales and Operations Planning plan name from the To Plan list of values. The list of values is filtered for loaded plans with status = Completed (meaning that the plan has been run without errors).
- From Plan and To Plan show the first ten plan names sorted alphanumerically, with a Search… option link at the bottom. Clicking the link opens the Search and Select Plan dialog. You can filter the search using either Plan Name or Plan Type (Demand, Supply, and Demand and Supply).
- You must select measures from the list of Available Measures. Available Measures are filtered for measures that are common to the Planning Central source plan and Sales and Operations Planning target plan.
- If you define a custom measure group that contains the list of measures to be used in Integration, then you do not need to look through all of the predefined groups for the available measures.
- To use Sales and Operations Planning plans in Planning Central, you must ensure that within Sales and Operations Planning Plan Options, the Planning Product Level is set to Item. If Planning Product Level is set to Category, then you cannot use Sales and Operations Planning demand forecasts in Planning Central.
Key Resources
- Oracle Supply Chain Management Cloud – Release Readiness, available from the Oracle Help Center.
Collect Data From External Data Sources
Most enterprises have a variety of demand fulfillment systems they must plan, some of which may be from systems other than the Oracle Supply Chain Management Cloud. You can load the external data from other systems to plan for the facilities managed on these external systems by way of flat files. Key data that you can load from other systems include:
- Reference data. Organizations, currencies, units of measure, calendars, shipping networks, and items.
- Demand planning data. Booking and shipment history, price lists, causal factors, and external forecasts.
- Order management data. Open sales orders.
- Manufacturing data. Routings, resources, work orders, and related manufacturing data.
- Inventory data. On-hand inventory and transfer orders between locations.
- Purchasing data. Suppliers, supplier sites, item suppliers, purchase orders, and purchase requisitions.
Steps to Enable
To collect data from external systems, you must complete several steps. Two types of external systems are now available, and the steps are slightly different for each type. The two types of external source systems are:
- External with no data uploaded to Oracle Cloud Applications except for Oracle Supply Chain Planning Cloud.Support for this type of external system is new in this release.
- Partially external with some data uploaded linked to Oracle Cloud applications. Support for this type of external system is available with Release 12. Refer to Release 12 documentation for more information. For a partially external system, the following must be true:
- External system data for items, item structures, and catalogs is uploaded to Oracle Product Data Model Cloud.
- External system data for customers, customer sites, regions and zones is uploaded to Oracle Trading Community Model Cloud.
- External system data for sales orders is uploaded to Oracle Order Management Cloud.
Before uploading data from external source systems, you must complete the following setup steps:
-
Define the external source system in Manage Trading Community Source Systems and Enable for Order Orchestration and Planning.

Manage Trading Community Source Systems Page
-
Define the same source system in Manage Planning Source Systems and set Version to External.

Setting the Version of the external source system to External
-
Download templates from docs.oracle.com for File Based Data Import for Oracle Supply Chain Management Cloud.

File Based Data Import Page for Oracle Supply Chain Management Cloud
- For your external source system, the following table lists the available templates for data upload to planning. Not all templates on the File Based Data Imports can be used for planning.
Data Type
Collection Entities
XLSM File Name
Reference Data
Items
ItemImportTemplate.xlsm
Item Costs
ItemCostImportTemplate.xlsm
Customer Specific Item Relationships
ItemSubstituteImportTemplate.xlsm
Catalogs, Categories, and Item Categories
CatalogImportTemplate.xlsm
Item Structures
BillofMaterialImportTemplate.xlsm
Bill of Resources
BillofResourcesImportTemplate.xlsm
Planners
PlannersImportTemplate.xlsm
Customers and Customer Sites
CustomerImportTemplate.xlsm
Regions
RegionsImportTemplate.xlsm
Zones
ZonesImportTemplate.xlsm
Region-Zone Mapping
RegionZoneMappingImportTemplate.xlsm
Locations and Region-Location Mapping
LocationsImportTemplate.xlsm
Organizations and Organization Sites
OrganizationImportTemplate.xlsm
Subinventories
SubInventoryImportTemplate.xlsm
Suppliers and Supplier Sites
SupplierImportTemplate.xlsm
Item Suppliers (Approved Supplier List)
ApprovedSupplierListImportTemplate.xlsm
Interlocation Shipping Networks and Transit Times
InterLocationShipMethodsImportTemplate.xlsm
Currencies and Currency Conversions
CurrencyImportTemplate.xlsm
Units of Measure and Unit of Measure Conversions
UOMImportTemplate.xlsm
Calendars, Calendar Exceptions, Shifts, Shift Workday Pattern, Week Start Dates and Period start Dates
CalendarImportTemplate.xlsm
Calendar Associations
CalendarAssignmentsImportTemplate.xlsm
Demand Classes
DemandClassImportTemplate.xlsm
Carrier, Ship Mode of Transport and Ship Class of Service
CarrierImportTemplate.xlsm
GOP Allocation Rules and Rule Assignments
PlanningAllocationRulesImportTemplate.xlsm
GOP ATP Rules and Rule Assignments
ATPRulesImportTemplate.xlsm
GOP Supply Update Rules
RealTimeSupplyUpdatesImportTemplate.xlsm
Order Orchestration Reference Objects:
Freight Terms, FOB Points, Invoicing and Accounting Rules, Shipment Priorities, Payment Terms, Return Reason, Tax Classification Code, Tax Exemption Reason, Sales Credit Type, Activity Type, Document Categories, Payment Methods,
Receipt Methods
OrderOrchestrationImportTemplate.xlsm
Cross Reference Mapping Information
CrossReferenceDataImportTemplate.xlsm
Demand Planning Data
Booking History
BookingHistoryImportTemplate.xlsm
Shipment History
ShipmentHistoryImportTemplate.xlsm
Price Lists
PriceListImportTemplate.xlsm
Causal Factors
CausalFactorsImportTemplate.xlsm
Forecast Measures
ForecastMeasureImportTemplate.xlsm
Fiscal Calendars
FiscalCalendarImportTemplate.xlsm
Custom Measures, Sales and Operations Planning – Backlog, Inventory, and Production History
CustomMeasuresImportTemplate.xlsm
Supply Planning Data
Forecasts
ExternalForecastImportTemplate.xlsm
Sales Orders
SalesOrderImportTemplate.xlsm
Safety Stock Levels
SafetyStockLevelImportTemplate.xlsm
Supply Reservations to Sales Orders
ReservationImportTemplate.xlsm
On Hand
OnhandImportTemplate.xlsm
Purchase Orders, Purchase Requisitions, PO in Receiving, In Transits
PurchaseOrderRequisitionImportTemplate.xlsm
Transfer Orders (including expense type transfers)
TransferOrderImportTemplate.xlsm
Supplier Capacity
ApprovedSupplierCapacityImportTemplate.xlsm
Resources, Resource Shifts
ResourcesImportTemplate.xlsm
Resource Availability
ResourceAvailabilityImportTemplate.xlsm
Routings (including mapping between BOM and Routing),
Routing Operations, Routing Operation Resources
RoutingsImportTemplate.xlsm
Work Order Supply
WorkOrderSuppliesImportTemplate.xlsm
Work Order Material Requirements
WIPComponentDemandsImportTemplate.xlsm
Work Order Resource Requirements
WIPOperationResourceImportTemplate.xlsm
Planned Order Supplies
PlannedOrderSupplyImportTemplate.xlsm
Sourcing Rule and Assignments
SourcingImportTemplate.xlsm
- To upload data and collect it to Oracle Supply Chain Planning Cloud, follow these steps:
- Review the first tab of the template for upload instructions.
- On the second tab, enter your data in rows 10 and below. Pay attention to whether a column is required. The screenshot below shows the organizations tab with a little sample data entered. You must fill out the data on the organization sites tab.
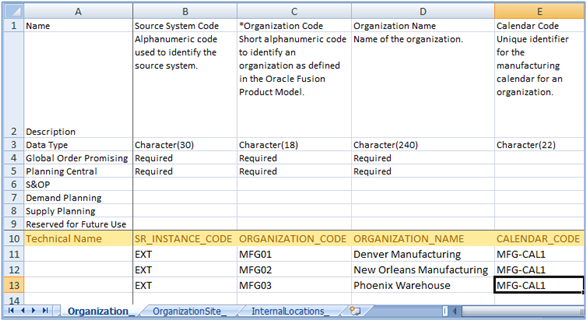
Contents of Sample Organizations Upload File
- Zip the resulting CSV file by following the instructions of the first tab of the template. Upload the file using File Import and Export page. You can find this page by opening the navigator and looking under Tools.
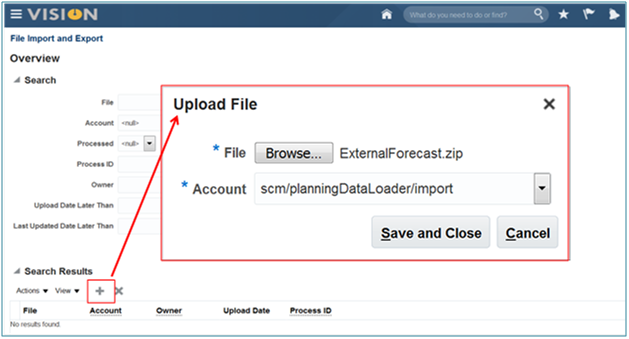
File Import and Export Page
- In plan inputs, navigate to the Load Planning Data from Files popup.
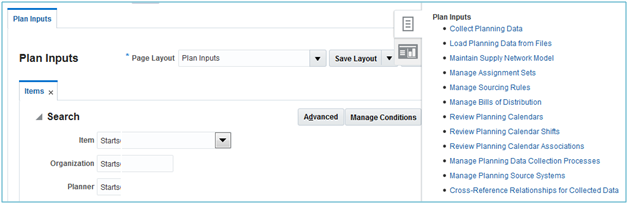
Accessing the Load Planning Data From Files Task
- Fill out the Load Planning Data from Flat Files and submit the ESS request.

Specifying Which File to Upload
- Upload the organizations that belong to your external system, using the OrganizationImportTemplate.xlsm.
- After upload of organizations, then In the Manage Planning Source Systems page, highlight the external system and click the Manage Organizations list to confirm that your organizations are uploaded to planning.
- Continue uploading all reference, order management, manufacturing, inventory and purchasing data using the planning file upload feature. Upload only the data that you need for planning.
- Define and run plans for the external source system. To define a plan for an external source system, you only need to set Source System and select the organizations on the scope tab of the plan options as shown in the following screenshot.

Setting the Source System to be Planned by a Plan
Tips And Considerations
Load related data in the same file. The data for the files found in your zip file will be automatically loaded in the right sequence. For example, if you are uploading suppliers, items, and purchase orders, the items and suppliers will be loaded first, so that when the purchase orders are uploaded for any new items or suppliers, the new items and suppliers are already present.
Key Resources
- Oracle Supply Chain Management Cloud – Release Readiness, available from the Oracle Help Center.
APPENDIX A: FUNCTION SECURITY Roles AND PRIVILEGES
This release may include new roles and privileges that facilitate function security for new features. If you have created custom job roles, then you can add new privileges to those custom roles as needed.
For a list of new roles and privileges in this release, refer to the What's New section of the Oracle Supply Chain Planning Cloud: Security Reference guide, available on the Oracle Help Center.
---

Copyright © 2017, 2018, Oracle and/or its affiliates. All rights reserved.
This document is provided for information purposes only, and the contents hereof are subject to change without notice.This document is not warranted to be error-free, nor subject to any other warranties or conditions, whether expressed orally or implied in law, including implied warranties and conditions of merchantability or fitness for a particular purpose. We specifically disclaim any liability with respect to this document, and no contractual obligations are formed either directly or indirectly by this document. This document may not be reproduced or transmitted in any form or by any means, electronic or mechanical, for any purpose, without our prior written permission.
Oracle and Java are registered trademarks of Oracle and/or its affiliates. Other names may be trademarks of their respective owners.
Intel and Intel Xeon are trademarks or registered trademarks of Intel Corporation.All SPARC trademarks are used under license and are trademarks or registered trademarks of SPARC International, Inc. AMD, Opteron, the AMD logo, and the AMD Opteron logo are trademarks or registered trademarks of Advanced Micro Devices. UNIX is a registered trademark of The Open Group.
