
- Revision History
- Overview
- Feature Summary
- Recruiting
-
- Recruiting
- Adaptive Intelligence
- Agency Hiring
- Candidate Experience
-
- Automated Country Selection in Apply Flow
- Build More Complex Career Sites
- Configuration of Miscellaneous Documents Attached by Candidates
- Improved Job Requisition Search Autosuggest
- Improved Navigation to Multiple Job Applications in Candidate Self Service
- Increased Support of Job Requisition Flexfields in Career Sites
- Validation of Dates in Apply Flow
- Candidate Security Enhancements
- Candidates and Candidate Job Applications
- HCM Data Loader
-
- Add Interview Schedules to Job Requisitions Using HCM Data Loader
- Add Responsibilities and Qualifications to Job Requisitions Using HCM Data Loader
- Move Job Applications to the HR Phase Using HCM Data Loader
- Update Non-Draft Job Requisitions Using HCM Data Loader
- Update Source Tracking Using HCM Data Loader
- Job Requisitions
- Oracle Digital Assistant
- Scheduled Processes
- Screening Services
- Transactional Business Intelligence for Recruiting
- Recruiting
- IMPORTANT Actions and Considerations for Recruiting
- Controlled Availability for Recruiting
This document will continue to evolve as existing sections change and new information is added. All updates appear in the following table:
| Date | Product | Feature | Notes |
|---|---|---|---|
| 25 FEB 2022 | Recruiting / Candidate Experience |
Build More Complex Career Sites | Updated document. Revised feature information. |
| 25 FEB 2022 |
Recruiting / Adaptive Intelligence |
Time to Hire | Updated document. Revised feature information. |
| 25 FEB 2022 |
Recruiting / Candidate Experience |
Simplified Person Search and Merge Process | Updated document. Revised feature information. |
| 28 JAN 2022 | Recruiting / Candidate Experience |
Configuration of Miscellaneous Documents Attached by Candidates | Updated document. Revised feature information. |
| 28 JAN 2022 | Recruiting / Candidate Experience |
Candidate Security Enhancements | Updated document. Revised feature information. |
| 22 DEC 2021 | Recruiting / Adaptive Intelligence | Best Candidates | Updated document. Revised feature information. |
| 22 DEC 2021 |
Recruiting / Adaptive Intelligence |
Recommended Jobs | Updated document. Revised feature information. |
| 22 DEC 2021 |
Recruiting / Adaptive Intelligence |
Similar Candidates | Updated document. Revised feature information. |
| 22 DEC 2021 |
Recruiting / Adaptive Intelligence |
Similar Jobs | Updated document. Revised feature information. |
| 22 DEC 2021 |
Recruiting / Adaptive Intelligence |
Time to Hire | Updated document. Revised feature information. |
| 22 DEC 2021 |
Recruiting / Scheduled Processes | Search Index Upgrade Enhancements | Updated document. Revised feature information. |
| 29 OCT 2021 | Recruiting / Candidate Experience | Candidate Security Enhancements | Updated document. Feature delivered in update 21D. |
| 29 OCT 2021 | Recruiting / Job Requisitions | Add Skills to Job Requisitions | Updated document. Revised feature information. |
| 29 OCT 2021 |
Recruiting / Candidate Experience |
Configuration of Miscellaneous Documents Attached by Candidates | Updated document. Revised feature information. |
| 29 OCT 2021 |
Recruiting / Scheduled Processes |
Index Candidate Attachments Scheduled Process | Updated document. Revised feature information. |
| 29 OCT 2021 |
Recruiting / Scheduled Processes |
Search Index Upgrade Enhancements | Updated document. Revised feature information. |
| 24 Sep 2021 | Controlled Availability for Recruiting | Controlled Availability for Recruiting | Updated document. Revised feature information. |
| 03 SEP 2021 | Created initial document. |
HCM Cloud applications have two types of patches you can receive that are documented in this What’s New:
- Release Updates (21A, 21B, 21C, and 21D)
- Optional Monthly Maintenance Packs to each update
It is important for you to know what Release Update your environment is on. You can find this in your Cloud Portal.
____________________
 HAVE AN IDEA?
We’re here and we’re listening. If you have a suggestion on how to make our products better, please let us know. To enter an idea go to the Ideas Lab on Oracle Customer Connect. In this document wherever you see the light bulb icon after the feature name it means we delivered one of your ideas.
____________________
Suggested Reading for all HCM Products:
- Human Resources What’s New – In the Global Human Resources section you will find features on the base application in which other application are built upon.
NOTE: Not all Global Human Resource features are available for Talent and Compensation products.
- Oracle Human Capital Management Cloud Functional Known Issues and Maintenance Packs (Document ID 1554838.1). These documents identify bug fixes and possible known issues. You will also need to review these documents based in the release update version you are currently on or will be moving to.
- Oracle Help Center – Here you will find guides, videos and searchable help.
- Release Readiness – New Feature Summary, What’s New, Feature Listing Spreadsheet, Spotlights and Release Training
GIVE US FEEDBACK
We welcome your comments and suggestions to improve the content. Please send us your feedback at oracle_fusion_applications_help_ww_grp@oracle.com. Indicate you are inquiring or providing feedback regarding the HCM Cloud What’s New in the body or title of the email.
Column Definitions:
Report = New or modified, Oracle-delivered, ready to run reports.
UI or Process-Based: Small Scale = These UI or process-based features are typically comprised of minor field, validation, or program changes. Therefore, the potential impact to users is minimal.
UI or Process-Based: Larger Scale* = These UI or process-based features have more complex designs. Therefore, the potential impact to users is higher.
Features Delivered Disabled = Action is needed BEFORE these features can be used by END USERS. These features are delivered disabled and you choose if and when to enable them. For example, a) new or expanded BI subject areas need to first be incorporated into reports, b) Integration is required to utilize new web services, or c) features must be assigned to user roles before they can be accessed.
| Ready for Use by End Users Reports plus Small Scale UI or Process-Based new features will have minimal user impact after an update. Therefore, customer acceptance testing should focus on the Larger Scale UI or Process-Based* new features. |
Customer Must Take Action before Use by End Users Not disruptive as action is required to make these features ready to use. As you selectively choose to leverage, you set your test and roll out timing. |
|||||
|---|---|---|---|---|---|---|
| Feature |
Report |
UI or |
UI or |
|
||
Configuration of Miscellaneous Documents Attached by Candidates |
||||||
Improved Navigation to Multiple Job Applications in Candidate Self Service |
||||||
Increased Support of Job Requisition Flexfields in Career Sites |
||||||
Add Interview Schedules to Job Requisitions Using HCM Data Loader |
||||||
Add Responsibilities and Qualifications to Job Requisitions Using HCM Data Loader |
||||||
Prevent Changing Job Field Configuration for Job Requisitions |
||||||
Oracle Digital Assistant - Refer a Candidate Using Internal Candidate Experience Skill |
||||||
Combine Agent Invitation Information with Job Application and Source Information |
||||||
Oracle Recruiting Cloud provides tools for hiring managers and recruiters to source and nurture candidates, create and manage job requisitions, screen and select candidates, create and manage job offers, and onboard new employees into the organization. It also provides career sites for employees and external candidates to search, discover and apply to jobs using a frictionless application process. Oracle Recruiting Cloud provides tools for hiring managers and recruiters to source and nurture candidates, create and manage job requisitions, screen and select candidates, create and manage job offers, and onboard new employees into the organization. It also provides career sites for employees and external candidates to search, discover and apply to jobs using a frictionless application process. Oracle Recruiting Cloud provides tools for hiring managers and recruiters to source and nurture candidates, create and manage job requisitions, screen and select candidates, create and manage job offers, and onboard new employees into the organization. It also provides career sites for employees and external candidates to search, discover and apply to jobs using a frictionless application process.
Recruiters can use the Best Candidates feature to review the recommended best candidates for open job requisitions.
When the feature is enabled, you can see the Top Recommendations section in job requisitions. Candidates are sorted in order of recommendations, and you can refine the list of recommended candidates to review or decide who to invite to apply for a job. In addition, you can sort the job applications based on the AI recommendations.
The Best Candidates feature uses artificial intelligence (AI) and machine-learning algorithms to make recommendations.

Top Recommendations of a Job Requisition
This feature increases recruiters productivity, helps reduce the time in the overall candidate selection process, and improves the quality of selected candidates.
Steps to Enable
To enable the Best Candidates feature in Oracle Recruiting Cloud, you need to perform these steps:
- Create a profile option called IRC_AI_INTELLIGENT_MATCHING.
- Enable the profile option IRC_AI_INTELLIGENT_MATCHING.
- Enable the Best Candidates feature.
- Run the scheduled process Synchronize Recruiting Data for Candidate Recommendations.
Step 1: Create Profile Option
You need to create a profile option called IRC_AI_INTELLIGENT_MATCHING.
- In the Setup and Maintenance work area, search for the task Manage Profile Options.
- On the Manage Profile Options page, click the Create icon.
- On the Create Profile Option page, create the profile by entering these values:
- Profile Option Code: IRC_AI_INTELLIGENT_MATCHING
- Profile Display Name: Intelligent Matching Features Enabled
- Application: Recruiting
- Module: Recruiting Common
- Description: Enable or disable AI features in the Setup and Maintenance work area.
- Start Date: Today’s date
- Click Save and Close.
When the profile option is created, you need to enable it at the Site level.
- On the Manage Profile Options page, go to the Profile Option Levels section.
- Set the profile option to be enabled and updatable at the Site level.
- Click Save and Close.
Step 2: Enable Profile Option
You need to enable the profile option IRC_AI_INTELLIGENT_MATCHING so that the Best Candidates feature becomes available in the Recruiting and Candidate Experience offering.
- In the Setup and Maintenance work area, search for the task Manage Administrator Profile Values.
- On the Manage Administrator Profile Values page, search for the profile option code IRC_AI_INTELLIGENT_MATCHING.
- In the Profile Values section, set the profile value to Y.
- Click Save and Close.
Step 3: Enable Best Candidates
You can now enable the Best Candidates feature in Oracle Recruiting Cloud.
- In the Setup and Maintenance work area, go to:
- Offering: Recruiting and Candidate Experience
- Functional Area: Recruiting and Candidate Experience Management
- Task: Enterprise Recruiting and Candidate Experience Information
- In the AI Feature Integration section, select the Best Candidates option.
- Click Save and Close.
Step 4: Run Scheduled Process
When AI features are enabled, you need to run the scheduled process Synchronize Recruiting Data for Candidate Recommendations to push data from Oracle Recruiting Cloud to the Adaptive Intelligence App.
- In the Navigator menu, go to Tools > Scheduled Processes.
- On the Overview page, click Schedule New Process.
- Search for the process Synchronize Recruiting Data for Candidate Recommendations.
- Click OK.
- On the Process Details page, click Advanced Options.
- Configure these fields:
- Entity Type: Select All or leave the field blank. For initial or incremental data ingestion, you need to select All to ingest all the entities.
- From Date: You can leave the field blank to pull all data, or you can select a date when to start the data extraction.
- We recommend a recurring schedule to be performed every 4 or 6 hours. On a testing environment, you can schedule on a need basis. Click the Schedule tab and set up a schedule.
- Click Submit.
When the scheduled process is completed, anonymized requisition and candidate data will have been exported to the AI Cloud service and will then be processed. You can expect to see recommendations for AI features after 8 to 12 hours depending on the volume of data.
Tips And Considerations
To use the Best Candidates feature, your organization must meet the following criteria:
-
The Recruiting environment must not be on a government pod.
-
The Recruiting environment must not be on Break Glass.
For best results, it's strongly recommended to also meet these criteria:
-
The Recruiting environment must be live in production for at least 6 months to benefit from high quality recommendations and prediction results.
-
The Recruiting environment must use English for their operation language.
The Best Candidates feature uses Adaptive Intelligence matching algorithms to provide recommendations based on the below job requisition data and candidate profile data.
Job Requisition Data:
- Title
- Description
- Education Level
- Job Function
- Job Family
- Qualifications
- Responsibilities
Candidate Profile Data:
- Work History (Previous Employment)
- Title
- Achievements
- Responsibilities
- Degrees (Education)
- Degree
- Major
- Education Level
- Skill
- Name
- Description
- Licenses or Certification
- Title
- Comments
Candidates can use the Recommended Jobs feature to review jobs based on their profile.
This feature uses artificial intelligence (AI) and machine-learning algorithms.
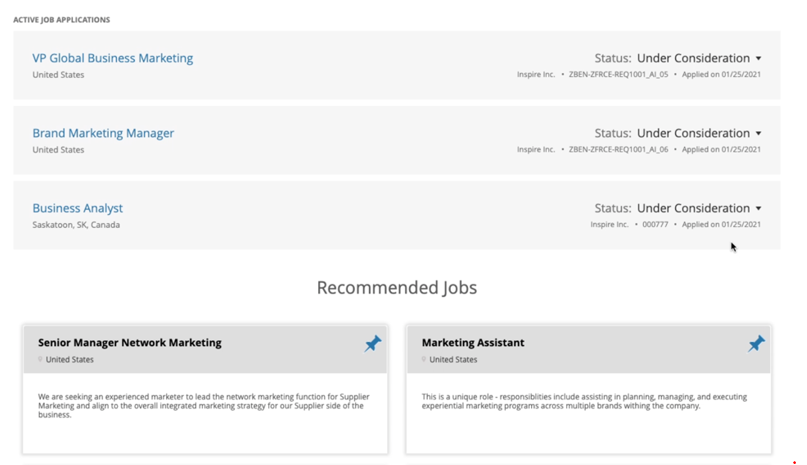
Recommended Jobs Based on Candidate Profile
With this feature, candidates find more relevant jobs based on their profile which also help them to discover jobs quickly.
Steps to Enable
To enable the Recommended Jobs feature in Oracle Recruiting Cloud, you need to perform these steps:
- Create a profile option called IRC_AI_INTELLIGENT_MATCHING.
- Enable the profile option IRC_AI_INTELLIGENT_MATCHING.
- Enable the Recommended Jobs feature.
- Run the scheduled process Synchronize Recruiting Data for Candidate Recommendations.
Step 1: Create Profile Option
You need to create a profile option called IRC_AI_INTELLIGENT_MATCHING.
- In the Setup and Maintenance work area, search for the task Manage Profile Options.
- On the Manage Profile Options page, click the Create icon.
- On the Create Profile Option page, create the profile by entering these values:
- Profile Option Code: IRC_AI_INTELLIGENT_MATCHING
- Profile Display Name: Intelligent Matching Features Enabled
- Application: Recruiting
- Module: Recruiting Common
- Description: Enable or disable AI features in the Setup and Maintenance work area.
- Start Date: Today’s date
- Click Save and Close.
When the profile option is created, you need to enable it at the Site level.
- On the Manage Profile Options page, go to the Profile Option Levels section.
- Set the profile option to be enabled and updatable at the Site level.
- Click Save and Close.
Step 2: Enable Profile Option
You need to enable the profile option IRC_AI_INTELLIGENT_MATCHING so that the Recommended Jobs feature becomes available in the Recruiting and Candidate Experience offering.
- In the Setup and Maintenance work area, search for the task Manage Administrator Profile Values.
- On the Manage Administrator Profile Values page, search for the profile option code IRC_AI_INTELLIGENT_MATCHING.
- In the Profile Values section, set the profile value to Y.
- Click Save and Close.
Step 3: Enable Recommended Jobs
You can now enable the Recommended Jobs feature in Recruiting.
- In the Setup and Maintenance work area, go to:
- Offering: Recruiting and Candidate Experience
- Functional Area: Recruiting and Candidate Experience Management
- Task: Enterprise Recruiting and Candidate Experience Information
- In the AI Feature Integration section, select the Recommended Jobs option.
- Click Save and Close.
Step 4: Run Scheduled Process
When AI features are enabled, you need to run the scheduled process Synchronize Recruiting Data for Candidate Recommendations to push data from Oracle Recruiting Cloud to the Adaptive Intelligence App.
- In the Navigator menu, go to Tools > Scheduled Processes.
- On the Overview page, click Schedule New Process.
- Search for the process Synchronize Recruiting Data for Candidate Recommendations.
- Click OK.
- On the Process Details page, click Advanced Options.
- Configure these fields:
- Entity Type: Select All or leave the field blank. For initial or incremental data ingestion, you need to select All to ingest all the entities.
- From Date: You can leave the field blank to pull all data, or you can select a date when to start the data extraction.
- We recommend a recurring schedule to be performed every 4 or 6 hours. On a testing environment, you can schedule on a need basis. Click the Schedule tab and set up a schedule.
- Click Submit.
When the scheduled process is completed, anonymized requisition and candidate data will have been exported to the AI Cloud service and will then be processed. You can expect to see recommendations for AI features after 8 to 12 hours depending on the volume of data.
Tips And Considerations
To use the Recommended Jobs feature, your organization must meet the following criteria:
-
The Recruiting environment must not be on a government pod.
-
The Recruiting environment must not be on Break Glass.
For best results, it's strongly recommended to also meet these criteria:
-
The Recruiting environment must be live in production for at least 6 months to benefit from high quality recommendations and prediction results.
-
The Recruiting environment must use English for their operation language.
The Recommended Jobs feature uses Adaptive Intelligence matching algorithms to recommend job requisitions based on the job requisition data and candidate profile data.
Job Requisition Data:
- Title
- Description
- Education Level
- Job Function
- Job Family
- Qualifications
- Responsibilities
Candidate Profile Data:
- Work History (Previous Employment)
- Title
- Achievements
- Responsibilities
- Degrees (Education)
- Degree
- Major
- Education Level
- Skill
- Name
- Description
- Licenses or Certification
- Title
- Comments
- Work History (Previous Employment)
- Title
- Achievements
- Responsibilities
- Degrees (Education)
- Degree
- Major
- Education Level
- Skill
- Name
- Description
- Licenses or Certification
- Title
- Comments
Recruiters can use the Similar Candidates feature to find candidates that have similar traits with an existing candidate. The feature is available for candidates, prospects, and candidate pool members. You can view a maximum of 30 similar candidates based on a specific candidate profile.
The Similar Candidates feature uses artificial intelligence (AI) and machine-learning algorithms to suggest similar candidates.
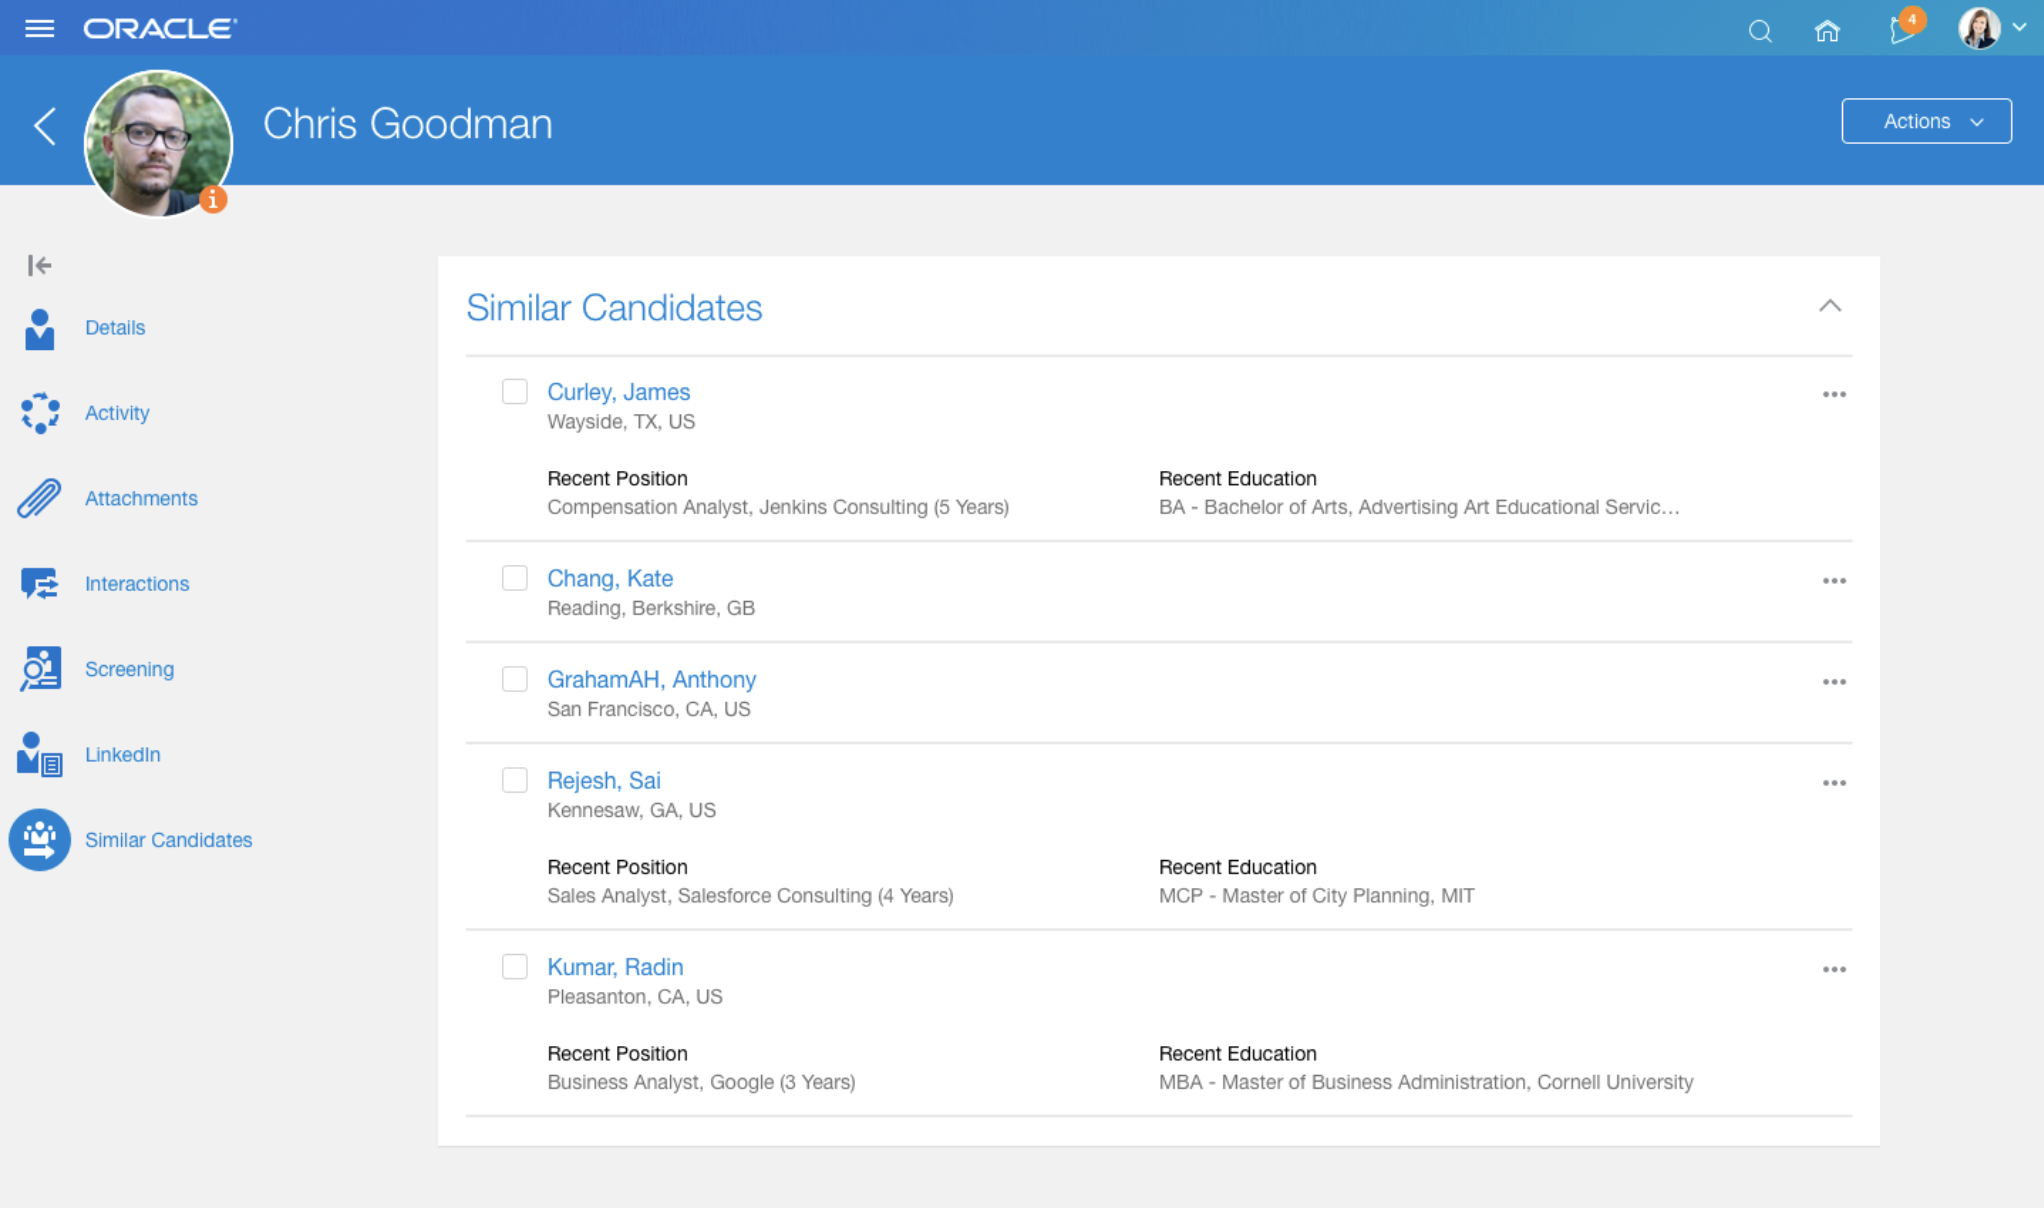
Similar Candidates for a Candidate
This feature increases recruiters productivity, helps reduce the time in the overall candidate selection process, and improves the quality of selected candidates.
Steps to Enable
To enable the Similar Candidates feature in Oracle Recruiting Cloud, you need to perform these steps:
- Create a profile option called IRC_AI_INTELLIGENT_MATCHING.
- Enable the profile option IRC_AI_INTELLIGENT_MATCHING.
- Enable the Similar Candidates feature.
- Run the scheduled process Synchronize Recruiting Data for Candidate Recommendations.
Step 1: Create Profile Option
You need to create a profile option called IRC_AI_INTELLIGENT_MATCHING.
- In the Setup and Maintenance work area, search for the task Manage Profile Options.
- On the Manage Profile Options page, click the Create icon.
- On the Create Profile Option page, create the profile by entering these values:
- Profile Option Code: IRC_AI_INTELLIGENT_MATCHING
- Profile Display Name: Intelligent Matching Features Enabled
- Application: Recruiting
- Module: Recruiting Common
- Description: Enable or disable AI features in the Setup and Maintenance work area.
- Start Date: Today’s date
- Click Save and Close.
When the profile option is created, you need to enable it at the Site level.
- On the Manage Profile Options page, go to the Profile Option Levels section.
- Set the profile option to be enabled and updatable at the Site level.
- Click Save and Close.
Step 2: Enable Profile Option
You need to enable the profile option IRC_AI_INTELLIGENT_MATCHING so that the Similar Candidates feature becomes available in the Recruiting and Candidate Experience offering.
- In the Setup and Maintenance work area, search for the task Manage Administrator Profile Values.
- On the Manage Administrator Profile Values page, search for the profile option code IRC_AI_INTELLIGENT_MATCHING.
- In the Profile Values section, set the profile value to Y.
- Click Save and Close.
Step 3: Enable Similar Candidates
You can now enable the Similar Candidates feature in Recruiting.
- In the Setup and Maintenance work area, go to:
- Offering: Recruiting and Candidate Experience
- Functional Area: Recruiting and Candidate Experience Management
- Task: Enterprise Recruiting and Candidate Experience Information
- In the AI Feature Integration section, select the Similar Candidates option.
- Click Save and Close.
Step 4: Run Scheduled Process
When AI features are enabled, you need to run the scheduled process Synchronize Recruiting Data for Candidate Recommendations to push data from Oracle Recruiting Cloud to the Adaptive Intelligence App.
- In the Navigator menu, go to Tools > Scheduled Processes.
- On the Overview page, click Schedule New Process.
- Search for the process Synchronize Recruiting Data for Candidate Recommendations.
- Click OK.
- On the Process Details page, click Advanced Options.
- Configure these fields:
- Entity Type: Select All or leave the field blank. For initial or incremental data ingestion, you need to select All to ingest all the entities.
- From Date: You can leave the field blank to pull all data, or you can select a date when to start the data extraction.
- We recommend a recurring schedule to be performed every 4 or 6 hours. On a testing environment, you can schedule on a need basis. Click the Schedule tab and set up a schedule.
- Click Submit.
When the scheduled process is completed, anonymized requisition and candidate data will have been exported to the AI Cloud service and will then be processed. You can expect to see recommendations for AI features after 8 to 12 hours depending on the volume of data.
Tips And Considerations
To use the Similar Candidates feature, your organization must meet the following criteria:
-
The Recruiting environment must not be on a government pod.
-
The Recruiting environment must not be on Break Glass.
For best results, it's strongly recommended to also meet these criteria:
-
The Recruiting environment must be live in production for at least 6 months to benefit from high quality recommendations and prediction results.
-
The Recruiting environment must use English for their operation language.
The Similar Candidates feature uses Adaptive Intelligence matching algorithms to recommend candidates based on the below candidate profile data.
- Work History (Previous Employment)
- Title
- Achievements
- Responsibilities
- Degrees (Education)
- Degree
- Major
- Education Level
- Skill
- Name
- Description
- Licenses or Certification
- Title
- Comments
Recruiters can use the Similar Jobs feature to recommend similar jobs based on a specific job requisition.
This feature uses artificial intelligence (AI) and machine-learning algorithms.
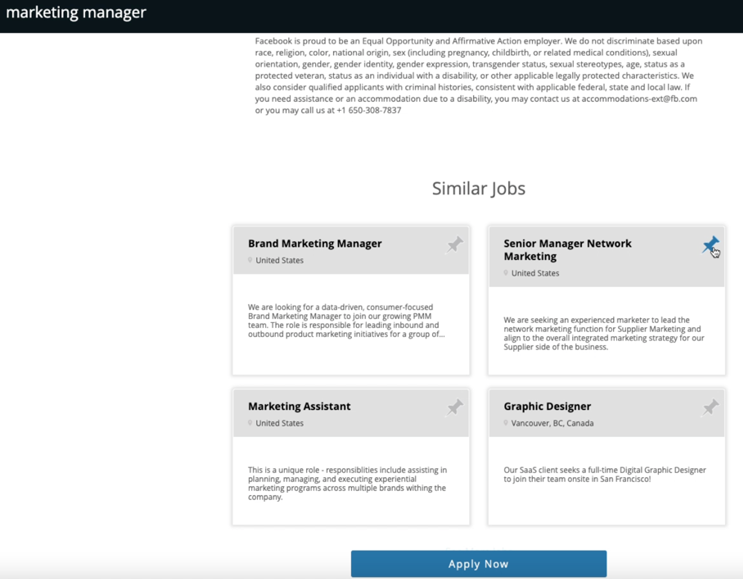
Similar Jobs Based on Job Requisition
This feature helps candidates find similar jobs quickly and apply for the right roles.
Steps to Enable
To enable the Similar Jobs feature in Oracle Recruiting Cloud, you need to perform these steps:
- Create a profile option called IRC_AI_INTELLIGENT_MATCHING.
- Enable the profile option IRC_AI_INTELLIGENT_MATCHING.
- Enable the Similar Jobs feature.
- Run the scheduled process Synchronize Recruiting Data for Candidate Recommendations.
Step 1: Create Profile Option
You need to create a profile option called IRC_AI_INTELLIGENT_MATCHING.
In the Setup and Maintenance work area, search for the task Manage Profile Options.
- On the Manage Profile Options page, click the Create icon.
- On the Create Profile Option page, create the profile by entering these values:
- Profile Option Code: IRC_AI_INTELLIGENT_MATCHING
- Profile Display Name: Intelligent Matching Features Enabled
- Application: Recruiting
- Module: Recruiting Common
- Description: Enable or disable AI features in the Setup and Maintenance work area.
- Start Date: Today’s date
- Click Save and Close.
When the profile option is created, you need to enable it at the Site level.
- On the Manage Profile Options page, go to the Profile Option Levels section.
- Set the profile option to be enabled and updatable at the Site level.
- Click Save and Close.
Step 2: Enable Profile Option
You need to enable the profile option IRC_AI_INTELLIGENT_MATCHING so that the Similar Jobs feature becomes available in the Recruiting and Candidate Experience offering.
- In the Setup and Maintenance work area, search for the task Manage Administrator Profile Values.
- On the Manage Administrator Profile Values page, search for the profile option code IRC_AI_INTELLIGENT_MATCHING.
- In the Profile Values section, set the profile value to Y.
- Click Save and Close.
Step 3: Enable Similar Jobs
You can now enable the Similar Jobs feature in Oracle Recruiting Cloud.
- In the Setup and Maintenance work area, go to:
- Offering: Recruiting and Candidate Experience
- Functional Area: Recruiting and Candidate Experience Management
- Task: Enterprise Recruiting and Candidate Experience Information
- In the AI Feature Integration section, select the Similar Jobs option.
- Click Save and Close.
Step 4: Run Scheduled Process
When AI features are enabled, you need to run the scheduled process Synchronize Recruiting Data for Candidate Recommendations to push data from Oracle Recruiting Cloud to the Adaptive Intelligence App.
- In the Navigator menu, go to Tools > Scheduled Processes.
- On the Overview page, click Schedule New Process.
- Search for the process Synchronize Recruiting Data for Candidate Recommendations.
- Click OK.
- On the Process Details page, click Advanced Options.
- Configure these fields:
- Entity Type: Select All or leave the field blank. For initial or incremental data ingestion, you need to select All to ingest all the entities.
- From Date: You can leave the field blank to pull all data, or you can select a date when to start the data extraction.
- We recommend a recurring schedule to be performed every 4 or 6 hours. On a testing environment, you can schedule on a need basis. Click the Schedule tab and set up a schedule.
When the scheduled process is completed, anonymized requisition and candidate data will have been exported to the AI Cloud service and will then be processed. You can expect to see recommendations for AI features after 8 to 12 hours depending on the volume of data.
Tips And Considerations
To use the Similar Jobs feature, your organization must meet the following criteria:
-
The Recruiting environment must not be on a government pod.
-
The Recruiting environment must not be on Break Glass.
For best results, it's strongly recommended to also meet these criteria:
-
The Recruiting environment must be live in production for at least 6 months to benefit from high quality recommendations and prediction results.
-
The Recruiting environment must use English for their operation language.
The Similar Jobs feature recommends job requisitions based based on the below job requisition data.
- Title
- Description
- Education Level
- Job Function
- Job Family
- Qualifications
- Responsibilities
Recruiters can use the Time to Hire feature to get estimates about the time it will take to make a first hire for a job requisition. The Time to Hire feature uses artificial intelligence (AI) and machine-learning algorithms to estimate the time for a first hire, based on previous similar job requisitions.
In previous releases, the Estimated Time to Hire section was only available in the Overview tab of job requisitions. It's now also available when you create a requisition and edit a draft requisition, so that you can see the estimated time to hire before finalizing the details of the requisition.
When you start creating a job requisition, only the estimated time to hire is displayed. When the requisition reaches the Open phase, another number is displayed to indicate the current number of days for which the requisition has been open, allowing you to compare the current time with the estimated time to hire. Once a first hire is made on the requisition, the current number of open days is no longer be displayed; it's replaced by the number of days it took for a first hire to be made.
You can modify the value of these 3 fields displayed in the Estimated Time to Hire section so you can see the impact it has on the estimated time to hire.
- Requisition Title
-
Education Level
- Locations
When you modify these values, it has no impact on the actual requisition values. You need to modify the corresponding values in the requisition details if you want to keep them.
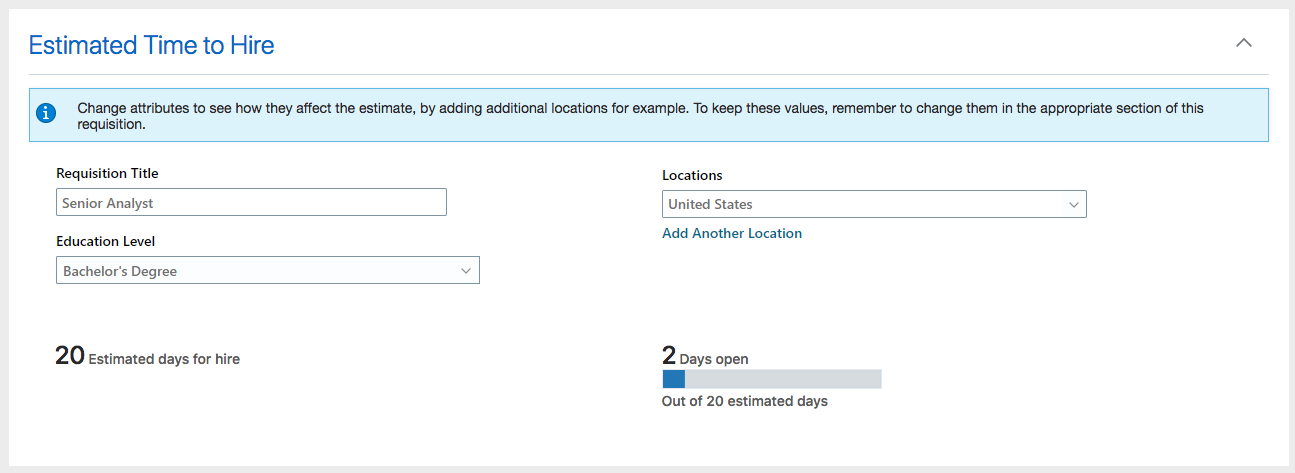
Estimated Time to Hire Section in a Job Requisition
This feature helps recruiters and hiring managers make informed decisions regarding the hiring process based on the time it could take to hire for a job requisition.
Steps to Enable
To enable the Time to Hire feature in Oracle Recruiting Cloud, you need to perform these steps:
- Create an Oracle Business Intelligence role called AIAPPS_BIP_ROLE who will extract values from Oracle Recruiting Cloud.
- Set up Adaptive Intelligence to create a connection between Adaptive Intelligence and Oracle Business Intelligence to extract values from Oracle Recruiting Cloud.
- Enable the hybrid framework for Adaptive Intelligence services.
- Create a profile option called IRC_AI_TIME_TO_HIRE.
- Enable the profile option IRC_AI_TIME_TO_HIRE.
- Enable the Time to Hire feature.
- Create a rule in Transaction Design Studio to display the Estimated Time to Hire section in requisitions.
Step 1: Create Oracle Business Intelligence Role
You need to create a role in Oracle Business Intelligence (BI) who will extract values from Oracle Recruiting Cloud. It’s a best practice to create a dedicated user. However, you can create and add this role to an existing user.
- Connect to the Oracle Recruiting Cloud as a user with the IT Security Manager role.
- In the Navigator menu, go to Tools > Security Console.
- On the Roles page, click Create Role.
- On the Create Role page, enter these values:
| Field | Value |
|---|---|
| Role Name | AIAPPS_BIP_ROLE |
| Role Code | AIAPPS_BIP_ROLE |
| Role Category | BI - Abstract Roles |
- Click Next three times.
- On the Role Hierarchy page, click Add Role.
- In the Add Role Membership window, search for and select BIAuthor, then click Add Role Membership.
- Search for and select BIPDataModelDeveloper, then click Add Role Membership.
- Click Cancel to close the window.
- Click Next two times.
- Click Save and Close.
- Click OK.
You need to create a user account named AIAPPS_BIP and assign the newly created AIAPPS_BIP_ROLE role:
- Click Users.
- On the User Accounts page, click Add User Account.
- In the User Information section, enter values for all of the required fields.
- Rename the User Name value to AIAPPS_BIP.
- Click Add Role.
- In the Add Role Membership window, search for and select AIAPPS_BIP_ROLE, then click Add Role Membership.
- Click Done to close the window.
- Click Save and Close.
You need to schedule a process to import the user and role security data.
- In the Navigator menu, go to Tools > Scheduled Processes.
- On the Overview page, click Schedule New Process.
- In the Schedule New Process window, select the Job type.
- Search for the process Import User and Role Application Security Data.
- Click OK.
- In the Process Details window, click Submit.
- Note the process ID, then click OK.
- Click Refresh until the status of the process ID you noted shows as Succeeded.
Step 2: Create Connection between AI and BI
You need to configure a connection between Adaptive Intelligence and Oracle Business Intelligence (BI) to extract values from Oracle Recruiting Cloud.
- Sign in to Oracle Adaptive Intelligent Apps for HCM. You will need help from your Oracle Cloud Administrator to get access to this page. Follow the instructions from this MOS article: DOC ID 2826501.1.
- Click Connections.
- On the Connections page, in the Oracle Business Intelligence section, click Add.
- In the Add Oracle Business Intelligence Connection window, enter your user name, password, and the URL for the Oracle BI Publisher.
| Field | Value |
|---|---|
| User Name | The user name you created in step Create Oracle Business Intelligence User (AIAPPS_BIP). |
| Password | The password associated with that user name. Note: If you change the Oracle Business Intelligence password later, you must also update it here. The passwords must match. |
| URL | The URL to your Oracle Business Intelligence instance. By default, this is the same URL as your instance of Oracle Recruiting Cloud. |
- Click Save.
Step 3: Enable Hybrid Framework for AI
You need to ensure that the system uses the hybrid framework for AI services.
- In the Setup and Maintenance work area, search for the task Manage Administrator Profile Values.
- On the Manage Administrator Profile Values page, search for the profile option code ORA_IRC_USE_AIAPPS_HYBRID.
- In the Profile Values section, ensure the value is set to Y.
- Click Save and Close.
Step 4: Create Profile Option
You need to create a profile option called IRC_AI_TIME_TO_HIRE.
- In the Setup and Maintenance work area, search for the task Manage Profile Options.
- On the Manage Profile Options page, click the Create icon.
- On the Create Profile Option page, create the profile by entering these values:
- Profile Option Code: IRC_AI_TIME_TO_HIRE
- Profile Display Name: Time to Hire Enabled
- Application: Recruiting
- Module: Recruiting Common
- Description: Enable or disable AI features in the Setup and Maintenance work area.
- Start Date: Today’s date
- Click Save and Close.
When the profile option is created, you need to enable it at the Site level.
- On the Manage Profile Options page, go to the Profile Option Levels section.
- Set the profile option to be enabled and updatable at the Site level.
- Click Save and Close.
Step 5: Enable Profile Option
You need to enable the profile option IRC_AI_TIME_TO_HIRE so that the Time to Hire feature becomes available in the Recruiting and Candidate Experience offering.
- In the Setup and Maintenance work area, search for the task Manage Administrator Profile Values.
- On the Manage Administrator Profile Values page, search for the profile option code IRC_AI_TIME_TO_HIRE.
- In the Profile Values section, set the profile value to Y.
- Click Save and Close.
Step 6: Enable Time to Hire
You can now enable the Time to Hire feature in Oracle Recruiting Cloud.
- In the Setup and Maintenance work area, go to:
- Offering: Recruiting and Candidate Experience
- Functional Area: Recruiting and Candidate Experience Management
- Task: Enterprise Recruiting and Candidate Experience Information
- In the AI Feature Integration section, select the Time to Hire option.
- Click Save and Close.
Step 7: Create Rule in Transaction Design Studio
You need to create a rule in Transaction Design Studio to display the Estimated Time to Hire section in requisitions. You can use these actions to create the rule:
- Recruiting - Create Job Requisition
- Recruiting - View and Edit Job Requisition
You can configure the visibility of the three requisition attributes which can be modified in the Estimated Time to Hire section: Education Level, Requisition Title, Locations.
Tips And Considerations
To use Time to Hire, your organization must meet the following criteria:
-
The Recruiting environment must not be on a government pod.
-
The Recruiting environment must not be on Break Glass.
For best results, it's strongly recommended to also meet these criteria:
- The Recruiting environment must be live in production for at least 6 months (and hiring candidates/closing requisitions for at least 6 months) to benefit from high quality recommendations and prediction results.
- The Recruiting environment must use English for their operation language.
The Time to Hire estimate provided by this feature represents the estimated time it will take for a requisition in the Open phase to have a first hired candidate (a candidate being moved to the HR phase). The system learns from the time to hire of past requisitions, identifying similar requisitions over different attributes such as the title, description, location, recruiting type, job function, education level. An estimated time to hire is then provided, based on the time to hire of similar past requisitions. For the very first requisitions, there won’t be sufficient data for the system to provide an estimate, so there won't be any estimate displayed. It’s recommended to disable the feature until the system has enough history to use to provide an estimate. When you think you have enough data, you can enable the feature in a testing environment and try it out to see if a time to hire estimate can be provided.
Improved Agency Hiring Security
As an administrator, you can enable a setting to control how much candidate data recruiting agents can see. If you enable the setting, agents will only view data in the candidate profile Attachments tab. If you don't enable the setting, agents will view data in the candidate profile Details tab and Attachments tab.
This feature improves security by restricting access to certain data. It also increases the candidate’s control of sharing their information.
Steps to Enable
A new setting controls this feature: Hide Candidate Data.
- In the Setup and Maintenance work area, go to:
- Offering: Recruiting and Candidate Experience
- Functional Area: Recruiting and Candidate Experience Management
- Task: Enterprise Recruiting and Candidate Experience Information
- In the Agency Hiring section, select the setting Hide Candidate Data.
- Click Save and Close.
Internal Candidates Management by Recruiting Agencies
As an administrator, when you create an agency, you can select an option to allow the agency to search internal candidates in the talent area using their email address and add them to their talent pool if they're not in an exclusivity period.
This feature allows agencies to manage internal candidates as well as external candidates.
Steps to Enable
A new option is available on the Create Agency page: Allow Internal Candidate Search.
- In the Setup and Maintenance work area, go to:
- Offering: Recruiting and Candidate Experience
- Functional Area: Source Candidates
- Task: Recruiting Agencies
- On the Agencies page, click Add.
- On the Create Agency page, select the option Allow Internal Candidate Search.
- Click Save and Close.
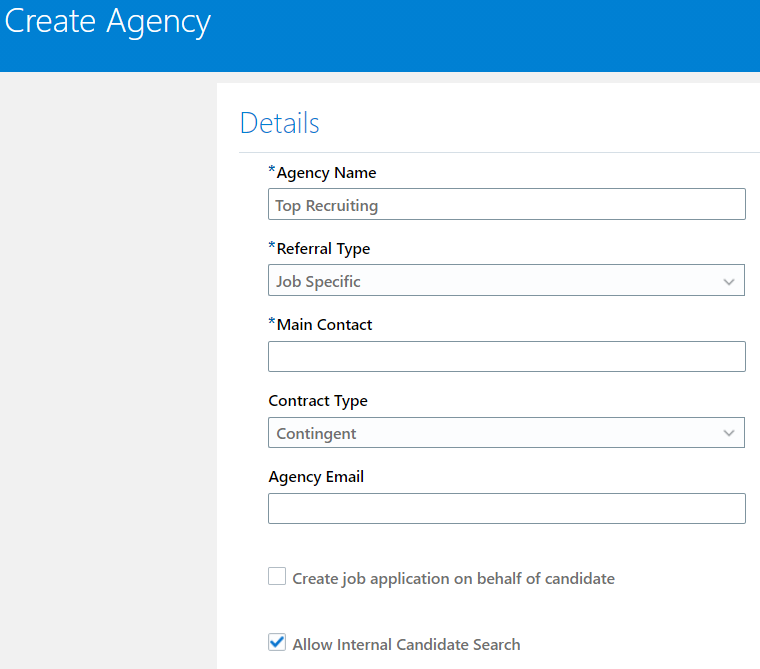
Create Agency Configuration Page
Automated Country Selection in Apply Flow
When candidates are completing their applications, their country value gets automatically populated using the following defaults:
-
If their browser setting is to always allow using their location, the country is defaulted based on their location
-
If their browser setting is not to allow using their location, the country is defaulted to the requisition's primary location country.
-
If their browser setting is to always ask before using their location:
-
If they allowed using location before entering the flow, or before entering the duplicate check for phone, country defaults based on their location
-
If they declined using their location before entering the flow, or before entering the duplicate check for phone, country defaults based on the requisition's primary location country
-
If they ignored the question, it will be asked again when they enter the flow, or the duplicate check for phone
-
Simplifies the process for candidates filling out job applications by defaulting the value for country selectors.
Steps to Enable
You don't need to do anything to enable this feature.
Build More Complex Career Sites
You can design more advanced career site pages using the new capabilities added to the career site editor. You're now able to easily add multiple rows to sections and then add predefined column layouts to those rows. You're able to add design elements just as you did before.
To access these new capabilities:
- On the Career Sites Configuration page, locate a career site and click Edit.
- Click the Pages tab.
- Click the Settings icon of a page, then select Edit.
- Click the Actions icon on the left to see the options available.
.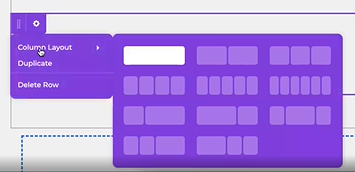
Predefined Column Layouts
You can edit your existing legacy sites using this new framework. The sites will be converted into the new framework once you edit them enabling you to use the new capabilities and layout options. Legacy sites that you don't edit will not be converted to the new framework.
The first time you edit your site with the new framework, you'll see a message giving you the opportunity to preview the page to ensure it's working and rendering as you expect.
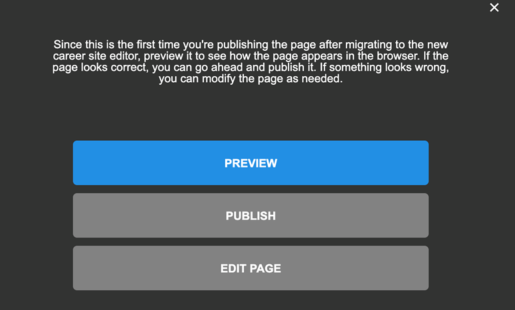
Preview Site Page
Create more complex career site pages by adding rows to sections and selecting pre-defined column layouts.
Steps to Enable
You don't need to do anything to enable this feature.
Tips And Considerations
When you're creating your column layouts, note that if you go from a 5-column layout for example, to a 3 column layout, columns and design elements within them will get deleted. You can easily restore the columns with their elements by clicking the Undo button. The delete order is from right to left.
In the rare case that a legacy site doesn't get converted into the new framework when you edit it, you'll be provided with an error message guiding you to the next steps to resolve the issue.
Configuration of Miscellaneous Documents Attached by Candidates
You can now define which types of attachments candidates are allowed to attach. Candidates can attach files of types you have defined. If they attach a file with a format that was not defined, they see a message informing them of supported file formats.
Provides more control over the attachments candidates can add which results in enhanced security.
Steps to Enable
You can configure a file type validation in the career site for miscellaneous attachments. A new profile option is available: ORA_IRC_MISC_ATTACH_FILE_TYPES. This profile option is disabled by default. When you enable it, the list of miscellaneous file types will be shown and validated in the career site.
- In the Setup and Maintenance work area, search for the task Manage Administrator Profile Values.
- On the Manage Administrator Profile Values page, search for the profile option code ORA_IRC_MISC_ATTACH_FILE_TYPES.
- Set the Site profile value to a list of allowed file extensions (comma-separated). Example: .doc, .docx, .pdf
- Click Save and Close.
Improved Job Requisition Search Autosuggest
This feature improves the candidate experience while searching for job requisitions by location or keyword. The search process has been streamlined for external candidates by exposing keyword and location search suggestions after entering only one character.
Streamlines the job requisition search process for external candidates by exposing keyword and location search suggestions after entering only one character.
Steps to Enable
You don't need to do anything to enable this feature.
Tips And Considerations
Oracle Search is required to take advantage of this enhancement.
Improved Navigation to Multiple Job Applications in Candidate Self Service
A maximum of 5 applications display in each job applications list: Active, Inactive and Draft. If there are any active applications that require the candidate's attention they're listed first and all of them are displayed.
If there are more than 5 applications in any one of the statuses, an active Show More button displays allowing candidates to see another 5 applications.
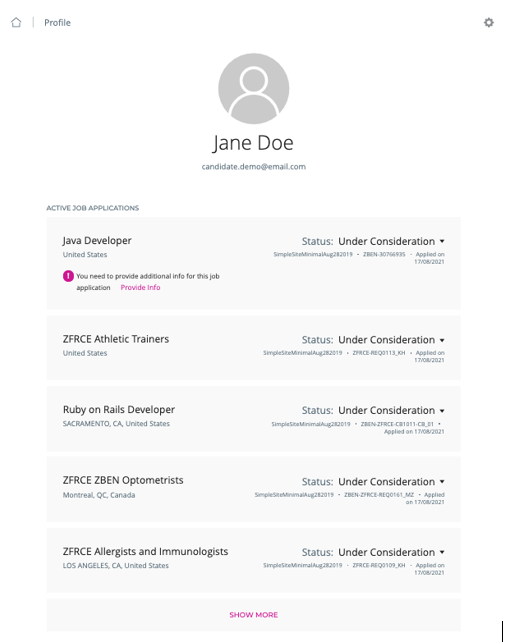
Job Applications List with Show More Button
This feature improves the user experience for external candidates
Steps to Enable
You don't need to do anything to enable this feature.
Increased Support of Job Requisition Flexfields in Career Sites
More job requisition descriptive flexfield (DFF) types can now be exposed in the Job Details pages and in search filters of external career sites. DFFs with dependent values and DFFs with subset values are now supported in Job Details pages and search filters. Static URL DFFs are now also supported in job details.
Provides more flexibility in terms of data that can be exposed to external candidates and the search filters that can be applied.
Steps to Enable
NOTE: This feature requires Oracle Search.
Key Resources
For more information on how to configure the Recruiting - Define Career Site Search Filters and Recruiting - Define Job Requisition Details for External Career Sites actions in the Transaction Design Studio, refer to these topics in the Implementing Recruiting guide available in Oracle Help Center.
- Add Job Requisition Flexfields as Search Filters in Career Sites
- Add Job Requisition Flexfields to Job Details Pages in Career Sites and Agency Portals
Validation of Dates in Apply Flow
Now when candidates are completing their applications they're shown more specific messages indicating if the dates they're entering are in the correct format.
For year input fields, if the value entered is in an incorrect format, an error message is shown, indicating the expected format for the input.

Error Message for Incorrect Date Format
For all date selectors, a guidance message is shown to inform candidates that the date will only be saved to their job application if it’s complete.

Informational Message to Prompt Users to Enter Date in Correct Format
Provides better guidance to candidates filling out job applications by enhancing validation messages in date components.
Steps to Enable
You don't need to do anything to enable this feature.
Candidate Security Enhancements
You can now use the grade level and business unit as additional security dimensions when searching for candidates. Grade Level and Business Unit are applicable to internal candidates only.
With this enhancement, you can now find specific candidates using additional security dimensions.
Steps to Enable
You can create a candidate security profile with grade level and business unit security dimensions.
- In the Setup and Maintenance work area, go to:
- Offering: Recruiting and Candidate Experience
- Functional Area: Recruiting and Candidate Experience Management
- Task: Candidate Security Profiles (Use Show All Tasks to see this task)
- On the Candidate Security Profiles page, click Create.
- Enter a name and a description.
- Select security dimensions. Possible options are:
- Country
- Recruiting Type
- Person Type
- Grade Level
- Business Unit
- Click Save and Close.
When you define security dimensions such as Country, Recruiting Type, and Person Type, a new option "Not Defined" is available. If a candidate doesn't have a Country defined, adding the "Not Defined" option will show that candidate as part of the candidate search results. Here's an example: If the Country has "United States" and "Not Defined" as part of the Country dimension, the candidate search will result with all candidates with "United States" as their home country and candidates that don't have country defined.
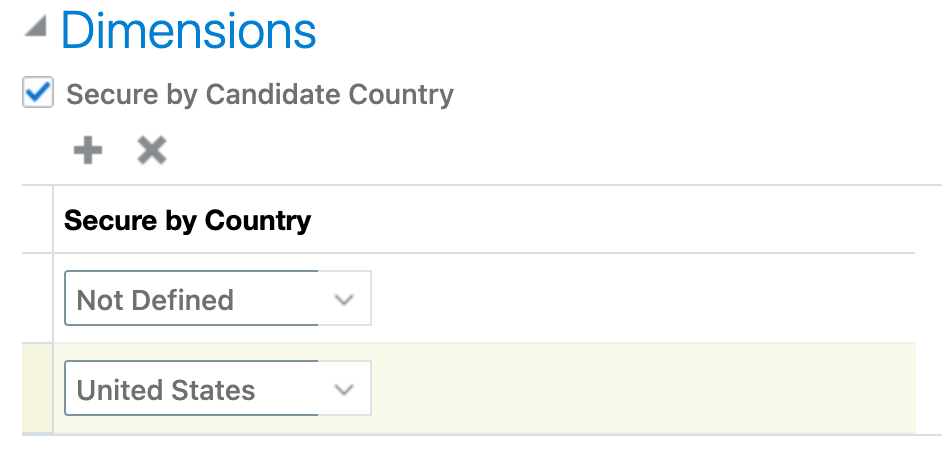
Not Defined Option
Candidates and Candidate Job Applications
Edit Actions in Active Candidate Selection Processes
As an administrator, you can now modify actions in active candidate selection processes.
- You can add events to a phase.
- You can add actions on events and states.
- You can edit actions on events and states.
- You can deactivate actions on events and states. The configuration of the action is preserved, but the action is never performed.
- You can reactivate actions on events and states. The action will be performed as usual.
When you modify the actions of an active or inactive candidate selection process, a warning message appears to inform you that these changes may impact existing job requisitions and job applications.
Impacts on Existing Job Applications
When you modify actions of a candidate selection process which is being used by job applications, the changes are immediately available on these job applications. For example, if you add an action to an event, the action is triggered the next time the even occurs if the conditions for performing the action are met.
Impacts on Job Requisition Configuration
When you modify actions of a candidate selection process that generates additional configuration on job requisitions, the configuration of the job requisition or requisition template using this process is updated accordingly. This apply to these actions:
- Send Interview Invite
- Initiate Background Check
- Request Assessment
- Request Tax Credit Screening
When a job requisition uses a candidate selection process with deactivated actions, these actions are still visible on the job requisition configuration, but there is an indication that they're deactivated.
For actions that are waiting to receive information by a partner (for example, Initiate Background Check) or a user or candidate (for example, Request Information), the information will be accepted even if the corresponding action has been deactivated. The fact that the action is deactivated only impacts its triggering, not the reception of information afterwards.
With this feature, when the recruiting process within your company changes, you can put these changes in place immediately, even for open job requisitions.
Steps to Enable
You don't need to do anything to enable this feature.
Key Resources
- For more information about creating candidate selection processes, see the Candidate Selection Processes chapter in the Implementing Recruiting guide available in Oracle Help Center.
You can now search for candidates using additional education fields and more granular candidate filters.
These new fields are now indexed and available in the keyword search:
- Major
- School
These more granular candidate filters are available:
- External Candidates
- Employees
- Contingent Workers
- Ex-Employees
- Ex-Contingent Workers
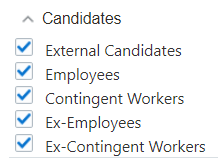
Candidates Filters
These enhancements help the hiring team to write powerful search expressions and obtain more precise search results.
Steps to Enable
You don't need to do anything to enable this feature.
Simplified Person Search and Merge Process
The functionality of the Search box on the Check Duplicates page is now made simpler. The label reads as Select candidate to merge, and additional search options are available.
Instead of entering the search string in the Search box and performing the Merge action directly from the drop-down list, this is how you search for and remove duplicates now on the Check Duplicates page:
- Select one of these search options:
- Name
- Person Number
- Phone
- In the Search box, enter the value corresponding to the search option that you selected. For example, to search by a candidate's email address, select Email and enter the email address in the search box. The matching candidate information appears in the drop-down list.
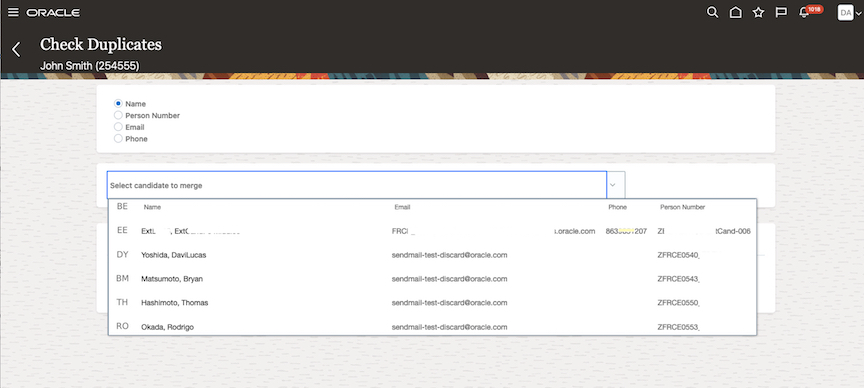
Search for Duplicate Candidates
- Select the candidate from the drop-down list. This takes you to the Pre-Merge Analysis page.
- Review the candidate’s details, and then click Continue to go to the Select Candidate to Retain page.
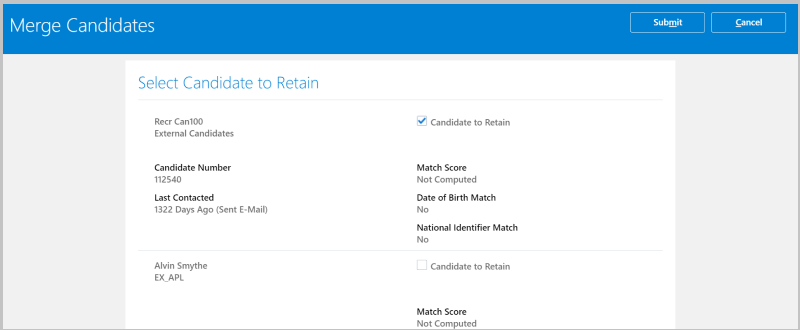
Select the Candidate to Retain
- On this page, you can decide which of the duplicate candidates you wish to delete and which ones to retain. For example, when one of the candidates doesn't have a prior work relationship with your organization, such as an ex-employee or an ex-contingent worker, you can delete that candidate.
This feature makes the duplicate candidate search and merge process simpler and intuitive.
Steps to Enable
Make the feature accessible by assigning or updating privileges and/or job roles. Details are provided in the Role section below.
Tips And Considerations
The merge process is initiated when you select a candidate from the set of candidates displayed on the Select Candidate to Retain page. The candidate details displayed on this page are controlled by the following profile options on the Manage Administrator Profile Values page in the Setup and Maintenance work area:
| Profile Option |
Supported Values |
Description |
|---|---|---|
| ORA_IRC_LOV_SEARCH_CAND_DUP_CHECK_STARTSWITH |
Y, N |
When set to Y, the application searches for the candidate’s name, email, person number, or phone number based on the starting values in the search string. When set to N, the application searches for candidates based on the full search string in the candidate’s name, email, person number or phone number. |
| ORA_IRC_LOV_SEARCH_CAND_DUP_CHECK_PHONE_VISIBLE |
Y, N |
When set to Y, the phone number is included in the search. When set to N, the phone number is not included in the LOV. |
Key Resources
- For more details on searching for and removing duplicate candidates, refer to the topic “Candidate Duplicate Check” in Chapter 6, “Prospects and Candidates” of the Using Recruiting guide in Oracle Help Center.
Role Information
A user needs these privileges to modify the profile options:
- Perform Candidate Duplicate Check and Merge
- Use REST Service - Candidates List of Values
Add Interview Schedules to Job Requisitions Using HCM Data Loader
You can use HCM Data Loader to add interview schedule information in a job requisition that’s in the Draft or Approval phase. When you upload the interview schedule, you can use either the Candidate Type or the Hiring Team Type template.
Using HCM Data Loader, you can also modify or delete the interview schedule and location information.
NOTE: When you create an interview schedule, you need to provide at least one location. When you delete locations from an interview schedule, you must retain at least one location.
This feature provides an alternative option to add interview schedule information for multiple job requisitions, without having to do it individually from the user interface.
Steps to Enable
You don't need to do anything to enable this feature.
Key Resources
- For details on how to load data using HCM Data Loader, refer to the HCM Data Loader guide in the Oracle Help Center.
Add Responsibilities and Qualifications to Job Requisitions Using HCM Data Loader
You can use HCM Data Loader to add and update information in these fields of a job requisition or job requisition template:
- Internal Responsibilities
- External Responsibilities
- Internal Qualifications
- External Qualifications
This feature provides an alternative option to update multiple fields in a job requisition or job requisition template, without having to do it manually from the user interface.
Steps to Enable
You don't need to do anything to enable this feature.
Key Resources
- For details on how to load data using HCM Data Loader, refer to the HCM Data Loader guide in the Oracle Help Center.
Move Job Applications to the HR Phase Using HCM Data Loader
Using HCM Data Loader, you can now move job applications from the Offer phase or the Custom phase to different states in the HR phase. The following moves are supported:
| From Phase - State |
To Phase - State |
|---|---|
| Offer - Accepted |
HR – Pending Automated Processing |
| Post Offer Phase – State (Customer configured) |
HR – Pending Automated Processing |
| HR – Pending Automated Processing |
HR – Rejected by Employer HR – Withdrawn by Candidate |
| HR – Pending Manual Processing |
HR – Rejected by Employer HR – Withdrawn by Candidate |
| HR – Processing in Progress |
None |
| HR – Processed |
None |
| HR - Error During Processing |
HR - Rejected by Employer HR - Withdrawn by Candidate |
| HR - Rejected by Employer |
Offer - Draft |
| HR - Withdrawn by Candidate |
Offer - Draft |
This feature provides an alternative option to move job applications between different states, without having to do it manually through the user interface.
Steps to Enable
You don't need to do anything to enable this feature.
Key Resources
- For details on how to load data using HCM Data Loader, refer to the HCM Data Loader guide in the Oracle Help Center.
Update Non-Draft Job Requisitions Using HCM Data Loader
You can now create or update job requisitions that are in the Approval, Job Formatting, Open, or Posting phases using HCM Data Loader. During an update, you can now edit a number of fields in each of these phases.
This feature provides an alternative option to create or update job requisitions in the non-Draft phase, without having to do it manually through the user interface.
Steps to Enable
You don't need to do anything to enable this feature.
Tips And Considerations
Your administrator decides which fields you can update. Therefore, if you aren’t able to edit some fields even with the required privileges and role, contact your administrator.
NOTE: Some fields are editable based on predefined conditions. For example, you can update some fields only if the requisition doesn’t have any job applications.
Key Resources
- For details on how to load data using HCM Data Loader, refer to the HCM Data Loader guide in the Oracle Help Center.
Role Information
Users with the Recruiting Manager role must have the two privileges, Update Job Requisition and Update Job Requisition After Draft Phase, to update these fields.
Update Source Tracking Using HCM Data Loader
You can create a job application or a candidate profile without adding source tracking information initially, and then later add it using HCM Data Loader. When you create a job application or candidate profile without source tracking information, the default information is used at first.
Using HCM Data Loader, you can also modify the source tracking information that you added.
This feature provides an alternative option to add source tracking information for multiple job applications or candidate profiles, without having to do it individually from the user interface.
Steps to Enable
You don't need to do anything to enable this feature.
Key Resources
- For details on how to load data using HCM Data Loader, refer to the HCM Data Loader guide in the Oracle Help Center.
Add Skills to Job Requisitions
As a recruiter, when you create a job requisition, you can now use the new Skills section to add skills to the requisition. The Skills section is available for all requisition types, that is standard and pipeline job requisitions.
Values in the Skills section may be defaulted depending on how you create the job requisition.
- Template: When you create a job requisition using a template, skill values aren’t defaulted because skills can’t be defined on standalone job requisition templates.
- Position or Job: When you create a job requisition based on a job or position, skill values are defaulted from the profile associated to this job or position, if your administrator enabled the new profile option. Similar to the other information defaulted from a position when creating from a position, if there is no profile attached to the position, the skill values will be defaulted from the profile attached to the job associated to this position.
- Existing Requisition: When you create a job requisition based on an existing requisition, the skill values from the source requisition are defaulted to the new requisition.
- Blank Requisition: When you create a job requisition using a blank requisition, no skill values are defaulted on the requisition.
When you search for job requisitions in the Requisitions list, you can now search using skill names that are included in the job requisition’s Skills section.
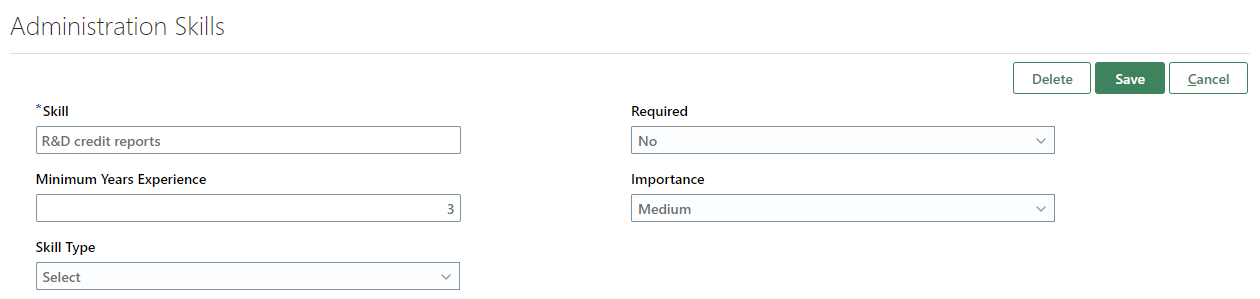
Skills Section in Job Requisition
Skills you add to a job requisition are visible to external candidates when they view the details of the requisition on a career site. They're currently not displayed to internal candidates and agents viewing the requisition details.
Candidates can search for jobs using skill names included in a job requisition’s Skills section.
When additional skill attribute values are captured on requisitions, only the skill name is displayed to candidates viewing the requisition details. Other attributes aren't displayed to candidates.
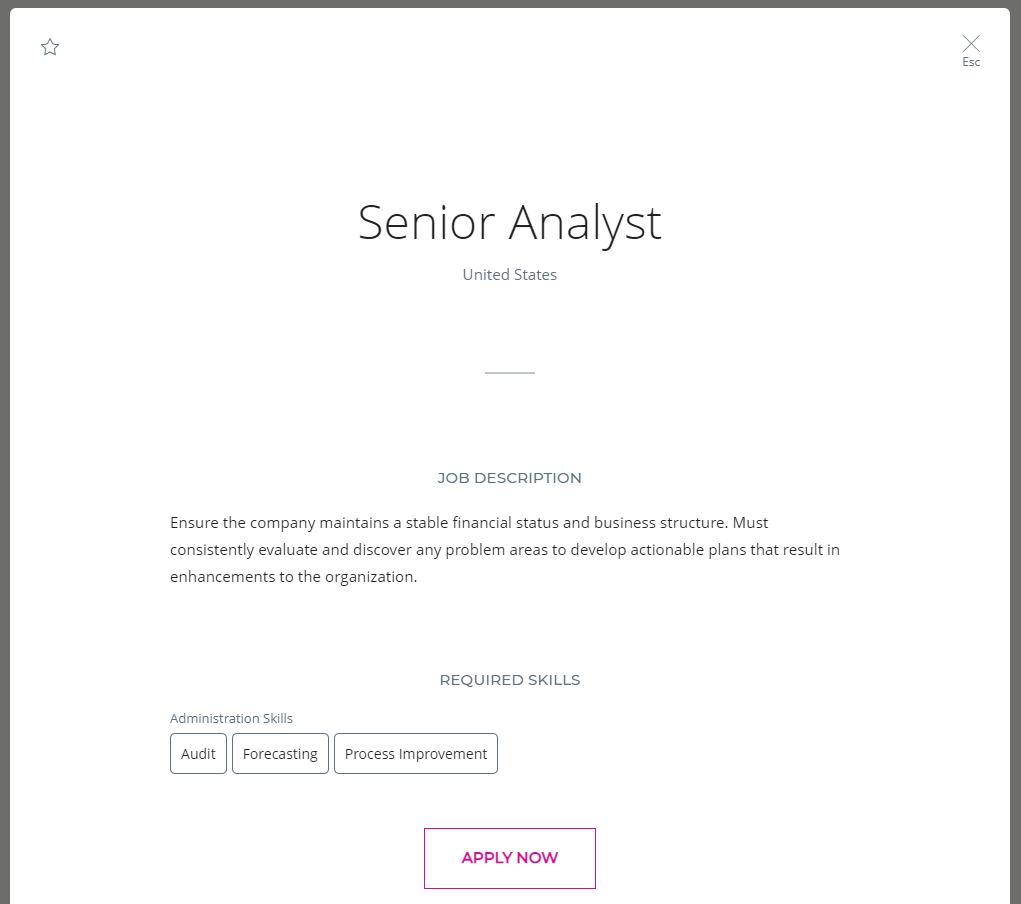
Skills Displayed to Candidates
With this feature, you can capture skills separately in the job requisition’s Skills section.
Steps to Enable
The Skills section in job requisitions is hidden by default and isn’t mandatory. To display the Skills section, you need to create a rule in Transaction Design Studio using these actions:
- Recruiting - Create Job Requisition
- Recruiting – View and Edit Job Requisition
- Activate a sandbox and page editing at the Site layer in Settings and Actions Menu > Edit Pages > Activate a sandbox.
- On your Home page, click My Client Groups > Quick Actions > HCM Experience Design Studio.
- Click the Transaction Design Studio tab.
- Select the action Recruiting - Create Job Requisition or Recruiting - View and Edit Job Requisition.
- Click Add to create a rule to display the Skills section.
- In the Basic Details section, enter a name and description for the rule. You can also select a role name, recruiting type, and country.
- In the Show or Hide Regions section, set the Skills to Visible. You can also set the section to be required.
- Click Save and Close.
You can define the defaulting behavior for skills on job requisitions created using a job or position. A new profile option is available: ORA_IRC_REQ_DEFAULT_SKILLS_FROM_PROFILE_ENABLED.
This profile option is disabled by default. When you enable it, skills are defaulted from the profile when recruiters create a job requisition based on a job or position.
- In the Setup and Maintenance work area, search for the task Manage Administrator Profile Values.
- On the Manage Administrator Profile Values page, search for the profile option code ORA_IRC_REQ_DEFAULT_SKILLS_FROM_PROFILE_ENABLED.
- Change the Site profile value to Yes.
- Click Save and Close.
The Position profile type configuration can be different from the Job profile type configuration, which is the one used in job requisitions. When you create a requisition using a position, only the skills contained in a skill content section which is available in the Job profile type configuration will be defaulted to the requisition. The other skills will be ignored.
All skill content sections configured to be displayed as part of the Job profile type configuration will be displayed in requisitions. The requisitions will also display the fields configured to be displayed in these content sections in the Job profile type configuration. (My Client Groups > Profiles > Profile Types > Job).
If multiple skill content sections are configured to be displayed in the Job profile type configuration, they'll all be grouped into a single Skills section in requisitions. While job requisitions can show multiple skill content sections defined in the Job profile type configuration, it's strongly recommended to use a single skill content section in that Job profile type configuration so that a single skill content section is displayed in requisitions. Furthermore, if you have subscribed to the Skills Center product, the single skill content section used in the Job profile type configuration should be the one to which Skills Center is a subscriber. This will help simplify the uptake of future improvements to skill support related to requisitions.
Tips And Considerations
Skills aren't multilingual, it's not possible to translate the name of a skill in multiple languages. For this reason, it's recommended to not use skills in multilingual job requisitions because the skill name will always be displayed to candidates exactly as entered, regardless of the language in which candidates are viewing the requisition.
Link Existing Job Requisition to Pipeline Requisition
You can now link an existing standard job requisition to a pipeline requisition. Before this release, you could only create a child requisition within a pipeline requisition. The Actions menu on the Requisitions list and requisition details page of standard requisitions contains a new action: Link to Pipeline Requisition.
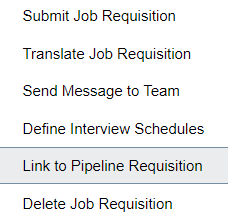
Link to Pipeline Requisition Action
Only requisitions matching the following criteria can be linked to a pipeline requisition:
- The requisition is a standard job requisition that isn’t linked to a pipeline requisition.
- The requisition is active meaning it’s not filled nor canceled.
- The requisition has no prospects nor job applications.
- The requisition isn’t scheduled to be posted and isn't posted on an external or internal career site, or on a job board.
- The requisition has no recruiting agent linked to it.
Also, if the pipeline requisition matches one of these criteria, you can’t link a standard requisition to it:
- The pipeline requisition is in the Draft phase.
- The pipeline requisition is in the Approval phase.
- The requisition if Filled.
- The requisition is Canceled.
When you link a standard job requisition to a pipeline job requisition, the standard requisition is adjusted so it’s a valid linked requisition:
- The value of the External Application Flow field is set to the value in the pipeline requisition.
- The value of the Allow Candidates to Apply When Not Posted field is set to No.
- The value of the Automatically Open Requisition for Sourcing field is adjusted as follows:
- If the field is set to Yes, posted internally, Yes, posted externally, or Yes, posted internally and externally, the field is set to Yes, not posted.
- If the field is set to Yes, not posted or No, the field value is preserved.
- The value of the Automatically Unpost Requisition field is set to No.
- Screening services configuration related to application flows defined on the requisition are removed.
- If the requisition is currently in the Posting - In Progress status, the status is changed to Job Formatting - In Progress.
Link a Requisition from a Pipeline Requisition
When you view a pipeline requisition, you can link an exiting requisition to the pipeline requisition. In the Linked Requisitions section, the Add menu contains a new action: Link Existing Requisition. When you use this action, you can select one or multiple standard requisitions.

Link Existing Requisition Action
View Linked Requisitions on a Pipeline Requisition
When you open a pipeline requisition and view the list of requisitions linked to that pipeline requisition, the requisitions are sorted by Creation Date – New to Old. A filter is also available to display all linked requisitions or just the active ones.
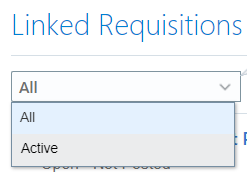
Linked Requisition Filter
View Pipeline Requisition for Draft Linked Requisition
You can view the pipeline requisition to which a standard requisition is linked, even if the linked requisition is draft. A new action is available in the Requisitions list: View Pipeline Requisition. This action is available for all linked requisitions, but is especially useful for draft ones because this is the only way to know to which requisition this is linked to.
The action is available if:
- The current requisition is a linked requisition, and
- The user has access to the pipeline requisition.
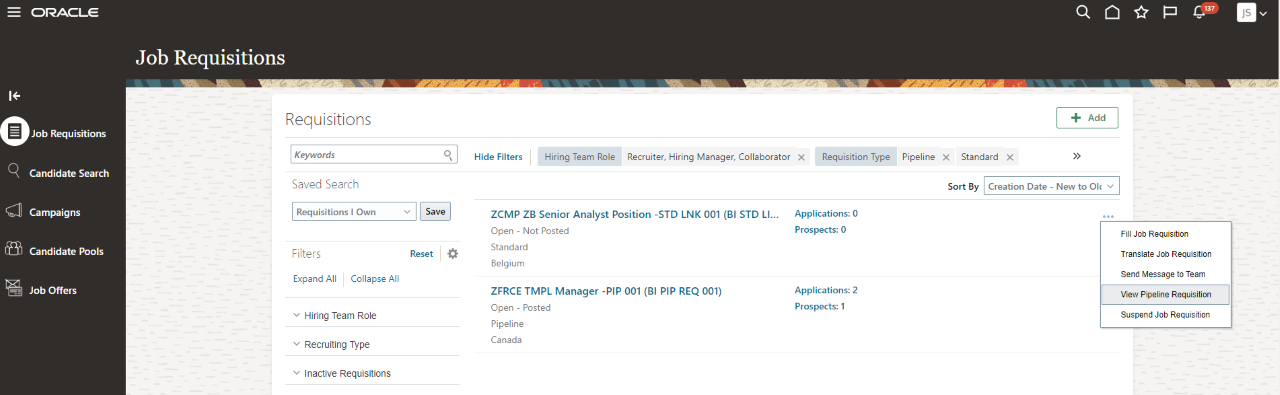
View Pipeline Requisition Action
With this feature, hiring managers can create their hiring requisitions as usual, and recruiters can link these hiring requisitions to a pipeline requisition afterwards.
Steps to Enable
Make the feature accessible by assigning or updating privileges and/or job roles. Details are provided in the Role section below.
Tips And Considerations
Here are small changes that were made for linked requisitions.
- For linked requisitions, the section recommending candidates to be added to the requisition is no longer visible because it's not possible to add candidates directly to a linked requisition (they must be added to the pipeline requisition first). The Recommendations tab has been removed as well as the Top Recommendations section in the Overview tab.
-
When you add a job application from a pipeline requisition to a linked requisition, the diversity and legislative information of the pipeline job application is now copied to the job application being created on the linked requisition.
- You can no longer edit the Automatically Unpost Requisition field.
Role Information
A new privilege is available: Associate Job Requisition to Pipeline Requisition. When a user has the privilege, the new action Link to Pipeline Requisition is displayed. By default, this privilege is granted to the Recruiter role and Recruiting Manager role.
| Privilege Name | Privilege Code | Job Role |
|---|---|---|
| Associate Job Requisition to Pipeline Requisition |
IRC_ASSOCIATE_JOB_REQUISITION_TO_PIPELINE_REQUISITION |
Recruiter Recruiting Manager |
Prevent Changing Job Field Configuration for Job Requisitions
In previous releases, you could configure if the Job field in job requisitions was visible or required using Transaction Design Studio. However, this was causing display issues. In this release, you can no longer configure the Job field in job requisitions using Transaction Design Studio. The Job field is disabled. If you still want to modify the configuration of the Job field, you will need to use Page Composer.
With this feature, there are no more display issues with the Job field.
Steps to Enable
You don't need to do anything to enable this feature.
Tips And Considerations
If you have rules in Transaction Design Studio where the Job field was configured, the rules will continue to work as configured. However, you won’t be able to create new rules and configure the Job field.
Refine Best Candidates for a Job Requisition
You can now refine the list of best candidates for a job requisition based on Location, Years of Experience, Degree, and Last Updated criteria.
- Open a job requisition.
- In the Top Recommendations section, click Refine Recommendations.
- Select a criteria.
- Click Refine.
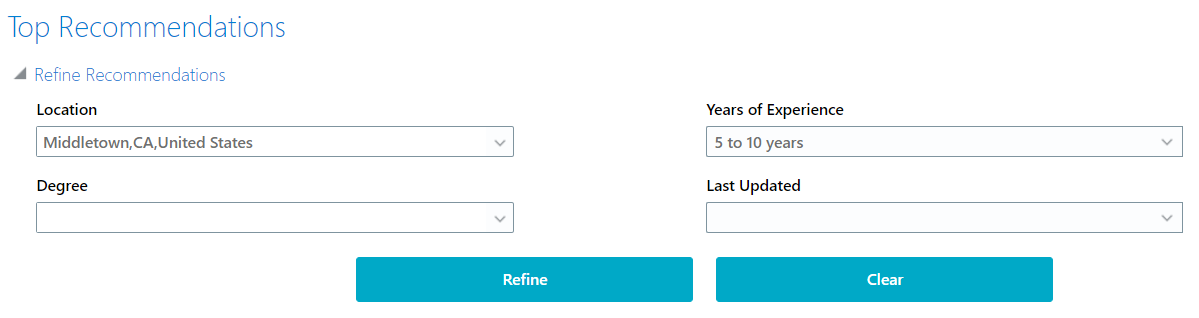
Top Recommendations for a Job Requisition
With this feature, you can see candidates that best fit your needs.
Steps to Enable
You don't need to do anything to enable this feature.
Tips And Considerations
You need to have enabled the Best Candidates feature to see this enhancement.
Oracle Digital Assistant - Refer a Candidate Using Internal Candidate Experience Skill
Let your employees refer candidates using Candidate Experience Skill within Oracle Digital Assistant.
Employees can refer other employees for a specific job requisition. The employee enters keywords to search for requisitions. When requisitions are displayed, the button Refer an Employee is available to create an employee referral.
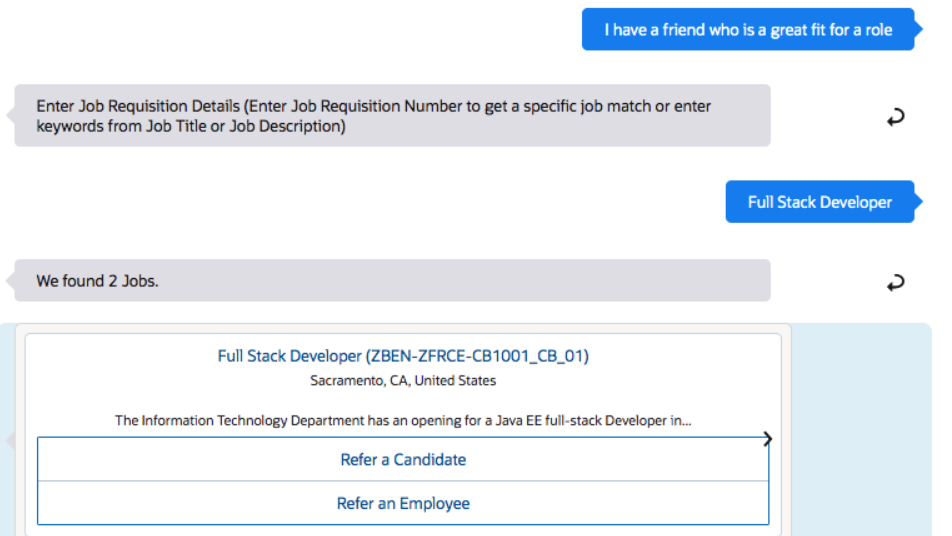
Refer an Employee with Oracle Digital Assistant
Employees can easily refer their friends and network to appropriate job requisitions.
Steps to Enable
You don't need to do anything to enable this feature.
Index Candidate Attachments Scheduled Process
In previous releases, the Load and Index Candidates scheduled process was creating an index for candidate entities and their corresponding attachment entities. To increase efficiency, a new scheduled process was created to index attachments separately: Index Candidate Attachments.
With this feature, you must run a separate schedule process for attachments. This process can be run along with the Maintain Candidates and Job Requisitions for Search scheduled process.
This scheduled process doesn't apply if you're on SemSearch.
Steps to Enable
You should run the Index Candidate Attachments process at a regular frequency. It's recommended to schedule it every 15 minutes.
- In the Navigator menu, go to Tools > Scheduled Processes.
- On the Overview page, click Schedule New Process.
- Search for the process Index Candidate Attachments.
- Click OK.
- On the Process Details page, click Advanced Options and configure the fields.
- Click Submit.
Key Resources
For more information on scheduled processes, refer to this topic in the Implementing Recruiting guide available in Oracle Help Center.
- Scheduled Processes in Oracle Recruiting Cloud
Search Index Upgrade Enhancements
In previous releases, during the upgrade process, the incremental indexing scheduled process automatically triggered full indexing if there were new fields added to the index. Based on the volume of the data, this was time-consuming and external factors such as connectivity issues and session time outs led to errors. Starting with this release, we'll use a new approach to increase the indexing speed during the upgrade process.
Here's the new process:
- The upgrade process updates the existing index with new mapping fields.
- When the index is on the latest mapping, we continue to ingest incremental (new and updated) records.
- The search functionality of existing records will continue to work with the fields that existed prior to the update.
In 21D (and in future releases where new fields are introduced), you must run the scheduled processes Load and Index Job Requisitions and Load and Index Candidates in the Upgrade Current Index mode. This will re-ingest the new fields of existing records (Requisitions or Candidates) into the index using bulk update API and enable all these new fields in search.
With this feature, the efficiency of indexing during the upgrade process is increased.
Steps to Enable
You don't need to do anything to enable this feature.
New Validation for Missing Assessment Packages
When you submit a job requisition, the validation process for missing packages or partners is now simplified and warning messages are more specific to the issue. You won’t see warning messages if you don’t configure a background check, assessment, or tax credit partner for a Candidate Selection Process (CSP) that doesn’t have these triggers.
Warning messages now appear in these scenarios:
- The CSP has a background check, assessment, and tax credit trigger, but you don’t configure the corresponding package.
- For a CSP with an assessment trigger, you don't select an assessment package in the candidate selection process.
NOTE: Warning messages no longer appear if you don’t select any assessment package in the Assessments for Internal/External Job Application fields.
- You add an assessment partner for a CSP that doesn’t have an assessment trigger, but don’t configure any assessment package.
- For a CSP with a tax credit trigger, you don’t configure a tax credit partner.
- When you add a tax credit partner for a CSP with a tax credit trigger, you don’t select the Candidate Selection Process option but select the External Application Flow option. This applies to both active and inactive CSPs.
The same validations apply when configuring assessments and tax credits in job requisition templates.
Complete job requisitions by taking advantage of the simplified validation for background checks, assessments, and tax credits.
Steps to Enable
You don't need to do anything to enable this feature.
Key Resources
- For details on managing job requisition templates, refer to Chapter 6, “Job Requisition Templates” of the Implementing Recruiting guide in the Oracle Help Center.
Transactional Business Intelligence for Recruiting
Oracle Transactional Business Intelligence is a real time, self-service reporting solution offered to all Oracle Cloud application users to create ad hoc reports and analyze them for daily decision-making. Oracle Transactional Business Intelligence provides human resources managers and specialists, business executives, and line managers the critical workforce information to analyze workforce costs, staffing, compensation, performance management, talent management, succession planning, and employee benefits.
Don’t want to start from scratch building a report or analytics? Check out the library of sample reports for all products on Customer Connect on the Report Sharing Center.
Create Reports Using Assignment DFFs in Job Offers
In your job offer reports, you can now include assignment descriptive flexfields (DFF) meant to be used in a job offer. Even though these flexfields were available in the job offer segment for several releases, you could not include them in reports from the Recruiting subject area.
With this feature, you can align reports content with the job offer user interface content.
Steps to Enable
You don't need to do anything to enable this feature.
Combine Agent Invitation Information with Job Application and Source Information
When you create reports, you can use these new fields related to job applications which are available under the dimension Source Tracking > Source Tracking - Agent. You can combine them with when the agent created the job application.
- Date When Agent Added to Requisition
- Last Update Date of Agent Added to Requisition
You can also use these new fields available under the dimension Job Requisition - Posting Details > Agents:
- Last Update Date
- Last Updated
The invitation for the agent can be sent between the creation date, the date when the agent was added to the job requisition, and the last update date when the agent was added to the job requisition, which is updated every time and action is taken, including sending the invitation.
With this feature, you can compare when the agent was added to a job requisition and when the agent submitted job applications.
Steps to Enable
You don't need to do anything to enable this feature.
Tips And Considerations
There is no invitation date in the database. As a result, we exposed the best proxies we have. Even though the creation date (which is the date when the agent was added to the job requisition) was available under Job Requisition, it could not be combined with the job application and source. The new field Date When Agent Added to Requisition provides the starting point, while the Last Update Date of Agent Added to Requisition provides the last possible moment the invitation was sent.
Opportunity Marketplace Subject Area
You can now create reports on gig usage and gig seeker preferences using the new subject area Recruiting - Opportunity Marketplace Real Time. These dimensions are available:
- Facts - Gig
- Number of Gigs
- Facts - Gig Application
- Number of Gig Applications
- Gig
- Gig - Basic information
- Gig Dates
- Gig Media
- Teammates
- Gig Application
- Gig Seeker
- Gig Seeker Preferences
- Gig Seeker Preferences - Basic Information
- Gig Seeker Preferences - Interests
- Time (the Time dimension is based on the gig creation date)
With this feature, you can report on gig activities, interests, performance, and usage across the organization and also report on seekers level of interaction.
Steps to Enable
Leverage new subject area(s) by adding to existing reports or using in new reports. For details about creating and editing reports, see the Creating and Administering Analytics and Reports book (available from the Oracle Help Center > your apps service area of interest > Books > Administration).
You don't need to do anything to enable this feature.
Role Information
Access to the Opportunity Marketplace subject area is granted by default to the Recruiting Manager role. It's coming through the newly introduced duty role: Recruiting Opportunity Marketplace Transaction Analysis Duty (FBI_RECRUITING_OPPORTUNITY_MARKETPLACE_TRANSACTION_ANALYSIS_DUTY).
Use Single Assignment in Reports
You can create reports by using these new fields that were added to various team dimensions of the Recruiting subject areas.
- Collaborator Assignment ID
- Collaborator Assignment Name
- Hiring Manager Assignment ID
- Hiring Manager Assignment Name
- Recruiter Assignment ID
- Recruiting Assignment Name
Because requisitions and offers are associated with a precise assignment, we can now render such assignment instead of showing all assignments at the person level.
With this feature, you can report on a precise assignment used in job requisitions and job offers without generating duplicate entries when reporting with users having multiple assignments. This reduces complexity when trying to report at the assignment level.
Steps to Enable
You don't need to do anything to enable this feature.
Tips And Considerations
In some rare cases, when a member of a team was included in a report, the number of entries may have been multiplied by the number of assignments. That should no longer be the case because the selected assignment, in addition to the person, is available in the various Recruiting subject areas. Verify that your reports are rendering properly. If there is a difference with a previous report version, it might be because the new version has the appropriate count compared to the previous one.
IMPORTANT Actions and Considerations for Recruiting
REPLACED OR REMOVED FEATURES
From time to time, Oracle replaces existing Cloud service features with new features or removes existing features. When a feature is replaced the older version may be removed immediately or at a future time. As a best practice, you should use the newer version of a replaced feature as soon as the newer version is available.
| Product | Removed Feature | Target Removal | Replacement Feature | Replaced In | Additional Information |
|---|---|---|---|---|---|
| Nothing at this time. |
_________________________
RECRUITING PAGES IN TRANSACTION DESIGN STUDIO
Rename actions in Transaction Design Studio to personalize Recruiting pages. The prefix Recruiting was added to recruiting actions to easily identify and select the pages.
_________________________
RECRUITING - NEW FIELDS MAY APPEAR FOR CANDIDATES APPLYING TO THE UK REQUISITIONS
Customers who are already gathering information in candidate job applications using any Oracle-provided legislative flexfields specific to Great Britain will start seeing additional fields in Update 21B. There is no impact to customers who are not exposing any Oracle-provided legislative flexfields for the UK, and no impact to customers whose requisitions have no locations within the UK. The additional fields include National Identity and Caring Responsibility, and possibly others if the customer has defined any lookup values. For more information, refer to the What's New features under Payroll for the United Kingdoms: https://www.oracle.com/webfolder/technetwork/tutorials/tutorial/cloud/r13/wn/wfr/releases/21B/21B-wf-rewards-wn.htm#T26610
If you don’t wish to expose these fields, your administrator can configure them to become hidden, even while retaining other Oracle-provided UK-specific flexfields configured as visible. For more information, refer to the topic Configure Oracle-Delivered Flexfields to Collect Legislative Information, in the Implementing Recruiting guide: https://docs.oracle.com/en/cloud/saas/talent-management/21b/faimh/job-application-flows.html#FAIMH4560249
_______________________
ORACLE DECOMMISSIONED THE HCM CLASSIC SIMPLIFIED USER INTERFACE IN UPDATE 20B
The HCM Responsive User Experience has been available and promoted as our standard since Update 18B. If you are still using the older HCM Classic Simplified User Interface, you must transition to the HCM Responsive User Experience, as these older pages will no longer be supported.
For consolidated information on generic setup information you can refer to My Oracle Support Document ID 2399671.1- HCM Responsive User Experience Setup Information.
_________________________
KNOWN ISSUES / MONTHLY AND STATUTORY MAINTENANCE PACK
Oracle publishes a Known Issues document for every Update to make customers are aware of potential problems they could run into and the document provides workarounds if they are available.
Oracle also publishes Maintenance Pack and Statutory Maintenance Pack documentation of bugs that are fixed in the monthly or statutory patching.
To review these documents you must have access to My Oracle Support:
Oracle Human Capital Management Cloud Functional Known Issues and Maintenance Packs (Document ID 1554838.1)
Controlled Availability for Recruiting
The following is a list of Controlled Availability features that are being offered by our Controlled Availability Program.
NOTE: These features are not generally available for all customers at this time. These are only available through the Controlled Availability Program and will require approval to become a part of the features program. To be a part of these programs you will be required to participate in testing and providing feedback. Some programs may require other participation as well.
Not to worry if you don't have to time to be a part of these early stage programs. You can uptake this feature when it is generally available for all customers. When these features are available for all customers you will see the features under their product headings as usual.
We invite you all to browse through the list of features to see if there are any features you are interested in implementing in advance of the features scheduled release. The table below will provide information on signing up for features. Please sign up soon, as these programs have limited availability and some are designed for specific types of customers.
The table below gives you a brief description of the features available and how to sign up. Some features are bigger than others, so for more information there may be a What's New describing the feature in more detail below this table.
We look forward to hearing your thoughts and ideas as you participate the Controlled Availability programs!
| Product | Feature Name | Feature Description | Type of Customer Needed to Test | How to Sign Up | Controlled Availability Release | Is the Program Still Open? |
|---|---|---|---|---|---|---|
| Recruiting |
Vanity URL |
You can use a customer branded URL to host external career sites. All career sites will be hosted under the same vanity domain. |
Customers must be: Live with HCM |
You will need to log a Service Request (SR) in My Oracle Support to request to be part of this program and be approved. Please tag the SR with "OR-Vanity-URL" |
21C | Yes |
| Recruiting |
Job Application Filters on Oracle Search |
Search the job application list with enhanced filtering capabilities like the new skills and languages filters using Oracle Search. Oracle Search is a dedicated search platform for Oracle Cloud that provides a faster search experience. |
Customers must be: Live with HCM Be on the Oracle Search Controlled Availability Program. See the Human Resources What's New for details. |
You will need to log a Service Request (SR) in My Oracle Support to request to be part of this program and be approved. Please tag the SR with "OR-JAFilters" |
21C | Yes |
| Recruiting | Job Application Grid View |
Give users the ability to configure which columns and fields appear in job application list views. Administrators can configure views available to specific roles or all users. Users with a new privilege can configure their personal views. |
All HCM Customers | You will need to log a Service Request (SR) in My Oracle Support to request to be part of this program and be approved. Please tag the SR with "OR-JAGrid" |
21C | Yes |
| Recruiting |
Advanced Job Application List Filters |
Perform more complex, targeted searches on the job application list with advanced filtering capabilities. Users can now select multiple job application questions/answers and skills to find the right candidates faster. Advanced filters requires uptake of job application filters on Oracle Search, a controlled availability feature in 21C. |
Customers must be on the following Controlled Availability Programs:
|
You will need to log a Service Request (SR) in My Oracle Support to request to be part of this program and be approved. Please tag the SR with "OR-JAFilters" |
21D | Yes |
| Recruiting |
Masking Job Application Grid Data |
Give administrators the ability to define which job application grid view fields are masked to facilitate name blind recruitment. Similar to the existing Page Composer solution used to mask job application data, users can write EL Expressions to define the roles, phases, and states to mask data and select which grid view fields to anonymize. |
Customers must be on the following Controlled Availability Programs:
|
"OR-MYou will need to log a Service Request (SR) in My Oracle Support to request to be part of this program and be approved. Please tag the SR with "OR-JAGrid" |
21D | Yes |
| Recruiting |
Configurable Compound Fields |
Give administrators the ability to define which fields appear in compound fields displayed in job application grid views. Configurable compound fields requires uptake of Masking Job Application Grid Data, a controlled availability above. |
Customers must be on the following Controlled Availability Programs:
|
You will need to log a Service Request (SR) in My Oracle Support to request to be part of this program and be approved. Please tag the SR with "OR-CompoundFields" |
21D | Yes |