
This document will continue to evolve as existing sections change and new information is added. All updates appear in the following table:
| Date | Module | Feature | Notes |
|---|---|---|---|
| 01 SEP 2023 | Created initial document. |
 HAVE AN IDEA?
We’re here and we’re listening. If you have a suggestion on how to make our cloud services even better then go ahead and tell us. There are several ways to submit your ideas, for example, through the Ideas Lab on Oracle Customer Connect. Wherever you see this icon after the feature name it means we delivered one of your ideas.
GIVE US FEEDBACK
We welcome your comments and suggestions to improve the content. Please send us your feedback at oracle_fusion_applications_help_ww_grp@oracle.com.
DISCLAIMER
The information contained in this document may include statements about Oracle’s product development plans. Many factors can materially affect Oracle’s product development plans and the nature and timing of future product releases. Accordingly, this Information is provided to you solely for information only, is not a commitment to deliver any material, code, or functionality, and should not be relied upon in making purchasing decisions. The development, release, and timing of any features or functionality described remains at the sole discretion of Oracle.
This information may not be incorporated into any contractual agreement with Oracle or its subsidiaries or affiliates. Oracle specifically disclaims any liability with respect to this information. Refer to the Legal Notices and Terms of Use for further information.
Pre-Update and Post-Update Tasks
Depending on the features you're using in your Cloud applications, you may be required to perform certain steps immediately before or after your quarterly update. For details of these pre-update and post-update steps and the product areas that are affected, refer to Oracle Fusion Cloud SCM: Performing Your Quarterly Update (doc ID 2337485.1) on My Oracle Support.
Optional Uptake of New Features (Opt In)
Oracle Cloud Applications delivers new updates every quarter. This means every three months you'll receive new functionality to help you efficiently and effectively manage your business. Some features are delivered Enabled meaning they are immediately available to end users. Other features are delivered Disabled meaning you have to take action to make available. Features delivered Disabled can be activated for end users by stepping through the following instructions using the following privileges:
- Review Applications Offering (ASM_REVIEW_APPLICATIONS_OFFERINGS_PRIV)
- Configure Oracle Fusion Applications Offering (ASM_CONFIGURE_OFFERING_PRIV)
Here’s how you opt in to new features:
- Click Navigator > My Enterprise > New Features.
- On the Features Overview page, select your offering to review new features specific to it. Or, you can leave the default selection All Enabled Offerings to review new features for all offerings.
- On the New Features tab, review the new features and check the opt-in status of the feature in the Enabled column. If a feature has already been enabled, you will see a check mark. Otherwise, you will see an icon to enable the feature.
- Click the icon in the Enabled column and complete the steps to enable the feature.
In some cases, you might want to opt in to a feature that's not listed in the New Features work area. Here's how to opt in:
- Click Navigator > My Enterprise > Offerings.
- On the Offerings page, select your offering, and then click Opt In Features.
- On the Opt In page, click the Edit Features (pencil) icon for the offering, or for the functional area that includes your feature.
- On the Edit Features page, complete the steps to enable the feature.
For more information and detailed instructions on opting in to new features for your offering, see Configure Offerings.
Opt In Expiration
Occasionally, features delivered Disabled via Opt In may be enabled automatically in a future update. This is known as an Opt In Expiration. If your cloud service has any Opt In Expirations you will see a related tab in this document. Click on that tab to see when the feature was originally delivered Disabled, and when the Opt In will expire, potentially automatically enabling the feature. You can also click here to see features with Opt In Expirations across all Oracle Cloud Applications.
Column Definitions:
Report = New or modified, Oracle-delivered, ready to run reports.
UI or Process-Based: Small Scale = These UI or process-based features are typically comprised of minor field, validation, or program changes. Therefore, the potential impact to users is minimal.
UI or Process-Based: Larger Scale* = These UI or process-based features have more complex designs. Therefore, the potential impact to users is higher.
Features Delivered Disabled = Action is needed BEFORE these features can be used by END USERS. These features are delivered disabled and you choose if and when to enable them. For example, a) new or expanded BI subject areas need to first be incorporated into reports, b) Integration is required to utilize new web services, or c) features must be assigned to user roles before they can be accessed.
| Ready for Use by End Users Reports plus Small Scale UI or Process-Based new features will have minimal user impact after an update. Therefore, customer acceptance testing should focus on the Larger Scale UI or Process-Based* new features. |
Customer Must Take Action before Use by End Users Not disruptive as action is required to make these features ready to use. As you selectively choose to leverage, you set your test and roll out timing. |
|||||
|---|---|---|---|---|---|---|
| Feature |
Report |
UI or |
UI or |
|
||
Specify Rolling Date Ranges to Load Planning Measure Data Using File-Based Data Imports |
||||||
Specify Multiple Measure Catalogs for Export of Data from a Single Plan |
||||||
Specify Rolling Date Ranges to Load Planning Measure Data Using File-Based Data Imports
When you load measure data to Oracle Fusion Cloud Supply Chain Planning using the file-based data import (FBDI) process, you may want to purge data that was previously collected before loading the latest data. For example, if you’re loading data for the Bookings History measure named Booked Item by Scheduled Ship Date, the data would typically have changed over the past few days due to changes in scheduled ship dates. Therefore, you probably want to load the data for the latest few weeks while making no changes in other time periods.
To determine what data will be replaced for this type of use case, you can now specify a date range for purging existing collected data in the parameters for the Load Planning Data from Files scheduled process. The date range can be specified as the number of days before and after the current date. Any existing data in the date range will be replaced while leaving the rest of the data intact.
Prior to this enhancement, when you loaded data for a measure using the FBDI process in targeted mode, all the previously loaded data for the measure got purged. In net change FBDI load, previously loaded data doesn't get purged, but gets overwritten if there is a match between the previously loaded and new data in the measure csv file.

Load Planning Data from Files
Time range purge during FBDI load is supported for both the Net Change and Targeted collection type. To purge the previously loaded measure data for a time range relative to today's date, you must first select Yes for the Enable Date Range for Purging Time-Dimensioned Measure parameter, and then specify the purge time range using the Number of Days Before Today and Number of Days After Today parameters. Previously loaded data for all of the time-dimensioned measures specified in the measures .csv files that are included in the uploaded data zip file would get purged for the specified time range.
For example, let's say you have initially loaded data for the Bookings History: Booked Item by Booked Date measure for the last 2 years and have defined a week planning time level demand plan to generate Bookings Forecast using rolling 2 years of Bookings History. The requirement for every weekly planning cycle is to first purge the previously loaded data for the last 2 weeks (14 days) and load the latest data for the Bookings History: Booked Item by Booked Date measure for the last 2 weeks on every Monday. Let's assume that today's date is Monday, November 20th, 2023, and you have generated a data zip file with a measure csv files containing data for the Bookings History: Booked Item by Booked Date measure for the past 14 days from November 6th, 2023 to November 19th, 2023. For the previously-mentioned measure FBDI data load requirement, you have to select Yes for the Enable Date Range for Purging Time-Dimensioned Measure parameter and specify 14 and 0 for the Number of Days Before Today and Number of Days After Today parameters respectively. The collection type can be set to either Targeted or Incremental.
Steps to Enable
You don't need to do anything to enable this feature.
Tips And Considerations
- Purge based on specified time range is applicable only for the planning measure data loaded using csv files generated from any of the below listed measure templates.
- Supply Chain Planning Measures (ScpMeasuresImportTemplate.xlsm)
- Supply Chain Planning Bookings History (ScpBookingHistoryImportTemplate.xlsm)
- Supply Chain Planning Shipments History (ScpShipmentHistoryImportTemplate.xlsm)
- Supply Chain Planning Option Bookings History (ScpOptionBookingHistoryImportTemplate.xlsm)
- Supply Chain Planning Option Shipments History (ScpOptionShipmentHistoryImportTemplate.xlsm)
- Supply Chain Planning Forecast Measures (ScpForecastMeasureImportTemplate.xlsm)
- Supply Chain Causal Factors (ScpCausalFactorsImportTemplate.xlsm)
- The purge data time range determined from the Number of Days Before Today and Number of Days After Today parameters, must align exactly with the time range for which you are populating data for a single or multiple time dimensioned measure in the csv files. If the purge time range is greater than the time range for which you are collecting data, then you would lose the previously collected measure data for the nonmatching time periods. For example, November 1st, 2023, to November 19th, 2023 is determined as the purge data time range based on your parameter inputs, and you are loading data for the measure only from November 6th, 2023, to November 19th, 2023, then you will lose all the previously loaded data for the time periods from November 1st, 2023 to November 5th, 2023.
- The Enable Date Range for Purging Time-Dimensioned Measures parameter is defaulted to No which retains the prior net change and targeted measure data load behavior.
- You can either leave the Number of Days before Today and Number of Days after Today parameters blank or set them to 0 if you want to purge the previously loaded measure data only for the current or today's date.
- Previously loaded measure data doesn't get purged for the specified time range if the Enable Date Range for Purging Time-Dimensioned Measures parameter is set to No.
Access Requirements
There are no new security privileges needed to access this feature. Users who currently have access to the Load Planning Data from Flat Files scheduled process will automatically be able to use this feature.
Users who are assigned configured job roles that contain these privileges are able to access this feature:
- Perform Order Orchestration and Planning Data Load (MSP_PERFORM_ORDER_ORCHESTRATION_AND_PLANNING_DATA_LOAD_PRIV)
- Run Plan with Snapshot (MSC_RUN_PLAN_WITH_SNAPSHOT_PRIV)
- This privilege is needed to run Create Trees for Dimensions scheduled process which is launched as part of the Load Planning Data from Files scheduled process if the zip file contains data that is used in planning hierarchies, such as organizations, items, customers, and suppliers.
- If the user running the Load Planning Data from Files scheduled process doesn’t have this privilege, then the Create Trees for Dimensions scheduled processes will fail.
Audit Measure Data Changes Directly from a Table Cell
When you’re in a planning cycle, it might become necessary for you to understand the trail of changes made to planning data, such as forecasts. You can now access the audit trail of changes to measure data directly from a table cell, and view the specific entries related to the displayed value. Note that this capability requires additional information to be captured in the audit trail when measure values are edited, so this additional data is available only for measure value changes made after this update.
Previously you needed to open the Audit Trail of Measure Updates table and search for entries to view a history of changes to measure values. Now, you can launch the audit trail directly from a table cell to view the history of changes to the measure value of the cell. The Measure Updates Audit Trail page displays the value which was updated directly in the selected cell in the table, or the value which was updated in another table on higher or lower aggregation. This page provides a quick and easy way to track audit changes.
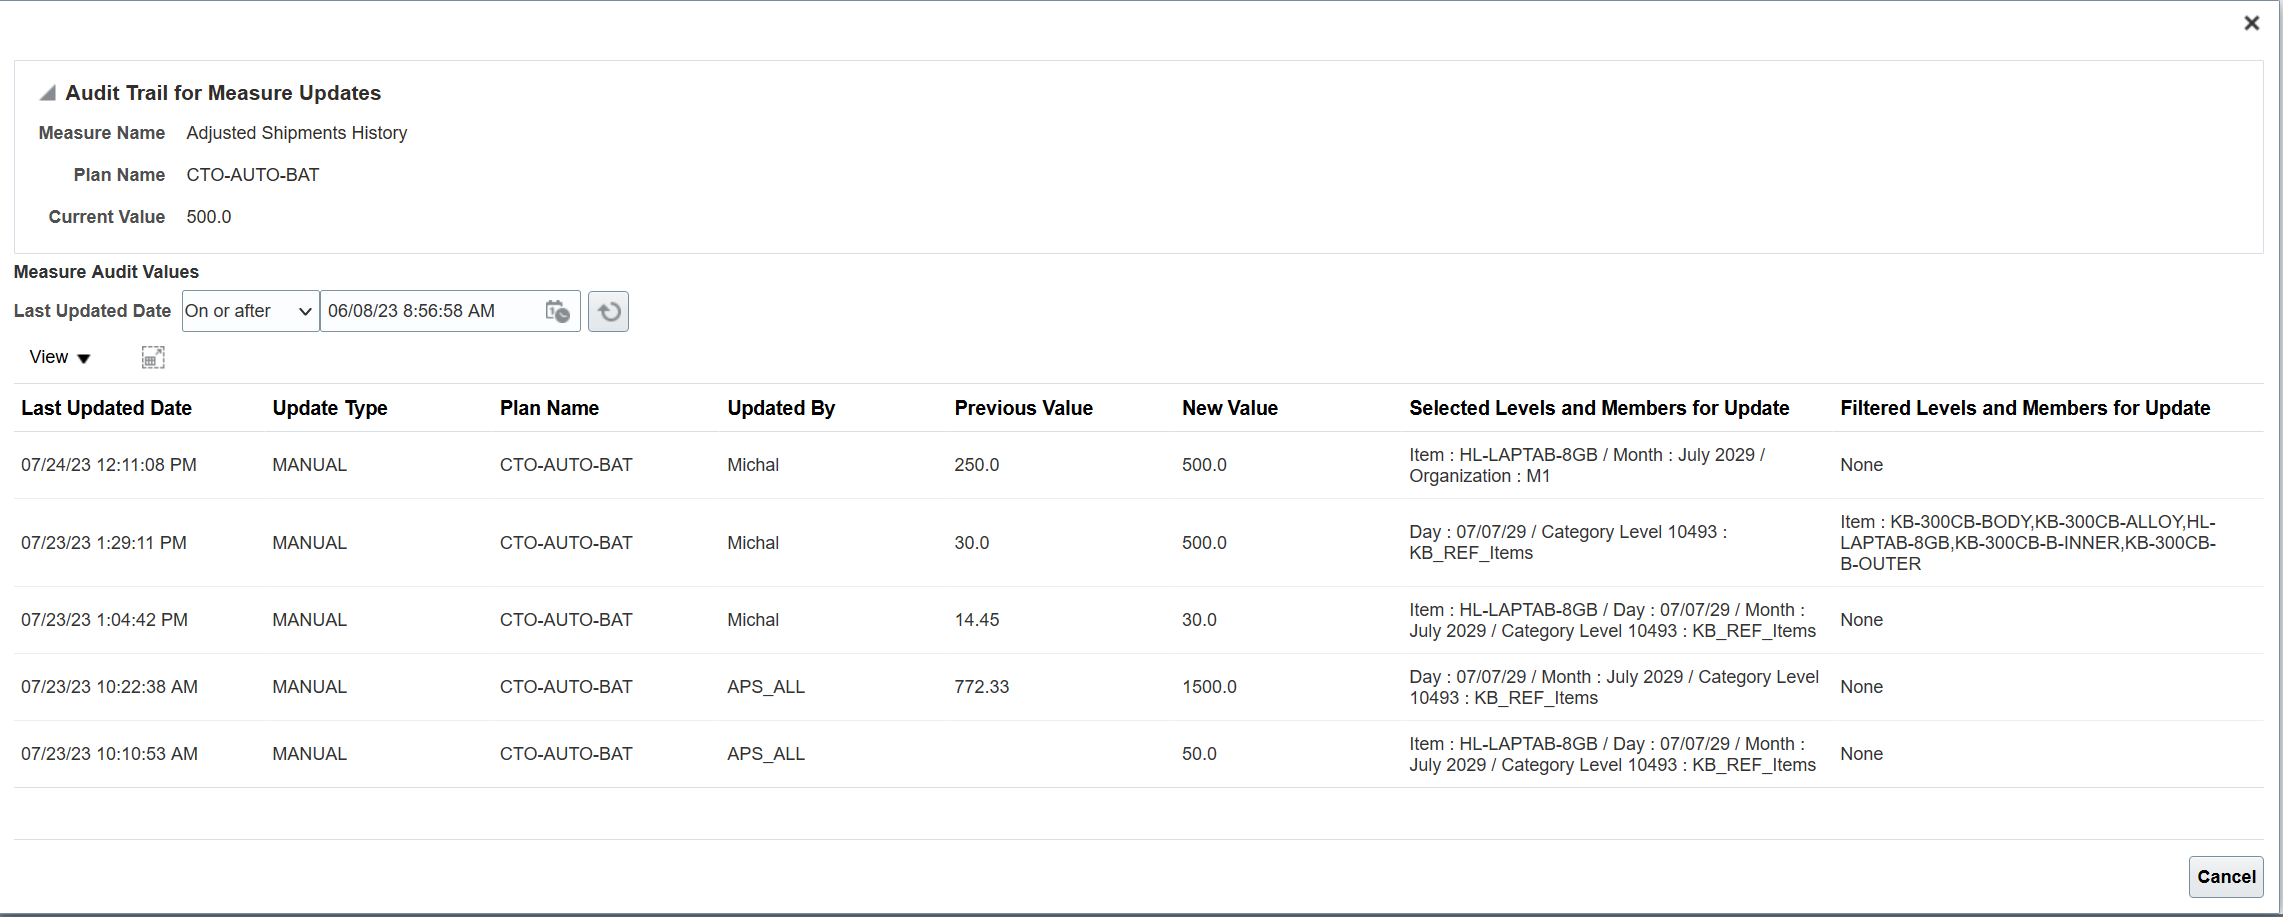
Audit Trail for Measure Updates Page
Steps to Enable
You don't need to do anything to enable this feature.
Tips And Considerations
- For existing plans, the new audit trail functionality will be available after the plan is run.
- The Audit Measure Data Changes Directly from a Table Cell feature captures updates starting from 23D. All updates done in earlier releases are still available in the previously existing Audit Trail of Measure Updates table.
- Audit trail for measure updates can be viewed for one editable cell at a time on all measures types in a table.
- Regarding the Audit Trail for Measure Updates page, Last Updated Date field: By default you can view the last 60 days of Audit Trail information. When changing the date, you need to refresh the table by clicking the refresh icon.
Access Requirements
Users who are assigned configured job roles that contain this privilege are able to access this feature:
- MSC_MAINTAIN_PLANNING_TABLES_PRIV
Specify Multiple Measure Catalogs for Export of Data from a Single Plan
You may have situations in a planning cycle where you want a different subset of data to be exported from Oracle Fusion Cloud Supply Chain Planning at various points in time. For example, in a given plan you may want to export the demand-related measures early in the planning cycle and supply-related measures later in the cycle.
You can now specify multiple measure catalogs applicable for export of data from a plan. When you’re ready to export the data from a plan, you can select the measure catalog containing the measures to be exported. This choice expands your flexibility to extract only a specific set of measures which can save processing time.
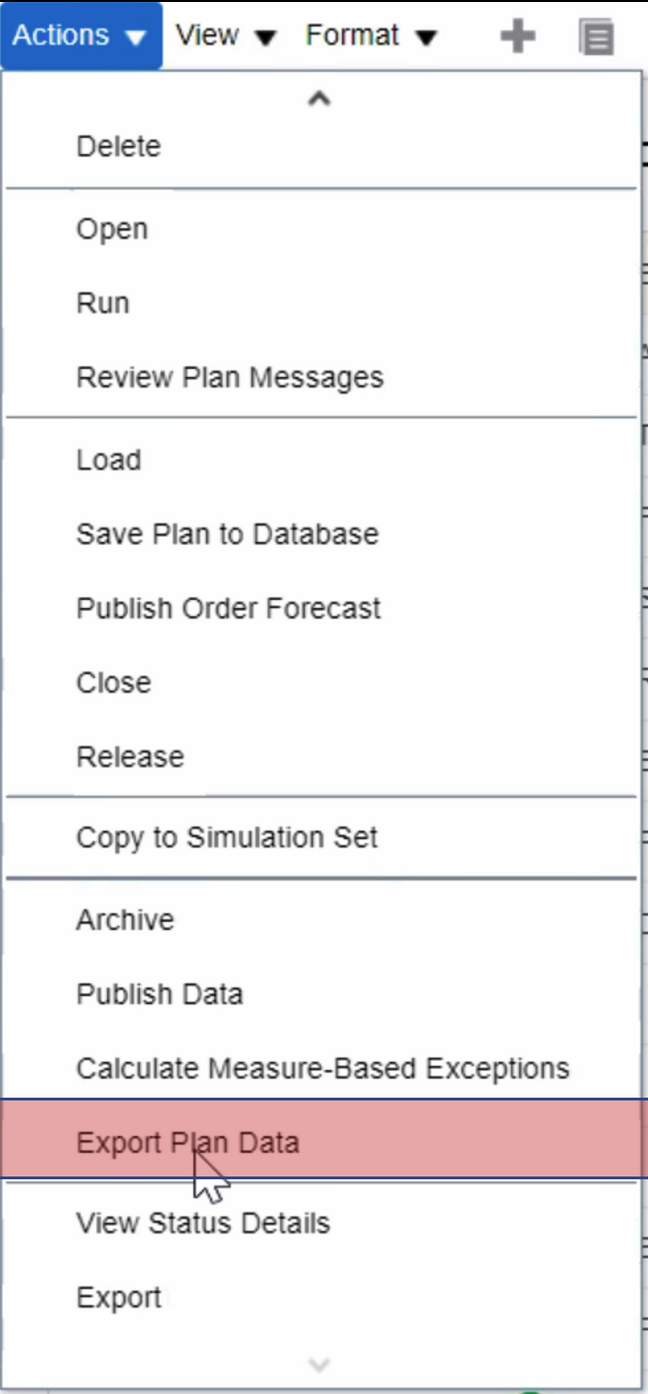
Export Plan Data menu option
The Export Plan Data option in the Actions menu initiates a dialog that enables users to specify a measure catalog to be used as the reference catalog for export. All measures in the specified catalog will be exported.
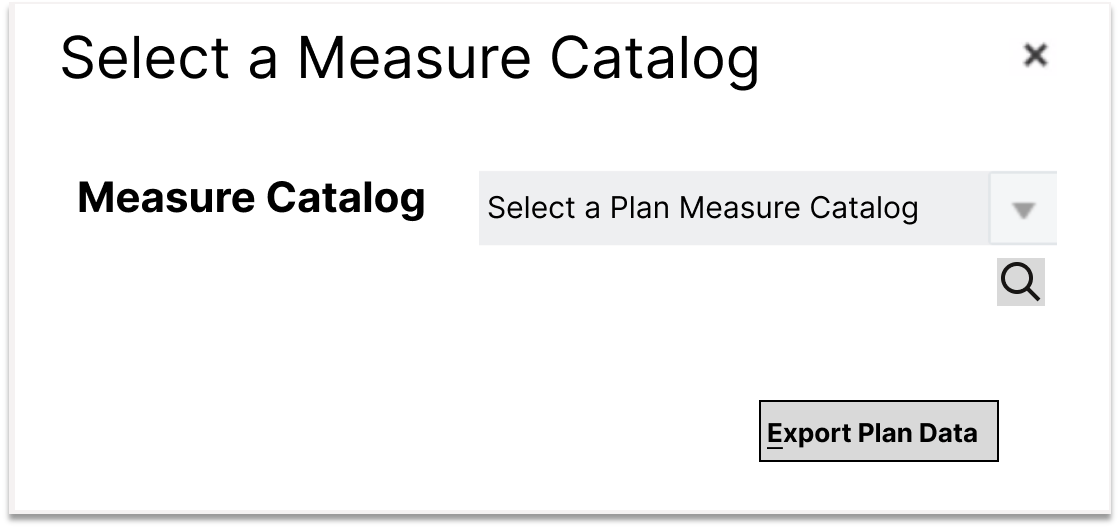
Export Measure Catalog
Select the desired measure catalog that you'd like to export the plan data for. The measures in the specified catalog need to be part of the plan's measure catalog.
Steps to Enable
You don't need to do anything to enable this feature.
Access Requirements
Users who are assigned configured job roles that contain this privilege are able to access this feature:
- Extract Planning Data (MSC_EXTRACT_PLANNING_DATA_PRIV)
Display Labels for Time Periods in Analytics
When you analyze plan data at aggregate levels on the time dimension, it’s convenient to view the name of the time level value, such as a quarter name, rather than the calendar date representing the first day of the time period. With this update, you can configure the label for the time period that’s displayed to enable more intuitive plan analysis.
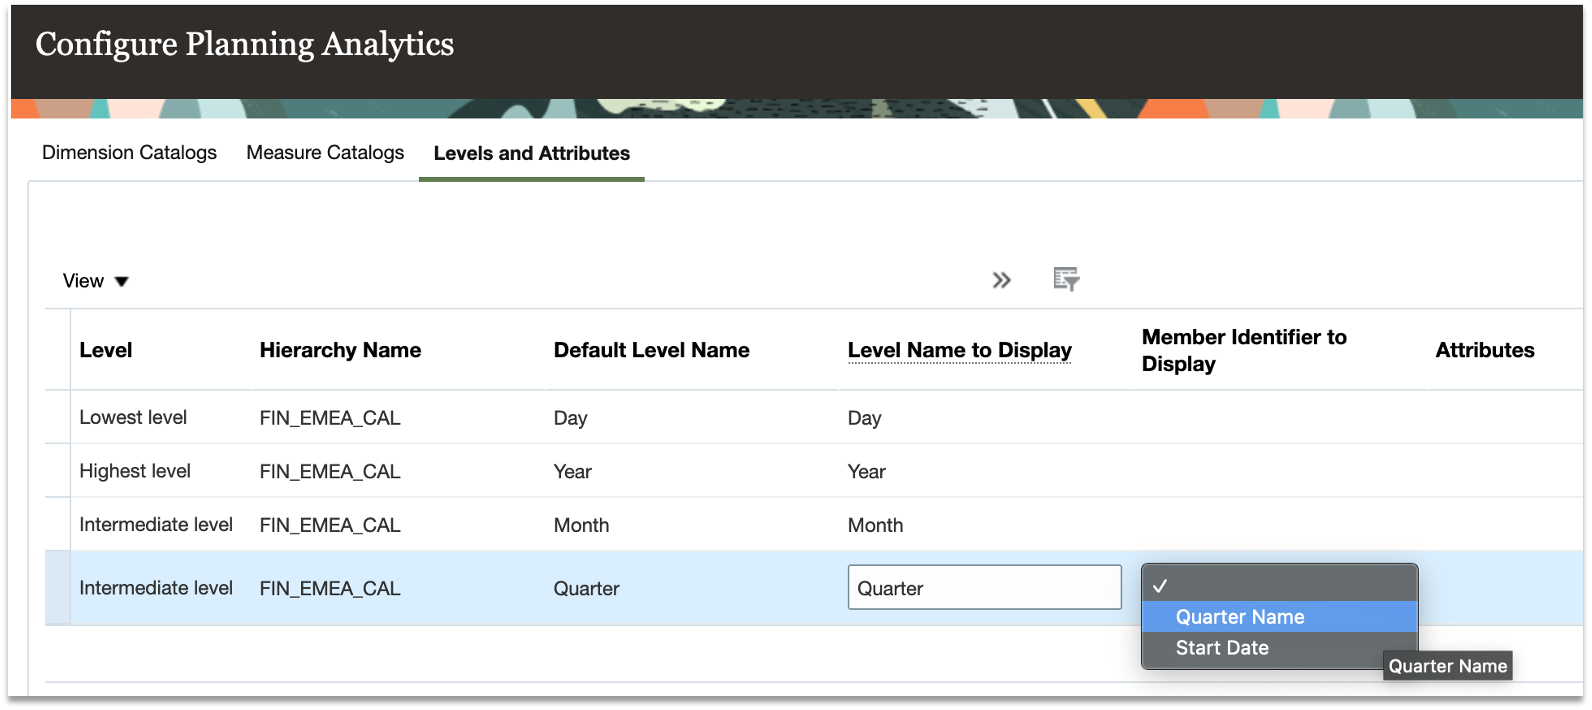
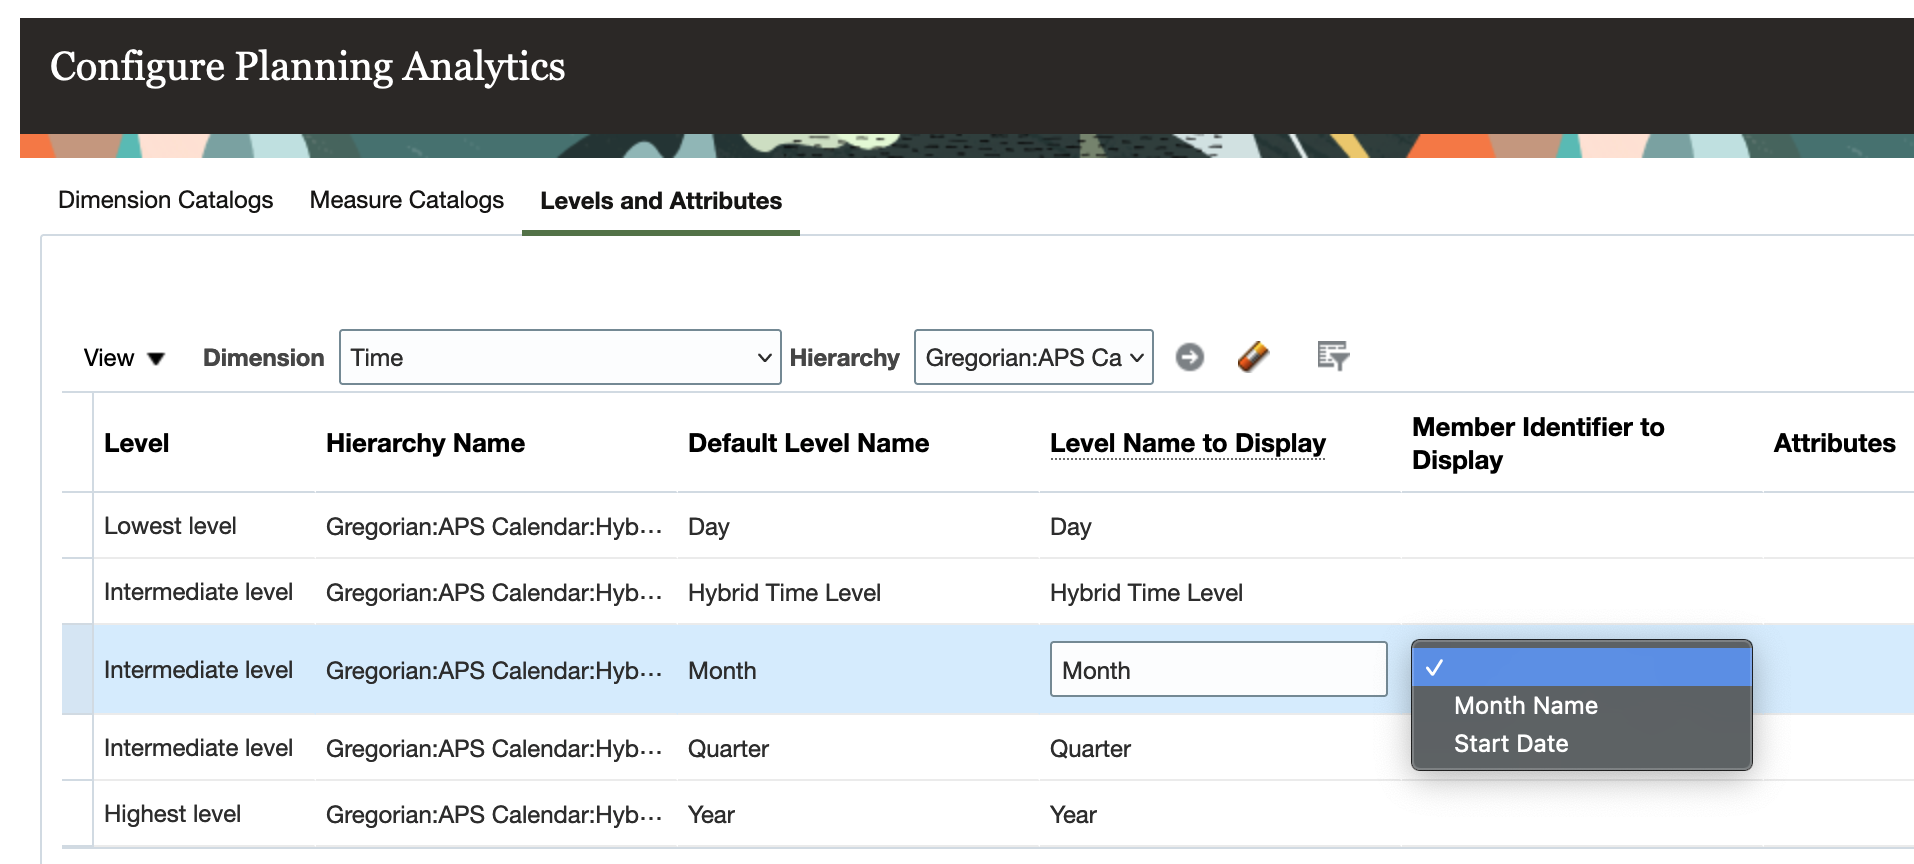
Configure Month and Quarter Name Display in Configure Planning Analytics
To configure this feature, go to the Configure Planning Analytics page and select your choice for the Member Identifier to Display column in the Level and Attributes page of the desired calendar as shown in the preceding screenshot. Choose either Name or Start Date for the Time level member.
After this selection is complete, you'll see Month and Quarter level members displayed in the chosen member identifier.
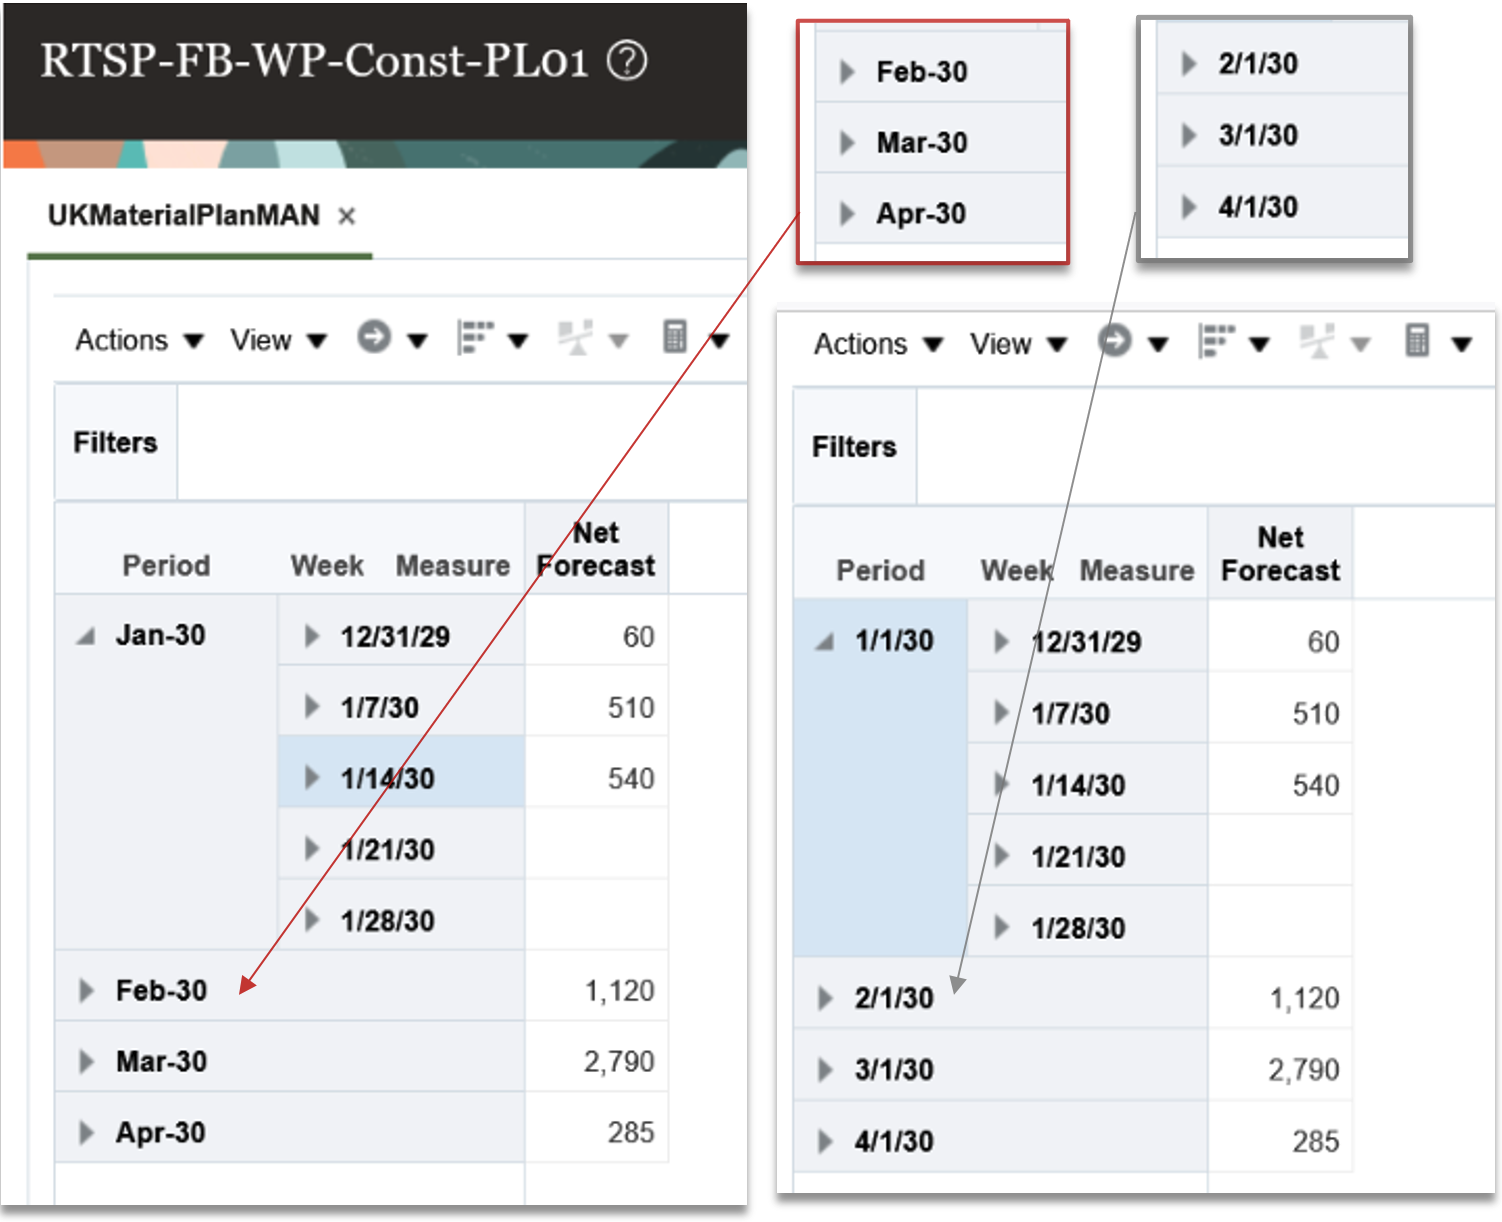
Display of Time dimension level name in planning data table
Steps to Enable
You don't need to do anything to enable this feature.
Access Requirements
No additional privileges are required to access this feature