Update 24B
Revision History
This document will continue to evolve as existing sections change and new information is added. All updates appear in the following table:
| Date | Module | Feature | Notes |
|---|---|---|---|
| 24 MAY 2024 | SCM Common Components | Extend SCM Redwood Application Pages Using Visual Builder Studio | Updated document. Revised feature description and key resources. |
| 11 MAR 2024 | SCM Common Components | Extend SCM Redwood Application Pages Using Visual Builder Studio | Updated document. Revised feature description. |
| 01 MAR 2024 | Created initial document. |
Overview
 HAVE AN IDEA?
We’re here and we’re listening. If you have a suggestion on how to make our cloud services even better then go ahead and tell us. There are several ways to submit your ideas, for example, through the Ideas Lab on Oracle Customer Connect. Wherever you see this icon after the feature name it means we delivered one of your ideas.
GIVE US FEEDBACK
We welcome your comments and suggestions to improve the content. Please send us your feedback at oracle_fusion_applications_help_ww_grp@oracle.com.
DISCLAIMER
The information contained in this document may include statements about Oracle’s product development plans. Many factors can materially affect Oracle’s product development plans and the nature and timing of future product releases. Accordingly, this Information is provided to you solely for information only, is not a commitment to deliver any material, code, or functionality, and should not be relied upon in making purchasing decisions. The development, release, and timing of any features or functionality described remains at the sole discretion of Oracle.
This information may not be incorporated into any contractual agreement with Oracle or its subsidiaries or affiliates. Oracle specifically disclaims any liability with respect to this information. Refer to the Legal Notices and Terms of Use for further information.
Pre-Update and Post-Update Tasks
Depending on the features you're using in your Cloud applications, you may be required to perform certain steps immediately before or after your quarterly update. For details of these pre-update and post-update steps and the product areas that are affected, refer to Oracle Fusion Cloud SCM: Performing Your Quarterly Update (doc ID 2337485.1) on My Oracle Support.
Optional Uptake of New Features (Opt In)
Oracle Cloud Applications delivers new updates every quarter. This means every three months you'll receive new functionality to help you efficiently and effectively manage your business. Some features are delivered Enabled meaning they are immediately available to end users. Other features are delivered Disabled meaning you have to take action to make available. Features delivered Disabled can be activated for end users by stepping through the following instructions using the following privileges:
- Review Applications Offering (ASM_REVIEW_APPLICATIONS_OFFERINGS_PRIV)
- Configure Oracle Fusion Applications Offering (ASM_CONFIGURE_OFFERING_PRIV)
Here’s how you opt in to new features:
- Click Navigator > My Enterprise > New Features.
- On the Features Overview page, select your offering to review new features specific to it. Or, you can leave the default selection All Enabled Offerings to review new features for all offerings.
- On the New Features tab, review the new features and check the opt-in status of the feature in the Enabled column. If a feature has already been enabled, you will see a check mark. Otherwise, you will see an icon to enable the feature.
- Click the icon in the Enabled column and complete the steps to enable the feature.
In some cases, you might want to opt in to a feature that's not listed in the New Features work area. Here's how to opt in:
- Click Navigator > My Enterprise > Offerings.
- On the Offerings page, select your offering, and then click Opt In Features.
- On the Opt In page, click the Edit Features (pencil) icon for the offering, or for the functional area that includes your feature.
- On the Edit Features page, complete the steps to enable the feature.
For more information and detailed instructions on opting in to new features for your offering, see Configure Offerings.
Opt In Expiration
Occasionally, features delivered Disabled via Opt In may be enabled automatically in a future update. This is known as an Opt In Expiration. If your cloud service has any Opt In Expirations you will see a related tab in this document. Click on that tab to see when the feature was originally delivered Disabled, and when the Opt In will expire, potentially automatically enabling the feature. You can also click here to see features with Opt In Expirations across all Oracle Cloud Applications.
Feature Summary
Column Definitions:
Features Delivered Enabled
Report = New or modified, Oracle-delivered, ready to run reports.
UI or Process-Based: Small Scale = These UI or process-based features are typically comprised of minor field, validation, or program changes. Therefore, the potential impact to users is minimal.
UI or Process-Based: Larger Scale* = These UI or process-based features have more complex designs. Therefore, the potential impact to users is higher.
Features Delivered Disabled = Action is needed BEFORE these features can be used by END USERS. These features are delivered disabled and you choose if and when to enable them. For example, a) new or expanded BI subject areas need to first be incorporated into reports, b) Integration is required to utilize new web services, or c) features must be assigned to user roles before they can be accessed.
| Ready for Use by End Users Reports plus Small Scale UI or Process-Based new features will have minimal user impact after an update. Therefore, customer acceptance testing should focus on the Larger Scale UI or Process-Based* new features. |
Action is Needed BEFORE Use by End Users Not disruptive as action is required to make these features ready to use. As you selectively choose to leverage, you set your test and roll out timing. |
|||||
|---|---|---|---|---|---|---|
| Feature |
Report |
UI or |
UI or |
|
||
Streamline Your B2B Setup for the Avalara and TIE Kinetix Service Providers |
||||||
Extend SCM Redwood Application Pages Using Visual Builder Studio |
||||||
Supply Chain Orchestration
Supply Chain Orchestration
Use Redesigned Pages to View Supply Requests
Use redesigned pages to view supply requests and their details on your desktop, tablet, or mobile device. You can now use the supply request reference, supply order, supply document, or item to search for your supply requests. Create and save your own default searches. Filter search results according to the supply's requested date, requested delivery date, request status, and so on. View recommended actions that you need to take to remove exceptions. View the supply documents that Oracle Supply Chain Orchestration created for each request. View details about request lines and take actions.
To use this feature, go to the Supply Orchestration work area, click Tasks > Supply Requests, then search for your supply request.
Improve your efficiency when you search for and view supply requests.
Steps to Enable
Use the Opt In UI to enable this feature. For instructions, refer to the Optional Uptake of New Features section of this document.
Offering: Manufacturing and Supply Chain Materials Management
Tips And Considerations
Use these attributes to search for your supply requests:
- Supply Request Reference
- Supply Order
- Supply Document
- Item
Use these attributes to filter your search results:
- Supply Requested Date
- Requested Delivery Date
- Supply Status
- Supply Type
- Business Flow
Do more:
- View details about the supply documents for each supply request.
- Create and save your own search. Make that search your default search.
- Drill into into the supply request to get details about the supply request and any exception messages that might exist.
- If a supply request is in exception, then you can view a recommended action to fix it.
- Do various actions on each supply request.
Key Resources
- See Using Supply Chain Orchestration and Supply Chain Orchestration on Oracle Help Center.
Access Requirements
You have a couple of options for giving people access to this feature, depending on whether you're assigning them predefined job roles or your own configured job roles.
- Users who are assigned any of these predefined job roles can access this feature:
- Supply Chain Operations Manager (ORA_DOS_SUPPLY_CHAIN_OPERATIONS_MANAGER_JOB)
- Users who are assigned a configured job role that contains these privileges can access this feature:
- Process Supply Order Interface (DOS_PROCESS_SUPPLY_ORDER_INTERFACE_PRIV)
- View Supply Orders (DOS_VIEW_SUPPLY_ORDERS_PRIV)
- Manage Supply Request Exceptions (DOS_MANAGE_SUPPLY_REQUEST_EXCEPTIONS_PRIV)
- View Supply Order Exceptions and Status (DOS_VIEW_SUPPLY_ORDER_EXCEPTIONS_AND_STATUS_PRIV)
If you're maintaining your own job roles, no new privileges were introduced to support this feature.
Collaboration Messaging Framework
Collaboration Messaging Framework
Streamline Your B2B Setup for the Avalara and TIE Kinetix Service Providers
The process for B2B setup has been streamlined for the Avalara and TIE Kinetix predefined service providers. If you are subscribed to their services, you can connect with your trading partners and exchange messages with greater ease.
The endpoints for these service providers are predefined, and a new simplified process is provided to streamline the B2B setup in the Collaboration Messaging work area.
Steps to Enable
At a high level, to set up these service providers:
- Configure the service providers to exchange messages with your trading partners.
- Create trading partners.
- Associate the trading partners with your customers or suppliers and select the documents you want to exchange.
These steps are detailed in the Configuring and Managing B2B Messaging for Oracle Fusion Cloud SCM guide.
Configure the Predefined Service Providers Avalara or TIE Kinetix to Exchange Messages with Your Trading Partners.
- Select Manage Collaboration Messaging Service Providers from the Tasks panel tab, search for either Avalara or TIE Kinetix and select Actions > Edit.
The overview tab displays the following details about the service provider:
- Connection type that is configured, Test or Production.
- A check box to indicate whether credentials are configured or not.
- The number of trading partners configured for the service provider.
- The number of trading partners with override message definitions.
- The number of customers that are setup with the service provider.
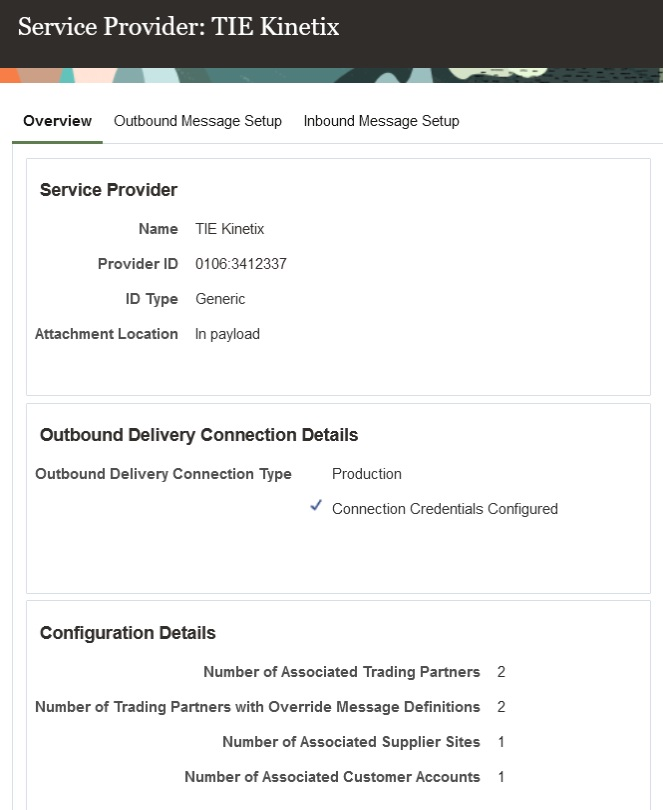
Service Provider Overview for TIE Kinetix
- Select Actions > Manage Delivery Settings to configure the settings for outbound message delivery.
-
- Select Test or Production in the Outbound Delivery Connection Type drop-down to reflect the environment you're setting up.
-
- Enter the username and password provided by Avalara or TIE Kinetix for sending messages to their network in the Service Provider User Name and Password fields.
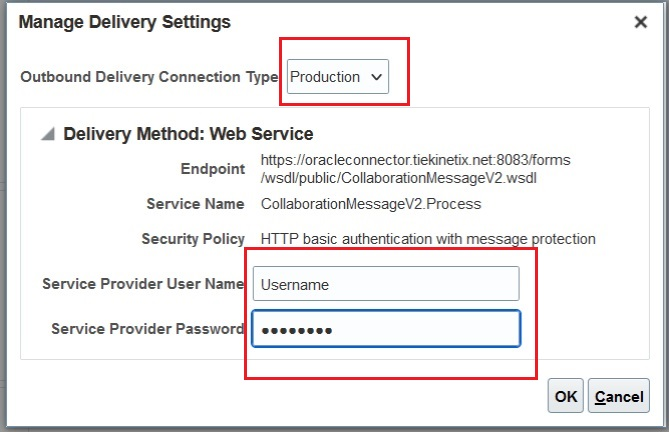
Manage Delivery Settings
- Select the Outbound Message Setup tab to activate the outbound messages:
The outbound messages available for Avalara are:
- Invoice
The outbound messages available for TIE Kinetix are:
- Invoice
- Purchase Order
- Change Purchase Order
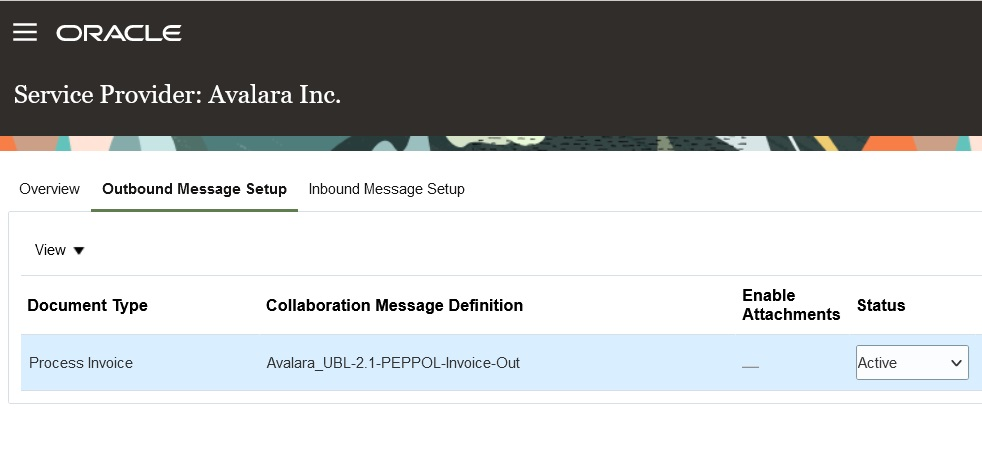
Avalara– Outbound Message Setup
- Select the Inbound Message Setup tab to activate the inbound purchase order.
The inbound messages available for Avalara are:
- Acknowledge Invoice
- Invoice
The inbound messages available for TIE Kinetix are:
- Acknowledge Invoice
- Acknowledge Purchase Order
- Invoice
- Shipment
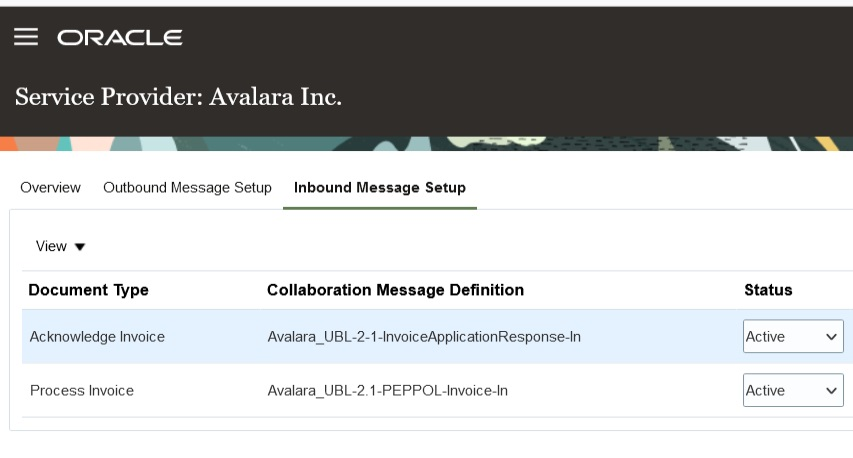
Avalara- Inbound Message Setup
Create Trading Partners
After completing the service provider setup, create your trading partners.
- Select Manage B2B Trading Partners on the Tasks panel tab.
- On the Manage B2B Trading Partners page, select Actions > Create, and add your trading partners.
- Select Avalara or TIE Kinetix as the service provider you're using.
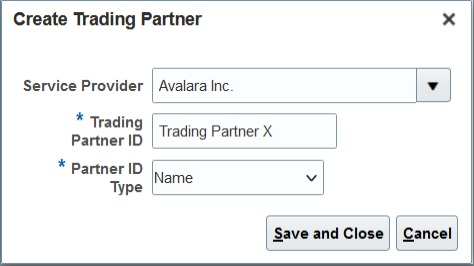
Create a Trading Partner
Associate Trading Partners with Your Customers
Next, associate the trading partners with your customers and select the documents you plan to exchange.
- Select Manage Customer Account Collaboration Configuration on the Tasks panel tab, and search for your customers.
- Select a customer and then select Edit Collaboration Configuration.
- In the Associated Service Providers section of the Edit Customer Account Collaboration Configuration page, select Actions > Add Row to add a trading partner and the service provider.
- In the Collaboration Documents for Service Provider section, select Actions > Add Row, add the documents you want to exchange and set their Association Status to Enabled.
Both the Avalara and TIE Kinetix service providers have the following documents available:
- Invoice Acknowledgement Inbound
- Invoice Outbound
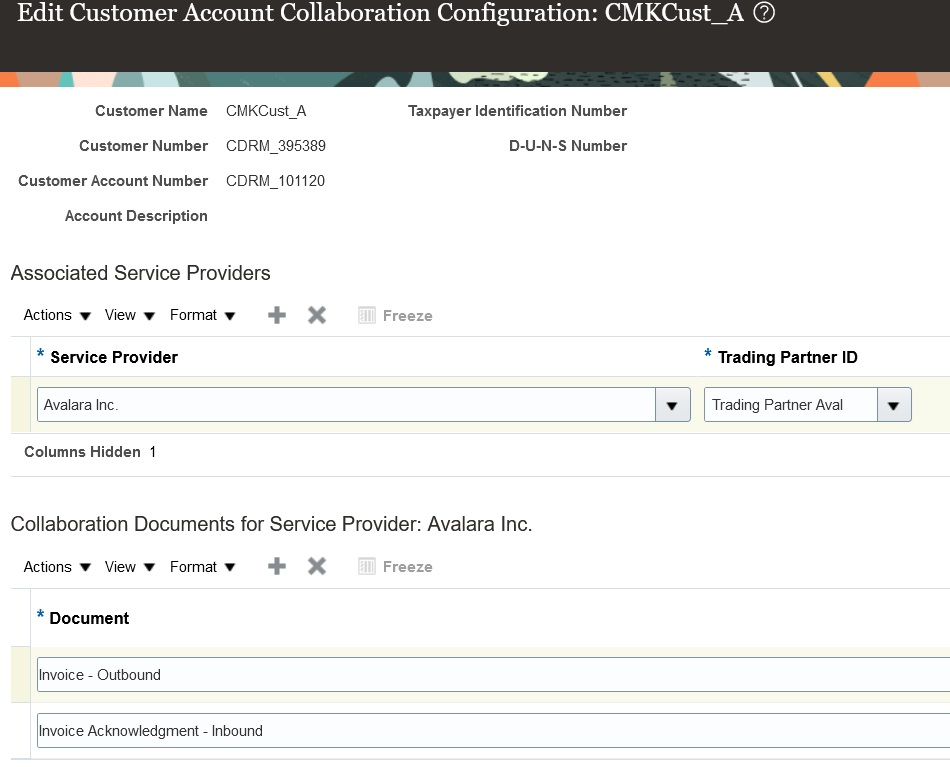
Customer Account Collaboration Configuration
Associate Trading Partners with Your Suppliers
- Select Manage Supplier B2B Configuration on the Tasks panel tab, and search for your suppliers.
- Select a supplier and then select Edit Supplier B2B Configuration.
- On the Edit Supplier B2B Configuration page, select the Trading Partner Assignment tab and click Actions > Add Row to add a trading partner and either the Avalara or TIE Kinetix service provider.
The Avalara service provider has the following document available for setup:
- Invoice - Inbound
The TIE Kinetix service provider has the following documents available for setup.
- Advance Ship Notice – Inbound
- Purchase Order Acknowledgement – Inbound
- Invoice – Inbound
- Purchase Order – Outbound
- Purchase Order Change – Outbound
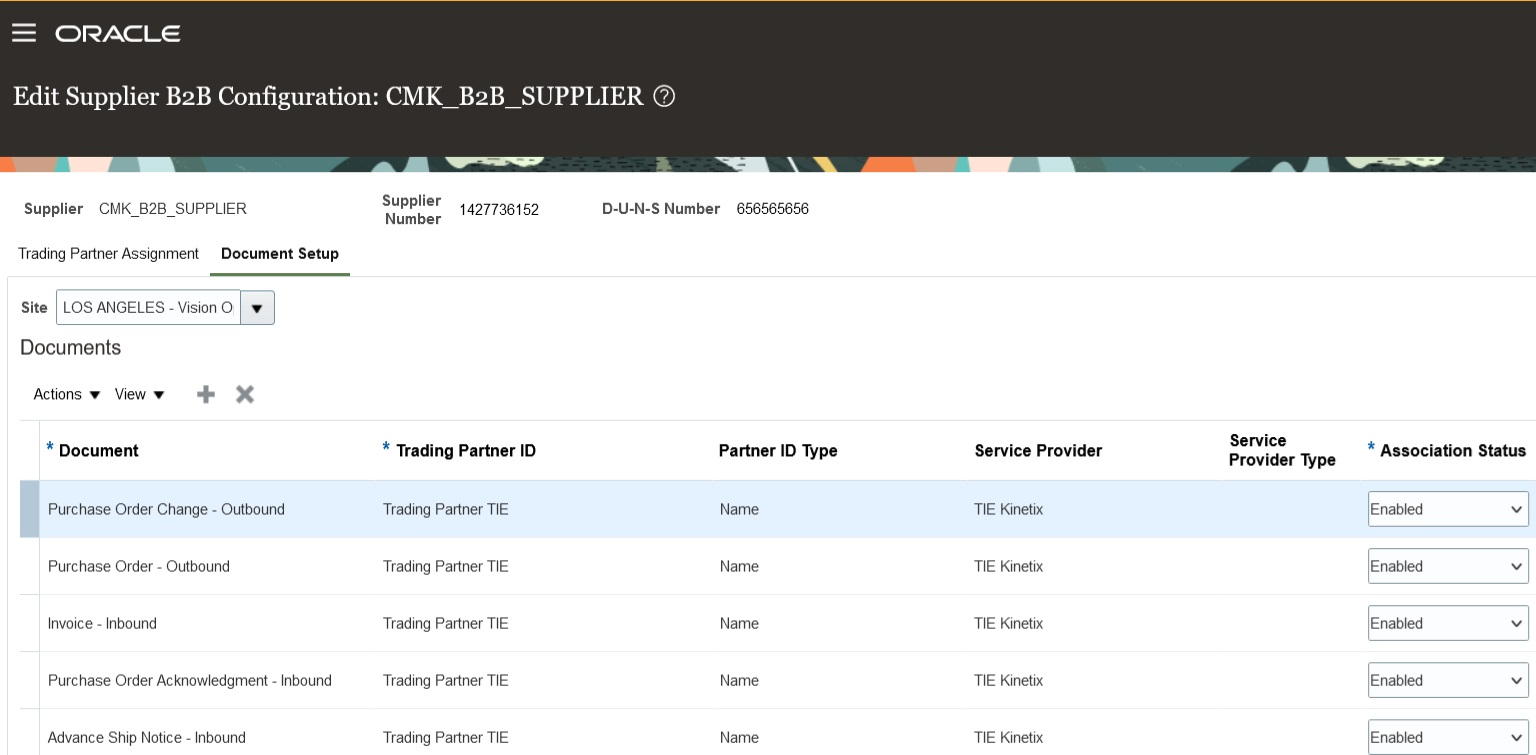
Document Setup for Supplier Sites
Tips And Considerations
If you used TIE Kinetix services prior to this release, you’ll notice that your message definition names are now prefixed with 'TIEKinetix_'. You can select TIE Kinetix from the list of service providers in the Manage Collaboration Message Definitions task to search for your message definitions.
Key Resources
- Refer to the Configuring and Managing B2B Messaging for Oracle Fusion Cloud SCM guide on the Oracle Help Center.
Access Requirements
Users who are assigned a configured job role that contains these privileges can access this feature:
- Manage B2B Customer Trading Partners (CMK_B2B_CUSTOMER_TRADING_PARTNERS_PRIV)
- Manage Customer Account Collaboration Configuration (CMK_B2B_CUSTOMER_ACCOUNT_TRADING_PARTNERS_PRIV)
- Manage B2B Trading Partners (CMK_B2B_TRADING_PARTNERS_PRIV)
- Manage Service Provider (CMK_MANAGE_SERVICE_PROVIDER_PRIV)
These privileges were available prior to this update.
Transmit a Purchase Order as a PDF File
You can use the Transmit the PO PDF as an unzipped file when it’s the only attachment check box to send a PO as an uncompressed PDF file by email to your suppliers. This option is applicable when the PO is the only attachment available for the message.
This feature makes it easier for smaller suppliers who don’t have automated systems to read the POs they receive.
Steps to Enable
The email delivery method may be configured for a service provider or a trading partner to transmit the PO PDF as an unzipped file. To enable this option,
- Select Manage Collaboration Messaging Service Providers from the Tasks panel tab, and search for the service provider you're using to deliver your B2B messages. If you don’t use a service provider for sending and receiving messages, select Manage B2B Trading Partners from the Tasks panel.
- Select the Delivery Methods tab, and on the email delivery method, select the Transmit the PO PDF as an unzipped file when it’s the only attachment check box.
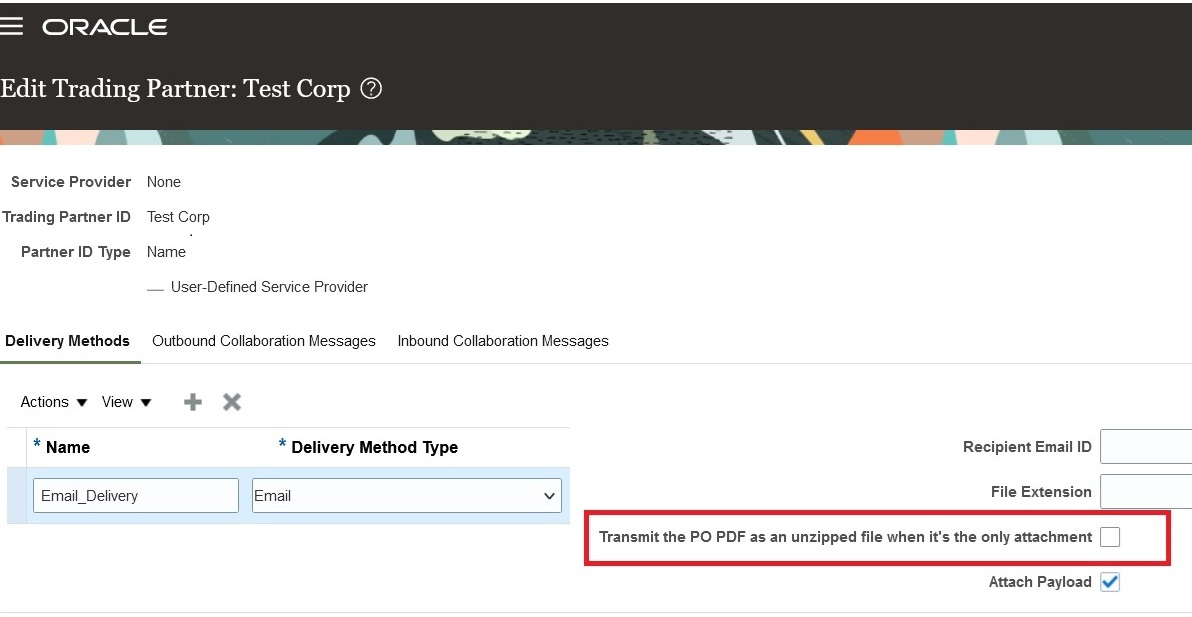
Transmit the PO PDF as an Unzipped File When It’s the Only Attachment on the Delivery Methods Tab
3. Select Save and Close.
Tips And Considerations
The PO PDF is sent as an uncompressed file if it's the only attachment for the message. If there are additional attachments, all attachments including the PO PDF will be compressed and sent as a ZIP file. If your suppliers can’t receive a ZIP file, you can use the File Extension field on the email delivery method to set the extension of the file that is sent by email.
Key Resources
-
Refer to the Configuring and Managing B2B Messaging for Oracle Fusion Cloud SCM guide on the Oracle Help Center.
Access Requirements
Users who are assigned a configured job role that contains these privileges can access this feature:
- Manage B2B Trading Partners (CMK_B2B_TRADING_PARTNERS_PRIV)
- Manage Service Provider (CMK_MANAGE_SERVICE_PROVIDER_PRIV)
These privileges were available prior to this update.
Supply Chain Collaboration
SCM Common Components
Extend SCM Redwood Application Pages Using Visual Builder Studio
Tailor a seamless experience for the users in your enterprise using Oracle Visual Builder Studio. You can use business rules in Visual Builder Studio’s Express mode to:
- Make the fields and regions on a page required or optional.
- Make the fields and regions on a page read-only or editable.
- Show or hide fields and regions depending on specific criteria.
- Configure Redwood pages to best meet your specific business needs. For example, you can control which actions are visible on the Receipt Deliveries page, or you can set the default date range that's available on the PAR Counts Overview page.
The types of changes you can make to a page depend on the page you're modifying.
NOTE: In this update, business rules aren't yet supported on all SCM Redwood pages.
To determine whether you can extend a specific page using Visual Builder Studio, go to the page and open the Setting and Actions menu. Look for the Edit Page In Visual Builder Studio task:
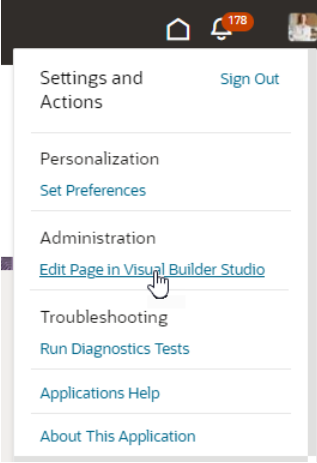
Settings and Actions Menu
If you don’t see the Edit Page in Visual Builder Studio task, then you can’t use Visual Builder Studio to edit the page, either because you're not assigned the necessary privilege to edit pages in VB Studio, or because the page can't currently be edited in VB Studio.
When you open a page in Visual Builder Studio, use only the Express mode to extend the page. Advanced mode isn’t supported. If Express mode isn't available when you open the page in VB Studio, then you can't extend the page in VB Studio. You can find the Express mode in the Visual Builder Studio header region:

Header Region in Visual Builder Studio
See Extending Oracle Cloud Applications in Visual Builder Studio Express Mode for details about how to extend your application pages in Express mode.
Steps to Enable
Leverage the Visual Builder Studio to expose your applications. To learn more about extending your application using Visual Builder, visit Oracle Help Center > your apps service area of interest > Books > Configuration and Extension.
Before you can start working with Visual Builder Studio, a systems administrator must complete some initial setup. For instructions, see Set Up VB Studio to Extend Oracle Cloud Applications.
Tips And Considerations
Keep the Pages list closed while you work in Visual Builder Studio Express mode. Closing the list gives you a cleaner view of the page you’re extending.
In Visual Builder Studio Express mode, you might see capabilities that support defaulting and validation of field values. The features aren't supported in SCM Redwood pages in update 24B. You'll be able to use defaulting and validation for selected SCM Redwood pages in future updates.
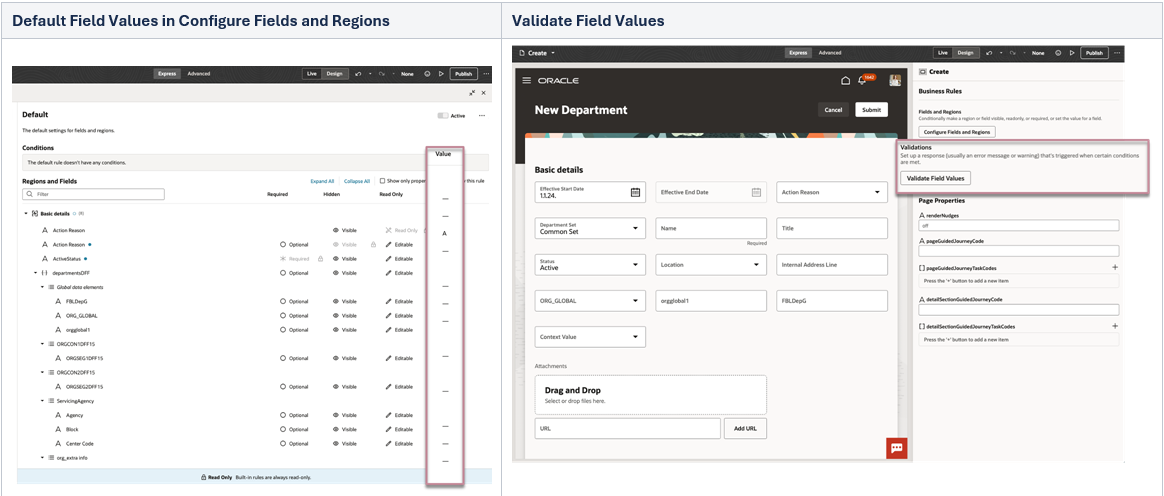
Default Field Values and Validate Field Values in VB Studio Express Mode
Key Resources
To start extending your application pages in Visual Builder Studio, follow the instructions to access Visual Builder Studio. As you’re working, you can find additional information in these resources:
- Extend Oracle Cloud Applications in Visual Builder Express Mode
- Oracle Fusion Cloud HCM and SCM: Extending Redwood Applications for HCM and SCM Using Visual Builder Studio
Access Requirements
To extend application pages using Visual Builder Studio, you must be assigned a configured job role that contains this privilege:
-
Administer Sandbox (FND_ADMINISTER_SANDBOX_PRIV)
This privilege was available prior to this update.
Supply Chain Collaboration
Today’s global supply chains increase manufacturers’ reliance on suppliers, contract manufacturers, and other trading partners. To be successful, companies must synchronize their activities across multiple tiers of trading parties. Oracle Fusion Cloud Supply Chain Collaboration enables companies to jointly plan supply, gain visibility into trading partner data, coordinate contract manufacturing execution, and measure performance across their trading networks. Trading partners are actively involved in the decision-making process, so they can exchange early warning signs and collaboratively resolve supply chain issues. Depending on the size and technical sophistication of each supplier, your company can interact using a portal-based user interface, standards-based B2B messages, or web services. Customers can also tailor Oracle Supply Chain Collaboration’s flexible, predefined business processes to their unique requirements. Enhanced collaboration results in more dynamic trading relationships, as well as increased reliability and efficiency of supply.
Supply Collaboration: Redwood Experience
Specify Aggregation Schedule Using a Redwood Page
You can now use the Redwood user experience to specify the aggregation schedule. The aggregation schedule is used for displaying supply collaboration measures in the Edit Order Forecast Details Page. On this page, you can:
- Select one of the two schedule types: Supply Chain Collaboration Default schedule or User-defined schedule.
- If Supply Chain Collaboration Default schedule is selected, select one of the predefined aggregation levels: Week and day or Period and day.
- If the User-defined option for schedule is selected, select one of the user-defined schedules from the drop-down list of schedules.
All existing combinations for defining an aggregation schedule in previous updates are still supported and are included on the Select Aggregation Schedule page.

Select Aggregation Schedule Page in the Redwood User Experience
Steps to Enable
Use the Opt In UI to enable this feature. For instructions, refer to the Optional Uptake of New Features section of this document.
Offering: Manufacturing and Supply Chain Materials Management
To use the Specify Aggregation Schedule Using a Redwood Page feature, you must first opt in to its parent feature: Supply Collaboration. If you’ve already opted in to this parent feature, then you don’t have to opt in again.
Follow these steps to enable or disable the Specify Aggregation Schedule Using a Redwood Page feature:
- In the Setup and Maintenance work area, search for and select the task Manage Administrator Profile Values
- On the Manage Administrator Profile Values page, search for and select the ORA_VCS_SC_CONFIGURATION_PAGES_REDWOOD_ENABLED profile option code.
- In the Profile Values section, set the Site Level to YES or No. The default value is NO.
- Y = enables the feature
- N = disables the feature
- Click Save and Close.
After this feature is enabled, navigation to the new Select Aggregation Schedule page using supply collaboration’s landing page’s panel task is updated to display Select Aggregation Schedule instead of Define Aggregation Schedule.
Access Requirements
Users who are assigned a configured job role that contains this privilege can access this feature:
- Manage Aggregation Schedules (VCS_MANAGE_AGGREGATION_SCHEDULES_PRIV)
This privilege was available prior to this update.
Manage Collaboration Planners Using a Redwood Page
You can now use the Redwood user experience to manage collaboration planners. Using the Collaboration Planners task, you can view all the collaboration planners that are active or inactive, and the portion of the network that they have access to. On this page, you can:
- Search by status, planner name, or ship-from supplier.
- After selecting the Add button, choose a collaboration planner, and then provide the planner access to a specific organization, supplier, supplier site or full access.
The new Collaboration Planners page displays active and inactive planners, showing the name, username, status, and whether they have full network access. When a collaboration planner doesn’t have full access, expanding the row will show the portion of the network that the planner has access to.
You can search for collaboration planners by selecting from the existing data filters or you can search by a planner name or a username.
An action menu on each row provides the following actions:
- Edit: Displays the collaboration planner details so that you can modify the planner’s access levels and status.
- Copy: Duplicates the existing planner’s access levels and status to quickly create a new collaboration planner.
- Delete: Removes the user’s supply collaboration access.

Collaboration Planner Page in the Redwood User Experience
Click the Add button to display the New Collaboration Planner page.
On the New Collaboration Planner page, set the Full Access option to No to restrict the planner’s access to the suppliers, supplier sites, and organizations specified in the Data Access Security section.
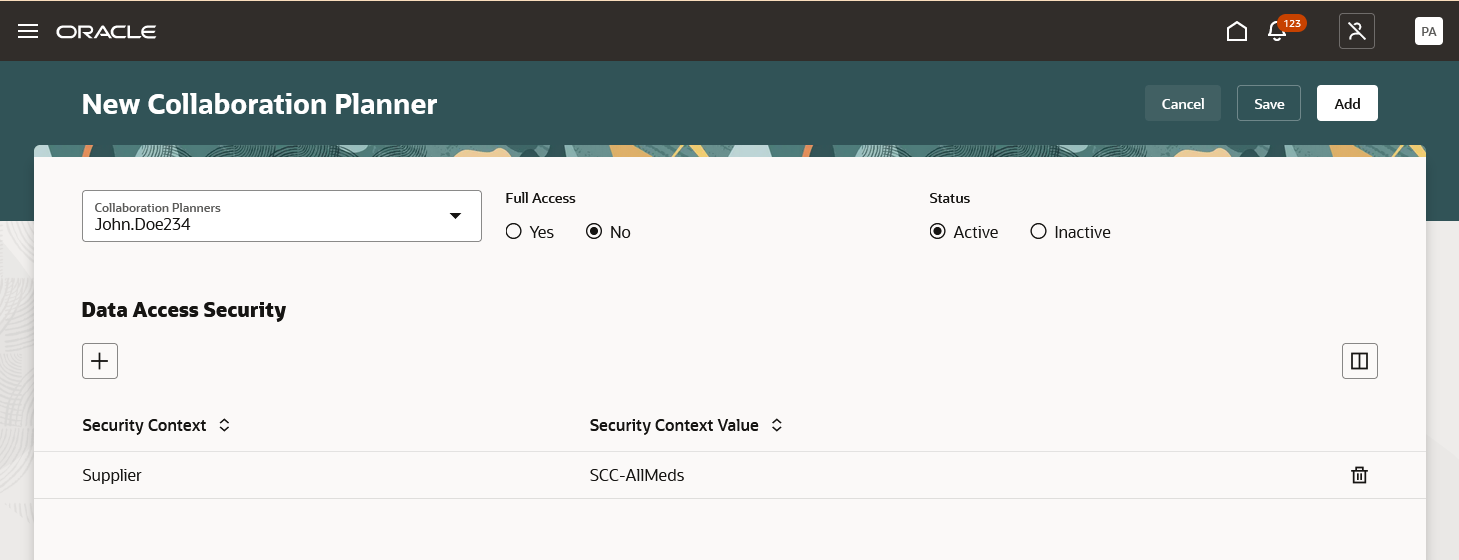
New Collaboration Planner Page in the Redwood User Experience
Adding a Data Access Security entry will open a side panel with an option to specify either a supplier, supplier site, or an organization.
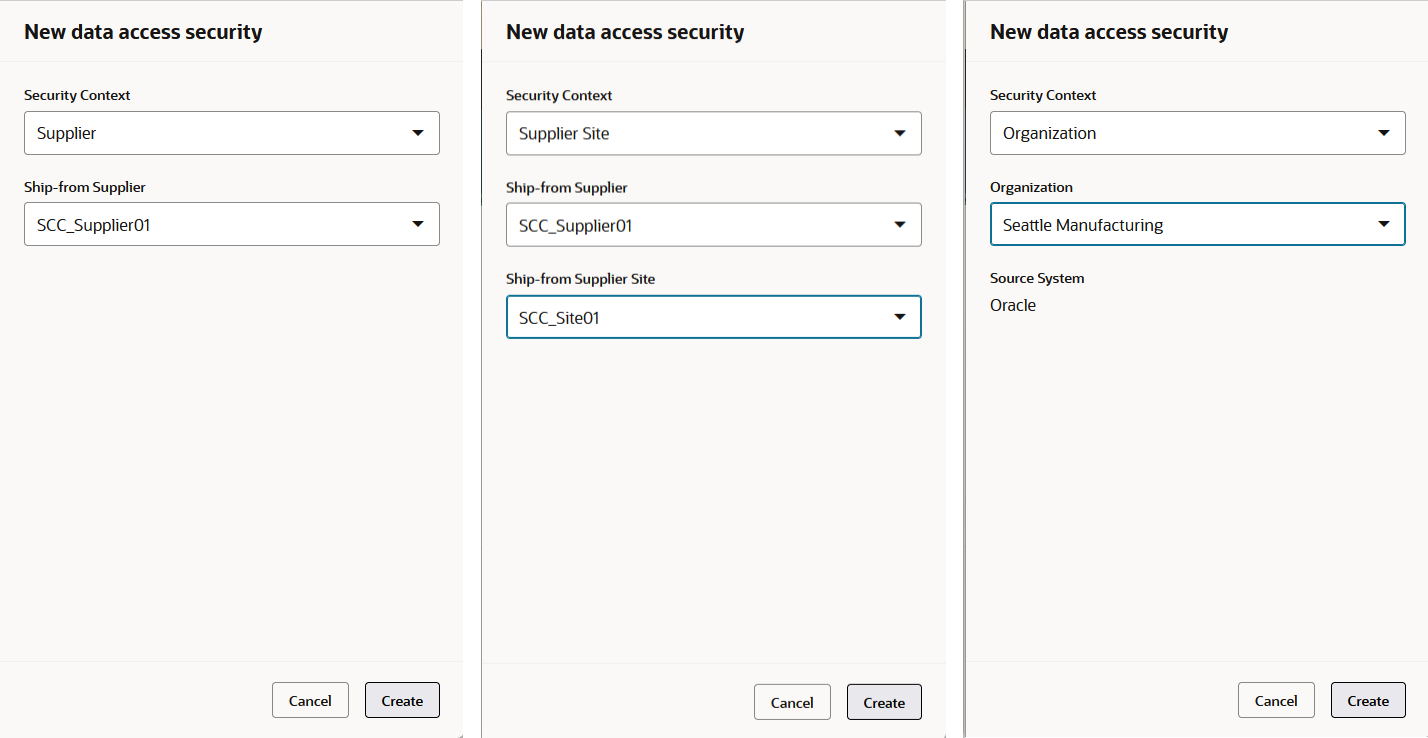
Adding Data Access Security by Supplier, by Supplier Site, and by Organization
Steps to Enable
Use the Opt In UI to enable this feature. For instructions, refer to the Optional Uptake of New Features section of this document.
Offering: Manufacturing and Supply Chain Materials Management
To use the Manage Collaboration Planners Using a Redwood Page feature, you must opt in to its parent feature: Supply Collaboration. If you’ve already opted in to this parent feature, then you don’t have to opt in again.
To enable or disable the Manage Collaboration Planners Using a Redwood Page feature:
- In the Setup and Maintenance work area, search for and select the task Manage Administrator Profile Values.
- On the Manage Administrator Profile Values page, search for and select the ORA_VCS_SC_CONFIGURATION_PAGES_REDWOOD_ENABLED profile option code.
- In the Profile Values section, set the Site Level to YES or No. The default value is NO.
- Y = enables the feature
- N = disables the feature
- Click Save and Close.
Tips And Considerations
When creating a new Collaboration Planner:
- Use the Add button to save the new collaboration planner and close the page.
- Use the Save button to persist the changes and stay on the page to make additional changes
Access Requirements
Users who are assigned a configured job role that contains these privileges can access this feature:
- Manage Collaboration Planners (VCS_MANAGE_COLLAB_PLANNERS_PRIV)
These privileges were available prior to this update.
Manage Collaboration Plans Using a Redwood Page
You can now use the Redwood user experience to manage collaboration plans. You use the Collaboration Plans page to:
- Create new collaboration plans
- Review collaboration plan candidates
- Convert collaboration plan candidates to collaboration plans
- Delete collaboration plan candidates
- Assign collaboration plan attributes and plan frequency
On this page, you can:
- Perform keywords searches by Supply Plan, Collaboration Plan, Status
- Use filter chips to search by status or last published
- After selecting the Create button, create a new collaboration plan, and define its attributes, such as supply plan source and planning frequency
Use the edit icon to convert plan candidates to collaboration plans, as well as edit existing relationships.
The new Collaboration Plans page displays both active and inactive plans, as well as plan candidates. As with the previous page layout, you can view the following plan attributes: Collaboration Plan, Supply Plan, Source System, Supply Plan Source, Last Published Date, and Status.
With this update, status can be active, inactive, or candidate. A status of candidate is the new indicator that the given record is a plan candidate, and you can convert it to a real plan by editing the candidate and saving it with the appropriate values.
The Collaboration Frequency attribute has also been added to give you an easy-to-read format that combines all weekly and monthly frequency definition combinations. For example, a collaboration plan with Frequency of Monthly, Frequency Duration of 1, a Start Day Ordinal of First, and a Start Day of Monthly would be displayed as “The 1st Monday of every month” in the new Collaboration Frequency field.
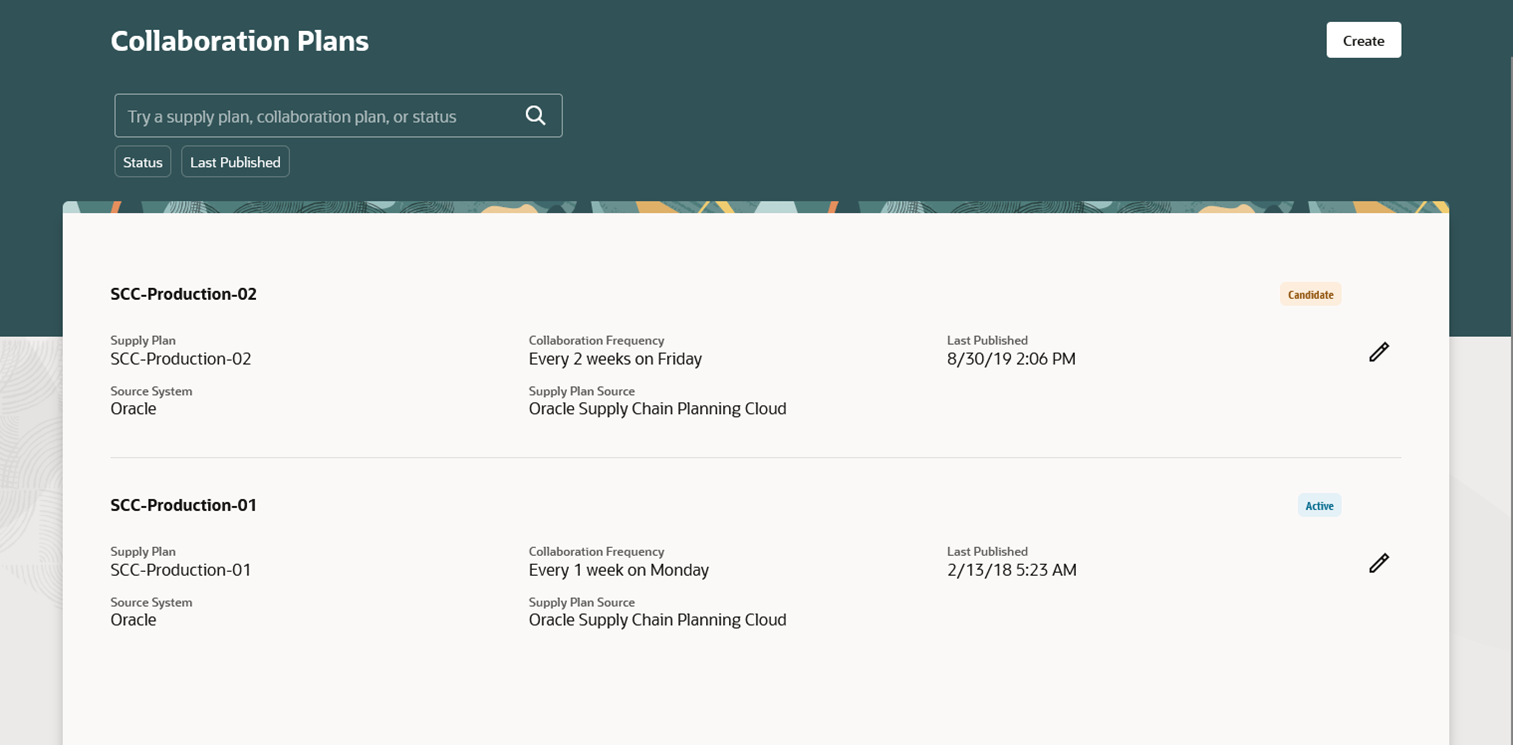
Collaboration Plans Search Page in the Redwood User Experience
All existing combinations accessible in previous updates are still supported and presented in the following manner for creating and editing plans, was well as converting candidates to collaboration plans.
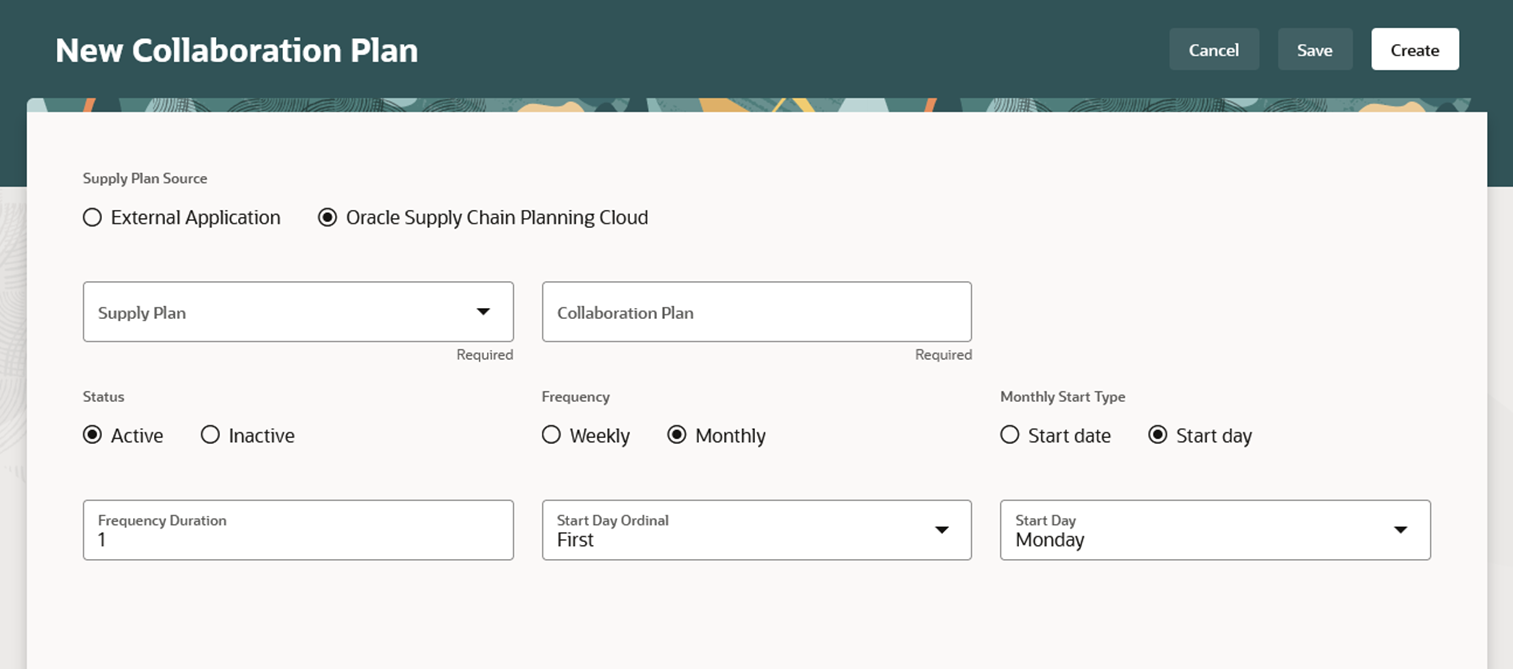
Page to Create a New Collaboration Plan in the Redwood User Experience
To streamline the new Redwood user experience, the following columns are no longer supported on the Collaboration Plans page:
- Relationship Candidates
- Collaboration Relationships
- Order Forecasts
Steps to Enable
Use the Opt In UI to enable this feature. For instructions, refer to the Optional Uptake of New Features section of this document.
Offering: Manufacturing and Supply Chain Materials Management
To use the Manage Collaboration Plans Using a Redwood Page feature, you must opt in to its parent feature: Supply Collaboration. If you’ve already opted in to this parent feature, then you don’t have to opt in again.
Follow these steps to enable or disable the Manage Collaboration Plans Using a Redwood Page feature:
- In the Setup and Maintenance work area, search for and select the task Manage Administrator Profile Values.
- On the Manage Administrator Profile Values page, search for and select the ORA_VCS_SC_CONFIGURATION_PAGES_REDWOOD_ENABLED profile option code.
- In the Profile Values section, set the Site Level to YES or No. The default value is NO.
- Y = enables the feature
- N = disables the feature
- Click Save and Close.
After this feature is enabled, the navigation to the Collaboration Plans pages using quick actions and the supply collaboration landing’s page panel task is updated to display Collaboration Plans instead of Manage Collaboration Plans.
Access Requirements
Users who are assigned a configured job role that contains this privilege can access this feature:
- Manage Collaboration Plans (VCS_MANAGE_COLLAB_PLANS_PRIV)
This privilege was available prior to this update.
Buy-Side Vendor-Managed Inventory: Redwood Experience
Manage VMI Analysts Using a Redwood Page
You can now use the Redwood user experience to manage VMI analysts. Using the VMI Analysts task, you can view all the VMI analysts that are active or inactive and the portion of the network that they have access to. On this page, you can:
- Search by status, VMI analysts, user name, supplier, or organization.
- After selecting the Add button, choose a VMI analyst and provide the analyst access to a specific organization or supplier, or full access.
The new VMI Analysts page displays active and inactive VMI analysts, showing the name, username, status, and whether they have full network access. When an analyst doesn’t have full access, expanding the row will show the portion of the network that the analyst has access to.
You can search for analysts by selecting from the existing data filters, or you can search by a VMI analyst name or a username.
An action menu on each row provides these actions:
- Edit: Displays the VMI Analyst details so that you can modify the analyst’s access levels and status.
- Copy: Duplicates the VMI Analyst’s access levels and status to quickly create a new VMI Analyst.
- Delete: Removes the user’s access as a VMI analyst.
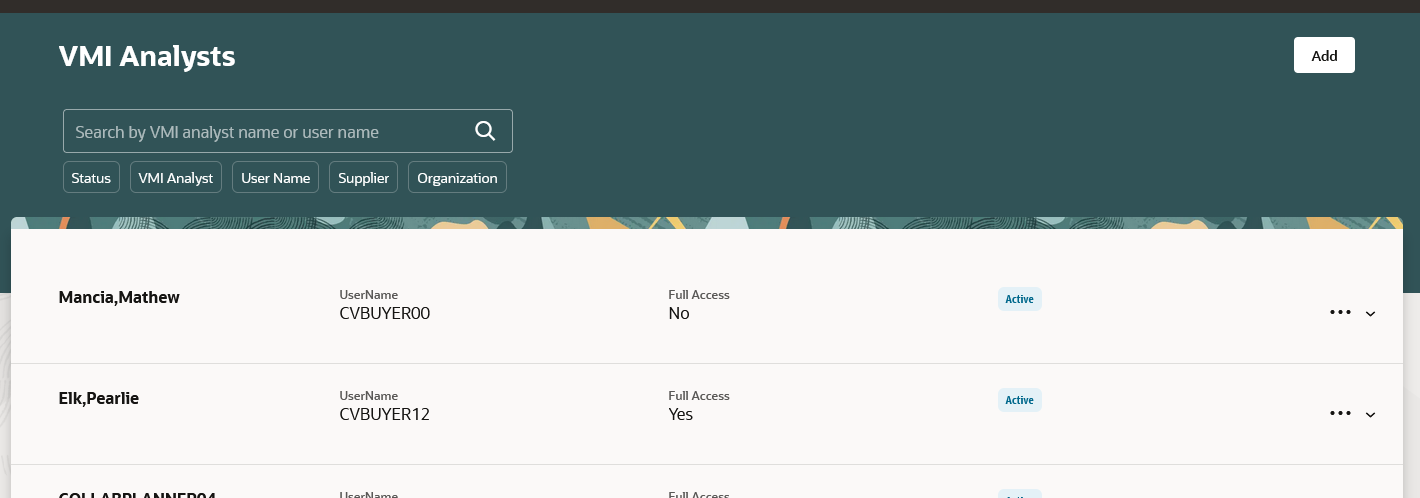
VMI Analysts Page in the Redwood User Experience
Click the Add button to display the New VMI Analyst page. On the New VMI Analyst page, set the Full Access option to No to restrict the VMI Analyst’s access to the suppliers and organizations specified in the Data Access Security section.
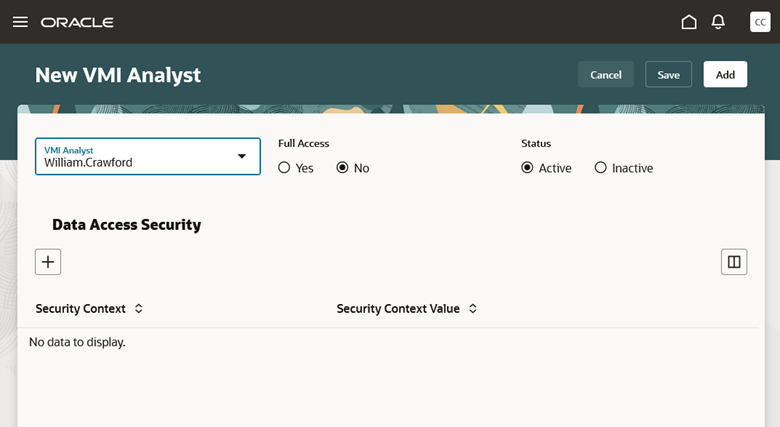
New VMI Analyst Page in the Redwood User Experience
Adding a Data Access Security entry opens a side panel with an option to specify either a supplier or an organization.

Adding Data Access Security by Supplier and by Organization
Steps to Enable
Use the Opt In UI to enable this feature. For instructions, refer to the Optional Uptake of New Features section of this document.
Offering: Manufacturing and Supply Chain Materials Management
To use the Manage VMI Analysts Using a Redwood Page feature, you must opt in to its parent feature: Vendor-Managed Inventory. If you’ve already opted in to this parent feature, then you don’t have to opt in again.
Follow these steps to enable or disable the Manage VMI Analysts Using a Redwood Page feature:
- In the Setup and Maintenance work area, search for and select the task Manage Administrator Profile Values.
- On the Manage Administrator Profile Values page, search for and select the ORA_VCS_VMI_CONFIGURATION_PAGES_REDWOOD_ENABLED profile option code.
- In the Profile Values section, set the Site Level to YES or No. The default value is NO.
- Y = enables the feature
- N = disables the feature
- Click Save and Close.
Tips And Considerations
When creating a new VMI Analyst:
- Use the Add button to save the new analyst and close the page.
- Use the Save button to persist the changes and stay on the page to make additional changes.