- Revision History
- Overview
- Pre-Update and Post-Update Tasks
- Optional Uptake of New Features (Opt In)
- Feature Summary
- Supply Chain Orchestration
- Supply Planning
-
- SCM Common Components
- Supply Planning
-
- Export Data in Planning Tables with Expanded Volume Limits
- Avoid Duplicate Pegging Details Using a Summarized Pegging View
- Secure Plan Data Considering Unassigned Entities
- Use a Deep Link to Access Oracle Fusion Cloud Supply Chain Planning
- Edit Time-Phased Safety Stock Quantities in a Supply Plan
- Gain Insights on Lead Times for Shipment to Receipt
- Synchronize Supplies from Production Scheduling Within a User-Specified Firm Horizon
- Selected Supply Planning Bug Fixes in This Update
- Constraint-Based Planning
-
- Backlog Management
- Production Scheduling
- IMPORTANT Actions and Considerations
Update 24B
Revision History
This document will continue to evolve as existing sections change and new information is added. All updates appear in the following table:
| Date | Module | Feature | Notes |
|---|---|---|---|
| 24 MAY 2024 | SCM Common Components | Extend SCM Redwood Application Pages Using Visual Builder Studio | Updated document. Revised feature description and key resources. |
| 26 APR 2024 | Supply Planning | Selected Supply Planning Bug Fixes in This Update | Updated document. Added section. |
| 18 MAR 2024 | Supply Planning | Edit Time-Phased Safety Stock Quantities in a Supply Plan | Updated document. Added a link to a demo. |
| 11 MAR 2024 | Backlog Management | Use Pick-Pack Lead Time for Configure-to-Order and Shipment and Arrival Sets | Updated document. Added a link to a demo. |
| 11 MAR 2024 | SCM Common Components | Extend SCM Redwood Application Pages Using Visual Builder Studio | Updated document. Revised feature description. |
| 11 MAR 2024 | Supply Planning | Export Data in Planning Tables with Expanded Volume Limits | Updated document. Revised feature description. |
| 11 MAR 2024 | Supply Planning | Pinpoint Root Cause of Late Demands Due to Material and Capacity Constraints | Updated document. Added link to a feature demo. |
| 01 MAR 2024 | Created initial document. |
Overview
 HAVE AN IDEA?
We’re here and we’re listening. If you have a suggestion on how to make our cloud services even better then go ahead and tell us. There are several ways to submit your ideas, for example, through the Ideas Lab on Oracle Customer Connect. Wherever you see this icon after the feature name it means we delivered one of your ideas.
GIVE US FEEDBACK
We welcome your comments and suggestions to improve the content. Please send us your feedback at oracle_fusion_applications_help_ww_grp@oracle.com.
DISCLAIMER
The information contained in this document may include statements about Oracle’s product development plans. Many factors can materially affect Oracle’s product development plans and the nature and timing of future product releases. Accordingly, this Information is provided to you solely for information only, is not a commitment to deliver any material, code, or functionality, and should not be relied upon in making purchasing decisions. The development, release, and timing of any features or functionality described remains at the sole discretion of Oracle.
This information may not be incorporated into any contractual agreement with Oracle or its subsidiaries or affiliates. Oracle specifically disclaims any liability with respect to this information. Refer to the Legal Notices and Terms of Use for further information.
Pre-Update and Post-Update Tasks
Depending on the features you're using in your Cloud applications, you may be required to perform certain steps immediately before or after your quarterly update. For details of these pre-update and post-update steps and the product areas that are affected, refer to Oracle Fusion Cloud SCM: Performing Your Quarterly Update (doc ID 2337485.1) on My Oracle Support.
Optional Uptake of New Features (Opt In)
Oracle Cloud Applications delivers new updates every quarter. This means every three months you'll receive new functionality to help you efficiently and effectively manage your business. Some features are delivered Enabled meaning they are immediately available to end users. Other features are delivered Disabled meaning you have to take action to make available. Features delivered Disabled can be activated for end users by stepping through the following instructions using the following privileges:
- Review Applications Offering (ASM_REVIEW_APPLICATIONS_OFFERINGS_PRIV)
- Configure Oracle Fusion Applications Offering (ASM_CONFIGURE_OFFERING_PRIV)
Here’s how you opt in to new features:
- Click Navigator > My Enterprise > New Features.
- On the Features Overview page, select your offering to review new features specific to it. Or, you can leave the default selection All Enabled Offerings to review new features for all offerings.
- On the New Features tab, review the new features and check the opt-in status of the feature in the Enabled column. If a feature has already been enabled, you will see a check mark. Otherwise, you will see an icon to enable the feature.
- Click the icon in the Enabled column and complete the steps to enable the feature.
In some cases, you might want to opt in to a feature that's not listed in the New Features work area. Here's how to opt in:
- Click Navigator > My Enterprise > Offerings.
- On the Offerings page, select your offering, and then click Opt In Features.
- On the Opt In page, click the Edit Features (pencil) icon for the offering, or for the functional area that includes your feature.
- On the Edit Features page, complete the steps to enable the feature.
For more information and detailed instructions on opting in to new features for your offering, see Configure Offerings.
Opt In Expiration
Occasionally, features delivered Disabled via Opt In may be enabled automatically in a future update. This is known as an Opt In Expiration. If your cloud service has any Opt In Expirations you will see a related tab in this document. Click on that tab to see when the feature was originally delivered Disabled, and when the Opt In will expire, potentially automatically enabling the feature. You can also click here to see features with Opt In Expirations across all Oracle Cloud Applications.
Feature Summary
Column Definitions:
Features Delivered Enabled
Report = New or modified, Oracle-delivered, ready to run reports.
UI or Process-Based: Small Scale = These UI or process-based features are typically comprised of minor field, validation, or program changes. Therefore, the potential impact to users is minimal.
UI or Process-Based: Larger Scale* = These UI or process-based features have more complex designs. Therefore, the potential impact to users is higher.
Features Delivered Disabled = Action is needed BEFORE these features can be used by END USERS. These features are delivered disabled and you choose if and when to enable them. For example, a) new or expanded BI subject areas need to first be incorporated into reports, b) Integration is required to utilize new web services, or c) features must be assigned to user roles before they can be accessed.
| Ready for Use by End Users Reports plus Small Scale UI or Process-Based new features will have minimal user impact after an update. Therefore, customer acceptance testing should focus on the Larger Scale UI or Process-Based* new features. |
Action is Needed BEFORE Use by End Users Not disruptive as action is required to make these features ready to use. As you selectively choose to leverage, you set your test and roll out timing. |
|||||
|---|---|---|---|---|---|---|
| Feature |
Report |
UI or |
UI or |
|
||
Extend SCM Redwood Application Pages Using Visual Builder Studio |
||||||
Avoid Duplicate Pegging Details Using a Summarized Pegging View |
||||||
Use a Deep Link to Access Oracle Fusion Cloud Supply Chain Planning |
||||||
Synchronize Supplies from Production Scheduling Within a User-Specified Firm Horizon |
||||||
Pinpoint Root Cause of Late Demands Due to Material and Capacity Constraints |
||||||
Use Pick-Pack Lead Time for Configure-to-Order and Shipment and Arrival Sets |
||||||
Plan and Schedule Supplies Respecting Minimum Transfer Quantity Between Operations |
||||||
Supply Chain Orchestration
Supply Chain Orchestration
Use Redesigned Pages to View Supply Requests
Use redesigned pages to view supply requests and their details on your desktop, tablet, or mobile device. You can now use the supply request reference, supply order, supply document, or item to search for your supply requests. Create and save your own default searches. Filter search results according to the supply's requested date, requested delivery date, request status, and so on. View recommended actions that you need to take to remove exceptions. View the supply documents that Oracle Supply Chain Orchestration created for each request. View details about request lines and take actions.
To use this feature, go to the Supply Orchestration work area, click Tasks > Supply Requests, then search for your supply request.
Improve your efficiency when you search for and view supply requests.
Steps to Enable
Use the Opt In UI to enable this feature. For instructions, refer to the Optional Uptake of New Features section of this document.
Offering: Manufacturing and Supply Chain Materials Management
Tips And Considerations
Use these attributes to search for your supply requests:
- Supply Request Reference
- Supply Order
- Supply Document
- Item
Use these attributes to filter your search results:
- Supply Requested Date
- Requested Delivery Date
- Supply Status
- Supply Type
- Business Flow
Do more:
- View details about the supply documents for each supply request.
- Create and save your own search. Make that search your default search.
- Drill into into the supply request to get details about the supply request and any exception messages that might exist.
- If a supply request is in exception, then you can view a recommended action to fix it.
- Do various actions on each supply request.
Key Resources
- See Using Supply Chain Orchestration and Supply Chain Orchestration on Oracle Help Center.
Access Requirements
You have a couple of options for giving people access to this feature, depending on whether you're assigning them predefined job roles or your own configured job roles.
- Users who are assigned any of these predefined job roles can access this feature:
- Supply Chain Operations Manager (ORA_DOS_SUPPLY_CHAIN_OPERATIONS_MANAGER_JOB)
- Users who are assigned a configured job role that contains these privileges can access this feature:
- Process Supply Order Interface (DOS_PROCESS_SUPPLY_ORDER_INTERFACE_PRIV)
- View Supply Orders (DOS_VIEW_SUPPLY_ORDERS_PRIV)
- Manage Supply Request Exceptions (DOS_MANAGE_SUPPLY_REQUEST_EXCEPTIONS_PRIV)
- View Supply Order Exceptions and Status (DOS_VIEW_SUPPLY_ORDER_EXCEPTIONS_AND_STATUS_PRIV)
If you're maintaining your own job roles, no new privileges were introduced to support this feature.
Supply Planning
SCM Common Components
Extend SCM Redwood Application Pages Using Visual Builder Studio
Tailor a seamless experience for the users in your enterprise using Oracle Visual Builder Studio. You can use business rules in Visual Builder Studio’s Express mode to:
- Make the fields and regions on a page required or optional.
- Make the fields and regions on a page read-only or editable.
- Show or hide fields and regions depending on specific criteria.
- Configure Redwood pages to best meet your specific business needs. For example, you can control which actions are visible on the Receipt Deliveries page, or you can set the default date range that's available on the PAR Counts Overview page.
The types of changes you can make to a page depend on the page you're modifying.
NOTE: In this update, business rules aren't yet supported on all SCM Redwood pages.
To determine whether you can extend a specific page using Visual Builder Studio, go to the page and open the Setting and Actions menu. Look for the Edit Page In Visual Builder Studio task:
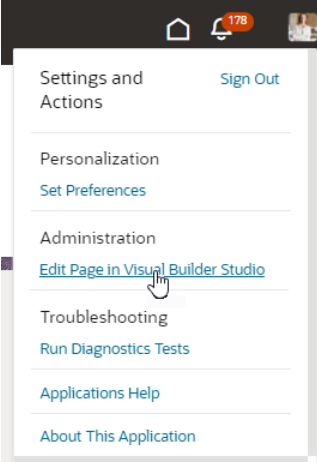
Settings and Actions Menu
If you don’t see the Edit Page in Visual Builder Studio task, then you can’t use Visual Builder Studio to edit the page, either because you're not assigned the necessary privilege to edit pages in VB Studio, or because the page can't currently be edited in VB Studio.
When you open a page in Visual Builder Studio, use only the Express mode to extend the page. Advanced mode isn’t supported. If Express mode isn't available when you open the page in VB Studio, then you can't extend the page in VB Studio. You can find the Express mode in the Visual Builder Studio header region:

Header Region in Visual Builder Studio
See Extending Oracle Cloud Applications in Visual Builder Studio Express Mode for details about how to extend your application pages in Express mode.
Steps to Enable
Leverage the Visual Builder Studio to expose your applications. To learn more about extending your application using Visual Builder, visit Oracle Help Center > your apps service area of interest > Books > Configuration and Extension.
Before you can start working with Visual Builder Studio, a systems administrator must complete some initial setup. For instructions, see Set Up VB Studio to Extend Oracle Cloud Applications.
Tips And Considerations
Keep the Pages list closed while you work in Visual Builder Studio Express mode. Closing the list gives you a cleaner view of the page you’re extending.
In Visual Builder Studio Express mode, you might see capabilities that support defaulting and validation of field values. The features aren't supported in SCM Redwood pages in update 24B. You'll be able to use defaulting and validation for selected SCM Redwood pages in future updates.
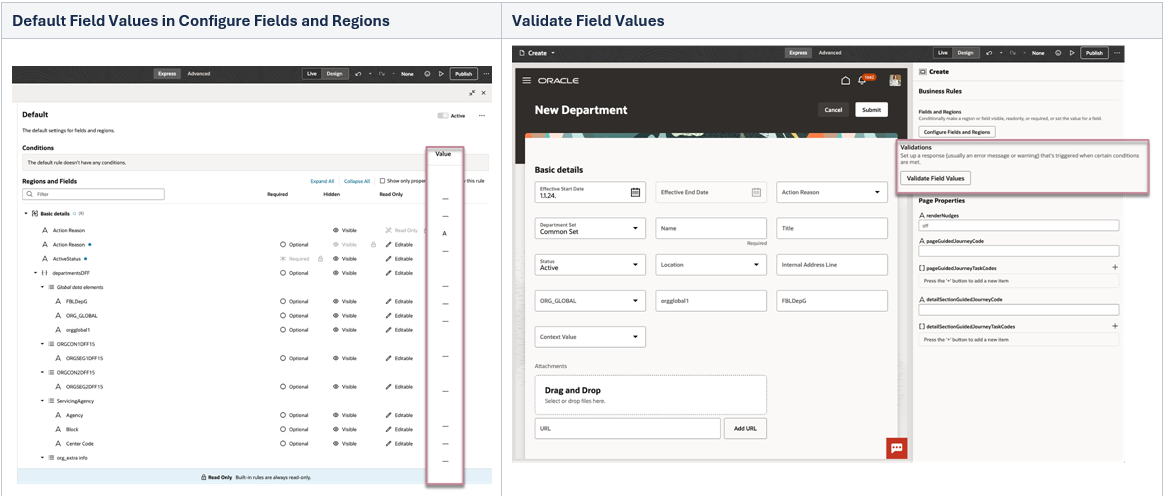
Default Field Values and Validate Field Values in VB Studio Express Mode
Key Resources
To start extending your application pages in Visual Builder Studio, follow the instructions to access Visual Builder Studio. As you’re working, you can find additional information in these resources:
- Extend Oracle Cloud Applications in Visual Builder Express Mode
- Oracle Fusion Cloud HCM and SCM: Extending Redwood Applications for HCM and SCM Using Visual Builder Studio
Access Requirements
To extend application pages using Visual Builder Studio, you must be assigned a configured job role that contains this privilege:
-
Administer Sandbox (FND_ADMINISTER_SANDBOX_PRIV)
This privilege was available prior to this update.
Supply Planning
Export Data in Planning Tables with Expanded Volume Limits
Export data from tables with as many as 1 million rows and 4,000 columns, subject to a maximum of 2 million cells. The Export Data in Format Specified in a Planning Table feature introduced in the 24A update is now enhanced to support increased volume limits. In addition, you can now export using either Microsoft Excel file format or CSV file format.
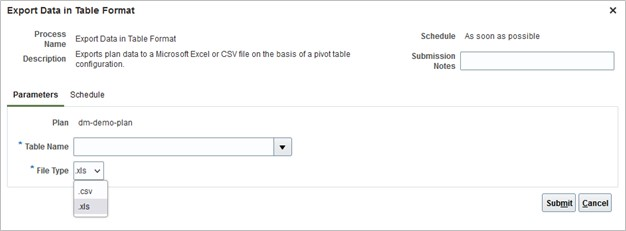
Export Data in Table Format Page
Previously, the Export Data in Table Format function supported exporting tables with up to 65,536 rows and 256 columns. These limits have been extended to 1 million rows and 4,000 columns with a maximum of 2 million cells. For example, you can now export a table with any of the following combinations (all of which equate to 2 million cells.)
- 1 million rows and 2 columns
- 500,000 rows and 4 columns
- 100,000 rows and 20 columns
This function has also been enhanced to support exporting in CSV (comma-separate values) format in addition to XLS (Microsoft Excel) format.
Steps to Enable
You don't need to do anything to enable this feature.
Tips And Considerations
Microsoft XLS format has a limit of 256 columns and 65,536 rows per sheet. When exporting in XLS format:
- The number of columns will be limited to 256.
- If the table selected for export has more than 65,536 rows (but less than 1 million rows), then the output will be split into multiple sheets within the same Excel workbook with each sheet having 65,536 rows or less.
- The resulting XLS file will include a macro that automatically runs the first time the file is opened. This macro will merge the multiple sheets into a single sheet and convert the file from an XLS format to an XLXS format. Microsoft XLXS format has a limit of 1 million rows.
Key Resources
- Export Data in Format Specified in a Planning Table (update 24A)
Access Requirements
There are no new roles or security privileges needed to access this feature.
- Users who currently have access to open planning tables will automatically be able to use this feature.
Users who are assigned a configured job role that contains one or both of these privileges can access this feature:
- Maintain Planning Tables (MSC_MAINTAIN_PLANNING_TABLES_PRIV)
- View Planning Tables (MSC_VIEW_PLANNING_TABLES_PRIV)
These privileges were available prior to this update.
Avoid Duplicate Pegging Details Using a Summarized Pegging View
On the Supplies and Demands tab in the Supply Planning work area, you can see detailed pegging information for a specific order. Previously, in some situations, you would see multiple pegging records for the same pegged order. Multiple records are generated for the same order to account for the end demand pegging, which allows efficient analysis of a particular pegging record to the end demand it’s pegged to.
With this update, you can aggregate multiple records for the same order to one record easily. This aggregation facilitates easy analysis in situations where you just want a streamlined view of all the orders pegged to a particular demand or supply order.
By default, the Supplies and Demands tab shows detailed pegging information. For example, suppose a single supply is consumed in a subassembly associated with multiple end demands. In that case, you’ll see one pegging record for each end demand pegged to that subassembly. In the following illustration, the item KB-CSP-ELEC is used in three subassemblies. Each subassembly is pegged to multiple end demands, causing a planned order for a subassembly to be repeated multiple times.
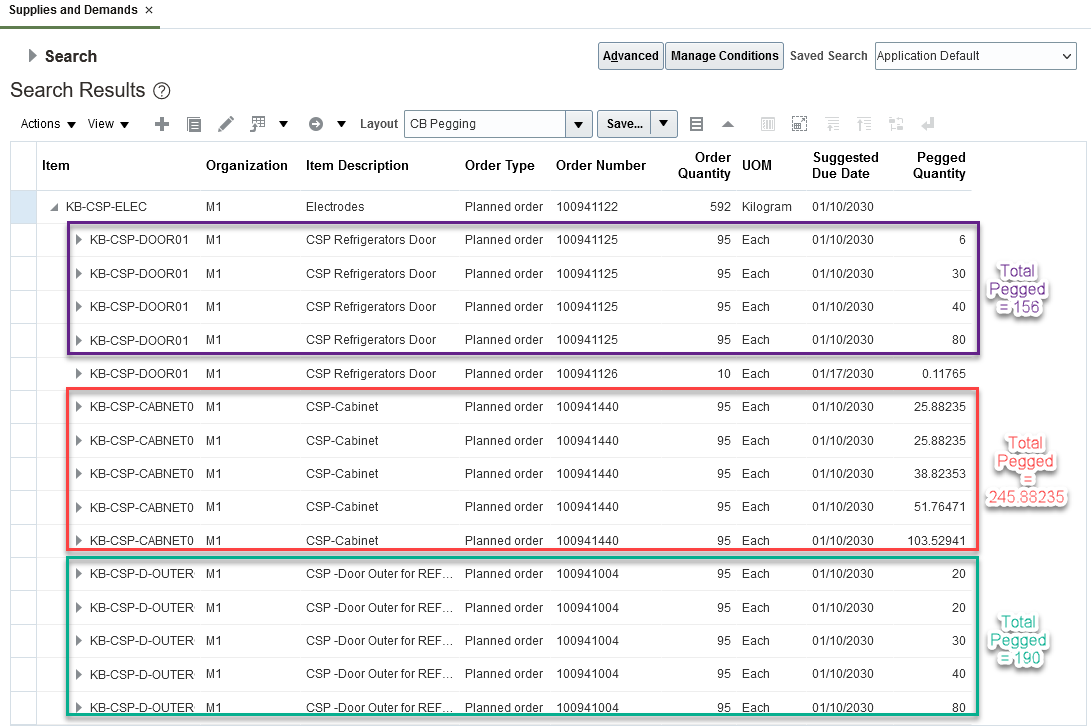
Supplies and Demands Full Pegging View
To see the total quantity of a component pegged to a subassembly, regardless of which end demand the subassembly is used, select the View Summarized Pegging action from the View menu.
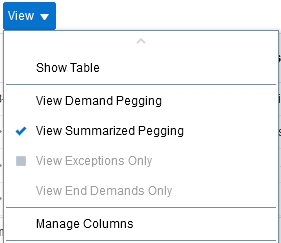
New View Summarized Pegging Menu Option
When View Summarized Pegging is selected, only one pegging row is displayed for each unique supply or demand (depending on the pegging direction). The image below shows how the pegging rows from the earlier illustration have been consolidated after selecting View Summarized Pegging. The 15 pegged rows were consolidated into 4 rows, one for each unique planned order, and the pegged quantity was summarized.

Supplies and Demands Summarized Pegging View
When you select View Summarized Pegging, the pegged child rows are summarized regardless of pegging direction. This means you can either start with a raw material supply and peg to an intermediate supply and eventually to the end demand. Or you can start with an end demand or intermediate supply and peg to the raw material.
Summarized pegging remains on until you either turn it off, close the Supplies and Demands page, or select a different table layout that doesn’t have summarized pegging turned on.
Steps to Enable
You don't need to do anything to enable this feature.
Tips And Considerations
Saving a table layout with summarized pegging:
- When you save a table layout, the layout will include whether summarized pegging is turned on.
- When you select a table layout that was saved when summarized pegging is turned on, the table will be refreshed based on the selected table layout and summarized pegging is enabled automatically.
For performance reasons, some actions aren’t available when summarized pegging is turned on:
- The View Exceptions Only, View End Demands Only, and Expand All actions on the View menu are disabled when summarized pegging is turned on.
- The Include All Child Rows option of Export to Excel is disabled when summarized pegging is turned on. To export child rows, you will need to first expand them in the table and then choose the Include Child Rows if Expanded option of Export to Excel.
Access Requirements
Users who are assigned a configured job role that contains these privileges can access this feature:
- View Supplies and Demands (MSC_VIEW_SUPPLIES_AND_DEMANDS_PRIV)
- Edit Supplies and Demands (MSC_EDIT_SUPPLIES_AND_DEMANDS_PRIV)
These privileges were available prior to this update.
Secure Plan Data Considering Unassigned Entities
Secure plan data providing visibility to unassigned members at the lowest level of the hierarchy for the customers, suppliers, organizations, or products dimension. With this update, you can provide visibility to data that’s currently not applicable to a dimension. For example, by assigning a particular organization to a user, you can now provide visibility to measures that aren’t striped by organization, such as supplier capacity.
You can configure planning data security with an enhanced option to include unassigned members of the Product, Organization, Customer, and Supplier entities. Doing so allows you to access measures that don’t use a dimension’s hierarchy levels. For example, the Supplier Capacity Available measure includes the Product, Organization, Supplier, and Time dimensions. The measure is computed at the Item, Supplier-Supplier site, and Day levels of the Product, Supplier, and Time dimensions. Because the measure value isn’t specific to an Organization, the Organization level isn’t included in the measure’s computation. In such a scenario, you can set up a data access set to get access to specific organizations as well as measures that aren’t specific to an organization (such as Supplier Capacity Available).
The following are examples of Supply Planning measures that can now display values by configuring data security with the Organization entity that has the Include unassigned planning level member check box selected:
- Supplier Capacity Available
- Supplier Capacity Required
- Net Supplier Capacity Available
- Supplier Capacity Utilization Percentage
- Supplier Capacity Required by Supplier Capacity Constraint Date
- Additional Capacity Required by Supplier Capacity Constraint Date
Secure Plans Considering Unassigned Entities applies at the lowest level of the hierarchies for the Product, Organization, Customer, and Supplier dimensions. It is applicable to views displaying measures and planning analytics details for the Product, Organization, Customer, and Supplier dimensions in Supply Planning, Demand Planning, Demand and Supply Planning, Sales and Operations Planning, Replenishment Planning, Global Order Promising, and Backlog Management.
The Administer Data Security view has been enhanced as follows:
- The data access set condition configuration has a new Include unassigned planning level member check box. You can select this check box only when the condition being created includes the Product, Organization, Customer, or Supplier entities at their lowest hierarchy level.
- You can select the Include unassigned planning level member check box along with other lowest-level members of the Product, Organization, Customer, and Supplier hierarchies.
Perform the following steps to secure plan data with unassigned members:
- Select Product, Organization, Customer, or Supplier as an entity in a data access set.
- Select the lowest level for Product, Organization, Customer, or Supplier.
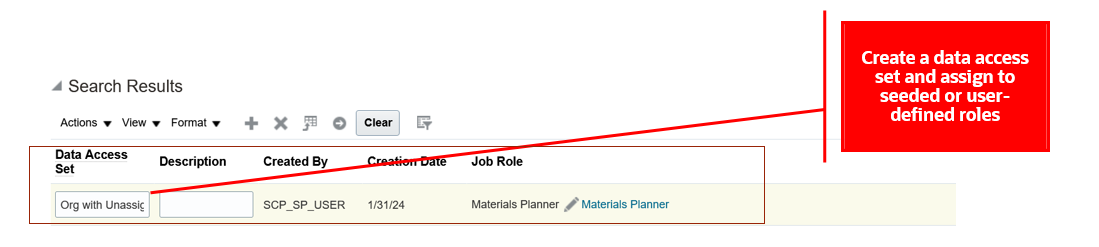
Create a Data Access Set on the Administer Planning Security page
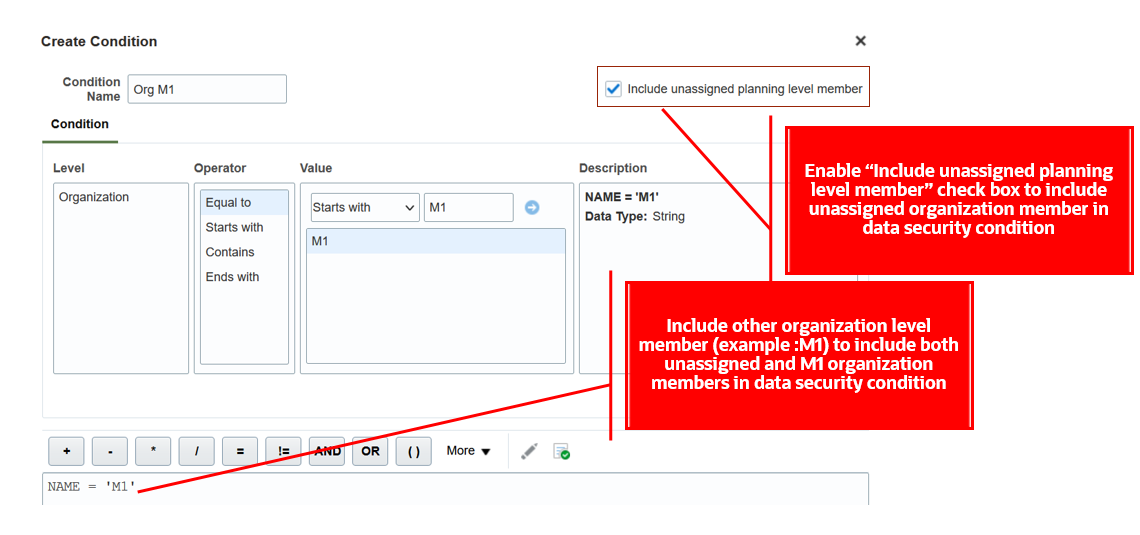
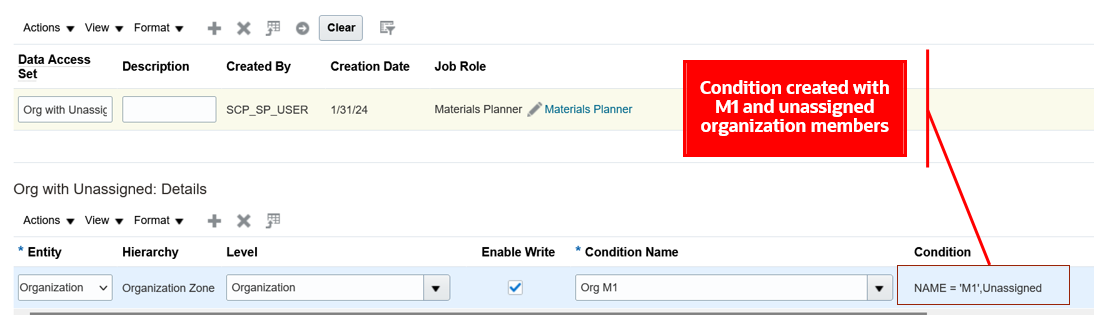
- Select the Create action to create a condition for Condition Name and select the Include unassigned planning level member check box.
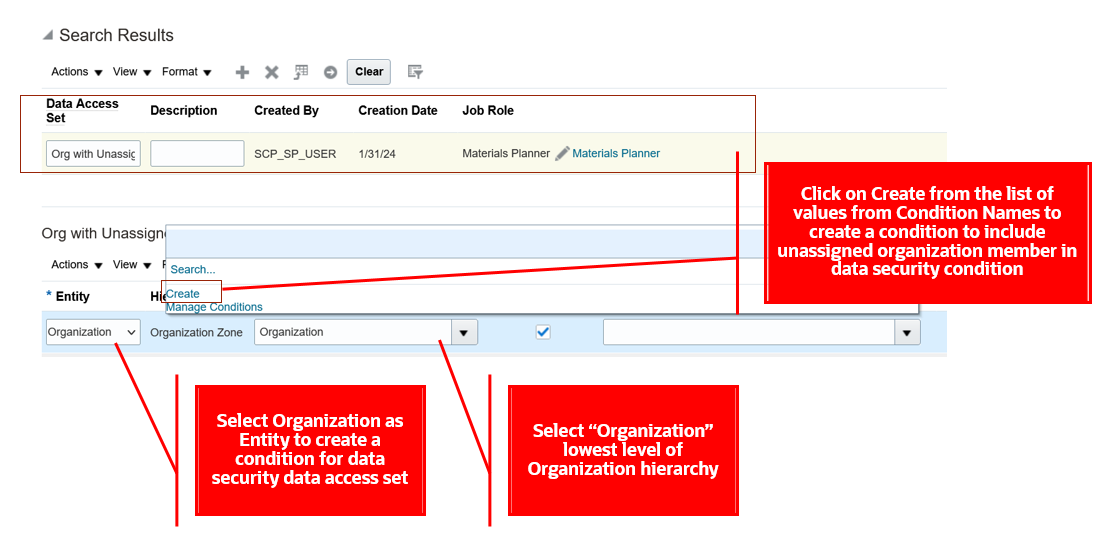
Create a Condition for an Organization Entity
- Create a condition by providing a Condition Name and selecting the Include unassigned planning level member check box. Add other level members if required to configure the data condition.

New Include Unassigned Planning Level Member Check Box
- Save the condition and assign it to the selected entity.

Assign the Condition to the Organization Entity
Let’s walk through some examples of Supplier Capacity measure details displayed when the Include unassigned planning level member check box is selected in the Supply Planning work area.
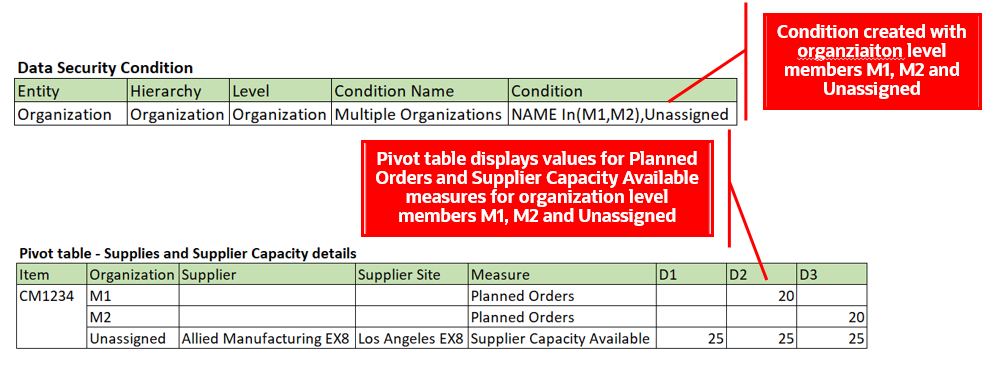
We will see how the data access set configured in the preceding screenshot is applied to the measure values in a table. The following pivot table shows Planned Orders measure values for organization-level members M1 and M2 and Supplier Capacity measure values for the unassigned organization-level member. The example shows a data security condition is created with organization-level members M1 and M2, and the Include unassigned planning level member check box is selected.
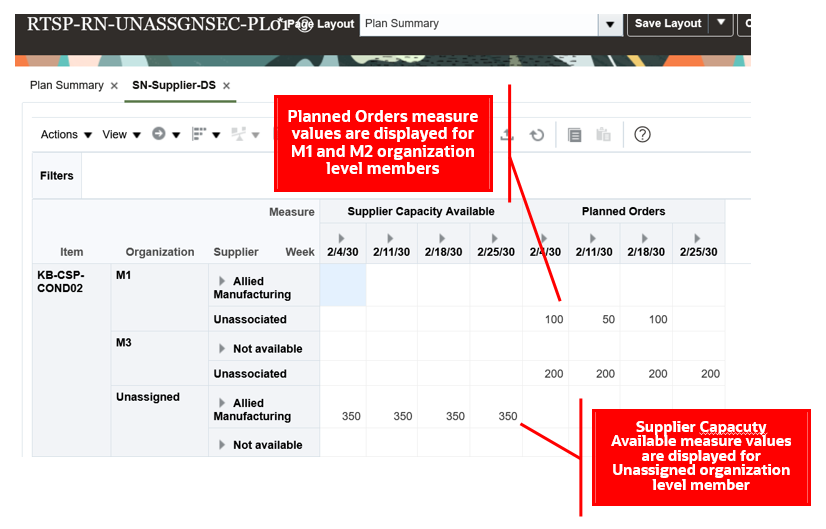
Pivot Table Created with Organization-Level Members
Let’s see what happens when we configure a data access set with the Include unassigned planning level member check box selected and with other lowest level members. Data security applies an In condition. In the following screenshot, a data security condition was created by selecting Include unassigned planning level member, M1, and M2 for an Organization. The condition applies data security for measures where the organization value can be unassigned, M1, or M2.
The pivot table shows values for Planned Orders and Supplier Capacity Available measures when the data security condition is configured with M1, M2, and unassigned organization-level members.

Data Security Condition for Organization-Level Members and Pivot Table Details
You can enable Include unassigned planning level member across multiple entities within a data access set. When enabled within a data access set, security is applied as an "AND" condition.
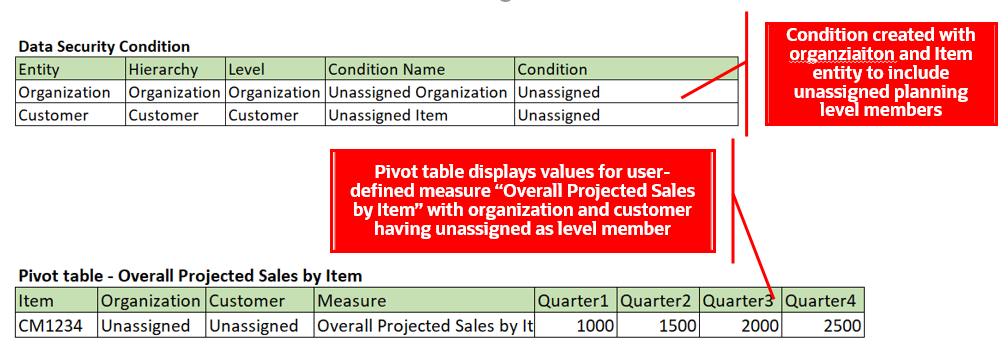
When Include unassigned planning level member is selected for an Organization and Customer entity, data security is applied and displayed for the measures when both Organization and Customer combinations are unassigned in a pivot table.
The pivot table shows values for user-defined measures with unassigned-level members for organization and customer entities.

Data Security Condition for Organization- and Customer-Level Members and Pivot Table Details
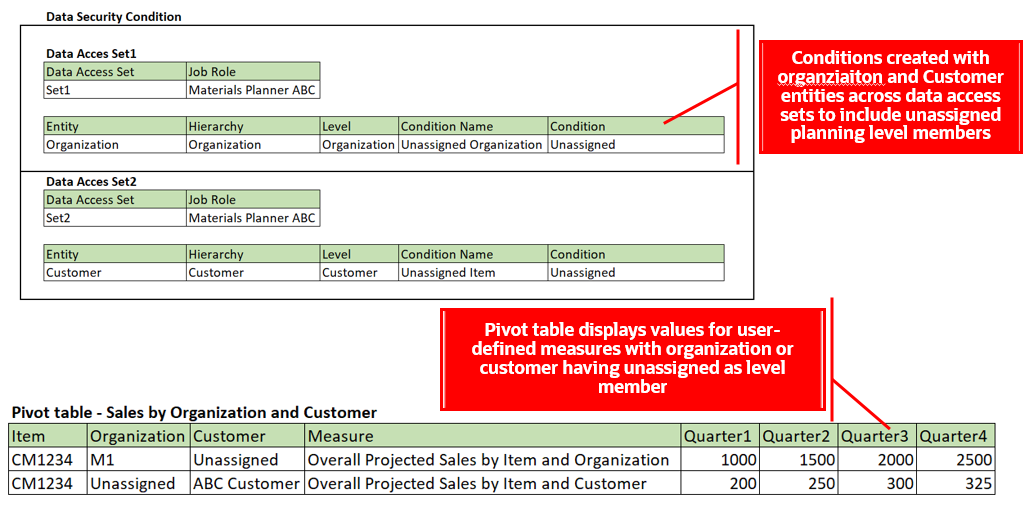
When you enable Include unassigned planning level member across data access sets, security is applied as a "OR" condition.
In the following example, enabling Include unassigned planning level member for Item in data access set1 and Organization entity in data access set 2, data security is applied and displayed for users for the measures when either Item or Organization have unassigned as lowest-level members in a pivot table.
The pivot table displays values for user-defined measures with unassigned level members for organization or customer entities.

Data Security Conditions for Data Sets and Pivot Table Details
Steps to Enable
You don't need to do anything to enable this feature.
Tips And Considerations
- Oracle Global Order Promising respects data security for the Organization entity only.
- Customer and Supplier data security configurations are applied for planning analytics user interfaces like pivot tables or graphs in these work areas: Supply Planning, Demand Planning, Demand and Supply Planning, Sales and Operations Planning, and Replenishment Planning.
- You can’t enable Include unassigned planning level member for existing data conditions. You must create a new data condition to enable it.
- You can delete data conditions with Include unassigned planning level member using Manage Conditions only if the condition isn’t assigned to an entity across a data access set.
Access Requirements
Users who are assigned a configured job role that contains this privilege can access this feature:
- Administer Planning Security (MSC_ADMINISTER_PLANNING_SECURITY_PRIV)
This privilege was available prior to this update.
Use a Deep Link to Access Oracle Fusion Cloud Supply Chain Planning
Use deep links to create more connected analytics and a seamless user experience between external applications and Oracle Fusion Cloud Supply Chain Planning. Deep links are a type of hyperlink used to open pages without using menus or navigating through a menu structure. With this update, you can easily navigate from an application, such as Oracle Fusion Analytics Warehouse, to specific pages in Oracle Supply Chain Planning. For example, you could create a deep link to navigate from Oracle Fusion Analytics Warehouse to the plans for an item in Oracle Supply Chain Planning.
This feature is supported for the following work areas: Supply Planning, Demand Management, Demand and Supply Planning, Replenishment Planning, and Sales and Operations Planning. With this feature, you can now navigate to the page layout and table or graph in the respective work areas. Additionally, you can navigate to the Exceptions or Supplies and Demand page.
The sample deep link URL for accessing this feature consists of three parts:
https://<host>/fscmUI/faces/deeplink?objType=<OBJECT_TYPE>&objKey=<Entity;Plan;FilterContext>
Base URL Object Type Path Object Key Values
- Base URL: This part must include the host information with “/fscmUI/faces/deeplink?” appended after it; for example, https://<host>/fscmUI/faces/deeplink?
- Object type path: This part should have the work area name under objTypethat that you want to open. For example, if you want to open the Supply Planning work area, pass objType = “MSC_SP_WORKAREA”. This path is appended to the base URL and contains details about the work area you are creating the link to.
- Object key values:
- Entity: Pass the table or graph or layout option that you intend to open; for example, objkey=Entity=Material Plan or objkey=Entity=Forecast Graph or objkey=Entity=Plan Summary.
- Plan name: Pass the plan name or plan ID of the Oracle Supply Chain Planning plan that you intend to open; for example, Plan=RTSP-Supply-Plan.
- Filter context: The filter context contains details about the hierarchies, levels, and level members of the dimension in the table, graph, or hierarchies and level members details of the dimension in the table or graph. It allows you to filter data records based on the details of the dimension you choose to filter. This information is appended to a combination of a base URL and object type path; for example, hierarchy1=Enterprise;level1=Organization,member1=M1.
You can pass the object key values using the following parameters:
- Parameters: Pass the parameters under the object key values; for example, hierarchy1=Product;level1=Item,member1=Laptop_1GB or hierachy1=Product;levelmember1=512342
When using this feature to link an Oracle Analytics report from Oracle Fusion Analytics Warehouse, construct the URL using the reporting platform features that support tokens as follows:
- Token values: Pass the column name under the object key values; for example, hierarchy1=${keyValuesForColumn:Hierarchy};level1=${keyValuesForColumn:level};member1=${keyValuesForColumn:Prd_Member_Id}; or hierachy1=${keyValuesForColumn:Hierarchy;levelmember1=${keyValuesForColumn:Prd_lvl_Member_Id}
The ObjType parameters for the work areas are as follows:
- Demand Management MSC_DM_WORKAREA
- Supply Planning MSC_SP_WORKAREA
- Demand and Supply Planning MSC_ISD_WORKAREA
- Replenishment Planning MSC_REPL_WORKAREA
- Sales and Operations Planning MSC_SOP_WORKAREA
For example, the following URL takes you to the Material Plan table in the Supply Planning work area from the Oracle Fusion Analytics Warehouse application.
With token values:
https://host/fscmUI/faces/deeplink?objType=MSC_SP_WORKAREA&objKey=entity=MaterialPlan;plan=${keyValuesForColumn:PLAN_ID};hierarchy1=${keyValuesForColumn:HIERARCHY_ID};levelMember1=${keyValuesForColumn:ORG_LVL_MEMBER_ID};hierarchy2=${keyValuesForColumn:HIERARCHY_ID};levelMember2=${keyValuesForColumn:PRD_LVL_MEMBER_ID};hierarchy3=${keyValuesForColumn:HIERARCHY_ID};levelMember3=${keyValuesForColumn:TIM_LVL_MEMBER_ID}
With parameters:
https://host/fscmUI/faces/deeplink?objType=MSC_SP_WORKAREA&objKey=entity=Material Plan;plan=RTSP-KB-SP-PL01;hierarchy1=SP_Catalog;level1=Item;member1=KB-CSP-ALLOY;hierarchy2=APS Calendar;level2=Week;member2=1/7/30;hierarchy3=Enterprise;level3=Organization;member3=M1
Additionally, it’s possible to pass the parameters of Member Id, Hierarchy Id, and Level Id details up to 5 parameters with names like member2, level2, hierarchy2, etc. All context details are appended with the AND clause. For example, if multiple Member Id, Level Id, and Hierarchy Id details are passed, then the filter context will be represented as (Member Id1, Level Id1, Hierarchy Id1) AND (Member Id2, Level Id2, Hierarchy Id2).
Steps to Enable
You don't need to do anything to enable this feature.
Tips And Considerations
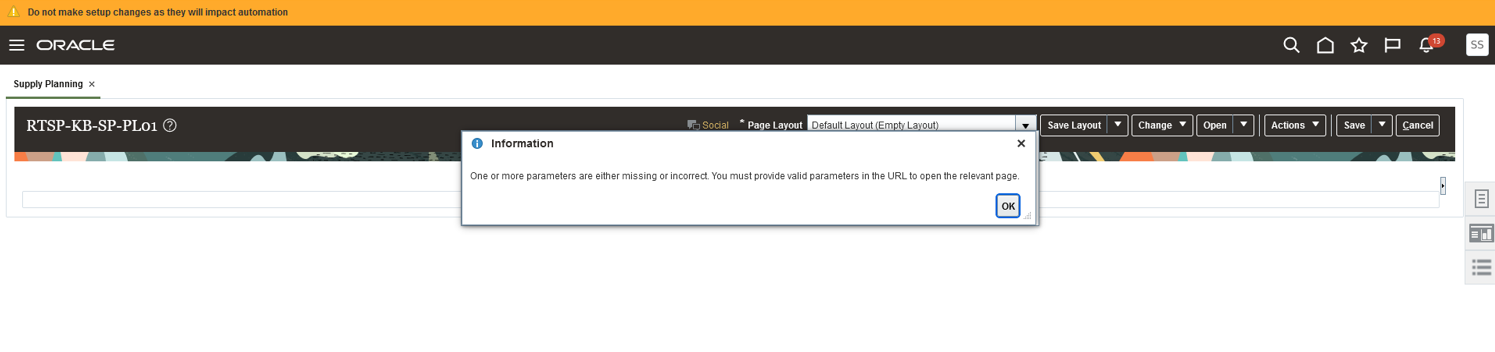
The Supplies and Demand page and the Exceptions page in their respective work areas support only the Item and Organization dimensions. However, it's important to note that this feature isn’t supported for Tiles and Tile sets within Graph sections.
If any of the parameters are missing or incorrectly passed, the following error is displayed.
Key Resources
Access Requirements
Users who are assigned a configured job role that contains these privileges can access this feature:
- Monitor Demand Management Work Area (MSC_MONITOR_DEMAND_MANAGEMENT_WORK_AREA_PRIV)
- Monitor Demand and Supply Planning Work Area (MSC_MONITOR_DEMAND_AND_SUPPLY_PLANNING_WORK_AREA_PRIV)
- Monitor Replenishment Planning Work Area (MSC_MONITOR_REPLENISHMENT_PLANNING_WORK_AREA_PRIV)
- Monitor Sales and Operations Planning Work Area (MSC_MONITOR_SALES_AND_OPERATIONS_PLANNING_WORK_AREA_PRIV)
- Monitor Supply Planning Work Area (MSC_MONITOR_SUPPLY_PLANNING_WORK_AREA_PRIV)
- View Planning Tables (MSC_VIEW_PLANNING_TABLES_PRIV)
Users must have access to the individual pages and tables.
Edit Time-Phased Safety Stock Quantities in a Supply Plan
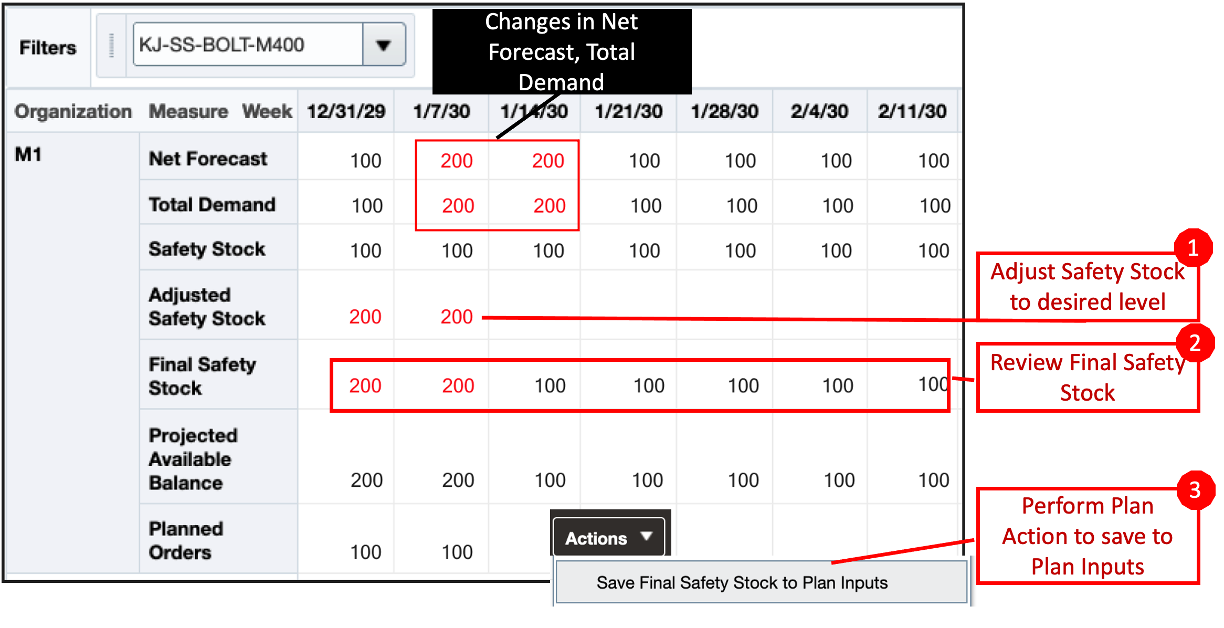
In a variety of situations, your planners might want to manually adjust safety stock levels that vary over time. This update allows you to verify current safety stock levels and determine if adjustments are necessary. You can update the new Adjusted Safety Stock measure. The new value is used in the next run of the supply plan to ensure that there’s enough stock to honor the new safety stock level if there are no supply constraints.
Two new seeded measures work together to help you edit the safety stock measure in a supply plan: Adjusted Safety Stock and Final Safety Stock.
Editing the Safety Stock in a Supply Plan
To set the desired safety stock level, edit the Adjusted Safety Stock measure. Save the plan and review the changes in the Final Safety Stock measure. The Final Safety Stock measure is recalculated with the updated Adjusted Safety Stock wherever present or with the original Safety Stock quantity, where there are no adjustments for the respective time buckets. The Save Final Safety Stock to Plan Inputs plan action saves the values for all the time buckets in the plan's horizon to the plan inputs.
Adjusted Safety Stock and Final Safety Stock Measures
Saving the Final Safety Stock for Future Use
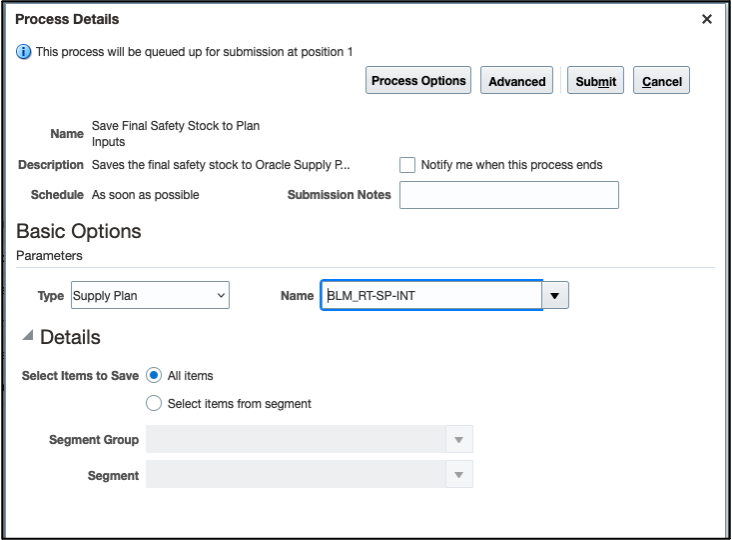
The Final Safety Stock measure can now be saved and used as a plan input for all plans that include that item on subsequent plan runs. You can run the Save Final Safety Stock to Plan Inputs scheduled process from the plan Actions menu. Alternatively, you can run it as a scheduled process in an automated mode. You can save the safety stock adjustments for all or specific segments (item-organization combinations), as shown in the following illustration.
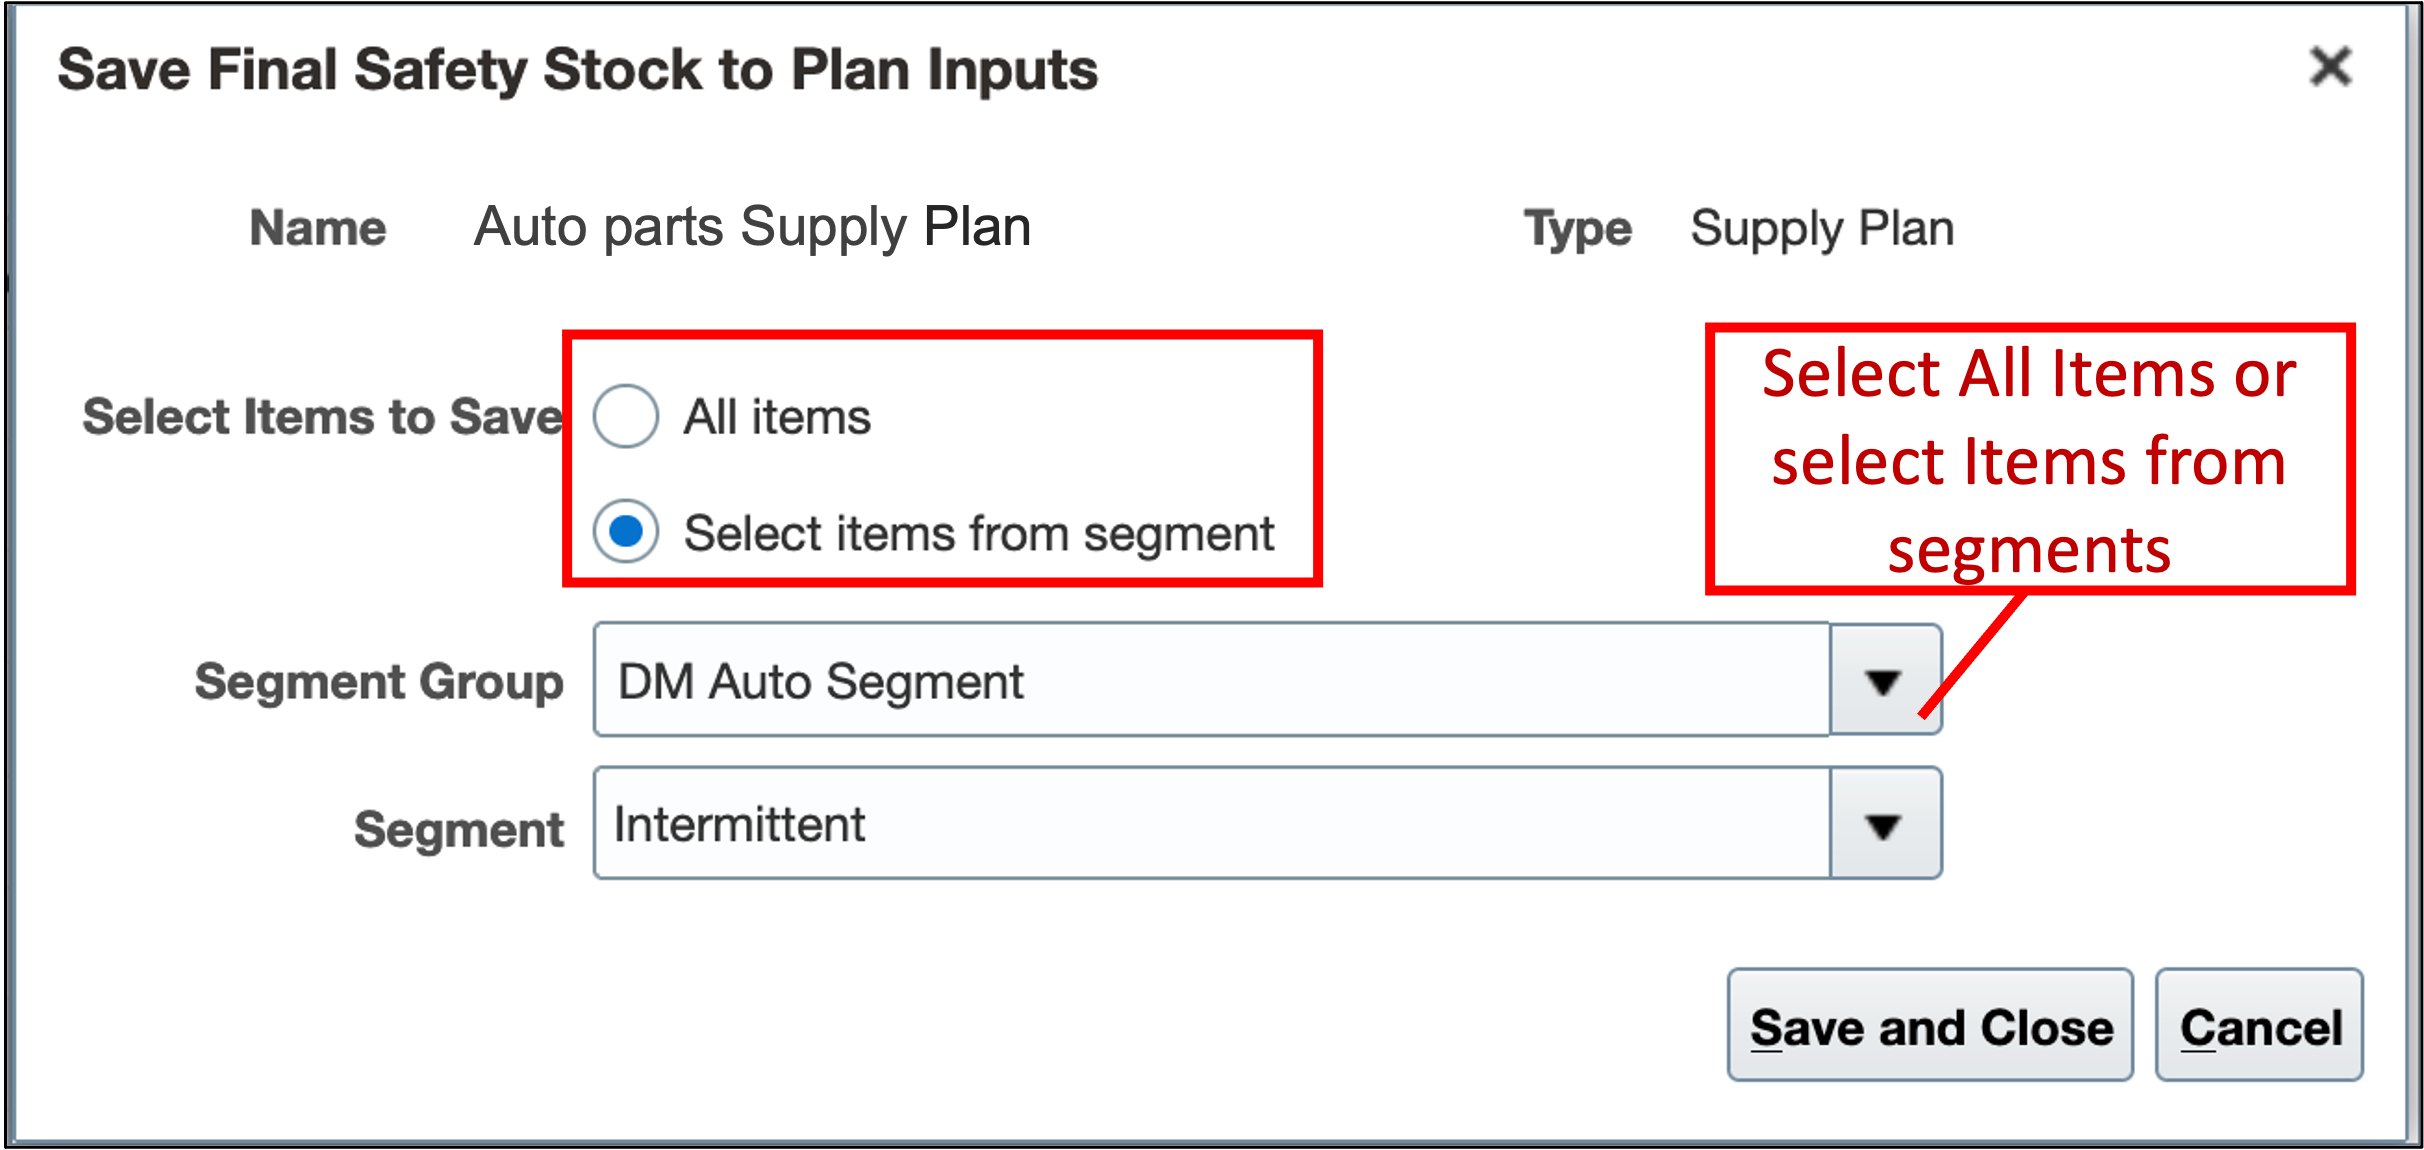
Segment Selection for Save Final Safety Stock to Plan Inputs
For Items with the Safety Stock Planning Method as Quantity, the safety stock in the plan inputs will persist. It can be overridden by subsequent changes to the Adjusted Safety Stock measure on the planning page. You can also make changes using the file-based data import (FBDI). The latest changes to safety stock, either by interface updates to the Adjusted Safety Stock or FBDI updates to the Safety Stock directly, will persist.
The values to the Adjusted Safety Stock measure continue showing until a complete refresh of the plan is performed via the Refresh with current data run plan option.
Running the Plan with a Full Refresh
The Final Safety Stock, which is saved to plan inputs, will now be used on subsequent plan runs for items that use the Safety Stock Quantity as an Item attribute.
Running the Plan with a Replan
For the items that have the Safety Stock Planning Method as Safety Stock Quantity, the plan will use the Adjusted Safety Stock quantity overrides and replan the supplies accordingly. You can iteratively replan and review the supply plan output changes without saving the safety stock adjustments to Plan Inputs. To do so, use the Run plan action with the Do not refresh with current data refresh option.
For the items that have Days of Cover as an Item attribute or those Items that use Statistical Safety Stock based on the Safety Stock Planning Method plan option, safety stock will be recalculated based on the respective methods. The adjusted safety stock quantity won't be considered for these items as the safety stock planning method isn't Safety Stock Quantity.
Using with Items that Have Days of Cover as a Safety Stock Planning Method Attribute
At certain times, you may want to override the safety stock calculated for items that use Days of Cover as a Safety Stock Planning Method attribute. Even for such items that have the Safety Stock Planning Method as Days of Cover, you can still edit the Adjusted Safety Stock quantity and save the Final Safety Stock quantity to Plan Inputs. However, to use those quantities in the next plan run, you need to change the item's Safety Stock attribute to Quantity from Days of Cover in the Items table. You can then use the Final Safety Stock generated as a Plan Input to be used in subsequent plan runs. However, in this case, the Adjusted Safety Stock quantity won’t be used in a subsequent replan without refreshing the current data.
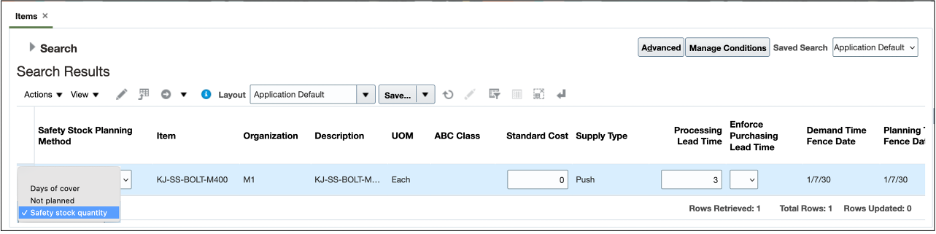
Safety Stock Planning Method in the Items Table
Safety Stock Planning Method as Statistical Safety Stock for End Items
When using the plan option Safety Stock Planning Method to use Statistical safety stock for end items also, you can still edit the Adjusted Safety Stock quantity and save the Final Safety Stock quantity to Plan Inputs. However, to use those quantities in the next plan run, you need to change the Safety Stock Planning Method to User-specified values for all items in the plan’s options. You can then use the Final Safety Stock generated as a Plan Input in subsequent plan runs. However, in this case, the Adjusted Safety Stock quantity won't be used in a subsequent replan without refreshing the current data.
Examples of Disaggregation across levels in the Hierarchy
The Adjusted Safety Stock measure follows the disaggregation rule of Equal when disaggregating data across the time hierarchy. The Illustration below shows the disaggregation of user input values in the time hierarchy.
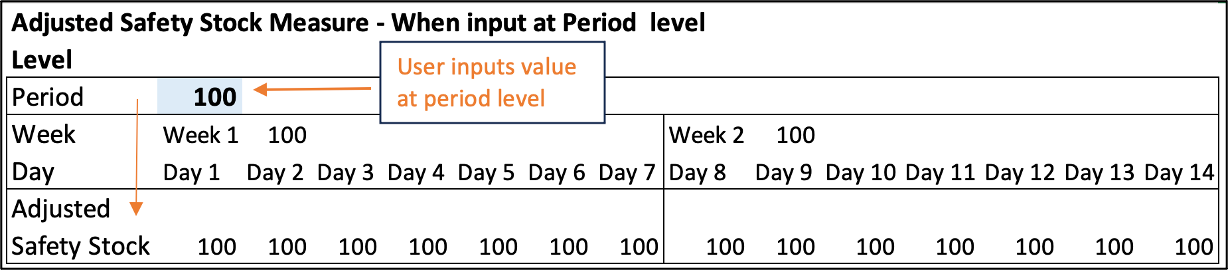
User Inputs Value at Period Level
In the preceding example, the Adjusted Safety Stock input at the month level is repeated for every week and each day of the week in that month.
Aggregation Across Time Hierarchy
While aggregating from lower levels on the time hierarchy, the Adjusted Safety Stock measure uses the aggregation rule of Last. For example, in the illustrated example below, the user inputs a value of 100 at the day level. Upon aggregation, the value for the parent, week level, retains the same value.
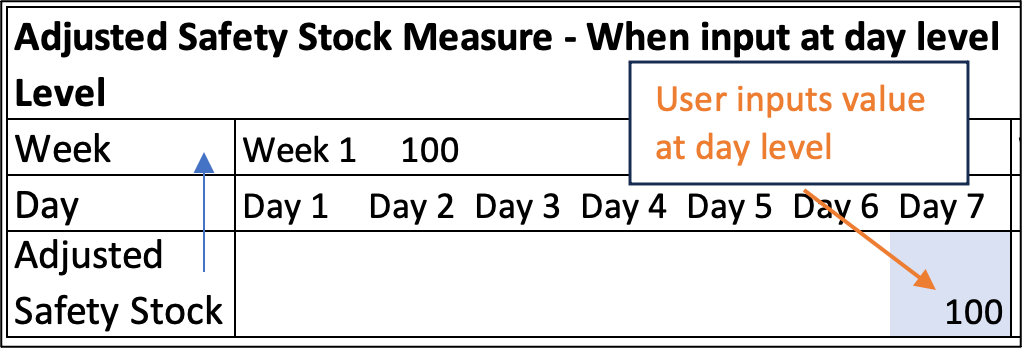
Aggregation in the Time Hierarchy
Disaggregation Across the Product Hierarchy
Proportional disaggregation is used for members in the product hierarchy. In the following illustration, no preexisting values exist at the item level and the disaggregation is proportionate.
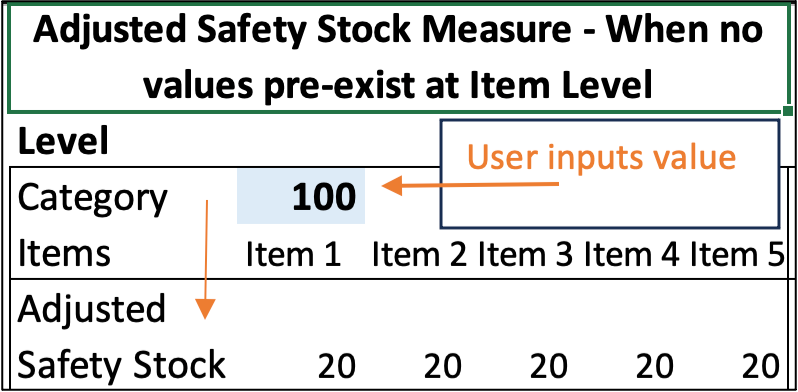
Disaggregation When No Preexisting Values Exist
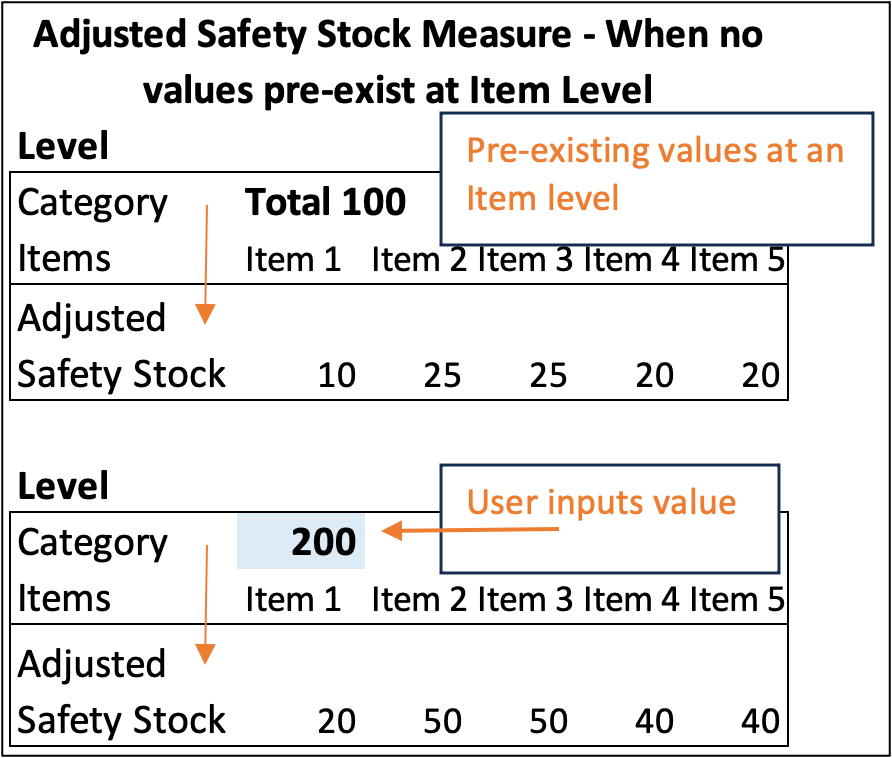
When disaggregating when previous values exist, planning considers the proportion of the preexisting values and disaggregates in the same proportion, as shown in the following illustration.
Disaggregation in Product Hierarchy When Values Exist
Aggregation in the Product and Organization Hierarchies
The aggregation in the Product and Organization Hierarchies follows the Sum rule. The values for all members at the same level are added to aggregate to the parent.
Steps to Enable
You don't need to do anything to enable this feature.
Tips And Considerations
- Add the two new measures, Adjusted Safety Stock and Final Safety Stock, to the measure catalogs.
- The Adjusted Safety Stock, Final Safety Stock, and Safety Stock measures are dimensioned by Item, Organization, and Date. However, in the case of attribute-based planning Safety Stock measure alone can also be dimensioned by attribute, whereas the other two aren't dimensioned by attribute. See the following example.

Adjusted Safety Stock In Case of Attribute-Based Planning
In the preceding example, the Adjusted Safety Stock measure for Org 1 will override the Safety Stock of 100 but not the Safety Stock of Org 1 - US, where US (Country of Origin) is the attribute of Org 1.
-
For plans that have Safety Stock Planning Method as Do not plan safety stock, the plan would still contain the Adjusted Safety Stock and Final Safety Stock measures. However, they won't participate in the safety stock calculation.
-
To enable automated workflows, you can program the Save Final Safety Stock to Plan Inputs scheduled process.
Scheduled Process Dialog Box
Key Resources
- Watch the Edit Time-Phased Safety Stock Quantities in a Supply Plan demo.
Access Requirements
Users who are assigned these job roles have privileges that can access this feature:
- Supply Chain Planner
- Demand and Supply Planner
- Replenishment Planner
These privileges were available prior to this update.
Gain Insights on Lead Times for Shipment to Receipt
Provide recommendations to adjust the assumptions for lead times for shipment to receipt for buy items based on actual performance.
Previously, you could use the lead time learning feature to receive alerts about major deviations in the actual supplier lead times when compared to those times specified in the approved supplier list (ASL) or supplier item record. The lead time specified is usually the expected lead time for the supplier to ship an item from a supplier site. In some situations, you might have modeled the entire lead time, including the shipment-to-receipt lead times in the ASL or supplier item record.
With this update, you can now capture the historical lead times in this situation as well and provide visibility to those item supplier combinations where your modeled lead times deviate significantly from the historical record. The computations of variance and other lead time metrics have been enhanced to examine the actual ship dates, requested ship dates, actual receipt dates, and requested dock dates, depending on whether your supplier manages the transportation or otherwise. These metrics use Planning Advisor to help alert you to situations when reality is deviating from your modeling assumptions so you can proactively take mitigation actions.
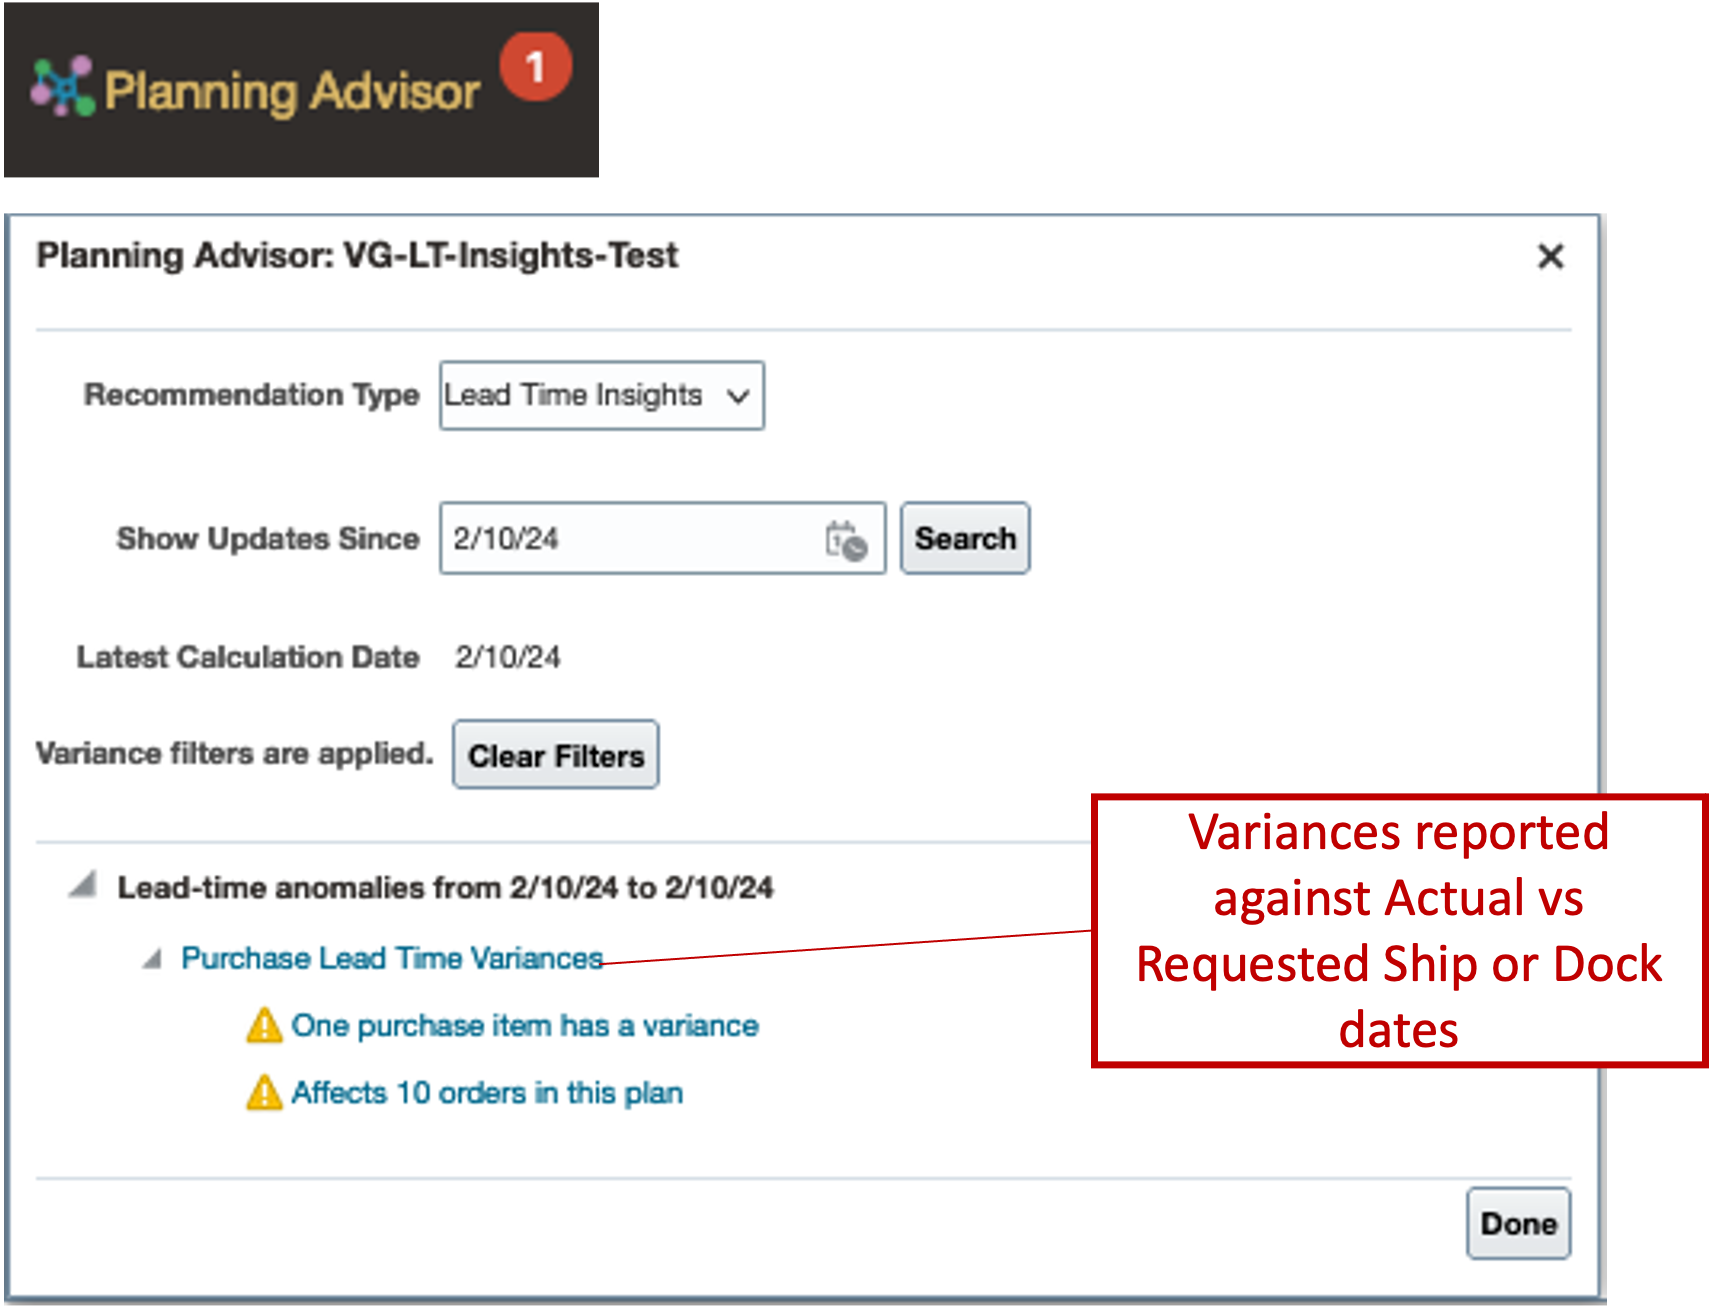
Planning Advisor Dialog Box
There’s an enhancement in the lead-time reporting calculations to address bulk and blanket order-based purchase orders where the lead time is recorded against the same order, but each instance of delivery is tracked for its lead time.
- The variances now reported consider if the shipment was delivered by means of Buyer-managed Transportation (BMT) in your purchase order history to arrive at the variance calculation as follows:
- For items that have the BMT as Yes and consider the Order to Ship cycles, the lead time variance (Variance Days in the following screenshot) is Ship Date – Requested Ship Date.
- For regular Buy orders that consider the Order to Receipt cycles for the lead time calculations, the lead time variance is calculated as Dock Date – Requested Dock Date.
- The Historical Lead Time days are the sum of the variance days and the Supplier Lead Time maintained in the ASL; for example:
- If the average Variance Days is 3 days and the Supplier Lead Time is 2 days, the Historical Lead Time is 5 days.
- The variance calculated shows both positive and negative values. Positive variance for delayed shipments and negative variance for shipments that were received earlier than planned.
- There are four new base entities collected from the purchase order history information. These entities are also introduced as columns on the Order Details page of the Lead Time Insights recommendation type:
- Requested Delivery Date (for PO Line)
- Promised Delivery Date
- Requested Ship Date (for PO line)
- Promised Ship Date
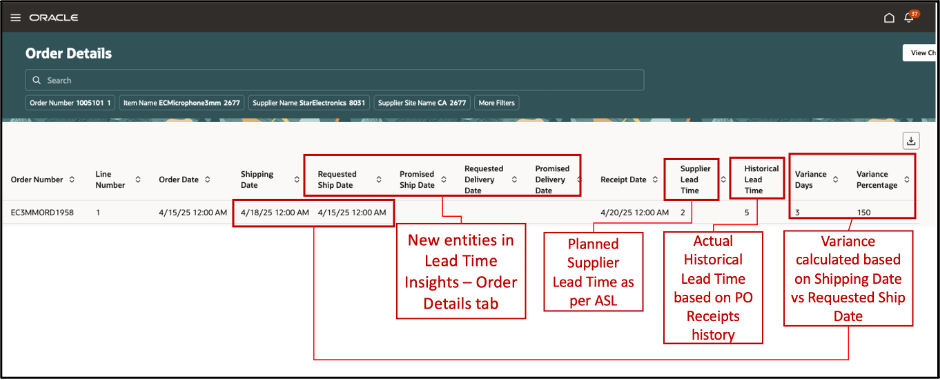
New Entities in the Lead Time Insights Recommendation Type
Steps to Enable
You don't need to do anything to enable this feature.
Key Resources
- Refer to the training content for 23B-Gain Insights on Lead Times for Purchased Items for enablement details.
Access Requirements
Users who are assigned a configured job role that contains this privilege can access this feature:
- Manage Lead Time Insights (MSC_MANAGE_LEAD_TIME_INSIGHTS_PRIV)
This privilege was available prior to this update.
Synchronize Supplies from Production Scheduling Within a User-Specified Firm Horizon
In a previous release, you could synchronize planned orders between your tactical supply planning processes with detailed production scheduling processes. In some instances, you might have a longer scheduling horizon than required to firm up your production schedules. In this case, it’s not necessary to synchronize the detailed production schedule with the tactical supply planning process for the entire time horizon.
With this update, you can now set a specific time window in days called the "firm horizon." When orders are scheduled within this window, they are considered firm and cannot be rescheduled.
Oracle Supply Planning synchronizes all the planned orders in the scheduling horizon of a production schedule. With this update, Supply Planning synchronizes only those scheduled planned orders from a production schedule that fall within a firm horizon window and implicitly firms them. The scheduled planned orders that fall outside of the firm horizon aren't considered by Supply Planning.
You can specify a firm horizon for each production schedule associated with a supply plan or a demand and supply plan. The Firm Horizon in Days field is enabled when the demand schedule type is Production Schedule, and the Include Production Scheduling Results in Next Plan Run check box is selected.
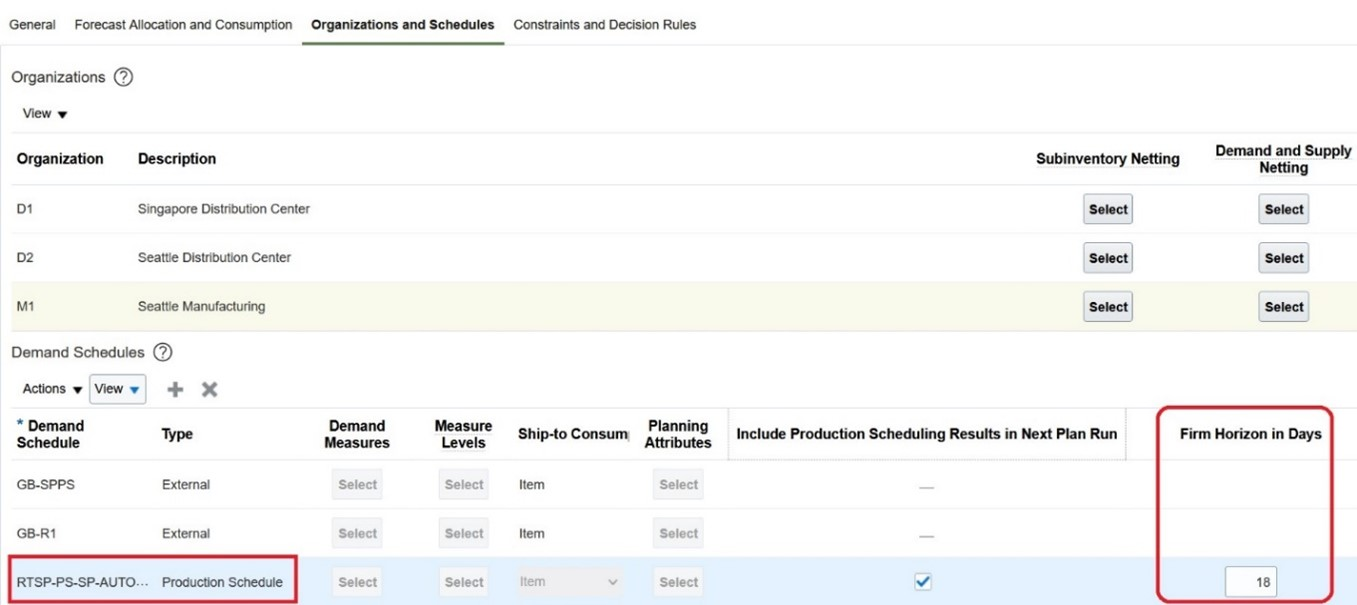
Firm Horizon in Days Column
You specify the firm horizon in days to synchronize only the scheduled planned orders from Oracle Production Scheduling that fall within this window.
When you specify a value for Firm Horizon in Days, the supply plan considers only those scheduled planned orders from a production schedule with a scheduled start date less than or equal to the supply plan run date plus Firm Horizon in Days (scheduled start date <= supply plan run date + Firm Horizon in Days).
Prior to this update, the planned orders synchronized from a production schedule were explicitly marked as firm (Firm Status = Firm) in Supply Planning. When a planner releases firm planned orders, firm work orders are created in Oracle Manufacturing. When Production Scheduling schedules these firm work orders, it has reduced scheduling flexibility because it respects the dates of firm work orders within the fixed-time fence set on the Schedule Options page.
With this update, the scheduled planned orders from Production Scheduling are considered implicitly firm. Supply Planning internally considers them firm, though the Firm Status isn't set to Firm. Because the Firm Status is Not firm, upon releasing a planned order supply from Supply Planning, the work order is created as not firm, and this gives Production Scheduling more flexibility for scheduling. The implicitly firm planned orders are considered in Supply Planning’s natural time fence calculation.
Steps to Enable
You don't need to do anything to enable this feature.
Tips And Considerations
- Because the planned orders from Production Scheduling are implicitly firm, you can recognize them by looking at the Schedule Name column in Supply Planning. If this column is populated with the production schedule name, then Supply Planning considers the planned order firm and plans accordingly.
- You can explicitly firm the implicitly firm planned orders and releases.
- If Firm Horizon in Days is not specified, the entire production schedule horizon is considered for planned order synchronization.
- If you change the firm quantity or firm date of a planned order from a production schedule in Supply Planning and run the supply plan with the Do not refresh with current data option selected, Supply Planning plans the change, and the resource requirements are recomputed. The process ignores the recommendations from Production Scheduling for this planned order.
Key Resources
- Refer to Schedule Planned Make Orders from Supply Planning release training to understand the integration between Supply Planning and Production Scheduling and how the scheduled planned orders from Production Scheduling are further planned in Supply Planning.
Access Requirements
Users who are assigned a configured job role that contains these privileges can access this feature:
- Edit Plan Options (MSC_EDIT_PLAN_OPTIONS_PRIV)
- Edit Plans (MSC_EDIT_PLANS_PRIV)
- Run Plan with Snapshot (MSC_RUN_PLAN_WITH_SNAPSHOT_PRIV)
- Edit Demands and Supplies (MSC_EDIT_DEMANDS_AND_SUPPLIES_PRIV)
- Monitor Supply Planning Work Area (MSC_MONITOR_SUPPLY_PLANNING_WORK_AREA_PRIV)
- Exceptions view (MSC_MANAGE_PLANNING_EXCEPTIONS_PRIV)
- Demand fulfillment view (MSC_MANAGE_DEMAND_FULFILLMENT_PRIV)
These privileges were available prior to this update.
Selected Supply Planning Bug Fixes in This Update
This update includes some bug fixes that can change the way Oracle Supply Planning works. This isn't a full list of all the bug fixes in this update. This list includes the bug fixes that can cause a noticeable change in application behavior.
Export Data in Format Specified in a Planning Table
In Update 24A, we introduced the Export Data in Format Specified in a Planning Table feature. This feature lets you export tables to Microsoft Excel while retaining the original table layout. With this feature, you can export tables that you weren’t previously able to open because they exceeded the 250,000 cell limitation. You can invoke this feature in the following ways:
- Use the Actions drop-down button in an open plan.
- Use the Actions menu on the Manage Plans page of the selected plan.
- Run the Export Data in Table Format scheduled process with a Plan and Table Name selected.
After this feature was introduced, we discovered that exporting tables with more than 2 million cells could cause an out-of-memory issue and, in some cases cause a server to stop functioning or operating correctly. To protect against this, we are introducing a limitation in Update 24B that will prevent the export of a table that contains more than 2 million cells. It’s possible that you successfully exported a table that exceeded this limitation in Update 24A. If so, this will no longer be possible in Update 24B and later releases.
Oracle reference: 36275383
Steps to Enable
You don't need to do anything to enable this feature.
Constraint-Based Planning
Create and run supply plans that consider material and capacity constraints. Focus on meeting demand on time by evaluating all possible alternatives, such as using different sources, substitute components, or alternative work definitions.
After you opt in to the Constraint-Based Planning feature, you can use the feature described in this section.
Pinpoint Root Cause of Late Demands Due to Material and Capacity Constraints
When a plan determines that a particular demand, whether it is a forecast or sales order, can’t be fulfilled on time, it’s essential that your planners understand what the root cause is so they can evaluate mitigation actions. Planners can use the data on the Analyze Late Demand page in the Supply Planning work area to facilitate this analysis.
With this update, the logic behind the Analyze Late Demand page has been enhanced to pinpoint the root cause of late demands to the actual supply at any level of the bill causing a demand to be late. The logic now factors in additional scenarios previously not considered. These enhancements help you understand the plan results so you can take mitigation actions when feasible.
With this update, the following scenarios were enhanced:
- Scenario 1: Identify the supply that isn’t in the pegging chain of an end demand but is causing it to be late because of a shared supply downstream pegged to an end demand.
Consider the following example. The plan run date is 04-Jan in this scenario.
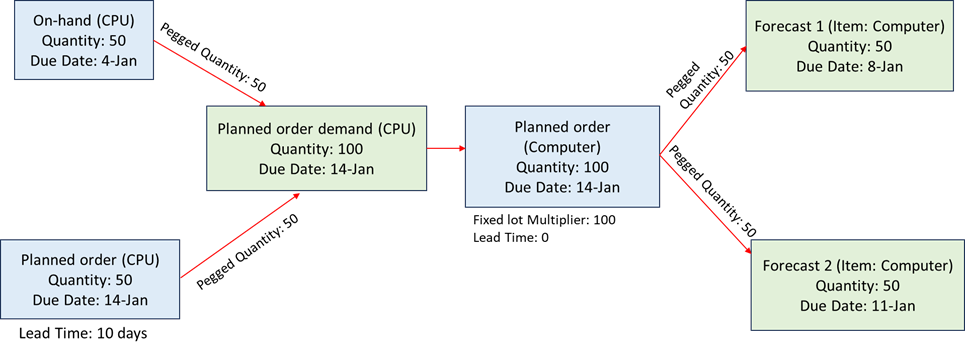
Example of Late Demand Analysis
In this use case, the Computer item is the final assembly with 0 days lead time, and its item structure has a CPU component with 10 days lead time.
The pegging structure of both forecasts is:
Forecast 1 (Computer), Qty 50, 8-Jan Forecast 2 (Computer), Qty 50, 11-Jan
-- Planned order (Computer), Qty 100, 14-Jan -- Planned order (Computer), Qty 100, 14-Jan
-- On-hand (CPU), Qty 50, 04-Jan -- Planned order (CPU), Qty 50, 14-Jan
Forecast 1 is satisfied late in this case because the planned order of the Computer item has a due date of 14-Jan. However, the planned order of the Computer assembly item is delayed because the planned order of the CPU component item has a lead time of 10 days.
Prior to this update, the Late Demand Analysis view for Forecast 1 stopped the constrained supply path at the planned order (Computer) because the component planned order (CPU) was-n’t in the pegging chain of Forecast 1. As a result, the planner couldn’t correctly identify the reason for Forecast 1’s delay.
After this update, the planned order (CPU) will also be shown in the constrained supply path of Forecast 1. This will help you correctly identify the supply that caused the delay, and you can take mitigating action.
Demands are satisfied late, as shown on the Supplies and Demands page. The Material Available Date is later than the due date of the demand.

Example of Analyzing a Late Demand
The forecast on 1/8 is delayed because the planned order supply of component item PPS-LDA-CPU01 is available only on 1/14 due to lead time constraints. This planned order is not in the pegging chain of forecast demand but has a shared supply downstream.
- Scenario 2: If purchasing lead times have been compressed when the Enforce Purchasing Lead Time item attribute has been set to No, those compressed purchased supplies don’t show on the Late Demand Analysis page.
Consider the following example:
-
- RA_ASSY is the final assembly with 0 days lead time.
- RA_SUBASSY is a sub-assembly item with a 1-day lead time.
- RA_COMP is a purchased part with the Enforce Purchasing Lead Time attribute set to No.
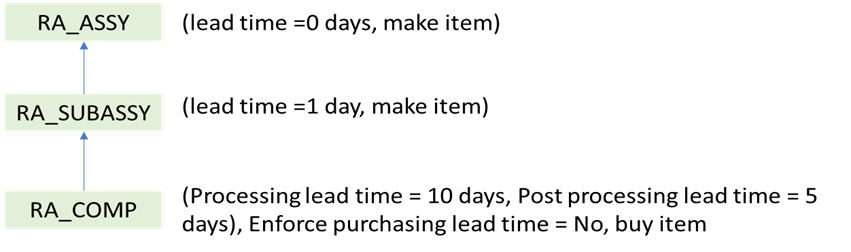
Item Structure of Final Assembly RA_ASSY
The following screenshot shows the supply demand:
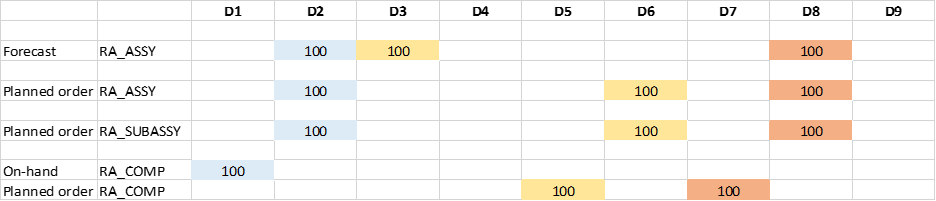
Example of the Demands and Its Supply Chain
In this use case, the demand on day 2 (D2) is satisfied on time because it’s pegged completely to onhand supply. The demand on day 3 (D3) is satisfied late due to the purchased component's lead time. The post-processing lead time is a hard constraint even if the Enforce Purchasing Lead Time item attribute is set to No. The demand on day 8 (D8) is satisfied on time. The processing lead time for the purchased component is compressed (EPLT=No), and component demand is outside the post-processing lead time.
Before this update, the Late Demand Analysis page showed the end demands for days 3 (D3) and 8 (D8). The late demand analysis has considered the total lead time of the purchased component even though the Enforce Purchasing Lead Time attribute was set to No and demand was satisfied on time.
With this update, the Late Demand Analysis page shows only the demand for day 3 (D3). In scenario 2, the planned orders for RA_COMP on day 5 (D5), RA_SUBASSY on day 6 (D6), and RA_ASSY on day 6 (D6) are on the constrained supply path. None of the supplies pegged to end demand on day 8 (D8) are on the constrained supply path.
Steps to Enable
Use the Opt In UI to enable this feature. For instructions, refer to the Optional Uptake of New Features section of this document.
Offering: Supply Chain Planning
Tips And Considerations
If you want to use the Pinpoint Root Cause of Late Demands Due to Material and Capacity Constraints feature, then you must opt in to its parent feature: Constraint-Based Planning. If you’ve already opted in to this parent feature, then you don’t have to opt in again.
- The late demand analysis view provides the list of supplies that can cause delays to an end demand. The constrained supply path is not the pegging tree of an end demand.
- A compressed upstream supply can still be on the constrained supply path for cases other than scenario 2 mentioned previously, for example, if it is pegged to a firm downstream supply and its latest start date is earlier than the earliest start date.
- There are a couple of changes to the user interface:
- The Pegged Quantity column is removed because the supply in a constrained path may not be directly pegged to the end demand.
- A new Parent Supply Order Number column is available. This column shows the supply order number of the immediate downstream supply. In cases with multiple parent downstream supplies, the order number of the latest supply is shown.
-
This feature is supported for both constrained plan types, Enforce Demand Due Date and Enforce Capacity Constrained.
Key Resources
-
Watch the Pinpoint Root Cause of Late Demands Due to Material and Capacity Constraints demo.
- Refer to the feature Identify Which Supplies are Causing Demands At Risk (update 22a) for the initial design.
Access Requirements
Users who are assigned a configured job role that contains these privileges can access this feature:
- Edit Plans (MSC_EDIT_PLANS_PRIV)
- Run Plan with Snapshot (MSC_RUN_PLAN_WITH_SNAPSHOT_PRIV)
- Edit Demands and Supplies (MSC_EDIT_DEMANDS_AND_SUPPLIES_PRIV)
- Monitor Supply Planning Work Area (MSC_MONITOR_SUPPLY_PLANNING_WORK_AREA_PRIV)
- Exceptions view (MSC_MANAGE_PLANNING_EXCEPTIONS_PRIV)
These privileges were available prior to this update.
Backlog Management
Reschedule your order backlog by prioritizing orders based on flexible demand priority rules. You can simulate the effect of different rules to find the best combination of scheduled dates and sources based upon the latest supply information, and then release the updated orders to order management systems for execution.
After you opt in to to the feature named Backlog Management, you can use the features in this section.
Secure Plan Data Considering Unassigned Entities
Secure plan data providing visibility to unassigned members at the lowest level of the hierarchy for the customers, suppliers, organizations, or products dimension. With this update, you can provide visibility to data that’s currently not applicable to a dimension. For example, by assigning a particular organization to a user, you can now provide visibility to measures that aren’t striped by organization, such as supplier capacity.
You can configure planning data security with an enhanced option to include unassigned members of the Product, Organization, Customer, and Supplier entities. Doing so allows you to access measures that don’t use a dimension’s hierarchy levels. For example, the Supplier Capacity Available measure includes the Product, Organization, Supplier, and Time dimensions. The measure is computed at the Item, Supplier-Supplier site, and Day levels of the Product, Supplier, and Time dimensions. Because the measure value isn’t specific to an Organization, the Organization level isn’t included in the measure’s computation. In such a scenario, you can set up a data access set to get access to specific organizations as well as measures that aren’t specific to an organization (such as Supplier Capacity Available).
The following are examples of Supply Planning measures that can now display values by configuring data security with the Organization entity that has the Include unassigned planning level member check box selected:
- Supplier Capacity Available
- Supplier Capacity Required
- Net Supplier Capacity Available
- Supplier Capacity Utilization Percentage
- Supplier Capacity Required by Supplier Capacity Constraint Date
- Additional Capacity Required by Supplier Capacity Constraint Date
Secure Plans Considering Unassigned Entities applies at the lowest level of the hierarchies for the Product, Organization, Customer, and Supplier dimensions. It is applicable to views displaying measures and planning analytics details for the Product, Organization, Customer, and Supplier dimensions in Supply Planning, Demand Planning, Demand and Supply Planning, Sales and Operations Planning, Replenishment Planning, Global Order Promising, and Backlog Management.
The Administer Data Security view has been enhanced as follows:
- The data access set condition configuration has a new Include unassigned planning level member check box. You can select this check box only when the condition being created includes the Product, Organization, Customer, or Supplier entities at their lowest hierarchy level.
- You can select the Include unassigned planning level member check box along with other lowest-level members of the Product, Organization, Customer, and Supplier hierarchies.
Perform the following steps to secure plan data with unassigned members:
- Select Product, Organization, Customer, or Supplier as an entity in a data access set.
- Select the lowest level for Product, Organization, Customer, or Supplier.

Create a Data Access Set on the Administer Planning Security Page
- Select the Create action to create a condition for Condition Name and select the Include unassigned planning level member check box.

Create a Condition for an Organization Entity
- Create a condition by providing a Condition Name and selecting the Include unassigned planning level member check box. Add other level members if required to configure the data condition.
New Include Unassigned Planning Level Member Check Box
- Save the condition and assign it to the selected entity.
Assign the Condition to the Organization Entity
Let’s walk through some examples of Supplier Capacity measure details displayed when the Include unassigned planning level member check box is selected in the Supply Planning work area.
We will see how the data access set configured in the preceding screenshot is applied to the measure values in a table. The following pivot table shows Planned Orders measure values for organization-level members M1 and M2 and Supplier Capacity measure values for the unassigned organization-level member when a data security condition is created with organization-level members M1 and M2 and the Include unassigned planning level member check box is selected.

Pivot Table Created with Organization-Level Members
Let’s see what happens when we configure a data access set with the Include unassigned planning level member check box selected and with other lowest level members. Data security applies an In condition. In the following screenshot, a data security condition was created by selecting Include unassigned planning level member, M1, and M2 for an Organization. The condition applies data security for measures where the organization value can be unassigned, M1, or M2.
The pivot table shows values for Planned Orders and Supplier Capacity Available measures when the data security condition is configured with M1, M2, and unassigned organization-level members.
Data Security Condition for Organization-Level Members and Pivot Table Details
You can enable Include unassigned planning level member across multiple entities within a data access set. When enabled within a data access set, security is applied as an "AND" condition.
When Include unassigned planning level member is selected for an Organization and Customer entity, data security is applied and displayed for the measures when both Organization and Customer combinations are unassigned in a pivot table.
The pivot table shows values for user-defined measures with unassigned-level members for organization and customer entities.
Data Security Condition for Organization- and Customer-Level Members and Pivot Table Details
When you enable Include unassigned planning level member across data access sets, security is applied as a "OR" condition.
In the following example, enabling Include unassigned planning level member for Item in data access set1 and Organization entity in data access set 2, data security is applied and displayed for users for the measures when either Item or Organization have unassigned as lowest-level members in a pivot table.
The pivot table displays values for user-defined measures with unassigned level members for organization or customer entities.
Data Security Conditions for Data Sets and Pivot Table Details
Steps to Enable
Use the Opt In UI to enable this feature. For instructions, refer to the Optional Uptake of New Features section of this document.
Offering: Supply Chain Planning
Tips And Considerations
- If you want to use the Secure Plan Data Considering Unassigned Entities feature, then you must opt in to its parent feature: Order Backlog Management. If you’ve already opted in to this parent feature, then you don’t have to opt in again.
- Oracle Global Order Promising respects data security for the Organization entity only.
- Customer and Supplier data security configurations are applied for planning analytics user interfaces like pivot tables or graphs in these work areas: Supply Planning, Demand Planning, Demand and Supply Planning, Sales and Operations Planning, and Replenishment Planning.
- You can’t enable Include unassigned planning level member for existing data conditions. You must create a new data condition to enable it.
- You can delete data conditions with Include unassigned planning level member using Manage Conditions only if the condition isn’t assigned to an entity across a data access set.
Access Requirements
Users who are assigned a configured job role that contains this privilege can access this feature:
- Administer Planning Security (MSC_ADMINISTER_PLANNING_SECURITY_PRIV)
This privilege was available prior to this update.
Use Pick-Pack Lead Time for Configure-to-Order and Shipment and Arrival Sets
Some organizations need extra time to package and label goods, arrange for transportation, or perform quality checks before shipment. If you need to reschedule configure-to-order items or order lines that are part of a shipment set or arrival set, you can now include this extra "pick-pack lead time." Previously, you could only add extra pick-pack lead time for standard items in Oracle Backlog Management.
You can adjust pick-pack lead time by fulfillment organization, carrier, and destination. Any pick-pack lead time you specify will offset the scheduled ship dates and scheduled delivery dates for order lines fulfilled in those organizations.
Example 1: Impact of Pick-Pack Lead Time on a Shipment Set
Here are the important points for the data shown in this example:
- The system date or plan run date is January 7, 2030.
- The pick and pack lead time is in interlocation shipping networks.
- The organization calendar at the requested ship-from organization is working from Monday through Thursday and isn’t working Friday through Sunday.
- The dates January 7, 2030, and January 14, 2030, fall on a Monday.
- The pick and pack lead time considers the organization’s working calendar.
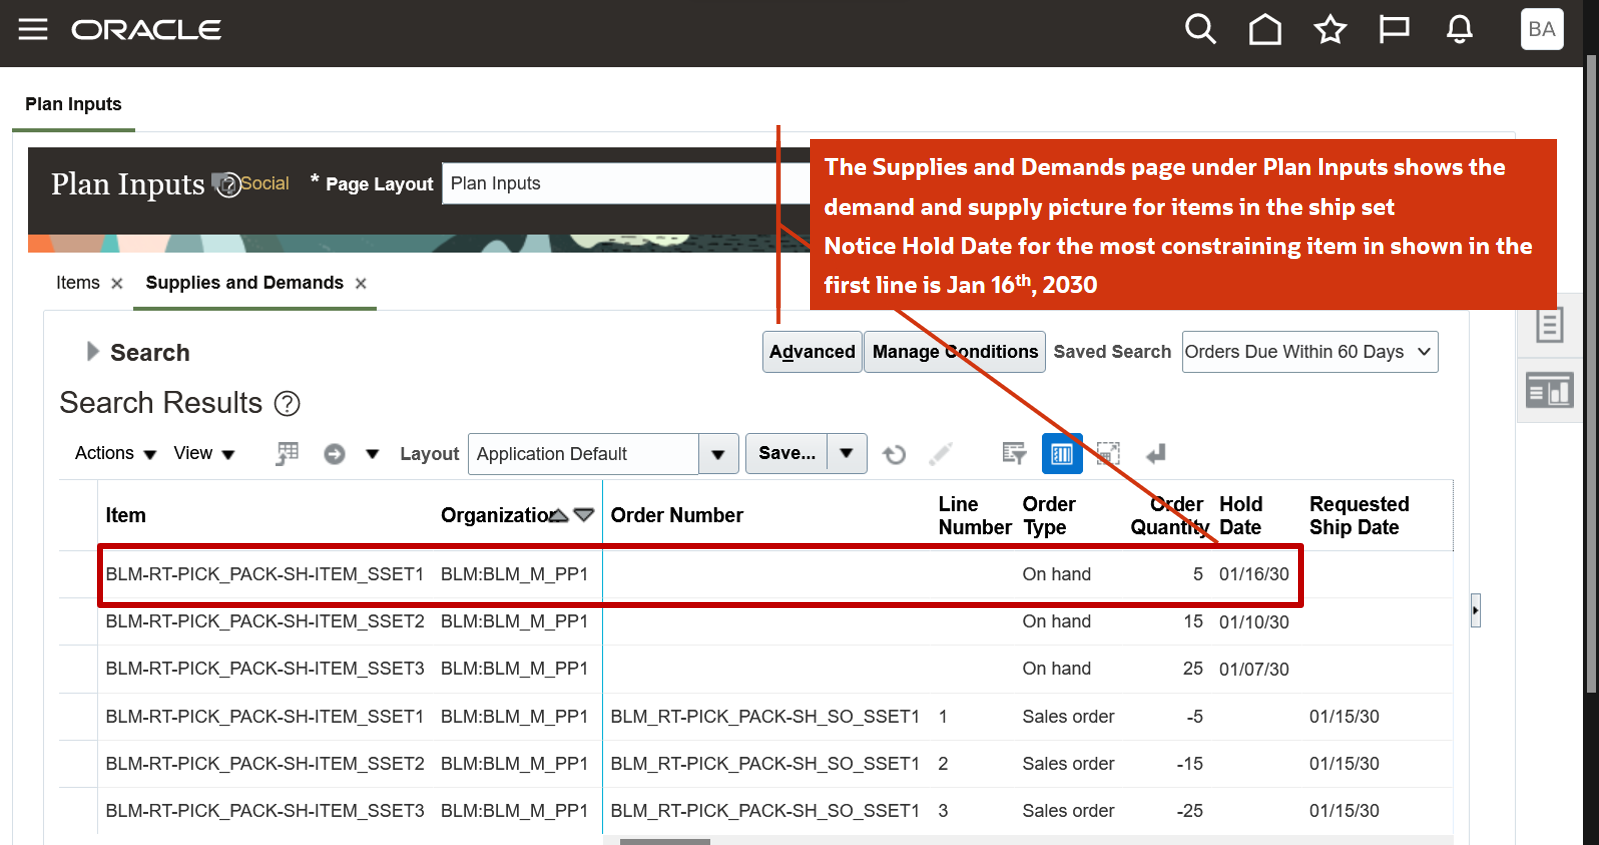
Shipment Set Order and On Hand Supply with Constraining Hold Date
The Supplies and Demands tab on the Plan Inputs page shows lines of a shipment set order and on hand supply that has a hold date of 01/16/30.

Pick and Pack Lead Time Column on the Interlocation Shipping Networks Tab
To see the pick-pack lead time, from the Plan Inputs or Backlog Management work area, select Maintain Supply Network Model from the task panel tab. Select the Interlocation Shipping Networks tab on the Maintain Supply Network Model page.
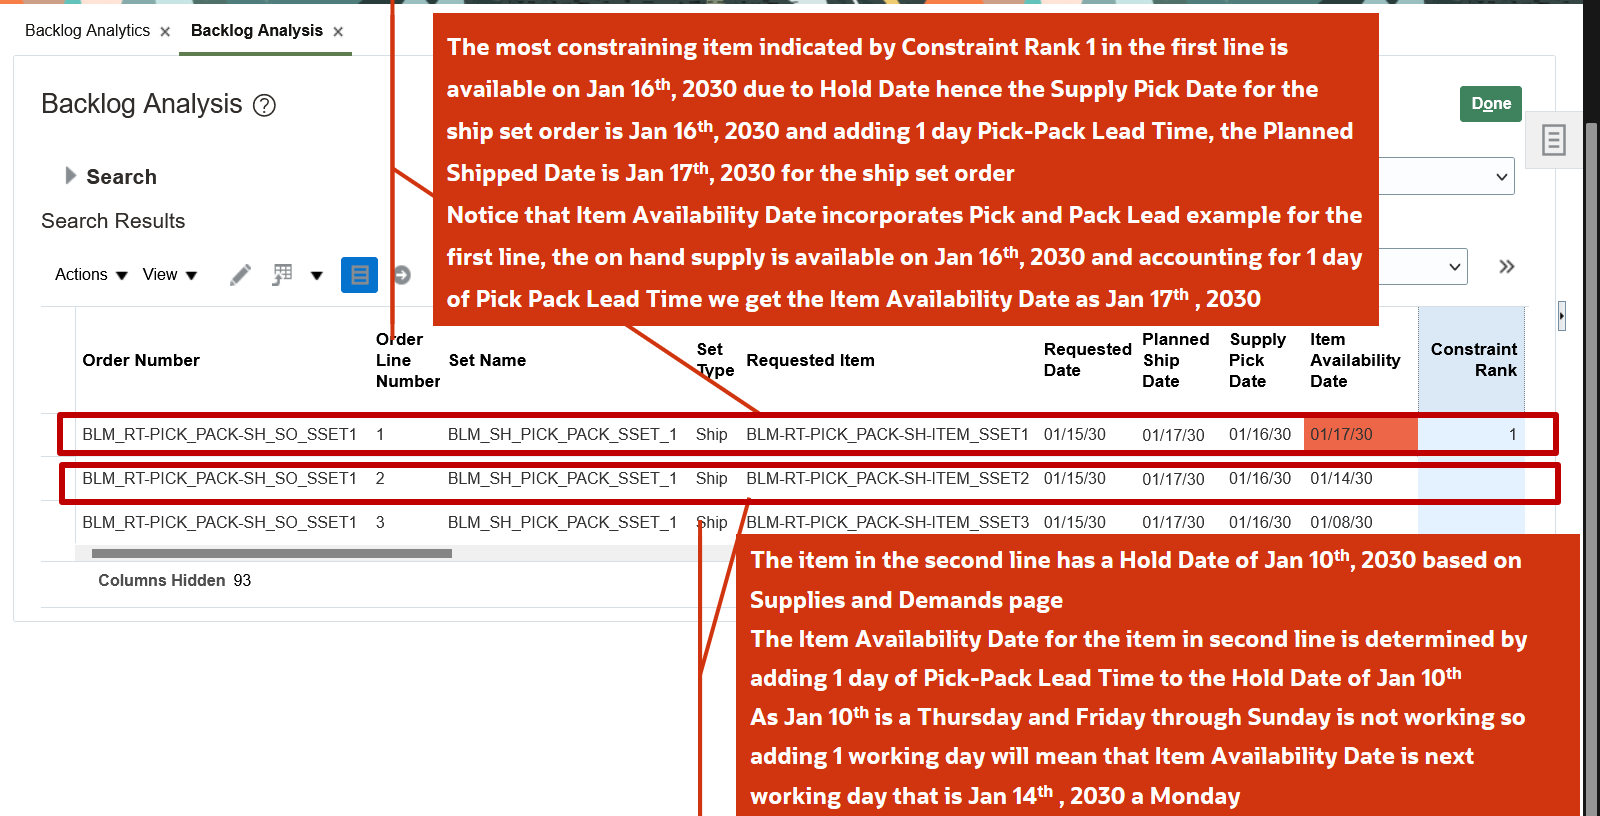
Backlog Analysis Page Shows Some Important Related Attributes for the Shipment Set
You might want to see how the pick-pack lead time affects the shipment set. For example, you can check some important related attributes, such as the Planned Ship Date, Supply Pick Date, and Item Availability Date. You can view these attributes in the Backlog Management work area on the Backlog Analysis page.
Example 2: Impact of Pick-Pack Lead Time on an Assemble-to-Order Order
Here are the important points for the data shown in this example:
- The system date or plan run date is January 7, 2030.
- The pick-pack lead time is specified only at the carrier level.
- The organization calendar at the requested ship-from organization is working Monday through Friday.
- January 14, 2030, is on a Monday.
- The pick-pack lead time considers the organization's working calendar.
You can see what happens when the pick-pack lead time isn’t set. From the Backlog Management work area, open the Backlog Analysis page to see some important related attributes, like Planned Ship Date, Supply Pick Date, and Item Availability Date.

Backlog Analysis Page Shows Important Related Attributes for the Assemble-to-Order Order
In the following figure, you can see that the Pick and Pack Lead Time is 3 days on the Carriers tab. To see your Pick and Pack Lead Time, open the Plan Inputs work area and select the Maintain Supply Network Model from the Tasks panel tab. Then select the Carriers tab.
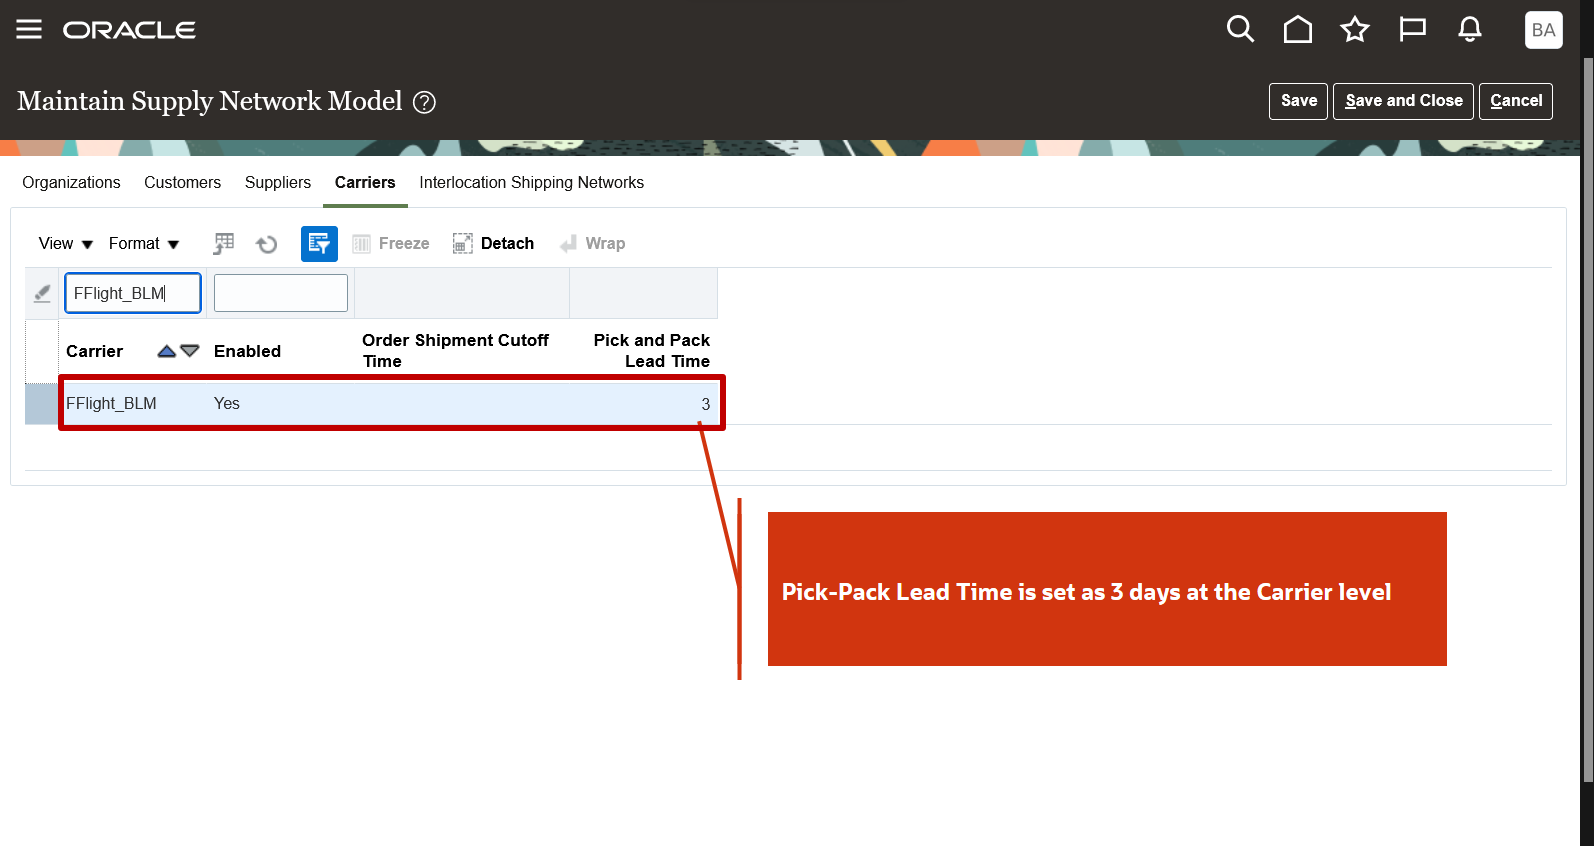
Pick and Pack Lead Time Column Specified on the Carriers Tab
You can see in the following figure how the 3-day pick-pack lead time affects the Planned Ship Date, Supply Pick Date, and Item Availability Date. To find the values for your environment, go to the Backlog Management work area and open the Backlog Analysis page.
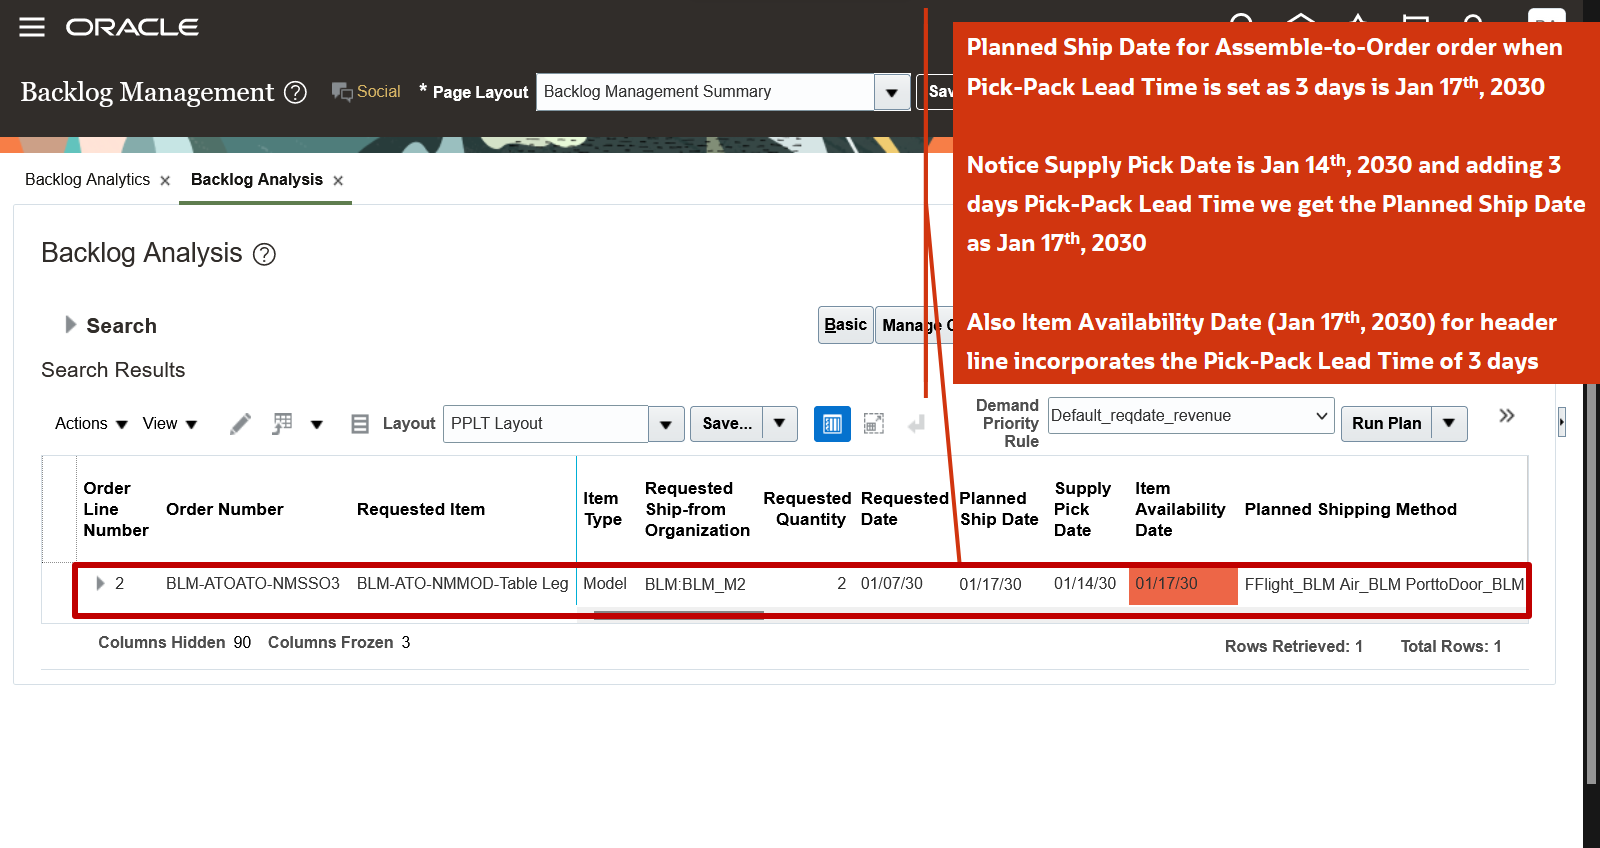
Backlog Analysis Page Shows Important Attributes for an Assemble-to-Order Order
Steps to Enable
Use the Opt In UI to enable this feature. For instructions, refer to the Optional Uptake of New Features section of this document.
Offering: Supply Chain Planning
If you want to use the Pick-Pack Lead Time for Configure-to-Order and Shipment and Arrival Sets feature, then you must opt in to its parent feature: Order Backlog Management. If you’ve already opted in to this parent feature, then you don’t have to opt in again.
Additional steps you must take for Backlog Management to plan sales order lines using this feature:
-
Select the Maintain Supply Network Model from the Tasks panel tab in the Plan Inputs work area.
-
On the Maintain Supply Network Model page, select one of these tabs depending on your use case:
-
The Interlocation Shipping Networks tab to provide a value for the Pick and Pack Lead Time column for a source, destination, and carrier combination.
-
The Carriers tab to provide a pick-pack lead time for a shipping method.
-
The Organization tab to provide a pick-pack lead time for an organization.
-
Enter values for the Pick and Pack Lead Time column in whole number format.
-
Click Save.
Tips And Considerations
- If the pick-pack lead time is defined in multiple tabs, Backlog Management will use the following hierarchy for pick-pack lead time:
- The source destination and carrier combination
- The carrier
- The organization
- The pick-pack lead time is applicable to different types of supplies, including on hand, transfer orders, purchase orders, and work orders.
- This feature isn't applicable to drop ship flows.
- Order cutoff times will be recognized by this feature.
- If the pick-pack lead time at the most granular level is null, then the pick-pack lead time at the second most granular level is considered, and so on.
- If the pick-pack lead time at the most granular level is 0, then 0 is considered as the pick-pack lead time, and Backlog Management doesn’t check it at higher levels of granularity.
- The Item Availability Date incorporates, includes, or encapsulates the Pick and Pack Lead Time.
- You’ll need to determine the levels where the pick-pack lead time needs to be defined, and whether it’s for an organization, carrier, or a combination of shipping method, destination, and organization.
Key Resources
-
Watch the Use Pick-Pack Lead Time for Configure-to-Order and Shipment and Arrival Sets demo
- Recommended related training:
- Use Pick-Pack Lead Time in Backlog Management (update 24A) Readiness Training
Access Requirements
Users who are assigned a configured job role that contains these privileges can access this feature:
- Monitor Backlog Management Work Area (MSC_MONITOR_BACKLOG_MANAGEMENT_WORK_AREA_PRIV)
- Edit Supply Network Model (MSC_EDIT_SUPPLY_NETWORK_MODEL_PRIV)
These privileges were available prior to this update.
Production Scheduling
Generate feasible factory schedules that maximize shop floor throughput and return on investment in resources and labor. You can calculate, manage, and monitor realistic schedules that the shop floor can execute on, while optimizing the usage of critical resources and meeting customer demand on time as best as possible.
After you opt in to the feature named Production Scheduling, you can use the features in this section.
Use Enhanced Calendar Visualization in Gantt Chart
Prior to this update, the Gantt chart displayed calendar events like shift exceptions on top of work order operations. As a result, work order operations and their labels weren’t always fully visible.
With this update, calendar events are displayed in the background so that work order operations and their labels are clearly visible in the Gantt chart. This improvement facilitates convenient and efficient schedule inspection.
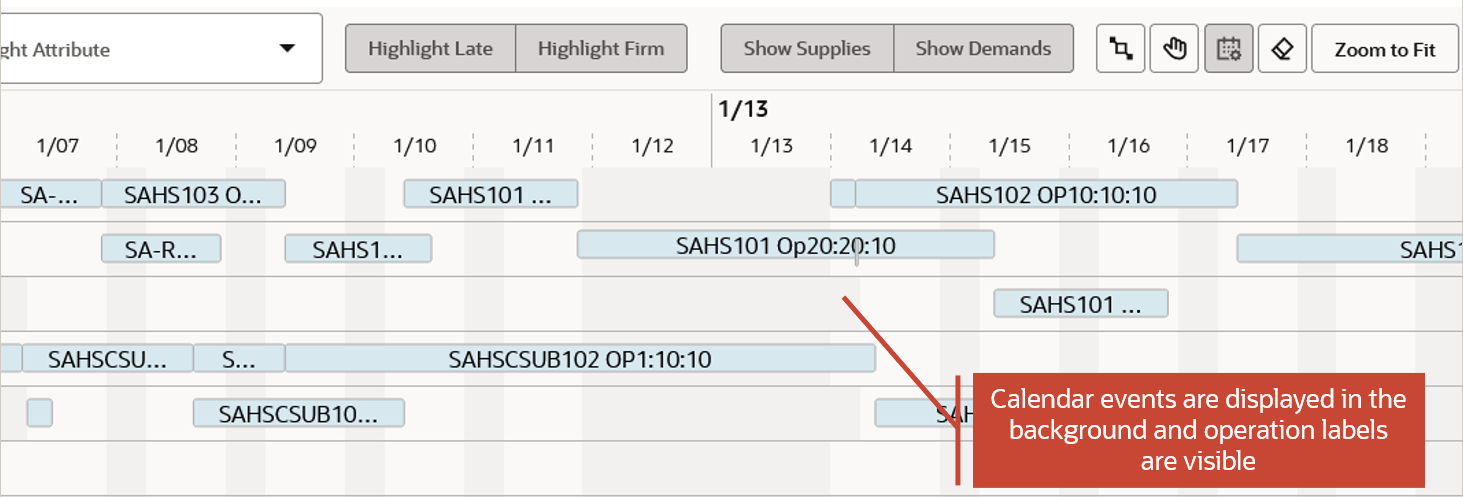
Display of Calendar Events
To modify the availability of a resource in a schedule, you can activate Edit Calendar Events mode. In this mode, calendar events are displayed on top of operations. You can select existing downtime events and use the context menu to remove them. Or you can add new downtime or availability to a resource or resource group.
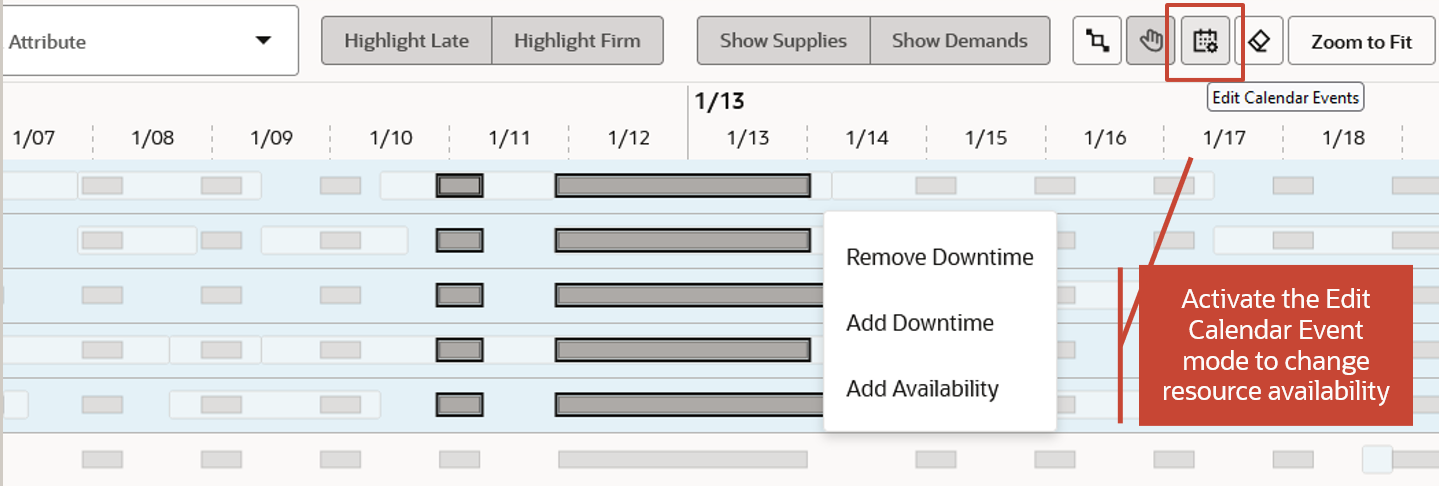
Activate Edit Calendar Events Mode to Modify Resource Availability
When Edit Calendar Events mode is active, you can only select downtime events in the Gantt chart. Work order operations are dimmed, displayed without labels, and cannot be selected. After making calendar event changes, you can turn off Edit Calendar Events mode, run a solve action to recalculate the schedule, and then evaluate the impact of the changes on your schedule quality.
In this update, we also added a small Gantt visualization enhancement. You can clear pegging highlights that were triggered by selecting a record in one of the schedule details tables under the Gantt chart. In the following example, the highlighted operation is pegged to the selected transfer order. Before this update, you could clear the pegging highlighting by clicking on the same record in the table while pressing the Ctrl key. With this update, you can now simply click the Clear Pegging Highlights button to clear it.
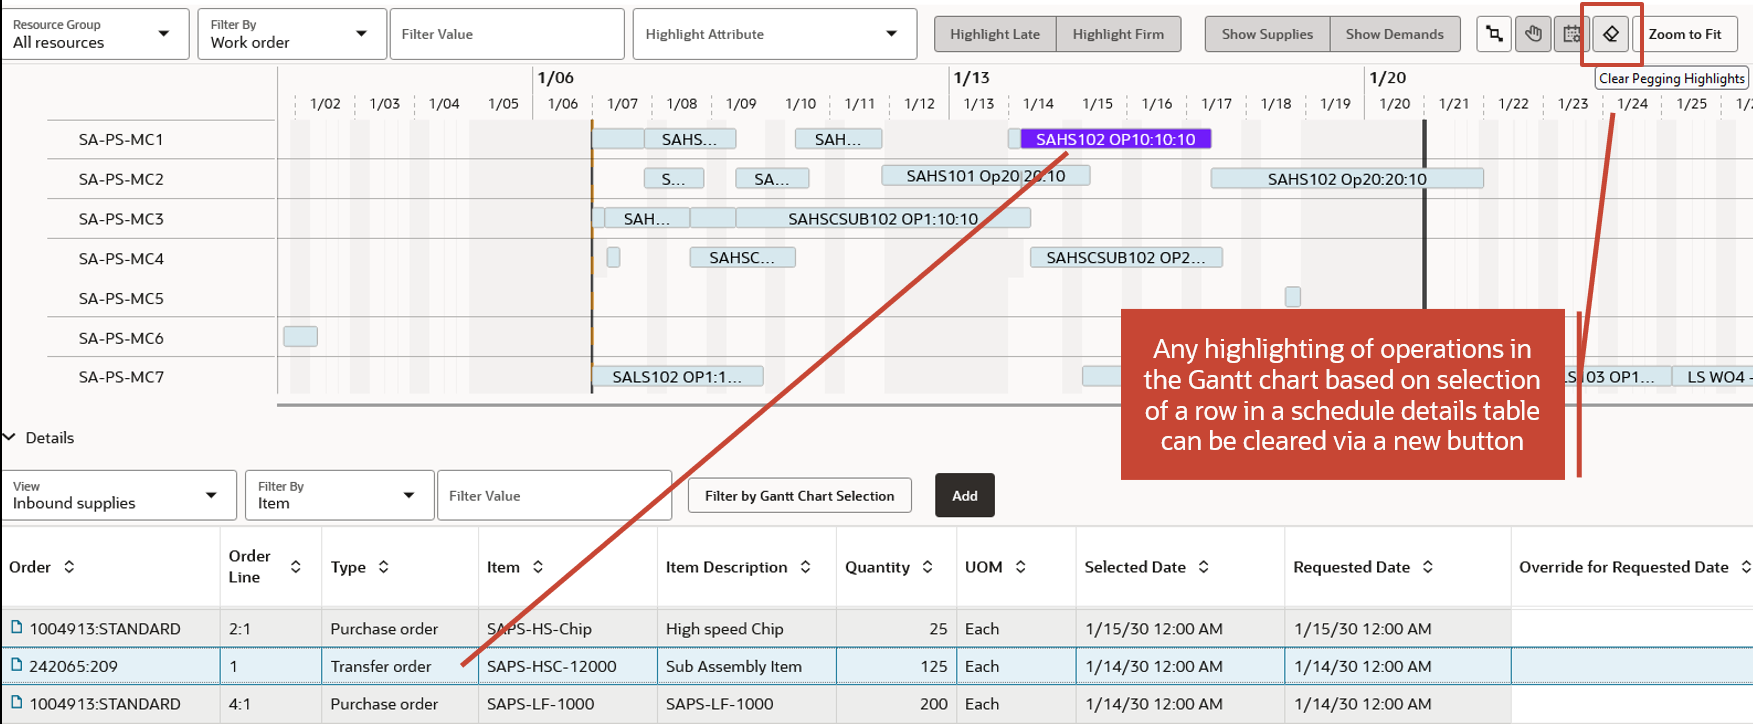
Clear Pegging Highlights
Steps to Enable
Use the Opt In UI to enable this feature. For instructions, refer to the Optional Uptake of New Features section of this document.
Offering: Supply Chain Planning
Tips And Considerations
If you want to use the Use Enhanced Calendar Visualization in Gantt Chart feature, then you must opt in to its parent feature: Production Scheduling. If you’ve already opted in to this parent feature, then you don’t have to opt in again.
Key Resources
Watch the Use Enhanced Calendar Visualization in Gantt Chart demo.
Access Requirements
Users who are assigned a configured job role that contains this privilege can access this feature:
- Edit Production Schedule (MSC_EDIT_PRODUCTION_SCHEDULE_PRIV)
This privilege was available prior to this update.
Plan and Schedule Supplies Respecting Minimum Transfer Quantity Between Operations
You can use the minimum transfer quantity to schedule production with reduced makespan by overlapping operations within and across work orders.
Prior to this update, all units of the prior operation in a work order had to be completed before the next operation could start, resulting in longer than necessary production times.
With this update, you can consider the minimum transfer quantity of an item's work definition to schedule sequential operations or work orders that overlap. The next operation or work order is started after the minimum transfer quantity has been produced in the prior operation or work order.
The consideration of minimum transfer quantity between operations reflects shop floor reality more closely and leads to shorter makespans, higher throughput, and resource utilization.
Schedule Options
On the Schedule Options page, you can now specify whether the minimum transfer quantity will be considered during schedule calculation. If you select the Consider minimum transfer quantity for schedule calculation check box, then operation overlaps will be possible within and across work orders.
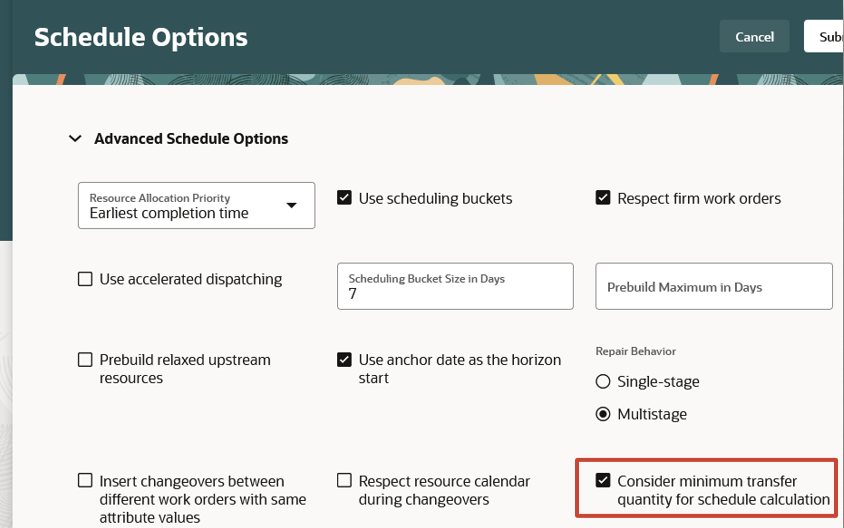
Advanced Schedule Options
Work Definition
The minimum transfer quantity is maintained on an item's work definition and is consistent across all operation resources, including alternates.
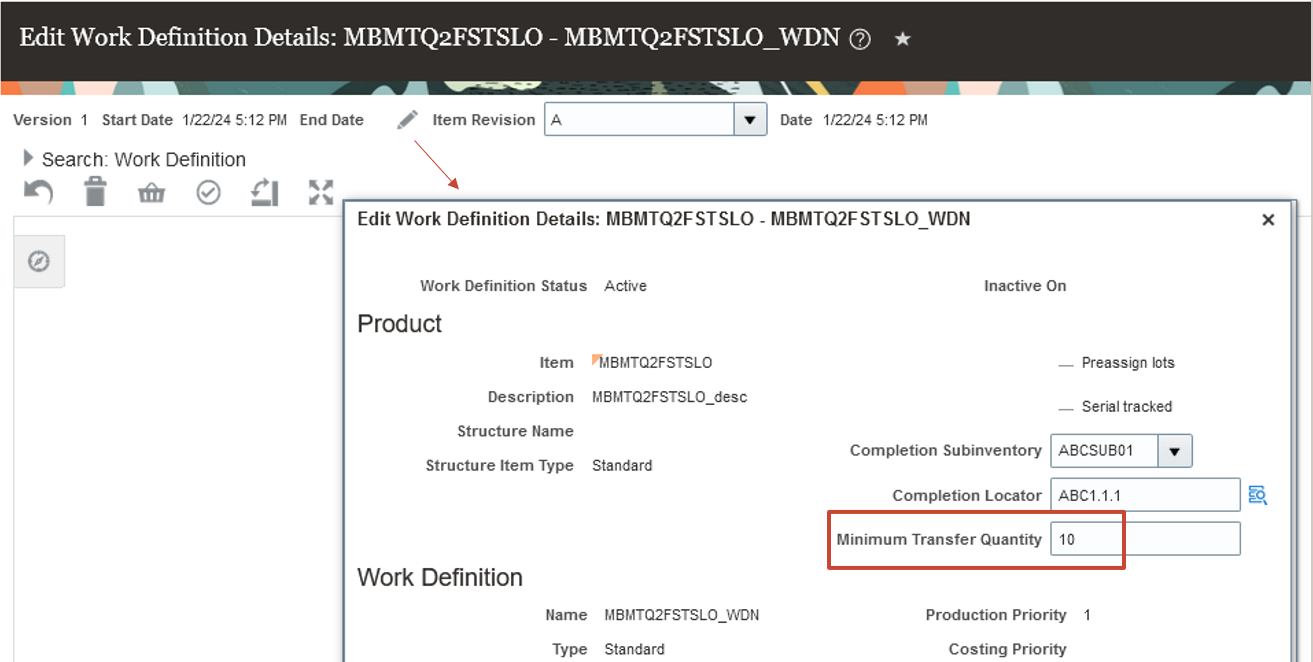
Work Definition Details
You can enable operation overlap for operation resource sequences by setting the Basis field to Variable in the Edit Operation Resource dialog box. When set to Fixed, operation resource sequences won’t overlap with any upstream or downstream operation.
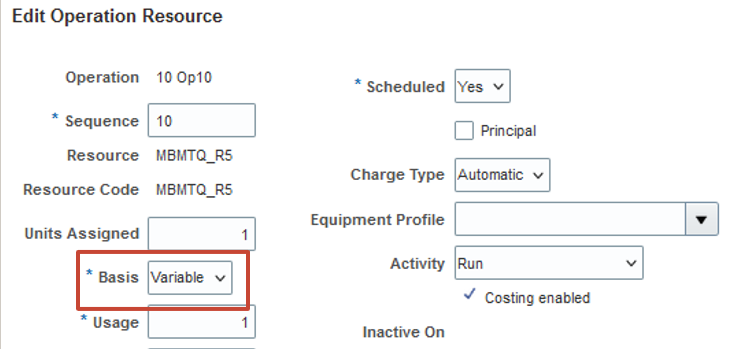
Edit Operation Resource
If successive operation resource sequences are defined as Variable, they might overlap if other constraints allow it (for example, materials and resource capacity). The overlap can be up to the duration that corresponds to the resource usage time of the upstream operation for one minimum transfer quantity.
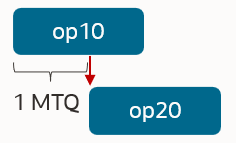
Operations with a Variable Basis Can Overlap
If one of the successive operation resource sequences is defined as Fixed, its operations will always be scheduled sequentially without overlap.
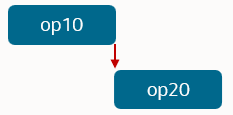
Operations with Fixed Basis Can't Overlap
Minimum Transfer Quantity Slices
When a work order uses a work definition that has a minimum transfer quantity defined, and the schedule option Consider minimum transfer quantity for schedule calculation is checked, then Oracle Production Scheduling divides the work order quantity by the minimum transfer quantity to determine how many slices are needed to complete the task. If the work order quantity isn’t a multiple of the minimum transfer quantity, then the last slice will contain an amount less than the minimum transfer quantity. For example, if the minimum transfer quantity is 10 and a work order quantity is 27, the first two slices each contain a quantity of 10, and the third slice contains a quantity of 7. Each slice consists of proportionally scaled operation resource sequences that consume proportional material requirements and resource hours and produce proportional outputs. These outputs are then available for downstream consumption.
Note that in the Gantt chart and dispatch list, only the complete operation resources are displayed, not individual slices.

Only Complete Operation Resources Are Displayed in the Gantt Chart
Work Order Dates
In Production Scheduling, the operations in the dispatch list and Gantt chart correspond to operation resource sequences from the work order operations. For each operation resource, the start date corresponds to the earliest start date of its minimum transfer quantity slices, and the end date corresponds to the latest date. These dates will be used when updating work orders upon schedule release. The start and end times of a work order scheduled with a minimum transfer quantity are determined as follows:
- Work order start date = Earliest operation start date
- Work order end date = Latest operation end date
- Operation start date = Earliest operation resource start date of all corresponding minimum transfer quantity slices
- Operation end date = Latest operation resource end date of all corresponding minimum transfer quantity slices
Varying Operation Resource Usage Hours
Typically, operation resource sequences vary in their resource usage, meaning that their resource durations differ as well. So, some operation resource durations within a work definition end up having shorter durations in the production schedule than others. Consequently, a solve action might space out faster operations, resulting in increased elapsed duration. The duration corresponds to the idle time that’s inserted between minimum transfer quantity slices. Note that the idle time of a resource isn’t visible in the Gantt chart; only complete operation resources are displayed. However, the elapsed duration shown in the dispatch list or tooltip will reflect that the elapsed duration is greater than the duration in those situations.
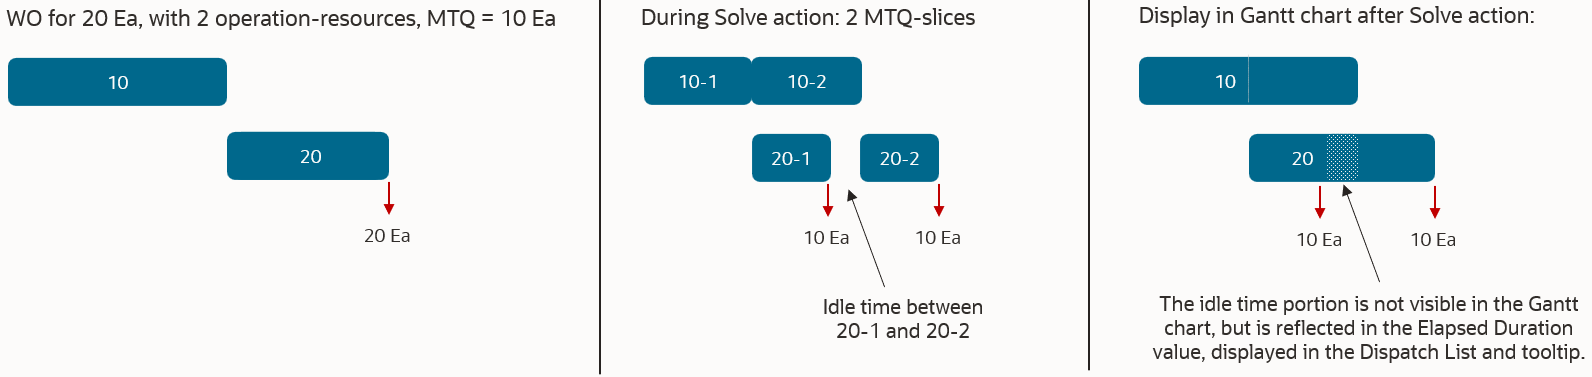
Varying Durations of Operation Resources Within a Work Order
In the previous example, if the upstream operation 10 was faster than operation 20, then no idle time would be inserted into operation 10. Operation 10 is the first operation, so there would be no need to wait for upstream minimum transfer quantity slices to complete. Therefore, all minimum transfer quantity slices of operation 10 would be scheduled together.
Work Orders with Single Operation Resource Sequences
If work orders have single operation resources, then their minimum transfer quantity slices are scheduled adjacently when the required components are available. If the components are delivered by other supplies, for example, upstream work orders, then the minimum transfer quantity slices might get spaced out. The following example assumes work orders WO1 and WO2, each with a single operation resource. WO1 produces a component that WO2 consumes, and WO quantities =20 and minimum transfer quantities =10. The solve action will consider two minimum transfer quantity slices for each work order, and the schedule result will depend on the WO operation resource durations. If the upstream work order WO1 is faster, then its minimum transfer quantity slices are scheduled adjacently, and component inventory buildup might occur. If the downstream work order is faster, then its minimum transfer quantity slices might be spaced out, resulting in an elapsed duration that’s greater than the duration.
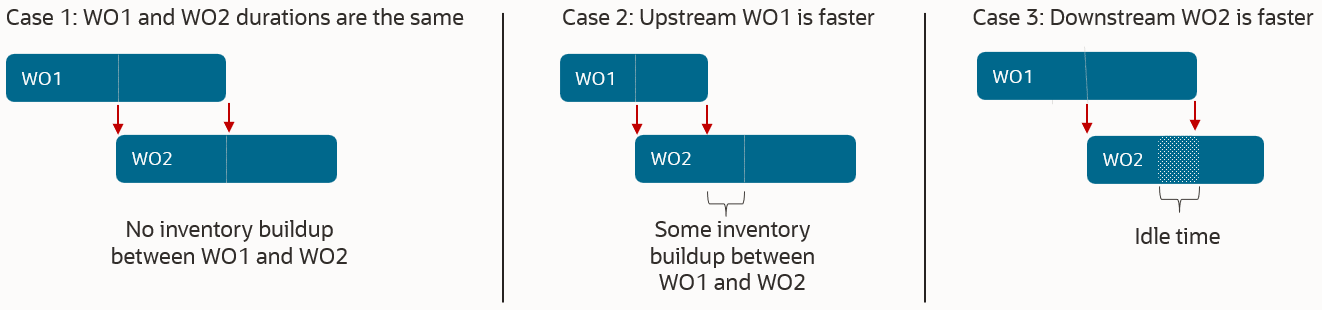
Two Work Orders with a Single Operation Resource
Repair Behavior and Starts After End Constraints of Successive Operations
In general, the repair action that can be triggered after performing manual schedule changes will always only reschedule the operations that were modified. In addition, those operations in the same work order that must be moved to adhere to the starts-after-end constraints of successive operations (for example, "op 10 must complete before op 20 can start") will also be rescheduled. In the context of minimum transfer quantity, this consideration applies to each minimum transfer quantity slice and the related upstream and downstream operation slices individually.
Repair Behavior for Work Orders with a Single Operation Resource
For work orders with only a single operation resource sequence, the repair action will behave as follows:
- Only the moved work order is rescheduled, independent of the single or multistage repair behavior defined in the schedule options.
- The duration of each minimum transfer quantity slice stays the same, but the idle time between the minimum transfer quantity slices might be removed.
The following example involves two work orders, each with a single operation resource, and assumes that the downstream work order’s operation resource is faster. If work order WO2 is moved out during manual scheduling, then the repair action might remove the idle time from the WO2 operation resource.
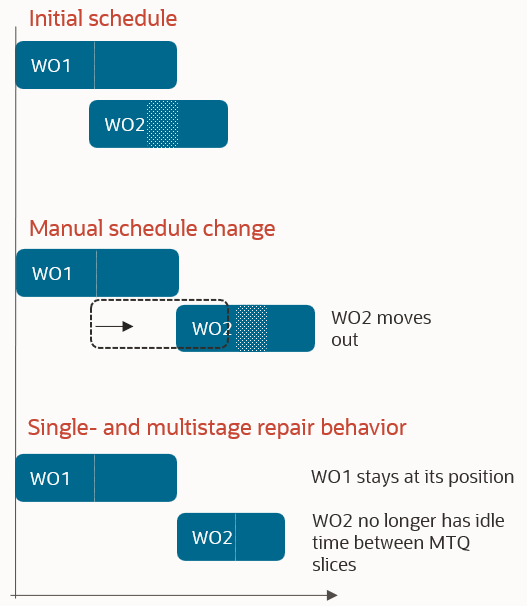
Repair Behavior for Work Orders with a Single Operation Resource
Repair Behavior for Work Orders with Multiple Operation Resources
In cases where a work order has multiple operation resources, the behavior of the repair action depends on the repair mode specified on the Schedule Options page in the Advanced Schedule Options section. If the minimum transfer quantity slices for a faster work order operation were spaced out by the solve action (op 20 in example below), then the repair action might compress such an operation again. This depends on the repair mode set in the schedule options:
- Single stage repair: Spacing is retained only if the precedence rules require it, as they are enforced for each minimum transfer quantity slice.
- Multistage repair: Spacing between minimum transfer quantity slices is generally retained, as the makespan of each individual minimum transfer quantity slice is minimized, resulting in the faster operation slices remaining spaced out.
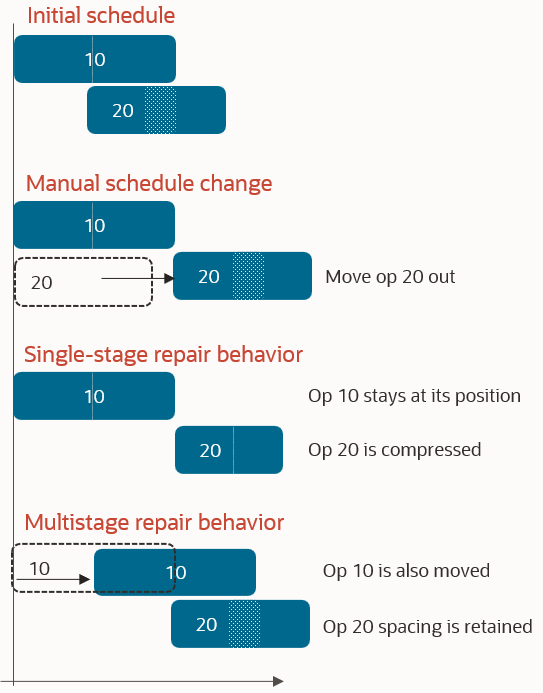
Repair Behavior for Work Orders with Multiple Operation Resources
Process Work Definitions and Minimum Transfer Quantity
For process work definitions, the minimum transfer quantity should be the same as the batch quantity or multiples thereof. Production Scheduling will consider the work order’s primary output quantity and the minimum transfer quantity to scale the input and output quantities and the duration of each operation’s minimum transfer quantity slice. For example, given a work order with primary output quantity=100, batch quantity=10, minimum transfer quantity=20, and a total duration of 10 hours, Production Scheduling will schedule:
- Five minimum transfer quantity slices, as WO Qty / minimum transfer quantity = 100 units / 20 units = 5
- Each minimum transfer quantity slice has:
- A duration of 2 hours, as WO total duration / # minimum transfer quantity slices = 10 hours / 5 = 2 hours
- An output quantity of 20 units, as WO primary output quantity / # minimum transfer quantity slices = 100 units / 5 = 20 units
Standard Operations and Minimum Transfer Quantity
We recommend not to use standard operations in multiple work definitions if more than one of these work definitions will have different minimum transfer quantity values. If used in such a situation, then Production Scheduling will use the largest of these minimum transfer quantity values for all work definitions and the work orders that use them.
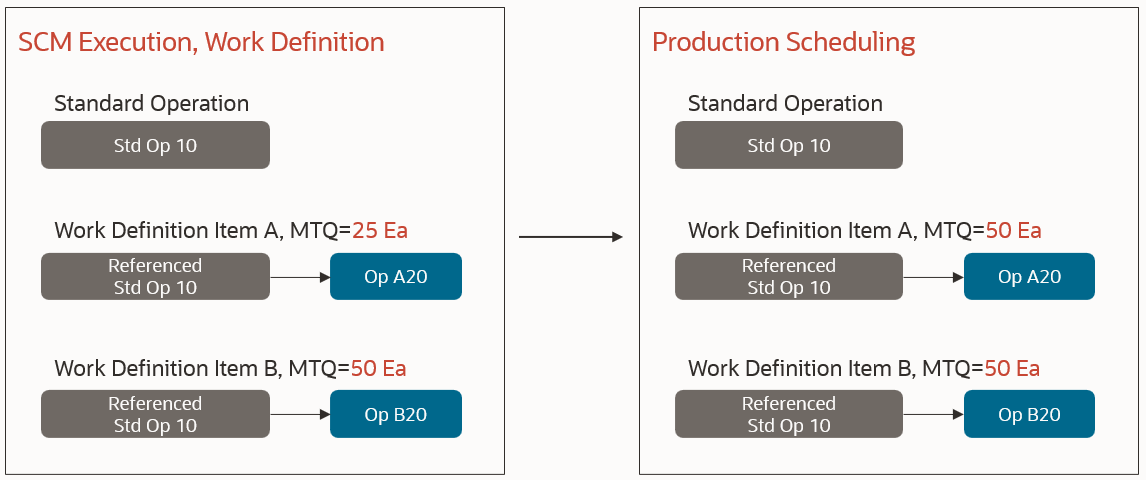
Standard Operations and Minimum Transfer Quantity
Outside Processing Operations
Note that outside processing operations will be scheduled without consideration of the minimum transfer quantity; that is, they will not overlap with the previous and next operations in the work order.
Steps to Enable
Use the Opt In UI to enable this feature. For instructions, refer to the Optional Uptake of New Features section of this document.
Offering: Supply Chain Planning
Tips And Considerations
If you want to use the Plan and Schedule Supplies Respecting Minimum Transfer Quantity Between Operations feature, then you must opt in to its parent feature: Production Scheduling. If you’ve already opted in to this parent feature, then you don’t have to opt in again.
Key Resources
Watch the Plan and Schedule Supplies Respecting Minimum Transfer Quantity Between Operations demo.
Access Requirements
Users who are assigned a configured job role that contains this privilege can access this feature:
- Edit Production Schedule (MSC_EDIT_PRODUCTION_SCHEDULE_PRIV)
This privilege was available prior to this update.
IMPORTANT Actions and Considerations
Changes to File-Based Data Import (FBDI) Templates
Some Supply Chain Planning FBDI templates have changed in this update. For details of the specific changes, refer to the Instructions tab of these FBDI templates:
- Bill of Resources (ScpBillOfResourcesImportTemplate)
- Purchase Order Shipments Receipt History (ScpPurchaseOrderRcvHistoryImportTemplate)
You can find the latest templates in the Supply Chain Planning section of Oracle Fusion Cloud SCM: File-Based Data Import (FBDI) for SCM, available on the Oracle Help Center.