
This document will continue to evolve as existing sections change and new information is added. All updates appear in the following table:
| Date | Product | Feature | Notes |
|---|---|---|---|
| 27 MAY 2022 | Common Financials | Service Excellence Continuing Investments | Updated. Revised feature information. |
| 27 MAY 2022 | IMPORTANT Actions and Considerations | Payment Infotile | Updated document. Added upcoming feature deprecation. |
| 18 MAR 2022 | Common Financials | Simplified Workflow Rules Configuration | Updated document. Delivered feature in update 22B. |
| 04 MAR 2022 | Created initial document. |
IMPORTANT NOTE: If you are being updated directly from 21D to 22B you should review the content of both 22A and 22B sections to ensure you see all the changes included in the update.
 HAVE AN IDEA?
We’re here and we’re listening. If you have a suggestion on how to make our cloud services even better then go ahead and tell us. There are several ways to submit your ideas, for example, through the Ideas Lab on Oracle Customer Connect. Wherever you see this icon after the feature name it means we delivered one of your ideas.
GIVE US FEEDBACK
We welcome your comments and suggestions to improve the content. Please send us your feedback at oracle_fusion_applications_help_ww_grp@oracle.com.
DISCLAIMER
The information contained in this document may include statements about Oracle’s product development plans. Many factors can materially affect Oracle’s product development plans and the nature and timing of future product releases. Accordingly, this Information is provided to you solely for information only, is not a commitment to deliver any material, code, or functionality, and should not be relied upon in making purchasing decisions. The development, release, and timing of any features or functionality described remains at the sole discretion of Oracle.
This information may not be incorporated into any contractual agreement with Oracle or its subsidiaries or affiliates. Oracle specifically disclaims any liability with respect to this information. Refer to the Legal Notices and Terms of Use for further information.
Optional Uptake of New Features (Opt In)
Oracle Cloud Applications delivers new updates every quarter. This means every three months you'll receive new functionality to help you efficiently and effectively manage your business. Some features are delivered Enabled meaning they are immediately available to end users. Other features are delivered Disabled meaning you have to take action to make available. Features delivered Disabled can be activated for end users by stepping through the following instructions using the following privileges:
- Review Applications Offering (ASM_REVIEW_APPLICATIONS_OFFERINGS_PRIV)
- Configure Oracle Fusion Applications Offering (ASM_CONFIGURE_OFFERING_PRIV)
Here’s how you opt in to new features:
- Click Navigator > My Enterprise > New Features.
- On the Features Overview page, select your offering to review new features specific to it. Or, you can leave the default selection All Enabled Offerings to review new features for all offerings.
- On the New Features tab, review the new features and check the opt-in status of the feature in the Enabled column. If a feature has already been enabled, you will see a check mark. Otherwise, you will see an icon to enable the feature.
- Click the icon in the Enabled column and complete the steps to enable the feature.
For more information and detailed instructions on opting in to new features for your offering, see Offering Configuration.
Opt In Expiration
Occasionally, features delivered Disabled via Opt In may be enabled automatically in a future update. This is known as an Opt In Expiration. If your cloud service has any Opt In Expirations in this update, you will see a related tab in this document. Click on that tab to see when the feature was originally delivered Disabled, and when the Opt In will expire, potentially automatically enabling the feature. You can also click here to see features with current Opt In Expirations across all Oracle Cloud Applications. Beyond the current update, the Financials forums on Cloud Customer Connect have details of Opt In Expirations upcoming in future updates.
Column Definitions:
Report = New or modified, Oracle-delivered, ready to run reports.
UI or Process-Based: Small Scale = These UI or process-based features are typically comprised of minor field, validation, or program changes. Therefore, the potential impact to users is minimal.
UI or Process-Based: Larger Scale* = These UI or process-based features have more complex designs. Therefore, the potential impact to users is higher.
Features Delivered Disabled = Action is needed BEFORE these features can be used by END USERS. These features are delivered disabled and you choose if and when to enable them. For example, a) new or expanded BI subject areas need to first be incorporated into reports, b) Integration is required to utilize new web services, or c) features must be assigned to user roles before they can be accessed.
| Ready for Use by End Users Reports plus Small Scale UI or Process-Based new features will have minimal user impact after an update. Therefore, customer acceptance testing should focus on the Larger Scale UI or Process-Based* new features. |
Customer Must Take Action before Use by End Users Not disruptive as action is required to make these features ready to use. As you selectively choose to leverage, you set your test and roll out timing. |
|||||
|---|---|---|---|---|---|---|
| Feature |
Report |
UI or |
UI or |
|
||
Expense Allocation to Projects and Accounts by Amount At Expense Report Level |
||||||
Service Excellence Continuing Investments
Our ongoing investment in service excellence has a focus on overall usability, resiliency, performance, and security. This work is based on monitoring performance trends, reviewing common use patterns, analyzing service requests, and participating in many discussions with customers.
In this update, our ongoing investment in service excellence includes improvements in the following areas:
Usability
-
Convert the quantity-based tax on invoices to the invoice currency, when the invoice currency is different from the tax currency. This enables users to compute, charge, and report more accurate tax amounts on both Payables and Receivables invoices.
-
Identification of credit analyst using email address in the Customer Import Upload FBDI. Previously, the Credit Analyst field of the Customer Import Upload FBDI only supported the import of credit analyst names. Enable this functionality by adding a new lookup code CR_ANALYST_EMAIL_CUST_PROFILE under the lookup type AR_FEATURES.
-
Intercompany workflow transactions are rejected on expiration and notified to the relevant stakeholders.
-
Splitting of customer statements by site for PRINT delivery method. Enable this functionality by adding a new lookup code AR_PRINT_STATEMENT_BURSTING under the lookup type AR_FEATURES.
Resiliency
-
Import Segment Values and Hierarchies process ends gracefully on cancellation.
-
Improved readability of log files when high volumes of journals are imported.
- Resiliency and diagnostic improvements to the fiscal document generation process for Brazil. Improvements include
- Simplification to Fiscal Document processing to allow multiple ESS processes to run on a single request.
- Better visibility for standalone fiscal documents.
- Corrections in handling CST (Tax Situation Code) for vendor flows.
- Resiliency and diagnostic improvements to the collection documents process for Brazil. Improvements include
- The anticipated withholding tax amount is displayed when the installment amount is updated.
- Improved performance of the Receivables Bank Return process.
Performance
- Performance improvements to the tax engine for account-based tax rules.
- Performance improvement in invoice validation through improved invocation of tax calculation.
- The Import Segment Values and Hierarchies process contains performance improvements when importing descriptive flexfield information.
- Support for purging of Collection Scoring History. Customers with high volume can purge the collection scoring history for optimal performance. Enable this functionality by adding a new lookup code IEX_SCORE_HISTORIES_UPSERT under the lookup type IEX_FEATURES. Optionally, stop storing data point histories by adding a new lookup code DISABLE_STORING_DATA_POINTS under lookup type IEX_FEATURES.
Steps to Enable
You don't need to do anything to enable this feature.
Simplified Workflow Rules Configuration
Use the Simplified Workflow Rules Configuration feature to create workflow rules using spreadsheets for Payables Invoice Approval and General Ledger Journal Approval workflows. Download the templates using the Manage Workflow Rules in Spreadsheet task to create and manage workflow rules according to your approval policies.
This feature was introduced in update 18C. In addition to the existing features, the 22B update also lets you do the following:
- Create rules using advanced configurations (rule conditions using sum, aggregate, count, and others).
- Specify the type and date of currency conversion rates for rules that evaluate transaction amounts in a different currency.
The advanced options allows you to configure approval rules to meet the complex approval requirements, such as routing approval notification to the approver based on the sum of all distribution lines amount for a particular cost center entered on distribution lines.
Steps to Enable
You don't need to do anything to enable this feature.
Tips And Considerations
Follow these steps to use advanced configuration:
- Select the newly introduced 'Advanced Configuration' in attribute categories.
- Select one of the options from the list within advanced configuration.
- Enter the values using dialog box by clicking on the respective cells.

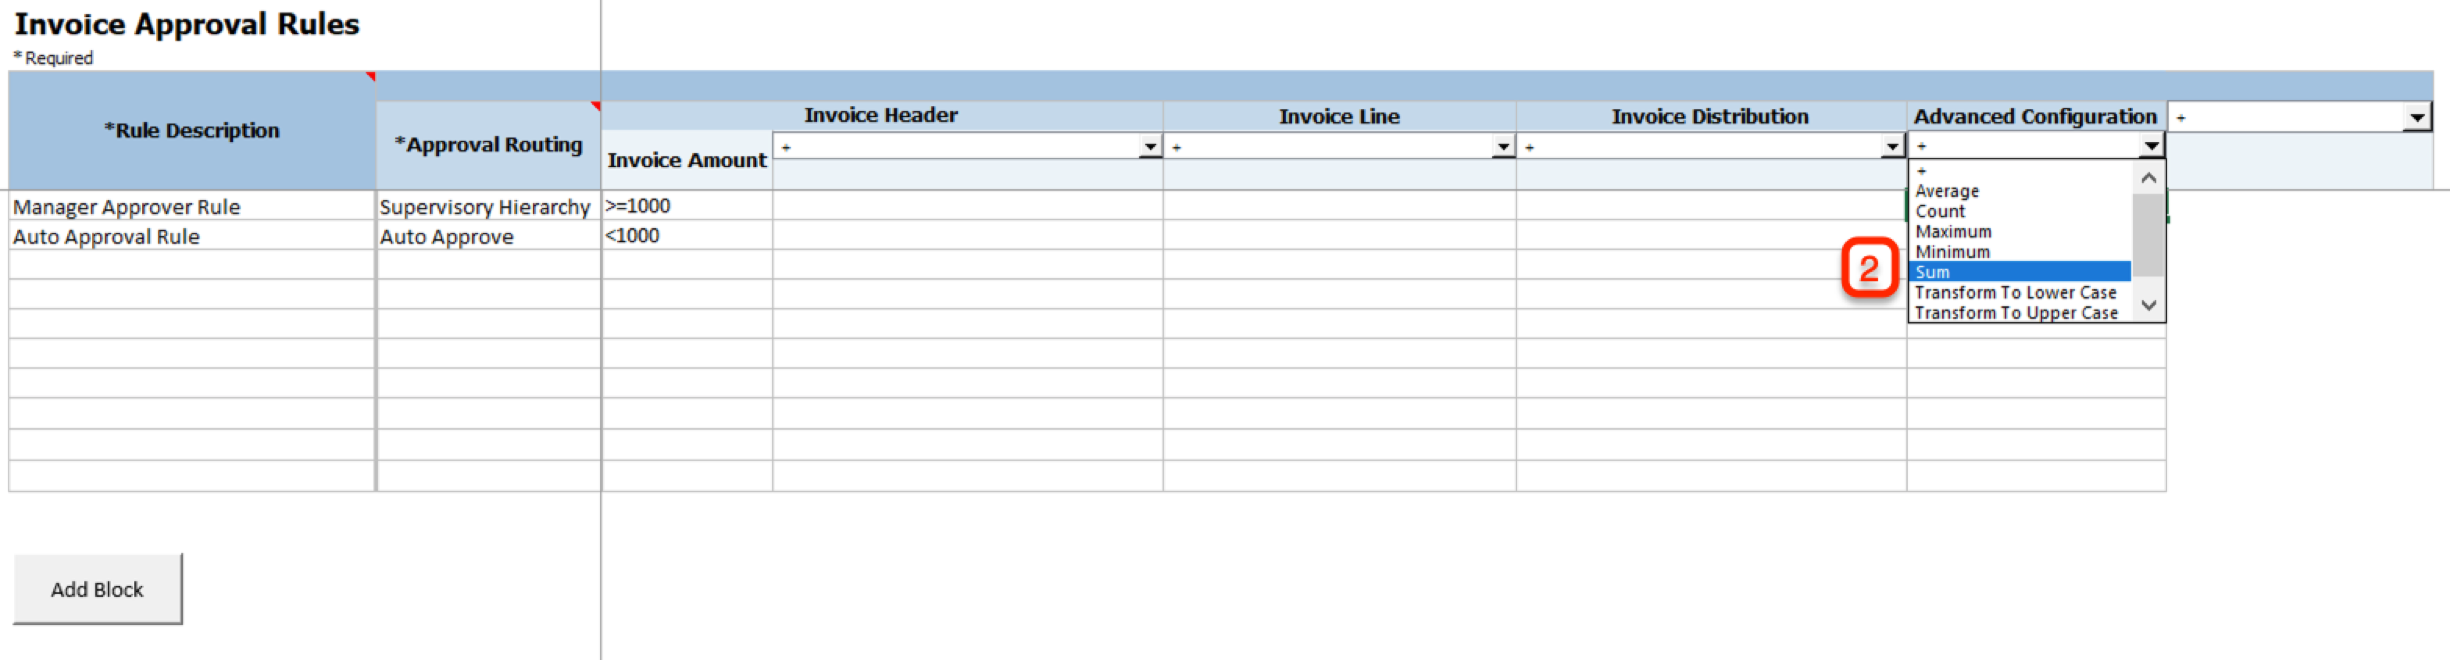
Select Advanced Configuration and Then Select an Option
You can select from the following options to configure advanced rules:
| Advanced Configuration Option |
Description |
| Count |
Returns the total number of data items such as Invoice Lines, Invoice Distributions etc. |
| Sum |
Returns the total of all the values of the selected attribute. |
| Maximum |
Returns the largest value in a set of values of the selected attribute. |
| Minimum |
Returns the smallest number in a set of values of the selected attribute. |
| Average |
Returns the average of all the values of the selected attribute. |
| Transform to Uppercase |
Converts the text in the attribute to upper case. |
| Transform to Lowercase |
Converts the text in the attribute to lower case. |
| Trim White Spaces |
Removes white spaces and rearranges the text in the attribute. |
Example using SUM:
For cost center 110, Approver A is authorized to approve when the total for cost center is less than or equal to $1000 and Approver B is authorized to approve when the total for cost center is above $1000.
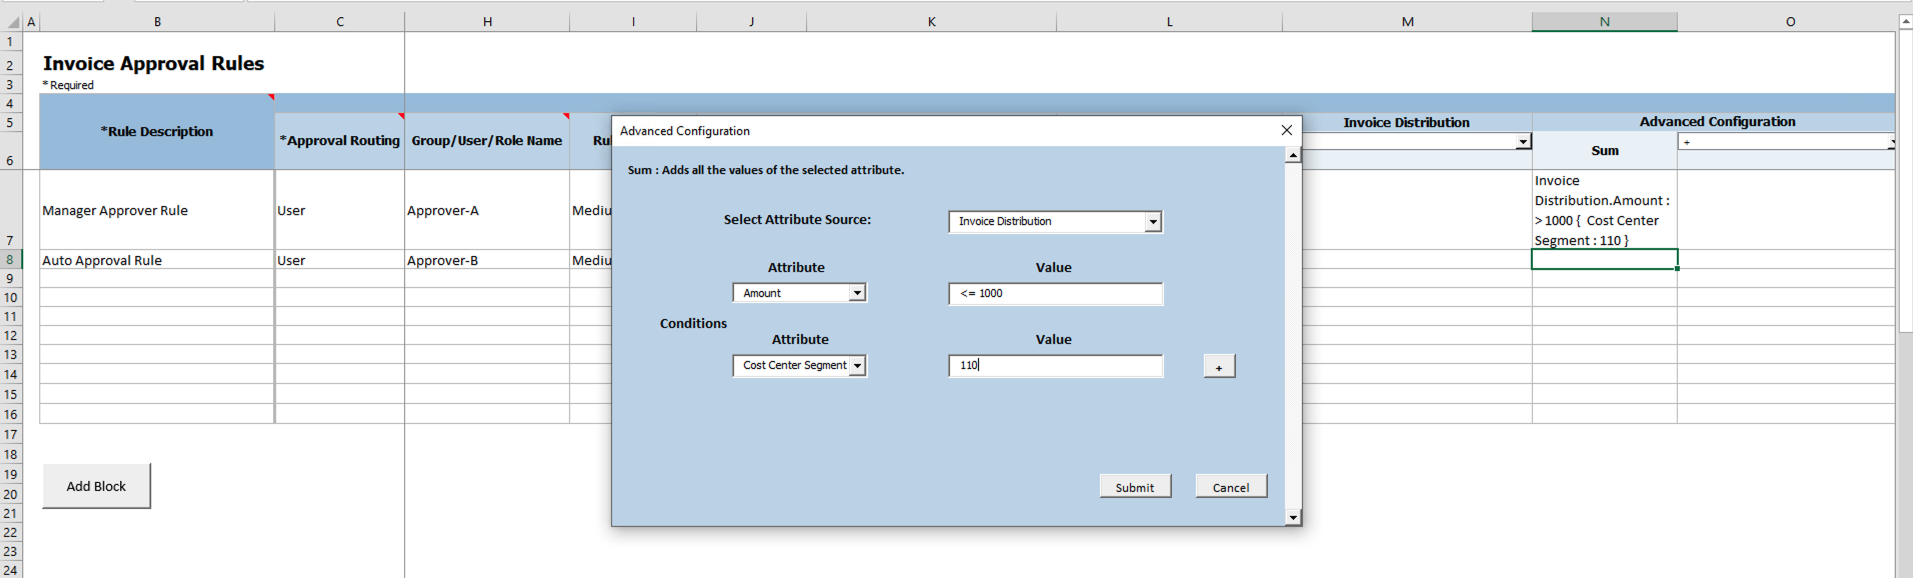
Enter Values for SUM
Using No Case Where:
In specific cases, you can use the 'no case where' pattern with COUNT option by setting the value as '0' or '= 0'. This lets you check that a selected data item doesn’t have a count of 0. For example, you can validate that none of the Distributions contain Cost Center as 520 or no Lines cross an amount limit.
Additional rule evaluation currency conversion options:
When defining rule evaluation currencies, you can now also provide these values for accurate calculation of currency conversion rate:
- Conversion Date
- Conversion Rate Type
The business requirement in the following example is to configure approval rules based on the invoice amount limit in functional currency always which is ‘GBP’. Invoice amount has to be converted into GBP using the invoice creation date as currency conversion date and currency conversion type "Spot".
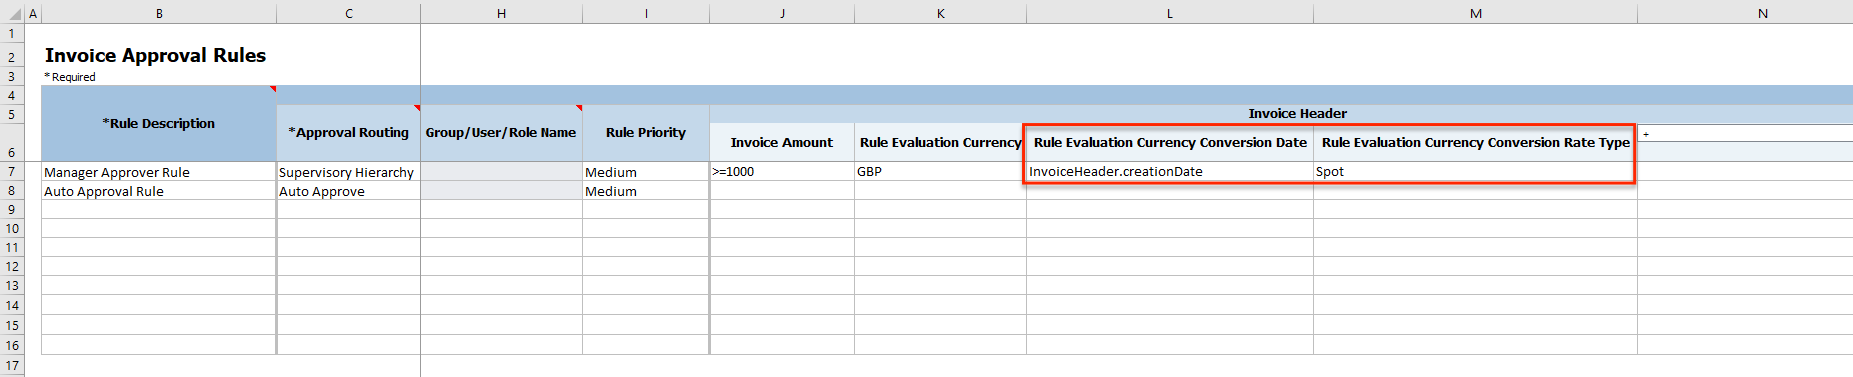
Enter Date & Rate Type Values in Rules with Currency Conversion Evaluation
Key Resources
- For an overview of the Simplified Workflow Rules Configuration feature, refer to the Manage Workflow Rules Using a Spreadsheet topic on the Oracle Help Center.
Role Information
- To use simplified workflow rules configuration, you need this role:
- Financial Application Administrator
Use the Workflow Transaction Console to proactively monitor all workflow tasks and resolve the exceptions for these workflows:
- Invoice Approval
- Expense Approval
- Journal Approval
- Invoice Hold Resolution
This feature was introduced in update 19D, with Invoice Hold Resolution workflow added in update 21B. In update 22C, this feature will be enabled by default for all customers.
When this feature is enabled, users will continue to see the following statuses on the transactions, even when the approval process fails for the transaction.
| Workflow Name | Workflow Transaction Status |
|---|---|
| Invoice Approval | Initiated |
| Expense Approval | Pending manager approval or Pending individual approval |
| Journal Approval | In process |
If you have not enabled this feature, the following statuses are displayed for the transactions where the approval process failed.
| Workflow Name | Workflow Transaction Status |
|---|---|
| Invoice Approval | Rejected |
| Expense Approval | Required |
| Journal Approval | Saved |
In case of the Hold Resolution Workflow, there are no changes to the workflow status of the transaction irrespective of whether this feature is enabled or not.
If you had already enabled this feature and then decided to opt out, this feature will not be re-enabled for you in update 22C.
For all failed workflow transactions, the workflow administrator or workflow submitter of the transaction receives an email notification for the error. Workflow administrators must review all failed transactions and the failure causes on the Workflow Transaction Console page and take appropriate action.
You can find additional details for this feature in the 19D release notes and help center documentation.
Steps to Enable
Use the Opt In UI to enable this feature. For instructions, refer to the Optional Uptake of New Features section of this document.
Offering: Financials
This feature has been enabled by default for new customers from update 19D onwards.
From 22C update, this feature will be enabled by default for upgraded customers as well.
You still have the option to opt out of using this feature. However, we strongly recommend that you plan for the uptake of this feature. If you wish to opt out of using the feature, follow these steps:
-
Click the Navigator, and then click New Features (under the My Enterprise heading).
-
On the Features Overview page, go to the Available Features tab.
-
Select the Workflow Transaction Console feature and click on the Enabled icon.
-
On the Edit Features page, deselect the Enable option for the feature or feature choices as required and then click Done.
Tips And Considerations
To display only financial-related tasks in the Workflow Transaction Console, enable the transaction security feature by using these steps:
-
Go to Navigator > Setup and Maintenance > Manage Enterprise HCM Information.
-
Click Edit > Correct.
-
In the Transaction Console Information section, select Enable Transaction Security.
Role Information
- Financial Application Administrator
Different Tax Exception and Tax Exemption Source Taxes
Apply tax exception and tax exemption derived from different source taxes to a related tax of the same regime. This helps reduce the setup and ongoing maintenance of the tax setup, and improve run-time performance during tax calculation.
Customers in the US (and countries like Brazil, Argentina, Colombia) with nexus in multiple states/provinces and needing to use Product Fiscal Classification to determine the tax rate that applies can define Tax Exceptions by Product Fiscal Classifications as an alternative to tax rate determination rules that are based on Product Fiscal Classification codes. This avoids maintaining too many tax rules/conditions for changes in tax rates and new states. For example, even if the customers leverage Tax Exceptions by Product Fiscal Classifications, the sheer number of required jurisdictions puts a burden on configuration, maintainability, and performance. In almost all cases, each category treatment is different only by state, not by each county, city, and so on. Hence, it is required for users to specify the exceptions for the state level. The Tax engine should pick up the exception for the lower-level jurisdictions from the state level tax.
Using this feature, you can derive the Tax Exception rate for lower-level jurisdictions by using the Tax Exception Source Tax specified at the Tax level. For example, users can specify the Tax Exception Source Tax as State for the county tax. If this is done, the Tax engine will use the exception derived for the state tax for the current transaction line and apply it for the tax line for the county tax. You can also define Tax exception based on both Product category and Inventory Linked Product Fiscal Classification, only once for each of the higher jurisdiction level taxes, and it will be applicable for all lower jurisdiction level taxes.
Countries like the US have tens of thousands of jurisdictions, and the tax rates, whether exempt/zero-rated or others, can vary from state to state for each product fiscal classification code. This feature will ensure that the tax rates can be applied to transactions with a minimum configuration, which will avoid performance issues and maintenance overhead.
If there is any change to the Tax rate or the inclusion of new states, this feature helps users to implement the minimum changes necessary to the Tax exception setups. Users no longer need to create new Tax Rules or change the conditions, reducing overall maintenance.
Steps to Enable
To use this feature, assign the source tax to a lower level tax using the following steps:
- Navigator -> Setup and Maintenance Task - Manage Taxes.
- Search the Tax and go to Control and Defaults.
- Check "Use tax exceptions from an existing tax".
- Provide Source Tax in "Tax Exceptions Source" field

- Save and Close.
NOTE: You can only find these fields on the Create/Edit Tax page. These fields are not available when you create tax using other methods such as rapid setup spreadsheets and setup services.
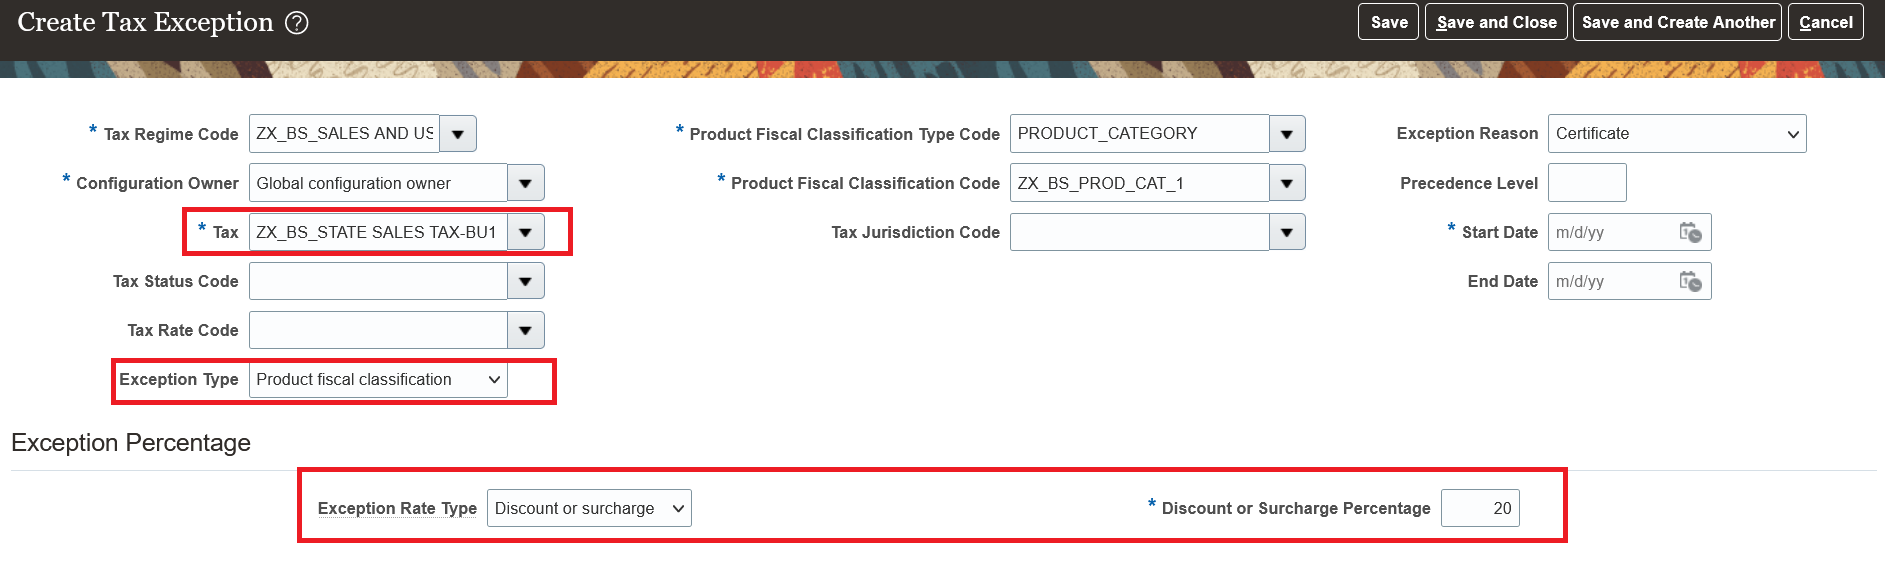
- Navigator -> Setup and Maintenance Task - Manage Tax Exceptions.
- Create a tax exception for the source tax based on Product Fiscal Classification.
Tips And Considerations
- To apply the tax exception to lower tax from source tax, we also need to have both taxes applicable to the transaction. This will ensure that the correct tax exception against the source tax and jurisdiction is picked up while calculating lower level tax amount.
- The compounding precedence of source tax should be lower than the compounding precedence of lower tax.
- If an exception is defined at a lower level, it will take precedence. If not found engine will search for source tax exception.
- If no source tax is applicable during tax calculation, the engine will consider it as no exception from source tax.
- If the exception type from source tax is ‘Special Rate’, it is not applied to the lower level tax.
Expense Allocation to Projects and Accounts by Amount At Expense Report Level
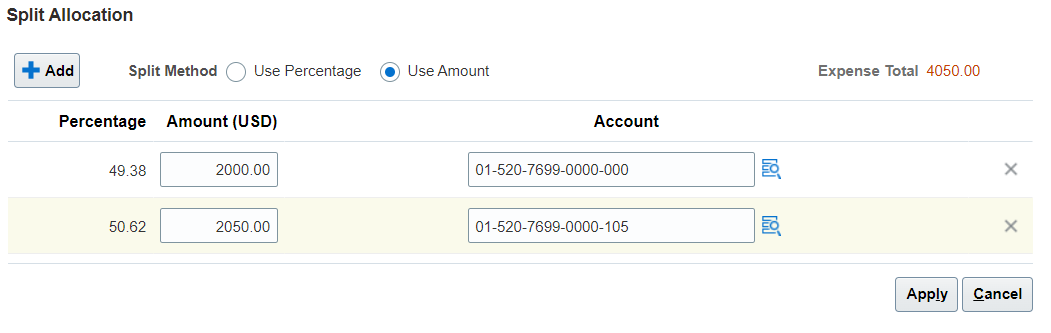
Allocate specific amounts to a project or expense account during expense report entry. The application calculates the percentage of allocation to the project or account using the amounts entered.
Use the Split Allocation window to split expense allocations across projects or accounts by amount or percentage.
You can access the Split Allocation window using the Split Allocations button in the expense report. Click the button to enter project or account allocations for the entire report, or select individual lines in the report and click the button to enter allocations for these lines only.

The inclusion of split allocations by amount lets you apply costs directly to a project or account, and optionally apply allocations to specific lines of an expense report. This is useful, for example, when allocating funds to projects or accounts with specific reimbursement maximums.
Steps to Enable
You don't need to do anything to enable this feature.
Tips And Considerations
- This feature uses the split allocation setting,
- You can only have one set of lines at a time for the line level split.
Key Resources
- Watch Split Allocations in Expense Reports Readiness Training
- This feature originated from the Idea Labs on Oracle Customer Connect: https://community.oracle.com/customerconnect/discussion/557070
Role Information
There is no need for a new role.
Expense Approval Routing Using Accounting Segments
Configure expense approval rules using accounting segments. This enables companies to route expense reports to account owners for approval, thereby providing visibility into expenses charged to their accounts.
An expense can be charged to one or more accounts, thereby creating one or more expense allocations for an expense. The Expense Distribution folder in the FinExmWorkflowExpenseApproval workflow is enhanced to include all account segments and its characteristics for each expense allocation.
You can create expense approval rules or update existing rules to take advantage of these new attributes. These attributes let you route expense report approval notifications to appropriate account owners.
These accounting attributes are added to the Expense Distribution folder for expense approval routing:
- Account Enabled Indicator
- Account End Date
- Account Segment 1 - Account Segment 30
- Account Start Date
- Account Type
- Detailed Budgeting Allowed Indicator
- Detailed Posting Allowed Indicator
- Financial Category
Accounting Segments Added to Expense Distribution Folder
Configuring approval rules by accounting segments provides the account owners better visibility into the expenses that are charged to their accounts, and also helps add another level of approval if needed.
Steps to Enable
You don't need to do anything to enable this feature.
Key Resources
- This feature originated from the Idea Labs on Oracle Customer Connect: https://community.oracle.com/customerconnect/discussion/609253
Role Information
To configure expense approval rules, you need to have the role of Application Implementation Consultant.
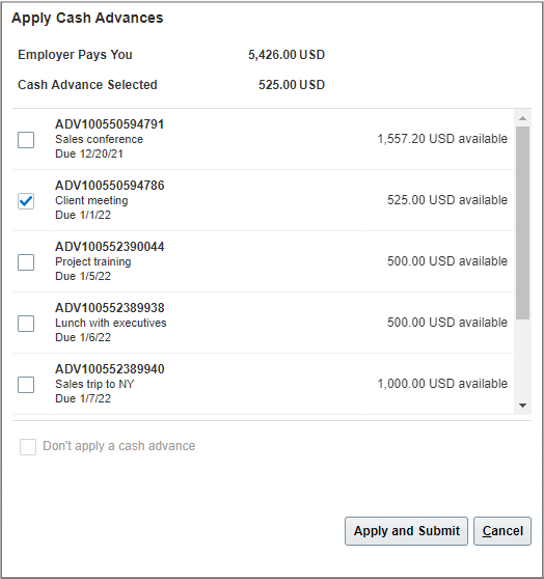
Manual Application of Cash Advances to Expenses
Manually apply cash advances to expenses during expense report submission. Employees can apply the cash advance designated for a specific trip to the corresponding expenses, providing visibility to approvers and auditors.
When submitting expenses, employees can select cash advances that are applicable to the selected expenses and submit the reports. If they choose not to apply a cash advance, they can provide a justification for not applying the available cash advances. The available cash advance amounts and the cash advance statuses get updated after employees apply cash advances and submit reports. Employees can view applied cash advances details in expense reports after submission.
Select Applicable Cash Advances
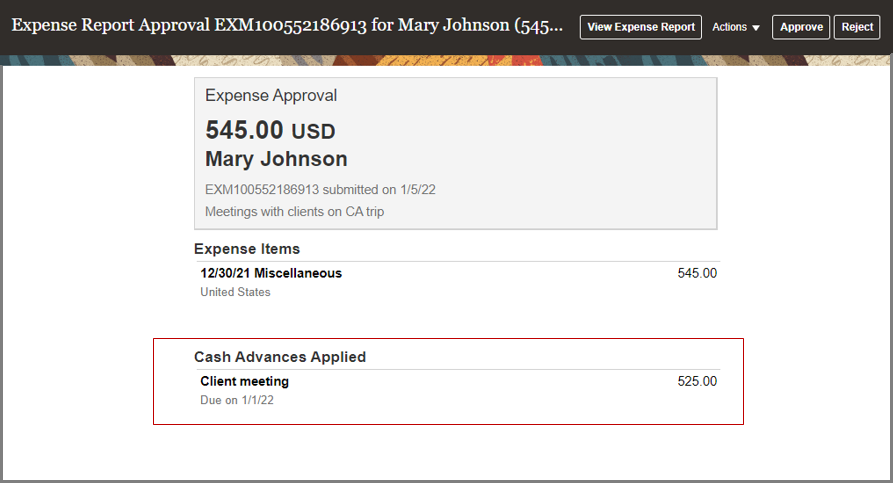
Approvers can review the applied cash advances in approval notifications and take necessary action. If the employee has provided a justification for not applying the available cash advances, then the approver can review it in the notification..

Review Applied Cash Advances
Auditors can view the applied cash advances on the Audit Expense Report page. Auditors cannot make any changes to cash advances that are applied to a report.
If approvers or auditors reject expense reports, then cash advances that are applied to the reports are automatically removed and returned to the employee’s available cash advances. If expense amounts are adjusted during expense report audit and applied cash advances exceed the reimbursement due to employee, then the difference is added back to employee’s available cash advances. The available cash advance amounts and the statuses are updated accordingly on the Cash Advances work area. The adjustment and rejection notifications identify any changes to the applied cash advances.
Cash Advances Removed
Enabling employees to manually apply cash advances provides more flexibility to employees and allows them to apply the cash advance obtained for a specific purpose to corresponding expenses. Additionally, approvers and auditors have better visibility into the outstanding cash advances.
Steps to Enable
To enable manual application of cash advances, perform the following steps:
- Sign in as the Application Implementation Consultant.
- From the Setup and Maintenance work area, navigate to the Manage Cash Advance and Authorization Policies page.
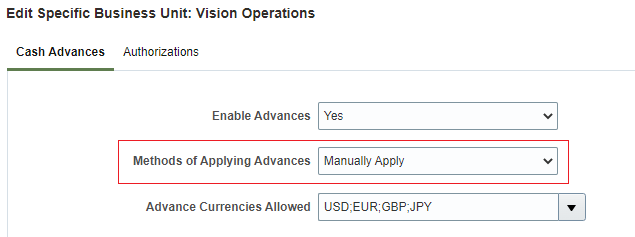
- Under Cash Advances, set Methods of Applying Advances to Manually Apply.
You can enable this at the implementation level on the Manage Cash Advance and Authorization Policies page, which applies to all business units. Alternatively, you can enable this for specific business units on the Create/Edit Business Unit window.

Configure Methods of Applying Advances
Key Resources
- Watch Manual Application of Cash Advances Readiness Training
- This feature originated from the Idea Labs on Oracle Customer Connect: https://community.oracle.com/customerconnect/discussion/557032
Role Information
To enable manual application of cash advances, you need one of these roles:
- Expense Manager
- Application Implementation Consultant
Manual Submission of All Expenses from Digital Assistant
Enable employees to submit all expenses from the digital assistant, including corporate card charges and cash expenses created from the Expenses web application.
Expenses that require more information, contain any errors, or are waiting for corporate card matches are not available for submission.
Employees can submit all the expenses together using Digital Assistant thereby simplifying the expense submission process.
Steps to Enable
You don't need to do anything to enable this feature.
Role Information
You don't need a new role or privilege access to use this feature.
PDF Attachments in Expenses Mobile Application
Enable employees to select PDF documents as attachments to their expenses. Search for and select PDF files that exist on the device.
When creating expenses from the mobile application, employees can browse through their device folders or cloud drives and attach PDF documents to their expenses in addition to image files. Approvers can also view the PDF attachments when approving the expenses from the mobile application.
This enables employees to attach PDF files, such as hotel, car rental, and airfare receipts easily, and to comply with local regulations where employees are required to attach the original PDF receipts from the merchants.
Steps to Enable
You don't need to do anything to enable this feature.
Tips And Considerations
To use this feature, ensure that you have downloaded the latest Expenses mobile application.
Key Resources
- Watch Expense Attachments in Expenses Mobile Application and Expense Approval Rules Readiness Training
- Refer to this idea in Idea Lab: https://community.oracle.com/customerconnect/discussion/534521
Role Information
You don't need a new role or privilege access to use this feature.
IMPORTANT Actions and Considerations
DEPRECATION OF OLDER DIGITAL ASSISTANT SKILL VERSIONS
The Digital Assistant and its skills continuously receive updates as they get smarter and provide enhanced conversational experiences. Check for updated versions every release in the Skill Store. Versions stop working when the underlying platform version becomes inactive, at the longest 2 years after release.
The Expenses skill built using Oracle Digital Assistant platform version 20.08 is deprecated. You can continue the use of your skill in platform version 20.08, however no updates or bug fixes for this specific version of the skill will be provided. We encourage you to move to the latest version of the Expenses skill at the earliest opportunity.
The 20.08 platform version of the Expenses skill will be removed from the Skill Store in six months.
DEPRECATION OF PAYMENT INFOTILE
Invoices Landing Page
The Payment infotile on the Invoices landing page displays the total amount due for payment by the currency. Clicking the amount displays the invoices due in the subsequent table. The Payment infotile will no longer be available from update 22C onwards. However, you can still retrieve the information from the Payment infotile using the suggested alternatives.
- Option A: Manage Invoices - Saved Search: Create a saved search to get the supplier invoice balance for validated/approved and fully/partially unpaid invoices.
- Option B: OTBI - Supplier Dashboard: Deploy catalog to get supplier and invoice outstanding balances.
Detailed steps for the above options are explained in MOS Note Alternate Options for Supplier Outstanding Balance on My Oracle Support.