
This document will continue to evolve as existing sections change and new information is added. All updates appear in the following table:
| Date | Feature | Notes |
|---|---|---|
| 11 APR 2019 |
Student Financials: Set Up Application Fees |
Updated document. Revised feature information. |
| 22 MAR 2019 | Created initial document. |
Student Management delivers cloud based, flexible, extensible best practice business flows to support how you enroll your students, maintain their personal information, and manage their payments. From a learner taking anon-credit course to the degree-seeking student, Oracle’s Student Management enables institutions to anticipate students’ needs, illuminate their academic path, and empower them to succeed.
This guide outlines the information you need to know about new or improved functionality in this update, and describes any tasks you might need to perform for the update. Each section includes a brief description of the feature, the steps you need to take to enable or begin using the feature, any tips or considerations that you should keep in mind, and the resources available to help you.
Give Us Feedback
We welcome your comments and suggestions to improve the content. Please send us your feedback at oracle_fusion_applications_help_ww_grp@oracle.com.
Column Definitions:
Report = New or modified, Oracle-delivered, ready to run reports.
UI or Process-Based: Small Scale = These UI or process-based features are typically comprised of minor field, validation, or program changes. Therefore, the potential impact to users is minimal.
UI or Process-Based: Larger Scale* = These UI or process-based features have more complex designs. Therefore, the potential impact to users is higher.
Customer Action Required = You MUST take action before these features can be used by END USERS. These features are delivered disabled and you choose if and when to enable them. For example, a) new or expanded BI subject areas need to first be incorporated into reports, b) Integration is required to utilize new web services, or c) features must be assigned to user roles before they can be accessed.
| Ready for Use by End Users Reports plus Small Scale UI or Process-Based new features will have minimal user impact after an update. Therefore, customer acceptance testing should focus on the Larger Scale UI or Process-Based* new features. |
Customer Must Take Action before Use by End Users Not disruptive as action is required to make these features ready to use. As you selectively choose to leverage, you set your test and roll out timing. |
|||||
|---|---|---|---|---|---|---|
| Feature |
Report |
UI or |
UI or |
Customer Action Required |
||
New Subject Area: Higher Education - Admissions Applications Real Time |
||||||
Oracle Campus Community includes everything that is shared among different Student Management product areas, whether person records or common setup objects for implementing Student Management.
Redirect Self-Service Users to the Home Page
Redirect a user automatically to the self-service home page after they sign up and set their password. To enable this redirection, use the User Category Name field on the Manage User Role Mapping page.

The URL of the page to which the user must be redirected is contained in the details for the user category name. You specify this URL through the Security Console.
To enable the automatic redirection of users to the home page after they sign up, you must ensure the following two requirements:
- You have a user category that contains the URL of the home page.
- This user category is selected for the signed-up user role on the User Role Mapping page.
Steps to Enable
To add a user category:
-
Sign in as IT Security Manager.
-
Click Tools > Security Console > User Categories.
-
Click the Create button. On the User Category Details page, specify a name and description for the user category. In the Next URL field, specify the URL of the self-service home page.
-
Click Done.
To specify the user category on the User Role Mapping page:
-
Sign in as IT Security Manager.
-
Click Setup and Maintenance. In the Setup list, select Student Management.

-
In the functional area, click Users and Security. Ensure that the Show list specifies All Tasks. Click the Manage User Role Mappings task.
-
On the Manage User Role role mapping page, select the user category you created for the redirection and click Save and Close.
Role Information
The user must have the IT Security Manager role.
It's important for an academic institution to establish a brand identity. You can configure the student and administrative pages to fit your institution’s branding. Select a logo of the institution and a branding color for these pages. Select a logo for larger screen sizes such as desktops and laptops, and select a logo for smaller screen sizes.
This graphic shows an area of the branding page where a logo for mobile devices is selected and also a primary branding color is selected:
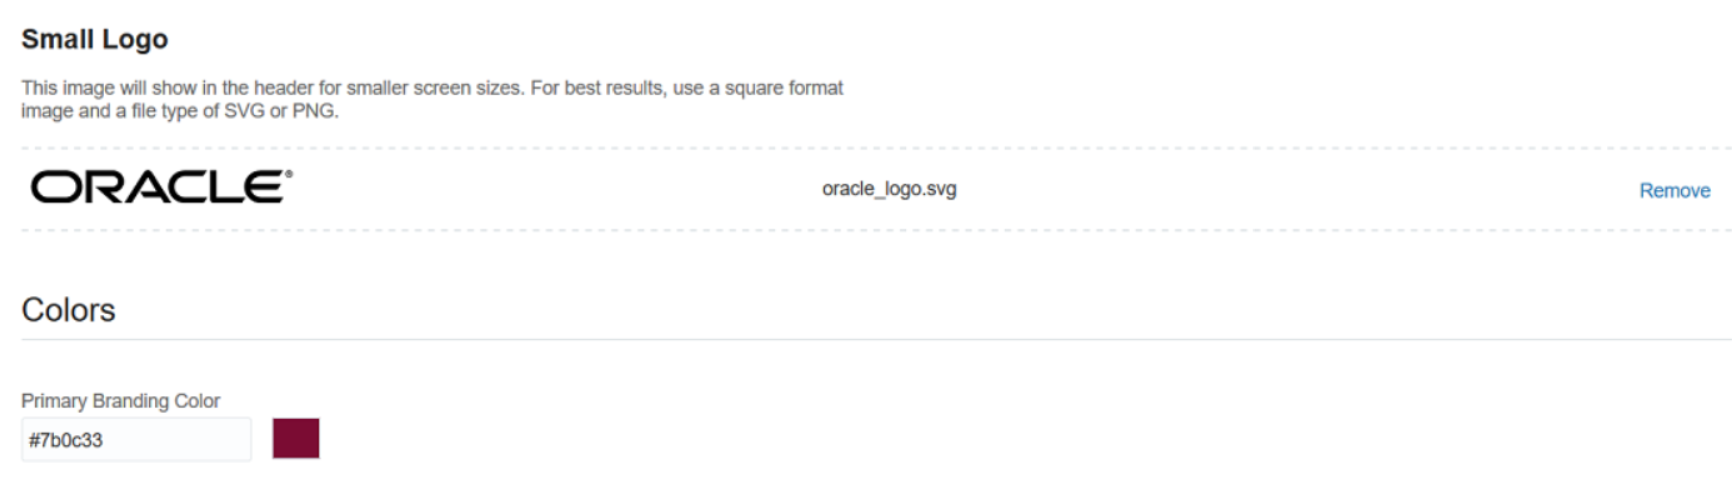
Specifying a Logo and Branding Color
Preview the branding configuration, for both mobile devices and desktop, before saving the configuration. The following graphic shows the preview page for mobile devices:

Preview Page for Small Screens
To configure and preview branding:
- From the home page, click Setup and Maintenance.
- From Setup, select Student Management.
- In Functional Areas, click Academic Structures.
- In Show, select All Tasks.
- Click Specify Branding and Colors.
Steps to Enable
No steps are required to enable this feature.
Use the new person management pages to search, view, and edit an applicant or student's personal details, such as name, address, email ID, and emergency contacts.
To access the new person management pages, from the home page, click Academics > Person Search.
After searching for a person, you reach the person detail page. The header of this page shows the summary information, such as the student's contact information, academic data, and service indicators. The page contains areas where you can edit the details, such as the student's address and emergency contacts. By clicking on the Communications tab, you can view the communications sent to a particular applicant or student, such as an applicant admitted confirmation email, and resend a communication, if needed.

Person Detail Page, Profile Tab (1 of 2)
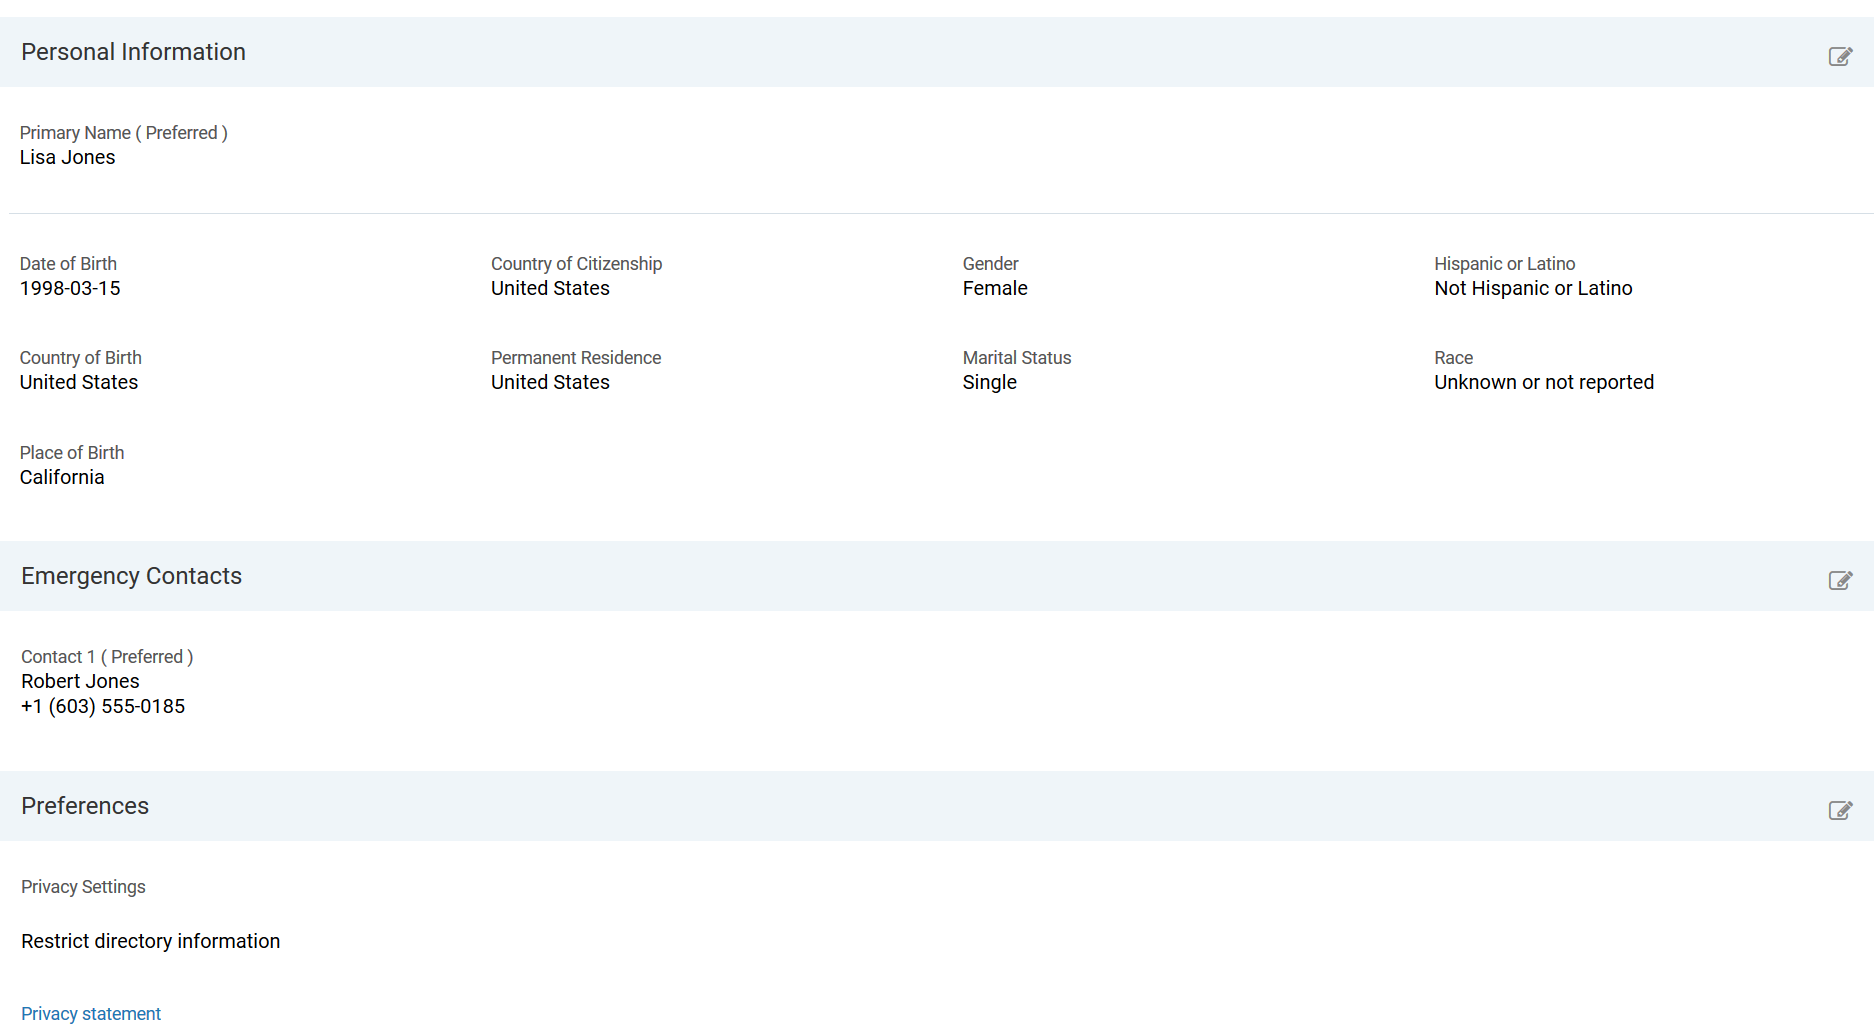
Person Detail Page, Profile Tab (2 of 2)
Steps to Enable
No steps are required to enable this feature.
Self-Service: Viewing Communications
Students and applicants can tap or click the bell icon to view the communications sent to them. They can filter these communications, such as view communications that the academic institution sent to them during the last 30 days, last 60 days, or view communications for a specific date range.
The bell icon is on the header of the self-service pages for a signed in user.
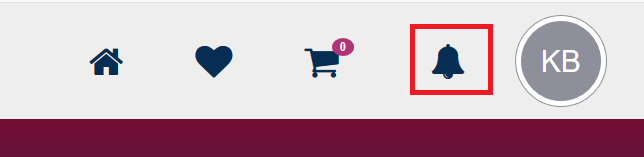
Bell Icon
Steps to Enable
No steps are required to enable this feature.
Oracle Student Financials is a tool for higher education institutions to manage student receivables, billing, and payment collection. Using Student Financials, both staff and students can quickly find and use the financial information they need to make critical decisions. Staff can actively manage student accounts by performing functions such as creating charges, accepting payments, processing refunds, and generating receipts.
Corporate sponsors or external organizations who have an agreement with your academic institution can now be billed for charges that students incur for sponsored courses. To bill external organizations automatically:
- On the Create Sponsorship Credit page, you must select the Bill Sponsor check box.
- Make sure when you set up the sponsorship credit and sponsorship fee that you use the same academic period that your course is set up with.
- On the Create Sponsorship Agreement, Agreement Details page, you must associate the sponsorship credit (Credit Name) and the sponsorship fee (Fee Name).
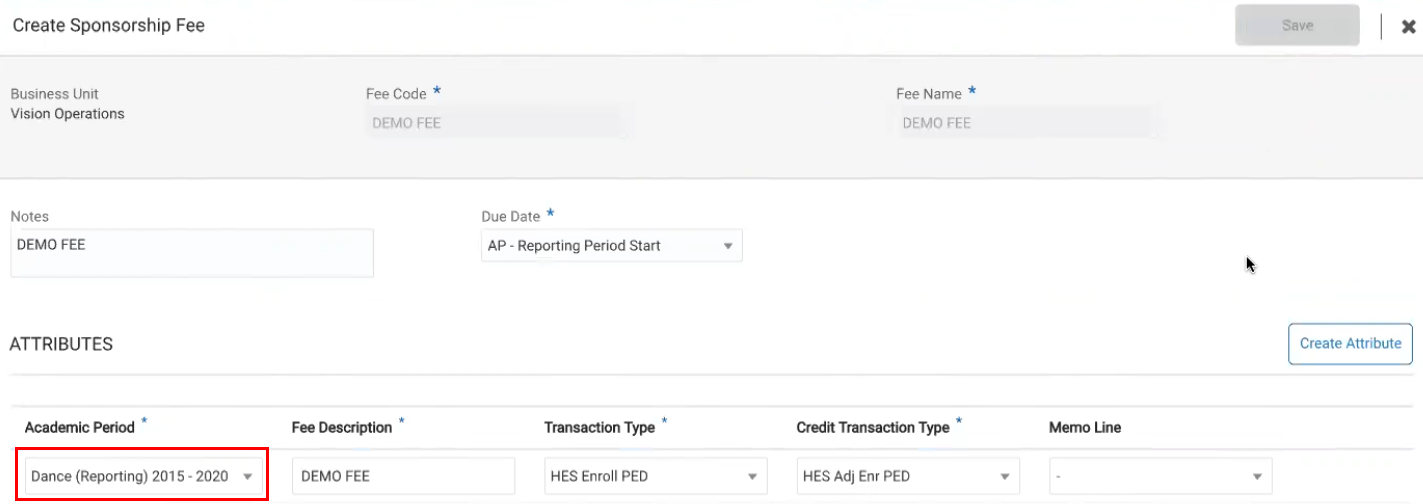
Create Sponsorship Fee Page
You must first create a sponsorship fee, then a sponsorship credit. When these two are ready, then create your sponsorship agreement.
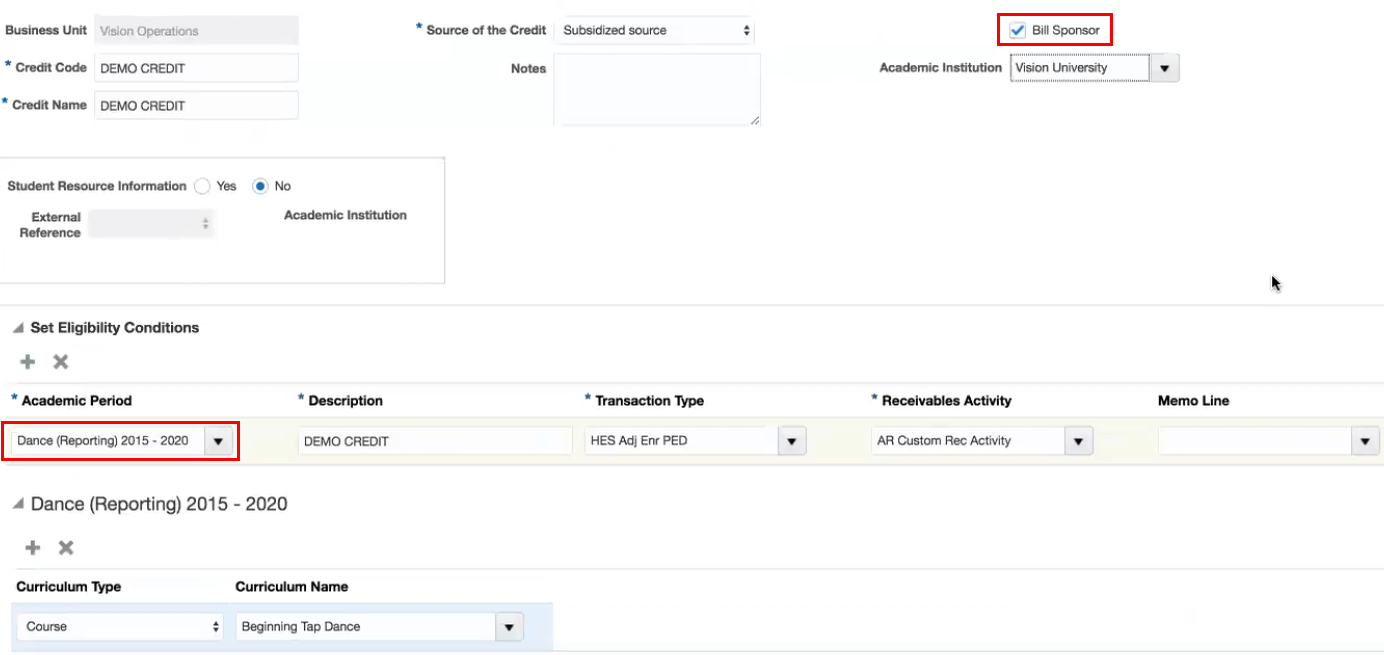
Create Sponsorship Credit Page

Create Sponsorship Agreement - Agreement Details Page
In the sponsorship agreement, make sure you use the appropriate sponsorship credit and fee. It is in the sponsorship agreement that you create the link between the credit and the fee.
NOTE: You can assign a sponsorship credit to only one sponsorship agreement.
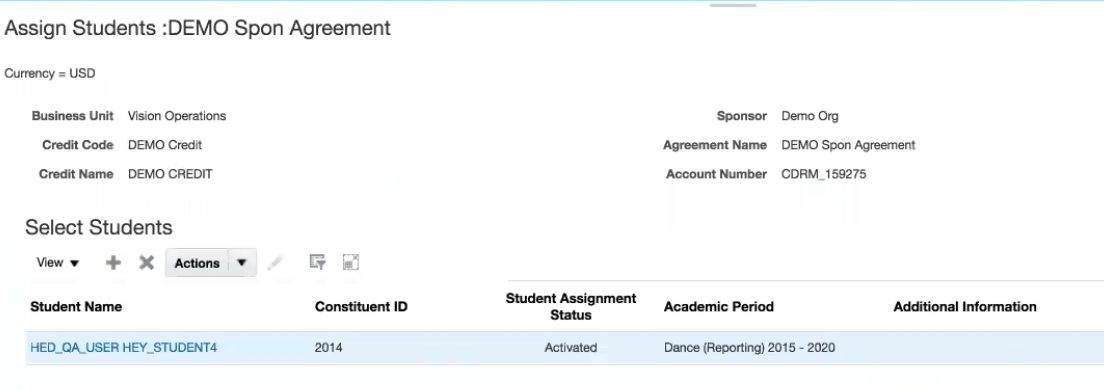
Manage Sponsorship Agreements - Assign Students
Once you've created your sponsorship agreement, you can assign students to the agreement. When the students log in to their account in self-service, they will see the course for which they've been sponsored. Students can then enroll in the course, and the system automatically logs the charges in the sponsoring organization's account.
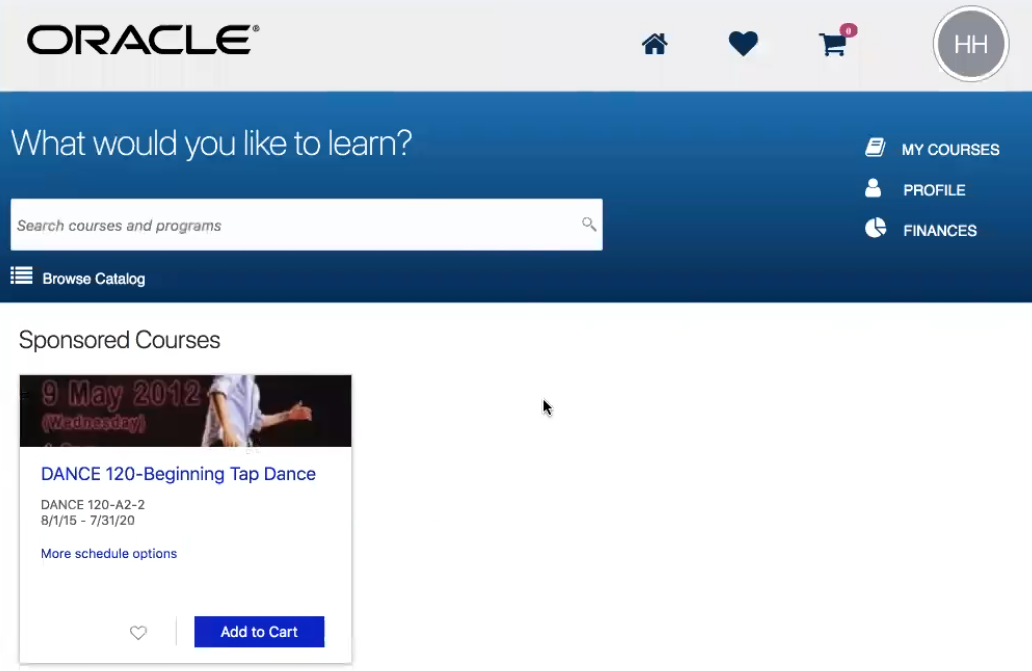
Self-Service Sponsored Courses
Steps to Enable
Make the feature accessible by assigning or updating privileges and/or job roles. Details are provided in the Role section below.
Tips And Considerations
- You must have external organizations defined in Campus Community before you can define a sponsorship agreement with them.
- The external organization must also have a customer account. The customer account number is generated when you save a sponsorship agreement as active; that customer account number is stored on the sponsorship agreement so you can easily retrieve the information on other Student Financials pages.
- An external organization can have multiple customer accounts associated with it. A customer account must be created for each sponsor/sponsor agreement combination. For example, if an organization has three sponsorship agreements there will be three customer accounts created for the external organization.
Key Resources
This feature builds on the feature released in:
- 19A: Create Sponsorship Credits
- 18B: Manage Organization Transactions; Create Sponsorship Agreements
Role Information
The Bursar job role is the role that maintains sponsorships.
You must make sure your administrator, the user who would likely create sponsorship agreements, has access to the reference data set that your institution uses.
To assign the reference data set to your administrator:
- From the Home page, click Setup and Maintenance.
- Go to the following:
- Offering: Student Management
- Functional Areas: Users and Security
- Task (Show All Tasks): Manage Data Access Set Data Access for Users
- To check whether the user has the proper data access:
- Click Users with Data Access.
- Provide either the user name or the role, then click Search. If your user has data access, the search results should show the user with the appropriate role, security context (reference data set), and security context value.
- If the user does not appear in the search results, then you must set up data access for the user:
- Click Actions > Create.
- In User Name, search for the user.
- In Role, select Bursar.
- In Security Context, select Reference data set.
- In Security Context Value, select the appropriate set ID (one that you're using).
- Click Save and Close.
- Click Done.
Use the Create Miscellaneous Fee page to create an application fee.
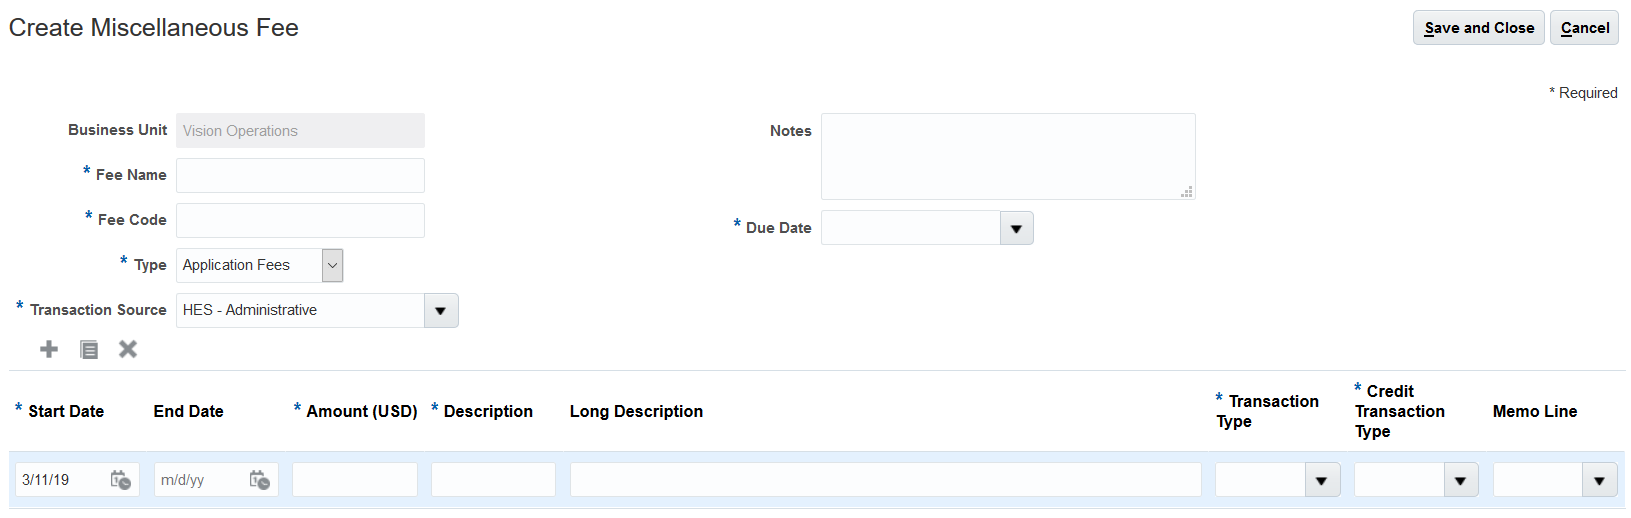
Create Miscellaneous Fee Page
On the Manage Miscellaneous Fees page, you can also duplicate an existing application fee. This allows you to easily create another application fee that has the same attributes as the existing one.
Steps to Enable
No steps are required to enable this feature.
Oracle Student Records enables you to set up and maintain your academic structures, curriculum structures and items, and academic calendars. You can enter, track, and process all academic information – from the course catalog and schedule of courses to student programs. You can enroll, grade, and evaluate students.
Create Transcript Types and Transcript Notes
Use the new Manage Transcript Types task to create transcript types such as official, online, or undergraduate.
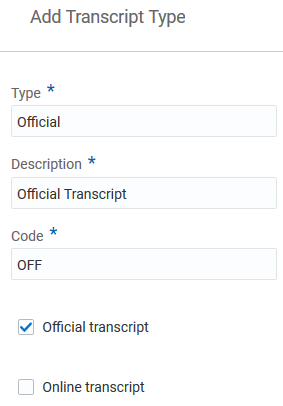
Transcript Types
Use the new Manage Transcript Notes task to create student-specific or curriculum-specific transcript notes. For student record notes, you can assign multiple student academic levels, such as graduate and professional, to a note. For curriculum type notes, you can assign multiple curriculum types, such as program and course, to a note.
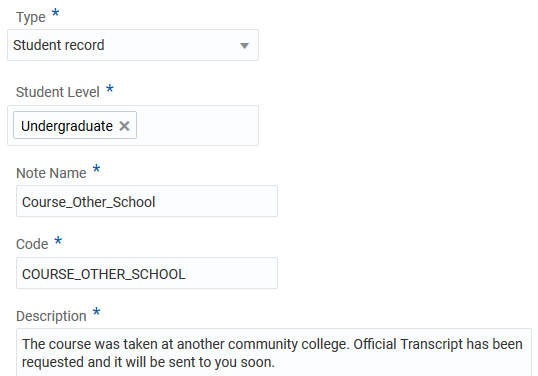
Transcript Notes
These are the first steps to support the creation of traditional education transcripts.
Steps to Enable
No steps are required to enable this feature.
Associate an Academic Level with a Reporting Period
The new Academic Level tab is available on the Academic Period page when the period category is academic reporting. Associate an academic level with a reporting period so that you can group and sequence reporting periods to display curriculum data in the student planner.
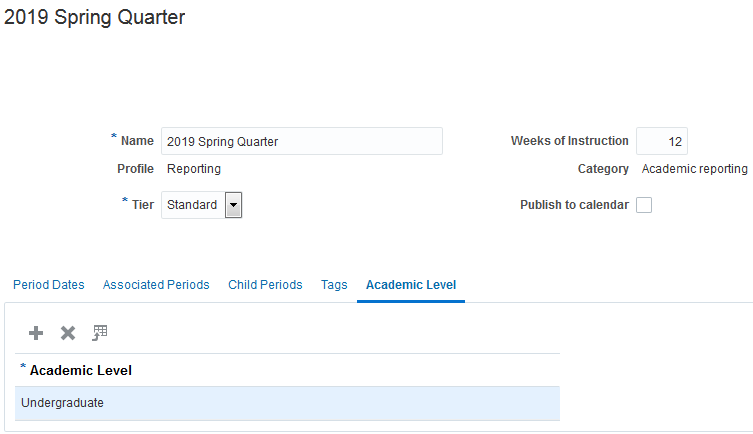
Academic Level Tab for Reporting Periods
Steps to Enable
No steps are required to enable this feature.
Use the new Complete Program action to complete a program for a student. For example:
- Complete a student program when the student completes a final credential so that the student's academic record indicates the program completion.
- Complete one element of a student program such as a minor when the student has not yet completed a final credential.
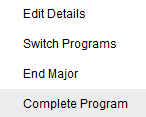
Complete Program
When you select the Complete Program action, the Complete Program page opens. Credentials that have been awarded display on the page.
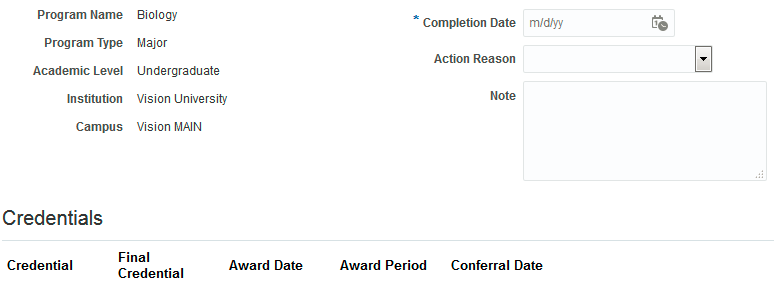
Complete Program Page
After you submit the program completion, on the student program landing page:
- The program status shows as Completed.
- Edit Details is the only action available for the program.
For a completed program, select Edit Details and click the Remove Completion button to reverse the completion and return the program to an active status.
Steps to Enable
No steps are required to enable this feature.
You can now withdraw a student from a reporting period.
A student’s enrollment by reporting period displays on the Period Statistics tab of the Student Results page. An action of Withdrawal is now available on this tab.
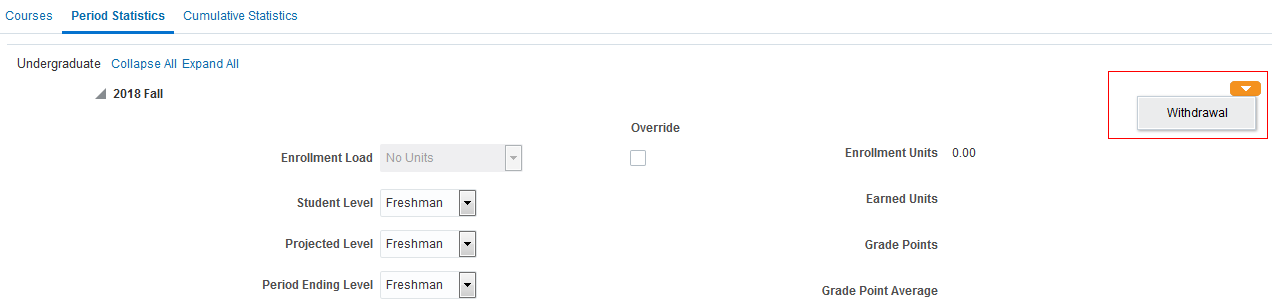
Withdrawal Action
When you select the Withdrawal action, the Withdrawal page opens. Enter a withdrawal date and reason. Information about withdrawal action reasons is provided later in this document.
In this example of the Withdrawal page, the student is not enrolled in courses for the reporting period:
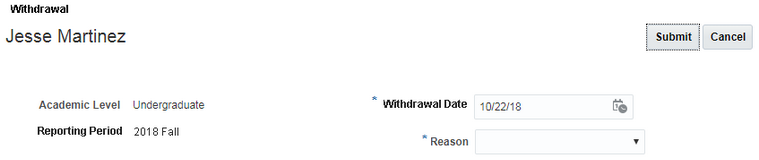
Withdrawal Page: No Enrollment
In this example of the Withdrawal page, the student is enrolled in courses for the reporting period. The courses display on the page:

Withdrawal Page: Enrolled Courses
Use the administrative enrollment UI to drop the courses from the student’s record. Then submit the withdrawal on the new Withdrawal page.
After the withdrawal is processed, the reporting period displays on the Period Statistics page with a status of Withdrawn and the withdrawal date.
You can use the Activate option to reverse the withdrawal.
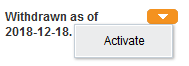
Activate Action
WITHDRAWAL ACTION REASONS
A new action of Withdrawal is available in the Manage Enrollment Action Reasons setup task. Create reasons to use when you take a withdrawal action for a student record.
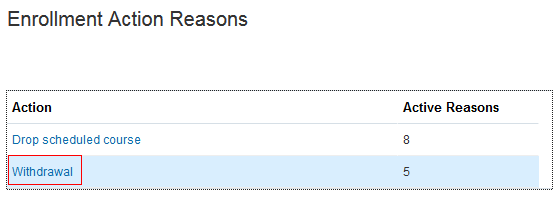
Enrollment Action Reasons
Steps to Enable
No steps are required to enable this feature.
Restrict Enrollment in Courses by Program
You can specify a program as a requisite for course enrollment. For example, restrict enrollment in an Economics course to students with an Economics major.
If a course has both program and course requisites, a student must meet all requisites in order to enroll.
Steps to Enable
No steps are required to enable this feature.
Oracle Student Admissions enables users to enter, track, and process the submission of the admissions applications.
Use Form Builder for Applications
Add a Relationships section to your applications forms to enable applicants to include even more information when applying online.
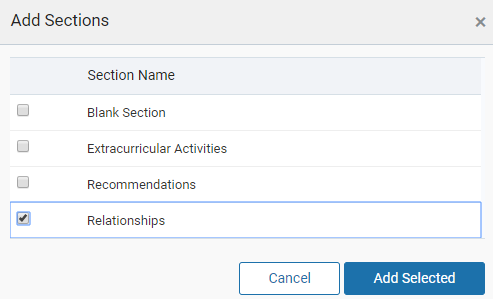
Add Sections: Relationships
You can allow applicants to add a name, contact information, and type of relationship.
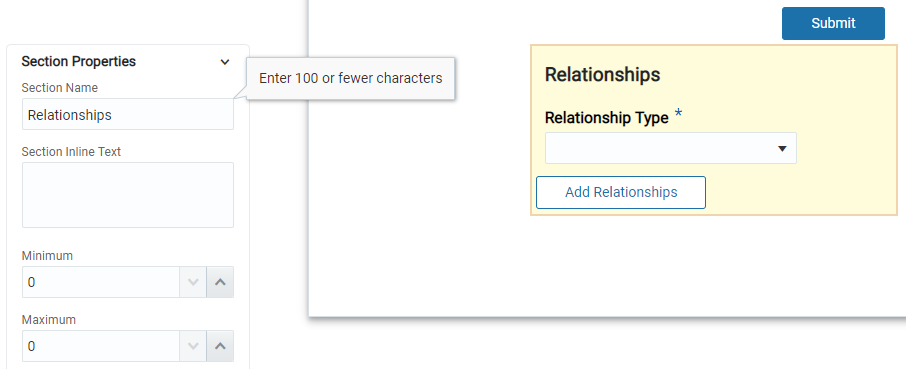
Relationships Section
Steps to Enable
No steps are required to enable this feature.
Role Information
The user must have the Admissions Manager role.
Create Admissions Activity Reports
Run admissions-related reports to review specific information for an applicant's:
- Academic history
- Recommenders
- Extracurricular activity
Admissions Analytics
Create your admissions reports using Tools > Report and Analytics > Create > Analysis.
Steps to Enable
Admissions reporting capabilities must be enabled in Oracle BI Publisher.
Role Information
The user must have the Admissions Manager role.
Manage Application Attachments
Add an Attachments section to enable administrators to attach files to any application, no matter its status. Also, they can add attachments even when no attachment sections were configured on the form.
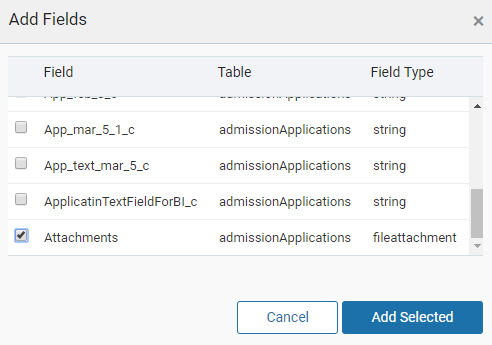
Add Field: Attachments
This empowers administrators to add, edit, remove, or download attachments for an application.
Attachments Field
Steps to Enable
No steps are required to enable this feature.
Role Information
The user must have the Admissions Manager role.
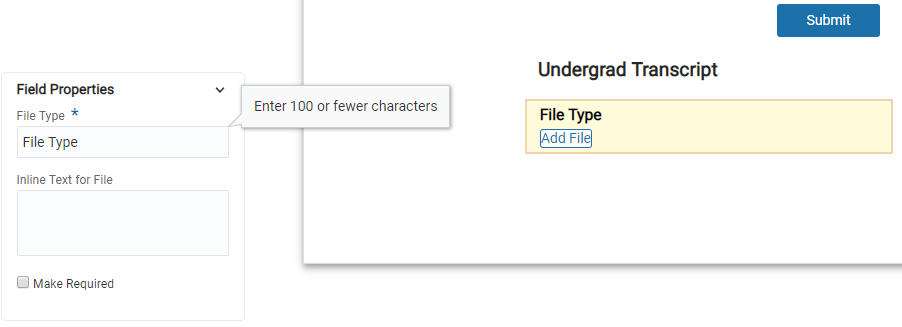
Prospective students can view and complete tasks on their new applicant landing page.
Applicant Landing Page
Applicants can:
- Continue an in-progress application
- View all applications that they have saved and submitted
- View an application's status
- View an admissions decision.
Steps to Enable
No steps are required to enable this feature.
Tips And Considerations
Online applications are set up using the Manage Admissions Application Action Reasons and Specify Admissions Settings areas within Functional Setup Manager.
Oracle Advisement provides the ability to build out a curriculum guided pathway for students. It also provides a student planner that allows students to plan and enroll in courses and track their own academic progress.
Design an Academic Plan Template
An Academic Load field is added to the Academic Plan Template Attributes section, for new full- and part-time designations.
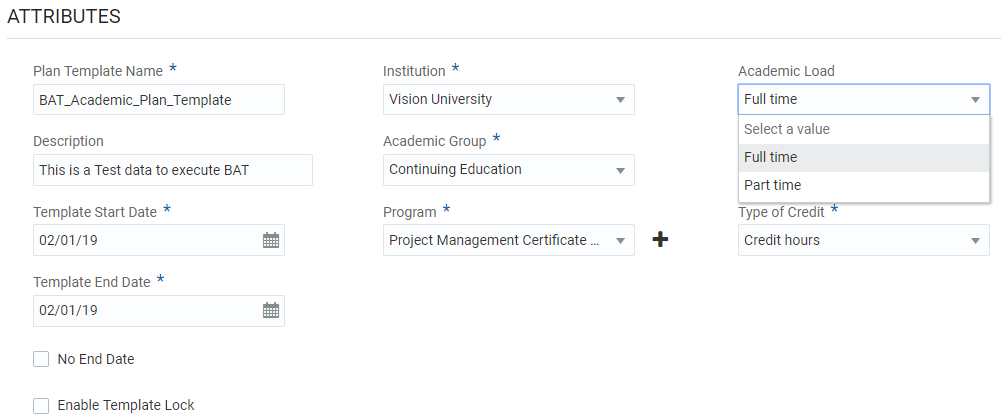
Academic Load Field
You can lock a guided pathway for the whole plan, or just for individual periods. This prevents the guided pathway from being changed both on the template and student planner.
PERIOD LEVEL
A lock icon is added at the period level; the default value is unlocked.
Period Level Lock
When the icon is locked at the individual period level the following icons are hidden:
- The plus sign to add more courses to the plan. This prevents more courses being added to the plan.
- The down arrow on courses and placeholders which prevents actions being taken on them.
When clicking on the lock icon when locked, it appears unlocked and the items from 1 and 2 display again.
When the lock is selected all individual periods in the plan are locked as in shown in the Period Level Lock graphic.
OVERALL PLAN LEVEL
A lock icon is added at the overall plan level; the default value is unlocked.

Plan Level Lock
When the icon is locked at the plan level the following icons are hidden:
- The Delete icon is hidden.
- All period levels within the academic plan are also locked. The plus sign and down arrow action are hidden and the individual plan levels become read-only.
In summary, the lock at the individual period level locks individual periods and the lock at the plan level locks all individual plans in the plan. Clicking the plan at the overall plan level when locked unlocks the plan and all individual periods. They all return to default mode.
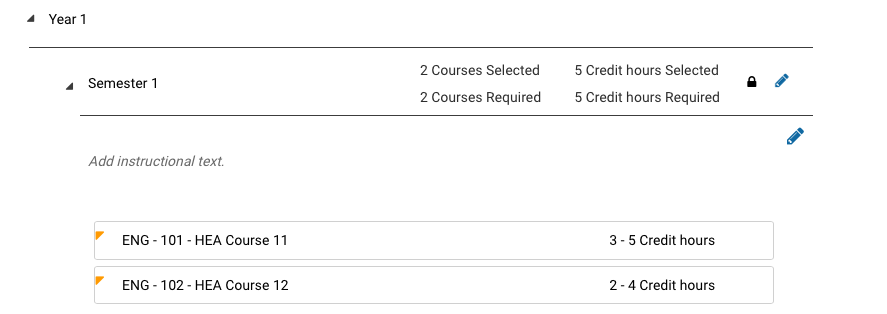
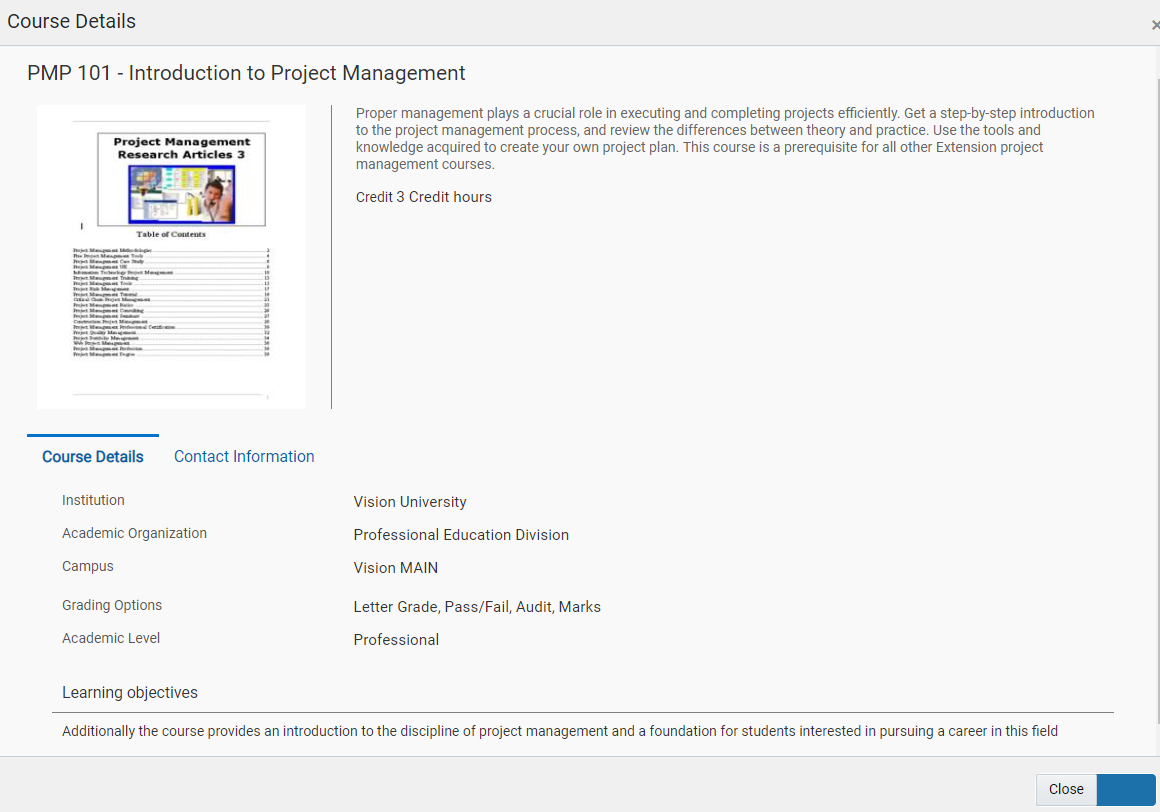
When you click on a course in an Academic Plan, a new Course Details page appears, which displays the same information used in Add Program Requirements. This story relates to consuming the new course details plan in the Academic Plan for each course.
Course Details Popup
Steps to Enable
No steps are required to enable this feature.
Role Information
The user must have the Admissions Manager role.
Transactional business Intelligence for Student Management
Oracle Fusion Transactional Business Intelligence is a real time, self-service reporting solution offered to all Oracle Cloud application users to create ad hoc reports and analyze them for daily decision-making. Oracle Transactional Business Intelligence provides admissions coordinators, academic coordinators, registrars, bursars, academic advisors, and student services managers the critical information to analyze admissions, enrollment, course capacity planning, and student tuition billing accounts.
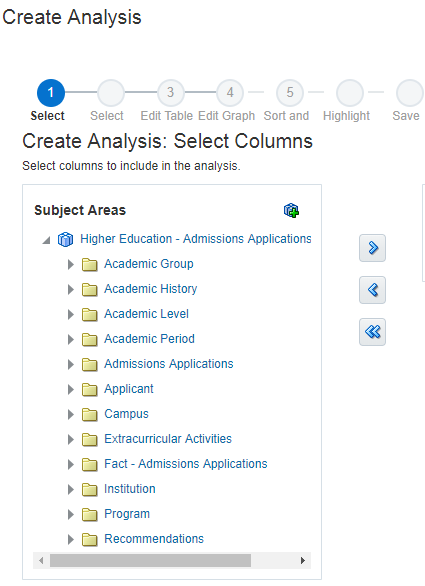
New Subject Area: Higher Education - Admissions Applications Real Time
Enhance your Student Management reporting with this new subject area. You can use this subject area to report on admission applicants, including application details, academic history, extracurricular activities, and recommendations. Details such as applicant name, applicant age, academic program applied for, and application status are available for reporting.
The following graphic shows the admissions applications subject area:
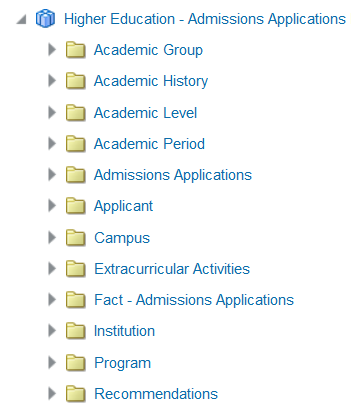
Subject Area for Admissions Applications
Steps to Enable
To use the subject area:
- Select Navigator > Tools > Reports and Analytics to open the Reports and Analytics work area.
- Include the subject area in your report or analysis.
---