
This document will continue to evolve as existing sections change and new information is added. All updates appear in the following table:
| Date | Feature | Notes |
|---|---|---|
| 20 SEP 2019 | Created initial document. |
Student Management delivers cloud based, flexible, extensible best practice business flows to support how you enroll your students, maintain their personal information, and manage their payments. From a learner taking anon-credit course to the degree-seeking student, Oracle’s Student Management enables institutions to anticipate students’ needs, illuminate their academic path, and empower them to succeed.
This guide outlines the information you need to know about new or improved functionality in this update, and describes any tasks you might need to perform for the update. Each section includes a brief description of the feature, the steps you need to take to enable or begin using the feature, any tips or considerations that you should keep in mind, and the resources available to help you.
Give Us Feedback
We welcome your comments and suggestions to improve the content. Please send us your feedback at oracle_fusion_applications_help_ww_grp@oracle.com.
Column Definitions:
Report = New or modified, Oracle-delivered, ready to run reports.
UI or Process-Based: Small Scale = These UI or process-based features are typically comprised of minor field, validation, or program changes. Therefore, the potential impact to users is minimal.
UI or Process-Based: Larger Scale* = These UI or process-based features have more complex designs. Therefore, the potential impact to users is higher.
Customer Action Required = You MUST take action before these features can be used by END USERS. These features are delivered disabled and you choose if and when to enable them. For example, a) new or expanded BI subject areas need to first be incorporated into reports, b) Integration is required to utilize new web services, or c) features must be assigned to user roles before they can be accessed.
| Ready for Use by End Users Reports plus Small Scale UI or Process-Based new features will have minimal user impact after an update. Therefore, customer acceptance testing should focus on the Larger Scale UI or Process-Based* new features. |
Customer Must Take Action before Use by End Users Not disruptive as action is required to make these features ready to use. As you selectively choose to leverage, you set your test and roll out timing. |
|||||
|---|---|---|---|---|---|---|
| Feature |
Report |
UI or |
UI or |
Customer Action Required |
||
Oracle Campus Community includes everything that is shared among different Student Management product areas, whether person records or common setup objects for implementing Student Management.
Self-Service: View Person Locale Preferences
Students and applicants can go to their Profile page to view their preferred date, time and number format, as well as their current time zone setting.
Steps to Enable
To set up the preferences of the users:
- Click Navigator > Setup and Maintenance.
- In the Setup page, select Search from the Tasks panel.
- Search for the Manage Administrator Profile Values task.
- On the Manage Administrator Profile Values page, set the preferences as profile values for these profile options:
- FND_TIMEZONE
- FND_TIME_FORMAT
- FND_DATE_FORMAT
- FND_NUMBER_FORMAT
You can set the profile values at these levels:
- Site level: The entire site of deployment.
- User level: A specific user.
For example, this screen shot shows the date format preference set up for a particular user:
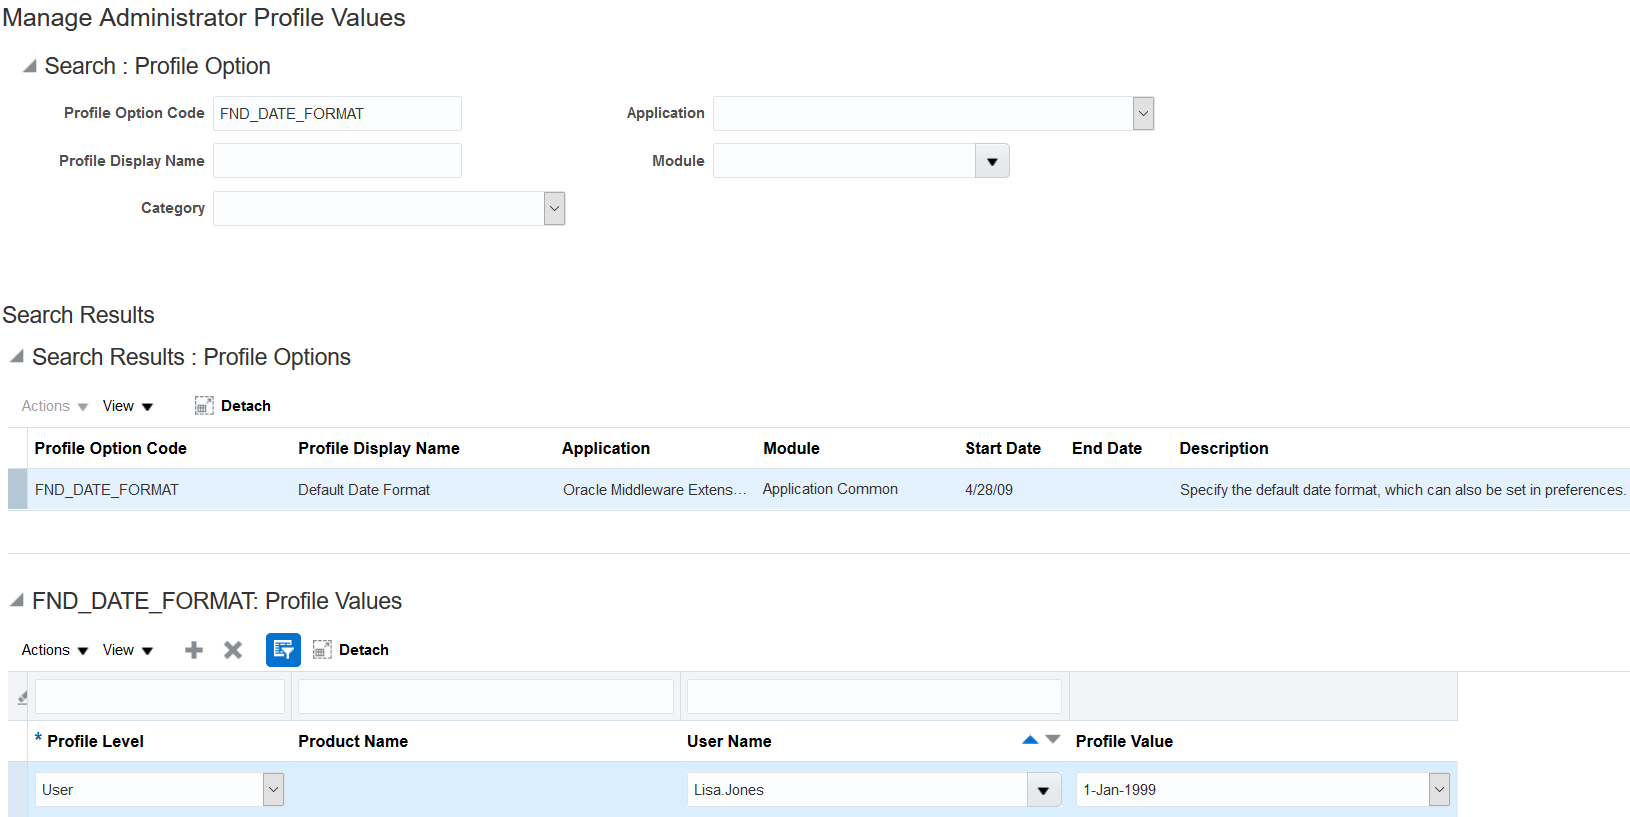
Configured Profile Option Example
For details about configuring profile options, see the Applications Core Configuration chapter in the Implementing Student Management book (available from the Oracle Help Center > Higher Education > Books).
Send emails with the date, time, and number fields automatically formatted according to the recipient's preferred settings.
Steps to Enable
To set up the preferences of the users:
- Click Navigator > Setup and Maintenance.
- In the Setup page, select Search from the Tasks pane.
- Search for the Manage Administrator Profile Values task.
- On the Manage Administrator Profile Values page, set the preferences as profile values for these profile options:
- FND_TIMEZONE
- FND_TIME_FORMAT
- FND_DATE_FORMAT
- FND_NUMBER_FORMAT
You can set the profile values at these levels:
- Site level: The entire site of deployment.
- User level: A specific user.
For details about configuring profile options, see the Applications Core Configuration chapter in the Implementing Student Management book (available from the Oracle Help Center > Higher Education > Books).
Enrollment supervisors can enact greater organizational efficiency through document submission tasks in task setup. A document can be submitted of a particular type, such as a transcript or recommendation letter.
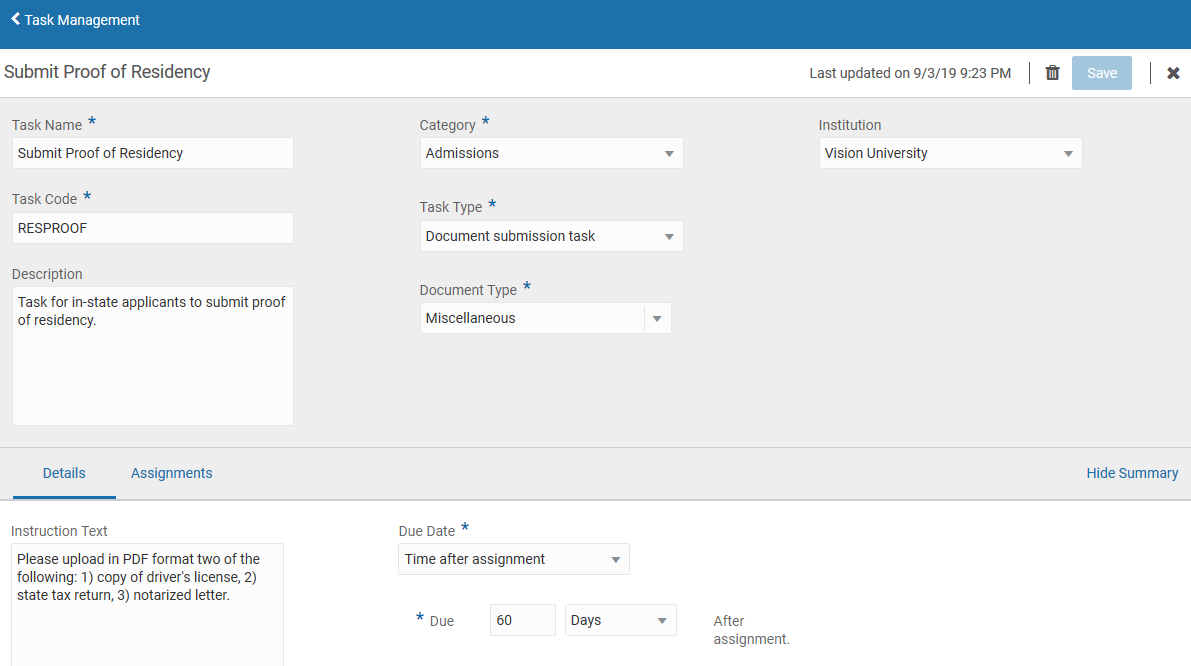
Document Submission Task Example
Steps to Enable
You don't need to do anything to enable this feature.
Institutional administrators will benefit from greater organizational control, as they can assign a task to a student. The administrator can use a person search to find the person, select Assign Task from the actions menu, search for the correct task to assign, apply additional configuration settings, then assign the task to the person.
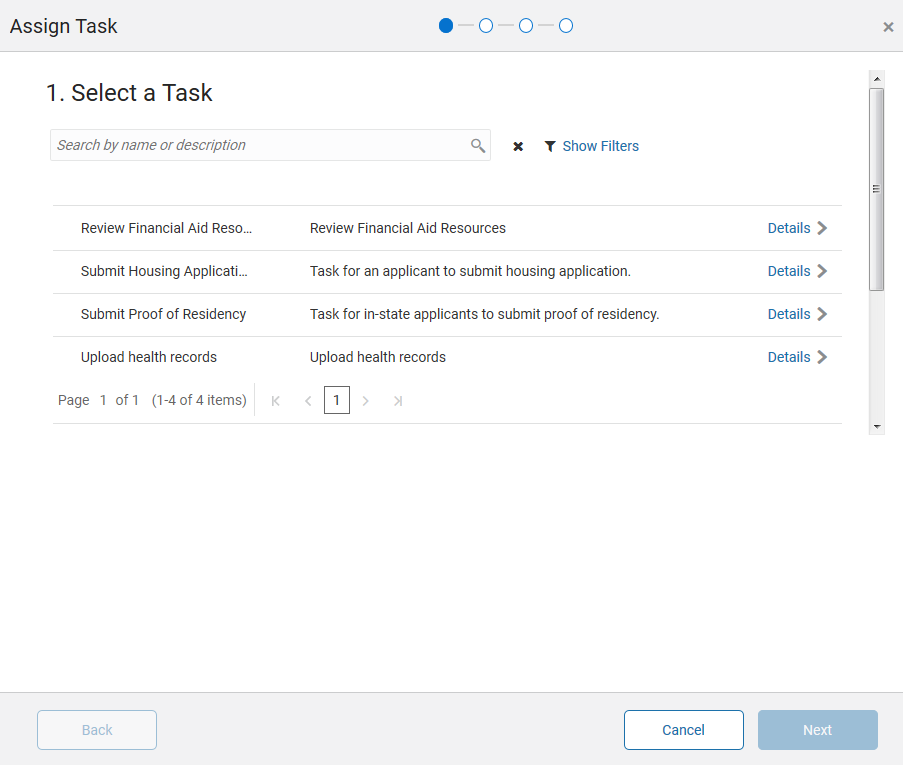
Manually Assign a Task
The administrator can also modify the due date at the time of assignment, associate the task with a particular admissions application, and enable or disable communications. By default, communication events are triggered when tasks are assigned and completed.
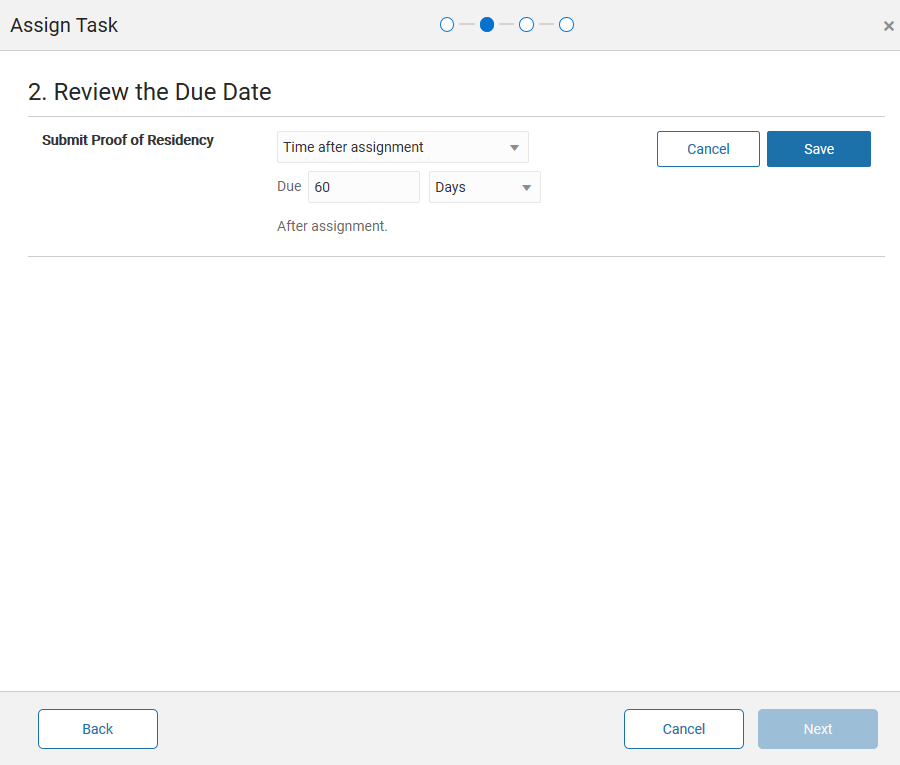
Task Due Dates
Steps to Enable
You don't need to do anything to enable this feature.
The institutional administrator can view and complete the tasks assigned to a student or applicant. The student can be located using Person Search, followed by navigation to the "To-Dos" tab. All tasks can be viewed that are assigned to the student, whether incomplete or completed, with drill-down capabilities into task detail. Tasks can also be completed on the person's behalf. If the task is a document submission task, a document can be uploaded and submitted documents can be downloaded.
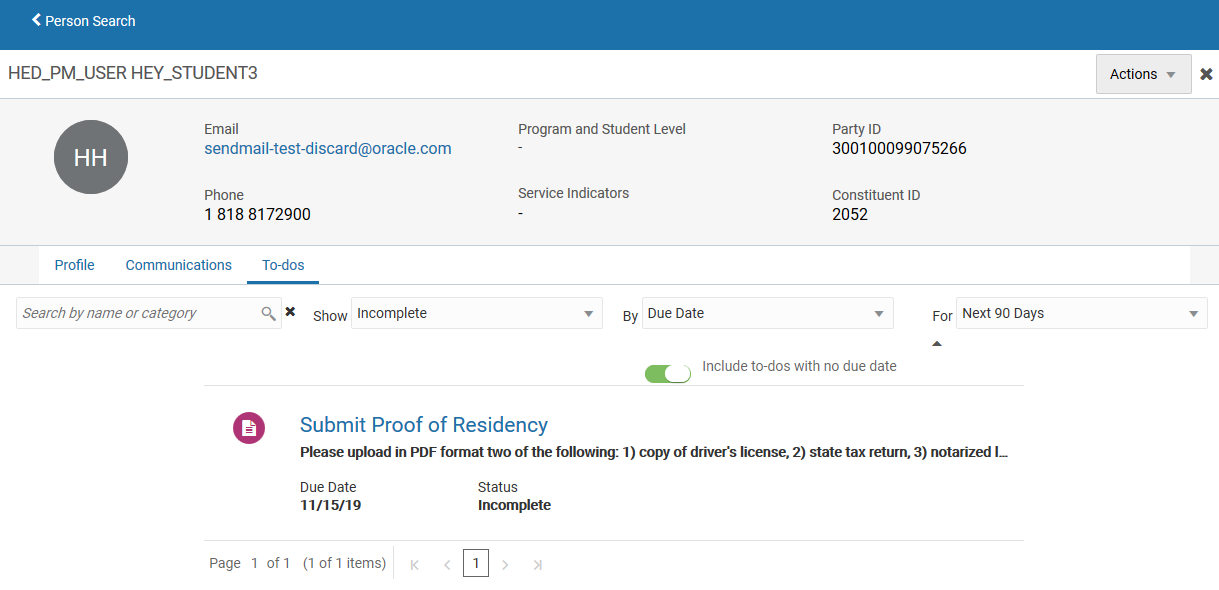
Review and Complete Tasks
Steps to Enable
You don't need to do anything to enable this feature.
Institution administrators can view the history of previously deleted external organization locations. External organization identifiers can be deleted and recreated multiple times on the same date.
The View History icon is available on the Locations tab of the External Organizations page if at least one location has been deleted. Click the icon to access the Location History page.
Steps to Enable
You don't need to do anything to enable this feature.
Create and Edit External Organization Subjects and Courses
Institution administrators can create and edit external organization subjects and courses, which will support the future transfer credit process and enable configuration of this feature during the implementation process.
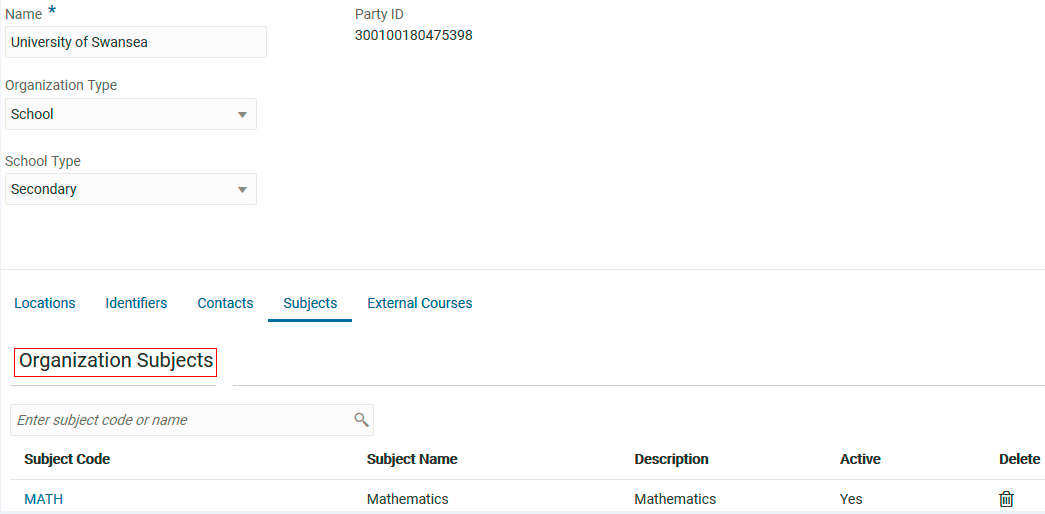
External Organization: Subjects
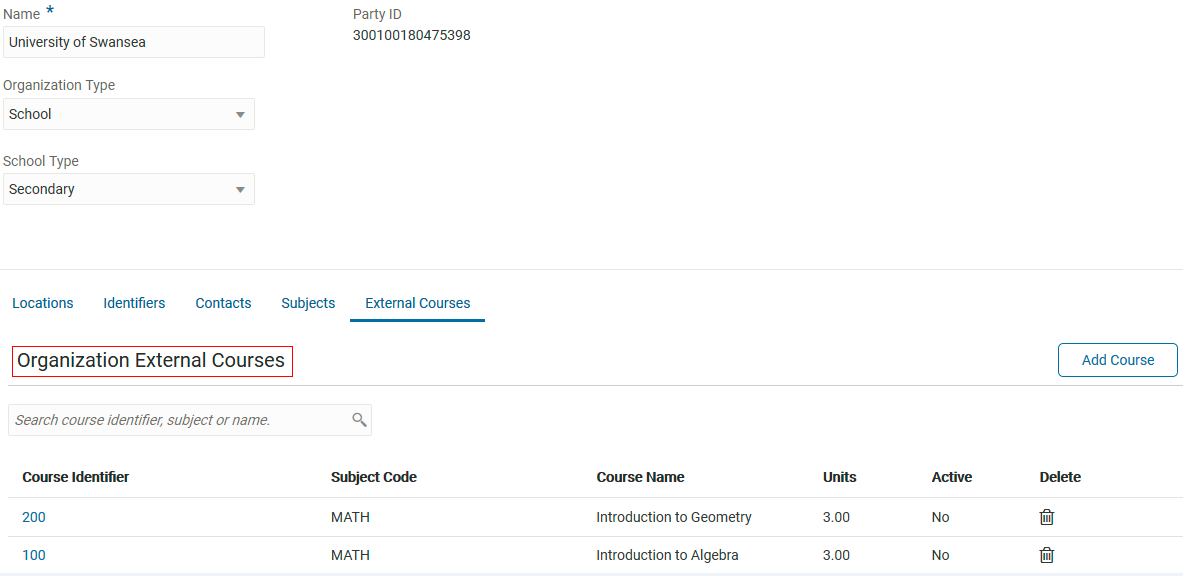
External Organization: Courses
Steps to Enable
You don't need to do anything to enable this feature.
Send Date-Based Communications
Send email reminders to students that are based on dates. You can specify the rule when a reminder is automatically sent. For example, set a rule that an email reminder should be sent to students three days before a tuition bill is due.
Steps to Enable
First, you need to add the event to a communication category. An event could be, for example, a bill due reminder or a task due reminder.
To add an event to a category:
- Click Navigator > Setup and Maintenance.
- In the Setup list, select Student Management.
- From the Student Structures functional area, select the Manage Student Management Categories task.
- On the Categories page, select an existing category or create a new category.
- Add the event to the category.
After you add an event to a category, set up the date-based communication:
- Access the Communications work area (Navigator > Academic Tools > Communications).
- Click Create Communication.
- Select Date-based as the communication type and specify other attributes such as category.
- In the Select Date field, specify the event for which you want the reminder to be sent.
- Specify the rule when a reminder should be automatically sent.
- Click the Content tab to create the communication content with placeholders that are automatically filled up when the communication is sent. These placeholders are known as tokens and could be, for instance, first name and last name of the student.
These screen shots show the Communication Details page where you specify the communication type, the reminder event, and the timing rules:
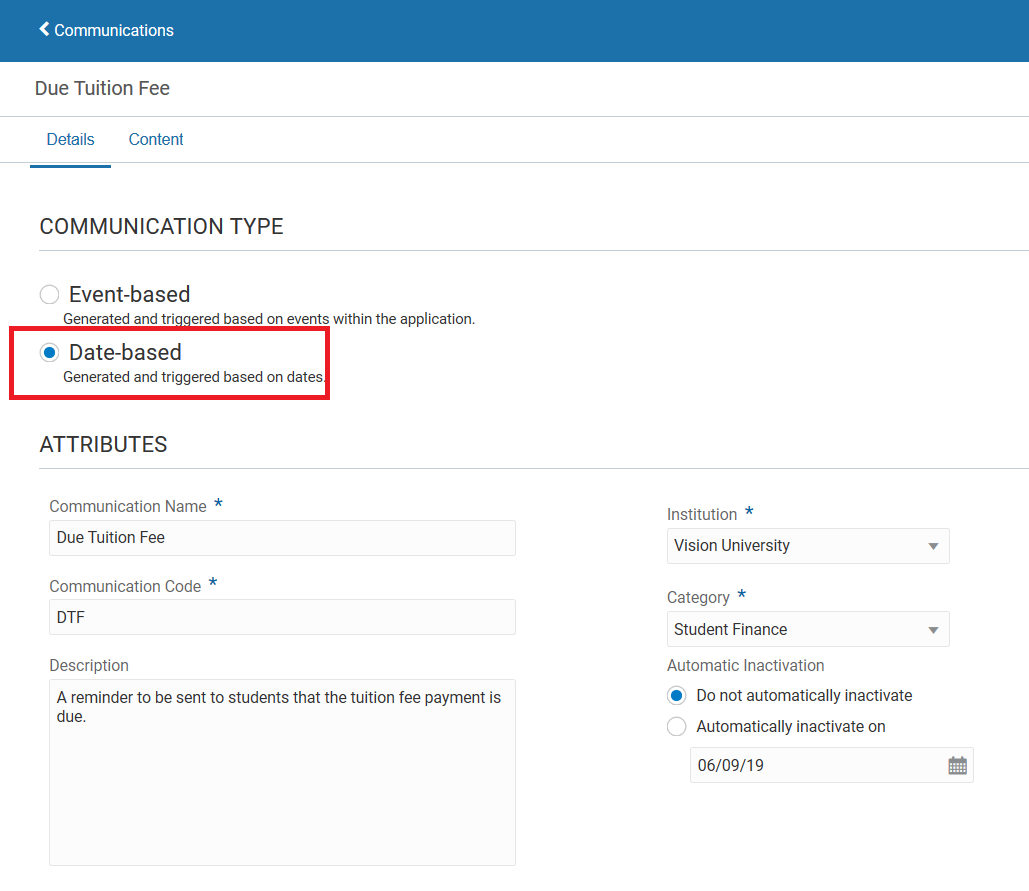
Communication Details Page (1 of 2)
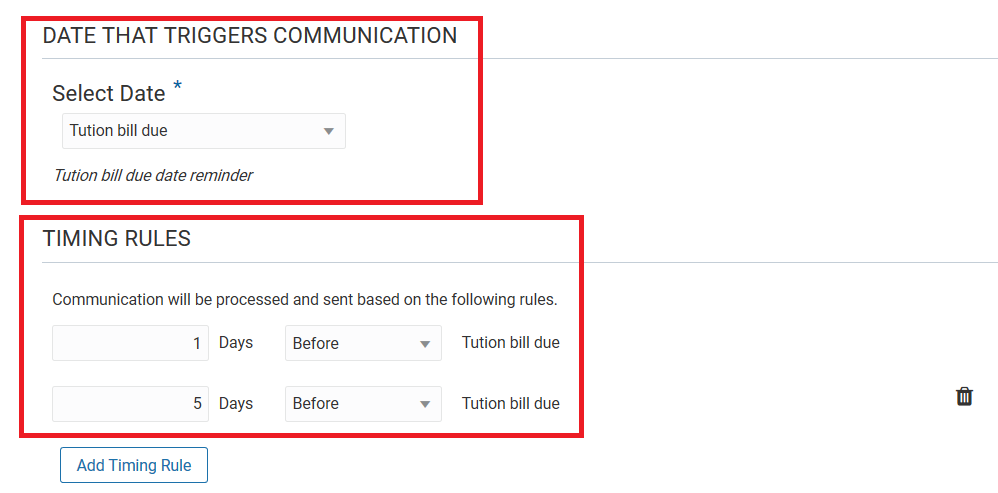
Communication Details Page (2 of 2)
This screen shot shows the Communication Content page:
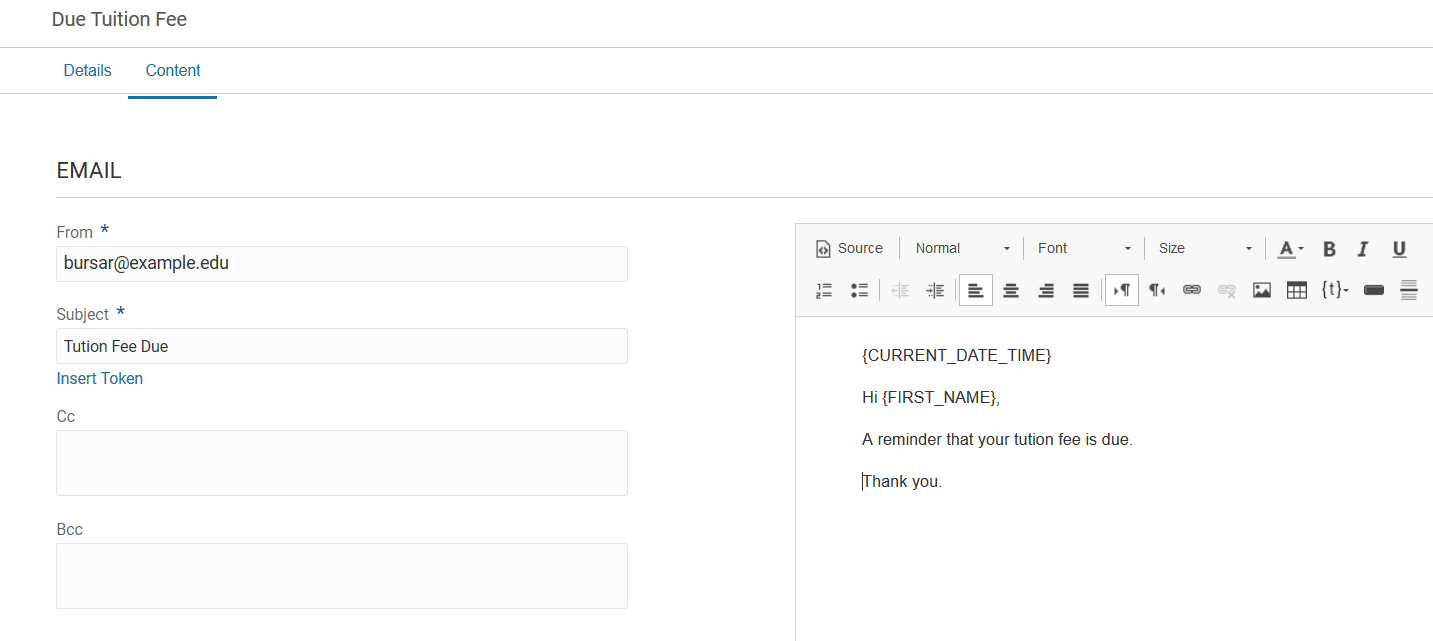
Communication Content Page
After you create a date-based communication, run the Send Communication process. This process sends all the date-based communications that you have set up. To run the process:
- Sign in as an administrator.
- Click Navigator > Tools > Scheduled Processes.
- On the Scheduled Processes Overview page, click Schedule New Process.
- Leave the type as Job, select the Send Communication process, and click OK.
- In the Process Details dialog box, click Advanced and in the Advanced Options, Schedule tab, select Using a schedule.
- Set the process to run daily at a particular time.
- Click Submit.
This screen shot shows the Process Details dialog box with options for defining a schedule:
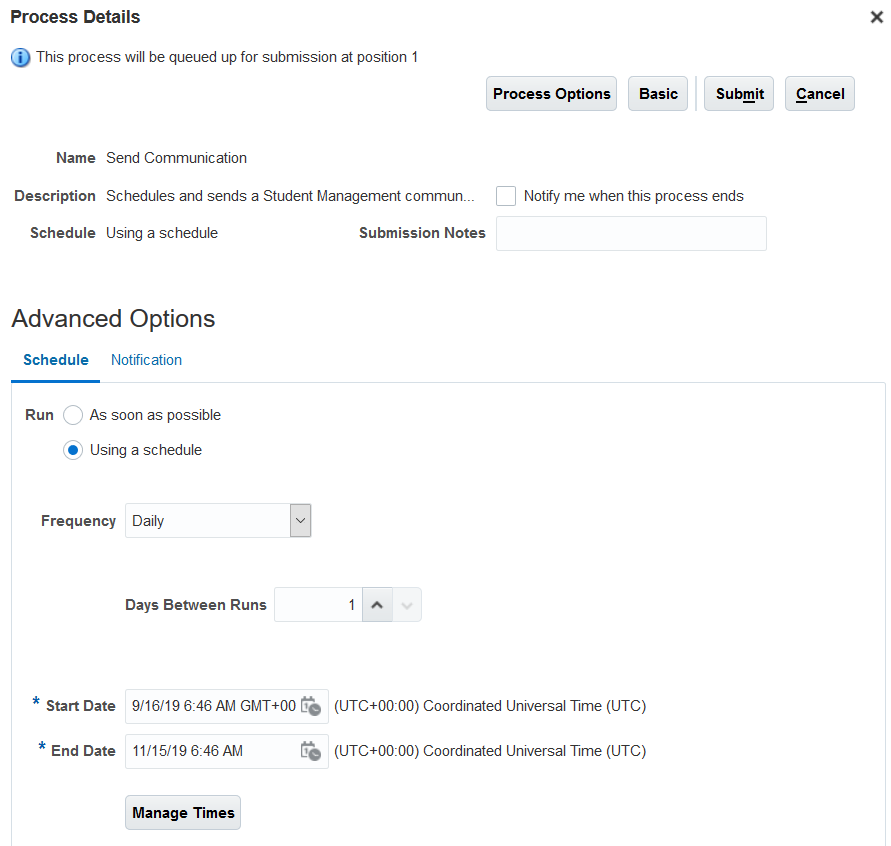
Process Details Dialog Box with Advanced Options
For more information about scheduled processes, such as how to track the progress of a process, see the Scheduled Processes chapter in the Using Common Features book (available from Oracle Help Center > Higher Education > Books).
Oracle Student Financials is a tool for higher education institutions to manage student receivables, billing, and payment collection. Using Student Financials, both staff and students can quickly find and use the financial information they need to make critical decisions. Staff can actively manage student accounts by performing functions such as creating charges, accepting payments, processing refunds, and generating receipts.
Select Eligible Curriculum in Sponsorship Assignments
Course curriculum can be selected while assigning a student to a sponsorship, providing more flexibility for finer control when adding eligible students to a sponsorship.
Once you've set up your sponsorship agreement, you can specify the course you want to sponsor for a particular student. The courses that you can choose from depend on how you set up your sponsorship credit. It's in the sponsorship credit that you specify which courses within the academic period are available for sponsorship.
To set courses for sponsorship:
- Log in as administrator.
- Click Navigator.
- In Academics, click Finances.
- Click Actions > Manage Sponsorship Agreement.
- From the list of agreements, select the corresponding row of the agreement you want to edit. Make sure you don't click the agreement name because that takes you to the sponsorship agreements page. This page contains setup information about the agreement.
- Click Assign Students. It's only when an agreement is active that you can assign students to it.
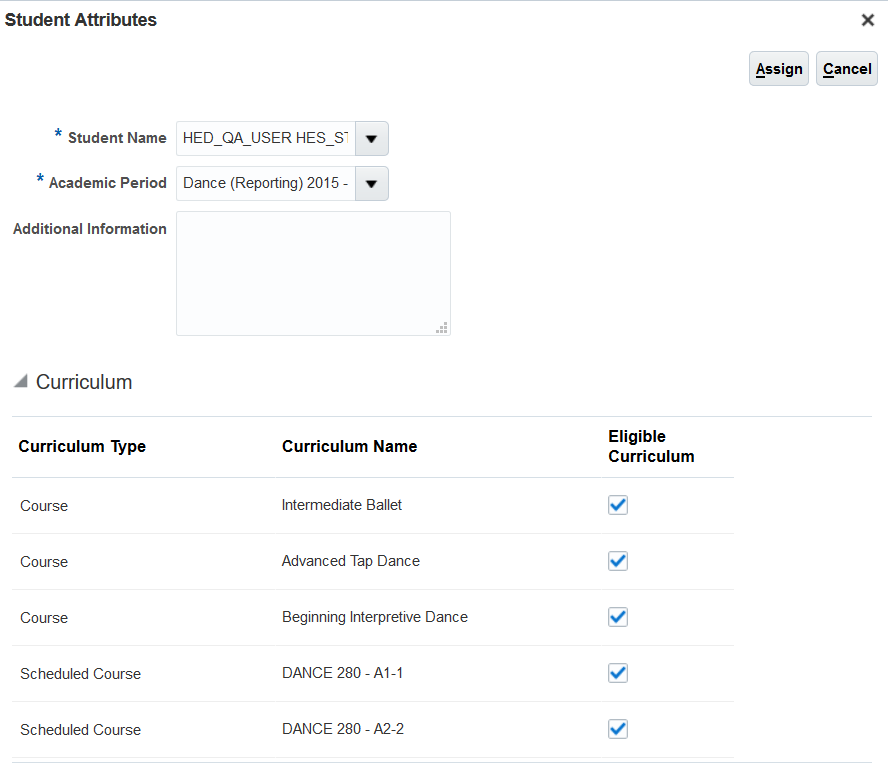
- In Select Students, click Create. The Student Attributes page appears.
- In Student Name, select the student you want to sponsor. You may have to search for the student.
- In Academic Period, select the appropriate academic period. This must match the academic period in the sponsorship credit. Once you select the academic period, the Curriculum region is populated with the courses you selected for sponsorship when you set up the sponsorship credit. By default, all the courses you define in the sponsorship credit are selected.
- In Curriculum, if there are any courses you don't want to sponsor for the student, deselect the corresponding Eligible Curriculum check box.
- Click Assign.
- Repeat steps 6-11 to add other students to the agreement.
- Click Save and Close.
- Click Done.
Assign Students to Sponsorship Agreement
Steps to Enable
You don't need to do anything to enable this feature.
Tips And Considerations
-
You can assign a student only once to a sponsorship agreement, even when you set the student as inactive in the agreement.
- Once you set the eligible courses for sponsorship, you can no longer modify them. If you really want to modify the courses you want to sponsor for the student, remove the student from the agreement, then redo the process.
Key Resources
This feature builds on the features released in:
- 19B: Manage Sponsorships
- 19A: Create Sponsorship Credits
- 18B: Manage Organization Transactions; Create Sponsorship Agreements
Oracle Student Records enables you to set up and maintain your academic structures, curriculum structures and items, and academic calendars. You can enter, track, and process all academic information – from the course catalog and schedule of courses to student programs. You can enroll, grade, and evaluate students.
Institution administrators will define the structure and content of transcript records, enabling configuration to begin on student transcripts during implementation.
You can select an institution and an academic level for each transcript type.

Transcript Type
Steps to Enable
You don't need to do anything to enable this feature.
Select an Institution for an Academic Level
Institution administrators can define explicit ownership over an academic level.
Select an institution for an academic level. Or make the academic level available for all institutions.
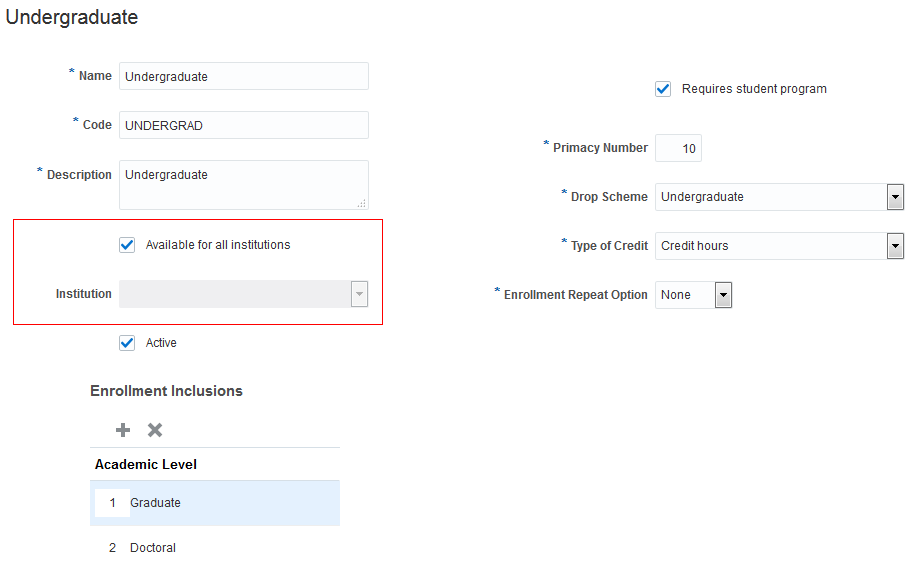
Academic Level
Here's some information to keep in mind if the following scenario applies to you.
BEFORE THE ENHANCEMENT
- You have a multi-institution setting.
- You have created curriculum items. This means you have assigned an academic level to the items.
AFTER THE ENHANCEMENT
If you change the default academic level setup (available for all institutions) and select a specific institution for an academic level, you receive a warning message about an invalid combination of institution and academic level.
Steps to Enable
You don't need to do anything to enable this feature.
Self-Service: View Design Enhancements to Student Pages
Students can view search results in a more organized layout, with separate tabs for courses and programs. They can also see the latest version of placeholder images for catalog items. In mobile pages, they can now see the branding logo.
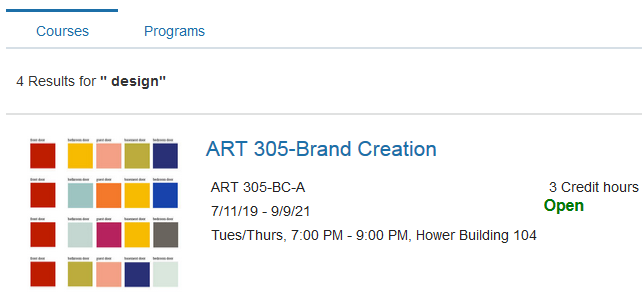
Courses Tab
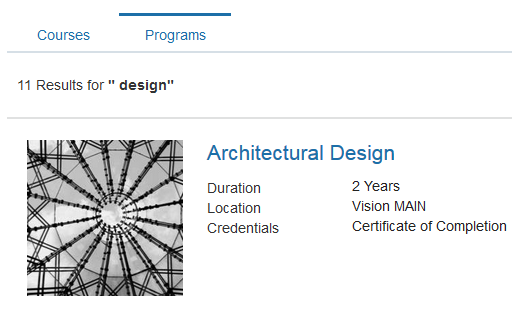
Programs Tab
Steps to Enable
You don't need to do anything to enable this feature.
Self-Service: View Programs and Courses by Storefront
Students can avoid confusion as their view will only include the academic programs and courses that belong to the particular storefront they are associated with.
Automatic filtering by storefront is enabled in Search and in the Browse Catalog pages, but not in the Home page.
Steps to Enable
You don't need to do anything to enable this feature.
Oracle Student Admissions enables users to enter, track, and process the submission of the admissions applications.
New tokens – academic program, academic program URL, descriptive text, and primary point of contact – are added to the communication templates delivered when an application gets submitted and after an admissions decision is made.
Descriptive Text and Primary Point of Contact are added to all admissions-related communication templates.
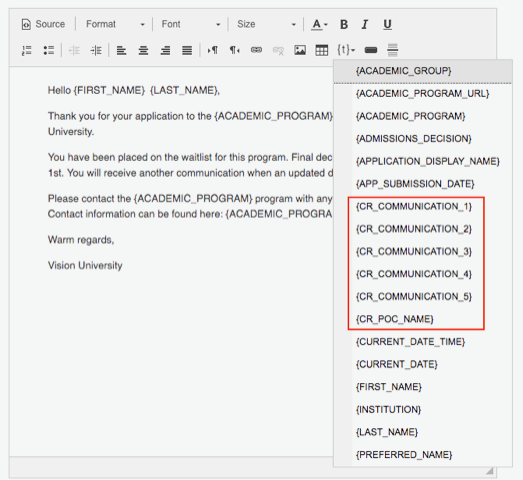
Descriptive Text and Primary Point of Contact Tokens
Additionally, the templates specific to when an application gets submitted, admitted, and denied now include tokens specific to the academic program and program URL.
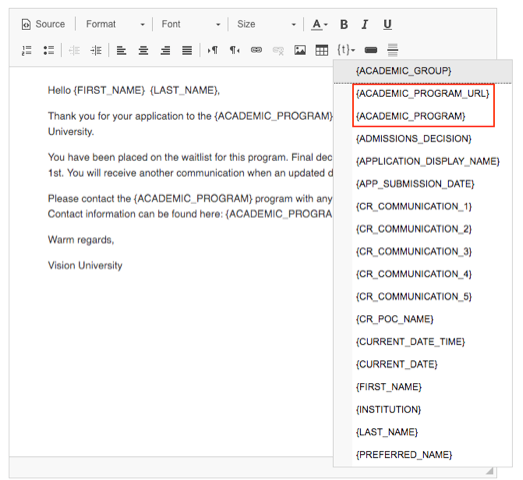
Academic Program and Program URL Tokens
Steps to Enable
You don't need to do anything to enable this feature.
Evaluate Admissions Applications
Offer the decision option of waitlist when completing a manual application evaluation.
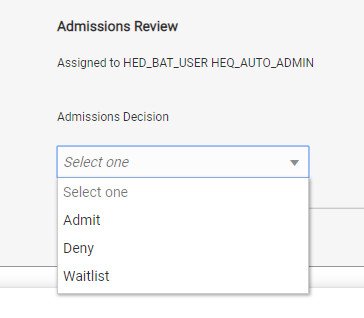
New Waitlist Admissions Decision
Steps to Enable
You don't need to do anything to enable this feature.
Role Information
The user must have the Admissions Manager or Admissions Coordinator role to submit an admissions decision or evaluate an admissions application.
Create Enhanced Admissions Reports
Create reports relevant to the most current record for form builder sections that may have historical records, both form name and display name, and attachment category.
Steps to Enable
Leverage new subject areas by adding to existing reports or using in new reports. For details about creating and editing reports, see the Creating and Administering Analytics and Reports book (available from the Oracle Help Center > Applications Common > Books).
Oracle Advisement provides the ability to build out a curriculum guided pathway for students. It also provides a student planner that allows students to plan and enroll in courses and track their own academic progress.
Set Up Program Timeline Structure
Registrars gain additional traceability when reviewing the Academic Plan Templates, as templates cannot be deleted if they have been previously assigned to a student via the Student Planner. Registrars gain the ability to ensure that any changes to academic requirements in the program, display the correct and up-to-date requirements when creating an academic plan template.

Deletion Warning
Steps to Enable
You don't need to do anything to enable this feature.