
This document will continue to evolve as existing sections change and new information is added. All updates appear in the following table:
| Date | Feature | Notes |
|---|---|---|
| 20 DEC 2019 | Created initial document. |
Student Management delivers cloud based, flexible, extensible best practice business flows to support how you enroll your students, maintain their personal information, and manage their payments. From a learner taking anon-credit course to the degree-seeking student, Oracle’s Student Management enables institutions to anticipate students’ needs, illuminate their academic path, and empower them to succeed.
This guide outlines the information you need to know about new or improved functionality in this update, and describes any tasks you might need to perform for the update. Each section includes a brief description of the feature, the steps you need to take to enable or begin using the feature, any tips or considerations that you should keep in mind, and the resources available to help you.
Give Us Feedback
We welcome your comments and suggestions to improve the content. Please send us your feedback at oracle_fusion_applications_help_ww_grp@oracle.com.
Column Definitions:
Features Delivered Enabled
Report = New or modified, Oracle-delivered, ready to run reports.
UI or Process-Based: Small Scale = These UI or process-based features are typically comprised of minor field, validation, or program changes. Therefore, the potential impact to users is minimal.
UI or Process-Based: Larger Scale* = These UI or process-based features have more complex designs. Therefore, the potential impact to users is higher.
Features Delivered Disabled = Action is needed BEFORE these features can be used by END USERS. These features are delivered disabled and you choose if and when to enable them. For example, a) new or expanded BI subject areas need to first be incorporated into reports, b) Integration is required to utilize new web services, or c) features must be assigned to user roles before they can be accessed.
| Ready for Use by End Users Reports plus Small Scale UI or Process-Based new features will have minimal user impact after an update. Therefore, customer acceptance testing should focus on the Larger Scale UI or Process-Based* new features. |
Action is Needed BEFORE Use by End Users Not disruptive as action is required to make these features ready to use. As you selectively choose to leverage, you set your test and roll out timing. |
|||||
|---|---|---|---|---|---|---|
| Feature |
Report |
UI or |
UI or |
|
||
Oracle Campus Community includes everything that is shared among different Student Management product areas, whether person records or common setup objects for implementing Student Management.
View Student and Applicant Checklists
Administrators can search for a student or applicant and see all of the tasks and checklists assigned to that applicant. They can monitor the status or complete checklists on the assignee's behalf, if the assignee is unable to complete the task independently.
Steps to Enable
You don't need to do anything to enable this feature.
Manage Checklists and Tasks Centrally
Institutions can assign tasks directly to students or applicants to communicate requirements or guide them through the academic experience. Students can then view all the tasks and checklists assigned to them in one central place. They can view the details, status, and due date of assigned tasks and checklists and complete them accordingly.
Steps to Enable
You don't need to do anything to enable this feature.
Apply to Programs by Proxy for Learners
Add learners to your user account so that you can apply to a program on behalf of a learner by proxy. For example, parents can enroll their children into continuing education courses. An audit trail of users and actions from the program application process builds automatically to maintain accurate record keeping.
To apply by proxy, a user:
-
Navigates to their profile and clicks the Add Learners button to create a user account for each applicant they will serve as a proxy for.
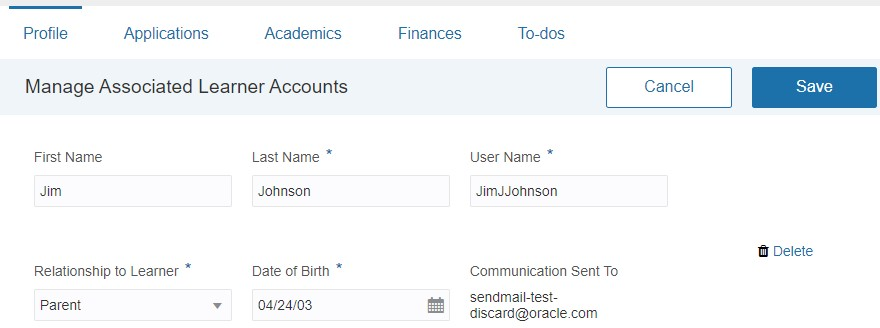
Adding an Associated Learner to Your Account
-
Searches for a program to apply to, either for themselves or a learner, and clicks Apply.
-
Selects the name of the person the application pertains to.
-
Completes and submits the application as usual.
Steps to Enable
You don't need to do anything to enable this feature.
Role Information
This is a self-service feature, used by guests and students.
Assign checklists and tasks to students to guide them through enrollment and academic obligations. Administrators can search for a student or applicant, find a checklist to assign, edit checklist settings, and assign it accordingly. Notify the student when a checklist is assigned.
Steps to Enable
You don't need to do anything to enable this feature.
Oracle Student Financials is a tool for higher education institutions to manage student receivables, billing, and payment collection. Using Student Financials, both staff and students can quickly find and use the financial information they need to make critical decisions. Staff can actively manage student accounts by performing functions such as creating charges, accepting payments, processing refunds, and generating receipts.
Enable Student Financial Integration Using a REST Service
Using the HED Payments REST service, retrieve fees associated with students' accounts, then create a record in Student Management to indicate that you received the payment.
With the HED Payments API resource, you can retrieve information about the student's fees. To collect payment, your institution can use the payment service provider of your choice. Then with the same resource, you can send the information that the student has paid to Student Management. Student Management can then create a record of the payment transaction, generate an invoice and receipt, then enroll the student in the relevant course. Or if the student has paid miscellaneous or application fees, you can send the information back to Student Management.
Students can view a history of their transactions in self-service. From the self-service home page, click Finances, then click Transaction References. These transaction references are only for the ones where the institution chose to use another service provider to collect payments.
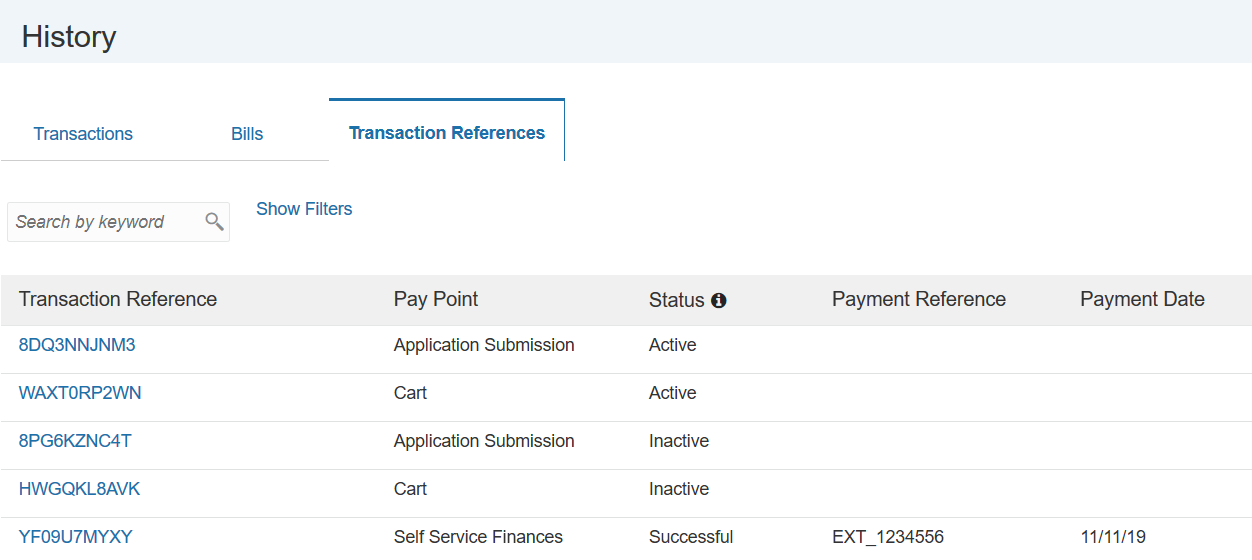
Transaction References Page
Here are descriptions of the fields on the Transaction References page.
| Field | Description |
|---|---|
| Transaction Reference | This is a unique alphanumeric code that Student Management generates when students make a payment. You will use this code to retrieve information about the fee. |
| Pay Point | This refers to the area of Student Management where the fees are pulled from. This can be the shopping cart, self-service My Finances, or the application submission page. |
| Status | This indicates the status of the transaction reference code. Only codes that are active can be used to make a payment. A status that says 'Successful' means that payment has been made successfully. Student Management knows that a payment is successful when you pass the information that you've received the payment. |
| Payment Reference | When a payment is successful, your payment service provider generates a transaction reference (payment reference). Using the REST service, you send the payment reference code to Student Management, and Student Management displays it on this page. |
| Payment Date | When a payment is successful, the date when you posted the information to Student Management is recorded. |
Steps to Enable
Review the REST service definition in the REST API guides, available from the Oracle Help Center > your apps service area of interest > REST API. If you're new to Oracle's REST services you may want to begin with the Quick Start section.
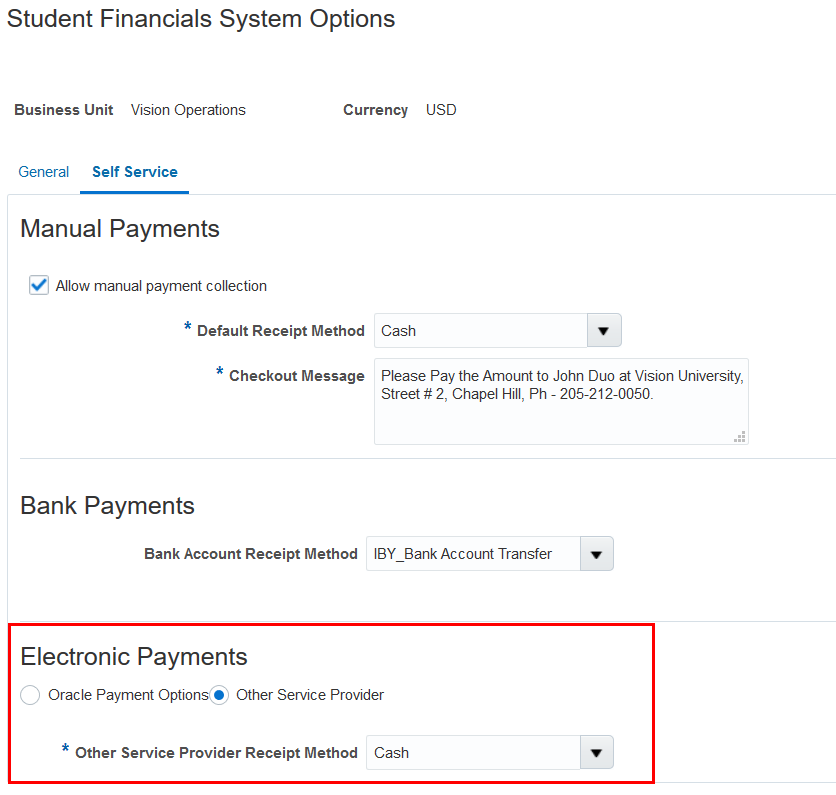
Before you can use the HED Payments resource, you must set up Student Financials System Options to accept electronic payments using another service provider. You also have to register your payment service provider with Student Management. When you register your payment service provider, you're given an API key. This key lets you use the API resource to get and send information to Student Management. The API key tells Student Management that the request to get and send information about student fees and payments comes from an authorized application.
To set up Student Financials System Options for electronic payments:
- Log in as administrator.
- Click Navigator > Setup and Maintenance.
- Go to:
- Offering: Student Management
- Functional Area: Student Structures
- Task: Manage Student Financials Options
- Click Self Service.
- In Electronic Payments, select Other Service Provider.
- In Other Service Provider Receipt Method, select Cash.
- Click Save and Close.
Student Financials System Options Page
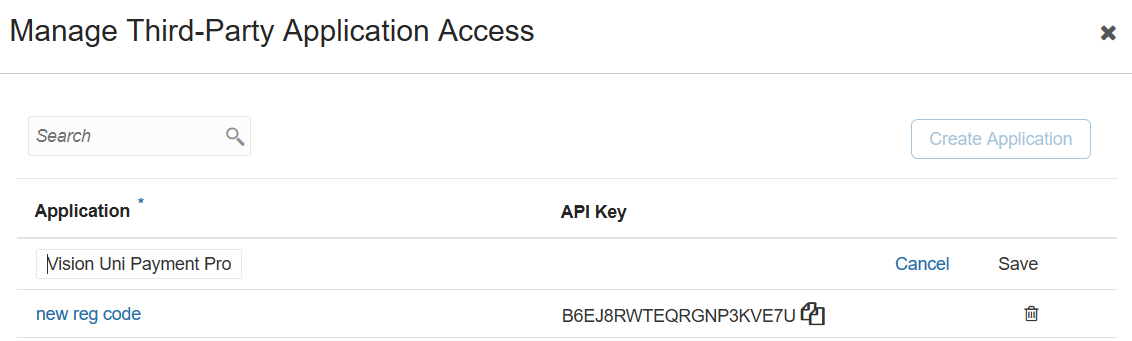
To register your payment service provider:
- Log in as administrator or bursar.
- Click Navigator, then in Academics click Finances.
- Click Actions > Manage Third-Party Application Access.
- Click Create Application. The Application field becomes available.
- In Application, enter a name for your third-party application, then click Save. Once you click Save, the API key is generated.
Manage Third-Party Application Access Page