
This document will continue to evolve as existing sections change and new information is added. All updates appear in the following table:
| Date | Product | Feature | Notes |
|---|---|---|---|
| 18 DEC 2020 | Created initial document. |
Student Management delivers cloud based, flexible, extensible best practice business flows to support how you enroll your students, maintain their personal information, and manage their payments. From a learner taking anon-credit course to the degree-seeking student, Oracle’s Student Management enables institutions to anticipate students’ needs, illuminate their academic path, and empower them to succeed.
This guide outlines the information you need to know about new or improved functionality in this update, and describes any tasks you might need to perform for the update. Each section includes a brief description of the feature, the steps you need to take to enable or begin using the feature, any tips or considerations that you should keep in mind, and the resources available to help you.
Give Us Feedback
We welcome your comments and suggestions to improve the content. Please send us your feedback at oracle_fusion_applications_help_ww_grp@oracle.com.
Column Definitions:
Features Delivered Enabled
Report = New or modified, Oracle-delivered, ready to run reports.
UI or Process-Based: Small Scale = These UI or process-based features are typically comprised of minor field, validation, or program changes. Therefore, the potential impact to users is minimal.
UI or Process-Based: Larger Scale* = These UI or process-based features have more complex designs. Therefore, the potential impact to users is higher.
Features Delivered Disabled = Action is needed BEFORE these features can be used by END USERS. These features are delivered disabled and you choose if and when to enable them. For example, a) new or expanded BI subject areas need to first be incorporated into reports, b) Integration is required to utilize new web services, or c) features must be assigned to user roles before they can be accessed.
| Ready for Use by End Users Reports plus Small Scale UI or Process-Based new features will have minimal user impact after an update. Therefore, customer acceptance testing should focus on the Larger Scale UI or Process-Based* new features. |
Action is Needed BEFORE Use by End Users Not disruptive as action is required to make these features ready to use. As you selectively choose to leverage, you set your test and roll out timing. |
|||||
|---|---|---|---|---|---|---|
| Feature |
Report |
UI or |
UI or |
|
||
Bank Account Payment Acceptance in Business Unit Format for All Countries |
||||||
Oracle Campus Community includes everything that is shared among different Student Management product areas, whether person records or common setup objects for implementing Student Management.
Business analysts can set up and associate a status scheme with a task so that users who are assigned the task can track progress with statuses relevant to their institutions and business processes.
To add a status scheme to a task, click Navigator, and in the Academic Tools area, click Task Management. When you create a task, Status Scheme is now a required field. When you select a scheme, you can see all of the statuses included with it, so you can be sure you're choosing the appropriate set of status options for that task.
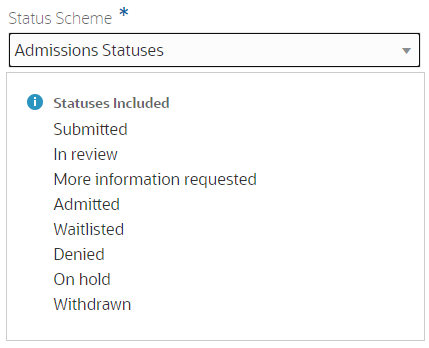
Status Scheme Example
In self-service, applicants only see tasks with statuses of New, In Progress, and Complete. If an administrator pauses or cancels a task, then it's no longer visible to the applicant.
This feature enables institutions to define statuses that better describe the state or progression of a task. Self-service users only see task statuses that are relevant to them and their task assignments.
Steps to Enable
You don't need to do anything to enable this feature.
Tips And Considerations
For more information about creating status schemes, refer to the Status Scheme Management feature for this release.
Role Information
You need the Application Administrator role to use this feature.
Program Tokens for Task and Checklist Communications
There are five new program communication tokens to provide program-specific information within a communication for these events:
- Task Assigned
- Checklist Assigned
- Task Due
- Checklist Due
You can customize these tokens and include them when designing the body of the email (such as a communication about approaching due dates) to provide program-specific instructions for those tasks and checklists.
Business analysts can add any of these variable program tokens while setting up task-assigned and checklist-assigned communication events, so they can deliver messages with content specific to the program the recipient is interested in. Students then receive more precise, informative communications about tasks applicable to them.
Steps to Enable
You don't need to do anything to enable this feature.
Tips And Considerations
Use the Programs work area to view and add text describing a program of study. Click Navigator > Academics > Curriculum > Programs.
Use the Communications work area to create communications. To open the work area, click Navigator, and in the Academic Tools area, click Communications. On the work area, click Create Communication.
Role Information
You need a business analyst role to use this feature.
Administrators can create groups of statuses for use within tasks. You will need to map statuses to a delivered status type, such as in progress or completed. Then, you can associate a status scheme with a task to allow end users to select those user-specified statuses while completing their tasks.
To create a status scheme:
- Click the Create Status Scheme button on the Status Schemes page.
- Define its attributes.
- Click the Add Status button to map your institution's status names to status types.

Status Scheme Example
If you add more than one status name to a status type, you must select one as the default value.
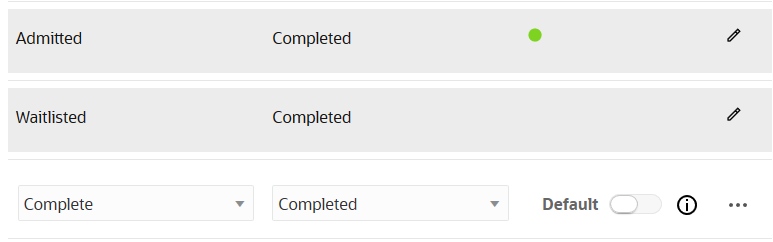
Default Status
You can edit, remove, and reorder statuses. When you're finished, make it Active, then save it.
NOTE: If your status scheme is incomplete, you'll receive a warning:
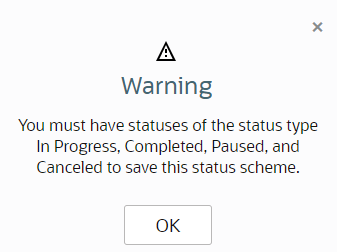
Warning
Institutions now have the ability to configure the available status values for a task, as well as the ability to track a student's progress through a task at a more granular level.
Steps to Enable
To access the Manage Status Schemes setup task, navigate to Setup and Maintenance > Student Management > Student Structures > Manage Status Schemes.
Role Information
You need the Application Administrator role to use this feature.
Multi-Region Email Configuration
Design email content with multiple regions, such as body regions and action regions. Regions offer flexibility to the business analyst to move them up and down or remove them in a modular fashion.
Body regions can include text and informational tokens such as name or address. It can also contain pictures, and other graphics as desired for informational or branding purposes. The body regions make up what most people refer to as the message body. Action regions consist only of action tokens. For example, action tokens can be buttons that allow a user to perform an action, such as to Accept or Deny.
The body and action regions provide increased flexibility and ease for the analysts to set up and format email messages.
Steps to Enable
You don't need to do anything to enable this feature.
Tips And Considerations
To configure multi-regions:
- Click Navigator > Academic Tools > Communications.
- Click Create Communication or edit a communication.
- Go to the Content tab.
- In the text area, add the email content to the body and action regions. Click the action menu of a region to move the region up or down, to remove the region, or to add another region. Action region is available only when the event trigger contains the required action tokens.
Users viewing actionable emails will experience a more intuitive, easy-to-use look and feel for the action buttons and improved performance when responding within emails. For example, analysts can add action tokens for accept and deny buttons when creating the communication. These two actions are part of the Learner Added Pending Consent event.
The configured branding color is automatically applied to the action buttons.
Having seeded actions for recipient responses, such as accept and deny, available for inclusion in communications-generated emails simplifies the setup of actionable emails.
Having the institution's branding color automatically applied to action buttons which, when coupled with institution logos and graphics, make for a professional and more consistent user experience.
Steps to Enable
You don't need to do anything to enable this feature.
Tips And Considerations
To add the action tokens:
- Create a new communication or edit a communication. The communication must have an event trigger that contains action tokens, such as the Learner Added Pending Consent event trigger.
- Go to the Content tab.
- Click the action menu of a region to know whether the region is a body region or an action region.
- Click inside the action region.
- Click the token icon to add the action tokens.
To select a branding color, use the Specify Branding and Colors setup task in the Academic Structures functional area of Student Management.
Branding Logo on All Logo-Enabled Pages
View your own configured branding logo or the Oracle logo when no branding logo is configured. Institutions can ensure all pages include the same branding logo throughout the application rather than only on student-facing pages.
Logos, if configured, are now displayed on all Student Management pages consistently, including all student-facing pages.
Steps to Enable
You don't need to do anything to enable this feature.
Tips And Considerations
To configure logos, use the Specify Branding and Colors setup task in the Academic Structures functional area of Student Management.
Person Profile Residency Management Using a REST API
Get, create, update, and delete student residency information originating from a source system outside of Student Management.
A REST API for capturing and updating students' official residency information is an alternative for the manual method of entering students' official residency information when they're available, especially when generated from another system. This can save institutions a significant amount of time and cost, and increase the accuracy of the data being captured in Student Management.
Steps to Enable
Review the REST service definition in the REST API guides, available from the Oracle Help Center > your apps service area of interest > REST API. If you're new to Oracle's REST services you may want to begin with the Quick Start section.
Bulk Assignment of Roles to Pages
Security administrators can now assign default page and data access for multiple pages to multiple roles.
Click the Assign Bulk Access to Roles button on the Manage Application Access page.
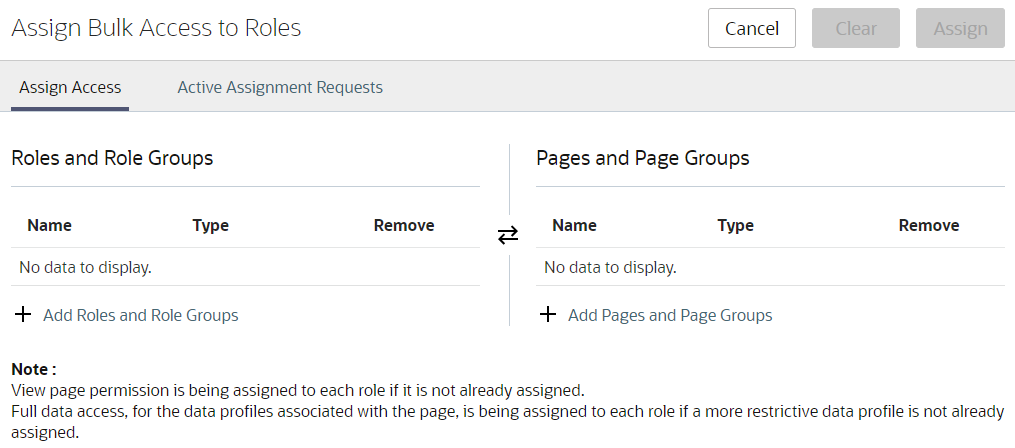
Assign Bulk Access to Roles Page: Assign Access Tab
You can search for, add, and remove roles, role groups, pages, and page groups on the Assign Access tab. When you are satisfied with your list of selections, click the Assign button to create a bulk access assignment request.
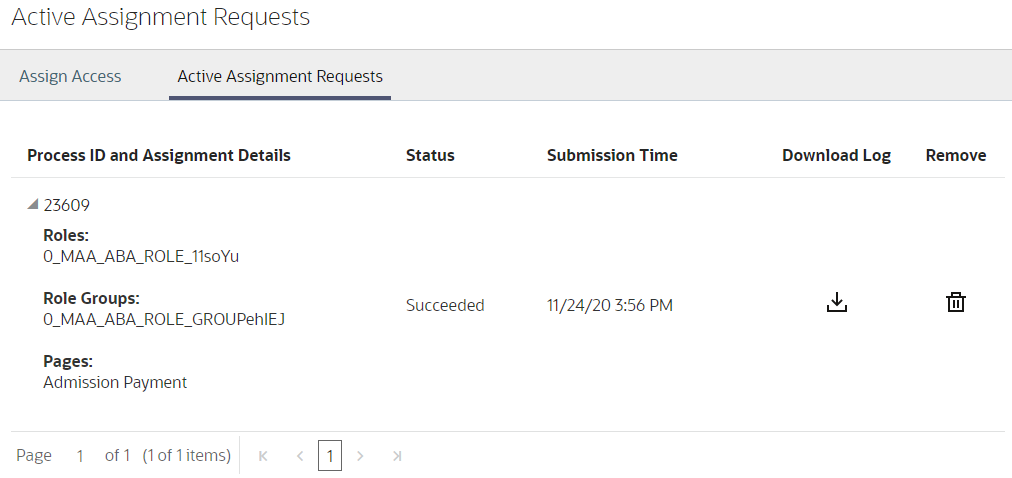
Assign Bulk Access to Roles Page: Active Assignment Requests Tab
You can review the status of the submitted processes on the Active Assignment Requests tab, and download a log to see the detailed results.
Security administrators can configure page access more efficiently by assigning access in batches.
Steps to Enable
You don't need to do anything to enable this feature.
Tips And Considerations
Group pages and roles into page groups and role groups to plan a bulk access assignment. Then, use this enhancement to assign default page and data access for all pages in the page group to all roles in the role group in a single step. The assignment process runs asynchronously in the background, allowing administrators to continue to submit more assignments while previous assignments are being done. You review the status of the submitted processes.
Role Information
You need the Higher Education Application Administrator or IT Security Manager role to use this feature.
Minimum Age Enforcement for a Proxy
Administrators can now configure a minimum age requirement for a proxy to be added to a proxy group. Navigate to the Proxy Groups tab on the Manage Application Access page, then click the Settings icon.
On the Proxy Group Settings page, enter a Minimum Age of Proxy.
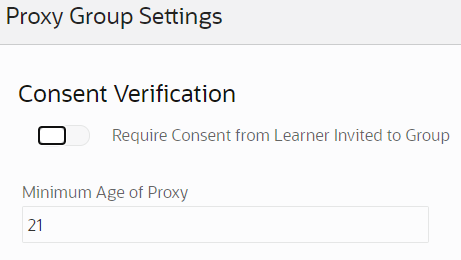
Proxy Group Settings Page
When a proxy group owner adds a learner to the proxy group, validation occurs that generates a communication email to that learner asking for their consent to be added.
This new validation adds these updates:
- Sets a minimum age for self-service users to own a proxy group.
- Allows proxy group owners to add other proxies to their proxy group who are older than the configured minimum age.
Steps to Enable
You don't need to do anything to enable this feature.
Role Information
You need the Higher Education Application Administrator or IT Security Manager role to use this feature.
Default Access Assignments Enhancements
Security administrators can assign default page permissions and data access to custom roles for individual pages. They can also see the global data profiles seeded with the predefined roles.
PAGE ACCESS
On the Manage Application Access page, select a student management page, click the ellipses in that row, and click Assign Page Access to Roles.
Security administrators can now add a custom role, then click the Page Access by Role option to automatically assign default access for all delivered page elements to that role. The administrator can also further modify permissions to the page elements if needed.
When the administrator assigns page access to a role, they will also see default data access assigned to the page, at the same time. The data profile that appears on the page is associated with the business object. The corresponding global data profile is assigned to the role.
DATA ACCESS
Seed data is now delivered to assign global data profiles to delivered roles.
- On the Manage Application Access page, Roles tab, filter the list for predefined roles.
- Click any role.
- On the Assigned Data Profiles tab you can see the global data profiles seeded for the role.
This feature enhancement makes default page and data access assignment a one-step process for administrators, rather than having to do it in multiple steps on multiple pages.
Steps to Enable
You don't need to do anything to enable this feature.
Role Information
You need the Higher Education Application Administrator or IT Security Manager role to use this feature.
Oracle Student Financials is a tool for higher education institutions to manage student receivables, billing, and payment collection. Using Student Financials, both staff and students can quickly find and use the financial information they need to make critical decisions. Staff can actively manage student accounts by performing functions such as creating charges, accepting payments, processing refunds, and generating receipts.
Bank Account Payment Acceptance in Business Unit Format for All Countries
Higher education institutions worldwide can set the default country in Oracle Fusion Receivables to the country where their business unit resides. So when users make payments, they now see the appropriate bank account fields. Previously, support for bank payments was only for the US and Denmark.
To set the default country for your business unit:
- Log in as administrator.
- Click Navigator > Others > Setup and Maintenance.
- Go to the Manage Receivables System Options task:
- Offering: Financials
- Functional Area: Receivables
- If necessary, search for your business unit, then select your business unit from the results.
- On the Billing and Revenue page, in Default Country, select the country for your business unit.
- Click Save and Close.
Institutions can collect information about bank payments in the format they need. This feature includes support for country-specific currency and bank codes, like international bank account number (IBAN).
Steps to Enable
You don't need to do anything to enable this feature.
Tips And Considerations
Here are some considerations and recommendations when using Oracle Financials:
- Oracle highly recommends consulting a core Financials consultant, implementation partner, or systems integrator to implement Oracle Financials. Various settings are crucial to ensuring that Oracle Financials works seamlessly with Student Management, such as setting up your enterprise structure correctly. This is important because currencies are tied to the countries your business units are set up in.
- Depending on the bank payment method your institution wants to use, you have to configure Oracle Financials to integrate with your financial institution.
- Field formats for bank account payments are seeded by Oracle Financials. In most cases, the seeded formats will match your institution's needs, based on your country. If you want to change the seeded field format rules, you can do so only from the backend, using the bank account user rules resource in Oracle Financials.
For students, proxies, or other users making bank payments, take note of these notations:
- Fields with one asterisk indicate that you must fill out the field.
- Fields with two asterisks indicate that you can select any one of these fields to fill out.
Key Resources
- Depending on your institution's preferred bank account payment method, you may need to use other features in Oracle Financials to complete the payment collection process and integrate it with your financial institution. For information on configuring and using ISO/SEPA direct debit in Oracle Fusion Payments, see ISO/SEPA Direct Debit Guide on My Oracle Support (Doc ID 2025869.1).
- See also Implementing Enterprise Structures and General Ledger in docs.oracle.com.
Role Information
You need the Administrator role to update receivables system options.
Oracle Student Records enables you to set up and maintain your academic structures, curriculum structures and items, and academic calendars. You can enter, track, and process all academic information – from the course catalog and schedule of courses to student programs. You can enroll, grade, and evaluate students.
Student Statistics Calculation
Calculated enrollment units will always include in-progress units that earn credit. Learners, Registrars, and other users will see a clearer picture of a student's in-progress units for an academic period.
In addition to the existing real-time GPA calculation, GPA is stored at the period reporting level.
Here's an example of the redesigned Period Statistics tab on the Student Results page.
Spring 2021:
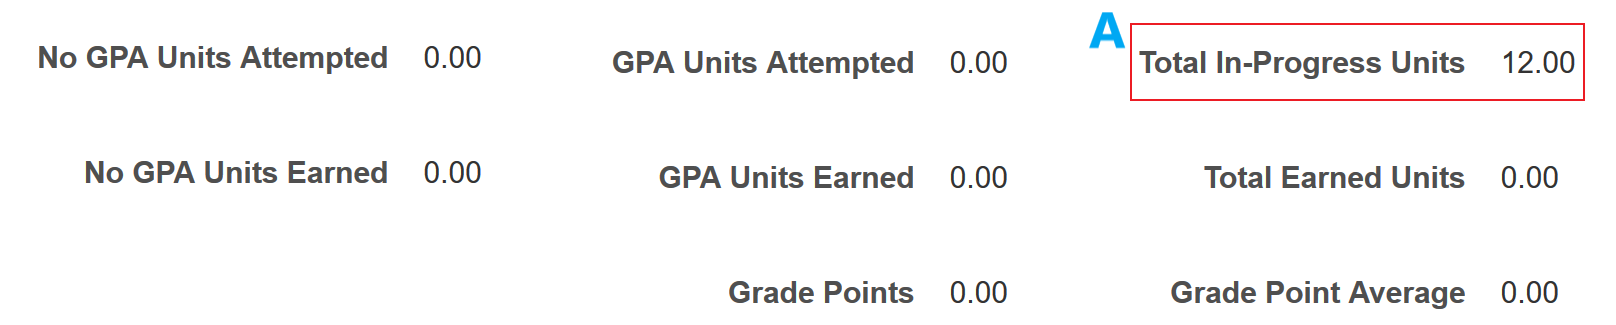
Period Statistics Spring 2021
Fall 2020:
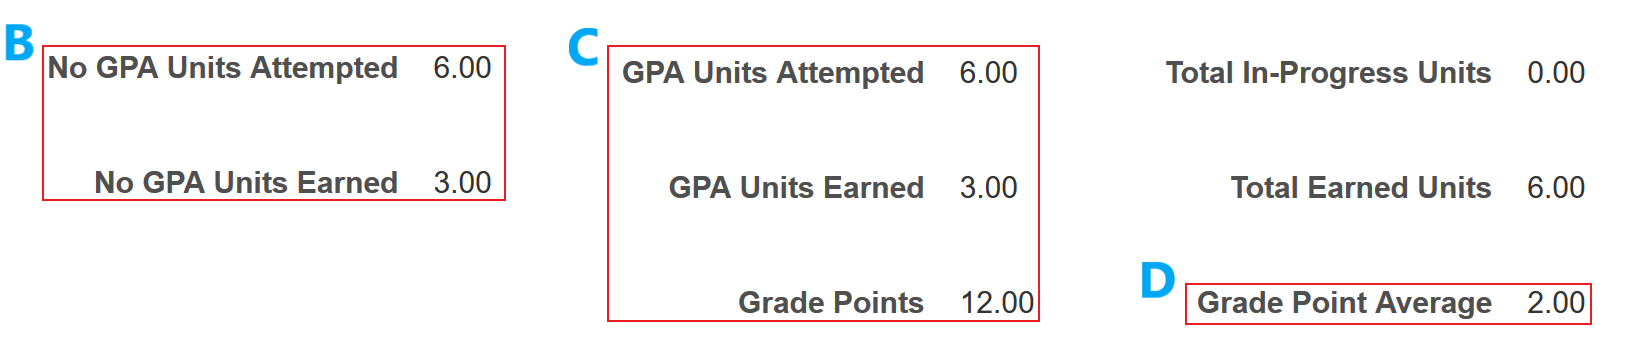
Period Statistics Fall 2020
Notice how statistics are now stored:
- A: In-progress units (no result posted).
- B: Units which earn credit but don't count towards GPA (such as Pass or Fail units).
- C: Units which earn credit and count towards GPA.
- D: GPA is stored at the reporting period level.
The Cumulative Statistics tab has been similarly redesigned.
Greater granularity ensures that you can track a student’s progress more clearly and comprehensively.
Steps to Enable
You don't need to do anything to enable this feature.
Tips And Considerations
After your environment is updated to 21A, student statistics data calculated prior to moving to 21A won’t be upgraded. If you make a change to preexisting student enrollment or results data, student statistics will be recalculated. Otherwise, for preexisting data, a batch process to recalculate the data is planned for the 21B release.
Removal of Transcript Type and Transcript Note Setup
The Manage Transcript Types and Manage Transcript Notes setup tasks are no longer available. (Although you could use these tasks to enter transcript setup data, there was no related transcript processing.)
Redesigned transcript setup is planned for a future release.
Steps to Enable
You don't need to do anything to enable this feature.
Oracle Student Admissions enables users to enter, track, and process the submission of the admissions applications.
Cancellation and Withdrawal of an Admissions Application
Administrators can cancel an admissions application that is incomplete after the application deadline. They can also withdraw an admissions application on behalf of an applicant whose plans have changed. The admissions office can create communication events, tied to these application status changes, that notify the student.
CANCEL AN APPLICATION
For any incomplete application, either in-progress or submitted, administrators now have a Cancel application option in the Actions menu.
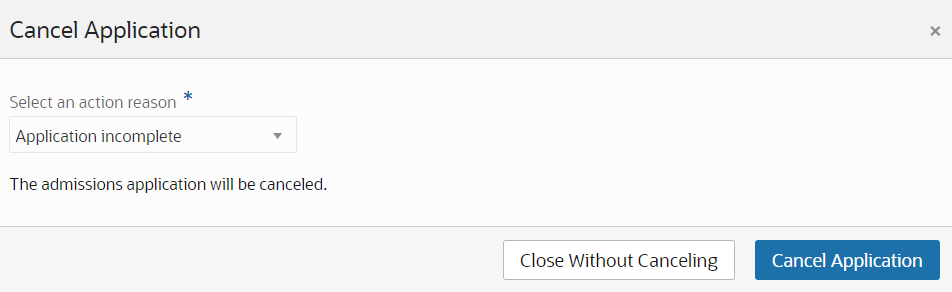
Cancel Application Page
When you cancel it, you must select an action reason. When you're done, the application status changes to reflect the cancellation. Applicants can no longer access an in-progress application that's been canceled. All canceled applications show the new status to applicants in self service.
WITHDRAW AN APPLICATION
For any submitted application, administrators now have a Withdraw application option in the Actions menu.
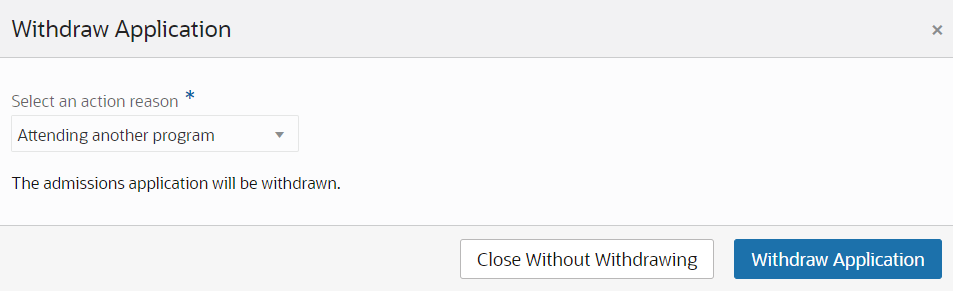
Withdraw Application Page
When you withdraw it, you must select an action reason. When you're done, the application status changes to reflect the withdrawal and the application shows the new status to applicants in self service.
REVERT AN APPLICATION
For any cancelled or withdrawn application, administrators now have a Revert application option in the Actions menu.
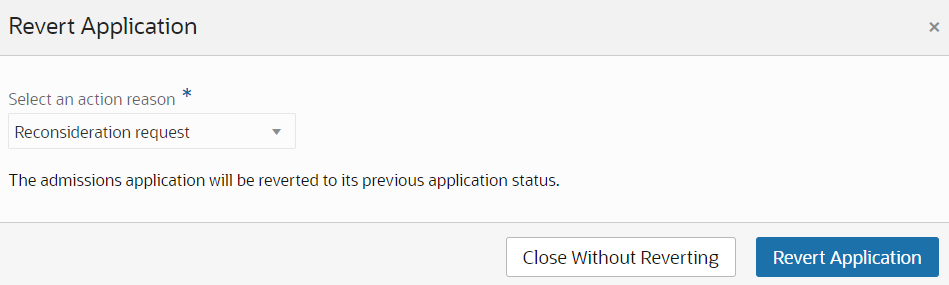
Revert Application Page
When you revert it, you must select an action reason. When you're done, the application reopens with its previous application status. For in-progress applications, the applicant can then access the application again in self service and work to complete it. For submitted applications, the applicant will see the reverted status of the application in self service and an administrator can now complete their evaluation.
The ability to cancel and withdraw admissions applications means admissions office operational staff no longer need to continue monitoring applications after the deadline has passed or after an applicant no longer wishes to be considered. The ability to revert an application back to its previous status means neither applicants nor staff need to repeat any previously completed work on the application.
Steps to Enable
You don't need to do anything to enable this feature.
Tips And Considerations
To create action reasons, in the Setup and Maintenance work area, use the Manage Admissions Application Action Reasons task:
- Offering: Student Management
- Functional Area: Admissions Structures
Role Information
You need the Admissions Coordinator or Admissions Manager role to use this feature.
IMPORTANT Actions and Considerations
REPLACED OR REMOVED FEATURES
From time to time, Oracle replaces existing Cloud service features with new features or removes existing features. When a feature is replaced the older version may be removed immediately or at a future date. As a best practice, you should use the newer version of a replaced feature as soon as the newer version is available.
| Product | Removed Feature | Target Removal | Replacement Feature | Replaced In | Additional Information |
|---|---|---|---|---|---|
| Campus Community | 21A | None |