
This document will continue to evolve as existing sections change and new information is added. All updates appear in the following table:
| Date | Product | Feature | Notes |
|---|---|---|---|
| 28 SEP 2021 | Campus Community | Updated document. Revised feature information. |
|
| 18 JUN 2021 | Created initial document. |
Student Management delivers cloud based, flexible, extensible best practice business flows to support how you enroll your students, maintain their personal information, and manage their payments. From a learner taking a non-credit course to the degree-seeking student, Oracle’s Student Management enables institutions to anticipate students’ needs, illuminate their academic path, and empower them to succeed.
This guide outlines the information you need to know about new or improved functionality in this update, and describes any tasks you might need to perform for the update. Each section includes a brief description of the feature, the steps you need to take to enable or begin using the feature, any tips or considerations that you should keep in mind, and the resources available to help you.
GIVE US FEEDBACK
We welcome your comments and suggestions to improve the content. Please send us your feedback at oracle_fusion_applications_help_ww_grp@oracle.com.
Column Definitions:
Report = New or modified, Oracle-delivered, ready to run reports.
UI or Process-Based: Small Scale = These UI or process-based features are typically comprised of minor field, validation, or program changes. Therefore, the potential impact to users is minimal.
UI or Process-Based: Larger Scale* = These UI or process-based features have more complex designs. Therefore, the potential impact to users is higher.
Features Delivered Disabled = Action is needed BEFORE these features can be used by END USERS. These features are delivered disabled and you choose if and when to enable them. For example, a) new or expanded BI subject areas need to first be incorporated into reports, b) Integration is required to utilize new web services, or c) features must be assigned to user roles before they can be accessed.
| Ready for Use by End Users Reports plus Small Scale UI or Process-Based new features will have minimal user impact after an update. Therefore, customer acceptance testing should focus on the Larger Scale UI or Process-Based* new features. |
Customer Must Take Action before Use by End Users Not disruptive as action is required to make these features ready to use. As you selectively choose to leverage, you set your test and roll out timing. |
|||||
|---|---|---|---|---|---|---|
| Feature |
Report |
UI or |
UI or |
|
||
Admissions Application Form Message to Clarify Instance Removal Restrictions |
||||||
Additional Biographical Information Fields for Admissions Application Forms |
||||||
Oracle Campus Community includes everything that is shared among different Student Management product areas, whether person records or common setup objects for implementing Student Management.
To-Do Item List and Detail Views
See highlighted overdue indicator and status badges for tasks when viewing a user's list of to-do items. Additionally, you can find specific to-do items with an improved advanced search.
Students can easily distinguish and prioritize the overdue tasks that require immediate attention. They can also distinguish tasks based on a status, and do a comprehensive search for tasks based on several search criteria (such as status type, date type, and date range). They can view all tasks by selecting All from the Status Type drop-down list and the task details by clicking a particular task.
Steps to Enable
You don't need to do anything to enable this feature.
Task and Checklist Assignment Views
View a list of assignments of tasks and checklists. Search for specific assignments, and drill down into specific tasks or checklists to update their completion status. Administrators can no longer view task or checklist assignments from the task and checklist setup pages.
From the Assignments tab, you can access the assignments detail easily and update them. You can search for and see all the tasks or checklists assignments on one central page now. From this page, you can view a task or checklist details by clicking on it. This simplifies the job of updating the tasks or checklists status and uploading documents. You can also create a new task assignment using a guided wizard flow.
Here are some of the advantages that you get:
- You can access assignments in a separate view, which is useful, as there are lots of assignment instances.
- Advanced search capability helps you to narrow down the search results displayed and to search on many criteria like Status, Assignee, Category, and so on.
- You can easily access and update tasks from the Tasks and Checklists Assignment view.
Steps to Enable
You don't need to do anything to enable this feature.
Role Information
You need the Administrator role to use this feature.
View communications sent to a party using an updated landing page that includes enhanced search and filter functionality.
The Communications landing page now has two tabs: Setup and Recipients. Use the Setup tab to create, update and review communications and use the Recipients tab to find recipients who receive these communications. You can search for a recipient by name and email address.
From the Recipients tab, you can navigate to see the message history of a particular recipient. The message history shows all the communications received by the recipient. You can drill down further to see communication message details, such as message content and message status, and resend the communication if needed from the message detail page.
Filter options are available on both the tabs; for example, you can filter the message history to review the communications sent to a particular recipient within a specific date range.
The feature provides an easy way to find communication recipients and view the communications sent to them by the cloud application. Users can also drill down to see details such as the message content, message status and action status, and the email metadata such as the email addresses in the To and From fields.
Steps to Enable
You don't need to do anything to enable this feature.
Tips And Considerations
To access the Communications landing page, click Navigator > Academic Tools > Communications.
Unified Task and Checklist Assignment Wizard
Assign tasks and checklists in different areas of Student Management Cloud with an updated, unified task and checklist assignment wizard. See summary and detail information while progressing through the wizard to maintain context of the task or checklist being assigned and to ensure accuracy of assignments.
You can use the step-based Task and Checklist Assignment Wizard to assign a single task or checklist to a list of people determined by an advanced search. The wizard behavior considers the context it's called from and depending on the situation, excludes the steps that aren't relevant. Here are some of the benefits of using the Task and Checklist Assignment Wizard:
- You can assign one task or checklist to multiple people at the same time.
- You get a consistent and guided experience based on the context for assigning a task or checklist.
- You can view the summaries of choices selected in each step of the wizard before triggering the assignment.
This screenshot shows some of the steps from the Task and Checklist Assignments Wizard page:
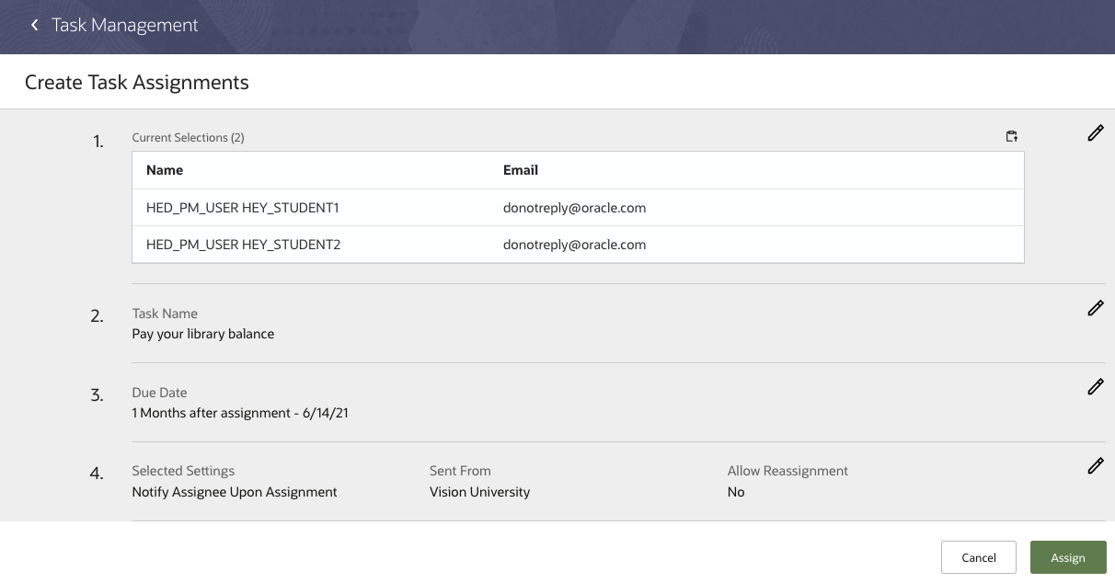
Task and Checklist Assignments Wizard
Steps to Enable
You don't need to do anything to enable this feature.
Role Information
You need the Admissions Manager or Admissions Coordinator role to use this feature.
Person Selection for Task or Checklist Assignment
Search for and select a population of one to many people using predefined search criteria to assign a task or checklist in the task and checklist assignment wizard. Administrators can confirm the name and email of the selected population by viewing a selection summary or copying it to the clipboard.
Now, you can select multiple people from your search result to assign them a single task or checklist at once. As an administrator, you can also copy the basic details (person names and emails) of people being assigned a task or checklist to the clipboard. This helps you to keep a track of the assigned people.
Steps to Enable
You don't need to do anything to enable this feature.
Tips And Considerations
When you select more than one person to assign a task or checklist, you can't associate the task or checklist with an object (such as an admissions application) as an assignment wizard step.
Role Information
You need the Admissions Manager or Admissions Coordinator role to use this feature.
Configure age limits to identify a person as fully-managed, joint-managed or self-managed. Here are the differences between the management levels for a person:
-
A fully-managed person's actions are controlled by another person, for example, a child under the age of 13 in the United States whose actions are managed by a parent.
-
A joint-managed person's actions are shared with another person, for example, a teen whose actions are shared with a parent.
-
A self-managed person controls their own actions, for example, an adult.
To access the Age Limits configuration, go to Navigator > Manage Settings > General Settings.
As an administrator, you can now configure the age limit by generically defining the age range in a central place.
This screenshot shows the General Settings page to define the age ranges:
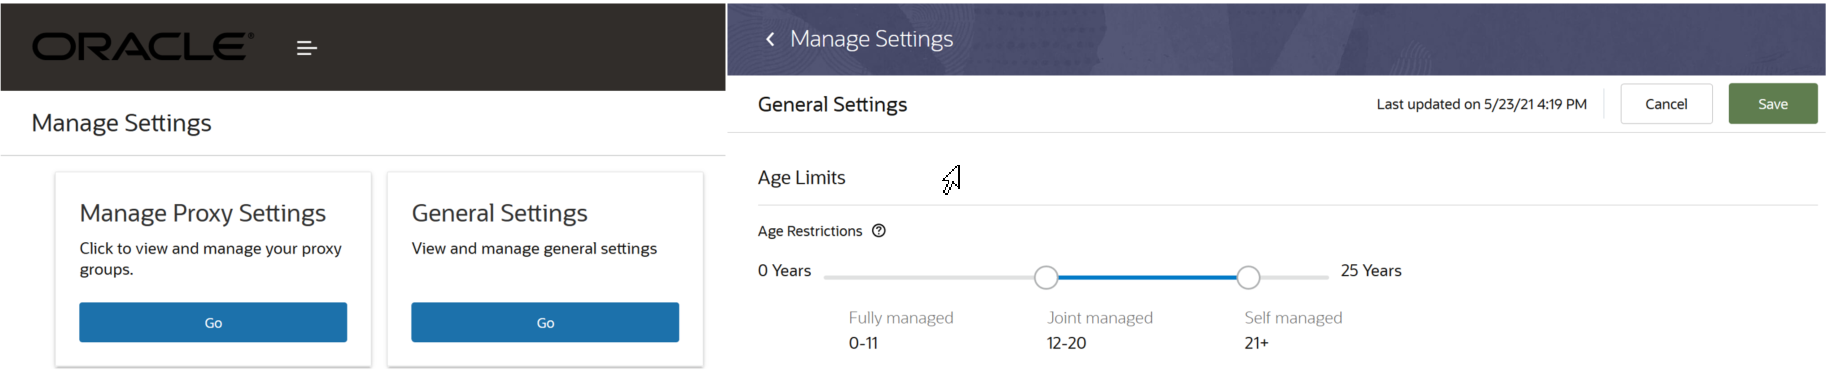
Configure Age Limits
Steps to Enable
You don't need to do anything to enable this feature.
Role Information
You need a Registrar or Higher Education Application Administrator role to use this feature.
Proxy Age Restriction and Consent Request Reminder
Administrators can no longer set up a proxy's minimum age. The required minimum age of a proxy is now based on the self-managed age range defined in the age settings configuration. A proxy or administrator can now trigger a consent request reminder communication to the members of a proxy group who haven't responded to the consent request.
You can now set the age limits by defining the age range of a proxy, based on the self-managed age settings in the General Settings instead of doing it in the Proxy Group Settings. You can't set up a proxy group if you are underage as defined in the self-managed age range in the age settings configuration. As an administrator, you or the proxy can also send a reminder communication to the members of a proxy group to accept or deny the invitation to join the proxy group.
Steps to Enable
You don't need to do anything to enable this feature.
Tips And Considerations
Now, when you open the General Settings for the first time, you can see that the Proxy Minimum Age setting is updated to the Self-Managed Age setting.
Role Information
You need the Higher Education Application Administrator or IT Security Manager role to use this feature.
Assign roles to a role group in a dedicated role assignment page. Administrators use role groups to efficiently assign default page access to roles.
As an administrator, first you need to enter the basic details for a new role group in the Details tab, and then only you can add roles to the new role group in the Assign Roles tab. This ensures that you provide the basic details for the role group before assigning any roles to that role group.
Steps to Enable
You don't need to do anything to enable this feature.
Role Information
You need the Higher Education Application Administrator or IT Security Manager role to use this feature.
Oracle Student Financials is a tool for higher education institutions to manage student receivables, billing, and payment collection. Using Student Financials, both staff and students can quickly find and use the financial information they need to make critical decisions. Staff can actively manage student accounts by performing functions such as creating charges, accepting payments, processing refunds, and generating receipts.
Payment Application Fee Group Export and Import
Administrators can now export and then import payment application fee groups from one Student Management environment to another.
To export and import fee groups, see "Manage Setup Using CSV File Packages" in Using Functional Setup Manager on docs.oracle.com. Then verify that the fee groups were imported in your target environment. While you're in the Setup and Maintenance work area > Student Management > Student Structures, click Manage Fee Groups. You should see the payment application fee groups you imported.
Using this feature saves you time. You avoid the tedious process of creating fee groups one by one. The ability to export and import fee groups in bulk is helpful during the initial implementation of Oracle Student Management Fusion Cloud Service.
Steps to Enable
You don't need to do anything to enable this feature.
Tips And Considerations
When exporting and importing fee groups, the source and target environments must be of the same Oracle Cloud Applications revision. Ensure that your test and production environments are at the same revision level before your export and import.
Role Information
You need the Application Implementation Consultant role to export and import CSV file packages.
Reapplication of Payments After Fee Adjustments
This feature is an enhancement to the behavior of the payment application process. Most higher education institutions have rules about how payments are applied to charges in students' accounts. For example, they may have rules where tuition is always paid first, or for the oldest charges to be paid off first. There will also likely be rules regarding financial aid. With this update, Student Management's payment application process automatically applies the rules so that institutions don't have to decide how every payment is applied.
In 21B, you use charge priority mappings to define the order in which payments are allocated to each charge, for when payments don't fully cover all eligible charges. You can use priorities to act as a tiebreaker, or set them up so that all eligible charges are paid off equally.
Before this release, fee adjustments, charge or receipt reversals, and payment adjustments didn't automatically activate the process to apply available credit to outstanding eligible charges.
With this update, a change in students' accounts will activate the payment application process. The process applies any available credit in a student's account to any outstanding eligible charge. And because this automatically happens, you hardly need to perform manual adjustments and unnecessary refund transactions to ensure that student accounts are always in good standing.
Steps to Enable
You don't need to do anything to enable this feature.
Tips And Considerations
- You need to use these features from 21B to be able to fully use this feature:
- Ensure that the student credit is active so that you can use the receipt method associated to it.
Role Information
You need the Higher Education Application Administrator or Bursar role to use this feature.
Eligible Charge Override for Receipts
In 21B, charge priority mapping lets you assign priorities to charges. By using student credits together with a charge priority mapping, you can specify which charges can be paid off by a given credit or payment. This meant that payments are restricted to specific charges. But there could be instances when you would need to perform overrides, that is, use the credit to pay off a different charge. This could happen when students request for a restricted payment, or if they want to use a different credit to pay for outstanding miscellaneous charges.
With this feature, you can force a payment to apply to charges it wasn't originally intended for. When you create a receipt or update an existing one, select the Override Charge Priority check box so that you can add other fees or charges. This allows the payment application process to apply the given payment to the fee or charge you added.
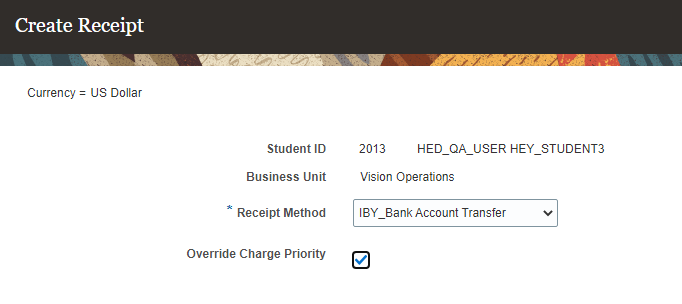
Create Receipt Page
When creating new receipts, the Receipt Method will be blank, and Override Charge Priority is not selected. These are the default settings. As soon as you select a receipt method, the list of eligible charges is populated with ones that the receipt or payment in context can be used with. When you select Override Charge Priority, you can add other charges that weren't a part of the original list of eligible charges. To create new receipts, go to the Finances work area, click the Student tile, search for the student, then click the name. From the student's account page, click Actions > Create Receipt.
If there are available credits in the student's account, you can update the corresponding receipt to use the credit. To update an existing receipt, go to the student's account page, click Actions > Manage Receipts. Select the receipt you want to update. select Override Charge Priority, then add the charge to the list..
If the payment amount equals the total outstanding charges, then all charges are automatically paid for. You can also specify the amount you want to apply to each charge. You can do either of these tasks:
- Enter a lump sum in Amount. The payment application process will then determine the amounts to apply to outstanding charges. The amounts are based on the charge priority rules of the receipt method.
- Enter an amount for each charge in the corresponding Pay Amount.
You also have the ability to remove a charge from a receipt.
With this feature, administrators have the flexibility to apply payments to other charges as befits the situation.
Steps to Enable
You don't need to do anything to enable this feature.
Tips And Considerations
You need to use these features from 21B to be able to fully use this feature:
Role Information
You need the Higher Education Application Administrator or Bursar role to use this feature.
Oracle Student Admissions enables users to enter, track, and process the submission of the admissions applications.
Requirement for Proxy to Apply on Behalf of a Learner
Add a proxy eligible tag to an academic program to require applications for the program to be submitted by a proxy user on behalf of a learner. Programs with the proxy eligible tag guide an applicant to add learners before they can apply to the program. Additionally, applicants are navigated to the program details page when accessing forms via a direct URL for a more consistent user experience.
You can see clear messaging when a program is eligible for a proxy to apply on behalf of a learner. Student Management Cloud now guides a proxy applying on behalf of a learner to create learners before accessing the application form. A proxy gets clear alerts when learners haven't been added to the proxy group and while managing them in a proxy group. The redesigned UI makes it easier to add learners to a proxy group and manage them.
This screenshot shows the page to add the Proxy Eligible tag to an academic program:
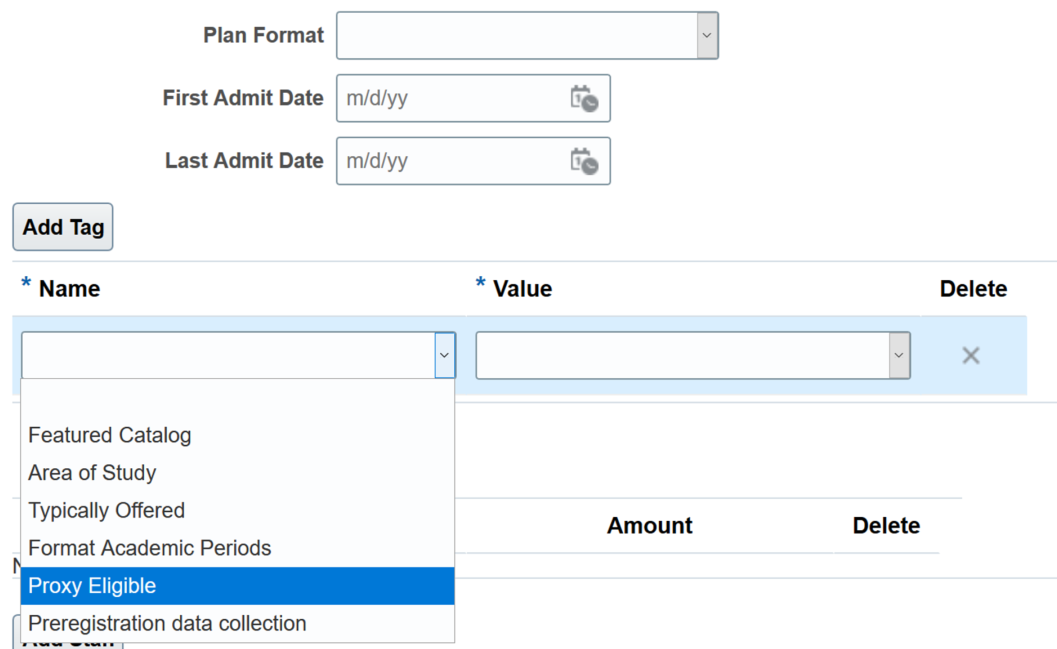
Add the Proxy Eligible Tag
This screenshot shows the program details page:
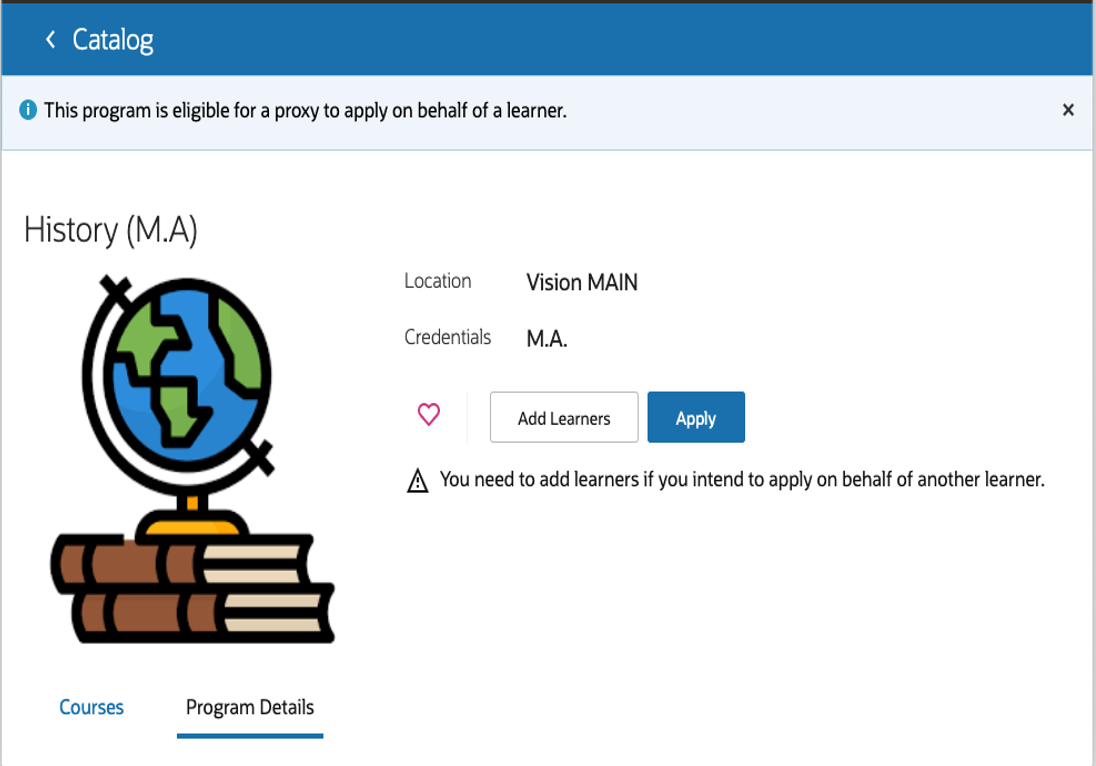
Program Details Page
Steps to Enable
Add the Proxy Eligible tag to the academic programs to accept applications from proxies on behalf of a learner.
- Click Navigator > Academics > Curriculum > Programs.
- From the list, open a program and click Action > Correct Record.
- Click Edit Administrative Controls and add Proxy Eligible tag to the program.
Add the Learner Added Consent Pending event to a Student Management Category.
- Click Navigator > Others > Setup and Maintenance.
- In the Setup list, select Student Management.
- In the Student Structures functional area, click the Manage Student Management Categories task.
- From the list, select a category and click Add Event.
Role Information
You need the Academic Coordinator, Student Proxy, Applicant, or IT Security Manager Role to use this feature.
Admissions Application Form Message to Clarify Instance Removal Restrictions
Understand why an entry, such as a specific address, can't be removed from an admissions application form by viewing a hint message. Applicants see the reason the entry can't be removed in a clear message. For example, an entry can't be removed because it's the preferred address.
The reason based contextual message helps sight-impaired users and the users on mobile devices to understand why they can't remove one or more instances from an admission application form. These instances include:
- Names
- Addresses
- Emails
- Emergency Contacts
- Phones
Steps to Enable
You don't need to do anything to enable this feature.
Role Information
You need the Admissions Coordinator role to use this feature.
Additional Biographical Information Fields for Admissions Application Forms
Add new fields to an admissions application form to collect additional biographical information from applicants, such as citizenship status, visa type, and primary language. Additionally, applicants can more easily specify an institution on the academic history and relationship sections of the application form.
As an admissions manager, you can now configure an admissions application form to include Citizenship status, Visa type, and Primary language fields in the Academic History section to provide relevant information about an applicant.
| Field Name | Description |
|---|---|
| Citizenship status |
This field provides the status of the applicant's citizenship in the country relevant to the admissions process. For example, country where the academic program will be administered. This information helps an institution to determine if a student requires a visa to attend. |
| Visa type |
This field provides information on the visa type held by applicants who are non-citizen residents of the institution's country. |
| Primary language |
This field provides information on the primary language spoken by an applicant. |
In addition, while entering an institution on an admissions application form, an applicant only needs to enter the institution’s name if it does not match an existing institution. An admissions coordinator or admissions operations staff now can review additional relevant information directly on an applicant's admissions application form, without opening any additional attachments.
Steps to Enable
To update the lookup options for the new fields, go to Setup and Maintenance > Student Management > Student Structures > Manage Student Management Lookups. Search and update these lookup types:
- Citizenship Status: ORA_HEY_CITIZENSHIP_STATUS
- Visa Type: ORA_HEY_VISA_TYPE
- Primary Language: ORA_HEY_PRIMARY_LANGUAGE
Tips And Considerations
Note that the new fields are available only on newly created forms.
Role Information
To use this feature, you need the Admissions Coordinator or Admissions Manager role.
Admissions Application Creation Event
Trigger actions when an admissions application is created. For example, send a communication with important dates and application instructions to applicants after they save an application for the first time. Now you can send a communication with instructions to an applicant who has started their application.
Add the Create Application event to a Student Management Category. Once the Admissions Manager adds the event to a category they can use it to trigger the action.
Steps to Enable
Add Create Application event to a Student Management Category.
- Click Navigator > Others > Setup and Maintenance.
- In the Setup list, select Student Management.
- In the Student Structures functional area, click the Manage Student Management Categories task.
- From the list, select a category and click Add Event.
Role Information
You need the Admissions Manager role to use this feature.