
This document will continue to evolve as existing sections change and new information is added. All updates appear in the following table:
| Date | Product | Feature | Notes |
|---|---|---|---|
| 29 APR 2022 | Campus Community |
Updated document. Delivered feature in update 22A. |
|
| 23 DEC 2021 | Created initial document. |
Student Management delivers cloud based, flexible, extensible best practice business flows to support how you enroll your students, maintain their personal information, and manage their payments. From a learner taking anon-credit course to the degree-seeking student, Oracle’s Student Management enables institutions to anticipate students’ needs, illuminate their academic path, and empower them to succeed.
 HAVE AN IDEA?
We’re here and we’re listening. If you have a suggestion on how to make our cloud services even better then go ahead and tell us. There are several ways to submit your ideas, for example, through the Ideas Lab on Oracle Customer Connect. Wherever you see this icon after the feature name it means we delivered one of your ideas.
GIVE US FEEDBACK
We welcome your comments and suggestions to improve the content. Please send us your feedback at oracle_fusion_applications_help_ww_grp@oracle.com.
DISCLAIMER
The information contained in this document may include statements about Oracle’s product development plans. Many factors can materially affect Oracle’s product development plans and the nature and timing of future product releases. Accordingly, this Information is provided to you solely for information only, is not a commitment to deliver any material, code, or functionality, and should not be relied upon in making purchasing decisions. The development, release, and timing of any features or functionality described remains at the sole discretion of Oracle.
This information may not be incorporated into any contractual agreement with Oracle or its subsidiaries or affiliates. Oracle specifically disclaims any liability with respect to this information. Refer to the Legal Notices and Terms of Use for further information.
Column Definitions:
Report = New or modified, Oracle-delivered, ready to run reports.
UI or Process-Based: Small Scale = These UI or process-based features are typically comprised of minor field, validation, or program changes. Therefore, the potential impact to users is minimal.
UI or Process-Based: Larger Scale* = These UI or process-based features have more complex designs. Therefore, the potential impact to users is higher.
Features Delivered Disabled = Action is needed BEFORE these features can be used by END USERS. These features are delivered disabled and you choose if and when to enable them. For example, a) new or expanded BI subject areas need to first be incorporated into reports, b) Integration is required to utilize new web services, or c) features must be assigned to user roles before they can be accessed.
| Ready for Use by End Users Reports plus Small Scale UI or Process-Based new features will have minimal user impact after an update. Therefore, customer acceptance testing should focus on the Larger Scale UI or Process-Based* new features. |
Customer Must Take Action before Use by End Users Not disruptive as action is required to make these features ready to use. As you selectively choose to leverage, you set your test and roll out timing. |
|||||
|---|---|---|---|---|---|---|
| Feature |
Report |
UI or |
UI or |
|
||
Incorporation of Delivered Secured Fields Into User-Defined Data Profiles |
||||||
Page Group and Data Profile Content Review, Clone, and Removal |
||||||
Find the profile for a person with an integrated person profile search. The person search work area opens with a list of all persons. The user can then search for a person and filter search results on academic levels and programs.
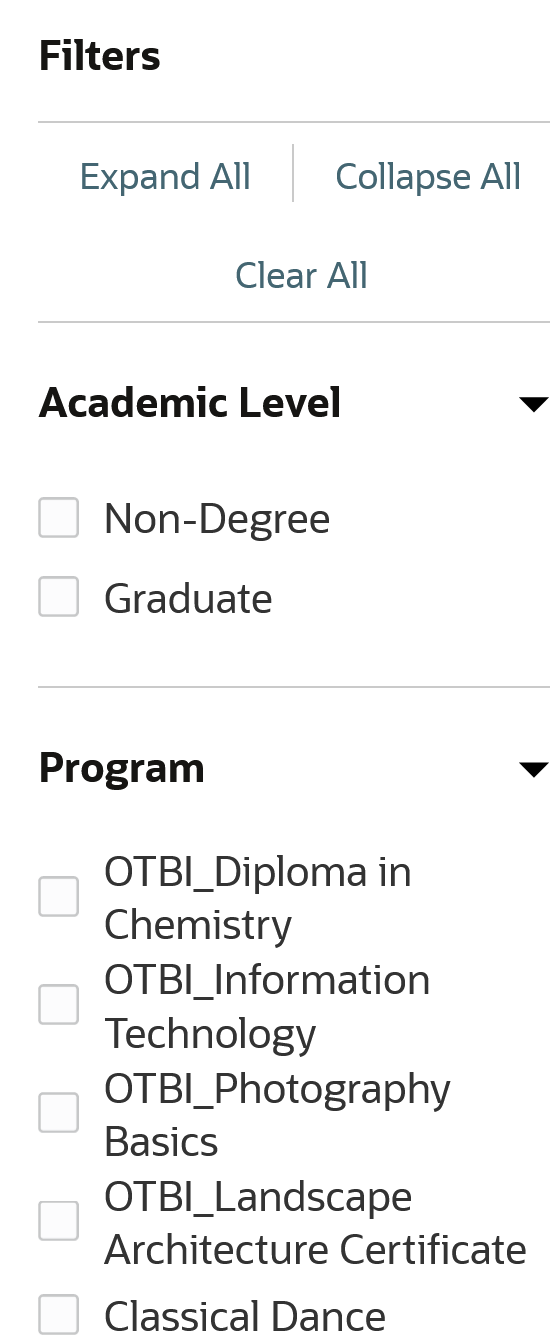
Filtering Search Results
Additionally, users can also navigate to their own profile using their avatar in the global header. End users can also use the avatar menu to create or edit managed student groups (previously known as proxy groups).
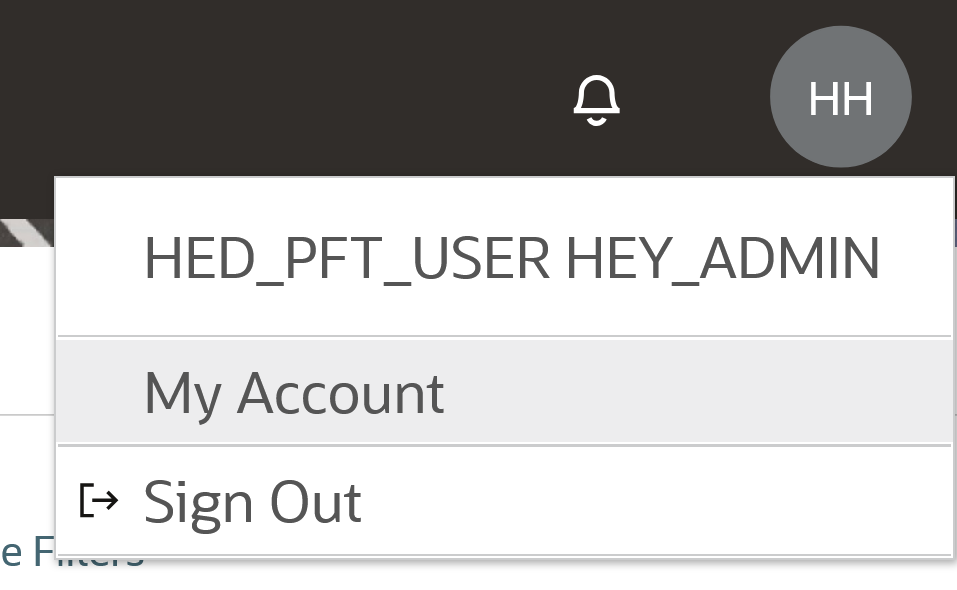
Example of an Avatar Menu for a User
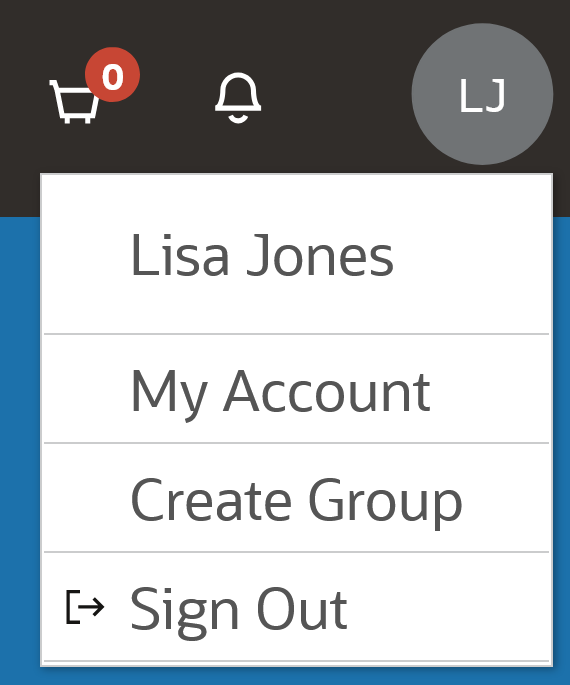
Example of an Avatar Menu for an End User
As part of enhancing Person Search, the action menu and the corresponding actions within it for assigning a task or a checklist have been removed. This functionality is already supported in other task management pages that provide a more streamlined and unified task and checklist assignment experience.
This feature provides a faster way to search for and select person records.
Users (such as administrators) and end users (such as students) can navigate to their own profile using the avatar menu by clicking on My Account.
Steps to Enable
You don't need to do anything to enable this feature.
Tips And Considerations
To access the person search work area, click Navigator > Academics > Person Search.
Upload, crop, and manipulate photos for a user's profile. Profile images appear as the avatar image for users throughout Student Management Cloud. End users can now perform this upload for themselves.
Depending on the security privilege, users and end users can upload their preferred profile image for their avatar for a more personalized, engaging experience.
Steps to Enable
You don't need to do anything to enable this feature.
Tips And Considerations
- Click the avatar menu, click My Account, and then upload the profile image.
- End users, such as students, must have the Manage Student Management Person Image security privilege to use this feature.
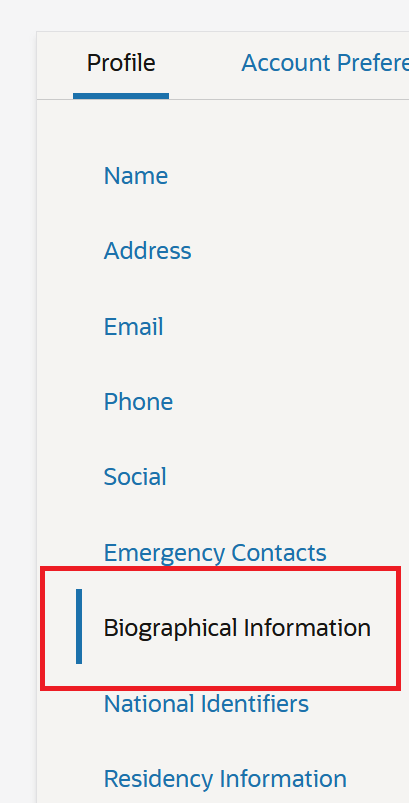
Edit contact information on a person's profile without first selecting an option to enable edits. You can also enter addresses that become active in the future.
Users and ends users can click the Name, Address, Email, Phone, and Social links under the Profile tab to immediately start editing contact information fields.
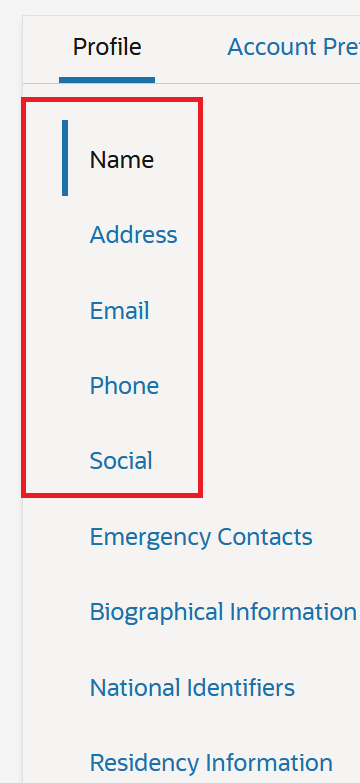
Contact Information Links
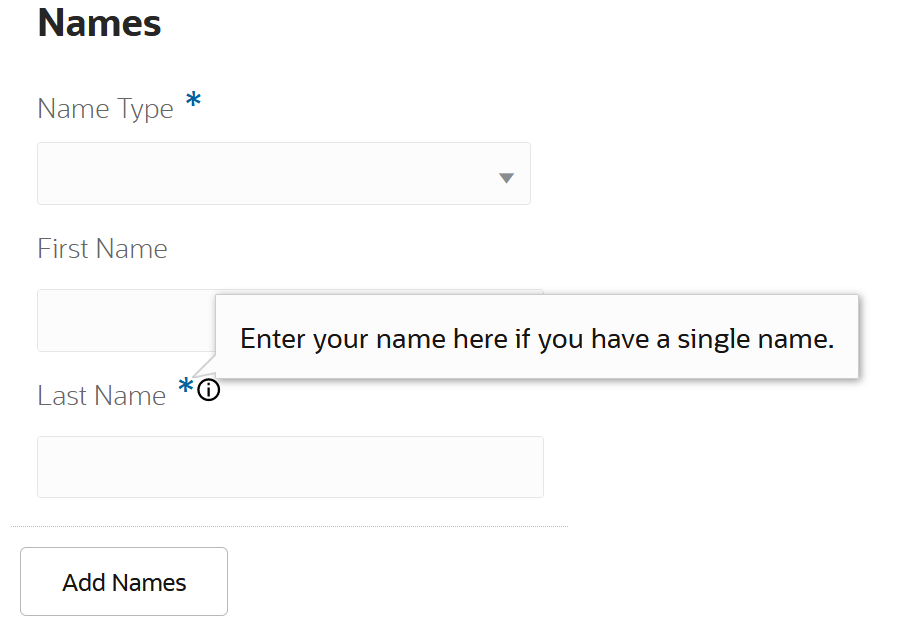
In the Name section, a message informs users to enter their name in the Last Name field if they have a single name.
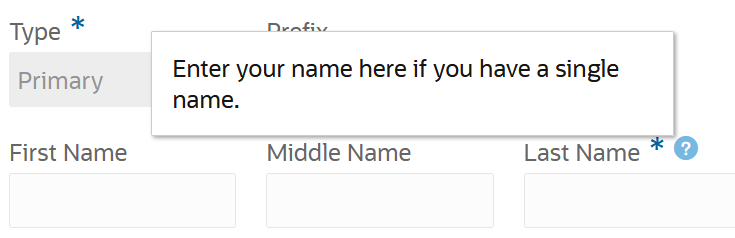
Message for Single Name
This feature provides the ability to quickly navigate to a desired section to view or update contact information.
Steps to Enable
You don't need to do anything to enable this feature.
Emergency Contact Information Update
Edit emergency contact information on a person's profile without first selecting an option to enable edits. Users and end users can click the Emergency Contacts link under the Profile tab to edit information.

Emergency Contact Information Link
This feature allows the user to visually see the separation of different segments of Person Profile. Now, Emergency Contacts has its own dedicated section allowing the user to add or remove contacts or set their preferred contact.
Steps to Enable
You don't need to do anything to enable this feature.
Biographical Information Update
Edit biographical information on a person's profile without first selecting an option to enable edits.
Users and end users can click the Biographical Information link under the Profile tab to immediately start editing fields such as Gender Identity, Race, Country of Citizenship, Marital Status, Date of Birth, Place of Birth, and more.
Biographical Information Link
It's an easier, more streamlined process to view and edit biographical information.
Steps to Enable
You don't need to do anything to enable this feature.
National ID Entry and Privacy Masking
Enter national ID values using configurable ID type values. Keep private information safe with new privacy masking of the national ID field.
Users and end users can click the National Identifiers link under the Profile tab to navigate to the section. Users, such as administrators, can enter national ID values for a person. They can click on the privacy masking icon to see or hide the entered characters.
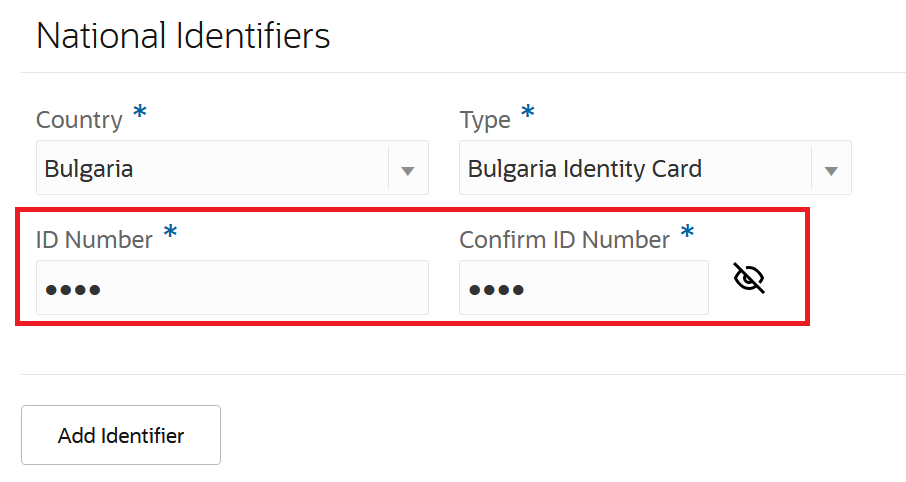
Privacy Masking
End users, such as students, have view-only access.
Benefits of this feature are:
- Users and end users can easily navigate to National ID section. Users, such as administrators, can edit or add national ID information. End users, such as students, have view-only access.
- Privacy masking of the National ID field reduces the risk of exposing sensitive data.
Steps to Enable
You don't need to do anything to enable this feature.
Tips And Considerations
To create national ID types or review the delivered types, use the Manage National Identifier Types task in the Setup and Maintenance work area:
- Offering: Student Management
- Functional Area: Student Structures
Student Official Residency Entry
Enter student official residency data on a user's person profile. You can determine a student's residency classification by institution and academic level to calculate tuition and for other purposes. Example residency values include In-State, Out-Of-State, or International. You can also record residency exceptions when needed.
Users and end users can click the Residency Information link under the Profile tab to navigate to the section. Users, such as administrators, can fill out the residency information for a person. End users, such as students, have read-only access to their residency information.
Benefits of this feature are:
- Users and end users can easily navigate to residency information section.
- Users, such as administrators, can fill out information related to the student’s residency. End users, such as students, will have read-only access to their residency information.
Steps to Enable
You don't need to do anything to enable this feature.
Regional Preferences Selection
Edit your regional preferences such as number format, date format, time format, and time zone. With these preferences, Student Management Cloud automatically adjusts and displays proper formats in different sections, for example, in Communications.
Users and end users can access these preferences by clicking their avatar and selecting My Account from the menu. Once the My Account page opens, they can click the Account Preferences tab. Account preferences of other users are not visible to administrators because they are not allowed to change preferences of another user. Administrators can only update their own account preferences.
This feature allows users and end users to adjust the format of data (number format, date format, time format, time zone, and country) to their own preference.
Steps to Enable
You don't need to do anything to enable this feature.
Communications tab has been removed from the Person Search work area (Navigator > Academics > Person Search). With this change, administrators now only need to go to a single place to view communications sent to individuals, such as applicants and students. They can go to the Communications work area (Navigator > Academic Tools > Communications) and use the Recipients tab to view these communications.
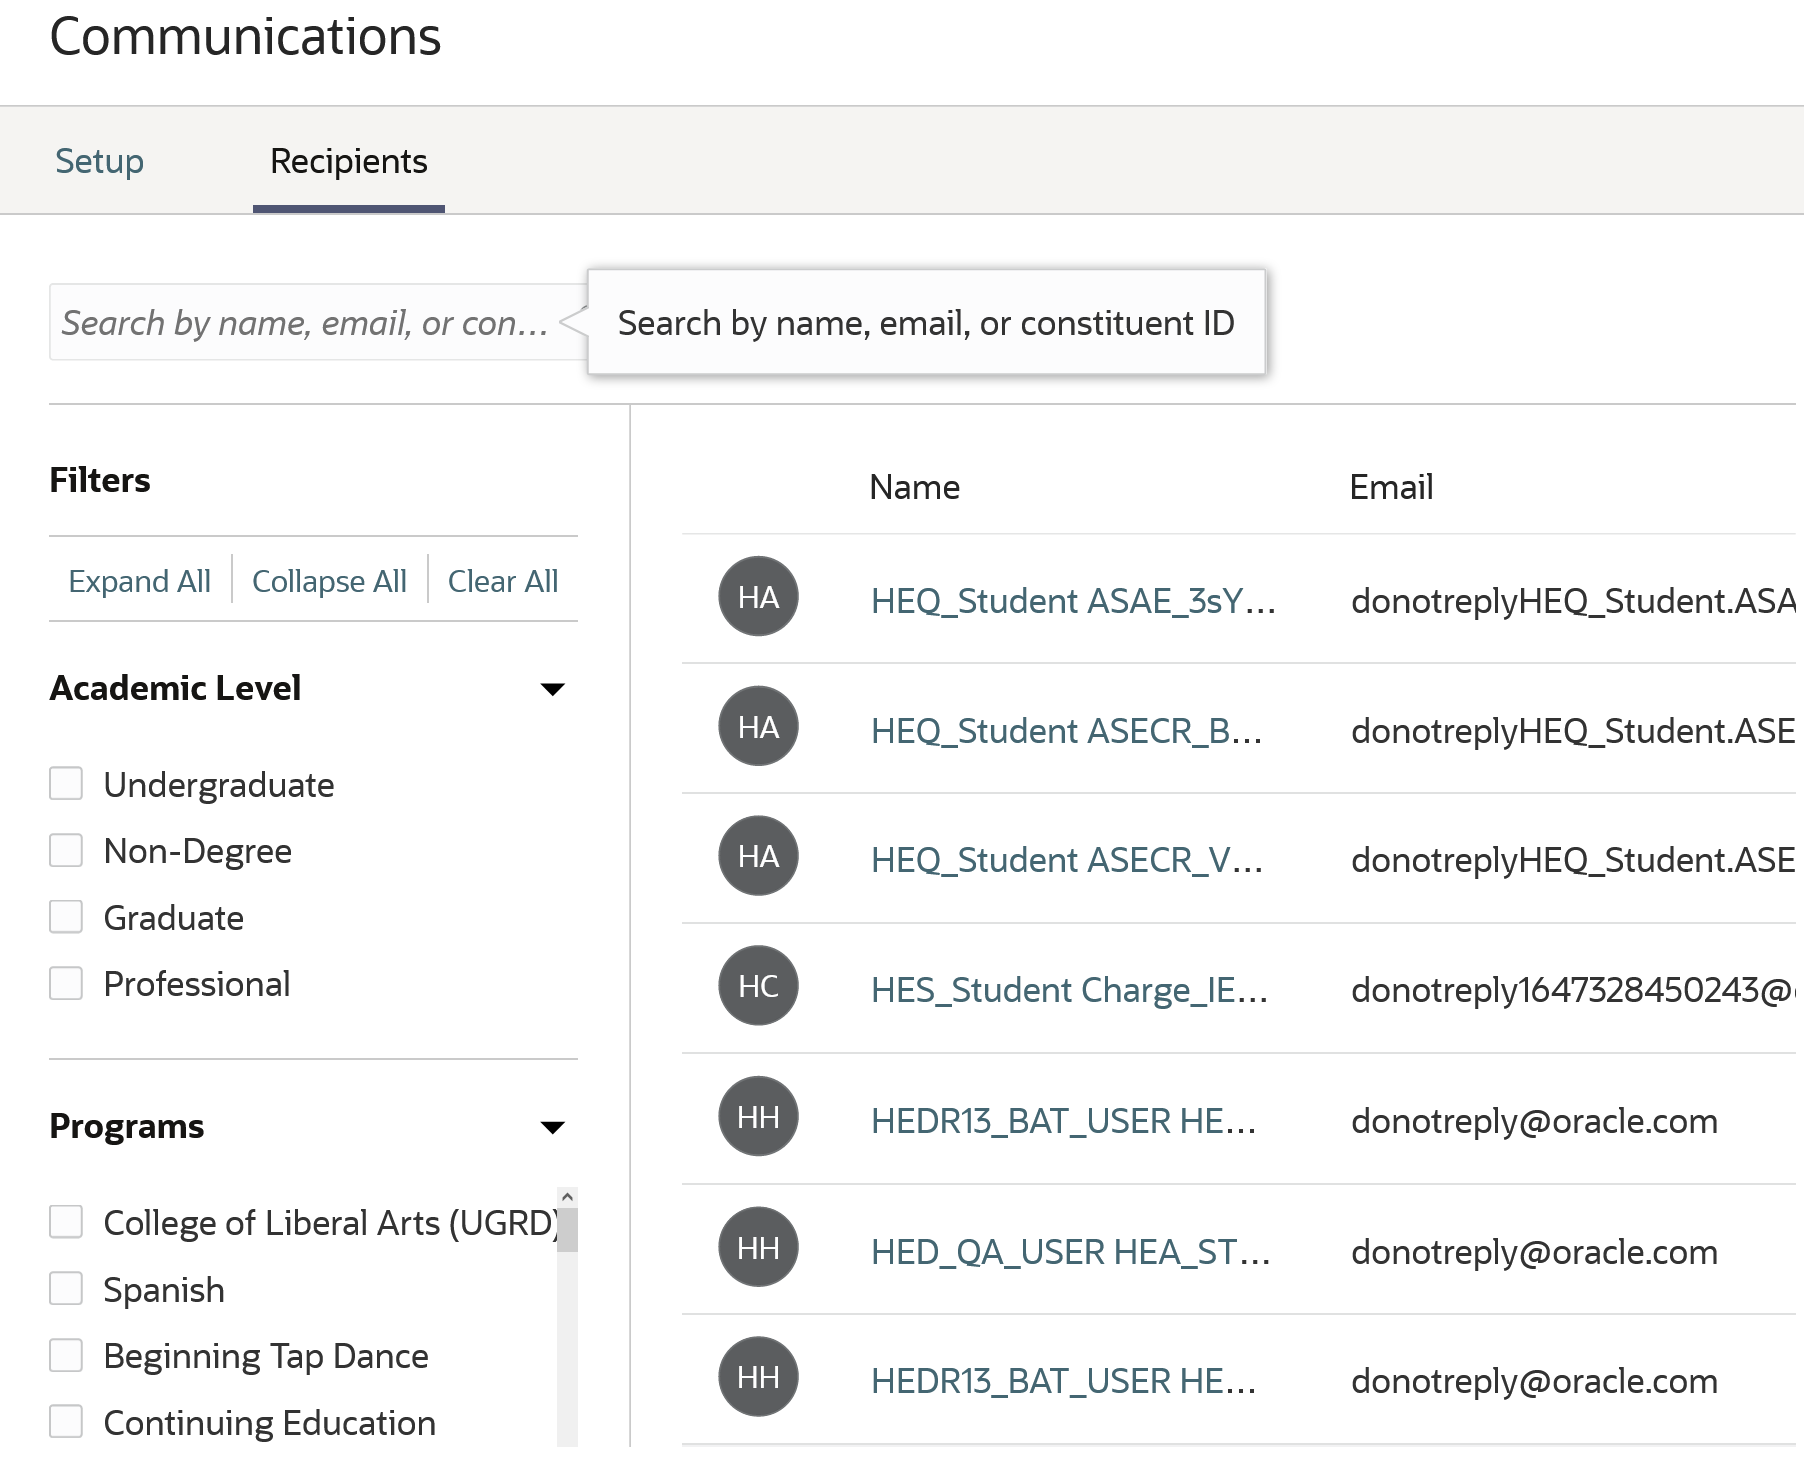
Recipients Tab on Communications Work Area
The feature provides an easy way to find a communications recipient, and view the communications sent to them by the system.
Steps to Enable
You don't need to do anything to enable this feature.
Student Management Cloud delivers new pages, page elements, and page permissions assigned to the predefined job roles in each release.
Here are the newly added pages, page elements, and page permissions for the mentioned predefined job roles:
| Page Name |
New/Existing |
Page Elements |
New/Existing |
Page Permission |
New/Existing |
Predefined Job Roles |
|---|---|---|---|---|---|---|
| Event Management |
New |
Event Details |
New |
View, Create, Update, and Delete |
New |
Higher Education Application Administrator |
| Manage Forms |
New |
Form Details |
New |
Manage |
New |
Admissions Manager |
| Manage Forms |
New |
Update a locked Form |
New |
Update |
New |
Admissions Manager |
| Manage Academic Business Unit |
New |
View Academic Business Unit Details |
New |
View and Manage |
New |
Bursar and Higher Education Application Administrator |
Steps to Enable
You don't need to do anything to enable this feature.
Tips And Considerations
If you created user-defined roles and assigned page access to them using the Manage Application Access task in Setup and Maintenance, you must review your user-defined roles to see if you need to assign them access to the new pages, page elements, and page permissions.
Role Information
You need an IT Security Manager role to use this feature.
Advanced Search and Filters for Roles
Search for predefined or user-defined roles assigned with global data profiles using the advanced search. Then, filter the predefined and global data profiles assigned to a role. Security administrators can easily review the data access of a role to make any changes.
Advanced search capability helps you to find predefined or user-defined roles that are assigned with at least one global data profile. Thus, you don’t need to review the details of each role manually to find roles assigned with global data profiles. This simplifies your review of data access.

Advanced Search
Also, while viewing the role details, you can use the facet filters to see the currently assigned data profiles for that role.
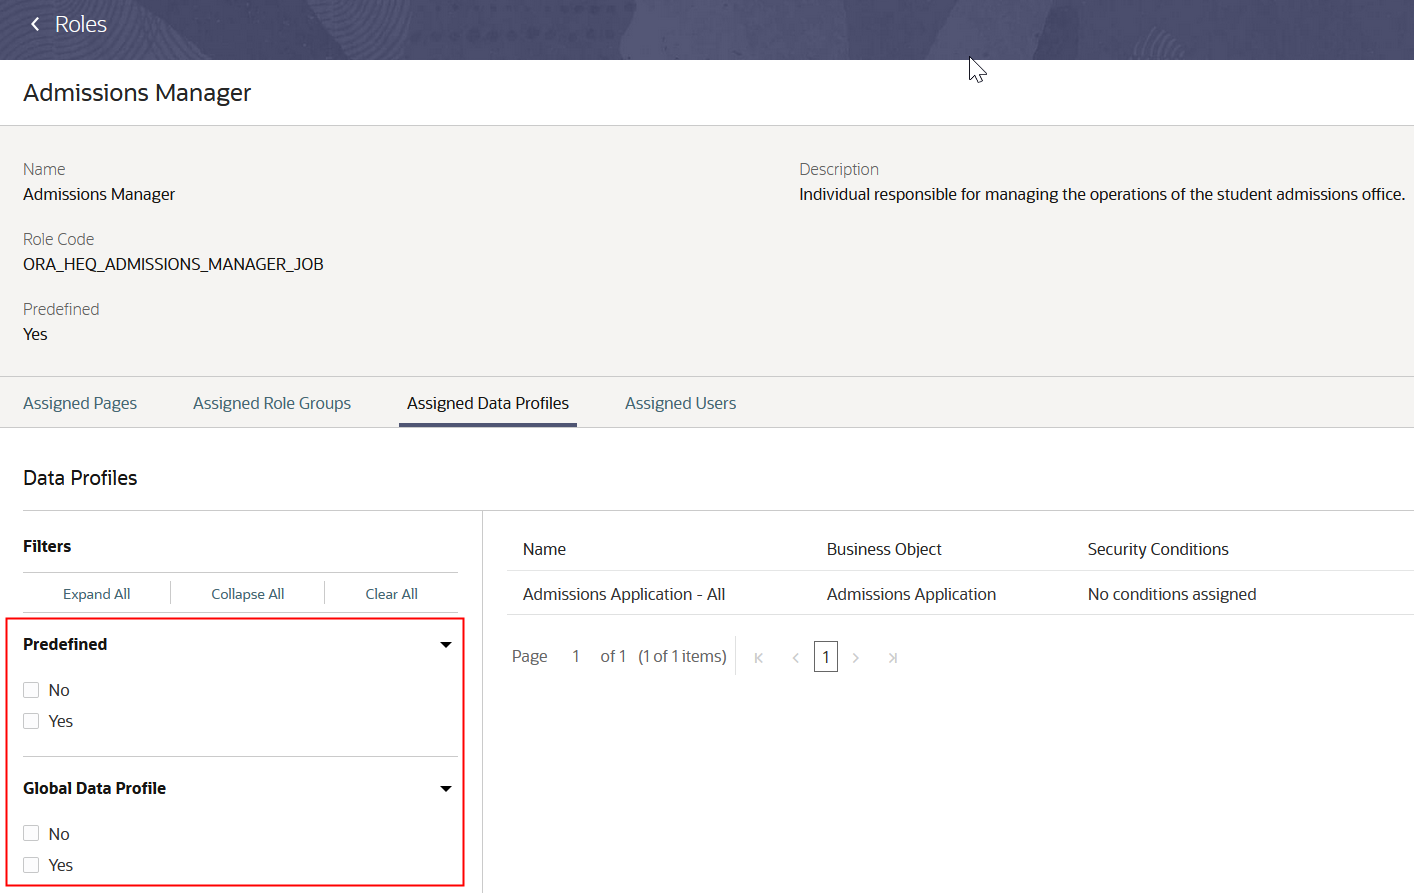
Facet Filters
Steps to Enable
You don't need to do anything to enable this feature.
Role Information
You need the Higher Education Application Administrator or IT Security Manager role to use this feature.
Incorporation of Delivered Secured Fields Into User-Defined Data Profiles
Incorporate delivered secured fields into user-defined data profiles with a batch process.
Student Management Cloud now ensures that the custom data profiles have the most current seed data for secured fields to enforce the data access effectively. You must run an ESS job after every release to update custom data profiles with the latest seed data for secured fields.
Steps to Enable
You don't need to do anything to enable this feature.
Tips And Considerations
As an administrator, you need to run the Synchronize Data Profile Securing Fields Seed Data process after every release. Here's what you do:
- Click Navigator > Tools > Scheduled Processes.
- On the Scheduled Processes Overview page, click Schedule New Process.
- Leave the type as Job, select Synchronize Data Profile Securing Fields Seed Data process, and click OK.
Role Information
You need the Higher Education Application Administrator or IT Security Manager role to use this feature.
Page Group and Data Profile Content Review, Clone, and Removal
Clone or remove an existing page group or remove an existing data profile after reviewing their contents.
Now you get the copy and delete functions in Manage page group UI and delete function in Manage data profile UI to review the contents and then copy or delete them. Thus, you can save time by making fewer clicks to copy or delete a page group and delete a data profile.
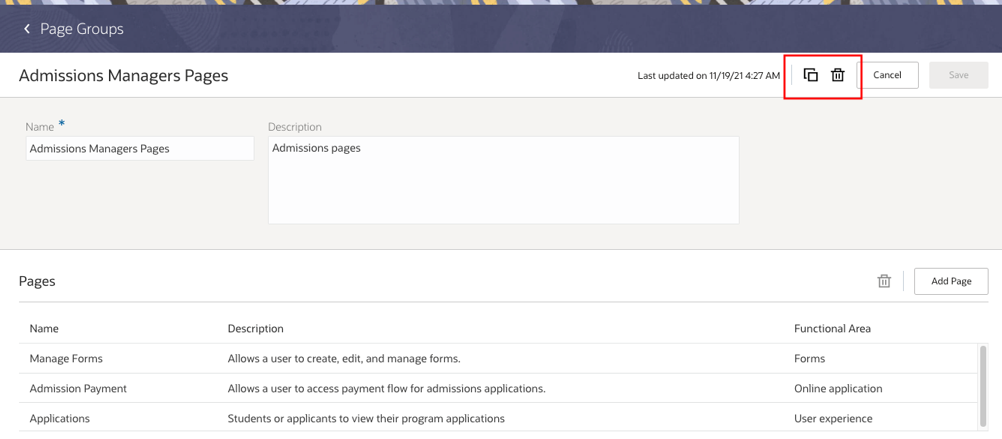
Copy and Delete Functions
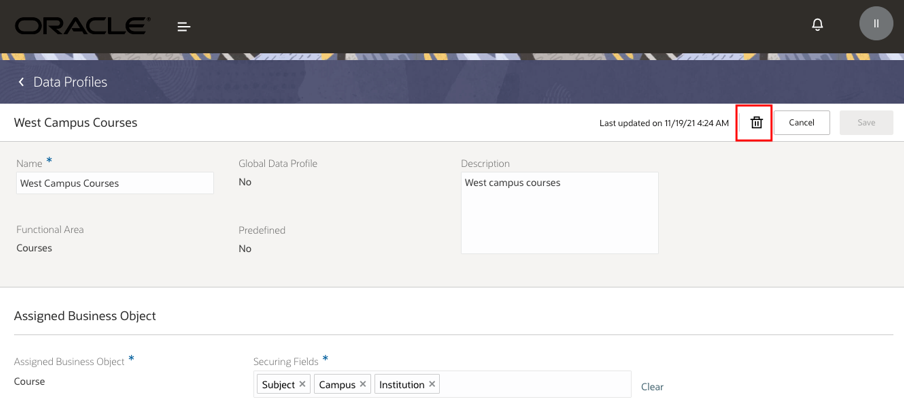
Delete Function
Steps to Enable
You don't need to do anything to enable this feature.
Role Information
You need the Higher Education Application Administrator or IT Security Manager role to use this feature.
Copy page permissions from one role or role group to another to easily duplicate page access permissions across roles or role groups.
Assigning the same page access permissions for multiple roles in this way is simpler now and you can do it in a single step. If you need to replicate the same page access permissions across roles or role groups, copy the page access permissions from one role or role group to another.
Steps to Enable
You don't need to do anything to enable this feature.
Tips And Considerations
Here's how to copy page access permissions to a different role or role group:
- In the Setup and Maintenance work area, use the Manage Application Access task:
- Offering: Student Management
- Functional Area: Users and Security
- Click Pages.
- Locate the page you want to specify the access permissions for, click the ellipses in that row, and click Assign Page Access to Roles or Role Groups.
- Review the assigned page access permissions to see if they're same or very similar to a different role or role group.
- To copy the assigned page access permissions to another role or role group, click the Copy icon.
- In the Add Role or Role Group dialog box, select a Role or Role Group for which you want to set the same page access permissions, and then click Next.
- When you're done, click Save.
Role Information
You need a Higher Education Application Administrator or IT Security Manager role to use this feature.
See a clear message if you have not been granted access permission to a page you are trying to view and return easily to the page you were on previously.
Student Management Cloud now displays a message if you don't have permission to access a page. It also provides a way to navigate back to a previous page, if available.
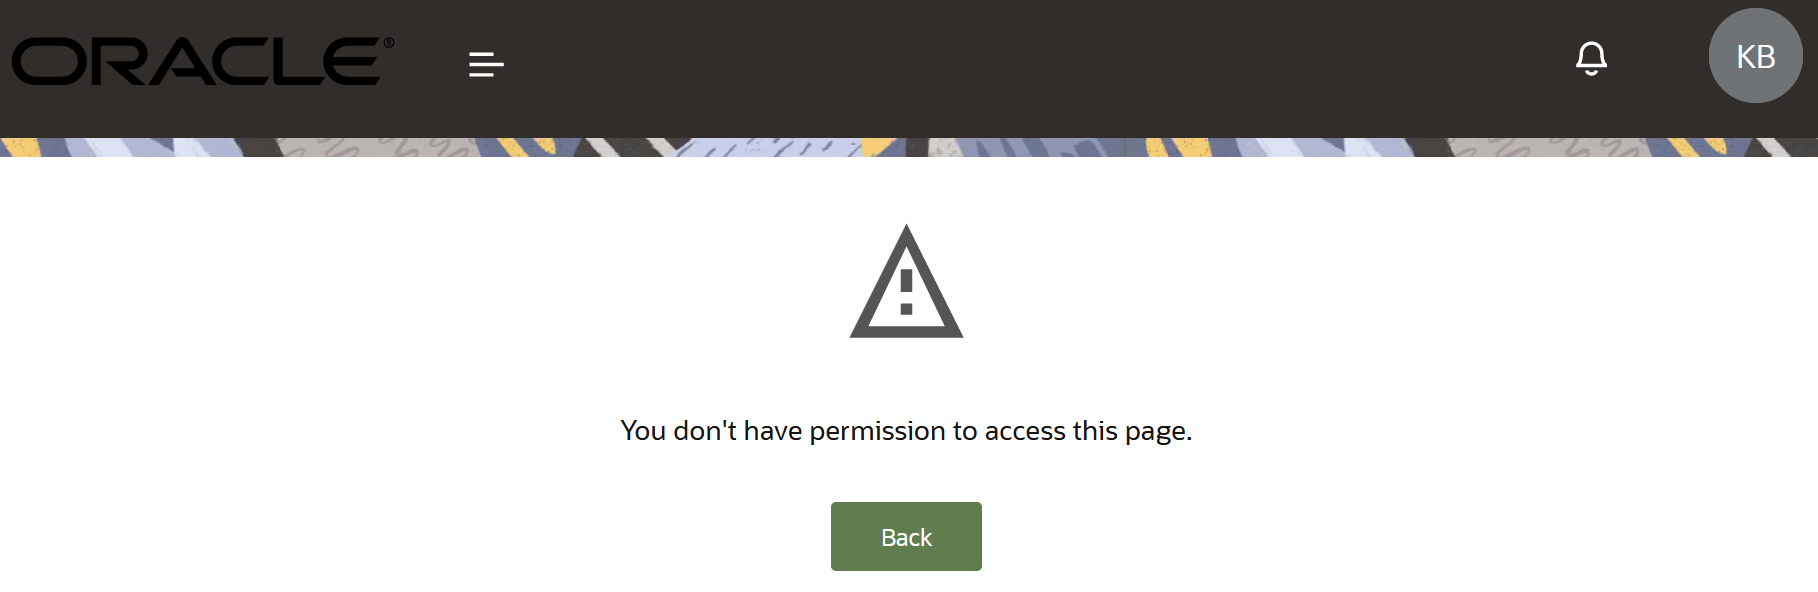
Error Message
Steps to Enable
You don't need to do anything to enable this feature.
Role Information
You need the Higher Education Application Administrator or IT Security Manager role to use this feature.
Add students to a managed student group to allow group managers to perform transactions on behalf of their managed students. Managed student group owners will more easily find this feature with updated labeling and clearer navigation.
Student Management Cloud now provides clearer, user-friendly labels to refer to a proxy, proxy group, and a learner in a more intuitive way.
| Old Label | New Label |
|---|---|
| Learner | Student |
| Proxy | Group Manager |
| Proxy Group | Managed Student Group |
| Consent | Approval |
In addition, save time by using the updated Avatar menu that simplifies the navigation to Managed Student and Create Group.
Based on your defined age restrictions on the self-managed age settings in the General Settings, Student Management Cloud now restricts fully managed students from signing up. The system displays an inline error message notifying the fully managed students that they can't sign up but a guardian is responsible for signing them up and taking actions on their behalf. Thus, you can ensure that no underage user is left unattended without a parent or guardian.
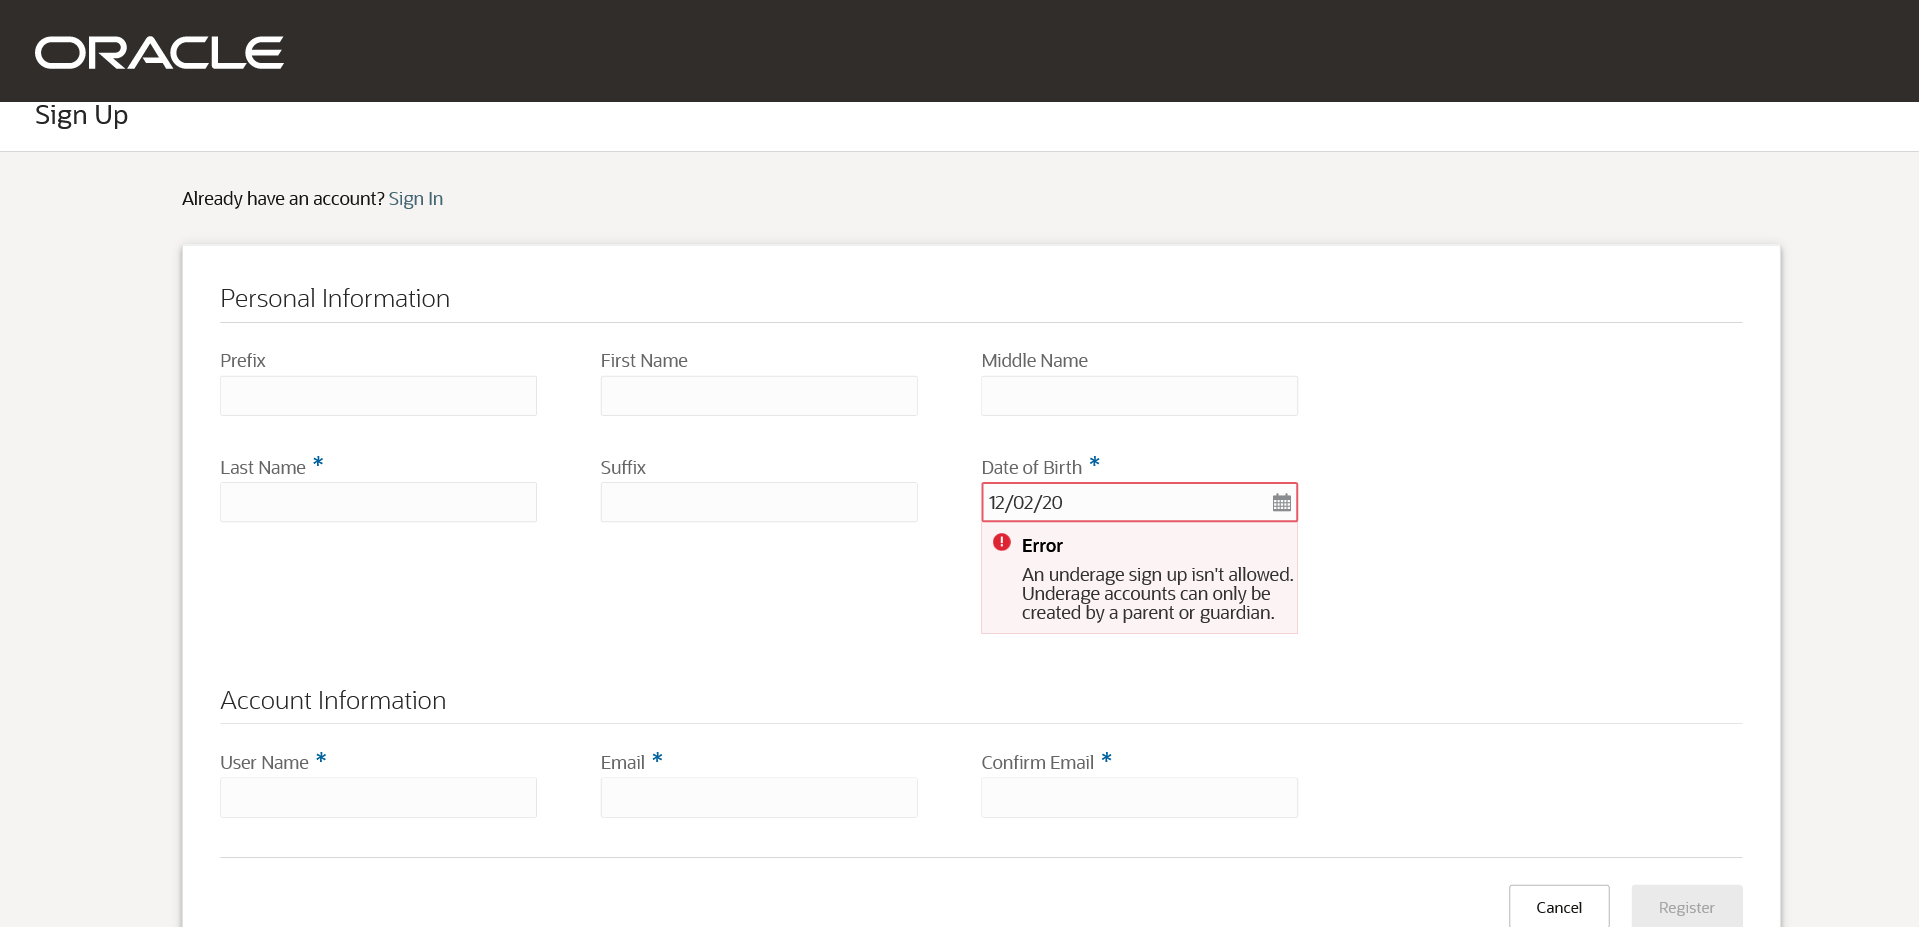
Blocking Underage Minor Sign Up
Steps to Enable
As an administrator, click Navigator > Manage Settings > General Settings to set an Age Limit configuration. Student Management Cloud calculates the age of the logged-in user and blocks the underage user from signing up depending on their age.
Tips And Considerations
Student Management Cloud displays Managed Students or Create Group in the Avatar menu depending on if the logged-in user is the owner of any existing group or not.
Role Information
You need the Higher Education Application Administrator, IT Security Manager, Anonymous User, or Group Manager role to use this feature.
Create and publish new versions of admissions application forms from already-created forms. Applicants will see the newest published version when starting a new admissions application. Additionally, use the filter criteria for Form Name, Status, and so on to narrow the search results and find the form more quickly in the Form Inventory.
Application forms are now in one of these version states:
- Draft
- Published
- Unpublished
Your students can see only the published version of a form. Initially, the forms are created in a draft state. Over time, you can create additional draft versions from any other draft, published, or unpublished form. When you create a draft and then later publish that draft version, the current published version automatically becomes unpublished.
Thus, you can have an alternate draft version with updated configurations of a published form ready while the published version is still in use. That means you can use the same form for two different academic periods with different versions.
If necessary, you can also unpublish a published version without replacing it with a new version. Even when a version is unpublished, in-progress applications will maintain an association with the version that was published at the time the application was started. As an administrator with the Update Locked Student Management Forms security permission, you can make changes to an unpublished form to correct any typographical errors on in-progress applications.
Here are some major benefits you get from the application form versioning:
- You can work in preparation for future admissions cycles well in advance by creating a draft copy of a published form.
-
You can create a different version of an existing form when unplanned changes are required due to circumstances that are out of your institution’s control. For example, a new form field is required due to a major global event.
Steps to Enable
You don't need to do anything to enable this feature.
Tips And Considerations
To create additional versions of an application form:
- Click Navigator and in the Academics area, click Admissions > Form Inventory.
- Open an application form from the list and click the Versions tab.
- Click the ellipses on the row for an existing version, and click Create Draft to start a new version based on it.
Role Information
You need the Admissions Manager role to use this feature.
Single Name Entry on Admissions Online Application Form
Enter a one-word name on an admissions application if your name is comprised of a single word. Understand how to enter your name with field-level messaging that explains that the name should be entered in the last name field and that the first name field can be left blank.
While configuring an admissions application form, you get this updated experience of field-level-messaging when viewing a preview of the form.
Field-Level Message
Your students get clear guidance when entering their names during registration or when filling out an admissions application, so they're less likely to get confused.
Steps to Enable
You don't need to do anything to enable this feature.
Role Information
You need the Admissions Manager, Admissions Coordinator, or Student role to use this feature.