
- Revision History
- Overview
- Feature Summary
- Student Management
-
- Campus Community
- Student Financials
- Student Records
-
- System Office Configuration
- Academic Institution Configuration
- Campus Configuration
- Academic Organization Configuration
- Building Configuration
- Facility Configuration
- Academic Subject Configuration
- Academic Level Configuration
- Drop Scheme Configuration
- Academic Periods and Period Attribute Dates
- Course Configuration
- Course Section Configuration
- Course Requisite Configuration
-
- Student Admissions
- Advisement
This document will continue to evolve as existing sections change and new information is added. All updates appear in the following table:
| Date | Product | Feature | Notes |
|---|---|---|---|
| 20 OCT 2022 |
Student Records |
Updated document. Revised feature information. |
|
| 20 OCT 2022 |
Student Records |
Updated document. Revised feature information. |
|
| 20 OCT 2022 |
Student Records |
Updated document. Revised feature information. |
|
| 20 OCT 2022 |
Student Records |
Updated document. Revised feature information. |
|
| 20 OCT 2022 |
Student Records |
Updated document. Revised feature information. |
|
| 20 OCT 2022 |
Student Records |
Updated document. Revised feature information. |
|
| 04 OCT 2022 | Student Records | Updated document. Revised feature information. |
|
| 04 OCT 2022 | Student Records | Updated document. Revised feature information. |
|
| 04 OCT 2022 | Student Records | Campus Configuration | Updated document. Revised feature information. |
| 04 OCT 2022 | Student Records | Updated document. Revised feature information. |
|
| 04 OCT 2022 | Student Records | Updated document. Revised feature information. |
|
| 04 OCT 2022 | Student Records | Updated document. Revised feature information. |
|
| 04 OCT 2022 | Student Records | Updated document. Revised feature information. |
|
| 04 OCT 2022 | Student Records | Updated document. Revised feature information. |
|
| 04 OCT 2022 | Student Records | Updated document. Revised feature information. |
|
| 04 OCT 2022 | Student Records | Updated document. Revised feature information. |
|
| 04 OCT 2022 | Student Records | Updated document. Revised feature information. |
|
| 04 OCT 2022 | Student Records | Updated document. Revised feature information. |
|
| 21 SEP 2022 | Advisement | Student Course Schedule | Updated document. Revised feature information. |
| 16 SEP 2022 | Created initial document. |
 HAVE AN IDEA?
We’re here and we’re listening. If you have a suggestion on how to make our cloud services even better then go ahead and tell us. There are several ways to submit your ideas, for example, through the Ideas Lab on Oracle Customer Connect. Wherever you see this icon after the feature name it means we delivered one of your ideas.
GIVE US FEEDBACK
We welcome your comments and suggestions to improve the content. Please send us your feedback at oracle_fusion_applications_help_ww_grp@oracle.com.
DISCLAIMER
The information contained in this document may include statements about Oracle’s product development plans. Many factors can materially affect Oracle’s product development plans and the nature and timing of future product releases. Accordingly, this Information is provided to you solely for information only, is not a commitment to deliver any material, code, or functionality, and should not be relied upon in making purchasing decisions. The development, release, and timing of any features or functionality described remains at the sole discretion of Oracle.
This information may not be incorporated into any contractual agreement with Oracle or its subsidiaries or affiliates. Oracle specifically disclaims any liability with respect to this information. Refer to the Legal Notices and Terms of Use for further information.
Column Definitions:
Report = New or modified, Oracle-delivered, ready to run reports.
UI or Process-Based: Small Scale = These UI or process-based features are typically comprised of minor field, validation, or program changes. Therefore, the potential impact to users is minimal.
UI or Process-Based: Larger Scale* = These UI or process-based features have more complex designs. Therefore, the potential impact to users is higher.
Features Delivered Disabled = Action is needed BEFORE these features can be used by END USERS. These features are delivered disabled and you choose if and when to enable them. For example, a) new or expanded BI subject areas need to first be incorporated into reports, b) Integration is required to utilize new web services, or c) features must be assigned to user roles before they can be accessed.
| Ready for Use by End Users Reports plus Small Scale UI or Process-Based new features will have minimal user impact after an update. Therefore, customer acceptance testing should focus on the Larger Scale UI or Process-Based* new features. |
Customer Must Take Action before Use by End Users Not disruptive as action is required to make these features ready to use. As you selectively choose to leverage, you set your test and roll out timing. |
|||||
|---|---|---|---|---|---|---|
| Feature |
Report |
UI or |
UI or |
|
||
Managed Student Group Membership and Relationship Maintenance |
||||||
Configure the Student Central landing pages to provide a personalized experience for each user. Each role has its own Student Central landing page composed of widgets designed to anticipate what the user needs and deliver just-in-time tasks and status information. Institutions can configure the page designs as well as the widget behavior.
A Student Central landing page is composed of page elements called widgets. Let's take a look at the widgets.
To-dos: Provides a list of urgent tasks and a quick and easy way to complete them.
- Tasks assigned to the user appear here.
- Tasks display in order of latest due date.
- Click on a task card to activate the slide up view where the user can complete the task.
- When a task is marked complete, it no longer displays in the widget.
- A quick link to the student’s task and checklist page is available on the last task card in the widget.
Finances: Displays status and call to action for a student’s finances.
- Provides a summary of a student’s financial standing.
- A Pay Now button displays when there’s a balance that must be paid.
- Configure widget to show Total Balance or Next Due Amount.
- A quick link to the student’s finances page is available in the widget.
Applications: Displays status and call to action for an applicant’s program applications.
- Displays a list of all admissions applications.
- Displays the status of each application.
- The Continue button takes the applicant to their in-progress application in one click.
Helpful Links: Provides a list of helpful links defined by the administrator.
- An administrator can add links to any destination.
- An administrator can organize links into categories.
- The widget title can be configured.
- Clicking on a link opens a new tab with the destination.
Here's an example of the Student Central landing page:

Student Central Landing Page
Now let's look at configuration. Only higher education application administrators can configure Student Central landing pages and widgets.
Assign Role Permission to Widgets
Widget permission settings depend on the type of role:
- Predefined roles have predefined access to Student Central and to widgets that are appropriate for the role.
- User-defined roles must be granted access to Student Central and to the widgets that display on their landing page.
Use the Manage Application Access task to view or configure widget access by role:
- Search for Application Access. Or, click Assign Roles from the Details tab for a widget or the Design tab in the Student Central Configurations page.
- Select the User Experience functional area.
- In the Student Central row, click the ellipses and click Assign Page Access to Roles.
Here's the Student Central page access for the predefined Student role. The administrator can view the widgets this role has access to, but can't change the access.
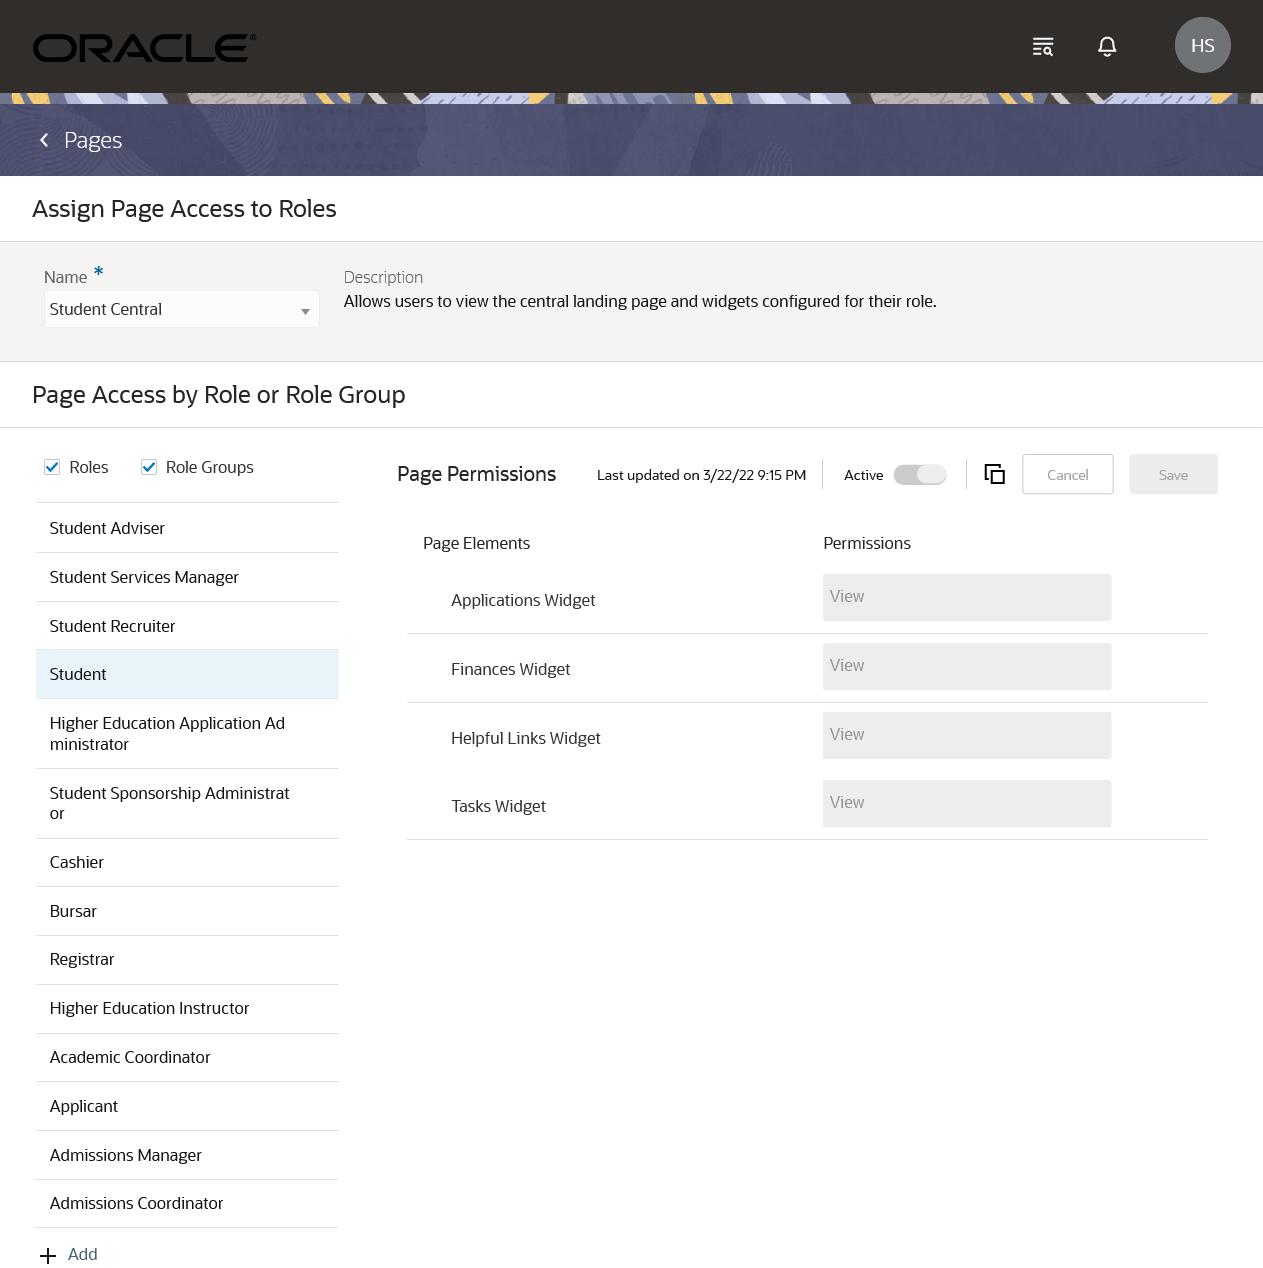
Student Central: Page Access for Predefined Student Role
For a user-defined role, select the role and then select or deselect View to make a widget available or unavailable. Save your changes. Here's an example:
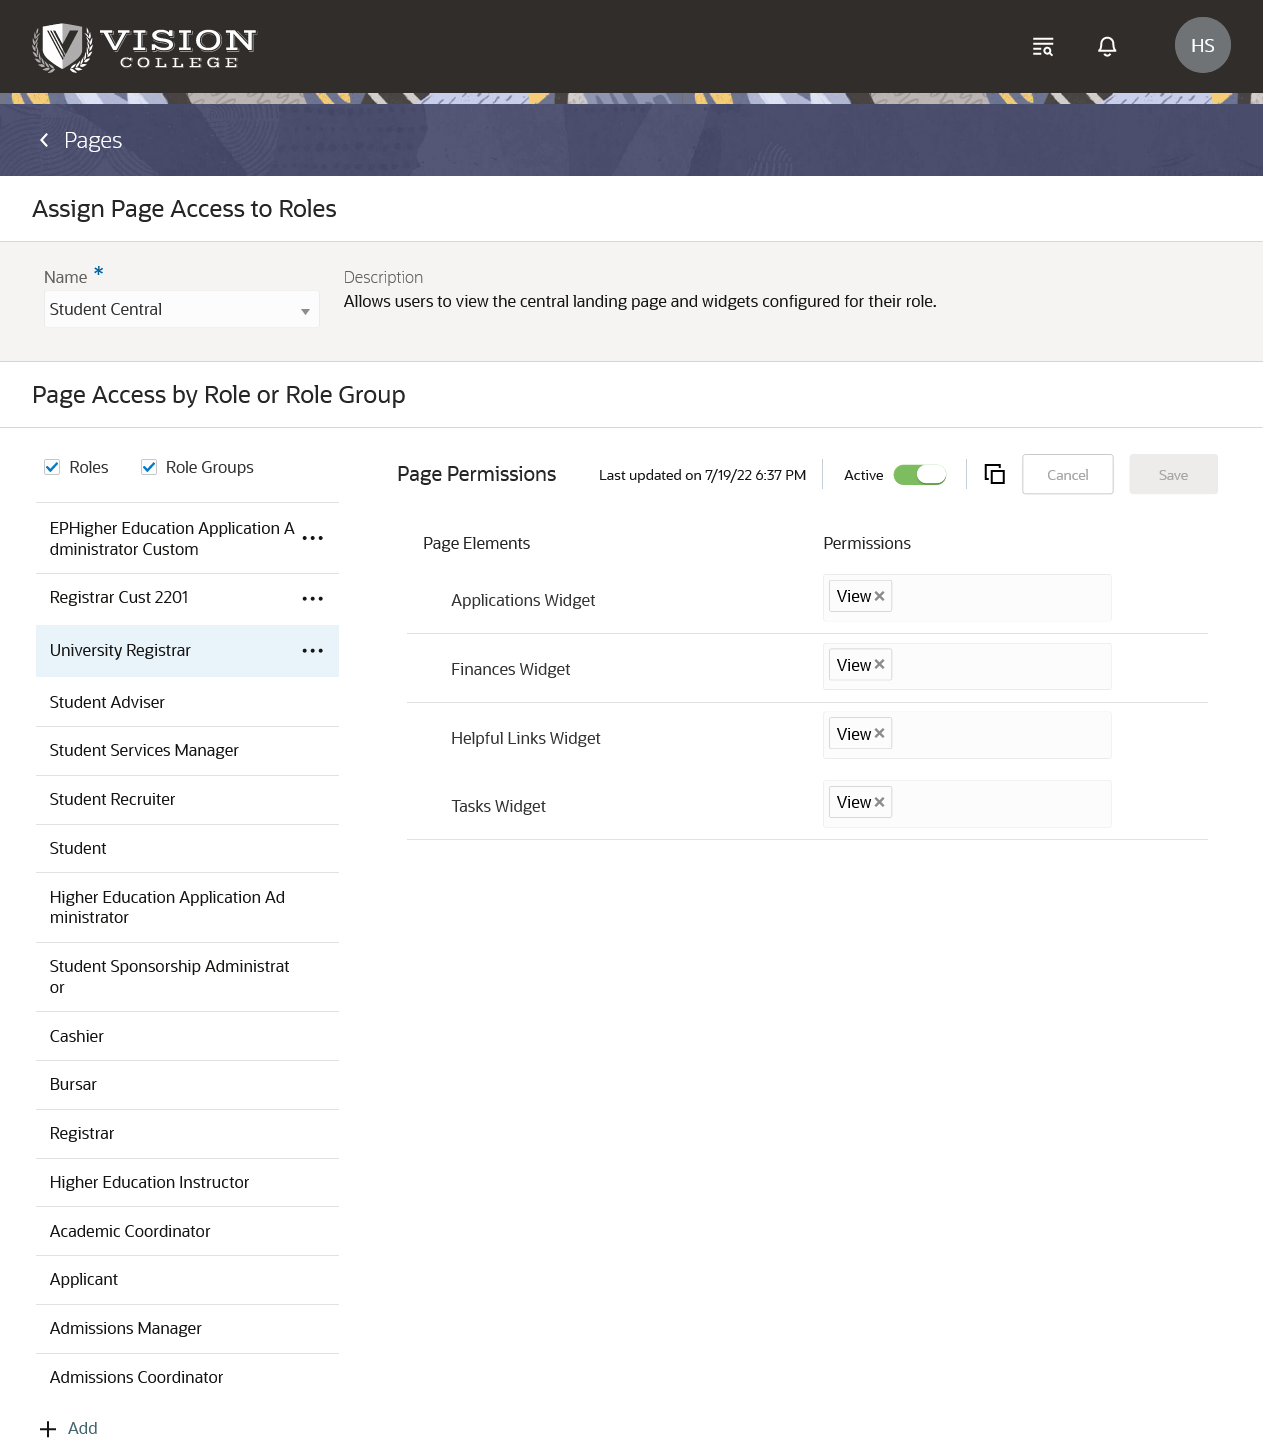
Student Central: Page Access for a User-defined Role
Configure Widget Default Settings
From Student Central, click Search and search for Student Central Widgets. Select a widget.
Here's an example of the Details tab for the To-dos widget:
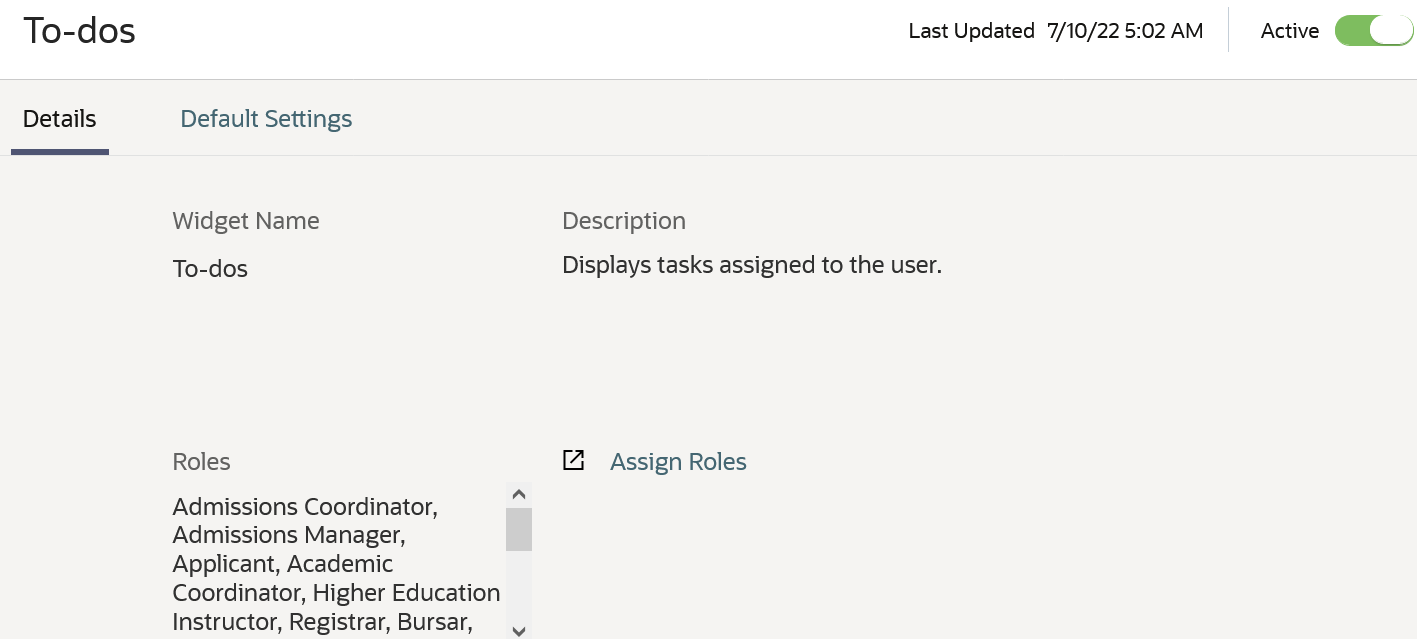
Widget Details
Here's an example of the Default Settings tab for the To-dos widget:
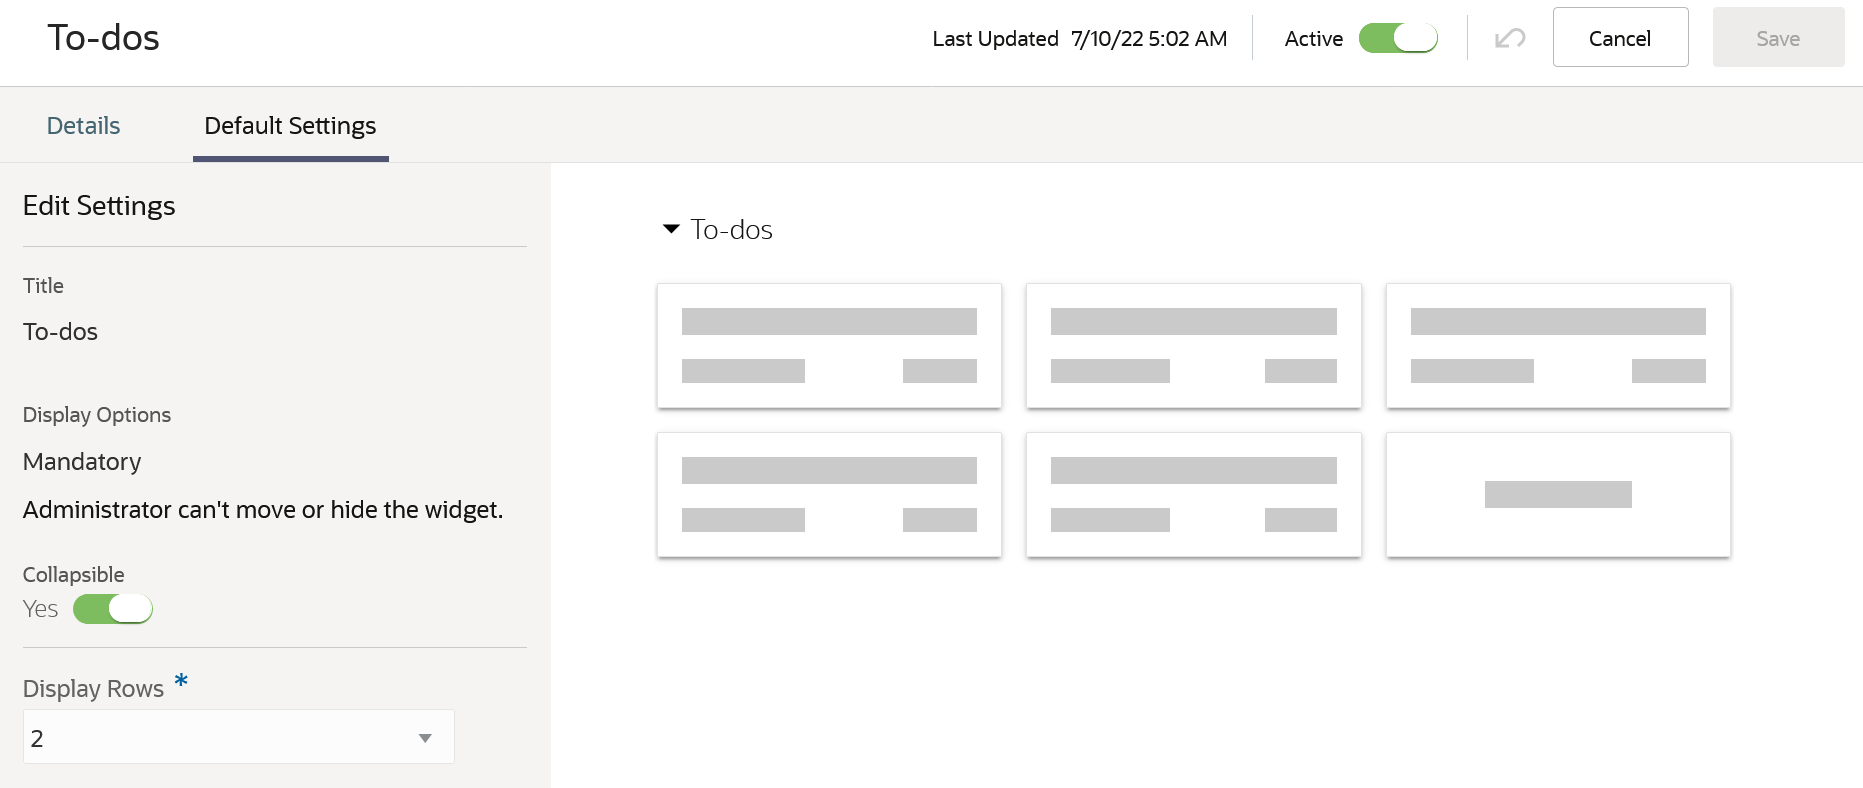
To-dos Widget Default Settings
Here, you can set the number of display rows.
And for the Finances widget, you can set the display amount:
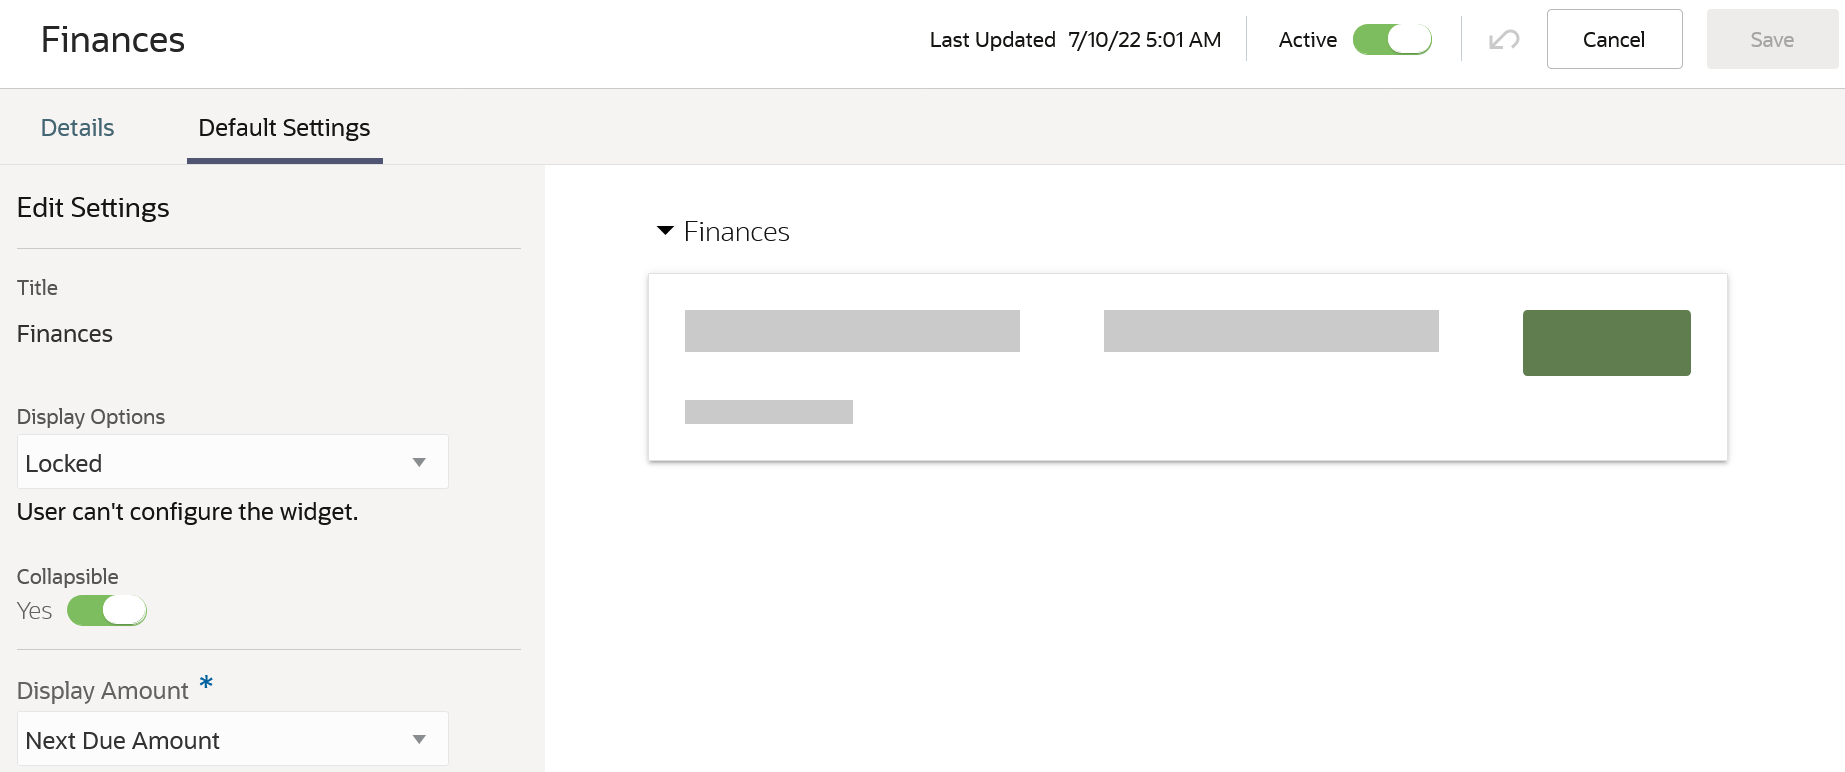
Finances Widget Default Settings
The Student Central widgets are dependent on the feature areas from which they draw data to present to the user. The user role must be granted access for both the widget and the feature it depends on:
- The To-Dos widget is dependent on Tasks and Checklists.
- The Applications widget is dependent on Application Forms.
- The Finances widget is dependent on Finances.
The Helpful Links widget doesn't have dependencies.
Configure Student Central Landing Pages
From Student Central, click Search and search for Student Central Configurations. Select a landing page.
Here's what you can view:
- The details of the page.
- The design of the page.
- A preview of the page design in desktop, mobile, tablet portrait, or tablet landscape format.
- The versions of the page: drafts, unpublished versions, and the currently published version.

Student Central Configuration: Details
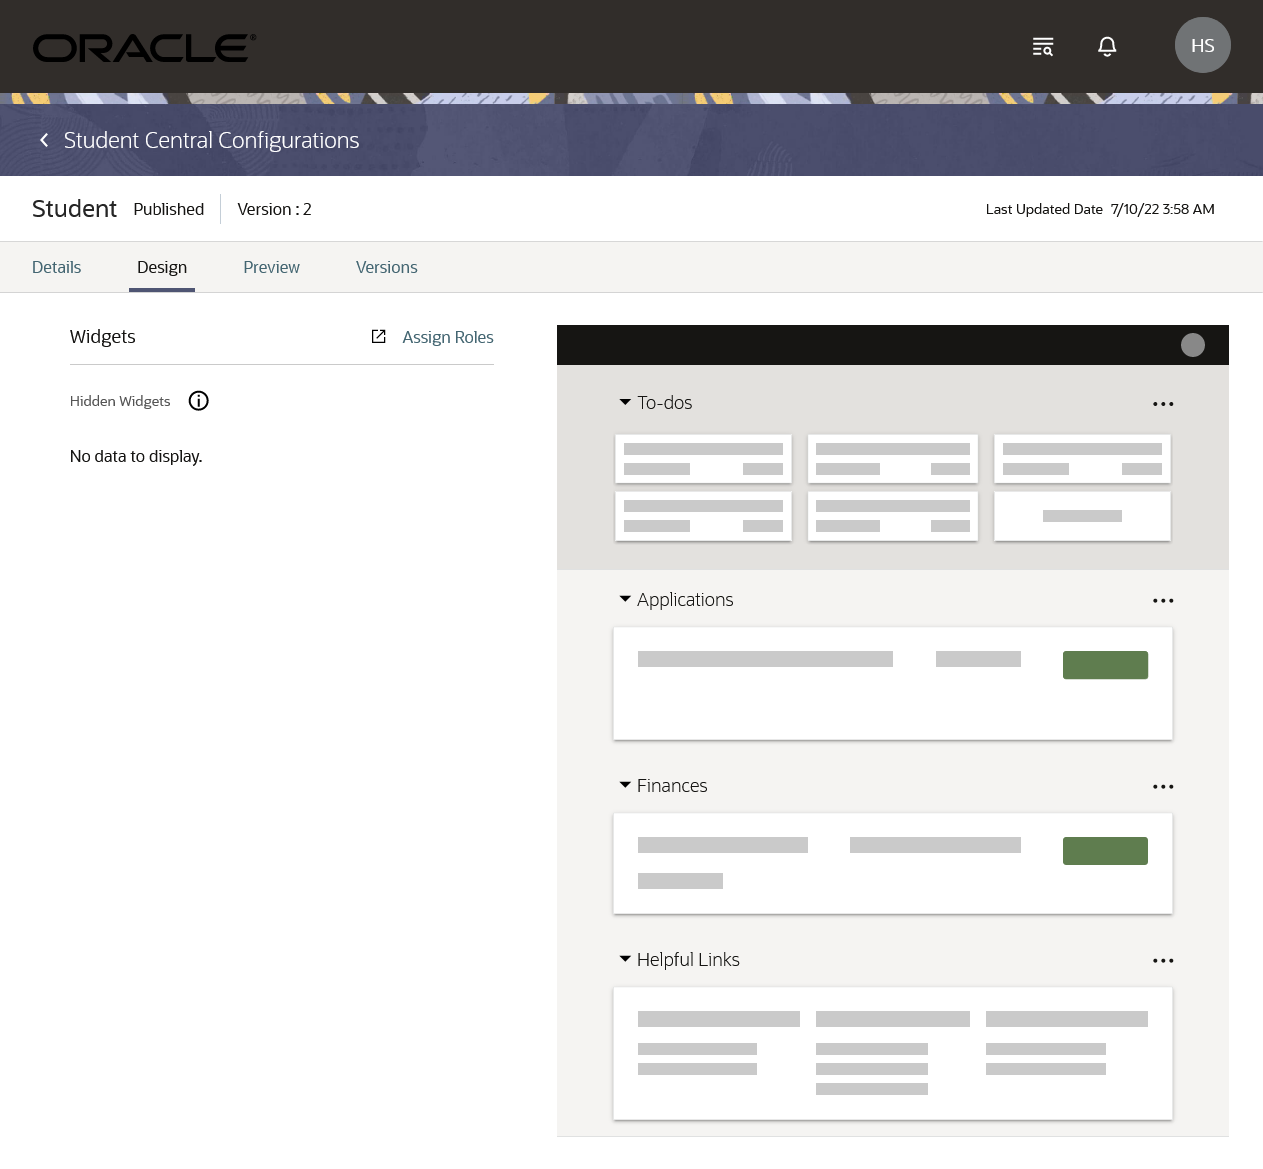
Student Central Configuration: Design
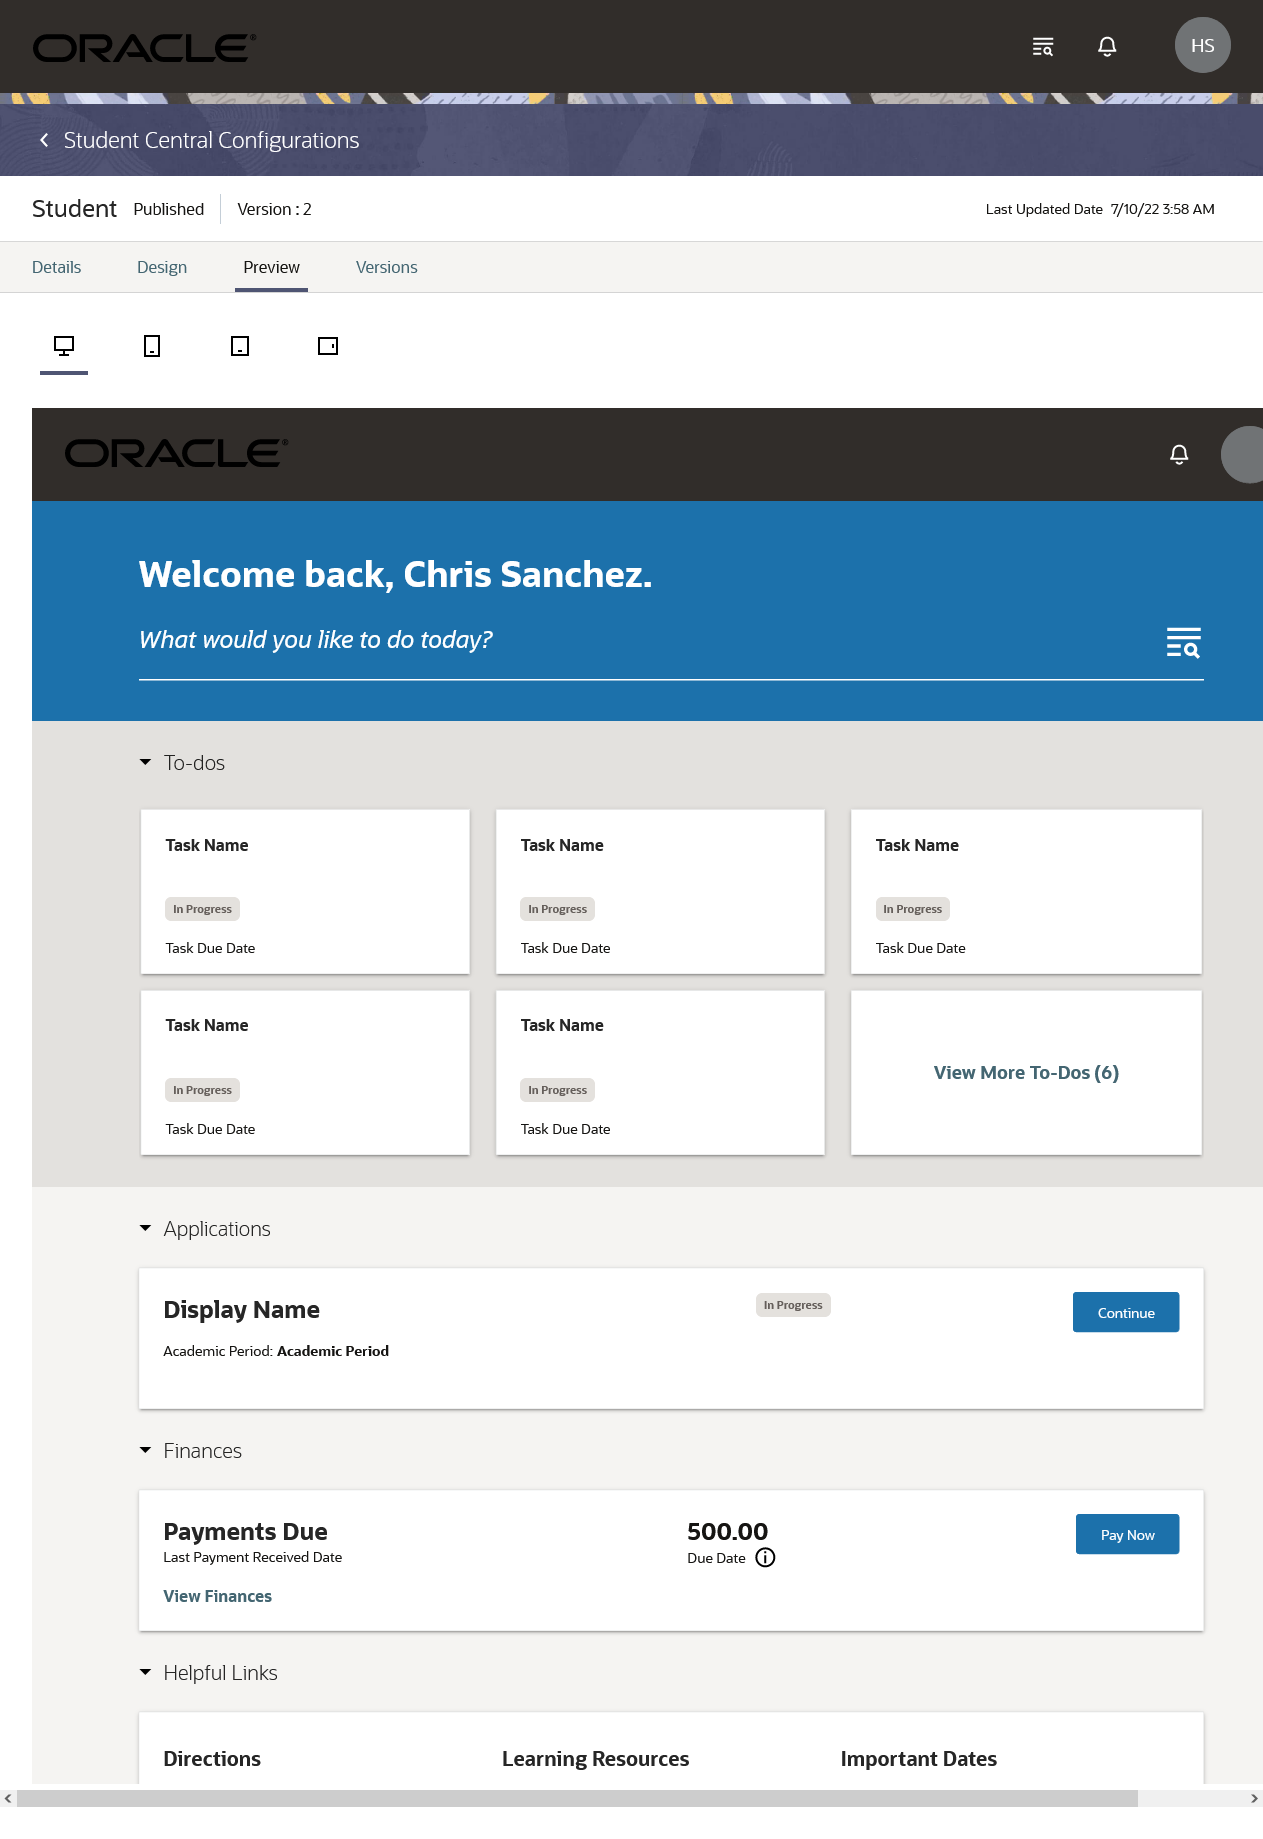
Student Central Configuration: Preview

Student Central Configuration: Versions
The Versions tab is your starting point when you want to make changes to a Student Central landing page.
For example, here's how you make a change to a published page:
- On the Versions tab, select the published version.
- From the Actions menu, create a draft.
- Make your changes. For example, here are the changes you can make on the Design tab:
- Edit widgets. You might add a new link to the Helpful Links widget for example.
- Add or hide widgets.
- Move widgets up or down the page.
- Use the Preview tab to review the changes you made.
- Save your changes and then publish to make the updated page available to users.
Here's some things to keep in mind when you make changes to pages:
- The action you can take depends on the page status:
- Create Draft for published or unpublished versions.
- Edit for draft versions.
- The Publish button is available for drafts only.
In summary, the centralized view of key tasks provided by the Student Central landing page allows Student Management users to work more efficiently. And the configurability of page layouts and widget content allows institutions to tailor pages to meet the needs of their constituents.
Steps to Enable
User-defined roles require this setup:
- User-defined roles must be granted access to Student Central.
- Widgets must be made available for user-defined roles.
- Higher education application administrators must configure widgets and page layouts for user-defined roles.
The Search Navigation feature serves as the primary navigation through the Student Management application. This feature makes it easy for authenticated users to browse, search, and navigate to destinations they have access to. The Academic Settings page is available to staff personas and administrators. This page provides a list of settings the user has access to. The list is organized in categories to help users browse and find settings they need for their job functions.
Search Navigation
Access search navigation from the banner on your Student Central landing page or from the top of a page in the Student Management application (availability depends on the type of page).
Select one of the destinations shown in the search modal. Or, type in the search field and select from the search results.
You can see destinations and search results for only the pages that you have access to.

Search Access from Banner

Search Access from Page
To search for a course, enter the course in the search field and click Search in Course Catalog. You're taken to the catalog search page and the value you entered is used for the search.
To search for people, enter the name of the person in the search field and then click Search in Person Search. You're taken to the person search page and the value you entered is used for the search.
Academic Settings
In the search modal, click Academic Settings.
Staff roles must be granted access to the Academic Settings page.
To find a page, expand the sections and browse or use the search field. You can see only the pages that you have access to.
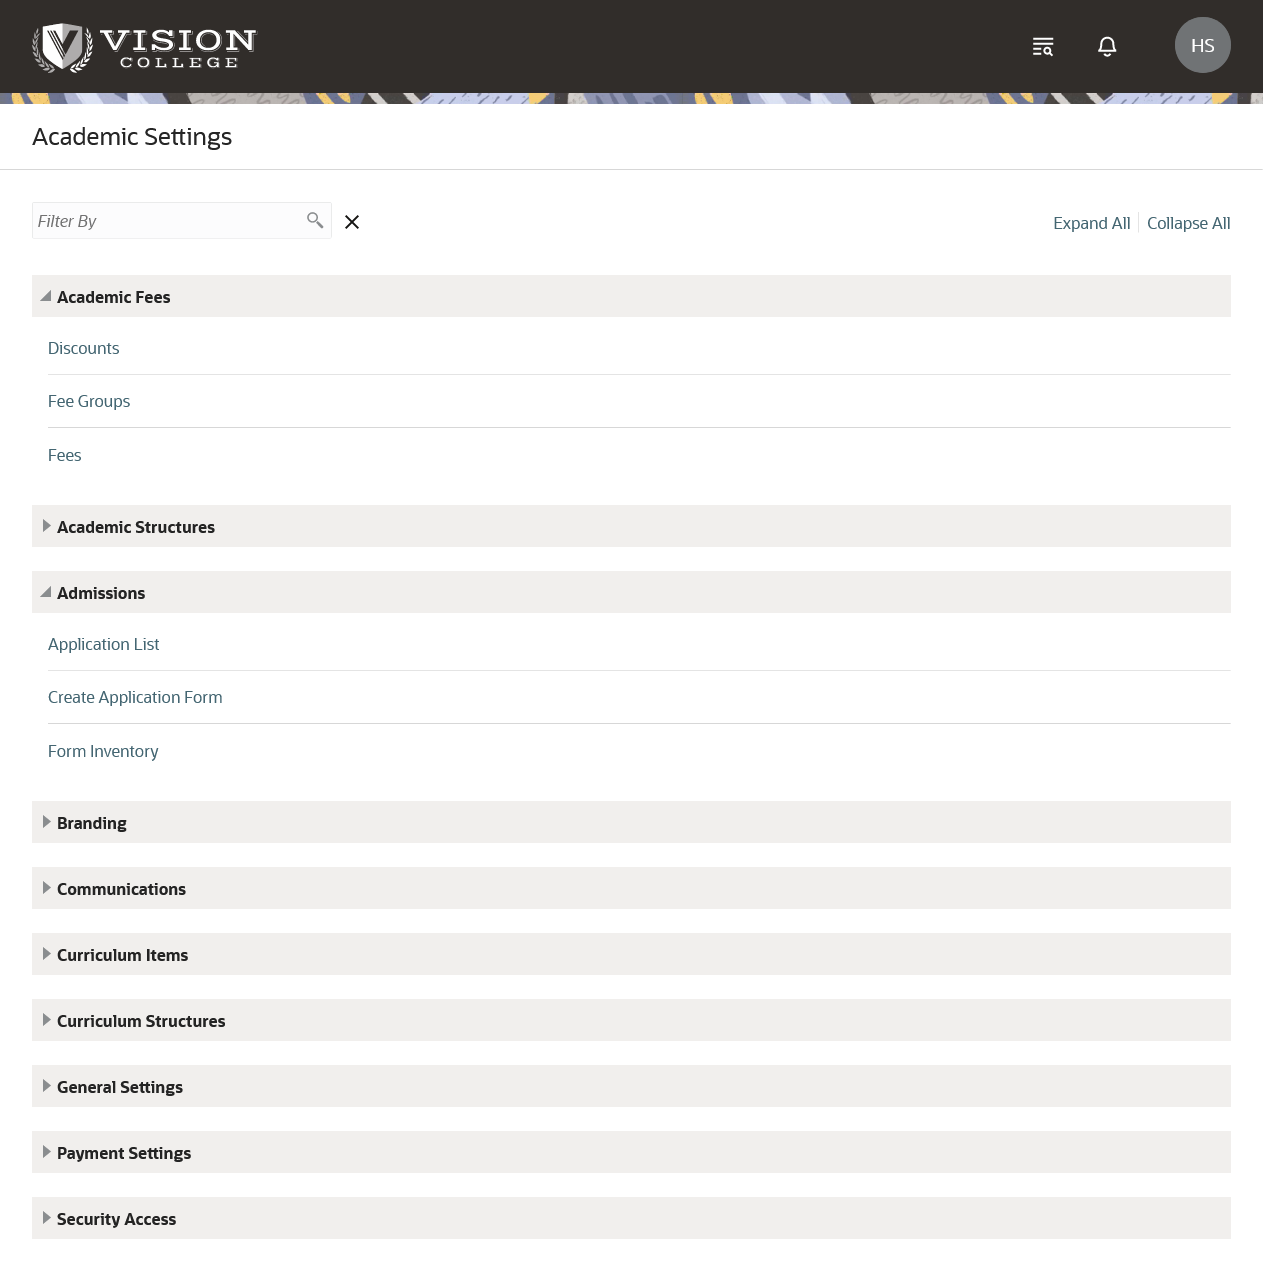
Academic Settings
Navigation Changes
To navigate from Student Central to Home, click Search and click the Home link shown in the modal.
To navigate from Home to Student Central, click Navigator > Academics > Person Search.
The navigation for these existing pages is updated for 22D:
Navigation Table
| Page Name | Navigation |
|---|---|
| Manage Student Management Lookups |
From Student Central, click Search and search for Manage Student Management Lookups. |
| Manage National Identifier Types |
From Student Central, click Search and search for National Identifier Type. |
| Student Management Categories |
From Student Central, click Search and search for Student Management Categories. |
| Communications | From Student Central, click Search and search for Communications. |
| Events | From Student Central, click Search and search for Monitor Events. |
| Status Schemes | From Student Central, click Search and search for Status Schemes. |
| Task Management | From Student Central, click Search and search for Task Management. |
| Task and Checklist Settings | From Student Central, click Search and search for Task and Checklist Settings. |
| Branding | From Student Central, click Search and search for Specify Branding and Colors. |
| Manage Time Zone Settings | From Student Central, click Search and search for Manage Time Zone Settings. |
| Age Settings | From Student Central, click Search and search for Age Settings. |
| Identifiers | From Student Central, click Search and search for Student Management Identifiers. |
| Contacts | From Student Central, click Search and search for Contacts. |
| Locations | From Student Central, click Search and search for Locations. |
| External Organizations | From Student Central, click Search and search for Student Management External Organizations. |
| Person Profiles | From Student Central, click Search and search for Person Profile Search. |
| Configure Person Relationship Type |
From Student Central, click Search and search for Configure Person Relationship Type. |
| Manage Application Access |
From Student Central, click Search and search for Application Access. |
| Create Group | From Student Central, click Search and search for Create Managed Student Group. |
| Institutions | From Student Central, click Search and search for Academic Institutions. |
| Campuses | From Student Central, click Search and search for Campuses. |
| Learning Catalogs | From Student Central, click Search and search for Learning Catalogs. |
| Academic Organizations | From Student Central, click Search and search for Academic Organizations. |
| Academic Levels | From Student Central, click Search and search for Academic Levels. |
| Academic Subjects | From Student Central, click Search and search for Academic Subjects. |
| Academic Periods | From Student Central, click Search and search for Academic Periods. |
| Academic Period Attribute Dates |
From Student Central, click Search and search for Academic Period Attribute Dates. |
| Academic Period Sequencing |
From Student Central, click Search and search for Academic Period Sequencing. |
| Buildings | From Student Central, click Search and search for Manage Buildings. |
| Facilities | From Student Central, click Search and search for Manage Facilities. |
| Manage Academic Staff | From Student Central, click Search and search for Manage Academic Staff. |
| Credentials |
From Student Central, click Search and search for Credentials. |
| Impact Mapping | From Student Central, click Search and search for Administrative Service Impact Mapping. |
| Result Sets | From Student Central, click Search and search for Manage Result Sets. |
| Result Types | From Student Central, click Search and search for Manage Result Types. |
| Drop Schemes | From Student Central, click Search and search for Drop Schemes. |
| Curriculum Build Statuses |
From Student Central, click Search and search for Curriculum Build Statuses. |
| Manage Curriculum Tags | From Student Central, click Search and search for Manage Curriculum Tags. |
| Program Types | From Student Central, click Search and search for Program Types. |
| Program Action Reasons | From Student Central, click Search and search for Program Action Reasons. |
| Requirement Categories | From Student Central, click Search and search for Requirement Categories. |
| Requisite Schemes | From Student Central, click Search and search for Requisite Schemes. |
| Enrollment Action Reasons | From Student Central, click Search and search for Enrollment Action Reasons. |
| Curriculum Templates | From Student Central, click Search and search for Manage Curriculum Templates. |
| Courses | From Student Central, click Search and search for Courses. From Student Central, click Search and search for Manage Curriculum. |
| Course Lists | From Student Central, click Search and search for Course Lists. |
| Academic Groups | From Student Central, click Search and search for Manage Curriculum. Then click Actions. |
| Programs | From Student Central, click Search and search for Manage Curriculum. |
| Learners | From Student Central, click Search and search for Learners. |
| Rosters | From Student Central, click Search and search for Rosters. |
| Academic Business Unit |
From Student Central, click Search and search for Academic Business Unit. |
| Manage Finances | From Student Central, click Search and search for Student Finances. |
| Discounts | From Student Central, click Search and search for Discounts. |
| Fees | From Student Central, click Search and search for Fees. |
| Fee Groups | From Student Central, click Search and search for Fee Groups. |
| Manage Mapping Attributes | From Student Central, click Search and search for Mapping Attributes. |
| Manage Charge Priority Mapping | From Student Central, click Search and search for Charge Priority Mappings. |
| Manage Student Credits | From Student Central, click Search and search for Student Credits. |
| Manage Credit Assignments |
From Student Central, click Search and search for Manage Credit Assignments. |
| Post Credit Transactions |
From Student Central, click Search and search for Post Credit Transactions. |
| Manage Refunds |
From Student Central, click Search and search for Manage Refunds. |
| Form Inventory | From Student Central, click Search and search for Form Inventory. |
| Academic Plan Format |
From Student Central, click Search and search for Academic Plan Format. |
| Academic Plan Templates |
From Student Central, click Search and search for Academic Plan Templates. |
In summary, users can access the new search navigation feature to quickly find and navigate to the page they need.
Steps to Enable
You don't need to do anything to enable this feature.
Configure predefined relationship types that allow you to decide what relationship types appear when users assign relationships. Users can assign relationships when adding a person to a managed student group or when creating accounts for fully or jointly managed users. The relationship types of parent and child and dependency are predefined as activated and they can't be inactivated. This is because these activated relationship types are required for assigning a relationship between a parent and a child or a guardian and a dependent.
From Student Central, click Search and search for Configure Person Relationship Type.
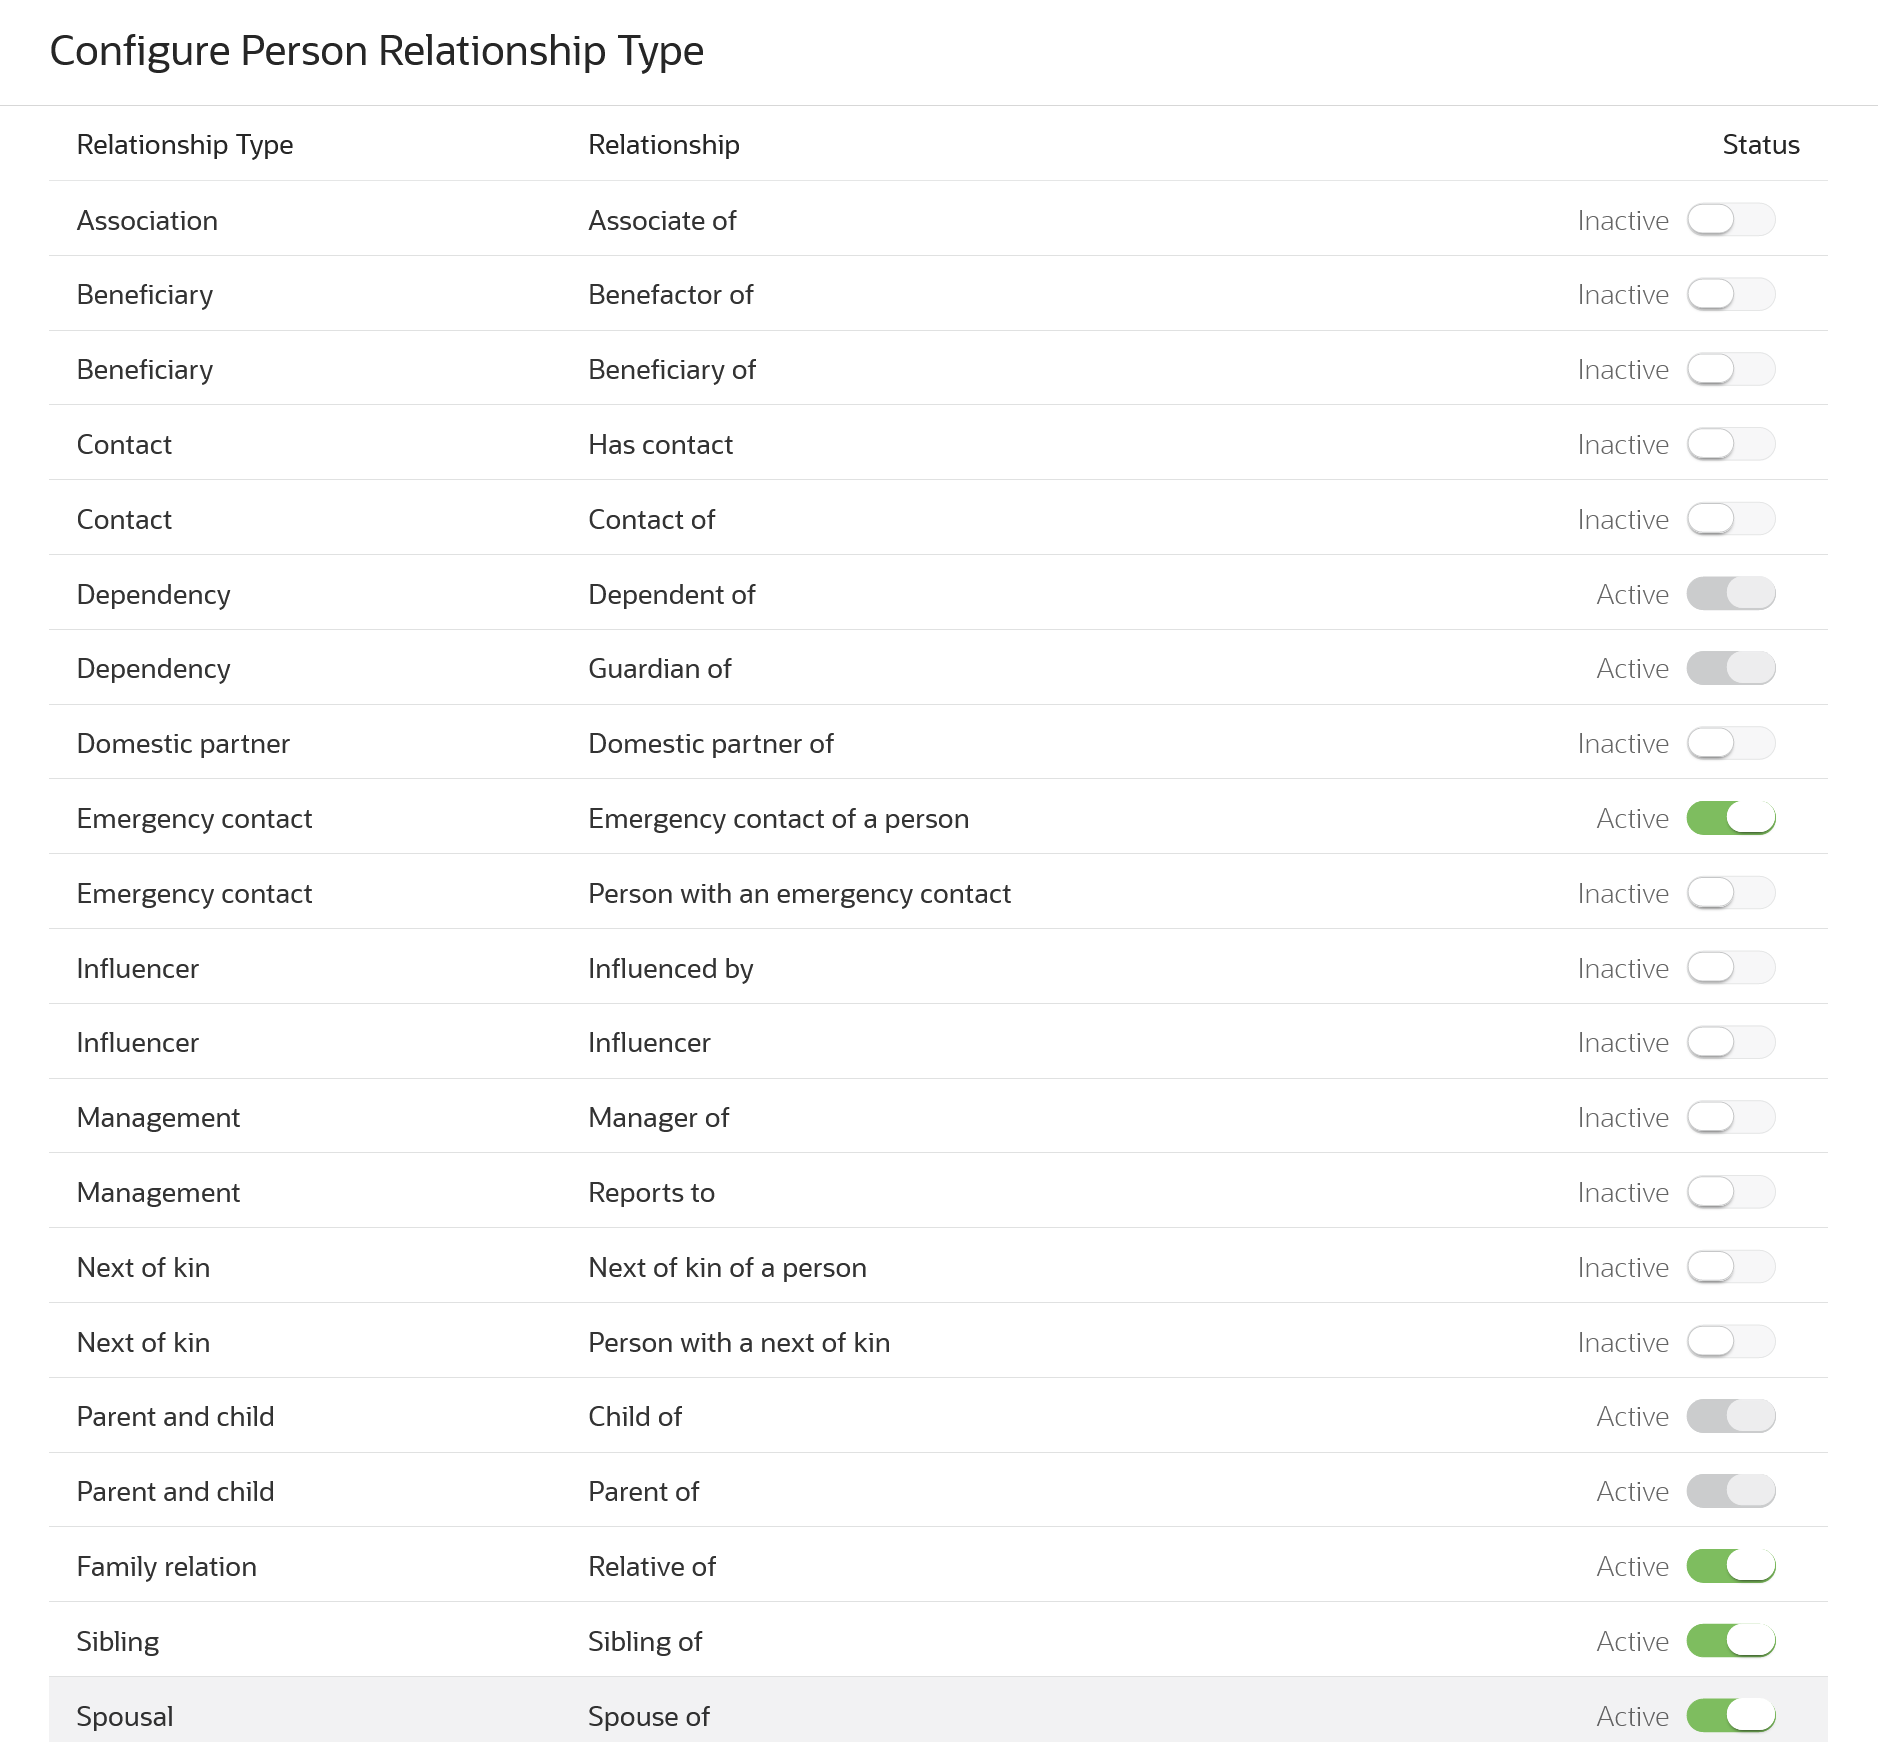
Configure Person Relationship Type Page
To configure, activate those types that you want to appear when users assign a relationship between a self-managed user and a group manager. For example, if you activated the spousal type, then the relationship appears when users assign relationship.
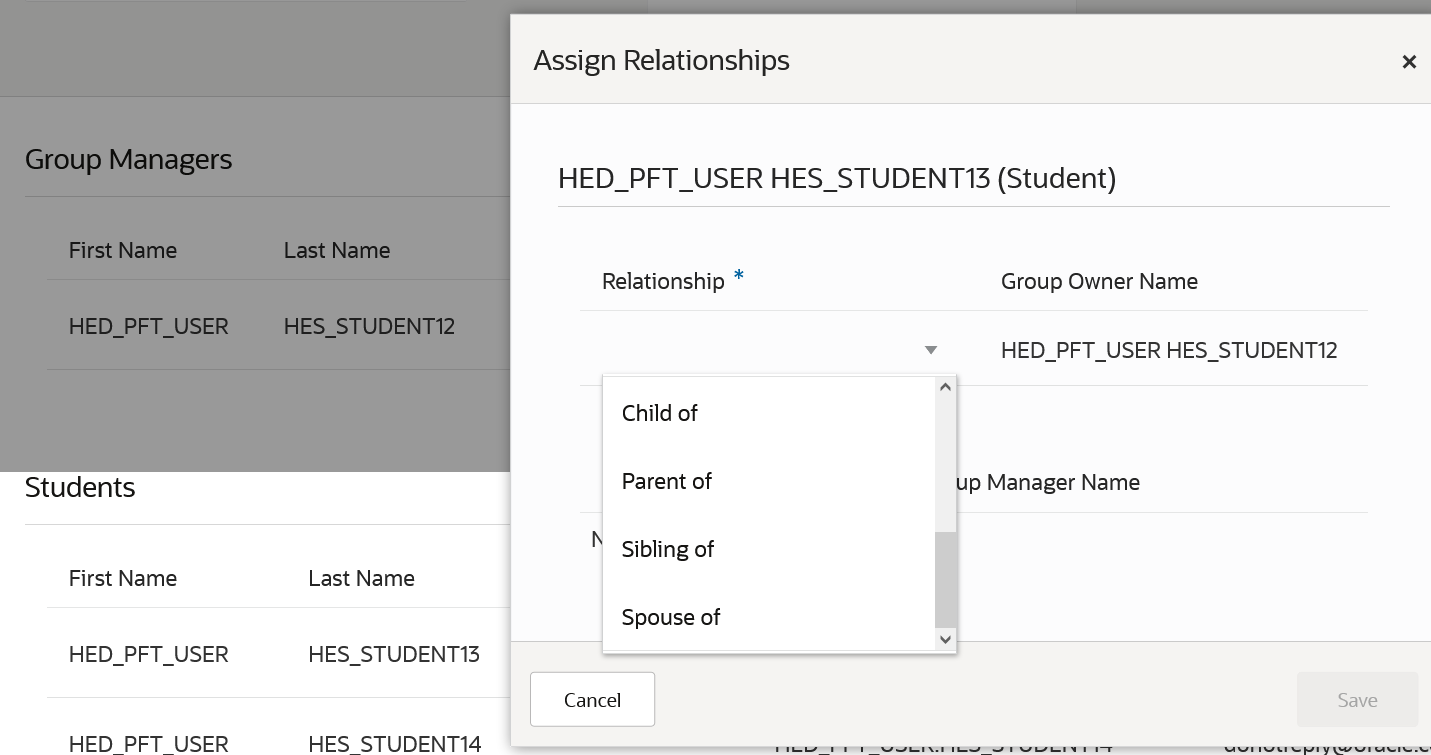
Example of Activated Relationships Available for a Self-Managed User
The relationship types predefined as activated, can't be inactivated. When an account is created for fully or jointly managed users either through sign up or the person search work area, the user must assign a relationship and only these predefined relationships appear at that time. The fully or jointly managed users must establish whether they are child of or dependent of a group manager.
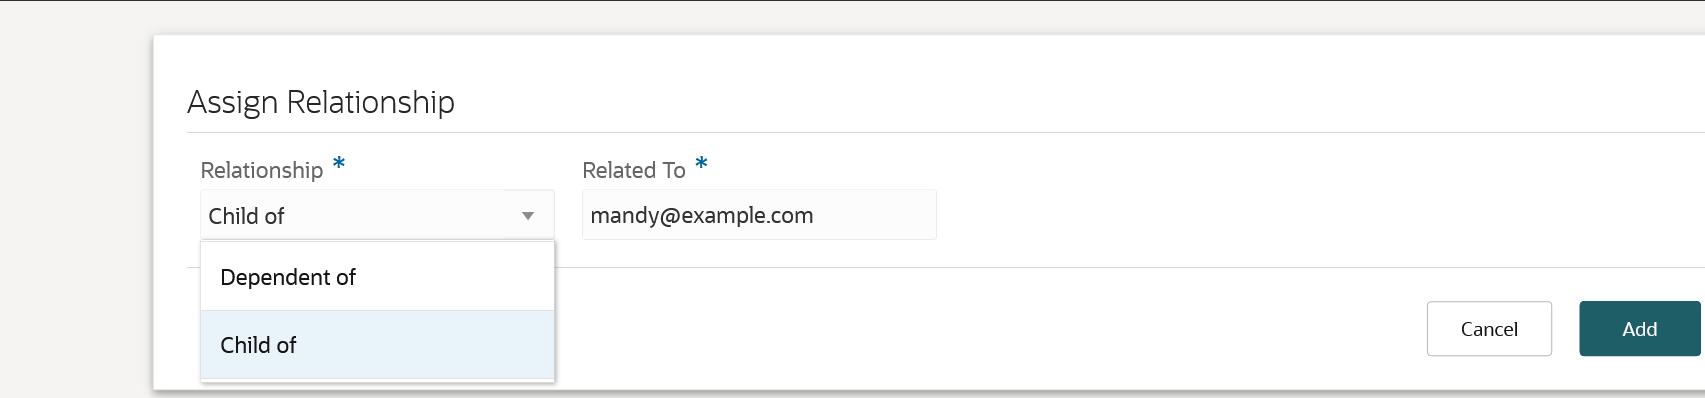
Example of Predefined Relationships Available for a Fully or Jointly Managed User
The benefit of this feature is that users must establish a relationship during these account creation scenarios:
- Fully or jointly managed user signing up for an account.
- Administrator creating an account for a fully or jointly managed user.
- Delegated access account creation, which means managed student group owner creating an account for fully, jointly or self-managed user.
Steps to Enable
You don't need to do anything to enable this feature.
Tips And Considerations
Ensure you configure age settings to define fully, jointly, and self-managed users. From Student Central, click Search and search for Age Settings.
Managed Student Relationship Definition
Define the relationship that a managed student group manager has with the members who are being added to the group. For example, define that a student being added to the group is the child of the group manager. Members of the student group can also see what relationships have been defined between themselves and group managers.
Users, such as students, can click their avatar and then My Account to navigate to their own person profile and click the relationship link to view their relationships.
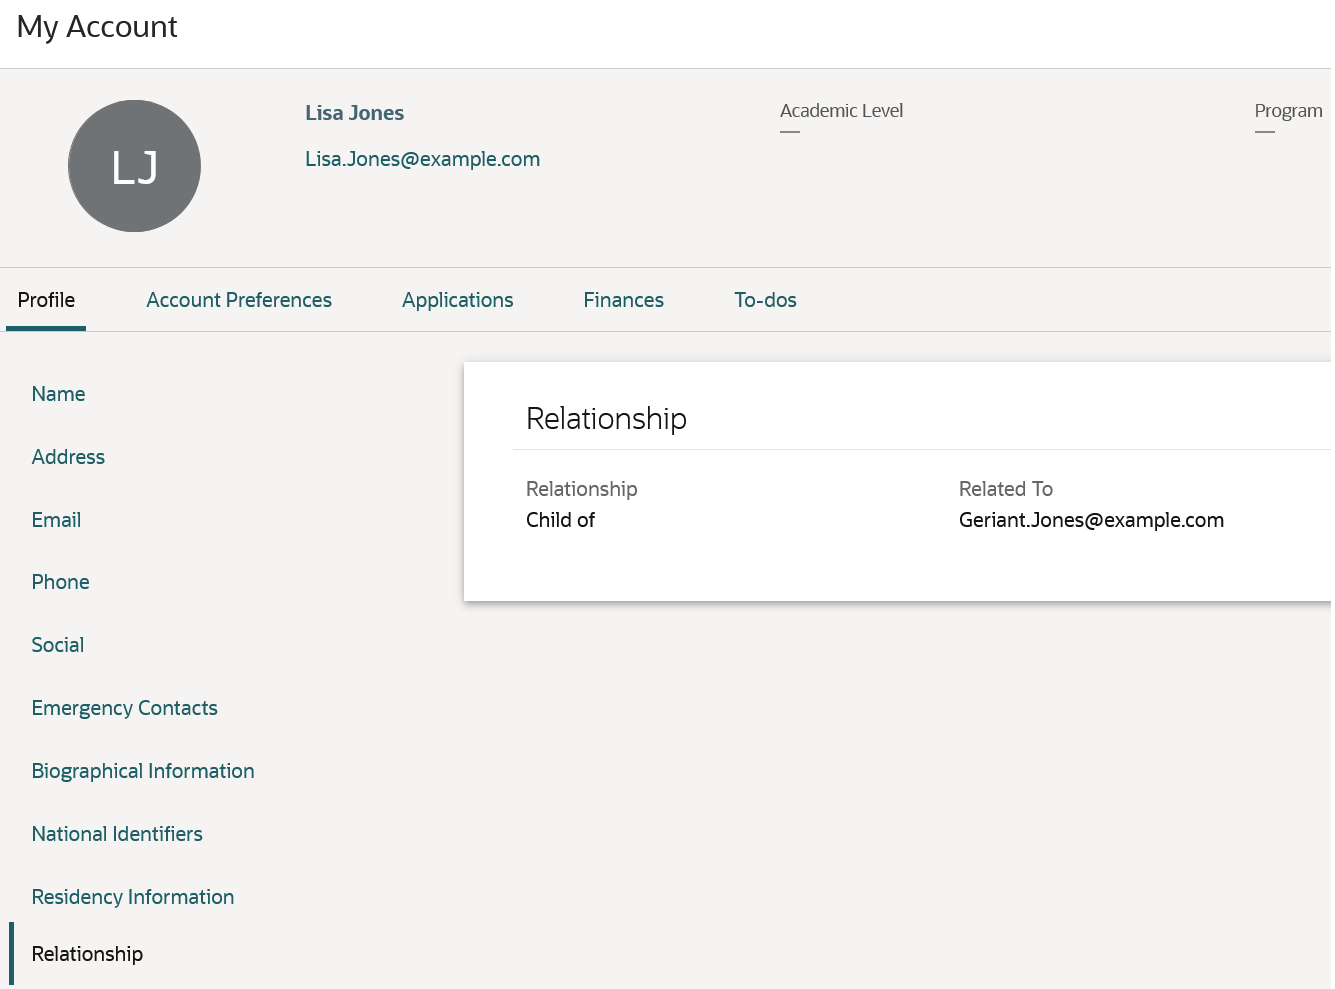
User Viewing Their Own Relationships
Administrators can navigate to a person’s profile and click the relationship link to view a user’s relationships. To navigate to a person’s profile: From Student Central, click Search and search for Person Profile Search.
The benefits of this feature are:
Users and administrators can view relationships.
Users must establish a relationship during these account creation scenarios:
- Fully or jointly managed user signing up for an account.
- Administrator creating an account for a fully or jointly managed user.
- Delegated access account creation, which means managed student group owner creating an account for a fully, jointly or self-managed user.
Steps to Enable
You don't need to do anything to enable this feature.
Oracle Fusion Cloud Student Management delivers new pages, page elements, and page permissions assigned to the predefined job roles in each release.
Here are the newly added pages, page elements, and page permissions for the mentioned predefined job roles.
| Page Name | New/Existing | Page Elements | New/Existing | Page Permission | New/Existing | Predefined Job Roles |
|---|---|---|---|---|---|---|
| Academic Periods |
New | Academic Periods Details |
New | View | New | Registrar |
| Academic Periods |
New | Academic Periods Details |
New | Manage | New | Registrar, Higher Education Application Administrator, and Academic Coordinator |
| Academic Period Attribute Dates |
New | Academic Period Attribute Dates Details |
New | View | New | Registrar |
| Academic Period Attribute Dates |
New | Academic Period Attribute Dates Details |
New | Manage | New | Registrar, Higher Education Application Administrator, and Academic Coordinator |
| Academic Settings |
New | NA | NA | View | New | Student Adviser, Student Services Manager, Student Recruiter, Higher Education Application Administrator, Student Sponsorship Administrator, Cashier, Bursar, Registrar, Higher Education Instructor, Academic Coordinator, Admissions Manager, and Academic Coordinator |
| Student Central |
New | NA |
NA | View | New | Student Adviser, Student, Academic Coordinator, Higher Education Application Administrator, Bursar, Registrar, Applicant, Student Sponsorship Administrator, Higher Education Instructor, Student Services Manager, Cashier, IT Security Manager, Admissions Coordinator, Admissions Manager, and Student Recruiter |
| Student Central |
New | Applications Widget |
New | View | New | Admissions Coordinator and Admissions Manager |
| Student Central |
New | Tasks Widget |
New | View | New | Admissions Coordinator, Admissions Manager, Bursar, Registrar, and Higher Education Application Administrator |
| Student Central |
New | Finances Widget |
New | View | New | Student, Cashier, Admissions Coordinator, Admissions Manager, and Bursar |
| Student Central |
New | Helpful Links Widget |
New | View | New | Student Adviser, Student, Academic Coordinator, Higher Education Application Administrator, Bursar, Registrar, Applicant, Student Sponsorship Administrator, Higher Education Instructor, Student Services Manager, Cashier, IT Security Manager, Admissions Coordinator, Admissions Manager, and Student Recruiter |
| Student Central Configurations |
New | NA | NA | View | New | Higher Education Application Administrator and IT Security Manager |
| Student Central Widgets |
New | NA | NA | View | New | Higher Education Application Administrator and IT Security Manager |
| Home | New | NA | NA | View | New | Student Adviser, Student, Academic Coordinator, Higher Education Application Administrator, Registrar, Bursar, Applicant, Student Sponsorship Administrator, Higher Education Instructor, Student Services Manager, Cashier, IT Security Manager, Admissions Coordinator, Admissions Manager, and Student Recruiter |
| Academic Periods |
New | Academic Periods Details |
New | View | New | Academic Coordinator, Registrar, and Higher Education Application Administrator |
| Student Management Buildings and Facilities |
New | NA | NA | View | New | Registrar |
| Student Management Buildings and Facilities |
New | Student Management Building and Facility Details |
New | View | New | Registrar |
| Student Management Buildings and Facilities |
New | Student Management Building and Facility Details |
New | Manage | New | Academic Coordinator, Registrar, and Higher Education Application Administrator |
| Course List |
Existing |
Course Lists Details |
New | View | New | Registrar and Higher Education Application Administrator |
| Manage Credit Assignment Page |
New | View Credit Assignment Details |
New | View | New | Bursar |
| Manage Credit Assignment Page |
New | Manage Waiver Assignment |
New | View | New | Registrar and Higher Education Application Administrator |
| Manage Credit Assignment Page |
New | Manage Waiver Assignment |
New | Manage | New | Bursar |
| Manage Credit Transaction Page |
New | NA | NA | View | New | Bursar, Registrar, Cashier, Student Sponsorship Administrator, and Admissions Manager |
| Manage Credit Transaction Page |
New | View Credit Transaction Details |
New | View | New | Bursar, Registrar, Cashier, Student Sponsorship Administrator, and Admissions Manager |
| Manage Credit Transaction Page |
New | Manage Waiver Transaction |
New | View | New | Bursar and Higher Education Application Administrator |
| Manage Credit Transaction Page |
New | Manage Waiver Transaction |
New | Manage | New | Bursar |
| Manage Credit Transaction Page |
New | Manage External Fund Transaction |
New | View | New | Cashier and Bursar |
| Manage Credit Transaction Page |
New | Manage External Fund Transaction |
New | Manage | New | Bursar |
| Drop Schemes |
New |
Drop Schemes Details |
New | View and Manage | New | Academic Coordinator, Registrar, and Higher Education Application Administrator |
| Drop Schemes |
New |
Drop Schemes Associations |
New | View and Manage | New | Academic Coordinator, Registrar, and Higher Education Application Administrator |
| Manage External Fund Credit Page |
New |
NA | NA | View | New | Student, Bursar, Cashier, Admissions Coordinator, and Admissions Manager |
| Manage External Fund Credit Page |
New |
View External Credit Details |
New | View | New | Student, Bursar, Cashier, Admissions Coordinator, and Admissions Manager |
| Manage Course Sections |
New | NA | NA | View | New | Registrar and Higher Education Application Administrator |
| Manage Course Sections |
New | Manage Course Section Details |
New | View | New | Registrar and Higher Education Application Administrator |
| Manage Course Sections |
New | Manage Course Section Details |
New | Manage | New | Registrar and Higher Education Application Administrator |
| Manage Courses |
New | NA | NA | View | New | Registrar, Higher Education Application Administrator, Academic Coordinator, and Student Sponsorship Administrator |
| Manage Courses |
New | Manage Course Details |
New | View | New | Registrar, Higher Education Application Administrator, Academic Coordinator, and Student Sponsorship Administrator |
| Manage Courses |
New | Manage Course Details |
New | Manage | New | Registrar and Higher Education Application Administrator |
| Entity Management |
New | NA | NA | View | New | Academic Coordinator, Registrar, and Higher Education Application Administrator |
| Entity Management |
New | Student Management System Offices |
New | View and Manage | New | Academic Coordinator, Registrar, and Higher Education Application Administrator |
| Entity Management |
New | Student Management Institution |
New | View and Manage | New | Academic Coordinator, Registrar, and Higher Education Application Administrator |
| Entity Management |
New | Student Management Campuses |
New | View and Manage | New | Academic Coordinator, Registrar, and Higher Education Application Administrator |
| Entity Management |
New | Student Management Academic Organizations |
New | View and Manage | New | Academic Coordinator, Registrar, and Higher Education Application Administrator |
| Academic Period Attribute Dates |
New | Academic Period Attribute Dates Details |
New | View and Manage | New | Academic Coordinator, Registrar, and Higher Education Application Administrator |
| Requisite Schemes |
New | Requisite Schemes Mappings |
New | View and Manage | New | Academic Coordinator, Registrar, and Higher Education Application Administrator |
| Requisite Schemes |
New | Requisite Schemes Details |
New | View and Manage | New | Academic Coordinator, Registrar, and Higher Education Application Administrator |
| Manage Student Credit Page |
New | NA | NA | View | New | Bursar, Cashier, Registrar, Higher Education Application Administrator, and Student Sponsorship Administrator |
| Waitlist Settings |
New | Waitlist Settings Details |
New | View and Manage | New | Registrar and Higher Education Application Administrator |
| Manage Waiver Credit Page |
New | View Waiver Credit Details |
New | View, Delete, Create, and Update |
New | Student, Bursar, Cashier, Admissions Coordinator, and Admissions Manager |
| Configure Person Relationship Type |
New | Relationship Type Details |
New | View and Manage | New | Higher Education Application Administrator, Student Services Manager, and Admissions Manager |
| View Submitted Form |
Existing |
Edit Submitted Application |
New | Edit | New | Admissions Coordinator, Student Recruiter, and Admissions Manager |
| Scheduler |
New | NA | NA | View | New | Student, Cashier, Admissions Coordinator, Admissions Manager, and Bursar |
Steps to Enable
You don't need to do anything to enable this feature.
Tips And Considerations
If you created user-defined roles and assigned page access to them using the Manage Application Access task in the Setup and Maintenance work area, you must review your user-defined roles to see if you need to assign them access to the new pages, page elements, and page permissions.
Managed Student Group Membership and Relationship Maintenance
Add or remove members from a managed student group. Additionally, group owners can modify the relationships defined for members of the group.
Group owners now have better control over their groups, including the ability to edit group information, add members, assign relationships to various group members, and view relationships for all members in the group.
Group owners must first add the relationship of a student with themselves before the student can be added to the group. Additionally, they can add the relationships of all the students with all the other group managers in the group.
The parent or guardian of the fully managed or jointly managed student gets consent communication whenever the student is added to a group.
Thus, Student Management Cloud complies with the COPPA law for minors in the US.
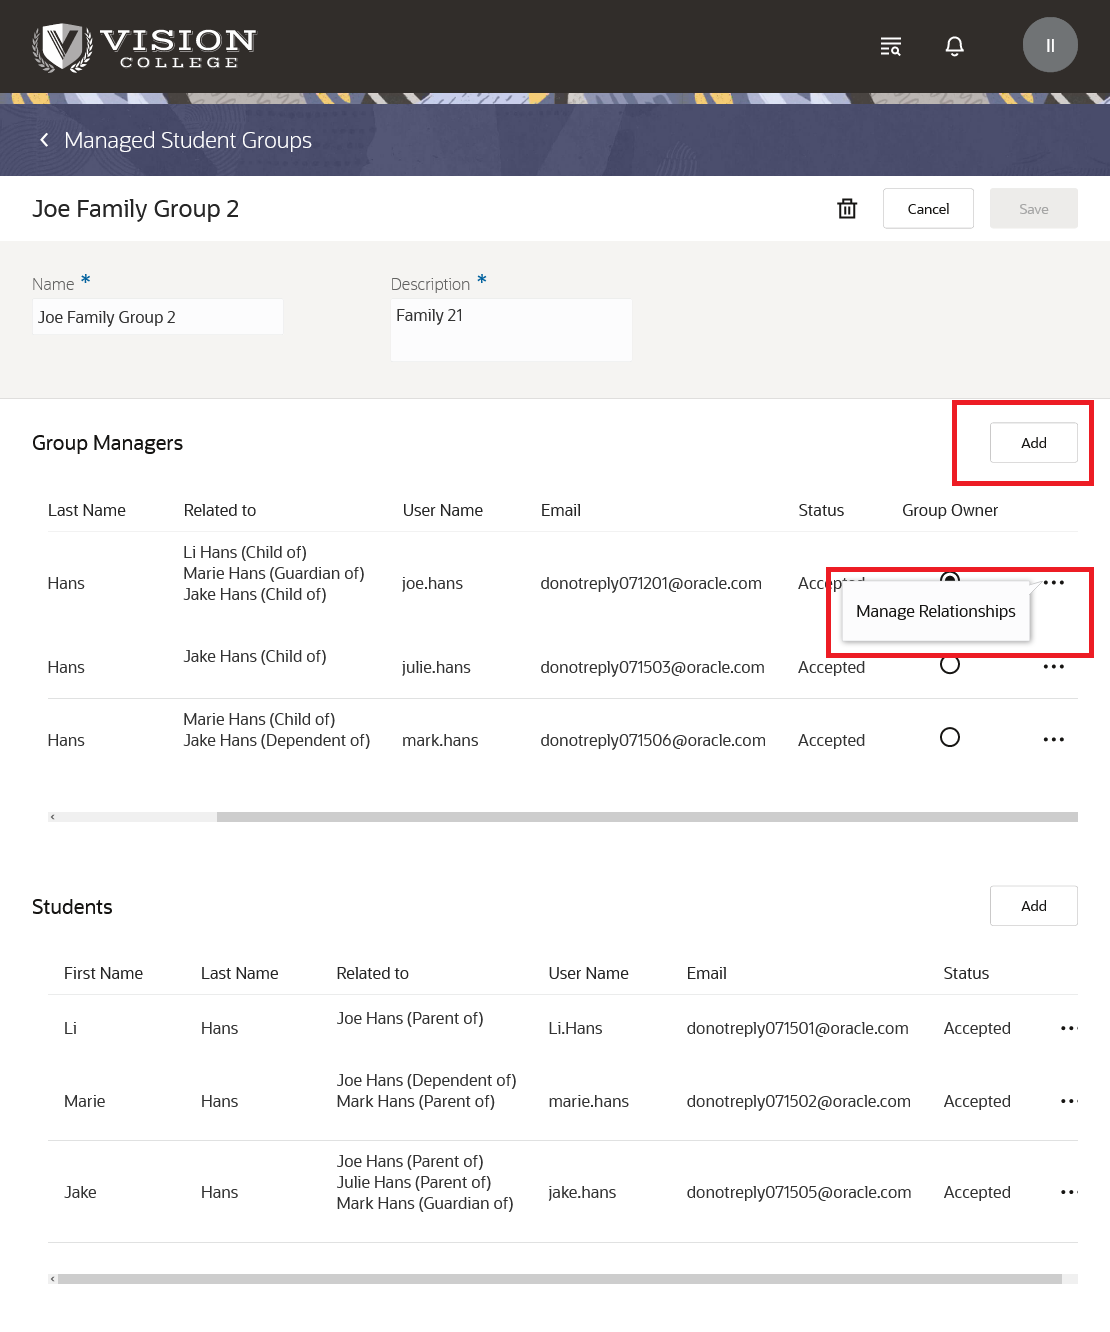
Group Membership and Relationship Maintenance
Steps to Enable
Create a separate consent communication for the invitation of fully managed or jointly managed students. These are email messages that convey information about specific events. These messages go to the parent or guardian of a fully managed or jointly managed student.
First, create a category for the event. You can group events in one category.
- From Student Central, click Search and search for Student Management Categories.
- Click Create Category.
- Fill out the required fields.
- Click Add Event.
- Search for these events, select each one, and then click Select to add to the category you're creating.
- Managed Student Approval Pending
- Managed Student Approval Request Sent
Click Inactive to switch the category to an active status, then save.
Next, create the communication template for each event. In this example, let's create a notification for the Managed Student Approval Pending event.
- From Student Central, click Search and search for Create Communications.
- Select Event-based.
- Fill out the required fields.
- In Institution, select your institution.
- In Category, select the category you created earlier.
- In Select Event Type, select Managed Student Approval Pending.
- In Time of Day Sent, select Send communication immediately when triggered.
- Click the Content tab. Here, specify the contents of the email that's sent to the administrator or student.
- Click Active to activate the notification, then save.
Follow the same steps to create notifications for this event: Managed Student Approval Request Sent.
Additionally, you can improve the quality of communication by adding the newly delivered relationship token in the existing email communication setup.
Include {RELATIONSHIP_WITH_GRP_OWNER} token in the existing communications for these events:
- Managed Student Approval Pending
- Managed Student Approval Request Sent
- Student Added Approval Pending
- Student Approval Request Sent
Here's what you do:
- From Student Central, click Search and search for Communications.
- Search for the existing communication setup using various filter criteria, such as Type, Trigger, and so on.
- Open a communication setup and click Edit > Content to include the tokens.
Tips And Considerations
Group owners must update the relationships for their fully managed or jointly managed students in the groups when they open their existing groups.
If a group owner adds an existing fully managed or jointly managed student with no parent or guardian relationship defined for their group, the student is directed to the help desk. The administrator can then add the parent or guardian relationship and add the student to the group.
Key Resources
-
For more information, refer to the Create Managed Student Groups topic in the Securing Student Management guide.
Role And Privileges
You need the Higher Education Application Administrator or IT Security Manager role to use this feature.
We've added the ability to export and import external fund credits from one environment to another. This is in addition to being able to export and import sponsorship credits and receipt credits.
Being able to export and import credits from one environment to another saves time since you wouldn't have to manually create credits in another environment. Also, the import process includes a validation process that prevents importing bad data.
Steps to Enable
To export and import credits, see:
Tips And Considerations
When exporting and importing credits, the source and target environments must be of the same Oracle Cloud Applications revision. Ensure both environments are at the same revision level before you proceed.
It's also extremely important that your target environment is already set up with the same list of values (LOVs) that are used in the student credits. If the same LOVs don't exist in your target environment, the credit that uses the non- existent LOVs isn't imported.
Key Resources
Check out these resource for information:
Now that institutions can create student credits like external funds, we enabled the refunding of this type of credit along with receipts and sponsorship credits.
To initiate the process, go to the Manage Refunds page, then click Issue Refunds.
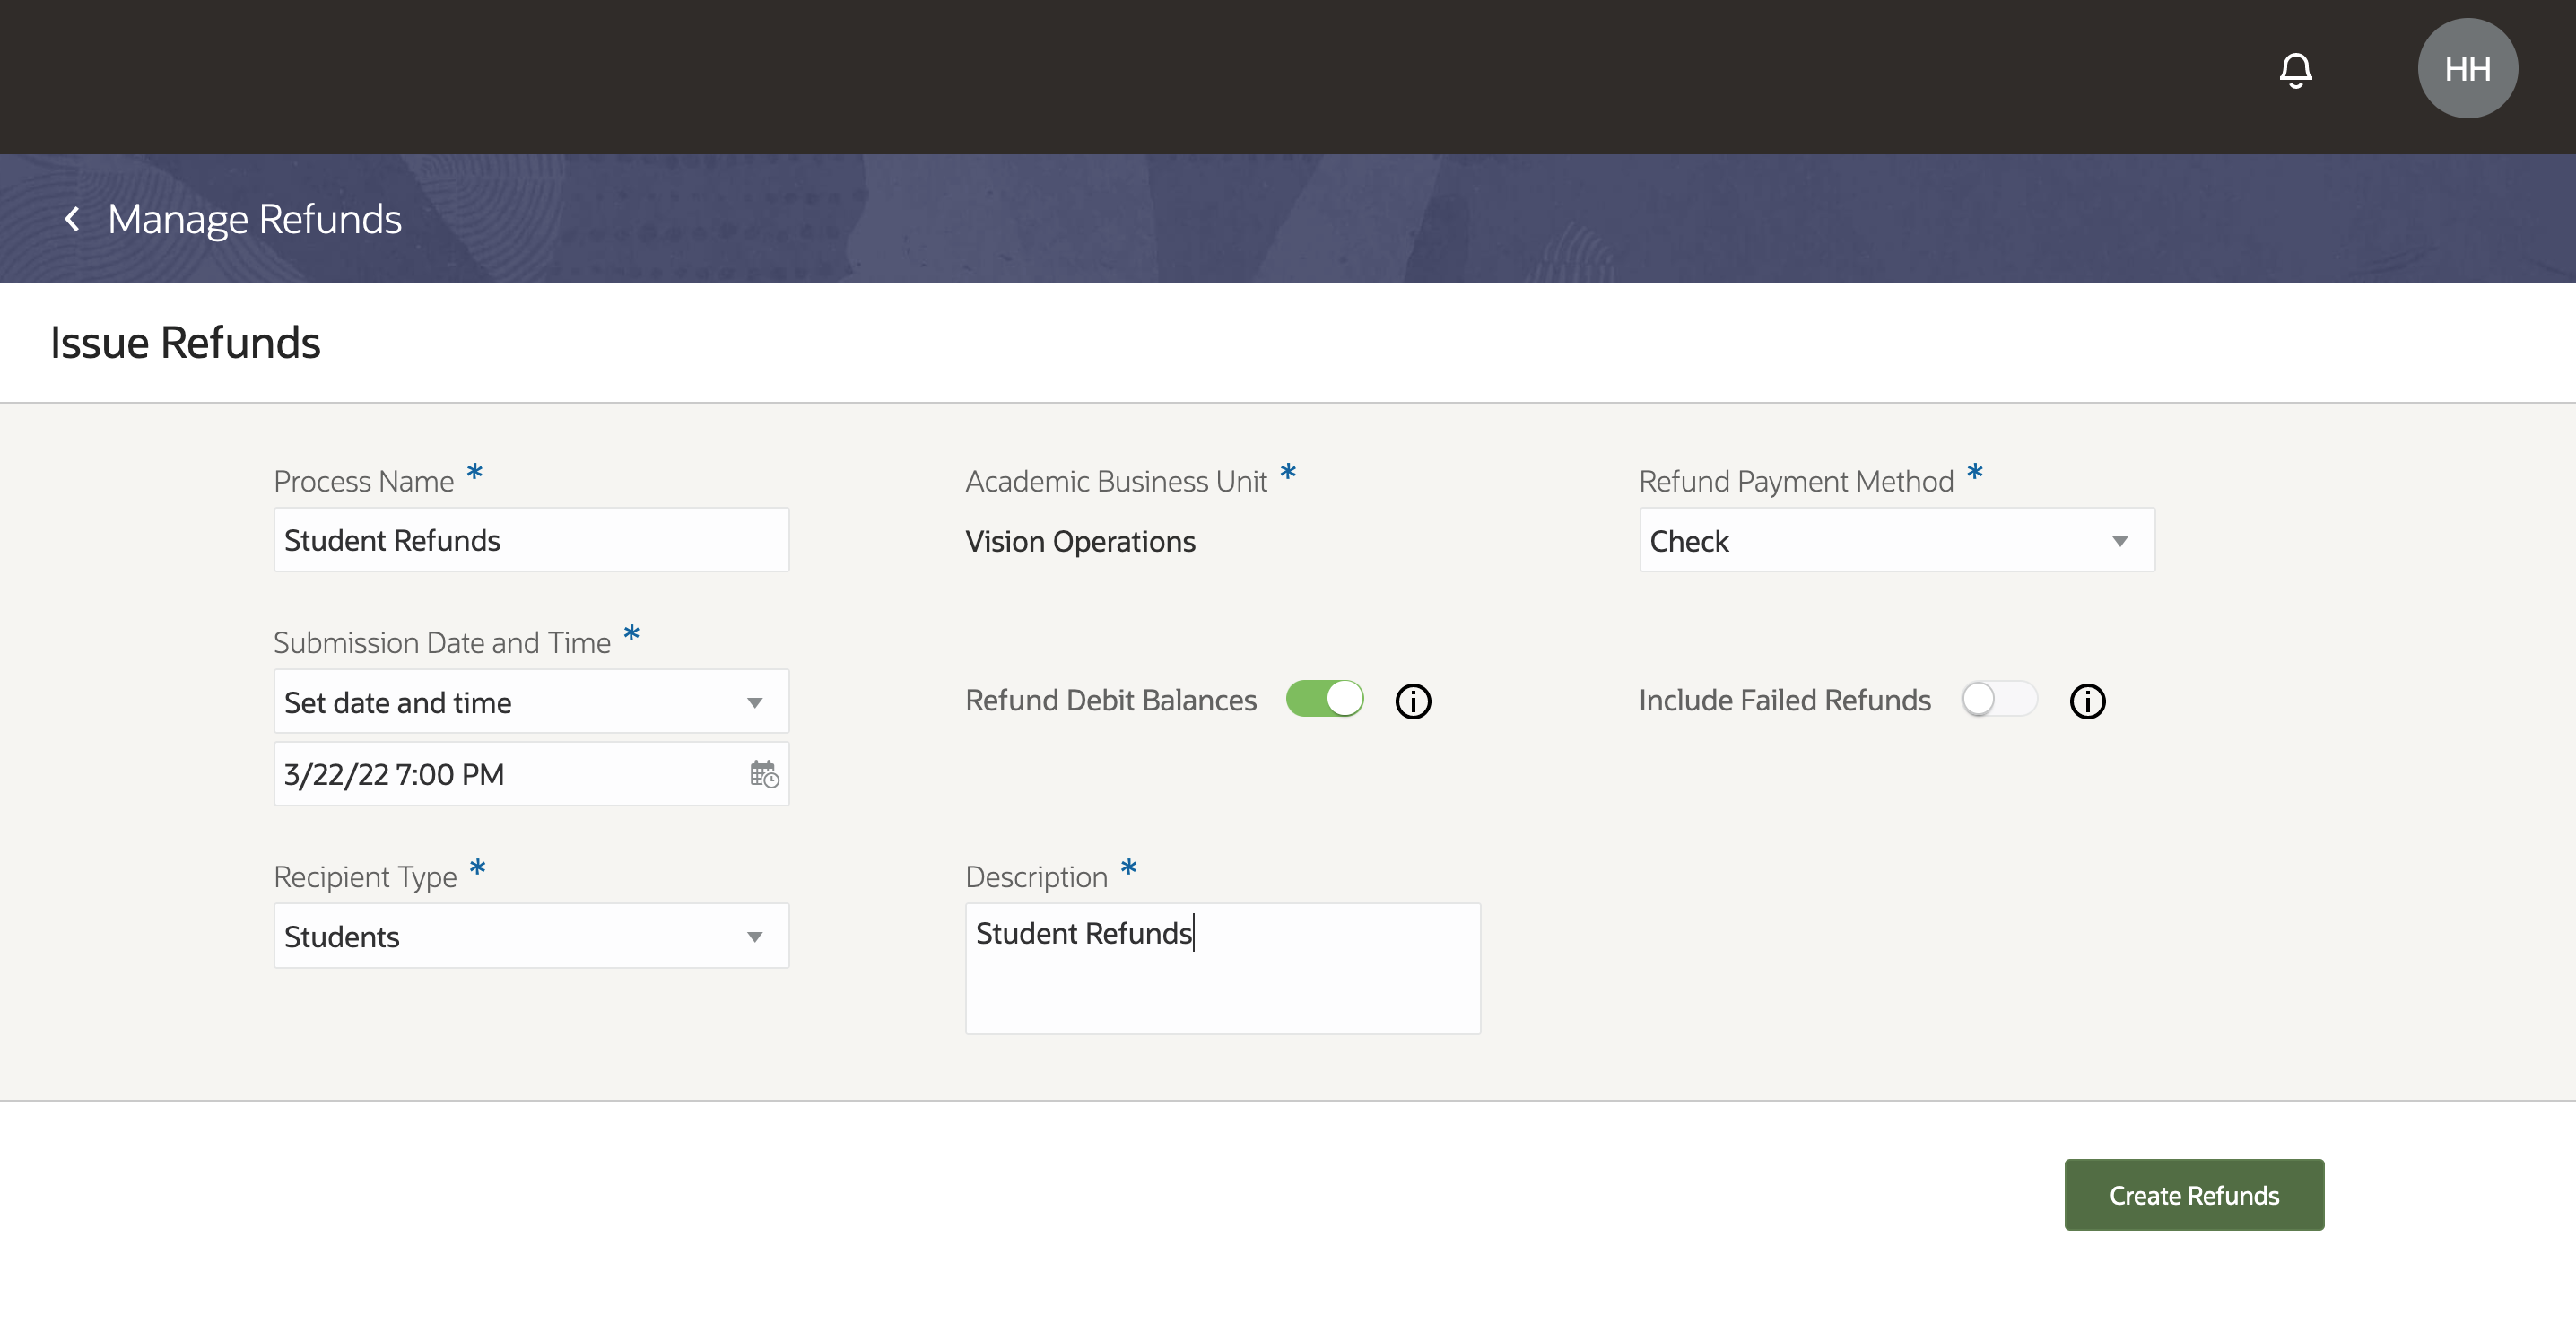
Issue Refunds
This enhancement to the refunding process allows institutions to use a batch process to refund multiple unapplied student credits of any type that's currently supported. This allows institutions to process refunds quickly, saving time.
Steps to Enable
You need to make sure these elements are set up:
- Payment methods in Oracle Fusion Cloud Payables. For information, see Payment Methods.
- Refund methods at the academic business unit level. This ensures that as you're issuing refunds, the list of refund methods you can choose from are ones that are relevant to the business unit. For information, see Manage Academic Business Unit.
- Approval limits for every individual who will issue refunds. If the refund request fails, this may be one of the causes. The approval limits dictate which transactions an individual can approve. Make sure that the limits are assigned correctly in Oracle Fusion Cloud Receivables. For information, see Approval Limits Document Types.
For a credit to be refundable, you must set it up as refundable when you create it. If you don't want a credit to be refundable, then disable Refundable Credit. For more information, see Manage Student Credits.
Tips And Considerations
At the time of this release, external funds/credits can only be refunded via mail. It will be sent to the student's Bill To address.
Key Resources
- Check out this resource for information: Manage Refunds
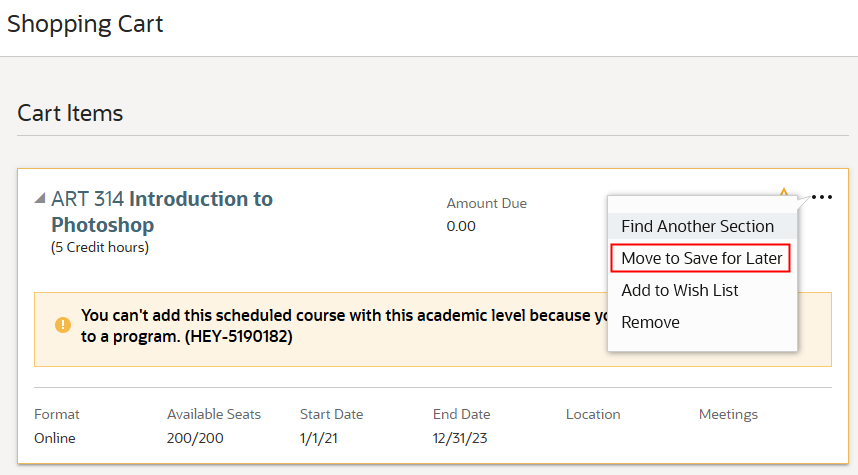
Save for Later Area in Shopping Cart
The shopping cart functionality has been improved to provide a better user experience. Students will be able to save items for later use. This can be helpful if there are requirements to fulfill prior to buying an item in the cart, as shown in the following image. If students are able to put these items in another area in the cart, in this case the Save for Later area, they can continue with the rest of their purchase.
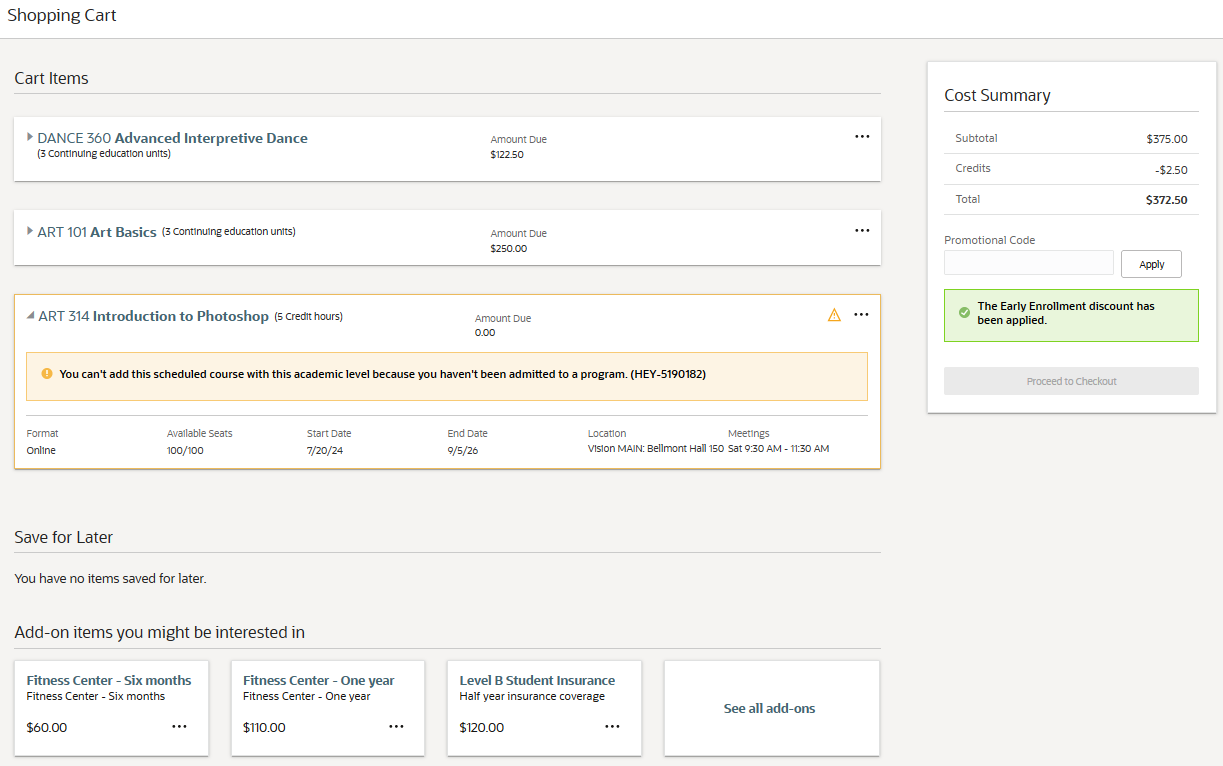
Shopping Cart
Item with Requirement in Shopping Cart
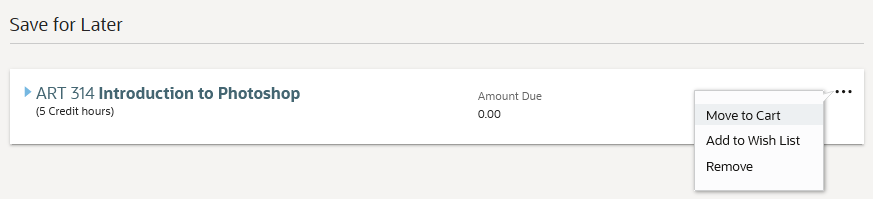
Save for Later Item
This enhancement makes it convenient for students to put off purchasing courses or other items at a later date. The items will still be available in the Save for Later area of the shopping cart even when they leave the site. Note that Save for Later is a complement to and not a replacement of wish lists.
Steps to Enable
You don't need to do anything to enable this feature.
Shopping Cart Exception Handling
When students enroll in courses or pay for items, they will be able to see real-time accurate information about these items in the shopping cart. When they proceed to make a payment, the items in the cart are validated to ensure there are no issues with the items that could prevent successful payment. But if there are issues with the items, say conditions that must be met first before being able to purchase the item, students will know what’s required so they can make their purchase.
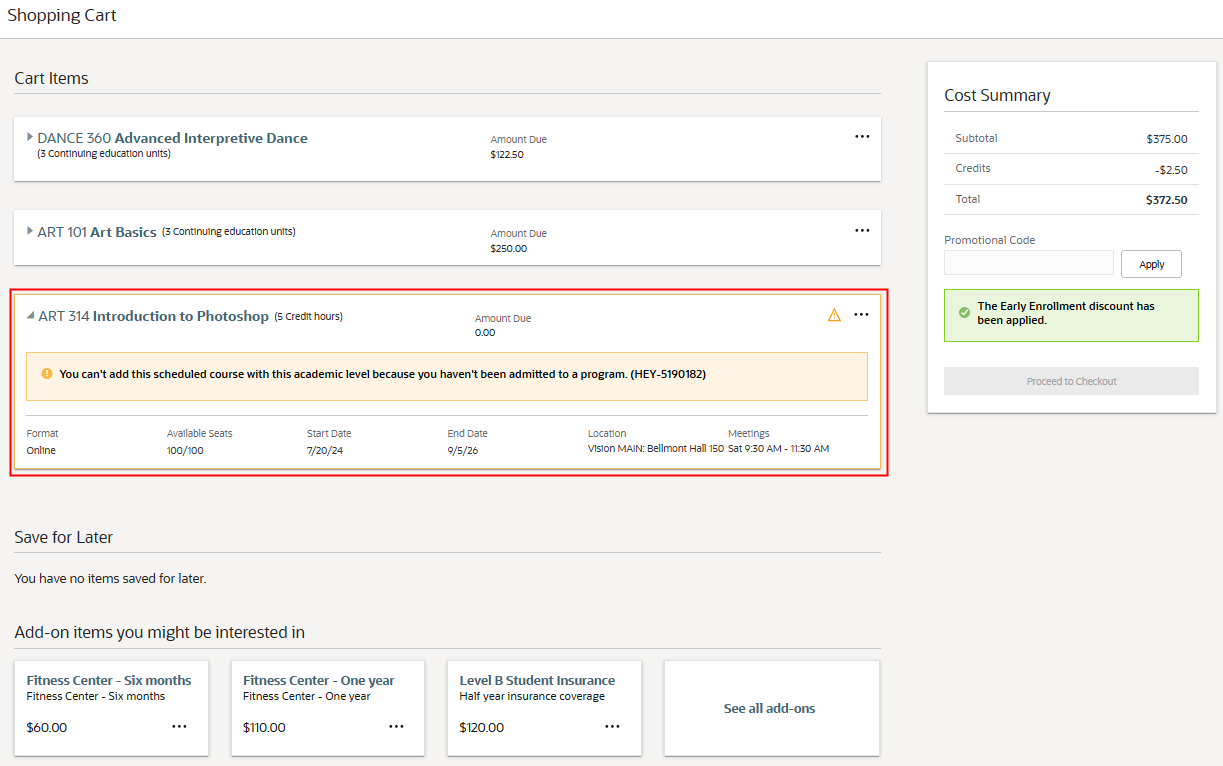
Shopping Cart
In the payment flow, the process checks if students have a billing address. If there isn't one, they are directed to a page where they can provide a billing address. A billing address is necessary to create a customer account.
This enhancement also provides a way for institutions to resolve issues when receipts or invoices aren't posted to student accounts even when payment is successfully collected. If this happens, the institution’s designated administrator receives an email notification about the issue and can work on resolving the problem even before students or parents alert them.
Students now have a better experience when making payments while institutions can readily address issues should they arise.
Steps to Enable
If you want to generate email notifications when associated transactions (like receipts or invoices) aren't properly posted, you need to:
- Designate an administrator to whom email notifications are sent. Go to the Academic Business Unit page, then in Payments, enter a default user in Payment Error Resolution. For more information, see Manage Academic Business Unit.
- Create the notifications to be sent. This process is the same as creating notifications when payment issues occur in admissions applications.
Tips And Considerations
Shopping cart registrations are always submitted as long as payment is successful. Currently, there's no way to disable this.
View, create, and update system offices as an optional layer of your academic structure.
A system office is a structural entity that is often the highest level entity in an organizational structure, such as an institutional system. System offices often have common oversight of institutions and their associated entities via a central governing office that might control funding, compliance, state reporting, and so on.
You can assign person contacts, location addresses, and identifiers to a system office.
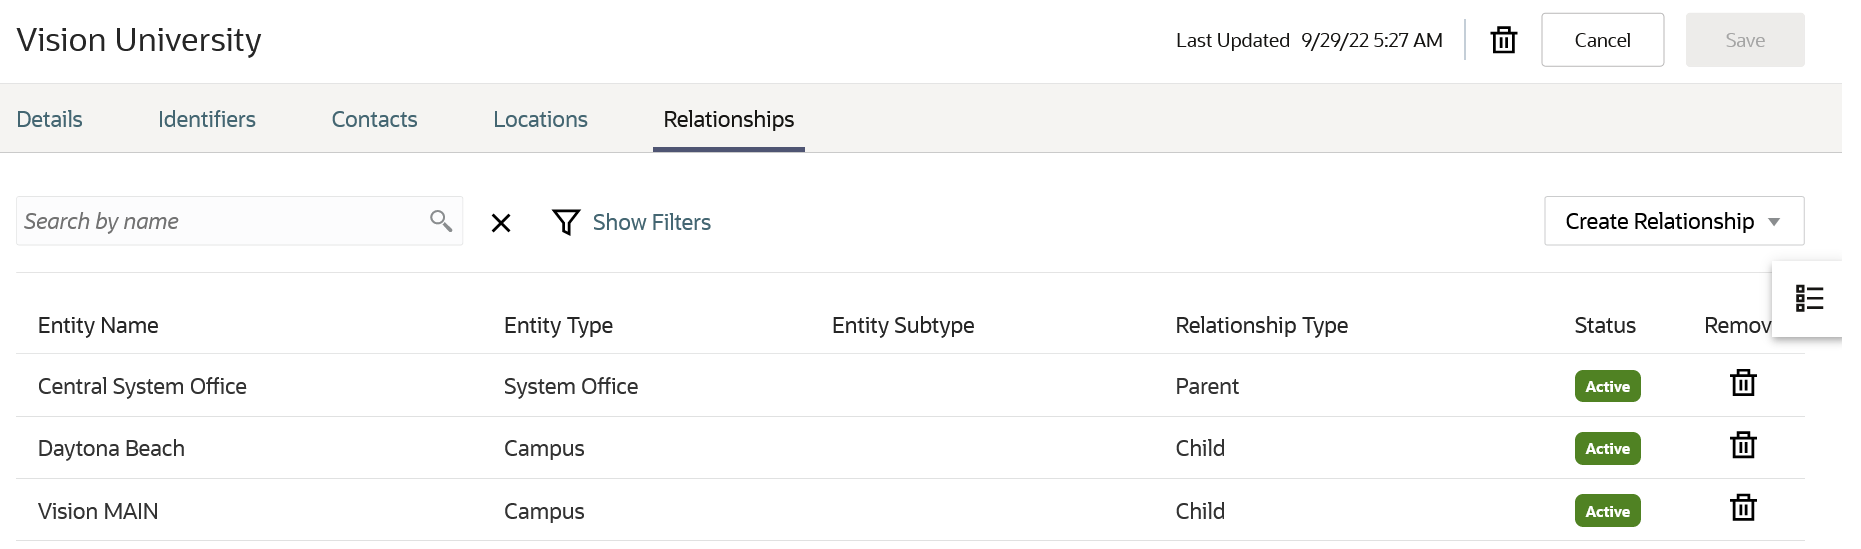
You can also create child relationships between a system office and academic institutions. After you create the relationships, you can then view the entities and where they sit in the overall hierarchy.
Navigation: From Student Central, click Search and search for System Offices.
Here are examples of the Details tab and Relationships tab.
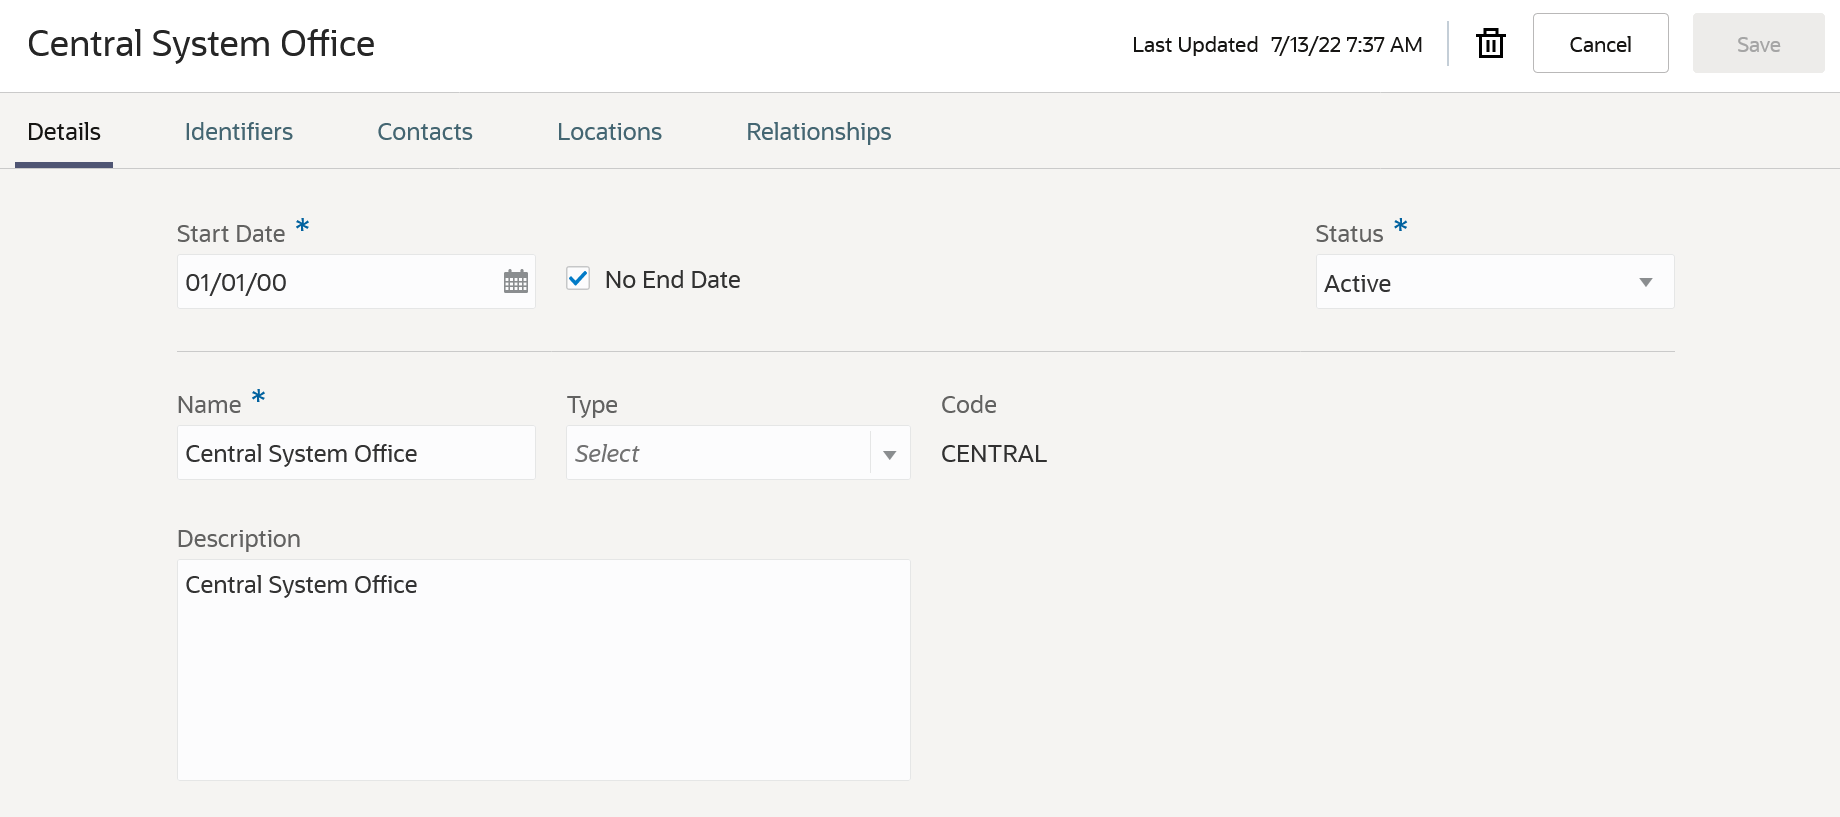
System Office Details

System Office Relationships
Instead of using the System Office page to create system offices, you can use the Rapid Implementation process. You can also export and import data from one environment to another.
This new feature allows you to configure your organizational hierarchy.
Steps to Enable
You don't need to do anything to enable this feature.
Academic Institution Configuration
View, create, and update academic institutions as part of your academic organizational structure using an updated user experience.
As before, you can search for academic institutions to view and maintain their configurations.
You can now assign person contacts, location addresses, and identifiers to academic institutions.
You can also create relationships between an academic institution and other entities:
- A parent relationship with a system office.
- Child relationships with campuses.
Navigation: From Student Central, click Search and search for Academic Institutions.
Here are examples of the Details tab and Relationships tab.
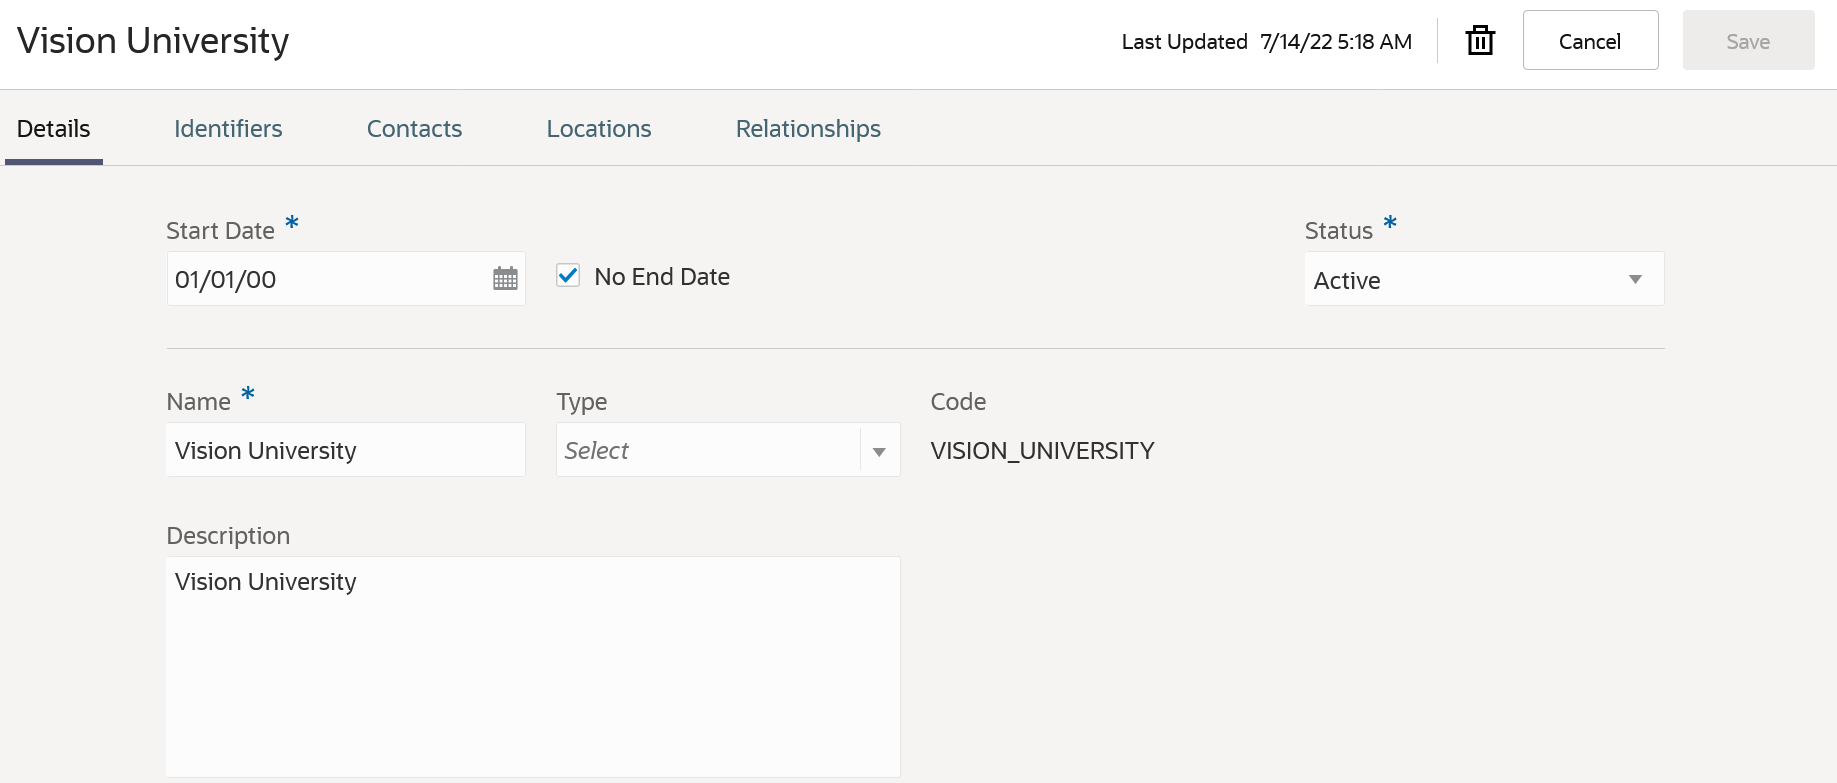
Academic Institution Details
Academic Institution Relationships
You can use Rapid Implementation to load academic institutions along with their related person contacts, location addresses, and identifiers. You can also import data from one environment to another.
This redesigned feature allows you to configure your organizational hierarchy.
Steps to Enable
You don't need to do anything to enable this feature.
View, create, and update campuses as part of your academic organizational structure using an updated user experience.
As before, you can search for campuses to view and maintain their configurations.
You can now assign person contacts, location addresses, and identifiers to campuses.
You can also create relationships between between a campus and other entities:
- A parent relationship with an academic institution.
- Child relationships with academic organizations.
You can use Rapid Implementation to load campuses along with their related person contacts, location addresses, and identifiers. You can also import data from one environment to another.
Navigation: From Student Central, click Search and search for Campuses.
The Campus page layout is the same as the Academic Institution page layout.
This redesigned feature allows you to configure your organizational hierarchy.
Steps to Enable
You don't need to do anything to enable this feature.
Academic Organization Configuration
View, create, and update academic organizations as part of your academic organizational structure using an updated user experience.
As before, you can search for academic organizations to view and maintain their configurations.
You can now assign person contacts, location addresses, and identifiers to academic organizations.
You can also create a parent relationship between a campus and an academic organization.
You can use Rapid Implementation to load academic organizations along with their related person contacts, location addresses, and identifiers. You can also import data from one environment to another.
Navigation: From Student Central, click Search and search for Academic Organizations.
The Academic Organization page layout is the same as the Academic Institution page layout.
This redesigned feature allows you to configure your organizational hierarchy.
Steps to Enable
You don't need to do anything to enable this feature.
View, create, and update buildings where teaching facilities are located using an updated user experience.
As before, you can search for buildings to view and maintain their configurations.
You can now assign person contacts and location addresses to buildings. You can also view the facilities that are part of the building.
You can also assign ownership of a building to a campus.
Navigation: From Student Central, click Search and search for Manage Buildings.
Here are examples of the Details, Facilities, and Ownership tabs.
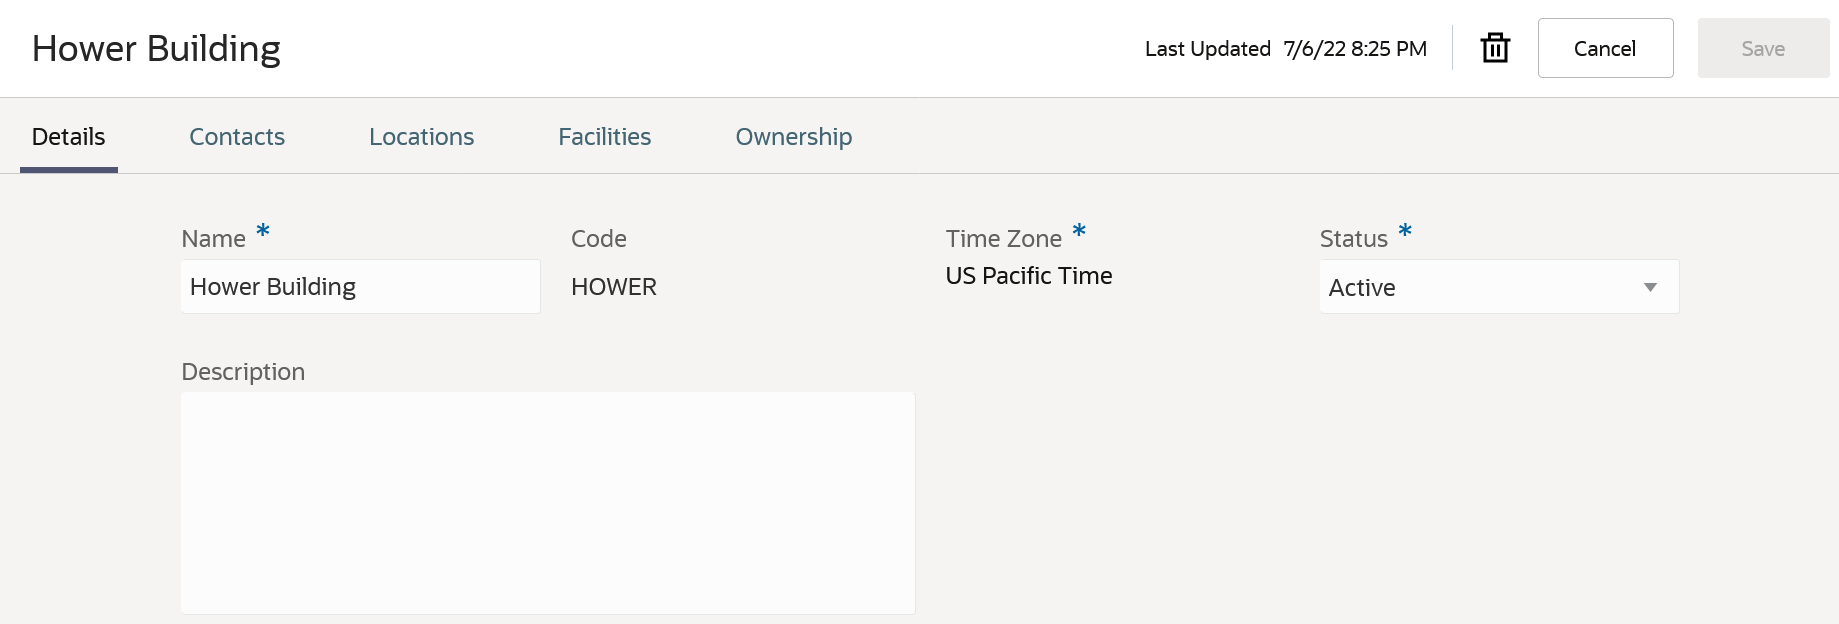
Building Details
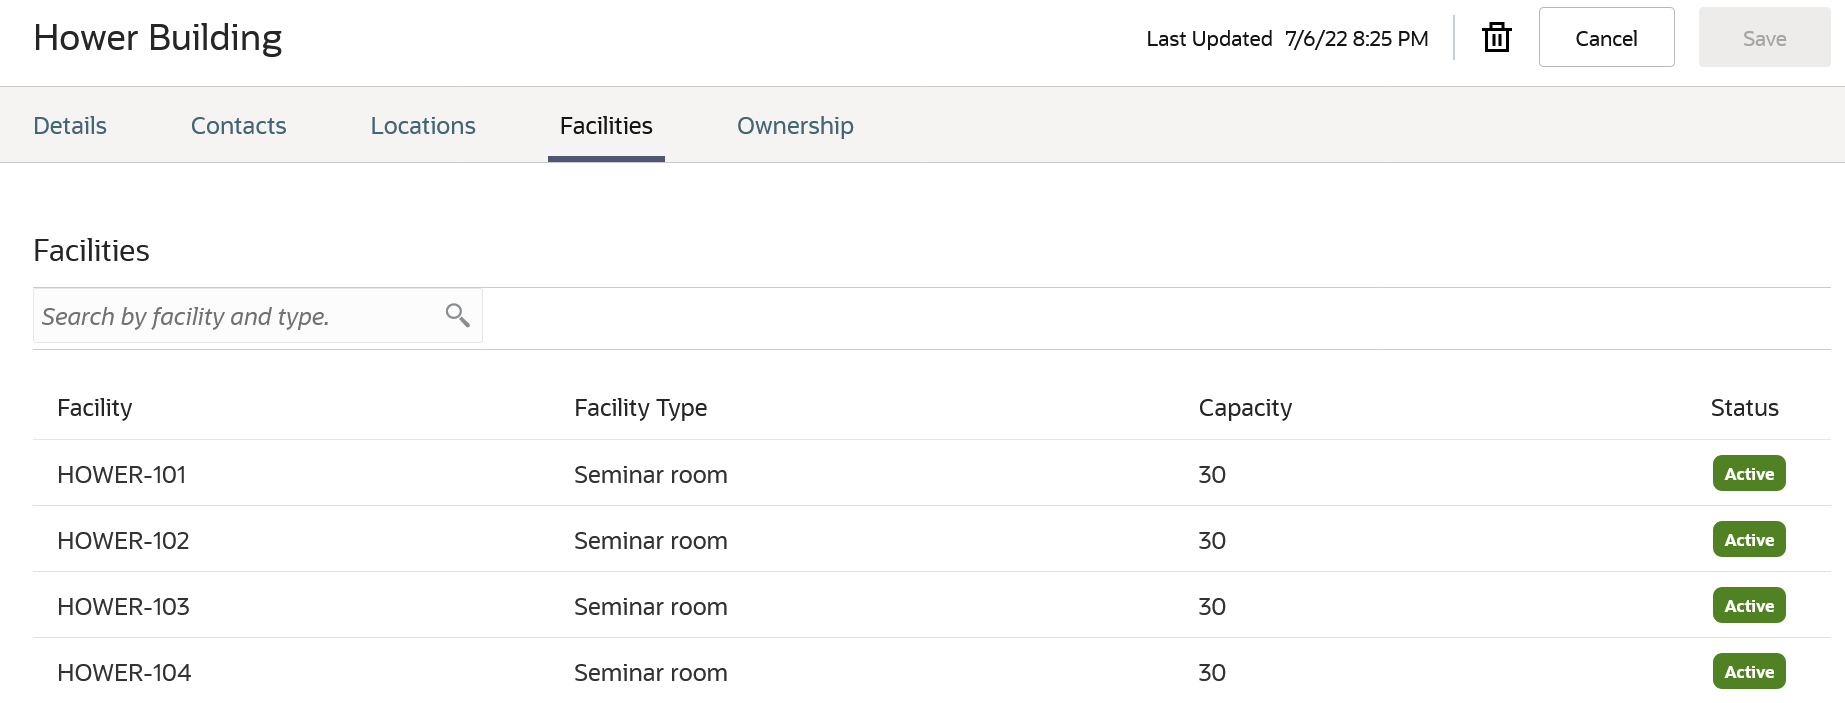
Building Facilities
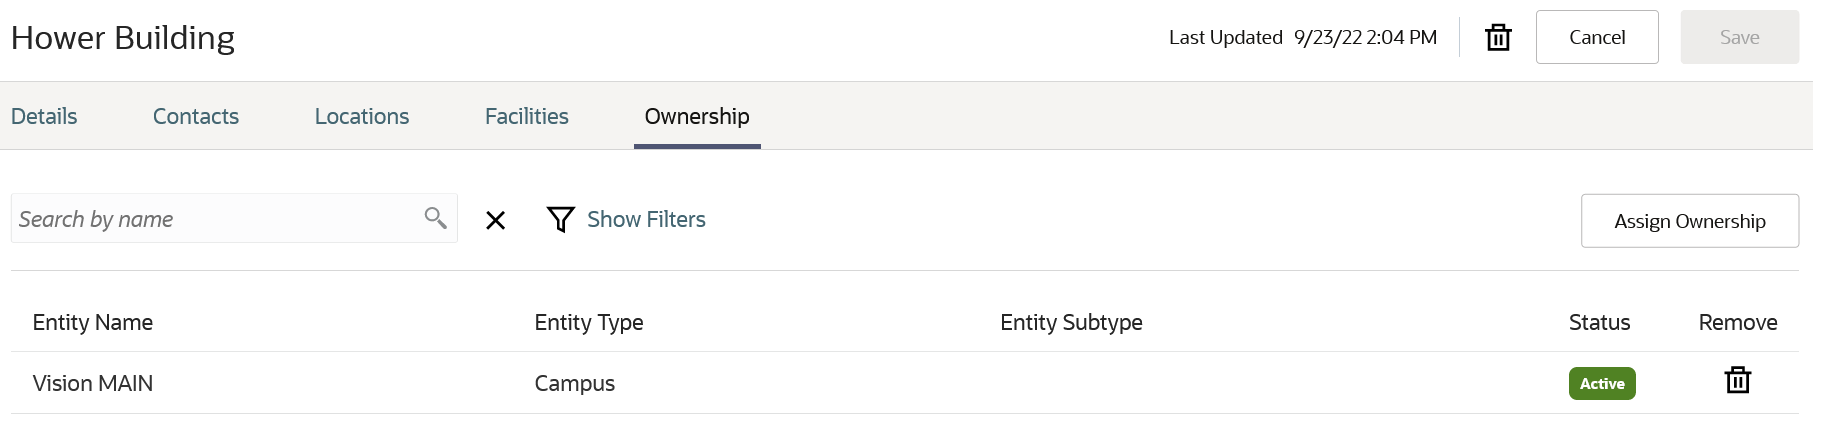
Building Ownership
You can use Rapid Implementation to load buildings along with related person contacts and location addresses. You can also import data from one environment to another.
Steps to Enable
You don't need to do anything to enable this feature.
View, create, and update facilities where course sections can take place using an updated user experience.
As before, you can search for facilities to view and maintain existing configurations.
You can now assign person contacts to facilities and view location addresses for associated buildings.
You can also assign ownership of a facility to a campus and to academic organizations within that campus.
Navigation: From Student Central, click Search and search for Manage Facilities.
The Ownership tab layout for facilities is similar to the Ownership tab layout for buildings.
You can use Rapid Implementation to load facilities along with related person contacts and location addresses. You can also import data from one environment to another.
Steps to Enable
You don't need to do anything to enable this feature.
Academic Subject Configuration
View, create, and update academic subjects as part of your academic structure using an updated user experience.
As before, you can search for subjects to view and maintain their configurations.
You can assign ownership of a subject to an academic organization.
Navigation: From Student Central, click Search and search for Academic Subjects.
Here's an example of the Ownership tab:
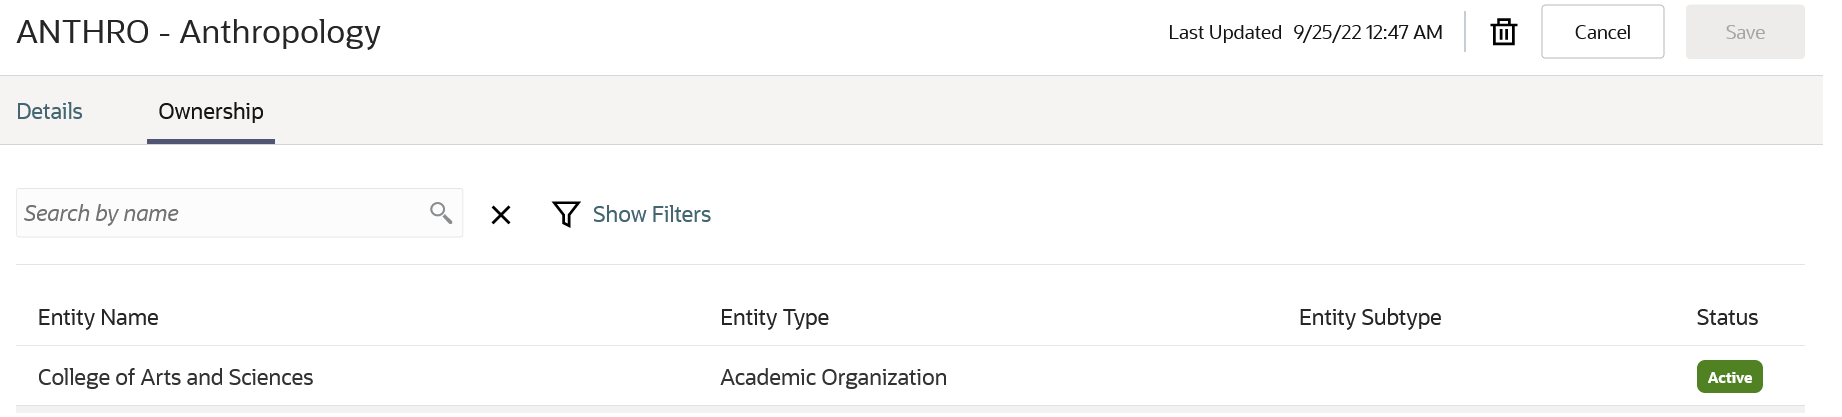
Academic Subject Ownership
The Percentage field has been removed.
You can use Rapid Implementation to load academic subjects, including ownership details. You can also import data from one environment to another.
Steps to Enable
You don't need to do anything to enable this feature.
View, create, and update academic levels as part of your academic structure using an updated user experience.
As before, you can search for levels to view and maintain their configurations.
You can now assign ownership of an academic level to one or more academic institutions.
Navigation: From Student Central, click Search and search for Academic Levels.
Here's an example of the Details tab. The Ownership tab is the same as for Academic Subjects.
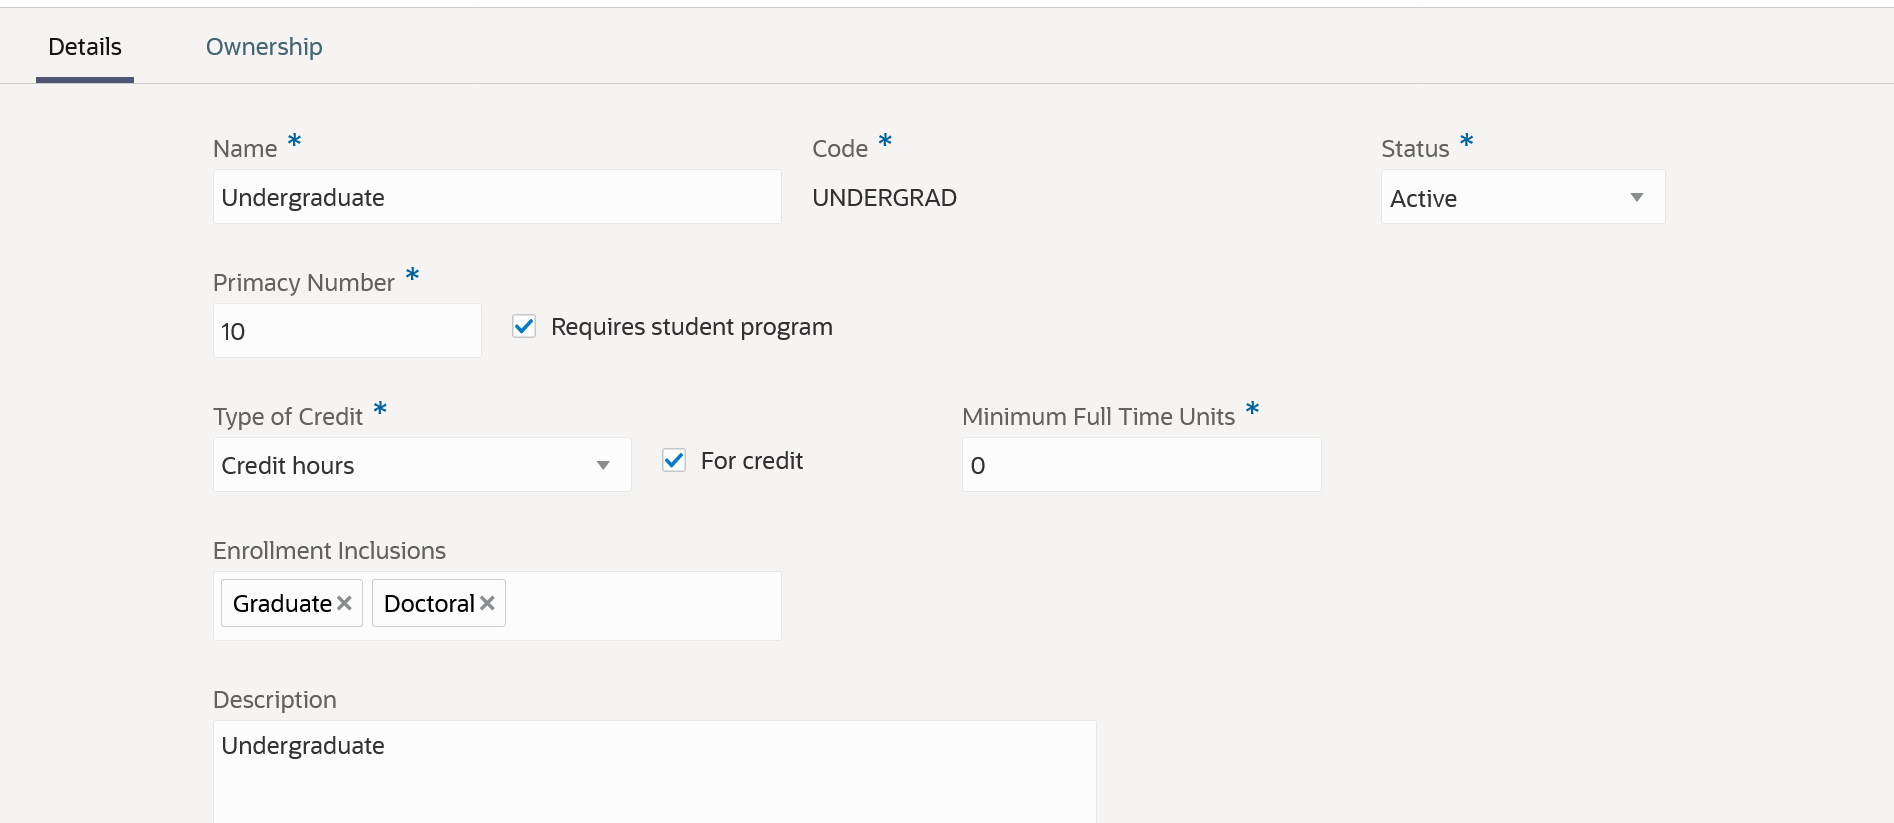
Academic Level Details
You now configure drop scheme mappings directly on the drop scheme setup instead of the academic level setup.
You now select an enrollment repeat option directly on the course setup instead of the academic level setup.
NOTE: As of this release, do not use Rapid Implementation or import and export between environments for academic levels, until further notice.
This redesigned feature allows you to configure more flexible ownership of academic levels.
Steps to Enable
You don't need to do anything to enable this feature.
View, create, and update drop schemes as part of your curriculum structure using an updated user experience.
As before, you can search for drop schemes to view and maintain existing configurations.
Previously you associated a drop scheme with a particular academic level on the academic level setup. Now when you configure a drop scheme, you can associate it with multiple academic institutions and academic levels, directly on the drop scheme setup.
Navigation: From Student Central, click Search and search for Drop Schemes.
NOTE: As of this release, do not use Rapid Implementation or import and export between environments for drop schemes, until further notice.
This redesigned feature allows you to flexibly configure your drop schemes.
Steps to Enable
You don't need to do anything to enable this feature.
Academic Periods and Period Attribute Dates
Create and maintain academic periods as spans of time containing curriculum offerings, using an updated user experience. Additionally, define the key dates within the period for milestones like first date to enroll, start and end dates for tuition calculation, last date to drop course sections, and so on. You can also associate periods with one another to create academic period hierarchies.
Academic Periods
NOTE: You no longer need to create a period profile to create and maintain academic periods.
These are the tabs on the redesigned Academic Periods page:
- Details
- Period Attribute Dates
- Ownership
- Period Hierarchy
Here are some of the things you can do on the page:
- Flexibly determine the attributes for a particular period. For example, remove an attribute if it's not relevant to a period.
- Edit the date setup for an attribute. For example, change the calculation method. The updated setup applies only to the particular period.
- Associate an academic period with one or more academic institutions.
- Create a period hierarchy to define the relationship between academic periods and reporting periods. An academic period can be a child of a reporting period only when the start and end dates of the reporting period are inclusive of the date span of the child period.
NOTE: As of this release, do not use Rapid Implementation or import and export between environments for the academic period feature, until further notice.
Academic Period Attribute Dates
View and edit predefined period attributes on the Academic Period Attribute Dates page. You can also create user-defined period attributes.
Add tags to an attribute to indicate the period types for which the attribute is relevant. Then when you create a period, the attribute is automatically added to the period based on the tag and period type.
Here's an example of date and time manual entry:
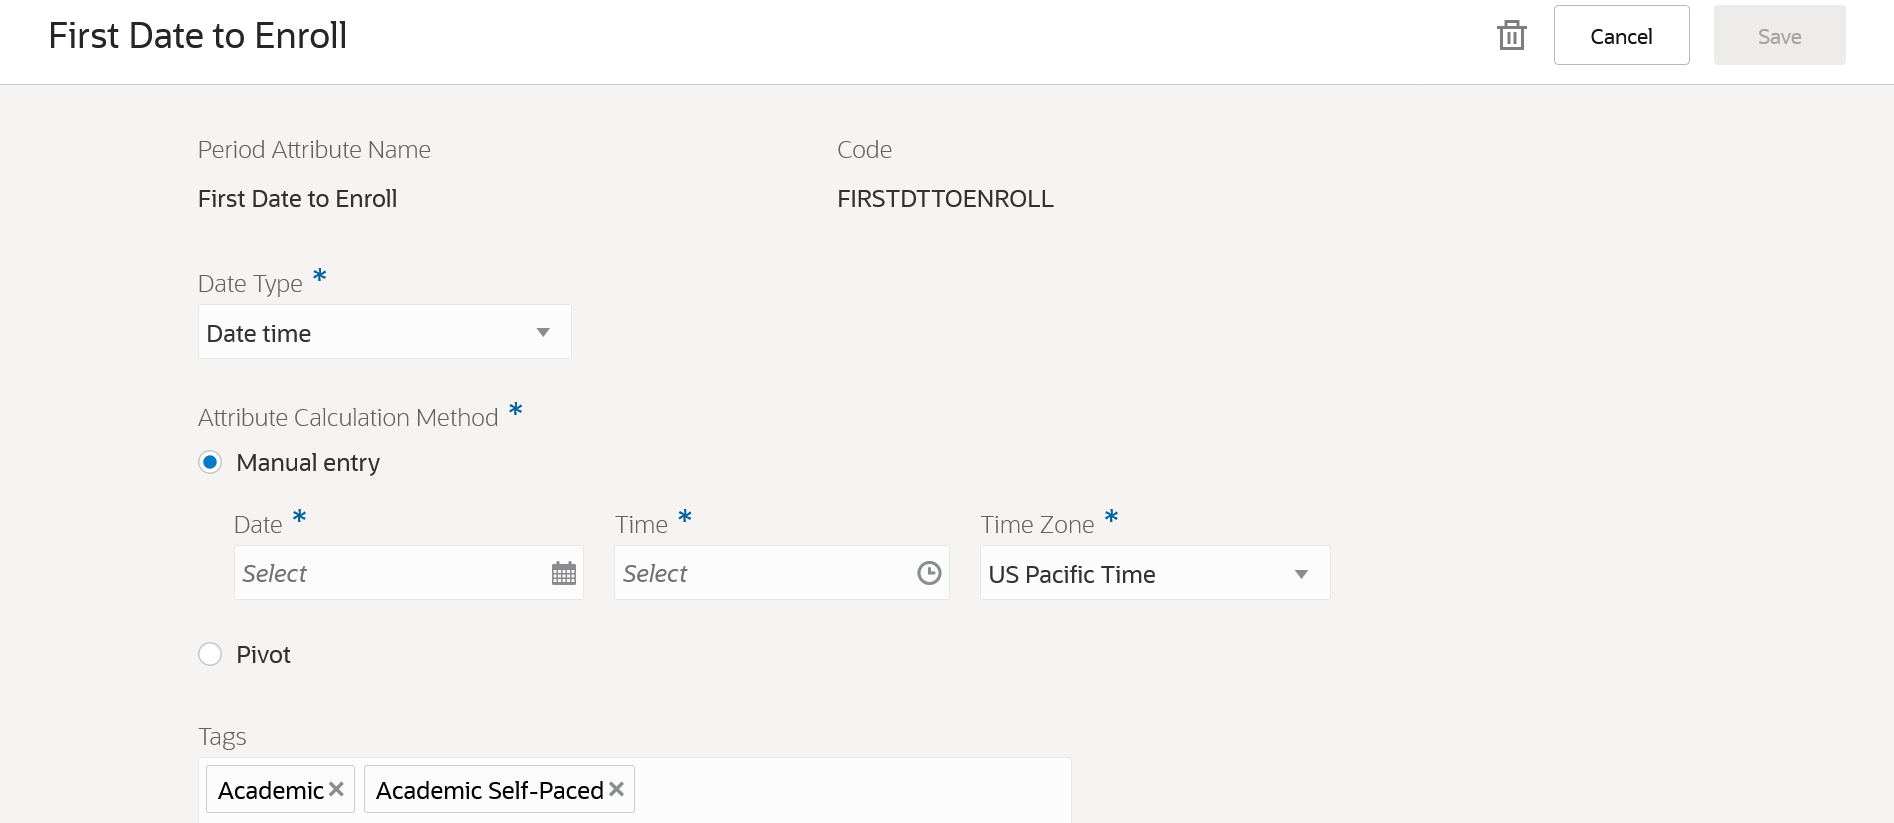
Date Time Manual Entry
Here's an example of date-based calculation using a pivot method:
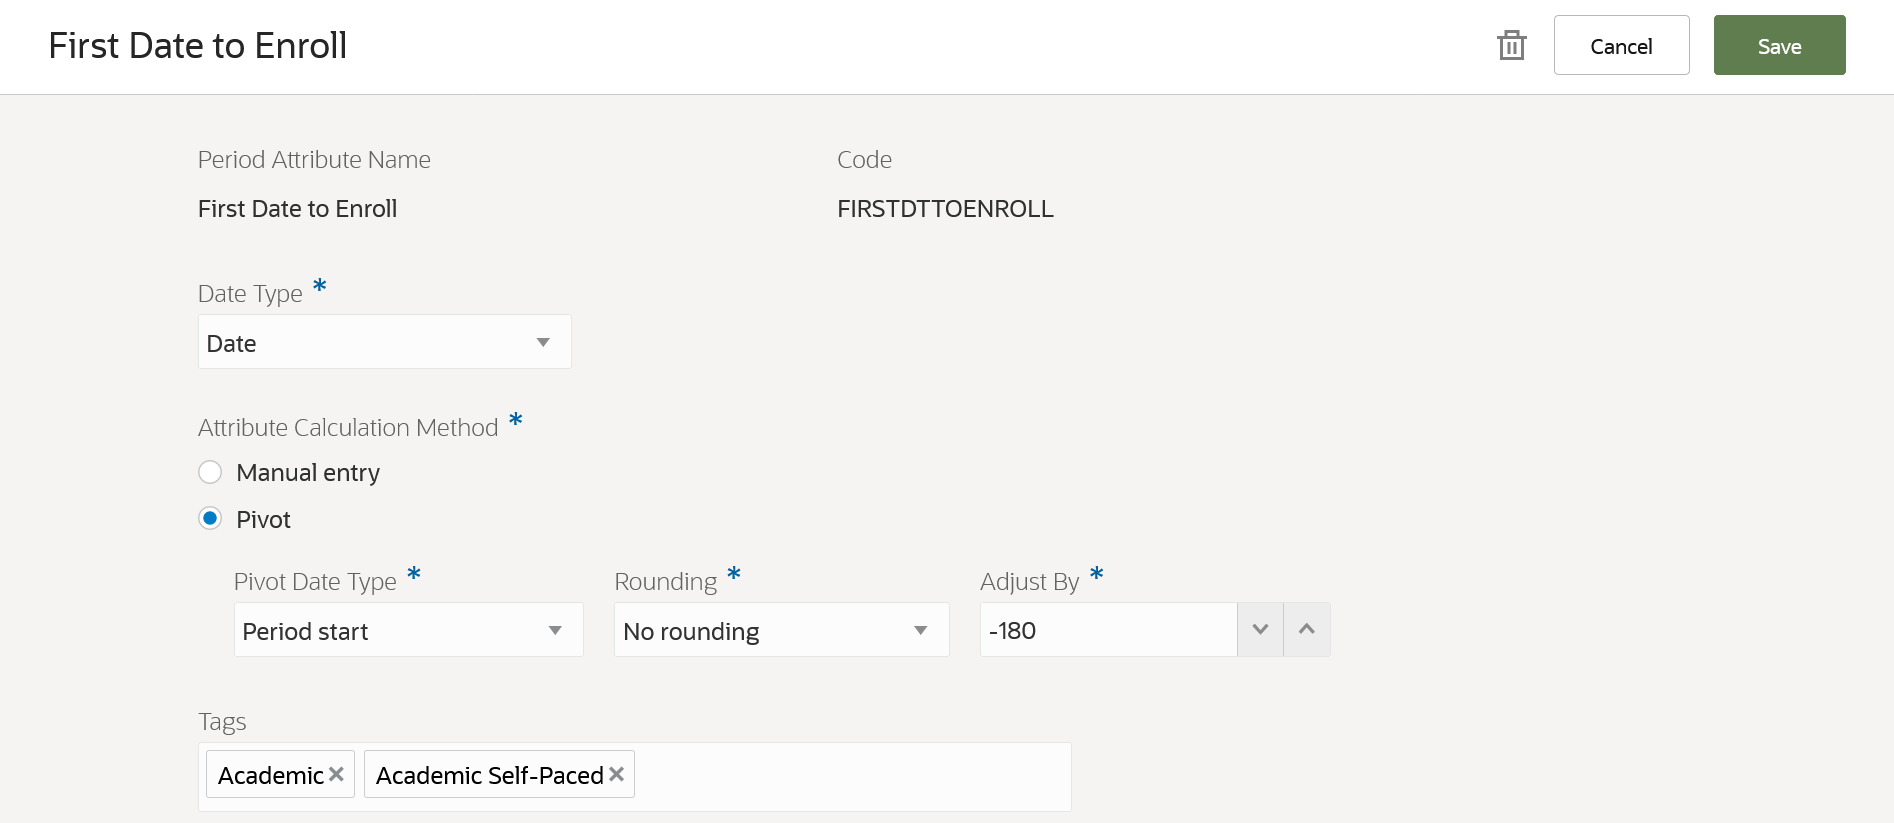
Date Pivot
NOTE: As of this release, do not use Rapid Implementation or import and export between environments for academic period attribute dates, until further notice.
In summary, this redesigned feature means that you can more efficiently and flexibly create and maintain your academic periods.
Steps to Enable
You don't need to do anything to enable this feature.
Tips And Considerations
Your existing academic period configurations will be upgraded automatically. Make sure to re-familiarize yourself with how to manage academic periods. Also keep in mind that parent and child relationships between periods will be validated against the period start and end dates to ensure parent date spans are inclusive of child date spans.
View, create, and update courses as part of your curriculum structure using an updated user experience.
As before, you can search for courses to view and maintain existing configurations.
Additionally, you can assign course identifiers such as CIP codes and person contacts.
You now select an enrollment repeat option directly on the course setup instead of the academic level setup.
You can create and maintain simple prerequisites for courses.
You can also assign ownership of a course to an academic organization.
Navigation: From Student Central, click Search and search for Courses.
Here are the Course page tabs:

Course Tabs
On the Details tab, you can now define the start and end academic periods for a course:
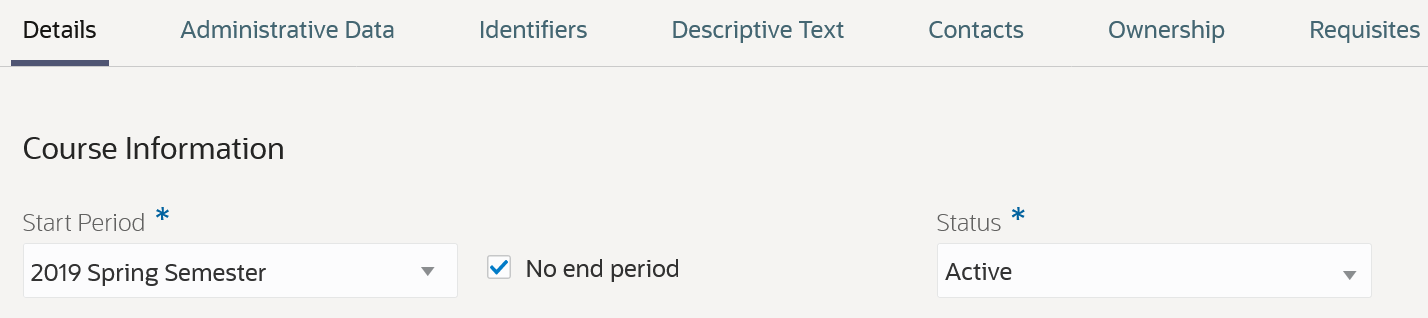
Course Details: Start and End Periods
NOTE: As of this release, do not use Rapid Implementation or import and export between environments for courses, until further notice.
NOTE: Use the redesigned Courses page and Course Sections page except when you need to assign curriculum tags. To assign tags, use the existing Courses page (from Student Central, click Search and search for Manage Curriculum).
Steps to Enable
You don't need to do anything to enable this feature.
View, create, and update sections of courses as part of your curriculum structure using an updated user experience.
As before, you can search for course sections to view and maintain their configurations.
In addition to existing configurations, you can now configure course section instructional methods by course type and configure course section result types.
You can create and maintain simple requisites as well as additional attributes. You can associate a staff member with a specific meeting record. And you can assign ownership of a course section to an academic organization.
NOTE: A scheduled course is now a course section.
Navigation: From Student Central, click Search and search for Course Sections.
These are the Course Section page tabs:
- Details
- Administrative Data
- Descriptive Text
- Ownership
- Requisites
Here's an example of managing course types on the Administrative Data tab:
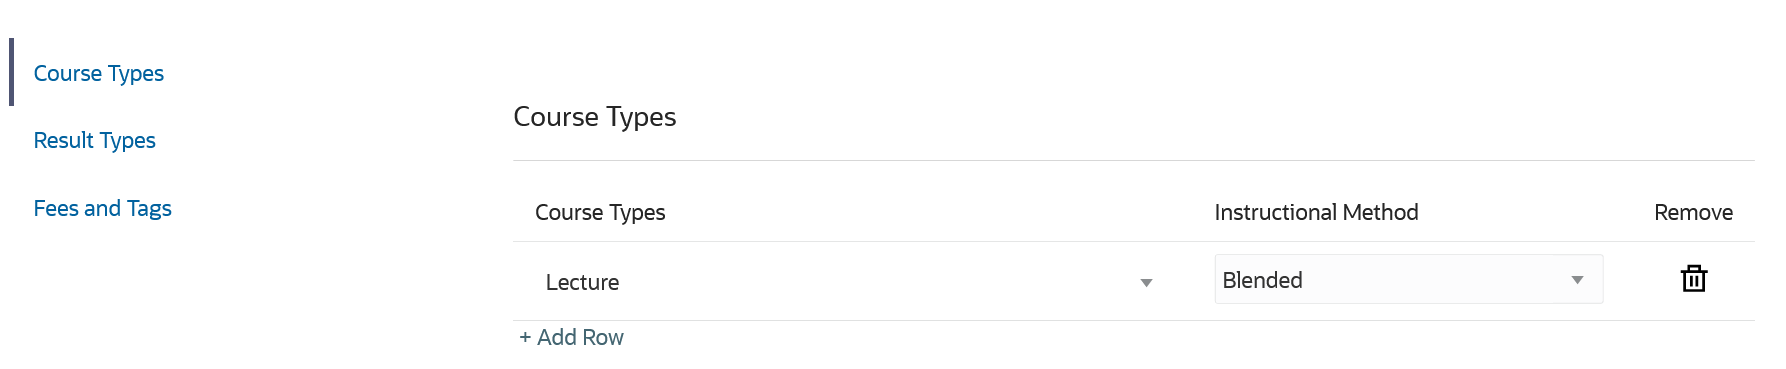
Course Section: Course Types
NOTE: As of this release, do not use Rapid Implementation or import and export between environments for course sections, until further notice.
NOTE: Use the redesigned Courses page and Course Sections page except when you need to assign curriculum tags. To assign tags, use the existing Courses page (from Student Central, click Search and search for Manage Curriculum).
Steps to Enable
You don't need to do anything to enable this feature.
Course Requisite Configuration
Configure requisite schemes to define when courses will fulfill a requisite requirement based on the requisite course outcome. Configure courses and course sections to have simple prerequisite relationships with other courses based on what courses satisfy requisite requirements.
Requisite Schemes
Navigation: From Student Central, click Search and search for Requisite Schemes.
When you create a requisite scheme, you can decide whether to map the requisite status to a course outcome as you currently do or to map the status to a result set value.
With outcomes mapping, a student who completes the course with a passing grade meets the prerequisite. For example, an A, B, C, or D for a letter grade course outcome.
However, the prerequisite requirement might be that the student must pass the course with a grade of C or better. In this case, you can use the results mapping option.
Here's an example of results mapping using a Marks result set:
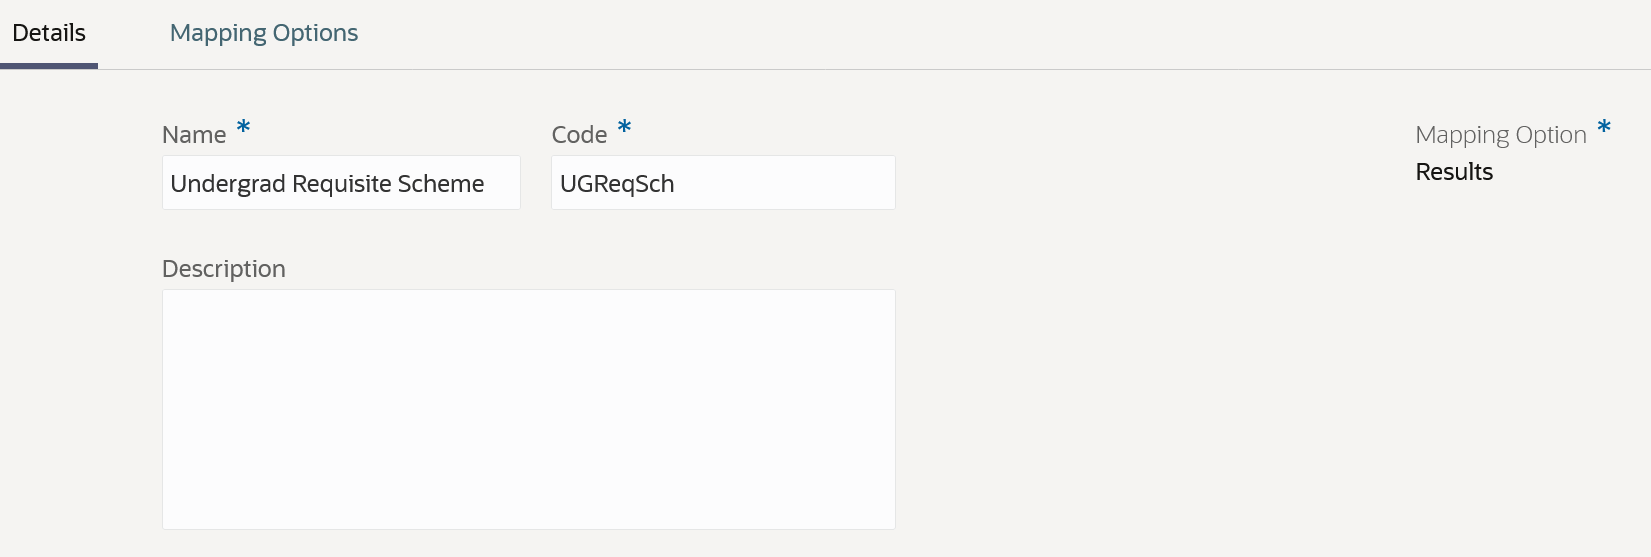
Requisite Scheme Details
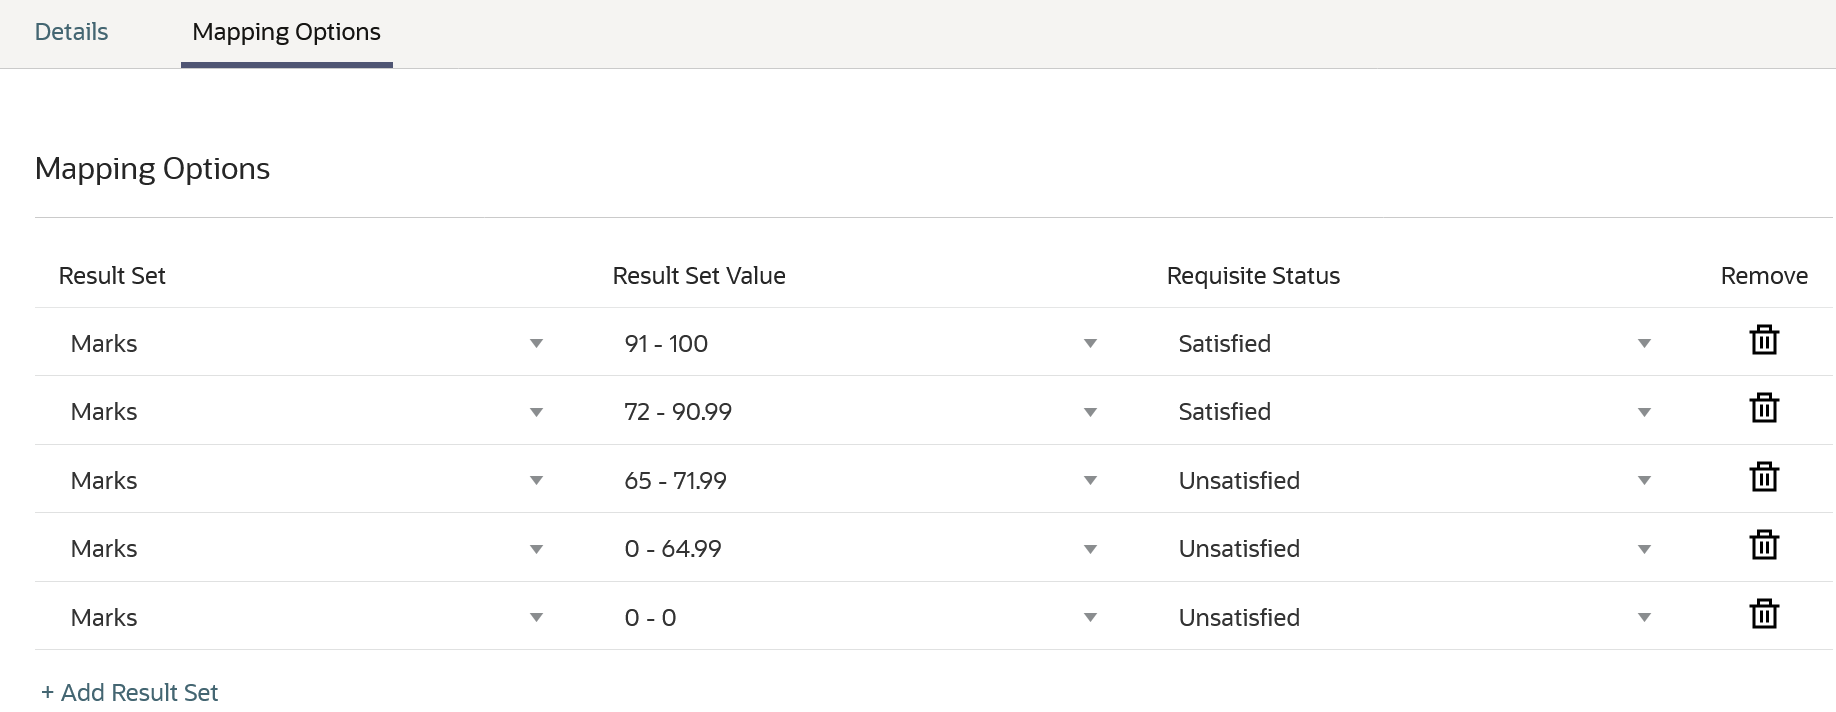
Requisite Scheme Mapping Options
NOTE: As of this release, do not use Rapid Implementation or import and export between environments for the new results mapping option, until further notice. You can use Rapid Implementation and import and export between environments for the existing course outcome mapping option.
In summary, you can now select a mapping option based on course outcome or result set value when you create requisite schemes.
Steps to Enable
You don't need to do anything to enable this feature.
View a printer friendly version of the admissions application form submitted by an applicant. You can view, download, and print a copy of an application.
As an admissions coordinator, you can easily retain a PDF or printed version of the Application form for your records. This gives you the benefit of sharing the application data with evaluators who don’t have access privileges to the student information system.
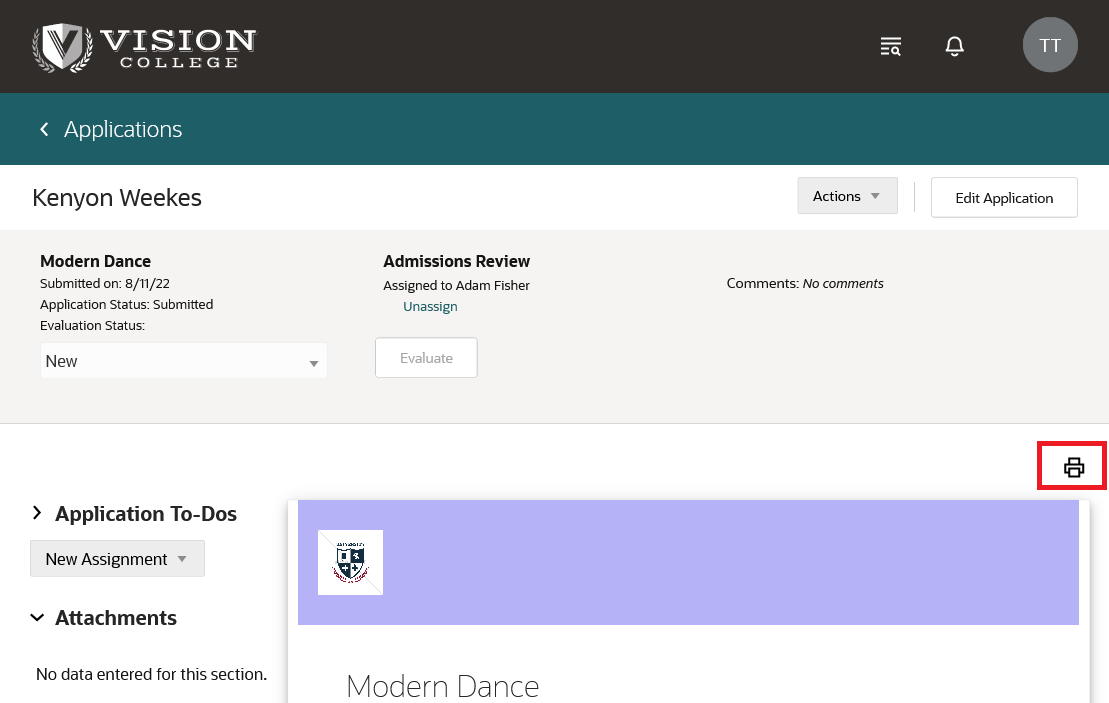
Print an Application Form
Steps to Enable
You don't need to do anything to enable this feature.
Key Resources
- For more information, refer to the Review an Application topic in the Using Student Management guide.
Role And Privileges
You need the Admissions Coordinator role to use this feature.
The Student Course Schedule is designed to simplify and clarify each step of the course scheduling and registration process. Students navigate to their course schedule to see active academic periods and prompts that indicate which course registration actions can be taken. Students can search for courses to add to their schedule, and the results are filtered to show only courses available to the student for a given period. Warning messages provide students with clear instructions on how to handle issues such as a repeated course or an unmet prerequisite. When students select course sections, they can view those sections on a scheduling calendar to see potential schedule conflicts. Key dates and deadlines are available to help students plan when to take actions such as enrolling, dropping, or switching course sections.
This redesigned Student Course Schedule supports the needs of both pay to enroll and tuition-paying students.
Let’s look at some key features of the Course Schedule:
- From any page, a student can select Course Schedule from the search navigation. This takes them directly to their schedule. Previously, students had to navigate to their My Account page and tab to the Academics section to get to their course schedule.
- In the schedule, the student can see all active academic periods and key dates for each period.
- The student can search and add courses to a period using the search field embedded in each period.
- The Select a Section button takes students to a list of available course sections. A preview calendar shows a typical week. Enrolled courses are shown on the preview calendar, and students can select the Preview check box to view a course section on the calendar. Selecting Add to Schedule and then Save adds the section to their course schedule.
- When the first day to enroll arrives, an Enroll button displays and students can enroll in the course section.
- Students see all enrolled courses for an academic period in their course schedule regardless of whether they enrolled from the learning catalog shopping cart or from the course schedule.
- When an academic plan template is active for a student's program, the student can add courses from the template directly to their schedule.
- A badge next to each academic period indicates what actions a student can take:
- Ready to Schedule: Student can start adding course sections for the academic period. But enrollment hasn’t started yet so the student will need to come back later to enroll.
- Now Enrolling: Student can enroll in course sections.
- In Progress: Classes have started and the window for a student to drop or add course sections might be closing soon or might have already closed.
- Expand an academic period to view key dates.
- Click the course name to view course details.
- Expand the course card to view course section details.
- Click the ellipses on the course card to take actions such as: Remove Course, Remove Section, Edit, View Details, Drop.
- Search for and add courses to an academic period. Search results are limited to the academic period.
- View warning messages such as an unmet prerequisite.
- Select a course section.
- Filter course section options, such as by time of day.
- Preview the course section on a scheduling calendar.
- View course section details.
- Select enrollment options and save.
- Edit enrollment options.
- Enroll in a course.
- Drop a course.
In the following example screenshots, you can see some of the Course Schedule features we've discussed.
Let's look at an example of a student who is a Spanish major and wants to start enrolling in courses. As you can see, the 2022 Fall period is now enrolling. The student adds a Spanish course to their schedule:
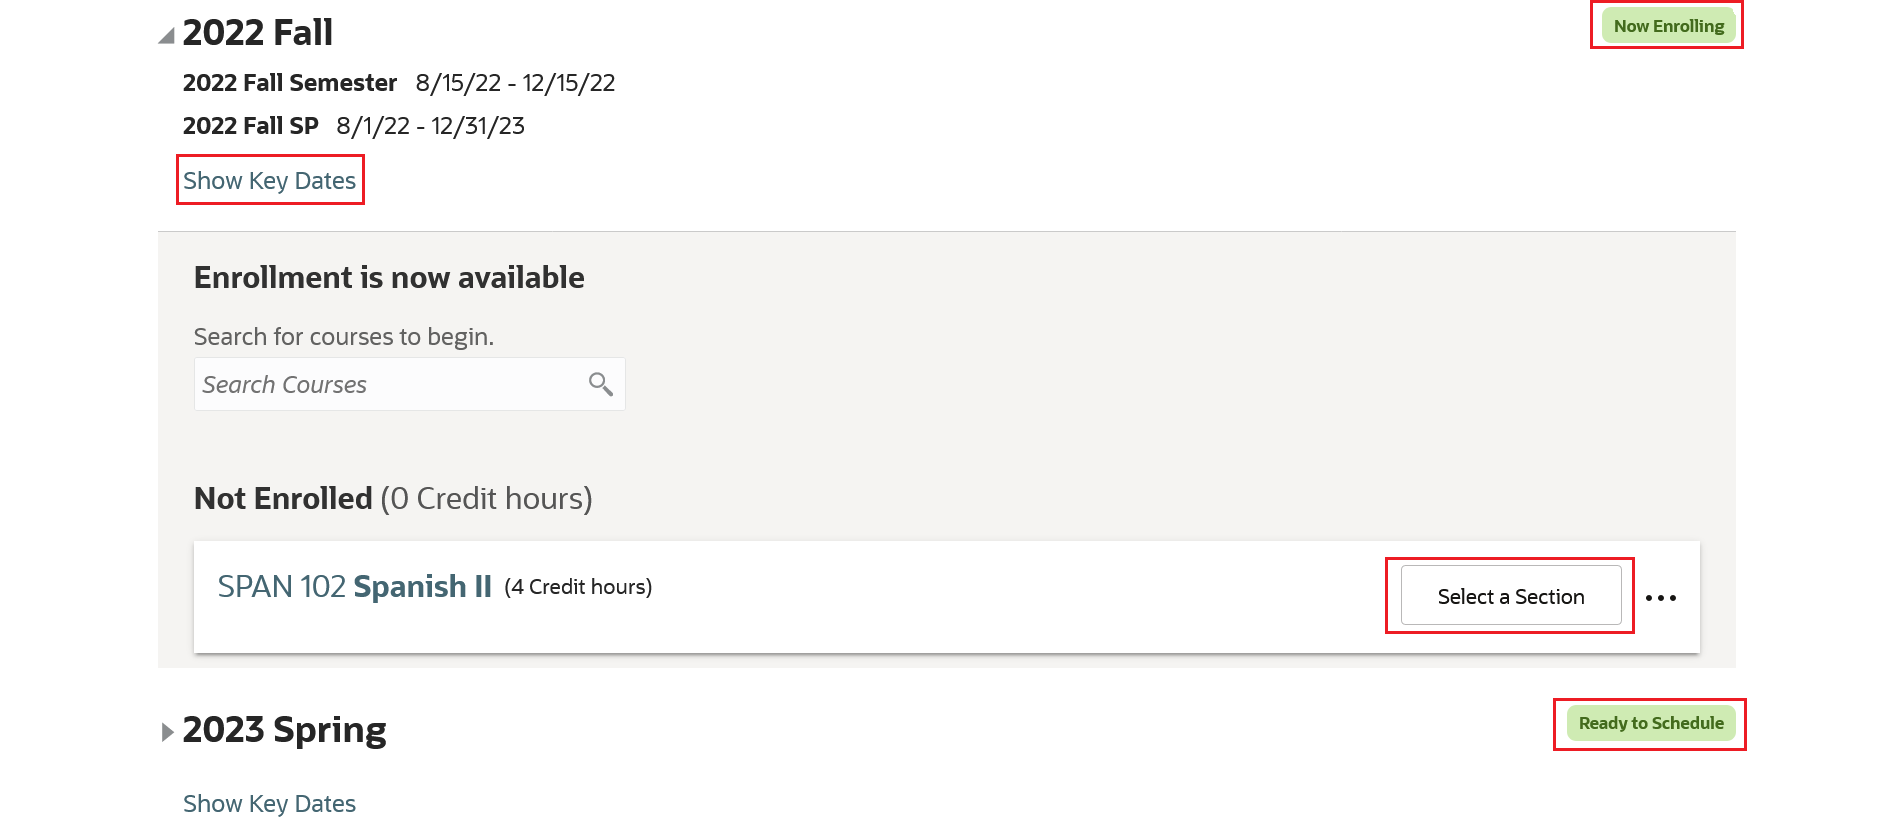
Course Schedule Example 1
The student clicks Select a Section and then indicates they want to see only sections that are available in the afternoon. Here's what they see:
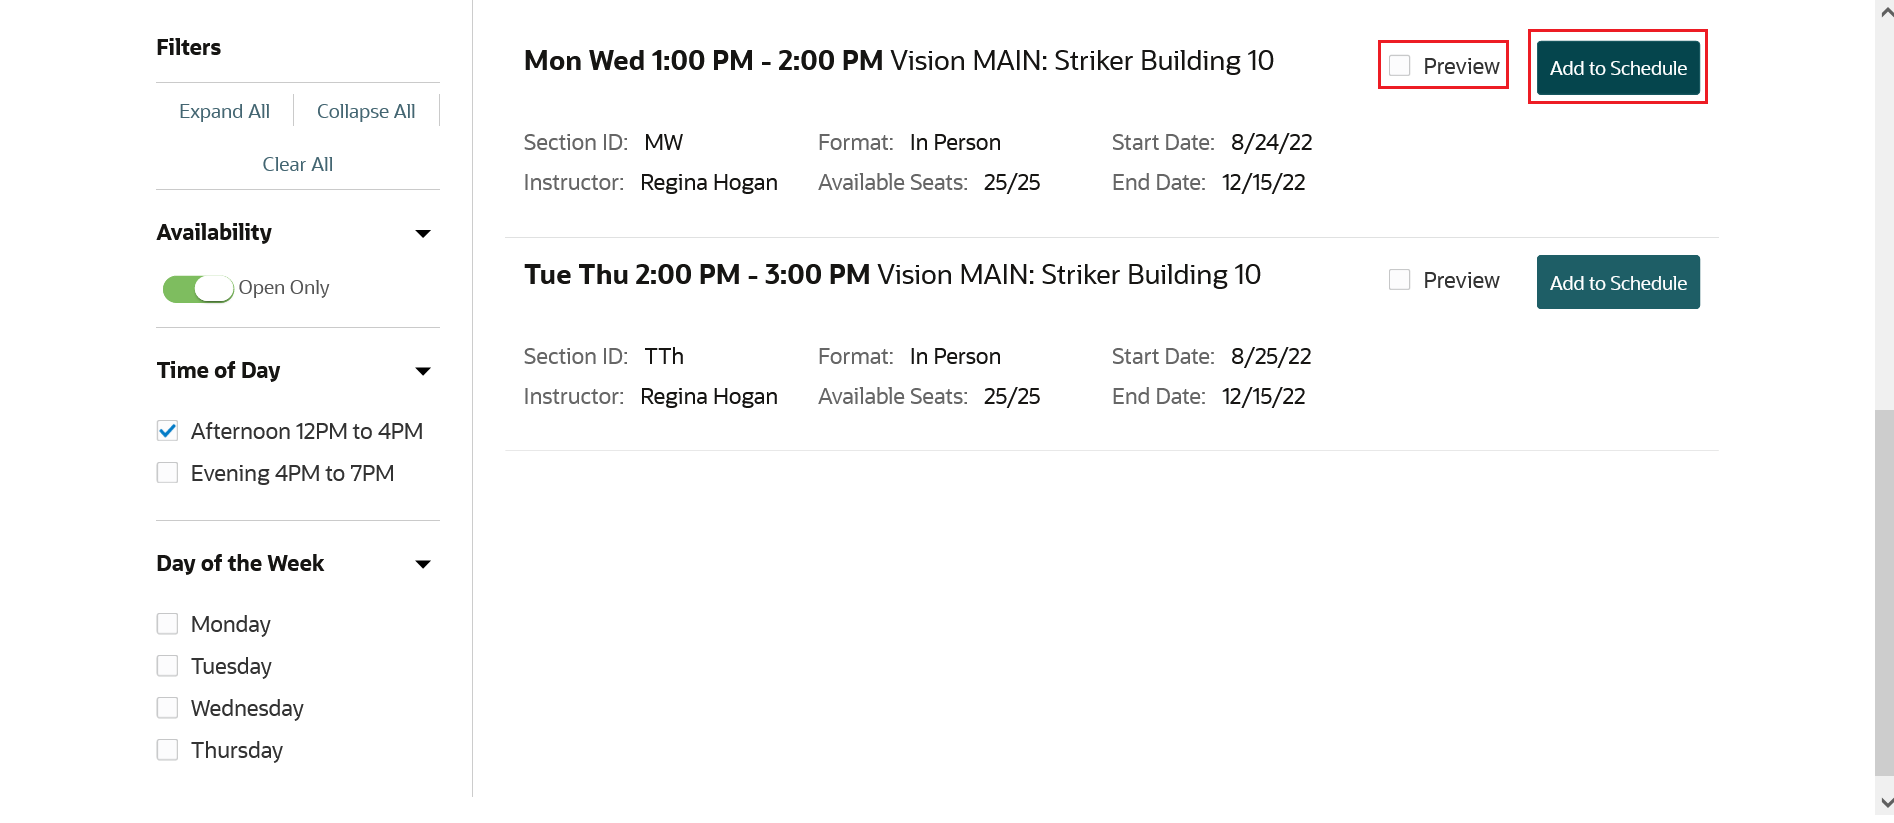
Course Schedule Example 2
If the student selected Preview, they could see the Spanish course section times on a scheduling calendar. And they could see the times for other course sections they previously added to their schedule or enrolled in. The student decides on the 1PM section. Here's the information they see when they click Add to Schedule:
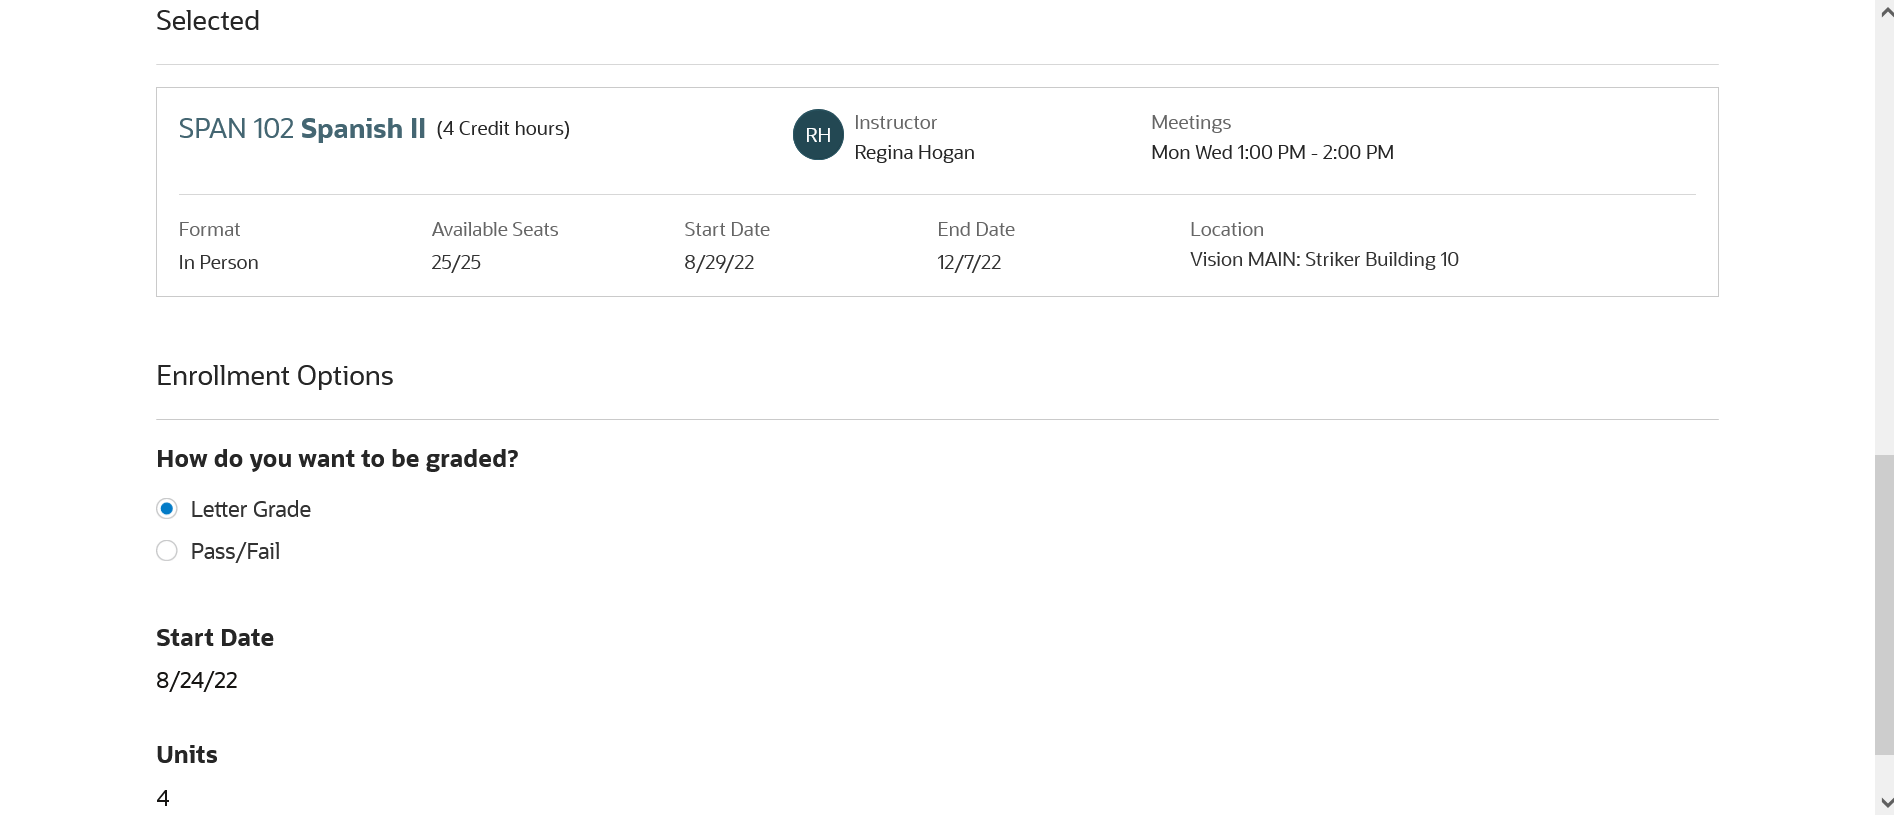
Course Schedule Example 3
Here's what the student sees after they click Save. The student can now go ahead and enroll in the section. The student can also edit the section or remove the course or section.
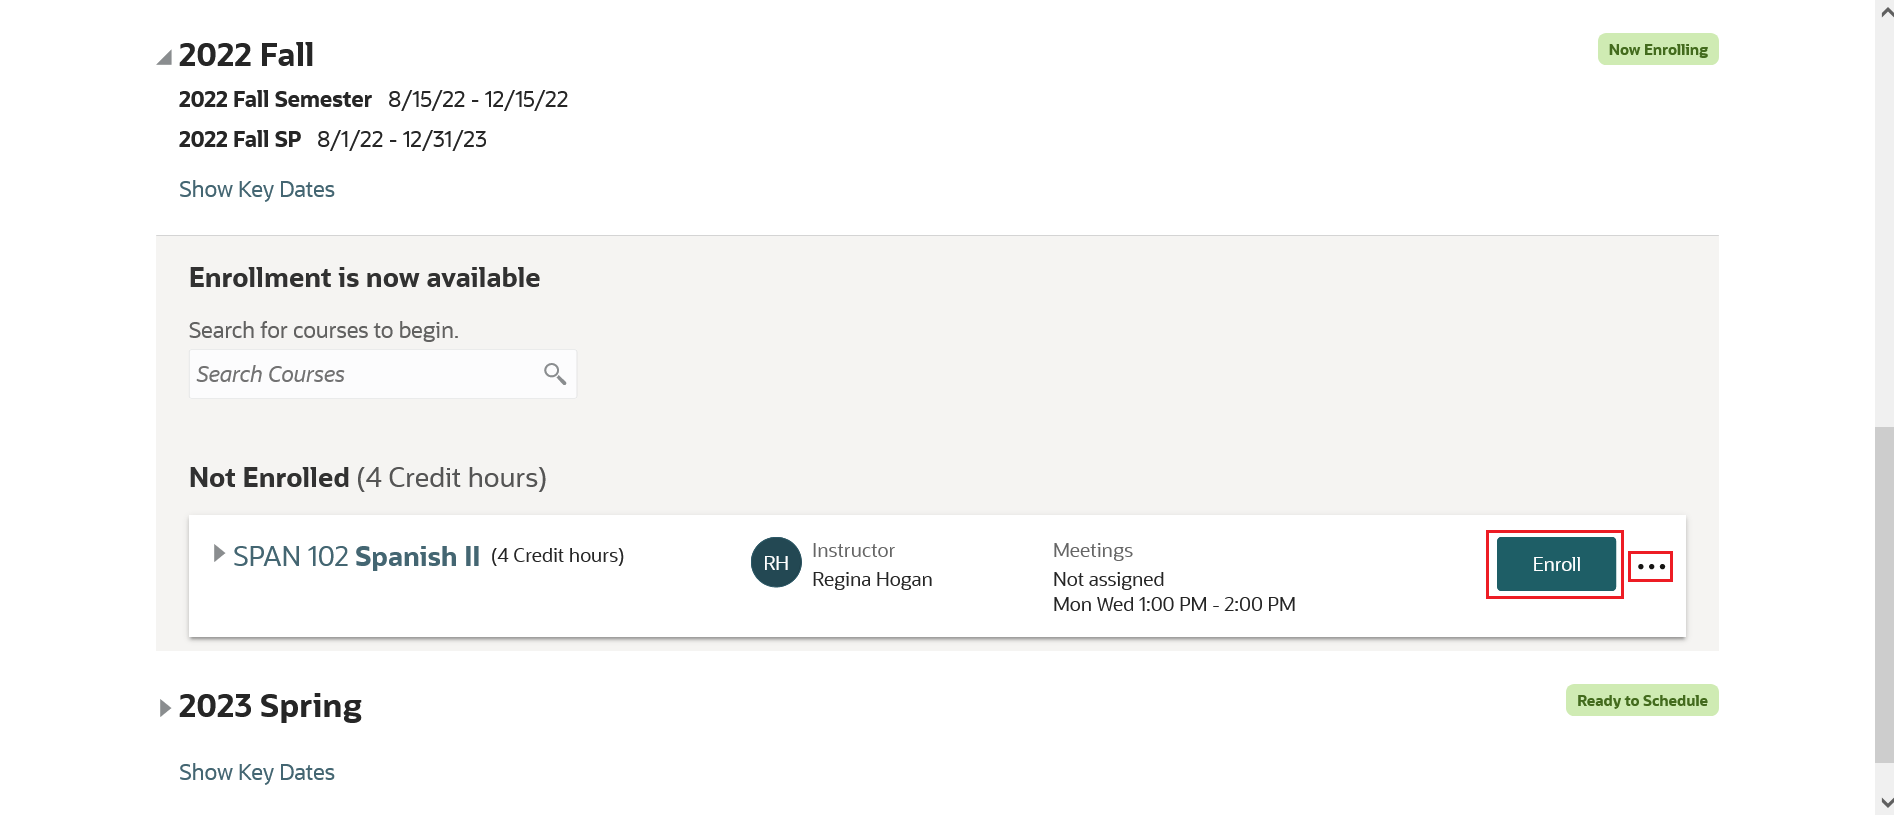
Course Schedule Example 4
The student clicks Enroll and their schedule shows they are enrolled in the course section:
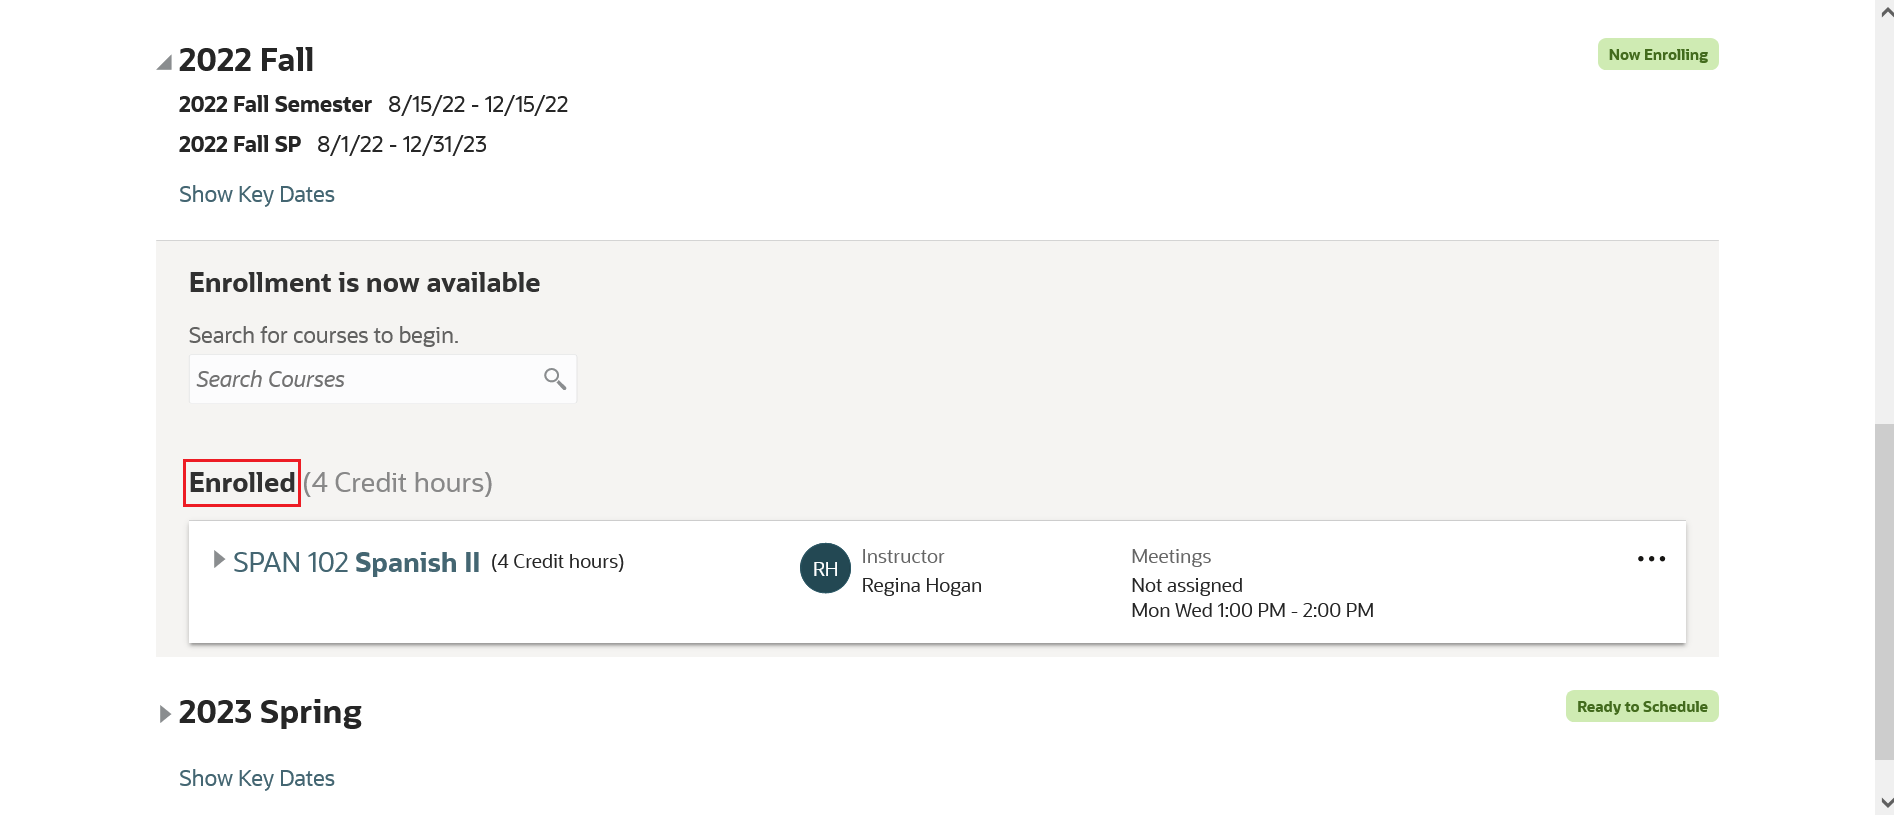
Course Schedule Example 5
Configure Your Academic Structures for the Student Course Schedule
When you set up the academic structures for your institution, be sure to take these specific steps to provide the configurations needed for the Student Course Schedule:
- Add the Reporting Period tag to academic period attribute dates.
Before you create academic periods, go to the Academic Period Attribute Dates page and add the Reporting Period tag to these attributes:
- First Date to Search
- First Date to Enroll
- Last Date to Enroll
- Last Date to Drop
- Create academic reporting periods and make sure that academic periods are associated with a reporting period.
- Add reporting periods to the academic period sequence.
- Make sure that students are enrolled in a program of study.
In 22D, students must be enrolled in a program of study to see active periods in their course schedule.
- (Optional) Create an academic plan template for a program of study.
This step is optional. If you would like to create a guided pathway for a program, you can do so by creating an academic plan template.
In summary, as you can see, the redesign of the Student Course Schedule means that students can more easily complete their course scheduling and registration tasks.
Steps to Enable
You don't need to do anything to enable this feature.