
This document will continue to evolve as existing sections change and new information is added. All updates appear in the following table:
| Date | Module | Feature | Notes |
|---|---|---|---|
| 09 JAN 2024 | Service Logistics | Improve Part Selection | Updated document. Revised feature description. |
| 19 MAR 2021 | Created initial document. |
This guide outlines the information you need to know about new or improved functionality in this update, and describes any tasks you might need to perform for the update. Each section includes a brief description of the feature, the steps you need to take to enable or begin using the feature, any tips or considerations that you should keep in mind, and the resources available to help you.
Security and New Features
The Role section of each feature identifies the security privilege and job role required to use the feature. If feature setup is required, then the Application Implementation Consultant job role is required to perform the setup, unless otherwise indicated. (If a feature doesn't include a Role section, then no security changes are required to use the feature.)
If you have created job roles, then you can use this information to add new privileges to those roles as needed. For details about how to compare your configured job roles to predefined job roles and add security artifacts to your configured job roles, see the Security Console and Roles and Role Assignments chapters in the Oracle SCM Cloud: Securing SCM guide on the Oracle Help Center.
Give Us Feedback
We welcome your comments and suggestions to improve the content. Please send us your feedback at oracle_fusion_applications_help_ww_grp@oracle.com.
Optional Uptake of New Features (Opt In)
Oracle Cloud Applications delivers new updates every quarter. This means every three months you'll receive new functionality to help you efficiently and effectively manage your business. Some features are delivered Enabled meaning they are immediately available to end users. Other features are delivered Disabled meaning you have to take action to make available. Features delivered Disabled can be activated for end users by stepping through the following instructions using the following privileges:
- Review Applications Offering (ASM_REVIEW_APPLICATIONS_OFFERINGS_PRIV)
- Configure Oracle Fusion Applications Offering (ASM_CONFIGURE_OFFERING_PRIV)
Here’s how you opt in to new features:
- Click Navigator > My Enterprise > New Features.
- On the Features Overview page, select your offering to review new features specific to it. Or, you can leave the default selection All Enabled Offerings to review new features for all offerings.
- On the New Features tab, review the new features and check the opt-in status of the feature in the Enabled column. If a feature has already been enabled, you will see a check mark. Otherwise, you will see an icon to enable the feature.
- Click the icon in the Enabled column and complete the steps to enable the feature.
In some cases, you might want to opt in to a feature that's not listed in the New Features work area. Here's how to opt in:
- Click Navigator > My Enterprise > Offerings.
- On the Offerings page, select your offering, and then click Opt In Features.
- On the Opt In page, click the Edit Features (pencil) icon for the offering, or for the functional area that includes your feature.
- On the Edit Features page, complete the steps to enable the feature.
For more information and detailed instructions on opting in to new features for your offering, see Offering Configuration.
Opt In Expiration
Occasionally, features delivered Disabled via Opt In may be enabled automatically in a future update. This is known as an Opt In Expiration. If your cloud service has any Opt In Expirations you will see a related tab in this document. Click on that tab to see when the feature was originally delivered Disabled, and when the Opt In will expire, potentially automatically enabling the feature. You can also click here to see features with Opt In Expirations across all Oracle Cloud Applications.
Column Definitions:
Report = New or modified, Oracle-delivered, ready to run reports.
UI or Process-Based: Small Scale = These UI or process-based features are typically comprised of minor field, validation, or program changes. Therefore, the potential impact to users is minimal.
UI or Process-Based: Larger Scale* = These UI or process-based features have more complex designs. Therefore, the potential impact to users is higher.
Features Delivered Disabled = Action is needed BEFORE these features can be used by END USERS. These features are delivered disabled and you choose if and when to enable them. For example, a) new or expanded BI subject areas need to first be incorporated into reports, b) Integration is required to utilize new web services, or c) features must be assigned to user roles before they can be accessed.
| Ready for Use by End Users Reports plus Small Scale UI or Process-Based new features will have minimal user impact after an update. Therefore, customer acceptance testing should focus on the Larger Scale UI or Process-Based* new features. |
Customer Must Take Action before Use by End Users Not disruptive as action is required to make these features ready to use. As you selectively choose to leverage, you set your test and roll out timing. |
|||||
|---|---|---|---|---|---|---|
| Feature |
Report |
UI or |
UI or |
|
||
Service Logistics Cloud-Pre 21D
Create Multiple Depot Repair Work Orders for a Single RMA
This feature provides the following new depot repair capabilities:
- The Depot Repair Create Work Order UI has been enhanced to enable you to create multiple work orders for a single RMA order line.
- The Depot Repair Work Bench Overview tab now displays all of the RMA order line’s repair work orders. This tab also enables you to drill down to the associated work order UI.
- The Depot Repair Work Bench Parts, Labor, and Expenses tabs now display the work order from which they were generated.
CREATE DEPOT REPAIR WORK ORDER UI
This UI has been enhanced to create multiple work orders for a single depot repair RMA line. The organization that will be performing the work order has been added to the UI. The organization defaults from the current location of the asset being repaired. However, you can change it to any organization that can service the asset’s operating organization as defined in the Manage Maintenance Organization Relationships UI. A sequence number (e.g. -1, -2, -3) has been added to the work order number to clearly identify the each of the work orders created for the repair RMA.
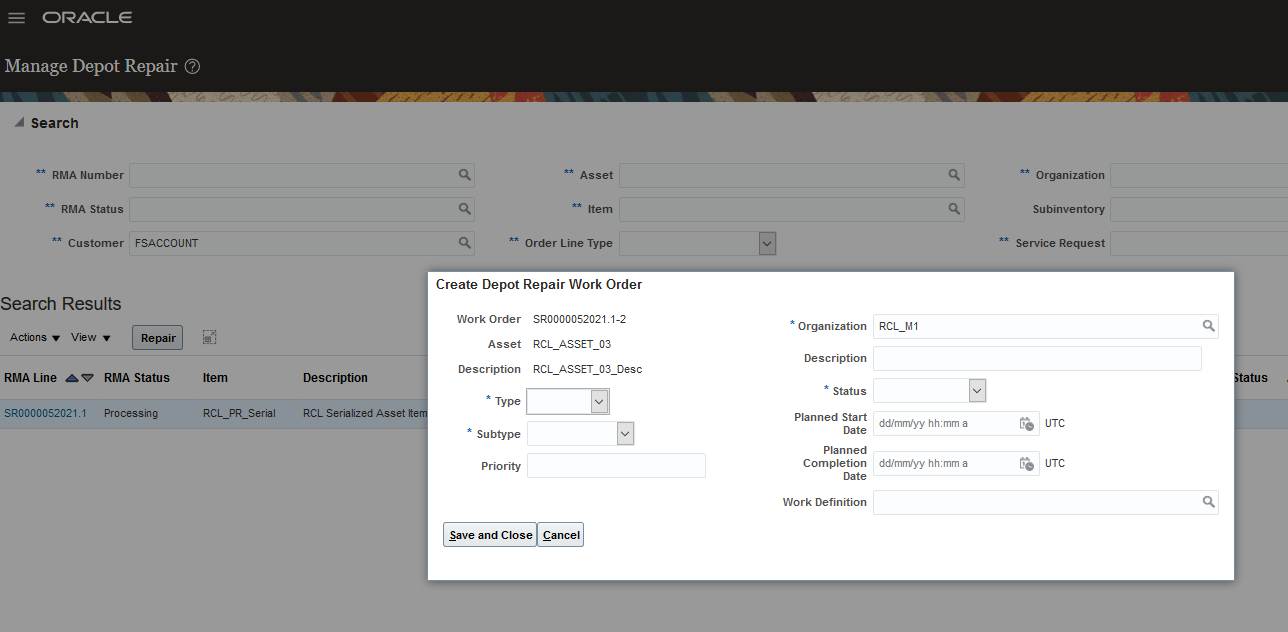
Create Depot Repair Work Order UI
DEPOT REPAIR WORKBENCH OVERVIEW TAB
The Depot Repair Work Bench Overview tab now displays all of the depot repair work orders created for the RMA. It also includes a drill down option that enables you to quickly access the Edit Work Order UI.

Deport Repair Workbench Overview tab with Multiple Depot Repair Work Orders
You can now drill down on the work order number to open the Edit Work Order UI as depicted in the screen shot below.
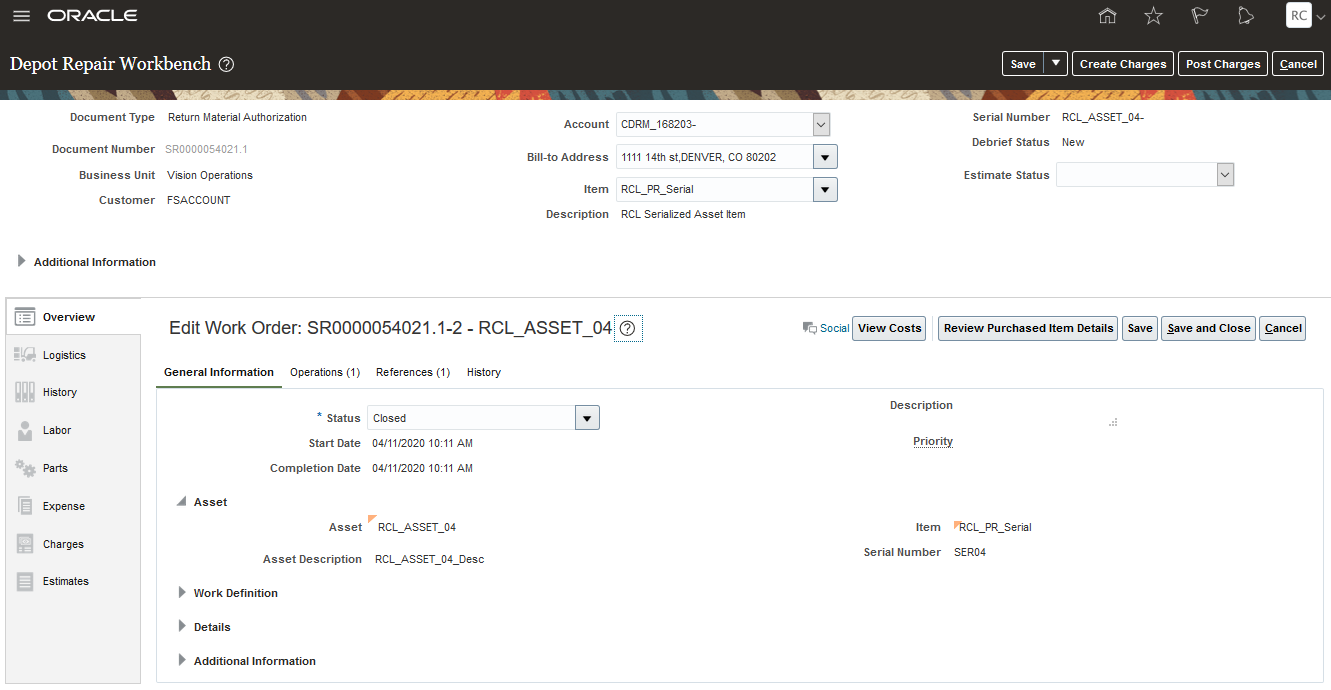
Depot Repair Workbench Overview Tab - Work Order Drill Down to Edit Work Order UI
DISPLAY REPAIR WORK ORDER NUMBER IN DEBRIEF TABS
The Depot Repair Workbench debrief tabs (Parts, Labor, and Expenses) now display the depot repair work order from where they were debriefed by the repair engineer.
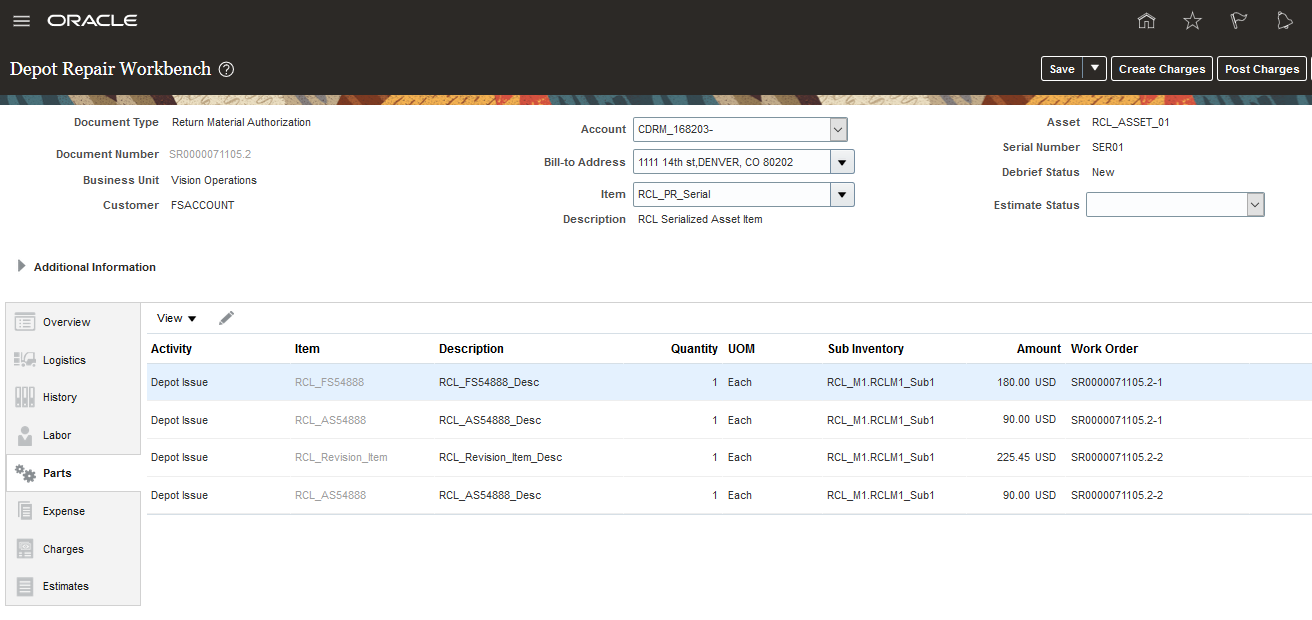
Depot Repair Workbench Parts Tab with Multiple Work Orders
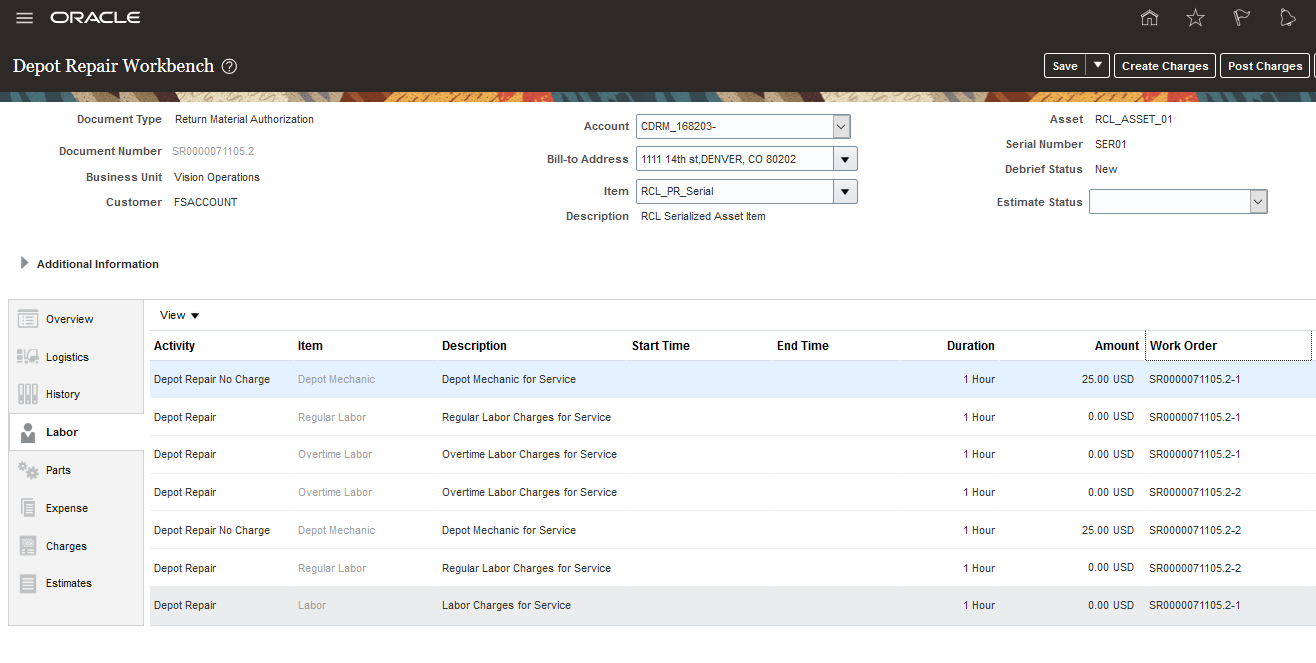
Depot Repair Workbench Labor Tab with Multiple Work Orders
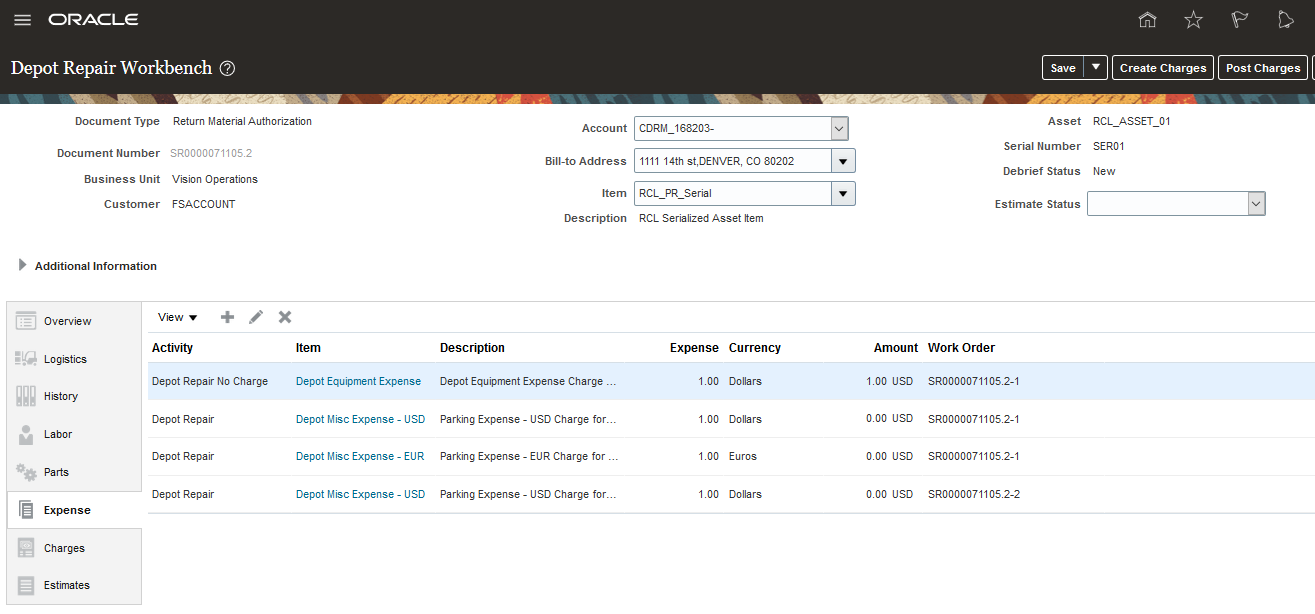
Depot Repair Workbench Tab with Multiple Work Orders
Being able to create multiple repair work orders for a single repair RMA enables you to capture costs and generate charges for repair work that is performed in multiple locations. This increases efficiency and accuracy by eliminating manual billing. It also provides a more complete picture of depot repair profitability.
Steps to Enable
You don't need to do anything to enable this feature.
Access Requirements
To use this feature, the following privileges or roles are required:
- Job Role Name and Code:
- Depot Repair Manager (ORA_RCL_DEPOT_REPAIR_MANAGER_JOB) - This role gives the user access to the Manage Depot Repair UI and the Depot Repair Workbench UI
Support Manual Adjustments for Estimates and Fixed Charges
This feature enables you to manually adjust field service and depot repair estimates as well as create fixed charges for flat fee field service and depot repair services.
ADJUSTING ESTIMATES
You can now manually adjust prices and their charge amounts in the Estimates tab of the Manage Charges and Estimates UI and the Depot Repair Workbench UI. To adjust the amount the customer is charged, click on the pencil icon in the Your Price column to open the Edit Price UI. Here you enter the adjustment amount and a reason for the manual price change. In the example below, the price for part RCL_AS588 was adjusted down by $2.90 for a price match.
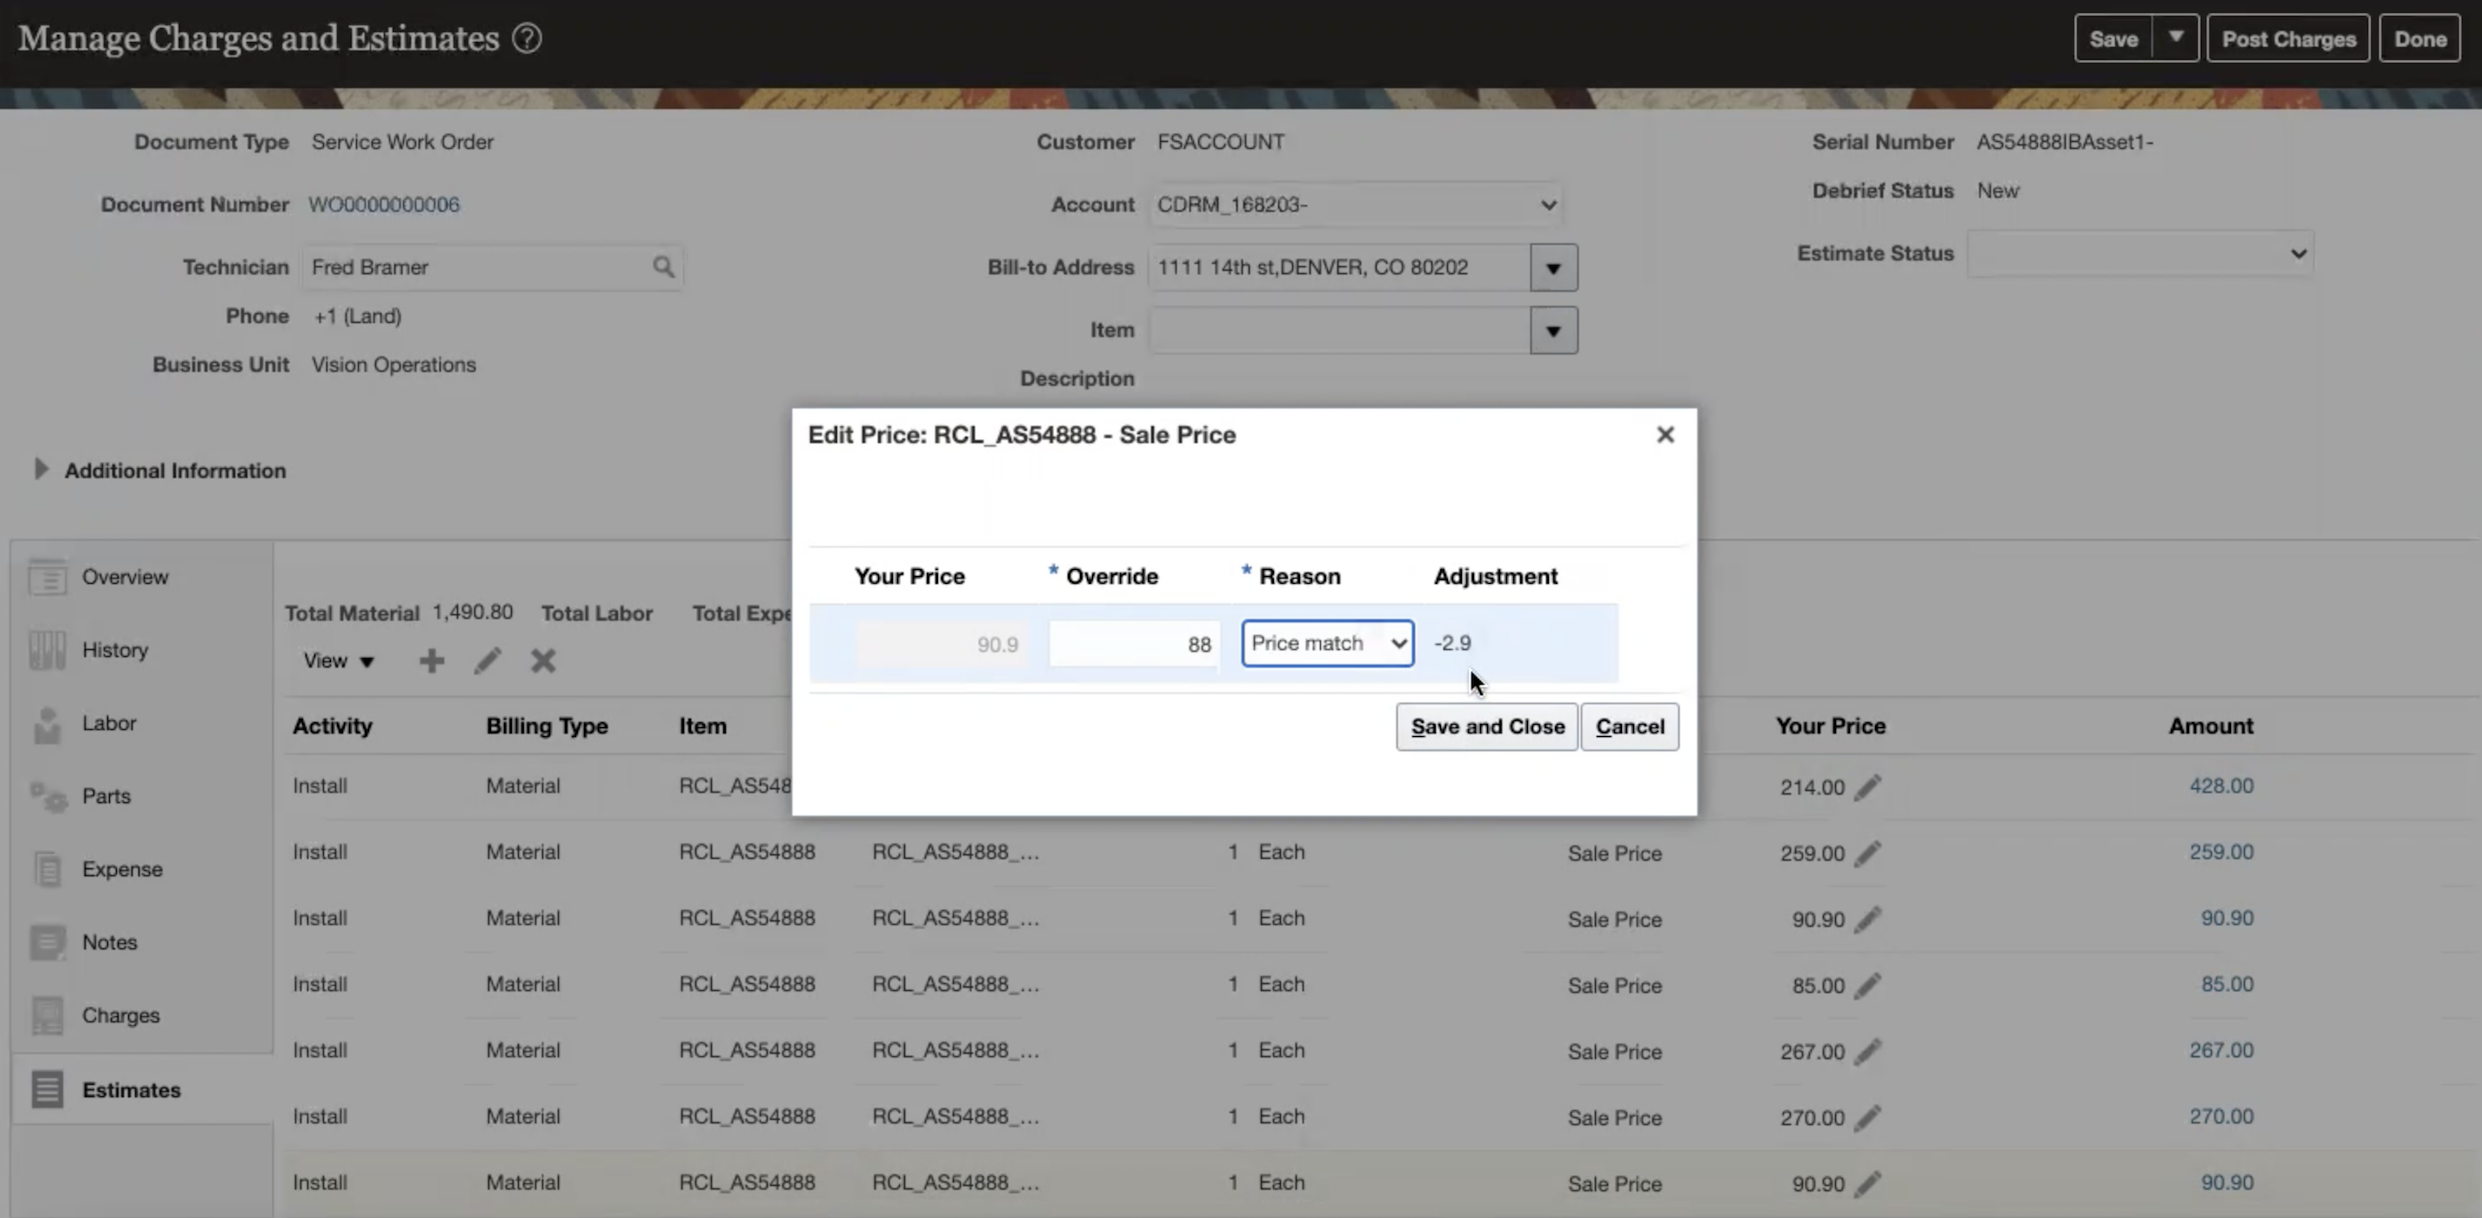
Manage Charges and Estimates UI - Estimates Tab - Edit Price UI
ADDING FIXED CHARGES
You can now add fixed service charges in both the Charges and Estimates tabs in the Manage Charges and Estimates UI and in the Depot Repair Workbench UI. To add fixed charges, click the plus (+) icon to open the Add Fixed Charge Details UI or the Add Estimates UI. In the example below, an estimate for a fixed Emergency Response charge is being created.
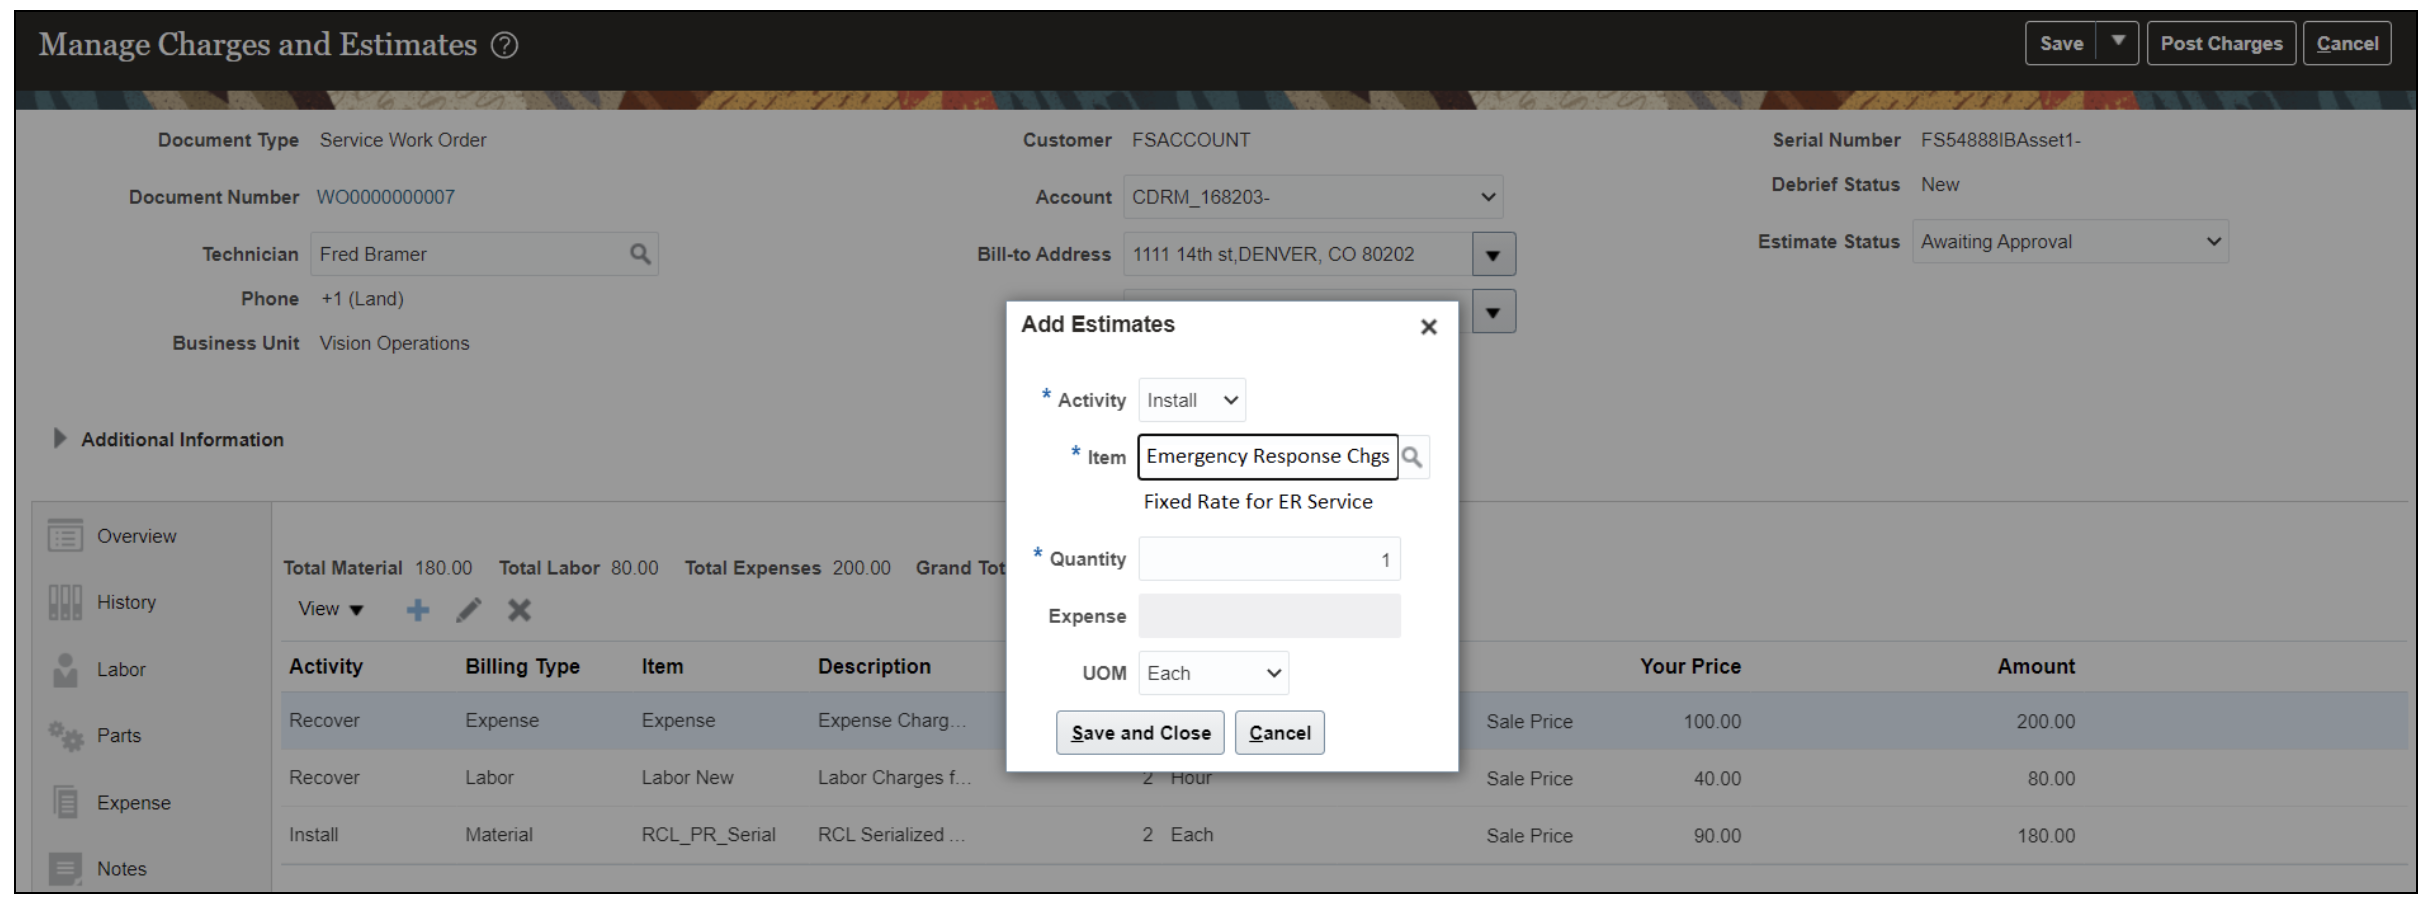
Manage Charges and Estimates UI - Estimates Tab - Add Estimates Dialog Box
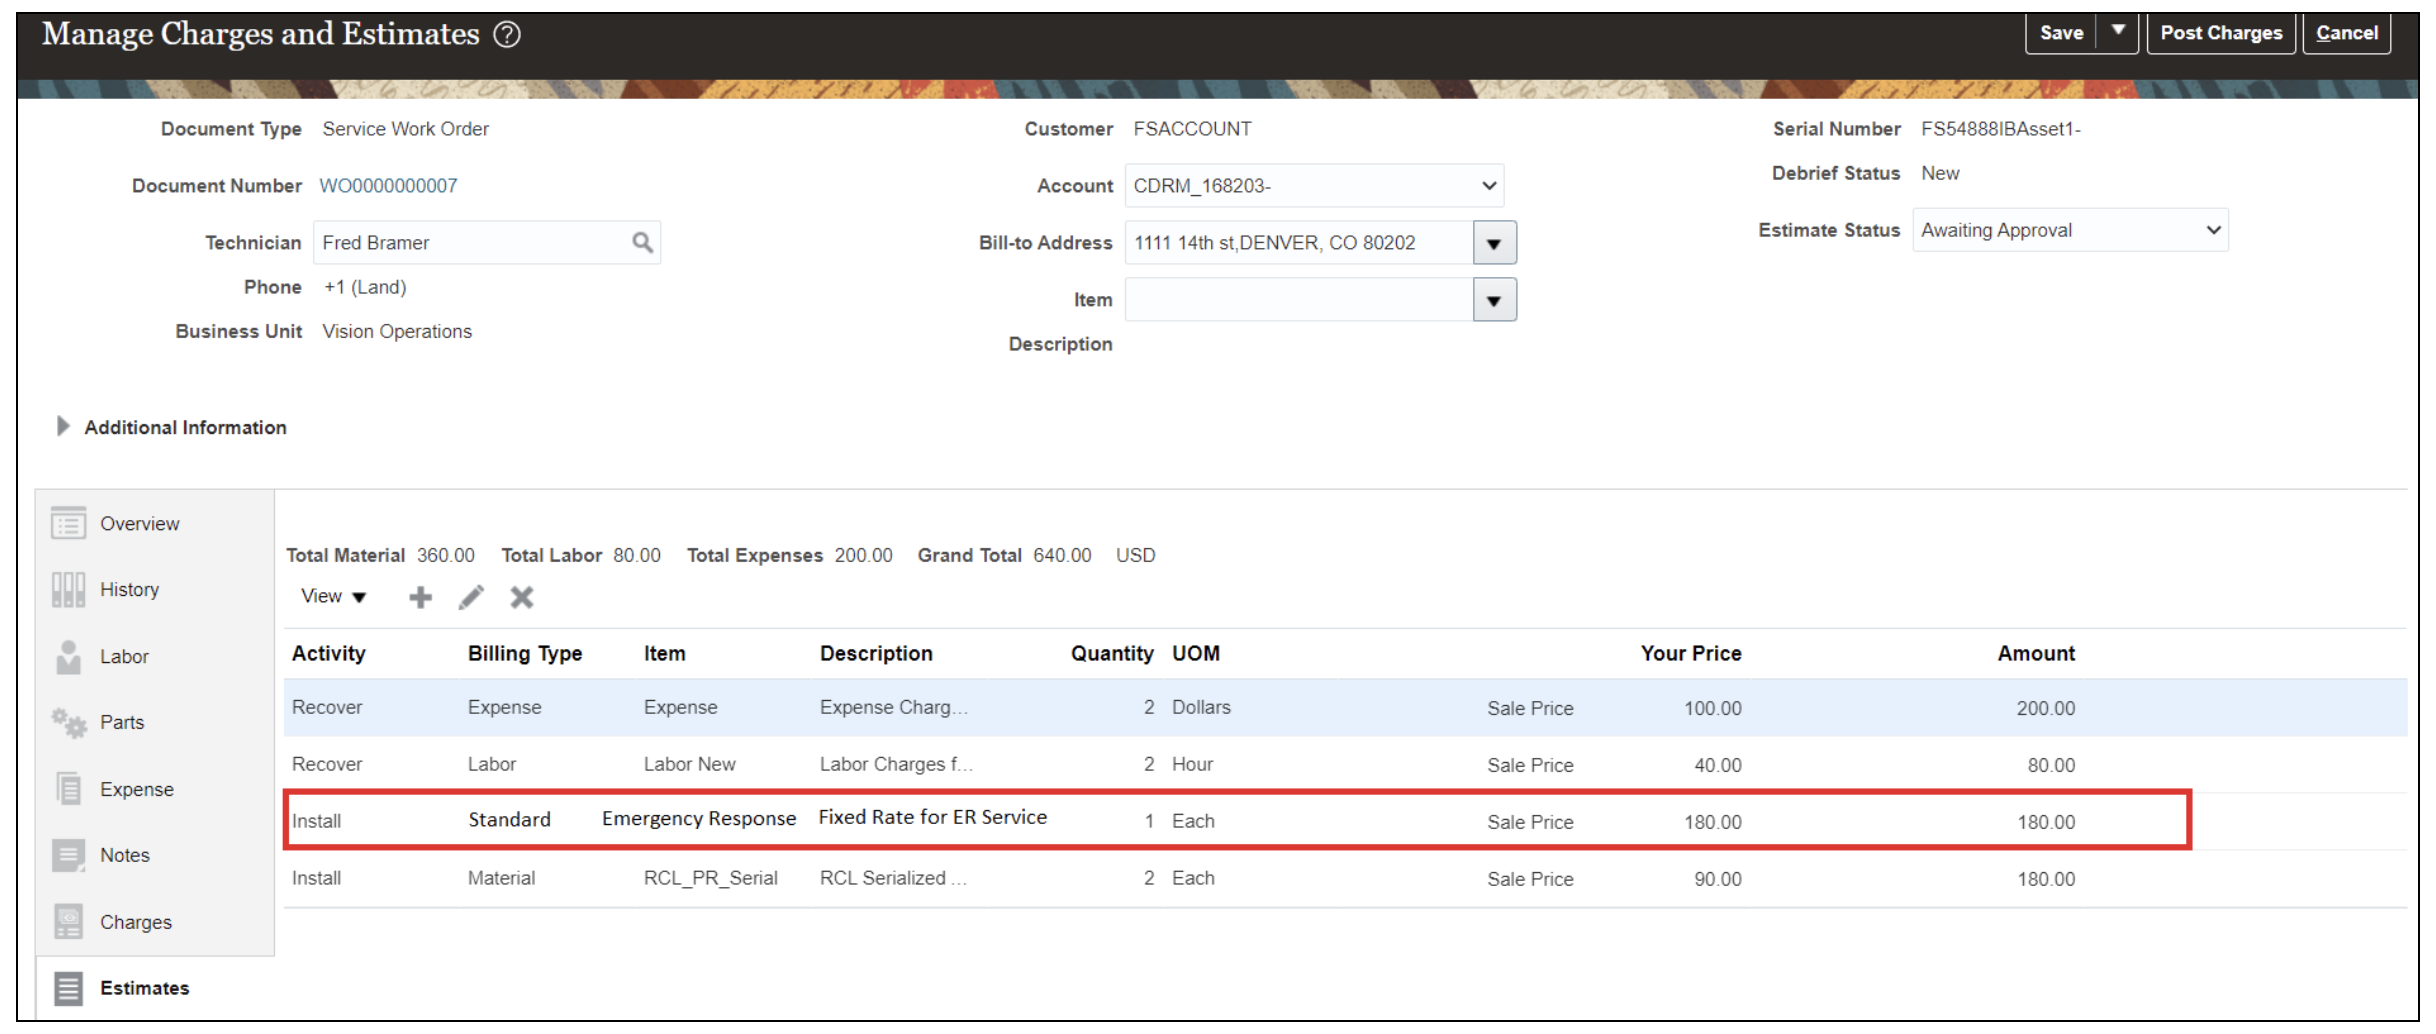
Manage Charges and Estimates UI - Estimates Tab with Emergency Response fixed charge
VIEWING ESTIMATE TOTALS
You can now view the estimated total in the Manage Charges and Estimates UI at the bottom of the Charges tab right above the actual charge total.
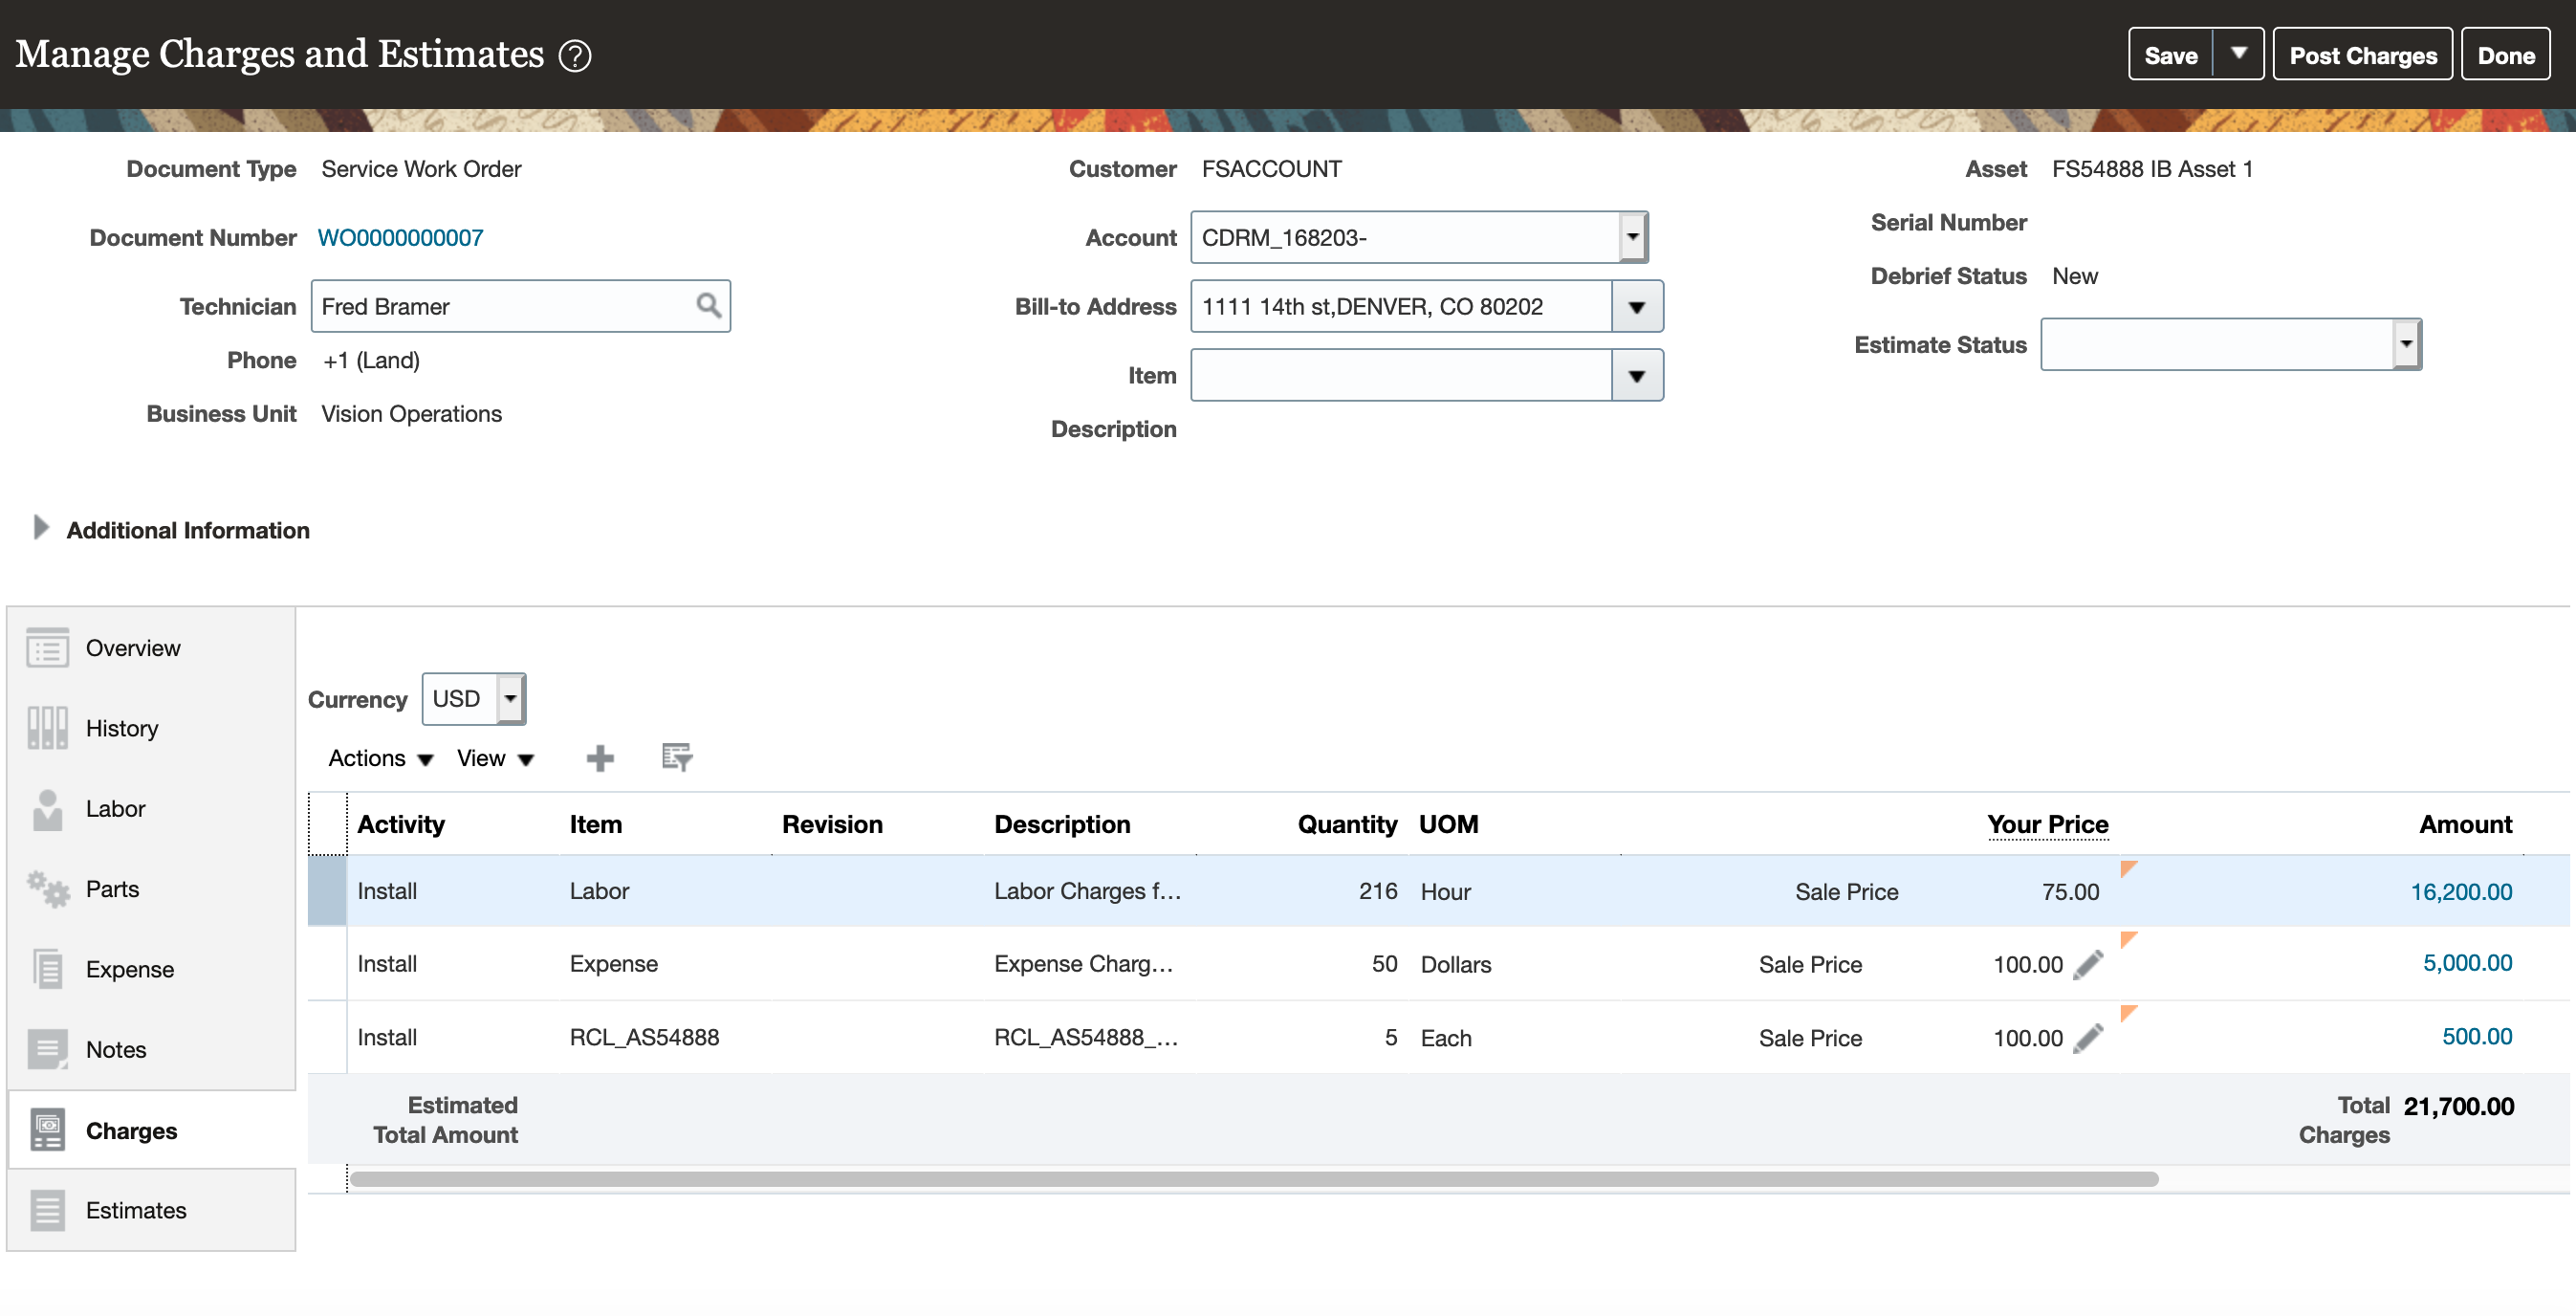
Manage Charges and Estimates UI - Estimate Total
The Manual Adjustment for Estimates feature allows you to modify charge amounts so you can to provide more accurate estimates and support the price negotiation process.
The Fixed Charges feature allows you to create service charges for flat fee services services like calibration, travel, and labor minimum which will elimate manual billing.
Steps to Enable
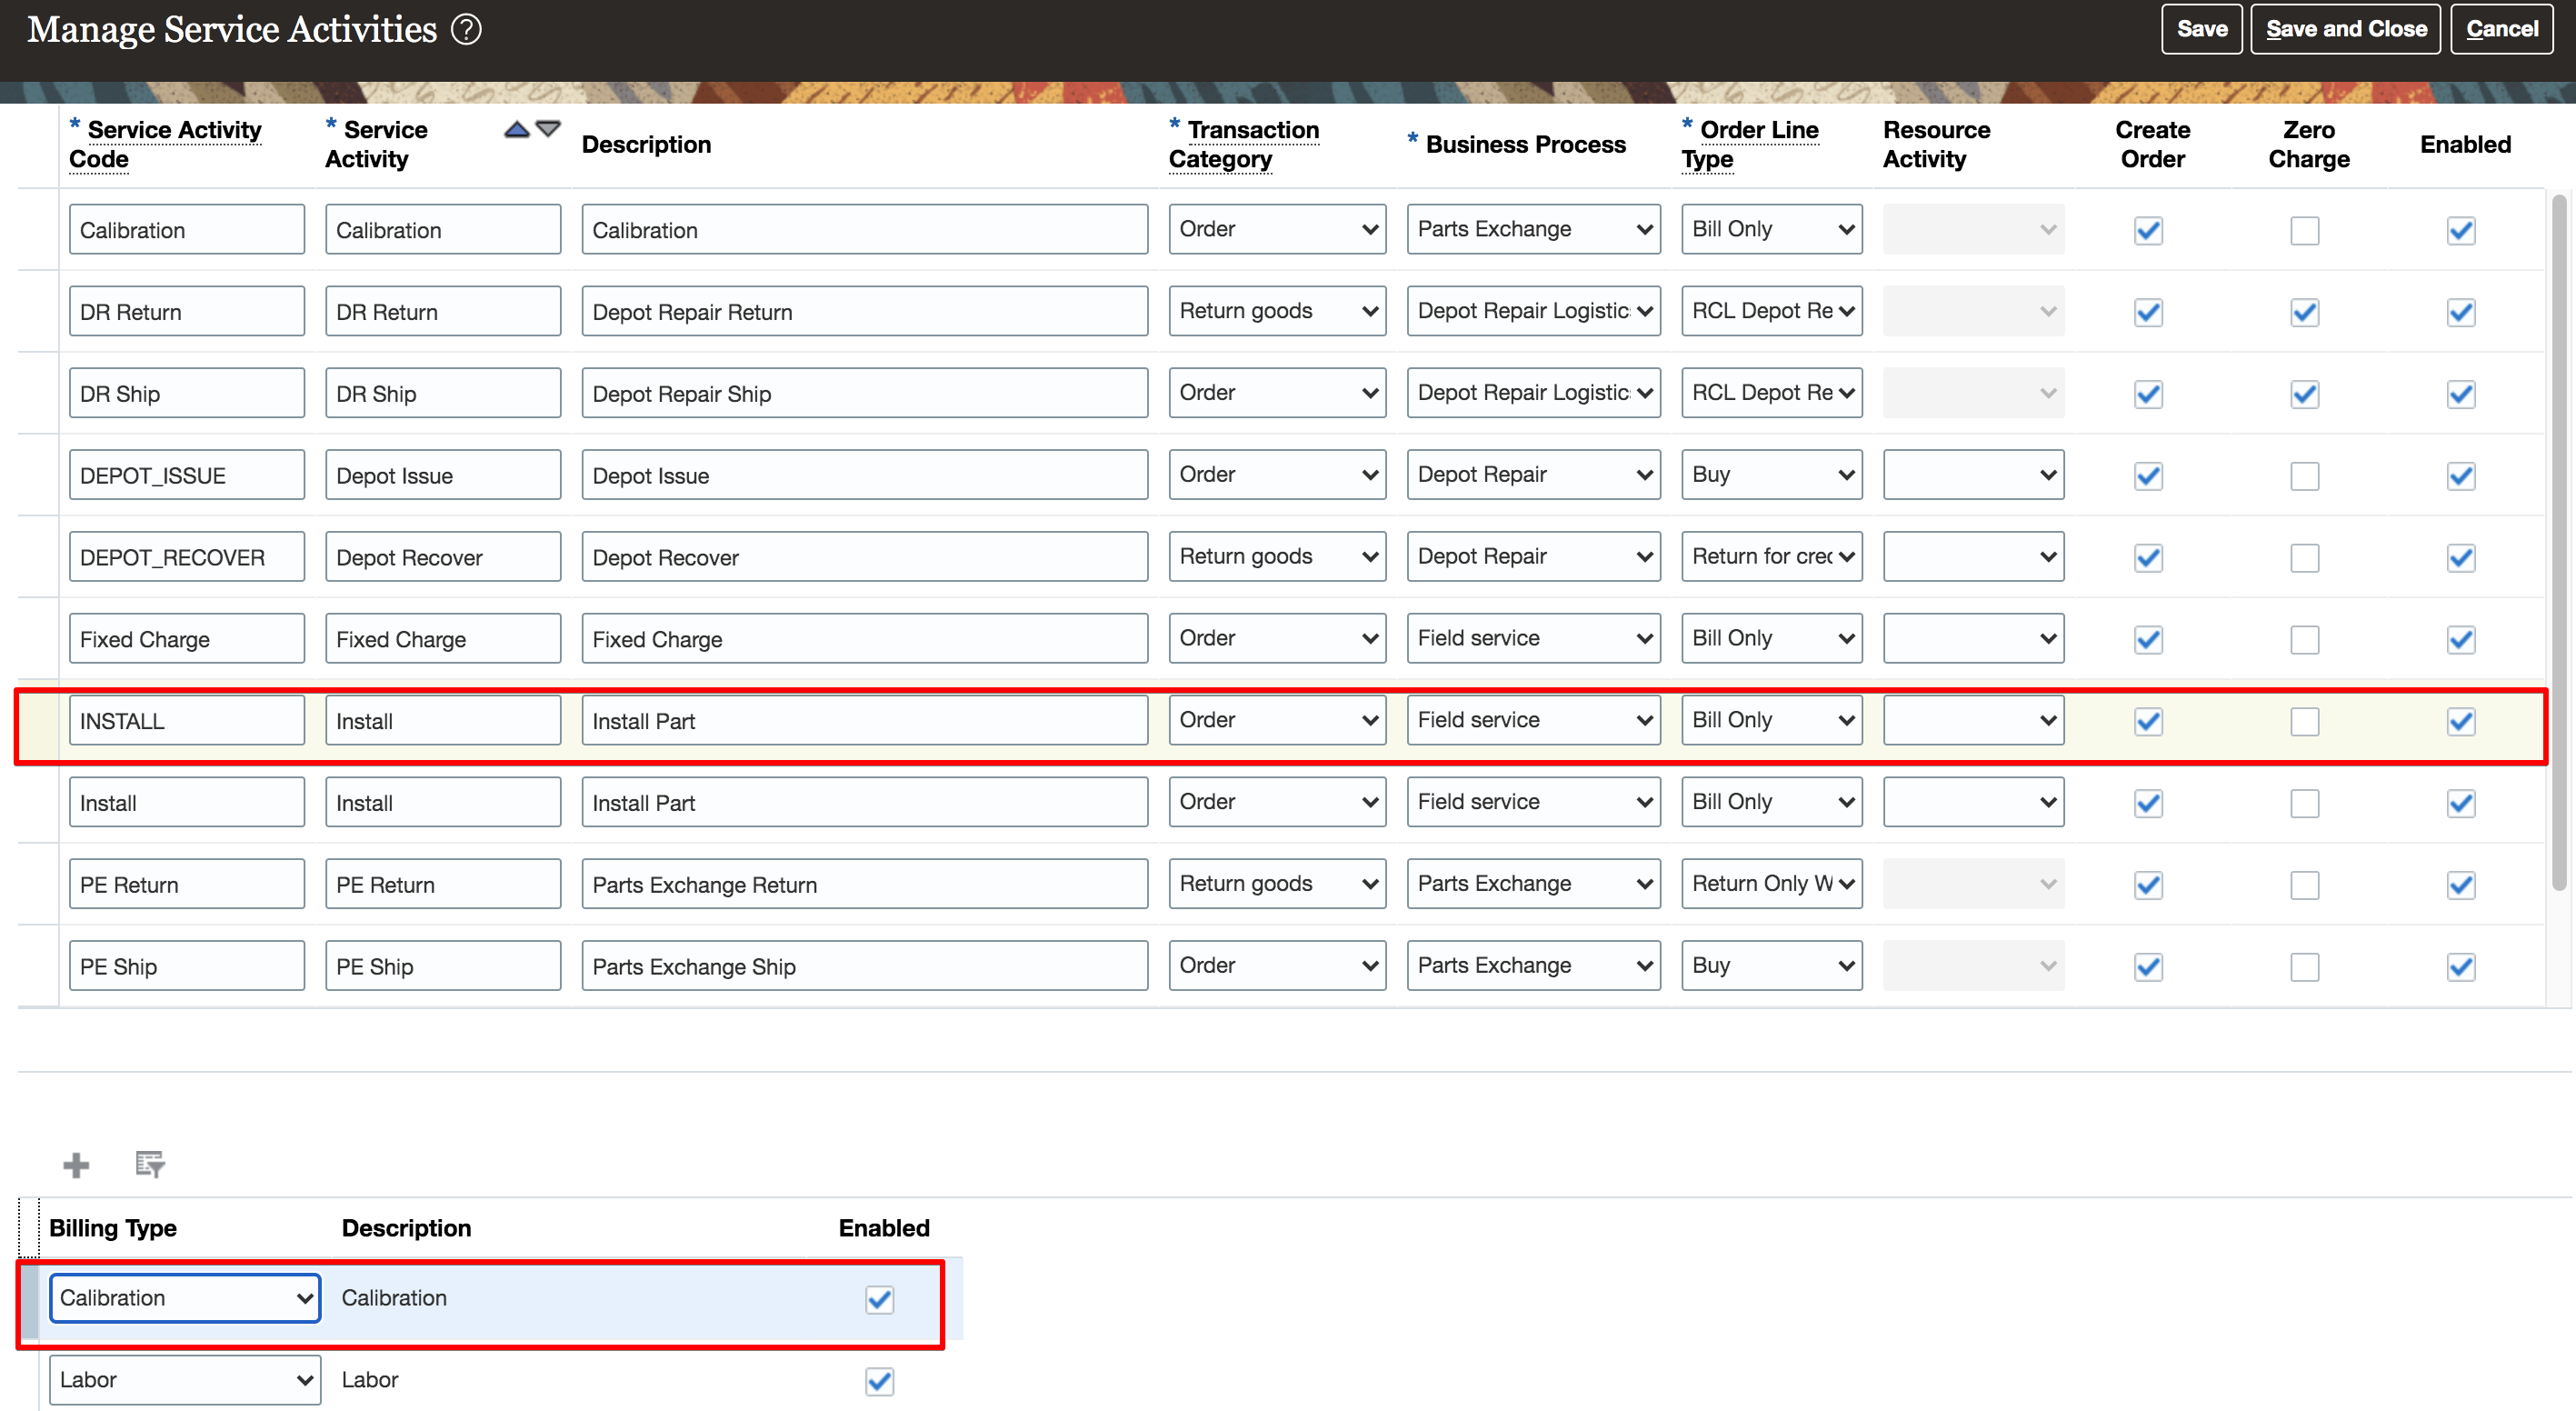
To create fixed charges, you must setup at least one new Billing Type, Service Activity Code, and Item.
- Create fixed charge billing types.
- Associate these new fixed charge billing types to the new seeded Fixed Charge (FIXCHARGE) billing category.
- Associate service activities (new or existing) to the new billing types created in step 1.
- Create fixed charge items and associate them to the new billing types created in step 1.
- Setup prices for the fixed charge items created in step 4.
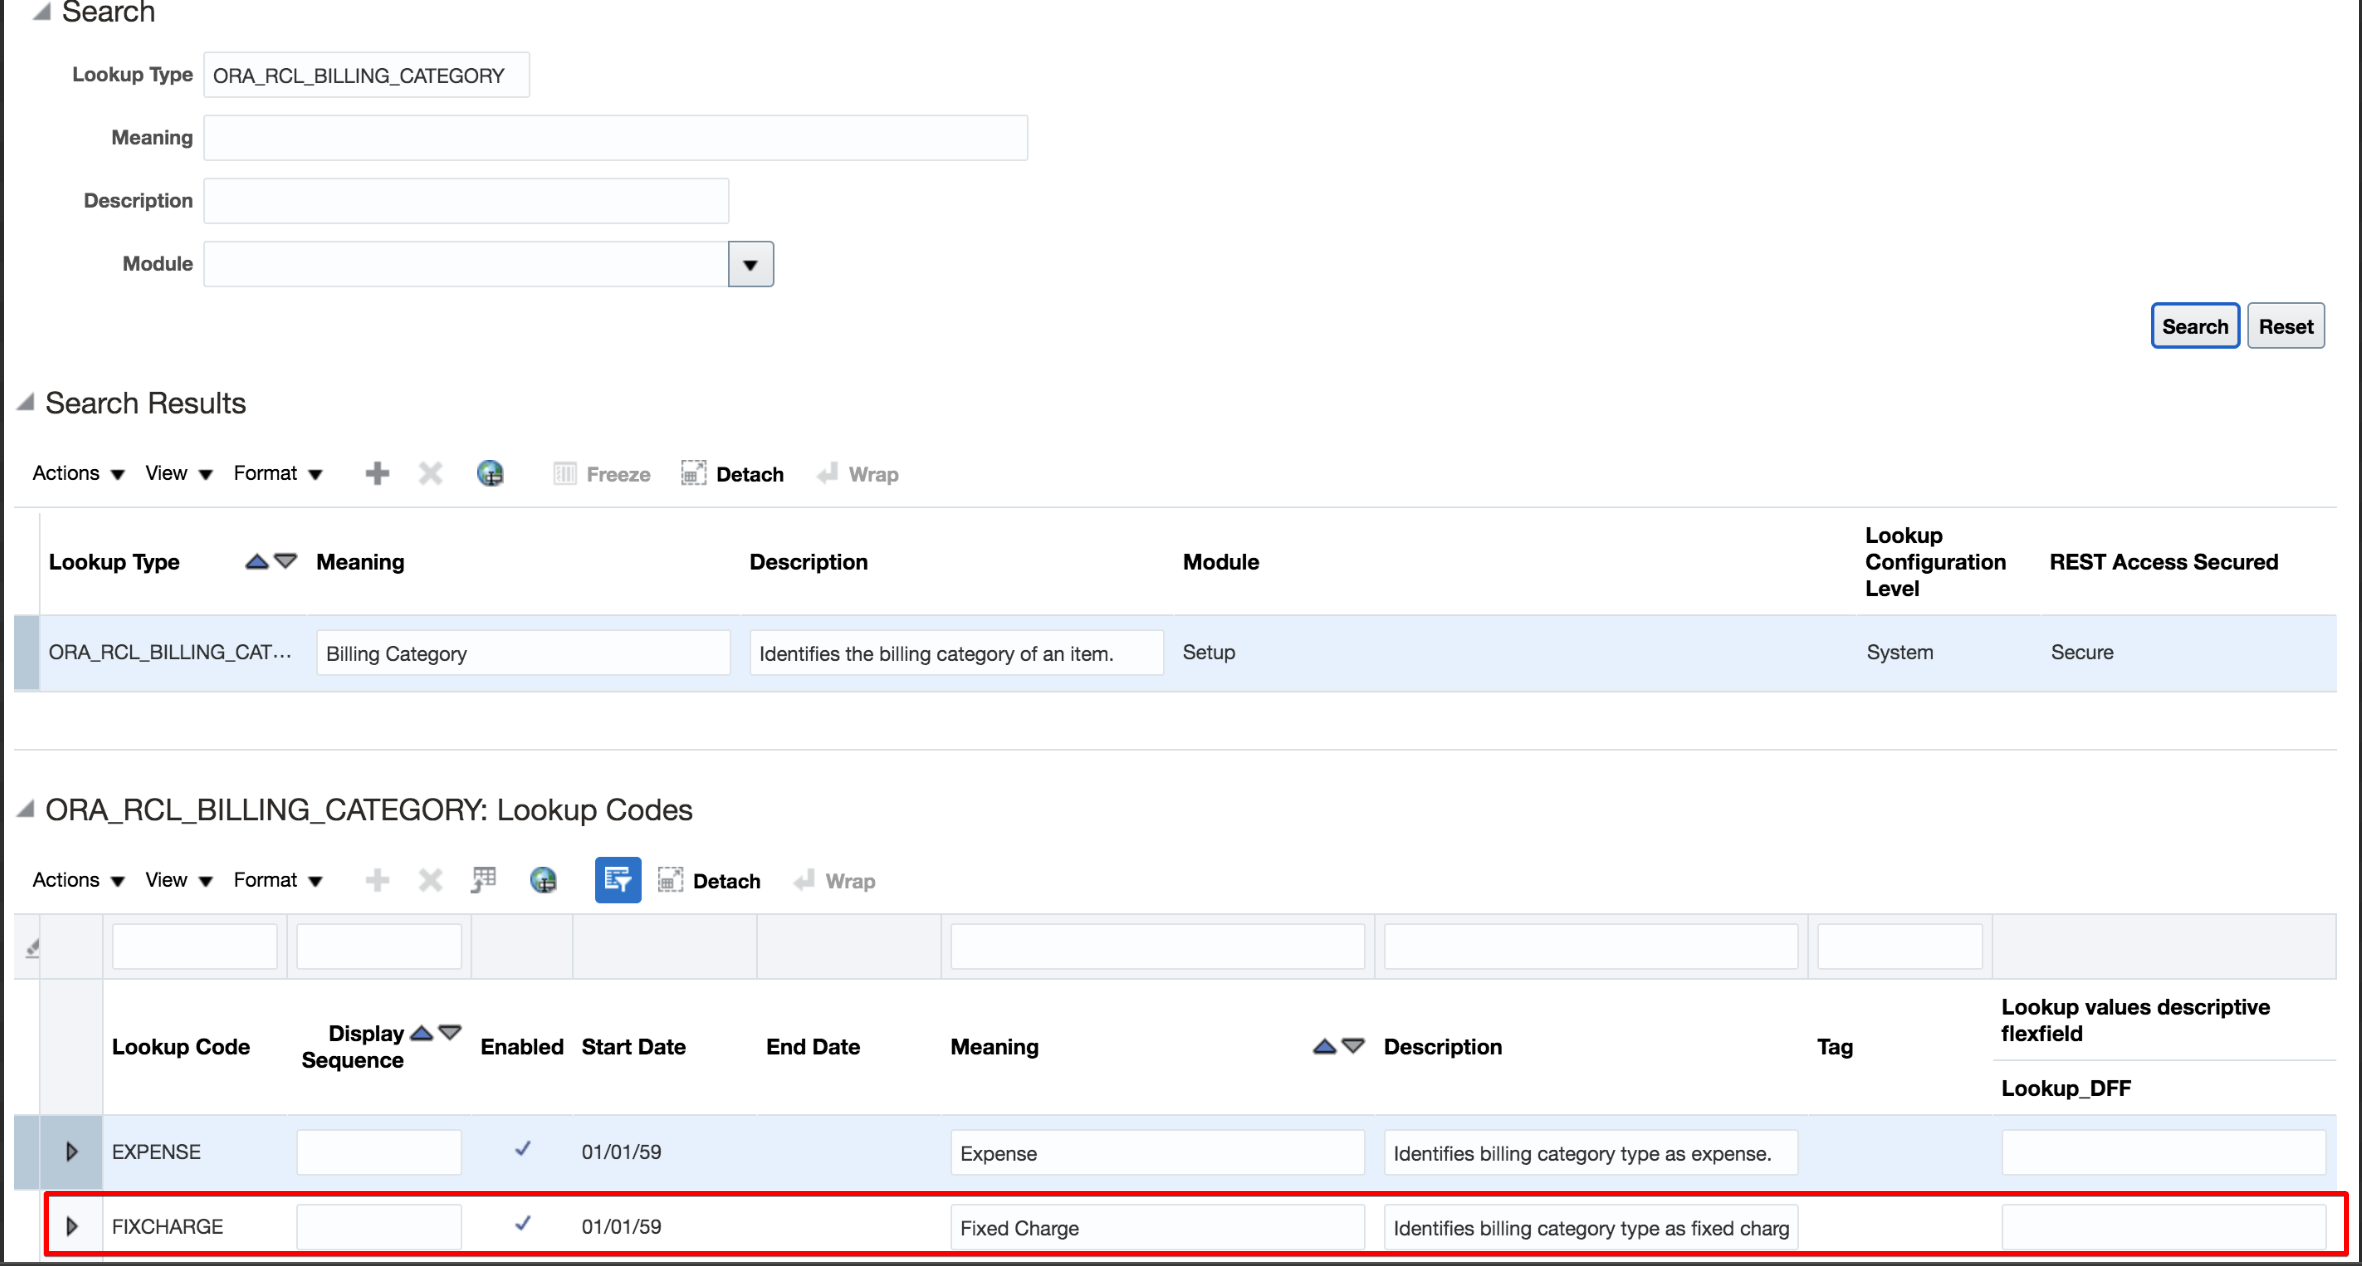
A new lookup code for fixed charges has been seeded in the Service Logistics Billing Category Lookup as depicted in the screen shot below.
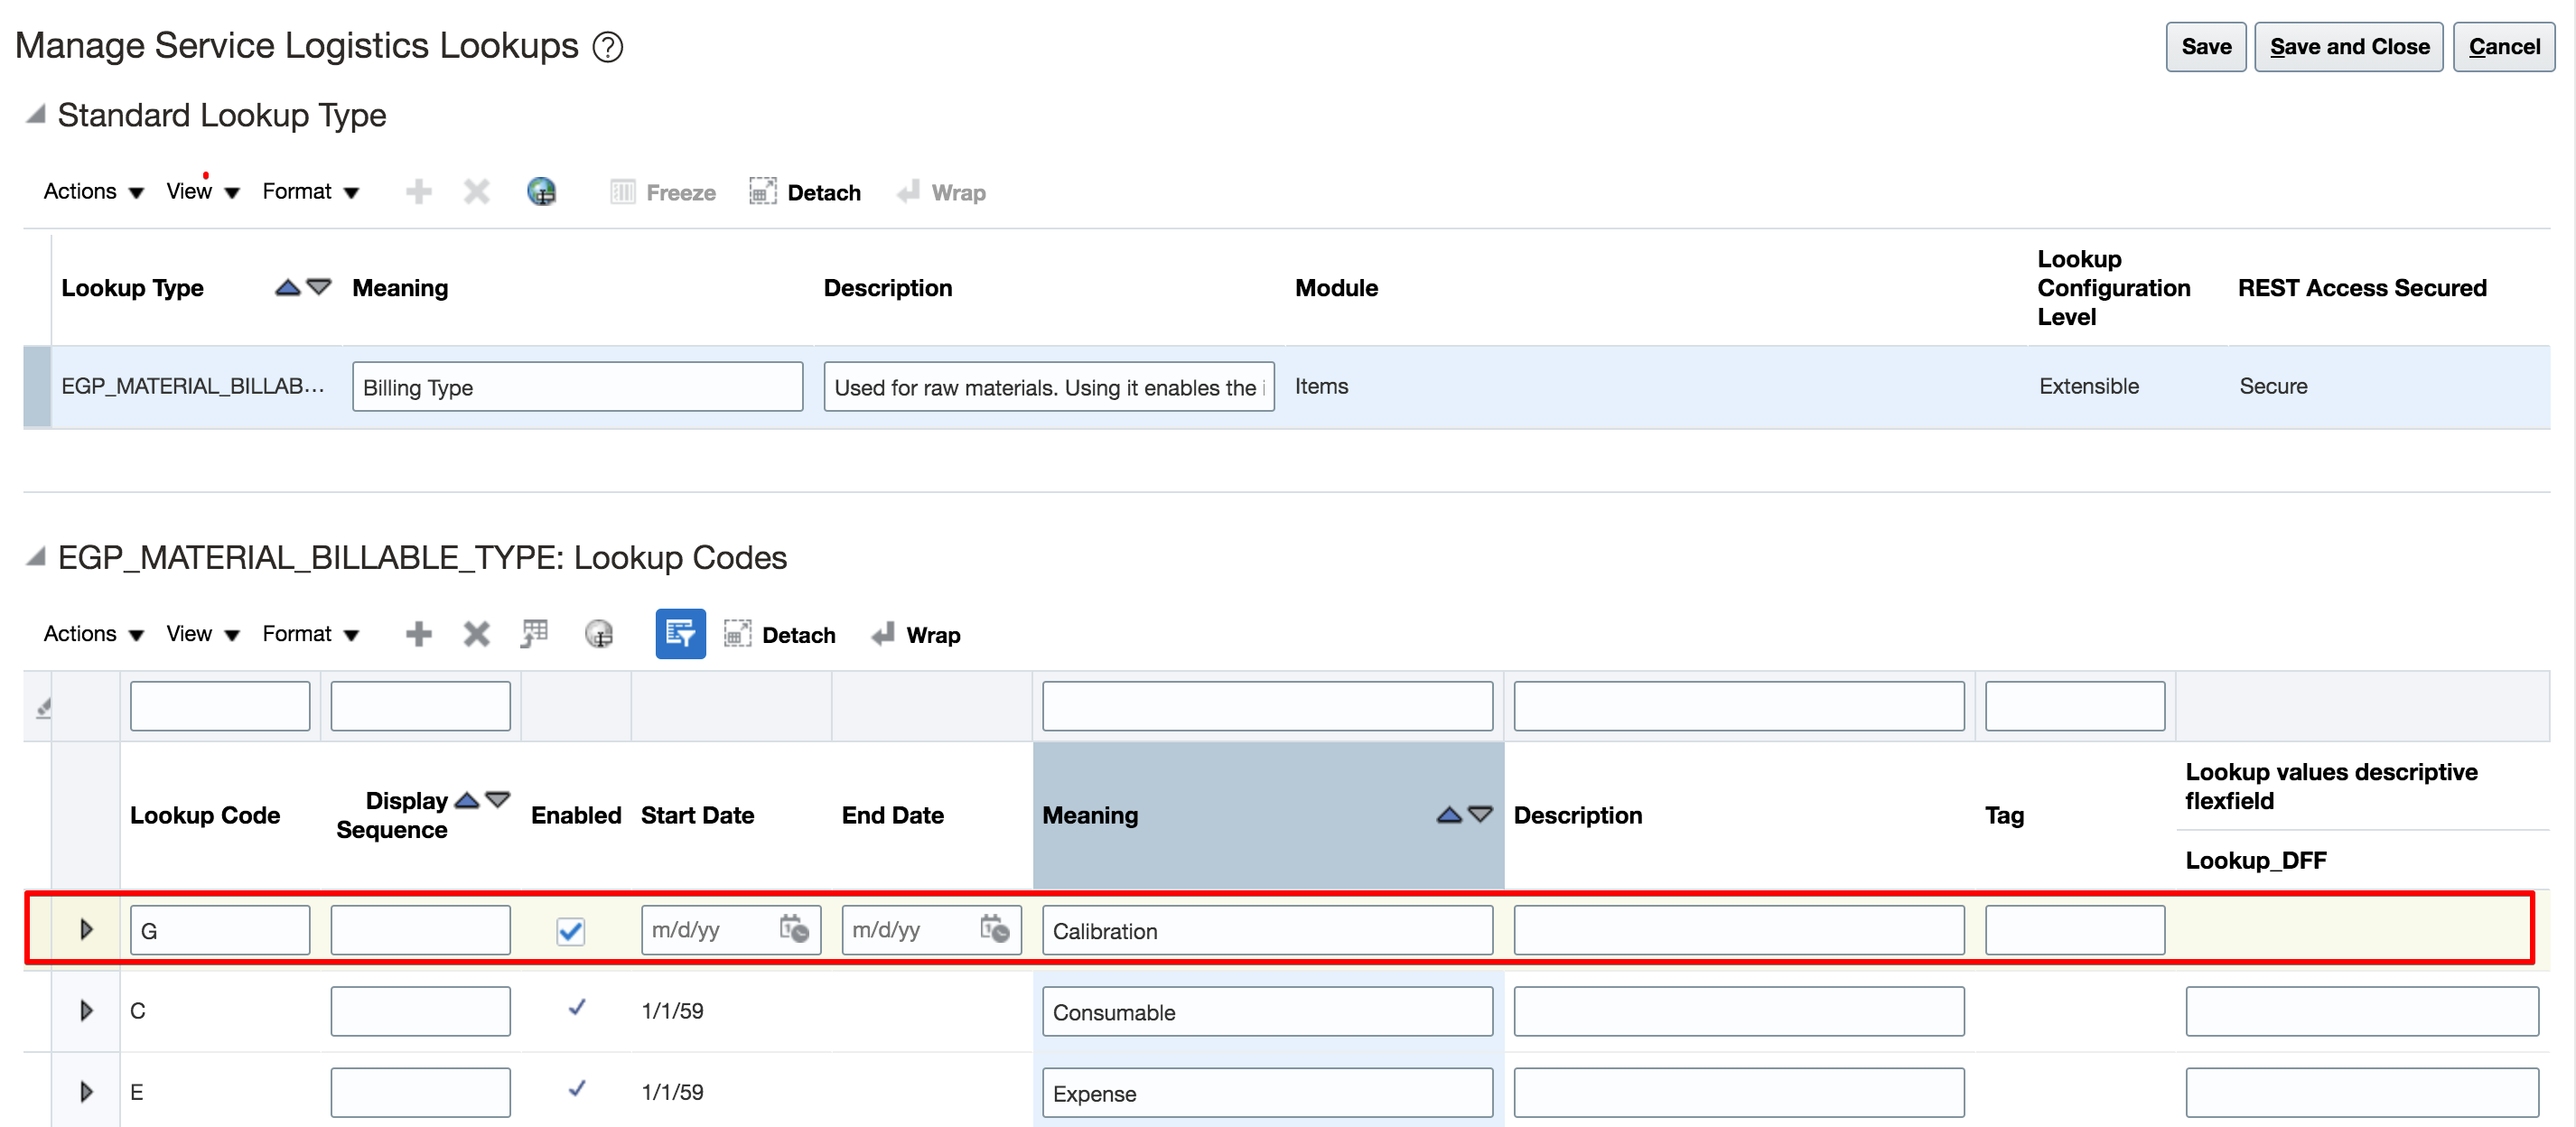
Add new lookups for fixed charges to the Service Logistics Billing Types as depicted in the screen shot below. In this example, a fixed charge billing type is being for a calibration service.
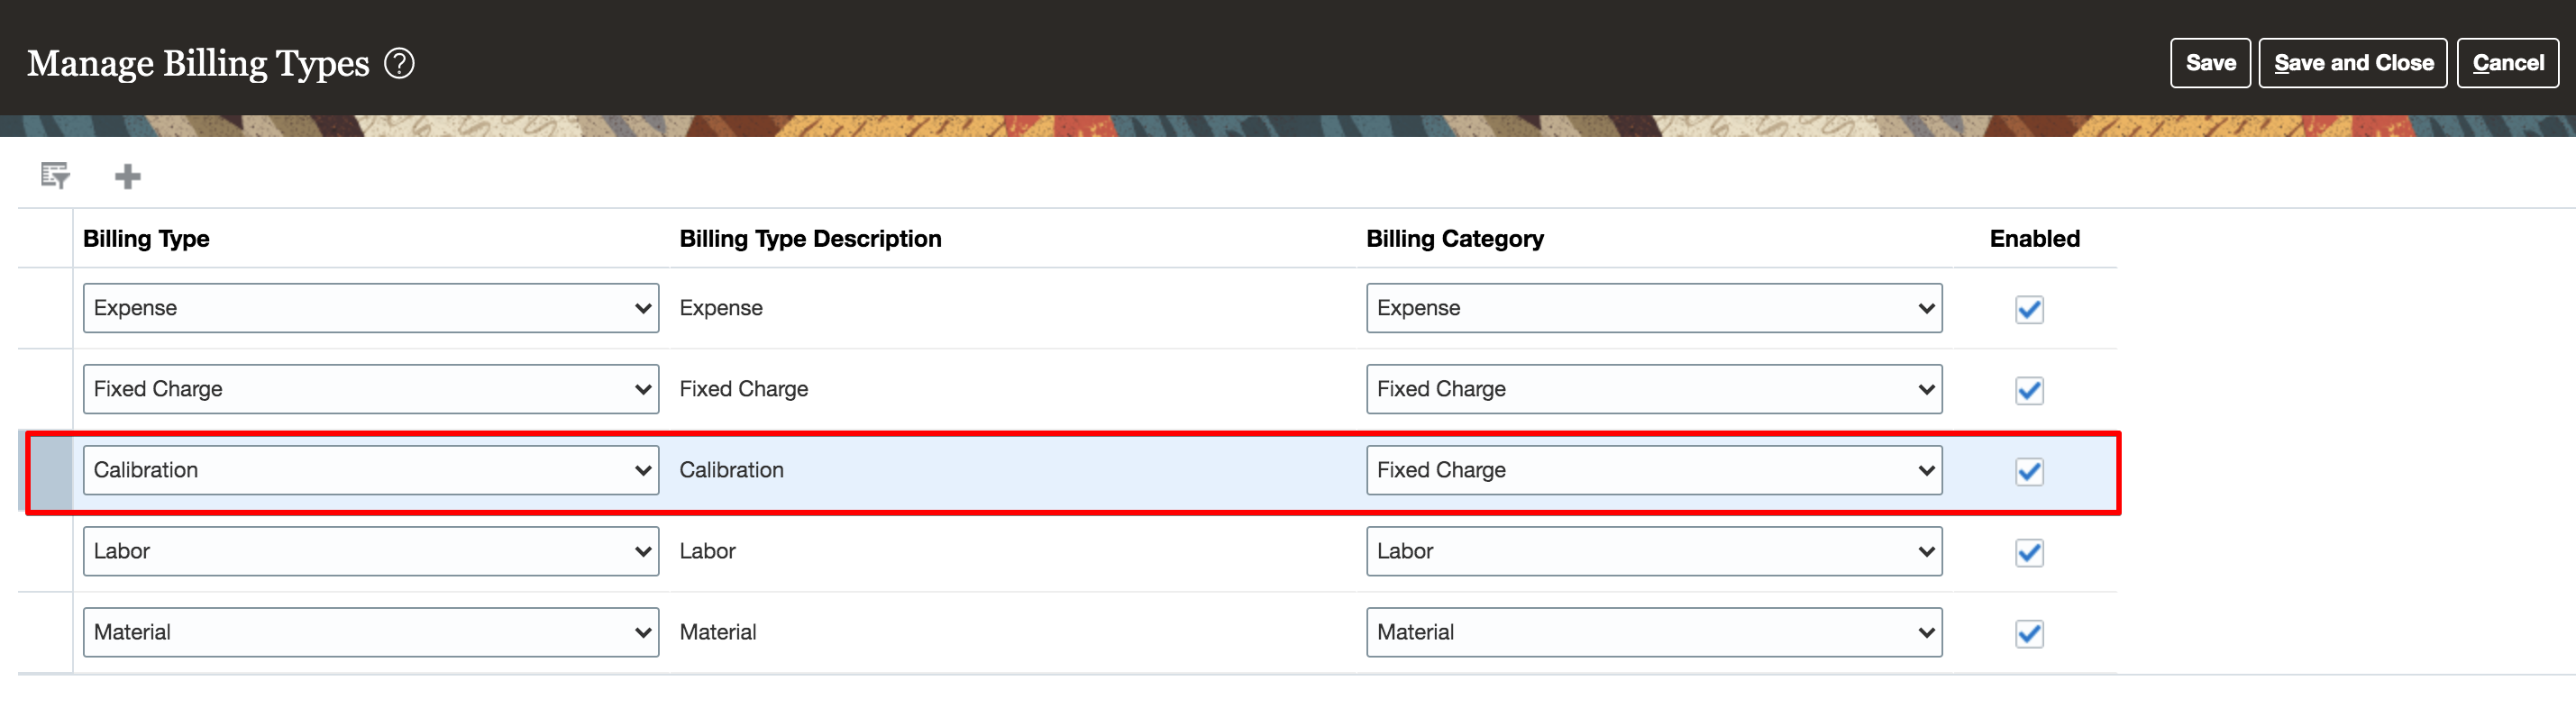
Associate the new fixed charge billing type to the seeded Fixed Charge Billing Category. In this example, the Calibration billing type has been associated to Fixed Charge billing category.
Create a new service activity and associate it to a fixed charge billing type. In this example, the Install service activity code has been associated to two billing types, Labor and the Calibration fixed charge billing type. This association enables the Install service activity to be used to create Installation fixed charges as well as debrief labor and generate labor charges.
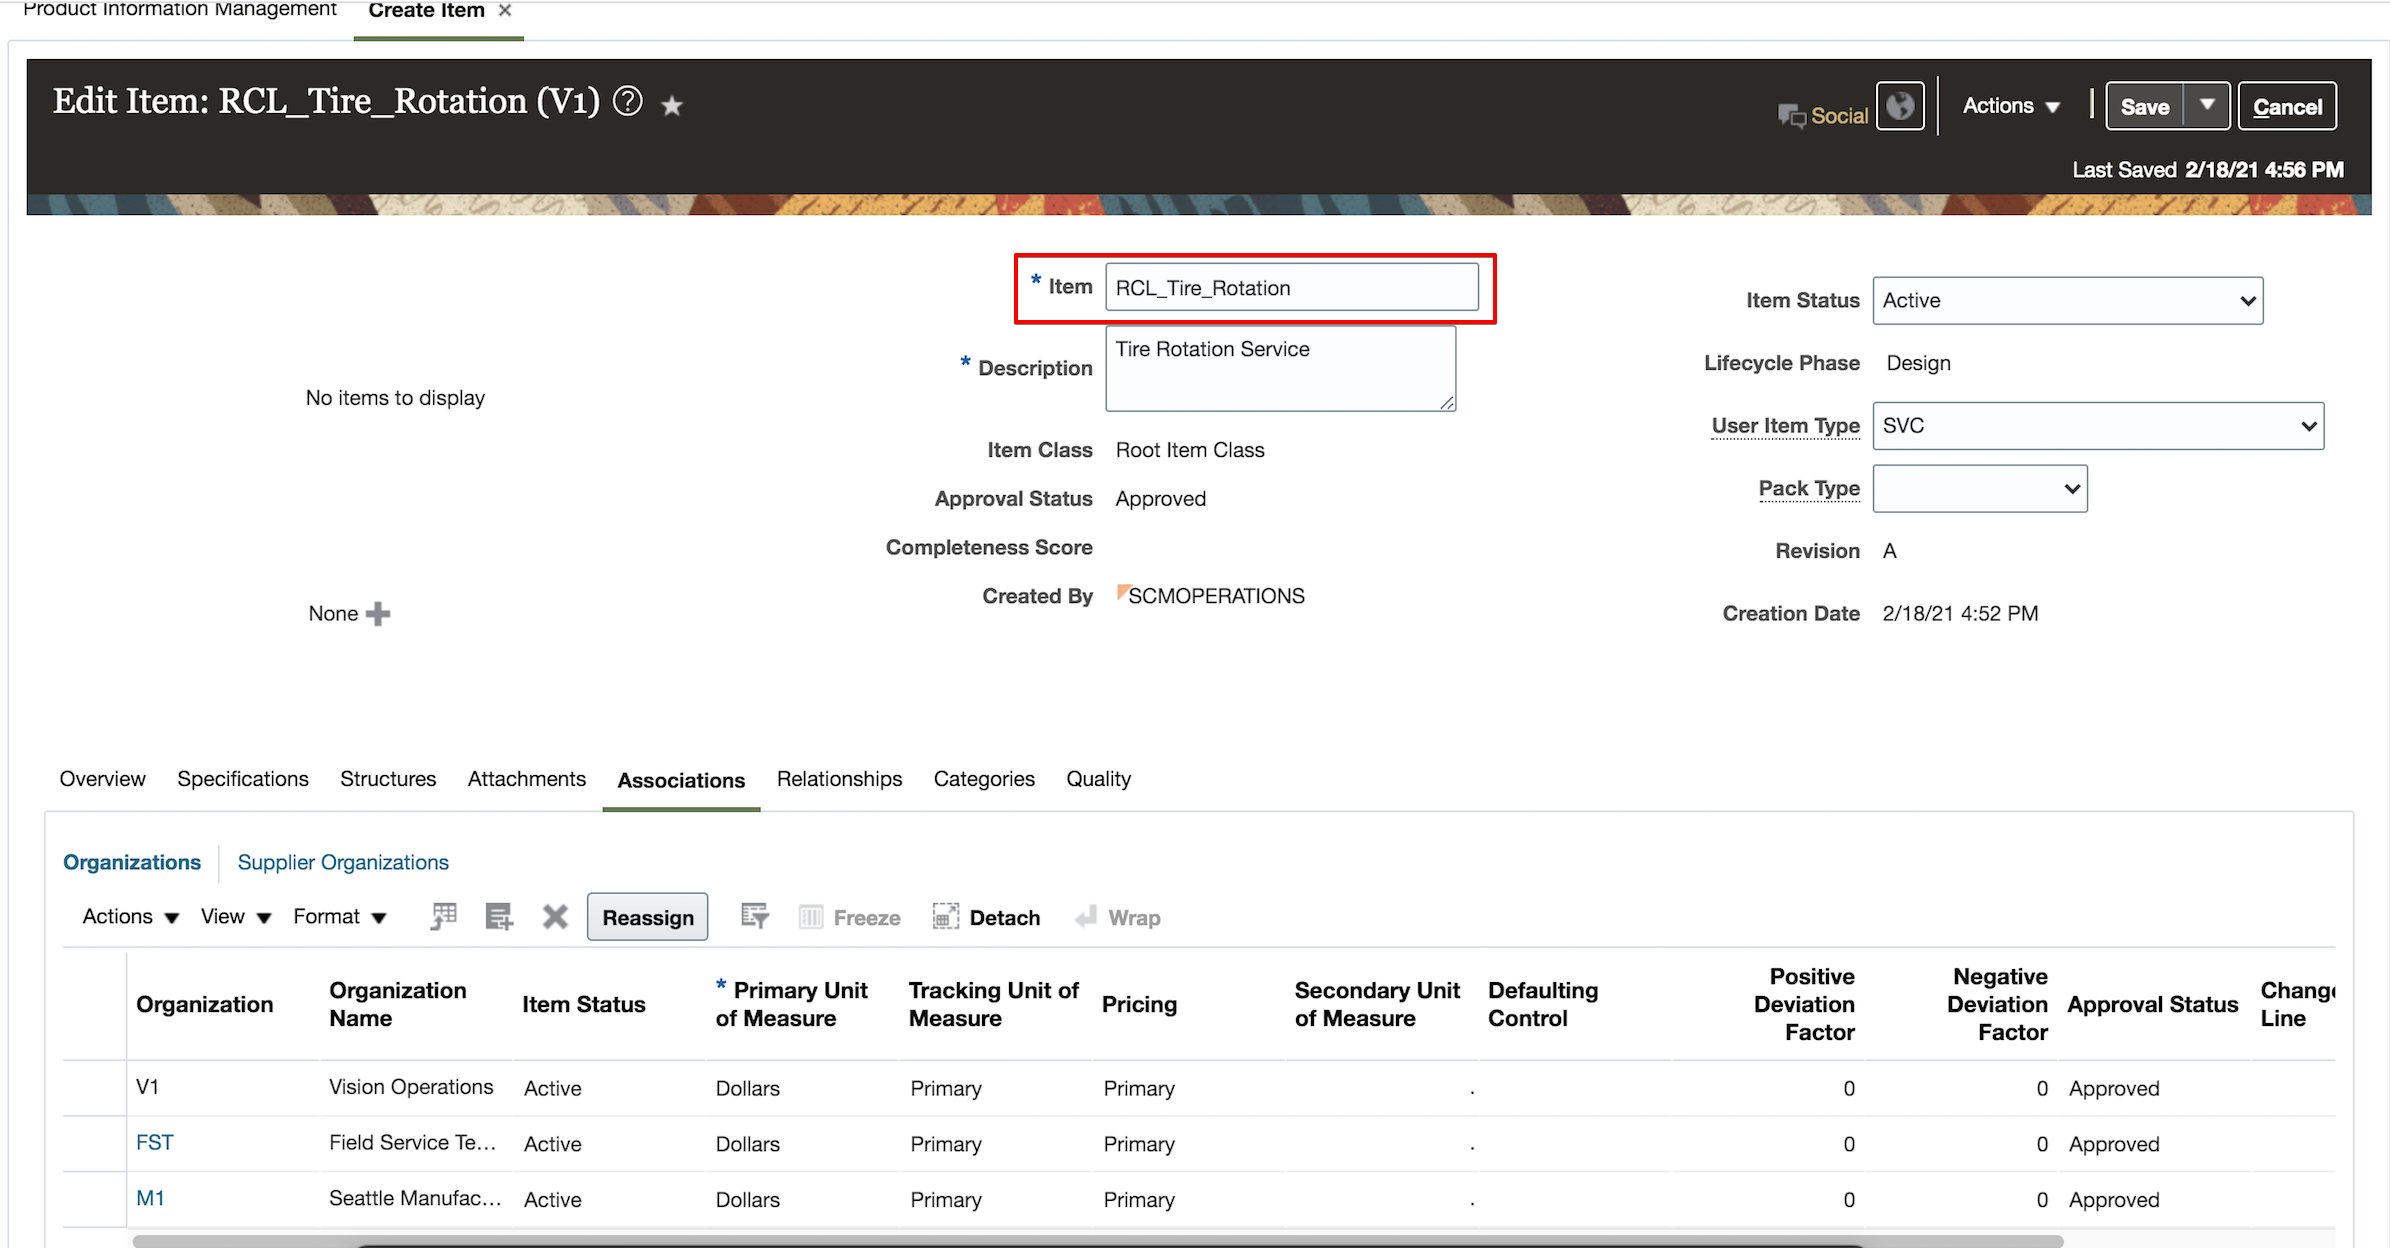
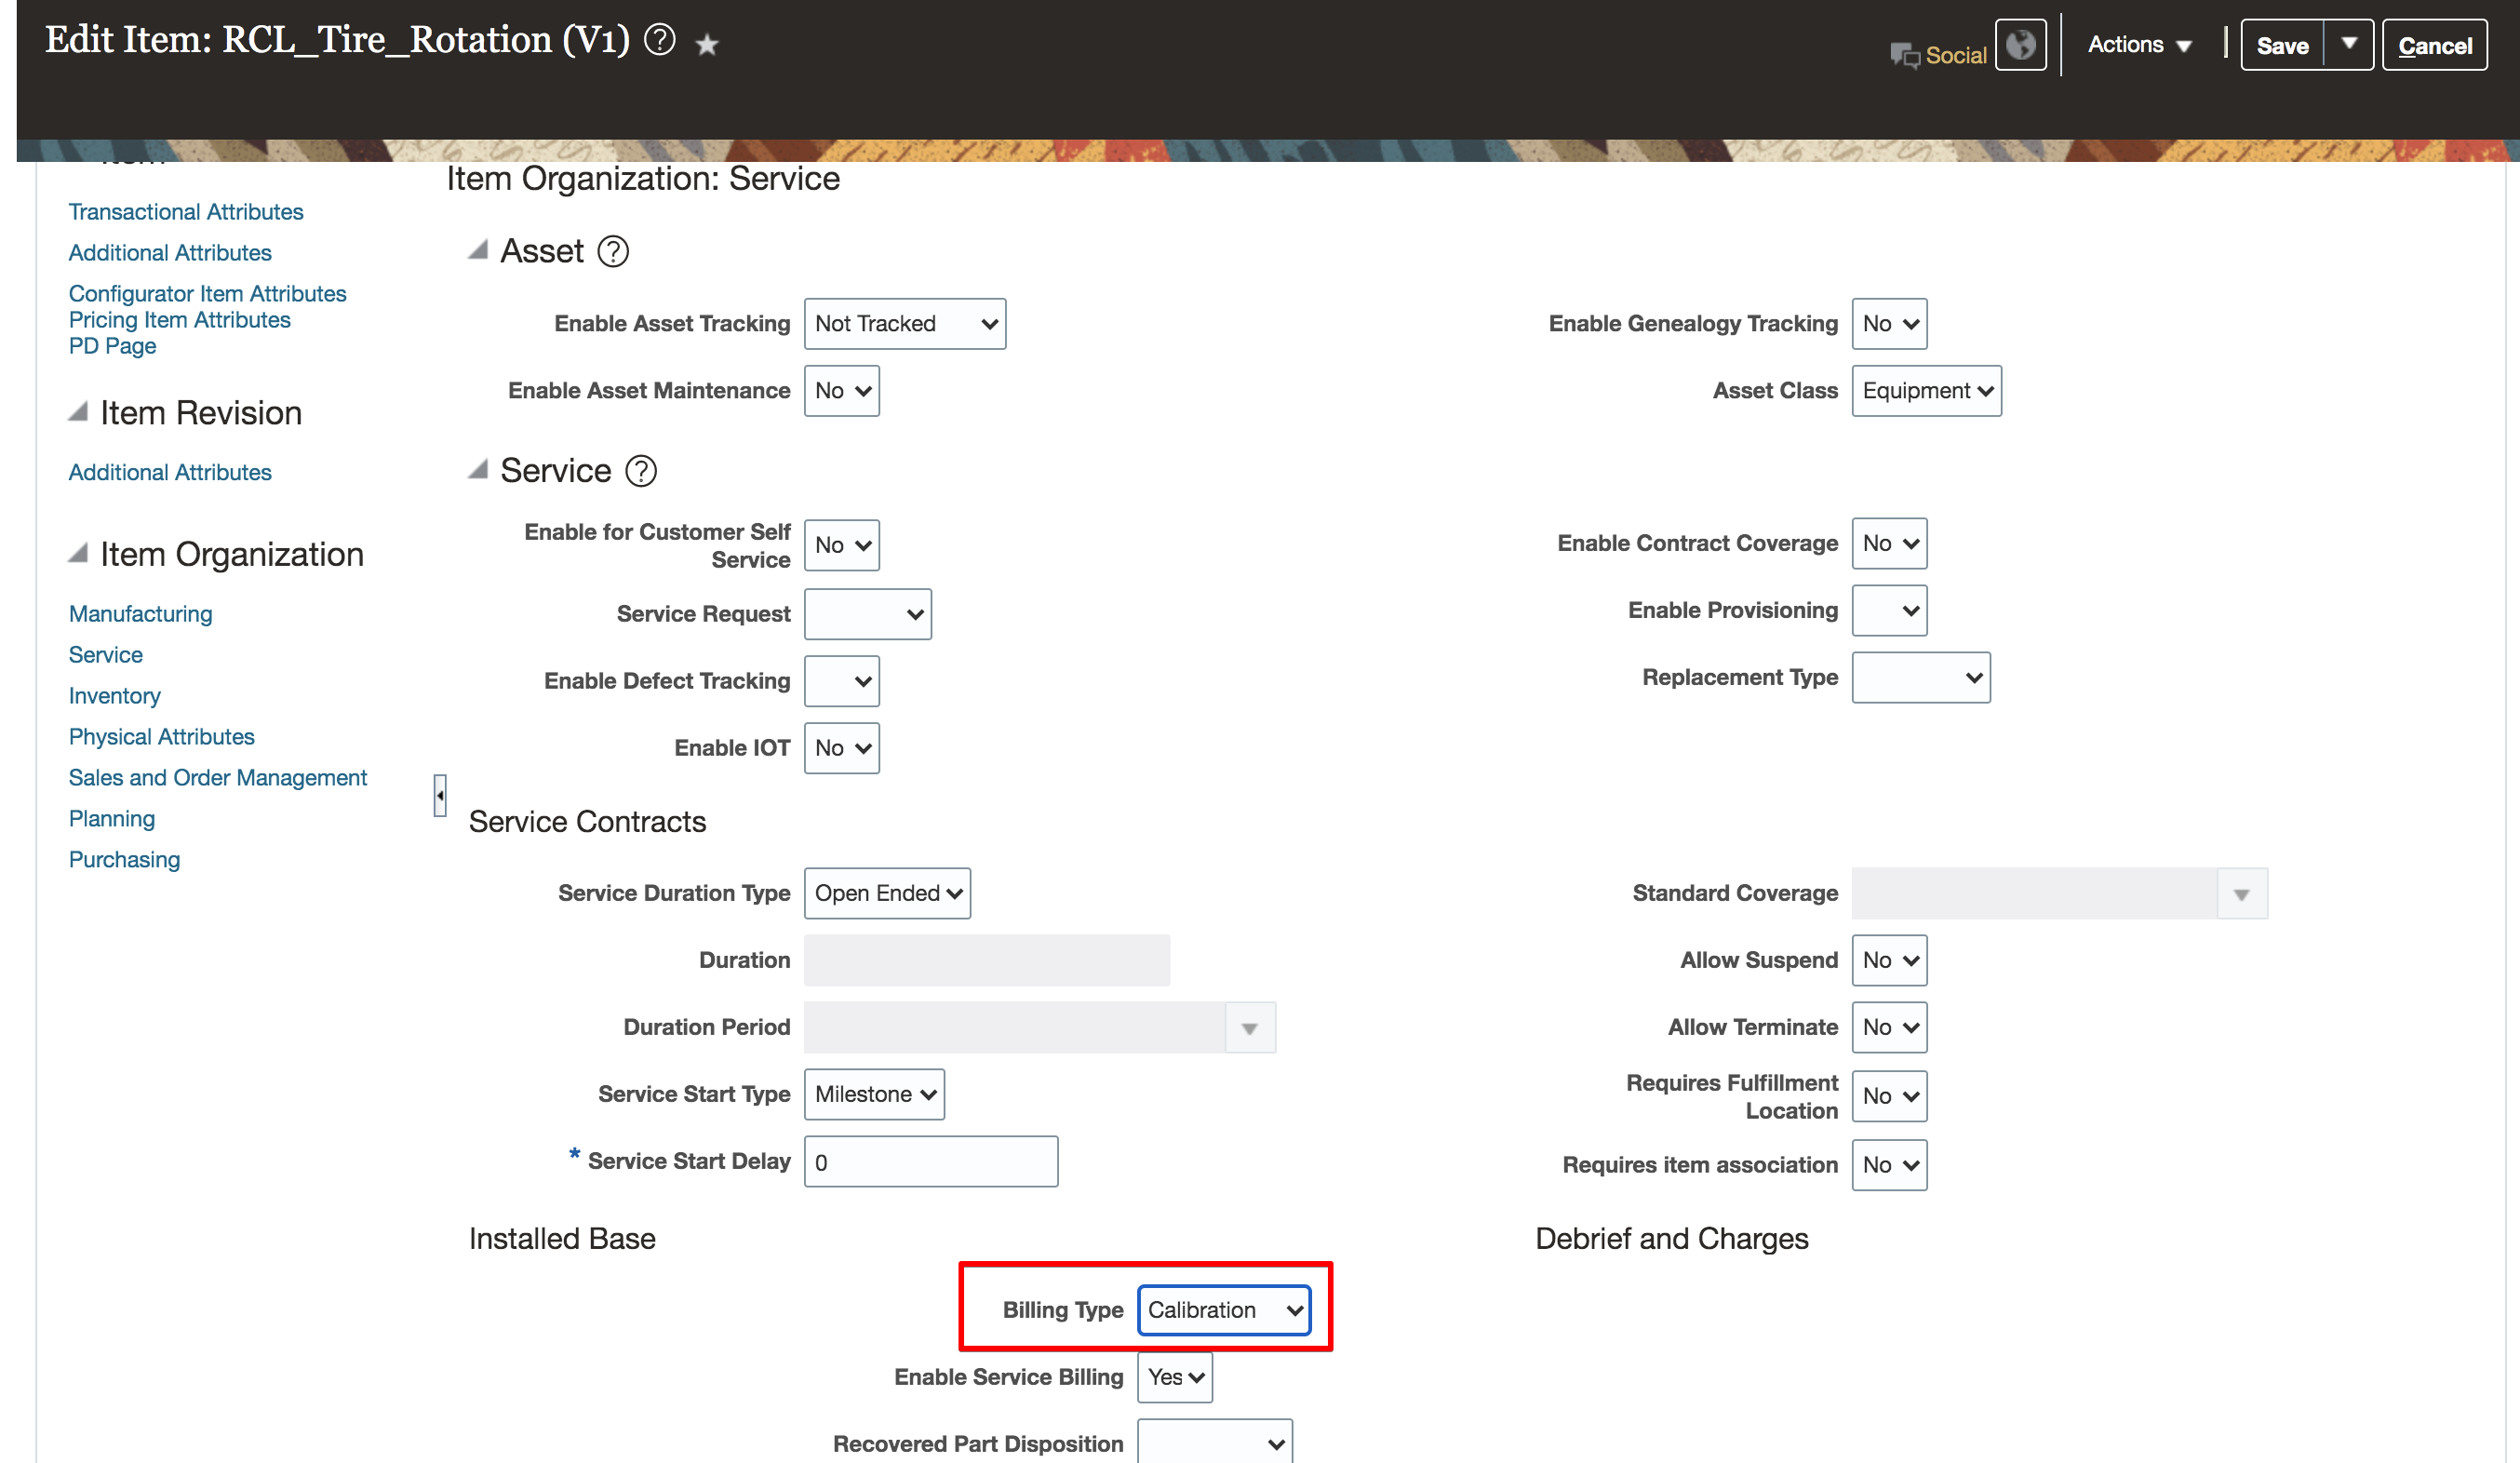
Create fixed charge items in Manage Items UI and then set up pricing for these items in the Pricing Cloud. The item must be created with a fixed charge billing type. In this example, the fixed charge item RCL_Tire_Rotation has been created with fixed charge billing type Calibration
Key Resources
- Watch Support Manual Adjustments for Estimates and Fixed Charges Readiness Training.
- Watch Service Logistics Estimate Charges Readiness Training.
- Watch Manage Depot Repair Readiness Training.
Access Requirements
To set up this feature, here's what you need:
- Job Role Name and Code:
- Field Service Administrator (ORA_RCL_FIELD_SERVICE_ADMINISTRATOR)
- Field Service Technician Duty(ORA_RCL_FIELD_SERVICE_TECHNICIAN_DUTY)
- Depot Repair Manager (ORA_RCL_DEPOT_REPAIR_MANAGER_JOB)
The return-to address and warehouse are now visible in the Part Requirements table so that call center agents and dispatchers can easily tell customers where to return broken parts. Shipment details now default when creating part-exchange and depot repair RMAs to make order creation more efficient.
FEATURES:
- Display Return to Destination Address
- Default Shipment Item, SAC, and Source Inventory Org
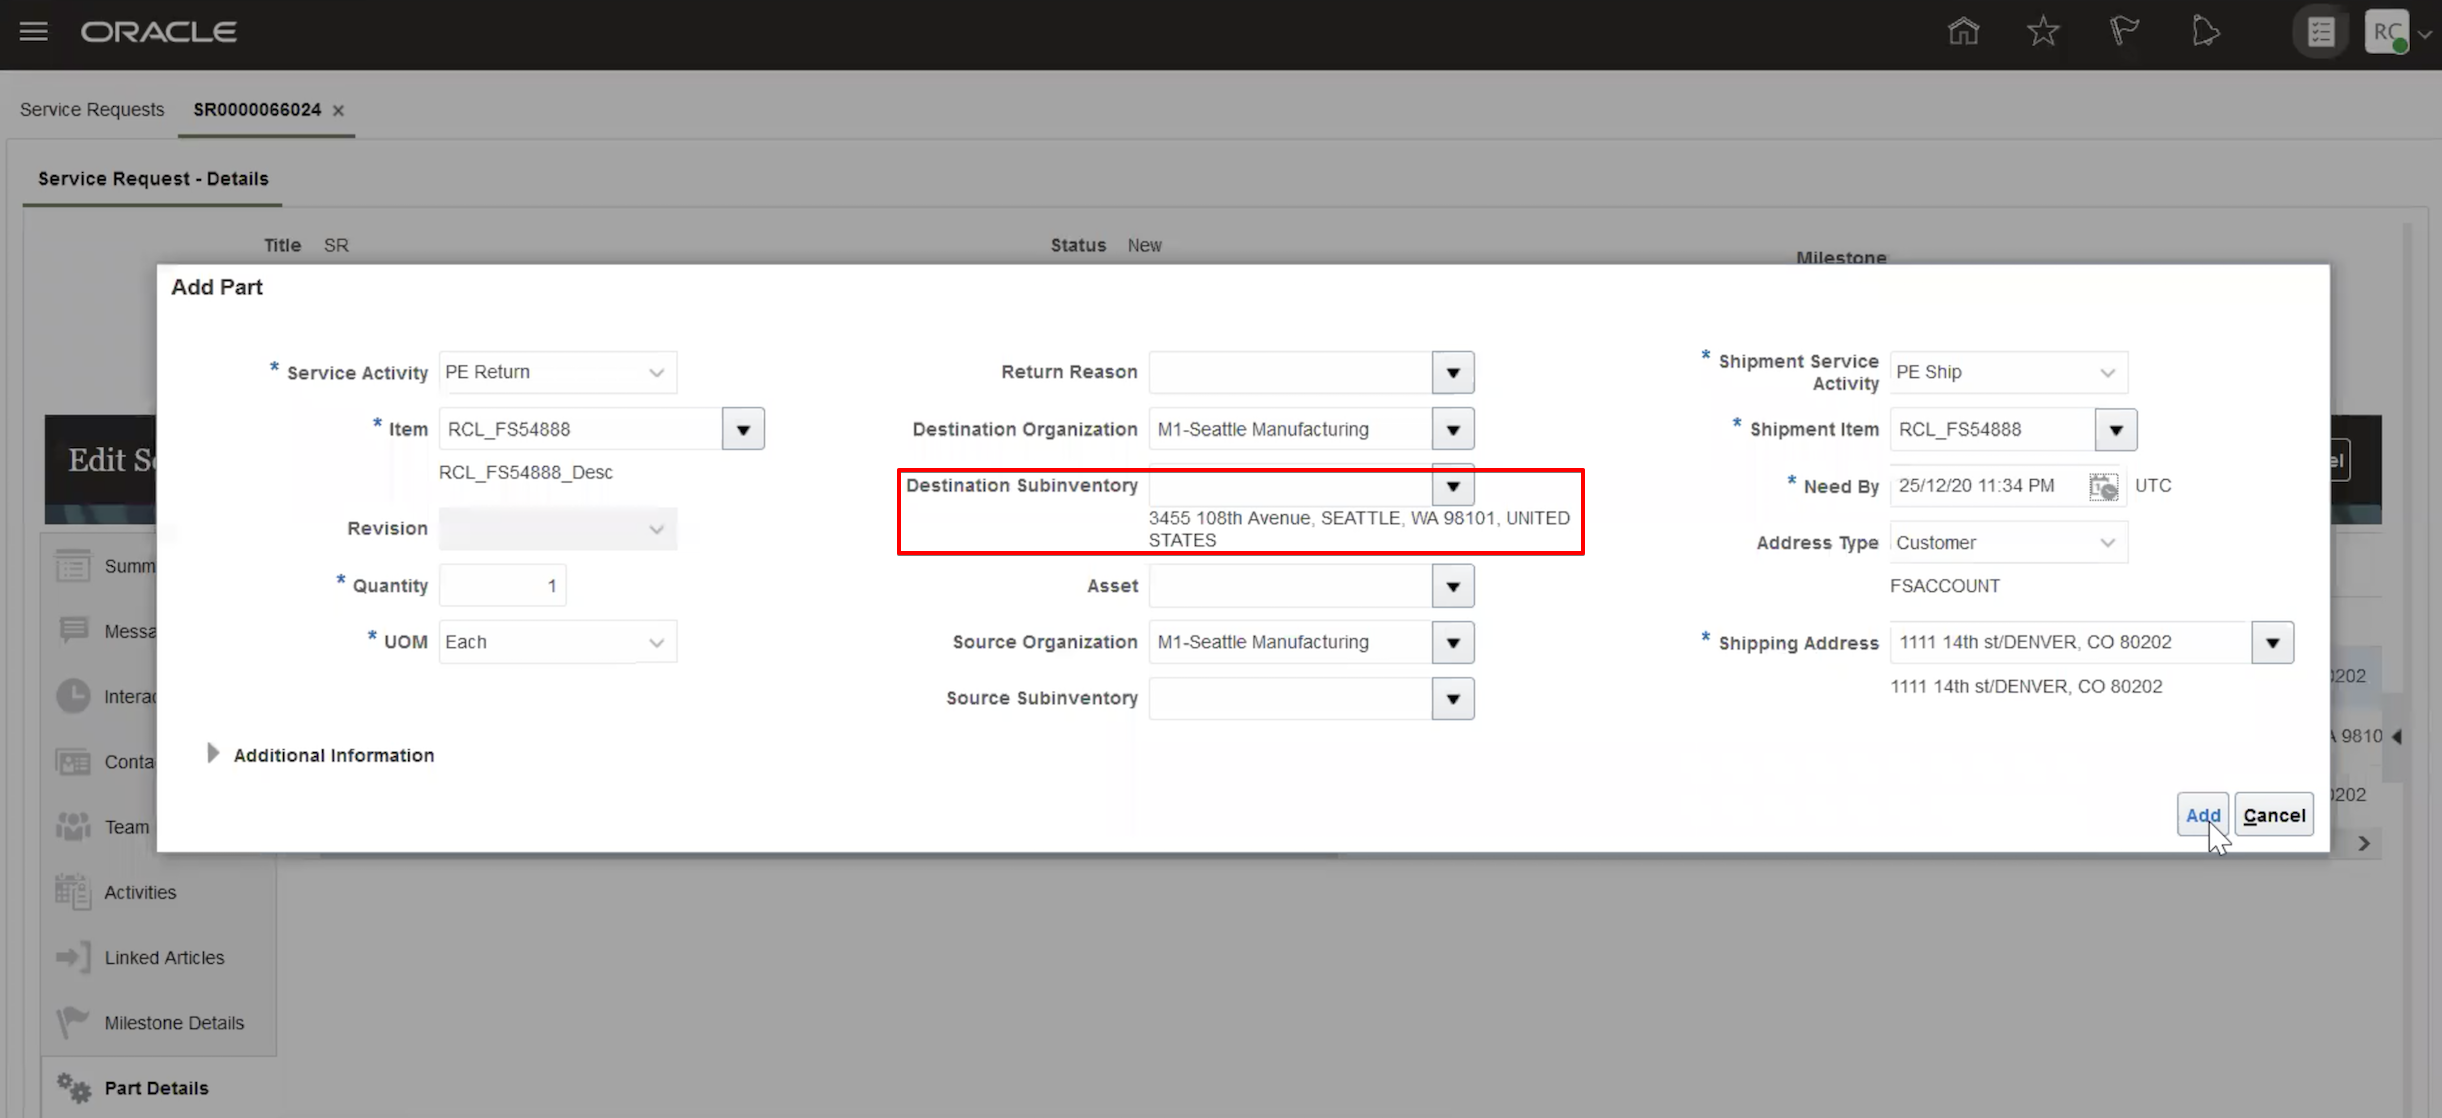
DISPLAY RETURN TO DESTINATION ADDRESS
The Destination Inventory Organization (or Subinventory if entered) address is displayed in the Add Part and Edit Part dialog box as well as in the Service Request-Part Details tab.
Add Part Requirement UI
DEFAULT SHIPMENT ITEM, SHIPMENT SERVICE ACTIVITY CODE, AND SOURCE INVENTORY ORGANIZATION
When creating depot repair RMAs and sales order lines, the Add Part Requirement UI defaults the source inventory organization from the RMA's destination organization, the shipment item from the RMA Item, and the shipment service activity defaults if the return service activity business process has only one shipment activity set up.
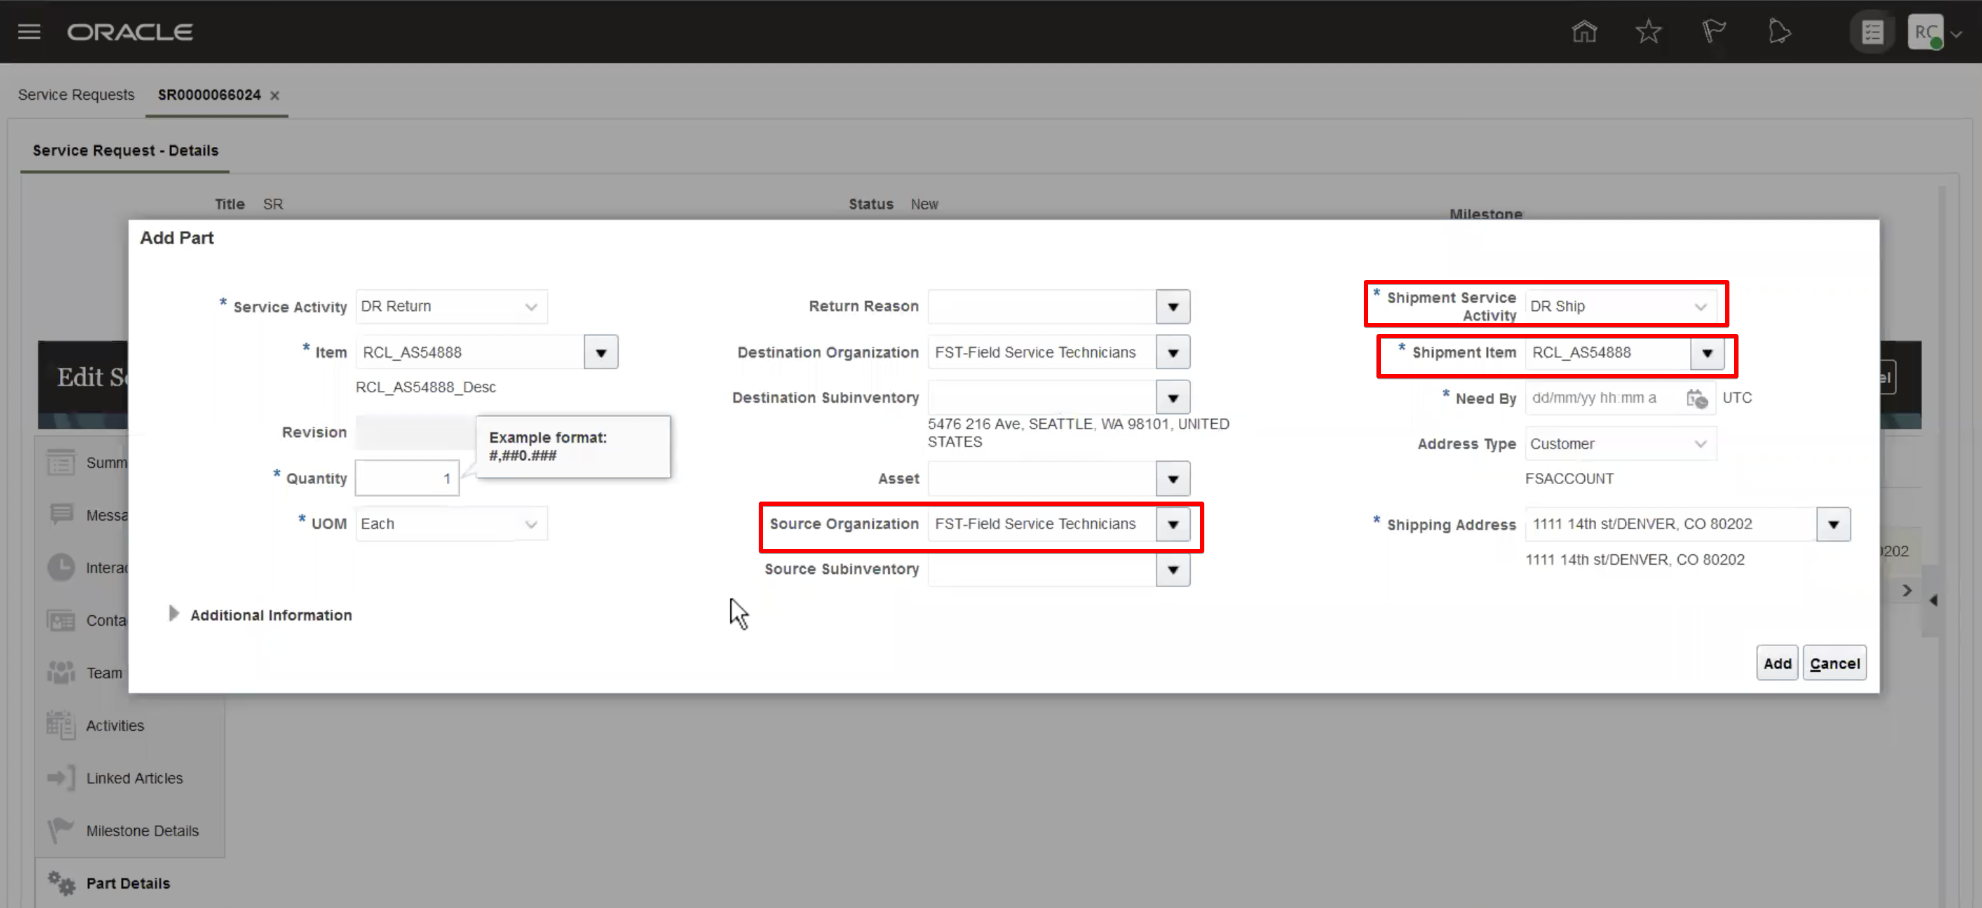
When creating part exchange (PE) RMAs and sales order lines, the Add Part UI defaults the source inventory organization from the RMA's destination, the shipment item from the RMA Item, and the shipment service activity code defaults if the return service activity business process only has one shipment service activity set up.

Displaying the destination organization in the Service Request-Part Details tab makes the return process more effective. Defaulting shipping details makes the customer service agent more efficient and reduces call time with the customer.
Steps to Enable
You don't need to do anything to enable this feature.
Key Resources
- Watch Improve Part Selection Readiness Training.
- Watch Part Requirements and Ordering UI Readiness Training.
Access Requirements
- Job Role Name and Code
- Field Service Administrator (ORA_RCL_FIELD_SERVICE_ADMINISTRATOR)
- Privilege Names and Codes
- Access Service Logistics Landing Page (RCL_PORTAL_ACCESS_LANDING_PAGE_PRIV)
- View Requirement Lines (RCL_PARTS_REQ_VIEW)
- Access Debrief Page (RCL_PORTAL_VIEW_DEBRIEF)
- Manage Estimates (RCL_MANAGE_ESTIMATES_PRIV)
Incorporate Additional Service Logistics Data Into Pricing
The calculation of service charges has been enhanced to use the Pricing Cloud Service Mapping interface. This enables you to use pricing algorithms and matrices including incorporating additional Service Logistics data. Using this feature, customers can add subscription numbers to the pricing component message description, and add service activity codes to pricing along with Service Request priority.
PRICE ADJUSTMENTS ACCORDING TO PRE-DEFINED ATTRIBUTES
Service mapping in Service Logsitics exposes 7 entities out of which there are 4 input entities and 3 output entities.
The 4 input entities are Header, Line, PricingTerm and Manual Price Adjustments. The corresponding attributes for these entities are described below.
Header Entity Attributes
AppliedCurrencyCode
- OrgId
- PricedOn
- Pricing Segment Code
- PricingStrategyExplanation
- PricingStrategyId
- RclPricingHeaderId
- PricingSegmentExplantion
- SoldToPartyId
- HeaderSourceType
- HeaderSourceId
Line Entity Attributes
- HeaderId
- InventoryItemId
- InventoryOrganizationId
- LineCategoryCode
- LineId
- OrderedQuantity
- UomCode
- LineTypeCode
- ShipFromOrganizationId
- ShipMethodCode
- ShipToLocationId
- SkipShippingChargesFlag
- ServiceActivityId
PricingTerm Entity Attributes
- ApplyToEntityId
- PricingTermId
- CoverageId
- ChargeDiscountId
- SourceName
- SubscriptionNumber
ManualPriceAdjustment Entity Attributes
- AdjustmentAmount
- AdjustmentTypeCode
- AdjustmentElementBasis
- ChargeDefinitionCode
- ParentEntityId
- ManualPriceAdjustmentId
- PricePeriodicityCode
- ReasonCode
- SequenceNumber
The 3 output entities are Charges, ChargeComponent and Pricing Message, which returns the pricing status. The entities and their corresponding attributes are used in both the pricing matrix extension and subscription number.
ADDITION OF SUBSCRIPTION NUMBER TO THE PRICING COMPONENT DESCRIPTION
You can modify the pricing algorithm to add the subscription number to the pricing component description in Pricing. After you’ve modified the pricing algorithm, the Pricing application returns the pricing component explanation with the subscription number. This component is displayed in the Service Logistics Amount breakup pop-up UI.
PRICE ADJUSTMENTS ACCORDING TO PRE-DEFINED ATTRIBUTES
Service mapping has a list of attributes that are available from Service Logistics, which can be used in pricing.
Being able to reference a subscription number helps with billing issues—especially when multiple subscription discounts have been applied.The ability to price services using additional service data, such as service activity codes increases your pricing options and marketing flexibility.
Steps to Enable
See Pricing Administration Guide.
Key Resources
- Watch Pricing Administration Guide.