
This document will continue to evolve as existing sections change and new information is added. All updates are logged below, with the most recent updates at the top.
| Date |
What's Changed |
Notes |
|---|---|---|
| 03 FEB 2016 |
Initial Document Creation |
Release 6.27 contains feature enhancements and fixes intended to improve functionality, quality, and usability of Oracle Responsys.
Distributed Content Collaboration
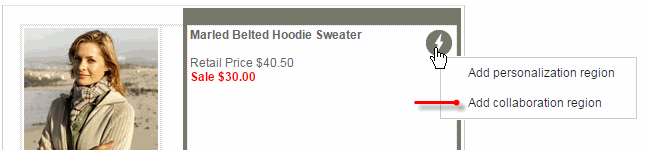
This feature is available only if it is enabled for your account. This release introduces Distributed Content Collaboration. This feature enables distributed teams, such as corporate marketers and local marketers, to collaborate on content of an email campaign.
Now, a corporate marketer can mark collaboration regions in a campaign, and local marketers can submit content for those regions. You can also control which recipients receive the messages, for example only customers of a local store, or a specific region.
Steps to Enable
- Select the new Add Collaboration region option.
- Create the Campaign to which users can contribute
- In program settings, identify the organization units for which recipients are to be targeted, and which organizational units can submit content.
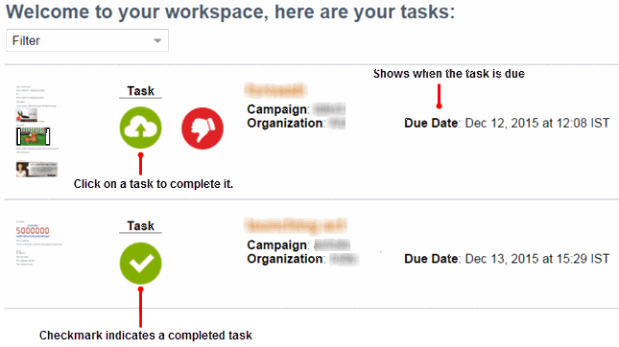
- Submit and approve content
- The new Task List shows all tasks assigned to the user. Click a task to complete and submit.
- After all content is submitted and approved (if required), Program sends the email campaign. Distributed Content Collaboration uses Audience Access Control to target specific organizations.
The Program Manager or Director creates a program with a collaboration stage. The stage must include the new Start Collaboration event and an Event Switch that uses the collaboration even when valid content is submitted.
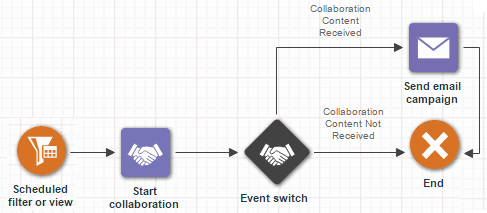

After Program initiates the collaboration, tasks are created for the selected organizational units. Users with the Content Contributor role in those organizations can contribute content. Users with the Content Approver role in those organizations can approve content.
Audience Access Control gives you the ability to target specific organizations based on the recipient's organization assignment without changing your filter definitions. For example, if your scheduled filter is set up for loyal customers, and you select the Bay Area organization through Audience Access Control, only loyal customers in the Bay Area will be selected. Audience Access Control applies only for Program and Scheduled Filter. Audience access is controlled by the Audience Scoping Code. The Audience Scoping Code assigns organizational units to recipients.
Steps to Enable
The Account Administrator specifies the Audience Scoping Code on the General Information page of each organization unit.

- The Data Director imports a file that maps target recipients to one or more Audience Scoping Codes via a Connect Import job.

Insight: New Interactive Dashboards for Email
The new dashboards are available to all new customers and accounts for which Interactive Dashboards were enabled in Release 6.25. If you are using Functional Access Control, the new dashboards are available to users with the Email Analytics Manager role.
Steps to Enable
- Click and select View Interactive Dashboards from the Insight menu.
- Select the Email tab.
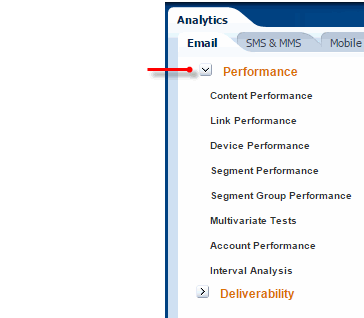
This dashboard provides an at-a-glance summary of the performance of the email channel. The dashboard helps you analyze trends in email performance metrics over time and provides drill-down to the detailed campaign for deep-dive analysis.
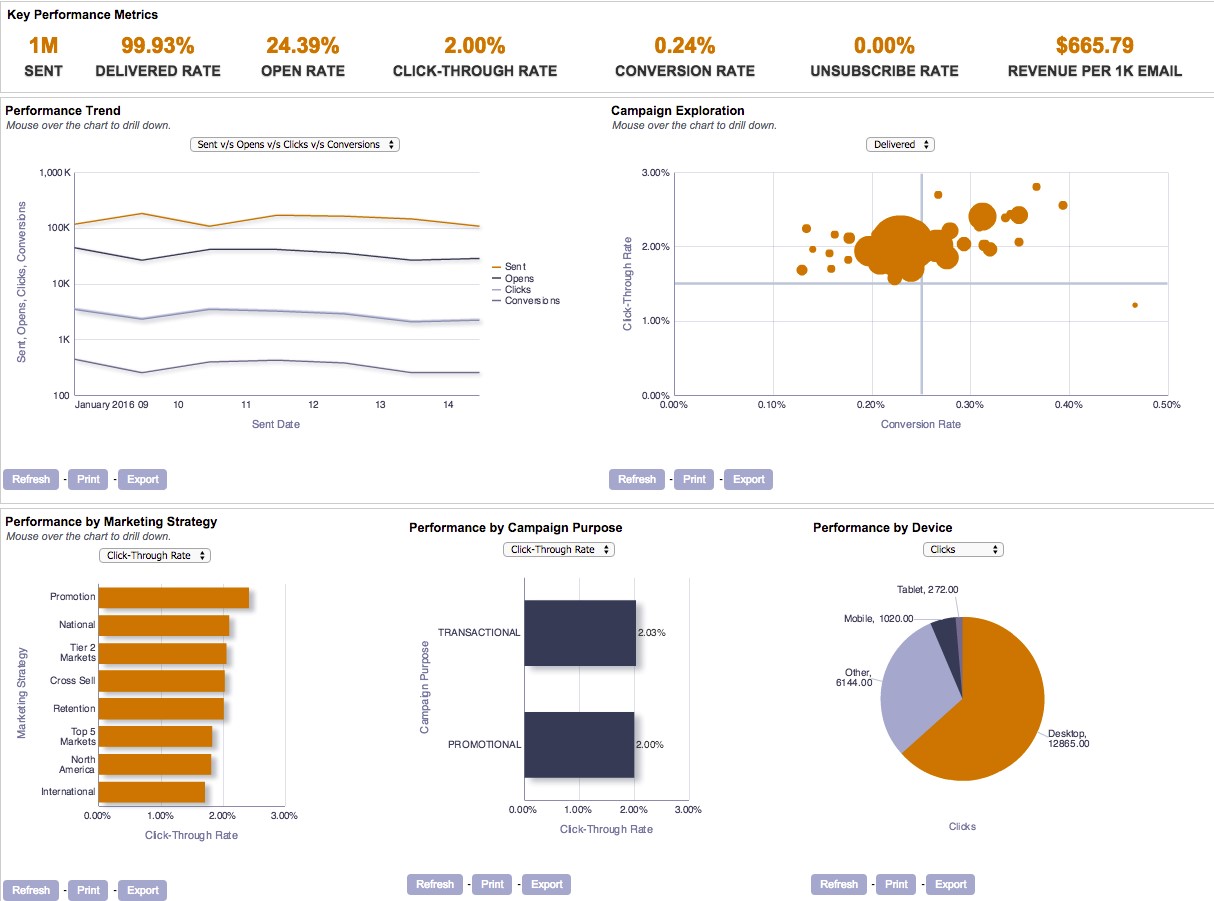
We added the following new performance dashboards:
- Content Performance
- Link Performance
- Device Performance
- Segment Performance
- Segment Group Trend Performance
- Interval Analysis
This dashboard provides a tabular view of performance metrics by the dynamic content modules used in an email campaign.
This dashboard shows the top-performing link categories by Open Rate, Click-Through Rate, and Conversion Rate, along with a detailed tabular view of the performance of each link in a campaign.
This dashboard trends the performance of various devices and browsers used to respond to email campaigns over time. The performance metrics include Opens, Clicks, and Conversions.
This dashboard provides a tabular view of performance metrics by segment values attached to an email campaign.
This dashboard provides a summary of the top-performing rules for a particular segment group and trends the performance over time. The performance metrics include Open Rate, Click-Through Rate, Conversion Rate, and Revenue per 1K emails.
This dashboard helps compare the performance of campaigns by predetermined day intervals after they are sent. This comparison is particularly useful when comparing the performance of several campaigns that were sent on different days but had a similar goal. For example, compare the performance of a Thanksgiving promotion campaign 1 day after it was sent in 2015 versus 1 day after it was sent in 2016.
Steps to Enable
- On the Email tab, click Performance, and select the dashboard you want.
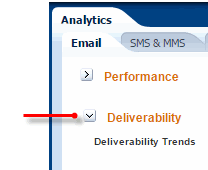
This dashboard provides an at-a-glance summary of the deliverability metrics of the email channel. The dashboard helps you analyze trends in deliverability over time and provides a summary of top bounce categories and top performing ISPs.
Steps to Enable
- On the Email tab, click Deliverability, and select Deliverability Trends.
Insight: New Interactive Dashboards for Email
In this release, we added the following new features to Interactive Dashboards.
The prompts on the Interactive Dashboards for email include the following new elements:
- Marketing Strategy
- Marketing Program
- Campaign Purpose
- Sent Date Range
Use these prompts to search for and select values to filter the results on the dashboard. The values on each prompt act as an AND condition on the filter.
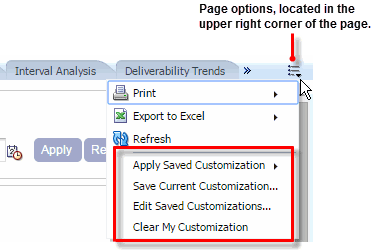
Save prompt values and table configurations for future use.
You can create a customization to retain a particular set of values applied on a prompt or a configuration of a table view (where available). For example, you can save a selection of campaigns and a sent date range. This makes it easy to get to the information you need without having to apply the filters again. After you create the customization, you can re-use and edit it.
Steps to Enable
- Click Page options and select the customization action you want.
This feature requires training and can be enabled for your account after you complete the training. After the feature is enabled, you will receive a Quick Start Guide, which provides detailed steps for the Interactive Dashboards Plus features. Interactive Dashboards Plus provides the advanced features described below. These features are useful for those analyzing data in the organization.
- Create custom analyses
- Save custom analyses in a catalog
- Send analysis via email
- Mark analysis as favorites
You can use drag and drop to create reports with tables and charts. You can create custom analyses for the Email, SMS, and MMS channels. Each channel provides the measures and dimensions relevant to the selected channel.
You can use the catalog to save your custom analyses for use by everyone in the organization. The catalog also stores pre-built analyses which can be used as templates to create custom analyses or for email delivery.
You can create a one-time or recurring schedule to email pre-built or custom analyses from the catalog to a group of recipients. The analysis can be attached to the email in the Excel, PowerPoint, or CSV format.
You can mark both pre-built and custom analyses in the catalog for easy access in the future.
We introduce the following new roles for Interactive Dashboards Plus:
- Email Analytics Author
- SMS Analytics Author
Provides access to Email analyses.
Provides access to SMS, and MMS analyses.
After this feature is enabled for the account, the Account Administrator must assign the respective roles to the users who need to author or schedule analyses.
Mobile App Channel: New Features
This release introduces the following new features for the Mobile App channel.
This release introduces Rich Push Message, a new message format for Push notifications. This new format enables your customers to better engage with your app. You can now extend the basic text-based Push notifications to show a Rich HTML message when the recipients swipe through the notification.
All standard functionality, such as Message Designer and Message Preview, are applicable for this format. In addition, you can:
- Use your HTML content from the Content Library
- Host your HTML content
- Personalize messages using standard RPL
- Include Dynamic Content Regions
The size of Rich Push Messages must be smaller than 2K.
Hosting your HTML content for Rich Push messages makes it easier to meet the limitation of less than 2K. Note that you can’t personalize hosted HTML messages. You can host the HTML messages in your own public-facing domain.
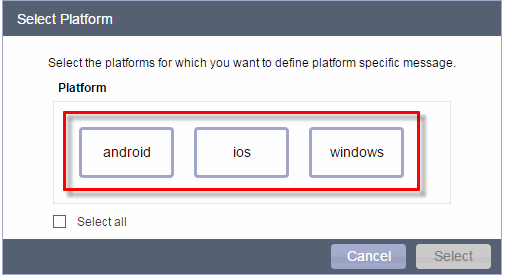
Platform Specific Messages Are Now Optional
With this release, creating Push messages for specific platforms (iOS, Android, and Windows) is optional.
Steps to Enable
- In the Push Message Designer, select the new Add platform button
- In the new Select Platform dialog, select the platforms you want.

An external developer can now use the Push Web Services API to trigger Push notifications to Mobile Application users. Push Notifications can be triggered to both known users and to a specific device.
You can use one of the following profile list attributes:
- Recipient ID (RIID)
- Customer ID
- Email Address
- Mobile Number
- EmailSHA256Hash
- EmailMD5Hash
Additionally, the following enhancements are made to the REST API:
- New interface to get all scheduled launches for a given email campaign
- New interface to get all profile lists in an account
- New interface to delete a member of a profile list given its RIID
- Enhanced interface to merge records into a PET using up to two merge keys
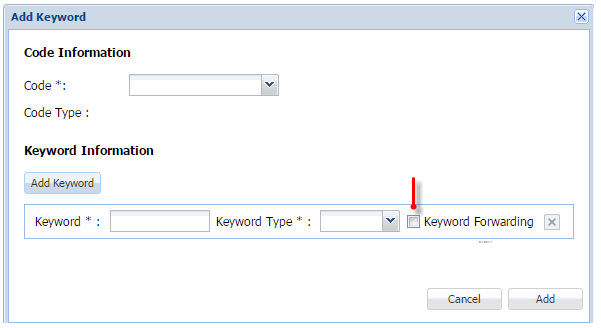
When an SMS message is received using a specific keyword, you can now post the message along with the mobile number and short code to an externally hosted web service for further processing. This functionality is extremely helpful for quick responses to a request. For example, the recipient can request flight departure information by sending an MO with the keyword DEPART, such as DEPART 854. Oracle Responsys can be configured to forward all incoming messages with the keyword DEPART to an external URI hosted by you. You can then process the information and respond with a message using the SMS Web Services API. The Account Administrator must enable keyword forwarding when adding a keyword.
Steps to Enable
- In the Campaign Management section of the Account Management page, click Manage Mobile SMS Keyword.
- On the Manage Mobile SMS Keyword page, click Add Keyword.
- In the Add Keyword dialog, add the keyword and select the new Keyword Forwarding checkbox.
Organizational Access Enhancements
In this release, we added Organizational Access support for SMS, MMS, In-App, and Push mobile objects. The following items are now controlled by the Organizational Access policy for mobile objects:
- Data sources available for use
- Apps available for use in Push and In-App campaigns
The apps are controlled by the organization assignment of the profile list with which the app is associated.
- Mobile campaigns in Program
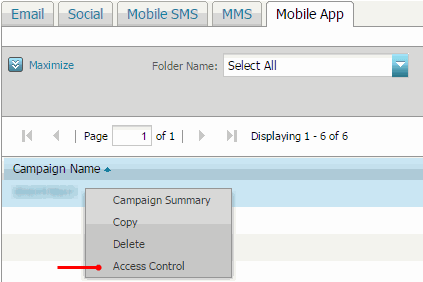
By default, the objects are assigned to the user's organization units during creation. You can view and change the organization assignment by clicking the arrow next to the object name and selecting the new Access Control option.
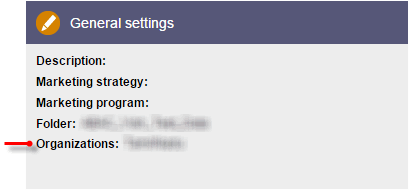
You can also view and change the organization assignment in the General settings section of the Campaign Workbook.
In this release, we added Organizational Access support for the following data objects:
- SQL view
- Join view
- Supplemental filter
- App channel list
Availability of these objects in the Email Campaign Workbook, mobile campaigns, Program Designer, and folders is now controlled by the Organizational Access policy. By default, the objects are assigned to the user's organization units during creation. You can view and change the organization assignment by clicking the arrow next to the object name and selecting the Access Control option.
Object Visibility Settings in Program Designer
You can now view and modify object visibility in Program Settings.
Steps to Enable
- In Program Designer, select Settings.
- Expand the new Access Control section.
- Navigate to and select the organizational units you want.

Support for Web Services API Call
Web Service API calls for all roles now support Organizational Access. For example, a user with the Campaign Web Services Manager role can access only objects that belong to user's organization units and their sub-organization units. By default, the objects a user creates are assigned to his organization units. You can view and change the organization assignment of the object using the Access Control option in the UI, not through an API call.
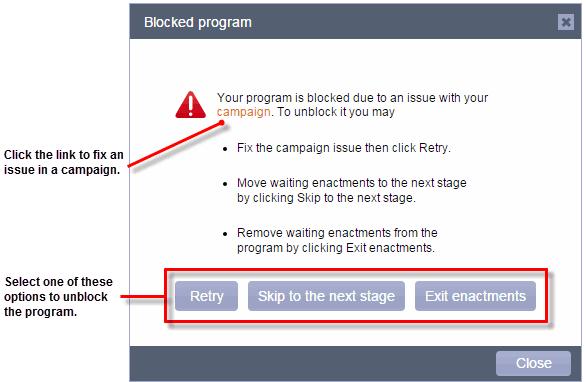
You can now unblock Send Campaign stages by addressing blocking issues. Depending on the type of issue, you can take one of the following actions to unblock a program:
- Retry
- Skip
- Exit
After you fix a blocking issue, use this option to re-try to send the campaign to all enactments which were blocked at the stage. Note that this option is not available in some cases, such as a system issue.
Use this option to skip the blocked stage and move the enactments to the next stage.
Use this option to move the enactments at the blocked stage out of the program.
Steps to Enable
When a stage is blocked, the Analyze tab shows blocked stages, and an email notification is sent to the address specified in Program Settings.
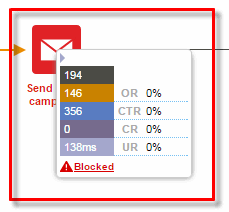
- Click Blocked to open the Blocked Program dialog.
- If the blocking issue is with a campaign, click the campaign link and fix the issue. Otherwise, select one of the available options.
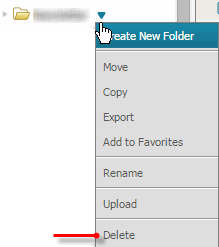
Recycle Bin For the Content Library
When you delete Content Library content, it is now moved to the Recycle Bin, and you can retrieve it for up to 30 days after deletion. When you delete content from Content Library, the files will remain in the new Recycle Bin folder. You can restore the deleted files and folders to their original location in the Content Library within 30 days. After 30 days, content will be deleted from the Recycle Bin and cannot be retrieved.
Steps to Enable
To move an item to the Recycle Bin:
- Click next to the item name and select Delete.
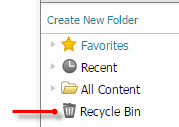
- In the Folder list, click the new Recycle Bin.
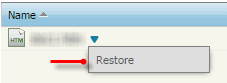
- In the Content List, click next to the item name and select Restore.
To retrieve an item from the Recycle Bin:
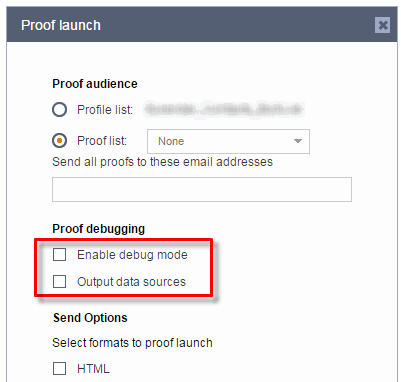
In this release, we added campaign debugging capabilities to Email Message Designer. This functionality helps you more easily validate that your personalization rules are working as designed as you can easily map the resolution of a rule to a value in the Profile List, PET, or Supplemental Table. Debugging is used only during Proof Launch and Preview, eliminating the chance that test content is accidentally sent to actual customers.
Debugging support offers two options:
- Debug mode
- Output data sources
Prints your RPL debug code at the end of the email
Displays all data fields and their associated values that were used to personalize the email at the end of the email.
You can select one or both options.
Steps to Enable
- In the Proof launch dialog, select the new Enable debug mode and/or Output data sources checkbox.
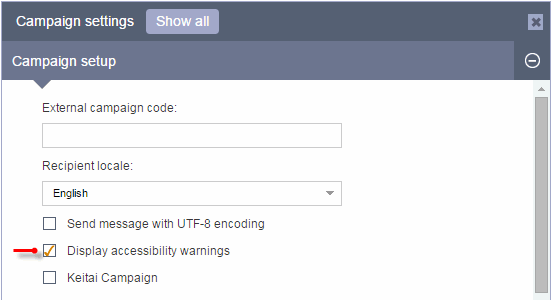
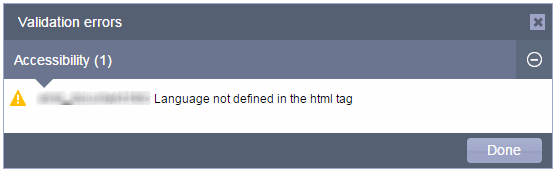
With this release, you can create accessible email messages, allowing visually impaired recipients to read the content using screen readers. When you validate the campaign, the Validation dialog displays warnings when the following tags utilized by screen readers are not defined:
- Missing <alt> tags for images
- Missing language attributes
- Proper data table elements
Unless the ROLE attribute (in TABLE) is "presentation", we assume the table is a data table. Presentation tables always pass validation. For data tables, we check whether the “summary”, “caption”, and TH elements are specified.
Steps to Enable
- In the Campaign Workbook, open the Campaign Settings section.
- In the Campaign setup section of the Campaign settings dialog, select the new Display accessibility warnings checkbox.
- Validate the campaign and check for any errors in the new Accessibility section of the Validation errors dialog
Send and Skip Notifications for Connect and API Bulk Launches
When you set Send and Skip notifications for the Campaign, these notifications are now respected when the campaign is launched by Connect and APIs, as well as the Live Launch.
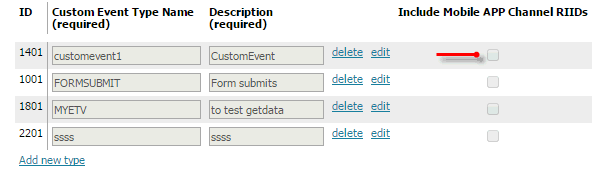
Custom Support for App Channel List RIIDS
If App Channel List is enabled for your account, you can now associate a Custom Event with the App Channel List RIIDs. This feature gives you the ability to market to known users on all their devices. The Custom Event can be raised as a result of a data upload using Connect, Form, Import, and API.
Steps to Enable
- In the Account Customization section of the Account Management page, select Define custom event types.
- Select the new Include Mobile APP Channel RIIDs checkbox of the event type you want.
Account Management Enhancements
This release introduces the following enhancements for Account Administrators.
Steps to Enable
- Click the new Set account display name link in the Global Settings section of the Account Management page.
- Type the new name in the Account Display Name field.
Define A Locale Language for Campaigns
Account Administrators can now select the locales to use for communicating with campaign recipients.
Steps to Enable
- Click the new Define locale language for campaigns link in the Campaign Management section of the Account Management page.
- Select the languages you want to use.
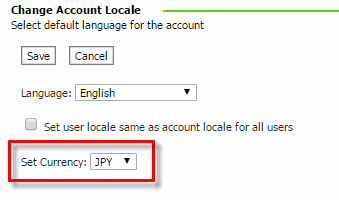
Select A Currency for the Account
Account Administrators can now select a currency to use for the account.
Steps to Enable
- Click the Set account locale link in the Global Settings section of the Account Management page.
- Select the currency from the new Set Currency list.
These are issues you reported to us that we fixed as part of the 6.27 release.
| Issue ID |
Product |
Description |
| 20741537 |
Connect |
Previously, a CED job did not zip up the content of the exported files when performed right after maintenance. This has been corrected |
| 21327608 |
Connect |
Previously, an Import and Export job, if performed at the same time on an object, resulted in “object no longer exists'” error. This has been corrected |
| 22114880 |
Program |
Previously, in some cases, programs did not launch when the Filter Engine was on. This has been corrected |
| 22121674 |
Program |
Previously, when you selected the "Enable Multivariate Testing" checkbox, the Done button disappeared. This has been corrected. |
| 22242025 |
Connect |
Previously, Export jobs sent multiple files to an external SFTP server. This has been corrected. |
| 22459078 |
Connect |
Previously, in some cases, “View Data Upload in progress” did not show an error message. This has been corrected. |
These are issues that came up as part of the 6.27 release. We will address them in a subsequent release.
| Issue ID |
Product |
Description |
Notes or Workarounds |
| 22145912 |
Program |
In rare cases, programs become blocked. |
|
| 22464140 |
Connect |
Some recipients are missing CUSTOMER ID in the click CED due to an issue with link encoding. |
|
| 22533194 |
Organization Access Control |
If Organizational Access Control is enabled for the account, a user cannot create a program from the Campaign Workbook dashboard. |
As a workaround, select Program from the main menu to create a program. |
| 22539133 |
Organization Access Control |
For programs assigned to the Root node, the node is not pre-selected or displayed in Program Settings. The selection is displayed correctly for all other organizational units. |
As a workaround, use Access Control in the context menu on the Manage Programs page. |
---

Copyright © 2016, Oracle and/or its affiliates. All rights reserved.
This document is provided for information purposes only, and the contents hereof are subject to change without notice.This document is not warranted to be error-free, nor subject to any other warranties or conditions, whether expressed orally or implied in law, including implied warranties and conditions of merchantability or fitness for a particular purpose. We specifically disclaim any liability with respect to this document, and no contractual obligations are formed either directly or indirectly by this document. This document may not be reproduced ortransmitted in any form or by any means, electronic or mechanical, for any purpose, without our prior written permission.
Oracle and Java are registered trademarks of Oracle and/or its affiliates. Other names may be trademarks of their respective owners.
Intel and Intel Xeon are trademarks or registered trademarks of Intel Corporation.All SPARC trademarks are used under license and are trademarks or registered trademarks of SPARC International, Inc. AMD, Opteron, the AMD logo, and the AMD Opteron logo are trademarks or registered trademarks of Advanced Micro Devices. UNIX is a registered trademark of The Open Group.