

This document will continue to evolve as existing sections change and new information is added. All updates are logged below, with the most recent updates at the top.
| Date |
Feature |
Notes |
|---|---|---|
| 02 OCT 2017 |
Program: Event Switch - Additional Events |
Document updated. Added feature delivered in Release 6.33. |
| 31 AUG 2017 |
Program: Cross Program Events |
Document updated. Added feature delivered in Release 6.33. |
| 14 AUG 2017 |
Initial Document Creation. |
This guide outlines the information you need to know about new or improved functionality in Oracle Responsys’ 6.33 August 2017 Release and describes any tasks you might need to perform for the update. Each section includes a brief description of the feature, the steps you need to take to enable or begin using the feature, any tips or considerations that you should keep in mind, and the resources available to help you.
This section gives you information to help you plan and use the features included in this release. We frequently update this document so don’t forget to check back and get the latest information.
- 6.33 August 2017 Release Training Videos
- Oracle Responsys 6.33 August 2017 Release Fixes and Known Issues
- Responsys Insiders (Customer Community)
- 6.33 Release Feature Availability
Some of the new features are automatically available to users after the upgrade and some require action from the user, the company administrator, or Oracle.
The table below offers a quick view of the actions required to enable each of the features.
| Action Required to Enable Feature |
||||
|---|---|---|---|---|
| Feature |
Automatically Available |
End User Action Required |
Administrator Action Required |
Oracle Service Request Required |
| Mobile |
||||
|
|
||||
|
|
||||
|
|
|
|
||
| Interactive Dashboards |
||||
|
|
||||
|
|
||||
|
|
||||
|
|
|
|||
| Campaigns |
|
|||
|
|
||||
| Open Campaign Analysis Dashboard from the Campaign Workbook and Manage Campaigns Page |
|
|||
|
|
|
|||
|
|
|
|
||
|
|
||||
|
|
|
|||
|
|
||||
|
|
||||
|
|
||||
| Data |
||||
|
|
|
|||
| App Channel List Filter Returns Only Recipients with Devices |
|
|
||
|
|
||||
|
|
||||
| User Interface |
|
|||
|
|
||||
|
|
||||
| Audience Designer |
||||
|
|
||||
|
|
||||
| Collaboration |
||||
| Select Images from Content Library |
|
|||
| API |
||||
|
|
|
|||
| Program |
||||
|
|
|
|||
|
|
||||
| Cross Program Events |
|
|||
|
|
||||
| Connect |
||||
|
|
||||
| RPL |
||||
|
|
||||

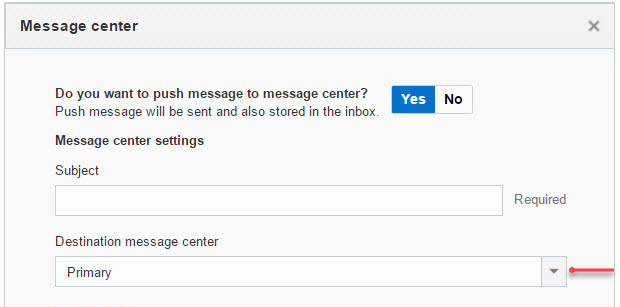
Multiple Message Centers for Push Campaigns
If your app includes several message centers, Push campaign designers can now send Push notifications to multiple message centers. The app may include up to 5 message centers.
Users with the Mobile App Administrator role may add and delete message centers. Users with the Mobile App Developer role may add message centers. If a message center is deleted, the campaigns that use it will produce a validation error.
For information about designing multiple message centers, please refer to: https://docs.oracle.com/cloud/latest/marketingcs_gs/OMCFB/message-center/.
- In the Push Message Designer, click
 in the Send to message center section.
 - In the Message center dialog, click Yes and select the destination message center from the list.
![]()
Split View Editor for Push and In-App Campaigns
The Split View Editor is now available for Push and In-App campaigns.
The Split View Editor provides two side-by-side editing panels:
- Source panel
This panel displays the HTML source of the rich text message. HTML developers can use this panel to easily make changes to and navigate the HTML source, while viewing the immediate impact in the Visual panel. - Visual panel
This panel displays a visual preview of the message and allows campaign developers to edit content.
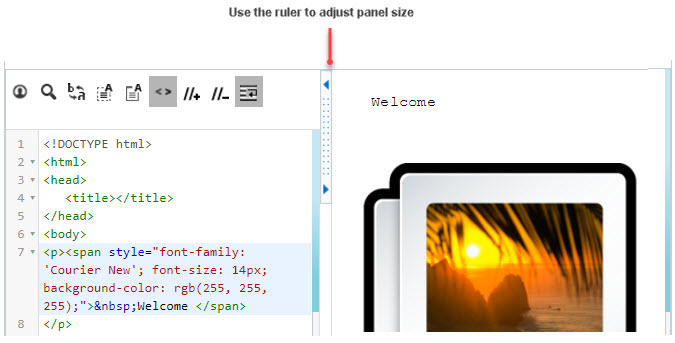
Steps to Enable
Note that enabling Split View Editor for Push and In-App campaigns also enables it for Email campaigns as well.
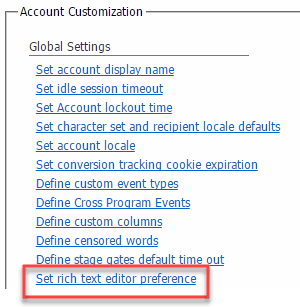
- In the Account Customization section of the Account Management page, select Set rich text editor preference.
- Un-select the Enable rich text editor when editing HTML documents checkbox and click Save.
Program-Independent In-App Campaigns
With this release, you can launch In-App campaigns from within the Campaign Workbook. You no longer need to create programs for In-App campaigns that do not involve cross-channel orchestration.
You can launch any new or existing In-App campaign from Program or from the Campaign Workbook.
Personalize Push Campaign Fields
With this release, you can design more flexible Push campaigns by personalizing the following Push campaign fields:
- Android Image URL
- iOS Image URL
- Title
- Values of custom key/ value pairs
In addition, you can now deliver messages with personalized Subject line and Message icon to the message center.
The List Analysis Dashboard trends the size of your list over months, weeks, and days and includes a breakdown by the recipients deliverability status and permission status.
Currently, this dashboard is available only for the Email and SMS channels.
Steps to Enable
- Click
 and select View Interactive Dashboards.
 - Select the List Analysis tab.
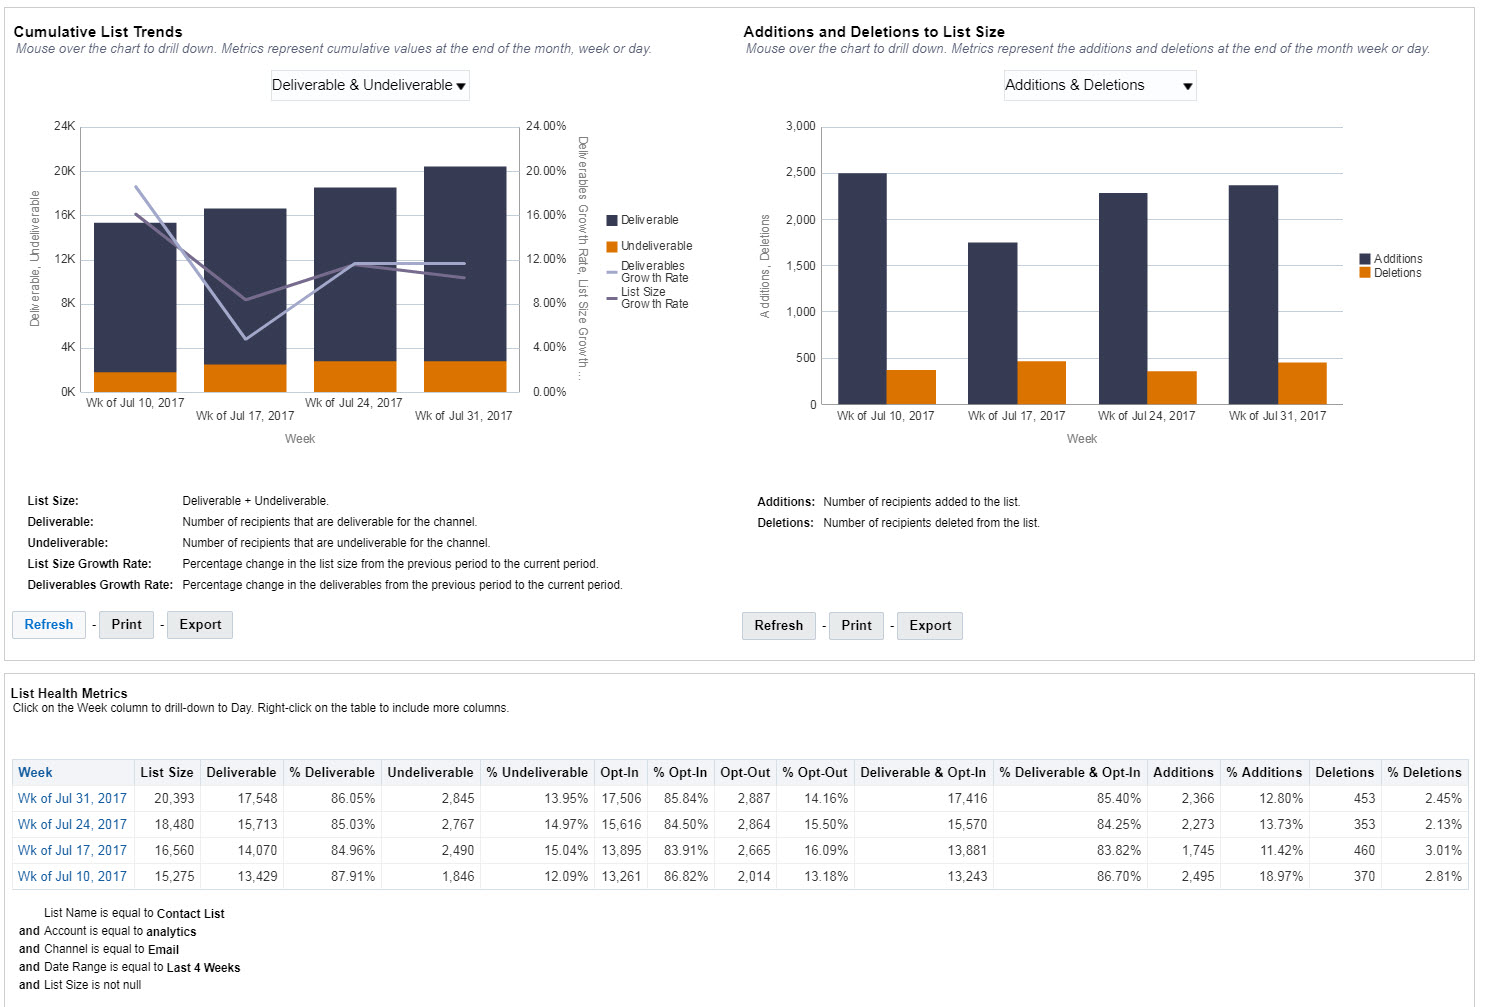
DATA AVAILABILITY
- This dashboard will be visible on the Pre-Release date, but data will be available only after the Release Date.
Pre-Release date is August 19th for I5, and September 9th for I2. Release date is September 2 for I5, and September 23rd I2. - The week is defined as Monday through Sunday. This means that data will be available visible on the Monday after the Release Date. For example, the Release Date for I2 is Saturday, September 2nd, so data will be available visible on Monday, September 4th from Saturday, September 2nd to Monday, September 4th.
- The data will include cumulative metrics for all time at the end of that week or day. While you can see a day by day trend on week one, you will not see a weekly or monthly trend right away, as the trending happens over time.
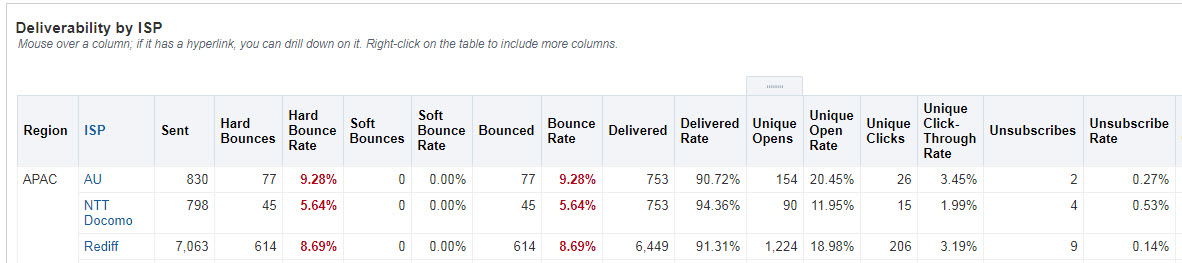
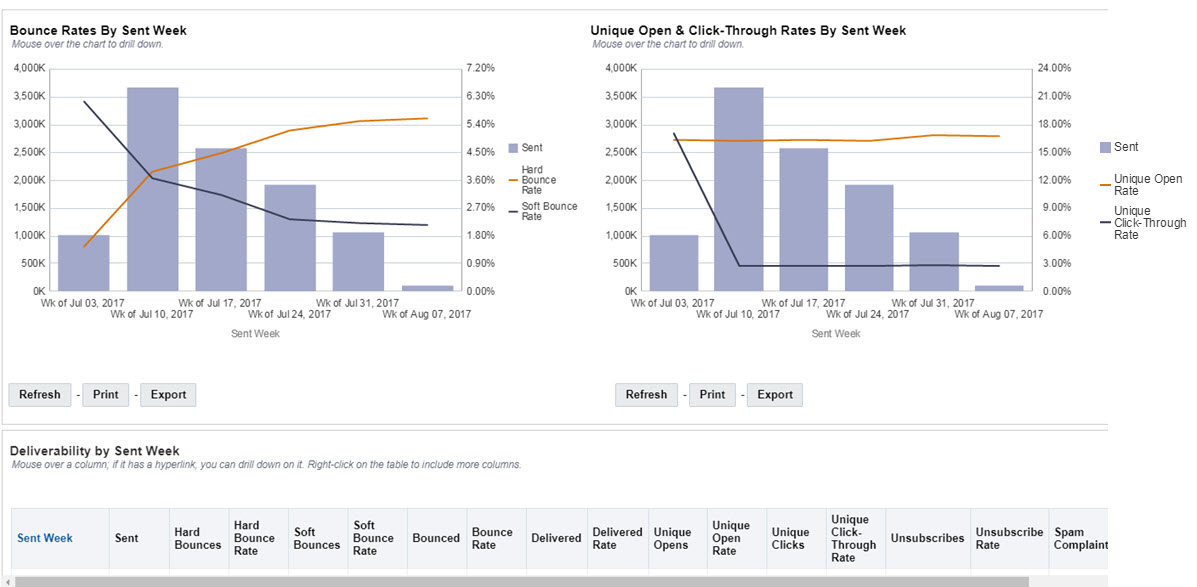
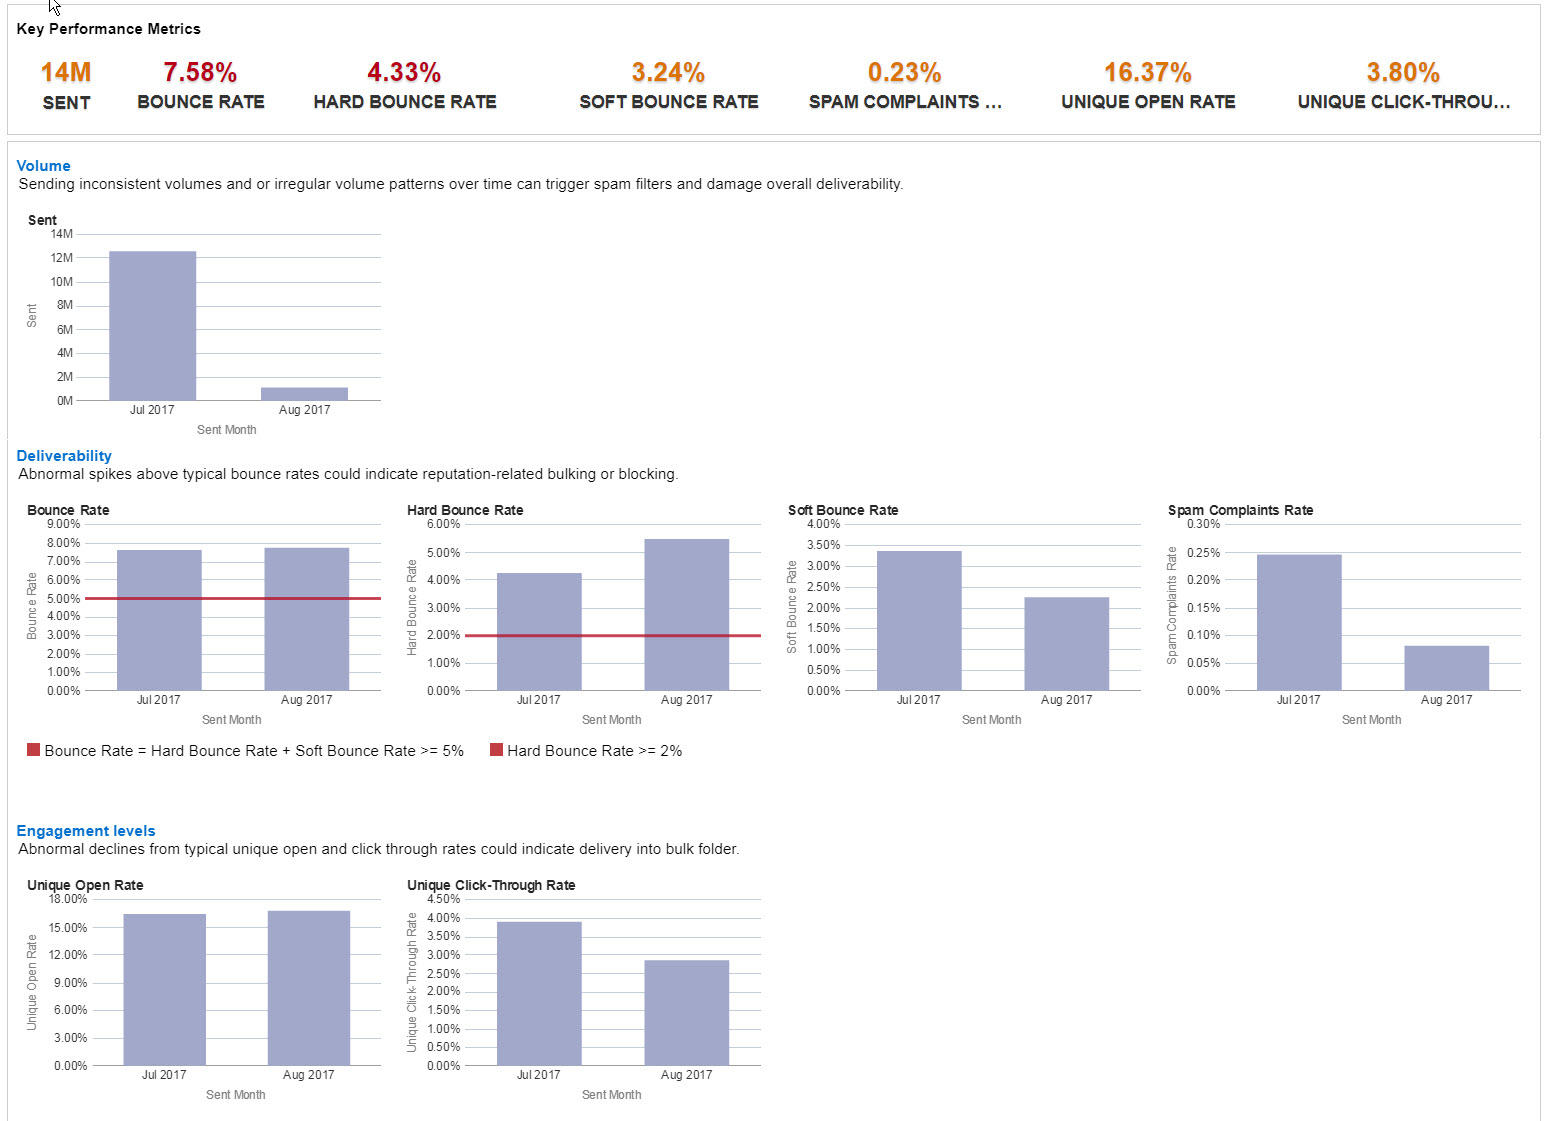
We added new deliverability dashboards to get you started analyzing your accounts’ deliverability performance. The dashboards highlight metrics that are above the recommended deliverability thresholds.
Steps to Enable
- Click and select View Interactive Dashboards.
- On the Email tab, expand Deliverability and select Deliverability Trends.
- Click View More Reports and select the report you want.
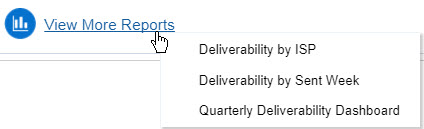
This dashboard provides a tabular view of deliverability performance by ISP.
This dashboard helps you analyze deliverability performance by week.
This dashboard provides a comprehensive view of the current (or previous) quarter deliverability health. The dashboard helps you analyze sending patterns, and deliverability and engagement rates.
Enhanced Multivariate Tests Dashboard
The Multivariate Tests dashboard now provides a better way to select a campaign and to review the performance of its test versions.
You can now also review the performance of multiple tests run on the same day.
Steps to Enable
- Click and select View Interactive Dashboards.
- On the Email tab, expand Performance and select Multivariate Tests.
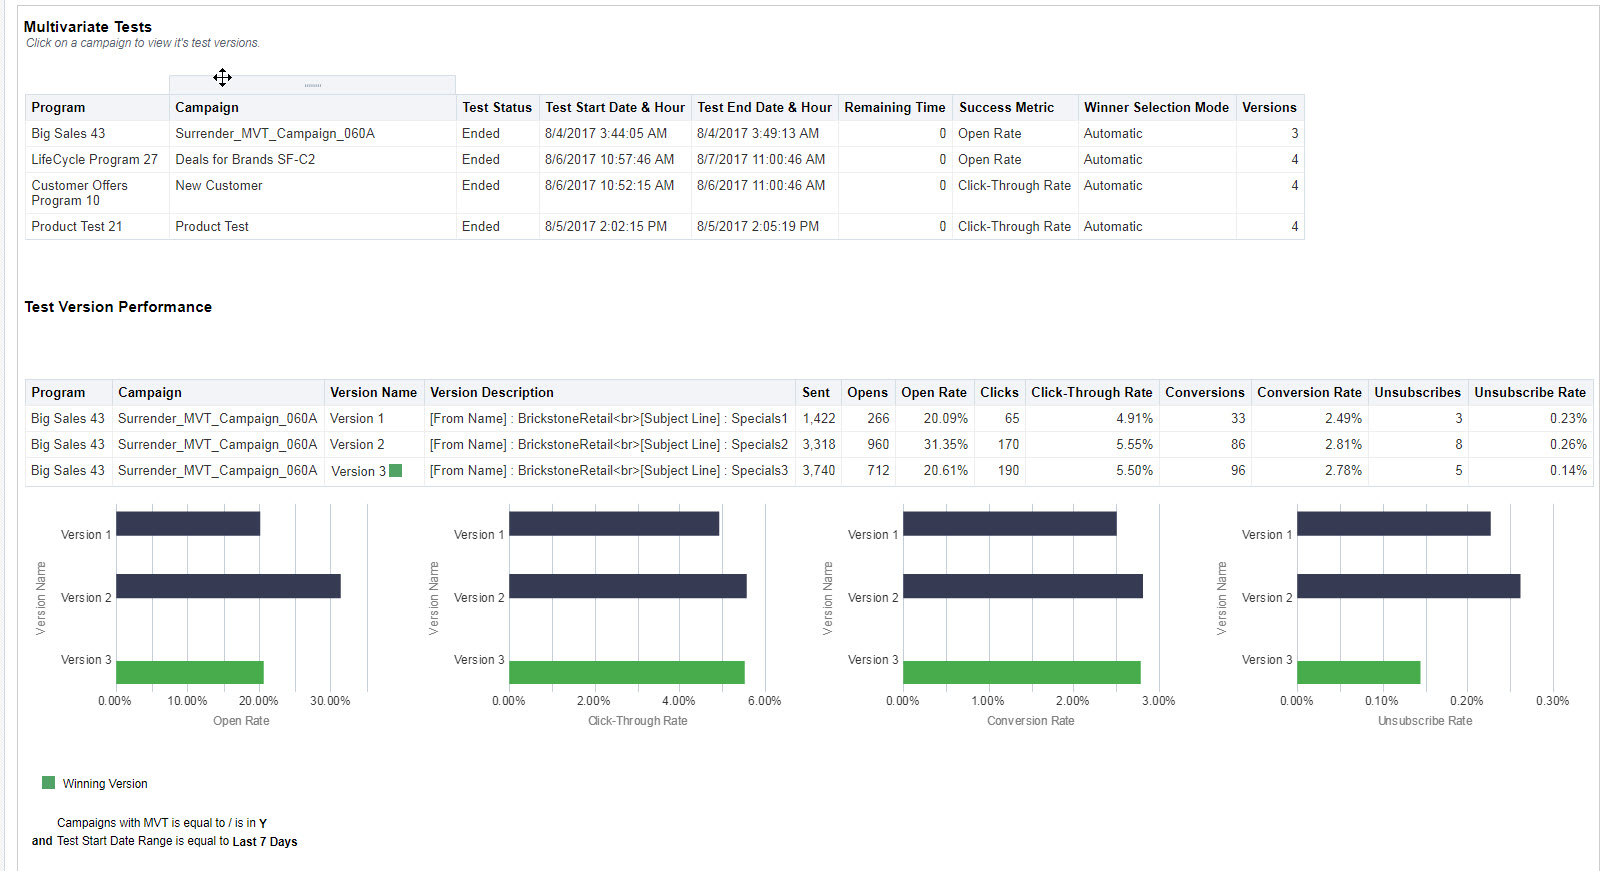
Sent Date Range and Currency Display
We made the following usability improvements:
- The values under the Sent Date Range and Event Date Range now appear in the user’s selected language.
- The currency symbol now appears in the user’s selected currency.
View Campaign Monitor on a Mobile Device
You can now access the Campaign Monitor on your iOS or Android mobile device so that you can quickly assess the performance and health of a campaign while it's being launched.
The Campaign Monitor provides statistics for campaigns that were sent in the past 24 hours. You can also generate a shareable link to a report and send it to peers who will be able to view it without logging into Oracle Responsys.
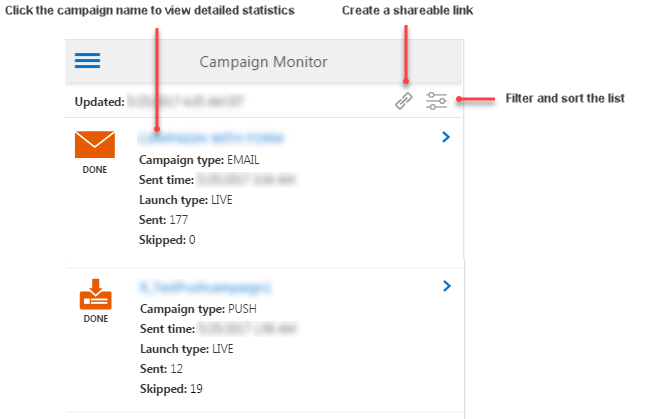
For information about using the Campaign Monitor on a mobile device, please see the Oracle Responsys Mobile Campaign Monitor User Guide.
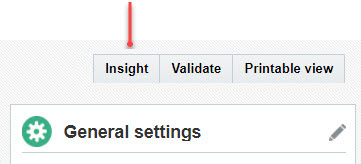
Open Campaign Analysis Dashboard from the Campaign Workbook and Manage Campaigns Page
You can now easily access reporting metrics for a campaign from the Campaign Workbook and Manage Campaigns page.
Steps to Enable
- On the Manage Campaigns page, click the new Insight icon next to the campaign name.
- In the Campaign Workbook, click the new Insight button.

Two Modes of Split View Editor
In this release, we divided the Split View Editor in the Email Message Designer into two distinct panels, HTML Source and Live View. This change improves usability based on user roles and makes better use of screen real estate.
HTML developers can use the HTML Source panel to easily make changes to and navigate the HTML source, while viewing the immediate impact in the Live View panel.
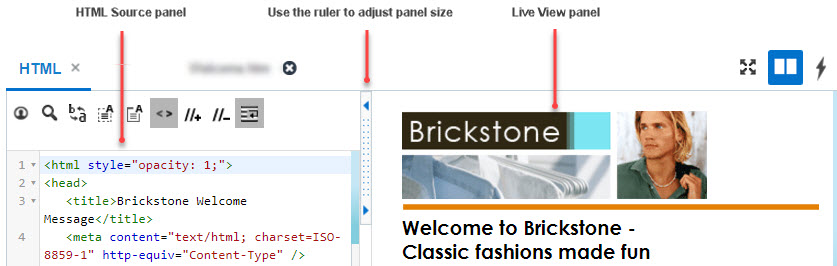
Marketers can hide the HTML Source panel and display the Live View panel and Dynamic Content Rules or MVT variant configurations to focus on adding dynamic content and rules to email campaigns.
Steps to Enable
- To hide the HTML Source panel and display the content rules editor, click
 .
. - To show the HTML Source panel, click
 .
.
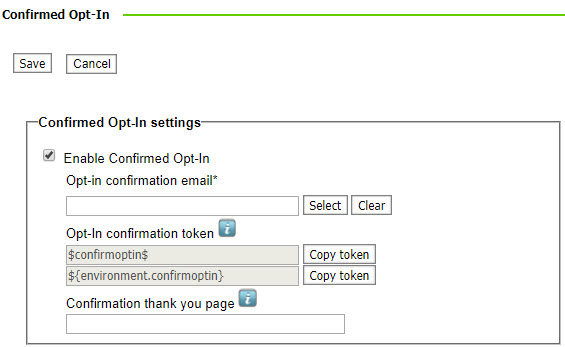
You can now use Confirmed Opt-In (also known as Double Opt-In) to obtain permission from your contacts to send promotional email communications.
With Confirmed Opt-In, contacts who are added to the list via a form will need to respond to an email confirmation request to receive promotional email communications.
Steps to Enable
- Enable Confirmed Opt-in for the account.
- On the Account Management page, click Manage confirmed Opt-In settings in the new Confirmed Opt-in section.
- On the Confirmed Opt-In page, select Enable Confirmed Opt-in, select the confirmation email campaign, and copy the opt-in confirmation token.
- Select the form for confirmed opt-in.
- On the List page of the form Dashboard, select the new Require subscribers to confirm their Opt-In checkbox.
- Create a transactional campaign to use as the confirmation email, and place the opt-in confirmation token (available on the Confirm Opt-In page) anywhere in the message body.


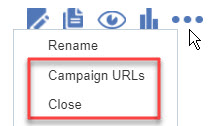
Manage Campaign Page Enhancements
You can now close a campaign and view campaign URLs directly from the Manage Campaigns page.
Steps to Enable
- Click
 and select the option you want.
Audit Dashboard for Mobile Campaigns
The Audit Dashboard is now available for SMS, Push, and In-App campaigns.
The Audit Dashboard provides details about the campaign launch activity, recipient inclusions and exclusions, the breakdown of skipped activity, and the average throughput.
The Audit Dashboard also includes a link for downloading sample data. The sample data report provides five samples of data for each skip reason. You can use that data for troubleshooting a campaign.
Steps to Enable
- In the Campaign Monitor, click
 of the campaign you want.
Split Launch Campaign Names in Calendar
With this release, the Campaign Calendar shows the names of the campaigns included in a split launch.
Steps to Enable
- Click the name of a split launch in the Campaign Calendar.
The names of the campaigns are shown on the Campaign Schedule Options page.

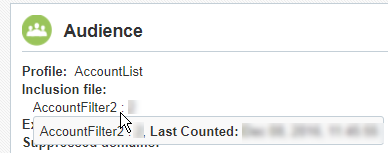
Estimated Filter Count in Campaign Workbook
If your campaign includes a filter and you ran a count for that filter, the Audience section in the Campaign Workbook now shows the estimated filter count.
Steps to Enable
- Point at the filter name in the Audience section.
The Proof Launch dialog now shows three separate sections for proof audience, send options, and notifications, providing easier access to the options you want to specify.
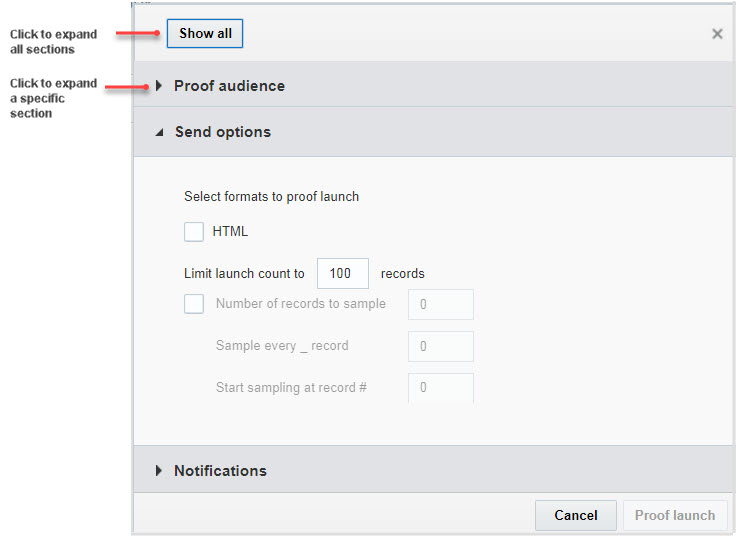
In addition, you can now send progress notifications for proof launch messages.

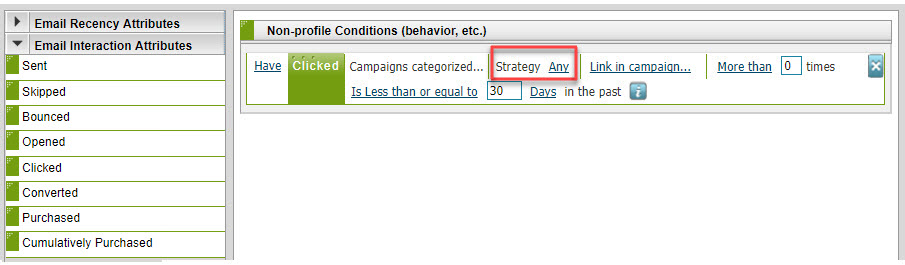
Campaign Strategy in Clicked Interaction Filter Attribute
You can now specify Strategy as a condition for the Clicked Email Interaction attribute in Email Behavior filters.
Steps to Enable
- Create an Email Behavior filter.
- Drag the Clicked attribute from Email Interaction Attributes to the drop zone.
App Channel List Filter Returns Only recipients with Devices
Previously, the App Channel List filter returned recipients with and without associated devices. To improve filter execution performance and avoid program blocks, the filter now returns only recipients that have devices associated with them.
Limited Number of Custom Columns in Profile Lists
To improve performance, new Profile Lists must not include more than 50 custom columns.
This limit does not affect existing Profile Lists, they will continue to work correctly.
Restrictions on SQL Views Using Behavioral Tables
To improve SQL View performance, new SQL Views cannot refer to behavioral tables.
Existing SQL Views with behavioral data will continue to work correctly, but you cannot edit and save them.
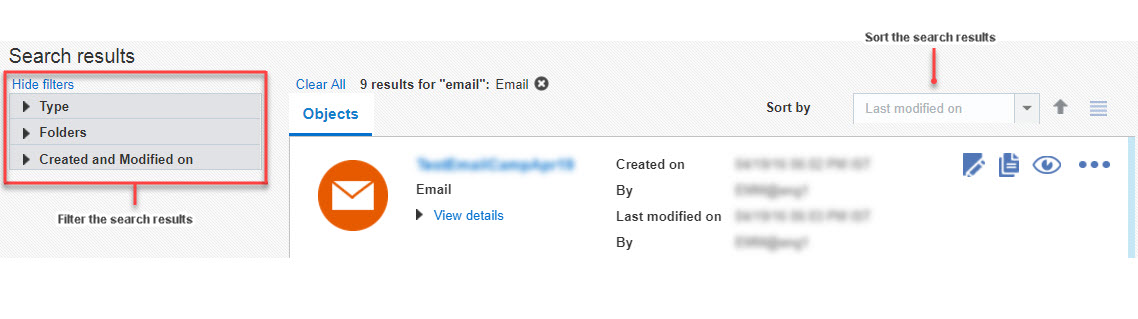
You can now search for objects in your account from any page. You can filter the search to refine your results further.
NOTE: You cannot search the Content Library, Connect jobs, Maxymiser campaigns, or Display campaigns.
Steps to Enable
- Click
 on any page and type the string you want to find.
In this release, we updated the top and side navigation bars to provide easier access to major Oracle Responsys features.
The updated navigation bar at the top of all pages provides quick links to common features.
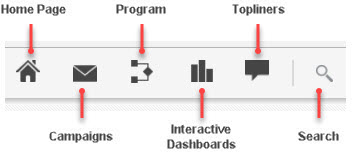
If Collaboration is enabled for your account, and you have any tasks, the Tasks link (![]() ) replaces the Interactive Dashboards link. In that case, use the side bar to access Interactive Dashboards.
) replaces the Interactive Dashboards link. In that case, use the side bar to access Interactive Dashboards.
The updated side navigation bar on any page provides direct access to all Oracle Responsys functions.
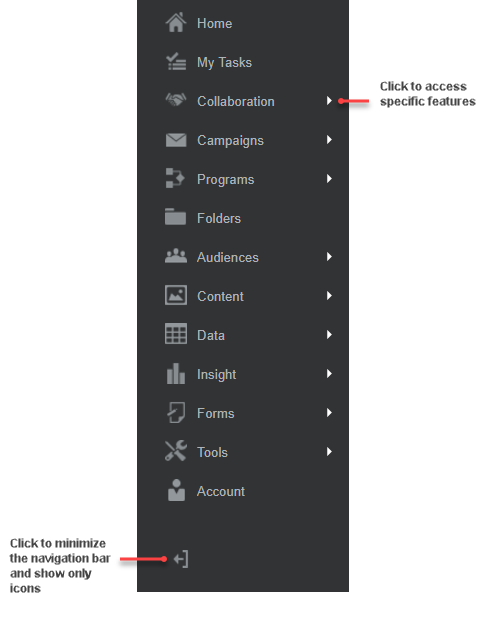
- To show or hide the side navigation bar, click
 .
.
Execution of audiences is much faster now so that you can analyze and run your audiences much more quickly.
To provide a cleaner view of the audience, the canvas and Analyze tabs no longer show names of the operators and display filter names inside the icon. Point at an operator to see its label.
Select Images from Content Library
Campaign designers can now designate a folder in the Content Library that contains pre-approved images for collaboration regions. Content contributors will then be able to select images from that folder.
Steps to Enable
- For each content region with the contribution type Image, click Change folder and select the Content Library folder you want.
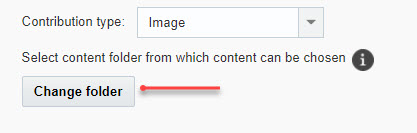
Images from the selected folder will be available for selection to content contributors.

We added REST APIs for:
- Sending dynamic attachment files (such as PDF or JPG) with a merge+trigger API request
- Getting all Push campaigns
- High availability (AFTM) API for triggering Push messages
This API is available only if AFTM is enabled for your account. Note that Profile Extension Tables (PETs) are not replicated in the secondary environment.
Additional resources for more information:
- Oracle Responsys REST API Developer's Guide (PDF and HTML).
- Oracle Responsys AFTM Developer’s Guide.
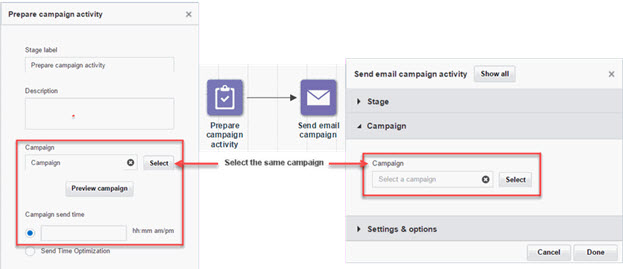
Prepare Messages Before Sending
You can now use the new Prepare stage to prepare messages at any time, then send the campaign at a specified time.
When you send email campaigns to a large audience, personalization might take a considerable amount of time and impact the send time. This feature helps with campaigns such as flash sales, where email messages must start going out at a specific time. Using the Prepare stage, you can personalize messages ahead of time.
Steps to Enable
- Add the new Prepare campaign activity to the program.
- In the Properties dialog, select the campaign and the campaign send time.
- Add a Send email campaign activity following the Prepare activity, and specify the same campaign as the Prepare campaign activity.
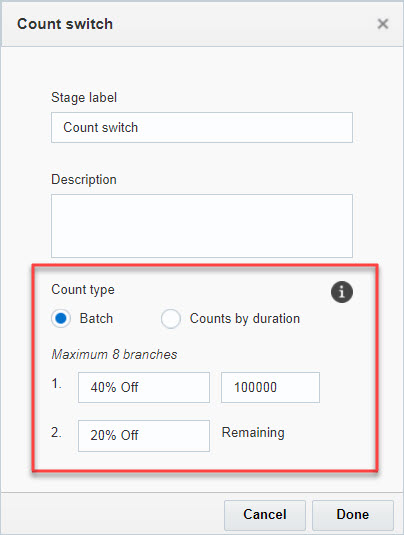
You can now send a specified number of enactments through a path using the new Count switch. Use this switch when you need to limit the number of sent messages to a specific number.
You can configure the Count switch to run for each incoming batch, or based on counts by days, weeks, or months.
Steps to Enable
- Add the new Count switch to the program and create at least two paths.
- In the switch properties dialog:
- Select the Batch or Count by duration mode.
- Batch mode applies the count rules to each incoming batch. Use this mode when enactments come in all at once, such as from a scheduled filter or Connect job.
- Count by duration applies the count rules within a time period. Use this mode when you need to send messages within a specific time frame, or for triggered enactments.
- Specify the counts for each path.
- The last path is always the ‘Remaining’ path. Any enactments that are not sent down one of the other paths are sent in the Remaining path.

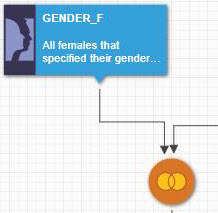
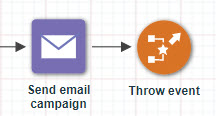
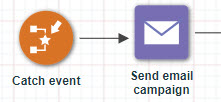
You can now orchestrate campaigns and send recipients across multiple programs. This feature also allows continuing customer journeys from one to multiple programs concurrently.
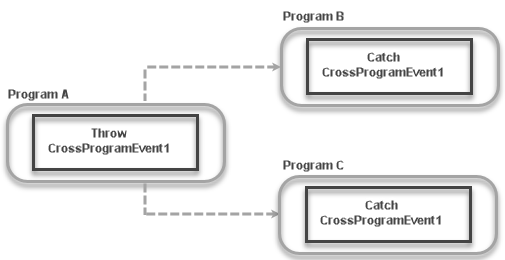
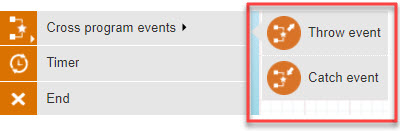
This feature introduces two events to Program :
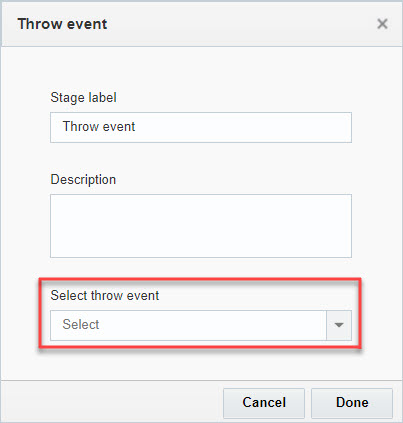
- Throw Event
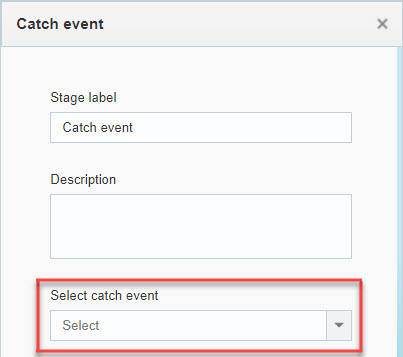
Sends recipients to another program. - Catch Event
Creates new enactments received from the Throw event.
Steps to Enable
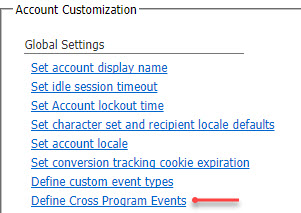
- The Account Administrator defines the Cross Program events:
- In the Global Settings section of the Account Management page, click the new Define Cross Program Events link.
- Click Add new event and enter the event name and description.
- The Program Designer configures the programs to throw and catch the same Cross Program event:
- In the program that is sending enactments, add a Throw event at the stage that recipients are to be sent to other programs.
- Right-click the Throw event and select Properties.
- Select the event to throw from the Select throw event list.
- In the program that is receiving enactments, add a Catch event as the starting event.
- Right-click the Catch event and select Properties.
- Select the same Cross Program event as the Throw event from the Select catch event list.

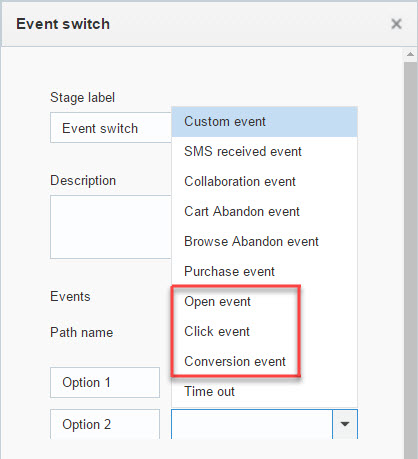
Event Switch - Additional Events
Event switches now support Opens, Clicks, and Conversions events that pertain to email campaigns.
Steps to Enable
- Select Properties of an Event Switch in a program, and select the event you want from the Events list.
Delete Multiple Jobs at a Once
You can now delete several Connect jobs at the same time.
Steps to Enable
- On the Connect page, use the CTRL and SHIFT keys to select multiple jobs and click Delete.
RPL (Responsys Personalization Language) Updates
In this release we added following methods and variables:
- Parsejson
This method provides complete support for parsing a JSON string to sequences, hashes, and primitives. - Nonce
This method generates a unique number that can be used in communication protocols to uniquely identify a request. - .today
This special variable returns the current date (in datetime format) as of midnight of the current day. - localtoutc
This method converts any datetime or date (assuming it is in the local time as defined by the template) and convert it to UTC. - utctolocal
This method converts any datetime or date (assuming it is in UTC) and convert it to the local time as defined by the template.
---

Copyright © 2017, Oracle and/or its affiliates. All rights reserved.
This document is provided for information purposes only, and the contents hereof are subject to change without notice. This document is not warranted to be error-free, nor subject to any other warranties or conditions, whether expressed orally or implied in law, including implied warranties and conditions of merchantability or fitness for a particular purpose. We specifically disclaim any liability with respect to this document, and no contractual obligations are formed either directly or indirectly by this document. This document may not be reproduced or transmitted in any form or by any means, electronic or mechanical, for any purpose, without our prior written permission.
Oracle and Java are registered trademarks of Oracle and/or its affiliates. Other names may be trademarks of their respective owners.
Intel and Intel Xeon are trademarks or registered trademarks of Intel Corporation. All SPARC trademarks are used under license and are trademarks or registered trademarks of SPARC International, Inc. AMD, Opteron, the AMD logo, and the AMD Opteron logo are trademarks or registered trademarks of Advanced Micro Devices. UNIX is a registered trademark of The Open Group.
6.33 Rev 3