
This document will continue to evolve as existing sections change and new information is added. All updates are logged below, with the most recent updates at the top.
| Date |
What’s Changed |
Notes |
|---|---|---|
| 03 APR 2017 |
Initial Document Creation |
This guide outlines the information you need to know about new or improved functionality in Oracle Transportation & Global Trade Management Cloud Release 6.4.2. Each section includes a brief description of the feature, the steps you need to take to enable or begin using the feature, any tips or considerations that you should keep in mind, and the resources available to help you.
We welcome your comments and suggestions to improve the content. Please send us your feedback at otm-doc_us@oracle.com. Please indicate you are inquiring or providing feedback regarding the Oracle Transportation & Global Trade Management What’s New in Release 6.4.2.
Some of the new Release 6.4.2 features are automatically available to users after the upgrade and some require action from the user, the company administrator, or Oracle.
The table below offers a quick view of the actions required to enable each of the Release 6.4.2 features.

Oracle Transportation and Global Trade Management
This section of the What’s New captures the transportation and trade improvements that benefit both Oracle Transportation Management (OTM) and Global Trade Management (GTM).
This feature provides you with a complete UI look and feel update that includes changes to almost every aspect of the user experience including updates to screen colors, font sizes, button color, icons and menus.
Some of the improvements provided as part of this feature include:
- Updated look and feel of OTM/GTM using a new theme; themesalta.css. The new theme changes the following:
- colors, font, size, and contrast
- various icons have been redesigned and modernized including:
- SmartLink
- Edit
- Delete
- View
- Search
- Calendar
- Volume
- The f, n, l, v icons have been replaced by more intuitive Search, New, and View icons:
- Search icon has replaced the f and l buttons.
- If the field is populated and you click the magnifying glass to run a search, a ‘begins with’ search is run and the finder results are presented.
- If you click search for an empty field, the finder criteria screen is presented allowing you to run an empty search, or to populate criteria and then run your search.
- New icon has replaced the n icon.
- View icon has replaced the v icon.
Steps to Enable
There are no steps necessary to enable this feature.
Key Resources
- See the OTM Branding Guide for details related to the new theme changes.
- See the Basic Data Entry for Refreshed User Interface help topic for more details.
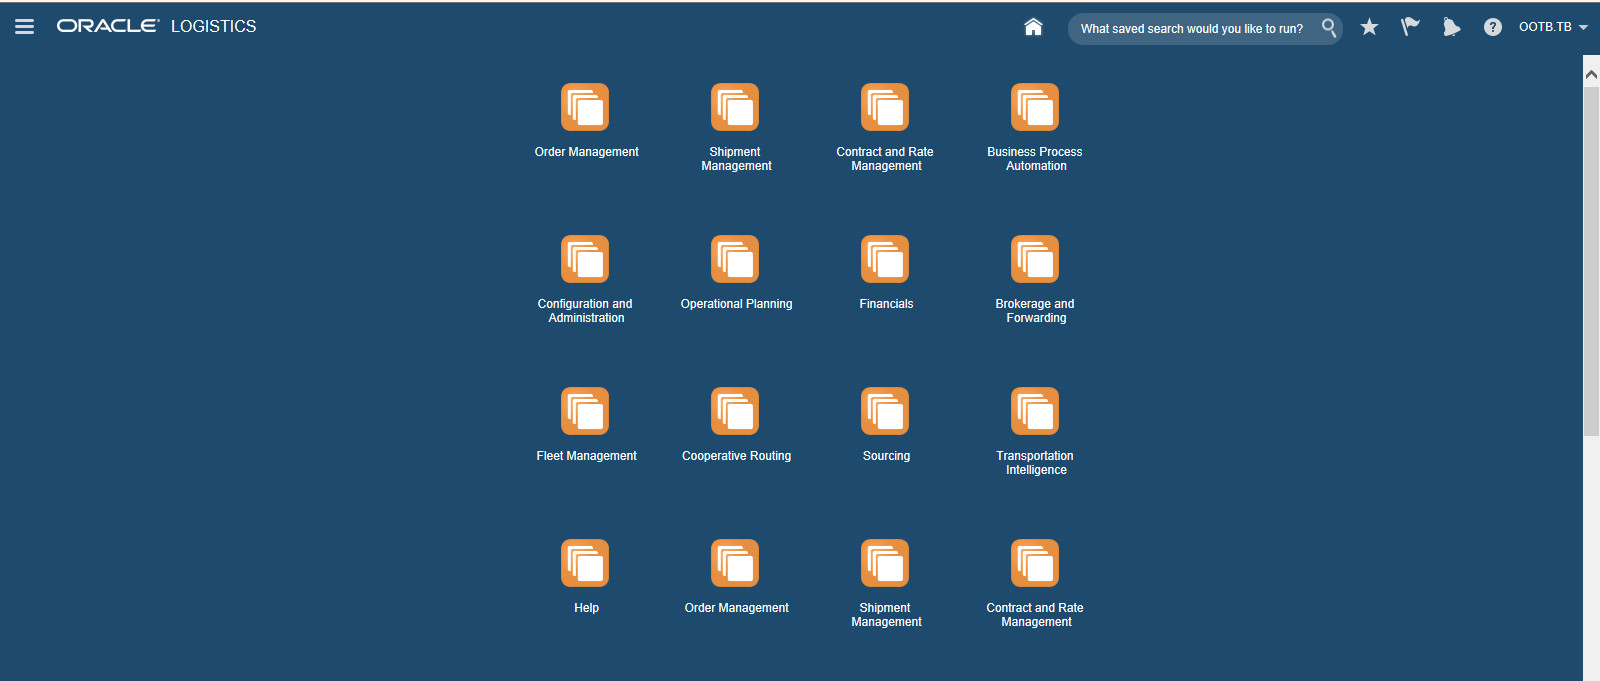
This feature provides a Logistics home page that has undergone a complete refresh. The new look includes a Springboard (main menu) and the Unified Global Header. The redesigned home page provides you with a clean, intuitive and more modern starting point for navigating through OTM/GTM.
Steps to Enable
There are no steps necessary to enable this feature.
This feature provides you with a Unified Header that provides access to a set of core capabilities no matter where you are in the system.
![]()
The Unified Header provides access to the following capabilities:
- Navigator

- Provides you full menu access to all your OTM and GTM menu items.
- Home

- Returns you back to the Springboard.
- Global Search (Saved Queries)

- Enter the first three characters of an existing saved search (saved query) and you will be able to see a list of the saved search/query IDs that match the entered characters. You can click on a saved search/query link to see the query results.
- Favorites

- Allows you to view or manage your list of user favorites.
- Business Monitor

- Brings up your configured the business monitor.
- Notifications

- Provides access to the Message Center. If you have new unread messages, a red circle appears on the Notification icon. When the mouse pointer hovers over the icon, a tool tip displays the number new messages (# New Notifications). If you click the icon, you see a finder results page displaying all of your messages.
- Help

- Provides direct access to on-line Help.
- Settings and Actions

- Provides information on your user details, system details, troubleshooting, and administration. From the Settings and Actions pop-up, you can:
- Sign out of OTM/GTM
- View user details
- Change user roles
- View system details
- Configure explanations via the Tracking Mode and Tracking Level drop-down lists
- Turn on/off Tracking Diagnostics for a user's session
- Navigate to various troubleshooting and administrative areas of OTM/GTM
Steps to Enable
There are no steps necessary to enable this feature.
Tips and Considerations
In the message center - to control how often the number of new messages is refreshed, you can set the glog.ui.messageCenter.refresh property which sets the refresh rate of the Message Center (in seconds).
This feature provides two types of menu access - the Springboard and the Navigator. The Springboard provides access to a sub-set of the menu groups and links that you need quick and direct access to. The Navigator provides comprehensive access to all of your menu groups and links.
Steps to Enable
There are no steps necessary to enable this feature.
Tips and Considerations
For a single user, both the Springboard and the Navigator show the menus assigned to that user via user access. The Springboard and the Navigator cannot display different menus – however you can select which menu groups and links are displayed on the Springboard.
This feature provides a new icon based Springboard view that allows you to navigate quickly to and from those areas of the system that you use most often. By default, the Springboard displays all the components available in the system and adheres to the default multi-level menu structure provided in the system. The real benefit provided by the Springboard is the ability to configure the navigation options on the Springboard to allow you to go directly to the menu groups and links that you use most often.
The Springboard is ideally suited for:
- Providing you with visibility to your most frequently used areas of the system in one home view.
- Allowing you to go directly to the functionality required for completing a task and then return you directly to the home view without having to navigate through a multi-level menu structure.
The following options were added to the Menu Editor to support Springboard setup/configuration:
- The Show on Springboard option on the menu editor page allows you to make a group or link visible or hidden on the Springboard.
- The PUBLIC menus now include a variety of standard icons for menu groups and items. You can change these icons by selecting from one of the available Image IDs in the Menu editor. The icon only displays if the Show on Springboard option is selected.
- To preview a new icon in the menu editor, right-click on the menu item and select View Details.
- All menu items with the Show on Springboard option selected appear in the Menu editor with a yellow star on the folder.
- When migrating from a custom menu, you will see only two types of icons (an orange folder icon for groups and a blue document icon for menu links). To take advantage of the available icons that ship with OTM, you can create new menus based on the updated PUBLIC menus.
- To open a Springboard item in a new tab or window, right-click on the lowest level menu item (for example, Buy Shipments) and select "Open in new window". Depending on your browser settings, the page will either open in the new tab or a new window. This option is not available for some menu items. For those menu items you will see the message "New window not supported".
Springboard
Steps to Enable
- No steps are required to enable the Springboard, the Springboard is on by default. There are, however, several steps (below) required for configuring the Springboard so that it provides the desired benefits for the user.
- From within the Menu Editor, you can configure the groups, links and icons that will appear in the Springboard when you create/add a new group or link to your menu.
- When creating a new menu element (group or link), you can make the group or link visible on the Springboard by checking the Show on Springboard option – the default is for the new menu element to be visible on the Springboard. To hide the element from the Springboard, deselect the Show on Springboard option
- Springboard icon ordering and positioning: The order of the icons shown on the Springboard is determined by the order in which the visible groups or links appear in the menu. The first group or link that is visible in the menu will occupy the upper left position in the Springboard; the next visible object will occupy the position to the right of the first. Each row in the Springboard contains four icons so the fifth group or link that is visible in your menu will occupy the first position in the second row of the Springboard.
- You can select an icon to display on the Springboard by selecting the desired Image ID icon. Note that a default icon will be displayed if you do not select an icon.
Tips and Considerations
Existing menu elements are not editable – configuring the menu options to show on the Springboard requires the creating of new menu elements.
This feature provides a new menu based navigation tool for navigating across the entire application. The Navigator, which is part of the new Unified Header, replaces the original application menu that occupied the left side panel in previous versions of OTM/GTM.
One of the big benefits of the Navigator is that it is closed by default which frees up valuable screen real estate. With the original menu, the user was constantly burdened with the arduous task of showing and hiding the menu to recover screen real estate. The Navigator is only displayed when you click on the icon to display it. Once you make your navigation selection the Navigator closes automatically.
The Navigator – like the menu from previous versions of OTM/GTM - relies on the menu configuration provided in the menu manager/menu editor. This means menu configurations from previous versions of OTM/GTM will work with the Navigator.
The Navigator represents the different menu hierarchies as follows:
- Options shown in bold black font represent groups that contain groups e.g., Order Management, Shipment Management, and Trade Master Data.
- Options shown in bold blue font under a group of groups represent a group e.g., Order Release, Equipment Management, and Trade Item Management.
- Options shown in blue font are direct links to managers, Power Data, etc.
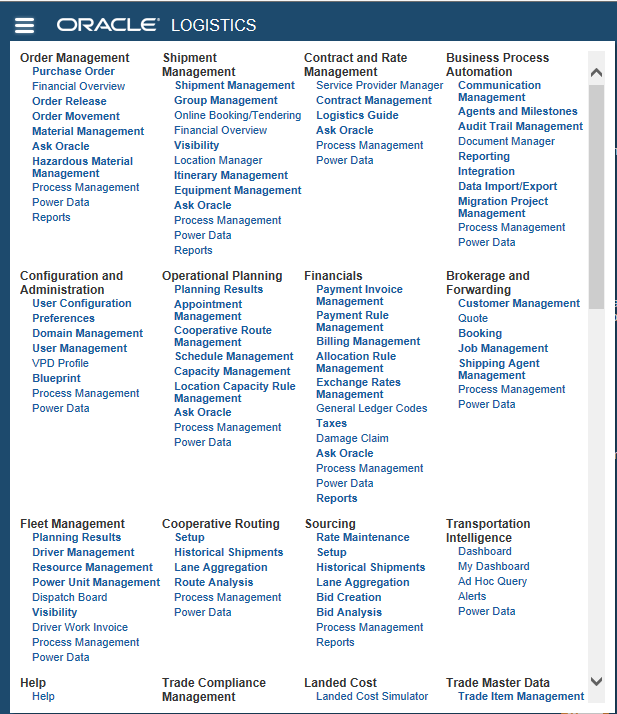
Navigator
Steps to Enable
No steps are required to enable the Navigator. The Navigator is on by default and will follow your current menu configuration.
Key Resources
- See the UI Refresh TOI.
This feature provides a set of usability improvements for the finder result pages. The improvements will simplify your finder result navigation, sorting, and record counting. The changes also provide an updated location for the Actions menu related to the object as well as providing updated icons to represent the add, view, edit, and delete options you may wish to initiate against a select set of records.
Improvements:
- There is one results page instead of multiple pages. To view more records, click the More link. To view all available records, click the All link.
- The Record counter (X of Y records), lists the number of records that resulted from your search:
- X: the number of records that are displayed after a search and the number of additional records that will be displayed when you click the More link. You can configure this number using the glog.webserver.finder.page_size property.
- Y: the maximum number of records returned from a search. Click the All link to see all records returned for the query. You can configure this number using the glog.webserver.finder.limit property.
- Selected: displays the number of records selected.
- The Actions button has been moved to the tool bar just above the search results grid and has been replaced with an Actions drop-down list.
- The functional buttons (New, View, Edit, and Delete) have been moved to a tool bar just above the search results grid and replaced with icons.
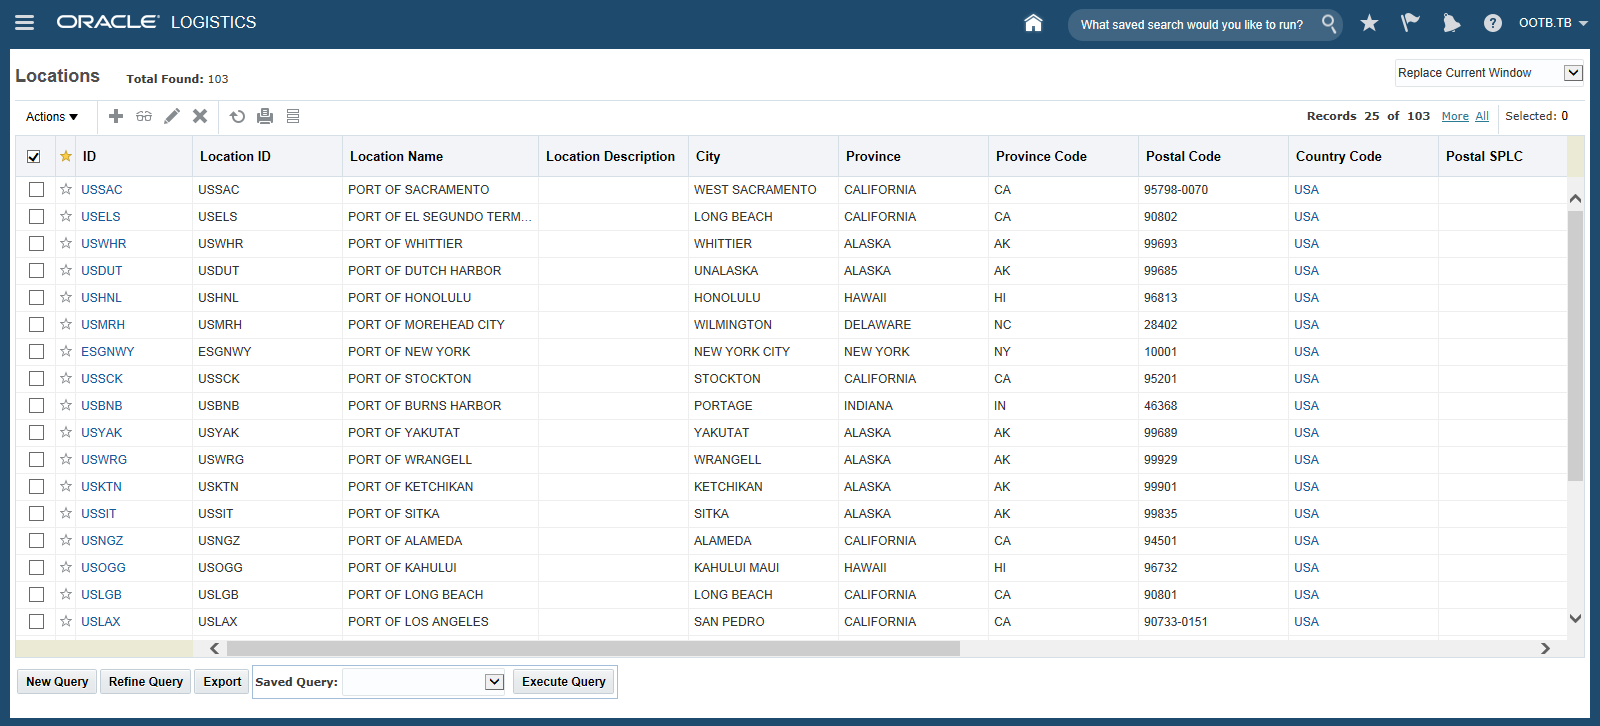
Sample Refreshed Finder Results – Location Manager
Steps to Enable
There are no steps necessary to enable this feature.
This feature provides an improved and greatly simplified process for adding and removing Favorites. A new column titled Favorites has been added by default to all refreshed search results pages. The addition or removal of an entry from the Favorites list involves nothing more than marking or unmarking a record as a favorite.
You will find that most all pages have an Add to Favorites/Remove from Favorites star icon next to the object IDs. These pages include managers, power data, finder results, business object confirmation pages, etc. All you need to do is click the star icon to add or remove the object from the favorites list.
Steps to Enable
A yellow star indicates that a record is a favorite. A gray star indicates the record is not a favorite.
- Click the gray star to add that record as a user favorite – either in the edit screen or in the finder results screen.
- Click the yellow star to remove that record from user favorites – either in the edit screen or in the finder results screen
- From the User Favorites Page
- Click New Favorite.
- Choose a Table Name from the list.
- Enter an ID and click Save. The type of ID available changes depending upon which table name you selected. Repeat this step for additional records that you want as favorites.
- Click Save.
- Click Save Favorites on the User Preferences/Favorites page.
Key Resources
See the User Favorites, Search Results, Favorites from Unified Global Header, Screen Set Manager: General help topics for more details.
This feature provides a new PUBLIC menu, the ASK_ORACLE_MENU, that replaces the Ask Oracle tool bar. This new approach gathers all of the Ask Oracle capabilities together so that the process of granting access to these capabilities for you and your users is more standardized and greatly simplified.
The ASK_ORACLE_MENU menu contains all the existing Ask Oracle links:
- Rates
- Airports
- Ports
- Logistics Guide
- Logistics Guide Details
- Air Schedules
- Vessel Schedules
- Ground Schedules
- Currency
- Time Zones
- Container Optimization
- Distance/Time
- Routing Rules
- Restricted Party Screening
- Sanctioned Territory Screening
- Control Screening
- License Screening
Steps to Enable
By default, the new PUBLIC ASK_ORACLE_MENU is not part of your menu.
- Make a copy of the delivered PUBLIC ASK_ORACLE_MENU.
- Go to User Menu Layouts copy the PUBLIC ASK_ORACLE_MENU.
- Optionally, edit the copied version of the PUBLIC ASK_ORACLE_MENU in the Menu Editor so that it contains only the Ask Oracle links you are interested in.
- Go to Manage User Access and modify your assigned user menu so that it includes either the PUBLIC ASK_ORACLE_MENU or your copied version of the Ask Oracle Menu.
Reorganized Transmission XML Schema
Reorganized Transmission Schema
This feature provides a new transmission schema definition that consists of a set of smaller XSD schemas/files that contain a logical grouping of related objects and APIs.
Reorganizing the schema into a set of smaller files makes it easier for you to identify and load only the files you need to load for the interfaces you are developing. For example, if you are only working on Financial interfaces you will now only need to load the Financials schema versus loading the entire GLogXML schema.
Other benefits provided by the reorganized schema:
- You can take advantage of the capabilities provided by the newer cloud based integration tools like Oracle’s Integration Cloud Service (ICS).
- It is considerably easier for you to understand the messages and content of messages that can be sent to OTM/GTM.
- It is now considerably easier to understand and identify the interfaces that are inbound, outbound or both inbound and outbound interfaces
List of XSD Schema files
| Schema Name |
Description |
|---|---|
| Transmission.xsd |
Definitions for all Primary Documents. |
| TransmissionCommon.xsd |
Definitions for types shared across interfaces. |
| Transaction.xsd |
This is a convenient schema which imports all other Transaction definition schemas. |
| GTM.xsd |
Transaction interfaces for GTM application functionality. |
| LocationContact.xsd |
Transaction interfaces for Location and Contact business objects and other related common types used in other interfaces e.g. Involved Party. |
| ShipUnit.xsd |
Transaction interfaces for Ship Units common to Orders, Shipments etc. |
| Item.xsd |
Transaction interfaces for Item and Package related business objects. |
| Document.xsd |
Transaction interfaces for Document Content for Content Management Systems. |
| Configuration.xsd |
Low level transaction interfaces e.g. User management. |
| Shipment.xsd |
Transaction interfaces for Shipment related business objects including Planned, Actual and Tendered shipments. |
| Order.xsd |
Transaction interfaces for Purchase Orders and Order Release business objects. |
| Planning.xsd |
Transaction interfaces related to planning of Orders onto Shipments. |
| Finance.xsd |
Transaction interfaces related Invoices, Payments etc. |
| Rate.xsd |
Transaction interfaces related to Rating structures used for cost calculations. |
| Job.xsd |
Transaction interfaces for Brokerage and Forwarding. |
| GenericTransaction.xsd |
Miscellaneous transaction interfaces that can apply to many business object types e.g. for object status updates. |
Starting in version 6.4.2 a new namespace URL will be used to identify XML messages which are valid according to the new set of schema files listed in the preceding table.
The following table lists the namespace URLs and associated physical file name for each new schema defined in version 6.4.2:
| XSD Schema File |
Namespace |
| Transmission.xsd and all other non-GTM schemas |
http://xmlns.oracle.com/apps/otm/transmission/v6.4 |
| GTM.xsd |
http://xmlns.oracle.com/apps/gtm/transmission/v6.4 |
To support backward compatibility, the version 6.4.1 GLogXML and GLogXML-GTM schemas will continue to be distributed with version 6.4.2 but will only describe XML messages for versions up to but not including, version 6.4.2.
All future 6.4.x versions of OTM and GTM will use the namespace URL introduced in version 6.4.2, namely “http://xmlns.oracle.com/apps/otm/transmission/v6.4”.
Steps to Enable
- To take advantage of the new schema, the new namespace URL must be used to identify XML messages which are valid according to the new set of schema files.
- There are no changes required if you plan to only use message formats from prior versions and do not intended to take advantage of any of the new 6.4.2 capabilities.
Key Resources
- See the 6.4.2 Integration Guide.
Tips and Considerations
All message formats currently accepted by versions prior to version 6.4.2 will continue to be accepted in version 6.4.2.
The new 6.4.2 messages must be used to take advantage of new features introduced in 6.4.2.
Integration Cloud Service Logistics Adapter
Integration Cloud Service Logistics Adapter
This feature provides a new Logistics adapter (for OTM/GTM) that expands the portfolio of available adapters available with Oracle’s Platform as a Service (PaaS) Integration Cloud Service (ICS) offering. ICS is a powerful and intuitive cloud based integration tool that allows you to design and deploy cloud to cloud (and on-premise to cloud) integrations quickly and securely.
The Logistics adapter (for OTM/GTM) simplifies the ICS Connection to a specific Logistics Cloud (OTM/GTM) instance and exposes the OTM/GTM schema for integration flow mapping/development in an easy to use visual designer environment.
Steps to Enable
License and configure Integration Cloud Service (ICS) to work with your OTM/GTM instance.
Key Resources
For more information on Integration Cloud Service, refer to https://cloud.oracle.com/integration.
This feature provides the ability to edit the content of an existing workbench layout. In previous versions, the edit content option was limited to removing content. This feature allows you to make changes to the previously defined content including changes to the object type, the tab name, and the screen set used.
Steps to Enable
There are no steps necessary to enable this feature.
Removed Restriction on Number of Workbench Layouts
This feature provides the ability to create an unlimited number of workbench layouts. Previously, there was a limit on the number of workbench layouts you could define. This limitation has been removed.
Steps to Enable
There are no steps necessary to enable this feature.
This feature provides you with the ability to copy an existing workbench layout. All panels, regions, screen sets, saved searches, etc. are copied to the new layout.
Steps to Enable
- The Copy action requires that you provide a new name for the copied layout.
- Copy options:
- You have the option to provide a new description for the new layout.
- You also have the option to select a different logic configuration to use with the new layout.
The default is for the copy actions to retain the existing description and logic configuration.
User Access/Domain Grants for Workbench Layouts
This feature provides the ability to grant or restrict access to workbench layouts using domain grants and VPD. With this new capability you can control which workbench layouts are available to which users. You can also control the user’s ability to edit the workbench layouts and layout content that they have access to.
Steps to Enable
There are no steps necessary to enable this feature.
This feature provides you with the ability to perform inline editing of records without having to open and edit each record individually.
Depending on your configuration, you will see the icons related to the new inline editing capabilities. The new icons are for Inline Edit, Revert and Save. All fields that you have defined as editable on the Screen Set manager - Results tab can be modified using the inline editing capabilities directly on the search results section page.
- When you click the Inline Edit icon (
 ), if a field is editable, you see an editable field replace the read only version. If editable, many fields in the results grid are available for editing. You can edit multiple fields in the grid.
 - If you want to discard all changes, click the Revert icon (
 ). Note that the values cannot be reverted once the data has been saved.
 - Edit a value and click the Save icon (
 ) to save the value to the database. In the Save Results pop-up, a green check mark indicates successfully saved records and a red check mark indicates records that were not saved.
Steps to Enable
For the object you wish to configure Inline editing for:
- Go to the Screen Set Manager - Results tab
- For each of the fields you would like to have available for Inline editing, click the More button. Then under Edit Options, select Editable Save.
- When all desired fields have been set to Editable, click Finish.
Tips and Considerations
You cannot edit the following fields using inline editing:
- Fields with links such as IDs
- Any fields that are primary keys
- Date fields
- Date/time fields
Although you can select the Editable option in the Screen Set Manager for these types of fields, they are not editable inline for the enhanced UI.
In addition, not all search results pages are compatible with the Inline Editing functionality.
Additional OTM Objects Supported in the Workbench
This feature provides an enhanced workbench that is now able to support most of OTM’s key objects. With these added objects, the workbench should become the first place you go to configure any work environment that involves relating multiple objects together in one view. For example: relating a shipment to the shipment stops and the orders on the shipment; relating a shipment to the related invoice and invoice lines.
New OTM objects available for adding as a table include:
- Appointment
- Bill
- Bulk Continuous Move Result
- Bulk Plan
- Capacity Limit
- Charter Voyage
- Consol
- Demurrage Transaction
- Driver Type
- Equipment
- Equipment Group
- Equipment Type
- Fleet Resource Assignment Results
- Invoice
- Invoice Line Item
- Item
- Itinerary
- Itinerary Leg
- Job
- Location
- Location Asset Inventory
- Network
- Network Detail
- Network Leg
- Order Base
- Order Release Ship Unit
- Order Release Ship Unit Line
- Power Unit
- Power Unit Type
- Rate Offering
- Rate Record
- Resource Schedule
- Resource Schedule Instance
- Sell Shipment
- Service Provider
- Shipment Equipment
- Shipment Group
- Shipment Ship Unit
- Shipment Ship Unit Line
- Tracking Events
- Voucher
- Work Assignment
- Work Invoice
New OTM objects available for adding to a map:
- Location
- Network
Steps to Enable
There are no steps necessary to enable this feature.
Additional GTM Objects Supported in the Workbench
This feature provides the ability to use the workbench capabilities with all of GTM’s key objects. With this feature, the workbench becomes the ideal place to configure any work environment that involves relating multiple objects together in one view.
- Document
- License
- License Line
- Party
- Product Classification Type
- Registration
- Restricted Party Screening Workbench
- Trade Item
- Trade Item Structure
- Trade Transaction
- Trade Transaction Line
- Declaration
- Declaration Line
- Declaration Message
Steps to Enable
There are no steps necessary to enable this feature.
Master-detail Saved Queries for Workbench - OTM
This feature provides a set of preconfigured PUBLIC saved queries that simplify the setup of basic master - detail table relationships in your OTM workbench designs.
The saved queries provided include:
- BILLS FOR SELL SHIPMENT
- BUY SHIPMENTS FOR ORDER RELEASE
- BUY SHIPMENTS FOR SELL SHIPMENT
- DETAILS FOR NETWORK
- EQUIPMENT FOR SHIPMENT
- INVOICES FOR SERVICE PROVIDER
- INVOICES FOR SHIPMENT
- LEGS FOR ITINERARY
- LEGS FOR NETWORK
- LINE ITEMS FOR INVOICE
- LINES FOR ORDER BASE
- LINES FOR S SHIP UNIT
- ORDER MOVEMENTS FOR ORDER RELEASE
- ORDER RELEASES FOR ORDER BASE
- ORDER RELEASES FOR SELL SHIPMENT
- ORDER RELEASES FOR SHIPMENT
- RATE OFFERINGS FOR SERVICE PROVIDER
- RATE RECORDS FOR RATE OFFERING
- SELL SHIPMENTS FOR BUY SHIPMENT
- SELL SHIPMENTS FOR ORDER RELEASE
- SHIP UNIT LINES FOR ORDER RELEASE
- SHIP UNITS FOR ORDER RELEASE
- SHIP UNITS FOR SHIPMENT
- SHIPMENTS FOR DRIVER
- SHIPMENTS FOR SHIPMENT GROUP
- STOPS FOR SHIPMENT
- TRACKING EVENTS FOR SHIPMENT
- VOUCHERS FOR INVOICE
- VOUCHERS FOR SERVICE PROVIDER
- WORK INVOICE FOR DRIVER
There are no steps necessary to enable this feature.
Master-detail Saved Queries for Workbench - GTM
This feature provides a set of preconfigured PUBLIC saved queries that simplify the setup of the basic master - detail table relationships in your GTM workbench designs.
The saved queries provided include:
- DECLARATION LINES FOR DECLARATION
- DECLARATION MESSAGES FOR DECLARATION
- DOCUMENTS FOR DECLARATION
- DOCUMENTS FOR TRADE ITEM
- DOCUMENTS FOR TRANSACTION
- ITEMS FOR LICENSE LINE
- LICENSE LINES FOR DECLARATION LINE
- LICENSE LINES FOR LICENSE
- LICENSE LINES FOR TRANSACTION LINE
- LICENSES FOR DECLARATION LINE
- LICENSES FOR LICENSE
- LICENSES FOR REGISTRATION
- LICENSES FOR TRANSACTION LINE
- PARTIES FOR DECLARATION
- PARTIES FOR DECLARATION LINE
- PARTIES FOR LICENSE
- PARTIES FOR REGISTRATION
- PARTIES FOR TRADE ITEM
- PARTIES FOR TRADE ITEM STRUCTURE
- PARTIES FOR TRANSACTION
- PARTIES FOR TRANSACTION LINE
- PRODUCT CLASSIFICATIONS FOR TRADE ITEM
- REGISTRATIONS FOR LICENSE
- REGISTRATIONS FOR PARTY
- REGISTRATIONS FOR REGISTRATION
- TRADE ITEMS FOR REGISTRATION
- TRANSACTION LINES FOR TRANSACTION
Steps to Enable
There are no steps necessary to enable this feature.
This feature improves the way that credential information is stored by now storing that information in Oracle Wallet. This change ensures that secure data, such as passwords, are placed into an encrypted store, and not visible to an end user.
The credentials supported by the Oracle Wallet include:
- Creating database connections
- Sending integrations to downstream systems
- Invoking external distance or rating engines
- Running reports on a BI Publisher server
- Storing documents in a Content Management System
Steps to Enable
There are no steps necessary to enable this feature.
Key Resources
For more information see The Security Guide, Migration Guide, and Administration Guide.
Oracle Transportation Management
Oracle Transportation Management (OTM) delivers robust transportation planning and execution capabilities to shippers and third party logistics providers. It integrates and streamlines transportation planning, execution, freight payment, and business process automation on a single application across all modes of transportation, from full truckload to complex multi-leg air, ocean, and rail shipments.
Oracle Transportation Management lowers transportation costs, improves customer service and asset utilization, and provides flexible, global fulfillment options.
Oracle Transportation Management (Base Product)
Order Management UIs and APIs to enter & manage orders in OTM Rate Management Rating engine Shipment Management Shipment creation (manual and agent based shipment creation) Booking & tendering (includes spot bids & broadcast tenders) Carrier communications Supply Chain Event Management Order & shipment events & visibility Business Process Automation Workflow agents & monitor profiles Document management Operational reporting.
Rate Inquiry Ports of Load - Ports of Discharge Constraint
This feature provides the ability to specify the Ports of Load and/or Ports of Discharge that should be considered when running your rate query. By specifying the Ports of Load and/or Ports of Discharge, the number of options considered can be greatly reduced. The reduction in options considered and the options returned simplifies your review process and has the added benefit of improving the run-time associated with generating the set of options.
Steps to Enable
There are no steps necessary to enable this feature.
This feature provides a set of automation agent usability enhancements.
- The description of your automation agent description can now be up to 4000 characters in length.
- The Direct SQL Update SQL length has been extended to 2000 characters.
- You can now track the user, time and optionally the reason for changes made to your automation agents. Now whenever you modify an agent, a record is added to the AGENT_CHANGE_LOG table. This table holds the user, time and optional reason for the change.
Steps to Enable
You can see an agent's change log by clicking on the Change Log button on the agent edit screen, or by opening the Change Log section of the agent view screen.
Tips and Considerations
The agent log is automatically removed if the agent is removed.
This feature provides a redesigned NMFC Class Table that now includes a new column called NMFC Class Code. This new column – and the seeded values – will now be transmitted to all External Rating Engines (e.g., SMC³’s RateWare® XL LTL Rating Engine) that depend on a properly formatted National Motor Freight Classification code for LTL freight rating.
Previous NMFC Class Codes values sent for rating:
50.0, 55.0, 60.0, 65.0, 70.0, 77.5, 85.0, 92.5, 100.0, 110.0, 125.0, 150.0, 175.0, 200.0, 250.0, 300.0, 400.0, 500.0
New NMFC Class Code values sent for rating:
50, 55, 60, 65, 70, 77.5, 85, 92.5, 100, 110, 125, 150, 175, 200, 250, 300, 400, 500
Steps to Enable
No steps are required to take advantage of the new NMFC Class Code field. The new mapping is handled as part of the migration.
Additional Details on Order Release Line Allocation Entity
This feature provides Order Release Line allocation details that now capture references to the shipment cost and/or invoice line item for better visibility and reporting purposes.
Steps to Enable
There are no steps necessary to enable this feature.
RateWare® XL Stop Alternation Support
This feature provides the ability to select the weight break to send to the RateWare® XL LTL Rating Engine to use for stop alternation. Selecting the Stop Alternation Break from the available drop-down list instructs RateWare® XL to not alternate to the next higher weight band if one is available.
Steps to Enable
- A new drop-down has been added to SMC Discount Section called Stop Alternation Break; the value selected here specifies the weight band where deficit rating should stop.
- If no value is specified in this drop-down, then the weight band which contains 99.99 (if any has been specified) is taken as the weight break where deficit rating should stop.
Tips and Considerations
The 99.99 default allows you to migrate from your old on-premise Rateware setup to the new RateWare® XL LTL Rating Engine option without requiring you to change your setup.
In the original Rateware on-premise application Stop Alternation was invoked when the weight break value of 99.99 was setup in OTM and sent to Rateware.
This feature adds the Shipment Group object to an extensive list of objects supported by OTM’s Tracking Event functionality. With this functionality, you can now create, view and manage tracking events related to your shipment groups.
For many implementations, the virtual Shipment Group is used to model real-world objects such as the ocean carrier booking request, the House Bill of Lading, the Shipper's Letter of Instruction, as well as the carrier manifest.
Steps to Enable
- You can add the tracking event information for shipment groups using the methods below:
- By using the web action on the shipment group Add Tracking Event.
- By directly entering the tracking event information related to the shipment group in the Shipment Group tab of the Tracking Event Manager.
- By sending in an inbound tracking event transmission with information related to shipment group.
- To link a tracking event to a shipment group, you can use the agent action Match Shipment Group. There are different matching methods provided for this:
- By Shipment Group
- By Shipment
- By Order Release
- By Order Release Line
- By Equipment
- Once the tracking event has been linked to a shipment group, you can use the following Data Type Associations to perform different actions on the objects related to the shipment group:
- TRACKING EVENT TO SHIPMENT GROUP
- TRACKING EVENT TO SHIP GROUP RELATED ORDERS
- TRACKING EVENT TO SHIP GROUP RELATED SHIPMENT
- Actions performed against related objects include:
- Recalculate Secondary Charge on shipment group
- Set External Status
- Recalculate Shipment
Secondary Charge Rule with Accessorial Code in Result
This feature provides the ability to assign an accessorial profile or a special service profile to the contracts for secondary charge section of your secondary charge rule definitions. When a secondary charge rule with either an accessorial profile or a special service profile is selected, OTM will copy the accessorials from the accessorial profile or the special services from the special service profile to the generated secondary charge shipments. OTM will then use the copied accessorial or specials services when the shipment is rated.
Steps to Enable
- Create the required accessorial profile and/or special service profile.
- Assign the accessorial profile and/or special service profile in the contracts for secondary charge section of your secondary charge rule.
- Save the entries in the contracts for secondary charge grid.
- Select finish to save the secondary charge rule.
- Execute the Build Secondary Charge Shipments action, if the selected secondary charge rule has an accessorial profile or a special service profile assigned, OTM will copy the accessorials and/or special services to the generated secondary charge shipments.
Tips and Considerations
In certain cases, services which need to be performed cannot be captured at the time of booking i.e. creating the order release; such services are discovered at the time of execution. For these additional services, the local office will have to setup a secondary charge rule with accessorial and special service profiles.
Ability to Configure Rates Based on Flex Fields
This feature provides the ability to rate shipments using flex field attributes related to different objects.
The flex field attributes related objects include the following objects:
- Shipment
- Equipment
- Ship Unit
- Shipment Stop
- Job
- Order Release
The Flex Field Rate Basis Items (RBIs) are grouped as:
- String
- Number
- Date
- Currency
Provided the following RBIs (Object and Type):
- <Object> Flex Field Qualifier
- Used as a conditional RBI to narrow down the flex field with which you want to work.
- <Object> <Type> Flex Field Value
- Used as conditional RBI, which returns the value of the String Flex Fields of the object used for rating.
- <Object> <Type> Field Value as Number
- Used as both conditional and charge RBI. This returns the double value of the string flex fields.
- <Object> <Type> Field Value as Weight
- Used as both conditional and charge RBI. This returns the double value of the string flex fields.
- <Object> <Type> Field Value as Volume
- Used as both conditional and charge RBI. This returns the double value of the string flex fields.
- <Object> <Type> Field Value as Volume
- Used as both conditional and charge RBI. This returns the double value of the string flex fields.
- <Object> <Type> Field Value as Duration
- Used as both conditional and charge RBI. This returns the double value of the string flex fields.
- <Object> <Type> Field Value as Date
- Used as both conditional and charge RBI. This returns the double value of the string flex fields.
- <Object> <Type> Field Value as Distance
- Used as both conditional and charge RBI. This returns the double value of the string flex fields.
For String type flex fields, all the above RBIs are applicable.
For Number type flex fields, except for Field Value as Number, all others are applicable.
For Date type flex fields, only Field Qualifier and Flex Field Value are applicable.
For Currency type flex fields, only the Flex Field Qualifier and Flex Field Value are applicable.
Steps to Enable
- Select the Flex Field to use as either a condition or charge on your rate record.
- Enter the desired criteria i.e., dates for date fields, days, hours, minutes for duration fields, numeric values for weight or volume fields, numeric values for text flex fields holding numeric values etc.
- Save the rate record.
Tips and Considerations
When you want to use a specific flex field as a condition or as a chargeable RBI, you must specify the flex field using a flex field qualifier RBI from the Basis drop-down list in the Conditions section. This will narrow down flex fields to a specific flex field you wanted to work. If the flex field qualifier is not specified and one of the flex field RBIs is used for rating, then the rating engine rates the shipment with all the flex fields corresponding to the object.
Spatial Integration to Support Postal Code Searches
This feature provides the ability to use Oracle Spatial for Postal Code to Postal Code level distance and time lookups. You can now provide just the Country Code and Postal Code for address validation and distance queries.
Previously Street Address, Country Code and Postal Code were mandatory for the address type POSTAL_CODE for the Oracle Spatial Engine to find distance, time, and geocode addresses. Now you can provide Country Code and Postal Code for address validation and distance queries.
Steps to Enable
There are no steps necessary to enable this feature.
PC*MILER Web Service Upgraded to Use Windows Communication Foundation (WCF)
This feature provides an upgraded PC*MILER Web Services integration using Windows Communication Foundation (WCF). The upgrade to WCS from Active Server Methods (Microsoft filename extension) ASMX was necessitated by Microsoft’s deprecation of ASMX.
The glog.ExternalDistanceEngine.PCMilerWS.useWCFEngine property has been added to the glog.appserver.properties file. This property tells OTM which web services implementation (WCF or ASMX) to use. The default is true, meaning use the WCF web services implementation.
New WCF credentials properties that have been provided include:
glog.ExternalDistanceEngine.PCMilerWS.AuthorizationKey
glog.ExternalDistanceEngine.PCMilerWS.useWCFEngine
Steps to Enable
There are no steps necessary to enable this feature.
PC*MILER Address Validation Match List Option
This feature provides the ability to configure your PC*MILER Web Services external distance engine to return a list of possible matches versus just receiving one match option when you run the Address Validation action using PC*MILER Web Services.
Steps to Enable
- Create a new External Distance entry by copying one of the existing PC*Miler web service External Distance entries.
- Enter a new External Distance ID
- Add a new parameter entry in the parameter grid.
- The parameter should be "GEOLIST_PROPERTY"
- The value should be "Yes"
- The country code should be "*".
- Click "Save" to save the parameter entry
- Click "Finished" to save the New External Distance Engine.
- The newly created External Distance Engine will be available for use for Validating Location Address. The new parameter provides a list of matched responses versus a single response.
PC*MILER Version Provided in Web Service Call
This feature provides the ability to specify the PC*MILER data version to use in the PC*MILER Web Service call. If no version is specified, the latest version is used by default.
Steps to Enable
- When configuring the PC*MILER Web Service to be used as either an external distance engine or external service engine, you can now specify the version to use by adding a parameter called DATA_VERSION. The value provided for this parameter should be the version which you want to use.
- You can also configure this at the application level with the property "glog.ExternalDistanceEngine.PCMilerWS.DataVersion". The value should be the version.
Tips and Considerations
If no version is specified, the latest version is used by default.
PC*MILER Web Services Staged External Service Engine Configurations
This feature provides a set of default external service engine (ESE) configurations to use with PC*MILER Web Service.
Default external services provided include:
- Lat/Long to Lat/Long (Practical)
- Address to Address (Practical)
- Postal to Postal (Default, Practical and Shortest)
- City to City (Default, Practical and Shortest)
Steps to Enable
There are no steps necessary to enable this feature.
This feature extends OTM’s PC*MILER|Rail integration options to include PC*MILER’s new PC*MILER|Rail Web Services offering. The new Web Service offering provides all the benefits of the on-premise version including: rail routing, distance calculation, but without the traditional on-premise management and costs.
Steps to Enable
- Obtain a license for PC*MILER|Rail. A license is required to use the PC*MILER|Rail Web Services offering.
- Contact an Enterprise Solutions Account Executive at 800.377.6453 or email sales@alk.com for more information.
- Set up authorization credentials. Once you have the necessary authorization credentials from PC*MILER, set the ExternalDistanceEngine properties in the glog.properties file. For PC*MILER RAIL Web Services, the web services authentication credentials are handled through the properties below:
- glog.ExternalDistanceEngine.PCMilerRailWS.AuthorizationKey
- glog.ExternalDistanceEngine.PCMilerRailWS.WbserviceWSDLUrl
- Configure a new Rate Distance for PC*MILER|Rail:
- Create and configure a new External Distance Engine where the javaclass 'glog.business.rate.ratedistance.external.PCMilerRailEngineWS' and the other required parameters like 'ROUTE_TYPE', 'SOURCE_ADDRESS_TYPE', DEST_ADDRESS_TYPE' are provided
- You can use the pre-seeded External Distance ID “PCMILER_RAIL_PRACTICAL_WS”
- Assign the Rate Distance to a Rate Offering.
or
Key Resources
- For additional information http://www.pcmiler.com/Media/pdfs/PCM29-FeatureSheet_Rail22.pdf
Generate Excel Reports Using Excel Format Template
This feature provides you with four additional Excel format options that you can use to generate reports. The set of available Excel formats now include: .html, .mhtml, .xlsx, and .xls.
You now have the following format options:
- Excel (.html) – select for reports with RTF format template. The generated output is html, which is enhanced with the .xls extension.
- Excel (.mhtml) – select for reports with RTF format template. The generated output is mhtml, which is enhanced with the .xls extension.
- Excel (.xlsx) – select for reports with RTF format template. This file will be with the .xlsx extension. This format provides binary content unlike the above two.
- Excel (.xls) – select for reports with Excel format template. This file will be with .xls extension. This format also provides binary content.
Steps to Enable
There are no steps necessary to enable this feature.
Charge Basis Added to Rate Cost View Screen
This feature enables you to view both the details of the rate cost lines and the details of the rate unit break profile when you view a rate record. Links to the details are found in the rate cost section of the rate record view page.
Steps to Enable
There are no steps necessary to enable this feature.
Provide Lat_Long Cache for Logic Configuration Rate Service ID
This feature provides the ability to cache latitude longitude based distance lookups provided from an external distance engine (EDE) and then use those cached distances for the calculations done inside of bulk planning. Using the cached distance setup inside of bulk planning’s multistop logic can improve solution quality without a significant increase in run-time.
Steps to Enable
- For the external distance engine providing distance based on latitude and longitude, the source and destination address type values should be set to “LAT_LONG”.
- The Cache Control Type should be set to ‘Cache by Address Lookup and Save'.
- To use the cache distances in planning the MULTISTOP RATE DISTANCE ID in the Multistop Logic Config should be set to point to the Rate Distance ID of the rate distance setup using the cached distance from the External Distance Engine.
Certify EBS Accounts Payable Integration Via SOA 12c
This feature provides an updated OTM - EBS Accounts Payable integration that is now supported with Oracle SOA 12c.
Steps to Enable
There are no steps necessary to enable this feature.
Sequencing Factor for Accessorial Rating
This feature enables you to control the sequence in which accessorials are costed by rating engine. Previously, accessorials were rated in alphabetical order based on the object where the requirement for the accessorial originated, i.e. shipment accessorials first, then ship unit, then location, then order base, then order base ship unit, then item and finally the global accessorials. With this enhancement OTM consolidates all of the identified accessorials across all the objects and then sequences them for rating using the sequencing factor values provided on the accessorials.
Steps to Enable
- To explicitly control the sequencing of the accessorials in rating, you must review your list of accessorials and determine the desired sequencing across all of your accessorials.
- For each accessorial, enter the appropriate Sequencing Factor. The Sequencing Factor value is used to control the order in which accessorials are rated.
- For example, to calculate Out of Route Miles charges first and then a Fuel Surcharge, and Discount; enter the sequencing factor value as 1 for the Out of Route Miles charges, 2 for Fuel Surcharge, and 3 for Discount.
Agent Action to Copy Flex Fields Between Objects
This agent action allows you to copy flex field attributes based on the associated objects for which the agent is triggered. If there are multiple related objects, the flex fields are copied to each one.
This agent action is available on the following agent types:
- CLAIM
- CONSOL
- GTM TRANSACTION
- GTM TRANSACTION LINE
- INVOICE
- ITEM
- JOB
- LOCATION
- ORDER BASE
- ORDER BASE LINE
- ORDER BASE SHIP UNIT
- ORDER MOVEMENT
- ORDER RELEASE
- ORDER RELEASE LINE
- ROUTE INSTANCE
- ROUTE INSTANCE LEG
- SELL SIDE SHIPMENT
- SHIPMENT
- SHIPMENT GROUP
- TRACKING EVENT
- VOUCHER
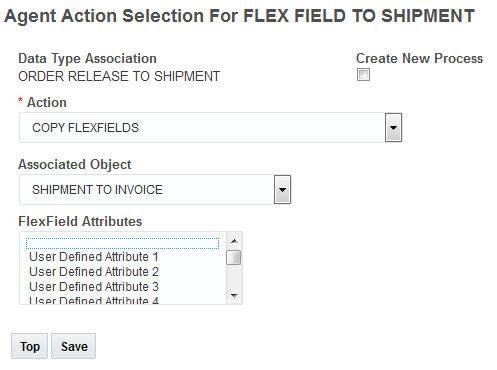
Agent Action for COPY FLEXFIELDS
Steps to Enable
- Create an automated agent for one of the agent types that support this agent action.
- Select a data type association (DTA) where the COPY FLEXFIELDS agent action is supported.
- Select the COPY FLEXFIELDS agent action.
- Select the related target object to which flex fields are copied by selecting the appropriate Associated Object.
- For the FlexField Attributes, select one or multiple flex field attributes which you would like to have copied to the associated object.
- If no flex field attributes are selected, all the attributes for the flex fields are copied.
- Save the Agent Action Selection.
- Click Finished to save the defined agent.
Tips and Considerations
If the selected flex field attributes are not present in either of the associated objects, the agent action will fail.
This feature provides a new agent action NOTIFY CONTACT that can be used to notify a contact in case any agent for Shipment Ship Unit and Shipment Ship Unit Line fails.
- Create an automated agent for Shipment Ship Unit or Shipment Ship Unit Line
- Action: Select the NOTIFY CONTACT agent action.
- Contact : Select the contact to notify.
- Communication Method: Select the method for contacting the specified contact.
- Subject: Select the subject line for the communication.
- Stylesheet Profile: Select the stylesheet profile for the message.
- Save the Agent Action Selection.
- Save the defined agent by clicking Finished .
Rate Basis Item for Shipment Total Rest Time
This feature provides a new rate basis item (RBI) that allows you to establish a time based rate that is based on a shipment’s total rest time. This Shipment Total Rest Time RBI allows you to enter a rate and calculate a cost for just the rest time portion of a shipment’s time related activities.
The total rest time for a shipment is calculated by accumulating the information from all the stops. This includes rest time from all the Hour of Service (HOS) rules which includes rest breaks, lunch hours, and overnight layovers between stops.
Steps to Enable
- Create a new rate record and add a new rate cost.
- Under the charge section, select the Basis Shipment Total Rest Time.
- Enter the rate.
- Enter the per unit days, hours, minutes.
- Save the rate cost entry.
- Save the rate record by clicking Finished.
Rate Basis Items for External Rating Engine
This feature allows you to send additional elements to an external rating engine 1) SHIPMENT.ITINERARY 2) SHIPMENT.RATE_RECORD 3) SHIPMENT.RATE_OFFERING to support a very unique external rating requirement related to multi-leg itineraries.
Steps to Enable
There are no steps necessary to enable this feature.
Tips and Considerations
These Rate Basis Items (RBIs) SHIPMENT.ITINERARY , SHIPMENT.RATE_RECORD , SHIPMENT.RATE_OFFERING are not part of OTM’s internal rating engine logic and are only provided for a unique external rating scenario.
Rate Basis Items for Order Ship Unit Line Length, Weight and Height
This feature provides three new Ship Unit Line level Rate Basis Items (RBIs) that can be used to support dimension rating requirements with the generic web service rating engine. The added RBIs are: Ship Unit Line Length, Ship Unit Line Width, and Ship Unit Line Height.
Steps to Enable
- Create a new rate record and add a new rate cost
- Under the charge section, one of the new RBIs as the Basis.
- For Amoun,t enter the rate for the selected Basis
- Enter the per unit amount and select the unit of measure
- Save the rate cost entry
- Save the rate record by hitting Finished
SQL Servlet Show Execution Plan
This feature provides an easy to use check box “Show Execution Plan” that can be checked when you provide a SQL statement. When you select this check box, you will be able to view the execution plan chosen by the Oracle optimizer for executing the query. The execution plan information can be extremely useful for troubleshooting a poorly performing query.
Steps to Enable
- A new check box called "Show Execution Plan" has been provided to show the execution plan.
- When you provide a SQL statement and select the “Show Execution Plan” check box, you will be able to view the execution plan chosen by the Oracle optimizer for executing the query.
This feature provides the ability to upload, modify, and delete documents using SharePoint 2013 as a content management system.
Steps to Enable
There are no steps necessary to enable this feature.
Cloud Document Service Integration
This feature provides the ability to use Oracle’s Platform as a Service (PaaS) document management offering Oracle Document Cloud (ODC) to upload, modify, and delete documents.
Oracle Documents Cloud Service is an enterprise-level collaboration platform that connects people and information. With Oracle Documents Cloud Service, you can use a web browser, your tablet, or your phone to access your files, wherever you are, and share files with other people.
Steps to Enable
You can configure a content management system with URL, username, and password to connect to the Oracle Document Cloud server. After authentication credentials are verified, you can perform, upload, edit, and delete operations for documents into the Oracle Document cloud server from OTM.
Key Resources
For more information about Oracle Document Cloud see https://cloud.oracle.com/en_US/documents
Rate Factor Logic Re-write in Java
This feature provides a completely re-architected and more efficient rate factor processing logic.
Some of the improvements provided by this re-architected solution include:
- The new rate factor logic only processes the rate factors when they are needed.
- The need for the generation of rate factors is now based on the start date of the shipment being considered and the effective and expiration dates of your rate factors.
- Previously, rate factors were processed and the values were stored in the database without any reference to the demand for the rate factor data.
Steps to Enable
There are no steps necessary to enable this feature.
Online Booking and Tendering Screens Additional Shipment Attributes Available
This feature allows you to now configure your online booking and tendering screens to display many more shipment attributes directly on your booking and tender screens. Additionally, the user-defined image path icons can now be configured.
Steps to Enable
- Copy the public Manager Layout for the online booking and tendering screen
- Modify the copied version of the online booking and tendering manager layout adding and modifying to layout to include the desired changes
- Save the modified layout
- Add the modified layout to the appropriate menus
Online Booking and Tendering Screens Actions for Reports and Documents
You can now configure your online booking and tendering screens to:
- Display actions for shipment reports
- View attached documents.
Steps to Enable
There are no steps necessary to enable this feature.
Online Booking/Tendering Screen Improved Performance Properties
This feature provides a set of configuration capabilities that can be used to improve the editing and viewing performance of the Online Booking/Tendering UI. You can now exclude portions of the XML to improve the editing/viewing performance experience in the Online Booking/Tender screen. You can also configure a set of UI performance properties to improve the performance and the viewing experience when a large number of related objects (order release, order release line, ship unit) need to be loaded into the Online Booking/Tendering UI.
Steps to Enable
- Online Booking/Tendering Profile ID is an Out XML Profile ID that helps to exclude specific portions of outbound tender offer XML while you edit/view a tender transaction.
- Online Booking/Tendering Profile ID is considered only when the glog.tender.UseOBTProfileID property is TRUE. The default is FALSE.
- The Default Online Booking/Tendering Profile ID is GLOG_OBT_XML.
- Note: To use Online Booking/Tendering Profile ID, you must select MAX as Default Mode on Out XML Profiles.
- There are a set of new properties available that you can use to improve the UI loading and viewing experience when there are – potentially - a large number of related objects that need to be loaded into the UI.
- glog.tender.UseOBTProfileID.limit.OrderRelease - Use this parameter to speed up the loading of the tender UI. When the order release count associated with a shipment exceeds the set value, the View Order Information button appears. Click this button, to view the order release information in a pop up window. Default: 100
- glog.tender.UseOBTProfileID.limit.ReleaseLine - Use this parameter to speed up the loading of the tender UI. When the sum of order release lines of all order releases exceeds the set value, the View Order Information button appears. Click this button, to view the order release information in a pop up window. Default: 100
- glog.tender.UseOBTProfileID.limit.ShipUnit - Use this parameter to speed up the loading of the tender UI. When the ship unit count of a shipment exceeds the set value, the View ShipUnits button appears in the Stops tab on the Online Booking and Tendering page. Click this button to view the ship unit information in a pop up window. Also, the View Items button appears in the Order Information tab. Click this button, to view the order item information. Default: 100
This feature provides a set of workbench Map enhancements that improve the usability and extend the capabilities available for your workbenches that include a map.
Location, Network and Network Details Added to Map
The available objects that can be shown on the map within the workbench has been enhanced to include Locations and Networks (Network, Network Details)
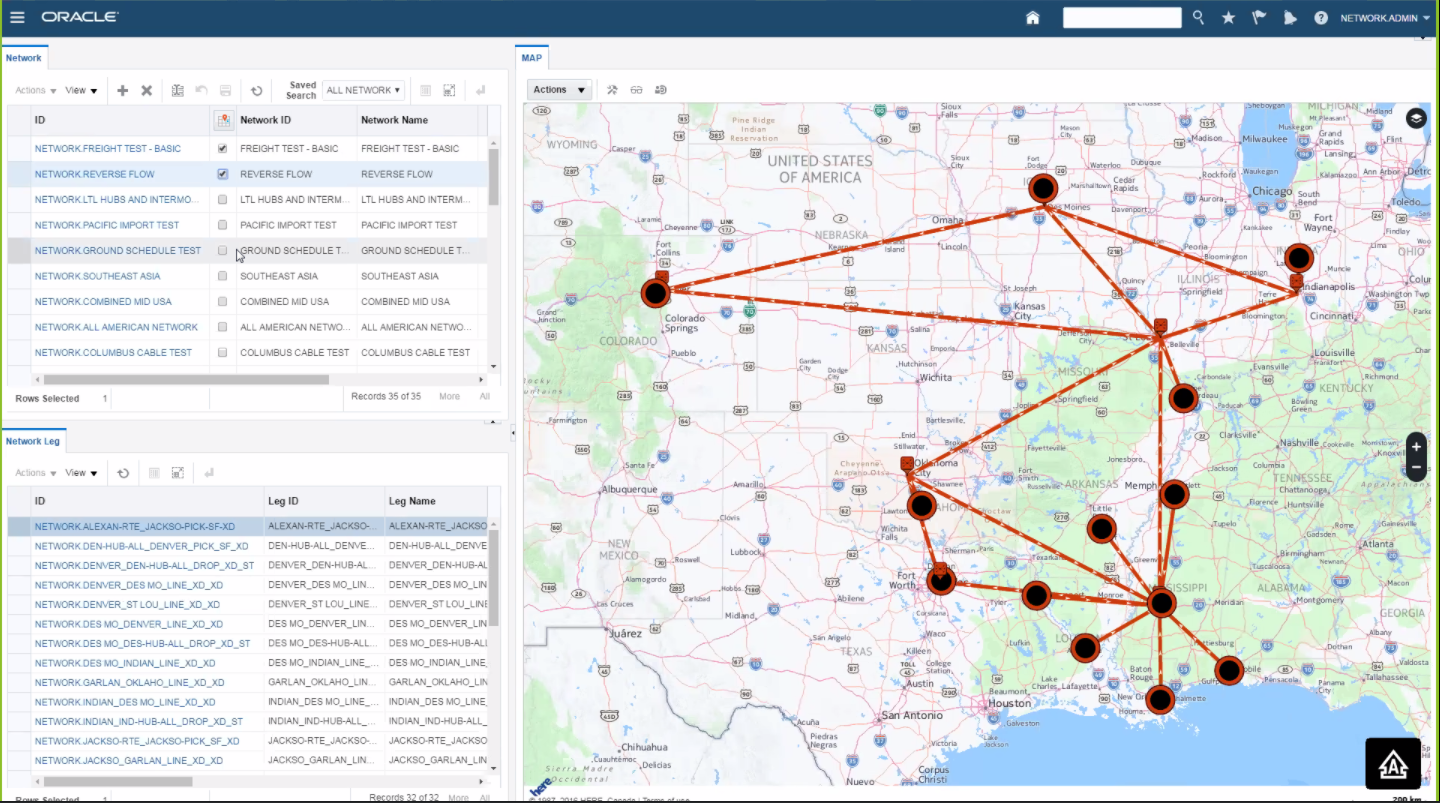
Workbench with Mapped Network, Network Details
Capabilities provided as part of this feature include the following:
- Added the following objects to a workbench map:
- Location
- Network, Network Details
- New Grouping Logic Configuration parameters for network map logic added to the Logic Configuration – Workbench. These parameters allow you to set the Line Style, Line Type, Line Width and whether to Show Arrows for network, network details on a by mode basis.
- Mode options include: Default –no matching mode, Air, TL, Intermodal, Ocean, Parcel, Rail.

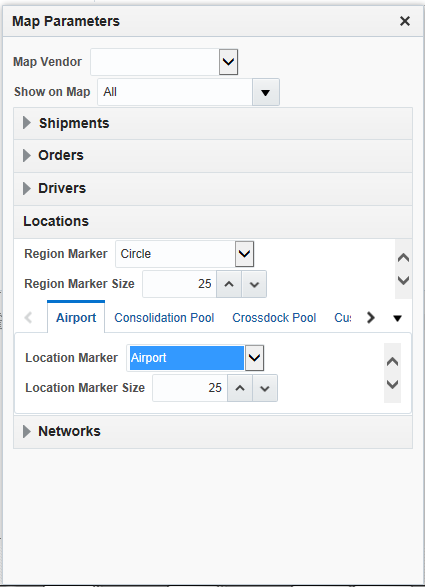
Map Parameters
- New Grouping Logic Configuration parameters for location map logic added to the Logic Configuration – Workbench. These parameters allow you to set the Location Marker to use and the Location Marker Size to use by location role.
- Roles supported include Default –role not covered, Airport, Consolidation Pool, Crossdock Pool, Customer, Deconsolidation Pool, Equipment Pool, Port, Rail Junction, Rail Ramp, Rail Station, ShipFrom/ShipTo.
- You can also set the Region Location Marker and Region Location Marker size.
Map Parameters Markers
- New map hover text details for the newly supported objects – Locations, Network and Network details.
Steps to Enable
There are no steps necessary to enable this feature.
Map Vendor Added Oracle Elocation
You can now select ORACLE ELOCATION (Oracle Maps Cloud Service formerly known as eLocation and Spatial maps) as your map vendor when setting the Map Parameters to use for the map content in your workbench. As with the other supported map vendors, you can set the properties to use with the ORACLE ELOCATION map option.
Capabilities provided as part of this feature include the following:
- You can now configure workbench maps to use Oracle eLocation.
- Added properties to configure eLocation for maps
- Added ORACLE ELOCATION as a map vendor in Map Parameters.
Steps to Enable
There are no steps necessary to enable this feature.
You can now show driving directions for a mapped shipment. This feature is supported for HERE, ALK, and Oracle eLocation.
Steps to Enable
There are no steps necessary to enable this feature.
Workbench Maps: ALK Geographic Region Configuration
You can now set the ALK MAP GEOGRAPHIC REGION parameter in the workbench logic configuration to identify the region that will invoke street level mapping of shipments when using ALK maps.
The different regions available are:
- Africa
- Asia
- Australia
- Europe
- Middle East
- North America
- South America
Steps to Enable
- Create a Workbench Logic Configuration for your workbench layout.
- Set the ALK MAP GEOGRAPHIC REGION parameter to the region where you would like to support street level shipment routing.
- Save the Workbench Logic Configuration.
- Create a new workbench using the newly created Workbench Logic Configuration.
Tips and Considerations
Street level mapping of shipments across multiple regions is not possible in the same layout since you can only specify one region at a time. To support multiple regions you can create two layouts using two different workbench logic configurations with two different region settings for the ALK MAP GEOGRAPHIC REGION parameter. You cannot use a line style of "street" to view street level routing in the same workbench layout. The workaround is to use line style of "Arc" or "Straight".
This feature provides a new set of easy to use drag-and-drop actions. These drag-and-drop actions are only available when using HERE as the selected map vendor for your layout.
The available drag-and-drop actions include:
- Move Order Releases to a Shipment
- Move Shipment Stop to Shipment (move order releases on a shipment stop from one shipment to another shipment)
Steps to Enable
There are no steps necessary to enable this feature beyond the requirement to select HERE maps as the map vendor for your layout.
Additional Markers for Use with All Objects on Maps
This feature provides a new set of visually pleasing markers that are used to view different objects on the map.
New markers are provided for the following objects:
- Airport
- Port
- Rail
- Crossdock Pool
- Equipment
- Consolidation Pool
- Deconsolidation Pool
Steps to Enable
There are no steps necessary to enable this feature.
This feature changes the default setting for the map vendor in the PUBLIC WORKBENCH DEFAULT logic configuration. Now, by default, there is no default value for the MAP VENDOR parameter in the WORKBENCH DEFAULT logic configuration. If you are using the PUBLIC (default) WORKBENCH DEFAULT logic configuration, you must now either manually select a map vendor from the map parameters pop-up or create a new WORKBENCH logic configuration with your selected map vendor of choice specified in the MAP VENDOR parameter.
Steps to Enable
There are no steps necessary to enable this feature.
Edit Shipment Agent Works on Ship Units that Contain Lines from Multiple Orders
This feature provides an OMD Edit Shipment agent action that now works for shipments with repacked shipment ship units that originate from multiple orders.
Steps to Enable
There are no steps necessary to enable this feature.
This feature provides an improved OMD propagator that can be configured as a pre-persist agent with the following functions:
- Add, delete, and modify a ship unit and propagate changes to shipments
- Delete order release lines and modify order release lines in a one-to-one relationship
- Set the shipment status to SHIPMENT MODIFIED_MODIFIED
Steps to Enable
There are no steps necessary to enable this feature.
Build Ship Units with Maximum Number of Different Items
This feature provides the ability to limit the number of packaged items to ship and the number of types of items to ship when creating a rainbow pallet. The limits can be set just for a transport handling unit or for a transport handling unit at a specific (delivery) location.
Steps to Enable
- Defining a Packaging Reference Unit:
- Enter a unique identifier in the Packaging Reference Unit ID field.
- Enter the unit's name in the Name field.
- Enter a description in the Description field.
- Select the Grouping Rule. This determines how to group items when consuming this packaging reference unit's capacity.
- A packaging reference unit with the SAME grouping rule can be attached to both a transport handling unit or a transport handling unit at a certain location, to limit the number of different types of package items allowed on that transport handling unit, or that transport handling unit going into that location. "Same" items are items with the same packaged item ID.
- A packaging reference unit with the LIKE grouping rule can be attached to both a transport handling unit or a transport handling unit at a certain location Doing so limits the number of LIKE items allowed on that transport handling unit, or transport handling unit when going into that location. "Like" items are items with the same packaged item type and the same packaging unit or if there is no packaging unit defined.
- Click Finished.
- Go to the delivery location where you want to define your packaging reference unit count and total packaging unit reference counts. Go to the Location Role Profile then create a new Location Transport Handling Unit Capacity entry.
- Enter the transport handling unit you want to define limits for in the Transport Handling Unit field.
- Enter the Packaging Reference Unit ID that you defined above
- Enter the desired Limit Packaging Reference Unit Count. This represents the number of package references units that can fill the usable space in the location. The area of a location may suggest more packaging reference units can fit, but due to the actual dimensions of the packaged reference units, a lower limit may be reached.
- Enter the desired Total Packaging Reference Unit Count. This total represents, by volume, the amount of packaging reference units that can fill the space. It does not take into account the actual shape and dimensions of the packaging reference unit, but rather how many packaging reference units can fit in the space based on the volume of each packaging reference unit.
- Click Save for each Capacity in Package Reference Units entry you define.
- Click Save to save the Location Transport Handling Unit Capacity entry
- Click Save to save the Location Role Profile
- Click Finished to save the location record
ERU Information Added to Shipment Manager Equipment Tab
This feature provides visibility to the Equipment Reference Unit ID and the Total Number of Equipment Reference Units on the Shipment Manager Equipment Tab.
Expand any shipment equipment to see the Equipment Reference Unit ID and Total Number of Reference Units for the equipment.
Steps to Enable
There are no steps necessary to enable this feature.
Ship Unit Build Properties Moved to Parameters
This feature provides a new ship unit logic configuration SUBLD LOGIC PARAMETER CONFIG which contains three parameters that were previously managed as properties.
The new SUBLD LOGIC PARAMETER CONFIG ID logic config can be found in the SHIP UNIT BUILDING group in the parameter set. The default values are provided in the SUBLD LOGIC PARAMETER DEFAULT logic config.
SUBLD Logic Parameters
- ESTIMATE SHIP UNIT HEIGHT - This parameter is used for ship unit height calculation. It controls if OTM will estimate the ship unit height using ship unit net volume or not. When In/On/Max for THU is On and ship unit height cannot be calculated due to lack of TiHi to use. The default is FALSE.
- Replaces property glog.business.order.estimateShipUnitHeight
- SHIP UNIT AS REPACK OPTION - When true, OTM will consider the order's ship units as an option during repack. The default is FALSE.
Note: Since OTM can only pack lines, this could be a misleading solution and it’s use is discouraged. - Replaces property glog.business.equipment.shipUnitAsRepackOption
- SHIP UNIT HEIGHT ADJ PERCENTAGE - This parameter is used for ship unit height calculation. It defines the adjustment factor for the estimated height. Default value is 20 meaning 20%. If the estimated height is H, then OTM will inflate to H * (1 + 20%).20.00 20.00.
- Replaces property glog.business.order.shipUnitHeightAdjPercentage
There are no steps necessary to enable this feature.
Control Repack Processing by Modes
This feature simplifies how you set the modes to consider for repack by providing an Allow Repack check box directly on the Transport Mode screen. This check box determines whether to consider the transport mode for repacking. Previously, this functionality was controlled by the property “glog.business.equipment.repackOnlyCostConsideredModes”.
Steps to Enable
- By default transport modes the Allow Repack check box is checked and the selected mode will be considered during repack.
- When the “Allow Repack” check box is checked, you can also specify if cost should be considered during repack by checking the “Consider Cost During SSU Repack” check box. By default, the “Consider Cost During SSU Repack” check box is not checked.
- To no longer have a particular transport mode considered for repack the “Allow Repack” on the transport mode should not be checked.
Order Configuration UI to Show Ship Unit Configuration for All Order Types
This feature provides order configuration UI that will be displayed for line-based order configurations.
Steps to Enable
There are no steps necessary to enable this feature.
Earliest Estimated Pickup Date Added to Order Release
This feature provides visibility to the earliest estimated pickup date for an order. The Earliest Estimated Pickup Date is read only and displays the earliest departure time for all of the first leg shipments that an order release is on. The time is displayed in the time zone of the source location.
Steps to Enable
- Added a parameter RECALC ORDER EARLIEST EST PICKUP DATES. When set to TRUE, the order release Earliest Estimated Pickup Date will be recalculated.
- Added a property glog.workflow.topic.OrderEarliestEstPickupDateSync.suppresslifetime. When true, a change to the Earliest Estimated Pickup Date does not trigger the Order Release MOD lifetime event or custom event.
- Added Earliest Ship Date to Order Release - Agent Action.
Order Release Delivered Status Types and Values
This feature provides a new order status type and a list of related values that can provide information about an orders delivery status. The new Order Delivered status is set according to the status of the related last leg buy shipment that the order is on. This status provides a way to understand if the order is still enroute, if some of the order has been delivered or if all the shipments involved in the final delivery leg for this order have been completed.
Capabilities
- Added a new agent action: SET ORDER DELIVERED STATUS.
- Added an order release status type “ORDER DELIVERED”, with the following values:
- ORDER DELIVERED_NOT STARTED: None of the shipments are ENROUTE-COMPLETED.
- ORDER DELIVERED_PARTIAL: At least one but not all of the shipments are ENROUTE-COMPLETED.
- ORDER DELIVERED_COMPLETE: All shipments are ENROUTE-COMPLETED.
Steps to Enable
- Create a new automation agent with the Agent Type of Order Release
- Set the desired conditions for changing the Order Delivered Status.
For example, you can decide to trigger this agent action when the shipment status is set to ENROUTE-COMPLETED. - Add the Action SET ORDER DELIVERED STATUS
- Click Save to save the action
- Click Finished to save the agent
Allow Source Location on Ready to Ship to Be Blank
This feature provides the ability to have the Source Location on the Ready to Ship screen to be blank. By allowing for the Source Location to be blank, you now have a more visible cue that the Source Location must be provided. Previously, the Source Location field was always populated with a Source Location since the data model requires that this field be populated. Populating the Source Location field by default allowed users to easily skip the step of updating this field with the correct source location.
Steps to Enable
- Source Location on the Ready to Ship action can default to blank by setting the glog.webserver.rts.defaultShipFromAsBlank property to true.
Order Base Line Releasing Improved
This feature provides a new action “Order Base Line Packing” that allows you to specify the packing information for order base lines coming from multiple order bases. The result of running this action will be one order release with multiple ship units that contain ship unit lines from multiple order base lines.
Steps to Enable
There are no steps necessary to enable this feature.
Tips and Considerations
This action only works for order configurations where the Releasing Logic is set to “One Ship Unit for All Lines”. A new public Order Configuration called “Instructed Prepack” with the Releasing Logic set to “One Ship Unit for All Lines” has been provided for you to use. It is recommended that you use this order configuration if you are using the new Order Base Line Packing action and Simple Ready to Ship.
Build Single Product Pallets with a Full Layer
This feature provides a Fully Layered check box on your Location's Location Transport Handling Unit Capacity grid that allows you to specify, by transport handling unit (THU), whether the ship unit built onto the specified THU - involving only one type of item - will be built fully-layered; i.e, no partial layers.
For example, you are packing 17 cartons of soda onto a given PALLET (THU) and the TiHi specified is 6 x 3. Normally, you would pack all 17 cartons onto one pallet with 5 full layers and one partial layer of 2 cartons. However, if you only allow full layers, checking the Fully Layered check box for this THU for this location will instruct OTM to pack 15 cartons on 1 pallet in 5 full layers of 3 each and then start another pallet with the remaining 2 cartons.
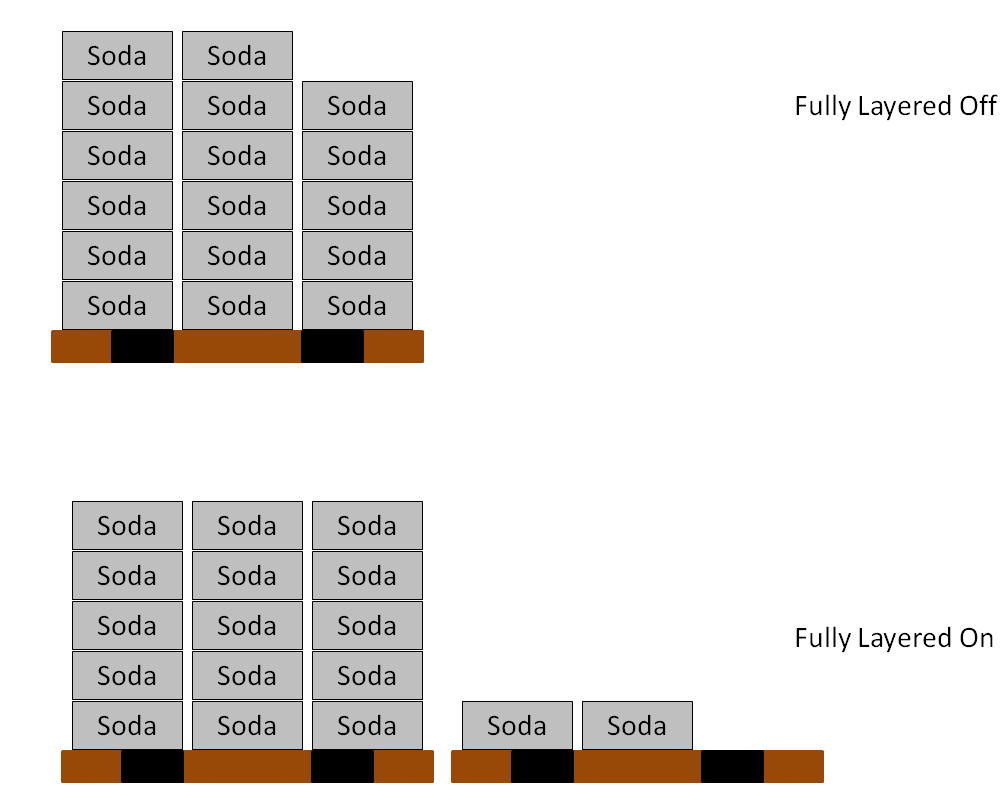
Visual for Fully Layered Off and Fully Layered On
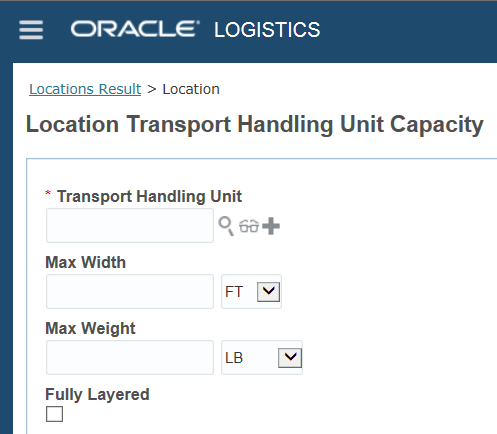
Location Transport Handling Unit Capacity Fully Layered check box
Steps to Enable
- Define your TiHi requirements either on the packaged item or on the order release.
- For your locations with the Fully Layered requirement, go to the Location Role Profile and add or edit the Location Transport Handling Unit Capacity entry for the THU you want to invoke the Fully Layered logic for. Items to configure:
- To invoke this capability, select the check box on your Location's Location Transport Handling Unit Capacity entry for all the THUs where you want the Fully Layered logic to apply. The Fully Layered capability is unchecked/off by default
- For each THU you want to enable, save the entry.
- When done, save the Location Role Profile.
- Select Finished to save the changes for your location.
Tips and Considerations
The Fully Layered capability like all of the capabilities related to the Location Transport Handling Unit Capacity feature are only invoked for the destination location. They are not considered for the source location.
Freight Payment, Billing, and Claims
Assign General Ledger Codes to Invoices and Bills
This feature provides the ability to assign General Ledger Codes (GL codes) to Invoices and Bills for Invoices and Bills that are received via integration. Previously, GL codes were only assigned to invoices that were auto-generated from OTM Shipments.
To assign general ledger codes to your Invoice or Bills that are received via integration, run the new action “Assign Invoice General Ledger Codes”.
Steps to Enable
There are no steps necessary to enable this feature.
Agent Action for Unmatch Invoice
This feature provides the tools you need to setup and run an agent action to unmatch an invoice based on your defined criteria. Previously, the only way to unmatch an invoice was to run a web action. Now you can automate the unmatch process.
Steps to Enable
- Create an automated agent for Invoice - Agent Type = Invoice
- Add the action: from Action drop down select UNMATCH INVOICE. Optionally, add a note.
- Save the Agent Action selection
- Save the defined agent by clicking Finished
Option to Change Default Invoice Approval Amount to Invoice Value
This feature allows you to set the default payment amount to the invoice line amount. The current default is for OTM to select the lower value of the shipment or invoice amount for payment.
Steps to Enable
- To change the default behavior, set the following property to TRUE, glog.invoice.approval.showAmountToPayAsInvoiceLineAmount .
- The default is FALSE.
Transportation Operational Planning
Fail on Fatal Rating Exception Extended to All Rating Engines
This feature provides an expanded fatal external rating exception capability that covers all external rating engines. The ability to fail on exception, when an external rating engine is down or unavailable, avoids having OTM waste time attempting to rate shipments when the external rating engine is down and/or avoids having OTM generate transportation plans that incorrectly exclude desirable carriers and modes.
When the parameter FAIL ON FATAL RATING EXCEPTION is TRUE, the fatal errors which might occur in various scenarios for different rating engines (for example, Rateware® XL, Rateware® XL with carrier connect) are identified and will stop the rating engine and bulk planning when OTM faces any fatal errors.
Steps to Enable
- To enable this feature, set the parameter FAIL ON FATAL RATING EXCEPTION to TRUE.
- The default is FALSE meaning the rating engine will behave normally.
- The FAIL ON FATAL RATING EXCEPTION is found in the Exception Handling section in The Parameter sets.
- If set to TRUE, when the rating engine encounters an internal error which is deemed to be catastrophic, the rating engine will immediately fail with the error: RECatastrophicException. All planning processes (build shipment, bulk plan, etc.) will fail and shut down immediately.
Multistop Performance Improvement Quick Hours-of-Service Check In Sequencing
This enhancement improves the performance of the sequence generation step in the development of multistop shipments by eliminating sequences that violate the hours of service (HOS) rules defined on the rate service.
For example, given an HOS rule with a maximum drive time of 12 hours, when the MULTISTOP QUICK HOS CHECK IN SEQUENCING parameter is TRUE, OTM will discard from further consideration all multistop sequences that exceed the 12 hour total drive time limit.
Steps to Enable
- Either edit or create a new MULTISTOP Logic Configuration
- Under the Multistop Sequencing group heading set the MULTISTOP QUICK HOS CHECK IN SEQUENCING to TRUE
- The default for this parameter is FALSE
- Save the MULTISTOP Logic Config
- Assign the MULTISTOP Logic Config to the desired Parameter
Tips and Considerations
If the parameter MULTISTOP SEQUENCE COST FOR TIME is greater than zero, the HOS check will be done automatically regardless of this setting.
Multistop Iterative Savings Algorithm
This feature provides another potential algorithm to consider when tuning your multistop optimization runs. The Iterative Savings algorithm increases the number of pairs of shipments that will be considered in developing the plan. In each iteration, many multistop shipments are generated and considered as a potential candidate for the final result. Finally, the process selects the best solution from the options generated.
Steps to Enable
- In the MULTISTOP Logic Configuration set the MULTISTOP CONSOLIDATION ALGORITHM TYPE to 6. Iterative Savings
- For the parameter MULTISTOP CONSOLIDATION ALGORITHM TYPE select option '6. Iterative Savings'.
- The parameter MULTISTOP COLGEN SAVINGS ALGORITHM TYPE needs to be set to '0-Concurrent' when using the iterative savings algorithm.
- These parameters impact this algorithm:
- MULTISTOP COLGEN NUMBER OF ITERATIONS
- MULTISTOP SAVINGS COST TOLERANCE PERCENTAGE.
Multistop Sequencing Performance Improvement for High Numbers of Stops
This feature provides a new sequencing algorithm designed specifically to handle multistop planning scenarios where there are a high number of stops (>10) to be sequenced.
With the MIP Sequencer algorithm, OTM solves a mixed integer programming (MIP) formulation of the stop-sequencing problem. This algorithm provides high quality sequences -comparable to Complete Enumeration, but it generates the sequences much faster than the Enumeration algorithm for a high number of stops.
Steps to Enable
- Either edit or create a new MULTISTOP logic configuration
- Under the Multistop Sequencing group heading set the MULTISTOP SEQUENCING ALGORITHM to option 5.MIP
- Selecting the MIP option will change the algorithm used for shipments with 8 stops or more (based on default settings) from the 2-Opt algorithm to the new MIP algorithm
- Save the MULTISTOP logic config
- Assign the MULTISTOP logic config to the desired parameter set.
Cutoff Recovery Time Details - Day of Week/Time of Day
This feature allows you to set up - by voyage service type and cutoff type - your cutoff and recovery times as either an offset with an offset duration or as day of week and time-of-day cutoff recover time.
Steps to Enable
- Enter the Voyage Service Types for this detail record.
- Select either Cutoff or Recovery for the detail.
- Select whether you want the cutoff or recovery to be set for specific day and time or a set period of time to be offset.
- If you select Day/Time, then enter the Day of Week and Time of Day.
- If you select Offset, enter the number of days (D), hours (H) and minutes (M) to be offset.
- Select the Cutoff Type:
- CY (Container yard): the 'gate house' time to arrive at the carrier’s facility. This is used to determine the actual times on the shipment.
- SI (Shipping instruction): the required time for shippers information to be provided to the forwarder. SI cutoff time calculation is based on the port of loading. It will display on the shipment but for information only.
- CFS (Container freight station): the required time to be at a 3rd party location for container packing. CFS cutoff time calculation is based on the shipment source location. It will display on the shipment but for information only.
- Save each detail record added. You will return to the Cutoff Recovery Time window.
Tips and Considerations
To calculate the SI (Shipping Instruction) and CFS (Container Freight Station) Cutoff, voyage start time is used as opposed to the shipment start time.
This feature provides the ability to include the transload voyage locations, the vessel description, voyage description, voyage service type, and the mother vessel or the feeder vessel information with your voyage schedules. Capturing and providing this information for a composite voyage (voyages that involve transload points and two or more vessels) is critical for satisfying clearance activities related to exports and imports.

Composite Voyage View
On the Voyage Schedule, you can now specify whether the voyage is a composite voyage by selecting the Composite check box. You can also provide information about the transload locations, the vessel description, voyage description, voyage service type, and the mother vessel or the feeder vessel.
Steps to Enable
There are no steps necessary to enable this feature.
Tips and Considerations
When searching for candidate voyages, voyage stops marked as Transload will be skipped when matching a shipment's port locations with depart/arrive locations of voyage.
This feature only is considered in Bulk Planning, Build Shipment, Show Network Routing Option, and Unassign Order.
This feature provides you with diagnostics information related to the creation and management of your shipment groups.
Steps to Enable
There are no steps necessary to enable this feature.
Load Config 3D Scoring Algorithm
This feature provides a new 3D scoring mechanism that you can use to find better packing options when using the 3D load configuration algorithm. The 3D load configuration algorithm with the scoring mechanism on will evaluate all item-orientation combinations in a fixed space and will score each placement to estimate the best combination based on the criteria.
Related Parameters and Properties: There are Logic Configuration - Container Optimization parameters that let you define your preferences. These are in the CONTAINER OPTIMIZATION 3D SCORING section.
Steps to Enable
- In Logic Configuration - Container Optimization, the parameters in the CONTAINER OPTIMIZATION 3D SCORING section should be set to TRUE to enable this feature
- CONSIDER SCORING LOGIC IN 3D PLACEMENT is used to turn on/off the 3D scoring mechanism so must be set to true to use this functionality
- The following parameters are not considered when this parameter is true:
- EMPTY SPACE SORT CRITERIA
- EVALUATION DEPTH
- ITEM SORT CRITERIA
- LOAD PLACEMENT ITERATION CRITERIA
- 3D SCORING NUMBER OF ITERATIONS: This parameter limits the number of times the 3D scoring mechanism will run.
- 3D SCORING MAXIMUM ITERATIONS WITHOUT IMPROVEMENT: This parameter limits how many iterations the 3D scoring mechanism will try without seeing improvement.
- Max and Min parameters: The following parameters work together to determine the priority, or weighting, of the criteria for placement. There is a minimum and maximum for each. By setting lower and higher values for these parameters, you can indicate the importance of that criterion. If you do not want a criterion considered, set the minimum and maximum values to zero. If you only want one criterion used, set all others to zero and set a non-zero value for that one. If you want two criteria used, such as both box size loading height criteria and box space dimension match criteria, set non-zero values for those parameters - the more important one, with higher values. The remaining parameters can be set to '0' for both the maximum and minimum. Note that weight does not refer to the actual weight but weighting or priority of the criteria.
- MAX/MIN WEIGHT FOR BOX SIZE LOADING HEIGHT CRITERIA: This criterion tries to pack items with larger volumes closer to the floor. The rationale here is to allow smaller items to be stacked on larger items.
- MAX/MIN WEIGHT FOR BOX SPACE DIMENSION MATCH CRITERIA: This criterion measures how well an item fits into the space being evaluated.
- MAX/MIN WEIGHT FOR COLUMN BUILDING CRITERIA: OTM looks at the number of units with the same dimensions that can be stacked into a column. If many identical items of a particular item type can be placed as a row, column, or stack, thus utilizing the space more efficiently and reducing the fragmentation, then it follows that it must be a good placement.
- MAX/MIN WEIGHT FOR UNUSABLE SPACE CRITERIA: When placing an item, new spaces are generated. If no item can fit into the new spaces generated, the space is considered as wasted space. Placement which generates minimum wasted space is preferred.
Tips and Considerations
Performance will be impacted based on the 3D Scoring Number of Iterations parameter and the number of items to be packed. Performance will be slower as either or both values get higher.
To handle priorities in 3D scoring, a multi-pass approach is used.
Mixing and Packing of Bulk Items
This feature provides the ability to designate an equipment group or equipment group compartment as being for bulk product, and based on that designation have new bulk loading rules applied where only one compatible packaged item will be loaded in the equipment group or equipment group compartment at a time.
The changes provided as part of this feature include:
- The ability to designate an equipment group or equipment group compartment as being for bulk product. By default, bulk designated equipment groups or equipment group compartments will only be loaded with one compatible packaged item at a time.
- Exception
- Multiple packaged items may be loaded into a compatible equipment group or equipment group compartment if the packaged items are 1). Compatible with the equipment group or equipment group compartment and 2). Have been identified as being in the same Bulk Mixing Family.
- Exception to the Exception - Ship Units that are marked as Exclusive Use, will not mix with other packaged items even if they belong to the same Bulk Mixing Family.
Steps to Enable
- This feature is activated by setting the Container Optimization Logic Configuration parameter called USE BULK EQUIPMENT GROUP LOGIC to TRUE (default is FALSE) and setting the CHECK COMMODITY COMPATIBILITY to TRUE (default is FALSE).
- It is also recommended that you create a new ORDER RELEASE BUNDLING RULE SET with the Order Bundle Commodity Rule turned off. To do this:
- Go to Configuration and Administration > Power Data > General > Rule Sets
- Select an existing Rule Set to copy, such as ordbundeset1
- Click Copy Rule Set.
- Enter a unique identifier in the Rule Set ID field.
- Enter a Rule Set Name.
- Select the Order Bundle Commodity Rule and use the left arrows to set this rule to Off.
- Click Finished
- Change the ORDER RELEASE BUNDLING RULE SET to use your newly configured Rule Set
- Setup your equipment group and/or equipment group compartment for the products that can be handled. This can be done in one of three ways:
- By listing the packaged items that are compatible with an equipment group or listing the compatible packaged items by each compatible equipment group compartment
- By assigning the packaged item’s Commodity ID to the compatible equipment group or assigning the packaged items Commodity ID to the compatible equipment group compartment (s)
- By assigning a Compartment Type ID to the packaged item and then assigning the Compartment Type ID to the compatible equipment groups or assigning the packaged items Compartment Type ID to the compatible equipment group compartment (s).
- Set the Bulk and (optionally) Has Meter check boxes on the equipment group and/or equipment group compartments
- The Bulk option is used to identify equipment groups or equipment group compartments that will be used to load bulk product. When checked, the new bulk loading rules will apply. Only one compatible packaged item will be loaded in the equipment group or equipment group compartment at a time.
- If this option is not checked, then the standard packaged item loading functionality will apply. Multiple packaged items can be loaded in the same equipment group or equipment group compartment, depending on the items compatibility rules.
- The Has Meter option is used to identify an equipment group or equipment group compartments that have metering capabilities i.e., can support the option of measuring out how much product should be discharged at any given stop. OTM checks for the presence of a meter (Has Meter checked) before allowing the same packaged item to be loaded into the same equipment group or compartment for delivery to multiple customers. Select the Has Meter check box to indicate that equipment group or equipment group compartment has a meter.
- Note that the Has Meter option has no meaning if the Bulk option is not checked.
- On the Packaged Items you can take advantage of two optional features:
- The Bulk Mixing Family ID is used to designate that this packaged item belongs to a family with one or more other packaged items and the packaged items in this Bulk Mixing Family can be loaded together into a compartment. This allows you to define an exception for the bulk loading rule that only allows for one packaged item to be loaded into a bulk designated equipment group or equipment group compartment at a time. This is not a mandatory field as it is rarely used but when it is needed, it provides the unique link. This is a text field that is not validated so the user must be very careful about the syntax.
- A NULL Mixing Family ID is NOT compatible with any other mixing family. You do NOT have to configure mixing families for each product.
- The Compartment Type Profile ID is used to define the packaged item compatibility with the equipment or compartment. The Compartment Type is implemented as a compatibility rule and as such its usage is not just limited to bulk goods – but can also be used for other non-bulk shipping scenarios. This is NOT a mandatory field and will be honored only when configured. This new field allows the additional level of granularity that can be applied at the compartment and does not have to be applied at the equipment group level.
- Exclusive Use check box on Order Ship Unit
- This flag allows you to designate – at the Order Ship Unit level whether this order ship unit can will be allowed to co-loaded or mixed with the very same product for another customer – this is essentially an exception to the scenario where the Bulk flag and the Has Meter flags are configured to allow the same packaged item to be loaded together in the same equipment group or equipment group compartment.
- The Exclusive Use Flag is meant to satisfy concerns regarding possible contamination accuracy of the meter or to merely satisfy a company’s policy.
- Note that the Exclusive Use check box is at the level of order ship unit level and must be so configured at that level.
Tips and Considerations
Each compartment must be configured; compartments will not inherit the configuration of the equipment group. If the equipment group has compartments, the configuration of the compartment will take precedence over the configuration of the equipment group.
- See the Mixing and Packing of Bulk Items TOI
Conopt Multicontainer Heuristic Algorithm
This feature provides a new heuristic based algorithm that is designed to provide improved container optimization solutions in scenarios where multiple equipment choices are available or required.
This new algorithm is particularly effective when the objective for selecting the set of equipment to use is focused on minimizing the cost of the equipment assigned versus algorithms that solve this problem assuming that maximizing the utilization of the equipment assigned is the best solution.
Steps to Enable
- To use this algorithm, set the Logic Configuration - Container Optimization parameter USE MULTICONTAINER HEURISTIC ALGORITHM to TRUE.
- This algorithm will use 3D based load configuration to pack items when the Logic Configuration - Container Optimization parameter USE 3D IN MULTICONTAINER HEURISTIC is TRUE.
Specify Compartment Filling Order
This feature provides a way to control the order in which compartments are filled. You can choose to pack by compartment item compatibility (default behavior) based on restrictions, or you can now pack compartments based on compartment number.
Steps to Enable
- You can set the Logic Configuration Container Optimization parameter EQUIPMENT COMPARTMENT SORT CRITERIA to take advantage of this feature:
- 0.Use Compartment Item Compatibility - the default value -will pack Items by compartment item compatibility based on restrictions.
- 1.Use Compartment Number will pack Items based on compartment number.
Network Routing and Ground Schedules
This feature provides an improvement for how the weight and volume capacity of a GROUND SCHEDULE/ CONSOL shipment is handled in the Network Routing MIP. This feature improves the routing decisions made by the algorithm and results in far fewer unscheduled orders.
With this feature, OTM ensures that all capacity constraints for the equipment as well as for shipment stops are satisfied.
Steps to Enable
There are no steps necessary to enable this feature.
Tips and Considerations
OTM does not currently support CONSOL shipments in network routing based planning.
Allow Ground Schedule to Have 3 Digit Stops
This feature provides the ability to define ground schedules with up to 999 stops. Previously you were limited to 99 stops or fewer (2 digits). Now you can define stops with up to 3 digits in length allowing you to define a ground schedule with up to 999 stops. Note that the stop numbers do not need to be consecutively numbered.
Steps to Enable
There are no steps necessary to enable this feature.
Voyage Fixed Check Box Added to Shipment
This feature provides a new check box on the shipment manager - Voyage Fixed that can be set manually or when you run the Change Schedule action.
Previously, the voyage assigned to a shipment was not permanent. An action that caused a service time re-drive could potentially change the voyage assigned. A new check box Voyage Fixed has been added to the Shipment manager so that the voyage assigned by the Change Schedule action will not be overwritten. The check box only applies to voyages, not other types of shipments. The check box can be set manually.
The Change Schedule action will first check if the shipment has the Voyage Fixed check box selected. If the Voyage Fixed check box on a shipment is already on (true) before the action is run, the action will issue a warning. You can choose to override the fixed voyage or cancel the action.
The Change Schedule action sets the Voyage Fixed check box to true (on).
Steps to Enable
There are no steps necessary to enable this feature.
Tips and Considerations
The agent actions, Change Voyage and Shipment Conditional Booking - Rerate and Redrive', can change the voyage even if this check box is selected. This can be prevented with an “IF” statement. See the actions for details.
Location Name Added to Re-sequence Stop Action
This feature provides visibility to the Location Name field along with the Location ID when you run the Resequence Stops action on a shipment. By providing the location name and ID, you will be more aware of the locations involved in your reseqencing action.
Steps to Enable
There are no steps necessary to enable this feature.
Order Bundling in Network Routing When Orders Do Not Have Identical Times
This feature provides a new parameter and functionality that provides you with more flexibility for how order movements can be bundled together given pickup and delivery early/late time windows that are not identical.
Previously, in order movement planning, order movements with early pickup and late delivery dates could only be bundled when each order movement had the same dates. This feature introduces a new parameter that can control how order movements with time windows that are not identical can be bundled.
Steps to Enable
- Set the MIN BUNDLING TIME WINDOW FOR PLANNING parameter (found under the Order Management sections in the Parameter sets).
- When this is set to 0 (the default), the behavior is as before.
- When this is set to a non-zero duration, then order movements can bundle if the resulting bundle pickup and delivery early/late time windows are each at least as long as the specified duration.
- Order movements with identical pickup and delivery windows can bundle together even if these windows are shorter than the specified duration.
Replace Cortona 3D Viewer with a Javascript 3D Library
This feature provides a new more visually appealing 3D load configuration and pattern-based load viewer. The new viewer is provided with the product so you are no longer required to download the old Cortona viewer to view your shipments that have been built using 3D load building or pattern-based load building.
The 3D load configuration viewer now uses a javascript 3D library by default.
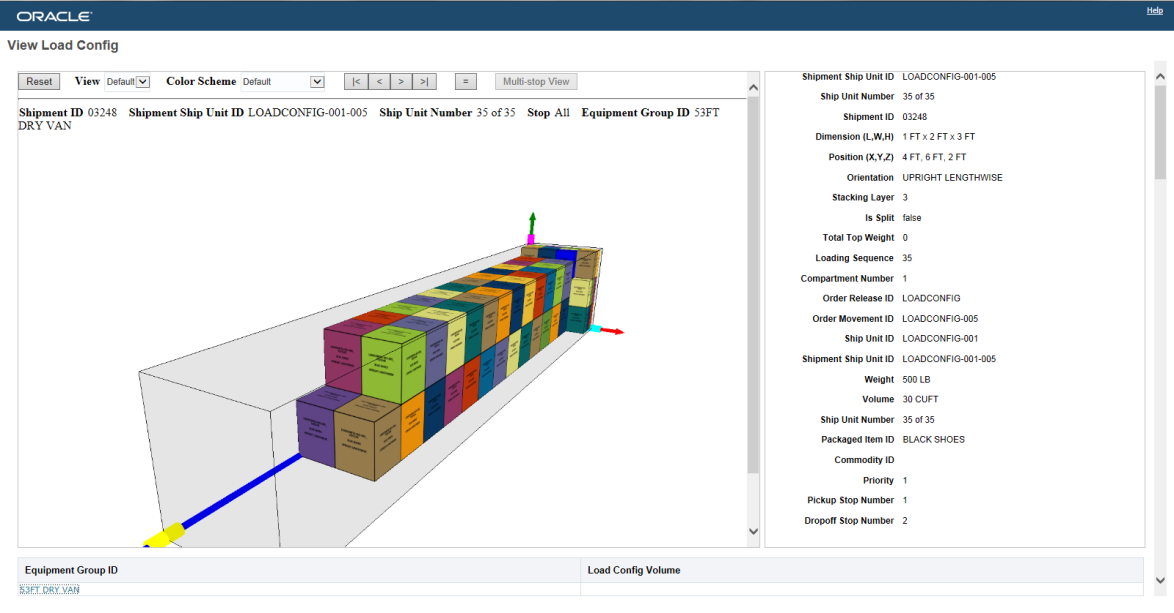
Load Config View
Steps to Enable
- Make sure all the prerequisites have been satisfied to use the Load Config viewer
- The CONTAINER OPTIMIZATION ALGORITHM Parameter USE 3D BASED LOAD CONFIGURATION is set to TRUE
- The dimensions (LxWxH) for all the ship units involved in the shipment to be viewed have been provided.
- The dimensions (LxWXH) for the equipment group assigned to the shipment to be viewed have all been provided.
Key Resources
- See View 3D Load Configuration for an overview of how the 3D viewer works.
Manage Appointments - Improved Create Appointment Scheduling
This feature provides a more efficient way to schedule and show options when making appointments.
The Schedule Appointment: Show Options action is faster and has more relevant steps:
- This action checks which stop locations have dock doors defined. If only one location has been configured, the action assumes you want to use this location and does not ask you.
- This action assumes you want to search in the time range from the stop time on and immediately searches for such appointment options. You can change the Earliest Appointment Start Time and Latest Appointment Start Time and launch a new search on this same screen.
- If your location has location resource groups defined, the action displays more succinct and relevant options by avoiding duplicate time slots for each door in the location resource group. (You can still drill down to the doors within a location resource group if you want).
- You can configure OTM to hide the end time of each appointment option.
Steps to Enable
There are no steps necessary to enable this feature.
Manage Appointments - Location Resource Group
This feature provides a Location Resource Group concept that allows you to combine many dock doors into a group. The grouping of similar dock doors into one group improves the visibility and management of locations with a large number of dock doors. The grouping concept also simplifies the configuration effort and the definition of match criteria between a shipment and its attributes and a resources/dock door and its capabilities.

View to all the Location Resource Groups

Filtered view of just one Resource Group
Steps to Enable
- Using Resource Groups involves defining the Resource Group(s) for a Location and then assigning the Resource Group(s) to the Location Resources to be grouped
Adding a Location Resource Group:
- To add a Location Resource Group, go to Operational Planning > Power Data > Appointments > Location Resource Group.
- Enter a Location Resource Group ID.
- Enter a Location Resource Name.
- Assign Locations to the Location Resource Group.
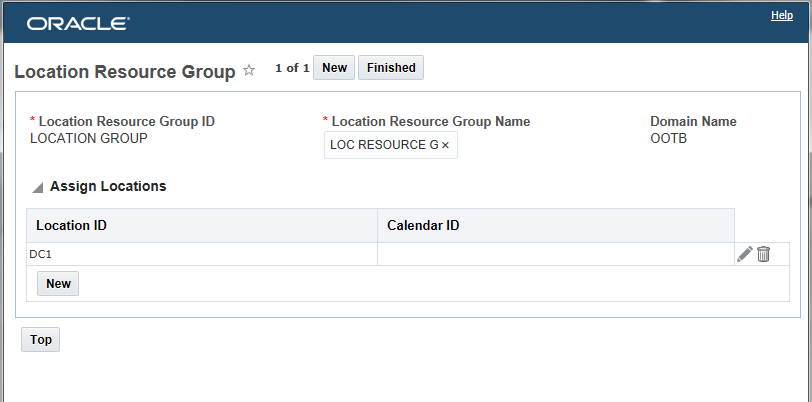
Define Resource Groups and Assign Locations
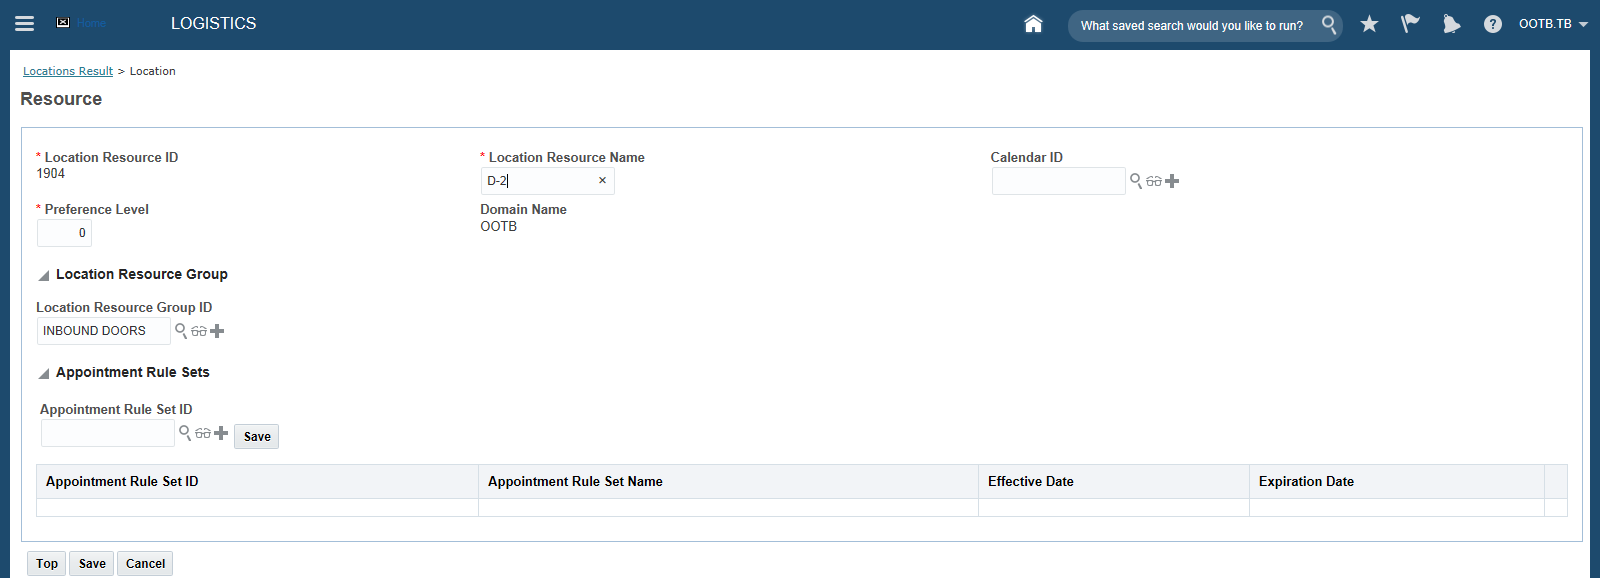
Assign Defined Resource Groups to Location’s Resources
Assign Defined Resource Groups to Location’s Resources
- Go to the location you assigned to the Location Group(s) which you have.
- Click on the Resource tab. Add or edit the Resource Type you want to assign your Resource Groups to.
- Add or edit the Location Resource you want to add a Location Resource Group to.
- Enter the desired Location Resource Group ID.
- Click Save to save the Resource.
- Click Save to save the Resource Type entry.
- Click Finished to save the Location changes.
Manage Appointments - Appointment Rule Sets
This feature provides a new appointment rule set concept that allows you to define the shipment attributes that must match to a defined resource or location resource group when scheduling an appointment.
An appointment rule set is a collection of shipment attributes. If the rules on the resource match the shipment, the shipment can use that resource to create an appointment. You can assign rule sets to Location Resources or Location Resource Groups. A particular location resource or location resource group can have multiple appointment rule sets, but only one appointment rule set can be active at any one point in time. You can define one default appointment rule set without any effective and expiration dates. OTM uses this if no overriding appointment rule sets exist with effective and expiration dates.
Steps to Enable
- To add an Appointment Rule Set, go to Operational Planning > Power Data > Appointments > Appointment Rule Set.
- Input an Appointment Rule Set ID.
- Provide an Appointment Rule Set Name.
- If applicable, enter an Effective Date. This should be the first day when the rule set is applicable.
- If applicable, enter an Expiration Date. This should be the last day when the rule set expires.
- Appointment Activity Type. This specifies if the trailer scheduled for the appointment is attached to the truck (Live) or being dropped (Drop). This field is for information only.
- Define the matching criteria that you would like to use to match the Appointment Rule Set and the shipments.
- Goods
- Flex Commodity Profile.
- Flex Commodity Check Option. If you select CHECK ALL, then the flex commodity profile on all shipment ship units on a shipment will be compared against the flex commodity profile on the location. If you select CHECK BY LARGEST WEIGHT, then only the heaviest shipment ship unit on a shipment will be used in the comparison. CHECK BY LARGEST VOLUME indicates that only the shipment ship unit with the largest volume will be compared against the location resource when trying to establish an appointment.
- If the status (selected or unselected) of Temperature Control in the appointment rule set matches with the status of Temperature Control of the shipment, then the shipment is compatible.
- If the status (selected or unselected) of Hazardous Allowed in the appointment rule set matches with the status of Hazardous Allowed of the shipment, then the shipment is compatible.
- Service Provider
- Service Provider Profile ID.
- Equipment Group Profile ID. If there are multiple equipment groups on a shipment, then all the equipment group IDs must match with the equipment group profile which is specified on the rule set.
- Mode Profile ID.
- Contact Profile ID. The contact profile controls which locations are valid for a shipment based on a list of contacts. To restrict shipments to a particular set of doors using contact profiles, ensure that they are also infeasible for the other doors. If you do not set up the other doors to be incompatible, those doors will also be feasible for them and the system can in effect use any door.
- Shipment Stop Activity Profile ID. OTM supports only Load and Receive activities for appointments.
- Geography
- Source Region ID. If the destination location of the shipment is the same as the location on which this appointment rule set is defined, then the shipment is considered as compatible only if the pickup location of the shipment lies in the source region. If the shipment is a multistop shipment, then the shipment is considered as compatible even if the source location is a middle stop.
- Destination Region ID. If the source location of the shipment is the same as the location on which this appointment rule set is defined, then the shipment is considered as compatible only if the delivery location of the shipment lies in the destination region. If the shipment is a multistop shipment, then the shipment is considered as compatible even if the destination location is a middle stop.
- Shipment Reference Numbers
- If the reference number details on the shipment contain all the reference number details defined on the appointment rule set, when the Compatible check box is selected for each appointment rule set, then the shipment is compatible.
- If you do not specify any shipment reference numbers on your appointment rule set, the shipment is considered as compatible.
- Reference Number Qualifier ID.
- Reference Number.
- Compatible.
- Click Save.
- Shipment Flex Fields
- Click New Flex Field to define a new shipment flex field. Compatible check works the same as mentioned in the shipment reference numbers section.
Tips and Considerations
Appointment Rule Set constraints are not honored for shipment groups.
Workbench - Load Config 3D Viewer Added
This feature provides the ability to add the 3D Load Viewer to your workbench layouts. The addition of the Load Config component allows you to incorporate the new three dimension load view of your shipment with other shipment information (like stops and orders) all in a single comprehensive workbench layout.

Workbench Load Config View of a Shipment
Steps to Enable
- Create a new workbench layout
- Provide a Layout ID
- Provide a layout Description
- Select the Logic Configuration to use from the dropdown
- Split the layout either vertically or horizontally
- Add Content in one of the panels to show the buy shipments:
- Component Type = Table
- Object Type = Buy Shipment
- Enter your desired Tab Name
- Select the Screen Set to use from the dropdown = BUY_SHIPMENT
- Optionally you can select the Show Gantt and Show map column
- And a Default Saved Search
- Add Content for the second panel to display the Load Config view:
- Component Type select Load Config from the dropdown
- If desired you can enter a Tab Name
- For the Associated Master Table select Buy Shipment from the drop down
- Make sure all the prerequisites have been satisfied to use the Load Config viewer:
- The CONTAINER OPTIMIZATION ALGORITHM Parameter USE 3D BASED LOAD CONFIGURATION has been set to TRUE
- The dimensions (LxWxH) for all the ship units involved in the shipment to be viewed have been provided.
- The dimensions (LxWXH) for the equipment group assigned to the shipment to be viewed have all been provided.
- Select any shipment that has been built with the required setup prerequisites to view the contents using the Load Config viewer.
Key Resources
- See the View 3D Load Configuration help topic for an overview of how the 3D viewer works. The functionality specific to the workbench 3D view panel is explained in 3D Load Viewer section of the Using a Workbench help topic.
Fusion Transportation Intelligence
Worldwide Province/City Map Data Added
This feature provides access to map data that covers more than 2000 provinces across the globe.
Steps to Enable
There are no steps necessary to enable this feature.
Tips and Considerations
Refer to the supported_provinces_list_for_map_data.xlsx to view a list of the provinces for which map data is supported. The province used in OTM must match a populated province in FTI.
Oracle Maps Cloud Service Automatically Configured
This feature provides a preconfigured integration with Oracle Maps Cloud Service (formerly Oracle Spatial and eLocation) server to view maps in FTI/GTI. This pre-configuration eliminates the manual configuration effort required previously.
Steps to Enable
There are no steps necessary to enable this feature.
Replace JARs for ETL Calls with Weblogic JARs
This feature provides an update and revision to the code used to trigger the extract, transform, load (ETL) process from OTM to FTI.
As part of the update the ODI-related JARs like spring-core.jar, etc. have been replaced with webservices in RunETL.java and RunTargets.java. RunETL is used to trigger the whole ETL process and RunTargets is used to trigger the Targets ETL.
Steps to Enable
There are no steps necessary to enable this feature.
Removed Limitations for Cloud Installations
This feature provides Cloud users of FTI with access to Maps and the integration of OBIEE with SSO so that logging into OBIEE can be accomplished without asking for credentials again.
Steps to Enable
There are no steps necessary to enable this feature.
Optimize Driver Assignment Action Performance Improved
This feature provides the opportunity to dramatically reduce your driver assignment run-time where the assignment of your drivers to shipments is done for shipments that are on work assignments. This improvement in run time is made possible when both your shipments to be assigned to drivers and your drivers have an assigned driver type.
The Optimize Driver Assignment action only evaluates the shipments and driver resources that have feasible driver types. This driver type check, if the driver types are configured correctly, will lead to fewer evaluations of driver to shipment and this evaluation reduction will improve the overall Optimize Driver Assignment run-time.
Steps to Enable
- Set the property glog.business.fleet.checkDriverTypeCompatibility to TRUE
- Assign a driver type to both your drivers and the resource schedules.
Tips and Considerations
The improvement in run-time assumes that the set of drivers that will be evaluated for each shipment will be reduced by limiting the drivers considered to a specific driver type. There will be no benefit if the set of feasible drivers for the shipments is not reduced by the driver type. For example, if you have 100 drivers all with the same driver type being assigned to 100 shipments all with the same driver type the run-time will not be reduced. If, however, the same 100 drivers are assigned to 50 different driver types and the same 100 shipments has also been assigned to a mix of the same 50 different driver types you will see an improvement in run-time since the Optimize Driver Assignment action will limit the evaluation of drivers and shipments to the matching driver types.
Dispatch Planning Optimization Savings Merge
This feature provides a new Saving Merge Algorithm to use when performing Driver Assignment Optimization. The new Savings Merge Algorithm provides outstanding optimization performance coupled with superior solution quality.
Steps to Enable
- To use the Savings Merge Algorithm, set the FLEET ASSIGNMENT ALGORITHM parameter to 2. Savings Merge. This parameter can be found in the Logic Configuration Type – Fleet Optimization and is in the General group. This parameter allows you to select the algorithm used by the driver assignment optimization logic. The default is 1.Column Generation.
- After selecting the Savings Merge Algorithm for the FLEET ASSIGNMENT ALGORITHM, set up the values for the parameters to use with the SAVINGS MERGE ALGORITHM. These parameters can be found in the SAVINGS MERGE ALGORITHM group.
Saving Merge Algorithm parameters:
- DRIVER EVALUATION TYPE - Default 1. Perform driver evaluation at end of process. This allows you to enter the type of driver evaluation performed inside the savings merge algorithm. It guides the algorithm to do thorough driver evaluation at different levels: 1: Perform driver evaluation at end of process, 2: Perform driver evaluation after each iteration, 3: Perform driver evaluation for all paired shipments.
- DRIVER WAIT TIME PENALTY - Default 0 - Allows you to enter the wait time penalty (range: 0 to 100) to be considered during the driver assignment optimization. The default value is 0, which means no penalty. The purpose of this penalty is to avoid assigning drivers to shipments with large wait times in between shipments.
- FLEET DISCOUNT PERCENTAGE - Default:- 10% - This allows you to enter the discount percentage to be considered for distance based savings. The discount percentage is applied to the common distance value during the savings calculation of the merge algorithms when the FLEET SAVINGS CALCULATION TYPE parameter is defined as Distance-based Savings. The higher the discount percentage value, the greater the distance savings. Also, the probability of assigning drivers to shipments is greater with a higher discount percentage. Range of values = 0 to 100%.
- FLEET FIXED COST PER RESOURCE - Default:- 0 - This allows you to enter the fixed cost per resource to be considered in merge algorithm during the driver assignment optimization. This cost is just used in the evaluation process and not part of the actual shipment cost. If you set higher values for this parameter, it will encourage the adding of more shipments to the driver string even if there is no cost benefit. Consider you have 2 shipments and 2 drivers available to be assigned to those shipments. If we are not stringing the shipments Driver 1 will drive shipment 1 and driver 2 will drive shipment 2(assumption). There are 2 driver resources used here. So the total cost UNCOMBINED = cost of shipment 1+ cost of shipment 2 + 2 * Fleet FIXED COST PER RESOURCE. If you string the shipments together and assign to 1 driver. Combined Total cost = cost of shipment 1+ cost of shipment 2 + cost of empty distance between shipment 1 and shipment 2 + 1* Fleet FIXED COST PER RESOURCE. If COMBINED Total cost < total cost UNCOMBINED, then we decide to string the shipments together. Note that this parameter is used only during the evaluation process. It will not be part of the actual shipment cost. You may not need to set a value for this parameter for most of the cases. If your objective is to string as many shipments as possible and assign drivers to those shipment, then a value for this. If you want a minimum cost solution, just use the default value for this parameter.
- FLEET RATE DISTANCE ID – Default: Estimate - This allows you to select the rate distance calculation method used by driver assignment optimization.
- FLEET SAVINGS CALCULATION TYPE - Default:- Distance based - This you allows to select the base used for savings calculation in the driver assignment optimization logic. Supported values are: 1. Distance based Savings, and 2. Cost based Savings.
- FLEET SEQUENCING ALGORITHM - Default:- 3.3-OPT – This allows you to select the algorithm used by driver assignment optimization sequencing logic. The supported values are: 1. Insertion, 2. 2-OPT, 3. 3-OPT, and 4. Complete Enumeration.
- FLEET SEQUENCING ALGORITHM FOR HIGH SHIPMENTS - Default:- 2.2-OPT. This allows you to select the algorithm used by driver assignment optimization sequencing logic when the number of combined shipments are high. The supported values are: 1. Insertion, 2. 2-OPT, 3. 3-OPT, and 4. Complete Enumeration.
- FLEET SEQUENCING ALGORITHM FOR LOW SHIPMENTS - Default:- 4.Complete Enumeration - This allows you to select the algorithm used by sequencer of driver assignment optimization logic when the number of combined shipments are low. The supported values are: 1. Insertion, 2. 2-OPT, 3. 3-OPT, and 4. Complete Enumeration.
- FLEET SEQUENCING HIGH SHIPMENTS MINIMUM - Default:- 8 - This allows you to enter the minimum number of combined shipments to be considered high number of shipments.
- FLEET SEQUENCING LOW SHIPMENTS MAXIMUM - Default:- 4 - This allows you to enter the maximum number of combined shipments to be considered low number of shipments.
Re-sequence, Add and Remove Shipment Screens Now Include Start/End Location and Times
The Re-sequence, Add and Remove Shipment screens now include start/end location and times.
Steps to Enable
There are no steps necessary to enable this feature.
Work Assignment Decision Support Actions Added
- This feature provides a set of work assignment decision support actions that greatly improve the usability and the solution tuning capabilities available. The new actions allow you to easily add, remove, or resequence the shipments assigned to a work assignment as well as allowing you to secure resources for the shipments in a work assignment, re-rate and re-drive the shipments in a work assignment and assign drivers to the shipments in a work assignment.
- Actions added
- Add Shipment: Added a new Work Assignment action Add Shipment, which allows you to add a specified shipment to an existing work assignment and to specify the position (sequence) of that shipment in that work assignment. Multiple shipments can be added at one time using this action.
- Remove Shipment: Added a new Work Assignment action Remove Shipment, which allows you to remove multiple shipments from an existing work assignment.
- Re-sequence Shipments: Added a new Work Assignment action, Re-sequence Shipments, which allows you to select an existing work assignment and to view and change the position (sequence) of one or more shipments in that work assignment.
- Secure Resources: Added a new work assignment action Secure Resources which secures resources for all shipments within the work assignment.
- Assign Driver: Ability to Assign a Driver to Shipments in a Work Assignments: Added the work assignment action Assign Driver, which assigns a driver to all shipments within a work assignment.
- Re-rate/Redrive: Added a new UI and agent actions, Re-drive and Re-rate Work Assignment.
Steps to Enable
There are no steps necessary to enable this feature.
Workassignment Agent Actions Disband Work Assignment and Remove Shipment
This feature provides two new work assignment agent actions, Disband Work Assignment and Remove Shipment from Work Assignment. These agent actions allow you to easily configure an automation agent to disband or remove a shipment from a work assignment when your defined criteria for performing the action is met.
Steps to Enable
There are no steps necessary to enable this feature.
Create Work Assignment Action Added Fix Error Option
This feature provides an Add Fix Error Option for the Create Work Assignment Shipment action, the Create Work Assignment resource schedule instance action, and for any errors that occur recalculating a work assignment when adding or removing shipments.
Previously, when an error occurred, it was displayed on a separate UI screen. There was no way for you to navigate directly back to the shipment sequencing screen to try a different sequence. The previous remedy was for you to exit the error screen and then start the entire work assignment action over from the beginning to get back to the shipment sequencing screen. This feature adds a 'Fix Errors' button on the error screen to allow direct navigation back to the sequencing screen.
Steps to Enable
There are no steps necessary to enable this feature.
Work Assignment Include Multi-leg Shipments in Bulk Planning
This feature provides the ability to have shipments that are involved in multi-leg/multi-shipment solutions considered in a work assignment as part of bulk planning. This multi-leg capability is also available when using work assignment actions - Create, Delete, Add, Re-sequence, and Disband.
Steps to Enable
There are no steps necessary to enable this feature.
Work Assignments Lifetime Events and Statuses
This feature extends the abilities of the work assignment object to raise lifetime events and to use these events in the development of work assignment agents.
Lifetime events added:
- RUN_AGENT_WORK_ASSIGNMENT
- WORK ASSIGNMENT - CHANGE EXTERNAL STATUS
- WORK ASSIGNMENT - CREATED
- WORK ASSIGNMENT - DISBAND (AGENT)
- WORK ASSIGNMENT - DRIVER ASSIGNMENT
- WORK ASSIGNMENT - MODIFIED
- WORK ASSIGNMENT - RE-DRIVE AND RE-RATE (AGENT)
- WORK ASSIGNMENT - REMOVE SHIPMENT ON WA
- WORK ASSIGNMENT - REMOVED
- WORK ASSIGNMENT - RERATE REDRIVE
- WORK ASSIGNMENT - RESEQUENCE SHIPMENT ON WA
- WORK ASSIGNMENT - SECURE RESOURCES
- WORK ASSIGNMENT - SEND INTERFACE
- WORK ASSIGNMENT - SET IMAGE
- WORK ASSIGNMENT - SET INDICATOR
- WORK ASSIGNMENT - SET STATUS (AGENT)
- WORK ASSIGNMENT - SHIPMENT ADDED
- WORK ASSIGNMENT - SHIPMENT REMOVED
- WORK ASSIGNMENT - STATUS CHANGED
Steps to Enable
There are no steps necessary to enable this feature.
Work Assignment ID Added to Shipment Finder
This feature provides access to the Work Assignment ID in the shipment finder. This new field lets you easily identify from a shipment, whether it is on a work assignment and if so which work assignment it’s on.
Steps to Enable
There are no steps necessary to enable this feature.
Work Assignments Add Multiple Selection for Disband Work Assignment Action
This feature provides the ability to select multiple work assignments with the Disband Work Assignment action. This allows you to quickly disband multiple work assignments by running the Disband Work Assignment action just one time versus running the action once per work assignment.
Steps to Enable
There are no steps necessary to enable this feature.
Work Assignment New Status to Indicate Change to Shipment to Trigger Re-Drive
This feature provides the ability to identify when a work assignment may need to be re-driven based on changes to the shipments that are assigned to the work assignment. This feature provides more control over the re-driving process - a process that can be expensive to execute from a run-time perspective.
Changes to shipments on a work assignment will now be indicated with a work assignment status. The WA_CALCULATE_NEEDED status indicates that the work assignment may need to be re-driven.
Steps to Enable
There are no steps necessary to enable this feature.
Work Assignment Gantt Chart Added to the Workbench
This feature provides you with a Work Assignment Gantt component that you can add to your workbench layouts. You can customize the columns in your Work Assignment Gantt using screen sets. In addition, the Work Assignment Gantt component contains two action menus, the new action menu options Work Assignment Actions and Shipment Actions are also controlled by the screen sets you specify when adding the Work Assignment Gantt.
Steps to Enable
There are no steps necessary to enable this feature.
Improved Driver Gantt Chart Usability
This feature provides several usability improvements to the Driver Gantt. You can now customize the columns in your Driver Gantt using a screen sets. In addition, the Driver Gantt component now contains two action menus. The new action menu options Driver Actions and Shipment Actions are controlled by the screen sets Driver Gantt.
- Driver Actions menu
- Shipment Actions menu
There are no steps necessary to enable this feature.
Oracle Transportation Sourcing
This feature provides you with an upgrade to the latest Apache POI version. Apache POI provides Java libraries for reading and writing files in Microsoft Office formats, such as Word, PowerPoint and Excel.
Steps to Enable
There are no steps necessary to enable this feature.
Key Resources
- See the Oracle Transportation Management Technical Architecture Guide for details.
This feature provides Sourcing reports that have been converted to standalone BIPublisher 11g reports.
The following reports were migrated from Oracle 10g to Oracle 11g, so they work with OTM 6.4.2:
- Award by Carrier
- Award by Lane
- Bid Round Status
- LTL Lane Summary
- LTL Shipment History
- Manual Awards Report
- Outlier Bids
- Savings by Lane
- Winning vs Other Bids
Steps to Enable
There are no steps necessary to enable this feature.
Mark for Purge Action for Bids
This feature provides a new action that allows you to mark bids for purging. The Mark for Purge action is available from the Bid UI and Process Management.
Steps to Enable
There are no steps necessary to enable this feature.
Key Resources
- See the Data Purge Help topic.
Sort Rate Record Costs in Downloaded Spreadsheet
This feature provides a sort order change that now ensures that rate record costs are always displayed in the same order for each download. Rate record costs are now sorted based on rate type (base, discount,..), cost basis, condition basis, and database order.
Steps to Enable
There are no steps necessary to enable this feature.
Key Resources
- See the Sorting section of the Downloaded Rate Costs, Accessorials, and Special Services for details.
The parent rate offering GID and parent rate record GID must be included in the rate load definition.
View Version History and Compare Rates
The View Version History feature allows you to link from a new rate to an older existing version of that rate (the parent). You can view the IDs of previous versions of the selected rate offering or rate record. To understand the changes made between versions of a specific rate offering or rate record, you can use the View Differences action.
Capabilities:
- At upload, optionally specify a parent rate using:
- a parent rate offering ID (available on the Rate Offering manager) when specified on the template rate offering, allows you to link from a new rate to an older existing version of that rate (the parent, and/or
- a parent rate record ID (available on the Rate Record manager) when specified on the template rate record, allows you to link from a new rate to an older existing version of that rate (the parent).
- See the Rate Offering and Rate Record help topics.
- If parents are specified, then you can view the Version History to see all the different versions/generations of rate (the parent rate offering ID or parent rate record ID). You can view the IDs of previous versions of the selected rate offering or rate record.
- If parents are specified, you can use the View Differences action to understand the changes made between versions of a specific rate offering or rate record.
Steps to Enable
There are no steps necessary to enable this feature.
Key Resources
- See the View Version History Action and View Differences Action help topics for more details.
Display Accessorial Cost ID and Components in Spreadsheet
This feature provides the ability to download accessorial information including the accessorial ID, re-use accessorials using the accessorial ID, and create a new accessorial by leaving the accessorial ID blank. To support this feature, read-only options were added to the accessorial cost and the rate record pages.
Steps to Enable
There are no steps necessary to enable this feature.
Key Resources
- See the Downloaded Rate Costs, Accessorials, and Special Services and Rate Record help topics for more details.
Edit Cost Conditions and Other Cost Columns
This feature provides the ability to download, edit, and add rate records cost columns present in rate record costs/accessorial costs. This provides better usability and makes it easier to edit costs.
Capabilities:
- You can view the attributes of costs: Added a new worksheet in the downloaded spreadsheet named Cost Parameters. This worksheet lists all conditions and descriptive attributes of rate record costs and accessorial costs. Some columns are applicable only to rate record costs and some of the columns are applicable only to accessorial costs. The costs themselves appear on the rate offering and rate record tabs as before.
- You can edit the values on the Cost Parameters tab: You can create new or edit downloaded conditions and descriptions on the Cost Parameters tab. Link your different cost parameters to each of your costs using a Cost Parameter ID.
Steps to Enable
There are no steps necessary to enable this feature.
Key Resources
- See the Downloaded Rate Costs, Accessorials, and Special Services help topic for details.
Delete Rate Load Definitions and Approval Summaries
This feature provides a way to delete a rate load definition once all the related approval summaries are deleted.
Steps to Enable
- Delete an Approval Summary:
- Select the approval summary row and click Delete (Delete).
- The following conditions must be met:
- Completion status of the approval summary is FINAL
- No associated rate records or rate offerings with a status of REJECTED are used as parent rates by other rates.
- Oracle Transportation Management also deletes all associated rate records and rate offerings with a status of REJECTED.
- Deleting a rate load definition removes it from the system. Once there are no approval summaries related a rate load definition, you can delete the rate load definition as follows:
- Go to Sourcing > Rate Maintenance > Manage Rate Load Definition.
- Enter search criteria or click Search. The Search Results section updates.
- Select the row of the rate load definition with no related approval summaries and click Delete (Delete).
- Click Done on the results page to return to the rate load definition search page.
Key Resources
- See the Delete a Rate Load Definition and Approval Summaries help topics for more details.
Warn for Overlapping Dates and Date Gaps
This feature provides a Warning indicator on the Approval Summary and Approval Detail pages if the effective/expiration dates of the parent and child rates overlap.
- OVERLAP: If any of the effective date/expiration date of the uploading rate falls in the time window of the parent, then the same will be treated as an OVERLAP.
- The effective date of the child rate is before the effective date of the parent rate.
- The effective date of the child rate is before the expiration date of the parent rate.
- The expiration date of the child rate is before the effective date of the parent rate.
- The expiration date of the child rate is before the expiration date of the parent rate.
- GAP: If the gap between the expiration date of the parent rate and the effective date of the currently uploading child rate is more than a day.
Steps to Enable
There are no steps necessary to enable this feature.
Key Resources
- See the Approval Details help topic for more details.
Ability to Query and Download 1,000 Plus Rate Records
This feature provides a way to easily query and download a large number of rate records.
There are now several ways to download rates:
- On the Download Rates page the Down Load Rates action allows you to download more than 1,000 rates based on the results of search or the results of a saved search.
- The Download Rates action support downloads for a selected Rate Load Definition and a selected Rate Record Structure.
- The Multiple Structure Rate Download action allows you to use a shopping cart approach and multiple rate record structures to download up to 1,000 rates.
- On the Multiple Structure Rate Download <rate load definition ID> page, you specify which rates to download to the spreadsheet.
- Search for and add rate records to the specified rate record structure. Select a rate record structure from the Add to Rate Record Structure drop-down list.
- Search for rate records.
- Select one or more rows in the Search Results section.
- Click Add to the right of the Add to Rate Record Structure drop-down list.
- Close the resulting information message.
- Optionally, click the Selected Rates tab to review the selected rates. On this tab, you can:
- Use the Rate Record Structure ID drop-down list to display only the rate records assigned to a single rate record structure ID. The default is all rate record structures. Changing the displayed rate records will not affect the rate record structures that will be downloaded. All rate record structures will be downloaded.
- To delete rate records, select the rate records and click the X to the left of the Rate Record Structure drop-down list.
- Click Multiple Structure Rate Download in the upper right-hand corner of the Download Rates page to download all rate record structures. Depending on the size of the downloaded spreadsheet, you see the following:
- If the downloaded spreadsheet is less than or equal to 5,000,000 bytes, you can immediately open or save the spreadsheet. Also, the spreadsheet is sent as an email attachment to all involved parties specified on the rate load definition.
- If the downloaded spreadsheet is greater than 5,000,000 bytes, an email containing a link is sent to all involved parties specified on the rate load definition. Click the link to download the spreadsheet.
There are no steps necessary to enable this feature.
Key Resources
- See the Downloading Rates, Download Rates and Multiple Structure Rate Download help topics for more details.
Rate Maintenance Query Based Actions
This feature provides Rate Maintenance Query Based Actions. The Query Based Actions button executes a selected action for a Saved Search or the active search criteria. The benefit of the Query Based Actions is that they are not constrained by the default 1,000 record limit associated with the finder results.
Steps to Enable
There are no steps necessary to enable this feature.
Add Rate Records to Operational Rate Offerings
This feature provides the ability to add new rate records to an active rate offering via Rate Maintenance.
Steps to Enable
- On the Rate Record Structure tab, enter the existing, active rate offering ID for the new rate records.
- Then when you upload the spreadsheet, the new rate records are created and associated to the existing, active rate offering ID.
Ensure Mandatory Fields are Included in the Rate Load Definition
This feature improves rate load definition usability by insuring mandatory fields are always included.
Certain fields on the rate load definition are now mandatory. For mandatory fields, the read-only, include/exclude, and re-ordering options are not available for you to change.
These mandatory fields include:
- For the Rate Offering Structure: Transaction Code and Rate Offering ID
- For Rate Record Structures: Transaction Code, Rate Offering ID, and Rate Record ID
Steps to Enable
There are no steps necessary to enable this feature.
Track Upload and Approval Process
The Approval Summary page now displays the information required to track the status of the rejected and failed rates. You can now view the Approval Status and Last Upload Status.
On the Approval Summary page, the following columns were changed or added:
- Completion Status column renamed to Approval Status
- New column for Upload Status which indicates the status of the last upload.
- A new status type of LAST_UPLOAD has been added and the following status type values are listed in the Upload Status column on the Approval Summary page:
- NEW
- SUCCESSFUL
- PARTIALLY_SUCCESSFUL
- FAILED
On the Approval Details page, the following were changed or added:
- Column updated for both grids:
- Upload Date column changed to Last Upload Date
- Approved/Rejected Date column changed to Last Approval Date
- Approved/Rejected By column changed to Status Changed By
- New columns for Rate Offering grid:
- Total Rate Records
- Approved Rate Records
Steps to Enable
There are no steps necessary to enable this feature.
Oracle Forwarding and Brokerage Operations
Itinerary Profile, Port of Load and Port of Discharge Added to Quote
This feature provides with additional criteria - Itinerary Profile, Port of Load, and Port of Discharge that can be used to perform a rate lookup during the Quote process.
Steps to Enable
There are no steps necessary to enable this feature.
Oracle Global Trade Management
Global Trade Management (Base)
This feature enables the use of standardized UOMs within GTM. Country-specific UOMs are received from a third party data provider and mapped to the standard OTM UOMs. These UOMs can be used for customs filing and other documents. As part of this feature, a new grid 'Required Units of Measure' is added to the Product Classification Code power data page. You can view the UOM details associated with a product classification code in this grid.
Steps to Enable
There are no steps necessary to enable this feature.
This feature provides a new Control Category option called Data Assignment that has been provided on the Compliance Rule page. This feature allows you to configure a compliance rule so that data (like bonds, remarks, reference numbers, user-defined codes valuation methods, etc.) will be automatically assigned to your trade transaction, trade transaction line, declaration, and declaration line.
Steps to Enable
- Go to Trade Compliance Management > Power Data > Compliance Rule > Compliance Rule and create a new Compliance Rule.
- Select Data Assignment for the Control Category option.
- Then on the Controls tab, select the different types of data (e.g. remarks, reference numbers, user-defined codes, involved parties, etc.) that will be automatically assigned to a business object like a trade transaction, trade transaction line, declaration, or declaration line when the compliance rule is executed. For the Data Assignment Control Category, the following fields appear on the Controls tab:
- Sequence: identifies the sequence in which data is assigned to a business object.
- Action: identifies what data is assigned to which object. For example, select the Assign Remarks option to automatically assign remarks to a trade transaction when the compliance rule is executed.
- Action Details: click Details to enter the particulars of the data to be assigned. The fields that appear in the new window differ based on your selection from the Action drop-down list. Select an ID of the specific data, and enter a code/value for the data selected. Select the Override check box if this data is to replace any existing value for the business object. Click Save and then click OK. The details are displayed in the Action Details text box.
- Once finished adding Actions and Action details, you may add Remarks.
- Select Finished to save the Compliance Rule.
Generate Customs Commercial Invoice from Trade Transaction
This feature enables you to generate a customs commercial invoice from a trade transaction. Previously this document could only be generated from a declaration.
Steps to Enable
There are no steps necessary to enable this feature, the same process used in previous versions to map and generate the document against a Customs Shipment (now the Declaration) are the same steps/process you will now use to generate the Customs Commercial Invoice against a Trade Transaction.
License Management Enhancements
The GTM License Management capabilities are designed to support companies with highly-regulated items that very often require a license and/or other type of authorizations to be imported or exported.
This feature provides a set of usability and processing improvements that provide the following :
- The ability to have a flexible configuration of license constraints and restrictions that can be applied based on different trade transaction types like sales order, fulfillment, shipment etc.
- The ability to perform license reservation (soft) at the time of order booking or fulfillment process.
- The ability to perform license assignment (hard) at the time of shipping.
- The ability to perform auto reconciliation of license reservations (soft) at the time of license assignments (hard).
- The ability to view accurate license quantity or value balances on a license line.
- The ability to view License Line Usage History corresponding to a transaction line.
- The ability to perform a reevaluation of the license on a transaction line, and to perform adjustments of assigned/reserved license if required.
Steps to Enable
License Management Setup
- Setup a Compliance Rule - The control category (License, License Exception, or Sanction) is required.
- Setup your Compliance Rule Set & Group.
- Setup your License Category & Type
- Setup your License Constraints
- Setup your License Code
- Setup Limiting Factor as well as License Type
- Setup your License Code – Detail (Balance Method)
- Balance Method by
- Transaction Type or User Defined Type (with Preference to Transaction Type)
- Define date, quantity and value qualifiers to maintain balances
- Filter to find transaction lines for license reconciliation
- Set up your License
- Setup your License Line
- Setup the line type, the authorized quantity and value
License Management Usage
- Setup a new Trade Transaction Line using the new Reference Number Qualifier ID Preceding Transaction Line.
- Trade Transaction Line – Smart link – use Reference Number Qualifier ID Preceding Transaction Line functionality View Related Transaction Lines Driven based on Preceding Transaction Line Reference Number Value.
- Trade Transaction – Actions

Assign License Actions
- Transaction - Assign License Show Options Action
- License Determination
- Display Matching Licenses
- You can select specific license line to assign.
- License Assignment
- Based on License Code definition system performs reservation or assignment
- System checks previous license reservation or assignment using the Preceding Transaction Line Reference Number Qualifier ID or Saved Query
- Transaction – Assign License Action
- Assign License
- License Determination, Assignment based on Expiration Date
- Based on License Code definition, system performs reservation or assignment
- System checks previous license reservation or assignment using the Preceding Transaction Line Reference Number Qualifier ID or Saved Query
- Re-Evaluate License Action
- Checks latest transaction match conditions with already assigned license
- Not a Match
- Updates the Control Status as On-Hold
- Update the Transaction Lines Notes section with more details
- Match
- Checks for any quantity or value modification on transaction line and accordingly reserves or assign additional or release licenses
- Checks previous or subsequent transaction lines usage/balance limits
- Avoids performing un-assign and re-assign of license at different stages of outbound flow
- Re-Evaluate License Action
- Un-Assign License
- Un Assign License for a Transaction Line
- Add un-assigned quantity to previous reserved transaction line
- Add to License Balance
- View License Balance Transactions

View License Line Balances
- View License Line Usage History – Finder Result Captures all Transaction Line Level License Balances

License Line Usage History
- Process – Transaction -> Copy Data from Transaction Line Action
- This copy action copies license information without incrementing or decrementing the balance. Useful when a previous related transaction is manually authorized.
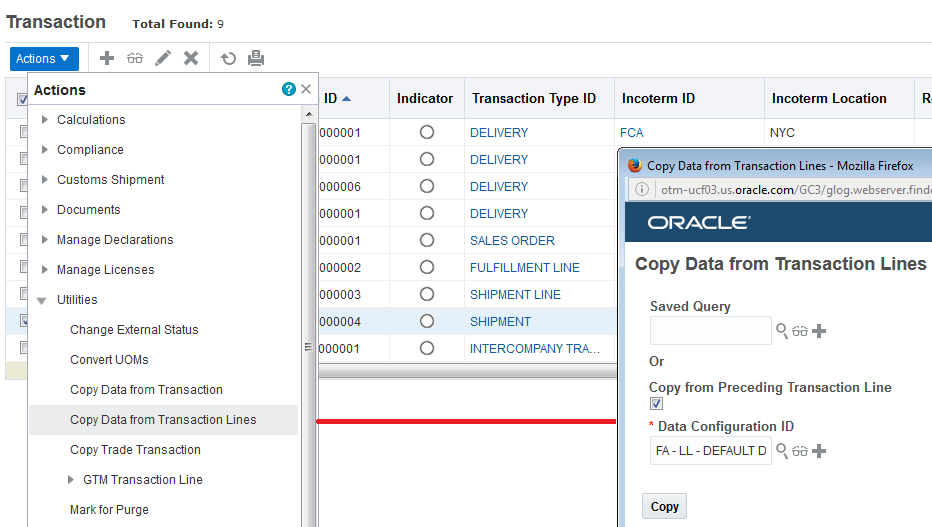
Copy Data Actions
Indicators and User-defined Images Added to License Line Manager
This feature provides the option to add indicators and user-defined images to the License Line Manager on the finder and finder result pages. This feature also provides two actions - Set Image and Set Indicator – that have been added to the License Line Manager Actions list.
Steps to Enable
- To add indicators to your finder and finder result pages:
- Copy the Public License Line Manger in the Screen Set Manager.
- Add the Indicator to your search screen by marking the Indicator check box on the License Line Screen Set Search tab.
- Add the Indicator Column to your License Line Manager Results screen by adding the Indicator column in the License Line Screen Set Results tab.
- To add User Defined Images to your Search and Results screens:
- Edit your version of the License Line Manager in the Screen Set Manager.
- Add the User Defined Image fields to your search screen by selecting the User Defined Image fields (1-5) you would like to add.
- Add the User Defined Image fields (1-5) as Columns to your Results screen by adding the User Defined Image field columns in the Screen Set Results tab.
Indicators and User-defined Images Added to Party Manager
This feature provides the option to add Indicators and user-defined images to the finder and result pages of the Party Manager. This feature also provides two actions - Set Image and Set Indicator – that have been added to the Part Manager Actions list.
Steps to Enable
- To add indicators to your finder and finder result pages:
- Copy the Public GTM_CONTACT Manager in the Screen Set Manager.
- Add the Indicator to your search screen by marking the Indicator check box on the r Screen Set Search tab.
- Add the Indicator Column to your Results screen by adding the Indicator column in the Screen Set Results tab.
- To add User Defined Images to your Search and Results screens:
- Edit your version of the GTM_CONTACT Manager in the Screen Set Manager.
- Add the User Defined Image fields to your search screen by selecting the User Defined Image fields (1-5) you would like to add.
- Add the User Defined Image fields (1-5) as Columns to your Results screen by adding the User Defined Image field columns in the Screen Set Results tab.
New Parameters Added to Service Parameter
This feature provides additional Service Parameters that can be incorporated into the matching process used for restricted party screening. The additional fields are:
- NAMECOMPANYADDRESSCITY
- NAMECOMPANYADDRESS
- NAMECOMPANYADDRESSCITYPROVINCE
Steps to Enable
There are no steps necessary to enable this feature.
Renaming Customs Shipment to Declaration
This feature provides a renamed and repurposed Customs Shipment business object. The Customs Shipment has been renamed to Declaration, and Customs Shipment Line has been renamed to Declaration Line. The new declaration object will now be used as a filing object/document and will be used to store and send information to a regulatory bodies or brokers for filing purposes.
Steps to Enable
There are no steps necessary to enable this feature.
This feature provides a manager to add information related to a bond. This information, if required, can be referenced on a declaration and it can be included when transmitting information for filing purposes.
Bonds, also known as Guarantees, are used to ensure that required duty and tax will be paid for an import. Generally you have one bond on file for each country with which you do business. There may be instances where you have separate bonds for each declaration. Once created, the bond can be added to a declaration or declaration line and is then available to be sent to a customs agency with your declaration.
The bond includes information such as bond number, the category, type and code of the bond, the liability limit that applies to the bond, and if the bond is an extension or a supplement to an existing bond. You can also specify information such as dates, involved parties, authorized parties, ports, remarks, and reference numbers.
Bond Manager
Steps to Enable
The tasks required for adding a Bond include:
- Go to the Bond manager via Declaration Management > Bonds.
- Enter a unique identifier in the Bond ID field. You will use this ID when you refer to this bond on other pages.
- Enter a bond number in the Bond Number field.
- Select the user-defined code category of the bond from the Category drop-down list.
- Select the user-defined code type of the bond from the Type drop-down list. The options available are determined by the category you selected in the previous step.
- Select the user-defined code value of the bond from the Code drop-down list. The options available are determined by the type you selected in the previous step.
- Enter an amount in the Liability Limit field, and select the currency from the corresponding drop-down list.
- If desired, select an additional code for the bond from the Additional Code drop-down list.
- Select one of the following check boxes:
- Extension: Select this check box to replace an existing bond with a new one that has a longer time limit. Using an extension reduces the amount of paperwork and data you have to submit during customs filing. The start and end dates of the extension will not overlap with the prior bond.
- Supplemental: Select this check box to supplement an existing bond when the total value of the bond is increased. For example, Company A had a $50,000 bond but realized their imports average $100,000 per month. So instead of replacing the bond on file, the company takes out a second bond to supplement the first one. A supplement bond is valid for the same time period as an existing bond.
- If this bond is an extension or supplement to another bond, enter the existing bond number in the Prior Bond Number field.
- Enter the validity period of the bond in the Effective Date and Expiration Date fields.
- Enter the date of execution of the bond in the Execution Date field.
- If desired, enter additional information about the bond in the Description field.
- Adding an Involved Party:
- Select the Authorized User check box if the involved party has the appropriate authorization to use the bond. The Authorized User option is automatically selected in the Involved Party Qualifier drop-down list.
- If the involved party is not an authorized user, select another qualifier from the Involved Party Qualifier drop-down list.
- Enter a party in the Involved Party field.
- Add Ports
- Add Remarks
- Add Reference Numbers
This feature provides functionality needed to create declarations that provide the data required to support your import, export or in-transit filings.
The features provided as part of this enhancement include:
- Data Copy: This feature provides the ability to copy data from transaction to transaction, transaction to declaration, or declaration to declaration. You can configure which data is to be copied and specify details about when the data can be copied: only copy if the target field is null, or you can overwrite, or append data in the target field.
- Aggregation Constraint Set: Use this feature to configure constraint sets based on which multiple trade transaction lines will be aggregated into one declaration. You can create aggregation constraints based on Incoterms, involved parties, countries of origin, classification codes, remarks, reference numbers, etc.
- Grouping Constraint Set: Use this feature to configure constraint sets based on which multiple trade transaction lines will be grouped into one declaration. You can create grouping constraints based on dates, Incoterms, transport modes, involved parties, remarks, reference numbers, etc.
- Declaration Logic Configuration: This feature enables you to set logic parameters required to create a declaration. Parameters that you can set include:
- Aggregation and Grouping Constraint Set
- Data Configuration
- Base Quantity, Primary Line Type Qualifiers
- Currency, Exchange Rate, Date
- You can also use this feature to configure parameters related to generation of declaration messages.
Steps to Enable
The tasks associated with setting up your declarations to support filing include the following:
- Declaration Type
- This page is accessed via Declaration Management > Power Data > Declaration Codes > Declaration Types.
- Declaration types are used to identify the kind of declaration you are filing and drives how trade transactions are consolidated, split, and aggregated into declarations. Declaration type is also used to link various pieces of information together. Data such as declaration sub type, procedures, produced document types, and additional information are a few examples of data that are linked to declaration type through a declaration type profile. It is recommended that declaration types be set up as a combination of a country/regime and the type of filing. For example, BE – IMPORT represents a Belgian Import Declaration and EU – Transit Arrival represents a European Union Transit Arrival declaration.
- Adding a Declaration Type:
- Enter a unique identifier in the Declaration Type ID field.
- Enter the declaration type name in the Name field.
- Enter the declaration type code in the Code field. If you need to send a declaration type to a customs agency using a code from a list, you can specify the code to be used.
- If desired, enter additional information about the declaration type in the Description field.
- Enter the regime associated with the declaration type in the Regime ID field.
- Enter an ID in the Request Status Group Profile field to associate a status group profile with the declaration type. This will be used when a declaration message is sent to the customs.
- Enter an ID in the Response Status Group Profile field to associate a status group profile with the declaration type. This will be used when a declaration message is received from the customs.
- Enter an ID in the Logic Configuration field to associate a declaration logic configuration with the declaration type.
- Select the domain in which this declaration type will be active from the Domain Name drop-down list.
- Click Finished.
- Declaration Sub Type
- This page is accessed via Declaration Management > Power Data > Declaration Codes > Declaration Sub Types.
- Declaration sub type is used for information regarding the type of declaration being filed. It may be used for different types of information depending on the declaration type. For example, on the Single Administrative Document used in the European Union, declaration sub type can be used for Box 1 Part 2 for import or export declarations and identifies whether it is a normal declaration, incomplete declaration, and so on. For transit declarations across Europe, it can be used for Box 1 Part 3 to identify community transit procedures. You can assign a sub type to a declaration and use it for customs filing.
- Adding a Declaration Sub Type:
- Enter a unique identifier in the Declaration Sub Type ID field.
- Enter the sub type name in the Name field.
- Enter the sub type code in the Code field. If you need to send a declaration sub type to a customs agency using a code from a list, you can specify the code to be used.
- If desired, enter additional information about the sub type in the Description field.
- Enter an ID in the Declaration Type Profile field to add profile details.
- Select a domain in which this declaration sub type will be active from the Domain Name drop-down list.
- Click Finished.
- Declaration Type Profile
- This page is accessed via Declaration Management > Power Data > Declaration Codes > Declaration Type Profiles.
- Declaration Types are grouped into a Declaration Type Profile. The declaration type profile is a key piece of information that is used to tie together different objects required for filing. Since setup data may vary depending on the regime, the country of filing, and the type of filing, declaration type profile is specified across other objects to ensure that proper data for a particular country and type of filing combination is being used for filing purposes. For example, for import filing into the EU, you can create a declaration type profile containing the declaration types for importing into different EU countries such as Belgium and the Netherlands.
- Adding Declaration Type Profiles:
- Enter a unique identifier in the Declaration Type Profile ID field.
- Enter the declaration type profile name in the Name field.
- Select the Compatible check box to include the declaration types listed in the Declaration Type Profile Details section in this profile. When you create a declaration type profile, you can specify if it is compatible. If the checkbox is selected, the declaration types listed within the declaration type profile are included and are compatible when the declaration type profile is specified in other areas of GTM. If the checkbox is not selected, the declaration types listed within the declaration type profile are not included and are incompatible when the declaration type profile is specified in other areas of GTM.
- Declaration Type Profile Details.
- Enter an ID in the Declaration Type ID.
- Click Save.
- Click Finished.
- Tariff Preference Type
- This page is accessed via Trade Compliance Management > Power Data > Transaction > Tariff Preference Type
- This page is accessed via Declaration Management > Power Data > Declaration Codes > Tariff Preference Types
- Tariff Preference Type is used to provide information on the tariff treatment of goods. Tariff treatment covers not only specific preferences such as “reduced import duty rates under the GSP” or “under arrangements with ACP countries” but also various other measures affecting customs duties such as tariff quotas, suspensions and end-uses. It is used for import declarations into the European Union and is reported in box 36 on the Single Administrative Document. You can assign a tariff preference to a declaration or a declaration line before customs filing.
- Adding a Tariff Preference Type:
- Enter a unique identifier in the Tariff Preference Type ID field.
- Enter the preference type name in the Name field.
- Enter the preference type code in the Code field. If you need to send a preference type code to a customs agency using a code from a list, you can specify the code to be used.
- If desired, enter additional information about the tariff preference type in the Description field.
- Click Finished.
- Procedure
- This page is accessed via Declaration Management > Power Data > Declaration Codes > Procedures.
- You can specify a procedure which indicates the customs procedure through which the goods are entering. Examples of customs procedures are ‘release of goods for free circulation’ or ‘placing under the customs warehousing procedure’. Each regime may have differences in how they refer to different procedures but this concept is something that is used globally.
- Some procedures may need to follow a prior procedure. In GTM, you can specify if a procedure can only be used as a prior procedure. An example of a procedure that is only a prior procedure is ‘Inward processing in another member state’.
- If a procedure follows another procedure, you can make the linkage between a procedure and all the allowable prior procedures. For example, for a procedure of ‘free circulation’, an allowable prior procedure is ‘Placing of goods under the customs warehouse procedure’. This means that goods may be placed under a customs warehouse procedure and then changed to a free circulation procedure when it is moved from the bonded warehouse. In the EU, procedure is reported in box 37.1 on the Single Administrative Document. Once created, the procedure can be added to the declaration or declaration line.
- Since procedures may vary by customs agency, specifying a declaration type profile on a procedure ensures that procedures are being used for the proper regime and declaration type.
- Adding a Procedure:
- Enter a unique identifier in the Procedure ID field.
- Enter the name of the procedure in the Name field.
- Enter the code of the procedure in the Code field.
- If desired, enter additional information about the procedure in the Description field.
- Enter an ID in the Procedure Type field.
- Select the Is Prior Procedure Only check box, if this will only be used as a prior procedure.
- Enter an ID in the Declaration Type Profile field to add profile details.
- Allowed Prior Procedures
- Enter a procedure ID in the Prior Procedure ID field.
- Click Save.
- Click Finished.
- Procedure Type
- This page is accessed via Declaration Management > Power Data > Declaration Codes > Procedure Types.
- Procedures may be grouped into Procedure Types. For example, all procedures related to free circulation may be grouped into a procedure type of ‘Release for Free Circulation’. Some regimes, such as the EU, may have recommendations on how to group procedures into procedure types and may require the procedure type to be sent with your declaration.
- Procedures can be grouped into procedure types since there can be many different types of procedures. In the European Union, the procedure and procedure type are included on the declaration for customs filing purposes.
- Adding a Procedure Type:
- Enter a unique identifier in the Procedure Type ID field.
- Enter the procedure type name in the Name field.
- Enter the procedure type code in the Code field. If you need to send a procedure type to a customs agency using a code from a list, you can specify the code to be used.
- If desired, enter additional information about the procedure type in the Description field.
- Click Finished.
- Procedure Detail
- This page is accessed via Declaration Management > Power Data > Declaration Codes > Procedure Types.
- For certain customs agencies, additional procedure detail may need to be specified on your declaration. For example, in the EU, the procedure details can either be at the national level or the community level. In the EU, procedure details are reported in box 37.2 on the Single Administrative Document. Once created, the procedure details can be added to the declaration or declaration line.
- Adding a Procedure Type:
- Enter a unique identifier in the Procedure Type ID field.
- Enter the procedure type name in the Name field.
- Enter the procedure type code in the Code field. If you need to send a procedure type to a customs agency using a code from a list, you can specify the code to be used.
- If desired, enter additional information about the procedure type in the Description field.
- Click Finished.
- Produced Document Type
- This page is accessed via Declaration Management > Power Data > Declaration Codes > Produced Document Types.
- Produced Document Type is used to specify information about documents, certificates, authorizations, and other data relating to the movement of goods that needs to be sent with a declaration to a customs agency. The code is used to identify the kind of document being sent. This information can be automatically assigned to your declaration line using compliance rules. Once you know the produced document types that are required, you can specify information that applies to a specific declaration line such as document number, document date, document validation location, and document archive information. In the EU, produced document type corresponds to box 44 on the Single Administrative Document.
- Adding Produced Document Type Information:
- Enter a unique identifier in the Produced Document Type ID field.
- Enter the name of the document in the Name field.
- Enter the code of the document in the Code field. If you need to send a produced document type to a customs agency using a code from a list, you can specify the code to be used.
- If desired, enter additional information about the document in the Description field.
- Enter an ID in the Declaration Type Profile field to add profile details.
- Click Finished.
- Additional Information
- This page is accessed via Declaration Management > Power Data > Declaration Codes > Additional Information.
- Additional information is used to send other important information related to the declaration to a customs agency. Usually a code is used to identify what kind of information is being sent. Once you know the additional information that is required, you can specify details that apply to a specific declaration line such as certain text and whether the goods are being exported from the EU or another country. This information can be automatically assigned to your declaration line using compliance rules.
- GTM enables you to provide default text that can be automatically assigned to a declaration along with the code. This text can then be overwritten at the declaration line level. For example, if an additional information code means that an authorization number needs to be sent with the declaration, when the additional information is assigned to the declaration line, the text can tell the user to Enter Authorization Number. The user can then overwrite this text with the authorization number that applies to a specific declaration line. In the EU, additional information corresponds to box 44 on the Single Administrative Document.
- Adding Additional Information:
- Enter a unique identifier in the Additional Information ID field.
- Enter the name of the information in the Name field.
- Enter the code of the information in the Code field. If you need to send additional information to a customs agency using a code from a list, you can specify the code to be used.
- If desired, enter a description in the Description field.
- Enter detailed information in the Text field.
- Select the Modifiable check box if you want to edit this text in the declaration line manager page.
- Enter an ID in the Declaration Type Profile field to add profile details.
- Click Finished.
- Bond – add or search for the required Bond.
- This page is accessed via Declaration Management > Bonds.
- Grouping Constraint Set
- In previous versions, GTM was able to group multiple trade transactions into a declaration. When grouping occurred, the entire trade transaction was grouped into a declaration. You could have multiple trade transactions grouped into one declaration. From version 6.4.2, trade transaction lines can be grouped independently into a declaration. This provides you more flexibility to only group certain lines from different trade transactions into a declaration. A new constraint set type called ‘DECLARATION LINE-GROUPING’ has been introduced to perform the grouping. The grouping constraint set allows you to define rules on which trade transaction lines can be grouped together into a declaration. The grouping constraint set is then specified in a logic configuration. When you trigger GTM to create declarations, grouping takes place based on the criteria you specified in the constraint set. You can group based on transactional data such as transport mode, Incoterm, date, involved party, port, reference number, remark, and user-defined type.
- The grouping logic also enables you to deconsolidate trade transaction lines. Shipments that come into GTM may be consolidated for shipping purposes but then need to be deconsolidated for customs filing. For example, you may have a trade transaction which could be used to create multiple declarations based on ultimate consignee or some other criteria. The grouping constraint sets you define will help you to create declarations at the correct level.
- Aggregation Constraint Set
- You can also aggregate lines together when creating declarations. Some customs agencies prefer you to file aggregated lines based on certain requirements. For example, a customs agency may want you to aggregate lines based on product classification code and country of origin. GTM can aggregate multiple transaction lines into a single declaration line based on rules you define in a constraint set. A new constraint set type of ‘DECLARATION LINE-AGGREGATION’ has been introduced to perform the aggregation. The aggregation constraint set allows you to define rules based on which trade transaction lines should be aggregated together into one declaration line. The aggregation constraint set is then specified in a logic configuration. When you trigger GTM to create declarations, aggregation takes place based on the criteria you specified in the constraint set. Once a declaration line is created, you can see which transaction lines were aggregated to create the declaration line. You can aggregate based on transaction line data such as product classification code, country of origin, Incoterm, authorizations, licenses, involved party, reference number, remark, and user-defined type.
- Data Configuration
- Data configuration enables you to copy relevant information between business objects including fulfillment order to shipment. Remember, fulfillment order and shipments are modeled as trade transactions. You can copy data between trade transactions, or from transaction to declaration, at both the header and the line level. You can specify details about when the data can be copied: copy only if the target field is null, overwrite if the target field is populated, or append data in the target field. Also, qualifier mapping is supported so that the target field uses a different qualifier. For example, on the trade transaction, you have a remark qualifier of SERVICE PROVIDER EQUIPMENT NUMBER. But when you copy this information to a declaration line, you want the qualifier to show as EQUIPMENT INITIAL NUMBER.
- The data configuration is then specified in a logic configuration. When you trigger GTM to create declarations, copying of data takes place based on the criteria you specified in the data configuration. You can specify which data you want to copy including involved party, product classification, license control, value, quantity, reporting quantity, reference number, and remark.
- Compliance Rule for Data Assignment
- You can automatically assign different sets of data to business objects in GTM. For example, you may need to include certain data on your declaration that does not come from an upstream system but is required when filing your declaration with a customs agency. Data can be automatically assigned based on criteria you define. Using the existing compliance rule capability, you can specify which data should be automatically assigned when certain criteria is met. Then when you run your Execute Compliance Rule or Execute Policy actions, you can assign the data you’ve specified if the criteria in the compliance rule is met.
- You can use automatic data assignment to assign data to your trade transaction, trade transaction line, declaration, or declaration line. You can use this to assign data such as bond, declaration sub type, involved parties, ports, procedure, prior procedure, procedure detail, tariff preference code, user-defined code, reference number, and remark.
- Logic Configuration
- Logic Configuration enables you to group many of the parameters needed to build a declaration from a trade transaction or a set of trade transactions. In the General section, you can see the logic configuration includes your grouping constraint set, aggregation constraint set, and data configuration. In addition, other criteria can be set including:
- Base quantity which is used when creating declarations with partial quantities of transaction lines
- Currency which is the currency in which values will be submitted to customs
- Exchange rate and exchange rate date which are used to determine which exchange rate to use
- Pagination size which is the number of records to be displayed on each page when creating a partial declaration
- Primary line data which is used during aggregation to determine the quantity qualifier, the line type, and the value qualifier
- Logic configuration also includes information about the message configuration including:
- The remark qualifier to be used to populate the action that creates the declaration message
- The involved party qualifier to be used for the filer and the transmitter
- The Out XML Profile that should be used
- The remark qualifier to be used to populate the Receiver ID
- Information related to the sender
- The remark qualifier to be used to indicate if the declaration message is a test message
- When you trigger GTM to create declarations, a logic configuration is specified. This logic configuration is used by GTM to create one or many declarations, each at the appropriate level and including the proper information.
- Status Code and Status Group
- For statuses related to declarations, the standard status group and status code structure from OTM is being used. This enables GTM to capture generic customs filing status and codes and supports the grouping of status codes. Request and response statuses will vary by customs agencies. By using this structure, GTM is able to model all the request and response statuses.
- Status codes may be provided by a customs agency that can then be modeled in GTM. You can specify a code which can be sent or received by a customs agency to tell you the status of your declaration. Once you create your status codes, you can group similar status codes into a status code profile. In this example, you are modeling request statuses which are sent to customs to tell them if you are sending an addition, deletion, change, or an original declaration.
- Once you’ve created your status codes and status code profiles, you then add your status code profile to a status group. You can tell GTM whether you want to include or exclude a status code profile from a status group. Then, you add your status groups into a status group profile. This status group profile is specified on the declaration type and ensures that the proper set of statuses is used for a country and filing type.
- Assign Request Status Group, Response Status Group, and Logic Configuration
to Declaration Type - Since statuses, particularly response statuses, may vary depending on the country and type of filing, you can link your Request Status Group Profile and Response Status Group Profile to your declaration type.
- A logic configuration can be specified for a declaration type. This enables you to have a direct connection between a declaration type and a logic configuration. For example, your grouping and aggregation constraint sets, data configuration, and data assignment rules may vary depending on the country and type of filing. Having the logic configuration on the declaration type enables you to ensure that proper rules are being followed when creating declarations. The logic configuration specified on the declaration type is the default logic configuration. However, if you are manually triggering using the Create Declaration action on the Trade Transaction, you can override the logic configuration on the declaration type.
Key Resources
- See the Declaration Management and Customs Filing TOI.
This feature provides new messaging capabilities designed explicitly to support filings with customs for an import, export, or in-transit transaction.
GTM provides a new generic customs connectivity architecture which will help you to collaborate with a filing agency or a broker to send customs data to a specific regime.
You can generate a declaration message for a declaration by using the Generate Declaration Message action on the declaration. The generated declaration message can then be transmitted to an external system by running the File Customs action against the generated declaration message. You can review the declaration messages (both sent and received messages for a declaration) by using the Review Declaration Messages smart link on the declaration.
GTM uses a combination of status codes and status groups on request and response declaration messages to provide you information about filing status of the corresponding declaration. You can update your declaration with required customs information provided on your declaration messages by running the Update Declaration action on the declaration message that contains the information you want to update your declaration with.
NOTE: GTM does not provide a pre-packed integration. However, the generic customs connectivity architecture will be used in integrations with third parties.
Customs Filing in the European Union (EU) has been an area of focus in this release. Several power data pages have been provided to add EU-specific information like declaration type, procedure and prior procedure, produced document, additional information, tariff preference, etc. and use it on a declaration while filing. GTM connects with Descartes’ Global Logistics Network (GLN) to send a declaration message request and receive a response. After receiving a filing request from GTM, GLN converts it into the format required by customs. Similarly, Descartes receives the response from customs and converts it into proper XML format before sending it to GTM.
Steps to Enable
- There are no steps required to enable this feature – however there will be integration work required to map the status codes and status groups on the request and response declaration messages so you that you can effectively provide and receive the information required to support regime-specific customs filing requirements.
Global Trade Intelligence (GTI)
Value Qualifiers Added to Support Estimated Landed Cost
This feature provides new facts that have been added to the transaction, trade transaction line, declaration, and declaration line analysis folders. These additional facts allow you to slice all existing dimensions with the newly introduced facts
The following 34 columns corresponding to value qualifiers have been added to each folder under cost section:
- Assist Freight Base
- Assist Value Base
- Bank Fee Base
- Brokerage Fee Base
- Buying Commission Base
- Charges Base
- Customs Value Base
- Domestic Inland Freight Base
- Dutiable International Freight Base
- Duty Base
- ELC Base
- Excise Tax Base
- FOB Value Base
- Foreign Inland Freight Base
- Handling Base
- HMF Base
- International Freight Base
- Insurance Base
- Invoice Value Base
- Interest Base
- Letter of Credit Base
- License Fee Base
- Loading Base
- Marketing Fee Base
- MPF Base
- Other Base
- Other Tax Base
- Packing Fee Base
- Price Per Unit Base
- Selling Commission Base
- Storage Fee Base
- Tax Base
- Unloading Base
- VAT Base
There are no steps necessary to enable this feature.
Rename "Customs Shipment" to "Declaration"
This feature updates all instances of "Custom Shipment" to "Declaration", and all instances of "Custom Shipment Line" to "Declaration Line".
These changes are reflected in the menu structure, labels, reports, and metadata.
Steps to Enable
There are no steps necessary to enable this feature.
Tips and Considerations
In areas such as logic and automation agents, the term 'GTM SHIPMENT' may still be used.
This feature provides new Metadata for certain XIDs which have been added. This enables you to create reports based not only on GID but also based on XID.
The following columns are added:
- User-defined Type XID to Trade Transaction Analysis, Trade Transaction Line Analysis, Declaration Analysis, Declaration Line Analysis, and Party Analysis folders
- Related Object XID to Trade Transaction Analysis and Declaration Analysis folders
- Item XID to Trade Transaction Line Analysis, Declaration Line Analysis, and Product Classification Analysis folders
- Product Classification Type XID to Trade Transaction Line Analysis, Declaration Line Analysis, Item Analysis, and Product Classification Analysis folders
- Commodity XID to Item Analysis folder
- User-defined Commodity XID to Item Analysis folder
- Country of Origin XID to Item Analysis folder
- Country of Manufacture XID to Item Analysis folder
- Party XID to Party Analysis and Restricted Party Screening Analysis folders
- Restricted Party XID to Restricted Party Screening Analysis folder
Steps to Enable
There are no steps necessary to enable this feature.
---

Copyright © 2017, Oracle and/or its affiliates. All rights reserved.
This document is provided for information purposes only, and the contents hereof are subject to change without notice. This document is not warranted to be error-free, nor subject to any other warranties or conditions, whether expressed orally or implied in law, including implied warranties and conditions of merchantability or fitness for a particular purpose. We specifically disclaim any liability with respect to this document, and no contractual obligations are formed either directly or indirectly by this document. This document may not be reproduced or transmitted in any form or by any means, electronic or mechanical, for any purpose, without our prior written permission.
Oracle and Java are registered trademarks of Oracle and/or its affiliates. Other names may be trademarks of their respective owners.
Intel and Intel Xeon are trademarks or registered trademarks of Intel Corporation. All SPARC trademarks are used under license and are trademarks or registered trademarks of SPARC International, Inc. AMD, Opteron, the AMD logo, and the AMD Opteron logo are trademarks or registered trademarks of Advanced Micro Devices. UNIX is a registered trademark of The Open Group.