

This document will continue to evolve as existing sections change and new information is added. All updates appear in the following table:
| Date |
What's Changed |
Notes |
|---|---|---|
| 17 NOV 2017 |
Updated document. Revised feature description. |
|
| 30 SEP 2017 |
Updated document. Added new feature. |
|
| 14 AUG 2017 |
Created initial document. |
This guide outlines the information you need to know about new or improved functionality in Oracle Field Service Cloud, August 2017 Release. Each section includes a brief description of the feature, the steps you need to take to enable or begin using the feature, any tips or considerations that you should keep in mind, and the resources available to help you.
For a listing of browsers supported by Oracle Field Service Cloud, log in to our support site and access Answer ID 8215.
We welcome your comments and suggestions to improve the content. Please send us your feedback at http://documentation.custhelp.com/ci/documents/detail/5/4/12.
The table below offers a quick view of the actions required to enable each of the August 2017 (17.8) features for customers upgrading from the February 2017 (17.2) release. If you are upgrading from a prior release, additional actions may be required in order to enable the new features or functionality. For more information about the feature upgrade or the actions required, see the section of the document as indicated in the Feature column.
Some of the new August 2017 Release features are automatically available to users after the upgrade and some require action from the user, the company administrator, or Oracle.
The table below offers a quick view of the actions required to enable each of the August 2017 Release features.
| Action Required to Enable Feature |
||||
|---|---|---|---|---|
| Feature |
Automatically Available |
End User Action Required |
Administrator Action Required |
Oracle Service Request Required |
| Administration |
||||
|
|
||||
|
|
||||
|
|
|
|||
|
|
||||
|
|
||||
| Enhancement: Statistics Control on Resource Type and Display Initial Ratio |
|
|||
| Enhancement: Visibility Configuration for Tabs and Sections in Visual Form Editor |
|
|||
|
|
||||
| Grouping for Visibility Conditions of Context Items and Values |
|
|||
|
|
||||
|
|
||||
| Capacity |
||||
|
|
||||
|
|
||||
| Daily Extract |
||||
| Embedding of BICS Reports/Dashboards Into Oracle Field Service Cloud |
|
|||
|
|
||||
| Manage |
||||
|
|
||||
| Manage and Mobility |
||||
|
|
||||
|
|
||||
| Mobility |
||||
|
|
||||
|
|
||||
| Parts Catalog |
||||
|
|
||||
| Plugin Framework |
||||
|
|
||||
| Routing |
||||
|
|
||||
|
|
||||
|
|
||||
|
|
||||
| SmartLocation |
||||
|
|
||||
| API |
||||
|
|
||||
|
|
||||
|
|
||||

The following topics describe the new features in Oracle Field Service Cloud, August 2017 Release.
Previously, Google Maps and Oracle Maps were only supported. Currently, Baidu Maps is also supported.
Baidu Maps is available starting with the August 2017 (17.8) production release of Oracle Field Service Cloud. The following features are included:
- Address geocoding using Baidu
- Map presentation in Core Manage, Mobility, Quota, and Collaboration using Baidu Map tiles
STEPS TO ENABLE
The following steps are included:
- Baidu Maps and Geocoding are enabled and available if Baidu is part of your subscription.
- Users must manually set the Baidu Browser key and Server key after 'Baidu Maps support' is enabled.
- Baidu related fields on configuration screen are visible only when 'Baidu Maps support' is enabled. You can view this information in the About Product screen.
NOTE: Baidu Maps will be available for provisioning and use after the 17.8 Production upgrade is complete. Once Baidu Maps is provisioned, the current map service (Oracle Maps or Google Maps) will no longer be used or available for use.
Key resources
- Administering Oracle Field Service Cloud
- Baidu Geocoding API
The management of map layers has been enhanced. This feature lets you perform the following tasks:
- Manage visibility of custom map layers for different user types
- Manage shapes uploading via Core Manage Interface
- Provides URL and user credentials to remote host via UI (Basic authentication may be used to download shape file)
- Change shape fields to be displayed on hint on Map in Mobility
- Monitor population progress
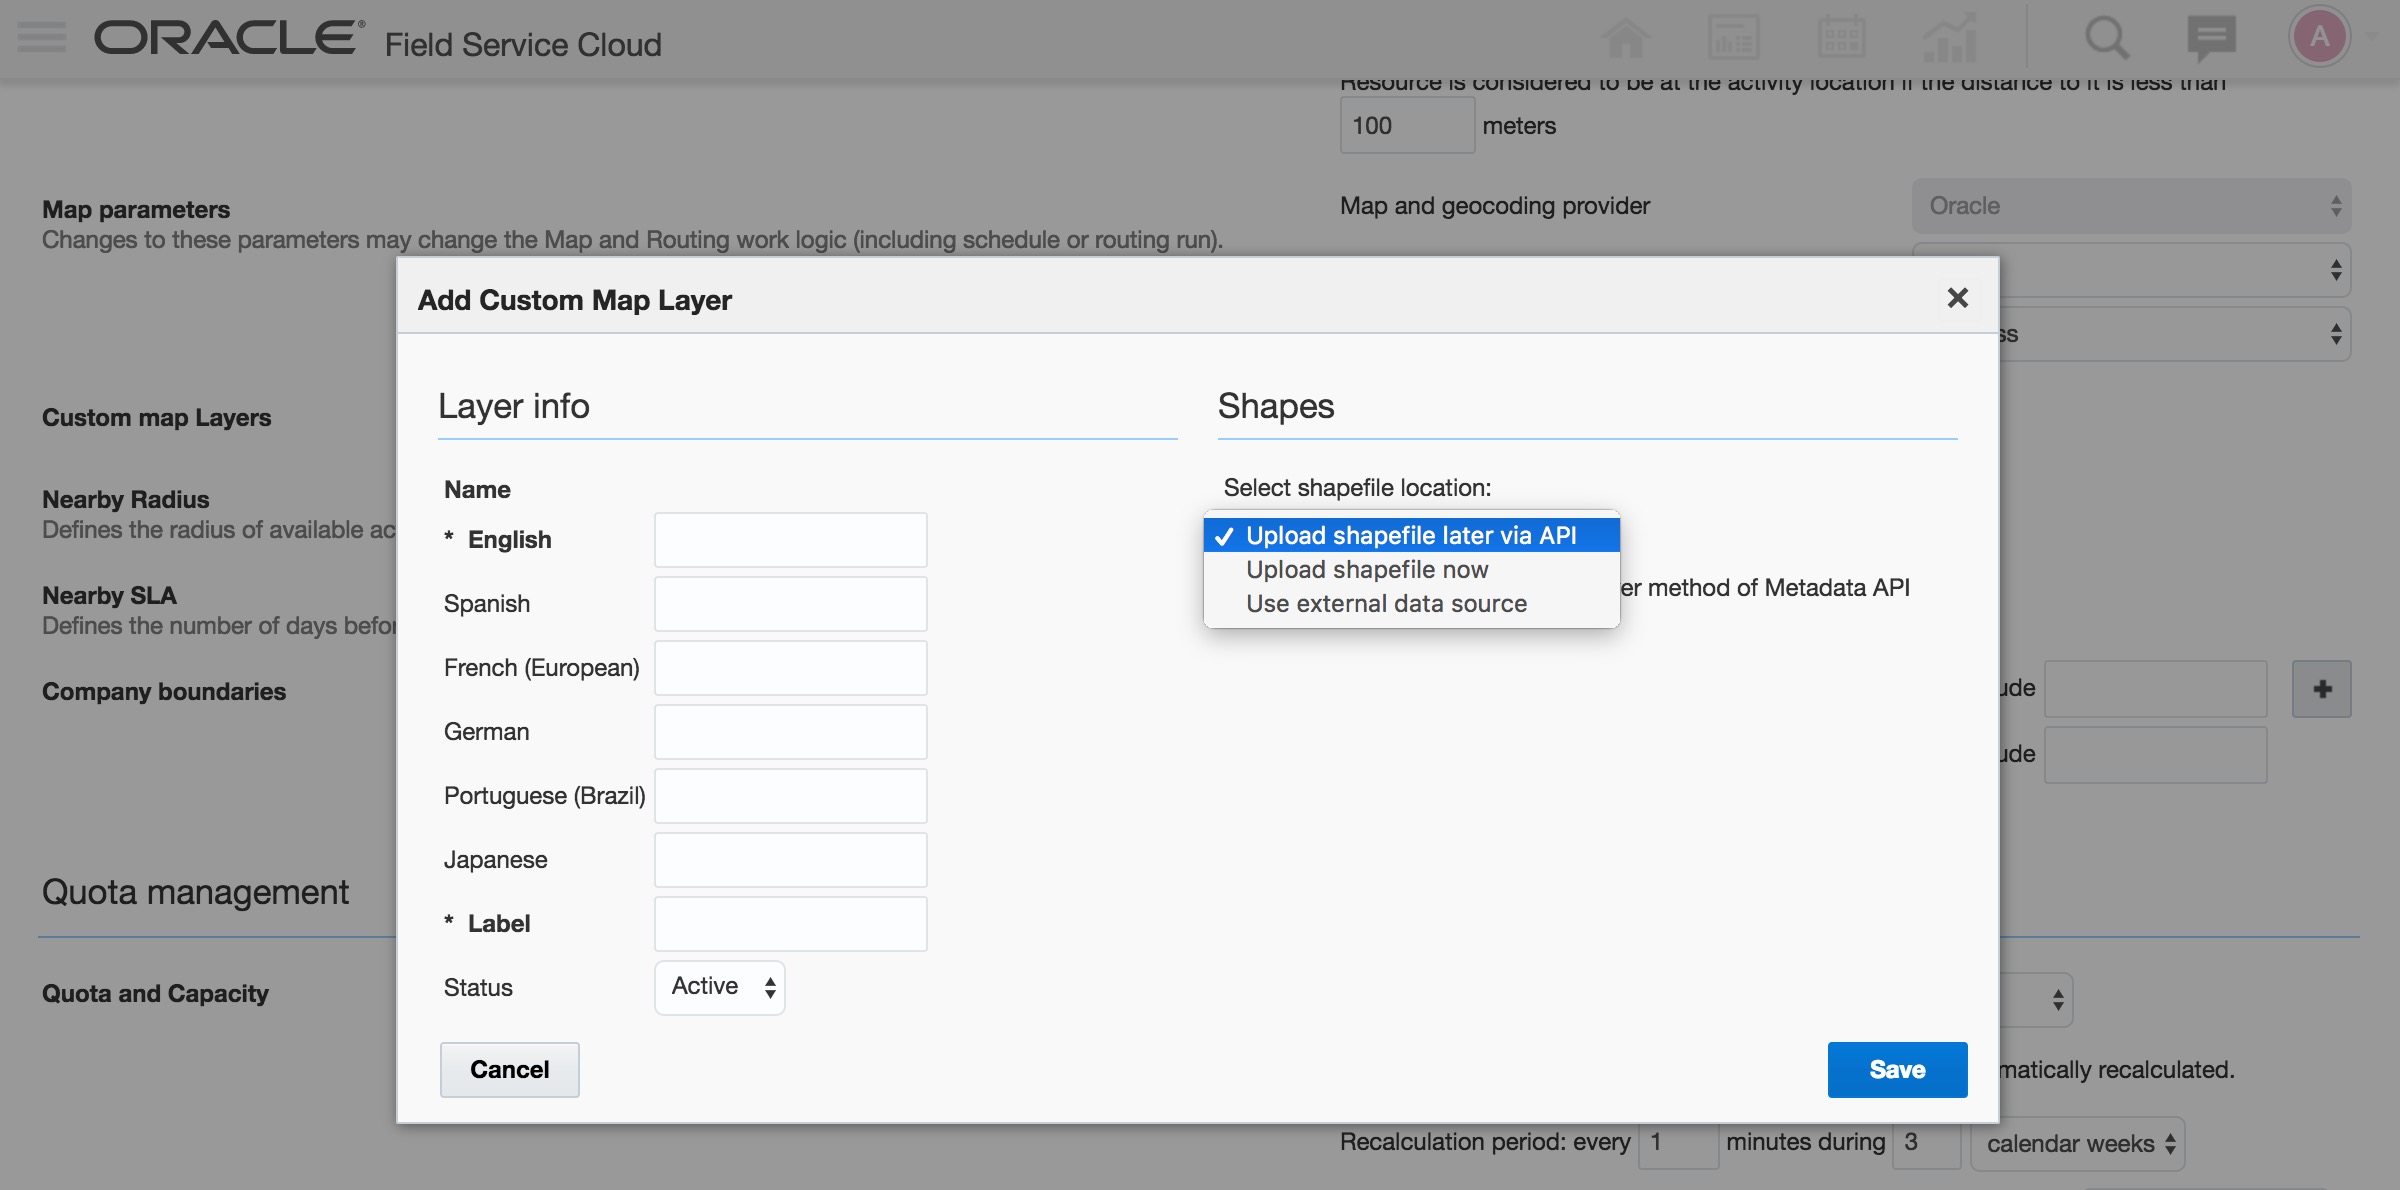
Add Custom Map Layer Dialog Showing the Select Shapefile Location Menu Options
STEPS TO ENABLE
ADD MAP LAYER TO ORACLE FIELD SERVICE CLOUD USING INTERNAL STORAGE
- Log into Core Manage and click Configuration.
- Click Business Rules to open the Business Rules screen.
- In the Custom Map Layers section, click Add layer.
- In the Add Custom Map Layer dialog, enter values in the Name and Label fields.
- In the Status field, select Active.
- In the Select shapefile location field, select Upload shape now from the drop-down list.
- Enter the URL to shape file, for example: https://www.example.com/shape_example; ftp://www.example.com/shape_example.
- Enter the Username and Password values if they are required to download file
- Enter the SRID value.
- Click Save to save the changes and exit the Business Rules screen.

Edit Custom Map Layer Dialog with Shapes Section Showing Internal Storage Options
You may wait till the shape is successfully populated.
Result: Layer is created in Oracle Field Service Cloud and the request is sent to populate layer. By default all user types are permitted to see this layer. Green tick icon is displayed in status column for this layer.
ADD MAP LAYER TO ORACLE FIELD SERVICE CLOUD VIA EXTERNAL STORAGE
- Click Business Rules to open the Business Rules screen.
- In the Custom Map Layers section, click Add layer.
- In the Add Custom Map Layer dialog, enter values in the Name and Label fields.
- In the Status field, select Active.
- In the Select shapefile location field, select Use external data source from the drop-down list.
- Enter the Mapviewer URL to shape file, for example: https://www.example.com/mapviewer/shape_example.
- Enter the Data Source and Theme values.
- Click Save to save the changes and exit the Business Rules screen.
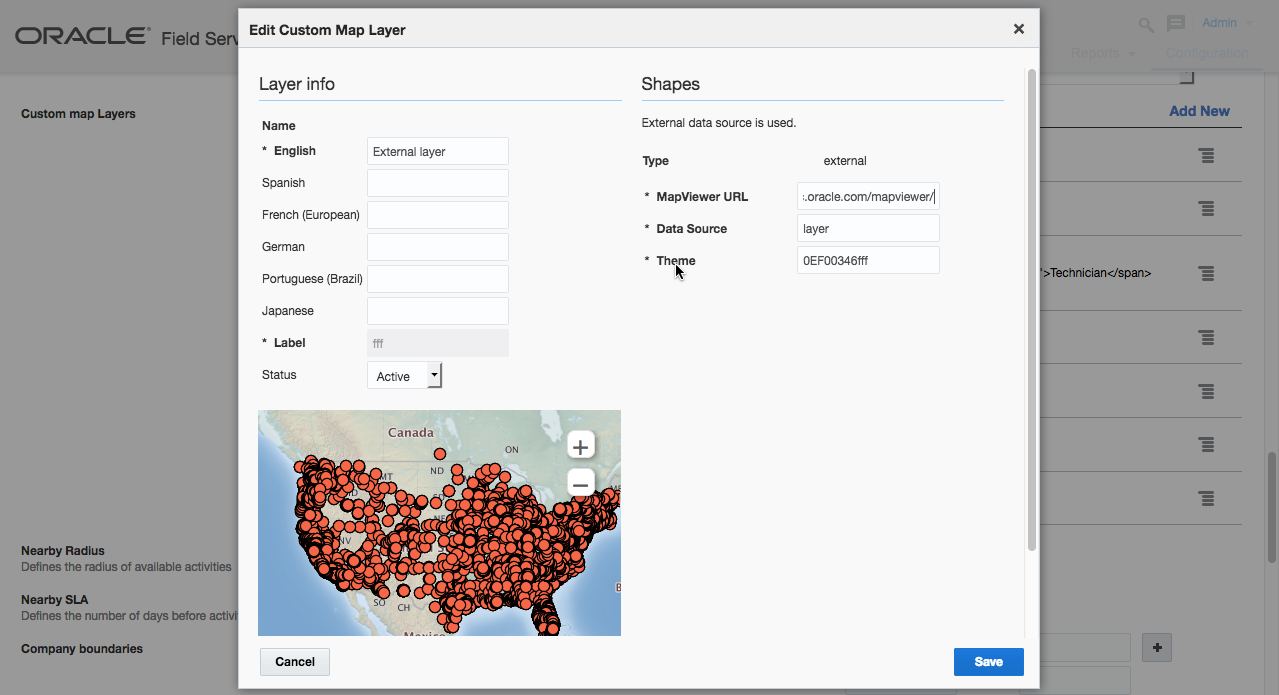
Edit Custom Map Layer Dialog with Shapes Section Showing External Storage Options
You may wait till the shape is successfully populated.
Result: Layer is created. By default all user types are permitted to see this layer.
MODIFY MAP LAYER
- Click Business Rules to open the Business Rules screen.
- Locate the Map layer you want to modify and select Modify from the drop-down menu.
- Make the changes.
- Click Save to save the changes and exit the Business Rules screen.
Result: Layer is removed from the list and Oracle Field Service Cloud. The shape remains in Oracle Field Service Cloud database.
MODIFY A MAP LAYER HINT
- Click Business Rules to open the Business Rules screen.
- Locate the Map layer you want to modify and select Modify from the drop-down menu.
- Enter the custom name of the column which you want to see on the hint. Enable the Visible on hint check box next to this column.
- Select Shape Title Column from available options.
- Click Save to save the changes and exit the Business Rules screen.
Result: Layer is removed from the list and Oracle Field Service Cloud. The shape remains in Oracle database.
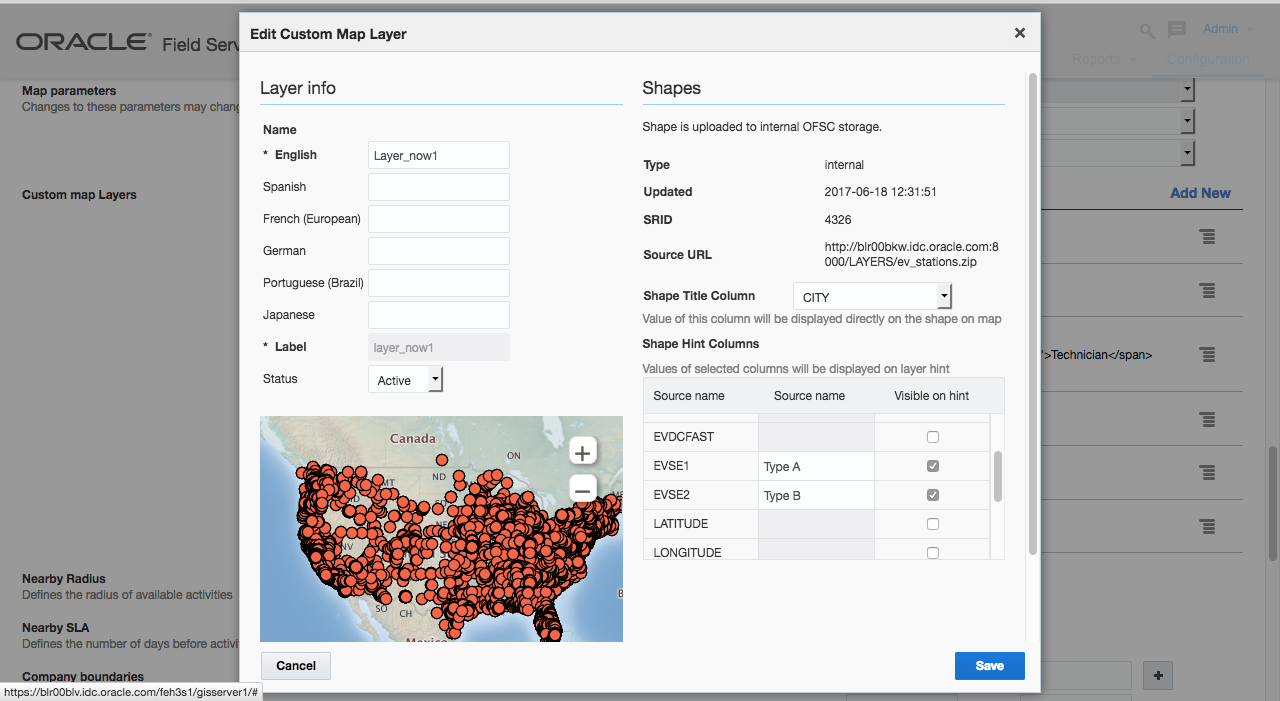
Edit Custom Map Layer Dialog Showing Map Hint Options
DELETE A MAP LAYER
- Click Business Rules to open the Business Rules screen.
- Locate the Map layer you want to delete and select Delete from the drop-down menu.
- Click Save to save the changes and exit the Business Rules screen.
Result: Layer is removed from the list and Oracle Field Service Cloud. The shape remains in Oracle database.
CONFIGURE A MAP LAYER FOR A USER TYPE
- Click Business Rules to open the Business Rules screen.
- Locate the Map layer you want to delete and select Permissions from the drop-down menu.
- Remove the user type from the list.
- Click Save to save the changes and exit the Business Rules screen.
- Log in to Mobility with a user assigned to that User Type.
- Select the Map tab and click Layer menu.
Result: The deleted map layer is not available in the Layer menu on Map
Key resources
Enhancement: Removal of Inactive Resources
Resources who have an inactive status for more than 12 months will be automatically removed from the system to improve performance and remove clutter from the resource tree. The following rules are applied:
- Resource Role = ‘Field Resource’, ‘Vehicle’ or ‘Tool’ will be deleted and removed if:
- resource has inactive status;
- resource was last updated more than 12 months ago. Update means:
- any field/property for resource was changed;
- resource calendars were changed;
- resource locations were changed;
- resource work zones were changed;
- resource inventories were changed;
- resource associated as Field Resource for some user;
- visibilities between users and this resource were changed.
- resource does not have activities in future days (non-scheduled activities, teamwork, and so on);
- resource is not used in visibility conditions in User types configuration (via ‘pid’ or ‘external_id’);
- resource is not used in blocking conditions of Message steps (via ‘external_id’);
- resource is not used in conditions of Filters (via ‘external_id’);
- resource does not have related user whom ‘uid’ is used in visibility conditions in User types configuration.
- Resource Role = ‘Bucket’ or ‘Organizational Unit’ will be deleted and removed if:
- resource has inactive status;
- resource was last updated more than N days ago
- any field/property for resource was changed;
- resource calendars were changed;
- resource work zones were changed;
- resource locations were changed;
- resource inventories were changed;
- resource time slots were changed;
- resource capacity categories were changed;
- resource routing profiles were changed;
- visibilities between users and this resource were changed.
- resource does not have any children, OR all children are subject of the removal rules;
- resource does not have activities in future days;
- resource is not used in visibility conditions in User types configuration (via ‘pid’ or ‘external_id’);
- resource is not used in blocking conditions of Message steps (via ‘external_id’);
- resource is not used in conditions of Filters (via ‘external_id’);
- resource does not have related user whom ‘uid’ is used in visibility conditions in User types configuration.
NOTE: Users related to deleted resources will also be deleted if they have no visibility on any other resource in resources tree.
The Main resource ID" relationship will also be updated based on the visibility in the resources tree.
- If the deleted resource was associated as Field Resource to some user but this user can see other resources, the main_resource_id field should be updated for this user but user will not be removed.
- If the deleted resource was associated as Field Resource to some user and this user is only related to this resource and the last login was more than 12 months ago, this user will be removed.
Key resources
Enhancement: Expression Validation and Support for Default Values and Validation Rules in Visual Form Editor
With August 2017 (17.8) release, changes have been made to the mobile activity and inventory screen configurations. It is now possible to configure fields and properties with default values and validation rules allowing companies to build screen configurations that ensure field resources are capturing the information to meet specific business needs.
This feature provides the following capabilities:
- Add default value for fields and properties.
- Add a validation rule for fields and properties.
- Use expressions for configuration of visibility and value visibility for fields and properties:
- A variety of expressions are now available including: variables/values, special operators (contains, in, between), arithmetic operators (+, -, *, /), comparison operators (=, <>, <, >, <=, >=), logical operators (or, and) and functions (if, now, empty, and concat). Set date and time of actions
- Date and time of performed actions might be automatically calculated to increase both compliance and transparency of daily work done by Technicians.
A default value is an auto-calculated value of field/property based on defined business rules and dependent on values of other fields and properties. A default value is represented as an expression filled into the corresponding configuration field. It is designed to simplify the user’s work by eliminating the necessity to enter values.
A validation rule is a restriction applied to some property or field that might be configured using values of other properties or fields, numbers or words, comparison, arithmetic or additional operators. It is designed to point out to a user that data entered was incorrect.
The configuration also allows validation error messages to be configured; it is now possible to notify users with a specific message if the validation fails.
Expressions provide a new extended way to configure visibility and value visibilities for fields and properties. It is designed to provide new configuration capabilities as well as simplify configuration by removing a need to create new properties used just as configuration elements to with conditions to show/hide other elements.
Visibility conditions can be entered as formula expression. Formula can also be used to configure the visibility settings of an item.
- In the Visibility section, add a new or open an existing visibility rule.
- Select the access mode for example Read-write.
- Configure the rule using the usual list mode or switch to the formula editor mode.
- After making changes, click the Save button to save the context layout.

Visibility Settings Dialog
PROCESSING RULES
- Default value rules – the default value is recalculated every time when dependent field is changed, where dependent fields are fields used in the formula of the rule.
- For Read-Only fields/properties:
- Default value is always recalculated and replaces value.
- Default value is submitted and saved, even if result of evaluation is empty string.
- For ReadWrite or Mandatory fields/properties:
- Default value is always calculated for empty fields/properties (taking in account value that was at the moment before rendering form)
- Default value is not calculated for not-empty fields/properties
- Default value stops calculated once it's manually changed on the open form
- Default value stops calculated once it's submitted with not-empty value\
- Default value is not calculated for fields/properties with pre-filled non-empty values defined on the Action links configuration screen
- Validation rules
- For Read-Only fields/properties:
- Are not applicable to R/O fields
- For ReadWrite or Mandatory fields/properties:
- Are used for ReadWrite fields/properties
- If a value of certain field/property does not match configured validation rule then the form can be submitted
- For Mandatory fields/properties
- Are applicable to Mandatory fields/properties
- If a value of certain field/property does not match configured validation rule then the form cannot be submitted
- For fields/properties where validation rules are not configured the 'NOT empty' rule is automatically applied (current logic)
- For fields/properties where validation rules are configured the system uses that rules on forms submission. I.e. if validation rule states that Mandatory field 'IS empty' then it will be submitted without value.
- Conflicts resolution
- If configured visibility rule contradicts with configured default value following logic applied:
- for ReadWrite fields/properties the form can be submitted and warning message configured in the Validation error message section is displayed
- for Mandatory fields/properties the form cannot be submitted and error message configured in the Validation error message section is displayed
- Visibility and value visibility
- Result of calculation will be converted to Boolean according Types conversion table.
SYNTAX
This section discusses the naming of entities:
- In order to relate custom properties and product fields to required entities following names should be used in expressions:
- activity–prefix for activity properties/fields. Example: activity.PROP_A1
- inventory–prefix for inventory properties/fields. Example: inventory.PROP_I1
- resource–prefix for resource properties/fields. Example: resource.PROP_R1
- user–prefix for user properties/fields. Example: user.PROP_U1
- request–prefix for service request properties/fields. Example: request.PROP_SR1
- Properties and fields should be used in expressions in the format where entity goes first with following label separated with the entity by dot. If label contains not "a-Z0-9_" symbols , it should be wrapped with ` symbol. Examples:
- activity.PROP_A1 = 25
- activity.PROP_A1 <> activity.PROP_A2
- inventory.`LABEL WITH SPACES`
OPERATORS
All operators are case sensitive and should be used in configuration as described in the "Language expression" section. For example:
- activity.PROP_A1 = 100 OR activity.PROP_A1 = 200–is correct
- activity.PROP_A1 = 100 or activity.PROP_A1 = 200–is incorrect
NUMBERS AND STRINGS
- String-type values should be used in expressions in double or single quotes as in:
- "string expression"
- "12345"
- 'single'
- Allowed string escape sequences:
- \' – To escape ‘ within single quoted string.
- \" – To escape “ within double quoted string.
- \\ – To escape the backslash.
- \n – To add line breaks between string.
- \t – To add tab space.
- Ignoring other escape sequences:
- \radasd => radasd
- \x123 => x123
- ...
- Integers should be used in expressions out of quotes. Like:
- 12345
- 6
- Float numbers should be used with dot as delimiter and without quotes. Like:
- 2.86954
FUNCTIONS
Functions should be used in expressions in the format where the name of the function is provided first followed by the expression in brackets. Arguments must be separated by comma. All functions are case-sensitive and should be used in configuration as described in the "Language expression" section. Examples include:
- toNumber("string expression")
- if(activity.PROP_A1 > 10, 15, activity.PROP_A2 + 200)
- toLowerCase(activity.PROP_A1)–is correct
- tolowercase(activity.PROP_A1)–is incorrect
This section discusses the list of functions to be used in detail:
- `if` function
- The function consists of three attributes separated by comma. The function represents the following logic: if attribute 1 is <some value> then set <some value> else set <other value>.
- Example: if (activity.PROP_A1 > 0,15, activity.PROP_A2+200)
- `now` function
- The 'now' function returns a local date/time as a string formatted according to the given format. Resource time zone is applied along with device time correction.
- The function can be set as now("format") where formats are DATE, DATETIME, TIMESTAMP. Value of the format should be placed in between double quotes same as for strings. Examples:
- DATE–now("yyyy/MM/dd")
- DATETIME–now("yyyy/MM/dd hh:mm:ss tt")
- TIME–now("HH:mm:ss")
- `toNumber` / `toString` functions
- The rules described above in the "Numbers and Strings" and "Properties and Fields" are applicable to that functions. Examples:
- toNumber("12345")
- toNumber(activity.PROP_A1)
- toString(1245)
- toString(activity.PROP_A2)
- 'concat' function
- The function can contain maximum 20 operands separated by comma and placed in between brackets. Examples:
- concat("abc", 15,"cde")
- concat(activity.PROP_A1,activity_PROP_A2)
- `toLowerCase` / `toUpperCase` functions
- The functions are used to convert strings to lower or upper case. The functions contain only one operand placed in brackets. Examples:
- toLowerCase("ABCD")
- toLowerCase(activity.PROP_A1)
- toUpperCase("abcd")
- toUpperCase(activity.PROP_A1)
- 'empty' function
- The function can be set with some field or property defined in brackets followed by the function. Examples:
- empty(activity.PROP_A1)
- if(empty(activity.PROP_A1),1000,activity.PROP_A2 +200)
- NOT empty(activity.PROP_A1)
- Activity Type groups:
- activity.awortype_group = "internal"
- activity.aworktype_group IN ('customer', 'maintenance')
The table provides the list of format characters in a local date/time function with description and examples for each format character.
| Format Character |
Description |
Example |
| D |
Day of the month, 2 digits |
1 to 31 |
| Dd |
Day of the month, 2 digits, with leading zeros |
01 to 31 |
| H |
24-hour format of an hour |
0 through 23 |
| H |
12-hour format of an hour |
1 through 12 |
| HH |
24-hour format of an hour, with leading zeros |
00 through 23 |
| Hh |
12-hour format of an hour, with leading zeros |
01 through 12 |
| M |
Numeric representation of a month |
1 through 12 |
| M |
Minutes |
0 to 59 |
| MM |
Numeric representation of a month, with leading zeros |
01 through 12 |
| Mm |
Minutes, with leading zeros |
00 to 59 |
| S |
Seconds |
0 through 59 |
| Ss |
Seconds, with leading zeros |
00 through 59 |
| T |
Short uppercase Ante meridiem and Post meridiem |
A or P |
| Tt |
Uppercase Ante meridiem and Post meridiem |
AM or PM |
| Yy |
A two digit representation of a year, with leading zeros |
17 |
| Yyyy |
A full numeric representation of a year, 4 digits |
2017 |
| Z |
The timezone offset |
+0 to ±11 |
| Zz |
The timezone offset, with a leading zero |
+00 to ±11 |
| Zzz |
The full timezone offset, with a leading zero |
+00:00 to ±11:30 |
It is possible to configure a group of activity types in default value and validation rules for visibility fields/properties. It should be configured in the following format:
activity.awortype_group = "LABEL"
where value defining a label of activity type group goes in double or single quotes. For example:
CALCULATION RULES
- Priorities (highest to lowest)
- Value (Number, String, variable, function, expressing in round brackets)
- Special operators (BETWEEN, IN, CONTAINS)
- Unary operators (NOT, -)
- Multiplicative operators (*, /)
- Additive operators (+, -)
- Comparison operators (=, <>, <, >, <=, >=)
- Logical operator AND
- Logical operator OR
Result of configured expression is calculated against following priorities:
| Lemma |
Description |
Use patterns |
Usage in |
||
|---|---|---|---|---|---|
| Default rules |
Validation rules |
Visibility |
|||
| Variables, entities & properties |
|||||
| This |
Value of current element |
this > 100 |
- |
+ |
- |
| entity.property |
Value of property of entity. |
activity.aworktype = 1 |
+ |
+ |
+ |
| White spaces and comments |
Assuming multiple white spaces as single space. Assuming white space as separator. |
this + 100 |
+ |
+ |
+ |
| [space], [tab], [line break] |
Assuming comment block as single white space. |
activity.PROP_A1 > 77 |
+ |
+ |
+ |
| /* Any comment */ |
|||||
| Logical operators (case sensitive, operands will be converted to Boolean) |
Logical disjunction |
a OR b |
+ |
+ |
+ |
| OR |
Logical conjunction |
a AND b |
+ |
+ |
+ |
| AND |
|||||
| Unary operators |
Logical not |
NOT (a AND b) |
+ |
+ |
+ |
| NOT |
Arithmetic inversion |
- activity.PROP_A1 |
+ |
+ |
+ |
| - |
|||||
| Equal Comparison Operators (case sensitive for Strings). Operands will be converted to String |
Equal to |
a = b |
+ |
+ |
+ |
| = |
Not equal |
a <> b |
+ |
+ |
+ |
| <> |
|||||
| Comparison Operators (case sensitive for Strings). Use toNumber() for arguments if number comparison is needed. |
Less than |
a < b |
+ |
+ |
+ |
| < |
Greater than |
a > b |
+ |
+ |
+ |
| > |
Less than or equal to |
a <= b |
+ |
+ |
+ |
| <= |
Greater than or equal to |
a >= b |
+ |
+ |
+ |
| >= |
|||||
| Arithmetic Operators (all operands will be converted to Number, any arithmetic operation with Infinity/NaN returns Infinity/NaN) |
Addition |
a + b |
+ |
+ |
+ |
| + |
Subtraction |
a – b |
+ |
+ |
+ |
| - |
Multiplication |
a * b |
+ |
+ |
+ |
| * |
Division |
a / b |
+ |
+ |
+ |
| / |
|||||
| Additional Operators (case sensitive) |
Return true if `string` contains `needle` |
this CONTAINS "A0" |
+ |
+ |
+ |
| string CONTAINS needle |
Returns true if `value` is equal to any `value1`...`valueN` |
this IN (1, 2, 3, 4) |
+ |
+ |
+ |
| value IN (value1[, value2, [, valueN]]) |
Returns true if `value` is equal to `min`, equal to `max` or between them. The same as: |
1 BETWEEN (0, 100) |
+ |
+ |
+ |
| value BETWEEN (min, max) |
|||||
| Functions (case sensitive) |
Function which returns value1argument if condition is true and value2 argument if condition is false |
if(activity.PROP_A1 > 0, 1, 0) |
+ |
- |
- |
| if(condition, value1, value2) |
Outputting current date in required format. |
now("yyyy-MM-dd HH:mm:ss") |
+ |
- |
- |
| now(string) |
Formatting object to required number format |
toNumber(activity.PROP_A1) |
+ |
+ |
+ |
| toNumber(value) |
Formatting object to string |
toString(activity.PROP_A1) |
+ |
+ |
+ |
| toString(value) |
Concatenate strings |
concat(this, "#", activity.PROP_A1) |
+ |
+ |
+ |
| concat(string1, string2 [... ,stringN]]) |
String to lower case |
toLowerCase(activity.PROP_A1) |
+ |
+ |
+ |
| toLowerCase(string) |
String to upper case |
toUpperCase(activity.PROP_A1) |
+ |
+ |
+ |
| toUpperCase(string) |
Returns true if `value` is undefined or empty string or NaN or Boolean, false in all other cases |
empty(activity.PROP_A1) |
+ |
+ |
+ |
| empty(value) |
|||||
LANGUAGE EXPRESSIONS
The language containing various operators and functions should be used for configuration of default values, validation rules and visibility of fields/properties. The language is described below.
TYPES CONVERSION
The table provides the list of format characters in a local date/time function with description and examples for each format character.
| Category |
Number |
String |
Boolean |
NaN |
Infinity |
Undefined |
| Boolean |
true →1 false→ 0 |
true →"true" false→ "" |
- |
- |
- |
- |
| Infinity |
→ Infinity |
→ "" |
→ false |
- |
- |
- |
| NaN |
→ NaN |
→ "" |
→ false |
- |
- |
- |
| Number |
- |
123 → "123" 1.5 => "1.5" |
1 → true 0 → true -10 → true |
- |
- |
- |
| String |
"" → 0 "1asda" → 0 "1.5" → 1.5 "2,3" → 0 |
- |
"" → false "anything" → true "0" → true "false" -> true |
- |
- |
- |
| Undefined |
→ 0 |
→ "" |
→ false |
- |
- |
- |
AVAILABILITY
- Screens:
- The functionality is available for Mobility only on 'Activity' and 'Inventory' configuration screens. The functionality can be accessible under the 'User types' menu item on the following list of screens: Edit/View activity, Cancel activity, Delay activity, End activity, End prework, Not done activity, Add activity, Start activity, Start prework, Suspend activity, Add/Details inventory, Deinstall inventory, Install inventory, Send/View activity request, Add/View inventory request, Add/View resource request, Edit Required Inventory
- Custom properties:
- The functionality of default values and validation rules is allowed ONLY for string, int and enum custom properties.
- Fields:
- The functionality of default values and validation rules is restricted to the following list of product fields (Name(label)): Account Number (customer_number), Activity Type (aworktype), Address (caddress), Appointment Number (appt_number), City (ccity), Customer Email (cemail), Customer Mobile Number (ccell), Customer Phone Number (cphone), Duration (length), Inventory Type (invtype), Name (cname), Points (apoints), Quantity (quantity), Serial Number (invsn), Service Request Type (srtype),State (cstate), Time Slot (time_slot), ZIP/Postal Code (czip)
- Constraints:
- The functionality of Default values and Validation rules is not supported for work skills or work zones.
- The functionality of Default values and Validation rules is not supported for custom properties with the 'Geolocation element' GUI.
- Following limitations are applied to configuration of expressions:
- 2000 characters for configuration of Default value
- 2000 characters for configuration of Validation rule
- 4950 characters for visibility configuration as expression
EXAMPLES
- SCENARIO 1: REPORT GAS CONSUMPTION
- Prerequisites: Let us assume that 'Predicted gas consumption', 'Real gas consumption', 'Difference', 'Counter is not broken' and 'Reporting notes' string-type properties are configured in the system. Also there is the 'Counter is not broken' integer properties having check box GUI
- Configuration: The expressions should be configured in the 'Default' field for the 'Difference' property. It should look like:
- activity.real_consumption-activity.predicted_consumption
- Visibility for 'Reporting notes' should be set as R/W with the same formula as condition:
- (activity.real_consumption-activity.predicted_consumption) >20 AND activity.counter_conditions=1
- SCENARIO 2: CHECKING RATIO
- Prerequisites: Let's assume that the Upstream Signal-to-Noise' property configured in the system:
- The 'Upstream Signal-to-Noise' property is configured on the 'Complete activity' screen as mandatory.
- Configuration: The expression should be configured in the 'Validation' field for the 'Upstream Signal-to-Noise' property. it should be follows:
- this BETWEEN (32,52)
- Custom error message should be configured in the corresponding field to be displayed to the tech in Mobility.
The activity contains information about gas consumption. There are three of them: predicted, real and removed. The 'predicted' amount of consumed gas is saved in the activity. When a Field Technician chooses to report real information about the consumed gas then the difference between 'real' and 'predicted' data should be calculated automatically.
If real consumption exceeds predicted consumption for more than 20 cubic meters and conditions of gas counter are good then the 'Reporting notes' property is displayed.
Field Technician has to enter the Upstream Signal-to-Noise ratio to complete an activity (it is mandatory). The range should not be seen and it has to be anywhere between +32 to 52dBmV. When the Field Technician enters a value of 55dBmV which is not in the range then the Field Technician should know that is not the range and has to try again. Field Technician measures again and enters that value 51dBmV which is in the range allowing to complete the activity.
Key resources
Enhancement: ICS Adapter Enhancements
In August 2017 (17.8) release, the integration capabilities and APIs have been expanded to allow you to easily integrate with backend systems. In the ICS integration expansion, the integration layer now supports capacity (activityBookingOptions) in addition to adding Search Activities, User Events and Resource Inventory Events operations.
The Event API, part of Oracle Service Cloud’s Core API, allows subscriptions to events and receive notifications in near real-time.
Users can now do the following:
- Create/Update/Delete events of user and resource inventory
- Search for an activity using the 'Search Activity' operation
- Check if an activity can be booked using the 'Get Activity Booking Options' operation
- Add new customer properties in Oracle Field Service Cloud and use them in the ICS mapping screen by refreshing the metadata.
STEPS TO ENABLE
Open the Oracloe Field Service Cloud ICS Adapter and configure objects you want to use.
Key resources
Enhancement: Statistics Control on Resource Type and Display Initial Ratio
This enhancement includes a set of changes made to the Statistics Parameters section in the Configuration, Resource Type screen:
- The Use durations reported to enhance company-wide estimations check box and Do not consider reported data of the first _working days for statistic estimations field are also considered for Travel statistics.
- Both Use durations reported to enhance company-wide estimations check box and Do not consider reported data of the first _working days for statistic estimations field are not dependent on the Personalize the estimation of activity duration check box.
- The Do not consider reported data of the first _working days for statistic estimations field is enabled only after you select the Use durations reported to enhance company-wide estimations check box.
- The text for the Use durations reported to enhance company-wide estimations check box is changed to Use data reported to enhance company-wide estimations.
- The Aggregate method is removed from the Work Statistics report.
- The Initial Ratio for Activity Duration field in the Resource Info screen is displayed as read-only even after modification and the value is rounded to the nearest natural number.
STEPS TO ENABLE
No steps are required to enable this feature.
Key resources
Enhancement: Visibility Configuration for Tabs and Sections in Visual Form Editor
In previous releases, it was possible to configure Tab and Section visibilities for Mobility but the configurations were not applied. With the August 2017 (17.8) release, the Tab and Section visibility configurations in Mobility will be applied.
To maintain backwards compatibility for existing Tabs and Sections visibilities, configurations will be substituted with a default unconditional visibility.
STEPS TO ENABLE
No steps are required to enable this feature.
Key resources
File Properties Configuration Improvement
Earlier, when you tried to create or modify a File type of property, the Add New Property and Modify Property dialogs displayed four options—File element, Signature element, Image element, and Capture image element. Now the Image element and Capture image element options are merged into one option—Image element. This means that the ability to capture an image using the device is now available with the Image element option. As a result, the MIME type configuration settings are removed. The default image size is increased to 1000 x 1000 pixels.
On the same screen, the option to configure custom file types—File element—now includes the mandatory field File size limit. Specify the maximum size of the file that can be uploaded. When upgraded from a previous version, the existing file properties will be set to 5 MB. Further, existing files stored in the properties are not affected in any way.
Metadata API. Property related functions remain fully backward compatible. This feature includes the following changes:
- A new optional field 'fileSizeLimit' is added to the property schema. The default value of 5MB is used if not specified in the request.
- Create/replace property (PUT): When a property of type 'file' with GUI type 'file element', is created, the default value of file size 5MB is used. (For the replace function, the size is changed to the default value if the value is not specified in the request.)
- MIME type is not required for the Image GUI, it is ignored when it is sent and it is not returned for this GUI type.
STEPS TO ENABLE
No steps are required to enable this feature.
Key resources
Grouping for Visibility Conditions of Context Items and Values
This feature has enhanced the display of context items and values in the Visual Form Editor. Visibility settings for property values are shown as groups, providing a better display of complex layout configurations.
The following image depicts the differences on how the values with identical visibility settings were stored separately creating long lists that were difficult to manage.
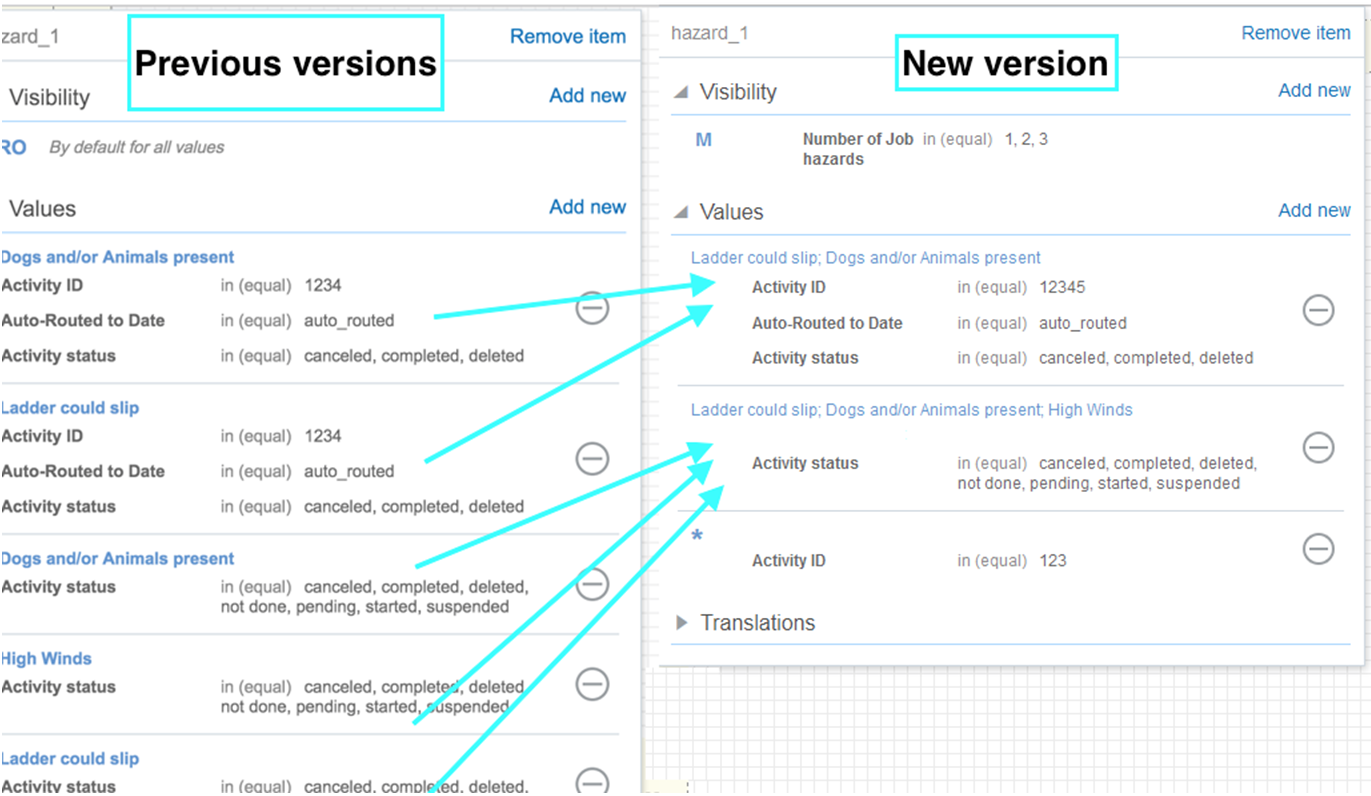
Grouping of Visibility settings
For example if a user wants to modify an existing set of values, clicking the row with the values will open the Properties dialog. The user may enable or disable the check boxes for these values.
If the user wants to add new values, clicking the ‘Add new’ link opens the dialog. The user can enable or disable the check boxes for the values and configure all the conditions again. A new group will appear in the list showing the result of the user’s recent action and it will be retained until the layout is saved. Once saved, all values with identical conditions will be grouped together.
No steps are required to enable this feature.
Key resources
Message Scenarios now include the ability to delivery notifications using Collaboration. Messages can automatically be delivered to defined users, user groups and help desks based on message scenario-conditions.
The following changes have been made to the Message Scenario module:
- Collaboration has been added as a delivery channel in the scenario step.
- Using collaboration as a delivery channel, you can send alerts of different types of events or situations in Oracle Field Service Cloud to Collaboration users (for example, technicians, help desk operators, and resources). Also, you can broadcast notifications or alerts to collaboration user groups or help desk groups on occurrence of an event or when a predefined condition is met in Oracle Field Service Cloud.
- Once selected, collaboration as a delivery channel, user will have the option to select the recipient as a:
- Resource: Resource associated with the launch condition defined in the message scenario. When selecting a resource as the recipient Oracle Field Service Cloud will deliver message to the resource associated with the launch condition.
- Static address: Any Collaboration user, users in a user group or operators of a help desk group. When selecting static address as the recipient message will be delivered to collaboration user / user group / help desk group based on user selection.
- Language & Time zone option
- Resource: system will use the Language and Time Zone of the user associated with the resource
- Static address: system will deliver message to each recipient according to the recipient user's language. Customer have option to configure the content in company specific languages, user should make sure content in recipient language is configured properly in patterns tab.
- Message Status
- Message scenario with collaboration channel will support the following status–New, False method, Obsolete, Sent & Failed.
- Collaboration Alert Message
- All these alerts from message scenario will come as a collaboration notification in collaboration window with below properties.
- All alerts from message scenario will be grouped under the same collaboration window–System message.
- Chats in collaboration window will present the Subject & Body content configured in message scenario. If no content is configured, a blank chat message will delivered the recipient.
- User will have only option to view these alerts there is no option available to reply this message.
- User will have option to leave message in case they want to remove this from collaboration active chat list. Once leaved these messages will be available in chat history.
- Setting Tab improvements
- Components from the Message Parameters section are moved to the Step Info section.
- Notification Time section has been moved to the right-hand side of the screen.
- Number of attempts on ‘failed’ status and Number of attempts on 'sent' status fields are moved to the Notification Time section.
- If Collaboration is selected as a delivery channel, you can either select Recipient or Use Static Address. Using the Use Static Address option, you can either select a user, a user group, or a help desk group.
- Changes in Events API
- Messages triggered from a message scenario are included in the Events API for collaboration events. The chatMessageSent and chatUpdated events have been modified. The key changes are:
- New field Application in chatMessageSent–This field is to represent that the chat is triggered from an internal or external applications
- Text will have both the message subject and body separated by a space delimiter.
- Details of chatMessageSent are as follows:
- eventType–Type of the event (string), value is: "chatMessageSent"
- application–This field is present only when the chat is triggered from an internal or external application (string). For example When the message is triggered from message scenario, this value will be 'message_scenario'
- time–Time of the event in UTC time zone (string). Format is "YYYY-MM-DD HH:MM:SS"
- user–Login of the user who triggered this event (string).This will not be applicable for chats triggered by message scenario
- chat–This record contains the chat/broadcast related key fields.
The fields are as follows: - chatId–Id of the chat/broadcast (string). This is the unique id for each chat/broadcast in the collaboration server.
- startedBy–Login of the user who started the chat/broadcast (string). This will not be applicable for chats triggered by message scenario
- startedTime–Time when the chat/broadcast was started in UTC time zone (string). Format is "YYYY-MM-DD HH:MM:SS"
- helpdeskName–Name of the helpdesk (string). (This field is present only for helpdesk chats)
- type–Type of broadcast (string). Values are "group-broadcast", "location-broadcast" and "activity-broadcast". (This field is present only for broadcasts)
- expireTime – Time when the broadcast will expire (string). Format is "YYYY-MM-DD HH:MM:SS". (This field is present only for broadcasts). Value is absent for broadcasts without expiry
- messsage–This record contains the message related key fields. The fields are:
- messageId–The Id of this message in the collaboration server (long)
- sequenceNumber–The sequence number of the message in this chat/broadcast (long)
- text–The text content of the message (string). In case of a message scenario the text will be reflected with subject and body of the message configured in the message scenario. There will be a space delimiter between Subject and body.
- needAcknowledgement field showing if acknowledgement is enabled for this message (Boolean). This field is present only for broadcasts. Absent for messages without acknowledgement option.
- attachment – This record contains the attachment related key fields. (This field will not be present if there is no attachment)
- transaction –This record contains the transaction related key fields. (This field will not be present if there is no transaction)
- participants–This record contains details of the participants in the chat/broadcast (This field is present only when the message is the first message of a chat/broadcast). Each participant is represented using the following fields
- name–Name of the participant (string)
- login–User login of the participant (string)
- invitedBy–User login of the user who invited this participant to chat (string). This will not be applicable for chats triggered by message scenario.
- invitedTime–Time when this participant was invited to chat (string). Format is "YYYY-MM-DD HH:MM:SS"
- Details of chatUpdated are as follows:
- eventType–Type of event (string), value is: "chatUpdated"
- time–Time of event in UTC time zone (string). Format is "YYYY-MM-DD HH:MM:SS"
- user–Login of the user who triggered this event (string)
- chat– This record contains the chat/broadcast related key fields. The fields are:
- chatId–Id of the chat/broadcast (integer). This is the unique id for each chat/broadcast in the collaboration server.
- startedBy–Login of the user who started the chat/broadcast (string). This will not be applicable for chats triggered by message scenario
- startedTime–Time when the chat/broadcast was started in UTC time zone (string). Format is "YYYY-MM-DD HH:MM:SS"
- helpdeskName–Name of the helpdesk (string). (This field is present only for helpdesk chats)
- endedTime–Time when the chat/broadcast was ended in UTC time zone (string). Format is "YYYY-MM-DD HH:MM:SS" (This field is absent if chat is not ended)
- type–Type of broadcast (string). Values are "group-broadcast", "location-broadcast" and "activity-broadcast". (This field is present only for broadcasts)
- expireTime–Time when the broadcast will expire (string). Format is "YYYY-MM-DD HH:MM:SS". (This field is present only for broadcasts). Value is absent for broadcasts without expiry
- participant–This record contains details of the participant whose fields were changed. (absent if no participant related data was changed) The fields are:
- name–Name of the participant (string)
- login–User login of the participant (string)
- invitedBy–User login of the user who invited this participant to chat/broadcast (string). This will not be applicable for chats triggered by message scenario
- invitedTime–Time when this participant was invited to chat/broadcast (string). Format is "YYYY-MM-DD HH:MM:SS"
- leftTime–Time when this user left chat/broadcast (string). Format is "YYYY-MM-DD HH:MM:SS" (absent if participant has not left the conversation)
NOTE: If a resource does not have permission to Collaboration, the message will not be delivered to the user, message scenario will return a status "false method".
NOTE: User will be able to search user / user group / help desk names with minimum 3 letters here.
NOTE: Oracle Field Service Cloud will check the pattern tab and if content is available in recipients language this content will be delivered to the user. If the content for a recipient's language is not available the default language of the company will be chosen as the recipient's language and content in default language will be delivered as message. If the content for the default language is also not configured, English language will be considered as the recipient's language and content in English language will be delivered as message.
Steps to Enable
No steps are required to enable this feature.
Key resources
Three Field Login Screen Redesign
This new login portal page of the Oracle Field Service Cloud user interface now has an updated new look and feel for users using the three field page.
STEPS TO ENABLE
Navigate to the Oracle Field Service Cloud Login page. The login screen that requires three fields username, password, and instance name fields opens:
- Core Manage
- Mobility (wide screen)
- Mobility (narrow screen)
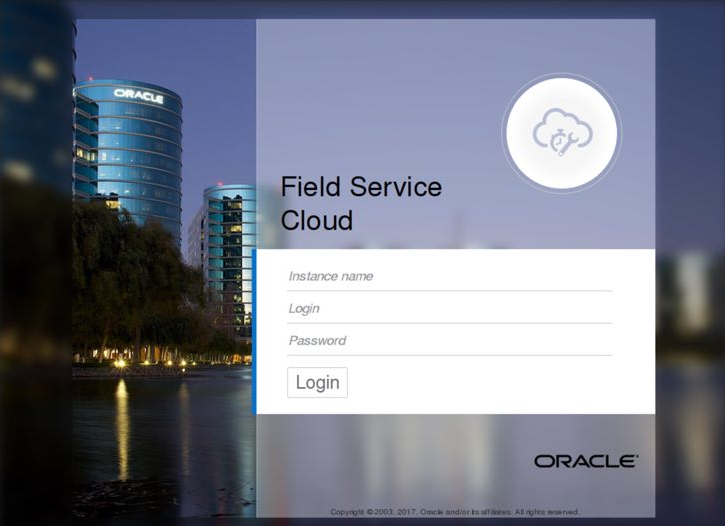
Login Screen for Core Manage

Login Screen (wide) for Mobility
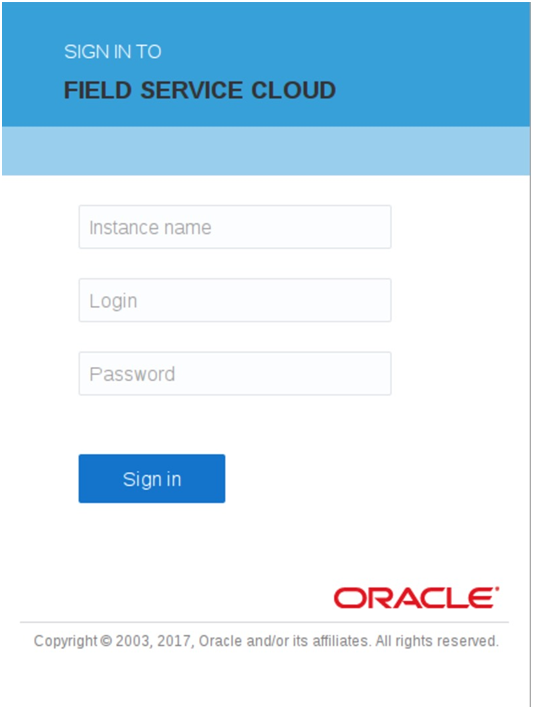
Login Screen (narrow) for Mobility
Key resources
Capacity Management–Booking Screen View
Currently, managing quota in Capacity management has been further improved thereby, providing a way to effectively and efficiently manage quota relative to the available capacity. This feature includes the following:
- In Quota screens and filters, time-slots and Capacity categories are sorted by order first followed by natural sorting
- Quota page showing availability-based quota and support for new booking for old quota
- Improved booking status page
- Capacity by category report showing the expected duration in minutes and the quota (amount of work performed) for a specific work type and time slot.
Steps to Enable
To view the Capacity by category report, use the following steps.
- Click Dashboard to open the Dashboard.
- Select the Capacity by category chart from the Dashboard.
- Click the Options icon to display the options for the chart.
- Select the following Date options from the drop-down list:
- Selected Day– Reports for the day selected in the calendar
- Day before selected – Reports for the day before the day selected in the calendar
- Select the following Capacity category type from the drop-down list:
- Any Capacity Category– Average values for all work types will be calculated
- Specific Capacity Category– Values for any specific work type that applies to this Resource will be calculated
- In the Booking intervals field, select an option from the drop-down list.
- Optionally, select a time-slot option from the drop-down list in the Time slots field.
- All– Average values for all time slots will be calculated
- Specific time slot– Values for any specific time slot can be calculated
- Modify the following values, if necessary
- Major Capacity Usage
- Critical Capacity Usage
- The gauge is set up with 0 in the lower left quadrant.
- The hand of the gauge sweeps from left (0) to right as capacity is used, pointing to the current amount of capacity that has been consumed.
- The higher value is determined automatically by multiplying Capacity and 1.3 shown in the lower right quadrant.
- The space between capacity and the higher value represents the point at which the number of work orders for that work type has exceeded quota. If the hand moves into this area (as a result of those additional minutes being consumed) the area will be highlighted in red. Apart from differentiating the capacity change in colors, you can also view the capacity value as text.
- The minute hand in the Capacity by category report changes with higher capacity. The GPS Data Fields field is no longer available in the Daily Extract Configuration screen
The title bar of the chart displays a set of icons.
NOTE: Time slot based data is available only when the time based quota setting is already enabled in the Quota Configuration screen.
This figure shows the Capacity by category report that appears as a gauge.
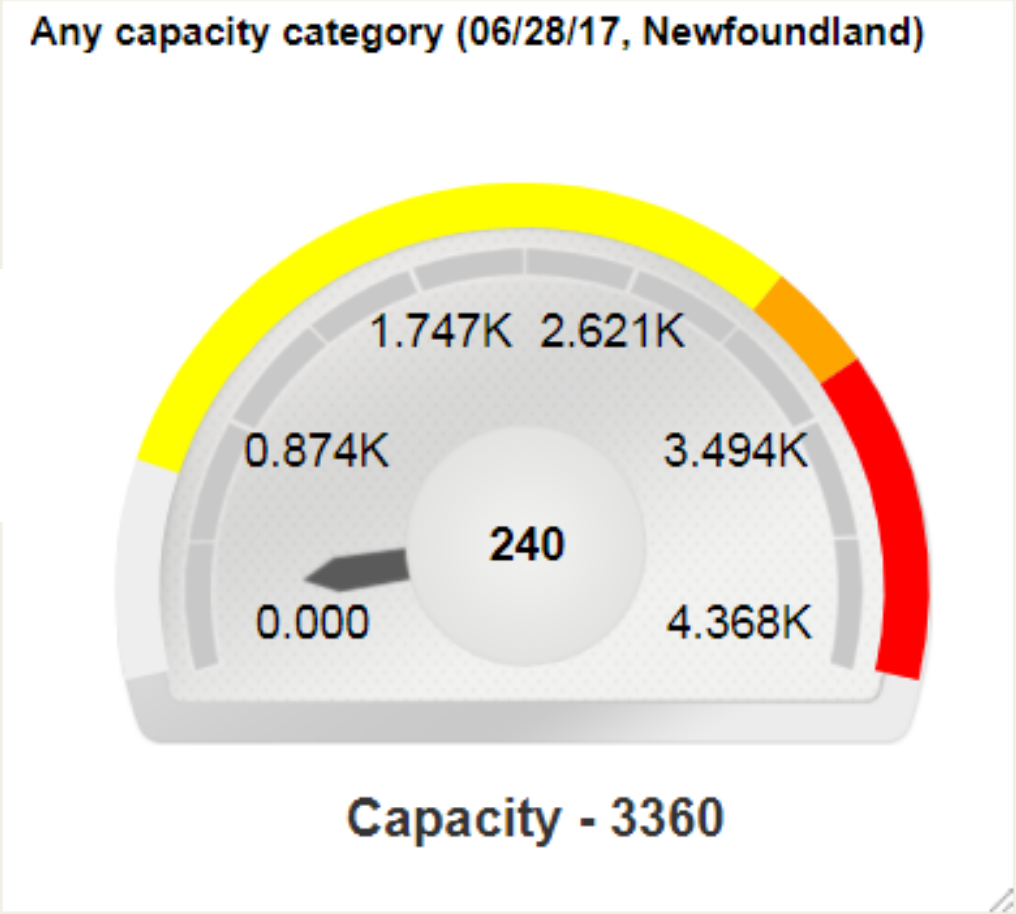
Capacity by Category Report
The gauge shows in minutes the anticipated total activity duration (based on work orders) and the amount of quota assigned for each specific time slot and work type:
Key Resources
The following REST methods have been added to more effectively and efficiently access and manage quota and capacity-related data via an API:
- GET /rest/ofscCapacity/v1/capacity/
The purpose of this operation is to return the maximum capacity available according to working calendars and capacity that is expected to be currently available. It allows: - extracting data from the "day" and "capacity category" levels using a single call
- defining fields to be returned for each of these levels
- extracting data for multiple areas (separately or aggregated)
- extracting data for multiple days
- GET /rest/ofscCapacity/v1/quota/
- The purpose of this operation is to update the booking quota.
- PATCH /rest/ofscCapacity/v1/quota/
- This operation will update the booking quota.
- GET /rest/ofscCapacity/v1/bookingStatuses/
- This operation will get the booking statues for one or multiple capacity areas and dates with a single request.
- PATCH /rest/ofscCapacity/v1/bookingStatuses/
- This operation will close/open booking for one or multiple capacity areas and dates with a single request.
- GET /rest/ofscCapacity/v1/bookingClosingSchedule/
- This operation will retrieve a booking closing schedule for one or multiple capacity areas.
- PATCH /rest/ofscCapacity/v1/bookingClosingSchedule/
- This operation will update a booking closing schedule for one or multiple capacity areas.
NOTE: The NULL and 0 values of quota are handled differently - NULL indicates no restriction while 0 indicates no booking allowed. Therefore it is necessary to explicitly pass the NULL value when it is required to clear a particular quota value.
The following metadata REST methods have been added:
- GET rest/ofscMetadata/v1/capacityCategories
- This operation will retrieve a capacity category.
- GET rest/ofscMetadata/v1/capacityCategories/{label}
- This operation will retrieve a capacity category that has a particular label.
- PUT rest/ofscMetadata/v1/capacityCategories/{label}
- This operation will update a capacity category that has a particular label.
- DELETE rest/ofscMetadata/v1/capacityCategories/{label}
- This operation will delete a capacity category that has a particular label.
The following REST methods have been added to an ofscMetadata node in order to access capacity areas-related data via API:
- GET /rest/ofscMetadata/v1/capacityAreas/CAPACITY REST API ADDITIONS
- This function returns all the data required to show a tree/list of capacity areas and implement the navigation. This function also returns all the attributes of a given capacity area or a group.
Here are some examples of REST method requests and what they return:
- GET /rest/ofscMetadata/v1/capacityAreas/
- Selects all known capacity areas and groups
- Returns default fields
- Returns links
- GET /rest/ofscMetadata/v1/capacityAreas/? expand=all&links=none
- Selects all known capacity areas and groups
- Returns default fields
- Expands all dependencies and returns default fields
- Suppresses returning of links
- GET/rest/ofscMetadata/v1/capacityAreas/?fields=category.name,category.status&activeOnly=true&expand=all&links=none
- Selects all known active capacity areas and groups
- Returns name and status of the categories
- Expands all dependencies and returns default fields
- Suppresses returning of links
- GET /rest/ofscMetadata/v1/capacityAreas/120344/
- Selects only one area or group (that has label = 120344)
- Returns default fields
- Returns links
- GET/rest/ofscMetadata/v1/capacityAreas/area1/?fields=name, parent.name,categories,category.status &expand=all&links=none
- Selects only one area or group (that has label = "area1")
- Returns particular fields
- Expands all dependencies
- Suppresses returning of links
Key Resources
Embedding of Oracle Business Intelligence Cloud Services (BICS) Reports/Dashboards Into Oracle Field Service Cloud
The August 2017 (17.8) enables Oracle Business Intelligence Cloud reports, visualizations, and dashboards to be embedded into Oracle Field Service Cloud. With this capability, users need not navigate between applications to access data; they can use Oracle Field Service Cloud as the single location to view complex reports used to achieve additional insight into the operation. Embedding also helps share content and data among Oracle Field Service Cloud and BICS.
NOTE: Requires a subscription to Oracle Business Intelligence Cloud.
Users can add any parameter values to the reports/dashboards embedded into Oracle Field Service Cloud. The reports / dashboards will be refreshed based on these parameter values.
Reports can be embedded by following three simple steps:
- Whitelist the Oracle Field Service Cloud domain in Business Intelligence Cloud ServiceS.
- Find the Business Intelligence Cloud Services URL of the object you want to embed.
- Sign in to Oracle Field Service Cloud. Embed the Oracle Business Intelligence Cloud Service content inside action link and use the copied URL.
STEPS TO ENABLE
To embed Oracle Business Intelligence Cloud report into Oracle Field Service Cloud:
- In Oracle Business Intelligence Cloud Service, add the domain name associated with Oracle Field Service Cloud to the Allow embedding in whitelist for Oracle Business Intelligence Cloud Service. For example adding *.etadirect.com in this field indicates that the access to etadirect.com specific content is approved.
- Get the Oracle Business Intelligence Cloud Service URL you want to embed:
- Open the Catalog screen.
- Open the Object (Analysis/ Dashboard/ Visual Analyzer)
- Copy the URL displayed in the new opened window.
- Log into Oracle Field Service Cloud and perform the following steps:
- Click Configuration in the Navigation Pane.
- In the Configuration screen, click Action Management.
- In the Action Management screen, click Add action link.
- In the Add action link window, complete the fields in the General tab to add the Oracle Business Intelligence Cloud Service dashboard link as an action link. For instructions on how to create an action link, see the Action Management section in Administering Oracle Field Service Cloud.
- Complete the following fields in Plug-in Details tab:
- TYPE—HTML5 application
- Use Plugin API—this value should be set as False
- URL—Your URL, for example: https://businessintellt-identity-domain.analytics.oraclecloud.com/analytics/saw.dll?Dashboard&PortalPath=%2Fcompany_shared%2FOFSCDEMO%2F_portal%2FOFSC%20Sample%20Dashboard
- Main menu items—True
- Tab or Iframe layout— True
- Click Configuration in the Navigation Pane and select User Types.
- In the User Types screen, click Screen Configuration.
- In the Action Management screen, click Add action link.
- Set the visibility to Read only for the appropriate user.
NOTE: Only administrators have the privilege to add safe domains to the whitelist. For information about safe domains, refer Whitelisting Safe Domains section in the Using Oracle Business Intelligence Cloud Service guide in the Oracle Business Intelligence Cloud Service documentation.
ADD PARAMETER VALUES
To add parameter values in embedded reports, users can create corresponding filter in BICS reports/dashboards. Use the following steps:
- Add resource tree parameters {pid} in the BICS URL:
- p0 represents the no of parameters included in the URL.
- p1 indicates the operators, for example eq.
- p2 stands for the column name in BICS
- p3 indicates the value of the attribute to be passed.
- Create a filter in the BICS report / dashboard with PID.
Add resource tree parameters {pid} in the BICS URL as follows: - https://businessintellt-identity-domain.analytics.oraclecloud.com/analytics/saw.dll?Go&Path=%2Fcompany_shared%2FOFSCDEMO%2F_portal%2FOFSC%20Sample%20Dashboard&p0=1&p1=eq&p2="provider"."pid"&p3="{pid}"
- https://businessintellt-identity-domain.analytics.oraclecloud.com/analytics/saw.dll?Dashboard&PortalPath=%2Fcompany_shared%2FOFSC-DEMO%2F_portal%2FOFSC%20DEMO%20Dashboard&Action=Navigate&P0=2&P1=eq&P2=PROVIDER.RESOURCE_ID&P3={pid}&P4=eq&P5=PROVIDER.PARENT_RESOURCE_ID&P6={pid}&options=mdr
- P0- No.of parameters to pass, in this case, two,
- P1- Operation btw first parameter set, "eq" stands for equal to
- P2- Column name in the format of table name column name, PROVIDER.RESOURCE_ID - for considering resource owned activity in reports
- P3- Value , the placeholder {pid}
- P4 - Operation btw Second parameter set,
- P5 - PROVIDER.PARENT_RESOURCE_ID - for aggregating child resources owned activities in reports
- P6- Value, the placeholder {pid}
- Configure SSO in both Oracle Field Service Cloud and Oracle Business Intelligence Cloud to avoid multiple login sessions.
NOTE: For displaying the dashboard for both parent and leaf nodes, the URI requires two PID placeholders.
To configure SSO in Oracle Field Service Cloud, use these steps
- Log into Oracle Field Service Cloud as an administrator–enter username and password.
- Click Configuration.
- Click Login Policies.
- Click Add New button.
- Complete the following fields:
- In the Authenticate using field, enter the SAML value.
- In the IdP Metadata XML field, enter the name of the Metadata file provided by IdP.
- In the label field, enter the unique identifier label. This will be used for the SSO login screen.
- In the OFSC Metadata XML field, download and update the SAML Idp metadata file.
- Enter the Policy name assigned to this policy.
- In the Specify SAML IdP field, enter the Upload metadata XML.
- Click Add.
NOTE: Ensure that the username in Oracle Field Service Cloud matches the username in Oracle Business Intelligence Cloud.
The Add Policy dialog is displayed. The values for SAML identity provider Encryption and Signing Certificates and SAML identity provider login/logout URLs are automatically populated from the Metadata xml.
To configure SSO in Oracle Business Intelligence Cloud, use these steps:
- Log onto Oracle Business Intelligence Cloud as an administrator–enter username and password.
- To enable SSO, Click SSO Configuration.
- Click Configure SSO.
- Select Import IP metadata option. Browse and select the same SSO file that was used for Oracle Field Service Cloud from SAML IDP Provider.
- In SSO protocol field, enter HTTP POST.
- In the User Identifier, custom attribute field, enter uid.
- Export Oracle Business Intelligence Cloud Service Provider metadata and update the SAML IDP provider in Oracle Field Service Cloud.
- Click Test and then select Start SSO.
- When you enter the administrator user name and password, you should see the message indicating a successful login session.
- Click Enable SSO.
NOTE: Ensure that the username in Oracle Field Service Cloud matches the username in Oracle Business Intelligence Cloud.
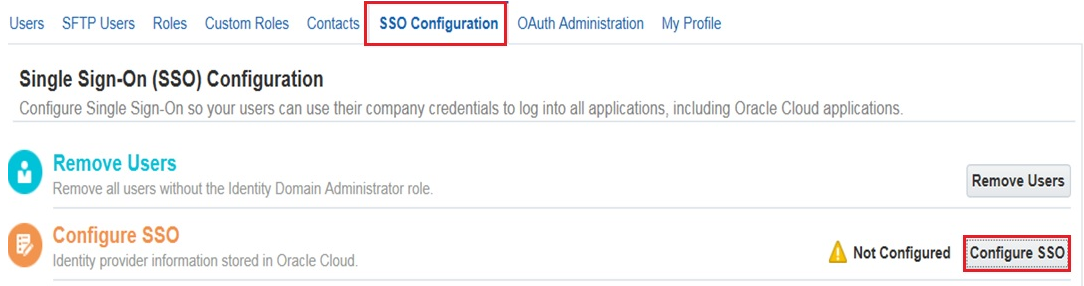
SSO Configuration Tab Options
NOTE: Oracle Business Intelligence Cloud instance should be active while accessing the embedded reports in Oracle Field Service Cloud. If not, a blank page will be displayed with error details.
Key Resources
Removal of CSV Files for the Daily Extract
Previously, the removal of CSV files for Daily Extract had been announced. The daily extract data is no longer saved in .csv files.
The following screens have been modified to cater to this change:
- The GPS Data Fields field is no longer available in the Daily Extract Configuration screen
Oracle Field Service Cloud Manage Header Redesign
All applications within the Oracle Cloud portfolio should have consistent look and feel so that users who have installed multiple cloud applications are presented with a similar user experience. The application now has a modern style header, with the default theme 'Vanilla'. The new header displays icons to access the most frequently used screens in Manage and Mobility.
Steps to Enable
- You can configure the header icons for your choice of the most frequently used screens.
- Remember that only four icons will be shown regardless of the number of icons you choose.
- You can access the remaining screens by clicking the navigation button in the top-left corner, next to Oracle logo.
- The four header icons are separated from the icons for search, collaboration, and user by a marker ‘|’. The search, collaboration, and user icons appear on the right of the | marker.
- Menu items, which can be hidden or opened
- Navigation button to open the menu items
- Header with icons for most frequently used screens or actions
- The new style is available only for the 'Vanilla' theme under "Configuration, Themes".
- All other themes use the classic look, which is, using tabs with words instead of icons and no navigation (hamburger) menu. The menu configuration has not changed and can be done in the "Configuration, User Types, Main menu items" screen.
- Oracle logo and the header icons adapt to the screen size. For wide screens all the header icons are present, for smaller screens the application name disappears, and for the smallest the application name and header icons disappear. In such cases the menu is accessible using the left pane.
- The following figure shows the icons that you can use in the header:
The following figure shows the redesigned header:
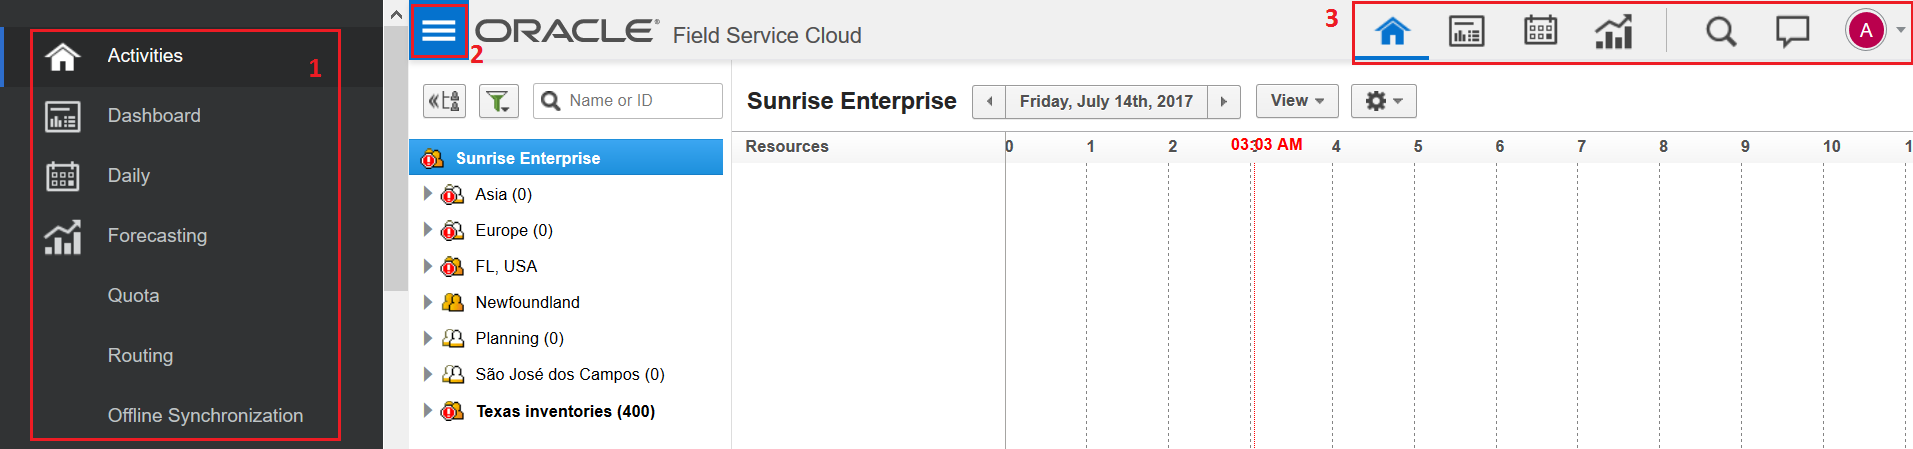
Redesigned Manage Header
The legends are:
Redesigned Manage Header Icons
Key Resources
This feature discusses the support for Access schedule consisting of set of access schedule intervals (up to two intervals per week day), and the set of exception dates.
As Access Schedule is always set up in the activity time zone, the Access Hours field is calculated in the time zone of the Activity Provider time, so Access Hours field is recalculated every time the activity is rescheduled or reassigned.
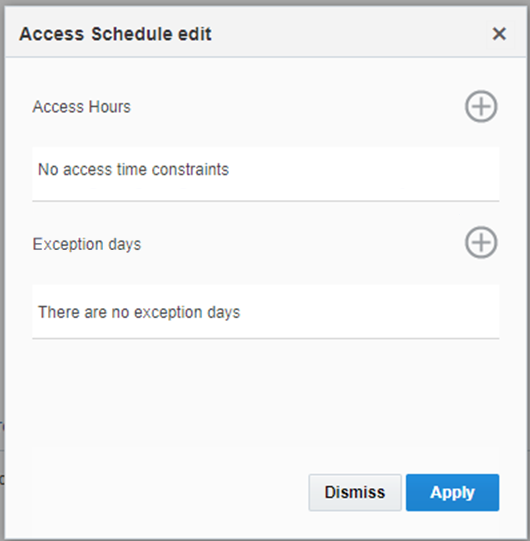
Access Schedule Edit Dialog
SET OR EDIT THE ACCESS SCHEDULE
To set or edit Access Schedule, ensure that Access Schedule field is added to the context.
- To edit Access Schedule, click the pencil next to Access Schedule field.
- To set Access Schedule, first choose the day(s) of week to set the access schedule for. You can set up to two Access Schedule Intervals per day of week.
- To add an Access Schedule Interval , click the + (plus) icon
- To delete an interval, click the – (minus) icon.
If multiple days of week have the same Access Schedule, you may set up the Access Schedule Intervals for all of them at once. - Exceptions Days section includes the dates for which asset is completely inaccessible.
- To add more, click the + (plus) icon in the Exception Days section and then select a date.
- To delete an Exception Day, click the – (minus) icon.
The Access Schedule editor window is displayed.
For example if you set the following Access Schedule:
- Mon-Fri: 8AM-12PM, 13PM-17PM
- Sat: 10AM-12PM
- Exceptions: 2018-01-01, 2018-05-01
This indicates that asset is accessible from 8AM till 12PM and from 13PM till 17PM Monday to Friday and from 10AM till 12PM Saturday and is closed on Sundays. The non-working days are January 1st 2018 and May 1st 2018.
INTERPRETING A SCHEDULE
The following rules are used to interpret a schedule:
- Empty schedule (or no schedule at all) and empty exception dates (or no exception dates at all)–no restriction, i.e. 24x7 availability
- Empty schedule (or no schedule at all) and some exception dates filled–24x7 availability except exception dates, not available during exception dates
- Schedule includes all 7 days (and may be some exception dates filled)–the availability is defined by the schedule per given week day, but the asset is not available during exception dates, if any
- Schedule includes some, but not all 7 days (and may be some exception dates filled)–the availability is defined by the schedule per given week day, if it is defined. The asset is not available during the week days for which no schedule is defined; also the asset is not available during exception dates, if any.
INTERPRETING ACCESS HOURS
Access Hours are recalculated after any changes in the access schedule and/or activity rescheduling. Access Hours are always shown in the provider time zone with respect to overnight settings.
For example, if the company has overnight set to 5 hours and no access schedule (that is 24x7 access), Access Hours will be calculated as 05AM-12PM, 12PM-05AM. If tomorrow is the exception date, only today segment is shown (i.e. 05AM-12PM). If the exception date is today, only the tomorrow segment is shown (i.e. 12PM-05AM).
ROUTING THE ACTIVITIES WITH RESPECT TO ACCESS SCHEDULE
Generally it is presumed that no work could be done beyond the hours defined by the Access Schedule. Thus all the kinds of the routing (including Urgent, Immediate and Bulk routing) will not schedule activity with the non-empty Access Schedule outside of defined Access Hours.
The only exception is the case when activity was manually scheduled to be performed beyond Access Hours. In this case traditional routing engine may leave the activity service window unchanged.
PERFORMING THE WORK BEYOND ACCESS SCHEDULE
If you try to assign the activity with non-empty Access Schedule to some provider, Oracle Field Service Cloud will assign it to the free place in the provider queue without breaking the Access Schedule if possible. Otherwise an alert that asset may not be accessible beyond the defined access hours is shown.
Operators may supersede this notification and confirm the activity scheduling. However, the alert is still shown at the activity level.
ADDING ACCESS SCHEDULE FIELDS TO UI
To get access to Access Schedule via the user interface, add Access Schedule (access_schedule) or Access Hours (access_hours) to the appropriate display context. Access Schedule can have visibility in both read-only and read-write modes; however, Access Hours can have only read-only visibility. Many screens including activity-related screens, lists and hints with the only exception of Mobility → Activity details screen. Access Schedule field includes Access Hours if they are calculated.
Key Resources
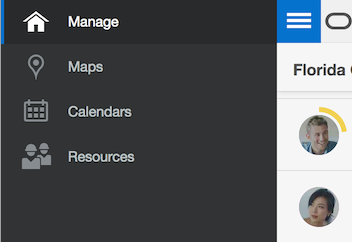
Standardization of Branding Area
All applications within the Oracle Cloud portfolio should have consistent look and feel so that users who have installed multiple cloud applications are presented with a similar user experience.
The application now has a modern style header, with the default theme 'Vanilla'. Changes have been made to the OFSC header so that opening Manage, Map, Calendar, or Resources screens.
The menu on the left side of the screen is always available and doesn't depend on the width of the screen.
![]()
Oracle Field Service Cloud menu bar (wide screen)
![]()
Oracle Field Service Cloud Menu Bar (narrow screen)
The menu elements that are shown in the header are replaced with the icons.
The description of the icons is described in the following table:
| Icon |
Description |
|
Manage screen |
Opens the Manage screen |
|
Maps screen |
Opens the Maps screen |
|
Calendars screen |
Opens the Calendars screen |
|
Resources screen |
Opens the Resources screen |
Steps to Enable
- Select My Display from the menu bar to open the My Display dialog.
- In the Design Theme field, select ‘Vanilla’ from the drop-down list.
The Oracle Field Service Cloud main window changes to show the Vanilla theme.
![]()
Oracle Field Service Cloud Mobility Window Showing Vanilla Theme
The header will include a navigation panel, depending on the screen size, and new graphical elements, icons, have been added to represent functional areas of the system. Clicking the Navigation button shows the list of available options in the Navigation Pane.
Key Resources
Remove SLA Alert When Activity is Before SLA Window
Currently Oracle Field Service Cloud shows a warning when activity is scheduled or when activity is started before the start of SLA window. For August 2017 (17.8) release, the warning ‘SLA window can be lost’ alert has been updated. The alert is no longer shown when the activity is scheduled to a day before start of SLA window on all screens in Core Manage and Mobility except the following two screens:
- move activity screen
- edit activity screen
Key Resources
Route Map Offline Availability
Earlier, it was tedious to manage offline users. This feature has improved the maps behavior in Mobility when user is offline and enhanced the activity management on map in Mobility with functionality from Activity List screen.
This feature provides the following benefits:
- Makes Map screen available offline; this enables implementing user Dashboard and eliminating Activity List screen in future.
- Improve user experience by enhancing map screen functionality–there will be no need to switch into Activity List screen for additional actions
- Route Map screen can be opened in offline mode
- Activities are displayed on map and in list in Route Map in offline mode
- There is possibility to navigate to Activity Details from the Route Map screen
- Switching to offline mode on Map screen does not cause system freeze
This feature also includes the following functionality discussed in detail.
MAP IN ONLINE MODE
In online mode, for activities in route that have no coordinates, the following priority is applied:
- Clicking the '>' (greater than) icon in the Route activity hint redirects to Activity Details screen.
- For non-scheduled activity hint, clicking the '>' (greater than) icon in the Route activity hint also redirects to the Activity Details screen; however, the activity data is requested from the database.
MAP IN OFFLINE MODE
In offline mode the following functionality is provided:
- You can click the Map menu command to view the Activity List and Activity Details screens
- Offline requests for routes do not work. Routes are loaded only after switching to online.
- Zoom level changing is unavailable in offline.
- No hint is displayed after click Non-scheduled activity on Map
- Custom layers are not refreshed within dragging. Pre-loaded part of layer shape is available. When switching to online mode, unloaded parts of shape are reloaded within dragging or zooming the map
The following changes are applicable to Route Hint:
- Here is how the Activity list shows when the Route map is opened offline:
- Here is how the Activity list shows when the user goes offline after the Route map was opened in online:
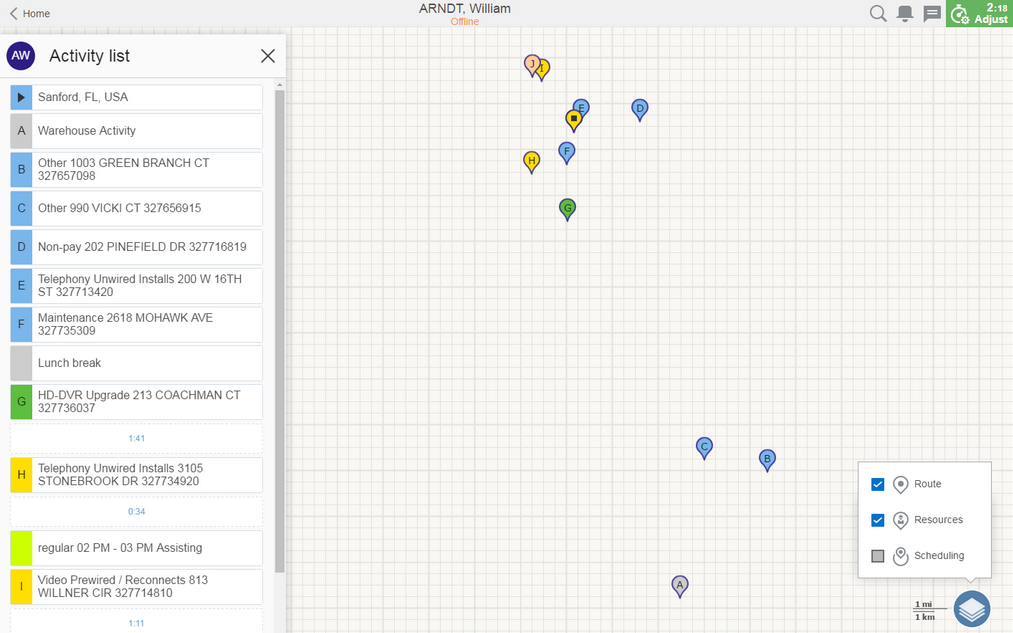
Activity List on Offline Route Map
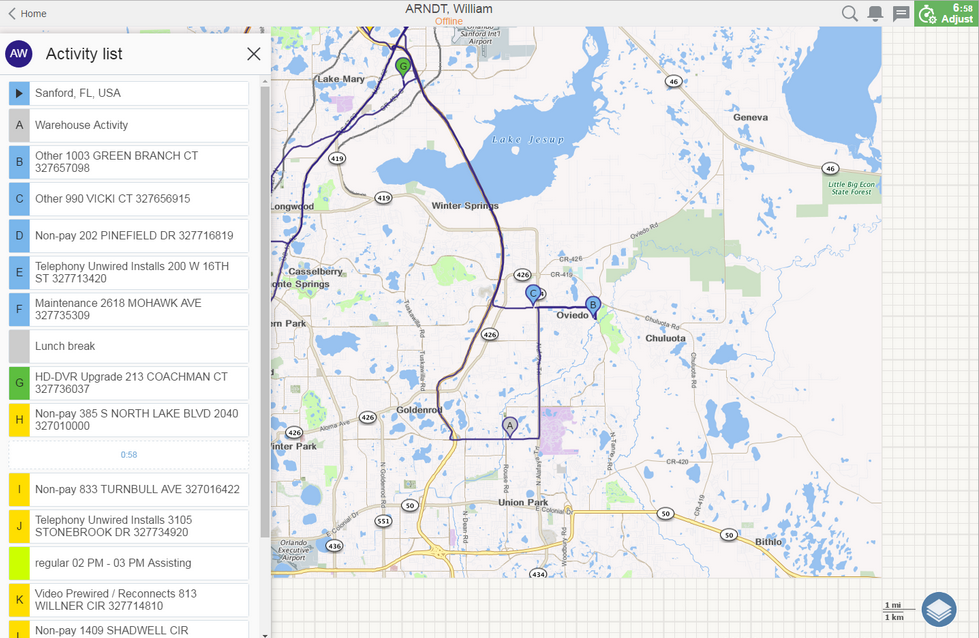
Route Map Showing Preloaded Tiles When the User Goes Offline
REVISED BACK BUTTON FUNCTIONALITY
Previously Back button on Activity Details screen displayed only the Activity List screen. Now users can return from Activity Details using Back button to the Route Map that they accessed from.
- Mobility > Map
- Mobility > Activity List > Map
- Mobility > Activity Details > Map
The name of the Back button depends on the target screen:
- Activity List - '< Activities'
- Activity List Map - '< Back'
- Activity Details Map - '< Details'
Key Resources
This enhancement improves the usability of the Parts catalog when there are users using different languages within the same instance. Today users with languages that differ from the language of Parts Catalog do not have access to the catalog. This release changes that behavior.
- If a user language is present in the uploaded Parts Catalog languages - use it (this is the current logic).
- If the user language is not available in the uploaded Parts catalog languages, use the default Parts Catalog language.
- Define default language for Parts catalog as 'Login Screen Language' configured on the Configuration → Display screen.
- If default language is not presented in Parts Catalog then check the first language used by Parts Catalog.
- Define first language by the lid field from the 'Languages' table.
Key Resources
The new features of Plugin API in 'Plugin Framework' functionality are as follows:
- Ability to hide the Mobility header when the Plugin is open.
- Ability to prevent user from returning to a previous screen using browser 'Back' functionality or the 'Back' button on the header in Mobility
- Extend the list of the screens to which the user can be redirected after closing the Plugin screen
- Ability to send files from the Plugin to Oracle Field Service Cloud using the Plugin API
- Backward compatibility
The updated Plugin Framework is backwards compatible with the version introduced in February 2017 (17.2) release.
The enhancements include:
- Ability to hide the Mobility header when the Plugin is open
- Prevent user from returning 'back'
- Extend the list of the screens to which the user can go back
When a user opens the Plugin from within Oracle Field Service Cloud Mobility and the header of the screen is rendered by Oracle Field Service Cloud. The user can leave the Plugin by clicking on the 'Back' button in the header. The Plugin will be closed without sending back any data to Oracle Field Service Cloud.
When a user opens a plug-in it is shown inside Oracle Field Service Cloud Mobility. The user can easily leave the plug-in by clicking on the browser 'Back' button or 'Back' button in the header of the Mobility. The plugin will be closed without sending back any data to Oracle Field Service Cloud.
In releases prior to August 2017 (17.8), clicking the Back button allowed the user to only return to the Default, Activity By ID, Next Activity and Activity List screens. If not, the user was redirected back to the activity list. With the August 2017 (17.8) release, clicking the Back button allowed the user to return to the following screens too:
- Start Activity
- End Activity
- Cancel Activity
- Not Done Activity
- Suspend Activity
- Delay Activity
Steps to Enable
No steps are required to enable this feature.
Key Resources
Routing Plan, Profile and Screen Improvements
The August 2017 (17.8) release includes several updates to Oracle Field Service Cloud’s Routing module. Enhancements include allowing activities to be assigned to field resources that are located in a different part of the resource tree and providing new routing configuration parameters from the Routing Screen, including the ability to view, add, edit and manage routing profiles and plans.
As part of the enhancement and the removal notice in the release notes, the Routing Execution Log screen is no longer available. All the actions that were available in the Routing Execution Log screen are now available via the Routing Screen.
The following changes were made:
- Page Configuration → Routing Plans screen is obsolete, has been removed from all the profiles and will be completely removed in 17.8 version.
- Routing → Routing Plans tab header now shows two numbers.
- The first number (next to single puzzle sign) indicates the number of routing plans in the current routing profile.
- The second number (next to multiple puzzles icon) indicates the number of routing plans available for the current bucket and the sibling buckets.
- Bulk operations on the routing plans and profiles have been removed.
To modify routing plans/profiles, you must perform the operations one by one.
New functionalities include:
- Operations related to viewing, adding and editing routing plans and routing profiles are accessible from the Routing Plans tab on the Routing screen.
During the upgrade:
- The visibility of the Execution Summary, Autorouting, Resource utilization and Savings widgets are migrated from Routing Screen visibility.
- The Read Only visibility of the Routing plan widget is migrated from Routing Screen visibility.
- The Read Write visibility of the Routing plan widget is migrated from Configuration -> Routing Profiles visibility.
STEPS TO ENABLE
To configure this functionality, use the following steps:
- The previous permissions for the Configuration → Routing Profiles screen are migrated to the permissions for Routing Plans tab on the Routing screen.
- To allow a user to perform all operations (i.e. add, edit delete, activate/deactivate, clone) on the Routing Plans and Routing Profiles, ensure that they have Read/Write permissions for Routing Plans tab on the Routing screen. Read-only permissions allow viewing the Routing Profiles and Routing Plans and performing Search, but not the ability to modify Routing Plans or Routing Profiles.
- To allow a user to run routing plans, including and rollback the results, ensure that they have RW permissions for Execution Summary tab on the Routing screen. Read-only permissions allow viewing the routing run results, opening reports and comparing runs.
- To allow a user to changing Baseline Settings, ensure that they have Read-only permissions for Baseline action on the Routing screen. The Read-only permission allows viewing of baselines, but not modifying them.

Permissions for Routing Plans Tab
Following sections discuss how to use this functionality.
- Accessing list of Routing Profiles
- To access the full list of Routing Profiles: Open the Routing Screen, select the Routing Plans tab and click the (View) link next to the phrase ' There are XX more routing profiles '.
- To narrow the list down, click the View button and set up the search conditions, including part of the name (for both Routing Plans and Routing Profiles) to search for, routing profile status and number of rows to show.
- Accessing list of Routing Plans in the Routing Profile
- To access the list of Routing Plans, access the list of Routing Profiles, and click the (triangle) next to the Routing Profile name.
- Viewing list of buckets where the given Routing Profile is assigned
- To view the list of buckets where the given Routing Profile is assigned, access the list of Routing profiles and locate the Routing Profile you want. The list of buckets is available at the routing profile header, next to the "Assign to" phrase.
- Renaming/Cloning/(De)activating/Deleting the Routing Profile
- To rename/clone/deactivate an active Routing Profile, to activate an inactive Routing Profile, or to delete a Routing Profile, access the list of Routing Profiles, locate the Routing Profile, click the (actions) button and then select the needed action.
- Renaming/Cloning/(De)activating/Deleting the Routing Plan
- To rename/clone/deactivate an active Routing Plan, to activate an inactive Routing Plan, or to delete a Routing Plan, access the list of Routing Profiles, locate the Routing Profile, choose the Routing Plan from the list, click the (actions) button and then select the needed action.
- Adding the Routing Profile
- To add a new Routing Profile, open the Routing screen, select the Routing Plans tab and click Add routing profile button.
- Adding the Routing Plan to the Routing Profile
- To add a new Routing Plan to the Routing Profile, access list of Routing profiles (see above), locate the Routing Profile, click the (actions) button and choose Add routing plan.
- Deleting the Routing Plan
- To delete a Routing Plan open the Routing Profile that contains it, click the (actions) button next to the chosen and choose Add routing plan.

Routing Plans and Routing Profiles
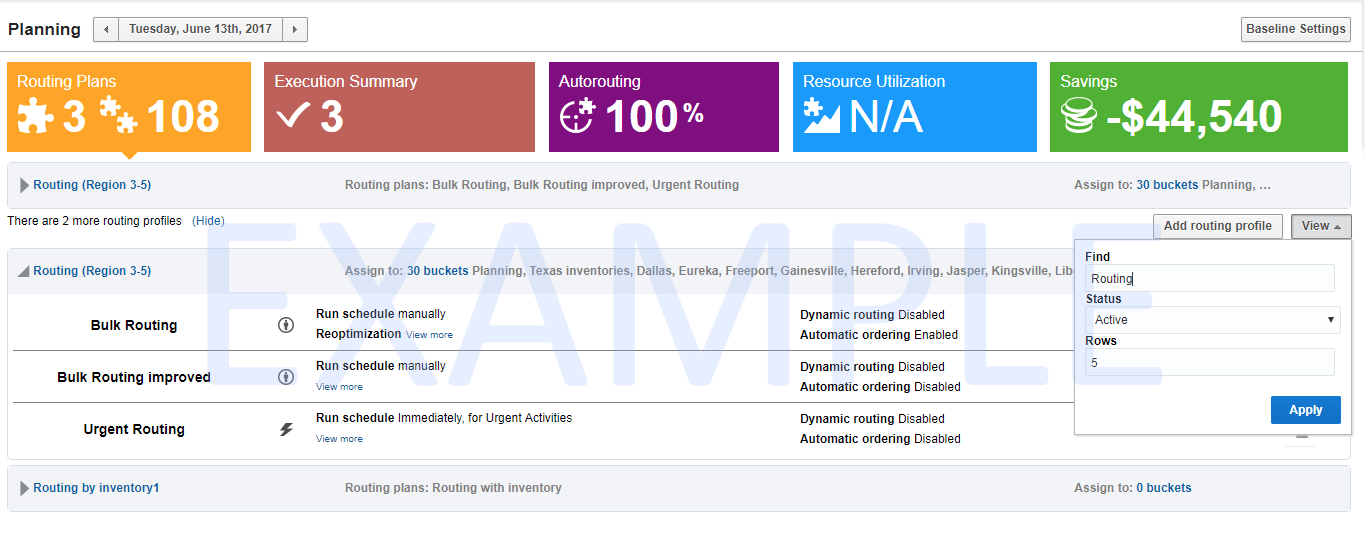
Routing Plans and Routing Profiles Using Search Condition
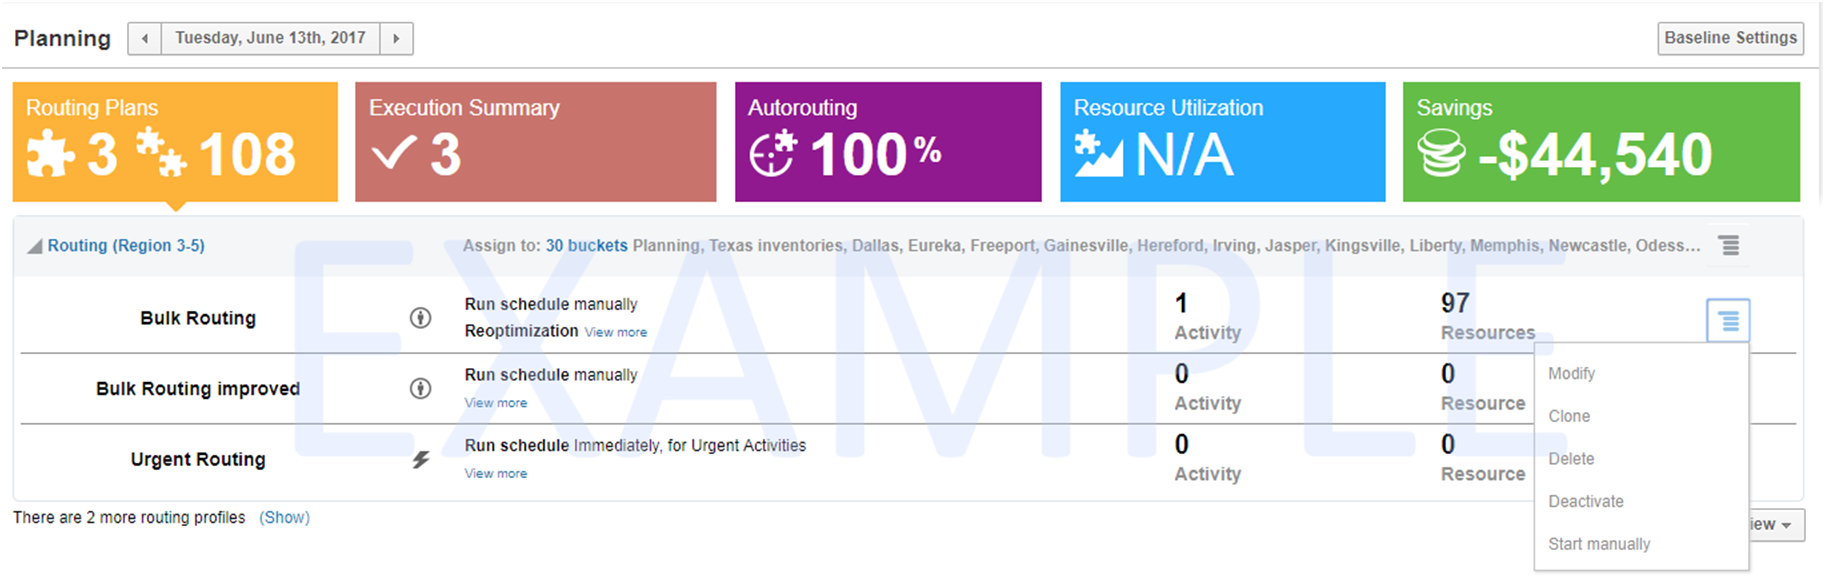
Properties Menu Options for a Routing Profile
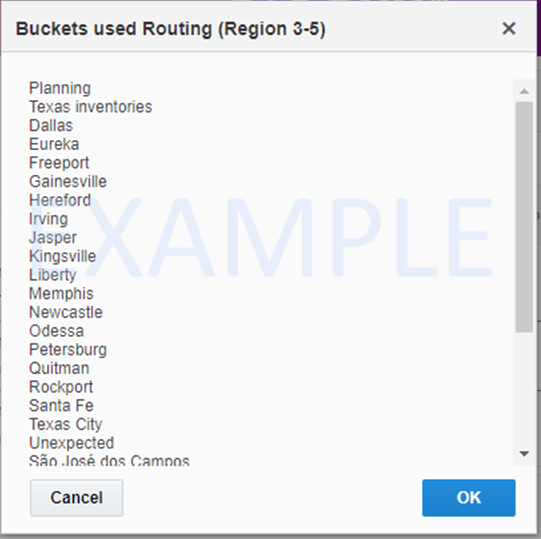
Buckets Used in a Routing Profile
Key Resources
Routing to Resources Outside the Parent Bucket
The August 2017 (17.8) release includes several updates to Oracle Field Service Cloud’s Routing module. Enhancements include allowing activities to be assigned to field resources that are located in a different part of the resource tree.
Normally Routing takes activities from parent bucket and routes them to the children in the resource tree. However, there could be a situation when you need to move personnel to do work in a particular area.
- First, ensure that work zones are turned on the business rules level, and the bucket where you'd like to add more personnel has some work zones assigned.
- Choose the resources that you would like to temporarily reassign. Assign them to one (or more) of the bucket work zones.
- If the organizations are already enabled and more than one organization is defined, activities can be routed to temporary assigned resources only if the resource's organization matches either the bucket's organization or the organization of any bucket/organization unit down the hierarchical tree.
- In the Modify Routing Plan dialog, open Filters tab and ensure that the Assign activities only to the resources down the hierarchical tree check box is disabled.
- Routing will now include temporary assigned resources during the routing plan run (whether it is manual, once a day, recurrent or sequential plan) and show the correct number of resources available for the given bucket and routing plan on the Routing Screen.
NOTE: The work zones should be assigned directly to the field resource, assignment to the group will not be enough.

Modify Routing Plan Dialog Showing Filters Tab Options
From the processing perspective, there is no difference between resources that are permanently located in the bucket and temporary assigned resources. Both are treated the same way for the day of assignment.
Assign activities to temporary assigned resources via immediate/urgent plans is not available in this release.
To improve responsiveness of the Routing screen, information about the number of resources may need couple of minutes to be refreshed to reflect accurate numbers after actual work zone assignment.
NOTE: If routing plans are started simultaneously on the two (or more) buckets sharing the same resources (either via temporary assignment or via tree hierarchy) then the run of the subsequent plans will be paused until the previous plans are finished. This may lead to delays in obtaining routing run results.
Key Resources
The August 2017 (17.8) release includes several updates to Oracle Field Service Cloud’s Routing module. Urgent routing plans have been enhanced, offering a new activity assignment option that will allow work to be assigned to the field resource regardless of their assigned work zones.
All new routing plans have the Assign only to resources that have appropriate work zone option enabled by default. Hence, the Urgent activities will be assigned to providers regardless of work zones.
- If the Assign only to resources that have appropriate work zone option is enabled, only the resources for which the resource's work zone matches that of the activity will be considered for Urgent activities.
- If the Assign only to resources that have appropriate work zone option is disabled, the resource could be considered for Urgent activities regardless of the resource work zone.
The same rules of processing work zones will be used for bundling activities along with the routed Urgent activity.
During upgrade, all the existing Urgent routing plans are migrated with "Assign only to resources that have appropriate work zone enabled" option turned on, so the functionality of existing routing plans remains the intact.
NOTE: This functionality requires the Using Work Zones check box to be enabled on the Business Rules screen.
Steps to Enable
- Locate the Urgent Routing plan you want to update.
- Click Modify
- Under Assignment and Fallback, update the Assign only to resources with appropriate work zone enabled
 parameter.
Key resources
Immediate Routing Improvements
The August 2017 (17.8) release includes several updates to Oracle Field Service Cloud’s Routing module. Immediate routing plans have been enhanced, offering multiday activity assignment when the Activity Type = Multi-day activity flag is set. Multiday activities will be assigned in the same way as any other activity matching the Immediate Routing filter. The activity will be assigned to the same resource for duration of the activity, just like if it was manually assigned.
Steps to Enable
No steps are required to enable this feature.
Data Presentation Improvements
With August 2017 (17.8) release, functionality has been added to improve text descriptions and other visual information in the screens in Manage and Mobility. This feature includes the following changes:
- In the resource hint, the field name has been changed from Idle time to Duration.
- If breadcrumbs are located relatively close to each other and have the same status (Normal or Idle), they are grouped into a single point. This point has duration - time period between the first and the last breadcrumb in the group. The duration value is rounded to minutes.
- Breadcrumb Start-End time is displayed in the Time section.
- For a single point, this field contains timestamp of breadcrumb.
- For a grouped point, the timestamp shows the range between the first and last breadcrumb.
- The Start-End time that was previously displayed without label was removed.
- In the Business Rules screen, the idle threshold description 'Resource is considered idle if moved less than XX meters within past YY minutes' has been replaced with: 'Highlight idle YY minutes and longer (at least 5 min)' field.
- The minimum value for YY is 5 minutes.
When you select a resource in the Resource Map, the resource hint for the selected resource will show the following values:
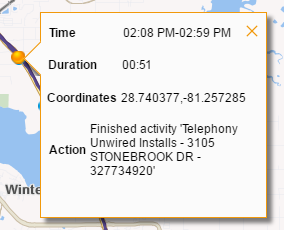
Resource Hint Showing Duration Field
NOTE: If the value previous value was less than 5 minutes, it will be set to 5 minutes during the upgrade.
steps to enable
No steps are required to enable this feature.
A number of Events API improvements have been made to improve and simplify integration. The following updates were made:
- 'Create subscription' endpoint changes
- List of fields to monitor for changes - so that the event gets published only if one or more of the fields in the list are updated.
- Filter expression - events that do not match it will not get published.
- Fields to return in each of the published events.
- The parameter 'events' of the root object is now optional, as long as new parameter 'subscriptionConfig' is specified.
- New parameter 'subscriptionTitle' added. It may be used to distinguish a subscription from the others.
- New parameter 'subscriptionConfig' is added. It is optional array of objects. Each object consists of the following fields:
- events - list of event types that a subscriber would like to receive. If one of the following parameters is used (filterExpression, monitorChanges or fields). This list has to contain events of a single object type (e.g. either activity or inventory). Otherwise event types can be mixed in one subscription.
- Required parameter.
- filterExpression - Filter expression to apply. Only events matching this filter will get added to this subscription.
- Optional. Default: all pass
- monitorChanges - List of fields to track changes for. The event will only get published if any of these fields change (so this is an additional filter).
- Optional. Default: change in any field will lead to event being published.
- The field names for activity events are the same names as you see in e.g. 'get activity' operation.
- The field names for inventory events are the same names as you see in e.g. 'get inventory' operation.
- Custom property labels can also be specified in this list.
- fields - list of fields and custom properties to additionally include in the event. These fields will be added to "activityDetails" element for activity events, "inventoryDetails" for inventory events.
- The field names for activity events are the same names as you see in e.g. 'get activity' operation.
- The field names for inventory events are the same names as you see in e.g. 'get inventory' operation.
- Custom property labels can also be specified in this list.
- Optional. Default: only the changed fields and the key fields are published.
- if the 'subscriptionConfig' array contains more then one element, then the events matching any of the elements will be published.
- Create subscription request validation
- user has no write permission for core-events or
- neither "events" parameter in request root, nor "subscriptionConfig" elements are specified,
- both "events" parameter in request root and "subscriptionConfig" are specified at once.
- either "events", or "subscriptionConfig" lists are empty.
- events contains events that do not exist, e.g. "activityNompleted"
- subscriptionConfig/idx/ - each element of subscription config to be checked
- subscriptionConfig/idx/events
- events is empty array or is absent
- events contains events that do not exist, e.g. "activityNompleted"
- events contains events for different entities (e.g. "events" : ["activityCreated", "inventoryCreated"] is not valid)
- subscriptionConfig/idx/filterExpression
- filterExpression is not a valid expression (see 'filterExpression' field syntax section).
- filterExpression contains fields/properties which do not exist "(doesNotExist == "something").
- filterExpression contains fields/properties for a wrong entity, e.g. resource name in activity event filter
- subscriptionTitle is specified and is an empty string, or is longer than the maximum of 255 characters.
- 100 subscriptions are already active (created but not deleted / expired)
- 'filterExpression' field syntax
- Filter expression is specified as a single string.
- It should evaluate to a boolean expression.
- It should contain 1 or more comparison statements
- Comparison statements have the form field operator value, for example: activityDetails.activityType == 'Install'.
- This order cannot be changed so ('Install' == activityDetails.activityType) is not valid.
- Comparing field to field (A == B) or value to value (1 == 1) is also not valid.
- Field has to be an alphanumeric identifier with no spaces or special characters except underscore. Subfields are separated by dot (.) Examples:
- activityDetails.activityType
- a
- activityDetails.X_MYPROP_10
- event.user
- field.subField
- Comparison operators are: <, >, <=, >=, ==, !=, in
- value can be either a string literal, an integer literal, or an array literal of strings and integers.
- string literals are delimited by single quotes, with escape character ~, e.g:
- str == 'My String'
- str == 'My string with ~' a quote inside'
- integer literals are without quotes, may not contain dot, or leading zeroes.
- num == 0
- num == 12345
- num == -67
- array literals have to only contain strings, or only integers, and are in square brackets. Empty arrays are not allowed. Arrays are only allowed following the "in" operator
- enum in [1,2,3]
- enum in ['Abc','Def','Ghi']
- String comparisons are valid:
- date > '2015-06-02'
- String comparisons all case-insensitive:
- name == 'john.smith'
- is the same as:
- name == 'JOHN.SMITH'
- String-integer coercion occurs:
- num == -123
- is the same as:
- num == '-123'
- Multiple comparison statements have to be separated by logical operator and/or.
- A == 1 and B == 2 or C == 3
- A == 'xx' or A == 'yy'
- Operator precedence:
- comparison operators: ==, !=, <, >, <=, >=, in
- 'not'
- 'and', 'or'
- Logical operators ('and' / 'or') have the same precedence, so parentheses can be used to achieve precedence
- A == 1 and (B == 2 or C == 3)
- Operators are also case-insensitive:
- (num IN [1,2,3]) OR (num < 0)
- Any statement can be preceded by "not" operator to negate it.
- not (activityType in ['IN','TC','BR'])
- A == 1 and not ( B == 2 or B == 3 )
- Whitespace outside strings is ignored.
- When the field being compared does not exist in the event, or is null then it evaluates to empty string. For example: Expressions (non_existent_field == '') and (null_field == '') are both true.
It is now possible to specify:
The syntax of the request to create subscription remains fully backward compatible. The changes in the request are:
NOTE: Order of 'subscriptionConfig' items is important because each event is tested to check if it matches the conditions of these items one by one, starting with the first item. If an event matches one of the 'subscriptionConfig' items, the items that follow the event are not checked.
The request fails if:
CREATE SUBSCRIPTION REQUEST EXAMPLE
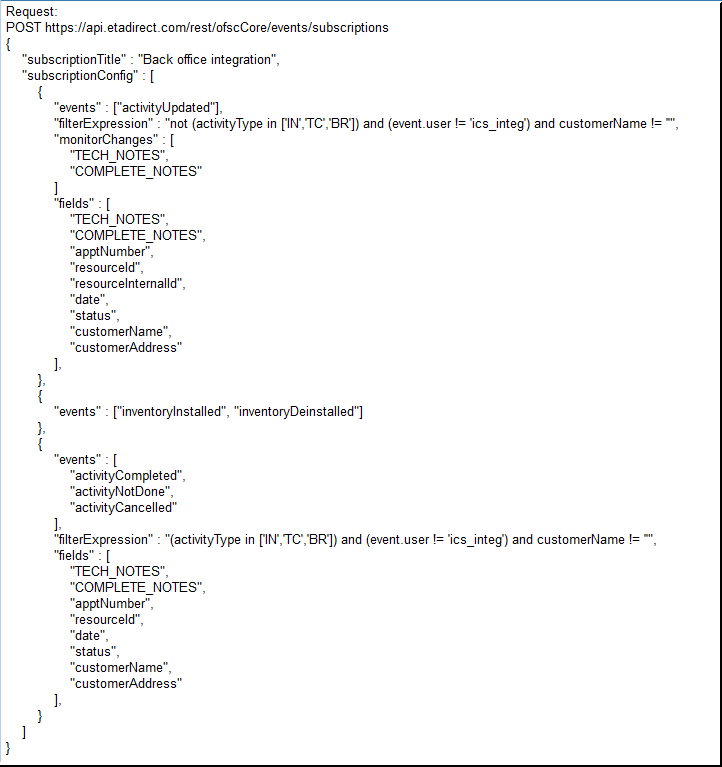
Example for Create Subscription Request
GET SUBSCRIPTION LIST - NEW ENDPOINT
This new endpoint retrieves the list of created subscriptions in order to manage them:
- GET /rest/ofscCore/events/subscriptions/
This operation returns the list of subscriptions based on the following parameters.
- Request parameters:
- ALLSUBSCRIPTIONS - boolean, default: false.
- if FALSE - then only the subscriptions created by the calling application are returned.
- if TRUE - then all subscriptions in the system will be returned, even if they were created by other applications (and so are not controlled by the calling application).
- Response:
- ITEMS - array of subscriptions, where each item has the following fields:
- SUBSCRIPTIONID - id of this subscription
- SUBSCRIPTIONTITLE - optional title of this subscription.
- Only present if passed to the "Create subscription" operation.
- APPLICATIONID - Application that has created this subscription.
- CREATEDTIME - time this subscription was created. Format: "YYYY-MM-DD HH:MM:SS" (UTC)
- EXPIRATIONTIME - time this subscription will expire if not used anymore. Format: "YYYY-MM-DD HH:MM:SS" (UTC)
- EVENTS - array of event types.
- Only present if passed to the "Create subscription" operation. Same format as passed to the "Create subscription" operation.
- SUBSCRIPTIONCONFIG - Array of event subscription config items.
- Only present if passed to the "Create subscription" operation. Same format as passed to the "Create subscription" operation.
- links - array of links - should contain links to "get events" operation, "canonical" link, etc.
The response contains two fields "items" and "links":
Following is an example for Get list of subscriptions request /response:

Example for Get List of Subscriptions Request/Response
GET SUBSCRIPTION ENDPOINT CHANGES
The existing "Get subscription" endpoint now returns additional elements:
- GET /rest/ofscCore/events/subscriptions/{subscriptionId}
Prior to this change it returned only the SUBSCRIPTIONID, EVENTS, and LINKS elements. Now it returns additional fields:
- SUBSCRIPTIONID - id of this subscription (same as before)
- SUBSCRIPTIONTITLE - optional title of this subscription. Only present if passed to the "Create subscription" operation.
- APPLICATIONID - Application that has created this subscription.
- CREATEDTIME - time this subscription was created. Format: "YYYY-MM-DD HH:MM:SS" (UTC)
- EXPIRATIONTIME - time this subscription will expire if not used anymore. Format: "YYYY-MM-DD HH:MM:SS" (UTC)
- EVENTS - array of event types. (same as before) Only present if passed to the "Create subscription" operation. Same format as passed to the "Create subscription" operation.
- SUBSCRIPTIONCONFIG - Array of event subscription config items. Only present if passed to the "Create subscription" operation. Same format as passed to the "Create subscription" operation.
DELETE SUBSCRIPTION - NEW ENDPOINT
It might be necessary when the limit of one hundred active subscriptions reached. As soon as some subscription(s) deleted it will allow new one to be created.
- DELETE /rest/ofscCore/events/subscriptions/{subscriptionId}
- Request Parameters:
- subscriptionId - Id of the subscription to be deleted - path parameter.
- Request contains no body and no query parameters.
- Response:
- status 204 "No content" - if subscription is deleted
- status 404 "Not found" - if no such subscription is found
- status 403 "Not authorized" - if trying to delete a subscription that was created by another application
Response contains no body. The HTTP status code is the only thing returned:
STEPS TO ENABLE
No steps are required to enable this change.
Key Resources
HTTP Basic Authentication Option for Outbound API
With August 2017 (17.8) release, users can either use the standard HTTP header 'Authorization' or the <user> SOAP structure to send user credentials in the HTTP request. This provides greater flexibility when integrating to external systems that require authorization in the HTTP header.
The Allow basic access authentication check box has been added to the Message Scenario, Delivery Channel screen to cater to this solution.
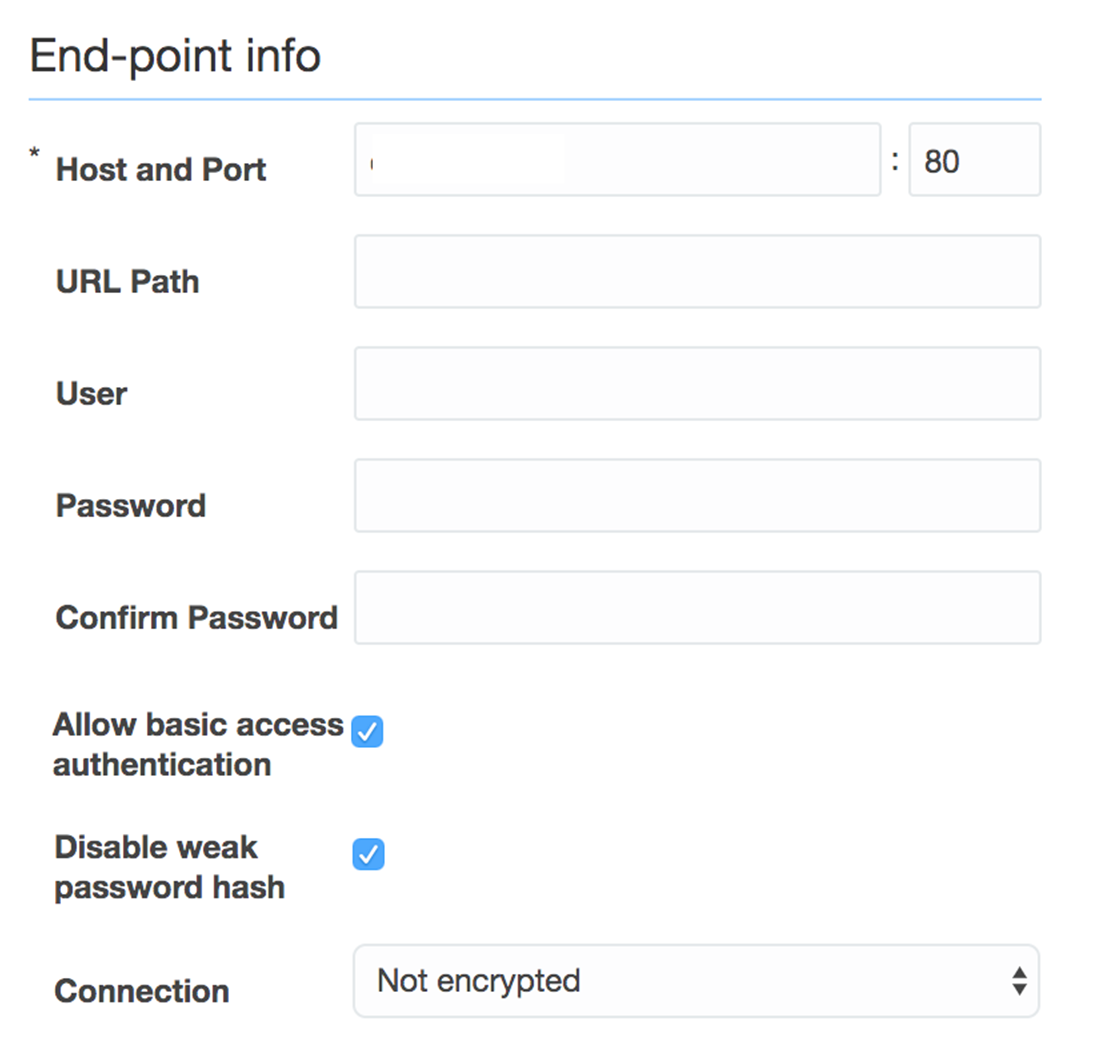
End-Point Info Dialog Showing the Allow Basic Access Authentication Check Box
- When the check box is selected, the outbound methods (such as send_message, drop_message, get_message_status methods) send the standard HTTP header 'Authorization' with base64-encoded user credentials (standard basic access authentication). Also, the <user> SOAP structure is sent in the body of the request. The client application can either use the standard HTTP header 'Authorization' or the <user> SOAP structure to send user credentials in the request.
- When the check box is not selected, the HTTP header Authorization will not be used in the request and the client application can use the <user> SOAP structure for authentication. Here is an example:
Here is an example:
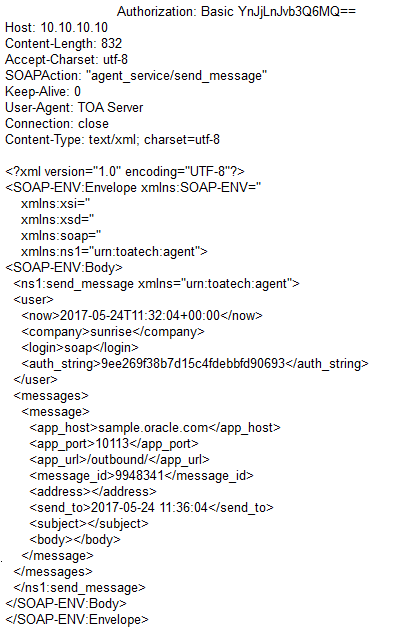
SOAP Request Example When HTTP Header 'Authorization' is Used
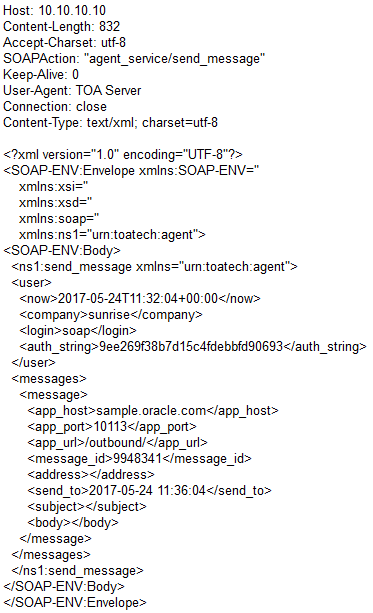
SOAP Request Example
Key Resources
Removal: External Trigger API and Parts Catalog
Access to the following functionality has been removed with August 2017 (17.8) release:
- External Trigger API.
- External API access is removed from the 'Application’ screen within the ‘API access’ settings.
- Parts Catalog v1. Customers are advised to move to v2.
- https://api.etadirect.com/soap/parts-catalog/v2/?wsdl
- Changes to Message scenario configuration:
- IVR Delivery Channel is not available in message step Add/Edit dialog as this is no longer an API to initiate the scenario.
STEPS TO ENABLE
No steps are required to enable this change.
Key Resources
---

Copyright © 2017, Oracle and/or its affiliates. All rights reserved.
This document is provided for information purposes only, and the contents hereof are subject to change without notice. This document is not warranted to be error-free, nor subject to any other warranties or conditions, whether expressed orally or implied in law, including implied warranties and conditions of merchantability or fitness for a particular purpose. We specifically disclaim any liability with respect to this document, and no contractual obligations are formed either directly or indirectly by this document. This document may not be reproduced or transmitted in any form or by any means, electronic or mechanical, for any purpose, without our prior written permission.
Oracle and Java are registered trademarks of Oracle and/or its affiliates. Other names may be trademarks of their respective owners.
Intel and Intel Xeon are trademarks or registered trademarks of Intel Corporation. All SPARC trademarks are used under license and are trademarks or registered trademarks of SPARC International, Inc. AMD, Opteron, the AMD logo, and the AMD Opteron logo are trademarks or registered trademarks of Advanced Micro Devices. UNIX is a registered trademark of The Open Group.
Aug2017 Rev. 3