

| Date | Feature | Notes |
|---|---|---|
| 07 MAR 2018 | Created initial document. |
This guide outlines the information you need to know about new or improved functionality in Oracle Service Cloud Agent Browser UI February 2018 and describes any tasks you might need to perform for the update. Each section includes a brief description of the feature, the steps you need to take to enable to begin using the feature, any tips or considerations that you should keep in mind, and the resources available to help you.
For a listing of hardware and software requirements for Oracle products, log in to our support site and access Answer ID 31.
Give Us Feedback
We welcome your comments and suggestions to improve the content. Please send us your feedback.
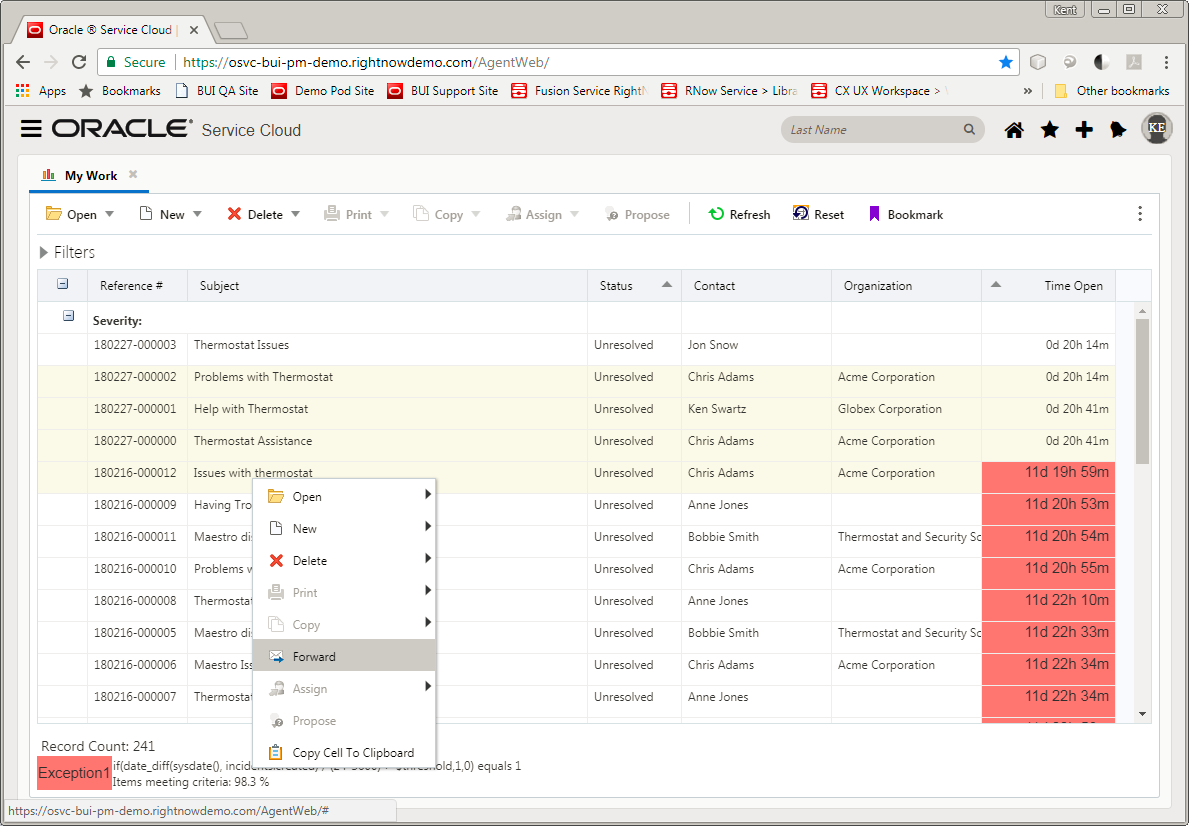
Select and Forward Multiple Records
Over the past year, Agent Browser User Interface capabilities have been added to match those within the Service Console Client. This includes the ability to select multiple records from report and execute an action on all the selected records. With this release the Forward action is now supported.
There might be times when you need to forward multiple incidents, tasks, or assets. For example, you might need information from another staff member before you can reply to a customer’s incidents. When you forward a record, you can attach files, send response files, and add comments. This feature has been available in the OSvC Service Console for some time and is now also available in the Agent Browser User Interface.

Steps to Enable
While looking at an incident, task, or asset report the user can selection more than one column on the report using the standard drag metaphor or by using a combination of shift-click or control-click actions. The result of these actions is for the records in the report that were selected to have a different background then the non-selected records.
Once the desired set of records has been highlighed, the user then can either use the right click contextual pop up menu or the report menu to choose the Forward action.
If the Forward action has not been configured to be available for this report, then the Forward item will not be available in neither the right click contextual pop up menu nor the report menu.
Margins and Border Support for Reports in Agent Browser UI
Margins are now supported within reports executed on the Agent Browser UI. This gives the user the ability to position the contents of elements in a report exactly where they might want them. Margins can be added to the following elements in a report:
- Text Fields in the report header/footer
- Cells in the data grid
- Headers within the report data grid
- Report sections such as charts, headers/footers, the entire data grid, and exceptions
Borders are also now supported within reports executed on the Agent Browser UI. This includes all available Service Console border orientations, line colors, weights and styles for use within the report data grid and borders surrounding report sections.
Steps to Enable
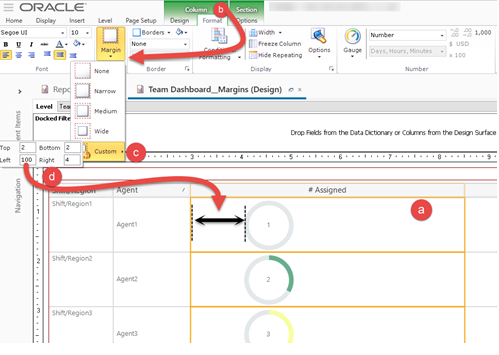
To configure a report using margins perform the following actions:
- Login to Service Console
- Edit an existing report or create a new one
- To add a margin to a column in the report:
- Select the desired column.
- Navigate to Column Format Tab > Margin Gallery > Select a predefined option or custom
- If selecting custom you can specify top, bottom, left, right margins
- Enter a value and see the margins change in that cell
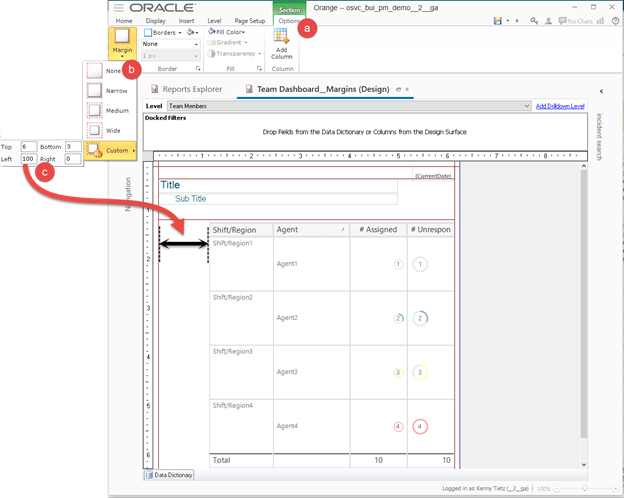
- To add a margin to a report section:
- Select the Section Options tab after clicking anywhere in that report section
- Select the Margin gallery
- Select a predefined margin or enter values into a custom margin
- See the changes within the report for that section
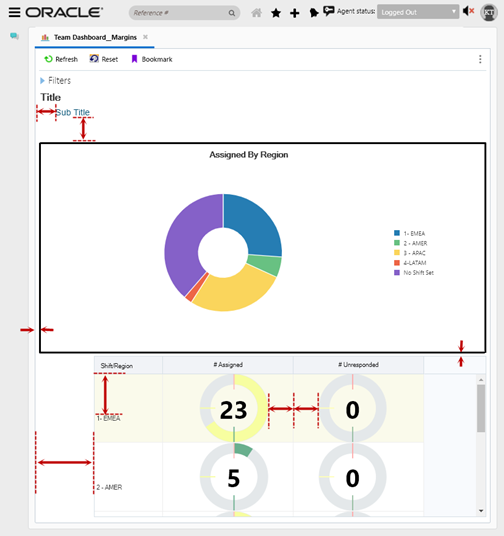
Running these reports within Agent Browser UI would show these margins. The screenshot of the report run in BUI below has margins on the following:
- 25 pixel left margin on subtitle
- 40 pixel bottom margin on the header section
- Medium predefined margin on chart section
- 100 pixel left margin on data grid section
- 75 pixel top margin on Shift/Region column
- 40 pixel right margin on # Assigned column
- 25 pixel left margin on # Unresponded column
Tips And Considerations
Cell and section alignment settings (left, right, center/top, middle bottom) are also supported.
---

Copyright © 2018, Oracle and/or its affiliates. All rights reserved.
This document is provided for information purposes only, and the contents hereof are subject to change without notice.This document is not warranted to be error-free, nor subject to any other warranties or conditions, whether expressed orally or implied in law, including implied warranties and conditions of merchantability or fitness for a particular purpose. We specifically disclaim any liability with respect to this document, and no contractual obligations are formed either directly or indirectly by this document. This document may not be reproduced or transmitted in any form or by any means, electronic or mechanical, for any purpose, without our prior written permission.
Oracle and Java are registered trademarks of Oracle and/or its affiliates. Other names may be trademarks of their respective owners.
Intel and Intel Xeon are trademarks or registered trademarks of Intel Corporation.All SPARC trademarks are used under license and are trademarks or registered trademarks of SPARC International, Inc. AMD, Opteron, the AMD logo, and the AMD Opteron logo are trademarks or registered trademarks of Advanced Micro Devices. UNIX is a registered trademark of The Open Group.
