
This document will continue to evolve as existing sections change and new information is added. All updates are logged below, with the most recent updates at the top.
| Date |
What’s Changed |
Notes |
|---|---|---|
| 08 April 2016 |
Initial Document Creation |
This guide outlines the information you need to know about new or improved functionality in Oracle Taleo Cloud for Midsize (Taleo Business Edition) Release 16A2. Each section includes a brief description of the feature, the steps you need to take to enable or begin using the feature, any tips or considerations that you should keep in mind, and the resources available to help you.
Some of the new Release 16A2 features are automatically available to users after the upgrade and some require action from the user, the system administrator, or Oracle.
The table below offers a quick view of the actions required to enable each of the Release 16A2 features.
| Action Required to Enable Feature |
||||
|---|---|---|---|---|
| Feature |
Automatically Available |
End User Action Required |
Administrator Action Required |
Oracle Service Request Required |
| Talent Center |
||||
|
|
|
|||
|
|
||||
|
|
||||
|
|
||||
| Career Center |
||||
|
|
||||
| Using the Search Results Page for the URL for the Career Center (bad name—any suggestions??) |
|
|||
|
|
||||
|
|
||||
| Additional Changes |
||||
|
|
||||
|
|
||||

We are excited to introduce the Talent Center, our fresh and modern onboarding experience that is fully responsive. The Talent Center can be used on mobile devices as well as desktops. Customers can configure the settings and content of the Talent Center. With this release, employees can view and update their employee profile and can complete their onboarding and offboarding activities.
Employees will access the Talent Center with the same login and password as the Employee Website. However, a different link (URL) will need to be used to access the Talent Center.
New Talent Center merge fields can be used to communicate the Talent Center URL to your employee base. The Talent Center merge fields should also replace the Employee Website merge fields in any email templates to your employees if switching to the Talent Center for Employee Activities.
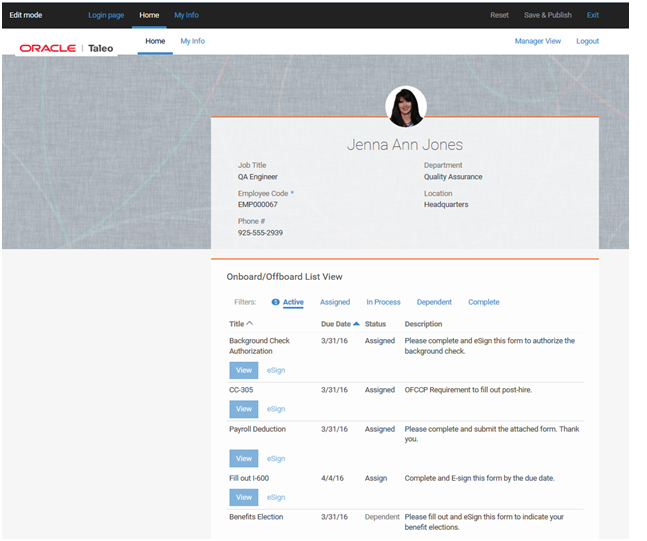
The main page of the Talent Center is the Home Page. This is the page that employees are taken to after successfully logging into the Talent Center. The Home Page contains an Employee Profile Summary as well as an Onboarding/Offboarding List View by default. Additional content can be added to the Home Page by the Administrator. Fields in the Employee Profile may be editable if configured as such. A pencil icon appears next to any field that is editable.
Recruiting and Onboarding customers are strongly encouraged to build a plan to implement Talent Center as a replacement for the current Employee Website (EWS). This will include configuration of the new Talent Center and modifications to any email templates referencing the Employee Website URL.
Recruiting, Onboarding, and Performance customers are encouraged to adopt the new Talent Center for Onboarding and continue to use the EWS for performance reviews and goal management.
Over the next few releases, the Product Management team is focused on including all employee-centric functions (like Performance and Hiring Manager tasks) into the new Talent Center.
When you implement Talent Center for your employees there is no need to move active onboarding/offboarding tasks from the EWS to the Talent Center; this will happen automatically. In the Talent Center, employees can view their assigned, in progress, and completed activities and use the quick filters to switch between them. Employees are able to eSign activities using any device—phone, tablet, or desktop. Some forms may not display optimally on smaller devices.
If you are assigning goals and conducting performance reviews, we recommend that you move onboarding to the modern, mobile Talent Center and continue to use the EWS for performance and goals.
Employees can click the My Info link at the top of the Talent Center to view and update their employee information. Fields that are editable by the employee will have a pencil icon next to them. The employee can click the pencil, edit the information in the field, and then click or tap the Save or Cancel icon (a check mark or large X icon respectively). The information is then updated in the Employee record. If the Employee record contains a profile picture, it will automatically be available in the Talent Center. Profile pictures cannot be uploaded directly from the Talent Center, although this will be available in a future release.
You are able to specify settings for each Talent Center. The steps to update these settings follow below.
In the Talent Center Information section, you may change the name of the Talent Center, select a theme and default locale, and add a custom logo. You will also find the URL for your Talent Center.
NOTE: The default locale determines the default language used throughout the Talent Center. If you are supporting multiple languages you can also define content in other languages in a single Talent Center, as described later in this document.
In the Talent Center Security section, you can set options regarding password security, such as requiring that employees reset their passwords every 30 days and that they will be locked out after a number of failed login attempts.
In the Talent Center Email Notifications section, you can decide if managers and other individuals are notified when employees edit their employee information.
In the Access Control section, you can control access from external IP addresses.
Steps to Update the Settings for a Talent Center
- Select Administration, then select Customize Onboard/Offboard.
- In the Manage Talent Centers section, click Manage for the Talent Center in question. A default Talent Center has already been created for you.
- Select your desired settings, as described above, and click Save.
Please refer to the Resource Center document entitled Talent Center Themes for information on how the themes apply to the Talent Center.
If you need to have more than one Talent Center, you can easily add another.
Steps to CreAte a New Talent Center
- Select Administration, then select Customize Onboard/Offboard.
- In the Manage Talent Centers section, click Add New Talent Center.
- Select your desired settings, and click Save. Your new Talent Center now appears below the default Talent Center on the Customize Onboard/Offboard page.
Configuring Content on the Talent Center
As an administrator you can easily customize the content that appears for all employees on the Talent Center using widgets. Widgets are movable content objects that can be placed within the containers on the page.
There are list view widgets to allow you to customize the content of your Onboard list views; static HTML widgets allow you to add custom content, such as an iFrame to another application, instructions for new hires, and important links for employees; Employee Profile and Employee Information widgets allow you to customize which employee fields display on the page so that employees can easily update their information.
All of these widgets can easily be configured in a What-You-See-Is-What-You-Get (WYSIWYG) editor so that you can see how the changes will appear to employees before publishing them. The widgets are fully responsive so they can be dragged from one side of the page to another as you lay out the information in the desired manner.
You can even add text in different languages, and the correct content will display for the employee based on the employee’s preferred locale as set in the Employee record.
NOTE: In order to customize the content on the Talent Center, your User record must be linked to an employee record. You will get an alert telling you to link the User record to an Employee record when attempting to configure the Talent Center pages if the two records are not already linked.
Steps to Customize the Talent Center Pages
- Select Administration, then select Customize Onboard/Offboard.
- In the Manage Talent Centers section, click Edit Pages for the Talent Center in question. Alternatively, you can click the Manage link, and then once on the page, click the Edit Pages button.
- You are taken to the Home page of the Talent Center, where you will see the default content that an employee will see, depending on which activities are currently assigned.
Default content on a Talent Center
At the top of the page are links for the Login Page, the Home page, and the My Info page. These pages are configured similarly. In the upper right-hand corner, you have the option to reset any changes that you have made, which will go back to the last saved version of your Talent Center. You can also Save & Publish your changes, or exit without saving any changes.
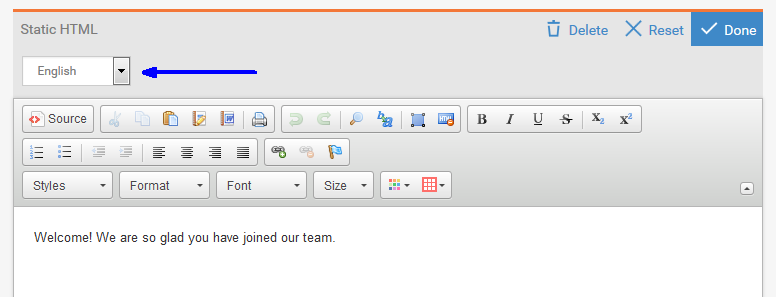
You can click on a widget to edit its contents. Different widgets are edited in different ways. When editing a widget, you can click the Reset button to remove your changes, you can click the Delete button if the widget is one that can be removed, or you can click the Done button to save your changes for that specific widget. You can also simply click outside of a widget to save its contents.
Buttons available when editing a widget
Once you have clicked Done or Reset you can also move a widget by dragging it around the page, releasing it when you see a red area. In the below example, the list view widget is being dragged from its default location on the right over to the more narrow column on the left. Since the widgets are fully responsive they will automatically adjust to the narrow column.

Dragging a widget to a new area on the page
When you have finished editing the page, click the Save & Publish button at the top of the page. Your changes are immediately available to employees.
Home Page
The Home page has two widgets by default: an Employee Profile Summary widget at the top, followed by the Onboard/Offboard list view. You can add a widget by clicking the Add new widget button at the bottom of the page. You can also move widgets around by dragging them. While the Employee Profile widget must remain at the top of the page and cannot be removed, the list view can be dragged to the narrow column on the left side.
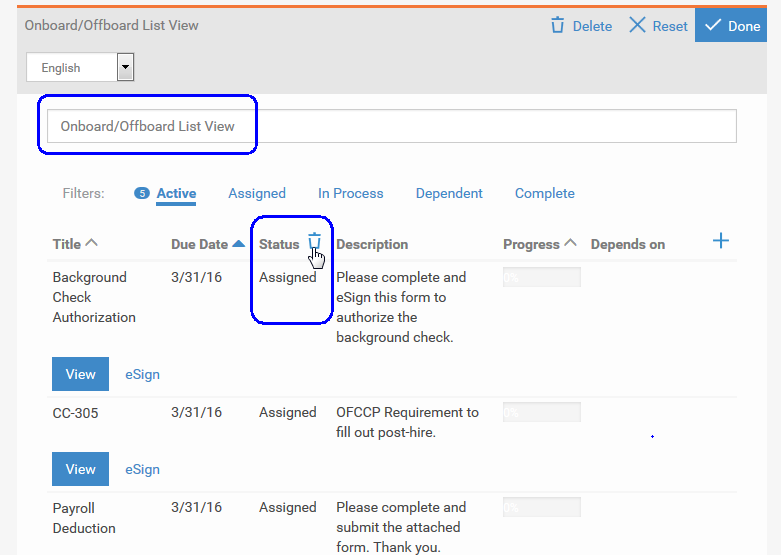
You can click in the Employee Profile Summary widget to edit its contents. Certain fields are present by default. The widget can contain up to 6 fields, so you may delete the default fields and add different fields as needed.
Steps to Customize the Employee Profile Summary Widget
- Click in the Employee Profile Summary widget at the top of the page.
- To remove a field, click on the area of the field, and then click the trash can icon.
- If you make a mistake, click the Reset button for the widget.
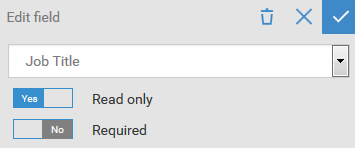
- To edit a field, click the pencil icon or anywhere in the field area, and then mark the field as read only or required.
- Click the checkmark icon when you have finished configuring a specific field.
- Click the Add Field link in the lower right hand corner of the Employee Profile to add another field to the Employee Profile. Select the field, enter the settings as desired and then click the plus button.
- Drag the fields around within the widget to display them in the desired order.
- When you have finished configuring the Employee Profile Summary Widget, click Done or click outside the widget.
- If you have saved the widget by mistake, click the Exit link at the top of the page. This will remove all the changes to the Talent Center pages since the last save, however, not just changes to the last widget you edited.
NOTE: The sliders to set the field properties work as follows: When the slider says Yes, this means that the attribute is true. When the slider says No, this means that the attribute is not true. If you click on the slider it will change. So in the below example, the field Job Title is set to read only but it is not required.
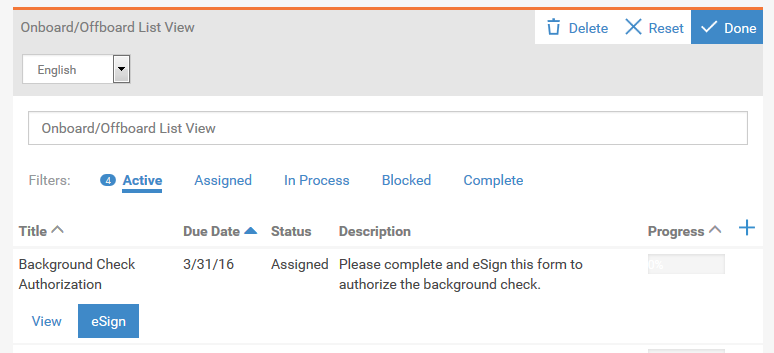
The other widget on the Home page is the Onboard list view. This list view can be customized as well.
Steps to Customize the Onboard List View
- Click the Onboard list view.
- The title of the list view is editable and can be changed. Change the language drop down to a different language to add a title for the list view in another language.
- As you hover over the various columns in a list view, a small trash can icon appears, allowing you to remove a column if it is not needed.
- The list view is being sorted by the column with the blue carrot. Clicking the blue carrot will change the sort from ascending to descending or vice versa. The list view can also be sorted by any column with a gray carrot. Clicking on another column will change that column to the blue carrot.
- Click the blue plus sign on the right side of the widget to add any available additional fields as columns to the list view.
- Click and drag the column title to re-order the columns.
- Click the Reset button at the top of the widget to revert any changes for the list view widget.
- Click the Done button at the top of the widget to save the widget, or simply click outside the widget.
- Once the widget has been saved, it can be moved to another location on the page by dragging and then releasing in the desired red area.
You can click the Add new widget button at the bottom of the page to add more content to the Home page. You can add another Onboard list view or a static HTML widget. You can use a static HTML widget to add company information, important links for new hires, or even a link to your Career Center.
For example, you can use HTML code similar to the following to link to your Career Center:
<p><iframe height="1000" src="https://YOURSERVER.tbe.taleo.net/chm01/ats/careers/v2/jobSearch?cws=42&org=SAMPLEORG" width="100%"></iframe></p>
When you add a new widget on the Home page, it will be placed below the Onboard list view, but you can drag it anywhere on the page, to the narrow or wide column, as long as it is below the Employee Profile. You can add multiple static HTML widgets to the Home page to provide your employees with the important information they need when they log into the Talent Center.
You can add content in multiple languages as well. If you are adding company information into a static HTML widget, you can change the language drop down to a language different from the default language and then add the information in another language.
Selecting another language when adding content to a widget
When an employee with a preferred locale different than the default locale logs into the Talent Center, the employee will see the content that you have entered for the other language. If content is not specified for the employee’s particular language, the content of the default language of the Talent Center will display.
Employees can also select another language from the login page. Any supported languages for your zone will appear in this list, so you can enter content in these languages and it will appear for the employees who select a language other than the default.
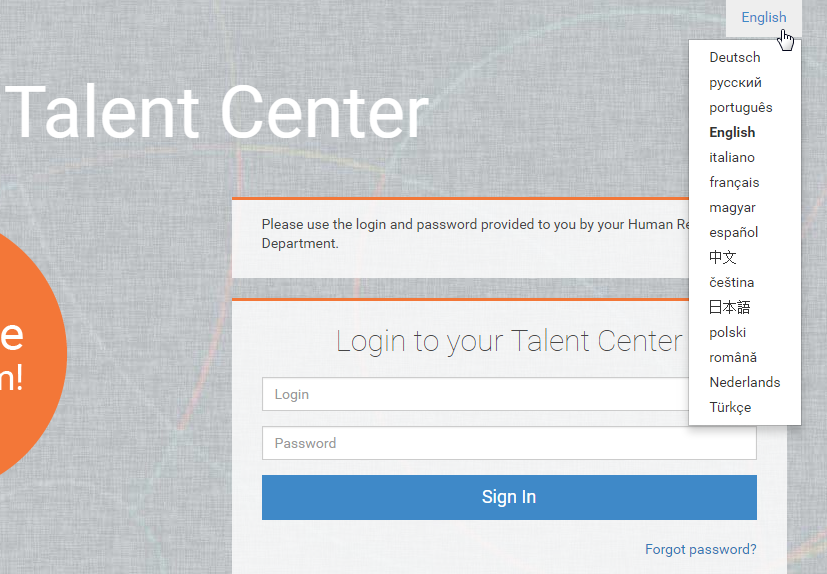
Language drop-down when logging into the Talent Center
When you have finished updating the content on the Home page, click Save & Publish at the top of the page.
Login Page
The Login page consists of five different widgets by default, as shown below. You can customize the content on this page to provide your employees with clear instructions when they log into the Talent Center, or information that is best suited to your company.

Widgets available on the Login page
You can customize the content of these areas by clicking on the widget. You can remove widgets that are not needed. The widget with the login information cannot be removed or updated, although it can be dragged elsewhere on the page. Simply drag and release it once you see a red box. The widget above the Login widget with the ‘Please use the login…’ text can be removed, but not edited. It has already been translated into other languages.
Click a widget to edit its contents. Click the Done button to save the widget, or simply click outside the widget. Click the Reset button at the top of the widget to revert any changes in that widget.
You can add additional static HTML widgets by clicking the Add new widget button near the bottom of the page. Newly added widgets can then be moved to a different place on the page.
When you have finished configuring the Login page, click Save & Publish at the top of the page.
NOTE: The widgets on the Login page are system default widgets and once deleted, they cannot be added again by clicking the Add new widget button. If you create a new Talent Center, they will be on the Login page, however.
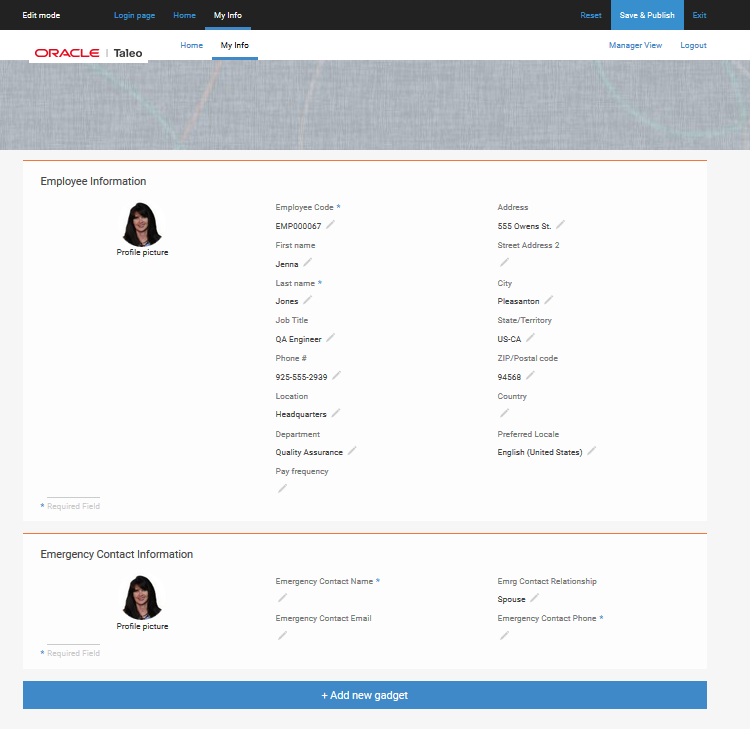
My Info
The My Info page allows employees to update more information than what appears on the Home page. Changes saved on the Talent Center flow to the Employee Record. If the Employee Information widget on the My Info page and the Employee Profile Summary widget on the Home page have the same fields, changes on one page will flow to the other page.
By default there is one Employee Information widget on the page. The content of the Employee Information widget can be customized.
Steps to Customize the Employee Information Widget
- Click in the Employee Information widget.
- To remove a field, click on the area of the field, and then click the trash can icon
- If you make a mistake, click the Reset icon at the top of the widget.
- To edit a field, click on the area of the field, and then mark the field as read only or required.
- Click Done when you have finished configuring a specific field.
- Click the Add Field link in the lower right hand corner of the Employee Information widget to add another field. Select the field, enter the settings as desired and then click the Add button.
- Click Done at the top of the widget to save your changes, or simply click outside of the widget.
You can add static HTML widgets to the My Info page, but you can also add another Employee Information widget in order to create different sections. In the following example, an emergency contact section was created by adding an Employee Information widget, removing the default fields that were present and then adding in custom fields for emergency contact information.
Creating sections on the My Info page
When you have finished editing the My Info page, click the Save & Publish button at the top of the page. Your changes are immediately available to your employees.
Setting a Default Talent Center
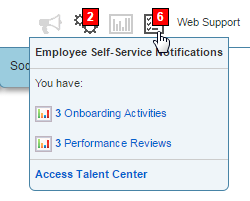
As mentioned previously, you can add custom content in multiple languages for a single Talent Center, so there is no need to create one Talent Center for each language. However you may want to use multiple Talent Centers for other reasons. Every employee can access all Talent Centers, as long as they know the correct URL. You can set a default Talent Center that will be accessed by Taleo Business Edition users via the quick access menu, which is the small notepad icon at the top of the page.
The default Talent Center is also the one to which the merge fields will refer.
On the Customize Onboard/Offboard page you can specify which Employee Website and which Talent Center should be used for quick access as shown below:
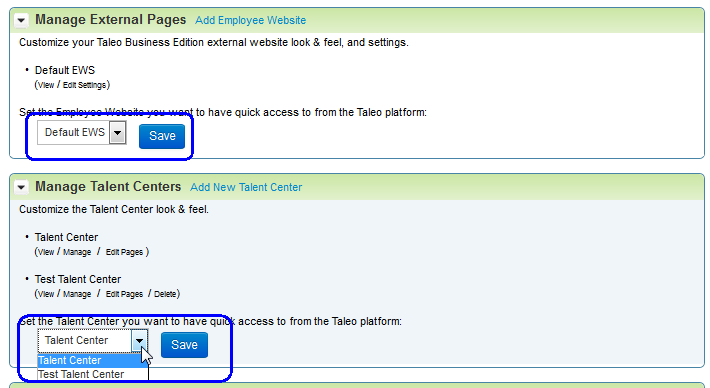
Selecting the default website for the Quick Access menu
By default the selected Employee Website will be used for quick access. When you are ready to move all employees over to the Talent Center, you can change a setting that will affect the quick access link.
Steps to Enable Talent Center for the Quick Access Link
- Select Administration, then select Organization.
- Click System & Email Settings.
- Scroll down to the User Interface Settings, and check Make Talent Center the default website for Employees.
- Click Save.
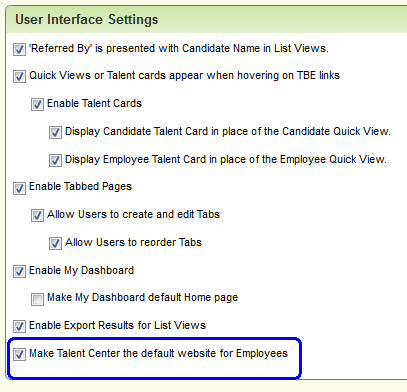
Now when users want to access the Talent Center from within Taleo Business Edition, the quick access menu will take them to the Talent Center rather than the Employee Website.
Talent Center Merge Fields
As mentioned previously, there are new merge fields available for the Talent Center. These are available when editing any system email template, under the Common fields area.
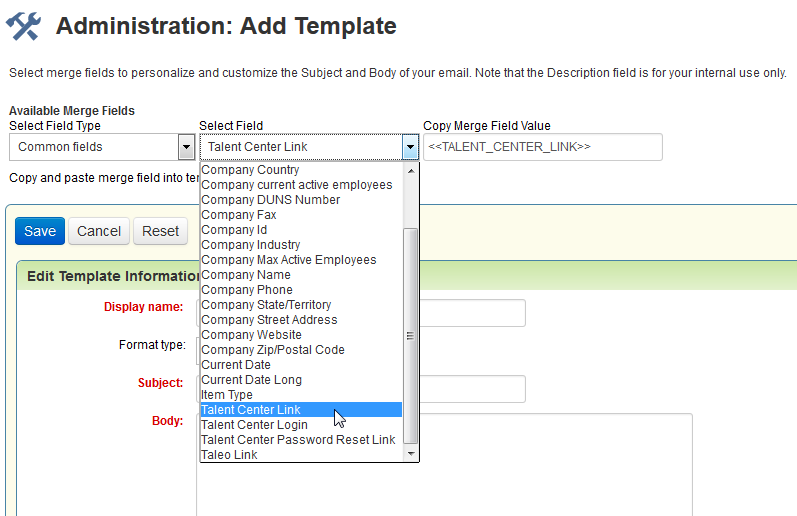
The three merge fields are:
- <<TALENT_CENTER_LINK>>
- <<TALENT_CENTER_LOGIN>>
- <<TALENT_CENTER_PASSWORD_RESET_LINK>>
When you are ready for employees to use the Talent Center, you can update the merge fields in your email to welcome new employees with the top two merge fields listed here, and you can update the merge field in your password recovery email with the third merge field listed here. If you have more than one Talent Center configured, these merge fields will refer to the default Talent Center as set on the Customize Onboard/Offboard page.
We are rebranding the ‘mobile enabled Careers Website’ to the Career Center. This modern candidate experience deserves a more modern name to replace the updated capabilities directed at improving the quality and volume of your candidates. The capabilities in the Career Center reflect the growth of the Talent Management industry and the focus on consumer based, mobile-ready applications.
Features such as the application workflow rather than a long application page, job alerts, allowing candidates to upload resumes from Google Drive or Dropbox, the Saved Draft Applications feature introduced in this release, and a highly configurable look and feel all contribute to a great candidate experience regardless of the device used to search and apply for a job.
References to the mobile enabled Careers Website throughout the product have been renamed to Career Center. For example, on the Customize Recruit page, the following now appears to customize the settings of a Career Center, formally the Mobile Enabled Careers Website:
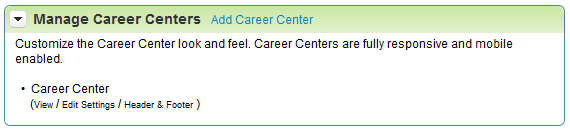
Rebranded Career Center
The legacy Careers Website has not changed. Customers may continue to use their legacy Careers Website. However, this version is not responsive and will not continue to be enhanced.
The Career Center now allows job seekers to save a draft of their application. This feature is only available for the Career Center and will not be added to the legacy Careers Website. When this feature is enabled for a Career Center, job seekers can save a draft of their application any time throughout the application process. Job seekers simply need an email address and a password, and then they can save a draft in case they need to complete the application at another time. When saving a draft application, required fields do not have to be populated as no validation is performed.
You can elect to have an email automatically sent to job seekers once a draft has been saved so that they can easily return to the Career Center. Once the application has been completed and submitted, a Candidate record is created in Recruit as always. Previous to submitting the application, the draft information is not accessible to users in Taleo Business Edition.
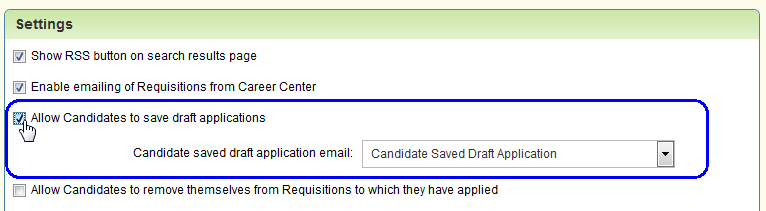
Steps to Enable Save Draft Applications
- Select Administration, then select Customize Recruit.
- In the Manage Career Centers section, click Edit Settings for the Career Center in question.
- In the Settings section, check the option Allow Candidates to save draft applications.
- By default the email template called `Candidate Saved Draft Application’ is selected. This is a new system template that can be edited via the Customize Recruit page. You can select a custom template or change this to `Do not Send’ if you do not wish to send an email when applicants save a draft.
- Click Save.
Once this setting has been enabled for a Career Center the Save Draft button will appear on the bottom of each page of the application after the registration page or login. When the job seeker clicks the button and the draft is saved, the text ‘Draft saved’ appears below the button.
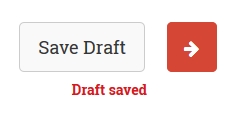
Text showing that the draft has been saved
Only one email will be sent to the job seeker per requisition, no matter how many times they save a draft for a single requisition, if email is enabled. The email template contains a link to return to the Career Center.
Once the job seeker logs back in, he or she can go to the My Jobs page to access any saved drafts and continue the application process by clicking the Proceed button. The Remove button will delete the draft.
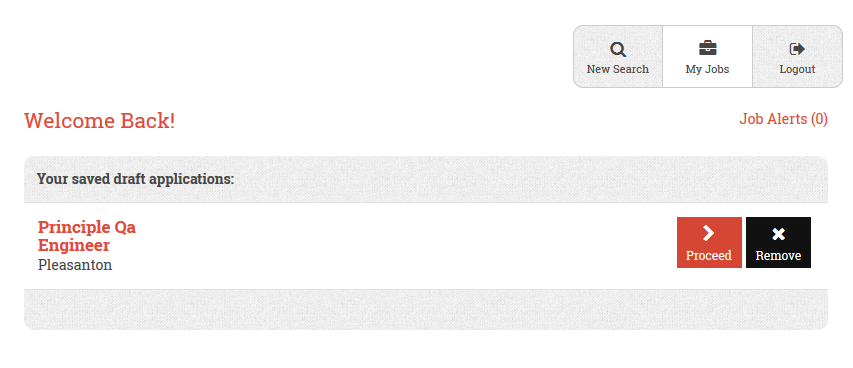
My Jobs page for a job seeker with a saved draft
When logged-in job seekers are searching for jobs, any positions for which they have saved a draft can be easily identified in the search results, as these positions will have a Proceed button next to them.
Before the job seeker has submitted an application and becomes a candidate, the information is not saved for any subsequent drafts saved for other positions. That is, if a job seeker saves a draft and then applies for a different position without submitting the first draft, the application will not be pre-populated with any information from previously saved drafts. Each draft can contain different information before the job seeker becomes a candidate. Only when the job seeker submits an application and becomes a candidate will the application information be populated in the candidate record. Even for existing candidates saving draft applications, none of the data in the draft applications will be saved in the candidate record until the draft is officially submitted as a completed application.
Direct URL to Career Center Search Results
Customers who have only a small number of job postings at any time may want to refer job seekers to the search results page listing all the opened jobs rather than the job search page where a job seeker must enter search criteria. This can now be accomplished with the Career Center.
Simply go to your Career Center and click the Search button without entering any search criteria. Then use the resulting URL in your link to your Career Center on your corporate website.
Setting a Default Career Center
If a user resets a candidate’s password from within Taleo Business Edition, the email that is sent to the candidate defaults to the Careers Website with ID=1, which is the default legacy Careers Website that is created for each customer. If you would like to refer candidates to a different legacy Careers Website, or a particular Career Center, there is a new setting which will do so.
Steps to Enable the Default Career Center
- Select Administration, then select Organization.
- Click System & Email Settings.
- At the bottom of the System Settings section, there is a new setting for Default Career Center. This is set to Careers Website for all customers.
- Change this setting to the desired Careers Website or Career Center.
- Click Save.
NOTE: This setting is not used when the correct Careers Website/Career Center is already known. For example, when a candidate is on a specific Career Center and clicks the Forgot Password link, the email the candidate receives returns the candidate to the same Career Center. Also, when a user invites a candidate to apply using the Invite feature, the user can specify the exact site to which the invitation will direct the candidate.
For those customers who have enabled the Voluntary Fields page on their application workflow for their Career Center the following changes have been made:
- All sections of voluntary fields presented to candidates after the application is submitted are now expanded by default rather than collapsed
- The Skip button has been removed at the bottom of the page
These changes will hopefully encourage more candidates to complete these fields. However, as these fields need to remain voluntary there is no way to require the fields to be completed.
In addition, if you have Application Snapshot turned on, each application that is created for a candidate will display the following information if any of the voluntary fields were enabled at the time the candidate applied:
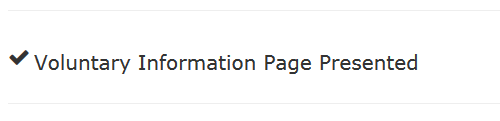
This information provides you with the proof that the candidate was shown the voluntary fields, whether or not they actually completed them.
Please refer to the online Help for more information on Application Snapshot.
Removal of Check Spelling Link
The Check Spelling link that was present in each text area field within Taleo Business Edition has been removed. This link used third party software which is no longer available. Most browsers contain a spell checker that can be set to a specific language so this is the suggested workaround.
Removal of Chart Information with the Pay Range Field
The chart information that displayed in the Pay Range field and in the Compensation Calculator has changed in this release. This Pay Range field is available when editing or viewing an employee record, on a position document when using Position Control, and similar list views. Clicking on the small dollar bill icon in the Pay Range field now shows the information as follows:
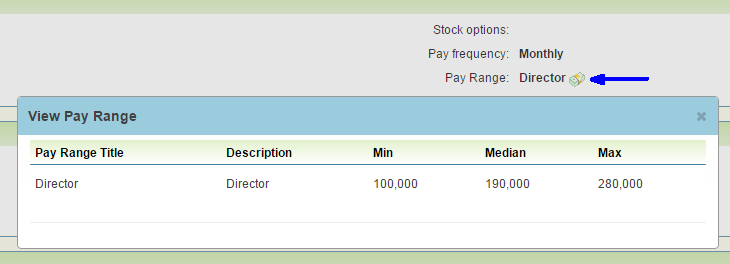
Information displayed with the Pay Range field
When viewing a compensation plan, the information displays as follows:

Information displayed for a compensation plan
The same numerical information is provided but without the graphical display.
---

Copyright © 2016, Oracle and/or its affiliates. All rights reserved.
This document is provided for information purposes only, and the contents hereof are subject to change without notice.This document is not warranted to be error-free, nor subject to any other warranties or conditions, whether expressed orally or implied in law, including implied warranties and conditions of merchantability or fitness for a particular purpose. We specifically disclaim any liability with respect to this document, and no contractual obligations are formed either directly or indirectly by this document. This document may not be reproduced ortransmitted in any form or by any means, electronic or mechanical, for any purpose, without our prior written permission.
Oracle and Java are registered trademarks of Oracle and/or its affiliates. Other names may be trademarks of their respective owners.
Intel and Intel Xeon are trademarks or registered trademarks of Intel Corporation.All SPARC trademarks are used under license and are trademarks or registered trademarks of SPARC International, Inc. AMD, Opteron, the AMD logo, and the AMD Opteron logo are trademarks or registered trademarks of Advanced Micro Devices. UNIX is a registered trademark of The Open Group.