
This document will continue to evolve as existing sections change and new information is added. All updates are logged below, with the most recent updates at the top.
| Date |
What's Changed |
Notes |
|---|---|---|
| 18 MAR 2016 |
Initial Document Creation |
This guide outlines the information you need to know about new or improved functionality included in Release 16A for Oracle Learn Cloud. Each section includes a brief description of the feature, the steps you need to take to enable or begin using the feature, any tips or considerations that you should keep in mind, and the resources available to help you.
IMPORTANT: Oracle Learn Cloud platform and general technology updates can affect complex or custom LearnCenter pages. If you are using a custom CSS file, it is important to verify your site CSS with each product release. Based on changes in the platform, there is a chance that you could see alignment or positioning issues after a release due to the custom CSS used on your site. Often any updates that your CSS requires are minor and easy to make. Contact Customer Support through My Oracle Support for any additional information.
For Licensing Information, please refer to My Oracle Support DOC ID 1461788.1 .
Some of the new Release 16A features are automatically available to users after the upgrade and some require action from the user, the company administrator, or Oracle.
The table below offers a quick view of the actions required to enable each of the Release 16A features.
| Action Required to Enable Feature |
||||
|---|---|---|---|---|
| Feature |
Automatically Available |
End User Action Required |
Administrator Action Required |
Oracle Service Request Required |
| Recurring Learning Plans |
||||
|
|
||||
|
|
||||
|
|
|
|||
|
|
|
|||
|
|
|
|||
| BI Reporting Enhancements |
||||
|
|
|
|||
|
|
||||
|
|
||||
|
|
||||
|
|
||||
|
|
|
|||
| Widget Enhancements |
||||
|
|
||||
|
|
||||
|
|
||||
|
|
||||
|
|
||||
| New Ability to Require Unique Email Addresses |
||||
| New Ability to Require Unique Email Addresses upon Registration |
|
|||
| Bulk Loader Enhancements |
||||
|
|
||||
| LearnCenter Links, Images, and Tags |
||||
|
|
||||
|
|
||||
|
|
||||

You now have the ability to set up recurring Learning Plans so that Users can retake training at any interval you set. This offers you an automated way to administer recurring training to your end Users. LearnCenter sends automatic email reminders to Users to prompt them to retake the training. You can configure the recurrence and the email reminders by number of days or months, and you can customize the email reminder as you can with other LearnCenter Communication Messages.
Tips and Considerations
For this feature to work, you must enable Multiple Attempts for web based training at the root LearnCenter. At this time, only Courses and Classes are supported for this feature. Pre-existing Learning Plans cannot be edited and set to recurring. Only active Learning Plans can recur. To stop a plan from recurring for certain Users, simply remove them from the Learning Plan.
Key Resources
- Refer to online help for instructions on enabling Multiple Attempts (TOC > Options > System Options > Multiple Attempts).
- Refer to online help for complete details on setting up Learning Plans (TOC > Advanced Learning > Learning Plans).
- Refer to online help for complete information on working with Communication Messages. (TOC > Communications > Communication Messages)
- Refer to online help for complete information on adding and editing Widgets (TOC >LearnCenter Designer > Widgets).
- Refer to online help for complete instructions on running custom reports in BI Reporting (TOC > Reports > BI Reporting).
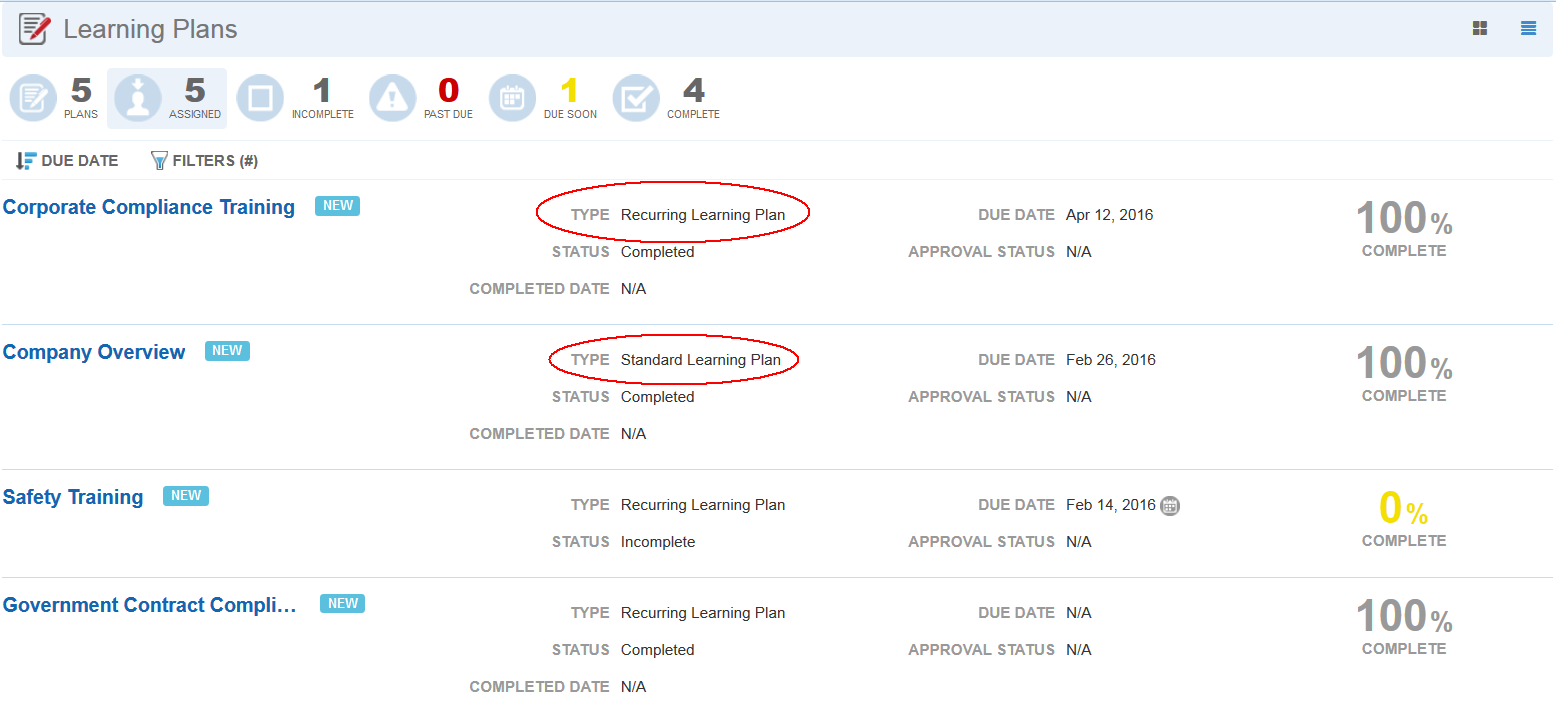
New Type Fields On Add Learning Plan Details Tab
There is a new Type field on the Add Learning Plan Details tab. Use this field to indicate whether you are creating a Standard Learning Plan (non-recurring), or a Recurring Learning Plan.
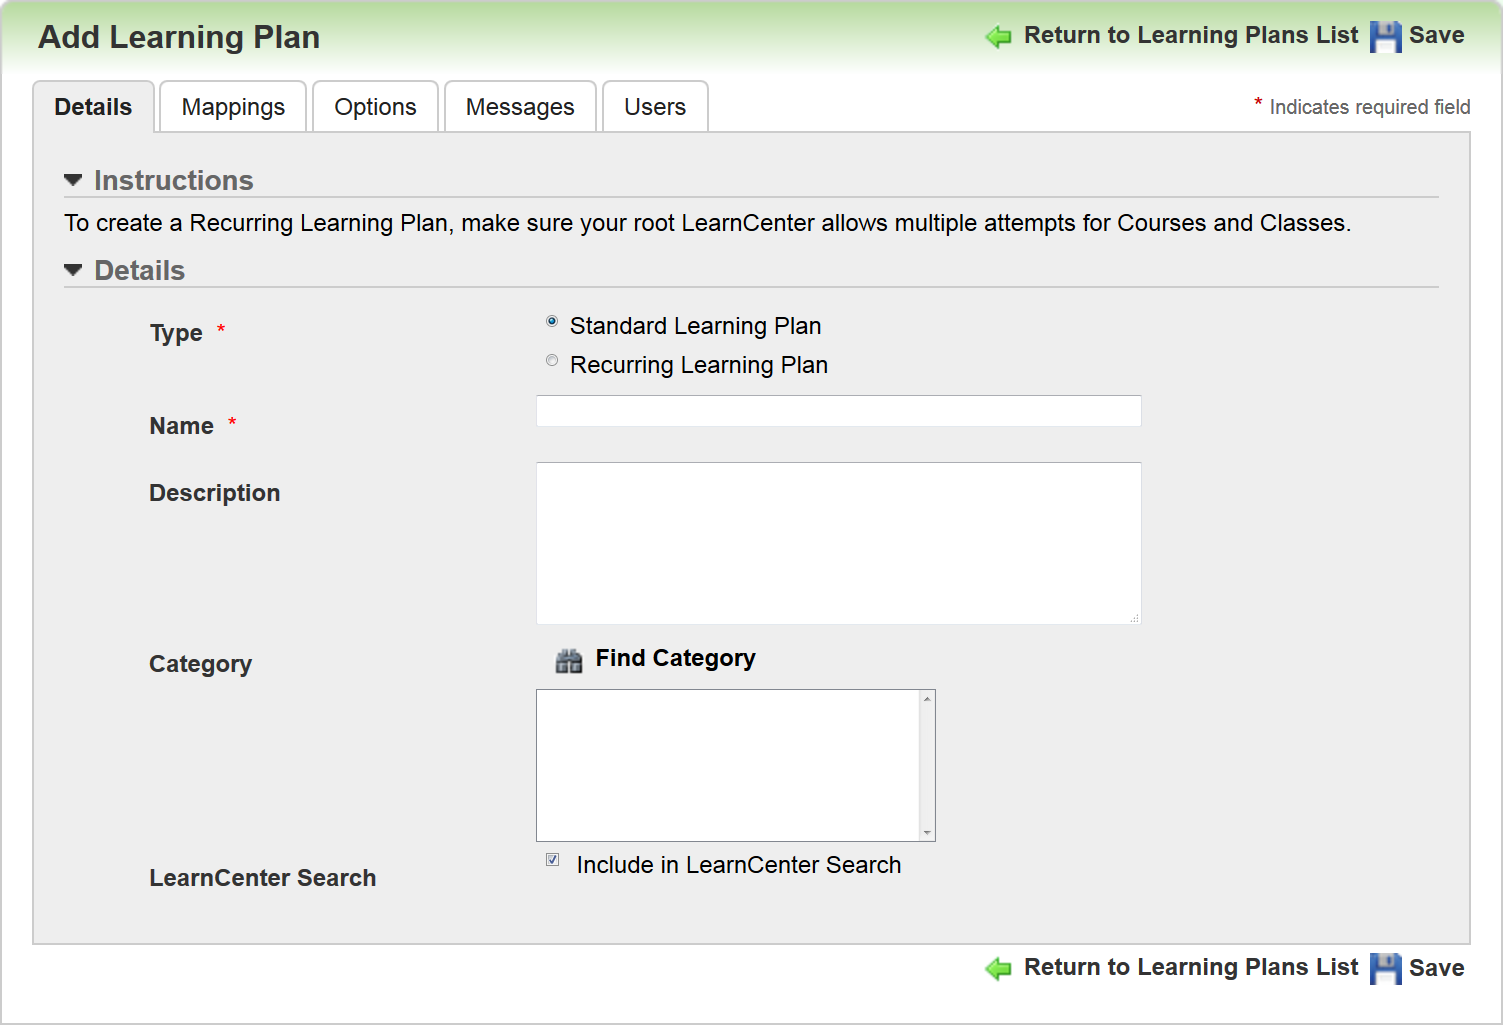
Once you click Save, the Type field dims and is no longer editable. If later you decide that you to change the type from Recurring to Standard (or from Standard to Recurring), you will not be able to do so. You will need to add a new Learning Plan in order to use the other Type.
Click Save and then click the Mappings tab.
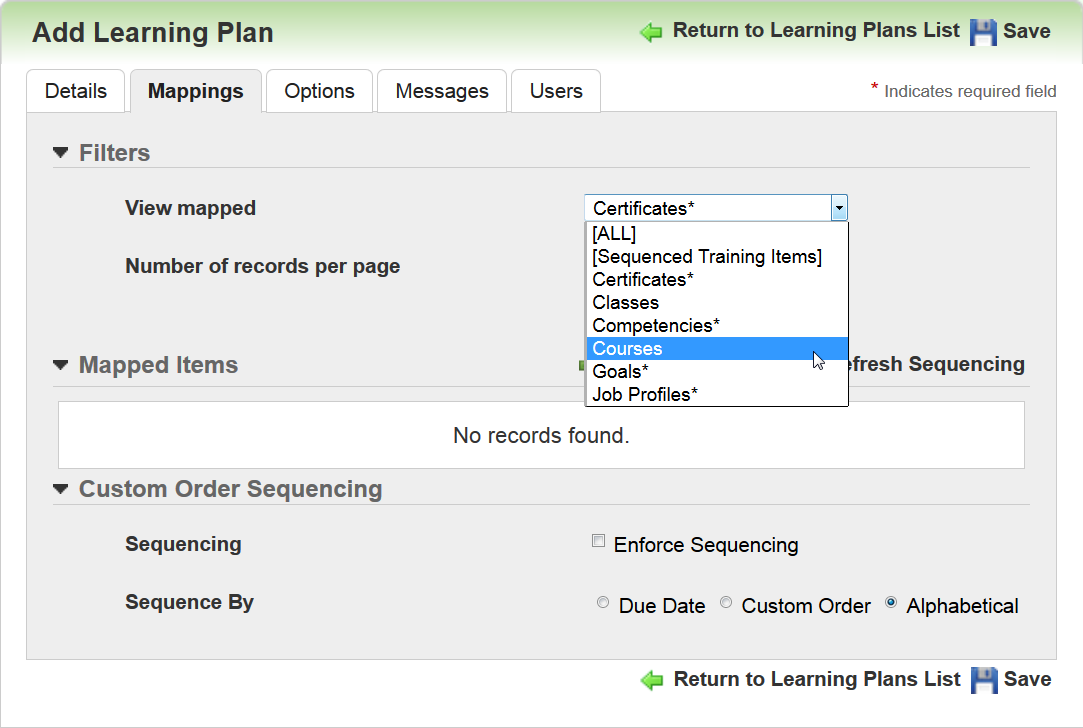
Only Courses and Classes are supported for use with recurring Learning Plans. Map the appropriate Courses and Classes to the Learning Plan, and then click the Options tab.
Use the Options tab to indicate how the Learning Plan should recur.
Note: If you do not set any information here, the Learning Plan cannot reoccur.
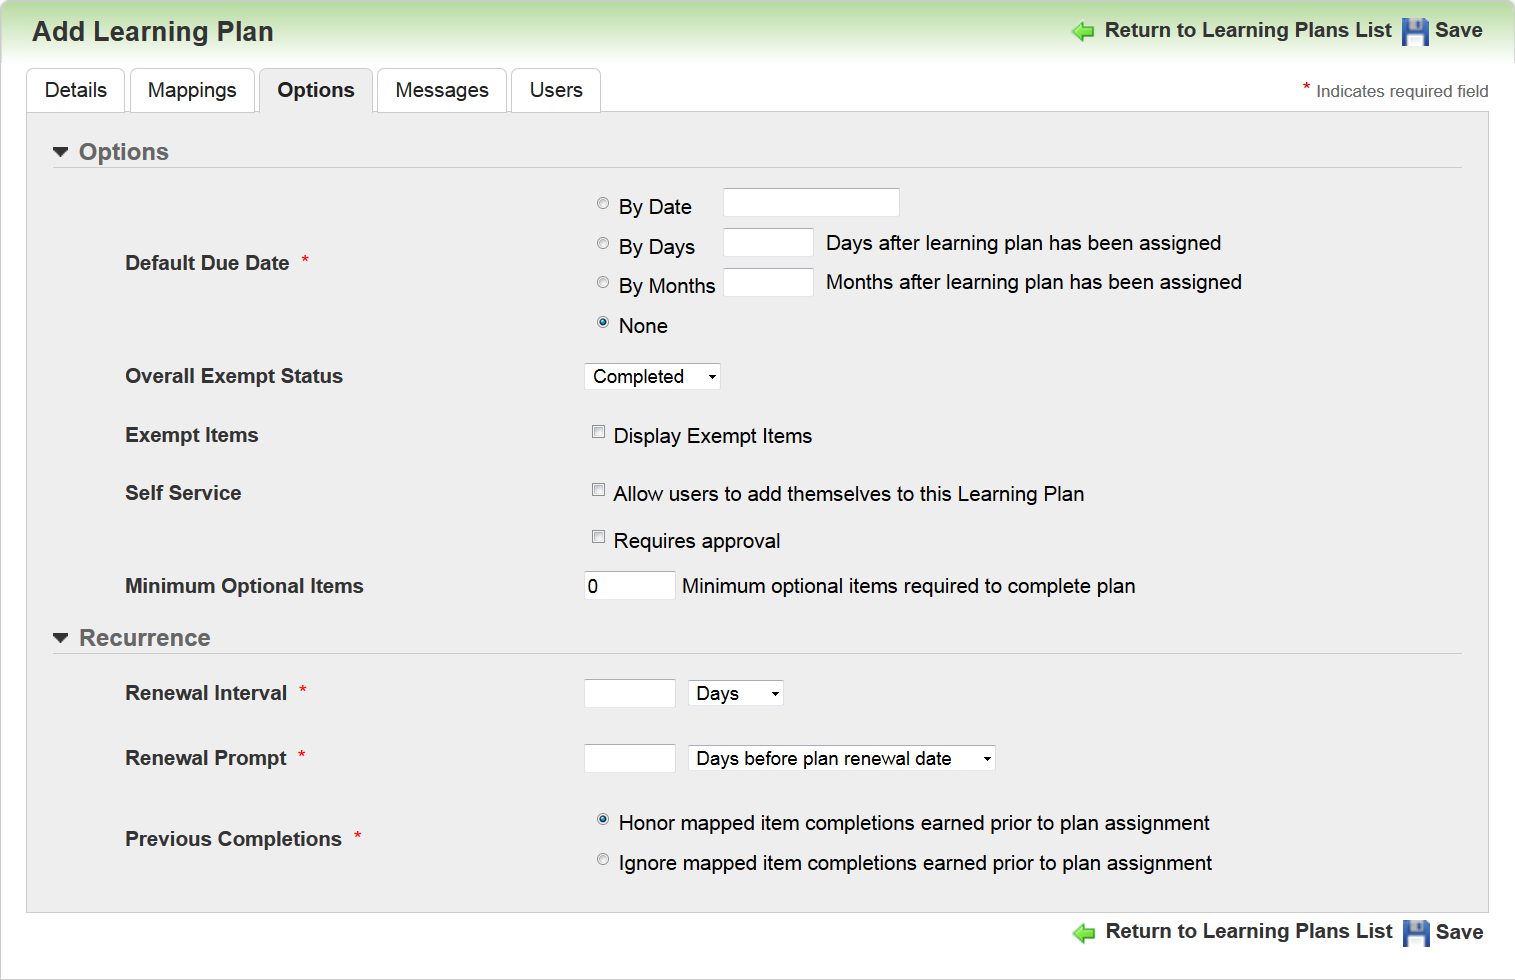
Select one of the following for Default Due Date: By Date, By Days, by Months. This field functions as it always has; the Default Due Date is the initial completion due date, and is calculated based on when the Learning Plan is assigned to Users.
There is a new Recurrence section on this tab that enables you to set the options for how this Learning Plan will recur. Renewal Interval can set by number of Days or Months. The Days selection has a default maximum limit of 365 days, and must be in a range between 2 and 365. If you have a Learning Plan that must be renewed every 2 years, you can set this field to either 24 Months. The Months selection has a default maximum limit of 60.
Note: Both of these maximums can be raised if necessary. Contact Customer Support through My Oracle Support and open a service request (SR) asking for these maximum defaults to be raised.
Use the Renewal Prompt field to indicate the renewal window during which you want notify Users that they have a Learning Plan renewal deadline approaching. A message is sent to Users reminding them that they have a Learning Plan that needs to be renewed by a certain date. The Renewal Prompt can be set a certain number of Days before plan renewal date or Months before plan renewal date. The Renewal Prompt value must be greater than zero and less than the Renewal Interval (maximum of 364).
Use the Previous Completions field to indicate whether you want to Honor mapped item completions earned prior to plan assignment. This means Users would not have to retake any Learning Plan mapped training that they have previously completed. You could alternatively indicate that you want to Ignore mapped item completions earned prior to plan assignment. This means Users would have to retake any Learning Plan mapped training they have previously completed in order to satisfy the requirements of the Learning Plan renewal.
Click Save, and then click the Messages tab.

There is a new Learning Plan Renewal Prompt Communication Message. This message is sent to Users to remind them of a Learning Plan that needs to be renewed by the date you indicated on the Options tab. You can use the provided default text, or customize the message to suit your needs. This message is sent to Users when the Renewal Prompt date is reached.
New Fields On the Add Widget Plans Tab
There is a new Show Plans in Selected Types field on the Add Widget Plans tab. This field enables you to indicate what type of Learning Plans you want to display on the Widget (Standard or Recurring).

Select the check boxes for the types you want to display.
New Attribute Available for Add Widgets Display Tab
You can add a Type attribute for Users to use to sort their Widget search results. You can rename the default text if necessary.
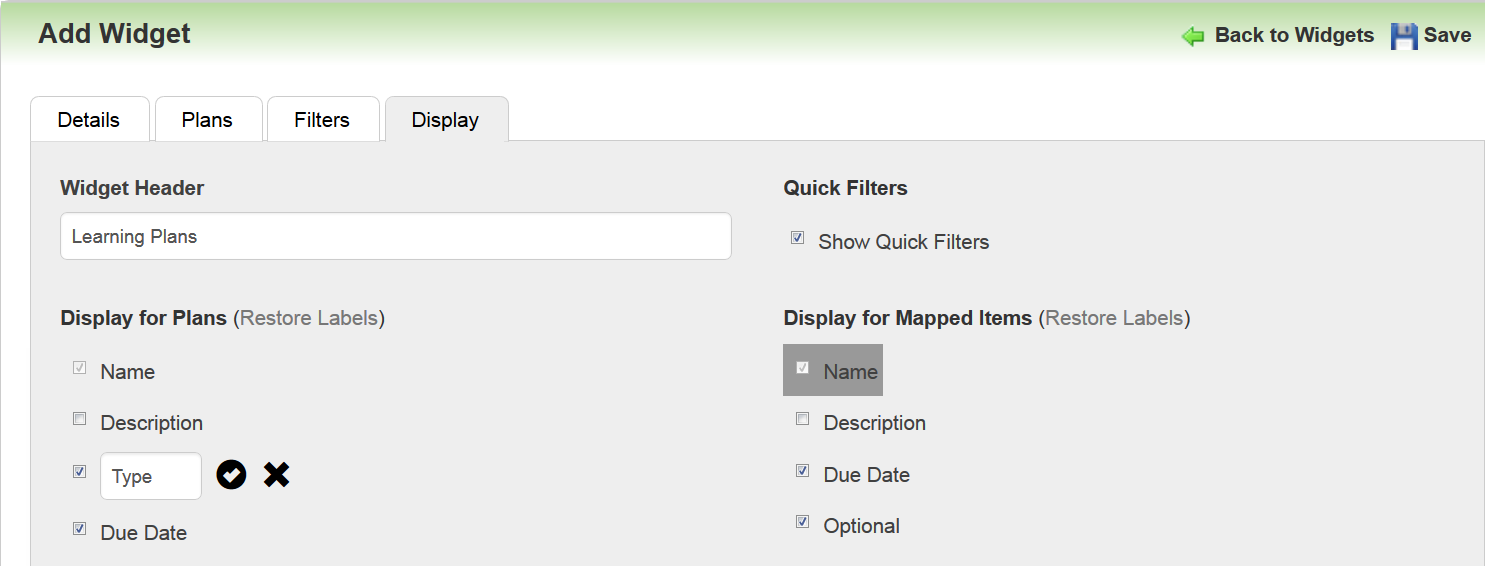
Selecting this attribute causes the Type field to display on the Widget for end Users.
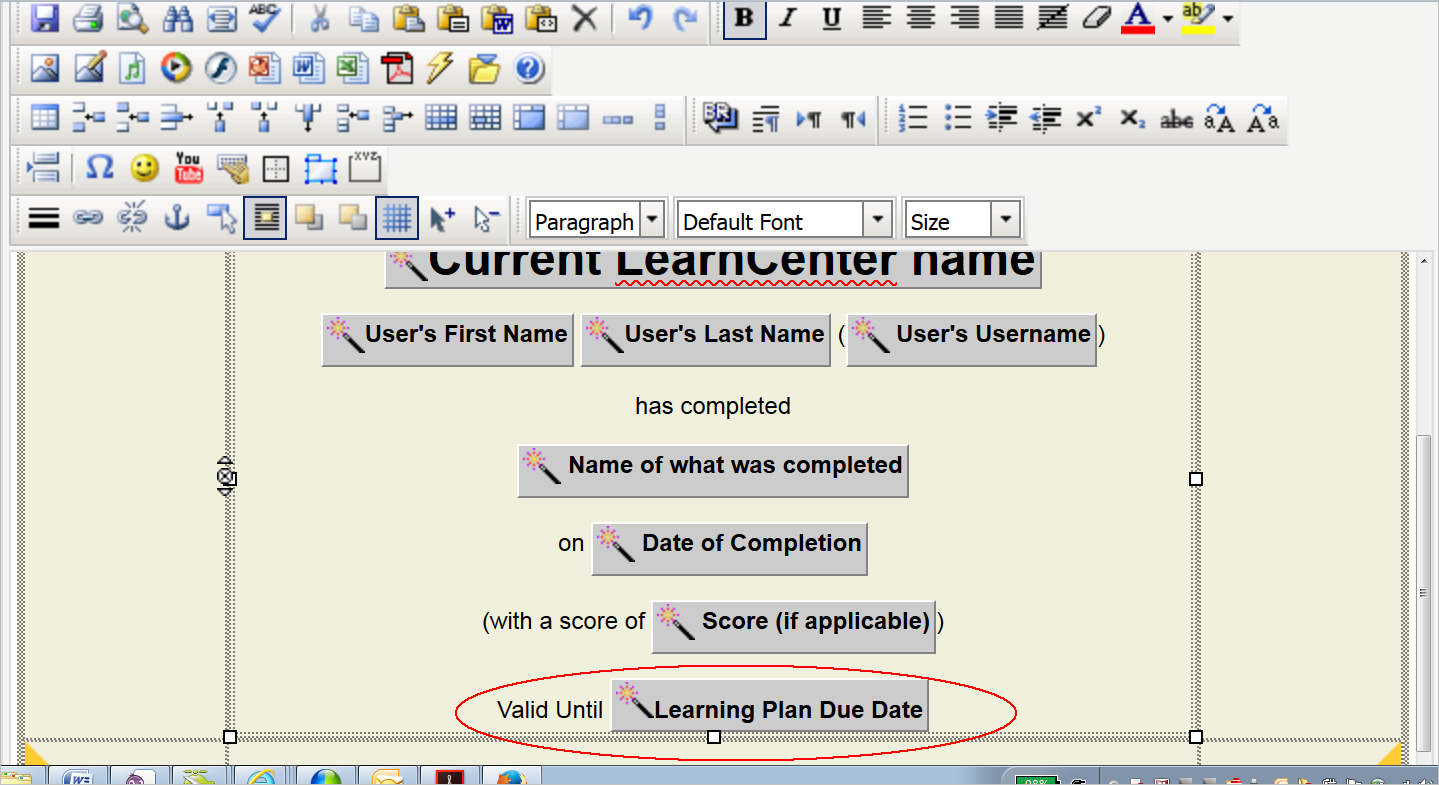
Suggestion for Certificate Expiration Dates
With the addition of Recurring Learning Plans, you may want to create Certificates that reflect expiration dates for the Learning Plans for which the certificates were earned. For example, you might want to add “This Certificate is Valid until February 28, 2017.” To do this, add the dynamic tag for the Learning Plan Due Date.
New Recurring Learning Plan Data View for BI Reporting
There is a new Recurring Learning Plan Completions Data View available from the Item Progress category in BI Reporting. Use it to create your own custom Recurring Learning Plan Completions report.

When you select this Data View, Recurring Learning Plan Completion fields become available in Step 5 of the Custom Report Wizard.

There are new BI Reporting enhancements included with Oracle Learn Cloud Release 16A. These enhancements provide additional capabilities for Administrators and the ability for end Users to run their own reports via a dynamic object.
Key Resources
- Refer to online help for complete instructions on running custom reports in BI Reporting and working with Data Views (TOC > Reports > BI Reporting).
- Refer to online help for complete instructions on Dynamic Objects (TOC > Dynamic Objects).
- Refer to online help for instructions on granting User Permissions (TOC > User Permissions).
New BI Report List Dynamic Object
There is a new BI Report List Dynamic Object.
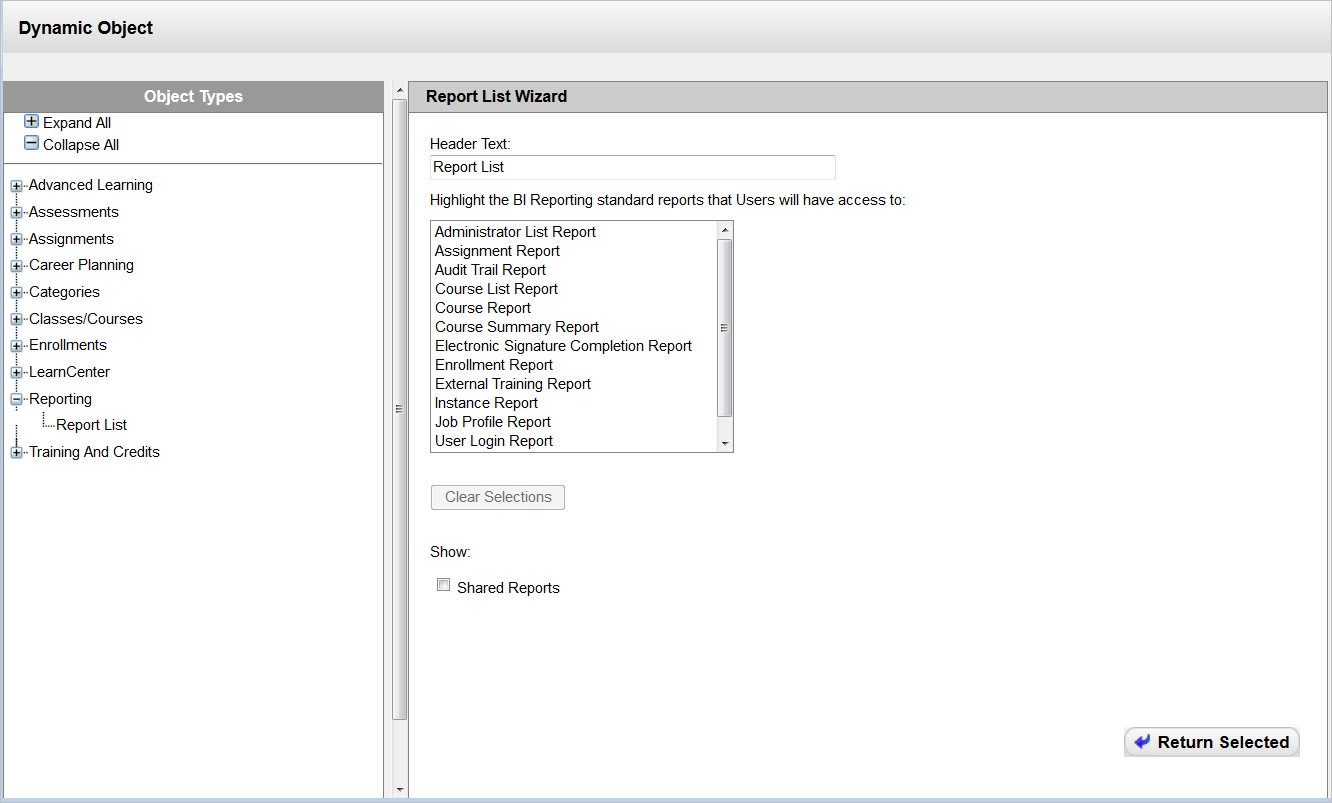
This dynamic object enables Admins to share reports with Users who do not have My Team or Control Panel access.
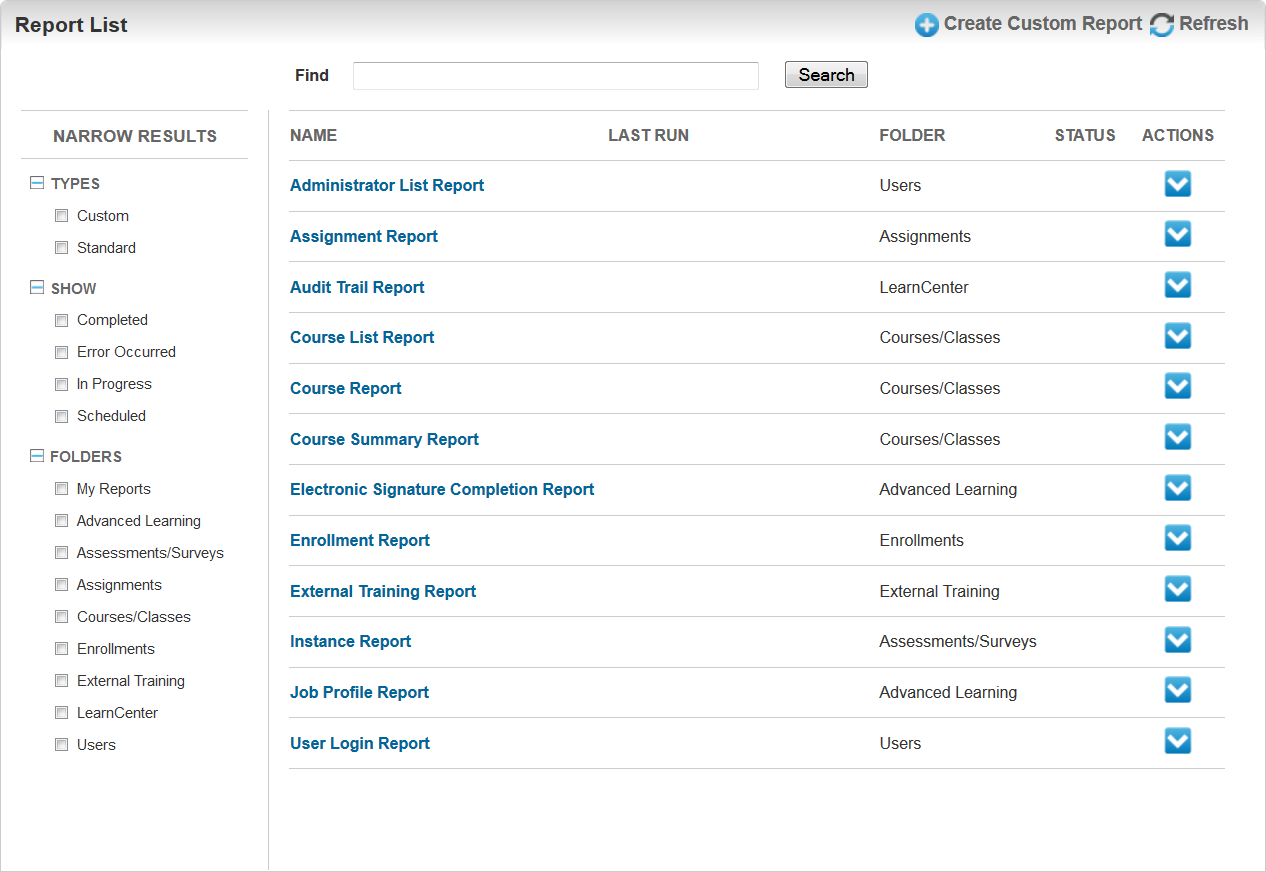
Notice what displays to Users is similar to what displays for Admins and Supervisors in the Control Panel and My Team.

The Users tab is not present for anyone using this dynamic object, because it is only used to run reports on the current logged in User.
Important: History is maintained on a per User-Per LearnCenter-Per-Role basis. What this means is if you are a Supervisor, an Admin, and a standard end User, and you can run reports from multiple locations (Control Panel, My Team or this dynamic object), the history and parameter setups for one location are not reflected in the other. If you change parameters or you run a report on the Control Panel, that information is no reflected in the BI Report List dynamic object. However, if you have multiples BI Report List dynamic objects, what you do in one dynamic object is reflected in another dynamic object.
New Ability to Upload Reports to SFTP Server
There is a new Copy to SFTP folder field on the Output tab for scheduling BI Reports.
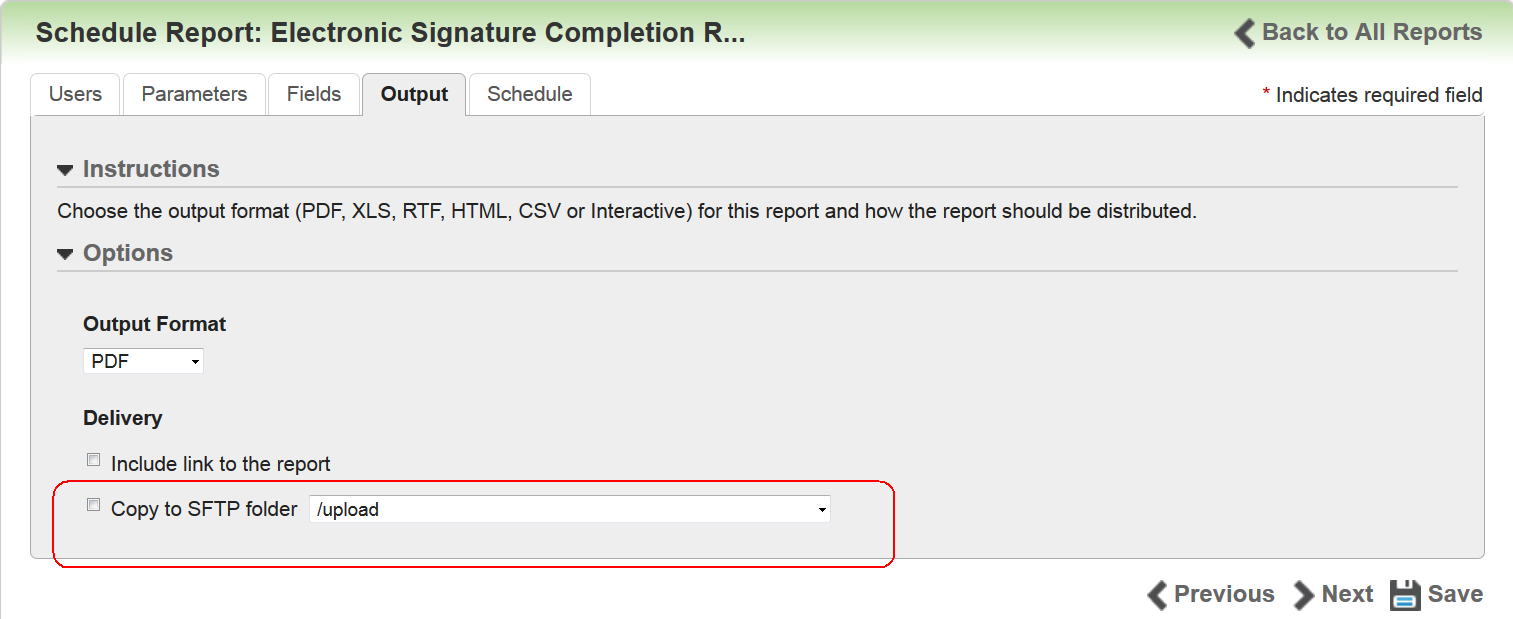
Use this field to tell LearnCenter to automatically upload an executed, scheduled report to the Upload folder or any child folder of the Upload folder of your SFTP server. You can select the appropriate folder from the drop-down list.
Use of this field enables you to streamline additional post-processing workflows you might have in place. In addition, if you use this with the CSV output, saving to an SFTP folder helps to automate report data into third party integrations or operations.
If someone dele tes the SFTP folder, the report is still accessible from the Last Run link on the BI Reporting main page and it can still be run , but it will not be copied to the SFTP folder since it no longer exists.
There are new Data Views for BI Reporting:
- Enrollment Notes – enables Admins to report on notes added to Enrollment records.
- User Notes – enables Admins to report on notes added to User records.
- Assignment Notes - enables Admins to report on notes added to Assignment records.
- Supervisor Notes - enables Admins to report on notes added to Supervisor records.
- Disabled Users - enables Admins to report on Users who may be locked out of their accounts on LearnCenter.
- Rating Mappings – enables Admins to report on items mapped to Ratings.
Updates to Existing Data Views
Credit Data is now part of the Category Mappings Data View, so you can find out what Credits are mapped to which Categories.
Authentication for Report Links
Users are now forced to log in to LearnCenter if they click a hyperlink to a report in an email. This hyperlink is present when you select the Include link to the report check box when creating the report. This forced login ensures that only authorized Users of your LearnCenter can view reports. The LearnCenter SSO feature will work with this authentication.
If you do not want to introduce authentication or the authentication does not work with your SSO integration, you have the following options:
• Do not include the links in the completion email. Users can access the reports through the LearnCenter referenced in the email.
• If the SSO integration is a custom solution, contact OCS to update your integration.
• Disable the link authentication using the method described in this document.
Disabling this authentication could open your information up to be viewed by an unauthorized party. If you are unclear as to the ramifications of disabling this feature, please contact Oracle Support for clarification. Additional information about disabling this authentication can be found on My Oracle Support (MOS) in DOC ID: 2115769.1.
Change to BI Reporting User Permission
A change has been made to BI Reporting User Permissions. The BI Report link from Control Panel Left Nav bar will be visible only if Users have been granted the following permissions:
- Manage BI -> View Reports
- Manage Control Panel Main -> View Control Panel Home Page
Widget Enhancements and New Widget
There are new enhancements to the Transcript Widget, a change to the Learning Plan Widget, and a brand new My Tasks Widget included with Release 16A for Oracle Learn Cloud.
Key Resources
- Refer to online help for complete information on adding and editing Widgets (TOC > LearnCenter Designer > Widgets).
- Refer to online help for instructions on using the Learning Plans settings page (TOC > Advanced Learning > Learning Plans > Learning Plan Settings).
Enhancements to the Transcript Widget
A new Generate PDF option called Transcript with Credits has been added to the Export options on the Transcript Widget page.
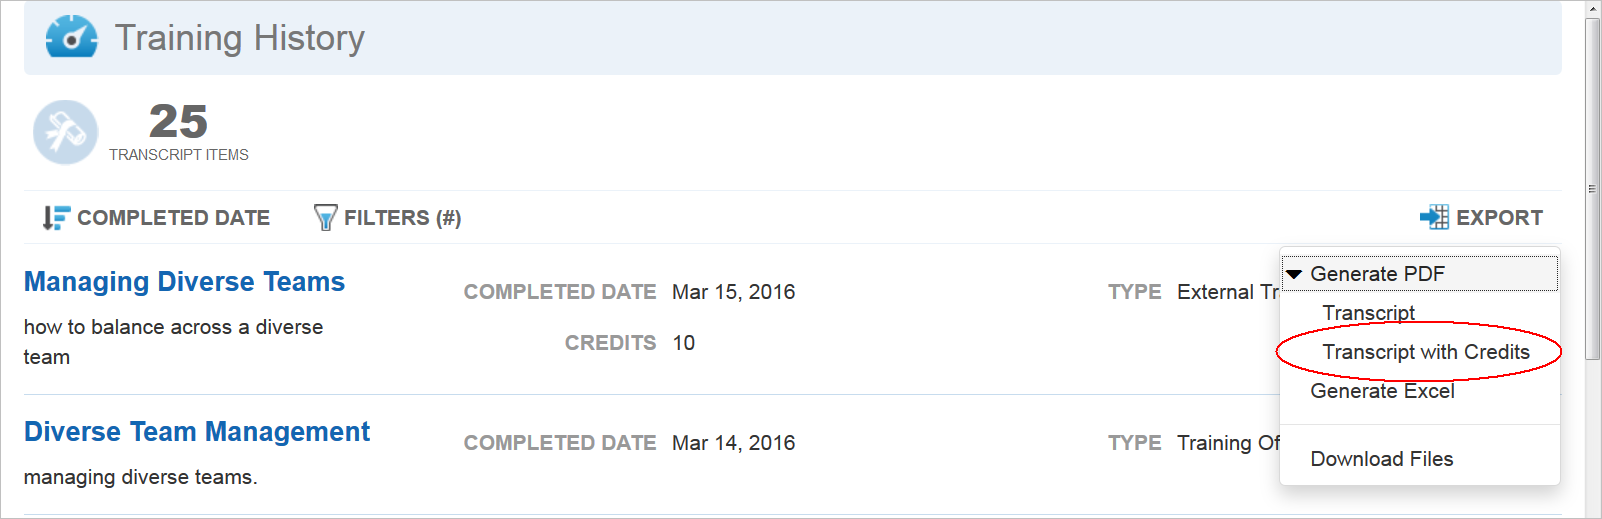
Select Transcript with Credits to generate the report. Click Export > Download Files to check on the progress of the report generation, and when completed to download it to your computer. When the Status is Ready, click the Title of the report to download the file.
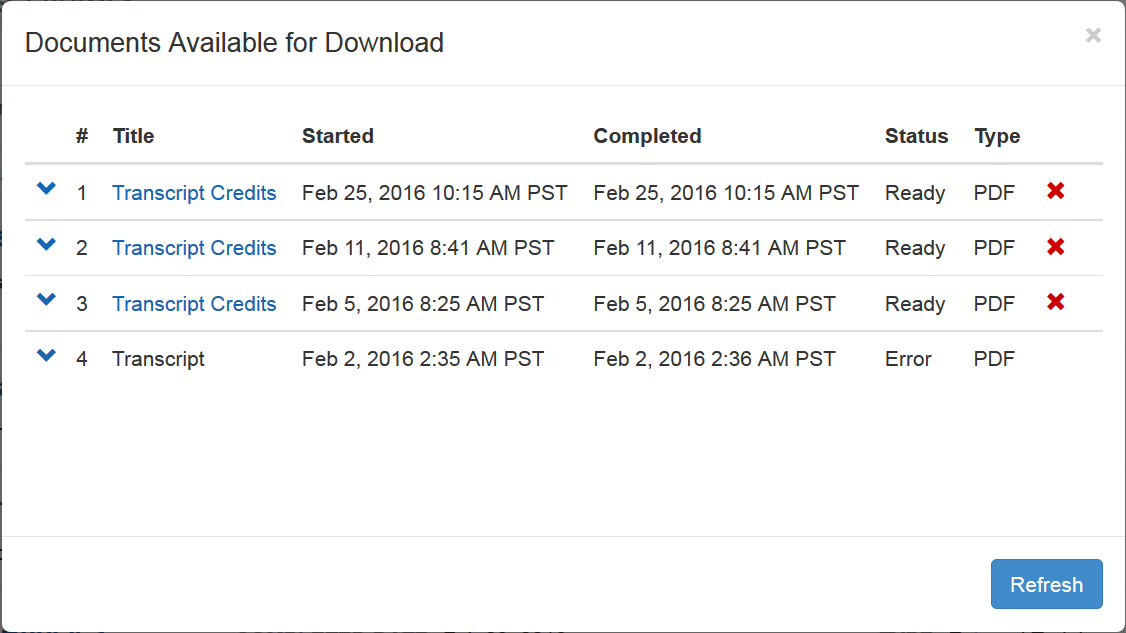
The file is saved to your designated location. Locate the file and open it. The file opens in a PDF reader.
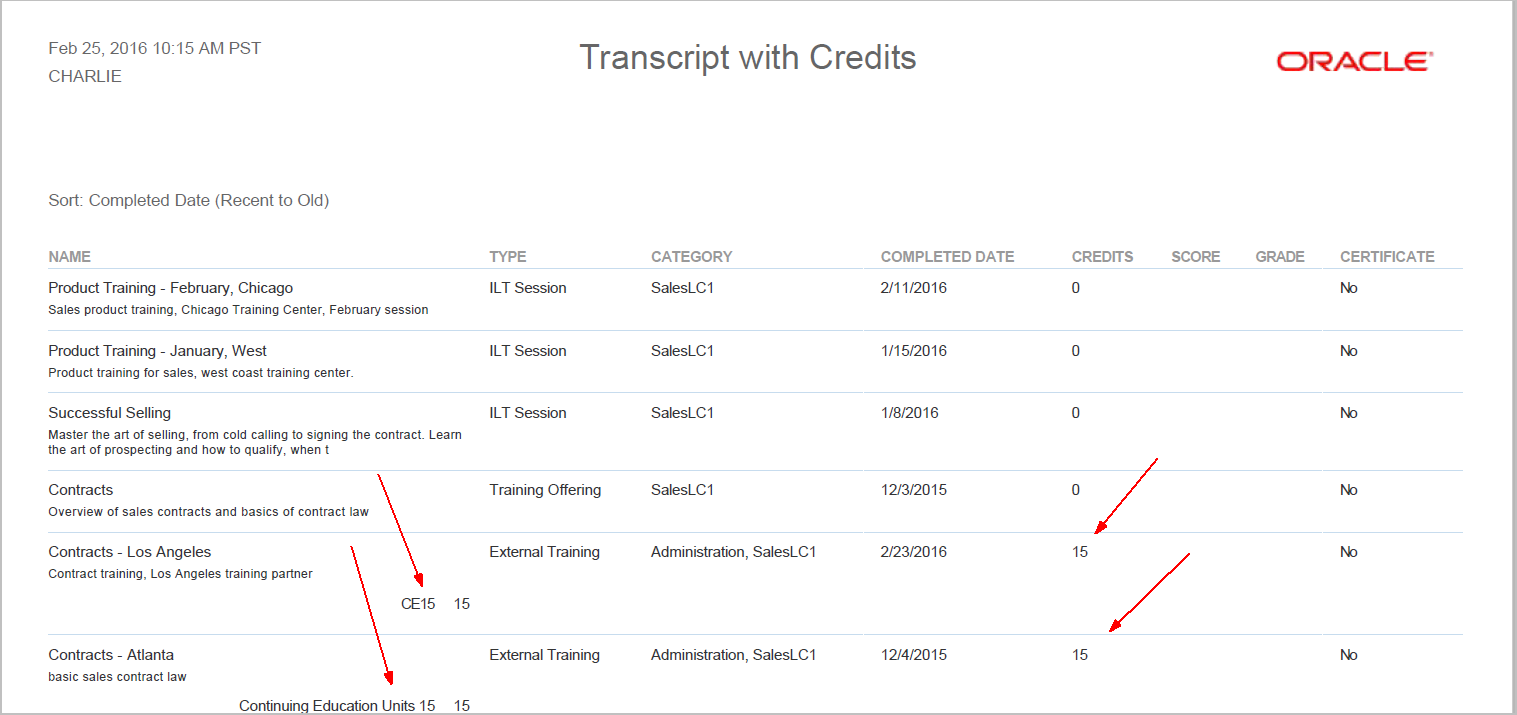
Notice that this report provides a list of completed training events within Admin-specified filters in a formatted, multi-row layout complete with company logo. If any earned Credits are associated with completed events, the Credit names and values display (otherwise the value in the Credits column is 0). You can further refine this PDF by selecting the Only include when credits assigned check box located on the window that opens when you click the Filters icon on the Transcript Widget page.

When you do this and regenerate the report, the PDF only displays completed items that have earned Credits.
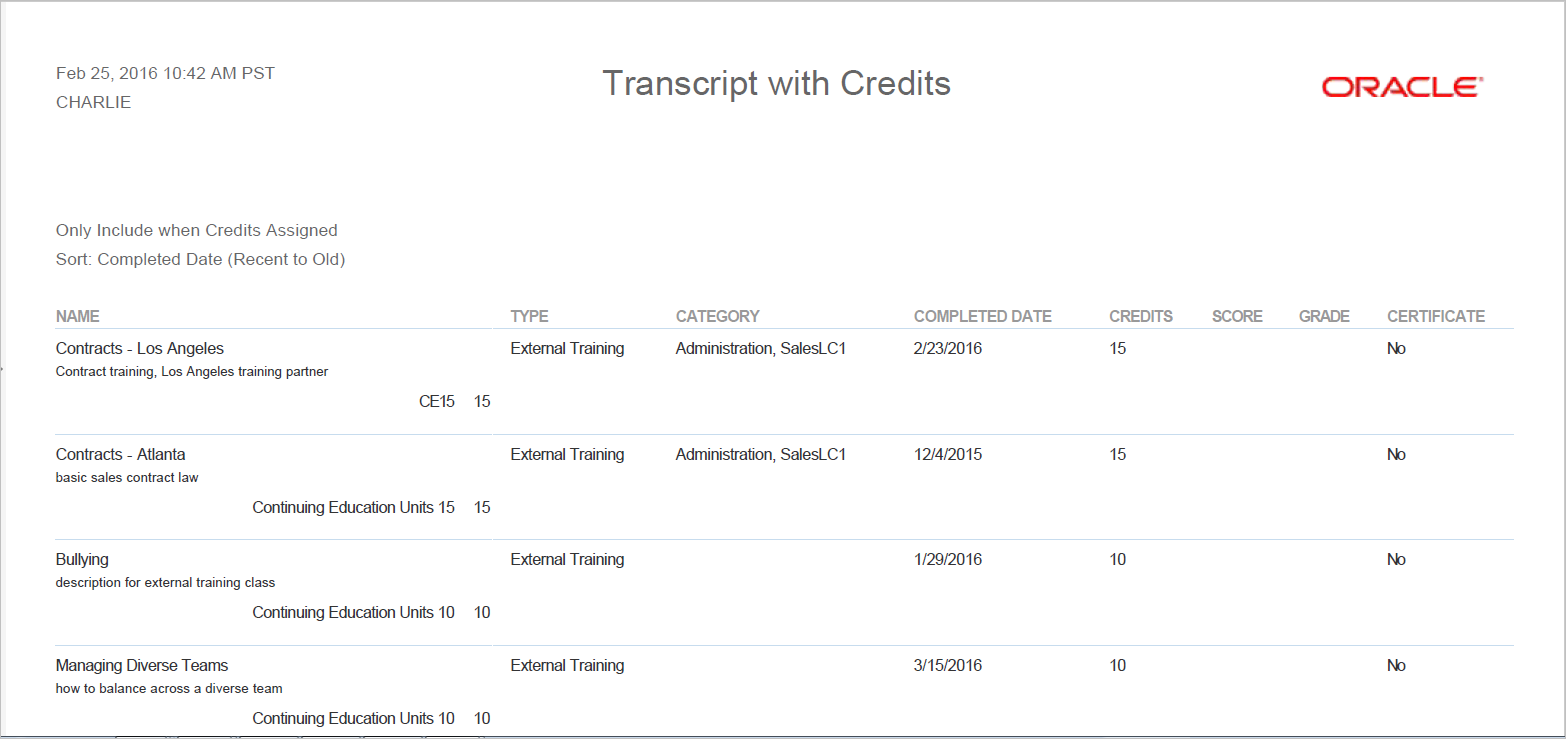
Notice in the illustration above that only items with Credits are listed in the transcript PDF.
Change for the Learning Plan Widget
In previous versions of the Learning Plan Widget, the Display following Enrollments and ILT sessions filter (located on the Display tab for the Widget setup) was not applied to Enrollments and ILT Sessions within ILT Track and Event containers. With Release 16A for Oracle Learn Cloud, this has been changed.

These filters are now used to determine if LearnCenter displays Past, Current, and Future Enrollments.
Note: If all the Enrollments/ILT sessions are filtered out, LearnCenter displays the Event and Track, but no Sessions or Enrollments are listed under the Track.
With Release 16A for Oracle Learn Cloud, we are introducing a new My Tasks Widget. The My Tasks Widget can be used to display a list of training items that are mapped to the current end User. Users can view this Widget to quickly see all of their incomplete Learning Plans and assigned training events, as well as completed training. On the Widgets page in the Control Panel, click Add Widget and notice that there is a new My Tasks option in the Select Widget Type drop-down list.
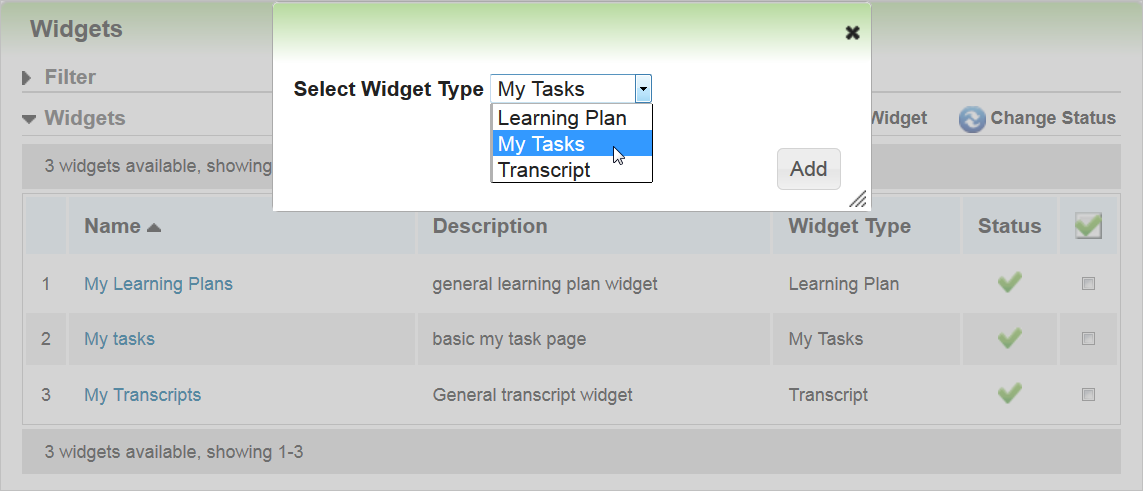
Select My Tasks and click Add to create and customize a new My Tasks Widget. The Add Widget window opens, showing the Details tab.
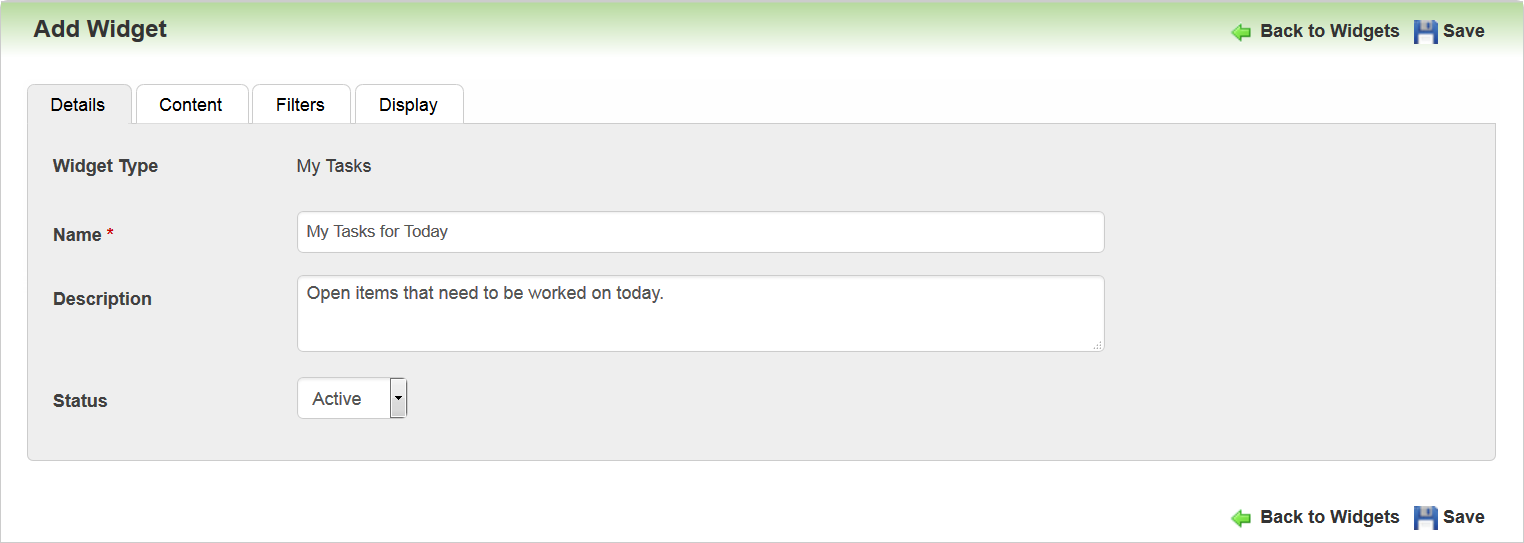
Type a Name and Description for the Widget. By default, the Status of the Widget is Active, which means it will be available for use as soon as you click Save. If you prefer, you can change the Status to Inactive until you are ready for Admins to begin selecting it. Click Save, and then click the Content tab.
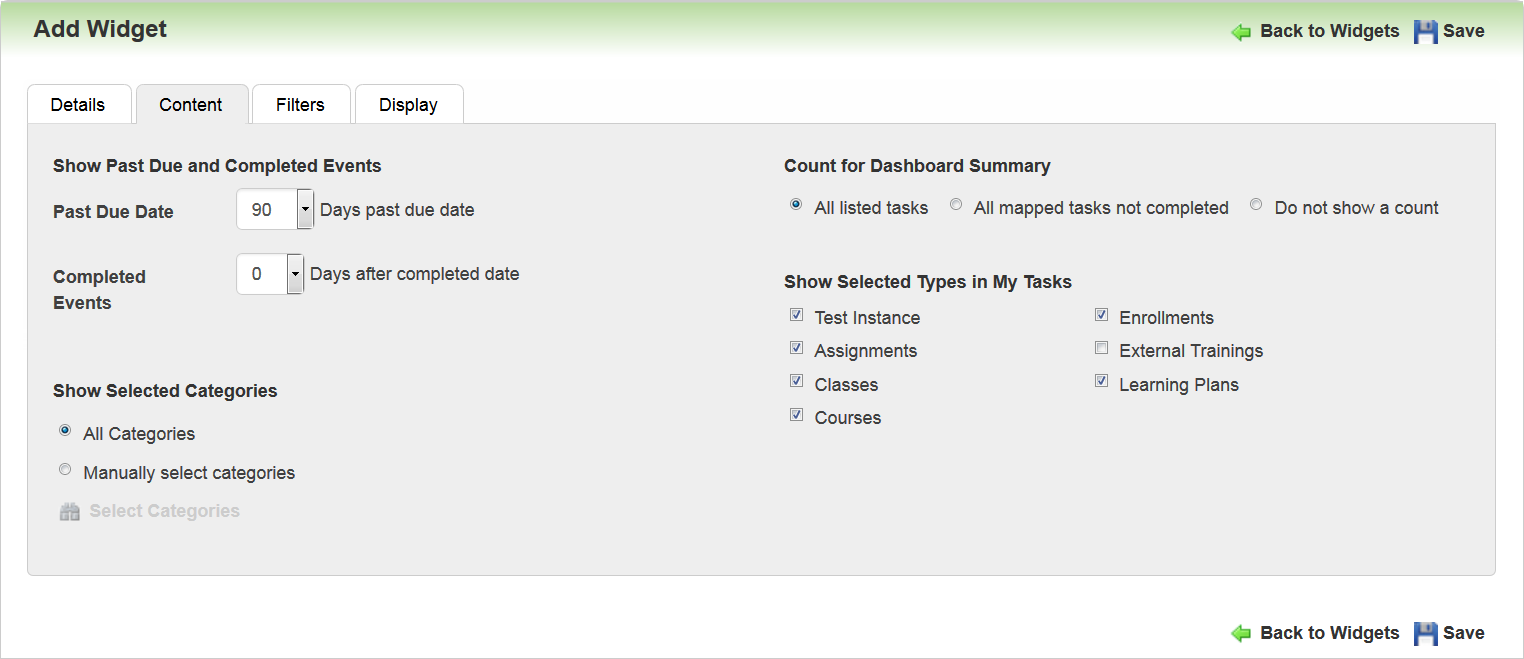
Use this tab to indicate what content you want to display to end Users on the My Tasks Widget page. You can set up filters to Show Past Due and Completed Events. Use the Past Due Date drop-down list to indicate how long you want to display items that are late. The default setting is 90 days. Use the Completed Events drop-down list to indicate how many days you want to display completed items. The default setting is 0, but you can opt to display items up to 30 days.
Tip: Remember that Users can also view their completed training items on the Transcript Widget. You may want to allow them to see completed items for a few days on the My Tasks Widget, or you may use the default setting of 0 to hide competed events on the My Tasks Widget.
You can show items that are mapped to All Categories, or you can Manually select categories. You can customize what types of items display on the Widget by selecting or clearing any of the following check boxes under Show Selected Types in My Tasks:
- Test Instance
- Assignments
- Classes
- Courses
- Enrollments
- External Trainings
- Learning Plans
By default, all items except for External Trainings are selected, which means they will be displayed on the Widget. At least one item must be selected. Click the Filters tab.

Use this tab to indicate what filters and Mini Dashboard items you want to display to end Users on the My Tasks Widget page. Select the check boxes for any of the items you want to display on the Mini Dashboard: All, Past Due, Due Soon, and No Due Date. Select one of the following from the Default Selection drop-down list to indicate which type you want to display by default on the Mini Dashboard: All, Past Due, Due Soon, and No Due Date. Select any of the following Filters to display to end Users on the Widget: Keyword (Name, Description, Category), Start Date, End Date, Due Date, Status, and Type. Click the Display tab.
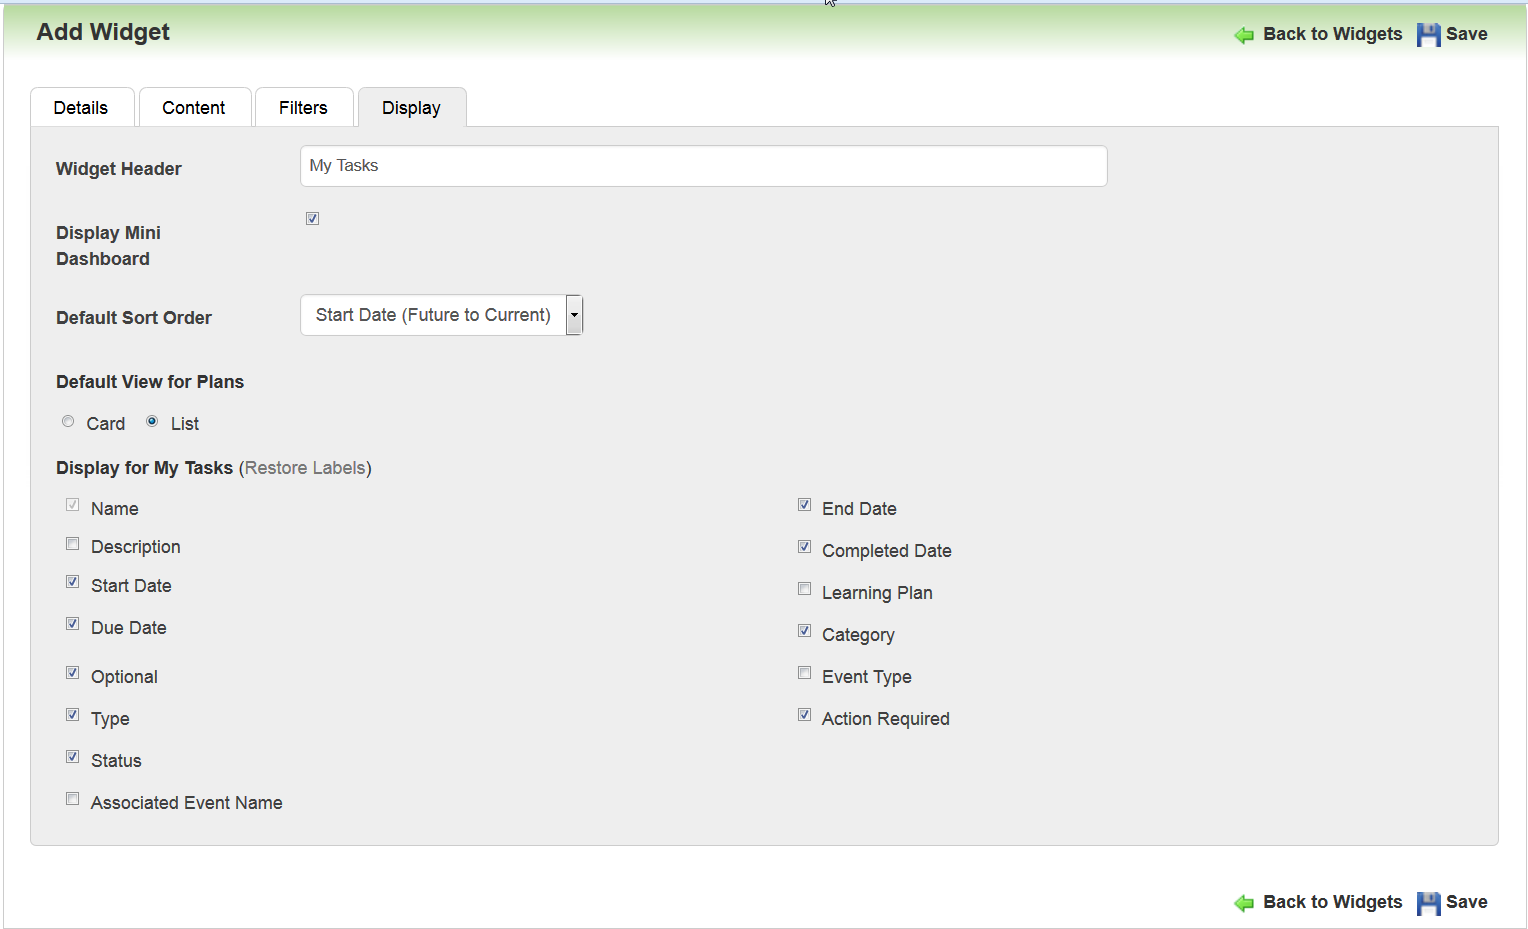
Use this tab to determine how items display to end Users on the My Tasks Widget page. You can use the Widget Header field to customize the header that displays at the top of the Widget, or you can use the default text. Select the Display Mini Dashboard check box to display the mini dashboard on the Widget. Indicate the Default Sort Order by selecting one of the following from the drop-down list:
- Due Date (Current to Future)
- Due Date (Future to Current)
- Start Date (Current to Future)
- Start Date (Future to Current)
- End Date(Current to Future)
- End Date (Future to Current)
- Status
Indicate whether you want the Default View for Plans to be Card or List. Select the check boxes for the items you want to Display for My Tasks.
Tip: It is recommended that you limit the number of items you select to keep the end display simple and clean. Not all items are applicable to all event types.
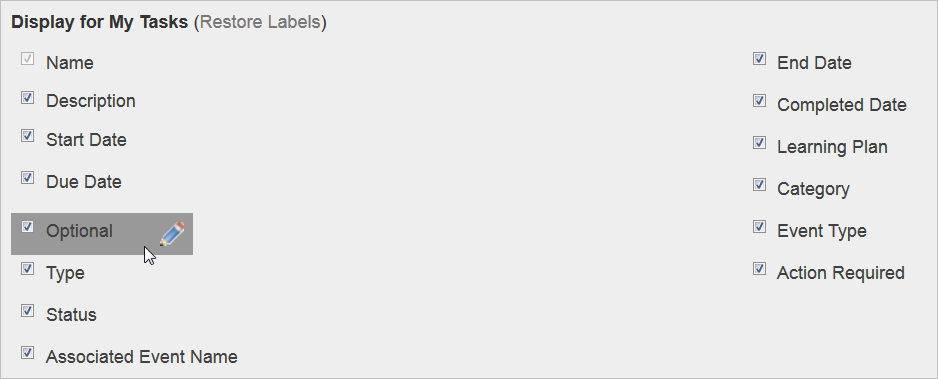
For most items in Display for My Tasks, you can customize the field label (a pencil icon displays when you mouse over the item, indicating that it is editable). Click the icon to open an editable field and type the text you want to display for the field. You can restore labels to their default settings by clicking Restore Labels.
Some selections are unique to My Tasks in the way they behave:
- Associated Event Name - displays items that are mapped to associated tasks. For example, an Assignment may be tied to a Course, Training Offering, Forum, Chat Room or Instance. A Test Instance may be tied to a Course or Enrollment. When you select this check box, a label displays the Event Type with a value being the Event. For example, if an Assignment is associated with a Course, the Label is COURSE and the value will be the Course name.
- Learning Plan - if a learning event on the My Task page was mapped from a Learning Plan, the Widget displays the Learning Plan name. The label is LEARNING PLAN followed by the Learning Plan name. Note that if the same Event is mapped from multiple Learning Plans, the Widget displays them all.
- Action Required – applicable only for Learning Plans. Indicates that there are items on the Learning Plan not yet mapped to the User that are required. “Required” means a) the item is not optional or b) the Learning Plan has a minimum number of optional items required and that minimum has not yet been reached (in terms of mapping). If you select this field, and action is required of the User, a “Yes” displays next to the Learning Plan's ACTION REQUIRED label on the My Tasks page in list view, or an action icon displays in card view (see illustration below).
- Event Type - only applicable for Enrollments. When you select this option, the Widget lists the type of event the Enrollment is for. For example, if the Enrollment is for an ILT Session, the label is EVENT TYPE and the value is ILT Session.
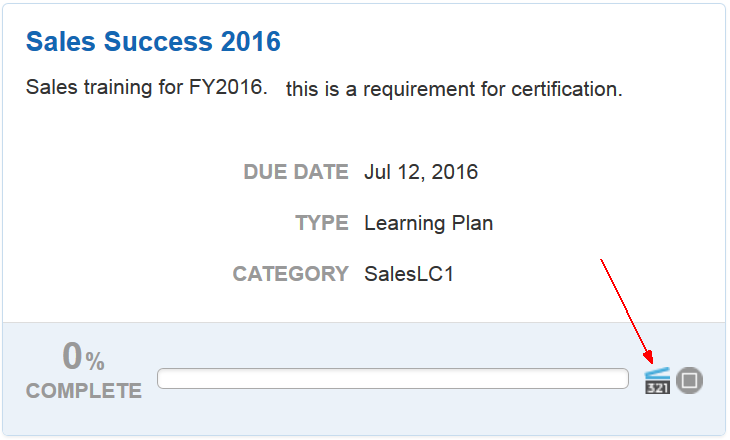
This indicates to Users that there are still some outstanding tasks that must be completed that are associated with the Learning Plan. These tasks do not appear on the My Tasks page on their own and Users must open the Learning Plan from the My Tasks page to see what those items are. Once enrolled, or once started, those items will then appear on the My Tasks page. If “No” displays for ACTION REQUIRED, this tells the User that everything required on the Learning Plan is either completed or mapped to the User, so they do not need to take further action on the Learning Plan (although they may choose to do additional optional items).
LearnCenter checks whether the minimum number of optional items has been mapped to the User. LearnCenter checks every item on the Learning Plan that is not optional, and checks that the item is mapped to the User. If optional items are mapped to a User, then the item will display as either complete or as an open item for the My Task page. LearnCenter also checks the minimum number of optional items that are required.
When you have finished making selections for the Widget, click the Save.
End User View for My Task Widget
The My Task Widget displays according to the options selected by the Admin in the setup discussed in the previous sections. The illustrations below depict some of those settings.
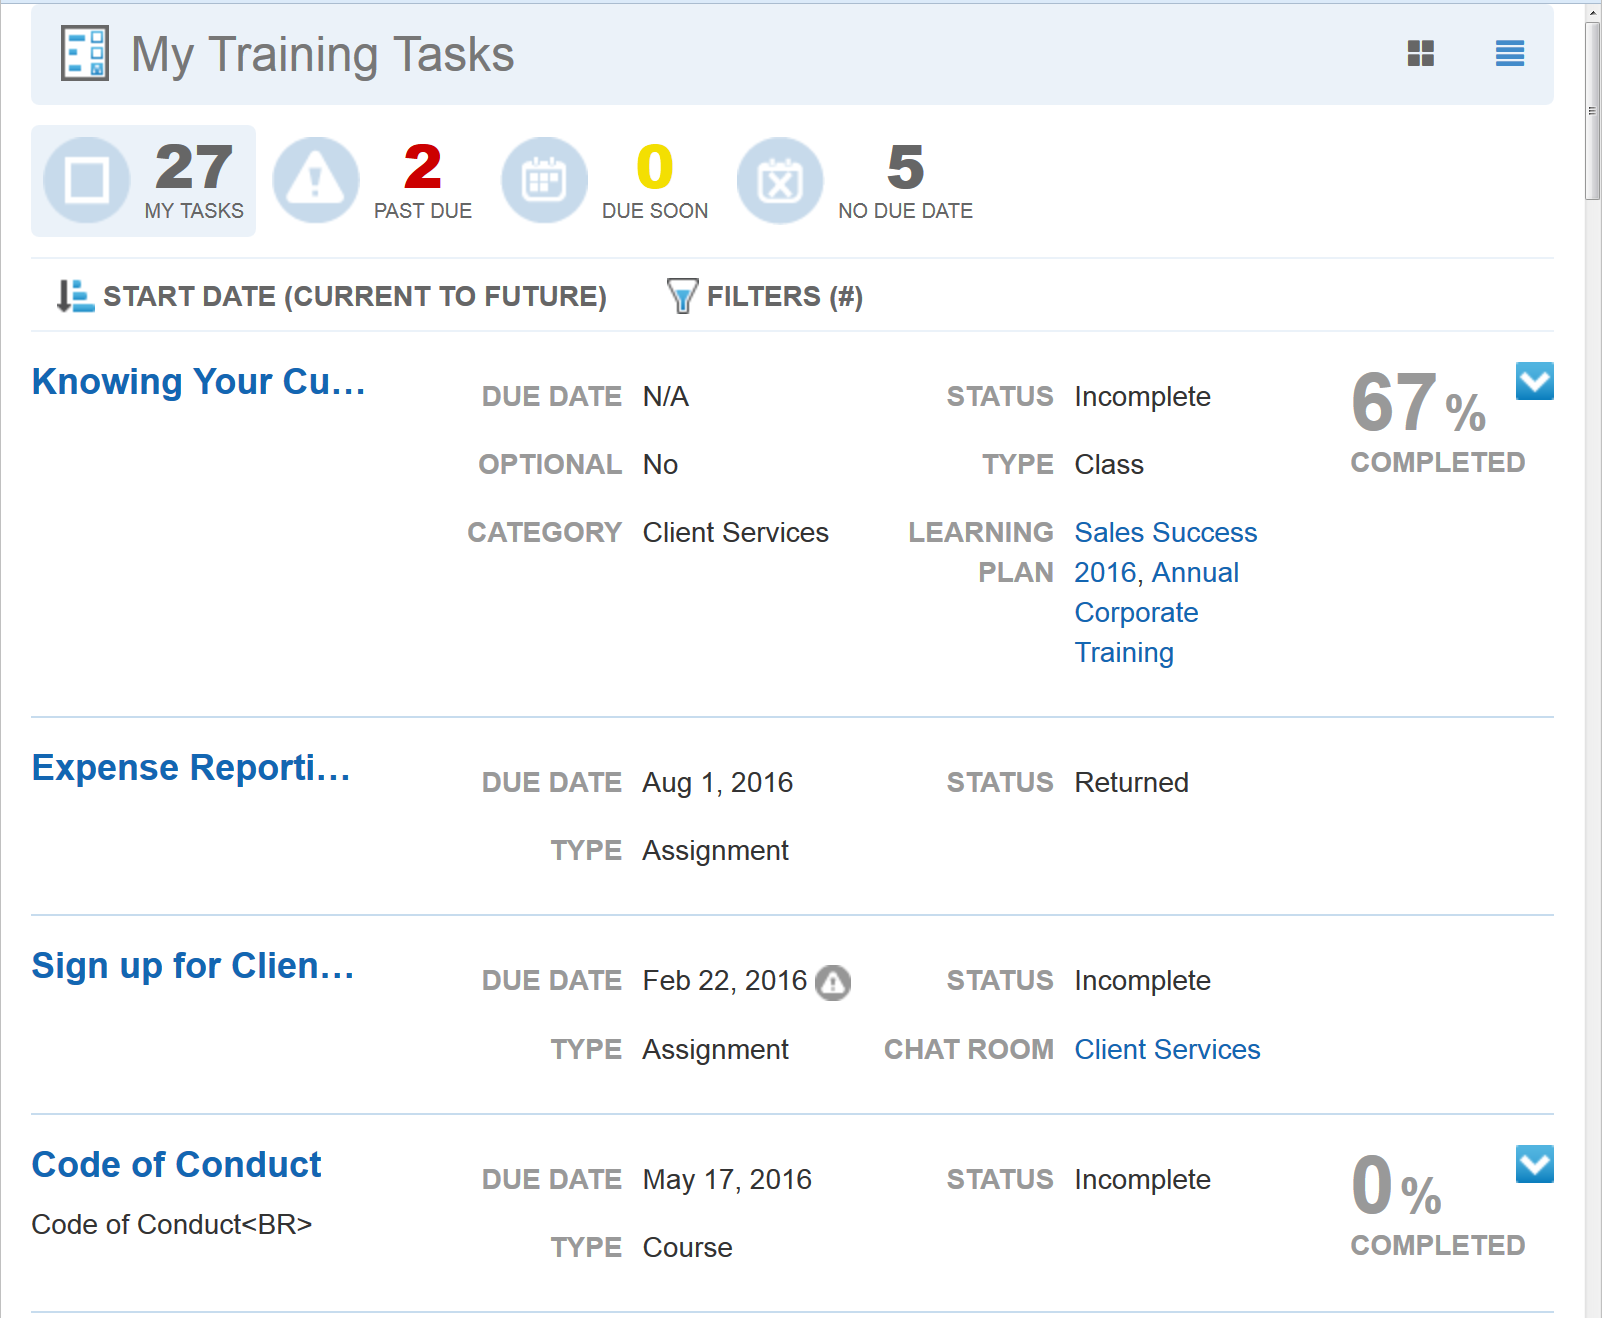
Users can filter the items on the page by clicking the icons in the dashboard at the top of the page. Items that have ![]() displayed next to them can be launched directly from the My Task page.
displayed next to them can be launched directly from the My Task page.
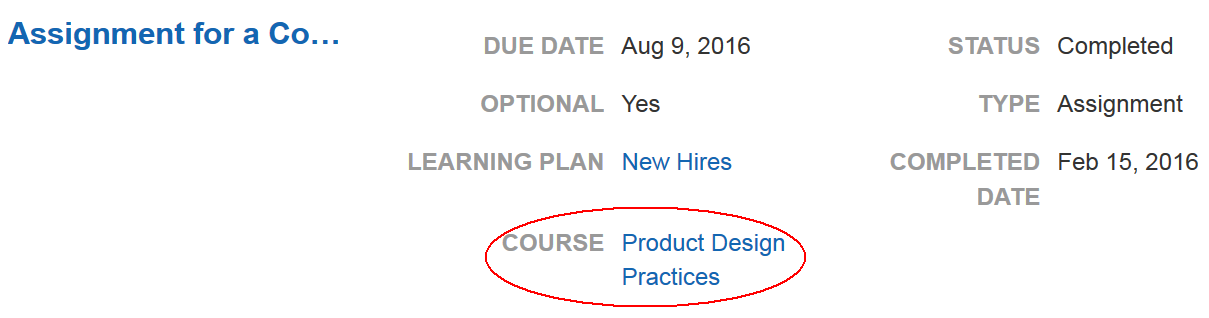
Tasks that are associated with other items are indicated like the following illustration in which the task is associated with a Course (Expense Reports test). The Source of the Assignment is a Learning Plan (New Hires).
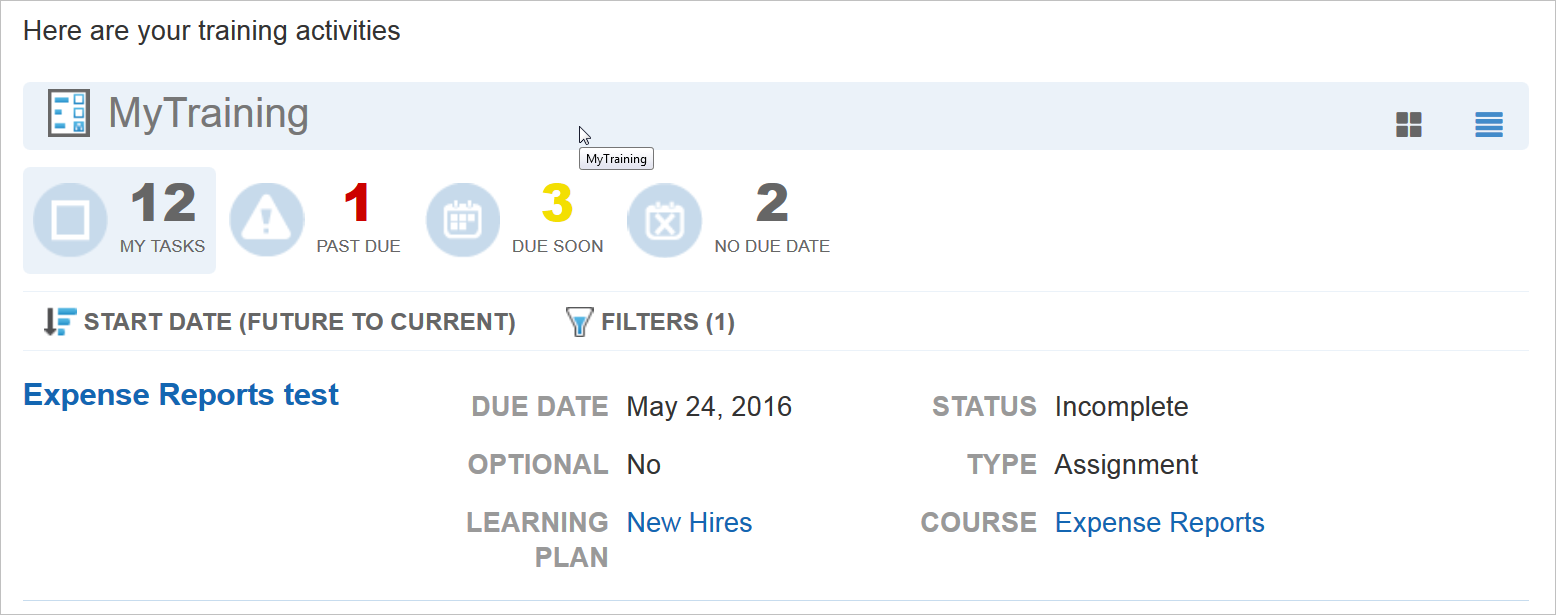
The name of the Course and a hyperlink to the Course are listed in the line item for the task.
Important: Items within a Learning Plan may be restricted with sequence rules, and access to the Assignment within the Learning Plan may be limited if sequence rules are enforced and previous items are not completed. However, sequence rules are not enforced on the My Task Widget. This means a User may access and complete an item on the My Task Widget page that they are prevented from completing elsewhere in LearnCenter based on sequence rules set up for a Learning Plan. Users will not be prevented from continuing with out-of-sequence events on the My Takes Widget page. This is applicable to all event types on the My Task Widget.
A Print Certificate option is available from the action icon for completed Enrollments and Learning Plans that have associated Certificates.

This icon is visible in either card or list view. Users can click Print Certificate to open and print their certificates.
Learning Plans Settings Due Soon Flag and My Task
The existing Due Soon check box, found on the Learning Plan Settings page (Control Panel > Advance Learning > Learning Plan Settings), now also affects the Due Soon flag on the My Task Widget. (Remember that it also affects the Due Soon flag on the Learning Plan Widget.)
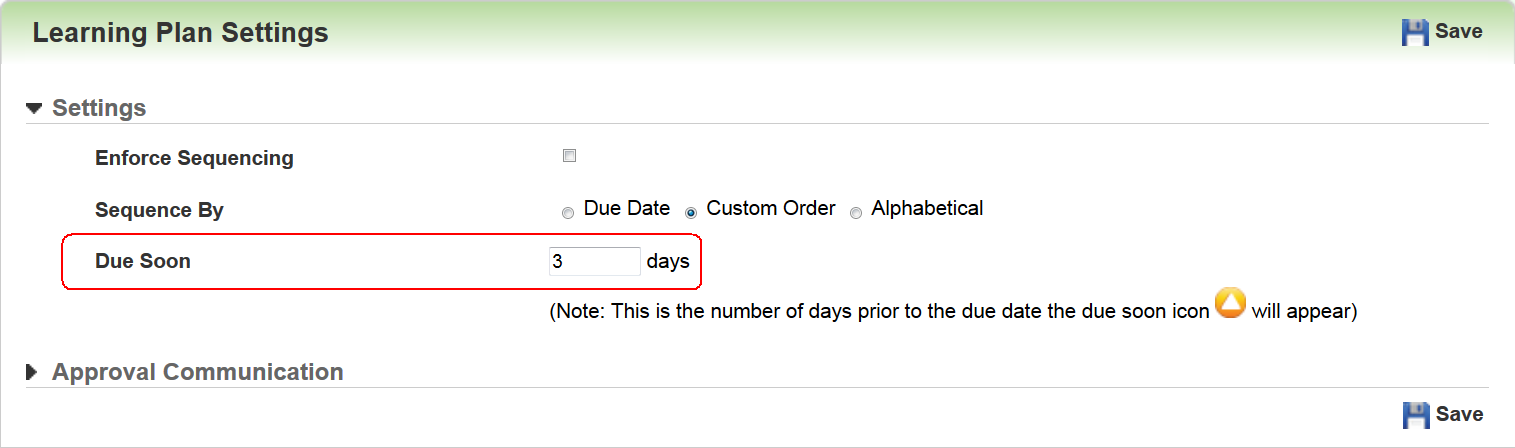
What you set here determines whether the Due Soon icon displays for all learning event types (Assignments, Assessments, Enrollments, etc.) on the My Tasks Widget page.
Note: Refer to online help for instructions on using the Learning Plans settings page (TOC > Advanced Learning > Learning Plans > Learning Plan Settings).
New Ability to Require Unique Email Addresses Upon Registration
A new option has been added to require that a unique email address be used for each registered end User. When this option is activated, a self-registering User is required to enter an email address not currently used by another User in the LearnCenter. Also, if a User updates their email address in on the User Details page, LearnCenter checks to make sure the email address they change to is unique.
Unique email address is enforced at the LearnCenter level. LearnCenter checks for existing email addresses regardless of the User's status. If a used email address is found, a message displays to Users alerting them that they must use a different email address. You can customize the content of this message.
Note: This feature is intended for use with end Users who self register, and not for Admins using the Control Panel. Validation is not enforced within the Control Panel.
This feature must be activated for you by Customer Support. Contact Customer Support by visiting My Oracle Support to open a service request (SR) asking for the Unique Email Address Validation feature to be activated. If you want to customize the message that displays to Users, notify Support when you open the SR.
Bulk Loader has significant enhancements and additions for Release 16A for Oracle Learn Cloud. They include User Interface improvements, additional training types, the ability to load User history, and a built-in scheduler to automate the loading of data from external systems. Steps for using template files and running bulk loader have not changed.
Key Resources
Refer to online help for complete instructions on using Bulk Loader (TOC > Integrations > Bulk Loader).
The Bulk Loader page has been updated to a new tabbed interface. This was done to better organize and display the various loader types. Previously, all loaders were displayed on a single page.

Use the Training tab to bulk-create and update training items and category mappings. Loaders introduced in previous Learn releases remain unchanged. New items for 16A that have been added to this tab are:
- Update ILT Session Mappings - enables you to remap existing ILT Sessions to new Tracks or Events. You can also take Quick Sessions and put them under Events and Tracks, or take items that are under Events or Tracks and make them Quick Sessions. This is the only place in LearnCenter that has this type of functionality.
- LearnCenter Course Creator – Enables you to bulk-create new LearnCenter Courses or bulk-update existing Courses. You can also create Courses based on template Courses they have already created.
- Category Mappings – Enables you to bulk-map items to Categories or bulk-remove items from Categories. This reduces the amount of manual labor involved in mapping and un-mapping large amounts of training items.
Enhanced for this release:
- Enrollments Loader – now enables you to bulk-create self study Enrollments.
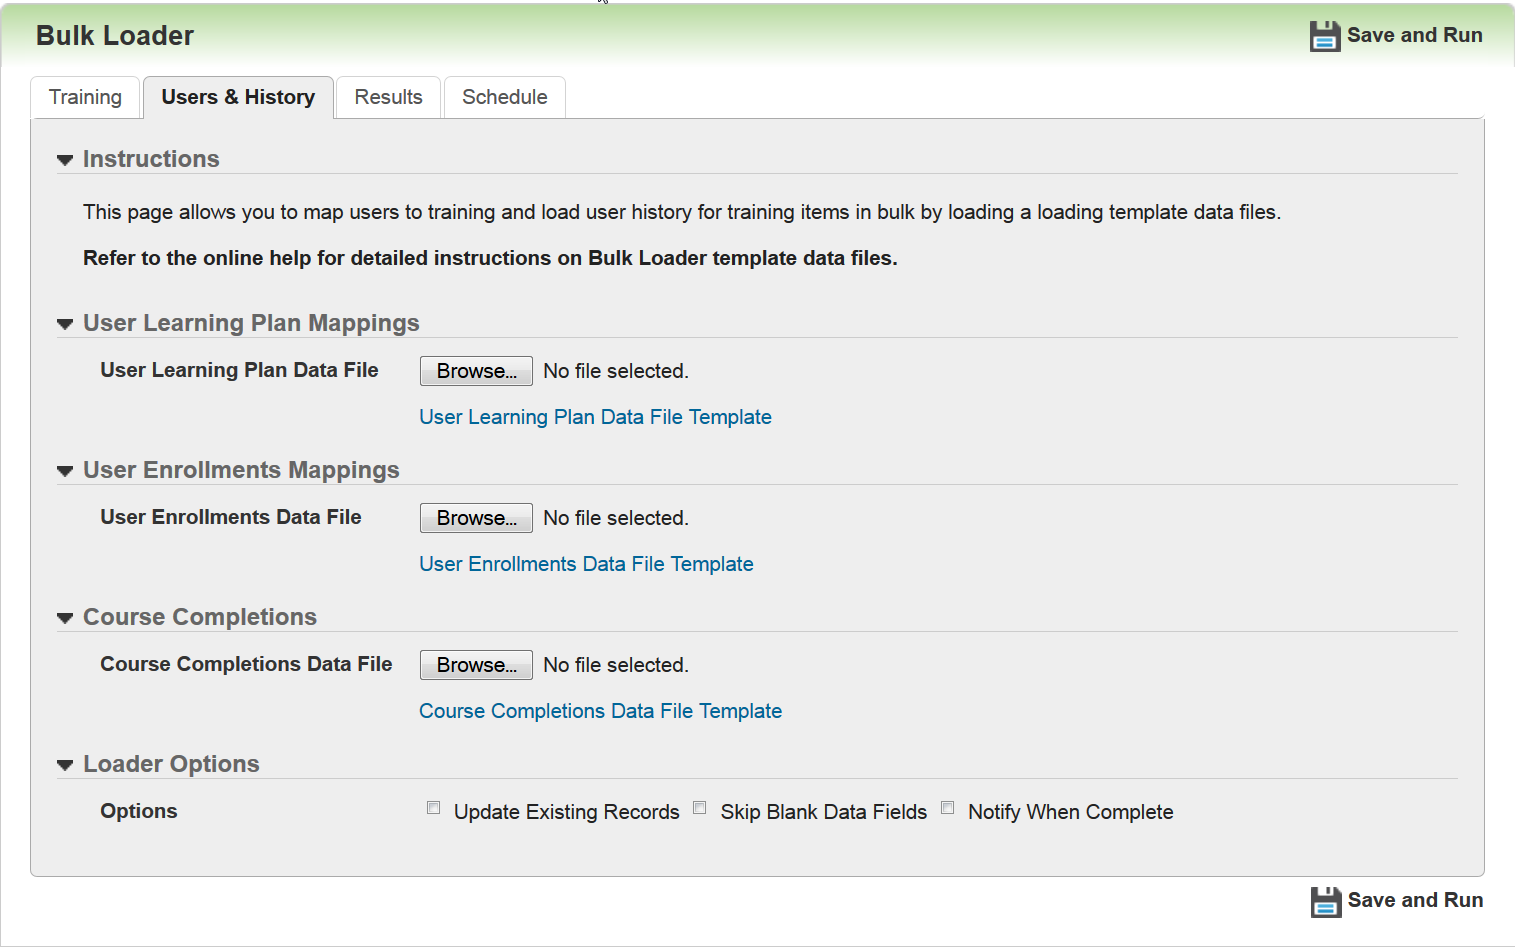
Use the Users & History tab to manage the mapping of Users to training items and their history. You can create User history or update past, present, and future completions.
New for this tab are
- User Learning Plan Mapping – enables Admins to manage Learning Plan completions. This includes the ability to manage completions related to the new Recurring Learning Plans feature.
- User Enrollment Mapping - enables Admins to bulk-create or update User Enrollment mappings and completions related to self-study, and Enrollments Course completions for AICC, SCORM, and LearnCenter Courses.
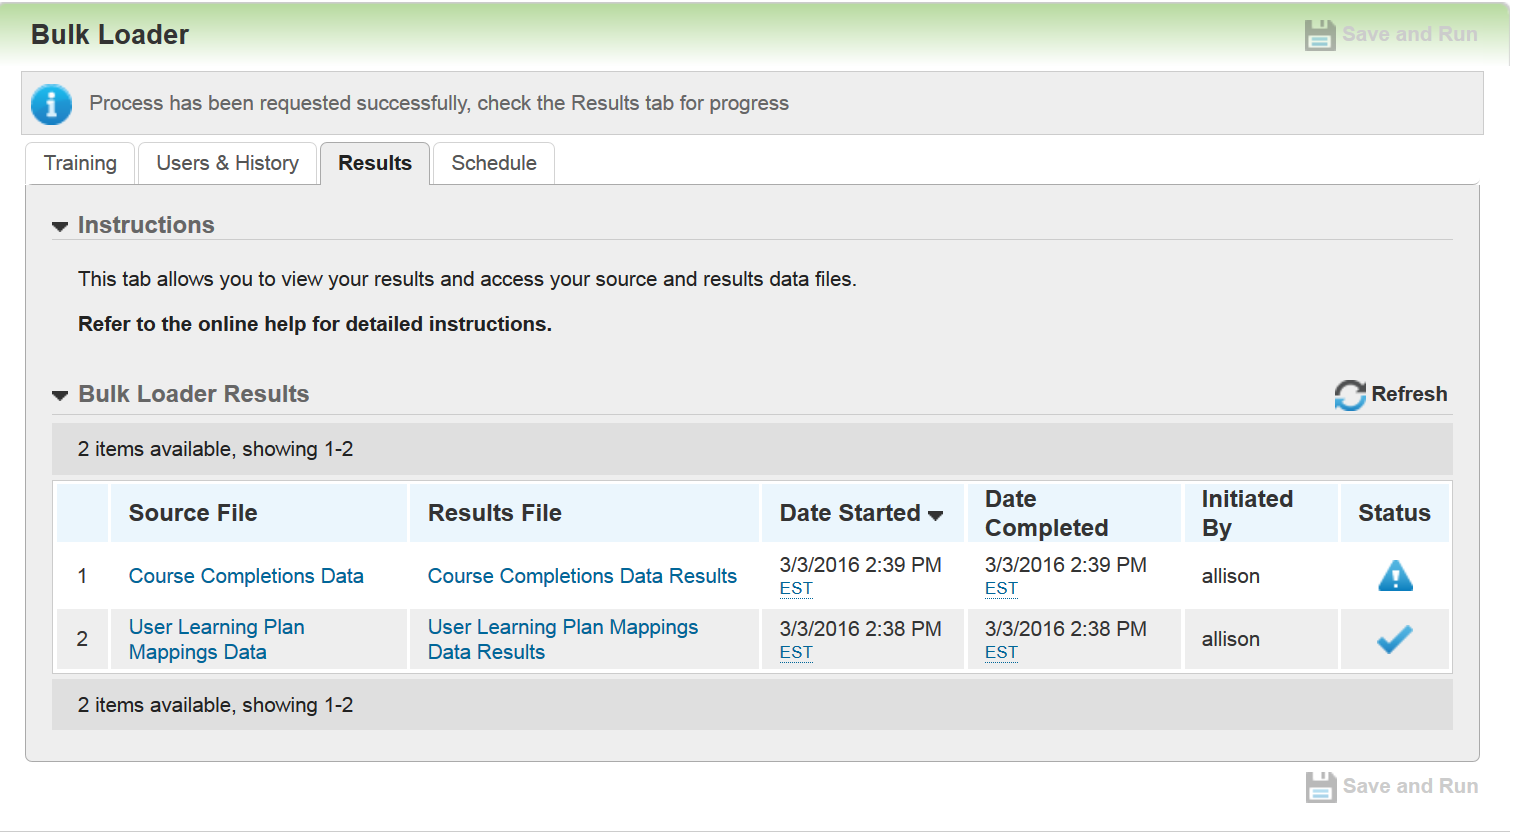
Use the Results tab to look at results for any of the loaders. New for this tab are:
- New Status icons alert you to whether the file loaded successfully (
 ), with errors (
 ) or is still processing (
 ).
). - New Refresh button - If the file is still processing (), you can click the new Refresh button to see if it is done.
- Date Started default sort order - shows the most recently run file at the top of the list. Previously the most recent file appeared at the bottom of the list. Now, you no longer have to scroll to the bottom to see your most recent file.
- Initiated by - enables you to see which Admin started a load.
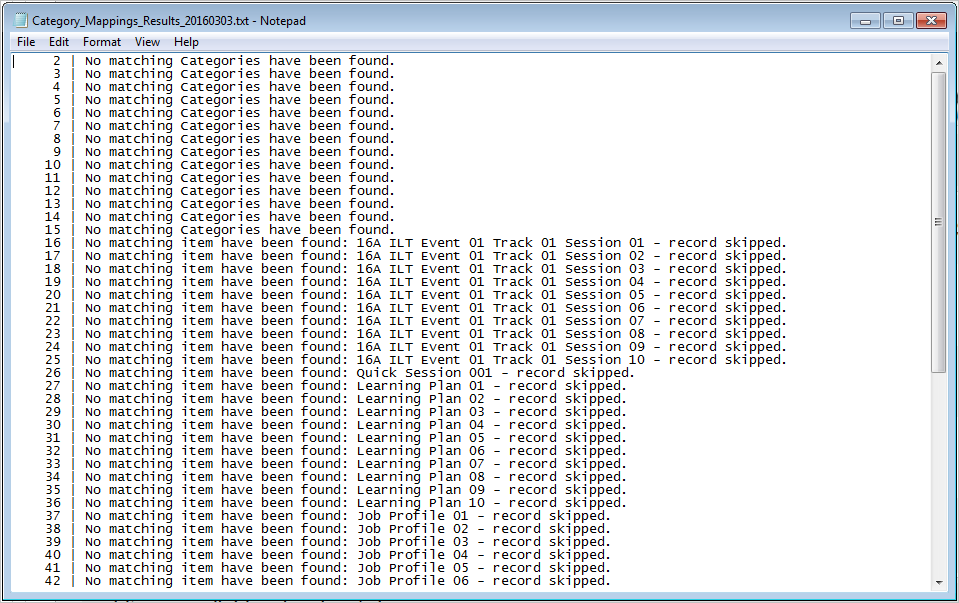
- Results File data enhanced - there is more information about why errors occurred. Line items in the Results file are now numbered so they are easier to match up to Source Files.
- Table Purge - Files are purged every Sunday night. The most recent 10 runs are saved.
Note: This number can be raised to as high as 50. If you would like this number changed, contact Customer Support through My Oracle Support and open an SR requesting to change the Bulk Loader Table Value.
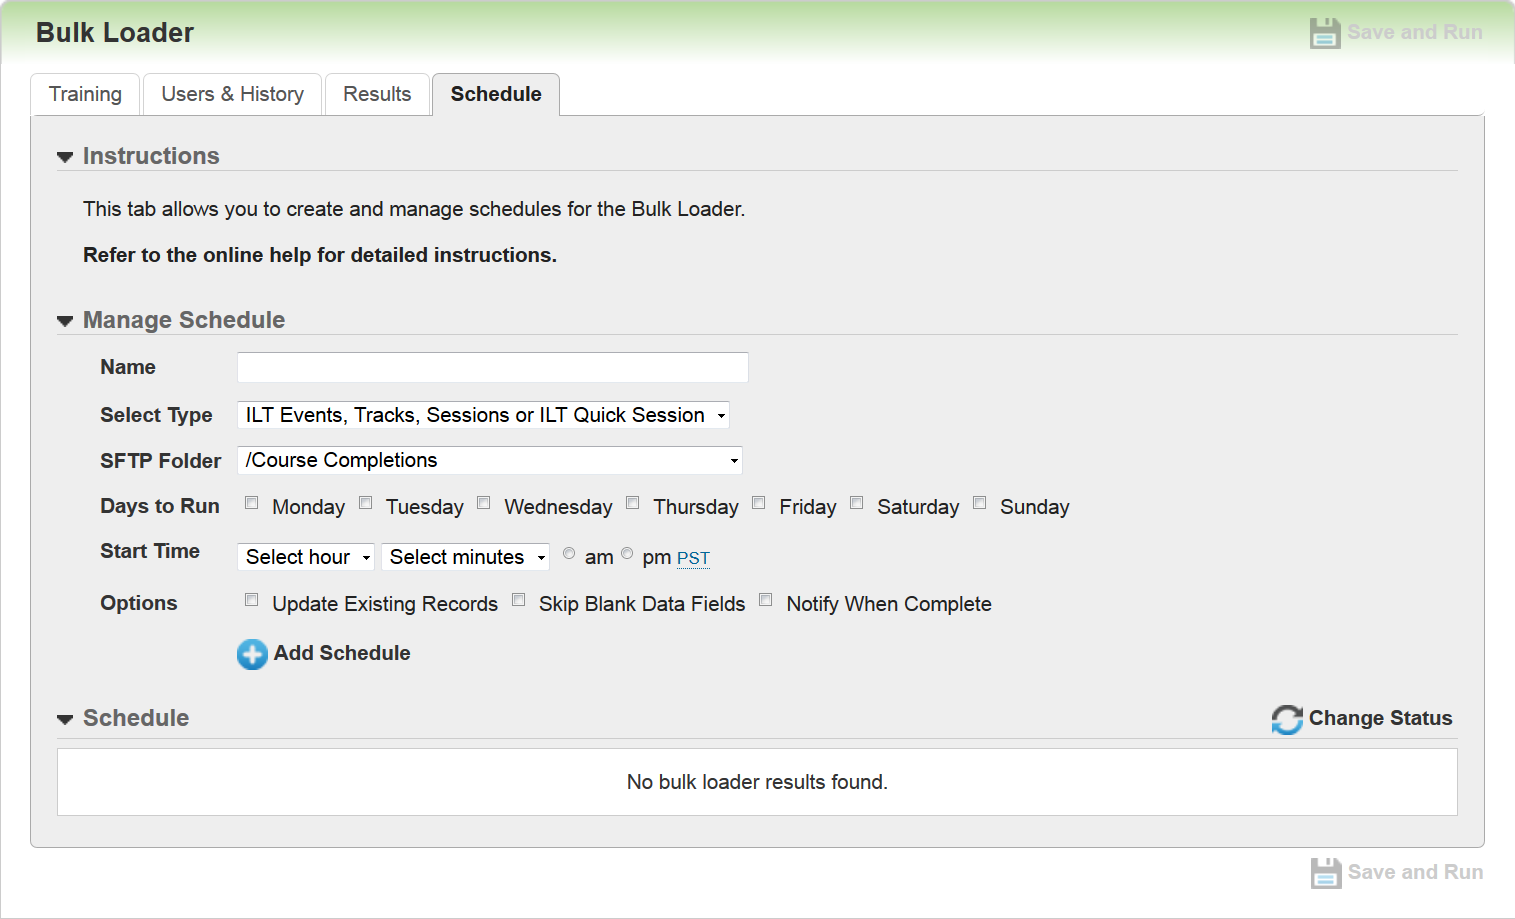
Use the Schedule tab to create scheduled data loads. This feature is particularly useful if you want to load data from third party training sites on a regular basis (for example: you can take data from third party web-based training completions, or third party badge readers from ILT sessions and attach that information to Enrollments). Once scheduled, LearnCenter will pick up a file from your SFTP site to begin processing them during the timeframes you indicate. To create a new schedule, do the following:
- Type a Name for the schedule.
- Select the Type of item you want to schedule for bulk loading.
- Select the appropriate SFTP Folder from the drop-down list. There is a now Bulk Loader folder under the Uploads folder on your SFTP site. The files you want to schedule should be placed here.
- Select the check boxes next to the days you want the Bulk Loader to perform the process in the Days to Run section.
- Use the drop-down lists to select the Start Time and indicate whether it is am or pm by selecting the appropriate option button.
- Click Add Schedule. The schedule is added to the bottom of the page.
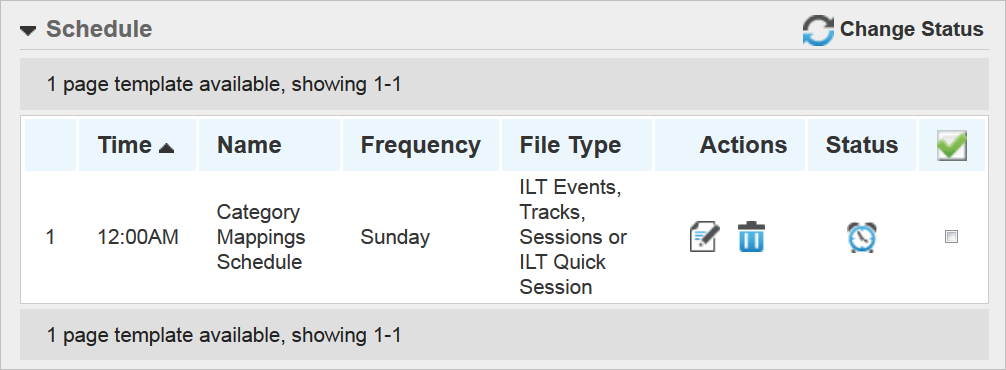
You can edit (![]() ), delete (
), delete (![]() ), or change the status of a schedule (by using the check box and the Change Status icon). When a schedule is active, the
), or change the status of a schedule (by using the check box and the Change Status icon). When a schedule is active, the ![]() icon displays in the Status column. When a schedule is inactive, the Status column is blank.
icon displays in the Status column. When a schedule is inactive, the Status column is blank.
LearnCenter Links, Images, and Tags
With Release 16A for Oracle Learn Cloud, we introduce enhancements for links, images, and tags which are available on the LearnCenter Designer editor tool bar in both Page Templates and Pages.
Tip: If you want any of the elements you create using these new enhancements to be available in multiple places, insert them into Page Templates.
- Refer to online help for complete instructions on using the LearnCenter Designer (TOC > LearnCenter Designer).
- Refer to online help for instructions on making fields available for use on the Field Settings page (TOC > Options > Field Settings).
- Refer to online help for instructions on User profiles (TOC > User Accounts > Managing Users > Managing User Profiles).
The Insert link window has been enhanced with the ability to insert pre-defined links to various pages in the LearnCenter.
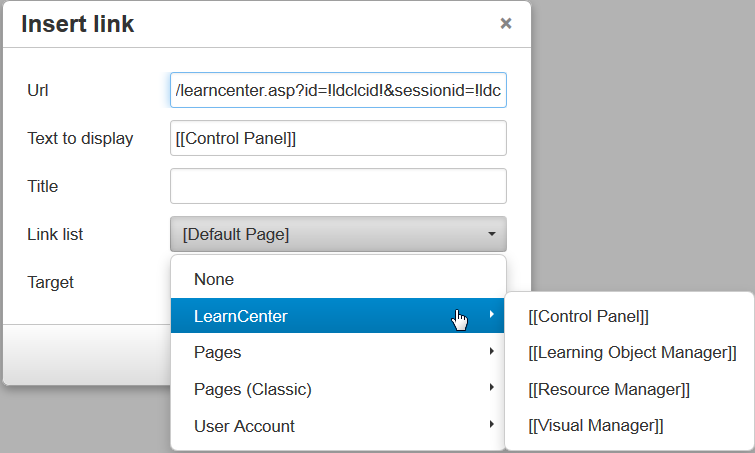
Any page available in your LearnCenter will display in the appropriate drop-down lists on this window. “Pages” means any page created by LearnCenter Designer. “Pages (Classic)” means any page created with the classic page editor.
What displays in the Link List for each User is dependent on their User Permissions. For example, if an Admin does not have the User Permission to use the Visual Manager , the Admin will not see the Visual Manager option as a section in the list.
When you select a page, other fields on the Insert link window are populated with the appropriate data. For example, the Url field is populated with the necessary data to make the link to the appropriate page. The Text to display field contains a sample field label that will display to end Users. You can change this text if you want to. Items that are presented in the Link List surrounded by brackets, [[ ]], can be localized. If you do not want the items to be localized, remove the brackets.
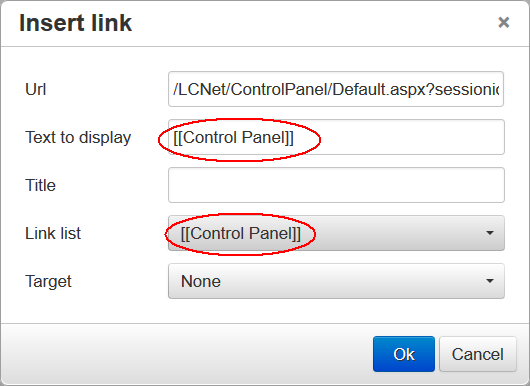
You must leave the brackets around the label on the page to indicate that the link label should be localized.
If you do not want the items to be localized, remove the brackets.
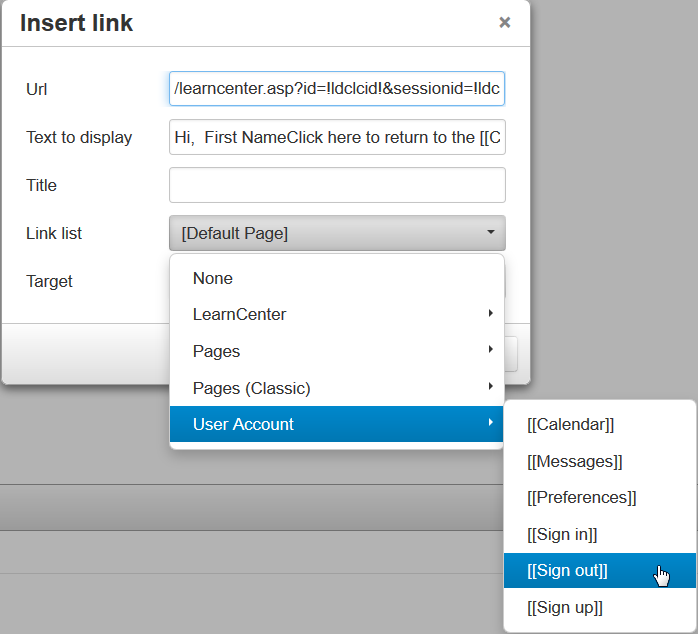
The User Account Sign in, Sign Out, and Sign up are also available.
Note: The Sign up link only displays in this list if you have selected the Show Signup Link check box on the Security Options page (Control Panel > Options > Security).
The Insert/edit image window has been enhanced with the ability to insert pre-defined image links to various pages in the LearnCenter.

There are two predefined images available for selection from this Image list drop-down list: LearnCenter logo, which is the custom logo you may have previously had customer support set up for you via a registry key, and User Account photo.
You can now select from a predefined list of Tags, which are related to User fields. Both User standard and custom fields are supported. There is a new Dynamic Tag button on the toolbar.
![]()
Click this button to open a new Insert dynamic tag window.
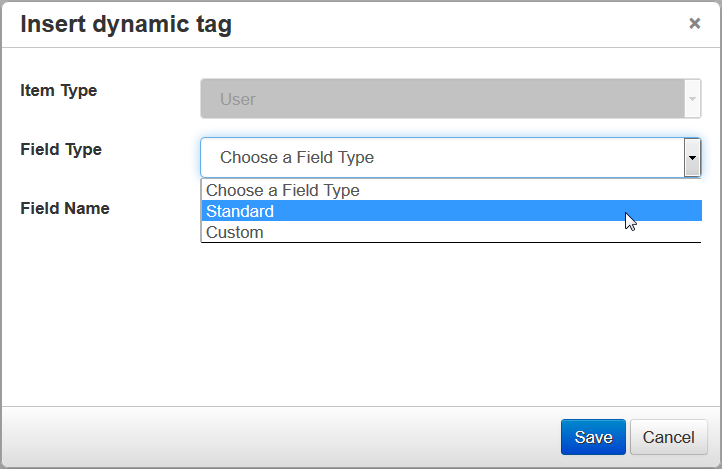
Select either Standard or Custom from the Field Type drop-down list.
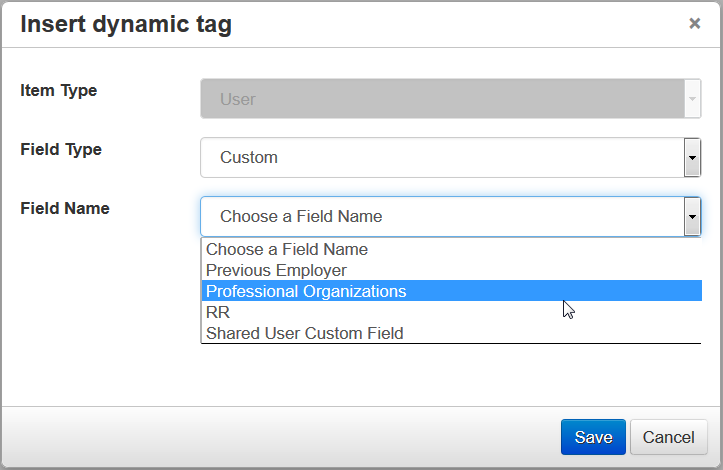
Select a field from the Field Name drop-down list. This drop-down list populates with either Standard or Custom fields, depending on what you selected for the Field Type.
There are a limited number of Standard fields available at this time. The fields available for selection in the Field Name drop-down list are determined by what is selected on the Control Panel > Options > Field Settings page. Refer to online help for instructions on making fields available for use on the Field Settings page.
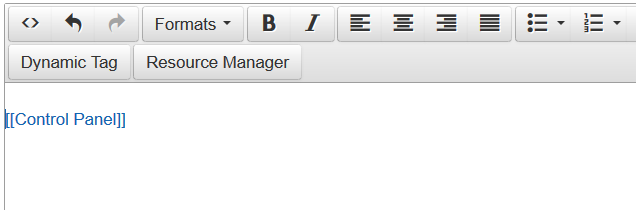
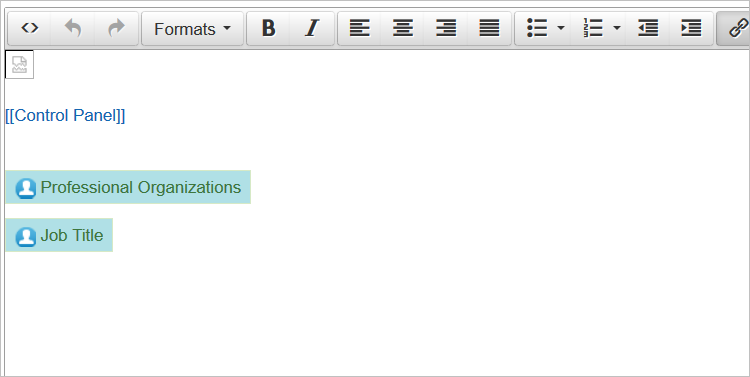
Once inserted, the links, images, and tags look similar to the following on the Page or Page Template. To remove any of them, simply highlight and delete them. You can use all standard HTML markup and style sheets with these new elements.
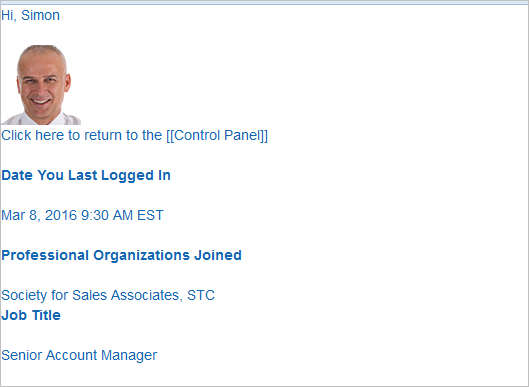
The following is a sample preview page with some of the elements discussed in this section. Notice the use of standard fields (First Name, Job Title, and Date Last Login), image (User Photo), and a custom field (Professional Organization).
Note: Dates and times display according to User Preference settings.
---

Copyright © 2016, Oracle and/or its affiliates. All rights reserved.
This document is provided for information purposes only, and the contents hereof are subject to change without notice.This document is not warranted to be error-free, nor subject to any other warranties or conditions, whether expressed orally or implied in law, including implied warranties and conditions of merchantability or fitness for a particular purpose. We specifically disclaim any liability with respect to this document, and no contractual obligations are formed either directly or indirectly by this document. This document may not be reproduced ortransmitted in any form or by any means, electronic or mechanical, for any purpose, without our prior written permission.
Oracle and Java are registered trademarks of Oracle and/or its affiliates. Other names may be trademarks of their respective owners.
Intel and Intel Xeon are trademarks or registered trademarks of Intel Corporation.All SPARC trademarks are used under license and are trademarks or registered trademarks of SPARC International, Inc. AMD, Opteron, the AMD logo, and the AMD Opteron logo are trademarks or registered trademarks of Advanced Micro Devices. UNIX is a registered trademark of The Open Group.