
This document will continue to evolve as existing sections change and new information is added. All updates are logged below, with the most recent updates at the top.
| Date |
What’s Changed |
Notes |
|---|---|---|
| 08 JUL 2016 |
Initial Document Creation |
This guide outlines the information you need to know about new or improved functionality in Oracle Taleo Cloud for Midsize (Taleo Business Edition) Release 16B1. Each section includes a brief description of the feature, the steps you need to take to enable or begin using the feature, any tips or considerations that you should keep in mind, and the resources available to help you.
Some of the new Release 16B1 features are automatically available to users after the upgrade and some require action from the user, the system administrator, or Oracle.
The table below offers a quick view of the actions required to enable each of the Release 16B1 features.
| Action Required to Enable Feature |
||||
|---|---|---|---|---|
| Feature |
Automatically Available |
End User Action Required |
Administrator Action Required |
Oracle Service Request Required |
| Onboard Enhancements |
||||
|
|
|
|||
|
|
||||
|
|
|
|||
| Talent Center Enhancements |
||||
|
|
||||
|
|
||||
|
|
||||
|
|
|
|||
| Career Center Enhancements |
||||
|
|
||||
| Recruit Enhancements |
||||
|
|
||||
| TBE to Learn Integration |
||||
|
|
|
|||
|
|
|
|||
| Additional Changes |
||||
|
|
||||
|
|
||||
|
|
||||

This release includes Onboard enhancements which will save users time while creating and working with packets, as well as allow for more flexibility when assigning onboarding or offboarding tasks to employees.
Onboarding or Offboarding packets that are still active can now be deleted, for example when employees later rescind their offers or if duplicate packets have been erroneously assigned. Taleo Business Edition (TBE) users can delete the packet and therefore all activities at once, rather than having to delete the individual activities one by one.
To delete an active packet, simply choose Delete from the Action menu on the right in any onboarding or offboarding list view. A confirmation screen will warn you that this deletion will remove all traces of the packet and activities. Once the packet is deleted, any email notifications pertaining to these activities will no longer be sent.
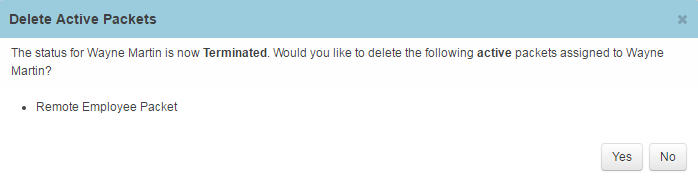
Packets can also be deleted in bulk. When attempting to delete multiple packets at once with different statuses, the active packets will be spelled out in the warning.

Warning message when deleting multiple packets at once
In addition, when terminating either a single employee or multiple employees at once, if any employees have active packets, those packets can be optionally deleted upon termination.
Steps to Enable
Delete Active Packets When Terminating a Single Employee:
- Edit the appropriate Employee record.
- Set the status to Terminated.
- At the prompt, say Yes.
- Save the Employee record.
NOTE: If you confirm that you want to delete the active packets but then do not save the Employee record, the employee will not be terminated and the active packet will not be deleted.
STEPS to Enable
Delete Active Packets for Multiple Employees:
- Select multiple employee records from any employee list view.
- From the ‘Change Status to…’ drop down, select Terminated.
- If at least one selected employee has an active packet, there will be a checkbox in the confirmation screen to delete any active packets associated with the selected employees. Select this checkbox.
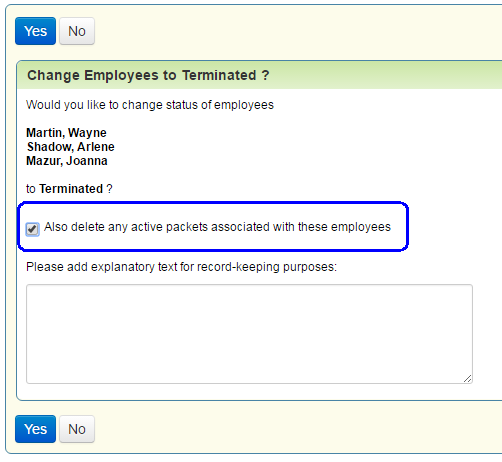
- Click Yes.
The selected employees will be terminated and any active packets will be deleted.
Setting the Due Date of Multiple Activities at Once
When assigning an onboarding/offboarding packet, or when adding activities to an existing packet, you can set the due date for multiple activities at once. Any activity which allows you to enter or change a due date at the time of assignment is included. This feature can save you time and reduce the chance of user error when entering due dates for many activities.
When you create an activity template, you can choose to set the due date at the time of assignment, or you can set the due date based on the start or hire date. When you choose the latter option, you can allow changes at the time of assignment. Only those tasks that have a defined due date that cannot be overridden at the time of assignment cannot be included when setting multiple due dates at once.
Steps to Enable
Assign Multiple Due Dates for Activities at Once:
- Create a new packet for an employee.
- Add a bundle and/or more than one activity.
- In the table, there is a new column of checkboxes on the left. Select any of these checkboxes or select the top checkbox to select all the available activities.
- From the calendar icon, select the due date, and then click the Set button.
- Select another subset of activities and set a due date, if needed.
- Save the packet.
NOTE: Those activities with due dates which cannot be changed upon assignment will be grayed out.
In the image below, the activity called Email Account is grayed out because the activity was defined so that the date cannot be set by the user at the time the packet is assigned. All the other selected activities will be assigned the date set via the calendar.
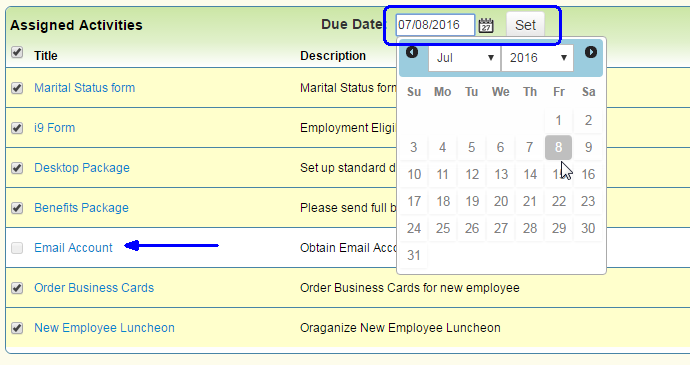
When editing the packet, you can only set due dates for new activities or bundles that you are adding. Any previously added activities cannot be changed.
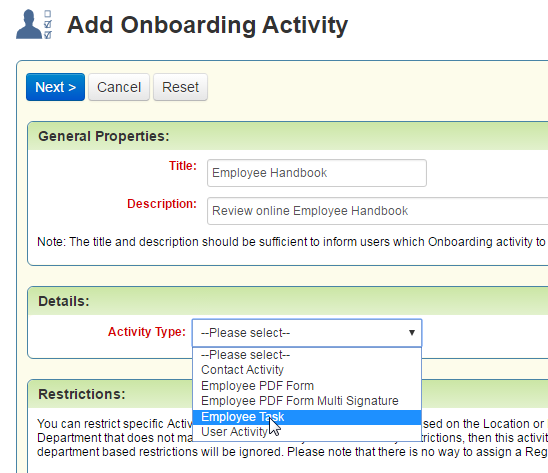
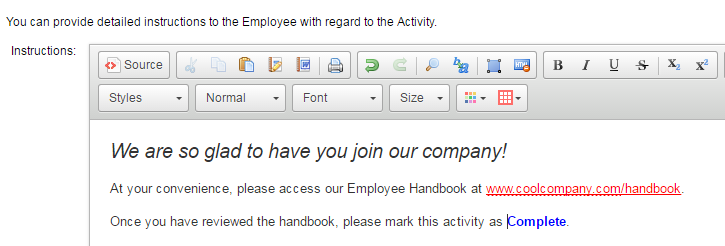
There is a new type of activity called Employee Task that can be used in onboarding and offboarding activity templates. This type of activity does not include a PDF form or require an eSignature. This task can be used to provide simple instructions to an employee, and the employee can mark the activity as complete. For example, a task could include a URL to an internal employee manual, and the employee is asked to review the manual and then mark the activity as complete once he or she has reviewed it. As another example, a task could ask an employee to upload a copy of his/her driver’s license. These new employee tasks can only be used with the Talent Center, not the Employee Website.
Steps to ENable:
Create a Task Employee Template:
- Select Onboard/Offboard, then select Activity Library.
- Switch to either Onboarding or Offboarding and click the New Activity Template button.
- Enter a title and description, and then select Employee Task from the Activity Type drop down.
- Add restrictions based on region, location, division and department as needed, and then click Next.
- Select the due dates and dependencies as you would for other activity templates.
- Enter an employee facing title and description. These will be seen in the list view on the Talent Center, if so configured.
- In the Instructions area, enter detailed instructions that will appear when the employee views the task. These can include step by step instructions for accessing a document online, uploading a document, etc. They should include instructions on when the employee can mark the activity as complete. This section can include HTML text as well.
- Save the activity template.
- Assign this template to employees as you would other templates.
NOTE: This drop down has replaced the radio button selection from the previous version.
NOTE: The system always checks for potentially harmful HTML in the Employee Facing Description and Instructions and automatically removes it from the field when the activity template is saved. If the HTML that was entered was removed, it was not a supported HTML tag.
Assigned activities of this task type will appear in the Onboard/Offboard list view widget in the employee’s Talent Center. The employee may click the View button to see the details of an activity.
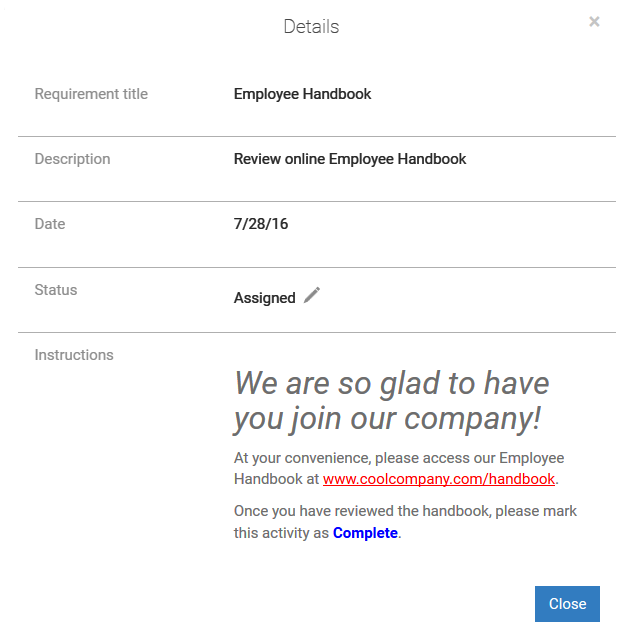
Task Activity when viewed by the employee from the Talent Center
By clicking the Pencil icon for the Status field, the employee can update the status of the task and save the status change. Once the activity pop-up is closed, the activity will be updated in the list view.
Key Resources
For more information on the Talent Center, please refer to the 16A2 What’s New Guide, available on MOS as well as the Resource Center.
Introduced in release 16A2, the Talent Center is our fresh and modern onboarding experience that is fully responsive. The Talent Center can be used on mobile devices as well as desktops. This release further enhances the onboarding experience.
Recruiting and Onboarding customers are strongly encouraged to build a plan to implement Talent Center as a replacement for the current Employee Website (EWS). This will include configuration of the new Talent Center and modifications to any email templates referencing the Employee Website URL.
Recruiting, Onboarding, and Performance customers are encouraged to adopt the new Talent Center for Onboarding and continue to use the EWS for performance reviews and goal management.
Over the next few releases, the Product Management team is focused on including all employee-centric functions (like Performance and Hiring Manager tasks) into the new Talent Center.
Employees now have the ability to upload attachments on the My Info page of their Talent Center. All the attachments uploaded in this widget are available for TBE users under the Attachment section of an Employee record, displaying with the type set to ‘Employee Attachments.’ Employees can also view, download, edit and delete their attachments.
As mentioned previously, employees can now be assigned simple tasks. These tasks can be used in conjunction with the attachment widget as well. For example, you can assign an employee the task of uploading a copy of his/her driver’s license or some other certificate. Once the employee has uploaded the file, the employee simply marks the activity as complete.
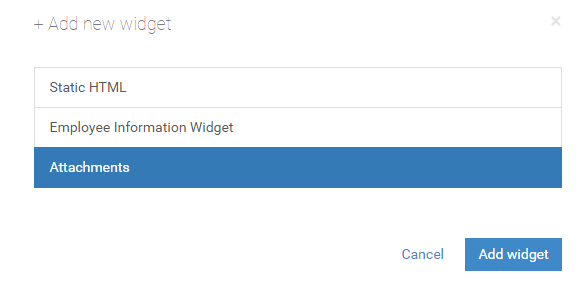
The attachment widget must be added to your existing Talent Center in order for employees to use it.
Steps to enable
Configure the Attachments Widget:
- Be sure to be logged in as an Administrator whose User record is linked to an Employee record.
- Select Administration, then select Customize Onboard/Offboard.
- From the Manage Talent Centers section, click Edit Pages for the Talent Center in question.
- Click on the My Info page and click the Add new widget button at the bottom of the page.
- Select Attachments, then select Add Widget.
- Drag the widget to a new location if desired by dragging and then dropping once you see a red area.
- Click Save & Publish in the upper right-hand corner to save your changes.
Steps to enable
Using the Attachments Widget:
- Log into the Talent Center as an employee.
- Click on the My Info link at the top of the page.
- Click the Add Attachment button and then locate the appropriate attachment.
- The name of the file will be used as the description as well. Click the Pencil icon to enter a new description.
- Click Save.
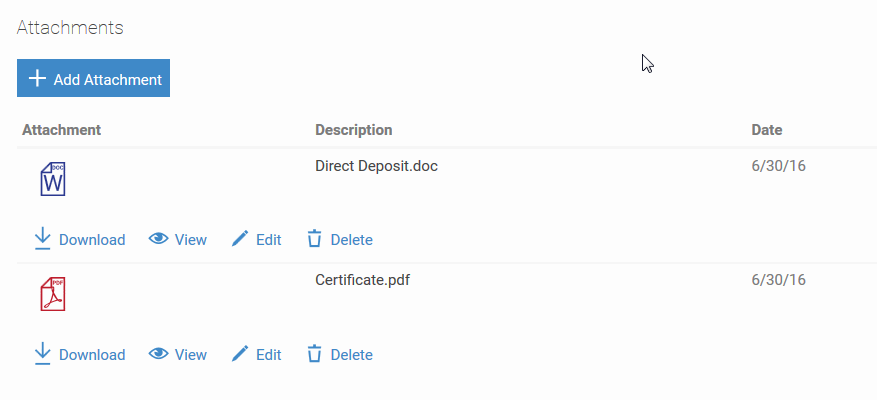
Employees can delete attachments, which will then delete the attachment from the Employee record. They can also view and download the attachments. The Edit button allows the employee to either change the description or upload another attachment to replace the original one. The History Log in the Employee record tracks all changes made by an employee within the Attachments widget. Users can view the attachments, and depending on the role, even delete them, from the Attachments table of an Employee record, which will then delete the attachment from the Attachments Widget.
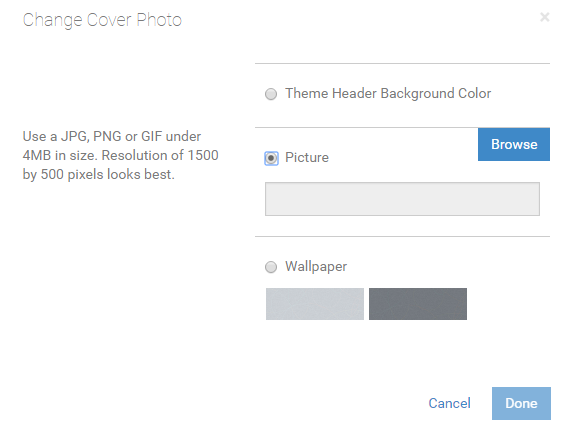
The wallpaper of the Talent Center login page, Home page and My Info page can now be customized. Administrators can choose a background color from the applied theme or add their own image as a background. This feature allows customers to brand the Talent Center to match their corporate image.
Steps to enable
Customize the Wallpaper Image:
- Be sure to be logged in as an Administrator whose User record is linked to an Employee record.
- Select Administration, then select Customize Onboard/Offboard.
- In the Manage Talent Centers section, click Edit Pages for the Talent Center in question.
- On the Home page, click the Change Cover Photo link at the top of the page.
- Select one of the available options. The default wallpaper is selected by default, but you can select to use the theme background color, or select an image from your locale drive. If you select Picture, you will see a description of the available formats and suggested size of the image.
- Locate the image with the Browse button, then click Done.
- Click the My Info tab and the Login page tab, and repeat the process to customize these other pages. Note that the suggested file size will vary depending on the page.
- When you have finished customizing the wallpaper, click Save & Publish in the upper right-hand corner.
Now your employees can see different background images on the various pages of the Talent Center.
NOTE: Although you can add images up to 4 MB, large file sizes can result in slower response times on mobile devices. Please keep this in mind when adding images and select smaller images to improve performance for all employees.
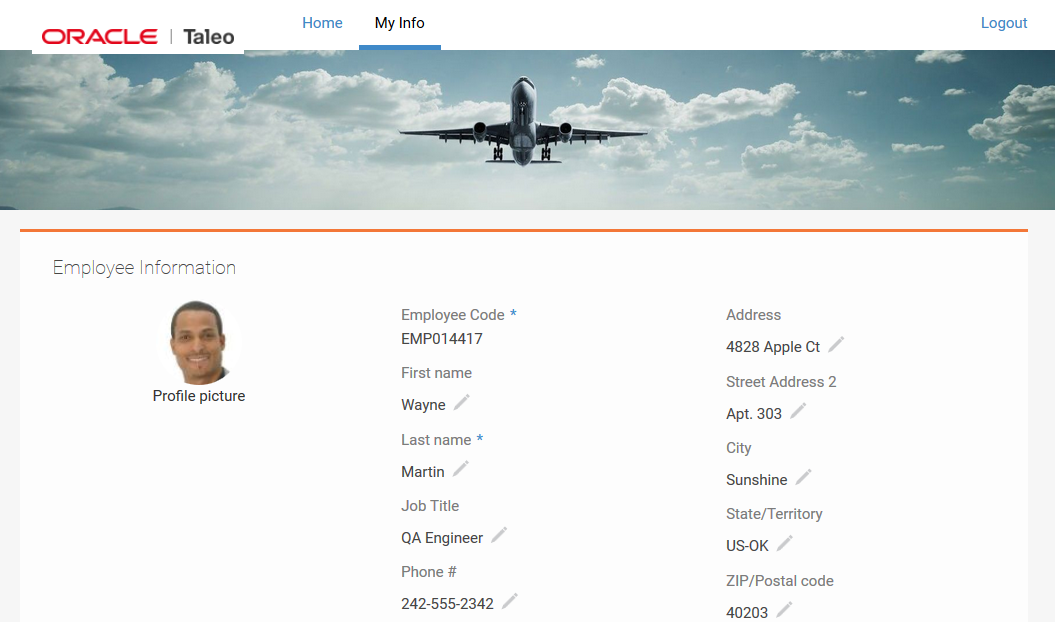
Background image on the My Info page
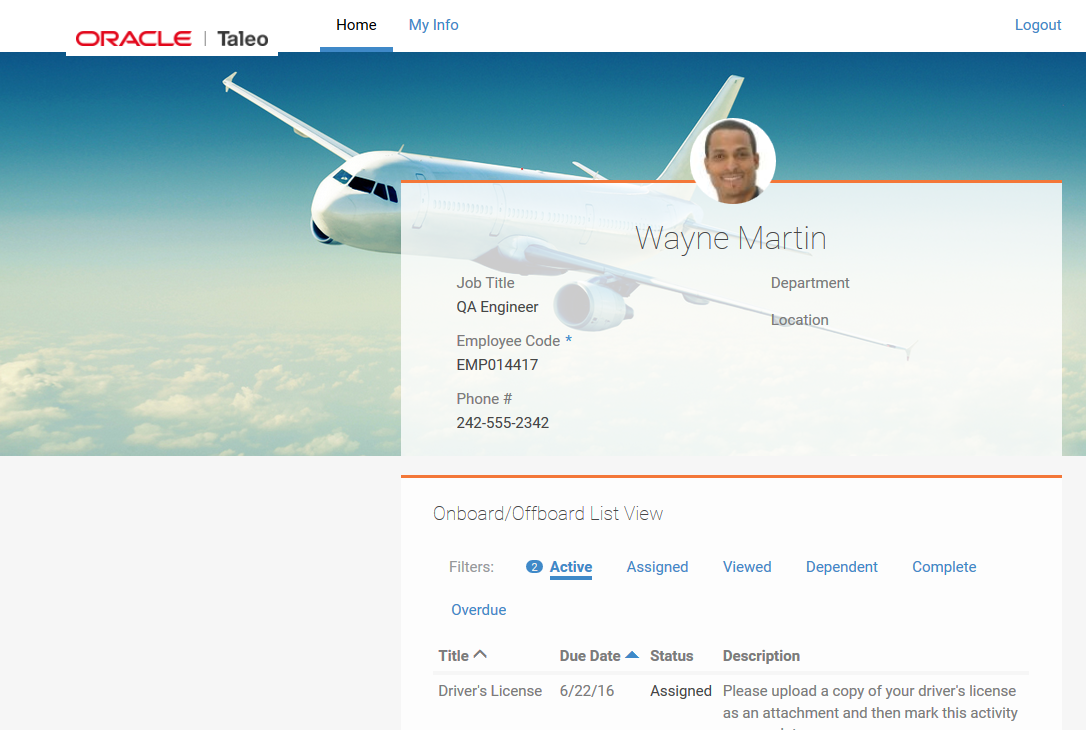
Background image on the Home page
You can select any of the widgets on the Talent Center and make them transparent. By default the background of the widgets is controlled by the theme applied to the Talent Center, using the category called Main Color. To change any widget to be transparent when configuring the Talent Center, simply select the widget as the administrator, and then select Transparent from the drop down to the right of the language drop down.
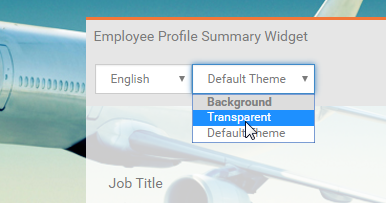
Setting a widget to have a transparent background
Click Done or click outside of the widget to save it. Setting the Employee Profile Summary Widget to transparent would result in the same image as above now displaying through the widget:
Home page with a transparent widget
There is a new employee field called Preferred Talent Center that allows you to assign a specific Talent Center to the employee. You can add this field to employee page layouts and list views as needed. If you assign a Talent Center other than the default to an employee, any emails using the merge field <<TALENT_CENTER_PASSWORD_RESET_LINK>> will link to the correct Talent Center.
For example, you could have a Talent Center set up specifically for interns, and then assign this Talent Center to all of your interns using this Preferred Talent Center field. When your interns received their welcome email, the URL would direct them to the Talent Center for interns.
You may set this field for a group of employees by importing a CSV file.
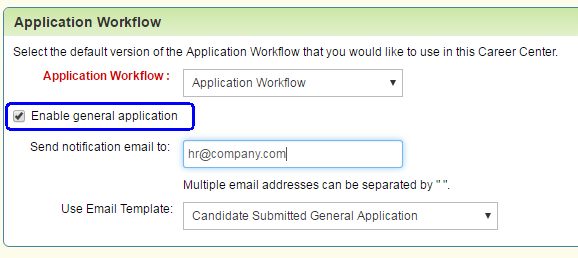
The General Application feature from the legacy Careers Website can now be used with the Career Center. When you enable this feature, candidates can express an interest in your company even when they cannot find a requisition that matches their skills. The candidate will see the same application as when applying for a specific requisition, except no requisition-specific questions are presented to the candidate. Also, the eSignature section is not presented to the candidate because this is requisition-specific information. The candidate can submit their basic information and attach a resume without expressing interest in a specific job. No Application Snapshot is created for the candidate either.
Steps to Enable
The General Application:
- Select Administration, then select Customize Recruit.
- In the Manage Career Centers section, click Edit Settings for the Career Center in question.
- Scroll to the Application Workflow section, and check the setting Enable general application.
- Enter one or more email addresses of anyone who should receive notifications when a general application is created. You can separate multiple addresses with either a space or a comma.
- Select the email template that you wish to send upon notification.
- Click Save.
- In the Customize Pages section, click the Career Center Pages link.
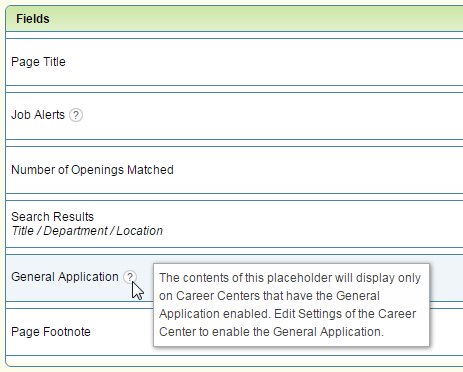
- Edit the Job Search Results page (This feature has moved from the Job Search page with the legacy Careers Website to the Job Search Results page).
- Notice that the placeholder for this feature will only display when it has been enabled. This placeholder can be dragged to a new location on this page if needed.
- Click Edit to the right of the General Application placeholder to modify the default text for this feature.
- Click Submit to save the text, and then click Save back on the Job Search Results page.
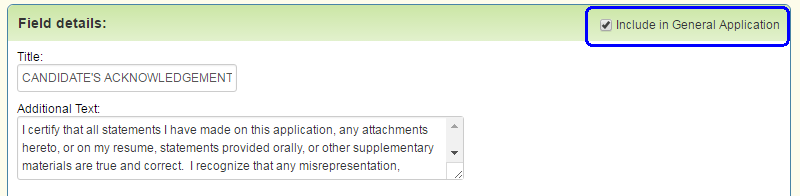
- Although the eSignature section does not pertain to general applications, you have the option to display custom text on the Review and Submit page. If you would like the Applications Statement text to appear for candidates submitting a general application, edit the Review and Submit application component, click Edit to the right of the Application Statements and check the setting Include in General Application.
- Click Submit, then click Save on the Review and Submit page.
NOTE: The default email template called Candidate Submitted General Application may refer to the ‘Edit Careers Website’ page, which is used for the legacy Careers Website (CWS). You may wish to change this text if you are only using the Career Center.
Once the General Application is enabled, candidates will see the following at the bottom of the search results page:
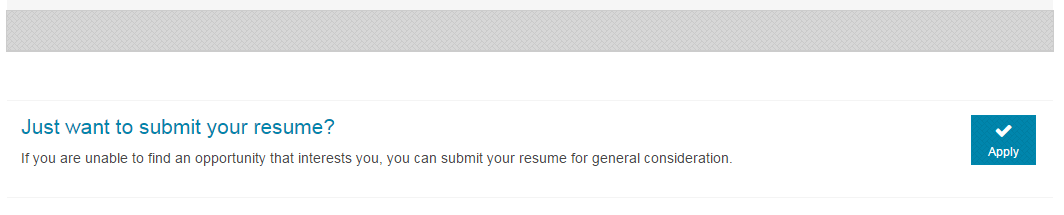
Option to submit General Application from the Job Search Results page
As they fill out the application, they will see the term ‘General Application’ on the left of each page.
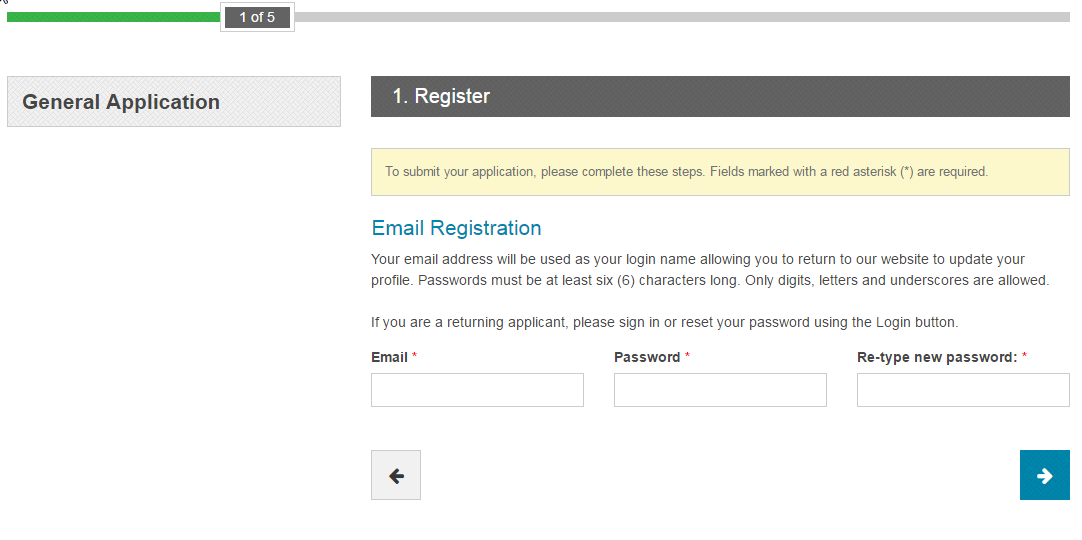
General Application as seen by a candidate
No requisition-specific screening questions are presented to the candidate. Candidates who have submitted a general application will appear in your candidate list views, but will not have any requisition information and no application snapshot will be created. You can select which main status is applied to these candidates if you want to distinguish them in some way.
Steps to enable
Set the Main Status for General Application Candidates:
- Create a new status for Career Center General Application candidates, if necessary.
- From the Customize Recruit page, select Status Mappings in the Customize Processes section.
- Click “Initial” Candidate Status Defaults.
- Select the appropriate status in the Main Status column for the Career Center category.
- Click Save.
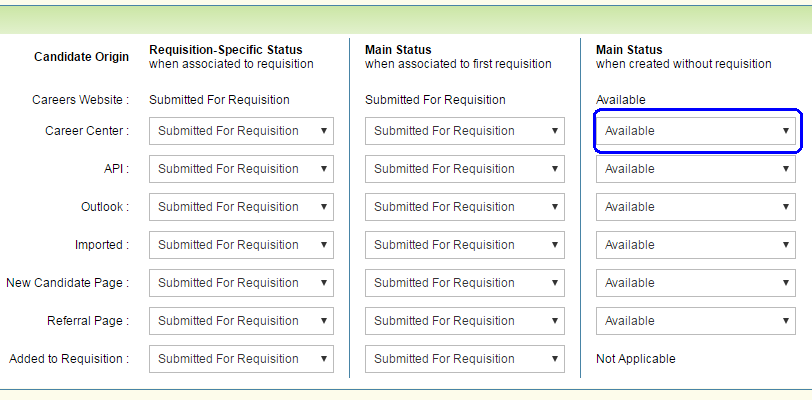
Now your candidates will be created with the status that you have selected.
Interview attachments are now stored in the calendar event. Previously, any attachments sent with the interview request were only available in the original email itself. Interviewers can now access resumes and other attachments from the calendar event, ensuring a better user experience.
When scheduling an interview, any included attachments are included in the email, as in previous releases. Once the user has accepted the interview and added the event to the calendar, if the user opens the interview from the calendar, he or she will see a link to the interview attachments at the top of the email. Clicking this link will bring the user to a page where all the attachments can be downloaded:
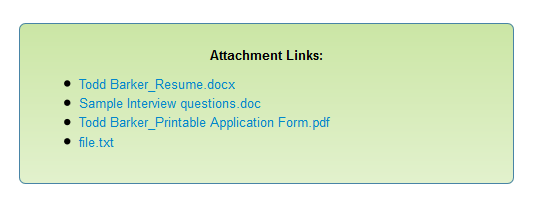
List of interview attachments
If the user who created the interview chooses to send a compressed zip file instead, this page will only contain one file, the zipped file, which can be downloaded and then unzipped.
If the user updates the interview, and adds or removes any attachments, the link in the ICS file will point to the updated list of attachments.
These attachments will expire two months after the interview, but the attachments in the original email itself are still available if the interviewer saves the original email.
NOTE: When Gmail users access the interview from their calendar, the information is always placed in Edit mode. Therefore the URL will not be clickable, thus they will need to copy and paste the URL in a browser. If Gmail users have email reminders set up, the reminder is a view-only email, so the link will be active in that situation.
With this release, customers who use both Taleo Business Edition and Oracle Learn can set up the following integrations between the two applications:
- Single Sign on (SSO) from TBE to Learn
- TBE Employees to Learn Users Data Sync
Both of these features can be set-up and configured by the TBE and Learn Administrators as self-service. The latest configuration guides can always be found at this location:
http://www.oracle.com/technetwork/documentation/default-1841567.html
NOTE: Although the set-up and configuration is self-service, the links to configure each of these features are only available to customers once ‘Learn Integration’ has been enabled. This can be done via a Service Request to Oracle Support. Oracle Support will need to verify that the customer has active TBE and Learn environments.
The TBE to Learn Single Sign On (SSO) is a self-service set up that may be enabled by users with administration access to both TBE and Learn. Access to the Learn SSO configuration feature in TBE will only be visible if Learn Integration is enabled for the TBE Zone.
Once the TBE and Learn configuration steps are completed in both TBE and Learn, TBE users and TBE employees will be able to Single Sign On into the defined Learn Center from the TBE Application, TBE Talent Centers and the TBE Employee Websites.
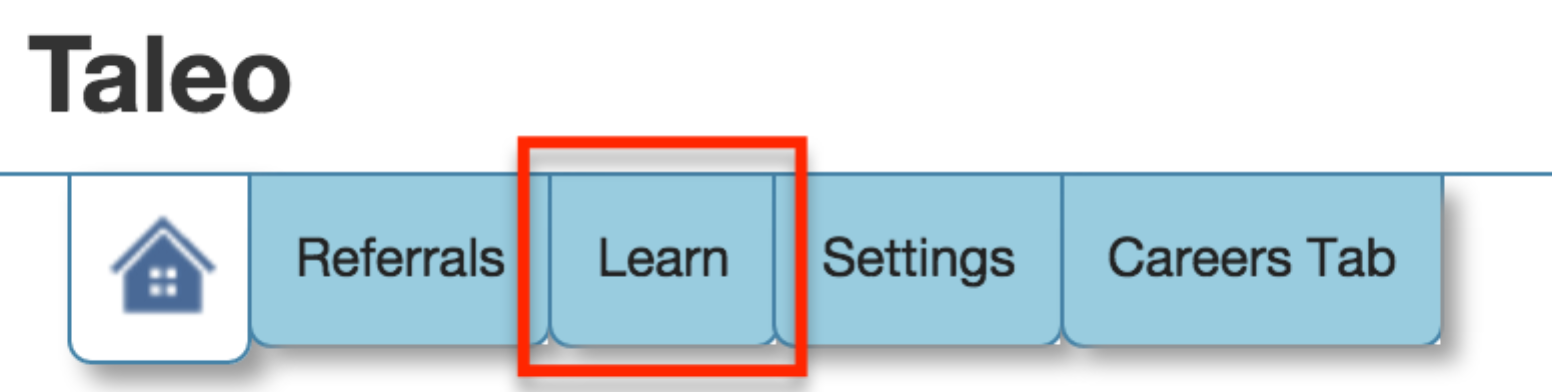
TBE users can click on the Learn tab in the TBE Menu. In doing so, the TBE user will be logged into Learn as the TBE employee that is linked to their TBE User record.

Learn menu available to TBE users
TBE employees, in the Talent Center or Employee Website (EWS), can click on the Learn tab in the EWS Menu or Learn link in the Talent Center header. In doing so, the TBE employee will be logged into Learn.
- From the menu of the legacy Employee Website (EWS):
- From the Learn link in the header of the Talent Center:
- The Learn tab will only appear if an Active Learn Connection exists in TBE.
- The Learn User will be created in Learn and assigned membership to the specified Learn Center if one is found to not already exist; matching by the TBE Employee ID to Learn Standard Field Employee ID.
- Learn will be opened in a separate browser window.
- TBE Users will only successfully access Learn if they have a TBE Employee record linked to their TBE User.
![]()
TBE to Learn SSO Configuration:
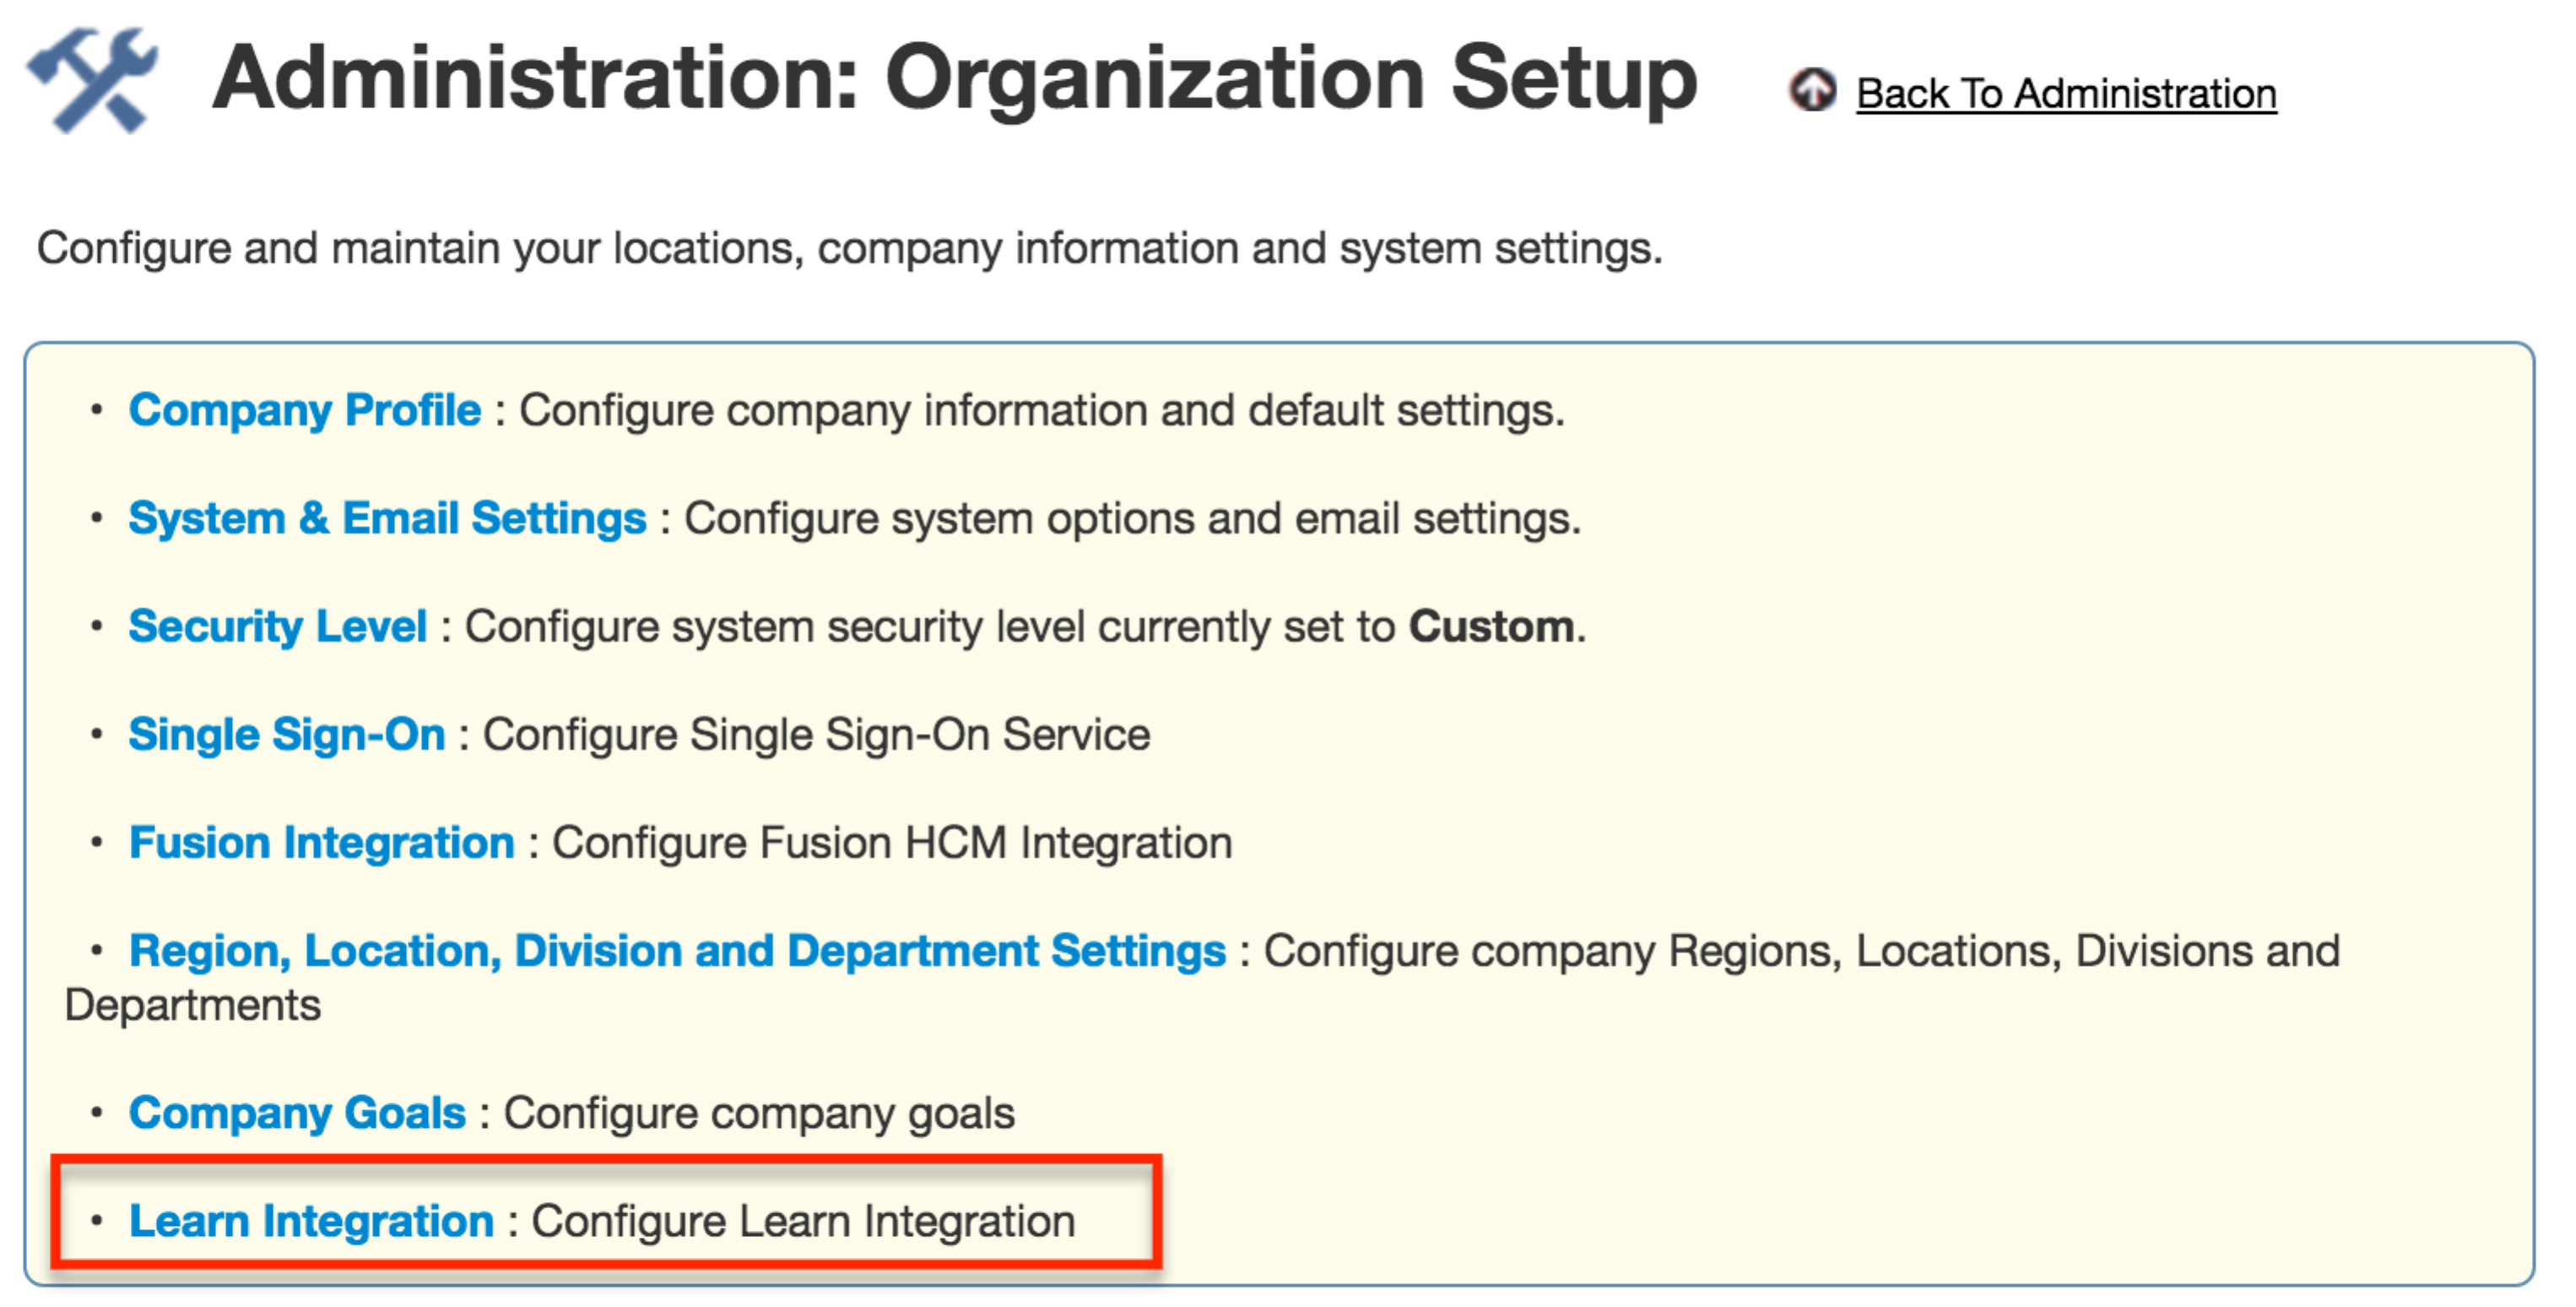
- If Learn Integration service is enabled for a TBE Zone, select Administration, then select Organization.
- Click Learn Integration.
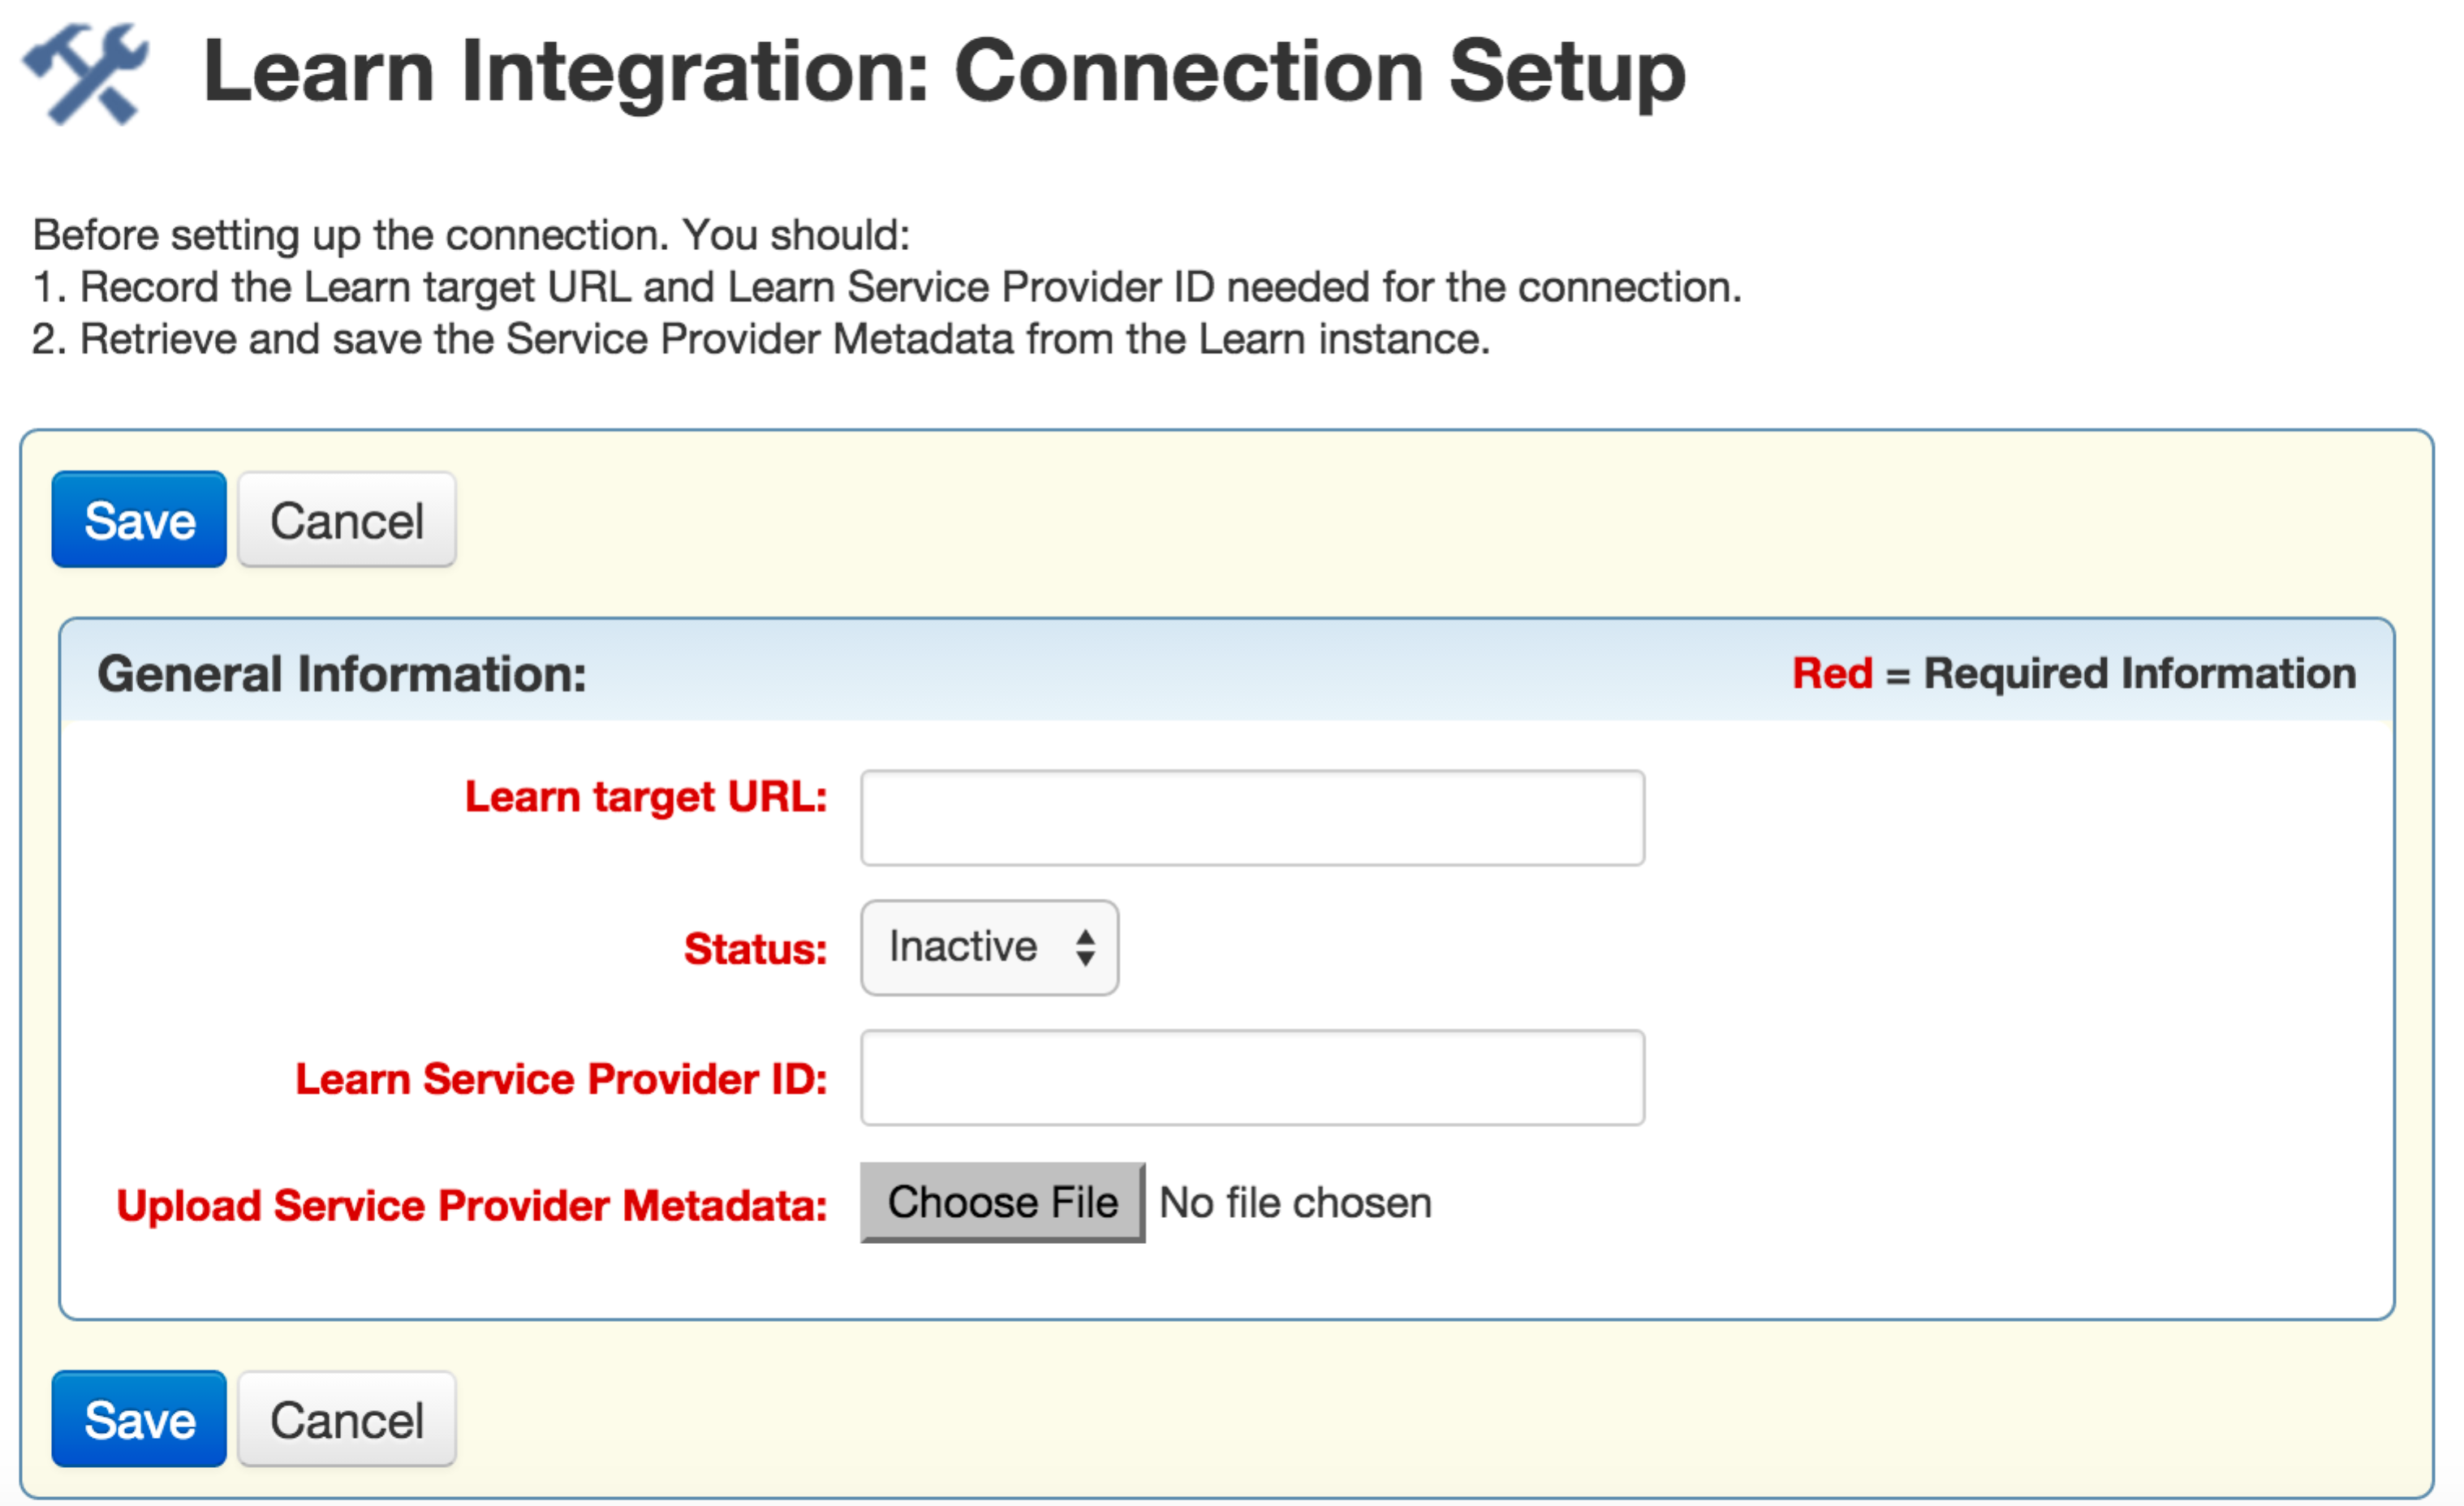
- This will take you to the ‘Learn Integration: Connection Setup’ UI where you will enter the information for the Learn environment to which the SSO for Employees should occur.
- Click Save. Once successfully saved, the connection is visible and the Security Certificate can be retrieved.

Key Resources
For more detailed information on setting up this integration please refer to the guide available at this location:
http://www.oracle.com/technetwork/documentation/default-1841567.html
TBE Employees to Learn Users Data Synchronization
The TBE Employees to Learn Users data synchronization is a self-service set up that may be enabled by users with administration access to both TBE and Learn. Access to the Learn Data Synchronization configuration feature in TBE will only be visible if Learn Integration is enabled for the TBE Zone.
Once the configuration steps are completed, Employee records in TBE will periodically get synced with the Learn User records keeping the two systems in sync.
The data synchronization will perform the following actions:
- Link any TBE Employee record with a Learn User record if the two match by Employee ID or Email address. For example, one created via Single Sign On.
- Create a new Learn user for any TBE employee that does not yet have a corresponding Learn user, link the two records and add the Learn user as a member of the Learn Center specified in configuration.
- Update any Learn user that is already linked to a TBE employee if the Employee record has been updated in TBE.
- Revoke a Learn user’s membership in the Learn Center if the linked TBE employee is de-activated in TBE.
- Refreshes the Organizational Structure (Supervisors/Supervisees) of the Learn users in the Learn Center to reflect the TBE employees Organizational Structure (Employees/Managers).
NOTE: If more than one match is found, no link will be made.
The data synchronization runs periodically, currently daily, at a time set up by the Administrator in TBE. A summary of the changes made as a result of each execution is logged in the History Log of the Learn Data Synchronization connection page.
If any issues are encountered during the execution, an email will be sent to the user(s) designated in the Learn Data Synchronization connection configuration.
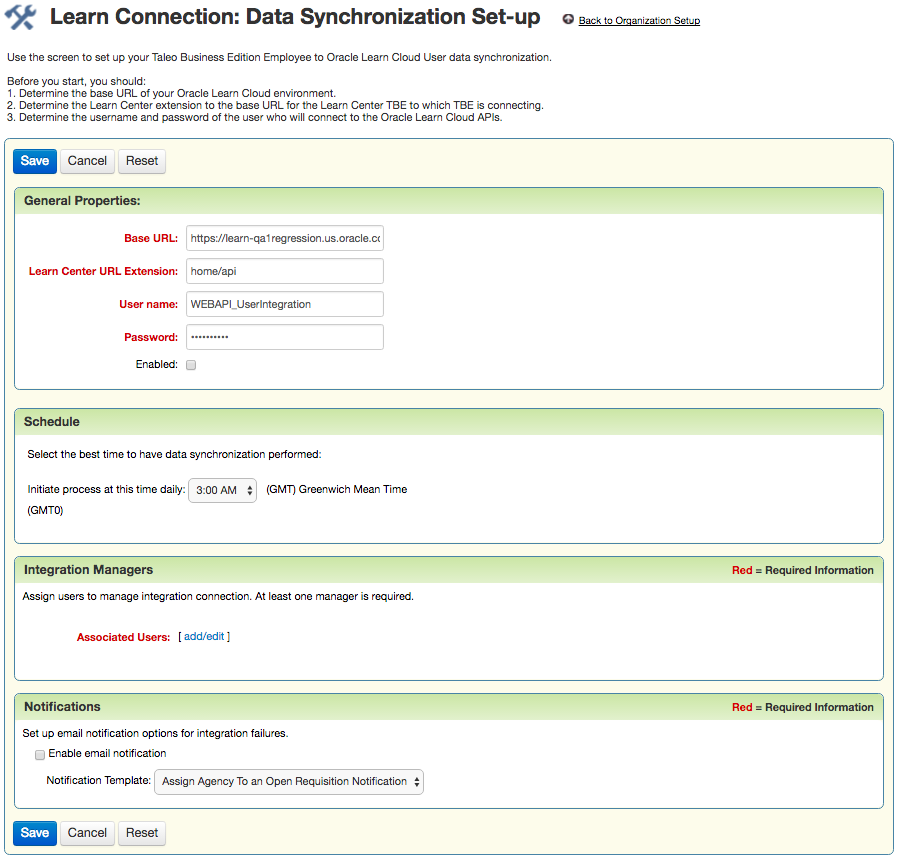
TBE to Learn Data Synchronization Configuration:
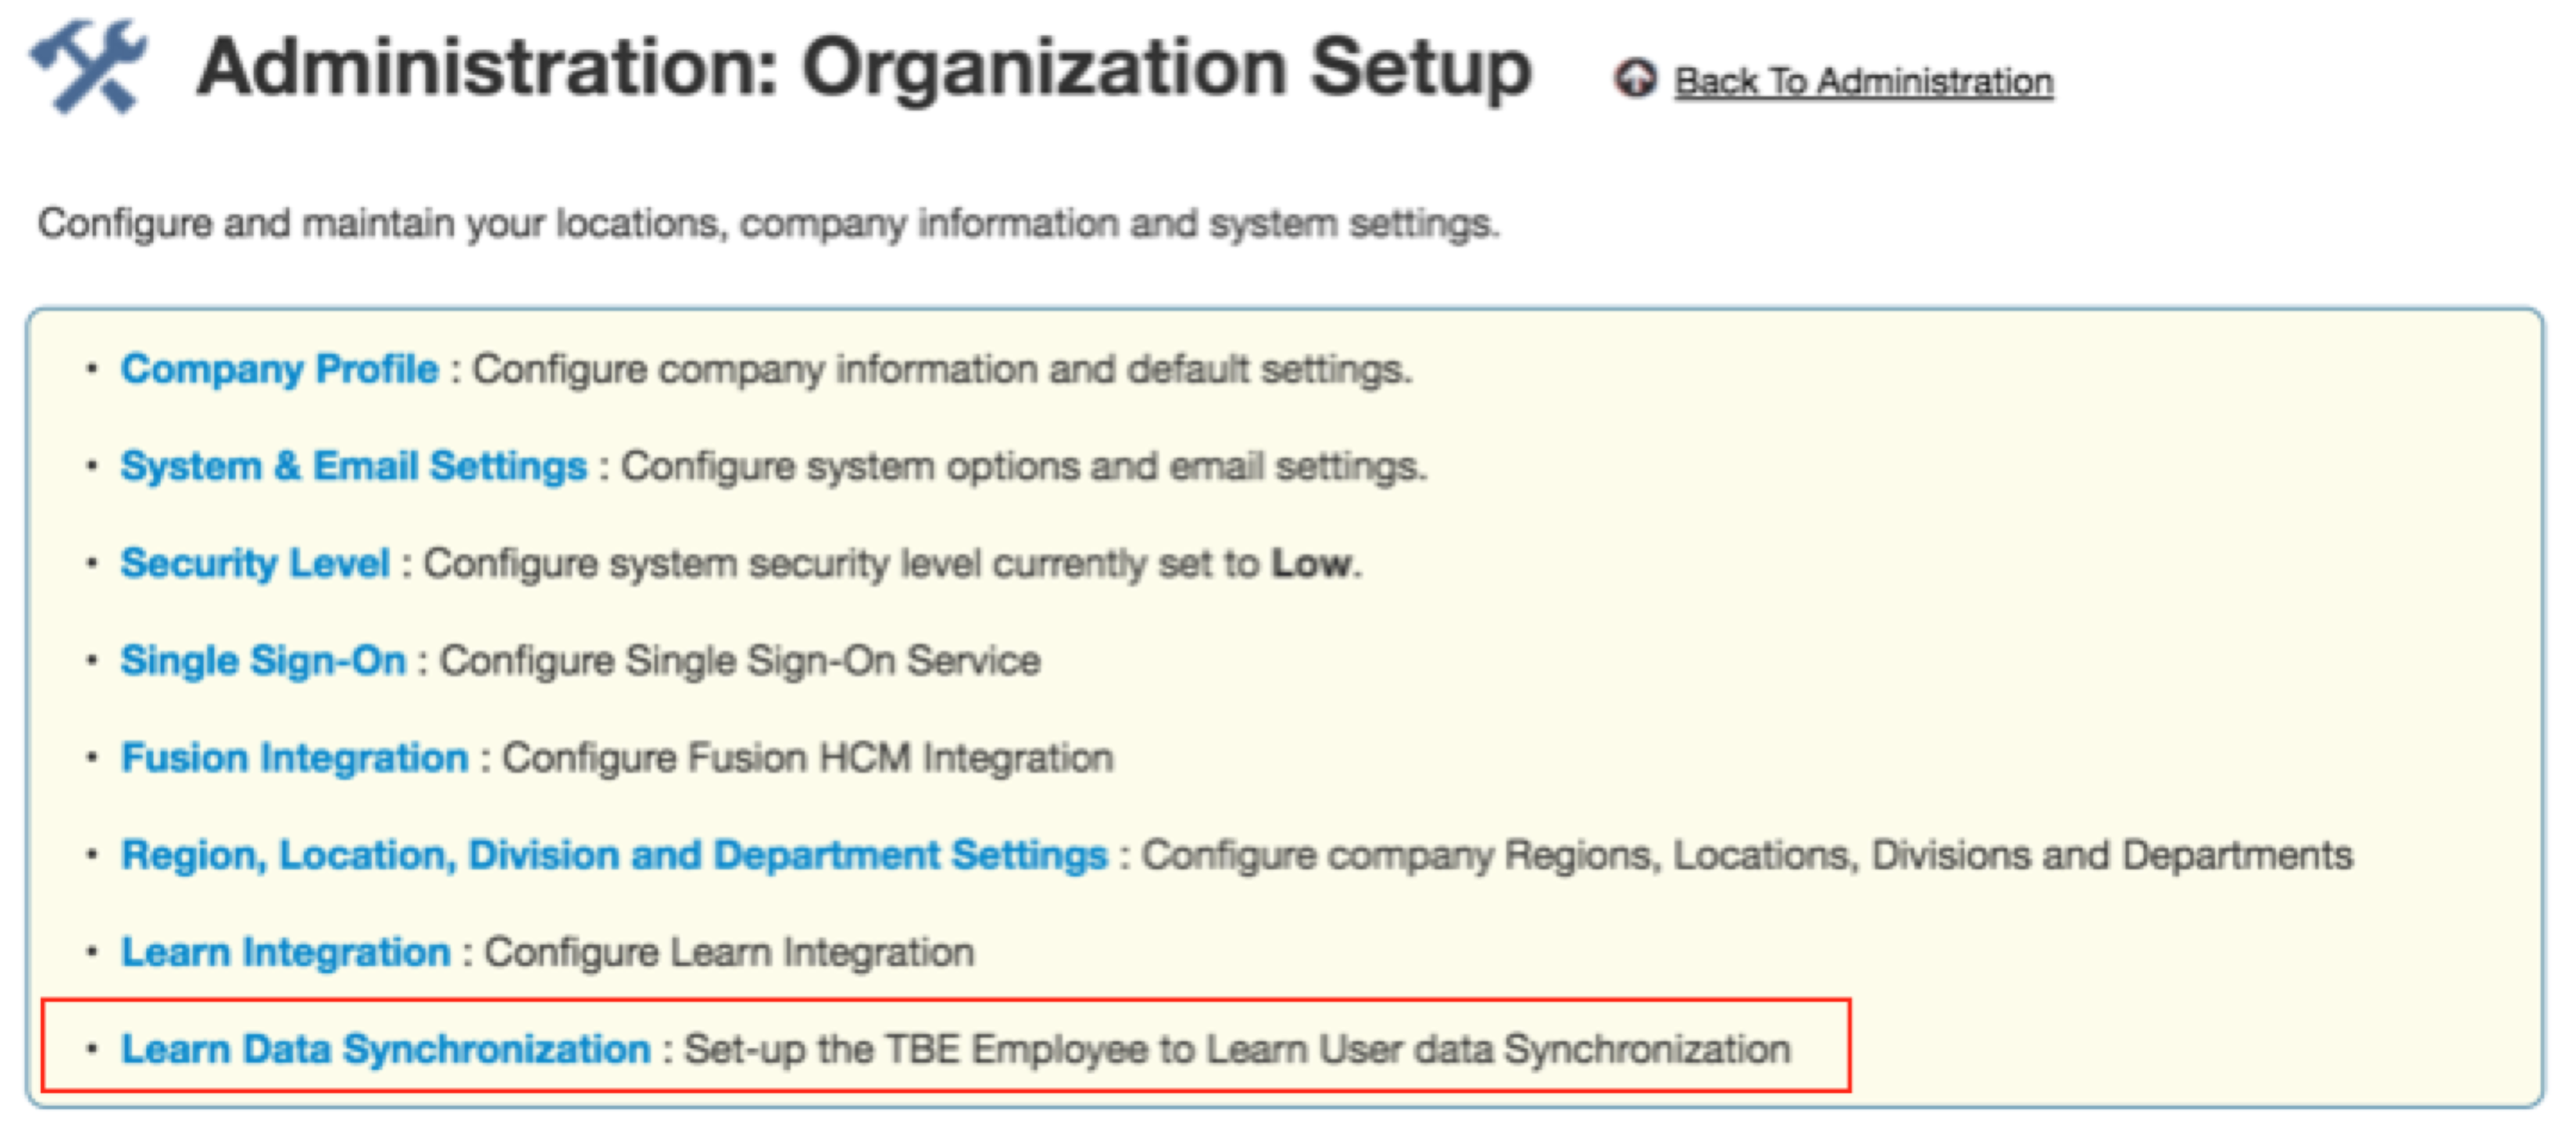
- If Learn Integration service and the ‘Oracle Learn Cloud’ integration fields have been enabled for a TBE Zone, select Administration, then select Organization.
- Click Learn Data Synchronization.
- This will take you to the ‘Learn Integration: Data Synchronization Setup’ UI where you will enter the information for the Learn environment and Learn Center to which the TBE Employees will be synced to Learn Users.
- Know the Base URL to the Learn Environment
- Know the Learn Center URL Extension to the Base URL for the Learn Center into which the Learn Users will be inserted.
- Know the username and password of the Learn user who has permissions to use the integration APIs. (Currently: WEBAPI_UserIntegration)
- It is also recommended that you create a new System Email Template that will be used to notify selected TBE users when issues are encountered with the integration.
NOTE: Before setting up the connection to Learn for data synchronization, some pre-requisites are recommended.
You will not be allowed to save the connection as Active unless the Base URL, URL Extension, username and password are correct. The system will validate these values before allowing you to save the active connection. You may save the connection as Inactive/Disabled at anytime without this validation occurring.
To complete your Learn Connection: Data Synchronization Set-up, complete the following:
Key Resources
For more detailed information on setting up this integration please refer to the guide available at this location:
http://www.oracle.com/technetwork/documentation/default-1841567.html
TBE to Learn Data Synchronization Execution and History Log
Once an Active Learn Integration: Data Synchronization Set-up has been saved, the process of the synchronization of TBE Employee records to Learn User records will initiate at the earliest opportunity after the time selected in the connection configuration.
Each time the job executes, daily at the selected time, the History Log of the connection (available via Administration ![]() Organization
Organization ![]() Learn Data Synchronization
Learn Data Synchronization ![]() History Log) is updated with entries reflecting the activity, a summary of all changes made successfully and unsuccessfully as well as whether any email notifications were sent to TBE Users to notify them of any issues encountered.
History Log) is updated with entries reflecting the activity, a summary of all changes made successfully and unsuccessfully as well as whether any email notifications were sent to TBE Users to notify them of any issues encountered.
For performance reasons, the number of rows that can be exported from the Candidates by Requisition List view has been reduced to 500. All other list views remain at 5000. This change will be reverted in a future release once the impacted list view can be optimized. If you need more than 500 candidates per requisition, it is recommended that you use a report in the interim.
Advanced Search Behavior Change
Advanced searches are now based on the Search Engine rather than the database in order to improve performance. This type of search updates the index every 30 seconds. Due to this change, changes that are saved may not be available immediately for searching. Changes saved to text fields for requisitions, candidates, employees, users, and rolling entities can take up to 30 seconds before they are available in the search results.
new field Added to Activity Table in Reporting
With the introduction of the new Employee Task Onboard/Offboard activity type, there are now activities that can be assigned to employees that have both an Employee Facing Description and Activity Instructions. As a result, there have been changes to the fields that are available for custom reporting from the Activity Table.
Previously, the Employee Facing Descriptions and the Activity Instructions were all reportable on custom reports under a common field called Activity Instructions. With the new release, Activity Instructions field will include only the Activity Instructions data for all activity types and Employee Facing Instructions will include only the Employee Facing Description data of the employee facing activities.
Customers should review their custom Onboard/Offboard Reports to determine if any changes need to be made to account for this change.
---

Copyright © 2016, Oracle and/or its affiliates. All rights reserved.
This document is provided for information purposes only, and the contents hereof are subject to change without notice.This document is not warranted to be error-free, nor subject to any other warranties or conditions, whether expressed orally or implied in law, including implied warranties and conditions of merchantability or fitness for a particular purpose. We specifically disclaim any liability with respect to this document, and no contractual obligations are formed either directly or indirectly by this document. This document may not be reproduced ortransmitted in any form or by any means, electronic or mechanical, for any purpose, without our prior written permission.
Oracle and Java are registered trademarks of Oracle and/or its affiliates. Other names may be trademarks of their respective owners.
Intel and Intel Xeon are trademarks or registered trademarks of Intel Corporation.All SPARC trademarks are used under license and are trademarks or registered trademarks of SPARC International, Inc. AMD, Opteron, the AMD logo, and the AMD Opteron logo are trademarks or registered trademarks of Advanced Micro Devices. UNIX is a registered trademark of The Open Group.