
This document will continue to evolve as existing sections change and new information is added. All updates are logged below, with the most recent updates at the top.
| Date |
What’s Changed |
Notes |
|---|---|---|
| 06 OCT 2016 |
Initial Document Creation |
This guide outlines the information you need to know about new or improved functionality in Oracle Taleo Cloud for Midsize (Taleo Business Edition) Release 16B2. Each section includes a brief description of the feature, the steps you need to take to enable or begin using the feature, any tips or considerations that you should keep in mind, and the resources available to help you.
Some of the new Release 16B2 features are automatically available to users after the upgrade and some require action from the user, the system administrator, or Oracle.
The table below offers a quick view of the actions required to enable each of the Release 16B2 features.
| Action Required to Enable Feature |
|||||
|---|---|---|---|---|---|
| Feature |
Automatically Available |
End User Action Required |
Administrator Action Required |
Oracle Service Request Required |
|
| Talent Center Enhancements |
|||||
|
|
|||||
|
|
|
||||
|
|
|||||
|
|
|||||
|
|
|||||
| Perform Enhancements |
|||||
|
|
|||||
|
|
|||||
|
|
|||||
| TBE to Learn Integration |
|||||
|
|
|||||
| Additional Changes |
|||||
|
|
|||||

Introduced in release 16A2, the Talent Center is our fresh and modern onboarding experience that is fully responsive. The Talent Center can be used on mobile devices as well as desktops. This release continues to improve the employee experience by allowing the employee to work with widgets to display more or less information, or present the information in a different way, depending on the employee’s preferences. Employees can also now access company documents from a document repository.
Recruiting, Onboarding, and Performance customers are encouraged to adopt the new Talent Center for Onboarding and continue to use the EWS for performance reviews and goal management.
Over the next several releases, the Product Management team is focused on including all employee-centric functions (like Performance and Hiring Manager tasks) into the new Talent Center.
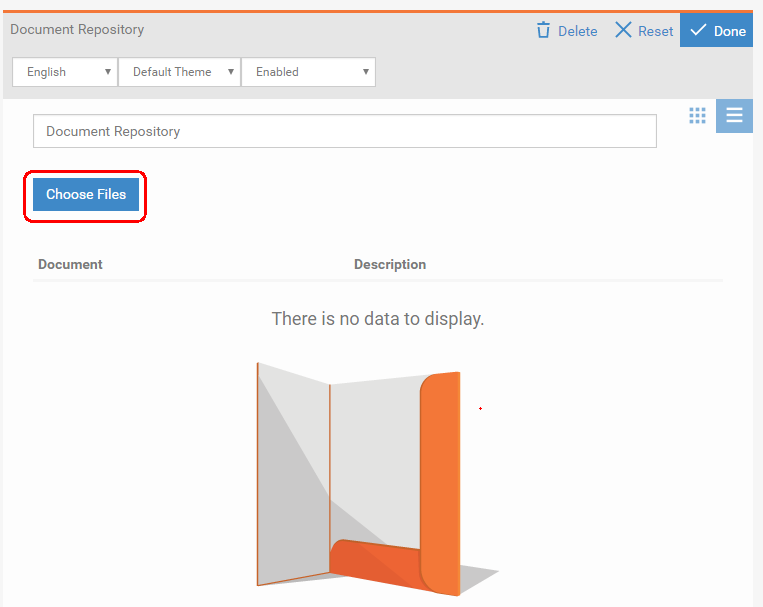
Administrators can now upload company documents to a document repository, allowing employees to view and download these documents from the Talent Center. This feature can be used in conjunction with the Employee Task onboarding activity introduced in the last release. Employees can have easy access to important documents.
For example, you can now have a repository of guides and forms that need to be downloaded and reviewed or signed, and then possibly uploaded again using the attachments widget.
The documents are added to Taleo Business Edition by Administrators, and then this new widget must be added to the Talent Center as well.
Steps to Enable
- Log into Taleo Business Edition as an administrator and from the Administration menu, select Organization.
- Click the new Document Repository link at the bottom.
- In the empty Documents table, add all the documents you wish to hold in the repository. You may want to add a description for each.
- If you add a document in error, select Delete from the Action menu on the right and delete the document.
- When you have added all the documents, select Administration, then select Customize Onboard/Offboard.
- Locate the Talent Center for which you want to add the Document Repository widget, and click Edit Pages.
- Scroll to the bottom of the Home page and click Add new widget.
- Select Document Repository from the list, and click Add widget.
- Move the widget to a new location if desired.
- Click the Choose Files button.
- Select the files you wish to display for all employees.
- Click Done to close the list of files, and then click Done again to save the widget.
- Click the Save & Publish button at the top of the Talent Center.
NOTE: You can add a larger set of documents to the repository and then limit the list that is available to the end-user employee.
NOTE: The Document Repository works very well in the smaller area on the left. When you drag a widget to another location, the color that displays to indicate that you can drop a widget is now blue rather than red.
You may need to update the description for some of your Onboard templates to instruct employees to download certain files from the document repository as part of the task.
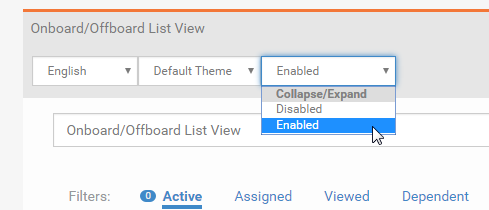
Employees can now collapse and expand the widgets on the Talent Center, resulting in a cleaner, more organized layout. The number of active and overdue items will be shown in the Onboard/Offboard list view when the widget is collapsed. Employees can see more of their important information at the same time without having to scroll. As other features such as performance reviews and goals are added to the Talent Center, this feature will be even more important, allowing an employee to collapse a widget with all completed items but still easily see when a new one has been added.
Administrators have the ability to configure whether a widget should be collapsible or not. For example, important company announcements can be added to the Talent Center without the ability to collapse the widget so that employees never miss important information.
Steps to Enable
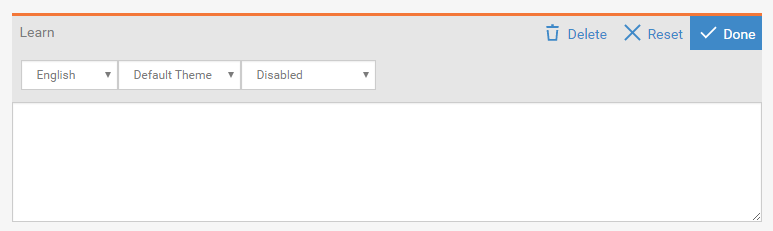
- From the Talent Center, click on any widget to place it into Edit mode.
- Select the third drop down menu, and select either Disabled or Enabled for the Collapse/Expand options.
- Click the Done button to save the widget.
- Repeat for other widgets.
- Click the Save & Publish button at the top of the page to apply all changes to the Talent Center.
NOTE: List view widgets will have the collapse/expand feature enabled by default, while static HTML widgets will have the feature disabled by default. You may want to prevent employees from being able to collapse widgets where you add import messages as static text, for example.
When your employees log into the Talent Center, all the widgets will be expanded, but each employee can decide to collapse any widget that displays the small collapse icon at the bottom.

Small icon showing that the widget can be collapsed
When the employee collapses the list view widget, the number of active and overdue items will display so that the employee can keep track of such items.

Widget displays the number of active and overdue items when collapsed
Each time an employee logs into the Talent Center, the widgets will be expanded or collapsed as they were when last exiting.
List view widgets now have an alternate way of displaying information called the Card View. There are two icons in the upper right-hand of each list view that display the List View (default) and the new Card View. The Card View displays each item in the list view as a small card that employees may find easier to read on a mobile device.

Card View for a list view widget on a desktop or large mobile device

Card View for a list view widget on a smaller mobile device
Employees can switch between the list view and the card view at any time, and the choice will be remembered when returning to the Talent Center.
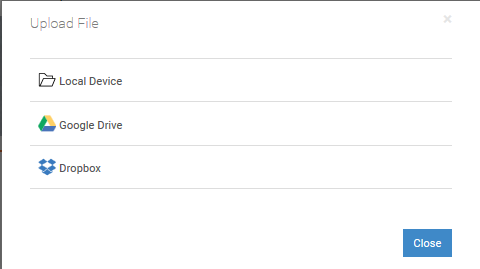
Allowing Document Upload from Google Drive and Dropbox
This release allows customers to configure the Talent Center so that employees can upload attachments from both Google Drive and Dropbox. This option is helpful when employees are on their mobile devices. For our Recruit customers, the same options are available for candidates to upload their resumes on the Career Center.
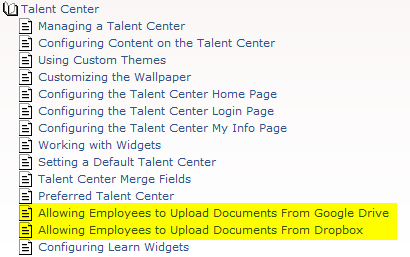
In order to configure this feature, you must add the Google or Dropbox information in the System & Email Settings page, but then also enable it in a specific Talent Center. Detailed instructions are available in the online Help>Onboard. Expand the Administration chapter, and then the Talent Center chapter to find the entries for both Google Drive and Dropbox.
Entries in the Help Table of Contents for Google Drive and Dropbox
Essentially, you need a client ID for Google Drive and an app key for Dropbox. Once you add this information to TBE, you enable Google Drive or Dropbox or both for each Talent Center.
Once this has been done, when employees add documents to the Attachments widget on the Talent Center, they will have the additional option of Dropbox and/or Google Drive.
Window that appears for employees on the Talent Center when adding attachments
This release allows joint TBE and Learn customers with Learn SSO configured to embed Learn widgets into the Talent Center, providing a richer experience for these customers.
Widget Portability enables you to embed supported Widgets on SSO-enabled Talent Center by placing a snippet of code into the Talent Center Learn widget. This means you can use LearnCenter widgets on your Talent Center pages.
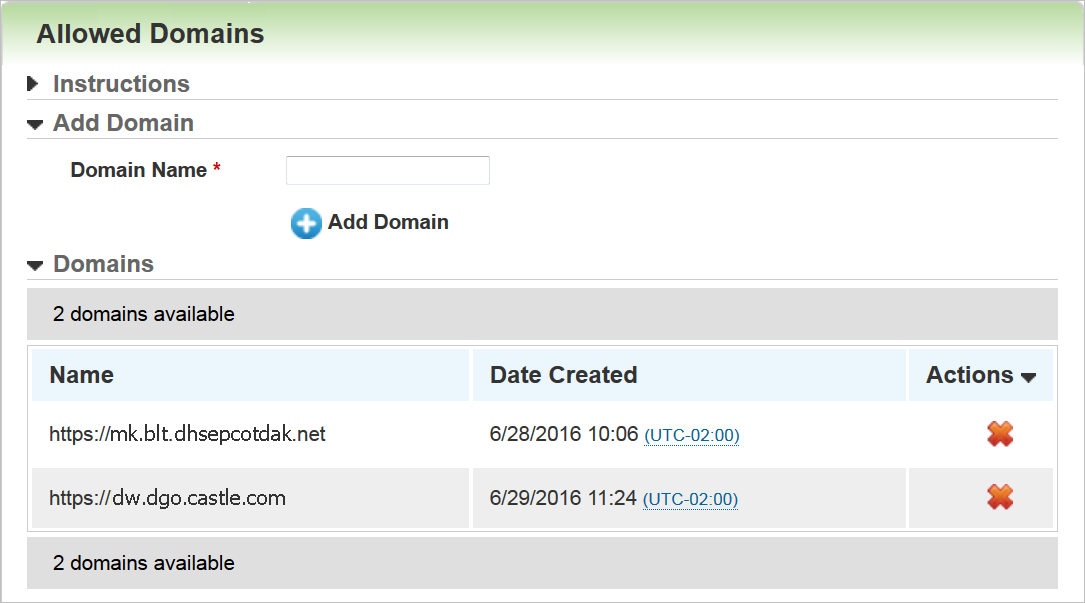
You must “whitelist” the TBE production domain: https://tbe.taleo.net to use widgets using a new Allowed Domains page in the root LearnCenter. Whitelisting a website means you are telling LearnCenter that this website is secure for use. Once placed on an external page, the look and feel of a widget can be customized to match that website’s design by overwriting default LearnCenter CSS styles.
Currently, the following widgets are supported for use with Widget Portability:
- Learning Plans
- Transcript
- My Tasks
Steps to Enable
- Enable SSO for your LearnCenter.
- Add the Learn widget to your Talent Center via the Add new widget button and follow the link that appears in the widget.
- Enter the appropriate domain information on the Allowed Domains page (root LearnCenter > Integrations > Allowed Domains).
- Copy the snippet of code from the appropriate Widget’s Embed BETA tab (Control Panel>LearnCenter Design>Widgets>Widget’s Embed BETA tab).
- Paste the code into the appropriate Learn Widget on your Talent Center and click Done or outside the widget area.
- (Optional) Update the HTML code so that the Widget uses the hosting site’s CSS.
- Save & Publish your page.
NOTE: Refer to the TBE Learn SSO Setup Guide in order to enable Learn SSO for you Learn Center.

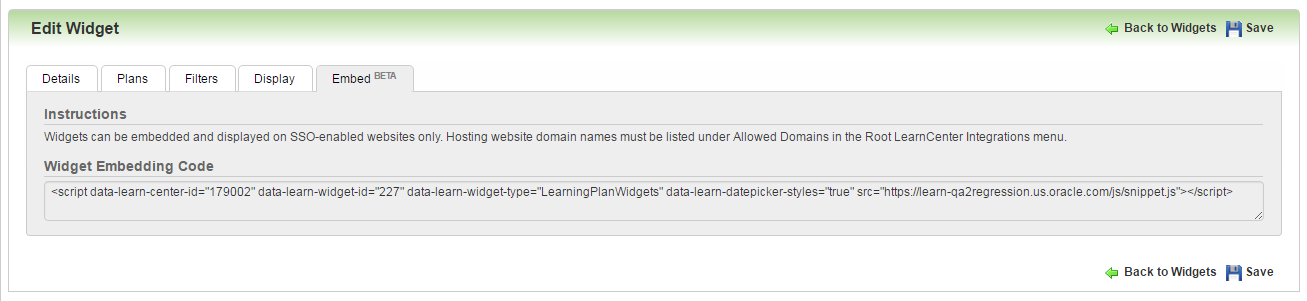
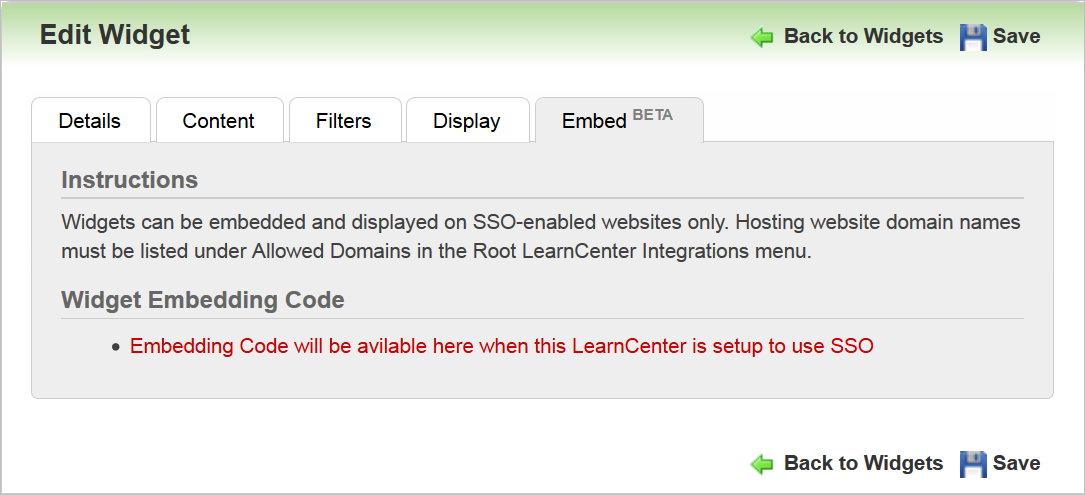
If you have not yet set up a LearnCenter for SSO, there will be no code here and a message displays instead.
A similar warning message displays to alert you if you do not have an allowed domain saved on the Allowed Domains page in the root LearnCenter (see above for details).
NOTE: Learn widgets have a better user experience when placed within wider container on Talent Center, therefore it is not recommended to add them into a narrow container on Home page.
Tips and Considerations
For this feature to work, you must enable the following items.
NOTE: This is information you will need to discuss or present to your IT personnel.
Widget Publishing Requirements
- SSO must be enabled on the hosting website.
- Hosting website domain must be listed on the Allowed Domains page (root LearnCenter > Integrations Control Panel menu).
- You must have the ability to embed a snippet of HTML code on the designated hosting website.
Widget Use
- Your Internet browser must allow pop-up windows (SSO authentication relies on pop-up windows)
- It is recommended that you use an Oracle-recommended, modern browser, such as Microsoft® Internet Explorer® 11, or the latest versions of Google Chrome® or Mozilla Firefox®. You can use earlier versions of Microsoft Internet Explorer browsers, but there may be additional browser prompts that affect User Experience.
NOTE: Refer to the Oracle Learn Cloud System Requirements document for a complete list of supported browsers.
Key Resources
- SSO topics in Learn’s online help
- Widget topics in Learn’s online help.
- The instructions in this What’s New document
- Detailed instructions in TBE’s Help>Onboard (expand the Administration chapter, and then the Talent Center chapter to find the entry for Configuring Learn Widgets)
- Your organization’s IT Staff
- Your organization’s web designer
This release includes some popular enhancement requests for Perform that will improve the user experience.
Employee Status Field for Reviews and Goals List Views
The employee status field can now be added to reviews and goals list views and page layouts. This change allows customers to filter out their inactive employees, if needed, from various list views or when searching for goals and reviews, providing for a better user experience.
You can add either the Employee Status field to any review or goals list view, or you can add the Employee is Active field. Rather than adding this field as a column, you may wish to filter by this field instead. An example is provided here.
Steps to Enable
- Edit the list view you wish to customize, such as Active Reviews.
- From the first filter list that is not already in use, select Employee Status.
- Click Next at the top or bottom of the screen.
- On the next page, select all but the Terminated status.
- Click Save.
Alternatively, you can select filter by Employee is Active Status, and then on the Next page, select Yes.
You can also add both of these fields to page layouts, such as the Review Search and Goals Search page. When these fields are present, you can search for goals meeting specific criteria but only for the employee statuses that are still active.
Printing Option for Multi-Rater Feedback
There is now a Print button available when viewing multi-rater feedback, enabling managers to have a printed copy of the feedback when completing a performance review, as needed.
Users access the multi-rater feedback as in previous releases, by selecting the name from the Multi-rater Feedback column in a Reviews list view.
Once on the feedback page, users simply click the small Print button to print the feedback.
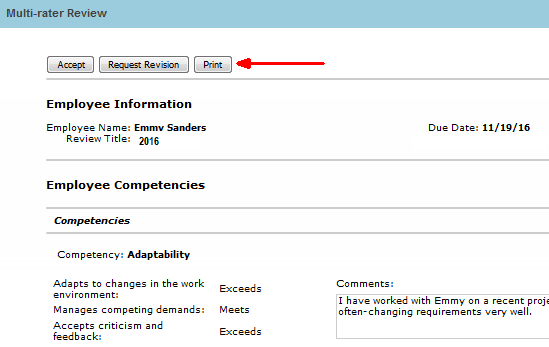
New Print button available in multi-rater feedback
No Perform-Related Reminders for Terminated Employees
Email reminders for goals, reviews, and multi-rater requests will no longer be sent for terminated employees. Emails will not be sent to either the employee who is no longer with the company (but perhaps the email is being forwarded to another employee) nor to the manager to remind them to complete a review for an employee who is no longer with the company.
The Perform reminders will no longer go out, but any active reviews are not updated. Customers can decide if they want to delete reviews that were never completed or move them to a custom ‘final’ status manually.
TBE Employees to Learn User Synchronization Enhancement
Joint Learn and Taleo Business Edition customers who implement the standard TBE Employees to Learn Users Sync will have the Hired Date populated on the Learn User record if populated on the TBE Employee record.
Customers will now be able to change the Sub Learn Center into which the Learn Users are assigned membership by updating the connection information – changing the URL Extension to a different Sub Learn Center. Changing the sub Learn center will remove the Employees’ Membership ID in TBE. The next sync execution will assign the Users membership in the new Sub Learn Center.
Customers will be able to also change the Learn environment, from Staging to Production for example, to which the sync is to occur. Changing the sub Learn environment will remove all of the Learn specific fields from the Employee records in TBE. The next sync execution will sync the Users to the new Learn Environment and Sub Learn Center.
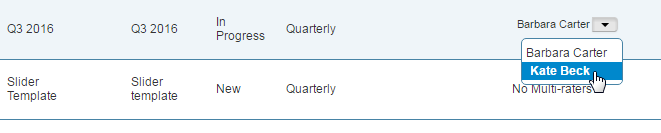
New Report Parameter for Requisition Actors
Adding fields such as requisition owners, requisition approvers, offer approvers, requisition hiring managers, or requisition managers to a custom report as parameters is now much easier. In previous releases you had to enter a range of IDs when doing so, which meant that you had to know the ID of these ‘actors’ on a requisition. Additionally, you could only add one at a time.
With this release you are now presented with a list of users to choose from, and you can select more than one. So if you wanted to create a custom candidate report but limit the results to those candidates tied to a requisition with a specific requisition hiring manager, for example, it is much easier to do so.
After locating the custom report topic which contains the table information that you need, simply select the ID field and add it as a parameter. In the example below, the ID field is from the Requisition Hiring Managers table.
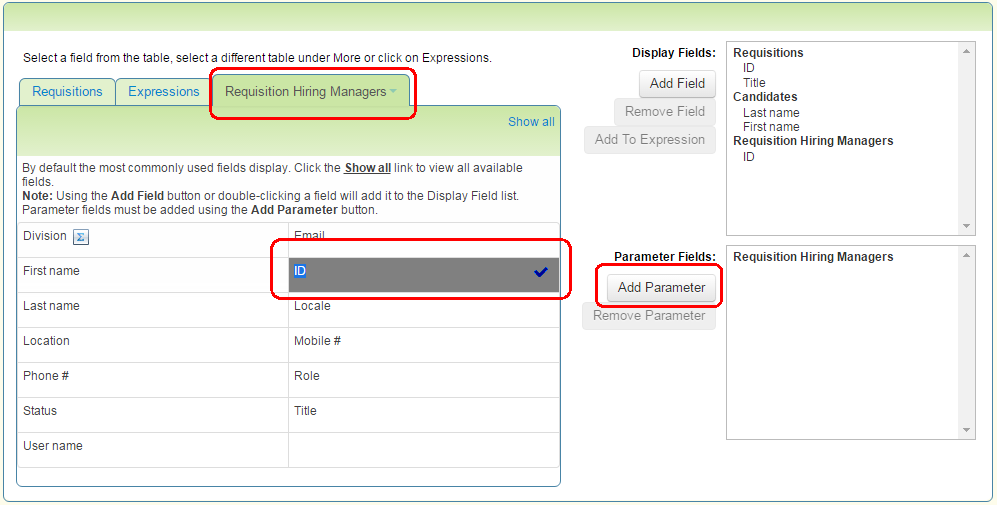
Adding the Requisition Hiring Managers’ ID field as a parameter
Continue designing the report. Then when running the report, when you click on the field to add a parameter, you are presented with a list of users, and you can select one or more users.
The full list of users is shown, not just those currently having the corresponding ‘actor’ access in their User record. This allows you to search for requisitions for which the specified user was a requisition hiring manager, for example, even if this access is no longer given to this user.
In the example below, the report results would show all records for which either Bob Smith or Adam Smith are the requisition owner AND Eddie Guzman is the requisition hiring manager.
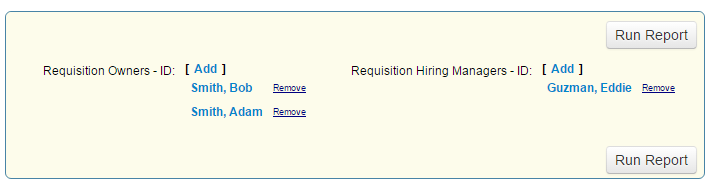
Adding more than one user as a parameter
---

Copyright © 2016, Oracle and/or its affiliates. All rights reserved.
This document is provided for information purposes only, and the contents hereof are subject to change without notice.This document is not warranted to be error-free, nor subject to any other warranties or conditions, whether expressed orally or implied in law, including implied warranties and conditions of merchantability or fitness for a particular purpose. We specifically disclaim any liability with respect to this document, and no contractual obligations are formed either directly or indirectly by this document. This document may not be reproduced ortransmitted in any form or by any means, electronic or mechanical, for any purpose, without our prior written permission.
Oracle and Java are registered trademarks of Oracle and/or its affiliates. Other names may be trademarks of their respective owners.
Intel and Intel Xeon are trademarks or registered trademarks of Intel Corporation.All SPARC trademarks are used under license and are trademarks or registered trademarks of SPARC International, Inc. AMD, Opteron, the AMD logo, and the AMD Opteron logo are trademarks or registered trademarks of Advanced Micro Devices. UNIX is a registered trademark of The Open Group.