
This document will continue to evolve as existing sections change and new information is added. All updates are logged below, with the most recent updates at the top.
| Date |
What's Changed |
Notes |
|---|---|---|
| 04 NOV 2016 |
Initial Document Creation |
This guide outlines the information you need to know about new or improved functionality included in Releases 16C for Oracle Taleo Learn Cloud. Each section includes a brief description of the feature, the steps you need to take to enable or begin using the feature, any tips or considerations that you should keep in mind, and the resources available to help you.
For Licensing Information, please refer to My Oracle Support DOC ID 1461788.1 .
For the latest information on browser support, please refer to the Oracle Taleo Learn Cloud System Requirements document; My Oracle Support DOC ID 1461788.1.
Some of the new Release 16C features are automatically available to Users after the upgrade and some require action from the User, the company administrator, or Oracle.
The table below offers a quick view of the actions required to enable each of the Release 16C features.
| Action Required to Enable Feature |
||||
|---|---|---|---|---|
| Feature |
Automatically Available |
End User Action Required |
Administrator Action Required |
Oracle Service Request Required |
| Legacy Row Reporting Restriction |
||||
|
|
||||
| New BI Reporting Data Extract Feature |
||||
|
|
||||
|
|
|
|||
|
|
|
|||
|
|
|
|||
|
|
|
|||
| Widget Portability Enhancements |
||||
|
|
||||
| New Team Monitor Widget |
||||
|
|
||||
|
|
|
|||
|
|
|
|||
| Updates to Previously Released Widgets |
||||
|
|
||||
|
|
|
|||
|
|
|
|||
|
|
|
|||
|
|
|
|||
|
|
|
|||
| Include in LearnCenter Search |
||||
|
|
|
|||
| Dynamic Groups Enhancements |
||||
|
|
||||
|
|
|
|||
|
|
|
|||
|
|
|
|||
|
|
|
|||
|
|
|
|||
|
|
|
|||
|
|
|
|||
|
|
|
|||
|
|
|
|||
|
|
|
|||
| LearnCenter Course Marketplace - OpenSesame |
||||
|
|
||||
|
|
|
|||
|
|
|
|||
|
|
|
|||

Legacy Reporting Row Restriction
As previously announced in Customer Connect, with Oracle Taleo Learn Cloud Release 16C, reports run using the legacy reporting technologies will be restricted to 100,000 rows. However, BI Reporting has been enhanced so that you can run reports without the current 65,000 row limitation.
NOTE: Refer to the original announcement in Customer Connect for additional details. See New BI Reporting Data Extract Feature below for detains on the BI Reporting enhancements.
New BI Reporting Data Extract Feature
With Oracle Taleo Learn Cloud Release 16C we are introducing a new BI Reporting Data Extraction feature that enables you to access and use BI Reporting data with third party software. This is something you would typically do if you need to retrieve more data than is currently allowed by BI Reporting for reports (65,000 rows). Data Extract enables you to retrieve a full data set for further processing in a third party system, or for backup purposes. The BI Reporting Data Extraction enables you to:
- Export all available data for a supported query
- Export data to an XML, JSON or CSV formats
- Receive data in a compressed file
- Schedule or run on demand data exports
- Sample data before running full data set export
NOTE: This feature is intended for Administrators who are responsible for analytics or for moving data from one product to another. This is not a feature most BI Reporting Administrators need to use. A new User Permission has been created to secure the use of running full data extractions. See below for details.
There is new User Permission under Manage BI Reporting called Extract Data.
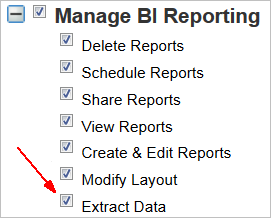
Grant this permission only to Users who will be doing full data extracts.
NOTE: By default, when Release 16C is released, only those Users with Co-Owner permissions are automatically granted these User Permissions. You can manually grant this permission to just those Users who need access to the ability to run full data extractions.
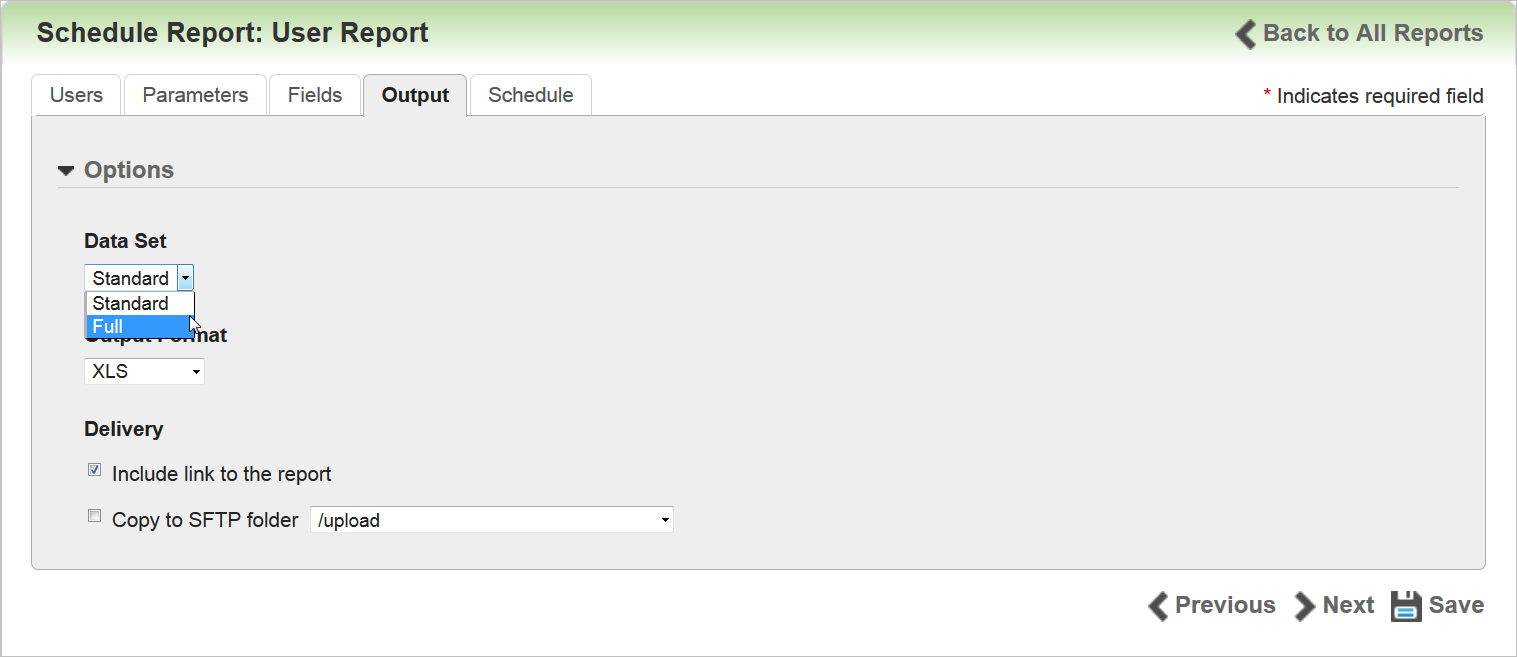
The Output tab on the BI Reporting setup page has been updated for use with this feature. The ability to output BI Reports to other formats has not changed, but is now referred to as a Standard extraction.
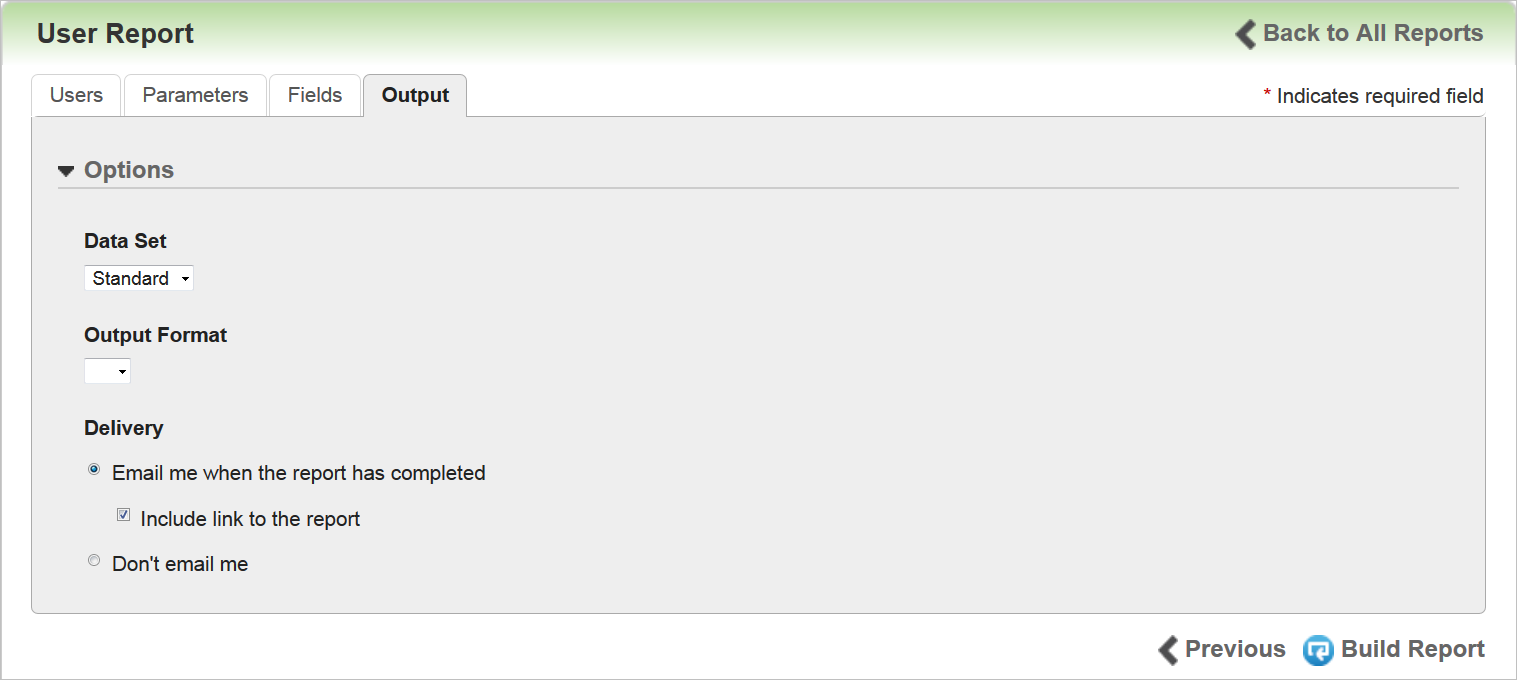
Select the Data Set you want from the drop-down list:
- Standard - a standard, BI Reporting reports data extraction, with up to 65,000 rows of data with no duplicates. With Standard, you can select Output Formats of:
- RTF
- XLS
- HTML
- CSV
- Interactive HMTL (You can manipulate this report)
- Sample – a smaller sampling of data. The sample will have exactly 50 rows, including duplicates, if a User selects CSV, JSON, XML (data extraction formats). For all other formats that number may be lower than 50, as the duplicates are filtered out. With Sample, you can select Output Formats of:
- RTF
- XLS
- HTML
- CSV
- Interactive HMTL (You can manipulate this report)
- JSON
- XML
- Full - All available data that can be extracted. This option only displays if a User has been granted the Extract Data User Permission. With Full, you can select Output Formats of:
- CSV
- JSON
- XML
NOTE: This is how the Output tab functioned prior to this release.
NOTE: Sample Data Sets cannot be scheduled.
NOTE: The maximum amount of time LearnCenter allows for data to be extracted is 6 hours. After that, the extraction is terminated. This limit has been imposed because some extractions can involve large numbers of complicated calculations that impose a drag on system performance. In cases where the time limit is exceeded, a partial data extract is still returned.
You can view the history of data extracts run for any report on the Report History page. See the online help topic called “Viewing BI Reporting Report History” (TOC > Reports > BI Reporting > Viewing BI Reporting Report History) for complete details on accessing and using this page.
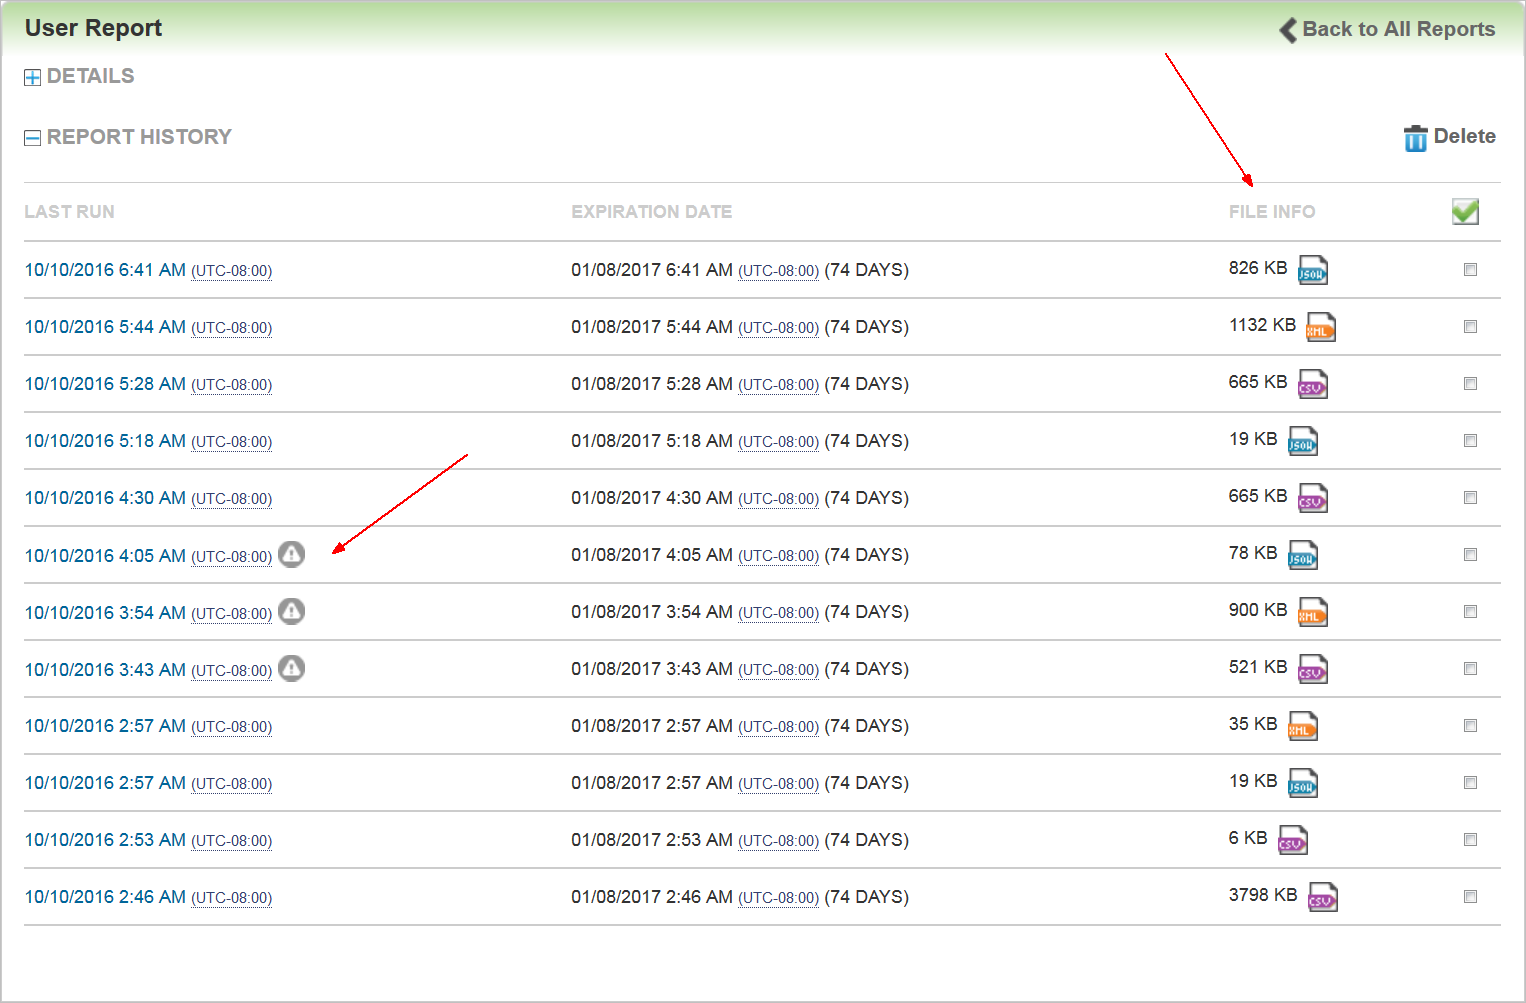
Notice that each extraction file type has its own icon. Clicking on the Last Run links enable you to download the zip file for that particular extraction.
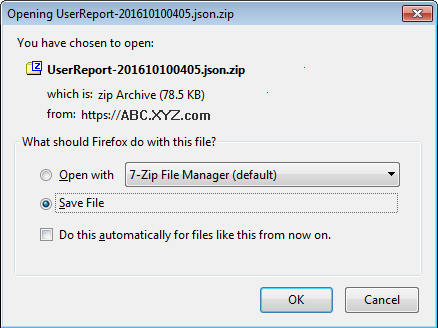
When files are extracted they are compressed ZIP files. Save files to your designated location.
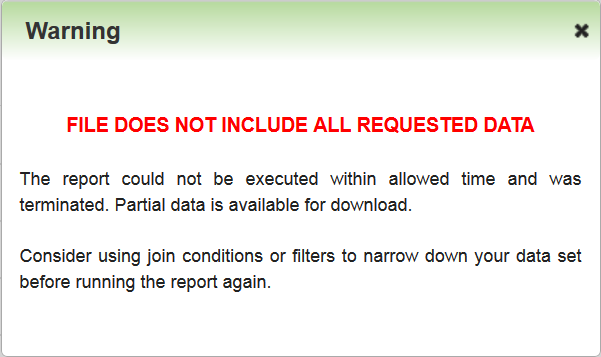
If a warning icon (![]() ) displays next to an item in the Report History, it indicates that an extraction did not complete. Clicking the icon displays information about why it did not complete, along with tips for improving the extraction the next time you run it.
) displays next to an item in the Report History, it indicates that an extraction did not complete. Clicking the icon displays information about why it did not complete, along with tips for improving the extraction the next time you run it.
You can cancel an extraction that is already running if you need to. For example, perhaps you selected the wrong output file type and want to change it. To cancel the first request and start a new one, attempt to run the report again. The following message displays.
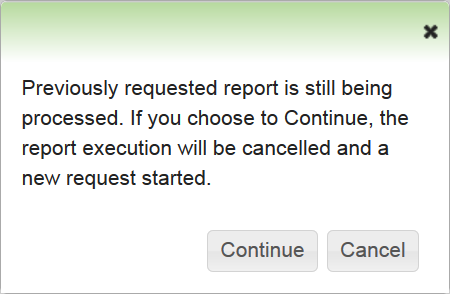
Click Continue to cancel the extraction.
NOTE: You can only run one extraction at time. This message alerts you to any previous extractions.
Both Standard and Full data extractions can be scheduled. Sample data must be run manually at the time you need it.
See online help for complete instructions on scheduling reports. (TOC > Reports > BI Reporting > Scheduling BI Reporting Reports).
Widget Portability Enhancements
An enhancement has been made to the Widget Portability - BETA feature. Two new parameters are available to help you to use custom CSS styles with the Widgets. One is for styling date pickers. The second is for determining how you authenticate Users: either by pop-up (default) or iframe.
- data-learn-datepicker-styles: Flag to control loading of DatePicker CSS, accepts true|false, default: true
- data-learn-auth-mode: Widget SSO authentication method, accepts: popup|iframe, default: popup
Example snippet code could look like this:
<script src="https://example.com/js/snippet.js" data-learn-center-id="XXXXXX" data-learn-widget-type="LearninPlanWidgets" data-learn-widget-id="XXX" data-learn-datepicker-styles=”true” data-learn-auth-mode=”popup”></script>
NOTE: See online help for full details on using Widget Portability – BETA (TOC > LearnCenter Designer > Widgets > Widget Portability – BETA).
With Oracle Taleo Learn Cloud Release 16C we are introducing a new Team Monitor Widget. This Widget provides Supervisors with visibility into their subordinates' Learning Plan and Transcript activities, and their progress. The Team Monitor Widget leverages data from existing Learning Plan and Transcript Widgets, and rolls up metrics from them to create Team Monitor views. The Team Monitor Widget contains a dashboard that lists counts for team members for selected status-based metrics. Supervisors can see each team member's dashboard metrics, and can use the metrics to drill down to the subordinate's Learning Plan or Transcript Widgets. Features of the Team Monitor Widget include:
- Multiple, customizable views of subordinates’ learning activities and progress, based on existing Learning Plan and Transcript widgets. Each Team Monitor widget may have up to 6 widget based views.
- Dashboard metrics based on subordinates Learning Plan status.
- Dashboard metrics that serve as quick filters to list the subordinates making up the metric.
- Dashboard metrics based on Transcript widget displays the count of team members.
- Ability to view Transcripts for any team member.
- An email option that provides a convenient way to message subordinates with questions or action requests regarding Learning Plans or Transcripts.
- Indirect subordinate visibility. Supervisors with multiple management levels can view each of their supervisor's Team Monitor page to view indirect team metrics, and drill down to the indirect team members' Learning Plans and Transcripts.
- List and Card layout formats.
- Embed tab for inserting Team Monitor on a non-LearnCenter page.
Adding a New Team Monitor Widget
You can add a new Team Monitor Widget from the Widgets page. Click Add Widget, select Team Monitor from the Select Widget Type drop-down list, and then click Add.
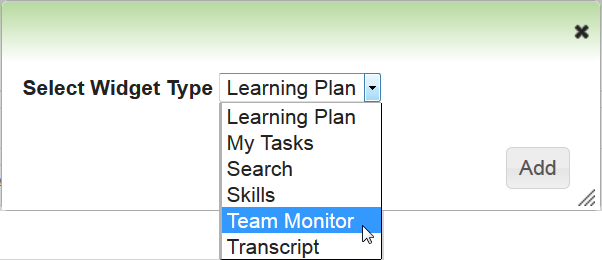
New Team Monitor Widget Type
The Add Widget page opens.
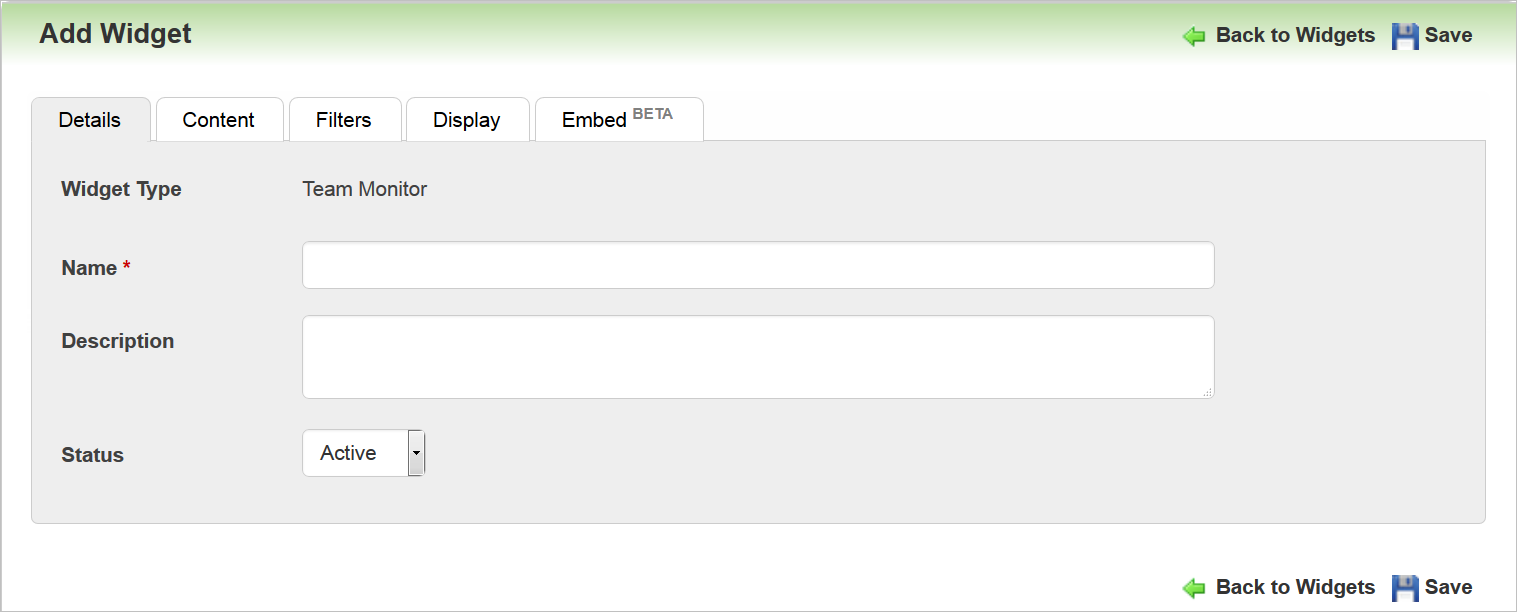
Adding a New Team Monitor Widget – Details Tab
Use the Details tab to give the Widget a Name and Description. Select the appropriate Status. Select the Content tab.
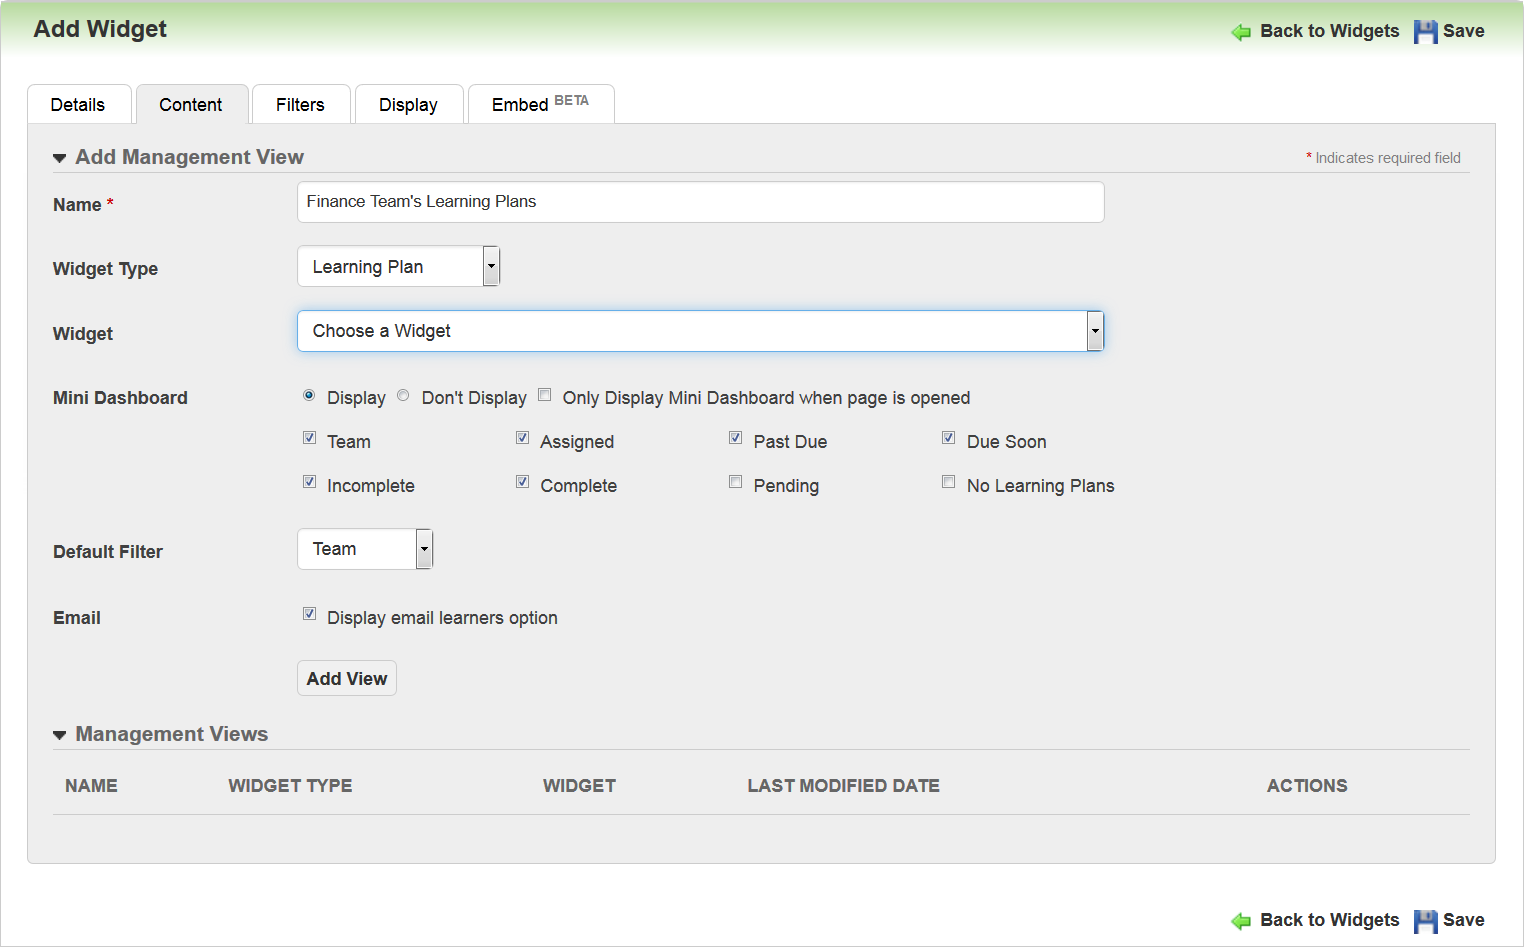
Adding a New Team Monitor Widget – Content Tab
Use this tab to add and customize the “views” that will display to Supervisors on the Widget. A view is a chunk of information based on either the Learning Plan or Transcript Widget, along with your selection of mini dashboard items and filters.
Specify a Name that will display for the first view. Select the Widget Type from which you want to pull information: either Learning Plan or Transcript. When you select a Widget Type, the Widget drop-down list and the Mini Dashboard options become available. The Widget drop-down list contains all available Widgets of the selected type. Select the one you want to include in the view.
Select either Display or Don’t Display for the Mini Dashboard. If you select Display, you can then select all of the sub items you want displayed to end Users. If you selected Learning Plans as the Widget Type the available options are Team, Assigned, Past Due, Due Soon, Incomplete, Complete, Pending, and No Learning Plans. If you selected Transcript as the Widget Type, the available sub option is Team.
Select Only Display Mini Dashboard when page is opened if you only want the dashboard to display when Users first arrive on the page containing the Widget. (See explanation of this feature below.)
You can select the Default Filter from the drop-down list.
Select the Display email learners check box if you want Supervisors to have the ability to send messages to team members from the Widget.
Click Add View when you have finished making selections. The view is listed at the bottom of the page under Management Views. You can now add additional views for the Widget.
NOTE: You can have up to 6 views total. You may want to have multiple Learning Plan views or Transcript views using different filters for each.
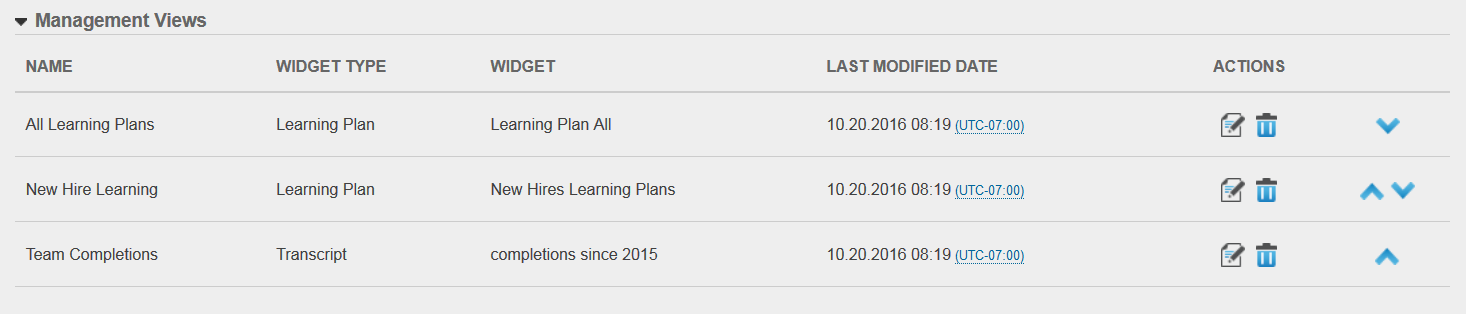
Adding a New Team Monitor Widget – Management Views
You can then add other views if you want. Notice that you can edit or delete views by clicking ![]() and
and![]() . Notice also that you can use the
. Notice also that you can use the ![]() and
and ![]() icons to rearrange the save Management Views. The order you select here is what the order that will display to end Users.
icons to rearrange the save Management Views. The order you select here is what the order that will display to end Users.
The Last Modified Date column lists the most recent update to any of the Management Views. The modified date/time is not by individual Management View, but is based on the most recent add/update to any of the available Management Views.
Click the Filters tab.
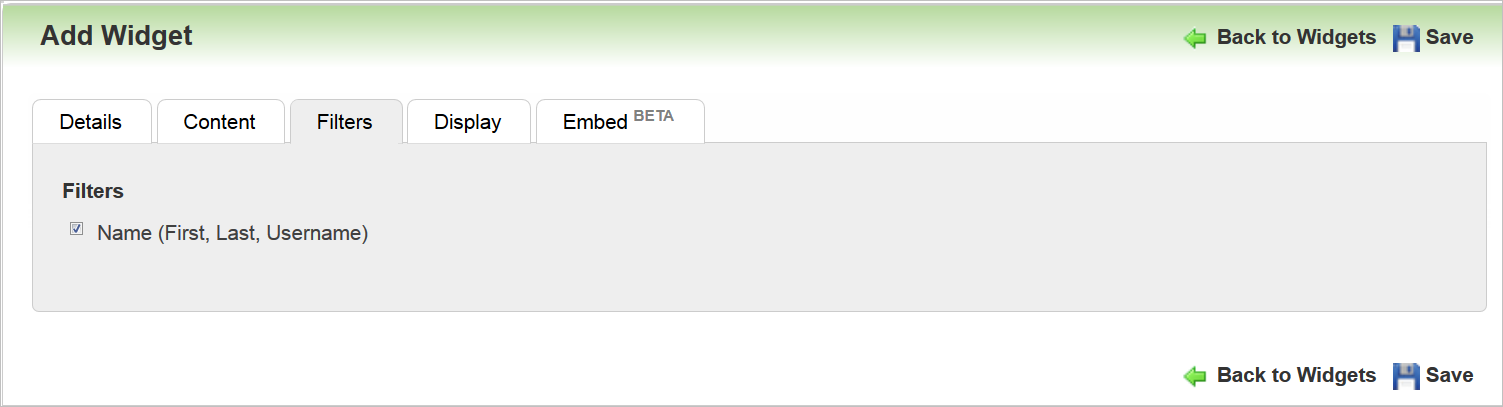
Adding a New Team Monitor Widget –Filters Tab
Use the Filters tab to filter the content. Currently, the only filter for this Widget is Name (First, Last, Username). Click the Display tab.

Adding a New Team Monitor Widget – Display Tab
Use the Display tab to indicate what items should display to end Users. Type a new name for the Widget Header or use the default “Team Monitor” text. Indicate whether the default view will be Card view or List view.
Select the Default Sort Order for Learning Plans from the drop-down list. Select the check boxes for the items you want to Display for Learning Plans. As with previous Widgets, you can customize the field labels (a pencil icon displays when you mouse over the item, indicating that it is editable). Click the ![]() icon to open an editable field and type the text you want to display for the field. You can restore labels to their default settings by clicking Restore Labels.
icon to open an editable field and type the text you want to display for the field. You can restore labels to their default settings by clicking Restore Labels.
Select the Default Sort Order for Transcripts from the drop-down list. Select the check boxes for the items you want to Display for Transcripts. The field labels for Transcripts are also editable as described in the paragraph above.
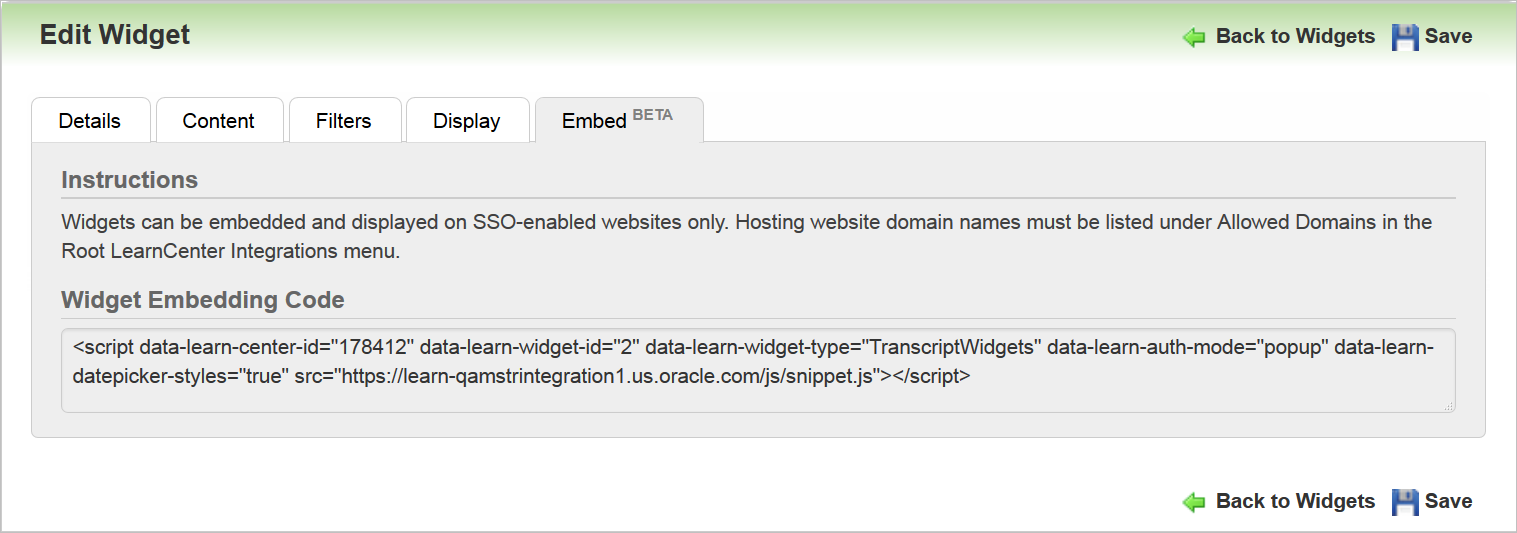
NOTE: The Embed tab is also available. This Embed tab enables you to embed supported Widgets on external SSO-enabled websites by placing a snippet of code on the hosting page. See the online help topic called “Widget Portability - Beta” (TOC > LearnCenter Designer > Widgets > Widget Portability – BETA) for detailed information.
The following illustrations are examples of what the Team Monitor Widget can look like to end Users based on different selections during Widget setup.
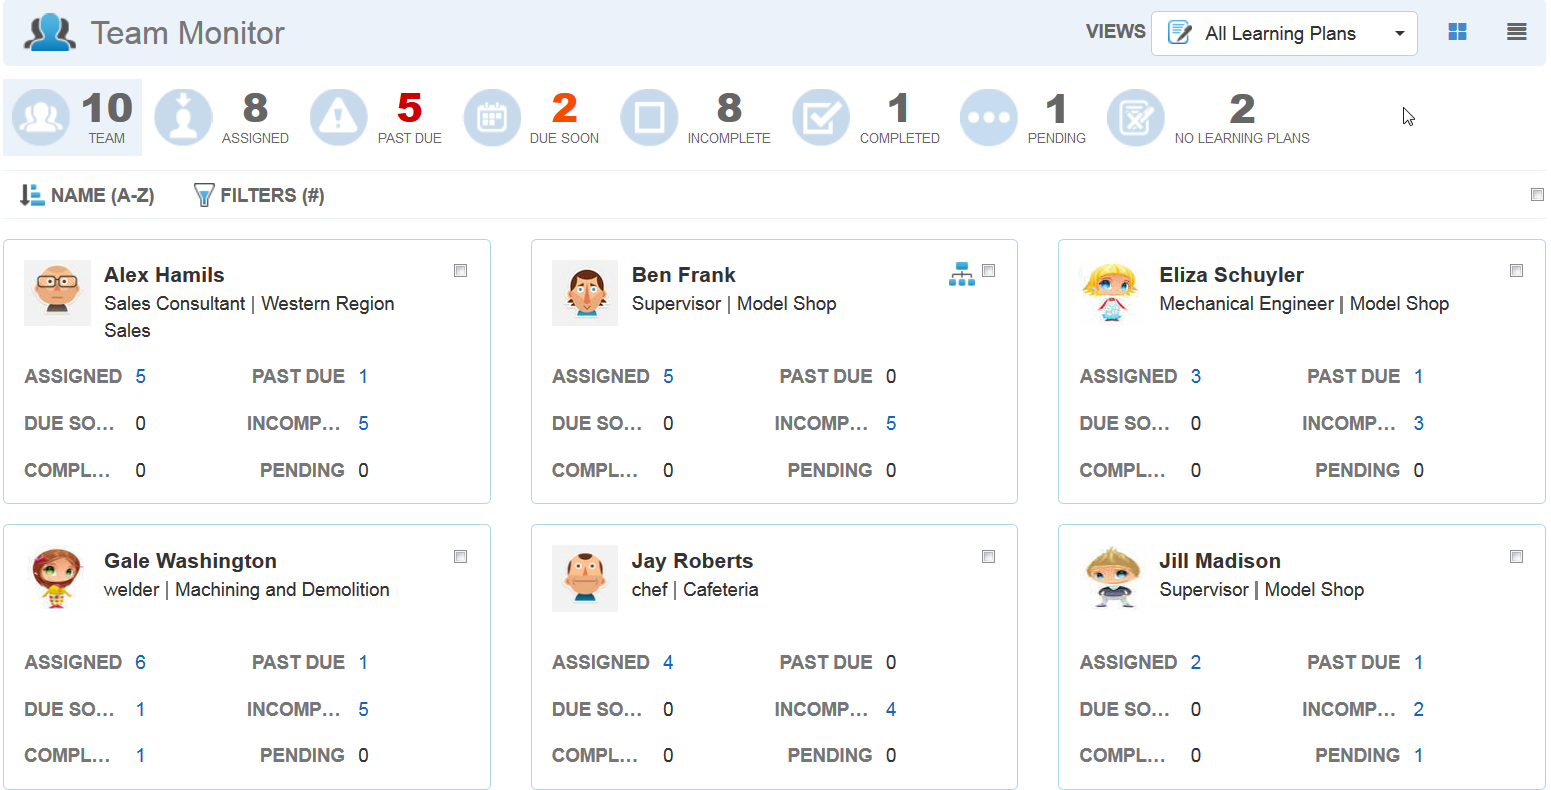
Illustration of How the Team Monitor Displays to Supervisors
In the example above, the Widget opens in Card view layout, and uses the All Learning Plans view. Notice the mini dashboard at the top of the page containing counts for various items. There are 10 people on this Supervisor’s Team. Eight members have Assigned items. Five members have Past Due items, and so on. Clicking any item in the dashboard refines the results to display just those team members who are associated with those counts. Clicking Team returns all team members to the page.
For example, clicking Due Soon causes only those Users with items that are due soon to display.
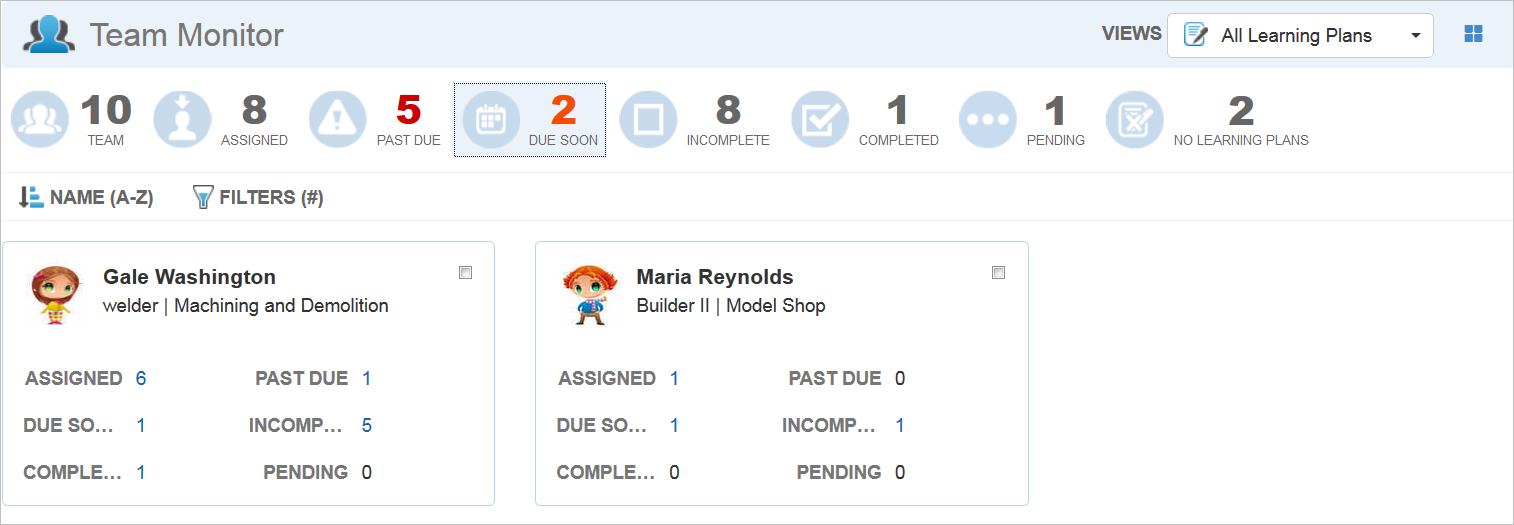
Illustration of How the Team Monitor Displays to Supervisors
Each User’s associated items display counts that are clickable.
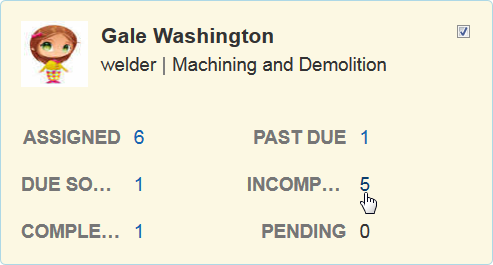
Illustration of How the Team Monitor Displays to Supervisors
You can drill down on any of the information listed for a User by clicking the counts.

Illustration of How the Team Monitor Displays to Supervisors
You can select members of the team by clicking the check box by their names.
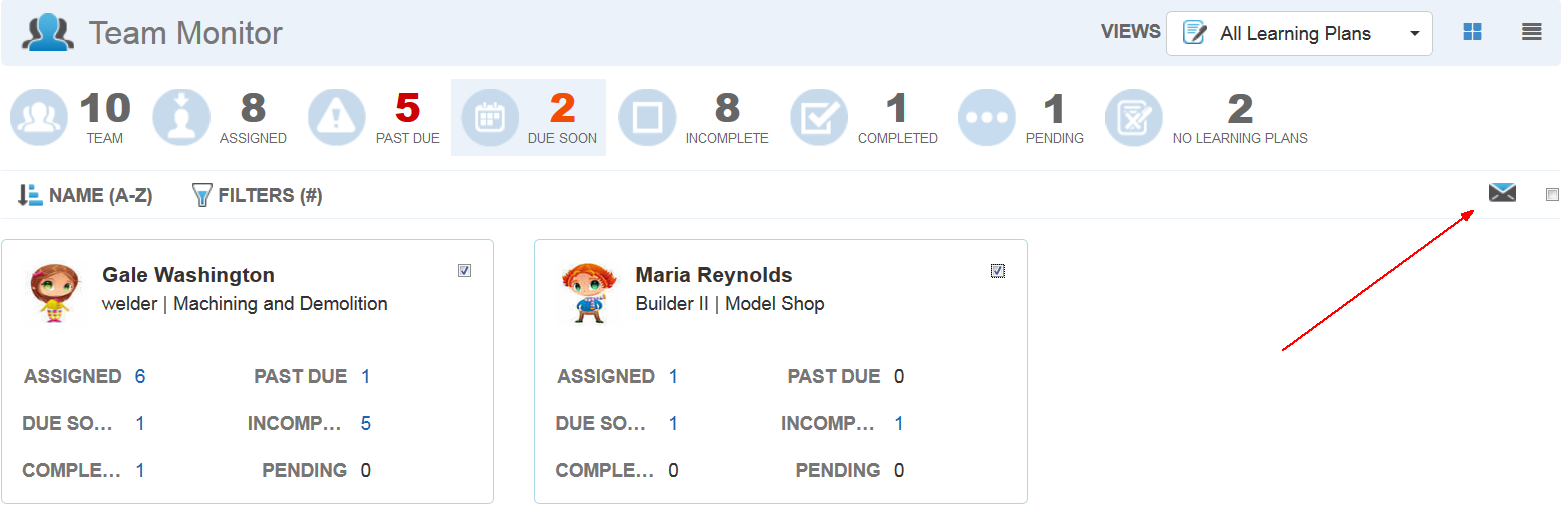
Illustration of How the Team Monitor Displays to Supervisors
You can email selected Users by clicking ![]() to open the Email Selected Team Members window.
to open the Email Selected Team Members window.
NOTE: Selecting the “select all” check box at the top of the page (next to the ![]() icon) only selects Users currently visible on the page. If there is a Load More link at the bottom of the page, you may want to use it to make additional Users visible to ensure you select all appropriate Users.
icon) only selects Users currently visible on the page. If there is a Load More link at the bottom of the page, you may want to use it to make additional Users visible to ensure you select all appropriate Users.
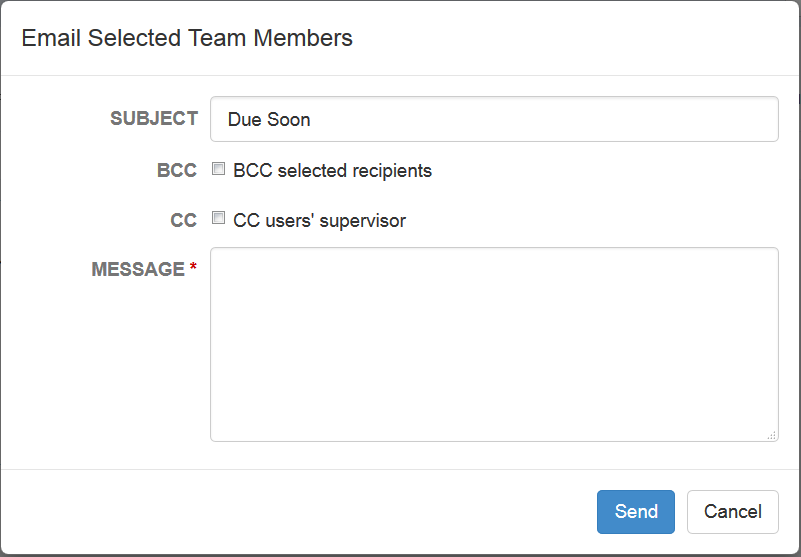
Supervisors can Email Selected Team Members from the Team Monitor Widget
Update the Subject, or use the default text. Select BCC if you only want recipients to see their own name in the email recipient list. Select CC to send a carbon copy to the users’ supervisors.
Tip: Selecting CC is a good option if you are sending messages to indirect reports and you want to let their supervisors know you are emailing them.
Type the Message and click Send.
If you have Users who supervise others, a special icon appears next to their name.
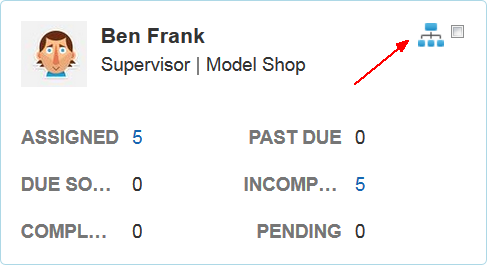
Illustration of How the Team Monitor Displays to Supervisors
Click this icon to see their subordinates.
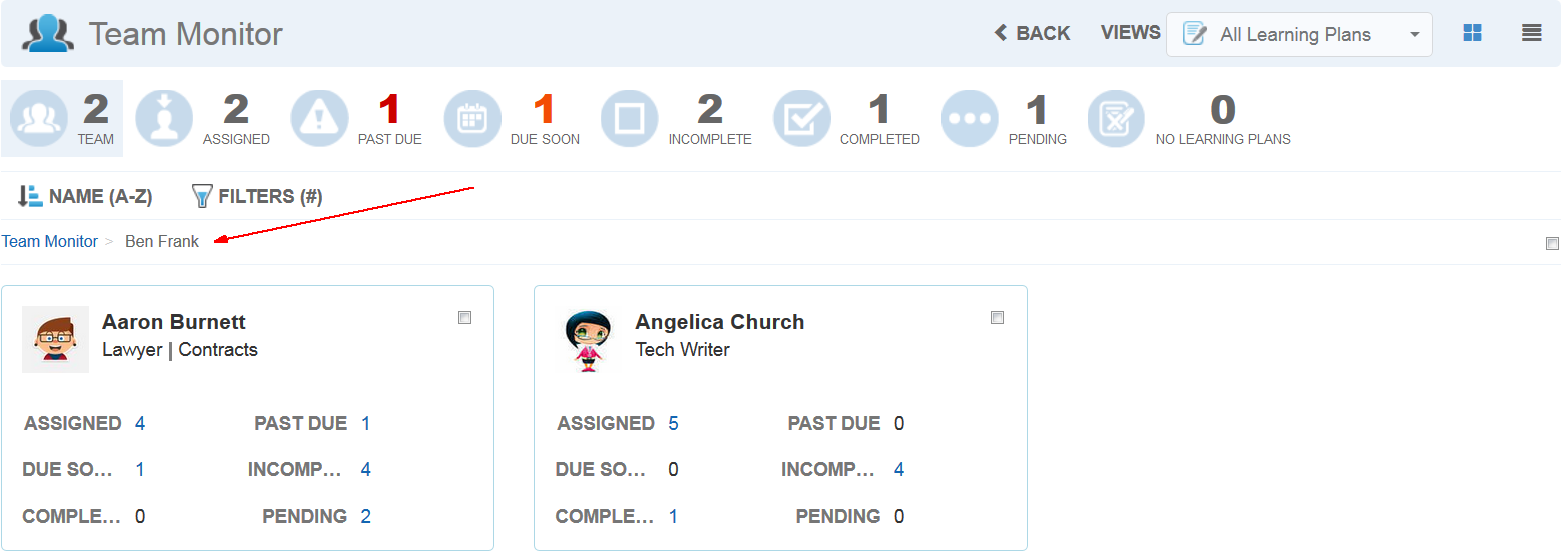
Illustration of How the Team Monitor Displays to Supervisors
Notice in the breadcrumbs you can see which User you clicked on to view the subordinates. The illustration above shows that User’s Team Monitor page. You can drill down on that Supervisor’s subordinates’ information by clicking the counts associated with them. You can also send email messages to them, and send carbon copies to their Supervisor.
If you created multiple views for the Widget, Supervisors can switch between Views from the Views drop-down list at the top of the page.

Supervisors Can Select the Different Views You Added to the Widget
Selecting a View displays the Widget using the settings you included on the Content tab for that view during the Widget setup.
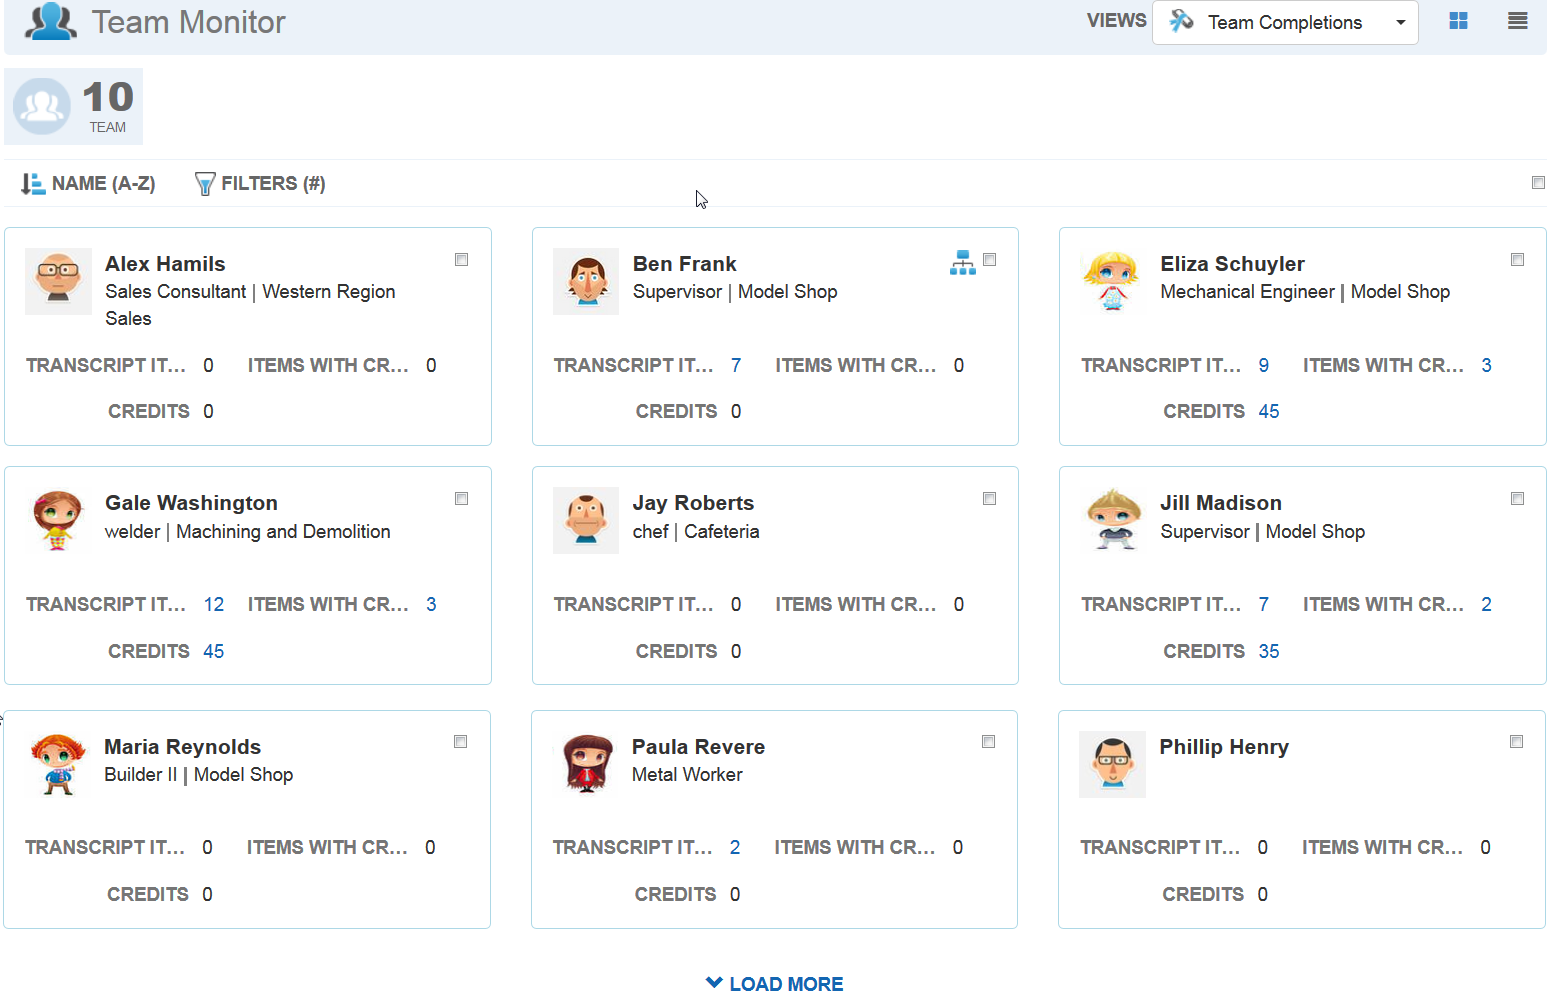
Illustration of How the Team Monitor Displays to Supervisors
The example above displays results for the selected view called Team Completions, which displays Transcript information to the Supervisor. The Supervisor can drill down to details by clicking the counts associated with each User.
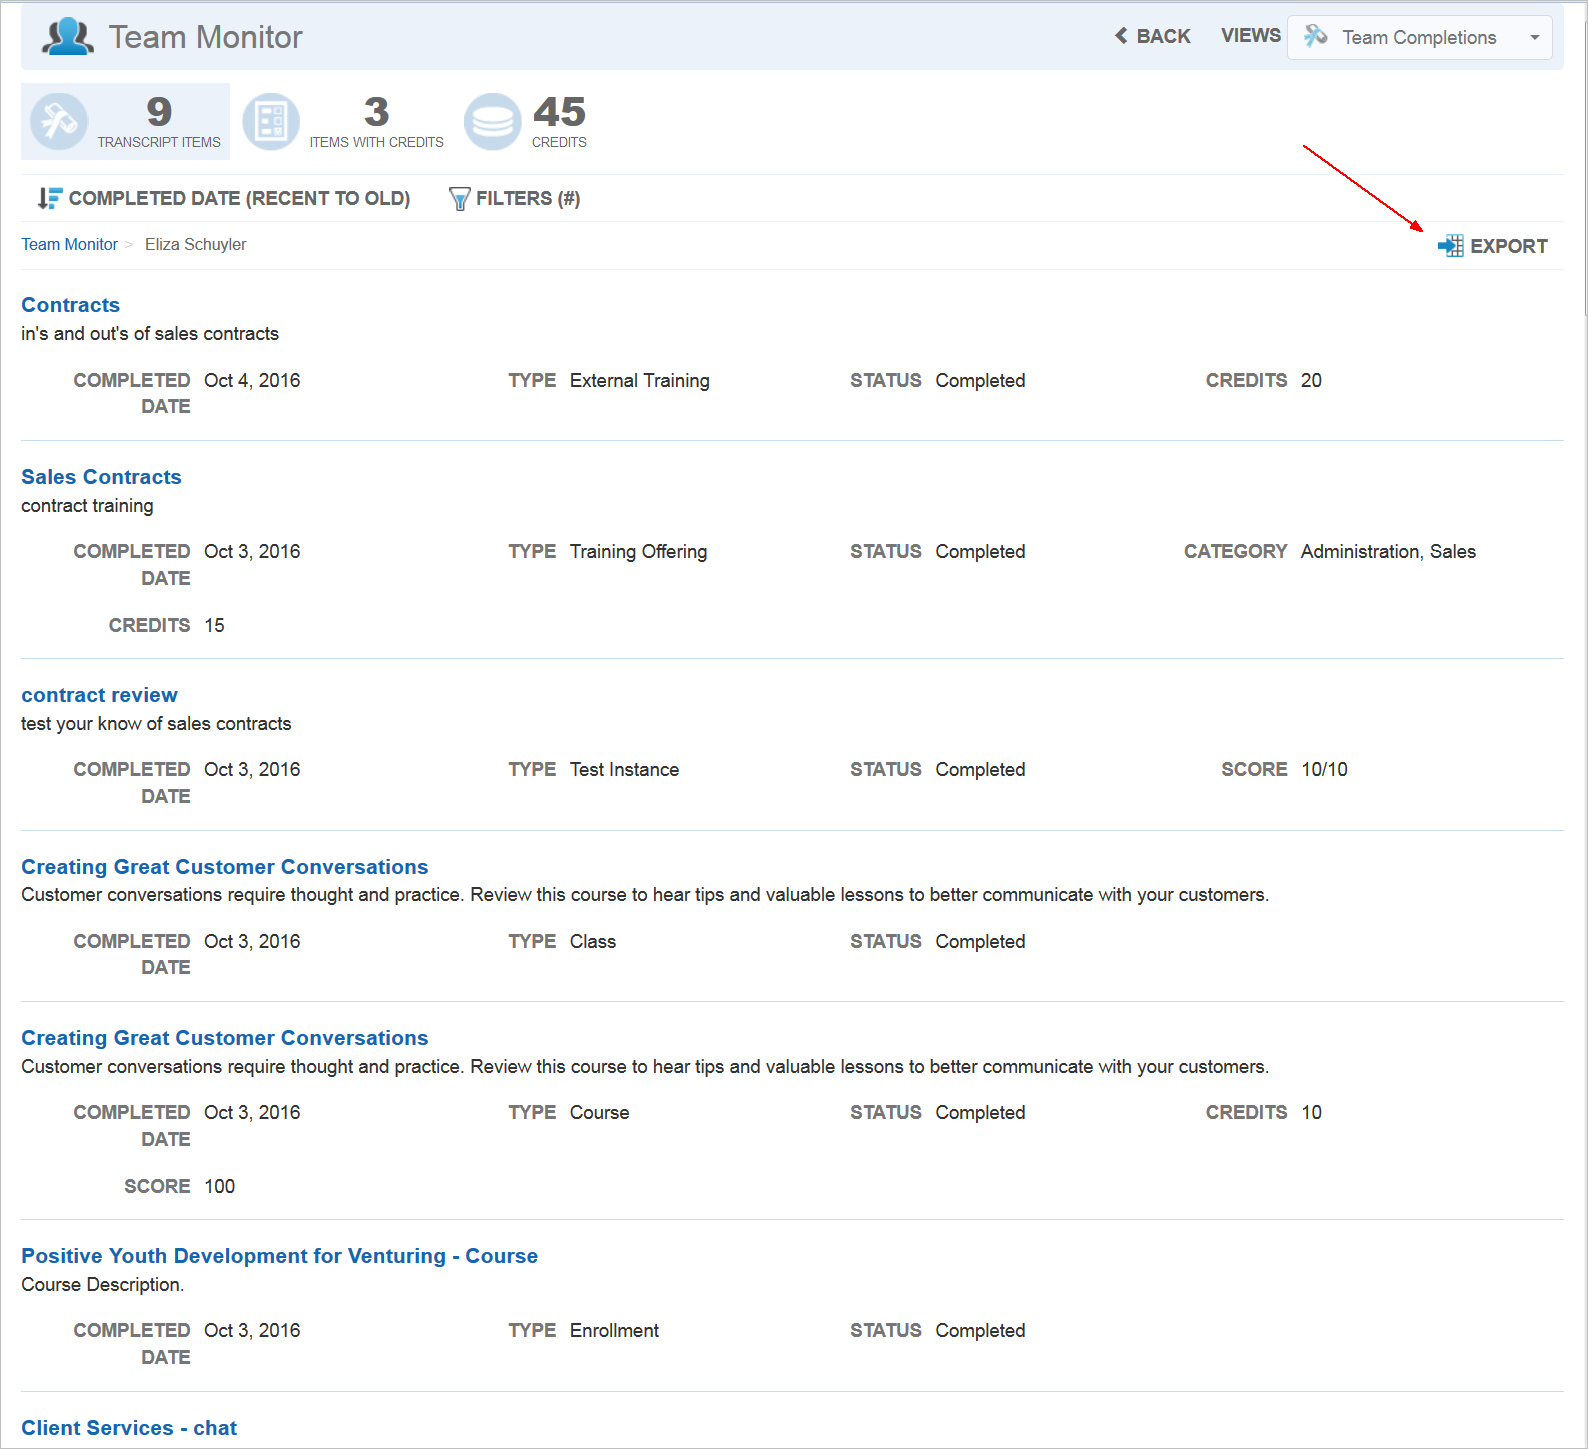
Illustration of How the Team Monitor Displays to Supervisors
When you drill down on a User’s Transcript, you have the ability to export the Transcript information.
Important: Due to the coding necessary to make this functionality available in the Team Monitor Widget, a ny PDF or Excel export files created via the Transcript Widget and viewed in the Download Manager prior to Release 16C will be lost. You may recreate them by re-running the export files. You can also download them prior to the release of 16C. We apologize for any inconvenience.
Updates to Previously Released Widgets
Some updates have been made to the Learning Plans, Transcript, and Search Widgets based on your feedback and requests.
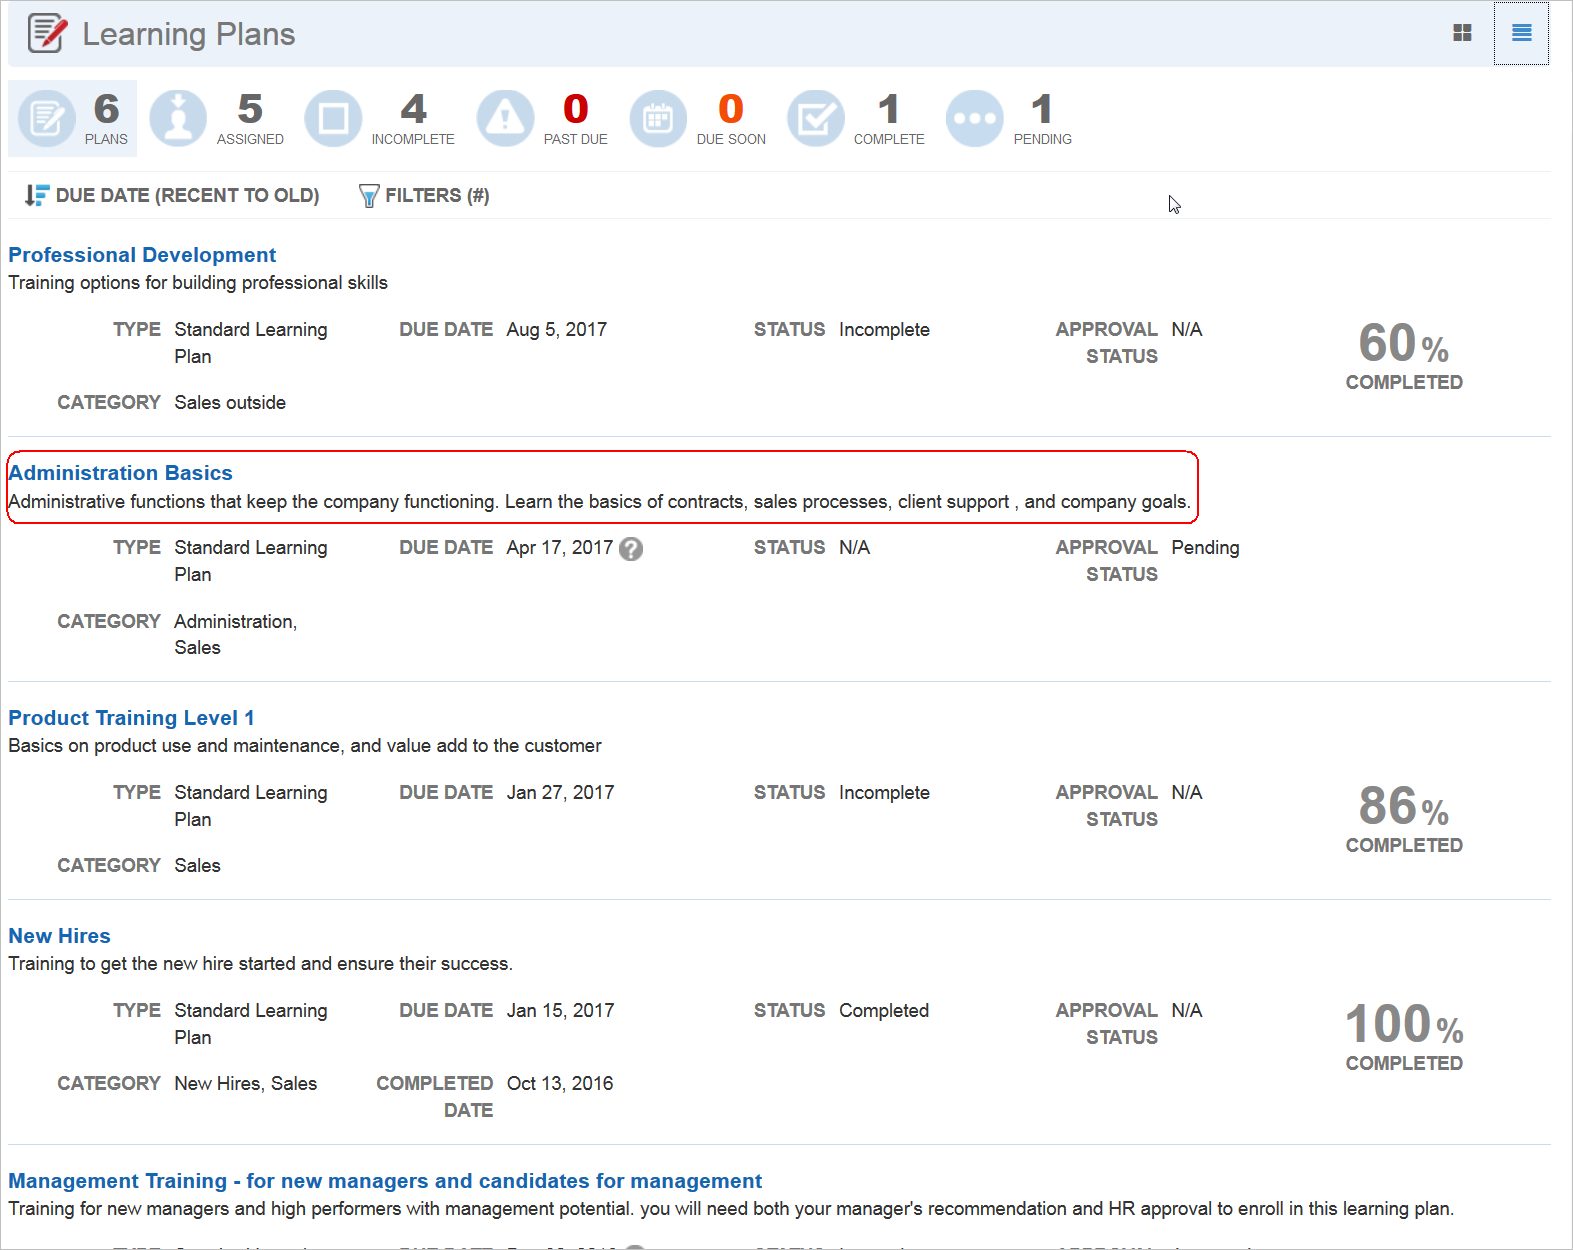
New Pending Approval Count for Learning Plan Widgets
There is a Pending option on the Filters tab of the Learning Plan Widget setup page.
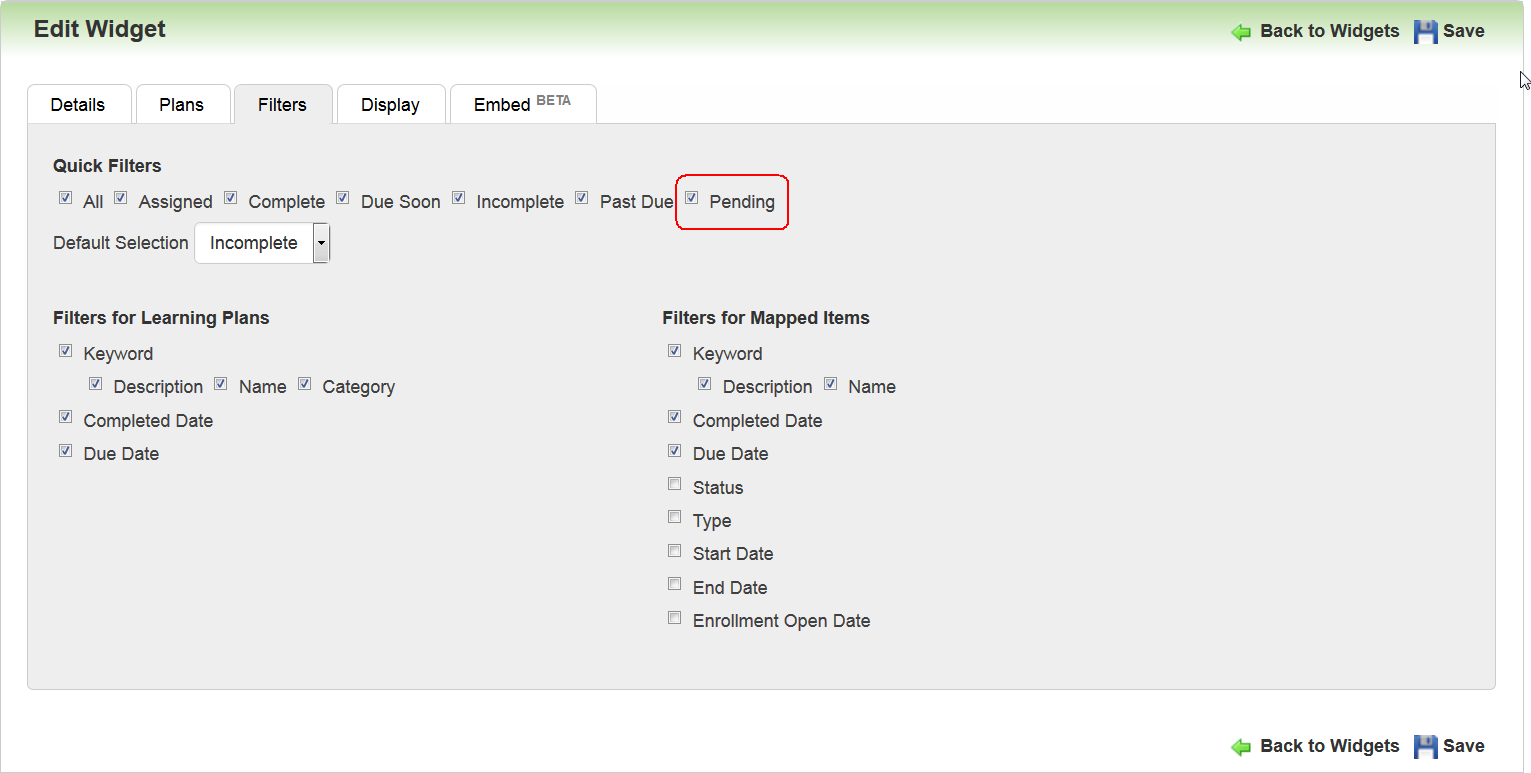
New Pending Approval Count Available for the LearnCenter Widget’s Mini Dashboard
Select this check box to include the Pending Approval count in the Learning Plan Widget dashboard for self-mapped Learning Plans awaiting approval. This option is only available for use when All Learning Plans is selected on the Plans tab. If Learning Plans mapped to current User is selected on the Plans tab, the Pending Approval check box is no longer selectable on the Filters tab. It is automatically cleared if it was previously selected, and you change the selection to Learning Plans mapped to current user on the Plans tab.
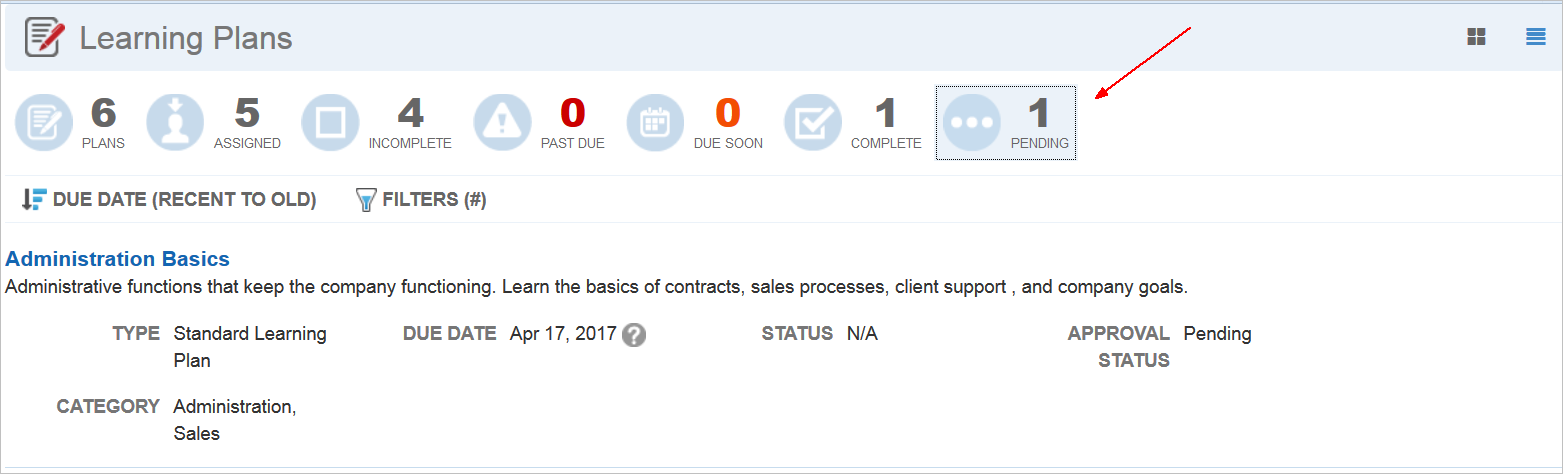
New Pending Approval Count Available for the LearnCenter Widget’s Mini Dashboard
Selecting Pending, or any dashboard metric, displays appropriate results. Selecting the metric again will collapse the list, displaying mini dashboard only. To see all results, select a different quick filter, such as Plans.
New Option to Display Mini Dashboard
The option to display the mini dashboard, formerly labeled as Display Quick Filters on the Learning Plan Widget, and Display Mini Dashboard on the Transcript Widget, has been updated. (This option is also available on the new Team Monitor Widget.) It is now consistently labeled as Mini Dashboard with Display and Don’t Display option buttons. New for this option is the Only Display Mini Dashboard when page is opened check box.

New Only Display Mini Dashboard When Page is Opened Option
Click this check box to only display the Mini Dashboard when the page opens. You may prefer to show only the mini dashboard if you have a lot of content on the page where the Widget resides.
New Only Display Mini Dashboard When Page is Opened Option
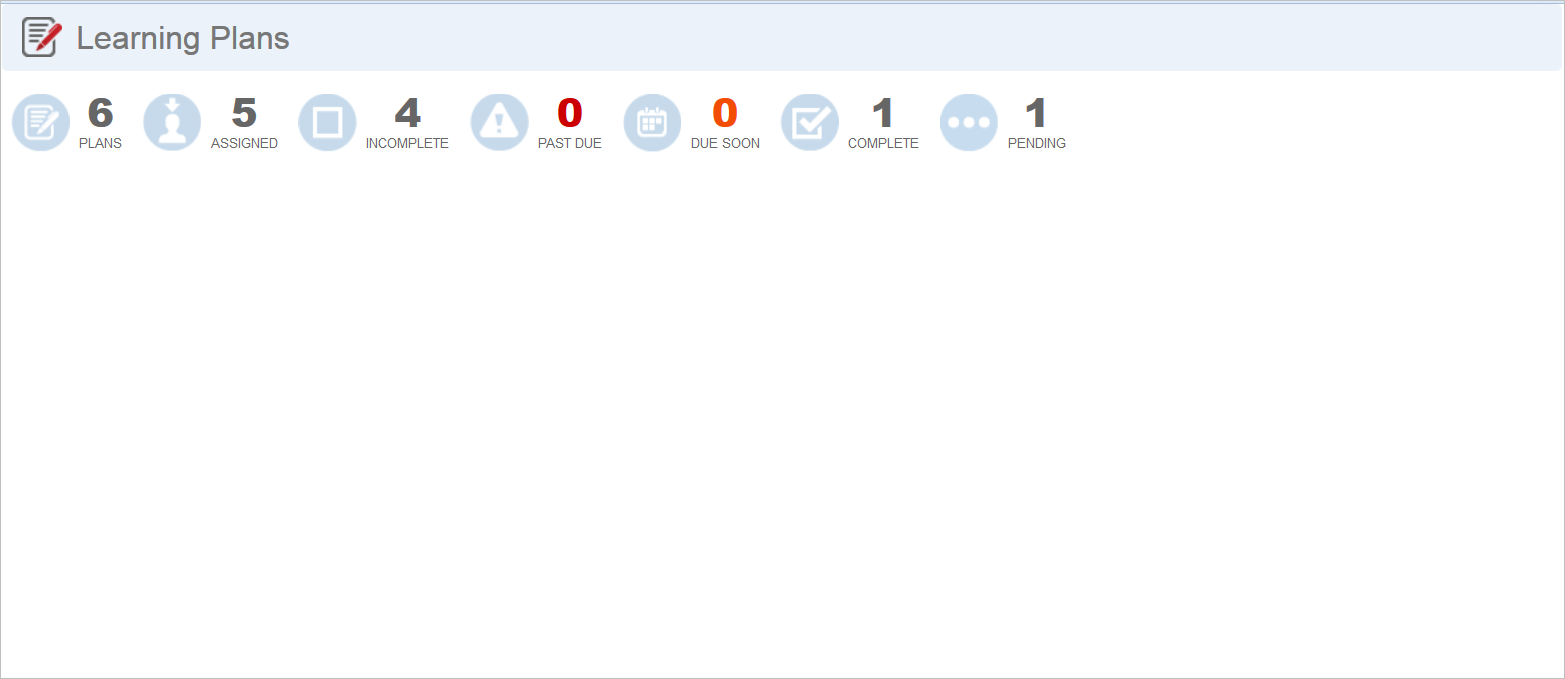
Selecting any dashboard metric expands the Widget to display the appropriate results. In the illustration below, the User clicked Complete.

New Only Display Mini Dashboard When Page is Opened Option – Metric Selected
Select the metric again to collapse the Widget results.
New Filters and Metrics for the Transcript Widget
You now have the ability to manually select certain Categories on the Content tab of the Transcript Widget setup.
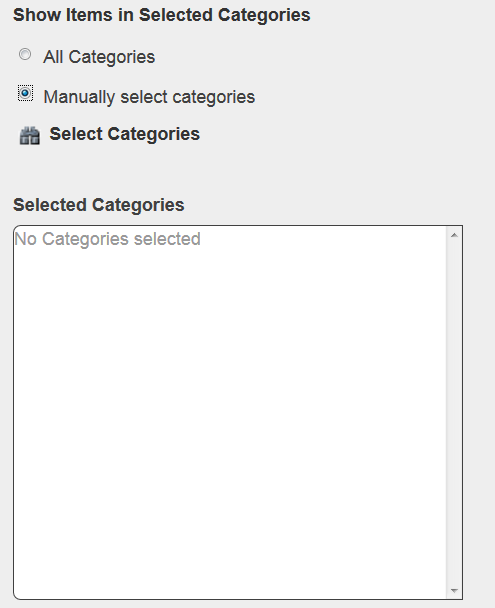
New Manually Select Categories Option
When you select Manually select categories, only training events within the manual list of Categories are included for display to end Users.
There are new Credits-related options available for display on the Mini Dashboard for the Transcript Widget.
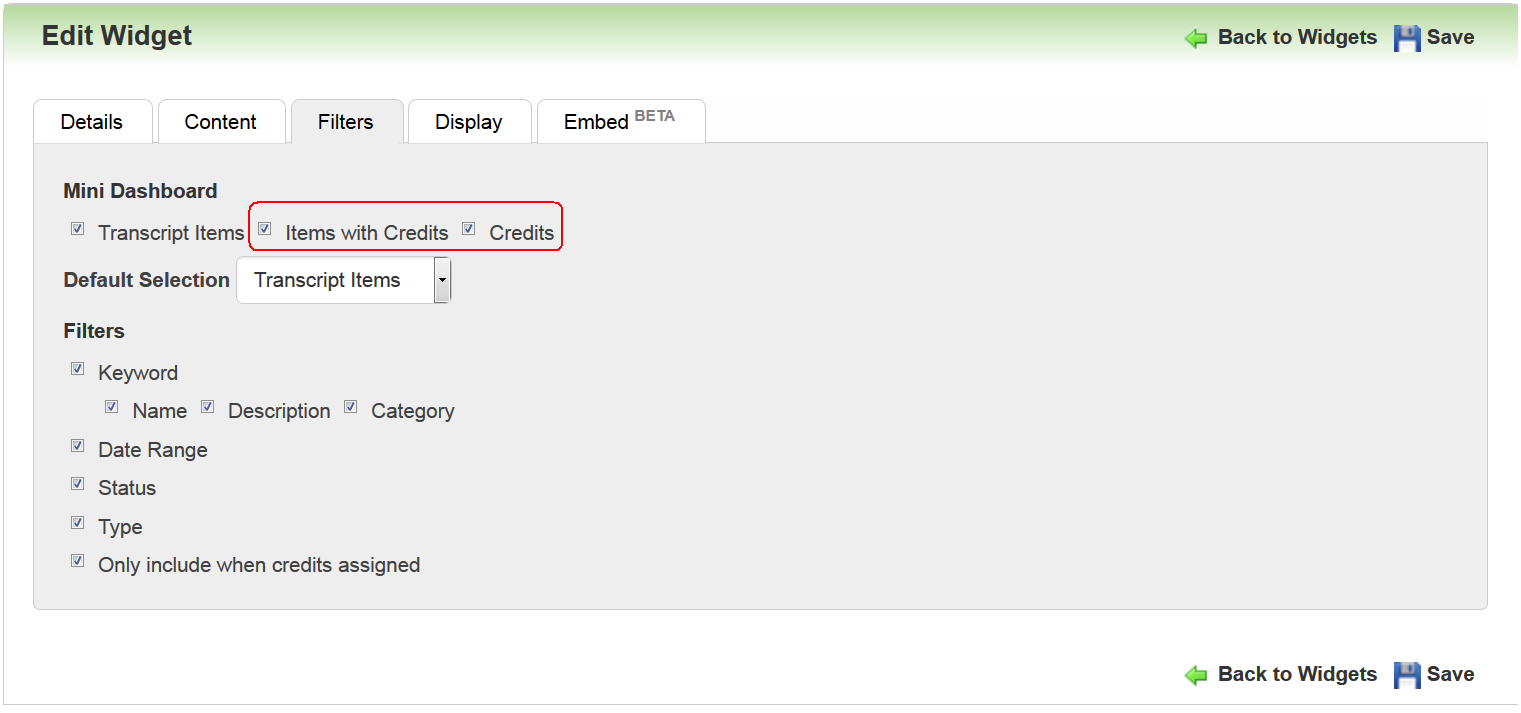
New Credits Options for the Transcript Widget’s Mini Dashboard
Previously, the only option for the Mini Dashboard was the total number of Transcript Items. You can now select Items with Credits, and total Credits earned. The illustration below shows how they display to end Users.
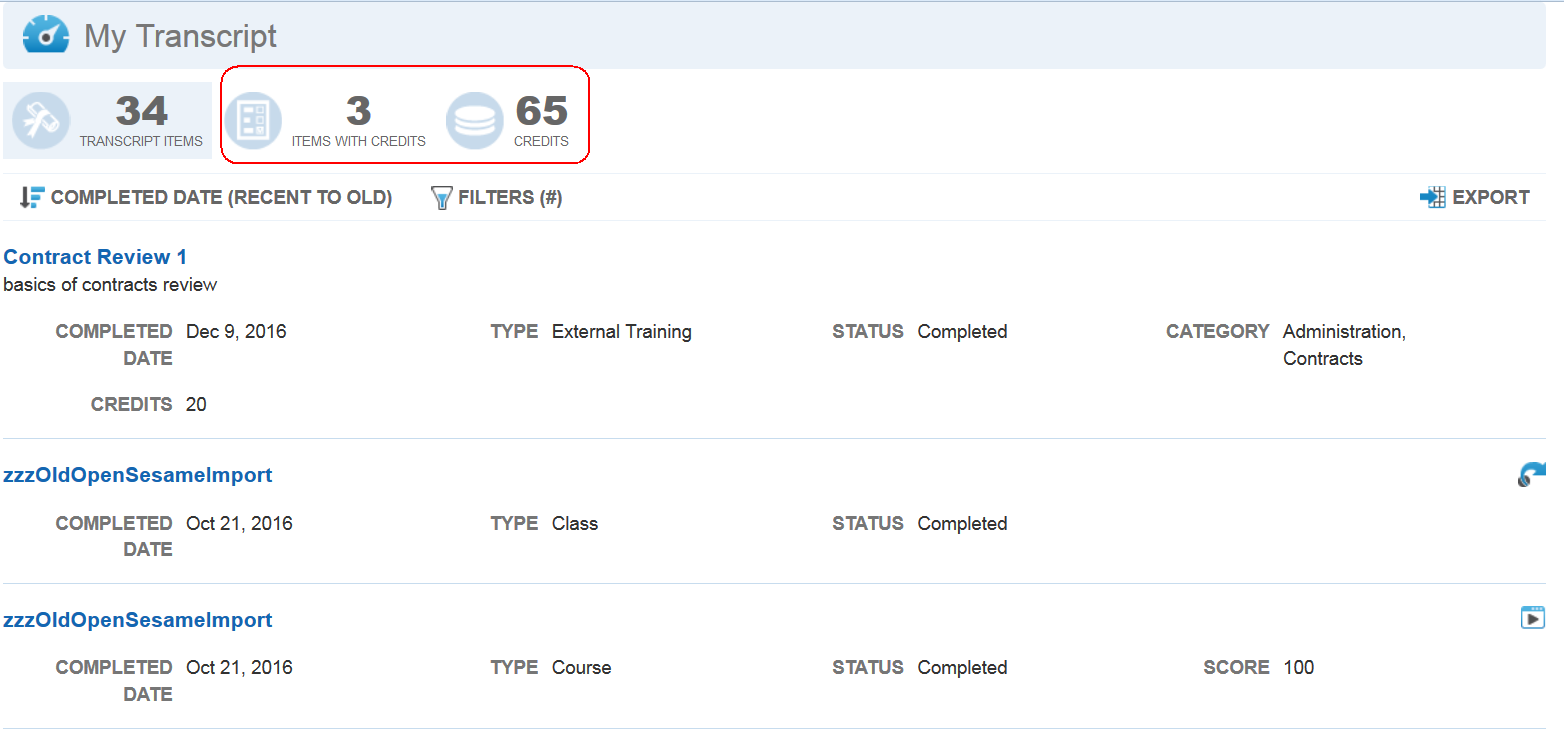
New Credits Options for the Transcript Widget’s Mini Dashboard
Improved Display for Long Names and Descriptions in Widgets
Name and Description now span with width of the page. They now appear above the label/values, and the maximum number of label/values columns on a page has been increased from 2 to 4.
Improved Display for Long Names and Descriptions in Widgets
This minimizes the truncation of Names and Descriptions.
If you prefer a layout with shorter names and descriptions, you can create and apply a custom CSS using the Learn Center Design page template.
Score Option Added to the Course Details Page
If a Course includes a built-in test or assessment, the score is now displayed in the Course Detail page header, as a percentage.

New Course Score Option for Mini Dashboards
Previously, the Course score was not available on the Course Summary or detail page for Widgets.
Include In LearnCenter Search for Training Offering and External Training
There is a new Include in LearnCenter Search option available on the Training Offering and External Training setup pages. This option was previously available with the other search objects.
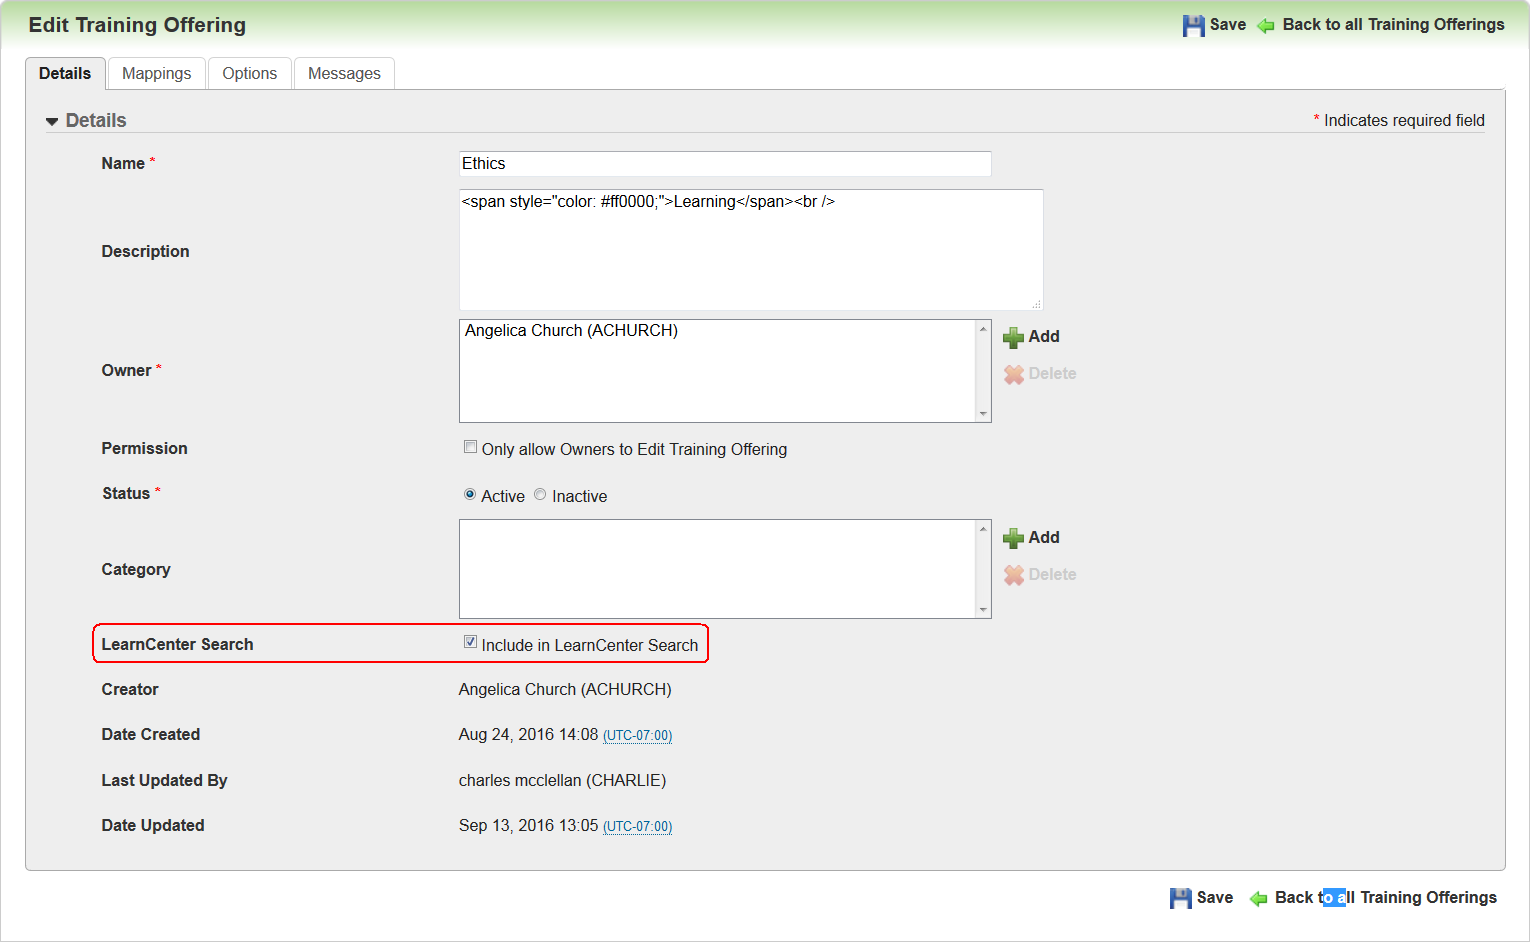
LearnCenter Search Option on the Details tab of the Edit Training Offerings Page.
Selecting the check box (default) makes the item searchable within the Search Widget. Clearing the check box excludes it from search results in the Search Widget.

LearnCenter Search Option on the External Training Details Page.
NOTE: The functionality works only with the Search Widget, and not the Search dynamic object.
The Dynamic Groups feature has been enhanced based on your feedback, and to further enable you to manage complex User Group mappings yourself. The new Dynamic Groups enhancements include:
- New Standard fields that are used across LearnCenter and which are usable with Dynamic Groups.
- New ability to see the last time updates to Dynamic Groups were completed.
- New options for creating Dynamic Groups that further automate Groups-related tasks.
- New ability to automate when a Group changes status (becomes inactive or active) by defining start and end dates for the Group.
- New ability to sequence training based on the status of Learning Plans, Job profiles, or Skills.
- New ability to decide if Users should Retain Mapping to training if they are removed from a Group.
Key Resources
- Refer to Learn online help for complete documentation on using Dynamic Groups. (TOC > User Accounts > Dynamic Groups).
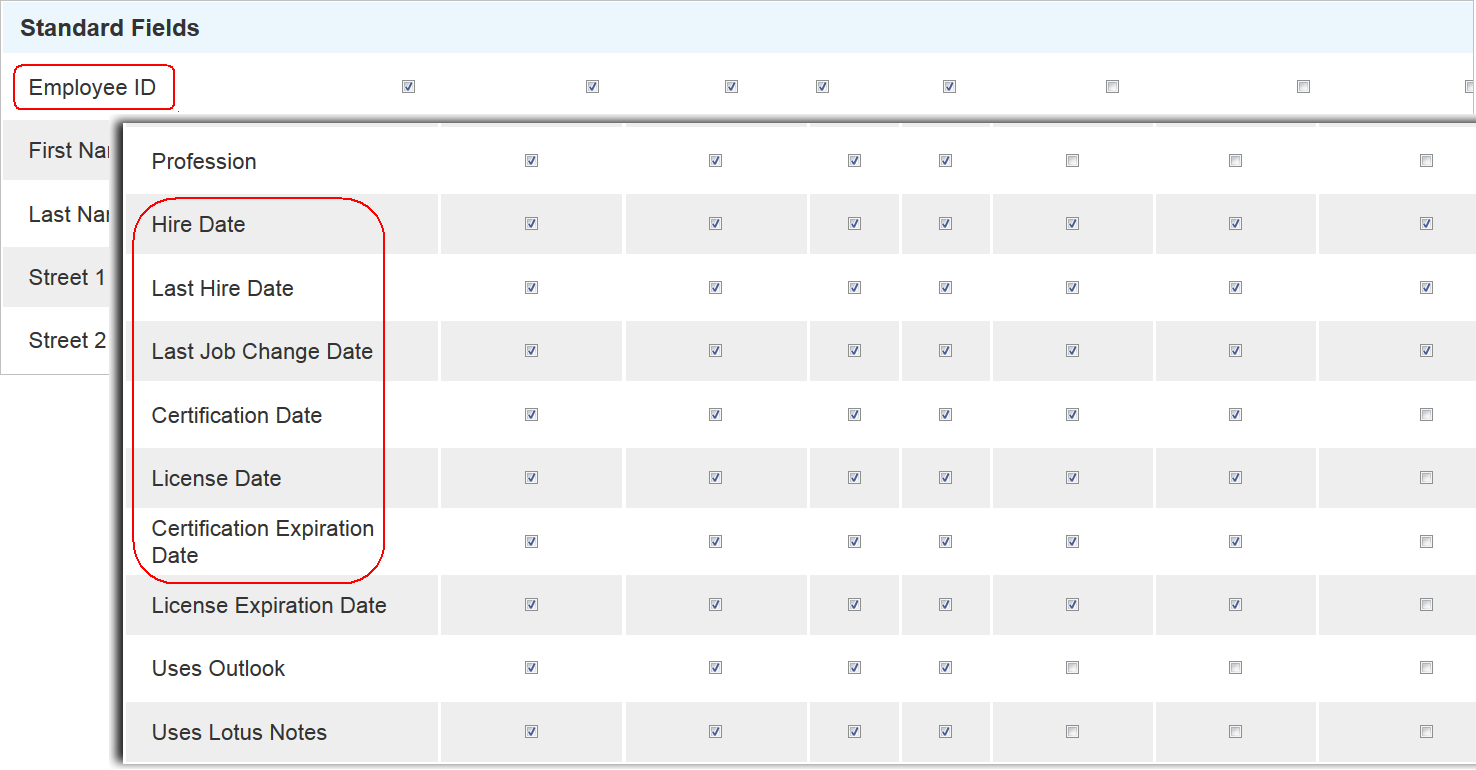
With this release, we are introducing new standard User fields. By default, these fields are not automatically selected when LearnCenter is updated to release 16C, so that you can determine which fields apply to your specific needs. The new fields are:
- Employee ID – up to 100 characters allowed.
Important: If you have paid for a custom integration with our services team, and the integration uses a custom Employee ID field , it is recommended that you reach out to your Oracle Account Manager before making any changes .
If you are using a TBE or SmartOrg-to-Learn product integration, the standard Employee ID field will be pre- populated with data that exist in TBE or SmartOrg, since this data was already being captured by TBE or TEE applications.
- Hire Date – date a User was hired.
- Last Hire Date – last date a User was hired.
- Last Job Change Date – last date a User’s job changed.
- Certification Date – date a User obtained certification.
- Certification Expiration Date – date a User’s certification expires.
- License Date – date a User obtained a license.
- License Expiration Date – date a User’s license expires.
NOTE: The date fields capture Month, Day, and Year as hard dates. This means they do not reference User time or time zones. For use with Bulk Import Users, dates are initially entered in a predefined format of mm/dd/yyyy format, but convert to the User’s selected format.
The new fields are available for use on the following pages:
- Administrator User Accounts page
- User List Export
- Bulk Import Users
- User Details
- User Preferences
- My Team Dynamic Objects
- Certificate
- Self-Registration page
- Signup Form
- User Card
- Tags on the LearnCenter Design Pages and Templates
- Enrollment Roster
- Electronic Signatures also uses the new standard Employee ID field.
These new standard fields enable you to create groups using a variety of new Dynamic Groups criteria options. Examples of these fields as Dynamic Groups criteria are illustration in sections that follow.
Refer to online help for complete instructions on using Fields (TOC > Options > Field Settings).
New Last Update Completed Field
There is a new Last Update Completed field on the Dynamic Groups Details tab.
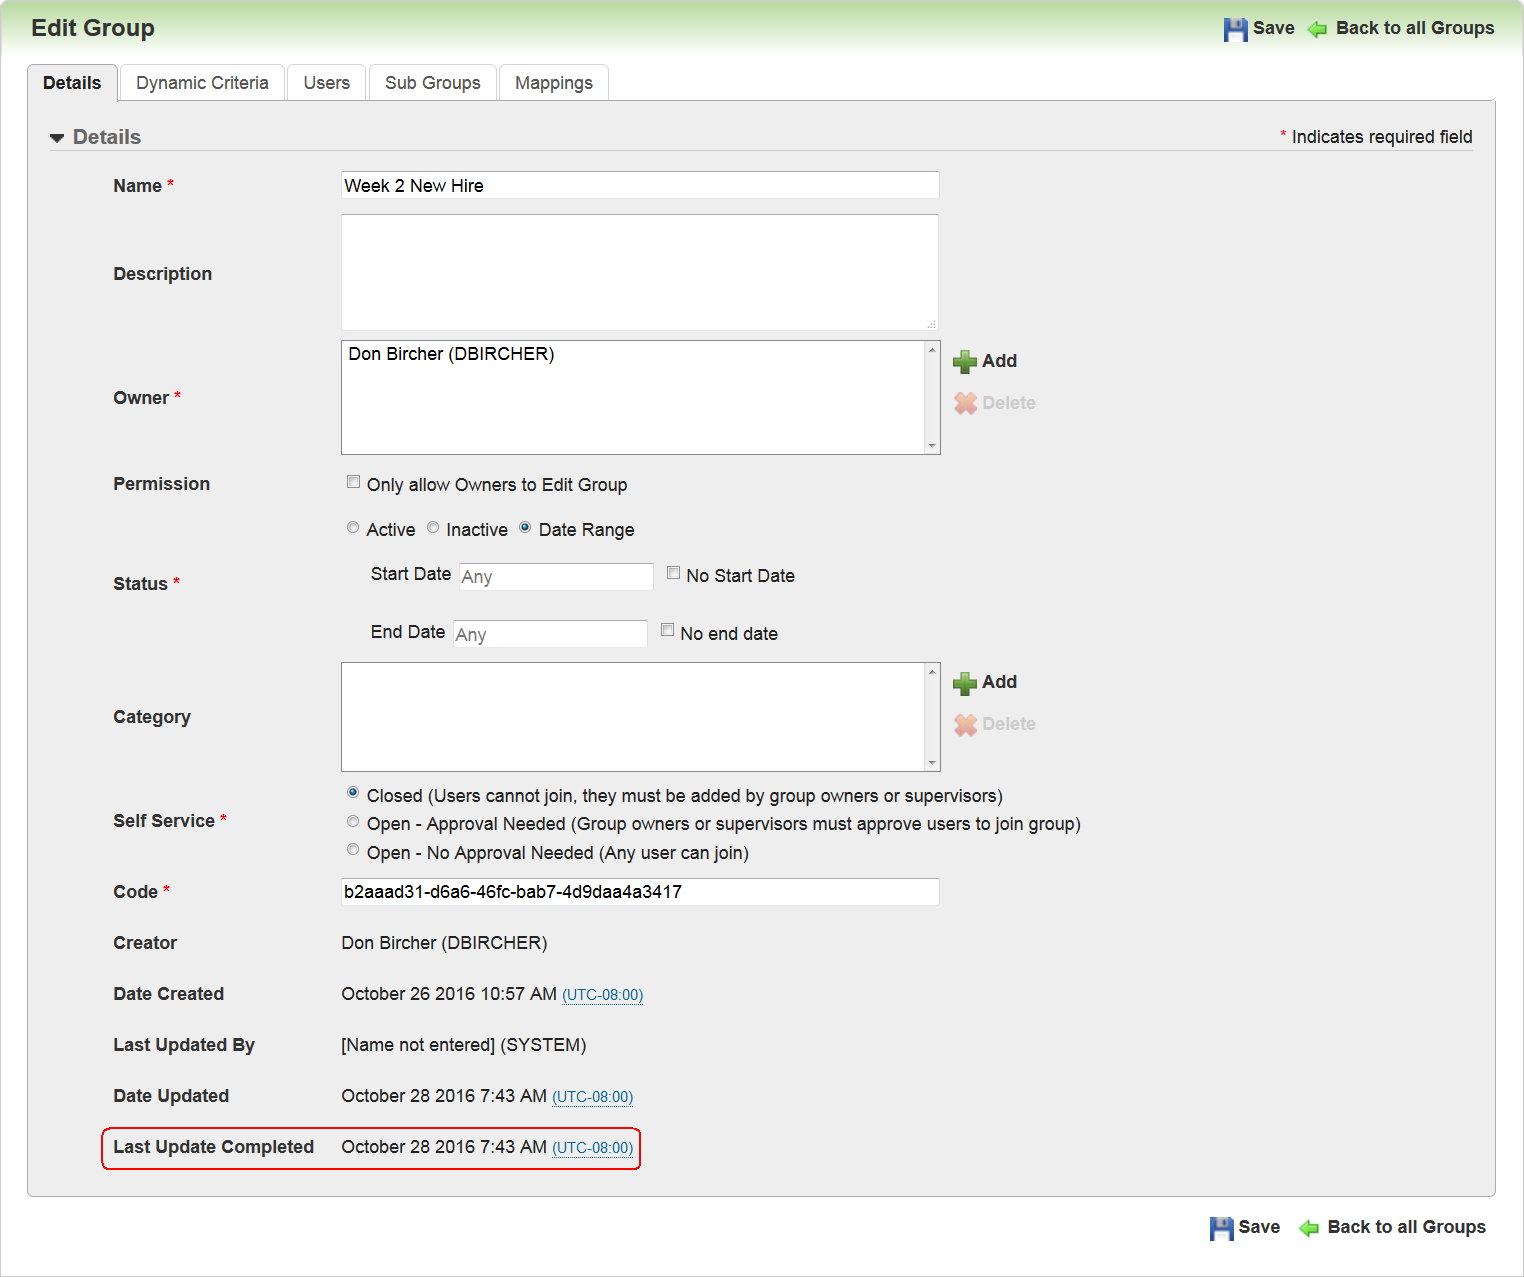
The Last Update Completed field captures the time the last update completed, allowing Administrators to see when the group finished adding or removing Users and mapped training items. This field differs from the Last Updated field, because the Last Updated field captures the time an update began. The time indicated in these two fields could be the same or different based on the kinds of computations and the amount of information being processed in the background for the Dynamic Group. This field was added to provide you more specifics about when updates occur for your Dynamic Groups.
For example, if you make changes to criteria in a Dynamic Group and click Save, it may take some time for Users to move in and out of the Dynamic Group based on your new criteria. With the new Last Update Competed field, you can see when the processing began, and whether or not is has completed.
The start time for this scheduled process is tied to the time zone of the data center housing the server on which your LearnCenter resides. This may not be the same as your time zone. The process runs at 5 AM server time . This could result in Users being moved in and out of Groups a few hours before or after you might expect. The Last Update Completed field translates the server completion time to your time zone.
For example, if the server time zone is Eastern Standard Time (EST) and processing completes at 5:08 AM EST, and you reside in the Central Time Zone, you will see 4:08 AM for the Last Update Completed field.
Ability Create Dynamic Groups Based on New Criteria Options
Along with the new Standard Fields, there are additional enhancements that provide you with more opportunities for automating certain tasks associated with Groups. These enhancements include:
- Ability to change a Dynamic Group’s status based on a date range.
- Dynamic criterion that enables you to set a time limit in number of days after a set date.
- Dynamic criterion that enables you to set a time limit in number of days before a set date.
- Dynamic criterion that enables you to set a date range.
- Dynamic criterion that enables you to create a Dynamic Group based on Supervisor Role.
- Dynamic criterion that enables you to move Users in and out of a Dynamic Group based on training item status.
- Ability to indicate whether Users retain mapped training items when they leave a Dynamic Group.
Each of these enhancements is described in the following sections.
You now have the ability to change the Status of a Dynamic Group based on Date Ranges.
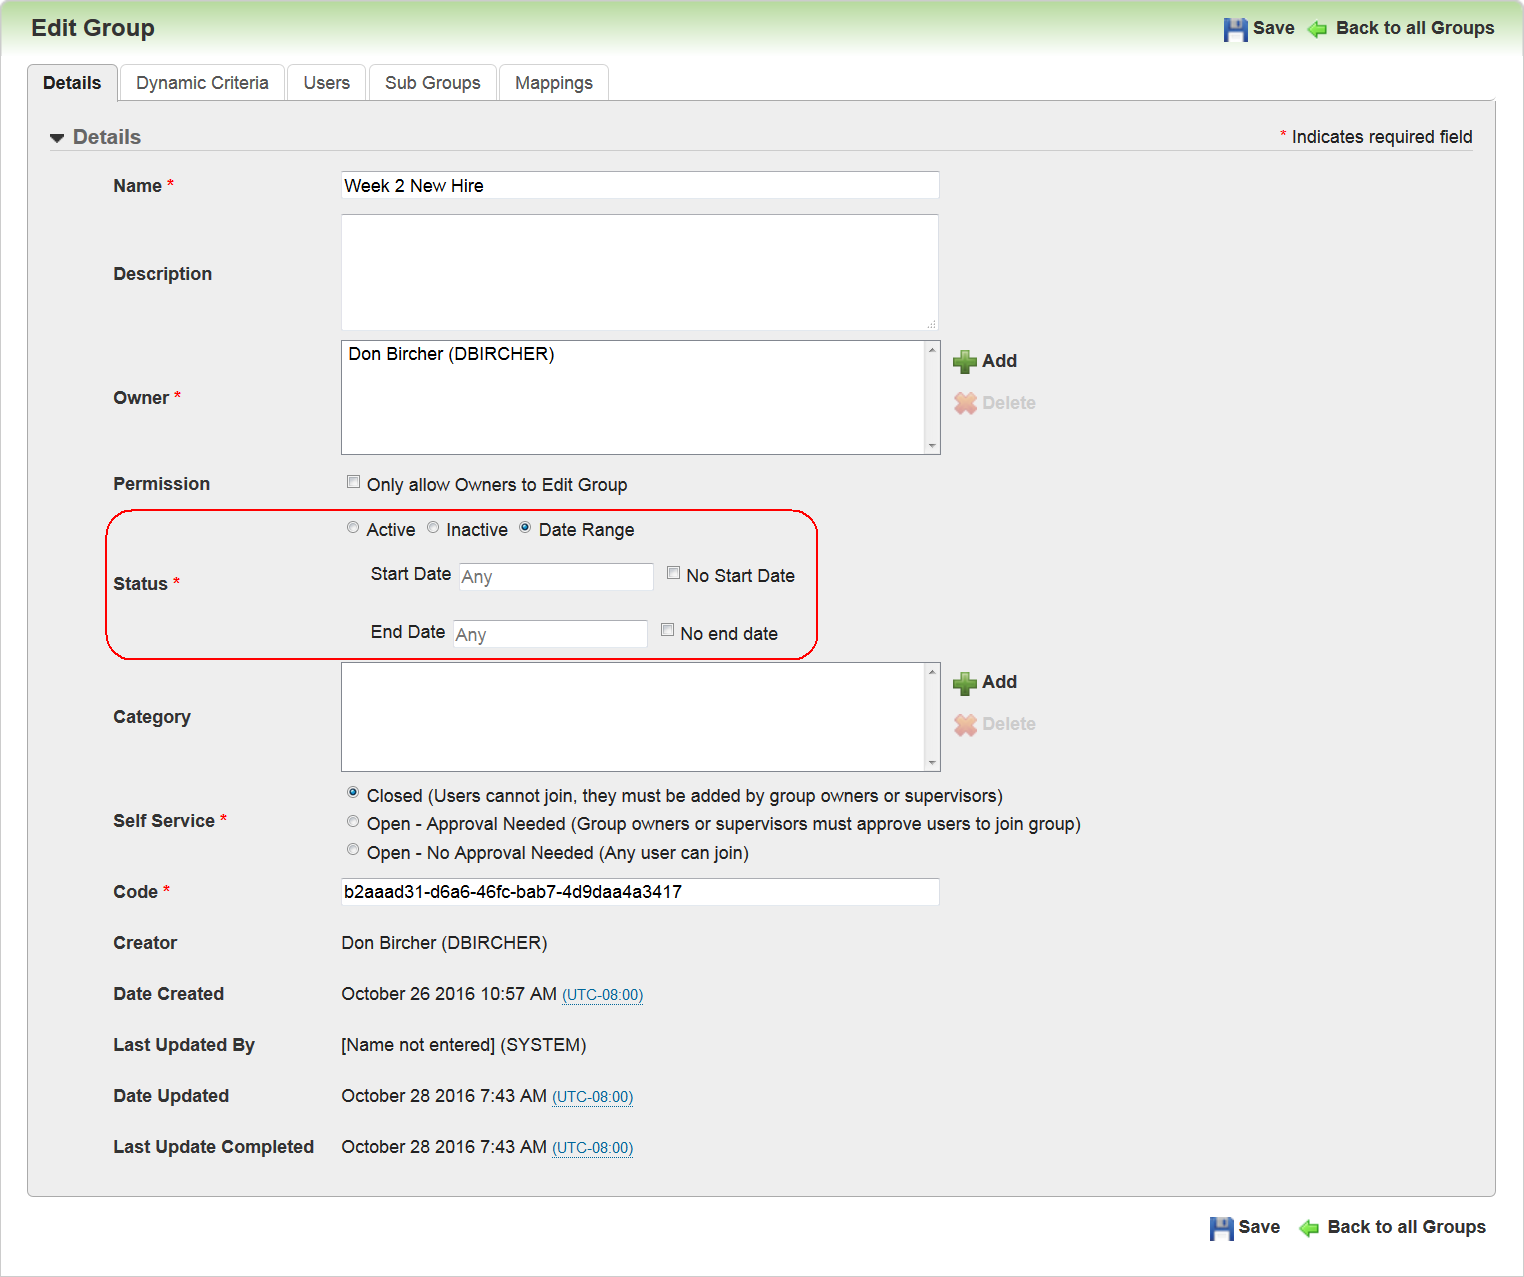
Notice that the Status field on the Details tab has been updated to include a Date Range option. When you select it, Start Date and End Date fields become available. You can use these fields to automate the status of Dynamic Groups. For example, perhaps you want a particular Group to become active on January 1 of next year, and remain active until April 15.
Notice that you also have the option to indicate that a Dynamic Group has No Start Date and No End Date. Used in combination with the Date Range fields, a Status could use:
- No Start Date with defined End Date
- Defined Start Date with No End Date
- Defined Start and End date
For example, using the combination of defined Start Date with No End Date, you could have a Dynamic Group become active on January 1 of next year, and remain active indefinitely.
New Dynamic Criteria - Time Limit Days After a Date
Using the new standard date fields and new criteria options, you now have the ability to set Dynamic Criteria based on the number of days after a defined date. This means you can have Users move into a Dynamic Group on a date you indicate, and move out of the Group after a set number of days. An example might be a New Hire Dynamic Group, where Users are moved in on their hire date and removed 90 days later.
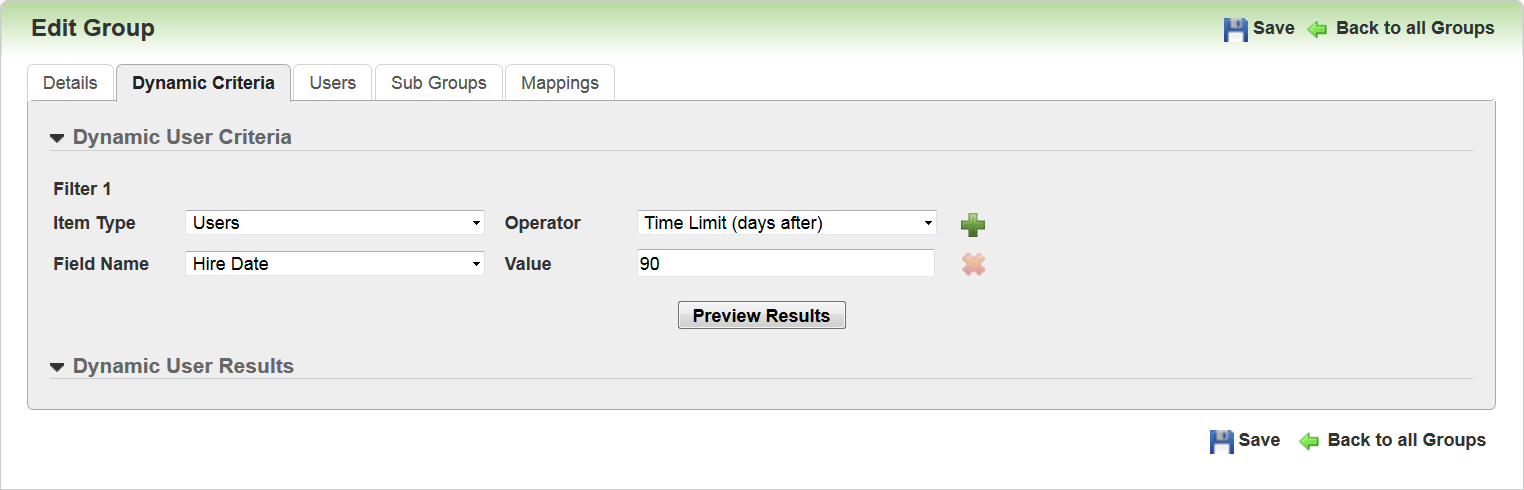
In the example above, the Admin selected the new standard Hire Date field for Field Name, Time Limit (days after) as the Operator, and entered a Value of 90 days. (The Value for the standard date fields can be up to 4 digits.) This can bet set as a single criterion, as in the example above. It can also be combined with other criteria using an AND or Or condition.
Dynamic Criteria - Time Limit Days Before a Date
Using the new standard date fields and new criteria options, you now have the ability to set Dynamic Criteria based on number of day before a defined date. This means you can have Users automatically moved into to a Dynamic Group based on a defined number of days before a set date, and then automatically removed on that set date. An example situation is to move Users into a Group 90 days before their upcoming certification or licensing expiration, and then remove them on their expiration date.
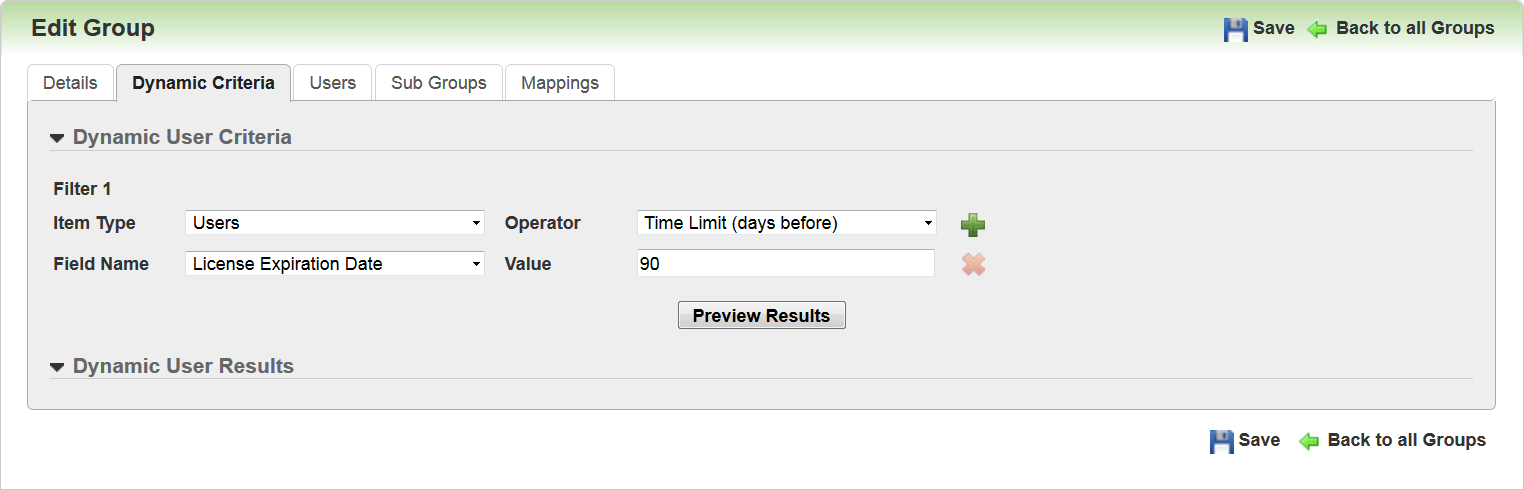
In the example above, the Admin selected the new standard License Expiration Date field for the Field Name, Time Limit (days before) as the Operator, and entered a Value of 90 days. (The Value for the standard date fields can be up to 4 digits.) This can bet set as a single criterion, as in the example above. It can also be combined with other criteria using an AND or Or condition.
Using the new standard date fields and new criteria options, you now have the ability to set Dynamic Criteria based on a date range. This means you can add Users to a Dynamic Group based on if the indicated date falls between two other defined dates. An example may be to group Users that are certified or licensed by a specified date range.
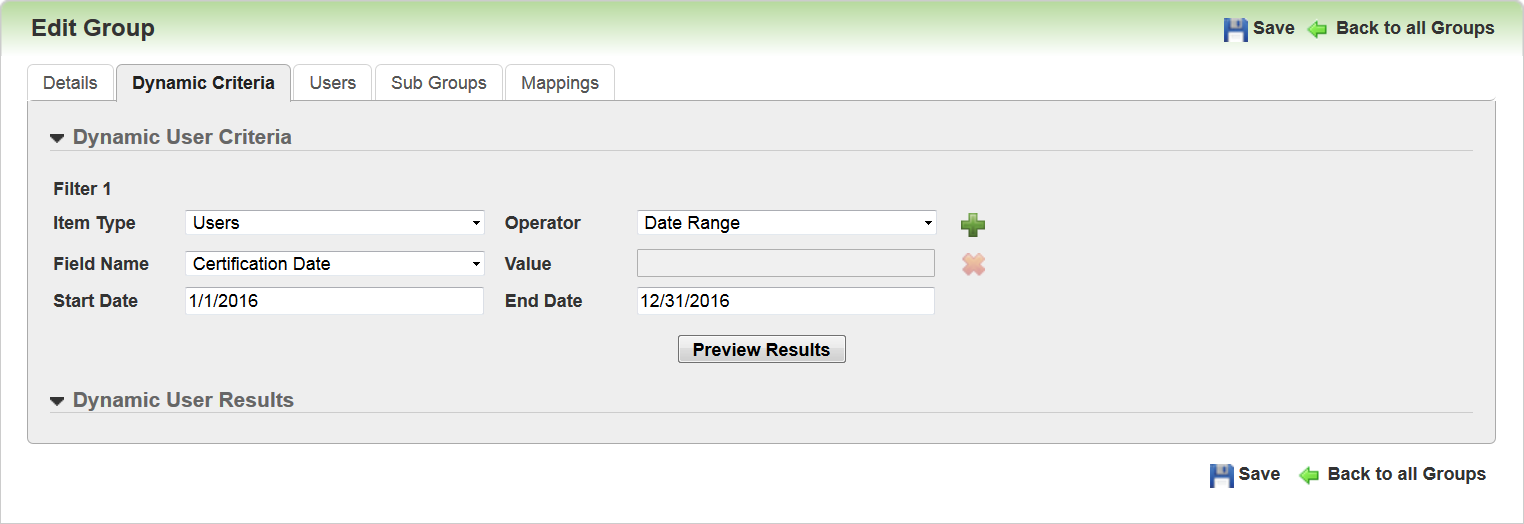
In the example above, the Admin selected the new standard License Certification Date field for the Field Name, Date Range as the Operator, and selected a Start Date and End Date in the date range fields. This can bet set as a single criterion, as in the example above. It can also be combined with other criteria using an AND or Or condition.
Ability to Create a Dynamic Group Based on Supervisor Role
You now have the ability to group Users based on their Supervisor Roles. You can create a group based on the default Supervisor Role, or any Supervisor role that you created.
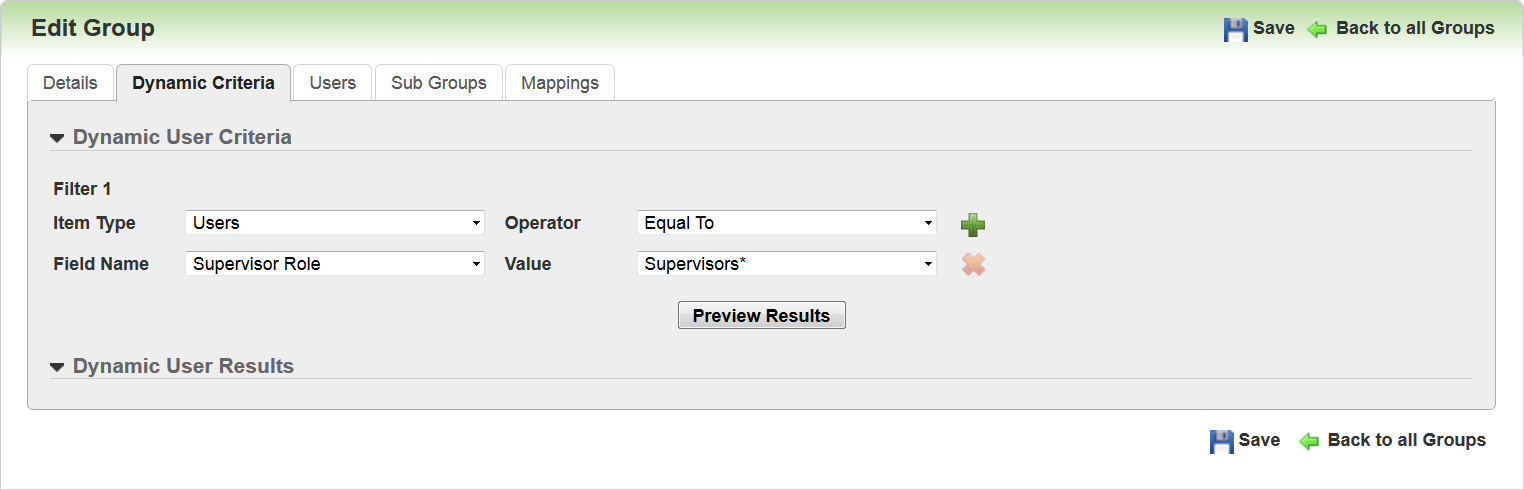
In the example above, the Admin selected Supervisor Role as the Field Name, Equal To as the Operator, and the default Supervisors role as the Value. You could also create a group of Supervisors who are not part of a certain Supervisor Role by selecting Not Equal To as the Operator and selecting a Supervisor Role as the Value.
Important: Recall that Users who were Supervisors prior to Oracle Taleo Learn Cloud Release 16B (when the Supervisor Roles feature was introduced) were not automatically added to the Default Supervisors Role. For Supervisors to be added to a Supervisor Dynamic Group, they must be first be assigned to a Supervisor Role. You can manually add any Supervisor who has not already been mapped to a Supervisor Role. Refer to online help for instructions on mapping Supervisors to a Supervisor Role (TOC > User Accounts > Supervisor Roles > Adding Supervisors to Supervisor Roles).
Supervisor Roles can bet set as a single criterion, as in the example above. It can also be combined with other criteria using an AND or Or condition.
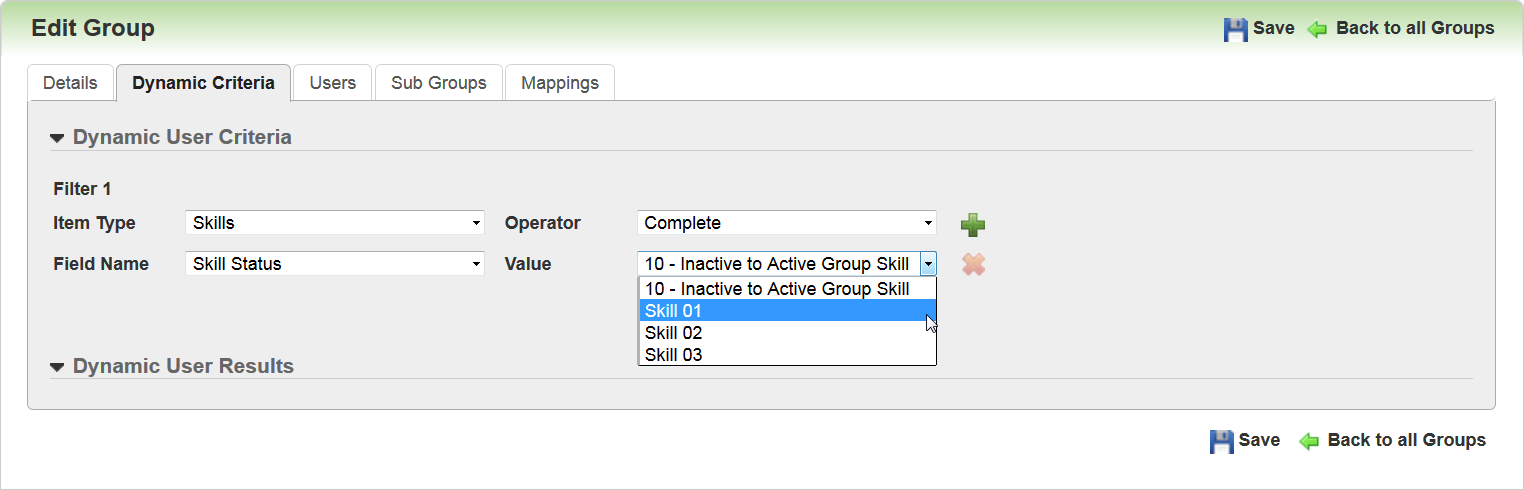
Dynamic Criteria - Training Item by Status
You can now place Users in Dynamic Groups based on their status for Learning Plans, Job Profiles, or Skills. Previously, you could only put Users in a Group based on the name or description of those mapped items.
Supported statuses for these learning items are:
- Learning Plans: Complete, Incomplete, and Exempt
- Job Profiles: Complete or Incomplete
- Skills: Complete or Incomplete
For example, perhaps you want to create a Dynamic Group of Uses who have completed certain Skills before they become part of the Group. You can select Skills as the Item Type, Skill Status as the Field Name, Complete as the Operator, and then select the active Skill you want to include from the Value drop-down list.
Perhaps you want to sequence training by grouping Users who have completed their New Hire Training Learning Plans, before assigning them new training.
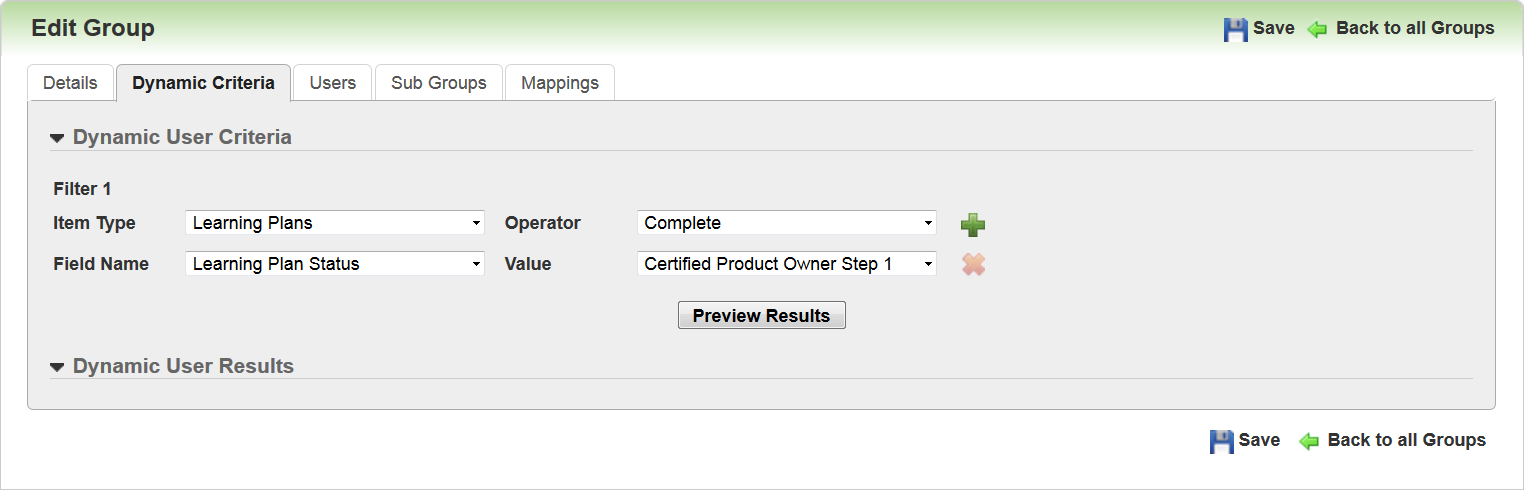
You can select Learning Plans as the Item Type, Learning Plan Status as the Field Name, Complete as the Operator, and then select the active Learning Plan you want to include from the Value drop-down list.
Training Items by Status can bet set as a single criterion, as in the example above. It can also be combined with other criteria using an AND or Or condition.
Ability to Indicate Whether Users Retain Mapped Items
You now have the ability to indicate whether a User’s mappings remain mapped to them when they are no longer mapped to a Dynamic Group. Previously, when a User was removed from a Dynamic Group, all of the User’s mappings were also removed.
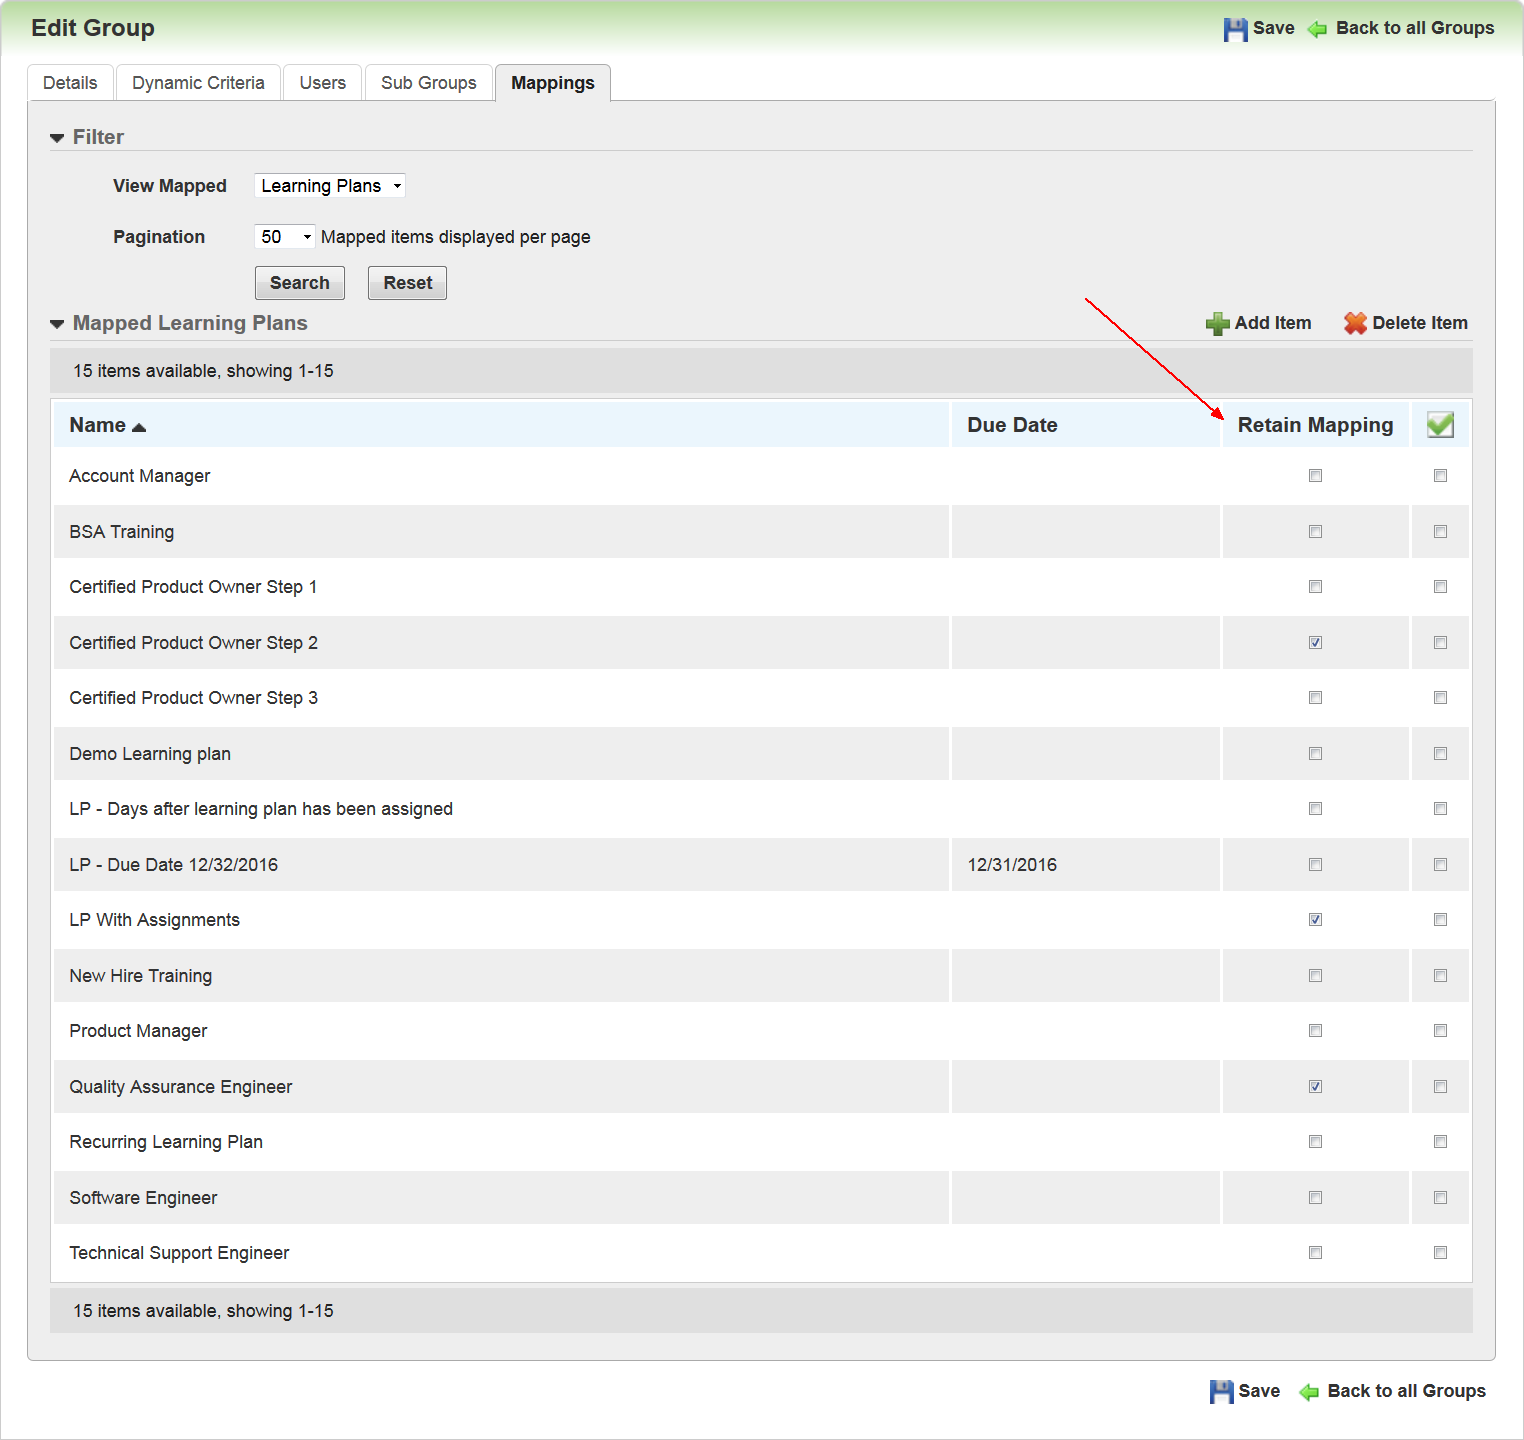
There is a new Retain Mappings check box on the Mappings tab for Dynamic Groups. By default, the Retain Mappings check box is cleared, which indicates that mappings added by the Dynamic Group are removed when the User is removed from the Dynamic Group. This is how mappings behaved prior to this release. Selecting the check box causes mappings that were added to the User when they were added to the Dynamic Group to remain with the User even after they are no longer mapped to the group. Notice that you can indicate whether a mapping should be retained on a per-mapped item basis.
Important : Selecting or clearing this check box only affects Users who are part of the Dynamic Group at the time you update the check box. For example, previous Users who were part of a Dynamic Group several months ago retained a particular Learning Plan when they moved out of the Dynamic Group, because the check box for the Learning Plan was selected when they were removed from the Group. This month, you decide clear the check box for the Learning Plan. Users who are currently in the Group will not retain the Learning Plan when they exit the Group. However, the previous Users who exited the Group before you made the change will continue to retain the Learning Plan.
Best Practice: If you are using recurring Learning Plans with Dynamic Groups you must select the Retain Mappings check boxes for those Learning Plans. If you do not, then the Learning Plans will not recur for Users who have moved out of the Dynamic Group.
LearnCenter Course MarketPlace Powered by OpenSesame
OpenSesame and Taleo Learn have had a partnership for a number of years. With Oracle Taleo Learn Cloud Release 16C we have furthered that relationship to enable you to easily import OpenSesame purchases into your LearnCenters. This integration handles the importing of the purchased OpenSesame content, and you decide when to make the content available in the Showroom. Features include:
- Control access to the marketplace to those that are authorized to make purchases
- Synchronized importing of purchased content into Taleo Learn
- View the history of courses imported
- Option to insert into Showroom during import
Tips and Considerations
- With this integration you are purchasing content from OpenSesame, Inc, and not from Oracle. This integration merely makes the importing of content from OpenSesame to LearnCenter easy for you.
- Any questions you have regarding payment options or content should be directed to OpenSesame Support, and not Oracle Taleo Learn Cloud Support. You can find links to and phone numbers for OpenSesame on their website (accessible through LearnCenter) or you can use the chat feature on the OpenSesame page. (The chat feature connects you to OpenSesame Support, not Oracle Taleo Learn Cloud Support.)
- If you are already using OpenSesame content with LearnCenter, contact your OpenSesame account representative to have your OpenSesame account linked to your Learn account before synching any new courses to the LearnCenter.
- Syncing OpenSesame content purchased prior to this integration creates duplicate Courses in your LearnCenter. You can manually make one of the Courses unavailable. You do not need to sync previously purchased Courses.
- OpenSesame Content available for purchase via this feature is SCORM 1.2 content.
Key Resources
- Courses online help topics
- OpenSesame Customer Support:
- Email: support@opensesame.com
- Phone: 1-503 - 808-1268
- Live Chat link
New User Permission
There is a new User Permission as a result of this feature.
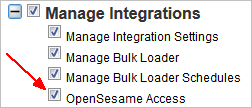
By default, this new permission is only granted to Users who have Co-Owner permissions. You can manually assign this permission to Users who need it. Users who have not been granted this permission will not see the new OpenSesame option on the Integrations Control Panel menu. (See below for details.)
Refer to online help for complete details on granting and denying User Permissions. (TOC > User Permissions)
There is a new OpenSesame menu option on the Integrations Control Panel menu.
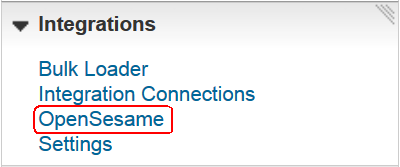
This option is only visible to Admins who have been granted the OpenSesame User Permission. (See the previous section for details.) Click OpenSesame to open the OpenSesame Catalog page.
The OpenSesame account visible on this page is tied to the current User. Users with permission to view this page have their own accounts, and what they see on this page is related to them.
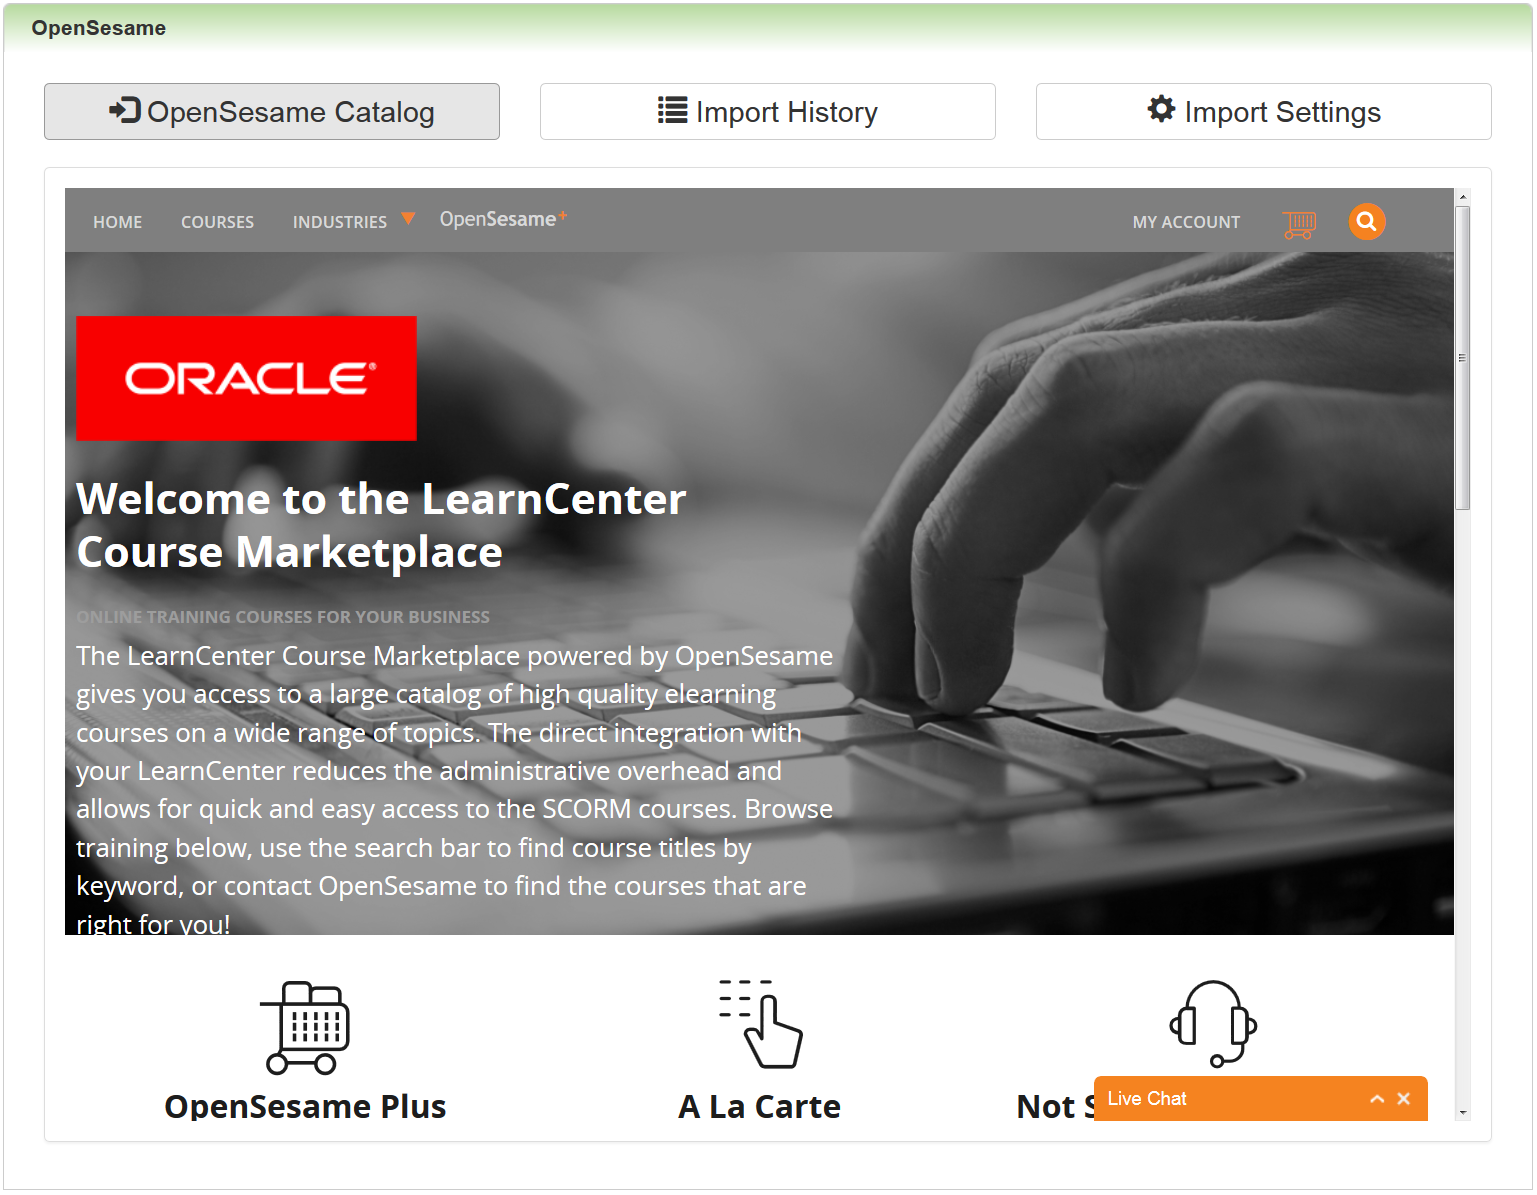
OpenSesame opens with three buttons at the top of the page:
- OpenSesame Catalog – opens by default when you click the OpenSesame menu option on the Integrations Control Panel menu. This is where you browse for and purchase OpenSesame content for your LearnCenter. It is also where you access My Account to sync your purchases with LearnCenter.
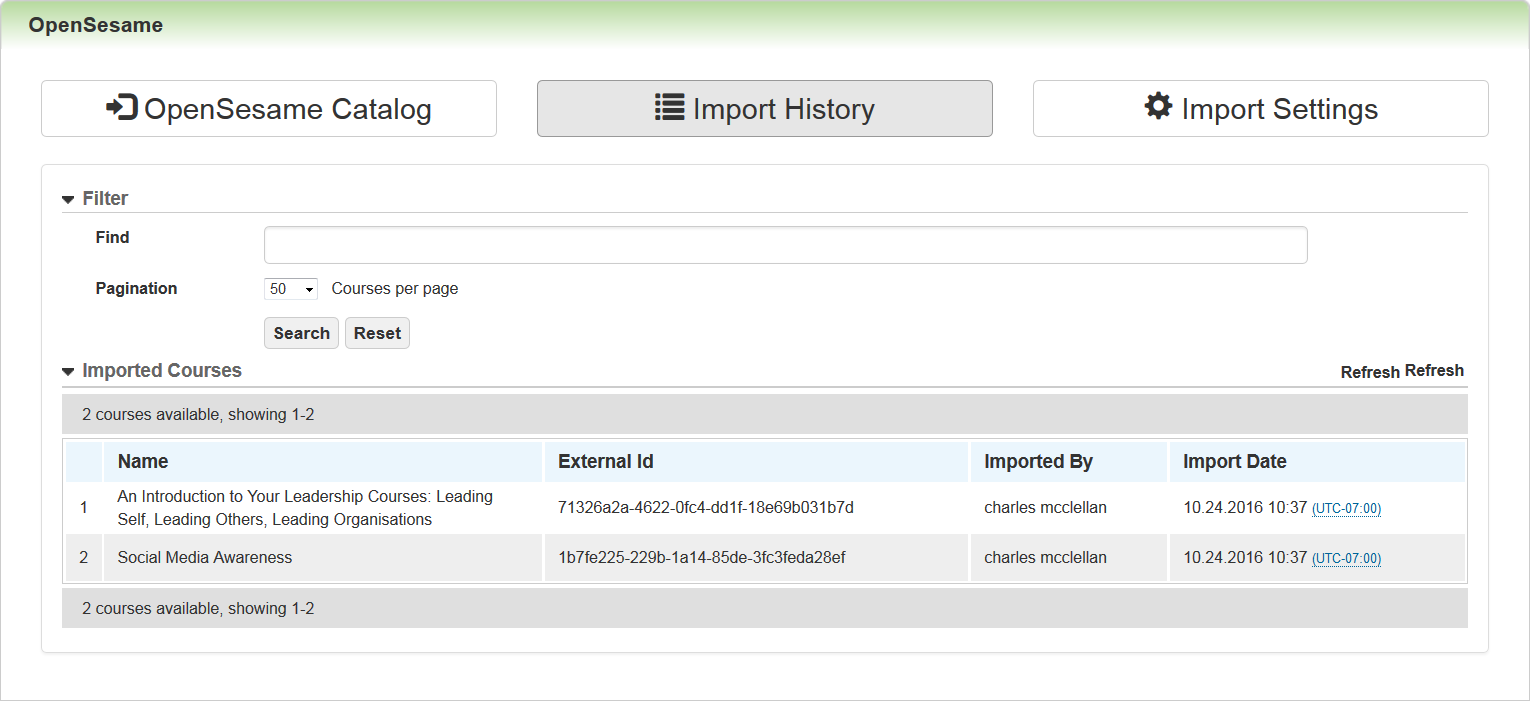
- Import History – displays a history of content imported by you and other Admins with access to OpenSesame for this LearnCenter.
- Import Settings – enables you to determine whether LearnCenter automatically brings your purchased OpenSesame content into the Showroom.
NOTE: The Live Chat button on this page connects you to OpenSesame Customer Support, and not Oracle Customer Support. Any questions you have regarding payment options or content should be directed to OpenSesame Support, and not Oracle Taleo Learn Cloud Support.
Using OpenSesame with LearnCenter
The OpenSesame page is easy to browse and use. The suggested workflow for purchasing and importing content into LearnCenter is as follows.
- Click the Import Settings button and decide whether you want LearnCenter to automatically bring your purchased OpenSesame content into the showroom.
- Click OpenSesame Catalog to browse for and purchase your content.
- Once you have purchased content, click My Account on the OpenSesame catalog page.
- Click Sync to sync them with LearnCenter. If you selected the Insert the Course into the Showroom check box on the Import Settings tab, your purchases are synced and added to the LearnCenter Course Showroom.
- Visit Import History to view the import progress or history.
- Once you have imported (synced) OpenSesame Courses with LearnCenter, they behave within LearnCenter just as other LearnCenter Courses do.
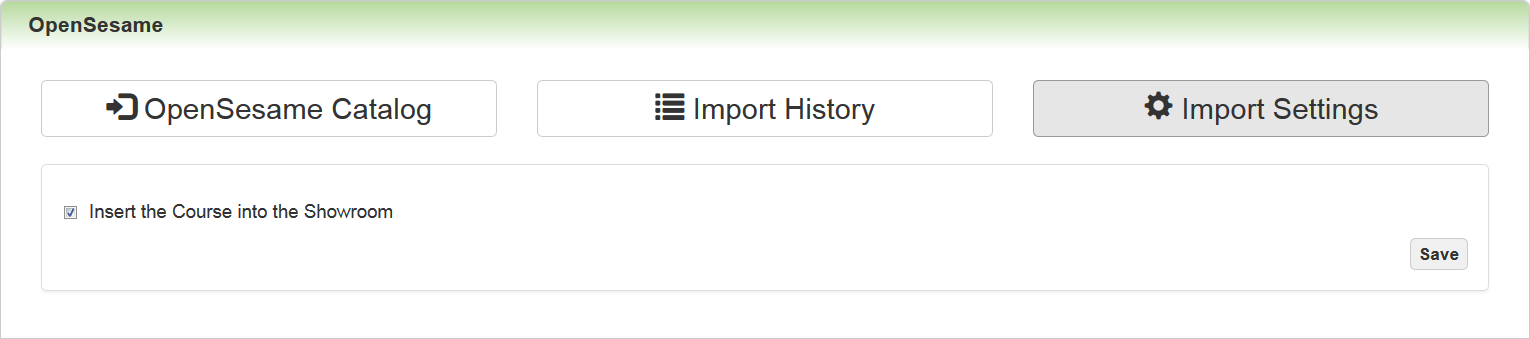
Select the Insert the Course into the Showroom check box if you want LearnCenter to automatically insert your synced purchases into the Showroom. Clear the check box if you want to manually add OpenSesame purchases to the LearnCenter Showroom at a later time. What you select here remains selected until you change it. That means if you select the check box today, then next week when you re-visit OpenSesame, the check box is still selected. It is recommended that you visit this page first and make that destination before purchasing and syncing content.
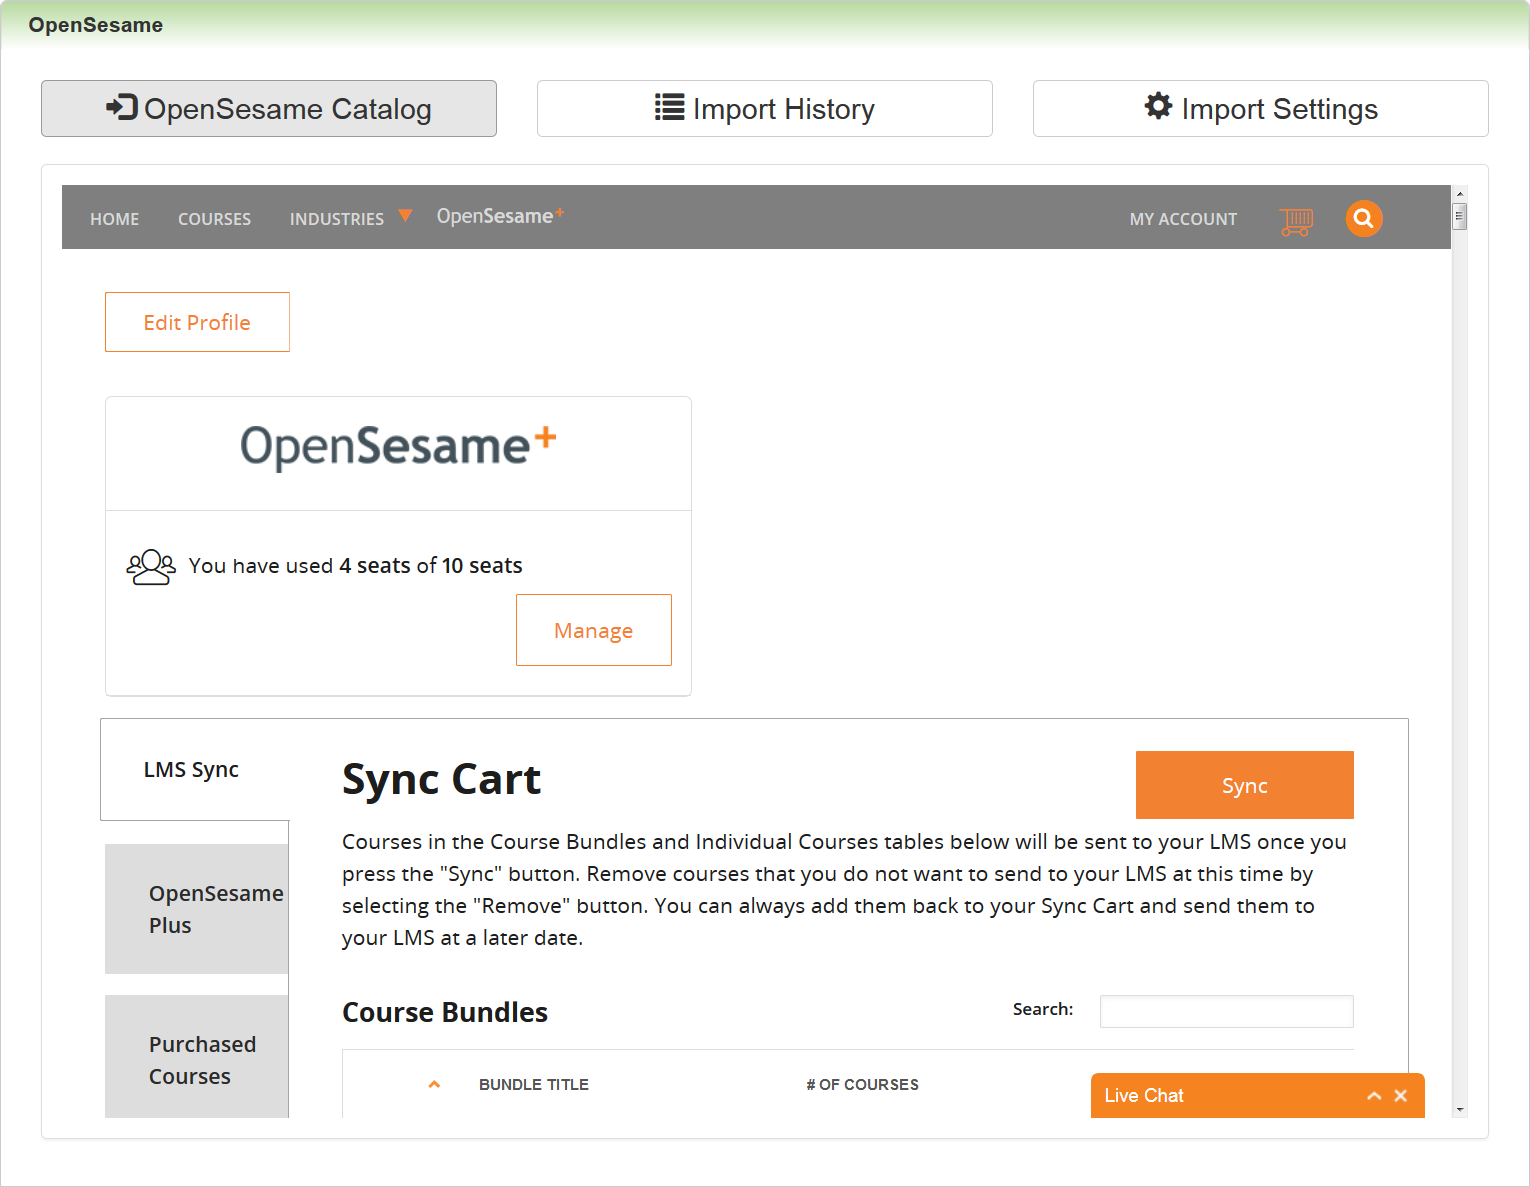
The LMS Sync tab lists all of the items in your cart.
Refer to online help for complete instructions on working with Courses in LearnCenter (TOC > Courses).
---

Copyright © 2016, Oracle and/or its affiliates. All rights reserved.
This document is provided for information purposes only, and the contents hereof are subject to change without notice.This document is not warranted to be error-free, nor subject to any other warranties or conditions, whether expressed orally or implied in law, including implied warranties and conditions of merchantability or fitness for a particular purpose. We specifically disclaim any liability with respect to this document, and no contractual obligations are formed either directly or indirectly by this document. This document may not be reproduced ortransmitted in any form or by any means, electronic or mechanical, for any purpose, without our prior written permission.
Oracle and Java are registered trademarks of Oracle and/or its affiliates. Other names may be trademarks of their respective owners.
Intel and Intel Xeon are trademarks or registered trademarks of Intel Corporation.All SPARC trademarks are used under license and are trademarks or registered trademarks of SPARC International, Inc. AMD, Opteron, the AMD logo, and the AMD Opteron logo are trademarks or registered trademarks of Advanced Micro Devices. UNIX is a registered trademark of The Open Group.