
This guide outlines the information you need to know about new or improved functionality included in Releases 17A for Oracle Taleo Learn Cloud. Each section includes a brief description of the feature, the steps you need to take to enable or begin using the feature, any tips or considerations that you should keep in mind, and the resources available to help you.
Click here to read the full announcement posted to Customer Connect on March 7, 2017.
.
For Licensing Information, please refer to My Oracle Support DOC ID 1461788.1 .
For the latest information on browser support, please refer to the Oracle Taleo Learn Cloud System Requirements document; My Oracle Support DOC ID 1461788.1 .
.
This document will continue to evolve as existing sections change and new information is added. All updates are logged below, with the most recent updates at the top.
| Date |
What's Changed |
Notes |
|---|---|---|
| 10 MAR 2017 |
Initial Document Creation |
Some of the new Release 17A features are automatically available to users after the upgrade and some require action from the user, the company administrator, or Oracle.
The table below offers a quick view of the actions required to enable each of the Release 17A features.
| Action Required to Enable Feature |
||||||
|---|---|---|---|---|---|---|
| Feature |
Automatically Available |
End User Action Required |
Administrator Action Required |
Oracle Service Request Required |
||
| New Content Manager |
||||||
|
|
||||||
|
|
|
|||||
|
|
||||||
|
|
||||||
|
|
||||||
|
|
||||||
| Converting an Uploaded Document to the new Media Course Type |
|
|||||
|
|
||||||
|
|
||||||
|
|
||||||
|
|
||||||
|
|
||||||
| New Catalog Widget |
||||||
|
|
|
|||||
|
|
|
|||||
|
|
|
|||||
| New Enrollment Option |
||||||
|
|
|
|
||||
|
|
|
|||||
| Team Monitor Widget – Management Reports |
||||||
|
|
|
|||||
| New Approval View for the Team Monitor Widget |
||||||
|
|
|
|||||
|
|
|
|||||
|
|
|
|||||
| Widget Enhancements |
||||||
|
|
||||||
|
|
||||||
|
|
||||||
|
|
||||||
| New Ability to Include Inactive Enrollments on the Transcript Widget |
|
|
||||
|
|
|
|||||
|
|
||||||
|
|
||||||
| Skills and Search Widgets are Now Portable |
||||||
|
|
|
|||||
| New Custom Fields for Learning Plans |
||||||
|
|
|
|||||
|
|
|
|||||
|
|
|
|||||
| New Ability to Export and Import Custom BI |
||||||
|
|
||||||
|
|
||||||
|
|
||||||
| Sequenced Learning Plans |
||||||
|
|
||||||
|
|
||||||
|
|
|
|||||
|
|
||||||
|
|
||||||
|
|
||||||
| How Communication Messages Work with Sequenced Learning Plans |
|
|||||
|
|
||||||
|
|
||||||

We are pleased to introduce the new Content Manager, a brand new Course type called Media, and a new Content Viewer. The Content Manager enables you to create training using unstructured training assets, such as Microsoft Word documents, Microsoft PowerPoint files, PDFs, Microsoft Excel spreadsheets, Rich Text Format documents, and text files. For example, you may be using Standard Operating Procedures (SOPs) and policy documents for training purposes. These documents can be uploaded to the Content Manager and quickly converted to the new Media Course type, and then viewed and tracked the same way other LearnCenter Courses are. When you upload documents to the Content Manager, there is no need to access the SFTP site, and you do not have to upload the files to the Resource Manager.
NOTE: If you are already using documents for training purposes, and they were previously uploaded to the Resource Manager, you will need to re-upload them to the Content Manager if you want to use them with this new functionality. They will not be ported over automatically.
You can map Media Courses to training items (such as Learning Plans or Enrollments), or you can place them directly onto LearnCenter Design pages. When Users access these Courses, they open using a new Document Course Viewer which is only available with the LearnCenter Course Player. This viewer was built using “responsive design” which makes it fit easily onto the screens of PCs, smart phones, or tablets.
With the Content Manager you can also:
- Manage the versioning of the documents so that Users are always presented with the latest versions.
- Place the content on a LearnCenter Design Page for general access by end Users. Content launches in a new carousel control that is responsive to any device size from which the User accesses it, and it tracks overall launches.
- Archive content so that the physical files can be completely removed from the system while maintaining all tracking information for reporting.
For purposes of this document, some of the screen illustrations are broken out into smaller segments so that they can be more easily described. Refer to online help if you need instructions on using any of the other LearnCenter features mentioned in this document.
Courses Menu Renamed and New Menu Option
The Courses menu has been renamed to Content so that it is inclusive of the new Content Manager feature. A new Content Manager option has been added to this Control Panel menu.
All of the pre-existing Courses menu functionality continues to function as it always has. No changes have been made to any of the Course-related Control Panel menu options as a result of this feature.
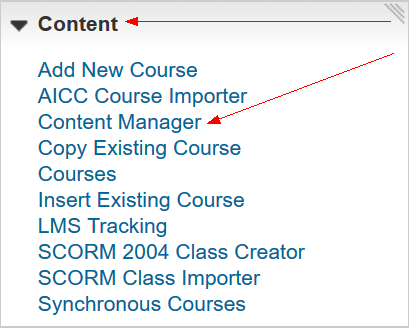
Courses Menu Renamed to Content Menu
When you select the Content Manager menu option, the new Content Manager page opens.
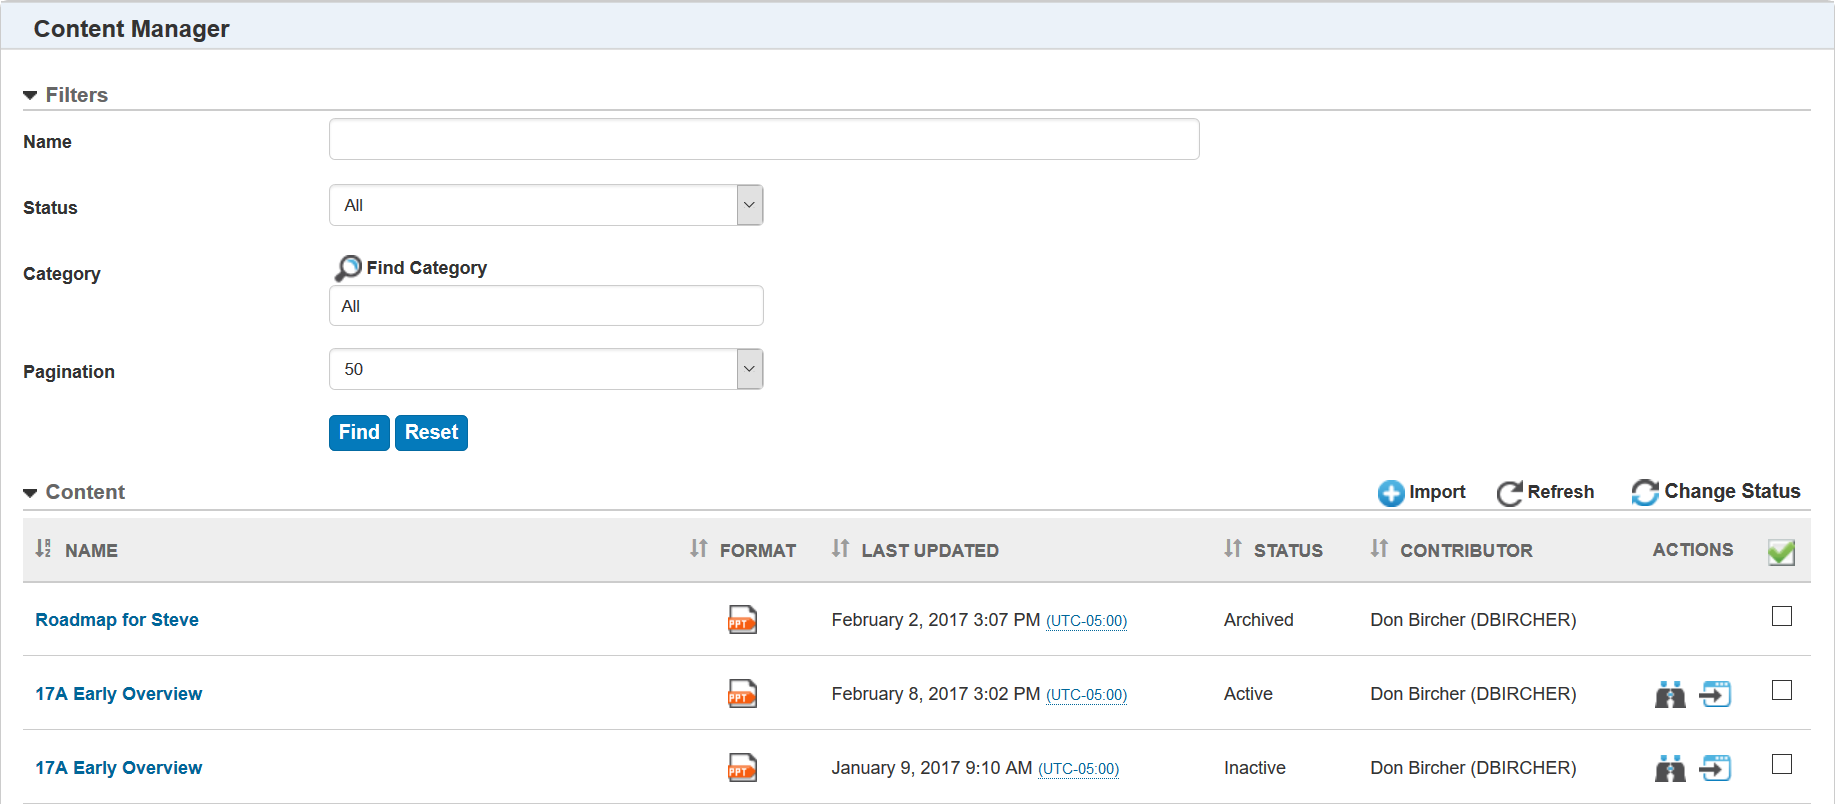
New Content Manager Page
The Content Manager page contains the documents you have uploaded to the Content Manager. Notice that each document has an icon that shows you what type of item it is (PowerPoint, Word, etc.). You can also see the date it was Last Updated and the Contributor who uploaded the document.
There is a Filters section to help you sort and find documents. You can filter by Name, Status, and Category. You can also indicate how many items you want to display per page using the Pagination drop-down list.
The document Status can be any of the following:
- Active – the document is available for use within the LearnCenter.
- Archived* - the document’s physical content has been deleted from LearnCenter (it is not saved for use later in an inactive status), but all tracking information for the document Course has been preserved for historical purposes. This means if Users have launched this information in Course format or they have Course completions for this document, the tracking information is still obtainable using BI Reporting, the Transcript Widget, or any other Widget in which the Course was visible. If the Course format of this item was once mapped to a Learning Plan, Widgets will still display them, but they can no longer be launched.
.
- Inactive – the document is not available for use within the LearnCenter, but can be made Active when you choose.
- Pending - the document is still uploading or is still converting to the Document Media type format.
You can change a document’s status by selecting the check box next to it, and then using the Change Status icon and accompanying drop-down list.
Notice that Active and Inactive documents have icons in the Actions column.
 - click this icon to preview the imported document.
 - click this icon to convert the imported document to the new Media Course type.
Both of these actions are described in further detail later in this document.
New Behavior Only Available with the Content Manager Page
Even though the Content Manager page resembles other Control Panel pages where there are lists of items, there is new behavior that is only available with this page.
- This page was developed using responsive design so that you can easily view it using a PC, smart phone, or tablet.
- Filters, once set, retain their settings each time an Admin returns to the Content Manager. They do not return to a default state when the Admin navigates away and returns to the page. You can clear the saved filter settings at any time by clicking Reset.
- You can select multiple items across multiple paginations of items and apply an action to all of them at once. On similar LearnCenter pages where you could select items for action, you could only apply actions on a per page basis. For example, perhaps you have 100 documents listed on the Content Manager page, and you are paginating the page to display 25 items per page. This means you have 4 pages of items. You can select the check boxes next to documents on page 1, and then move to page 2 to select additional check boxes. The check boxes you selected on page 1 remain selected. If needed, select more items on pages 3 and 4. All selected items on all pages remain selected. You can then change all of their statuses at once by selecting any status from the Change Status icon.
Importing Documents to the Content Manager
You import new documents on the Content Manager page by clicking Import. The Add Content page opens. In the Details section, give the document a Name and Description. 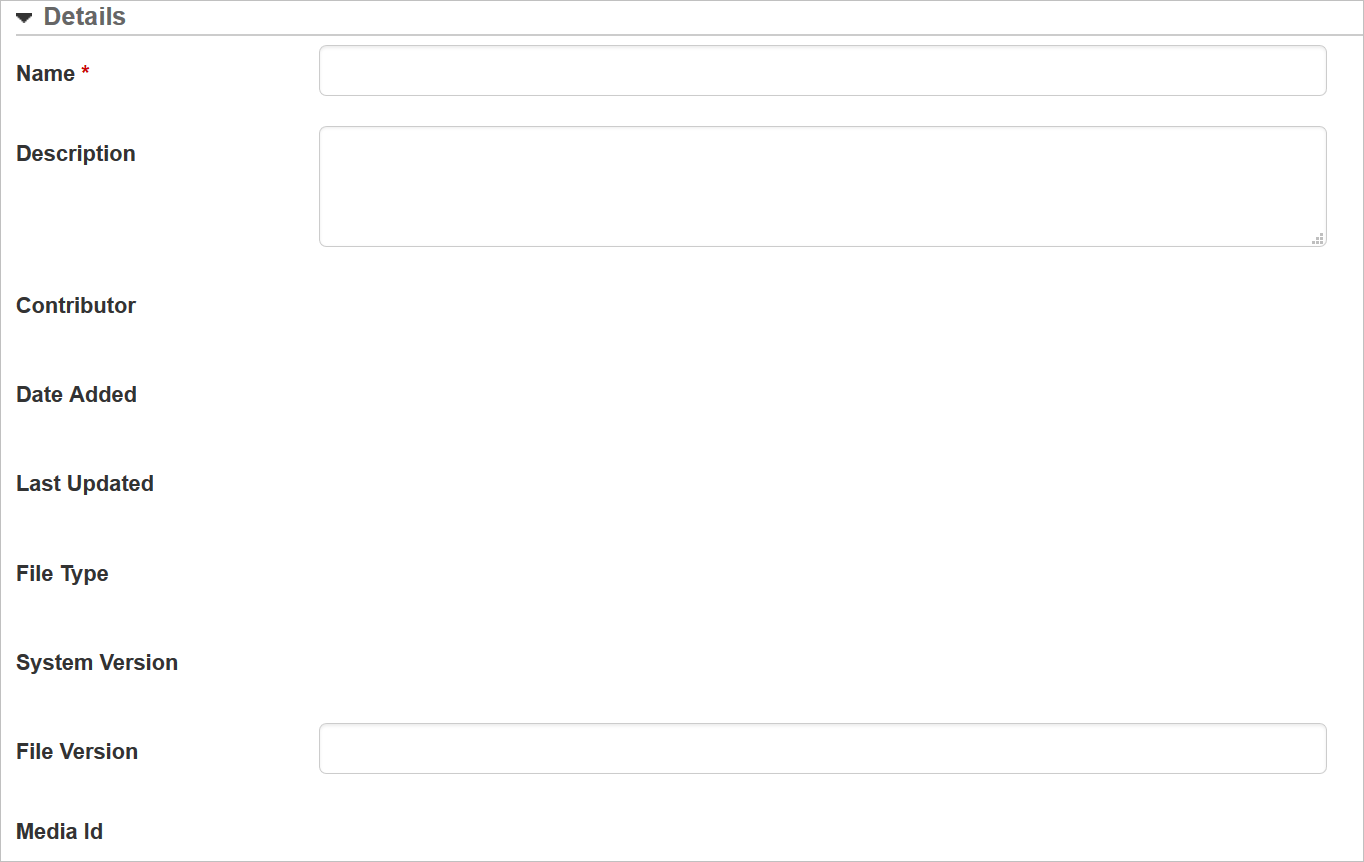
Importing Documents - Details Section
The Contributor, Date Added, Last Updated, File Type, System Version and Media Id fields are system-populated fields.
Notice that there is both a system-populated System Version field, and a File Version field into which you can type information. The difference between these fields is that the System Version displays LearnCenter-generated versioning information; whereas you can give the document any version information that makes sense to you or that follows your organization’s versioning conventions.
Use the Upload File section to upload the new document.
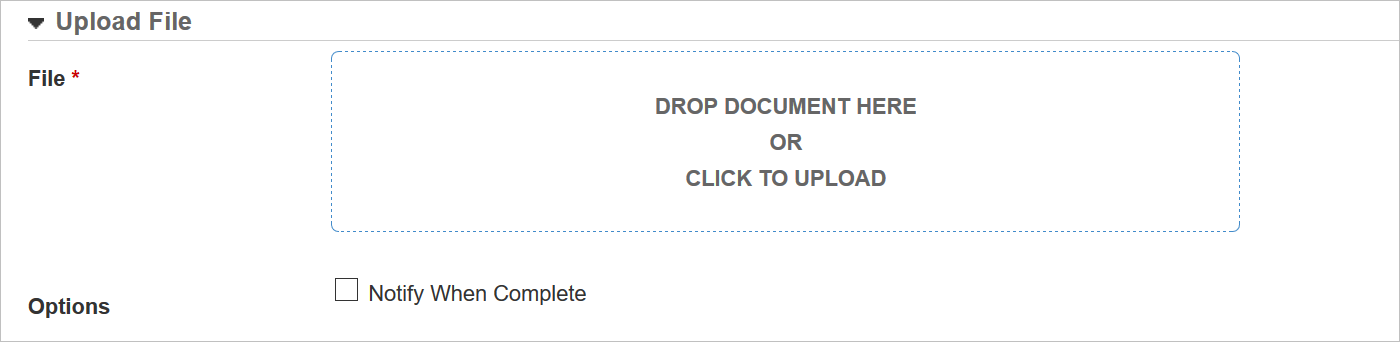
Importing Documents – Upload File Section
You can drag-and-drop files to the Content Manager page. There is no SFTP requirement to upload items here. You also do not need to access items from the Resource Manager. Just drag items from any folder on your PC to the Drop Document Here box. You can also Click this Box to open a browse dialogue if you prefer.
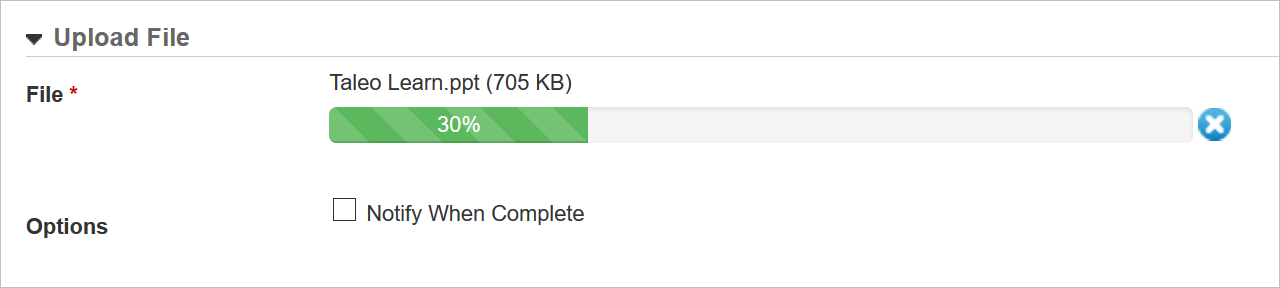
Importing Documents - Uploading
A progress bar on the page lets you see the item’s upload progress. While the document is uploading, you can continue working on the other fields on the page. Alternatively, you can select the Notify When Complete check box to receive an email message when the file has finished uploading. This is useful if you are moving on to another page before the file finishes uploading.
In the Properties section, you can enter information in the Standard fields that display. These are the same Standard fields that are available for other Courses. When you enter the information here, you will not have to add it later when you update the Course Properties page.
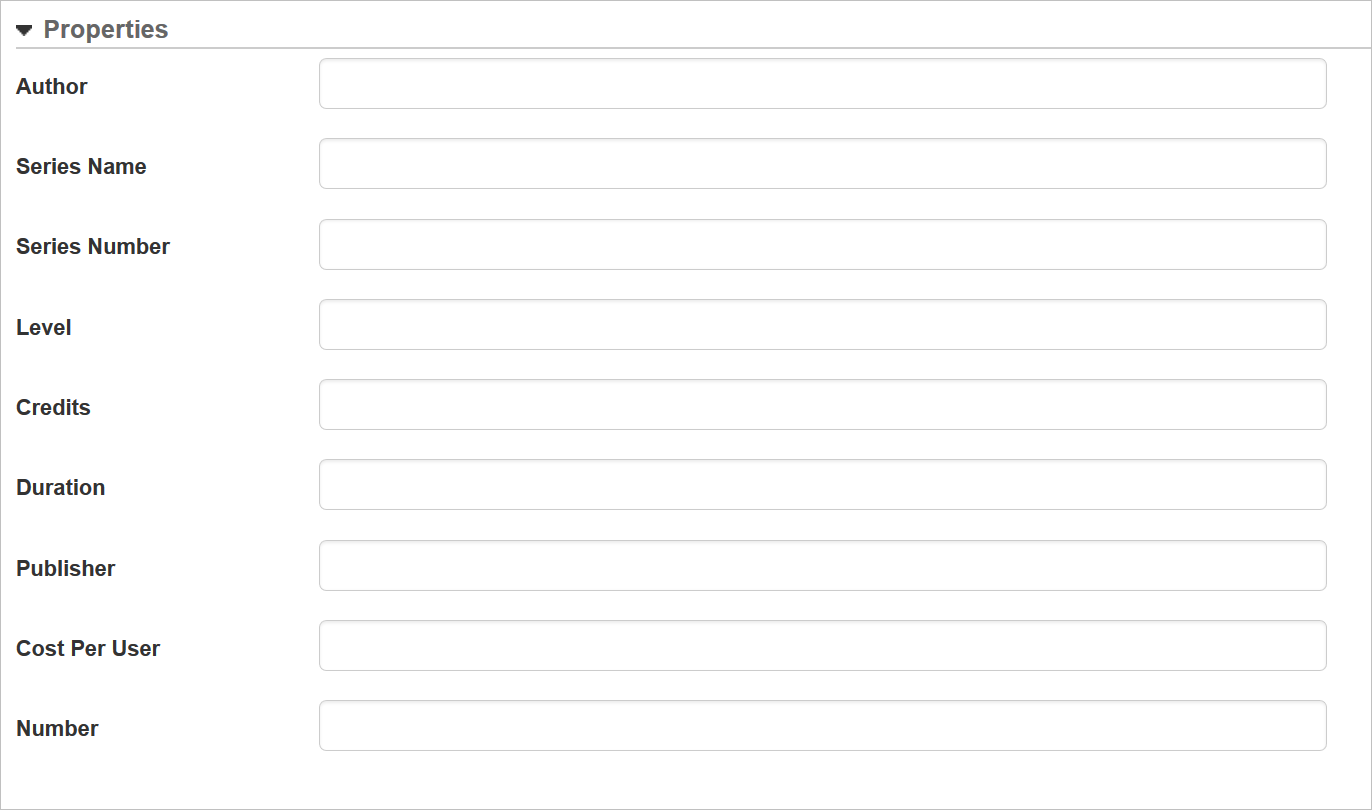
Importing Documents – Properties Section
When you have completed entering the necessary information, click Save. The information you entered is saved to the Content Manager. You receive a confirmation message in the View Content section, and the Change Log lists your initial upload.
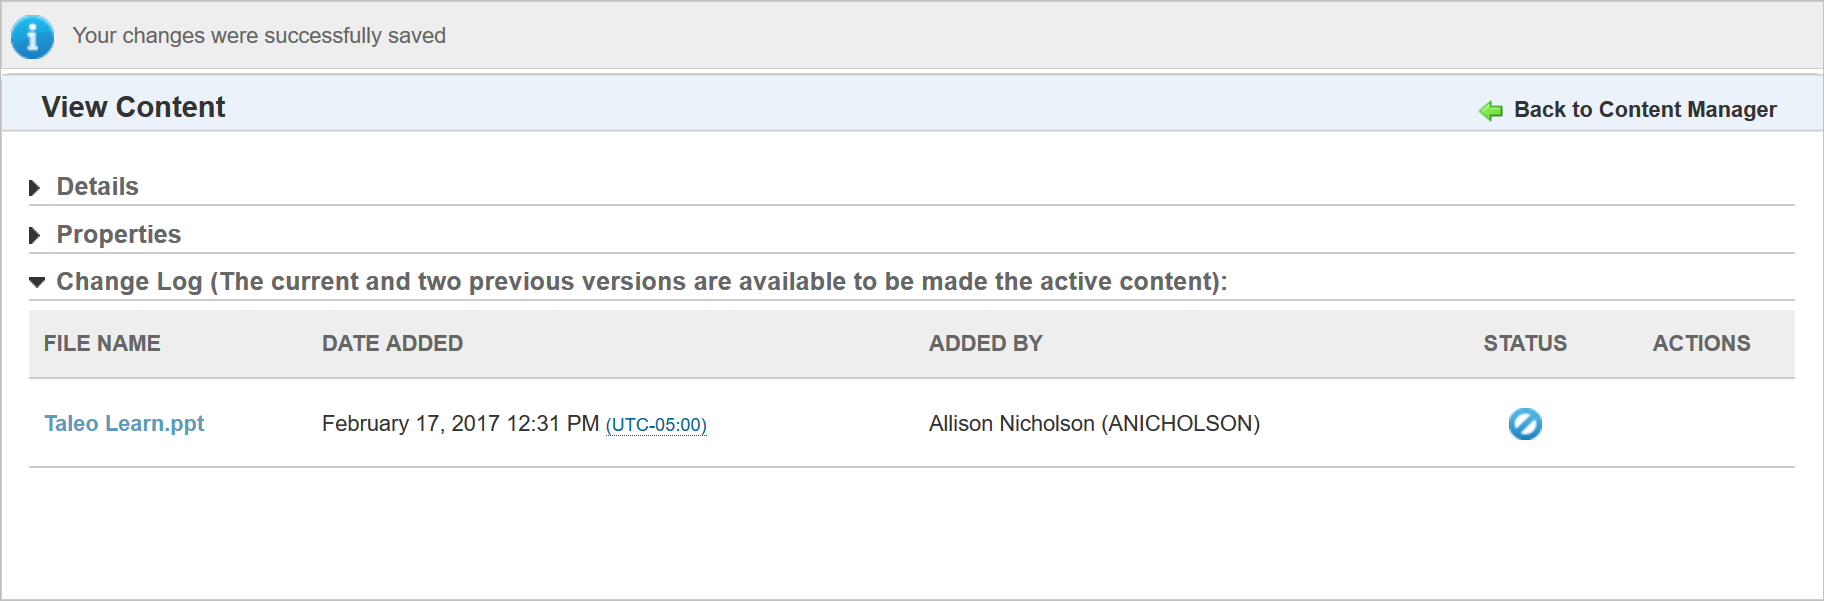
Importing Documents – View Content
The Change Log section will list future versions of this document when you upload them. See the next section of this document for additional information about the Change Log.
You can view the Details information. Notice that the system-populated fields now have values.
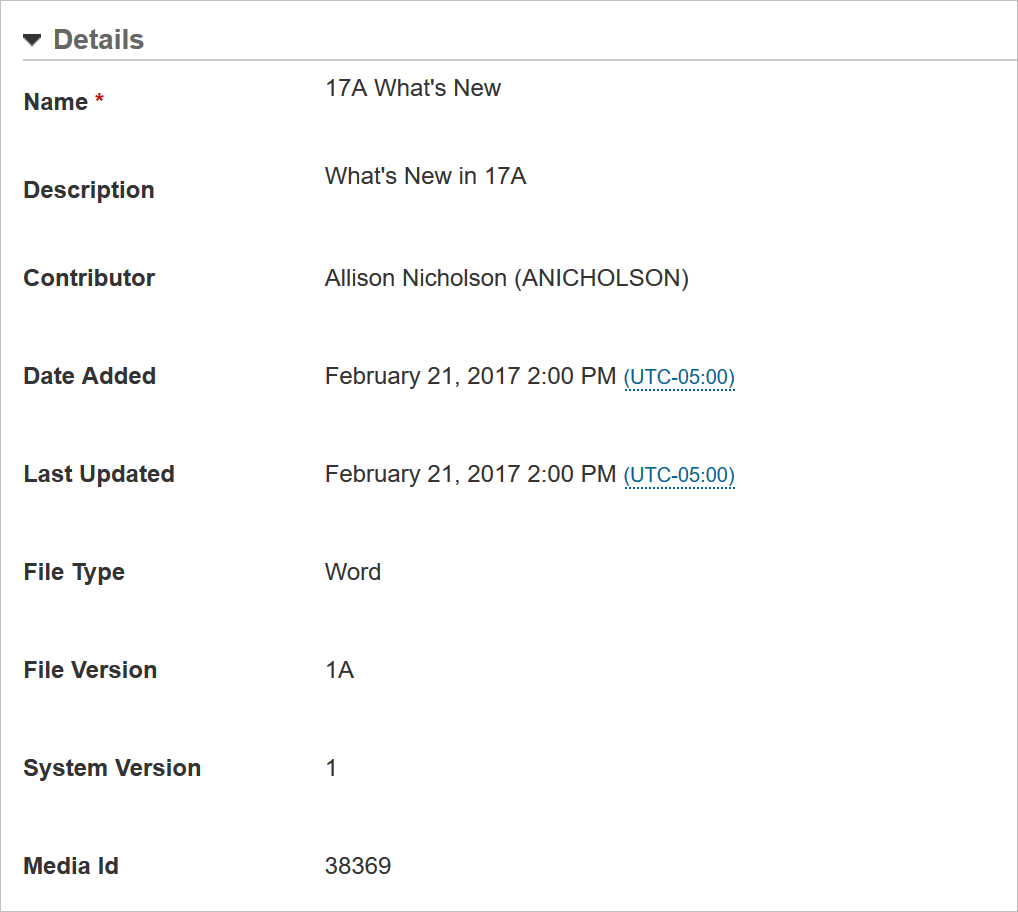
Importing Documents – System Details Populated
In the example above, notice that the File Version field was previously completed by the Admin. Click Back to Content Manager to return to the main Content Manager page where the uploaded document is now listed.
If you notice that the document’s Status is Pending, it means the document has not finished converting to the new document Course format.
Viewing and Editing Uploaded Document Properties
Once a document has been uploaded, you can click the file name to open it for viewing or editing. You can edit the Name and Description. Notice that there is now a thumbnail picture of the first page of your original document.
Document Thumbnail
Continue scrolling down the page until you come to the Change Log section. The Change Log displays a history of the various uploaded files for this document, including the File Name, the Date Added, Added By which User, and the Status.
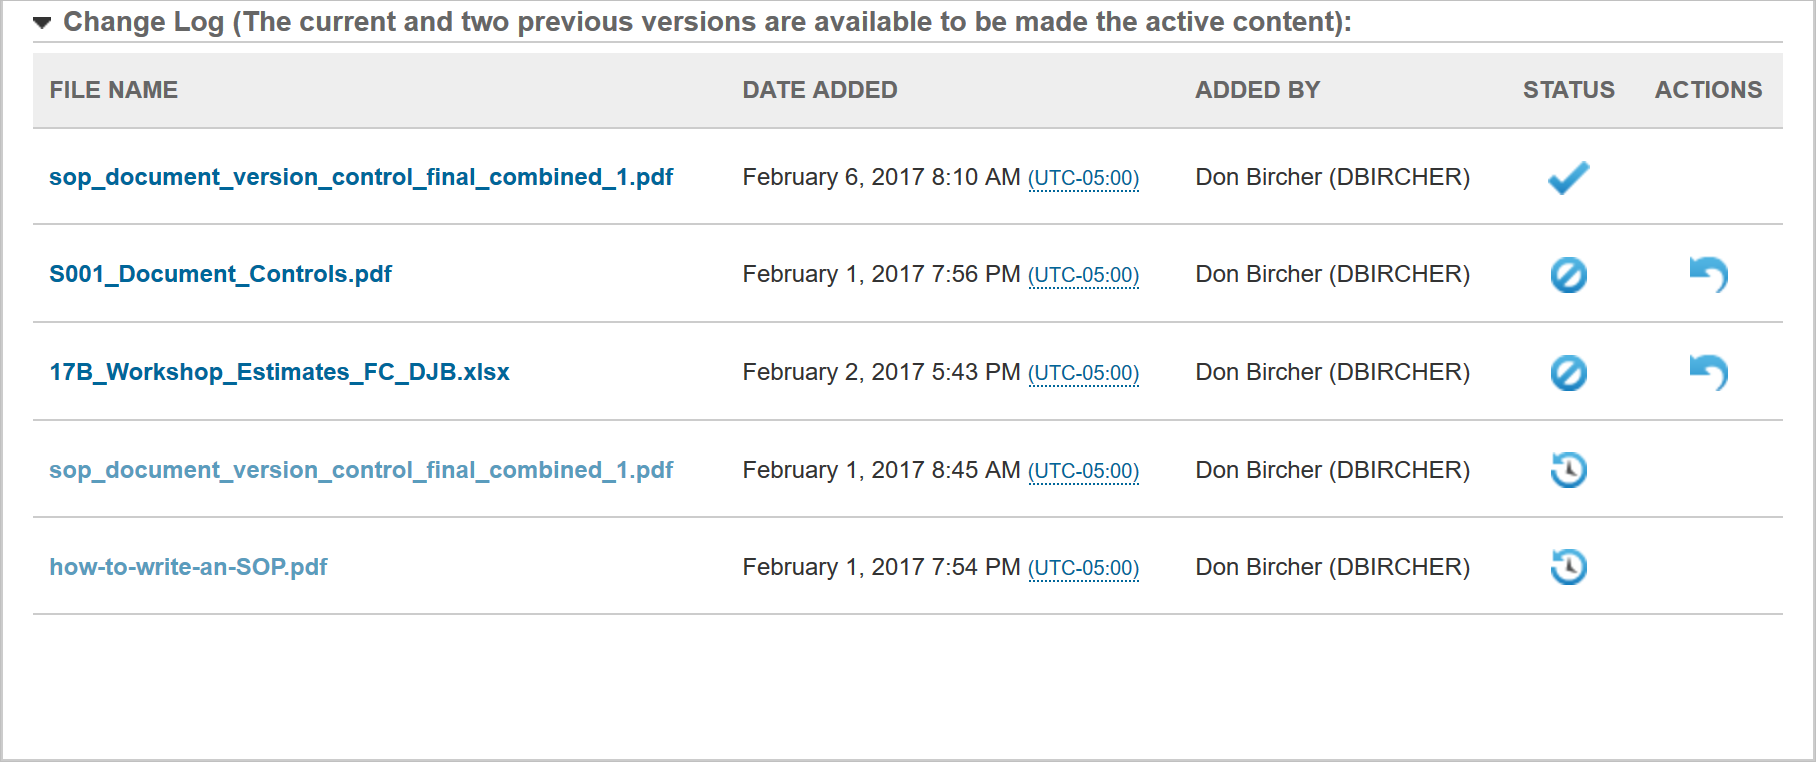
Document Change Log
You can download these document versions by selecting the file name. Notice that only the most recent 3 versions of the document are available for selection. Older document versions are listed for historical information, but are not available for selection.
A document with a check mark in the Status column is active. You can revert to a previous version by clicking the ![]() icon. The
icon. The ![]() icon indicates the line item is only available as historical information.
icon indicates the line item is only available as historical information.
Previewing an Uploaded Document
You can preview an uploaded document directly from the Content Manager page. Click ![]() next to the document you want to preview. The document opens in a web-enabled format, complete with a carousel of thumbnail images at the bottom.
next to the document you want to preview. The document opens in a web-enabled format, complete with a carousel of thumbnail images at the bottom.
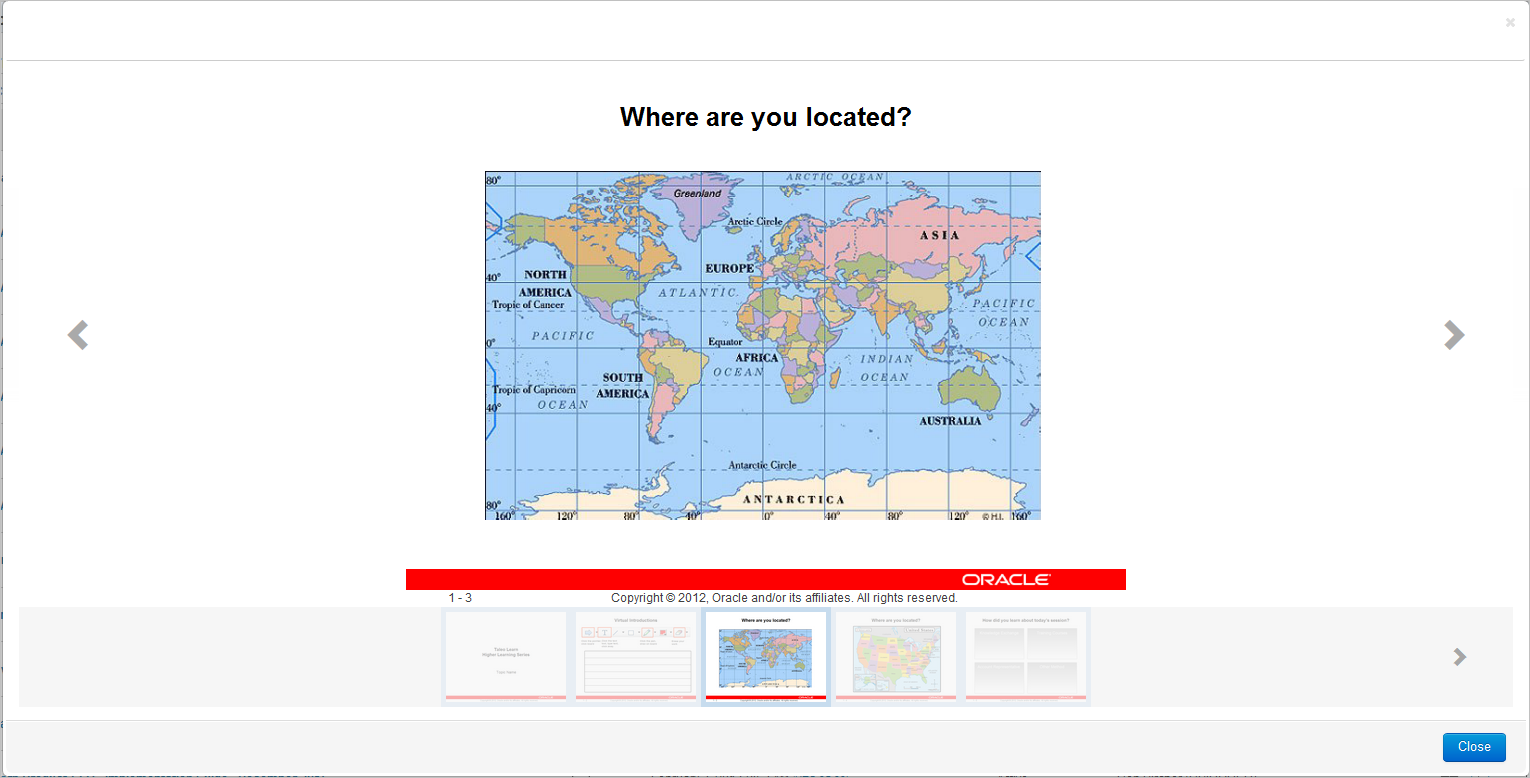
Document Preview with Thumbnail Carousel
You can click the left and right arrow icons, or you can click the images on the carousel to move around in the preview. Click Close when you are done.
Converting an Uploaded Document to the New Media Course Type
You can convert an imported document to the new Media Course type by clicking ![]() next to the Course on the Content Manager page. The following window opens so that you can customize your Course settings prior to converting it.
next to the Course on the Content Manager page. The following window opens so that you can customize your Course settings prior to converting it.
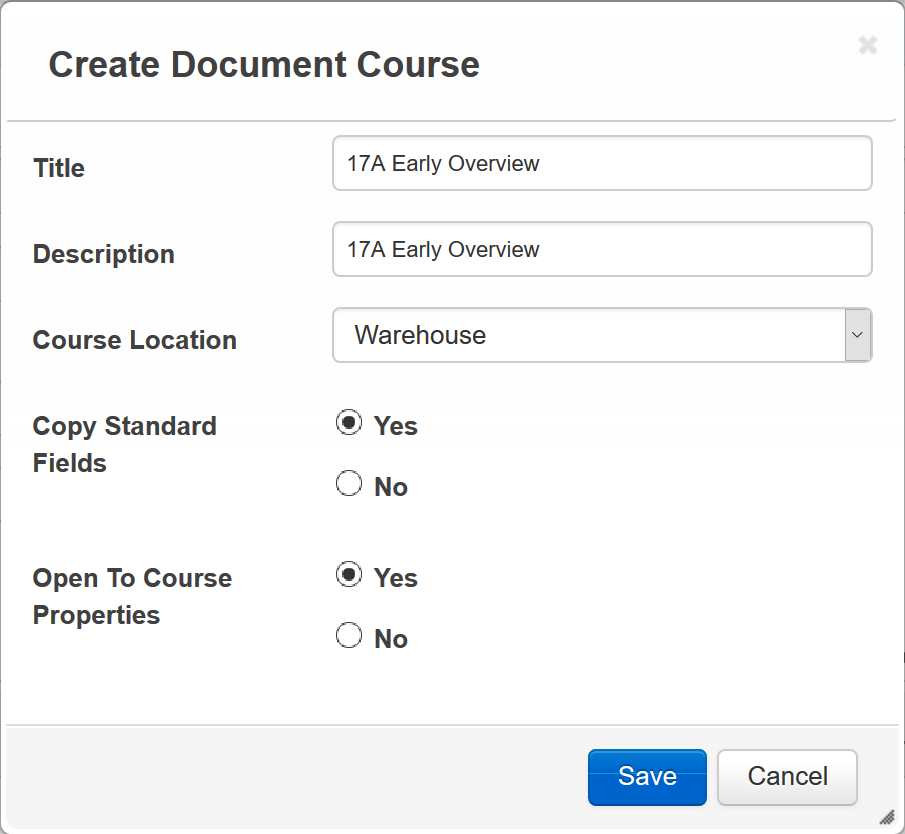
Create Document Course Window
The Title and Description are based on what you entered in the Name and Description fields when you initially imported the document to the Content Manager.
You can edit these here if you want to.
- Select a Course Location to indicate whether you want to import the Course to the Warehouse or insert it in the Showroom.
- Inserting the Course into the Showroom makes it available for use immediately.
Refer to the following topic in online help if you need additional information about the Warehouse vs. the Showroom: TOC > Courses > Importing versus Inserting WBT Content.
Indicate whether you want to Copy Standard Fields by selecting either Yes or No. (These are the fields you may have updated in the Properties section when you imported the document; Author, Series Name, Series Number, etc).
- Selecting Yes automatically copies the information to the matching fields on the Course Properties page.
Indicate whether you want LearnCenter to Open to Course Properties as soon as the document completes the conversion by selecting Yes or No.
- Selecting Yes opens to open the Course Properties page saves you time and the extra steps of navigating to the Course Properties page via the Control Panel.
When you are finished with the Create Document Course window, click Save. If you selected Yes for Open to Course Properties, the Course Properties page opens.
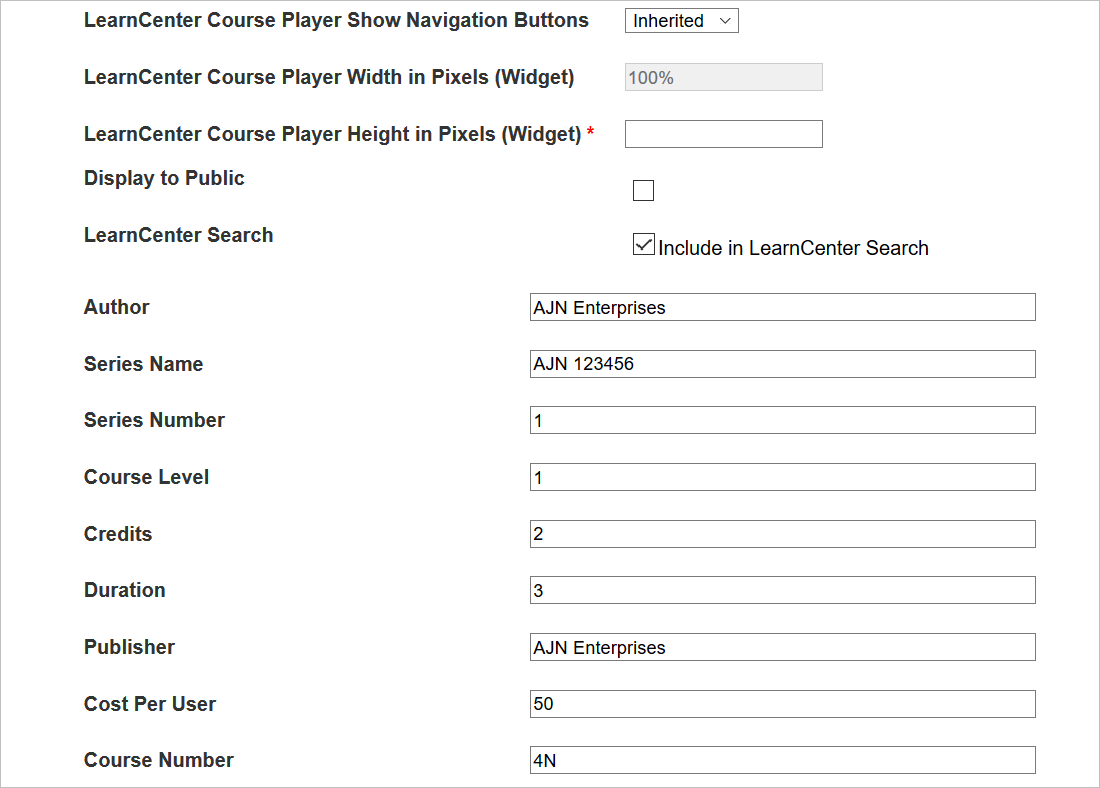
Course Properties Are Copied
You can then set the properties for things like Electronic Signature Information, Feedback Forms, Course Player Height and Widths, etc.
Best Practice: For the LearnCenter Course Player Height in Pixels (Widget) field, it is recommended that you use 700 for documents that have a Landscape layout, and 900 for documents that have a portrait layout.
If you selected Yes for Copy Standard Fields, the information you entered in the Properties section of the Add Content page (when you imported the document to the Content Manager) has been carried over to the Standard fields available in the Course Properties page.
Refer to online help if you need additional information about completing the fields in the Course Properties page (TOC > Courses > Managing Courses > Viewing and Editing Course Properties).
Workflows like ESignatures and Pre and Post Assessments work natively only within the LearnCenter Course Player.
Click Save. Your document is converted to the new Media Course type. You can click Return to Content Manager to return to the Content Manager.
If you upload a new version of the document in the Content Manager, and the Course is already mapped to a learning item, you do not have to do anything to update the Course within that learning item. The new version of the document Course is updated automatically wherever it is mapped. What this means is you can make minor corrections to things like typos, upload the document to the Content Manager again, and the Course is updated everywhere it is mapped.
Tip: Another useful scenario involves changing the document source type. Perhaps you initially upload a Microsoft Word® document and convert it to a Course, but you have a better version of the Course and it is in a Microsoft PowerPoint® presentation. You can simply import the PowerPoint presentation as the new version of the document in the Content Manager, and the Course is updated automatically in all places where it is mapped.
New Selection on the Course Selector Page
As a result of this feature, there is a new Courses Added with the Content Manager selection available on the Course Selector page.
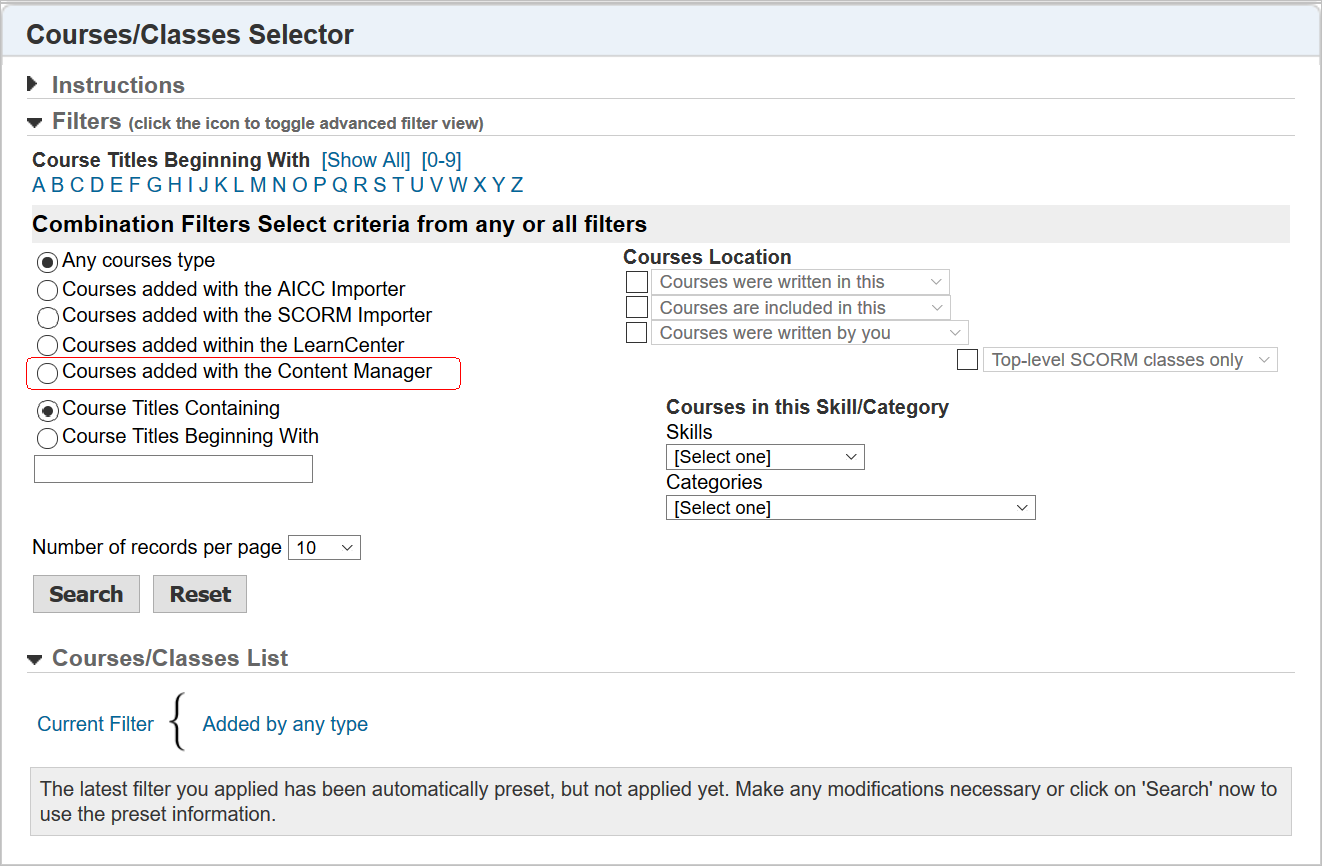
New Option on Courses/Classes Selector
Selecting this option includes only those Courses created with the Content Manager in the search results. Notice that the new Type is called MEDIA.
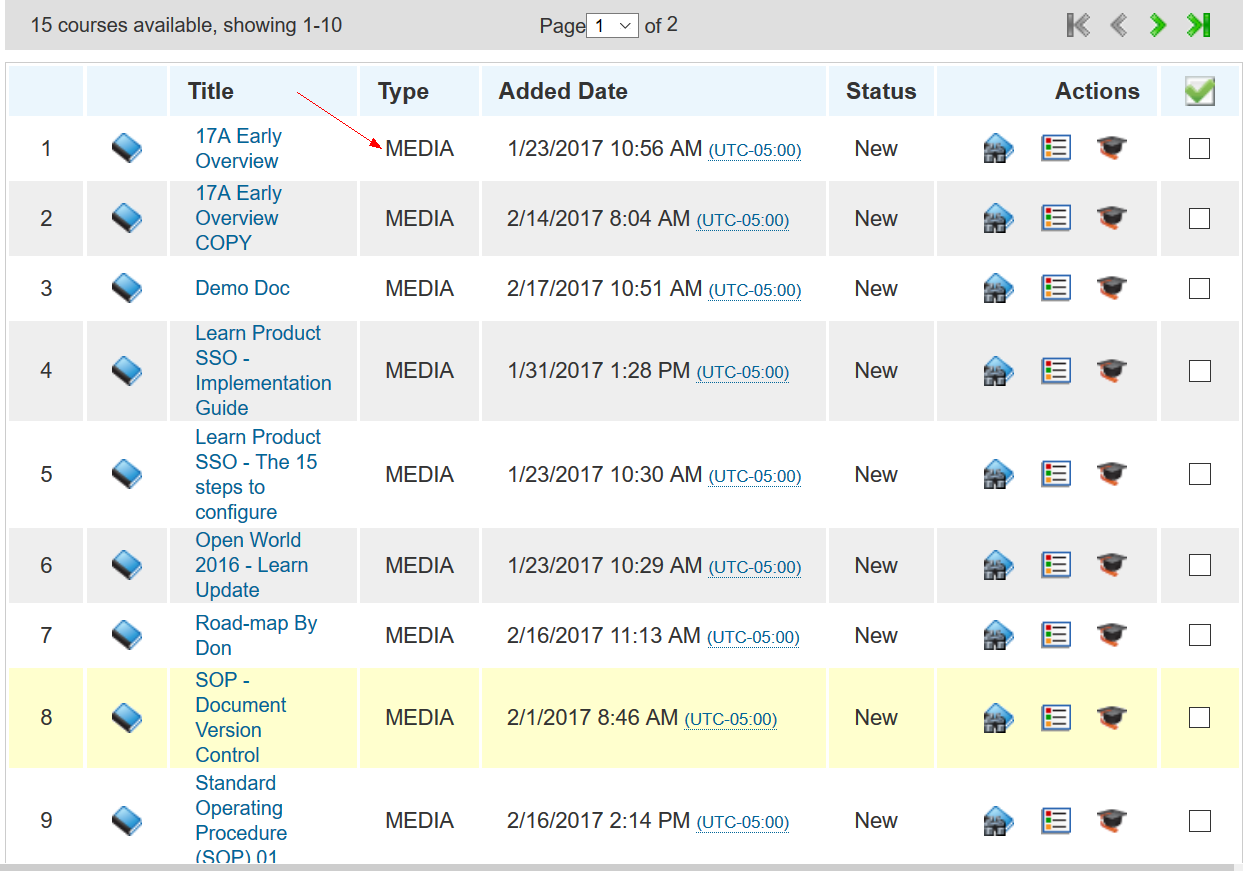
New Media Type
These new MEDIA Courses are available for selection wherever you can add a Course; however, these only work within the LearnCenter Course Player accessible via a Widget or deep linking. You can map these Courses to Learning Plans, Skills, Assignments, etc.
Placing a Course on a LearnCenter Page
You can place the new Document Content directly onto pages created using the LearnCenter Designer.
Refer to the online help topic called “Pages” (TOC > LearnCenter Designer > Pages) if you need instructions creating pages with the LearnCenter Designer.
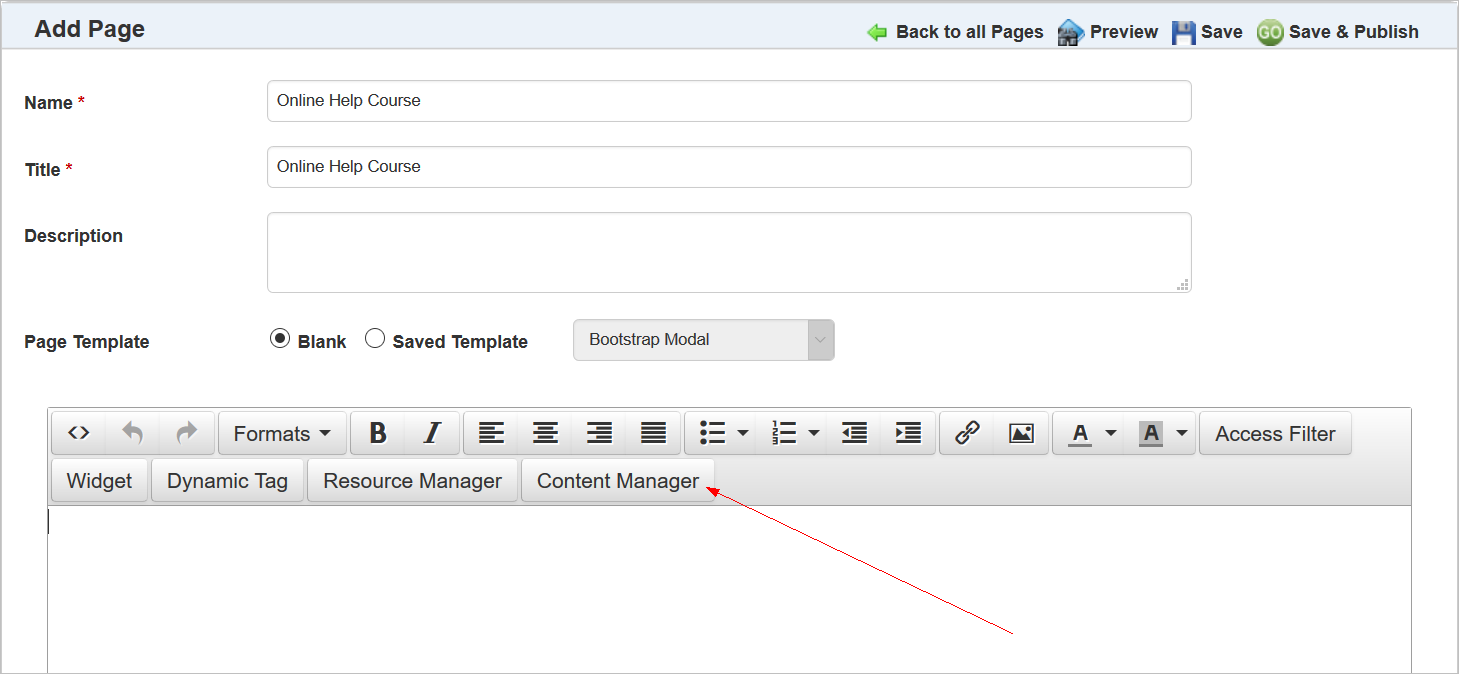
New Content Manager Dynamic Object for LearnCenter Designer Pages
There is a new Content Manager button on the WYSIWYG Editor bar. Click this button to add a Course created with the Content Manager. The Insert Content window opens.
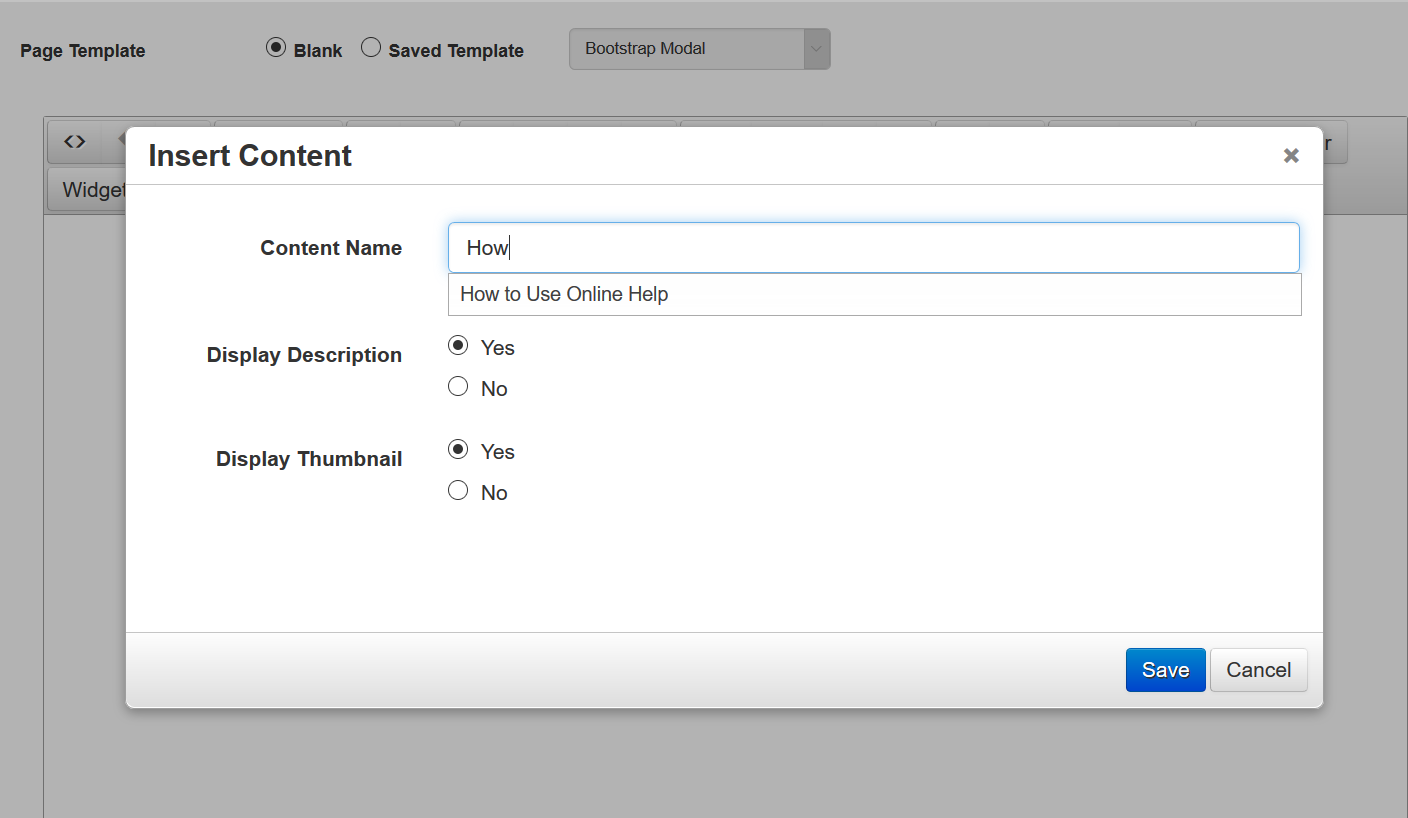
Insert Content Window
Begin typing the name of the Document in the Content Name field to display a list of Courses matching that name. Select the Document you want. Indicate whether you want to display the description of the Course by selecting Yes or No for Display Description. Indicate whether you want to display a thumbnail image of the Course by selecting Yes or No for Display Thumbnail. Click Save.
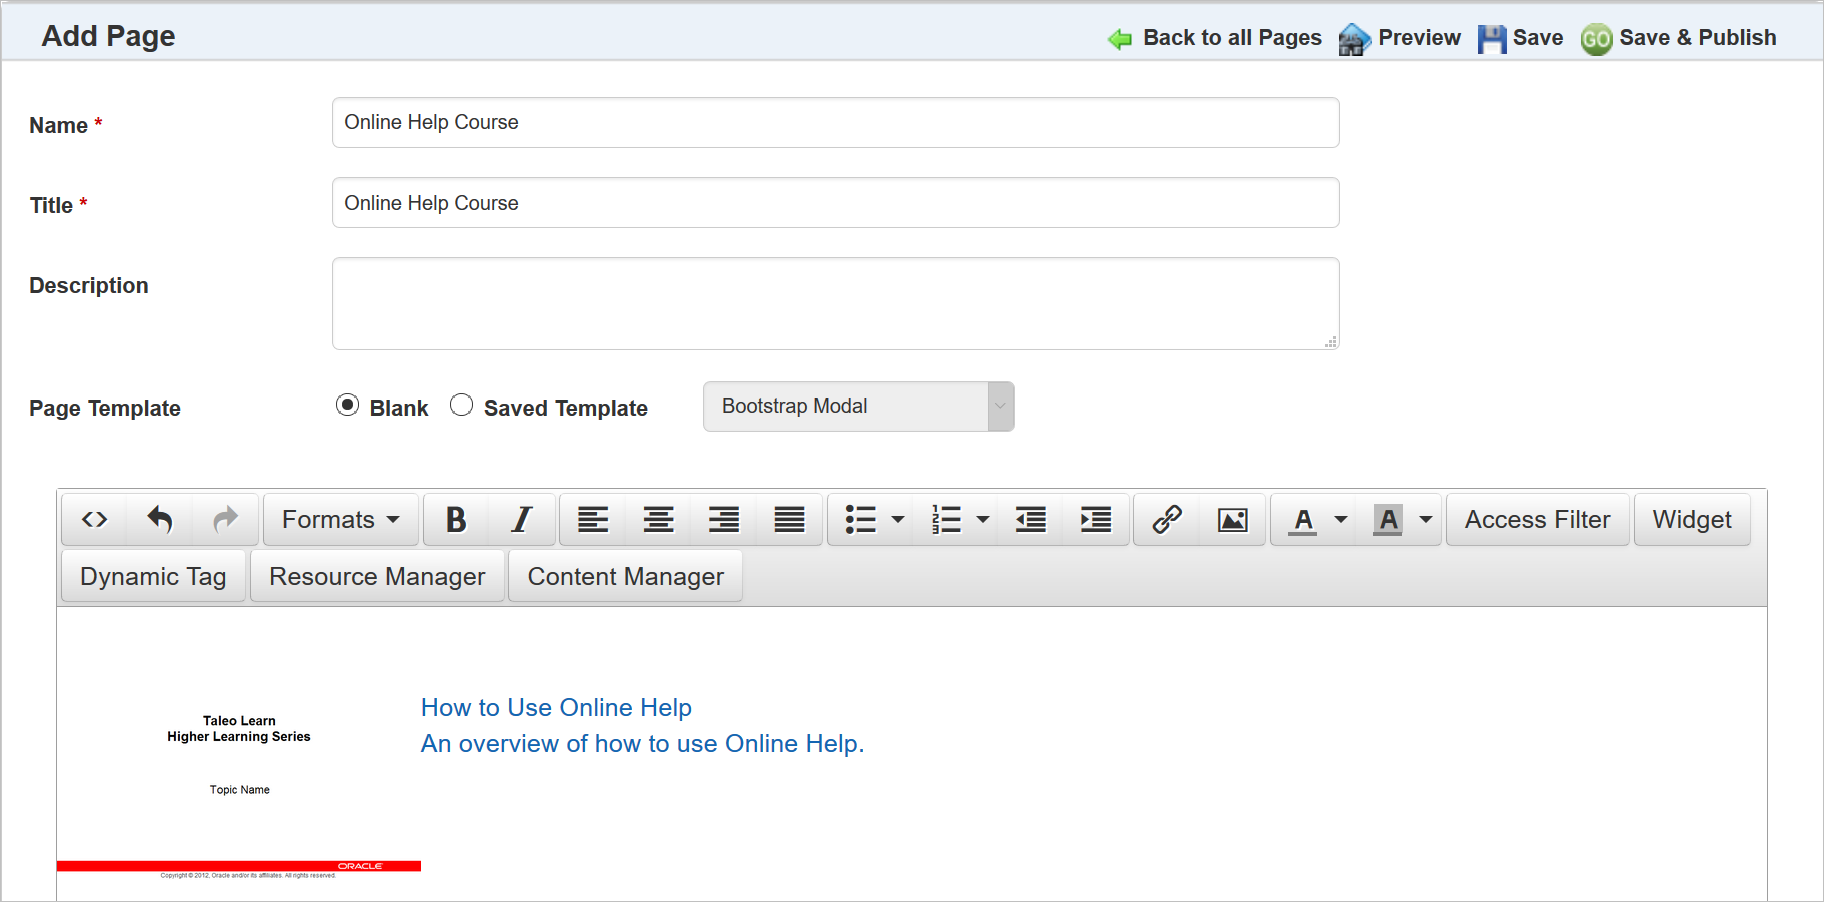
Content Added to Page
The Document is added to the page. Notice in the example above that the Title and Description both display next to the thumbnail. When you preview the page it looks similar to this.
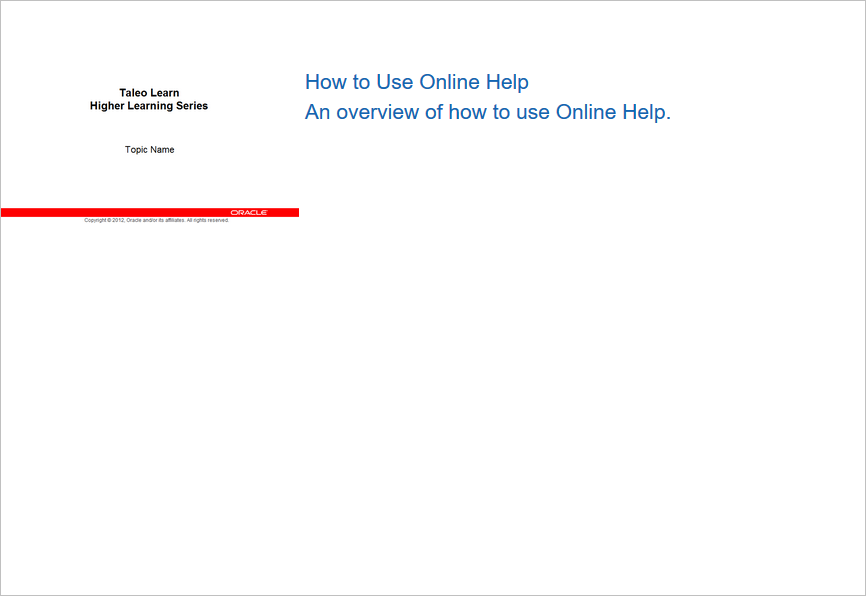
Page Content Preview
Users can click either the thumbnail or the Name and Description to open the Document.
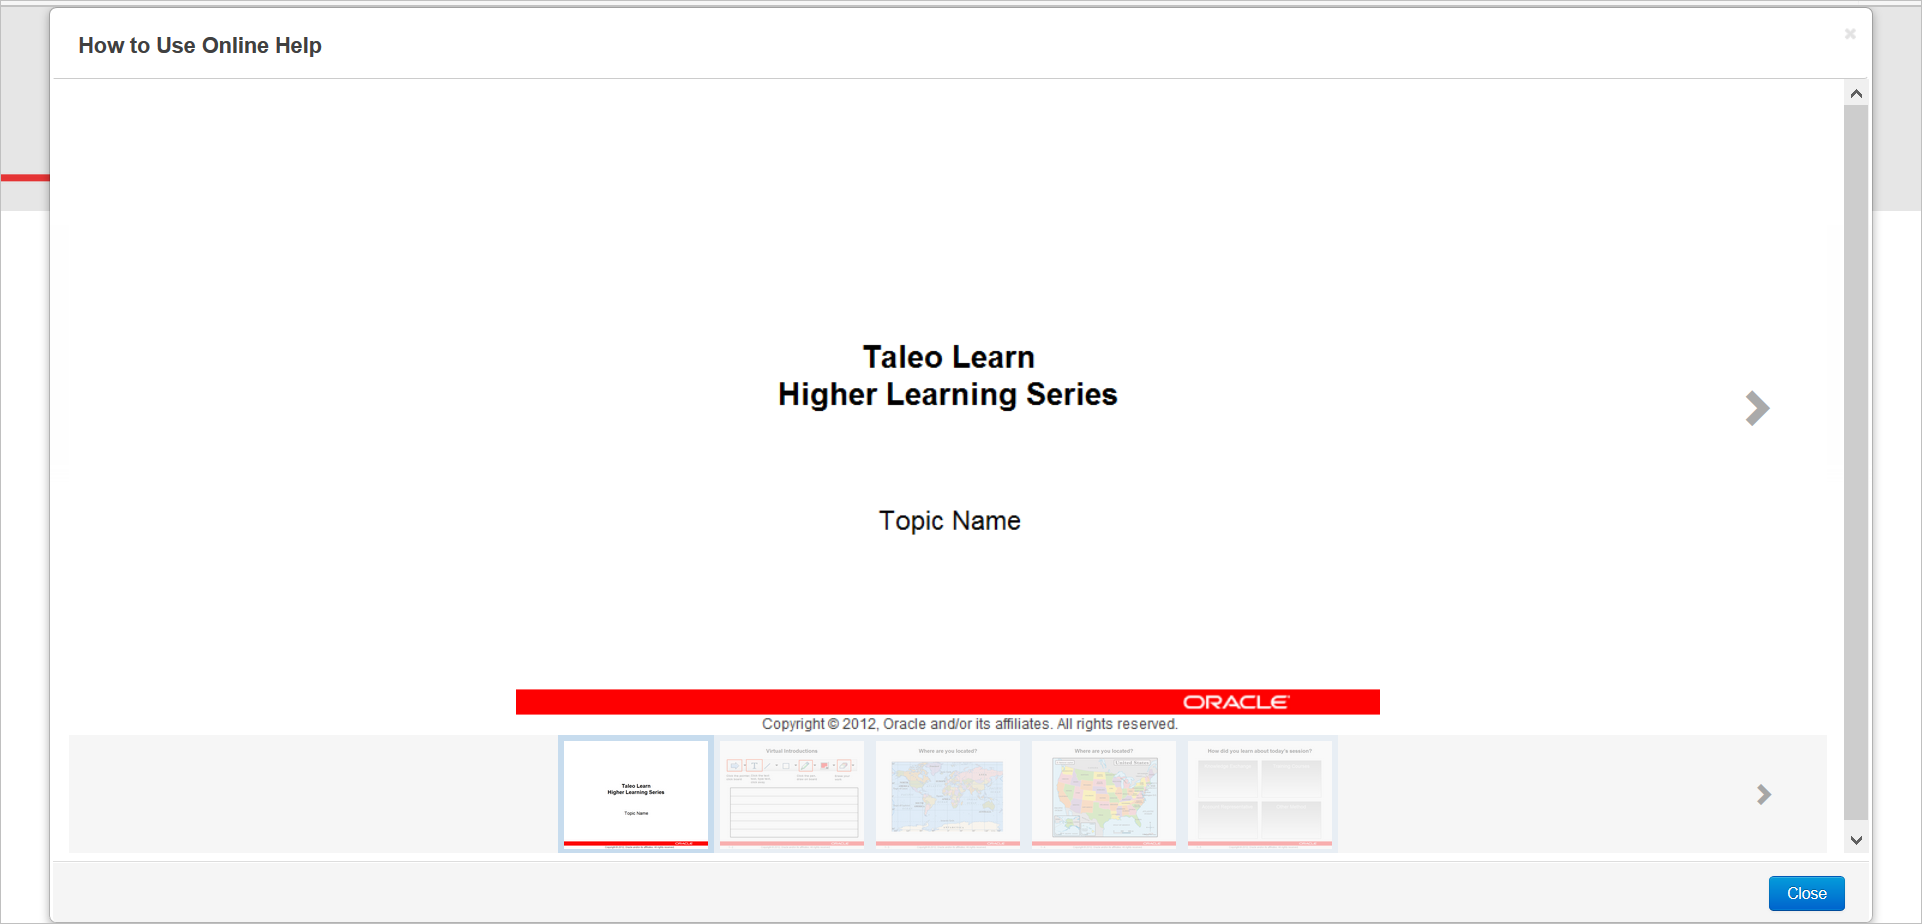
Preview with Thumbnail Carousel
Users can then use the left and right arrows or the thumbnail carousel to navigate through the document.
Once the Media Courses are mapped to learning items, Users only can access Media Courses only from Widgets or Pages created with the LearnCenter Designer.
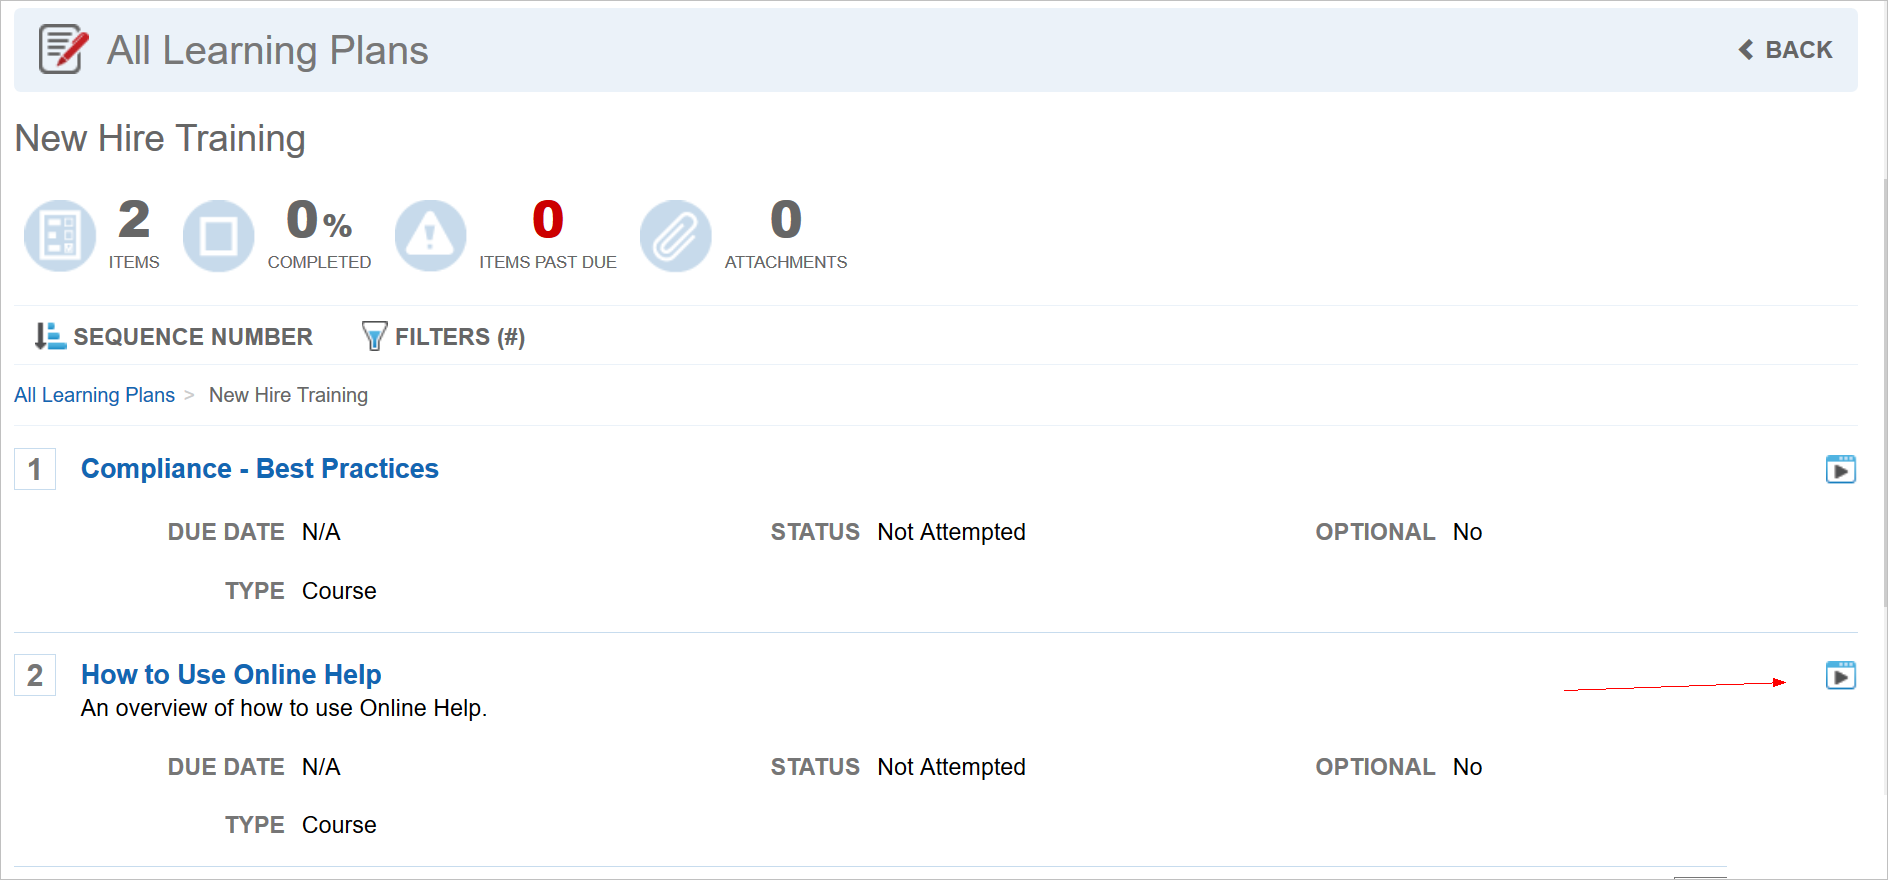
Document Courses can be Launched from Widgets
The Content Viewer launches when Users click ![]() .
.
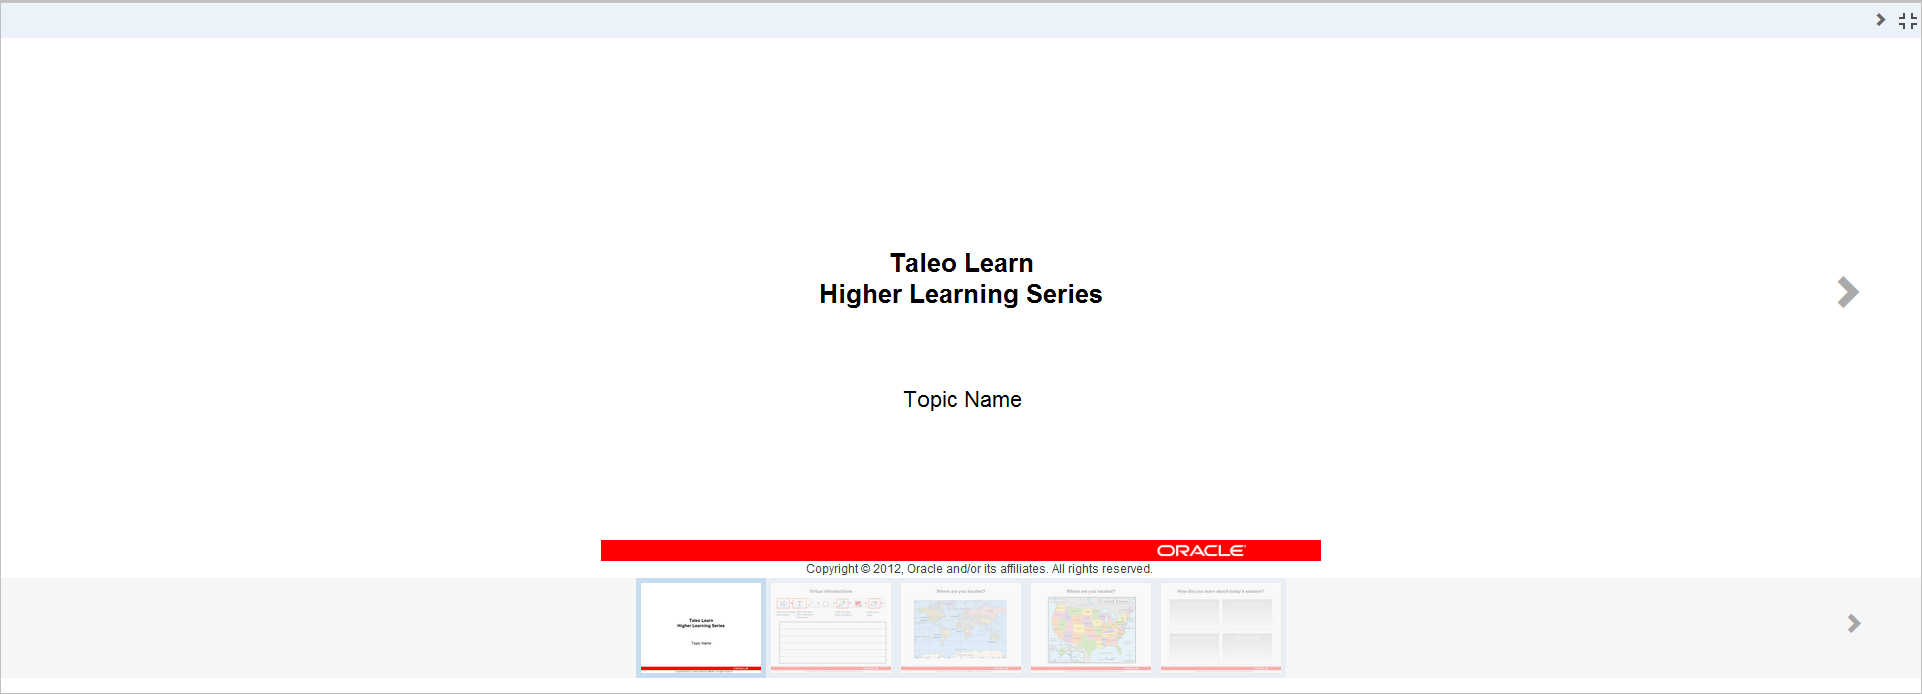
Document Course with Thumbnail Carousel
Notice that it has many of the same characteristics as the Course Player. One notable difference is that the thumbnail carousel is at the bottom of the Course. Users have the option of using it to navigate through the Course.
There are new User Permissions as a result of this feature.
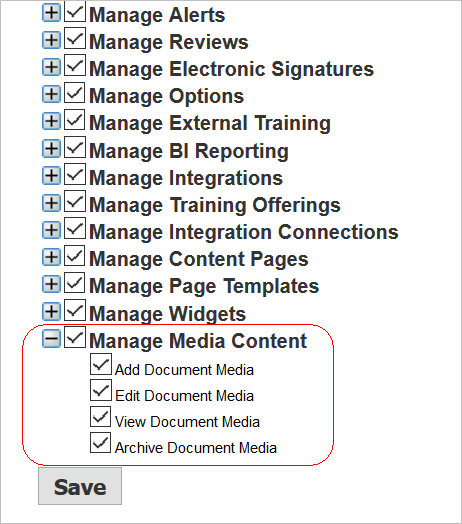
New User Permissions
You can grant the appropriate Users the ability to Add, Edit, View, or Archive document media. Upon release, only those Users with Co-Owner permissions will be automatically granted the Manage Media Content permissions. Refer to the User Permissions topic in online help (TOC > User Permissions) if you need instructions on granting User Permissions to Users.
There is a new Catalog Widget that enables you to present a catalog of learning events for Users.
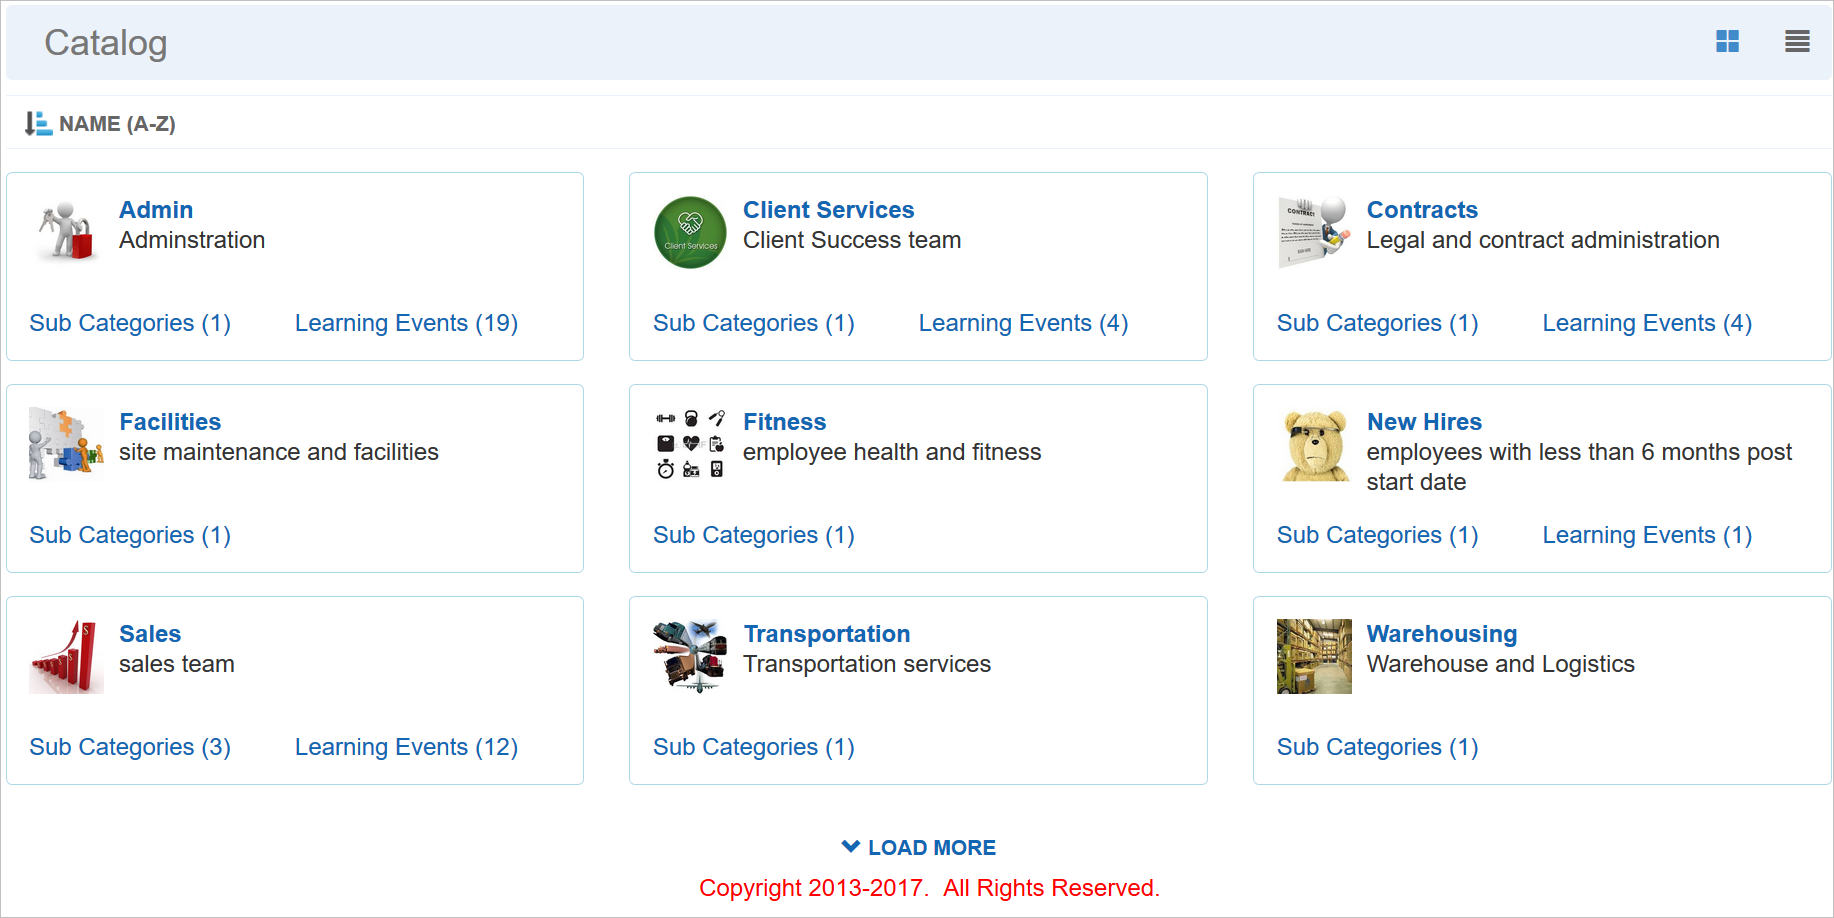
New Catalog Widget
The Catalog Widget groups training by Category. Users can search for training by root Categories, and then drill down through the sub category hierarchy to find available Learning events. Notice there are three links on each Catalog item:
- Click the Catalog name link to open the search results, and list all learning events with the catalog name as a Category, as well as any sub Categories under it, through the entire hierarchy.
- Click the Sub Categories link to display the next level of the Catalog, and list the Sub Category link for the next level, as well as learning events for the next level.
- Click the Learning Events link to open the search results page and display the learning events with the Catalog name as its Category. Learning events displays results for a single level in a Category structure.
You can create catalogs for a single type of learning event or a combination of event types. You do this during the Widget setup by choosing a Search Widget that is already set up to search for only these learning event types. (See Setting Up a New Category Widget below for details.) Learning event types available for cataloging include:
- Learning Plans
- Classes
- Courses
- Enrollments
- External Training
- ILT Sessions
- Training Offerings
- User’s Names
As with other Widgets, The Catalog Widget can display the Catalog in either Card View or List View. You can also sort by Name, or use Filters.

Name Sort, Filters, Card View and List View Icons
When Users click the Learning Events link, or drill down to learning events in sub Categories, a Search Results page displays the available learning events, along with facets on the left side of the page to refine the results.
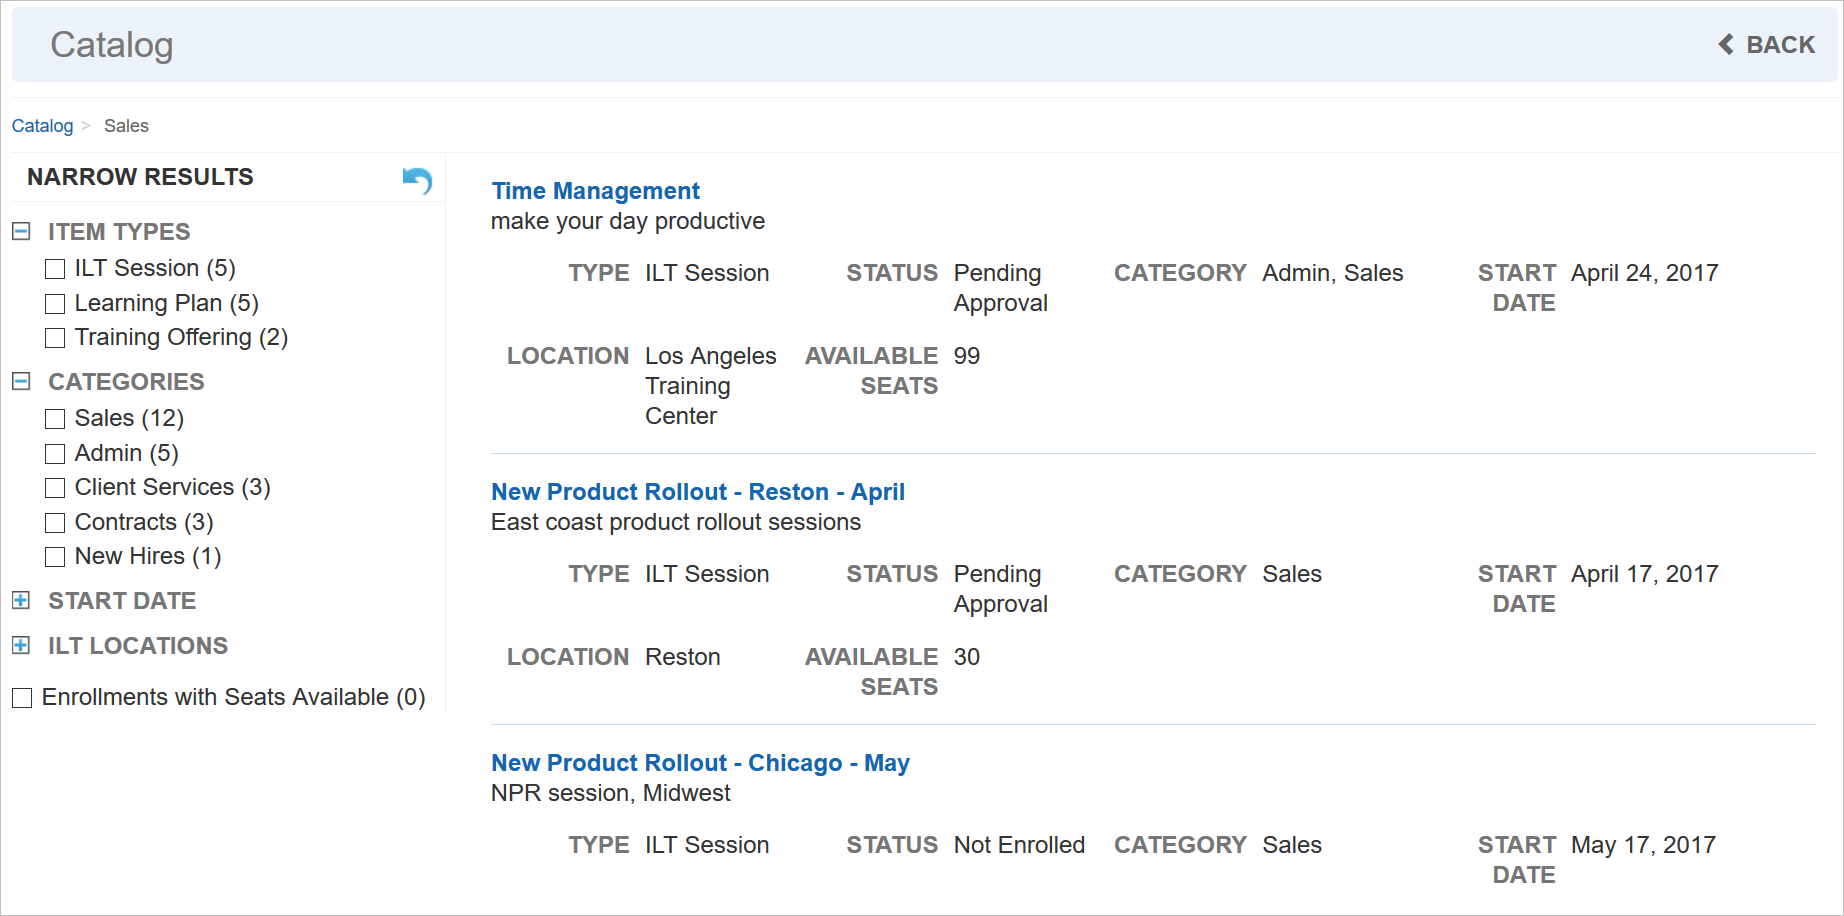
Catalog Search Results
New Ability to Add an Image to a Category
In the Catalog Widget in the illustration above, notice that an image displays for each Catalog. You can now add images to Categories so that they are available if you use the Catalog Widget. You can also set up a default image for all Categories.
To set the default image, do the following. On the Categories Control Panel menu, select Categories. In the Filters section, notice a new Add Default Image button.
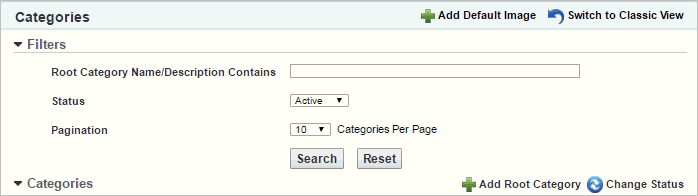
New Add Default Image Icon
Click Add Default Image to open an Upload window.
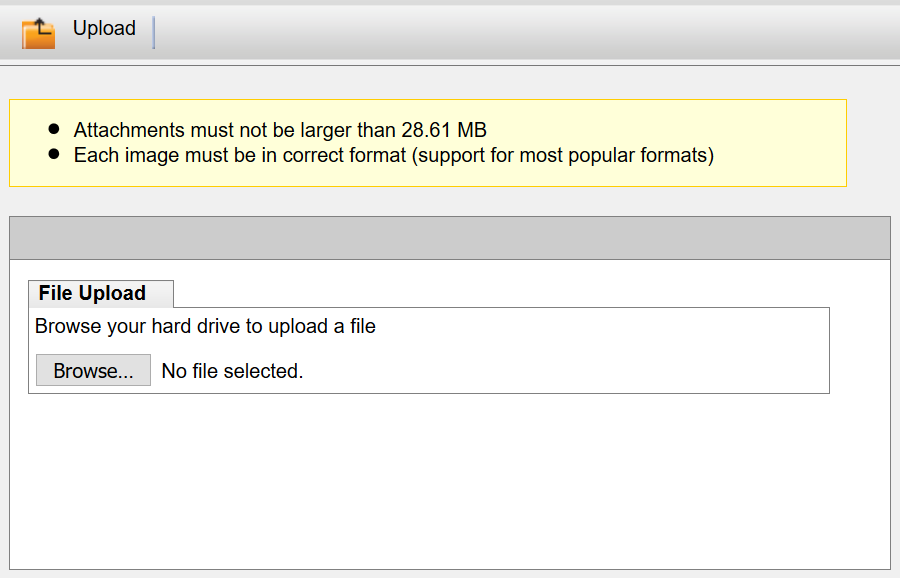
Upload Window
Browse to the location of the image you want to use, select it, and then click Open. Click Upload to upload the image.
To add an image to individual Categories, do the following. On the Categories page, click ![]() to open the Category Properties page. Click Edit Details.
to open the Category Properties page. Click Edit Details.
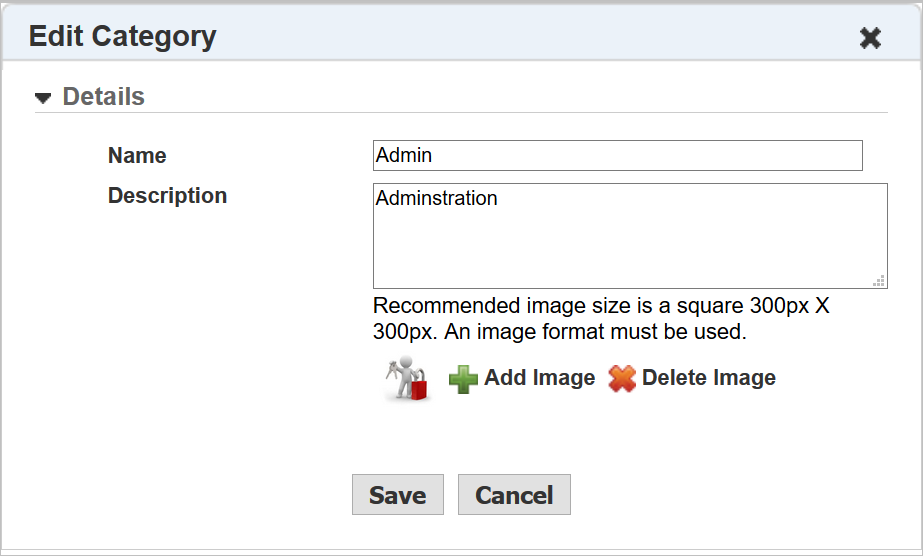
Edit Category
Click Add Image.
Upload Window
Browse to the location of the image you want to use, select it, and then click Open. Click Upload to upload the image.
These images will now display for the Categories on the Catalog Widget.
Setting Up a New Category Widget
You can add a new Catalog Widget from the Widgets page. Click Add Widget, select Catalog from the Select Widget Type drop-down list, and then click Add.
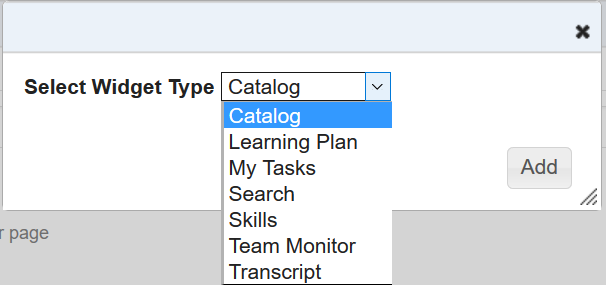
New Catalog Widget Type
The Add Widget page opens.
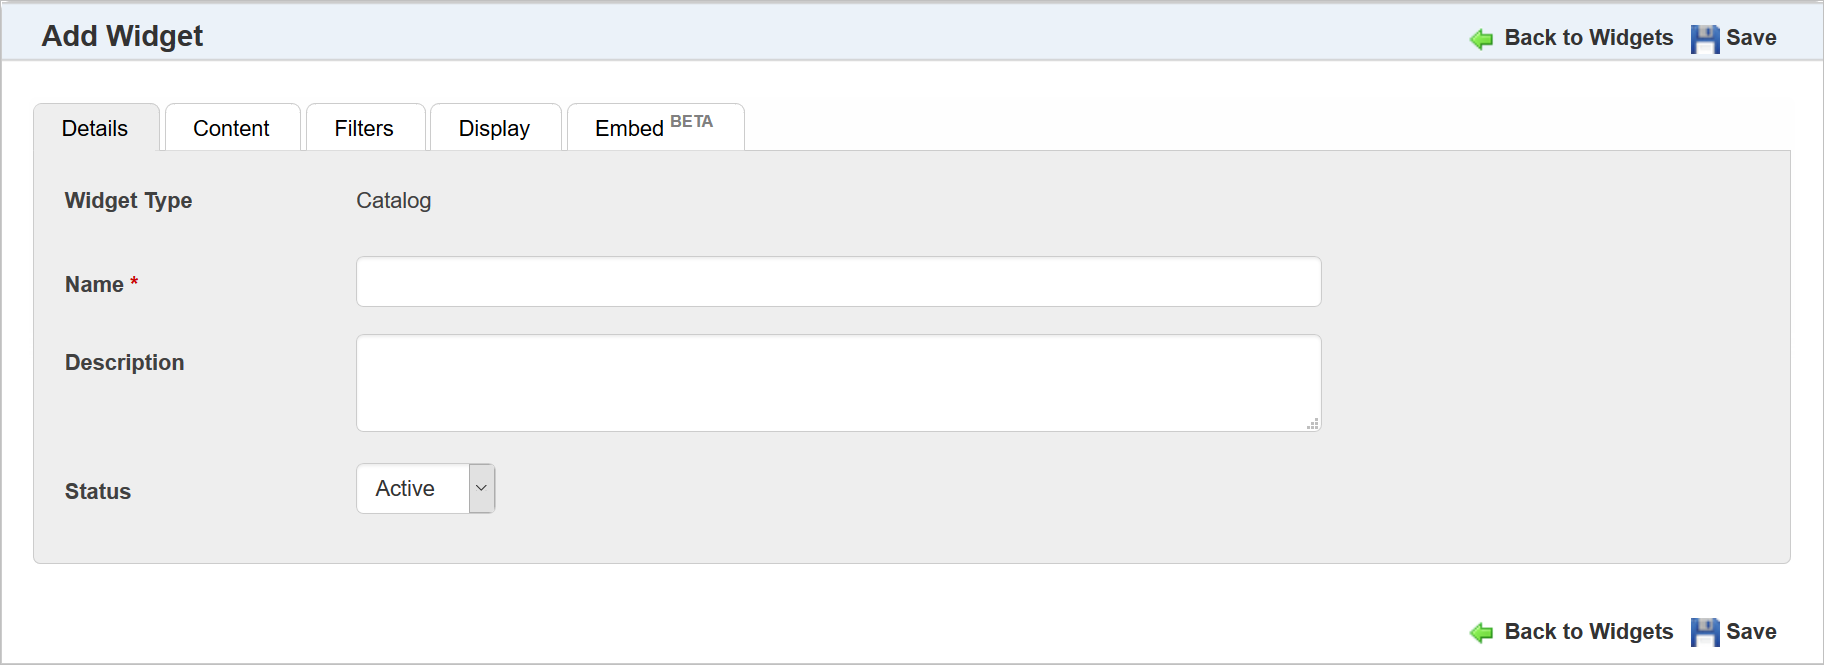
Add Catalog Widget – Details Tab
Use the Details tab to give the Widget a Name and Description. Select the appropriate Status. Select the Content tab.
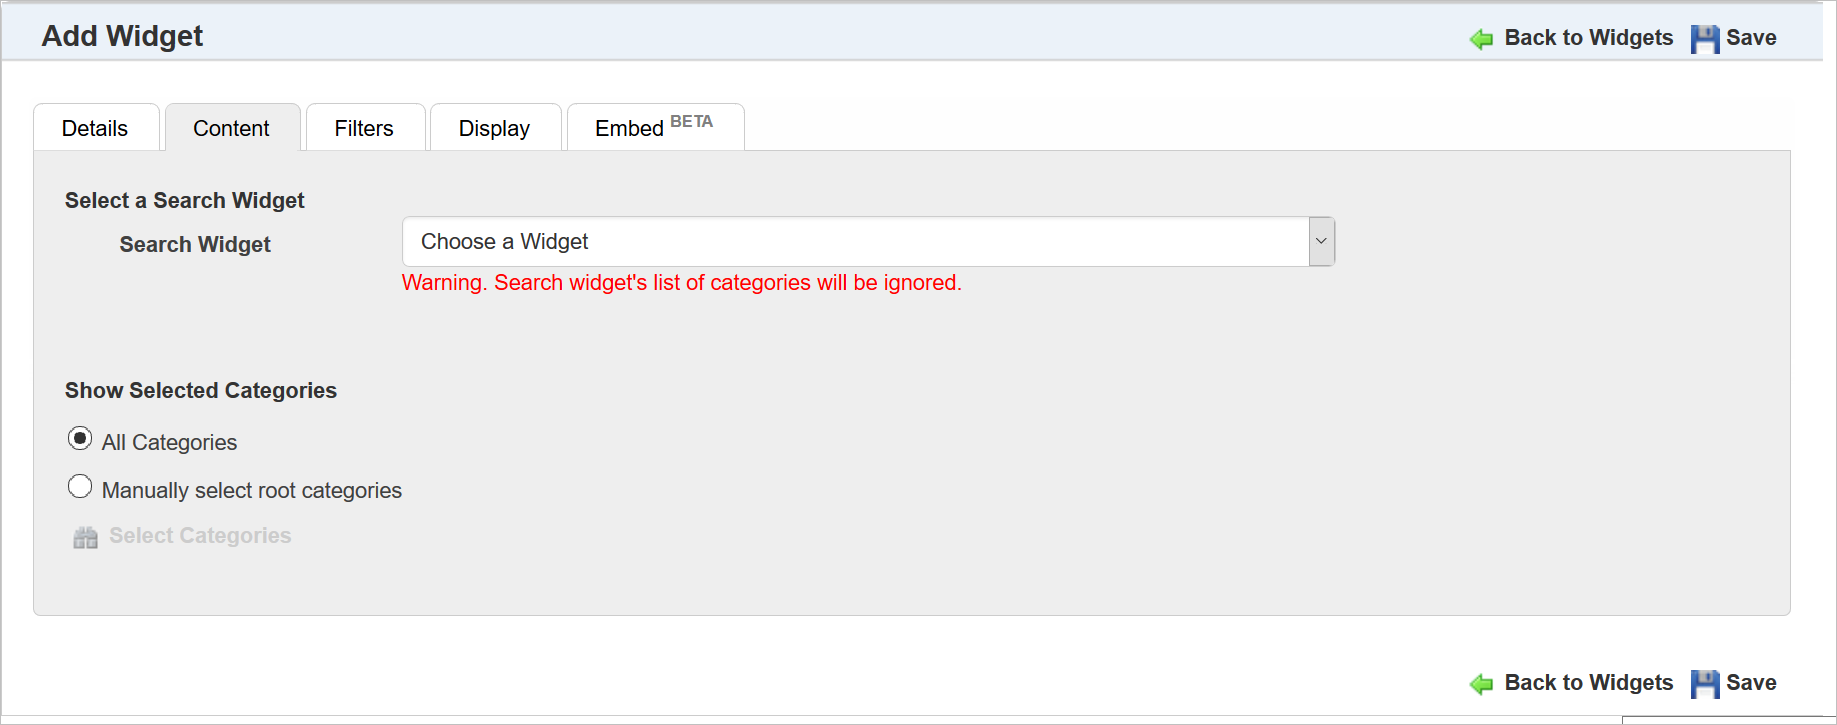
Add Catalog Widget – Content Tab
Select a Search Widget from the drop-down list. These are Search Widgets you have already created.
Refer to online help if you need assistance creating a Search Widget (TOC > LearnCenter Designer > Widgets > Adding a Custom Search Widget).
NOTE: The warning message stating that the Search Widget’s list of Categories will be ignored. This is because you will be determining which Categories you want to use for the Catalog Widget.
For Show Selected Categories, select either All Categories, which will use all Categories in the LearnCenter, or Manually select root categories. If you select Manually select root categories, additional fields display to enable you to search for and select the Categories you want to include.
NOTE: You can only select root Categories here. Users will be able to drill down to look through sub Categories on the Widget.
Select the Filters tab.
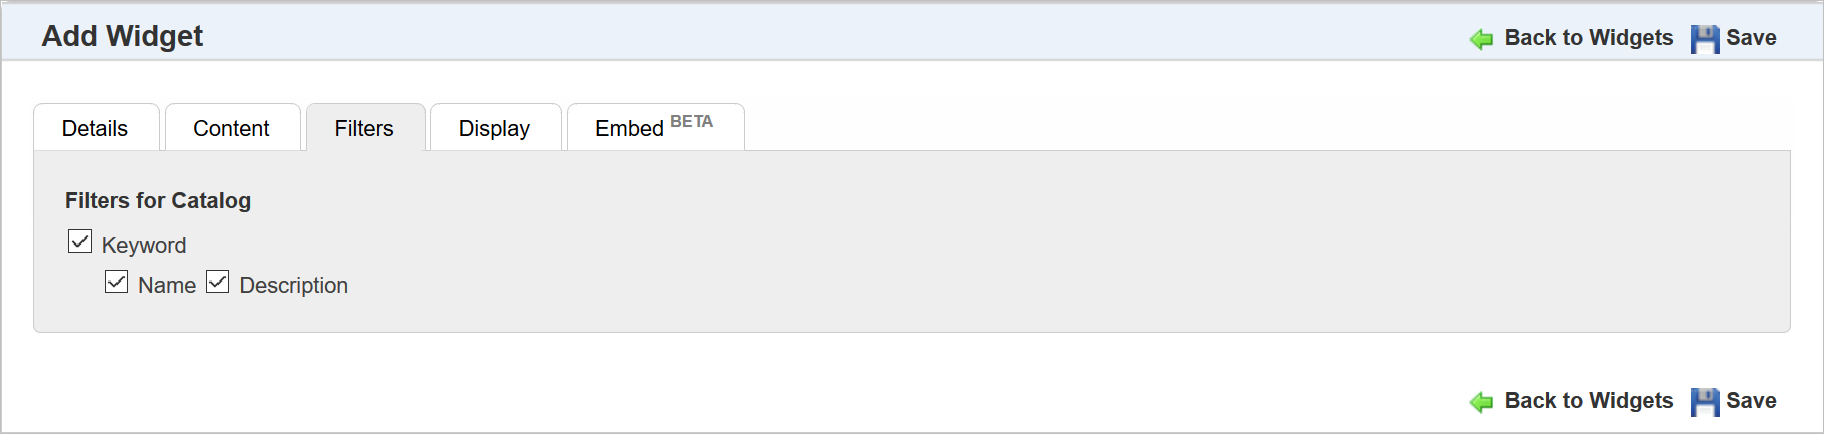
Add Catalog Widget – Filters Tab
Indicate which Filters will display to Users on the Widget by selecting the appropriate check boxes. At a minimum, you must select Keyword. Clearing this check box makes Name and Description unavailable for selection, and no filters will display on the Widget.
Click the Display tab.
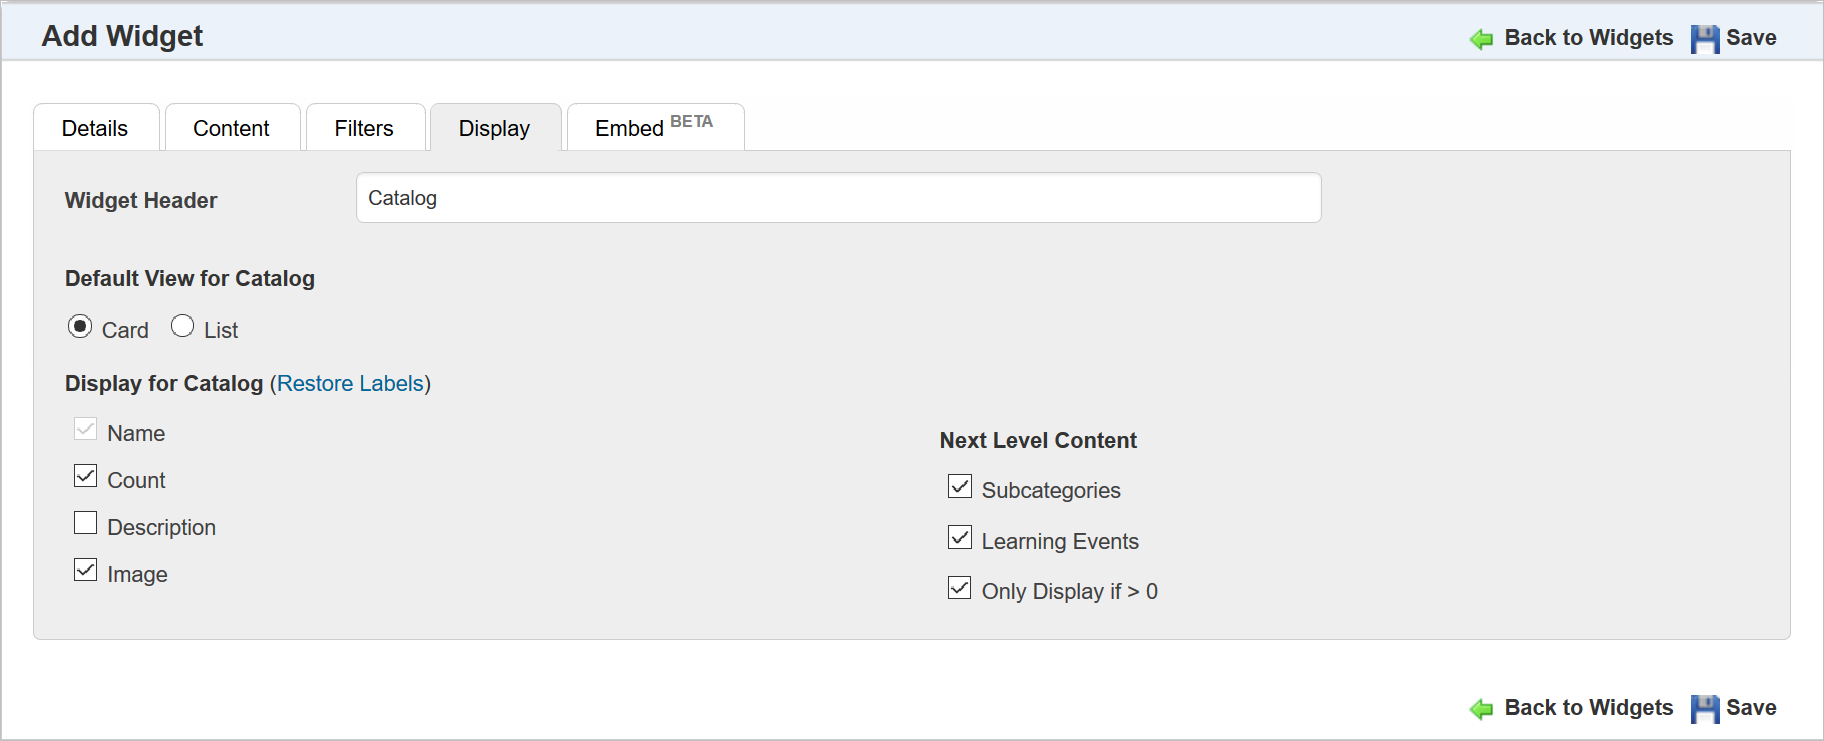
Add Catalog Widget – Display Tab
Use the Display tab to indicate what elements will display to Users on the Widget. Type a new name for the Widget Header or use the default “Catalog” text. Indicate whether the default view will be Card view or List view.
Use the check boxes under Display for Catalog to indicate which items you want to display on the Catalog. By default, the Name must display. You can select or clear the following check boxes:
- Count – this field is for future use.
- Description – to include the description of the catalog item.
- Image – to include an image for the Card or List view. These are the images you can now include in Category properties. (See New Ability to Add an Image to a Category above for details.) If a Category does not have an image, the default Category image is used for that Category in the Widget. If there neither a default image nor Category image, an empty box is displayed in place of the image.
- Subcategories – to include the Sub Categories link so that Users can drill down through the sub Categories to find Learning Events.
- Learning Events – to include the Learning Events link so that Users can view the available Learning Events for the Category.
- Only Display if > 0 – If this is selected, the Sub Categories link and the Learning Events link are only displayed on the Widget if a count exists for either. If a value is zero, there is nothing for Users to open, so you may not want to display a link. As a best practice, you may want to clear this field so that the end result on the Catalog has a cleaner display.
As with previous Widgets, you can customize the field labels (a pencil icon displays when you mouse over the item, indicating that it is editable). Click the ![]() icon to open an editable field and type the text you want to display for the field. You can restore labels to their default settings by clicking Restore Labels.
icon to open an editable field and type the text you want to display for the field. You can restore labels to their default settings by clicking Restore Labels.
The Embed tab is also available. This Embed tab enables you to embed supported Widgets on external SSO-enabled websites by placing a snippet of code on the hosting page. See the online help topic called “Widget Portability - Beta” (TOC > LearnCenter Designer > Widgets > Widget Portability – BETA) for detailed information.
There is a new option for Enrollments that enables you to automatically drop enrolled Users if their username is updated to a status of Removed. This means if a User leaves your organization and you change their LearnCenter status to Removed, they will be automatically dropped from all open Enrollments to which they are mapped. They will not be dropped from closed Enrollments.
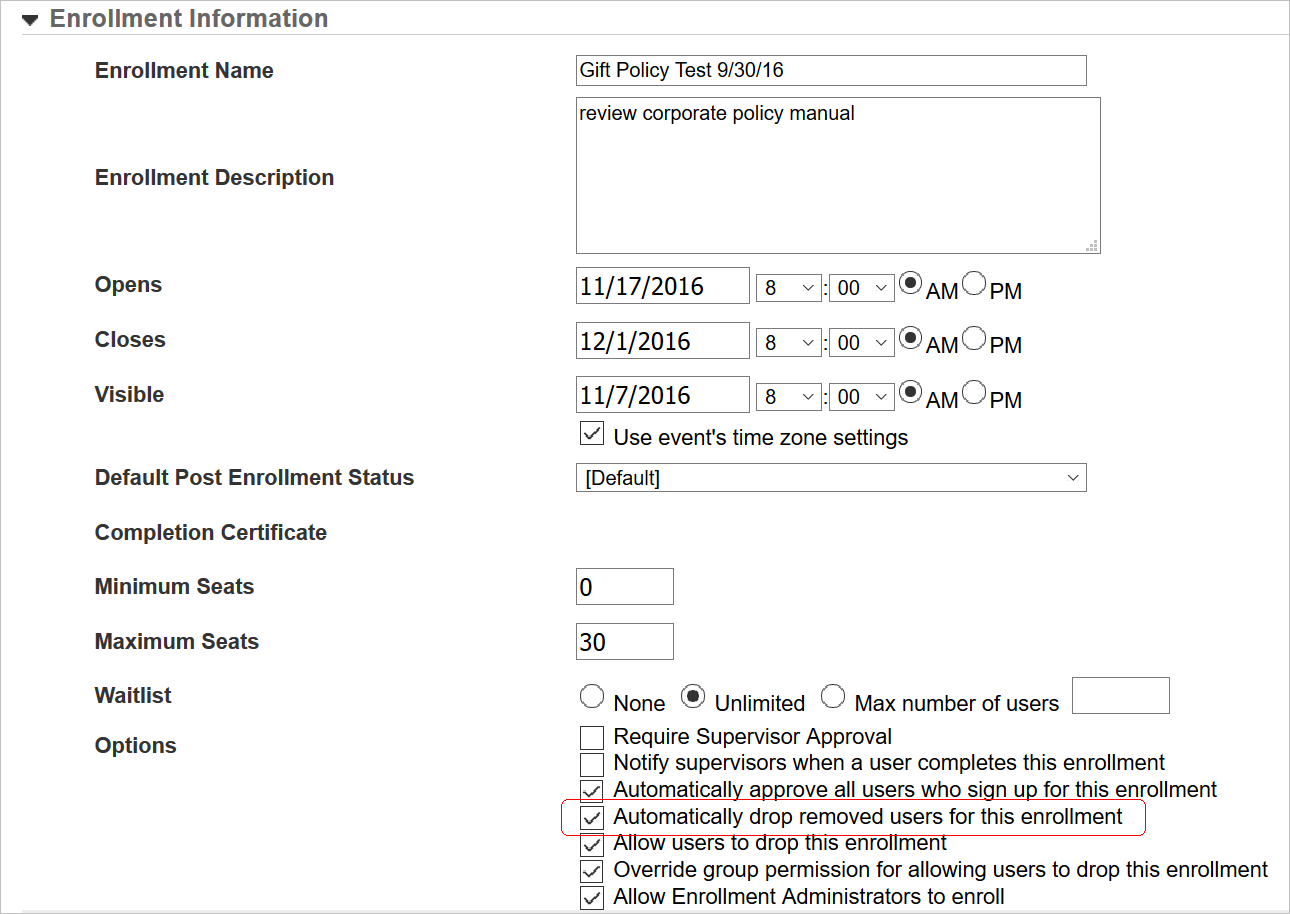
New Option for Enrollments
Select the check box to indicate that you want Removed Users to be automatically dropped. Clear the check box if you want Removed Users to remain enrolled.
By default, this check box will be cleared for all Enrollments. If you would like the check box to be selected by default, contact Customer Support through My Oracle Support for assistance. Please note that even if you opt to have this check box selected by default, it will only affect new Enrollments going forward. Previously created Enrollments will retain their original values.
If the removal of a Dropped User opens a space for a Waitlist member, the priority waitlist User will be enrolled and the waitlist updated. There is a background update, which occurs once every 24 hours at 1:30 CET, that drops Removed status usernames from open Enrollments.
Refer to online help if you need further instructions on Enrollments (TOC > Enrollments)
Important Change to Bulk Loader Template
As a result of this enhancement, a new column for the new Automatically drop removed users for this enrollment field has been added for the Enrollments Data Bulk Loader template. The addition of this column changes the columns count for the Enrollment Data Bulk Loader file. You will need to update your source file template to include the new field and renumber the remaining fields, or download a new template from LearnCenter.
IMPORTANT: Previously created Enrollments Data Bulk Loader files that do not contain this field will not work properly after the 17A release. If you have scheduled Bulk Loader data loads, you will need to make adjustments to your template once Learn 17A has been released for general availability (GA).
The new field information is as follows:
Options – Automatically drop removed users for this enrollment
| Text Editor |
Column |
Required |
Notes |
| 23 |
W |
No |
|
| Accepted Values |
Yes = Sets the Enrollment to automatically drop Removed Users for this Enrollment No = Sets the Enrollment to prevent Removed Users from being automatically dropped from the Enrollment Blank Column = Uses the default setting for this field. |
||
| Example: Yes Example: No |
|||
After adding this field to your template, you must renumber the remaining fields in your template accordingly. For example, Options - Allow users to drop this enrollment is now row 24, Column X, Options - Override group permission for allowing users to drop this enrollment is now row 25, Column Y, etc.
Refer to online help for complete instructions on using Bulk Loader (TOC > Integrations > Bulk Loader).
Team Monitor Widget – Management Reports
There is a new Reports tab on the Team Monitor Widget setup. This tab enables you to expose some BI Reporting reports to Supervisors and Managers via the Team Monitor Widget.
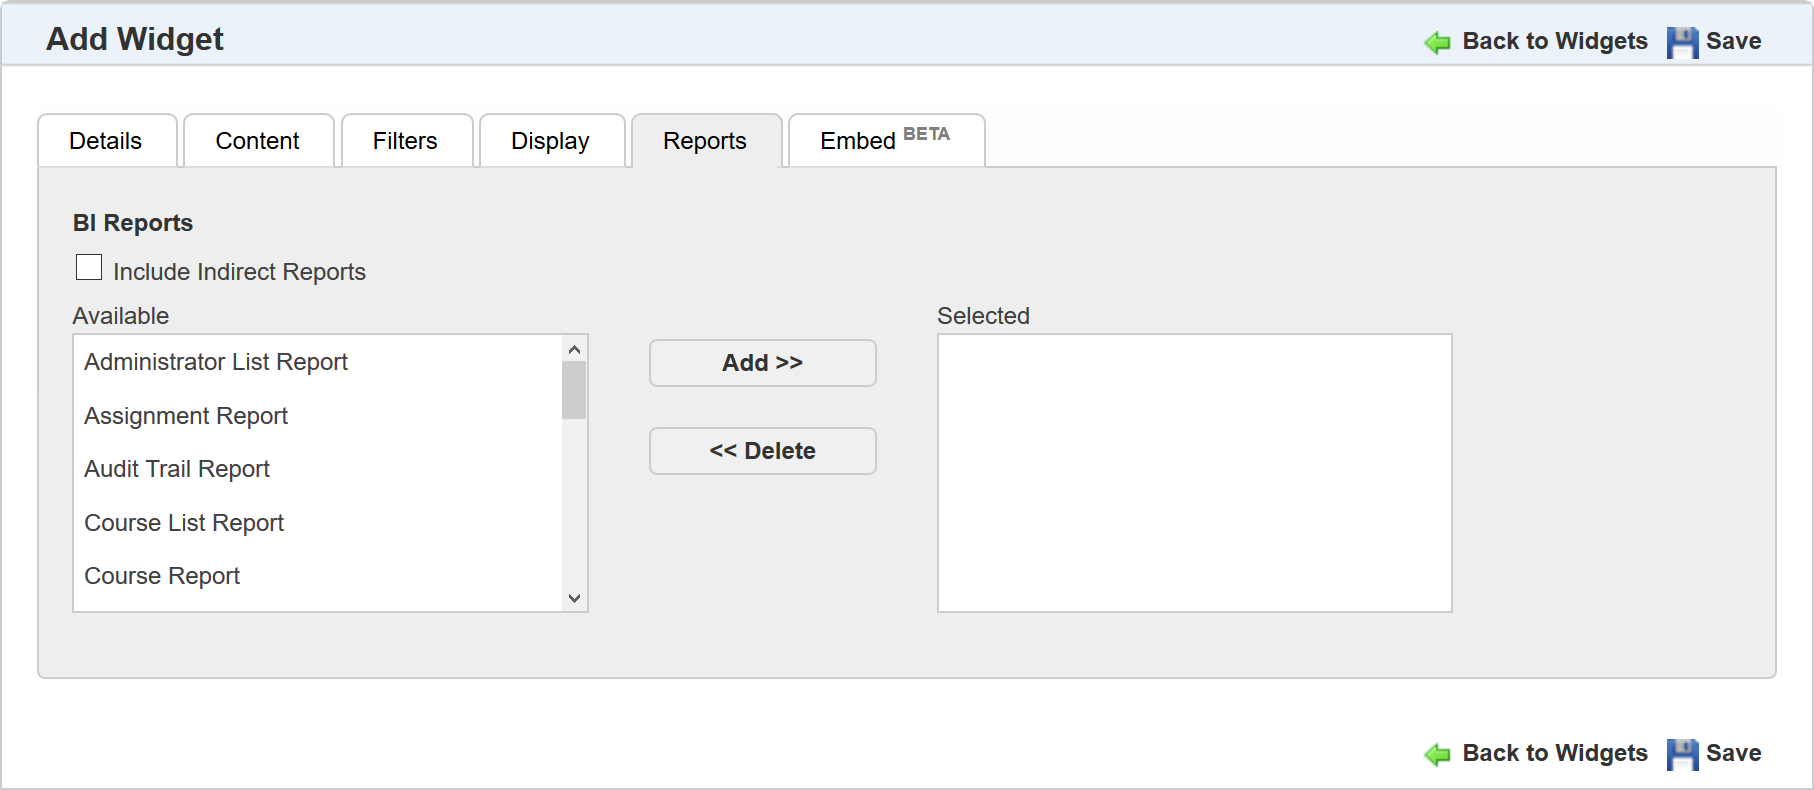
New Reports Tab
Reports available include:
- Administrator List Report
- Assignment Report
- Audit Trail Report
- Course List Report
- Course Report
- Course Summary Report
- Electronic Signature Completion Report
- Enrollment Report
- External Training Report
- Instance Report
- Job Profile Report
- Oracle Learning Plan Progress
- Oracle Learning Plan Status
- Oracle Skill Progress Report
- Oracle Skill Summary Report
- User Login Report
- User Report
Select the reports you want to expose and click Add >>. They are moved to the Selected box. To remove reports, select them and then click << Delete. Select the Include Indirect Reports check box if you want BI Reporting to include Users who are indirect reports of a Supervisor or Manager in the report results. Click Save to save your changes.
On the Team Monitor Widget, there is a new reports icon.
New Reports Icon
Supervisors can click the icon to open the BI Reporting window.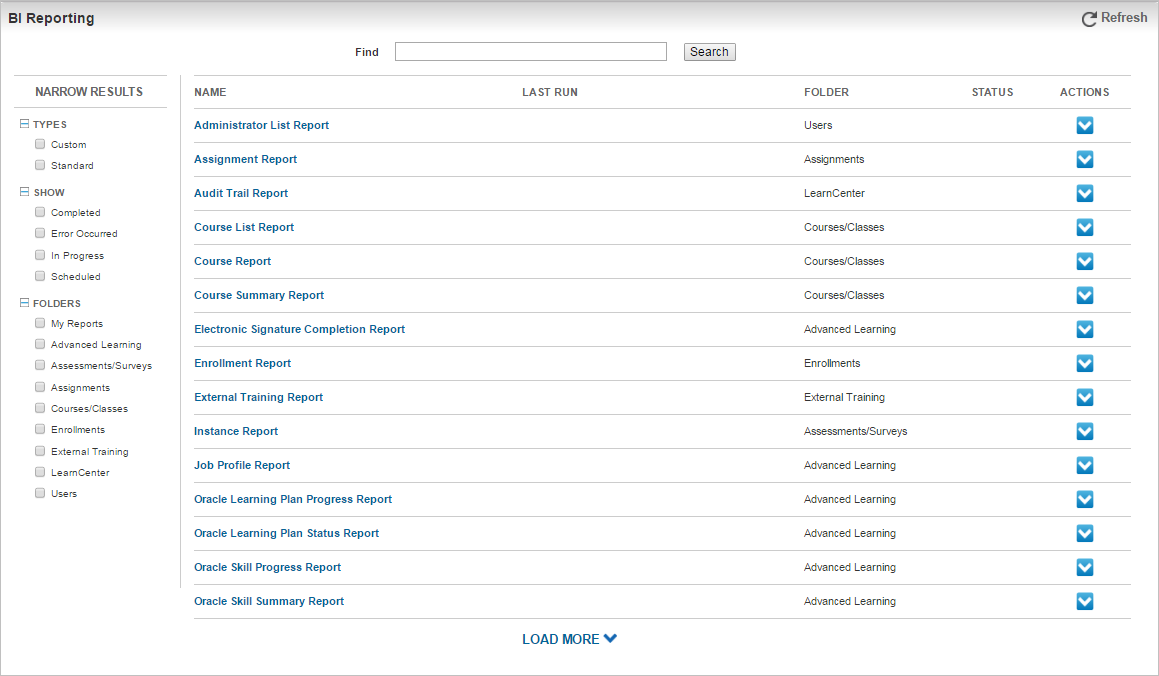
BI Reporting Window
The Reports Window that displays is similar to the BI Reporting Dynamic Object. It opens in a new tab in the browser. To close it, simply close the browser tab.
Refer to online help if you need additional information about the Team Monitor Widget (TOC > LearnCenter Designer > Widgets > Adding a Custom Team Monitor Widget).
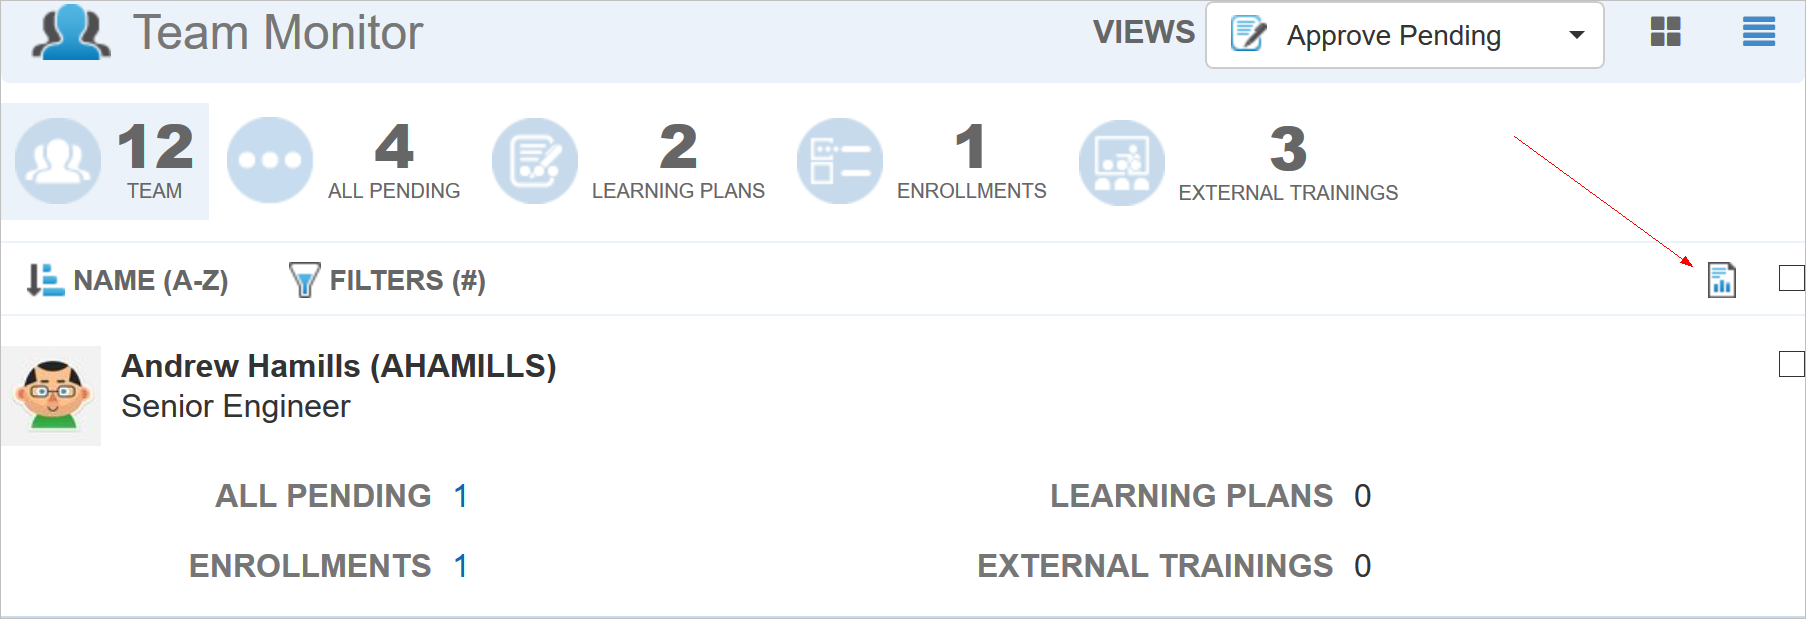
New Approval View for the Team Monitor Widget
There is a new Approval View option available for selection on the Team Monitor Widget.
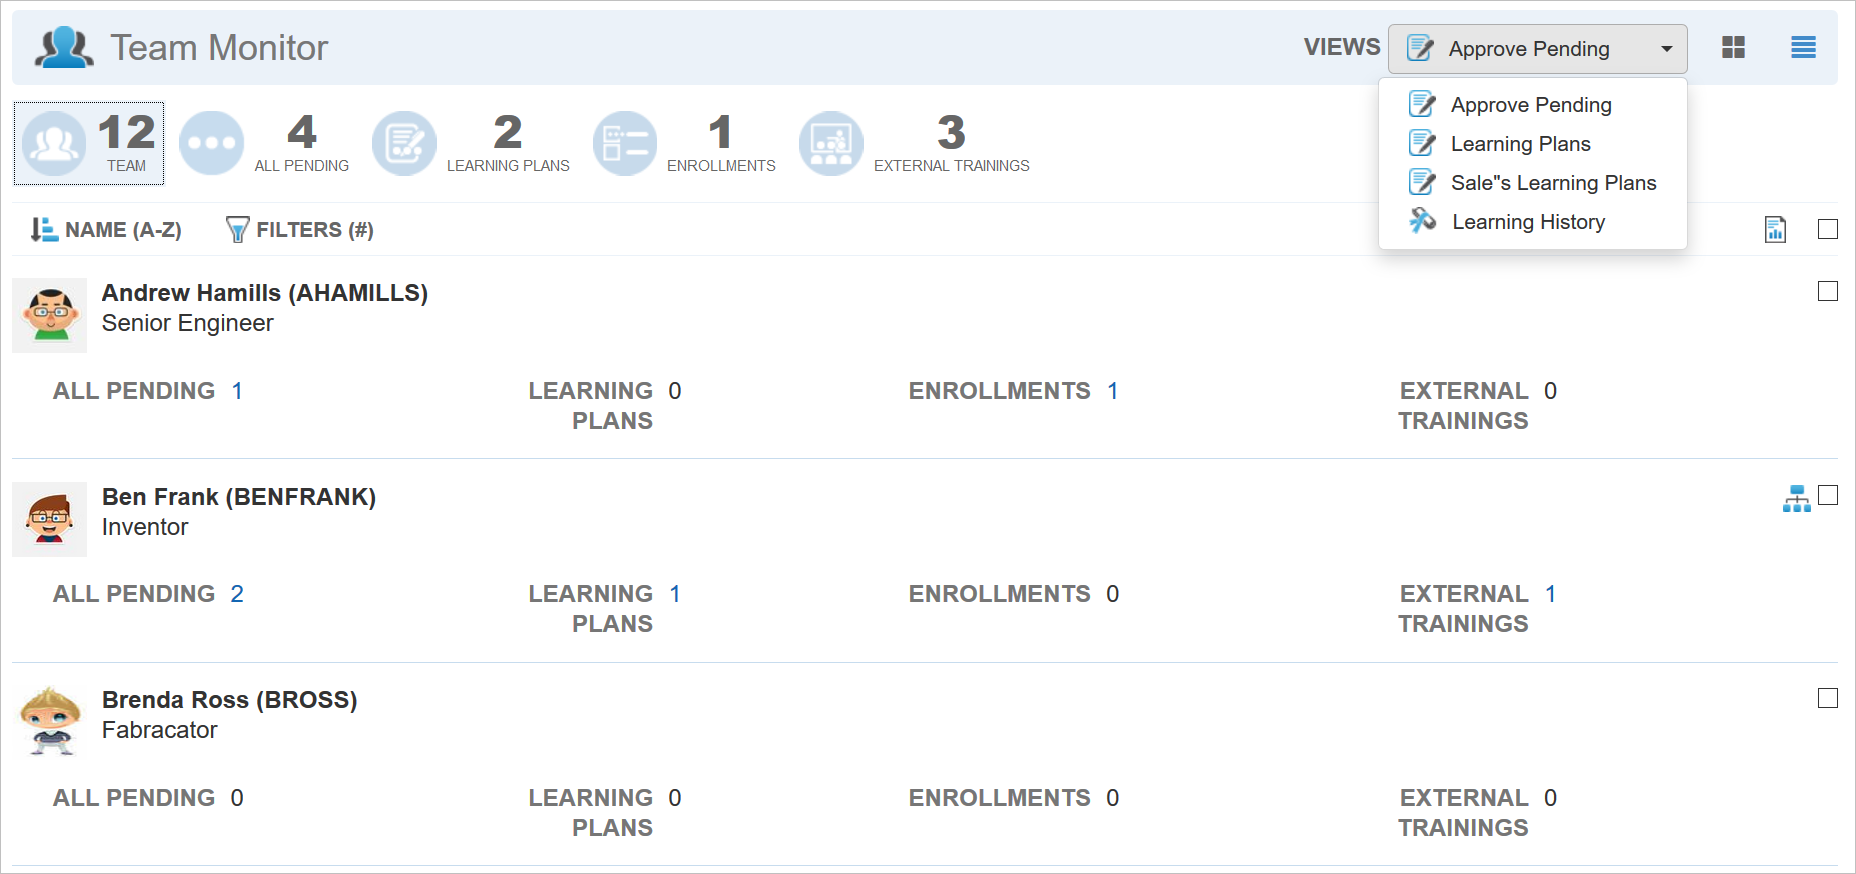
New Approval View
This view provides Supervisors and Managers with a list of Team Members who have pending Learning Plans, Enrollments, and External Training events. Notice that there is now a new Approve Pending view from the Views drop-down list. (This is available if you select this view during Widget setup. The actual name you defined for this view will display here.) Dashboard metrics display the number of team members with pending events and serve as quick filters. In the example above, there are 12 team members, and 4 of them have pending events waiting to be approved (All Pending). Two team members have Learning Plans pending, 1 has an Enrollment pending, and 3 have External Training events pending. The other quick filters are for a single type of learning event only. Click any of these to display a summary list. Supervisors and Managers can drill down to detail pages by clicking the count links for each User.
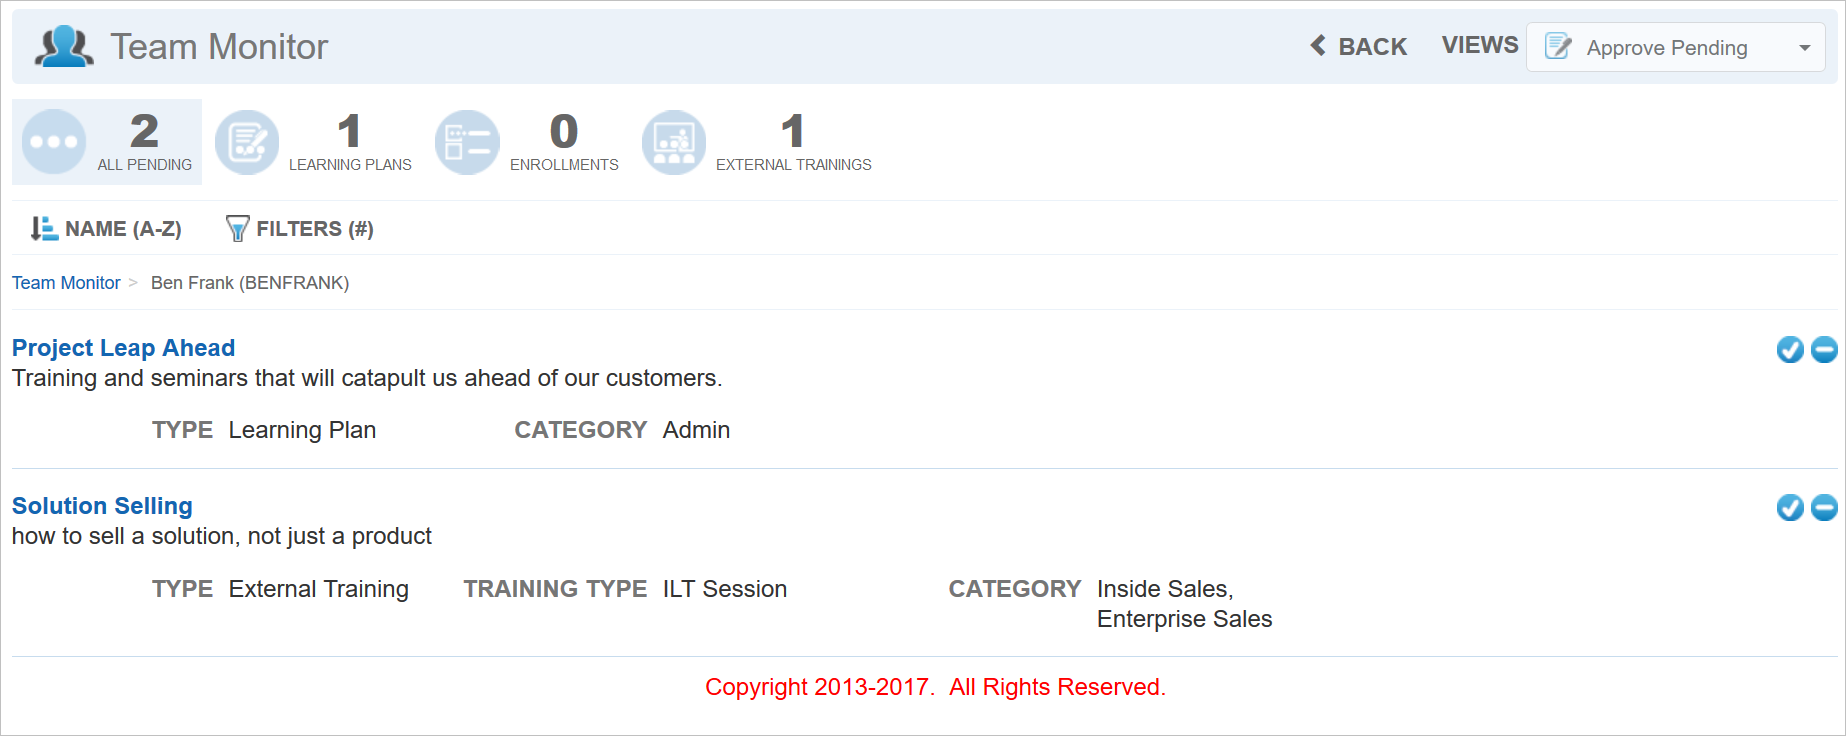
Pending Items for User
To see complete details for an event, click the event name link.
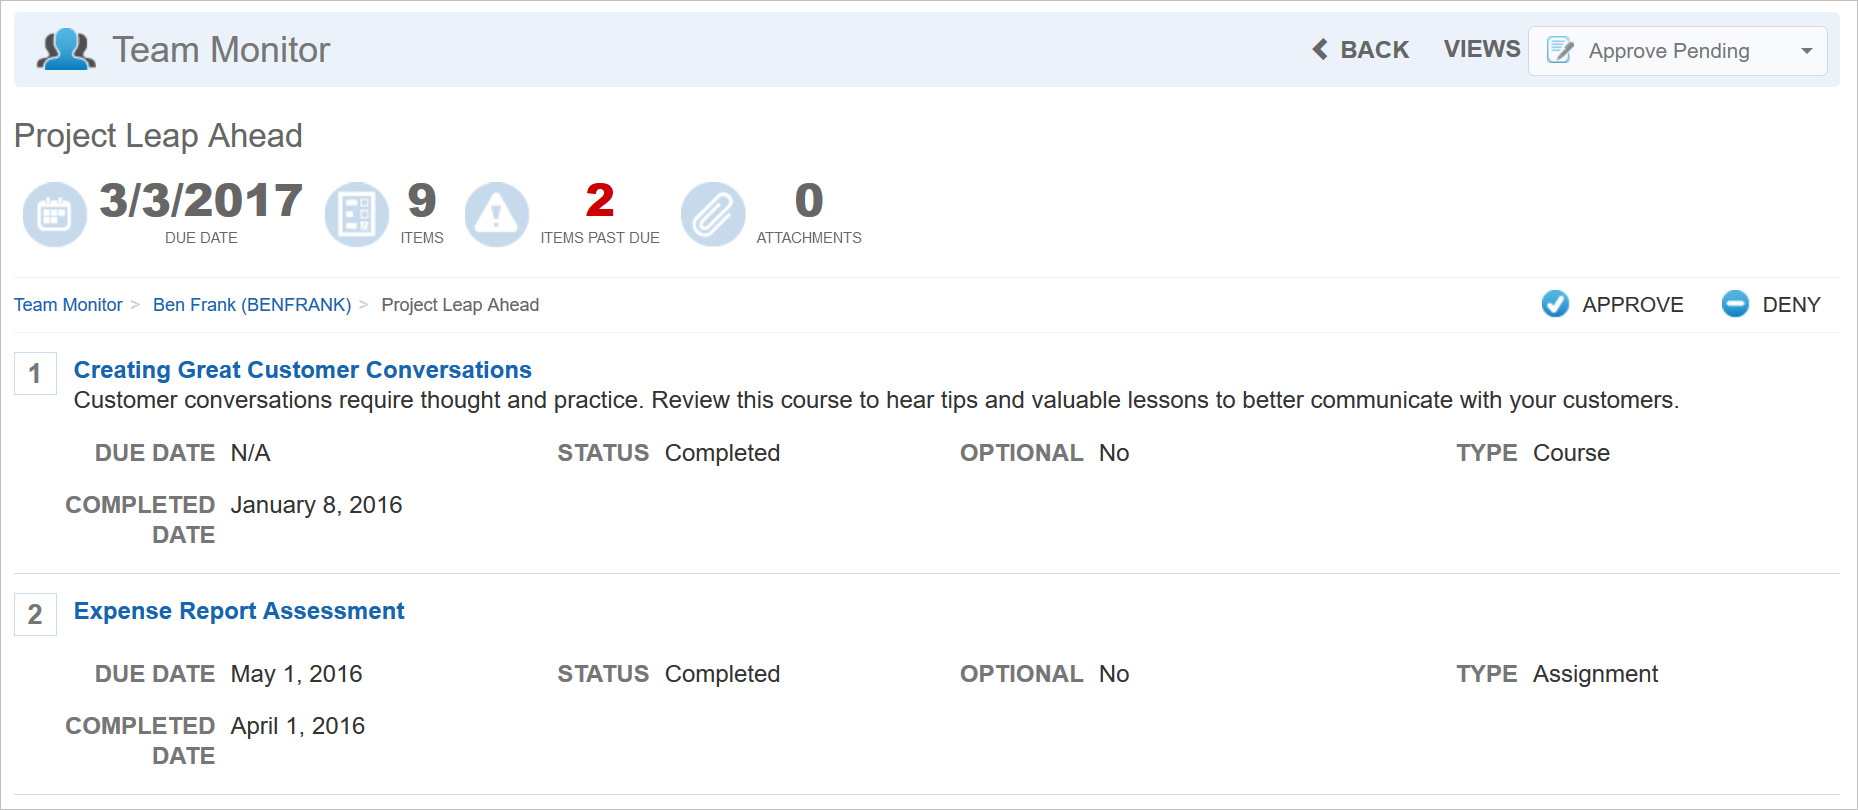
Details for Pending Items
Each pending event can be approved or denied from either the summary list or the detail page. When you click either Approve or Deny, a confirmation window displays.

Confirmation Window
Click either Yes to continue with the action, or No to cancel. For External Training Items, the confirmation window contains a Comments box.

Comments Box for External Training Approvals
Comments are optional, and you can click Skip to Approve or Deny without entering any comments.
Email messages are sent to Users when events are approved or denied.
Adding the Approval View to the Team Monitor Widget
You can add the new Approval view to the Team Monitor Widget. On the Team Monitor setup page, select the new Approval option from the Widget Type drop-down list on the Content tab.
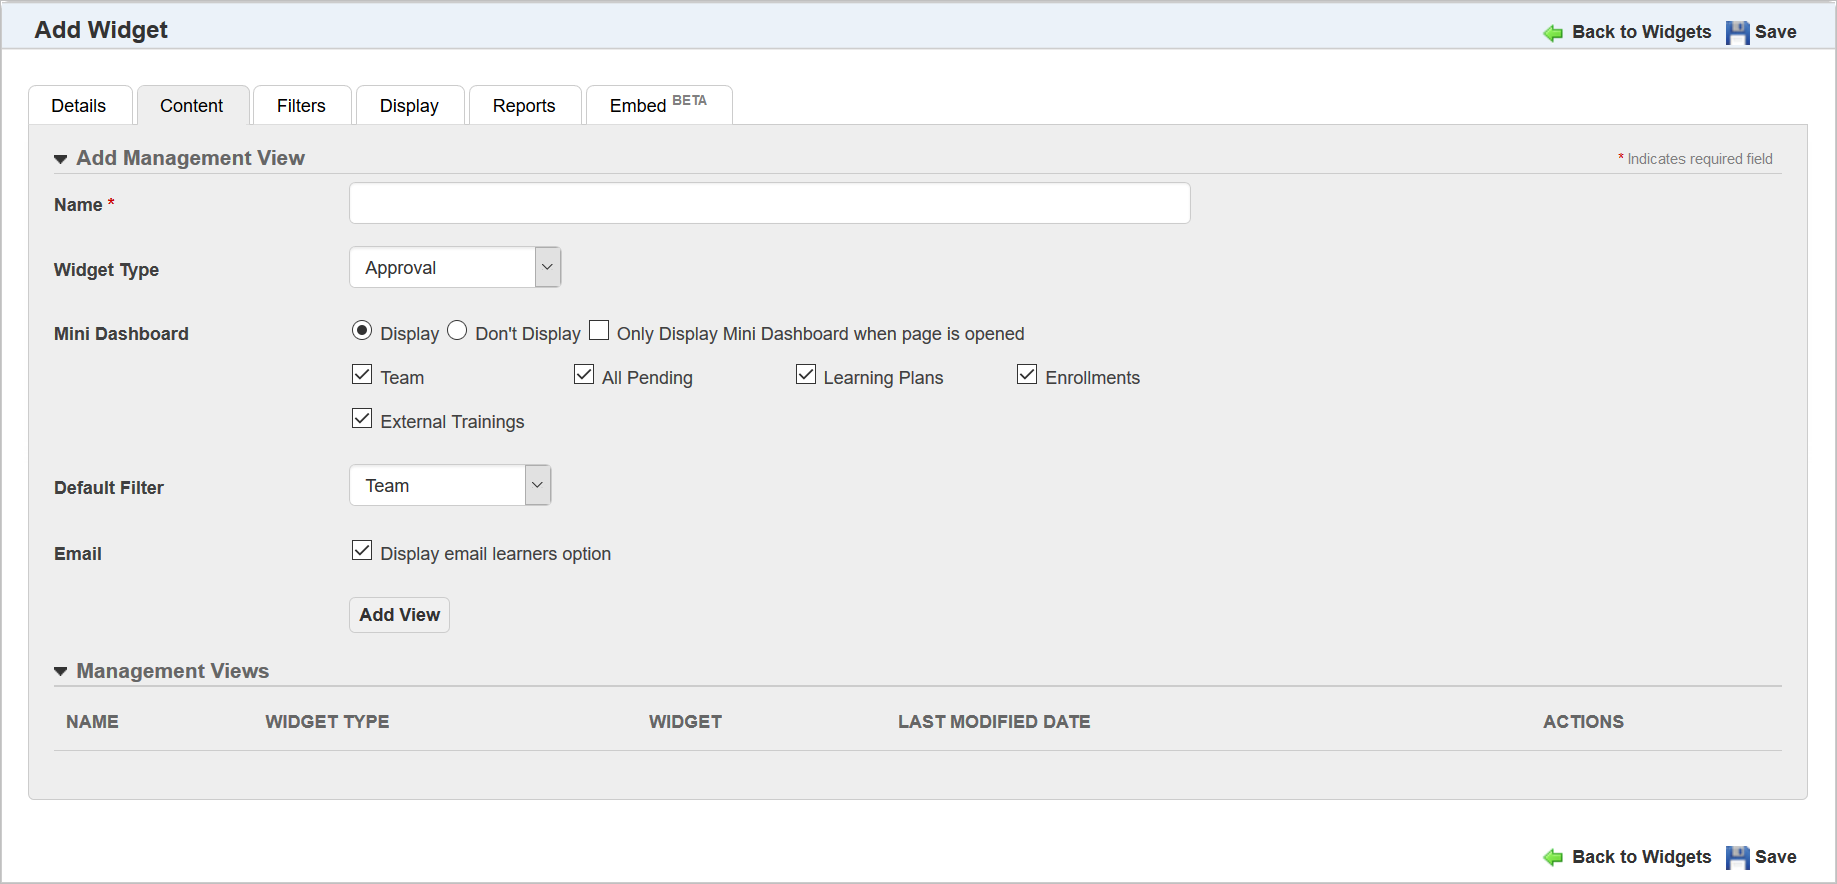
Approval View Setup
When you select a Widget Type, the Mini Dashboard options become available. Indicate which dashboard items you want to display on the Widget. You also give the view a Name. Indicate the Default Filter and Email option.
All of these options are described in online help. Refer to the topic called “Adding a Custom Team Monitor Widget” (TOC> LearnCenter Designer > Widgets > Adding a Custom Team Monitor Widget) if you need additional information on these options.
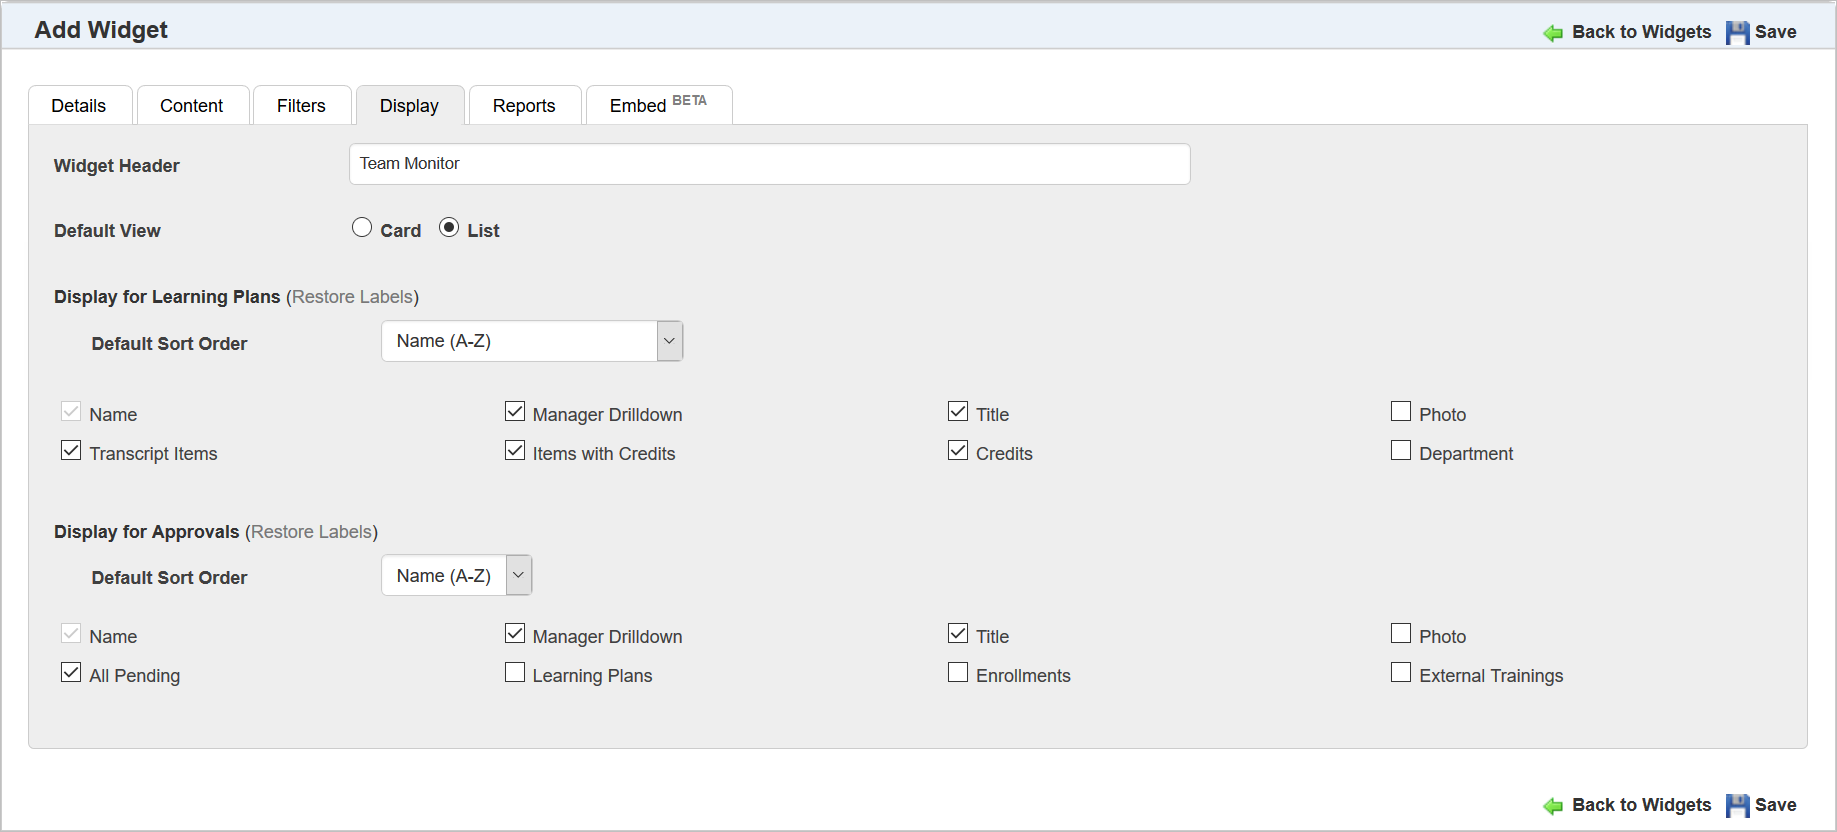
Approval View Setup
In the Display for Approvals section of the Display tab, select the check boxes for the items you want to display on the Widget.
There is a new Add External Training link on the My Task Widget.
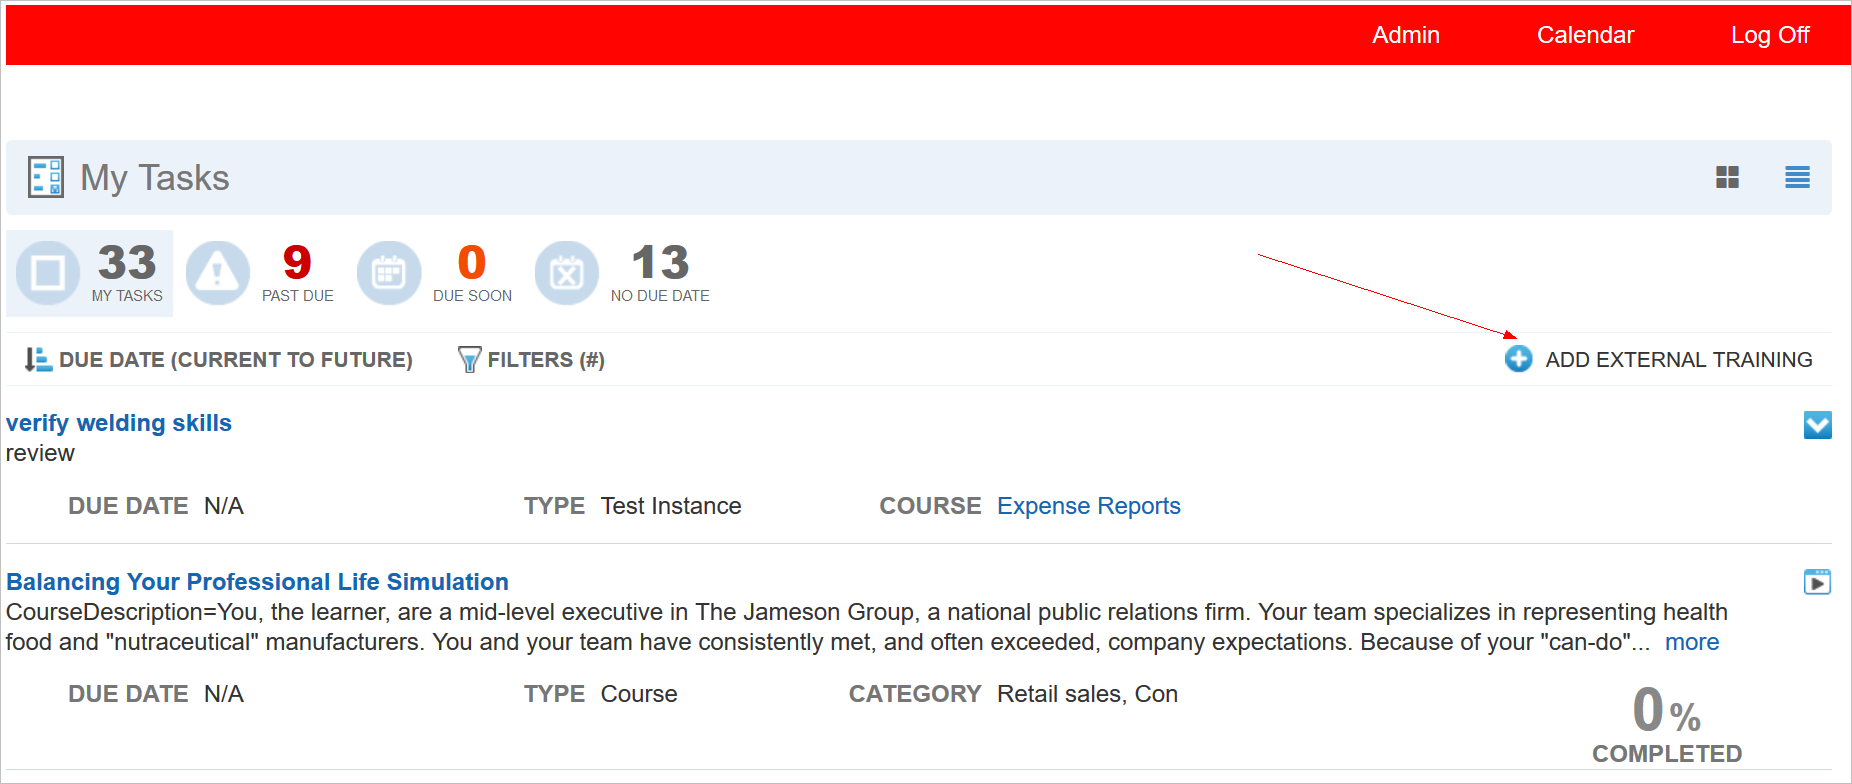
New Add External Training Link
When Users click this link a new Add External Training page opens, enabling them to create new External Training events.
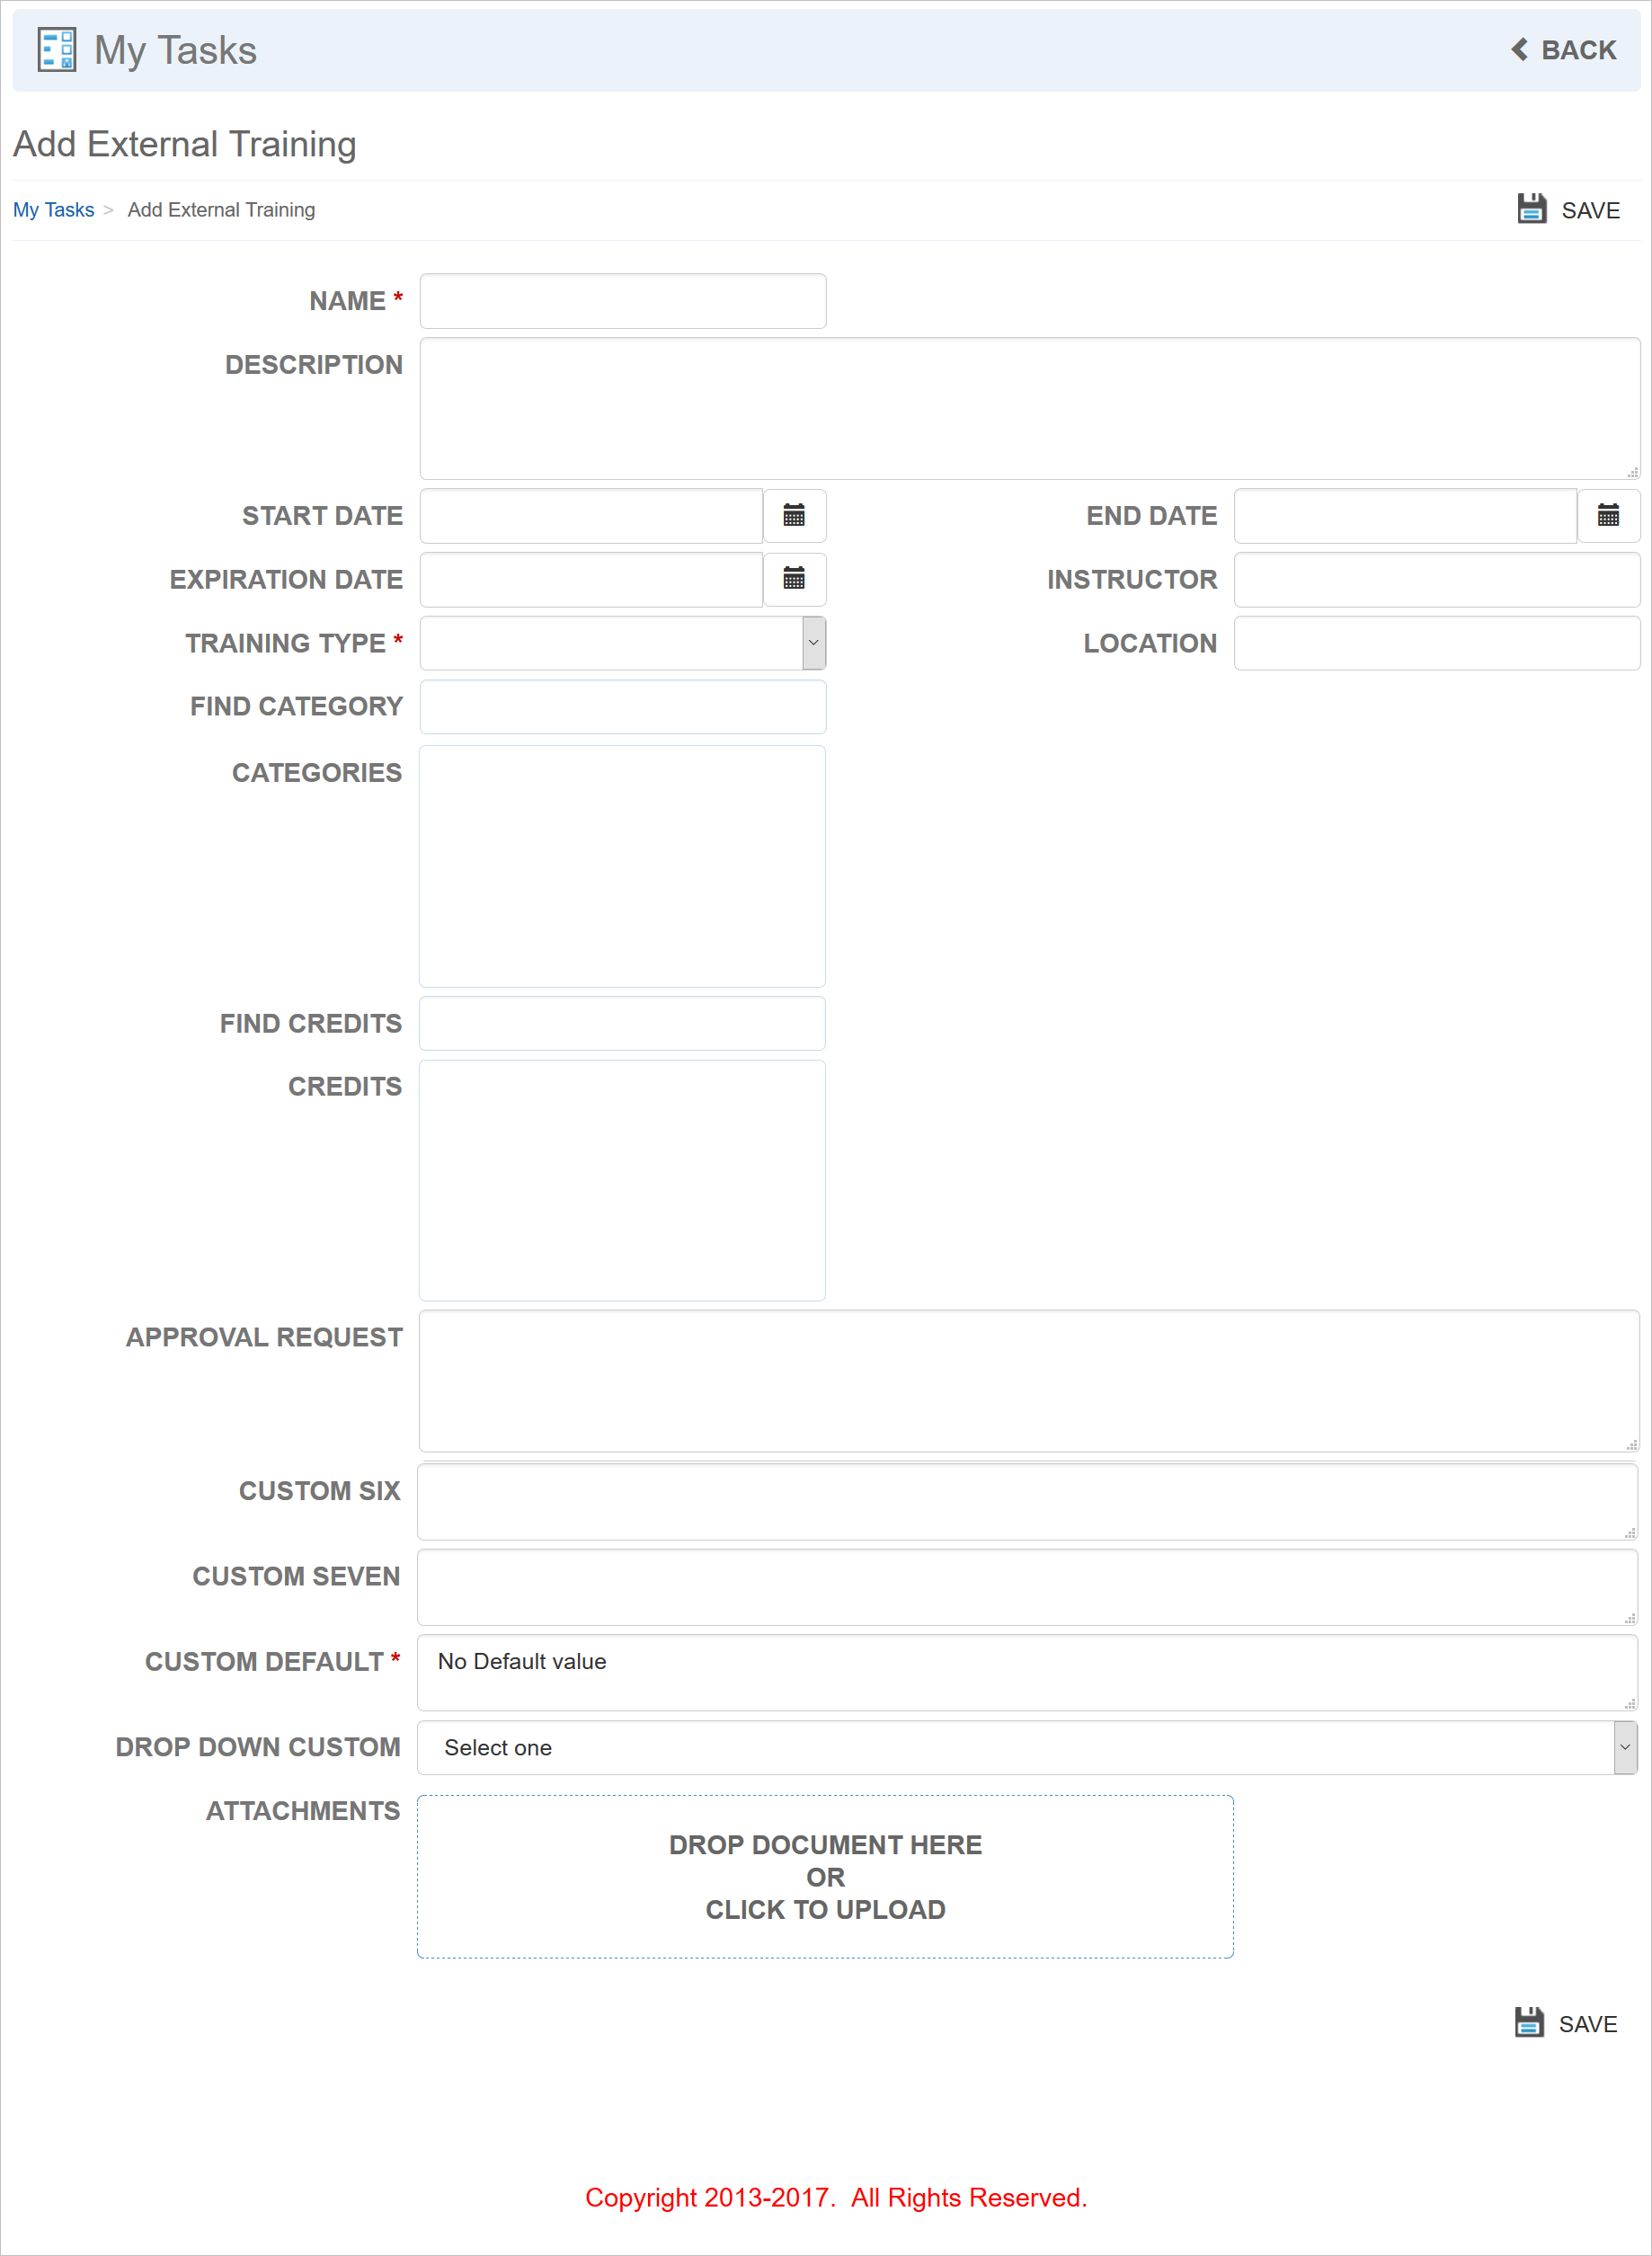
Add External Training Page
The fields that display on this page are the same as the ones that display for the External Training dynamic object.
Users can enter an External Training Name and optional Description. They can enter dates for training: Dates for the training: Start Date, End Date, and Expiration Date. There are fields to enter the Training Type, Instructor, and Location. Users can assign one or multiple Categories. For this field, they can type in Category names and LearnCenter will display a list of matching Categories. They can also select Credits in the same manner if you enabled this option during the My Tasks Widget setup (see the next section for details). If approvals are enabled, the Approval Request box is available for use. Notice that custom fields are present in the illustration above. The Drag-and-Drop functionality that is available in other places in LearnCenter can be used to add attachments to the External Training request. Users can simply drag items from any folder on their PCs to the Drop Document Here box. They can also Click this Box to open a browse dialogue if they prefer. When Users click Save, the event is saved, and any approval request emails are sent (if this workflow is activated for External Training).
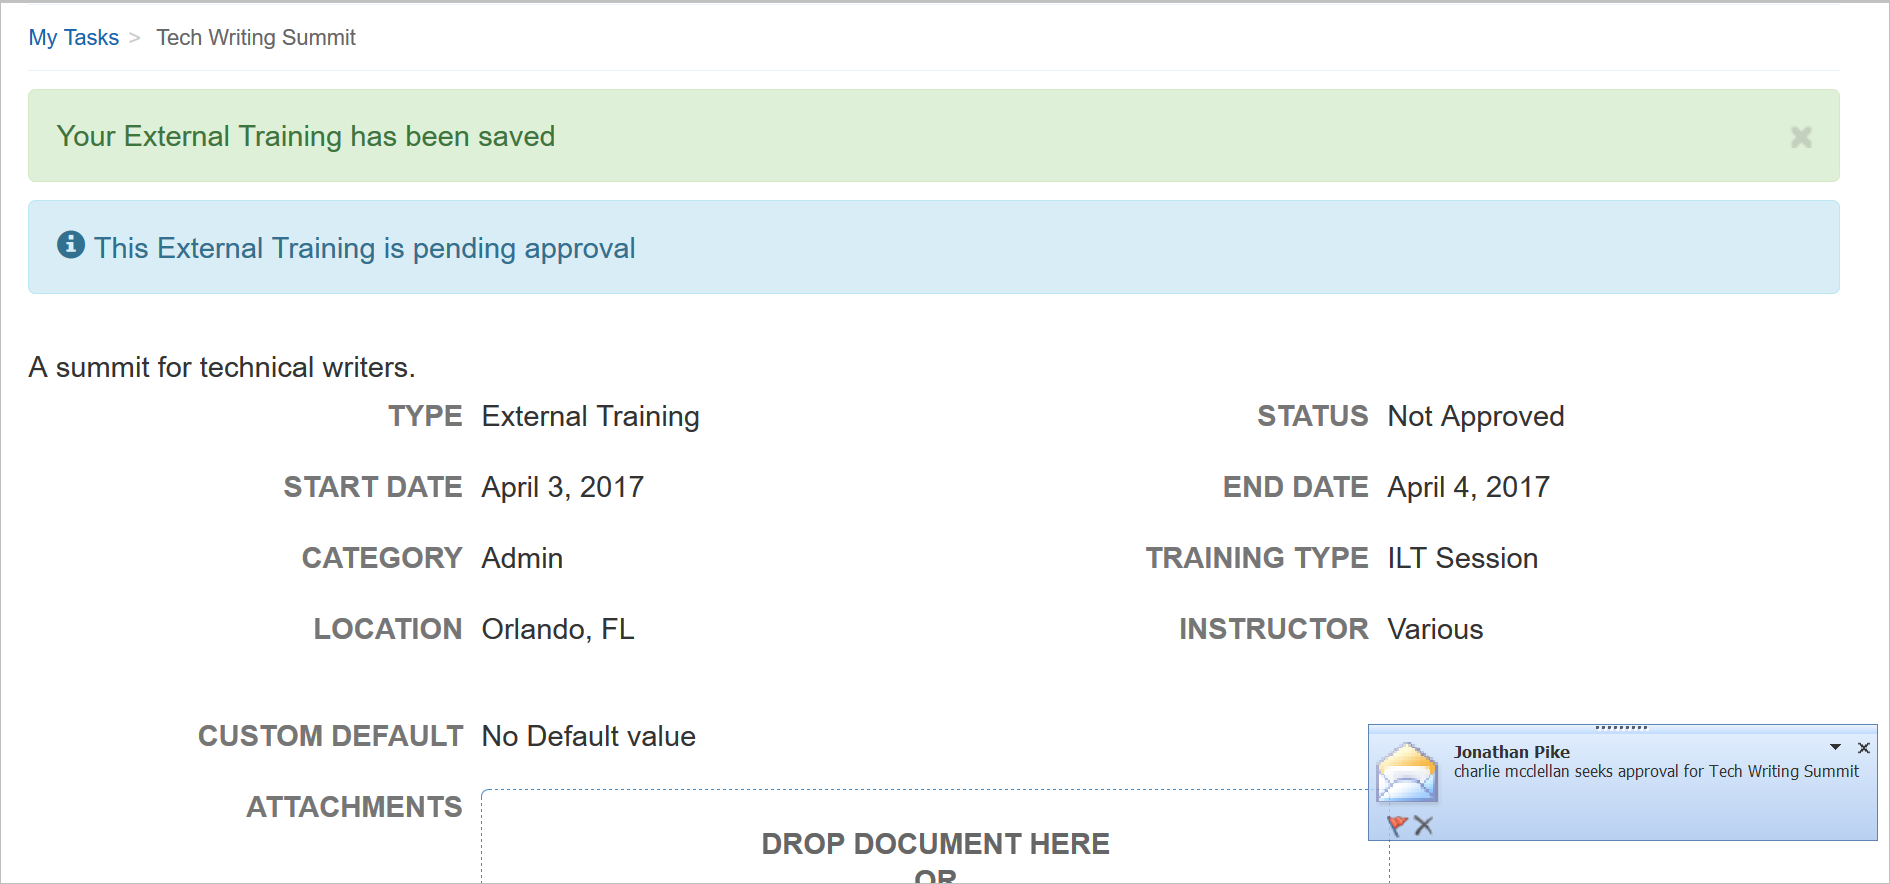
Approval Request Messages Are Sent
You can enable this External Training link for Users on the My Task widget setup Content tab.
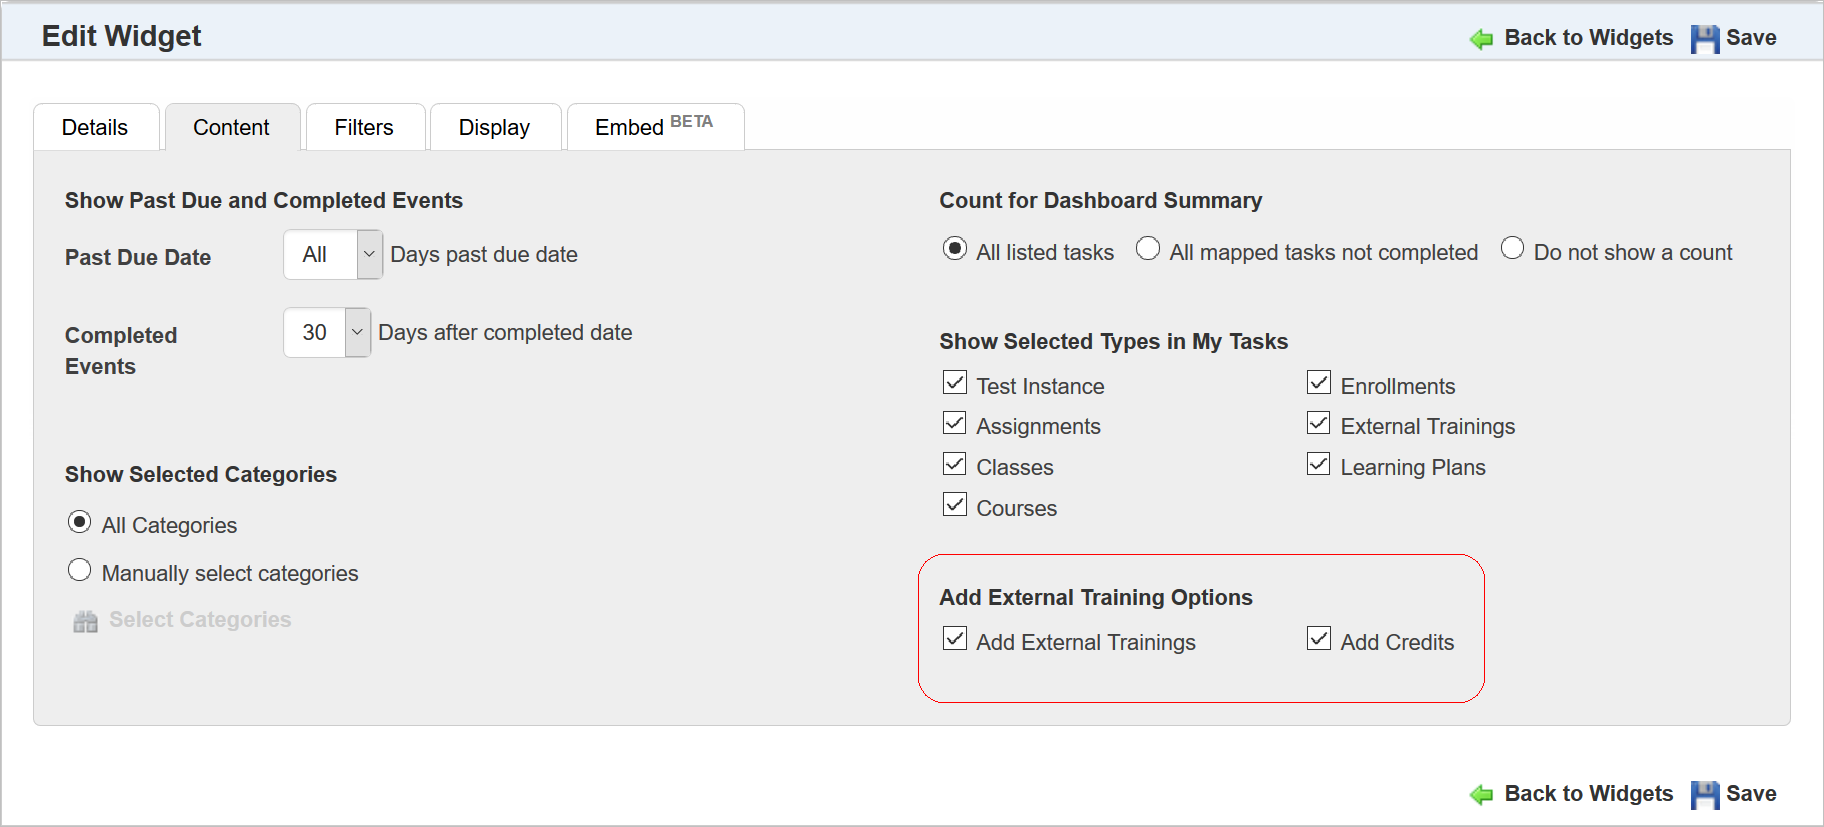
New Add External Training Options for Widget Setup
The Learning Plan, Transcript, My Tasks, and Skills Widgets have been refined to improve information access and usability.
Refer to online help if you need additional information about using the Widgets (TOC > LearnCenter Designer > Widgets).
Enrollment Detail Changes for the Learning Plan Widget
The Enrollment Detail page now displays the Type as Enrollment (previously Type displayed the event type of the Enrollment).
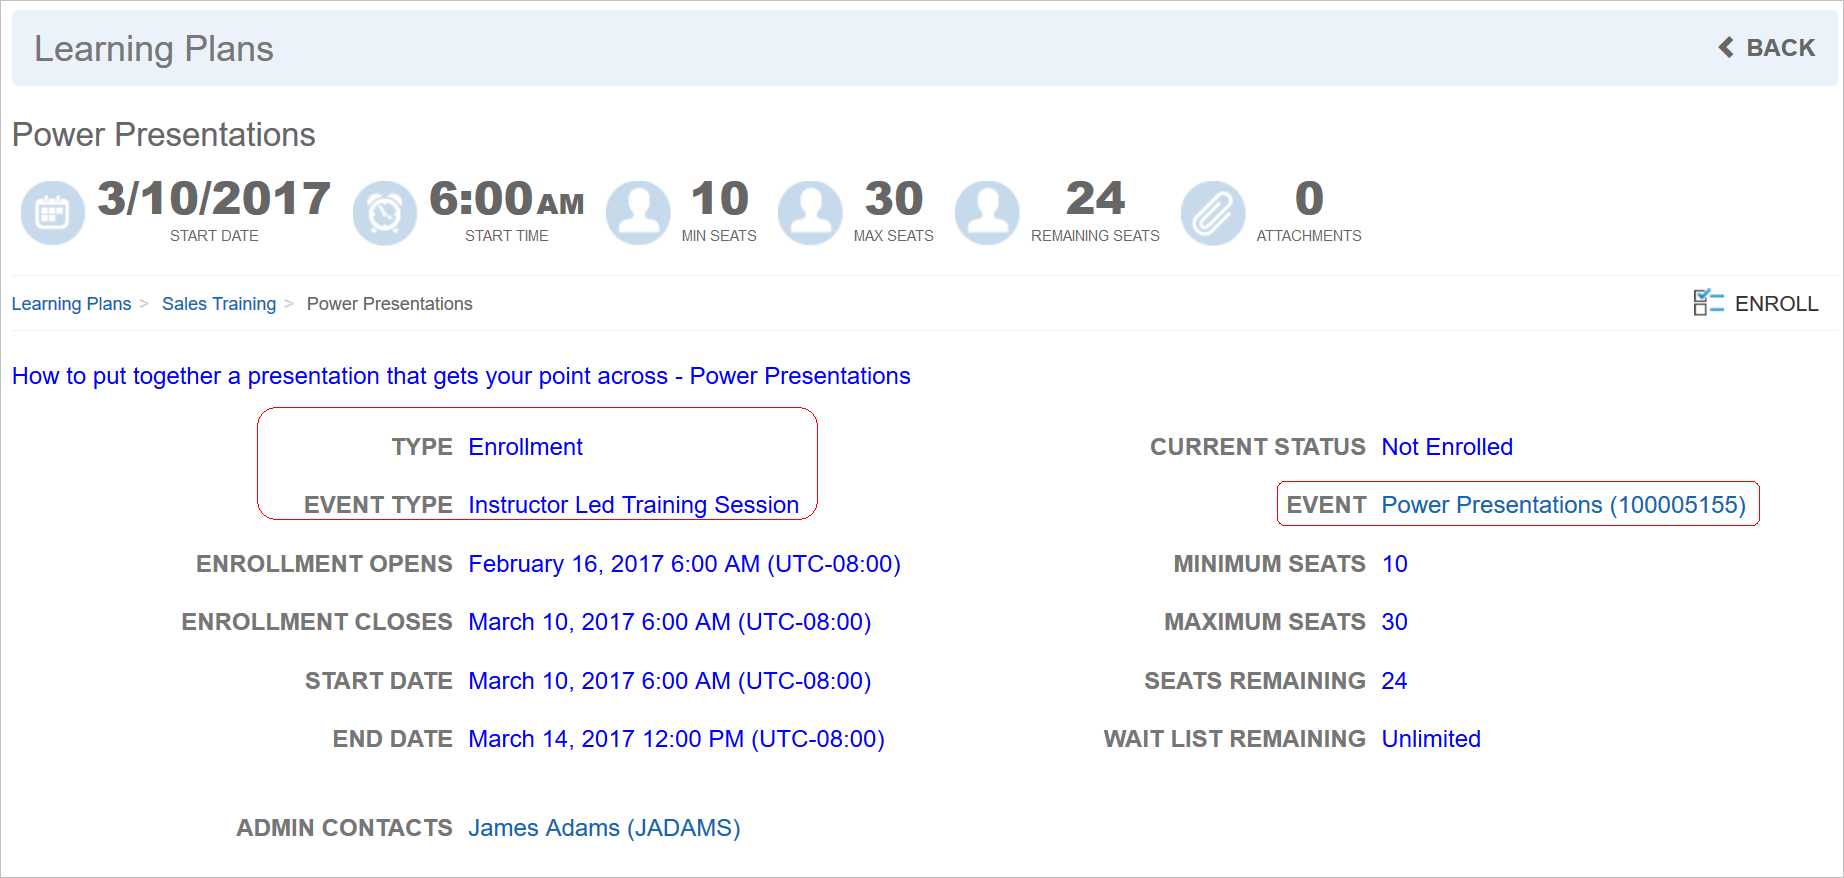
New Field Labels and Values
There are new labels and values for Event Type and Event name. Notice that Event name now links to the event’s Detail page. The Event name also contains an internal system-based number that will aid in identifying a specific learning event if you need to, when Event names are duplicated.

Event Detail Page
If the Event Type is Course or Class, clicking the Event name link opens the detail page.
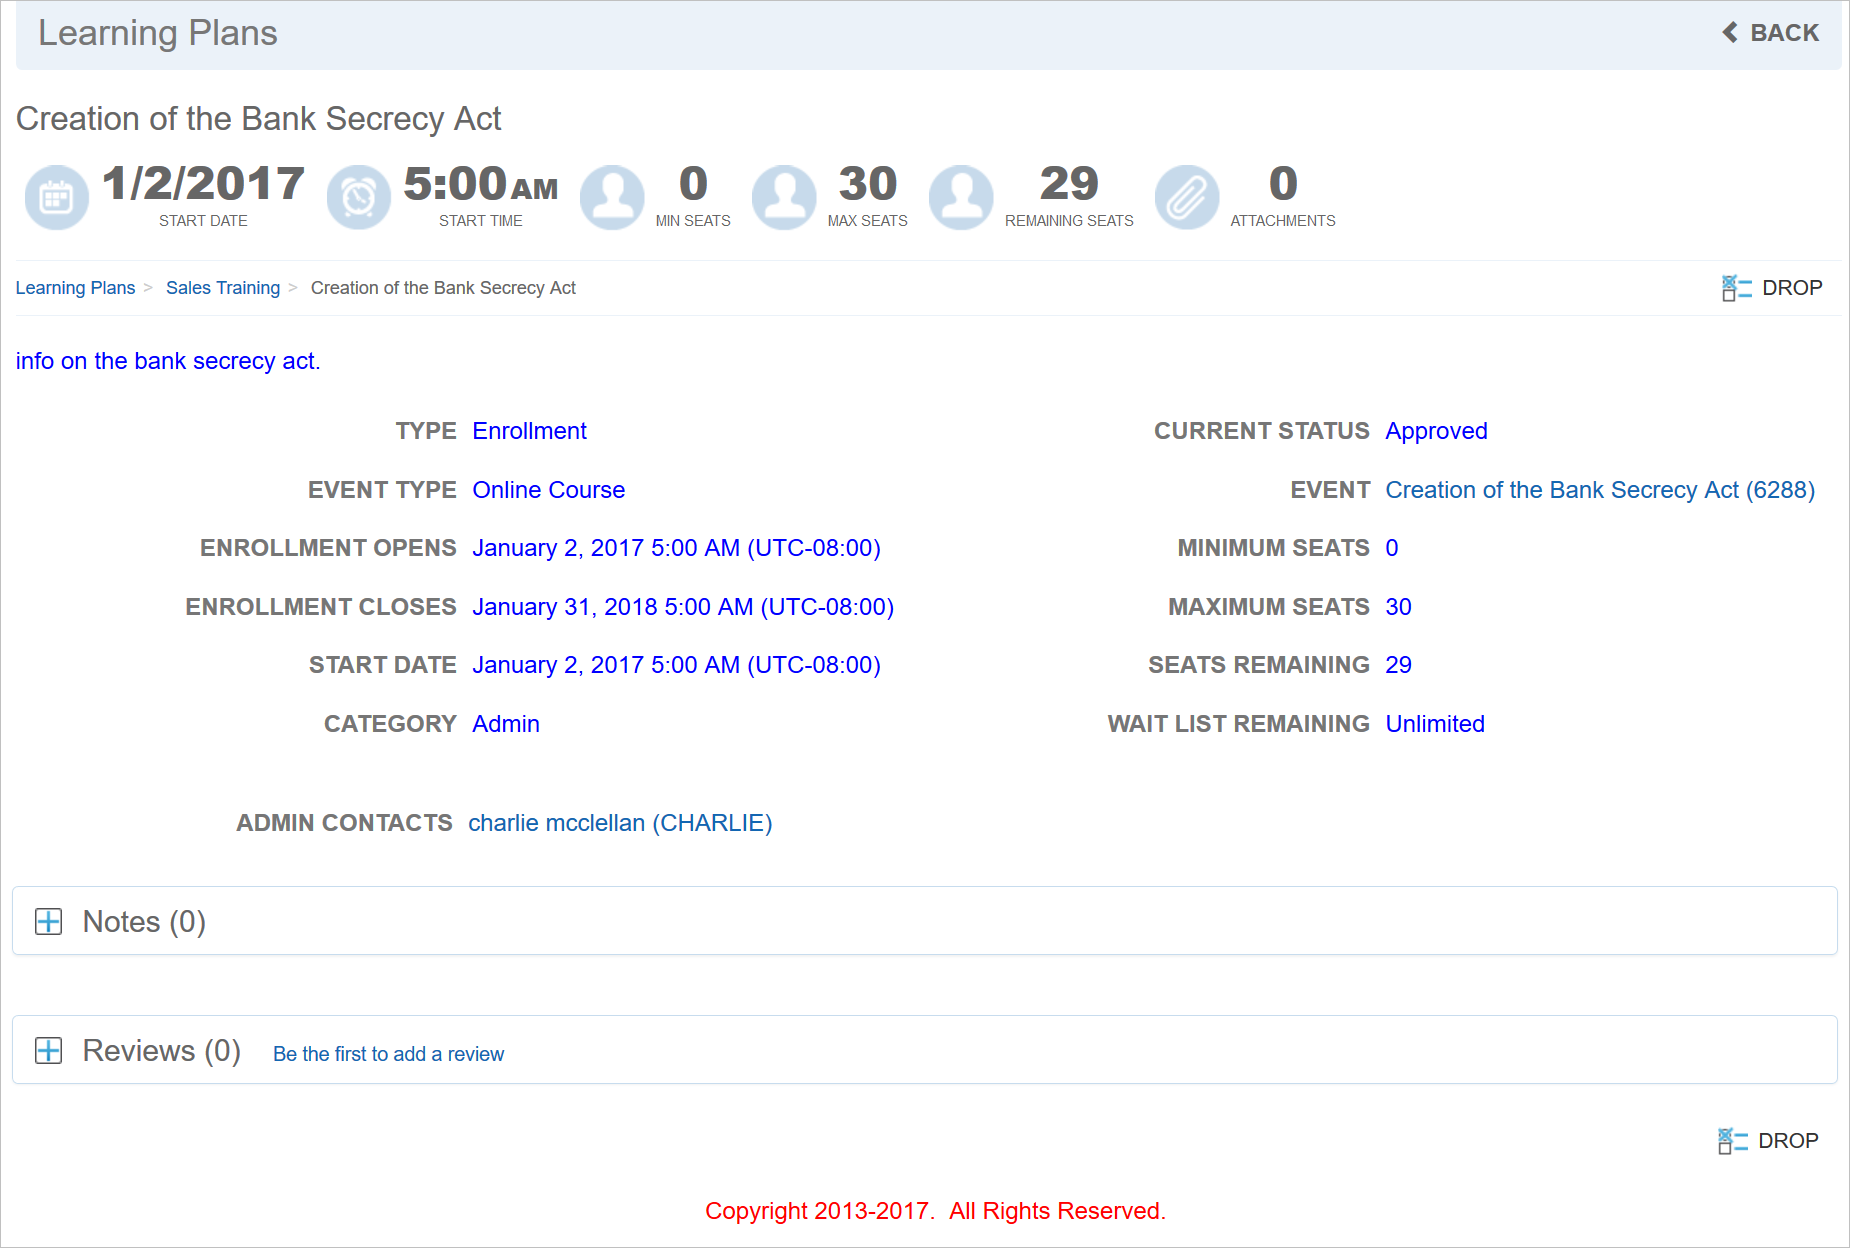
Event Detail Page
And from here, you can now launch the Course or Class.
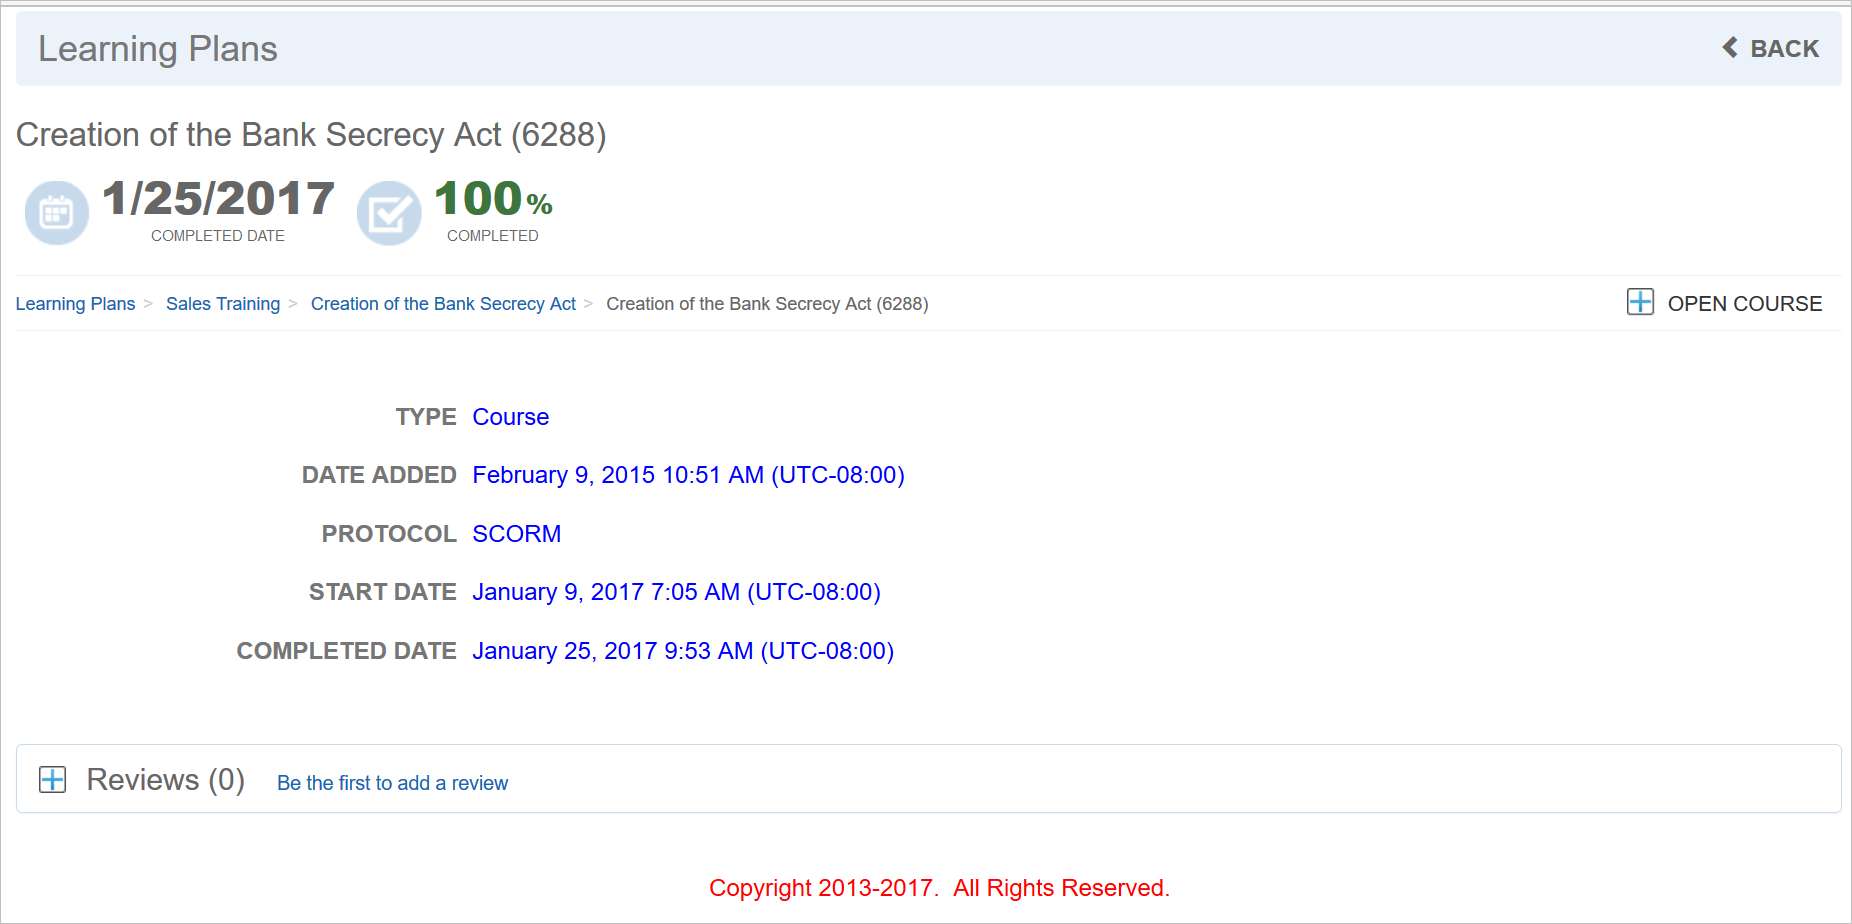
Event Detail Page – Open Course
Similarly, the Event Type is Test Instance, clicking the Event name link takes you to a detail page where you can launch the Instance.
ILT Session Detail Change for the Learning Plan Widget
The ILT Session Detail page has been updated to clarify the Session’s Enrollment list, with new labeling that instructs Users to select an Enrollment.
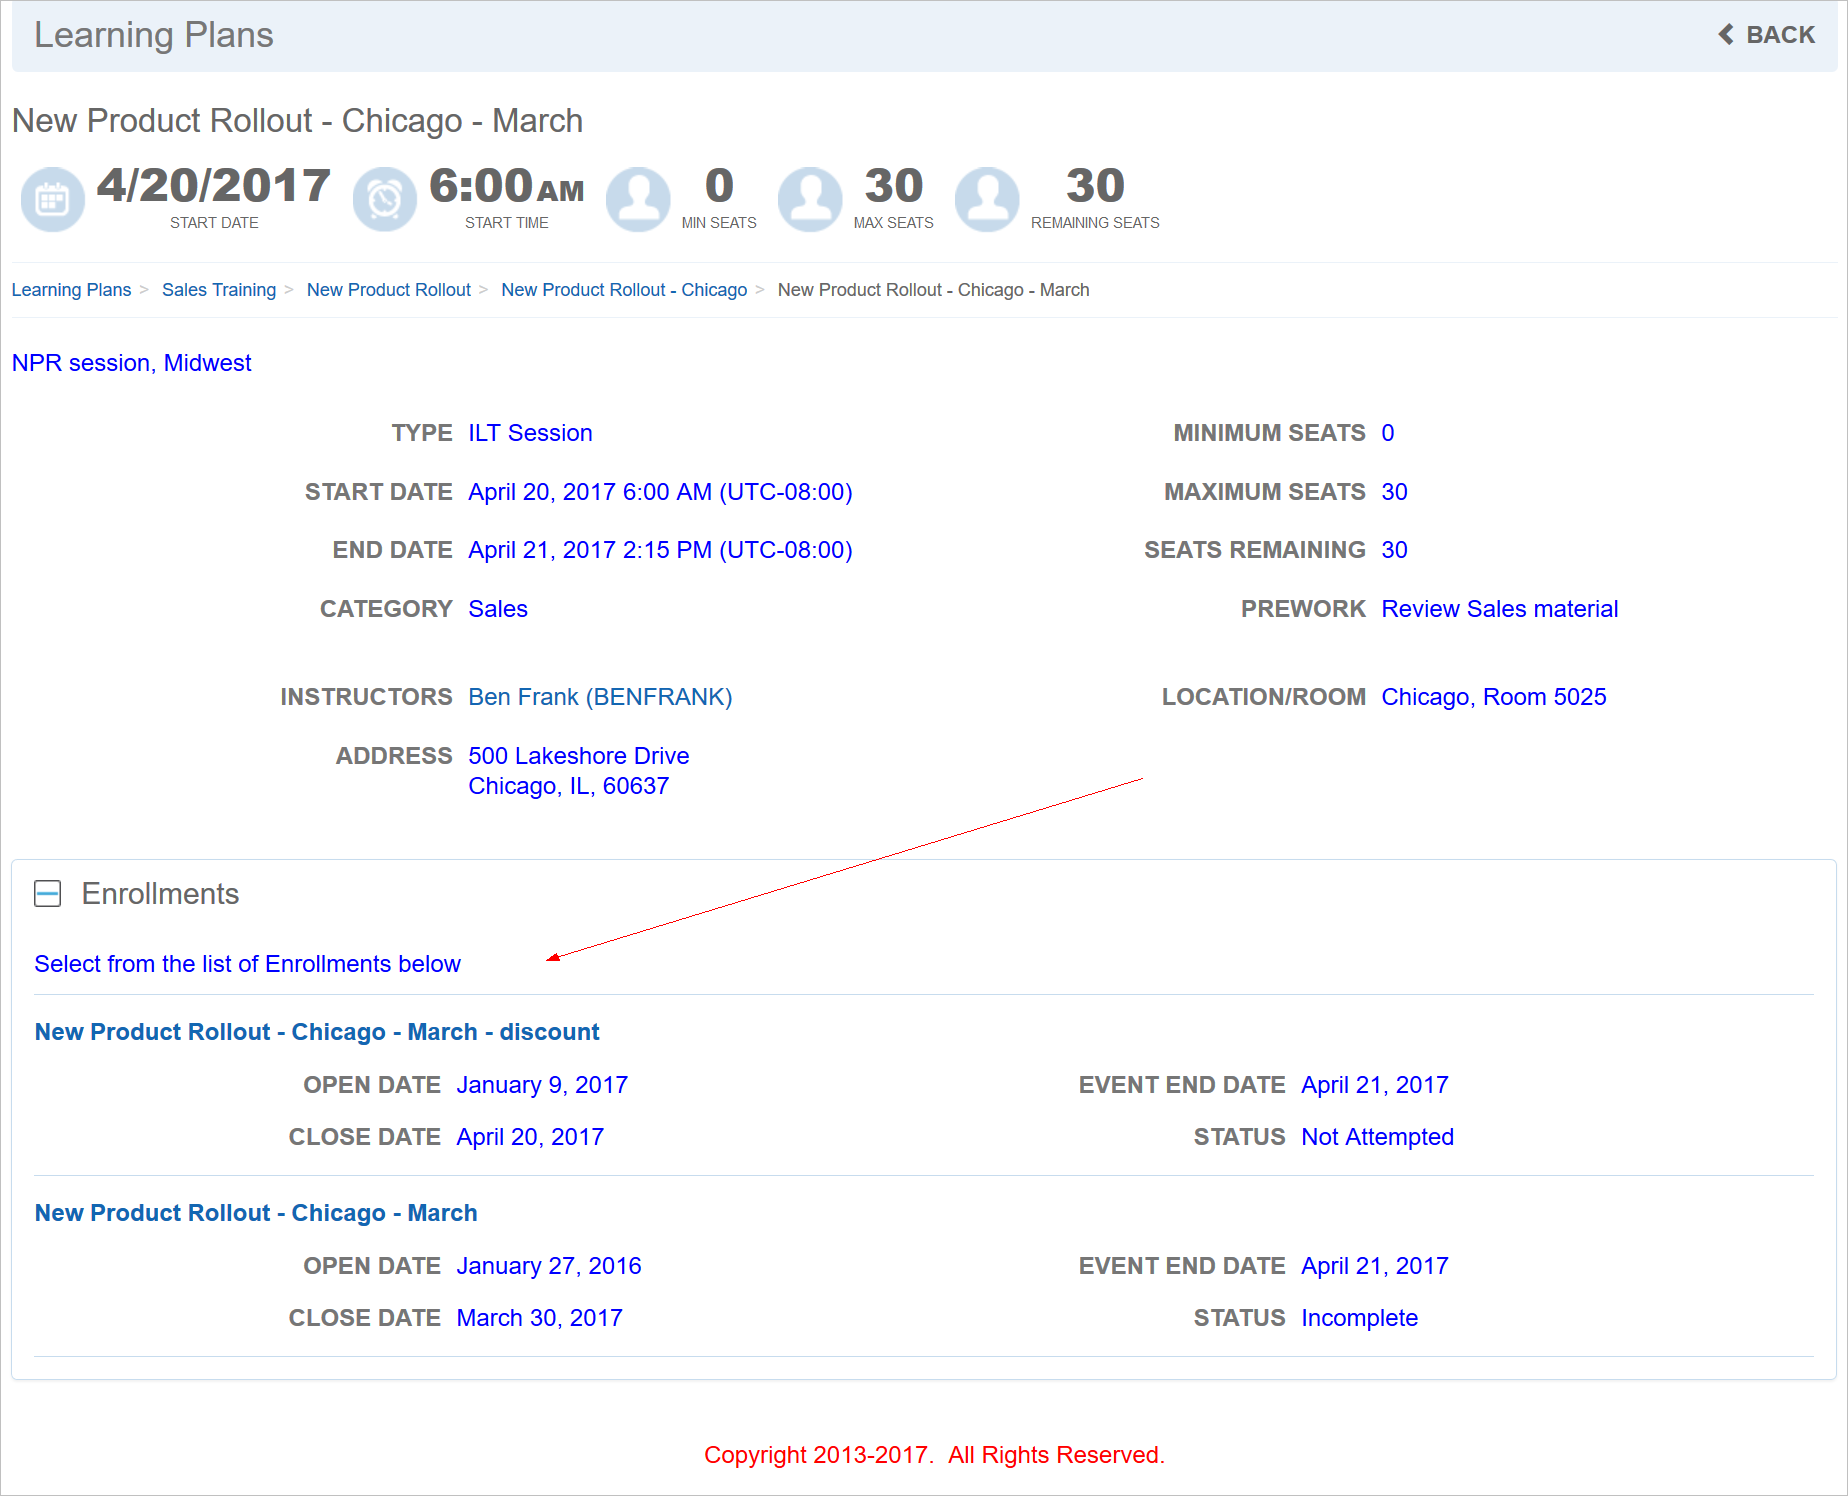
New Labeling Provides Clarification
The My Task Widget now includes a Print Certificate icon for completed Courses and Classes if a Certificate is assigned to the event.
Test Instances Score Change for the Transcript Widget
Test Instances with scores now display the score as a percentage on the Transcript Widget, making the score display format consistent with the Test Instance Detail page as well as classic Dynamic Objects.
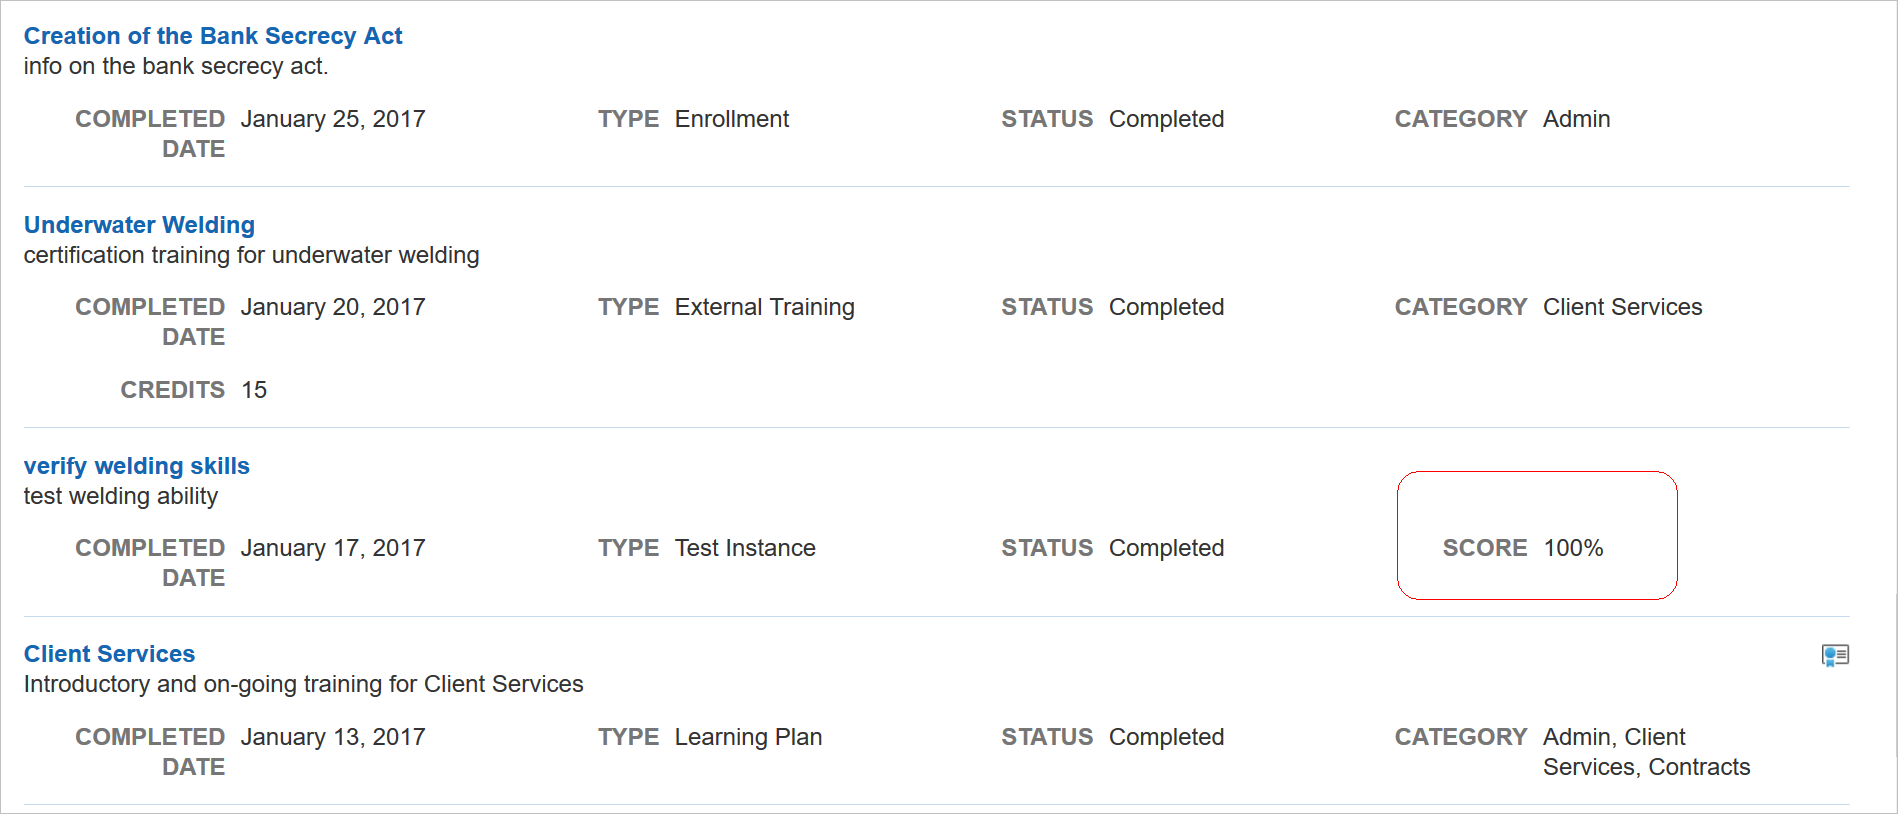
Test Instances Score Change
Previously, this displayed as a fraction.
New Ability to Include Inactive Enrollments on the Transcript Widget
You now have the ability to include inactive Enrollments on the Transcript Widget.
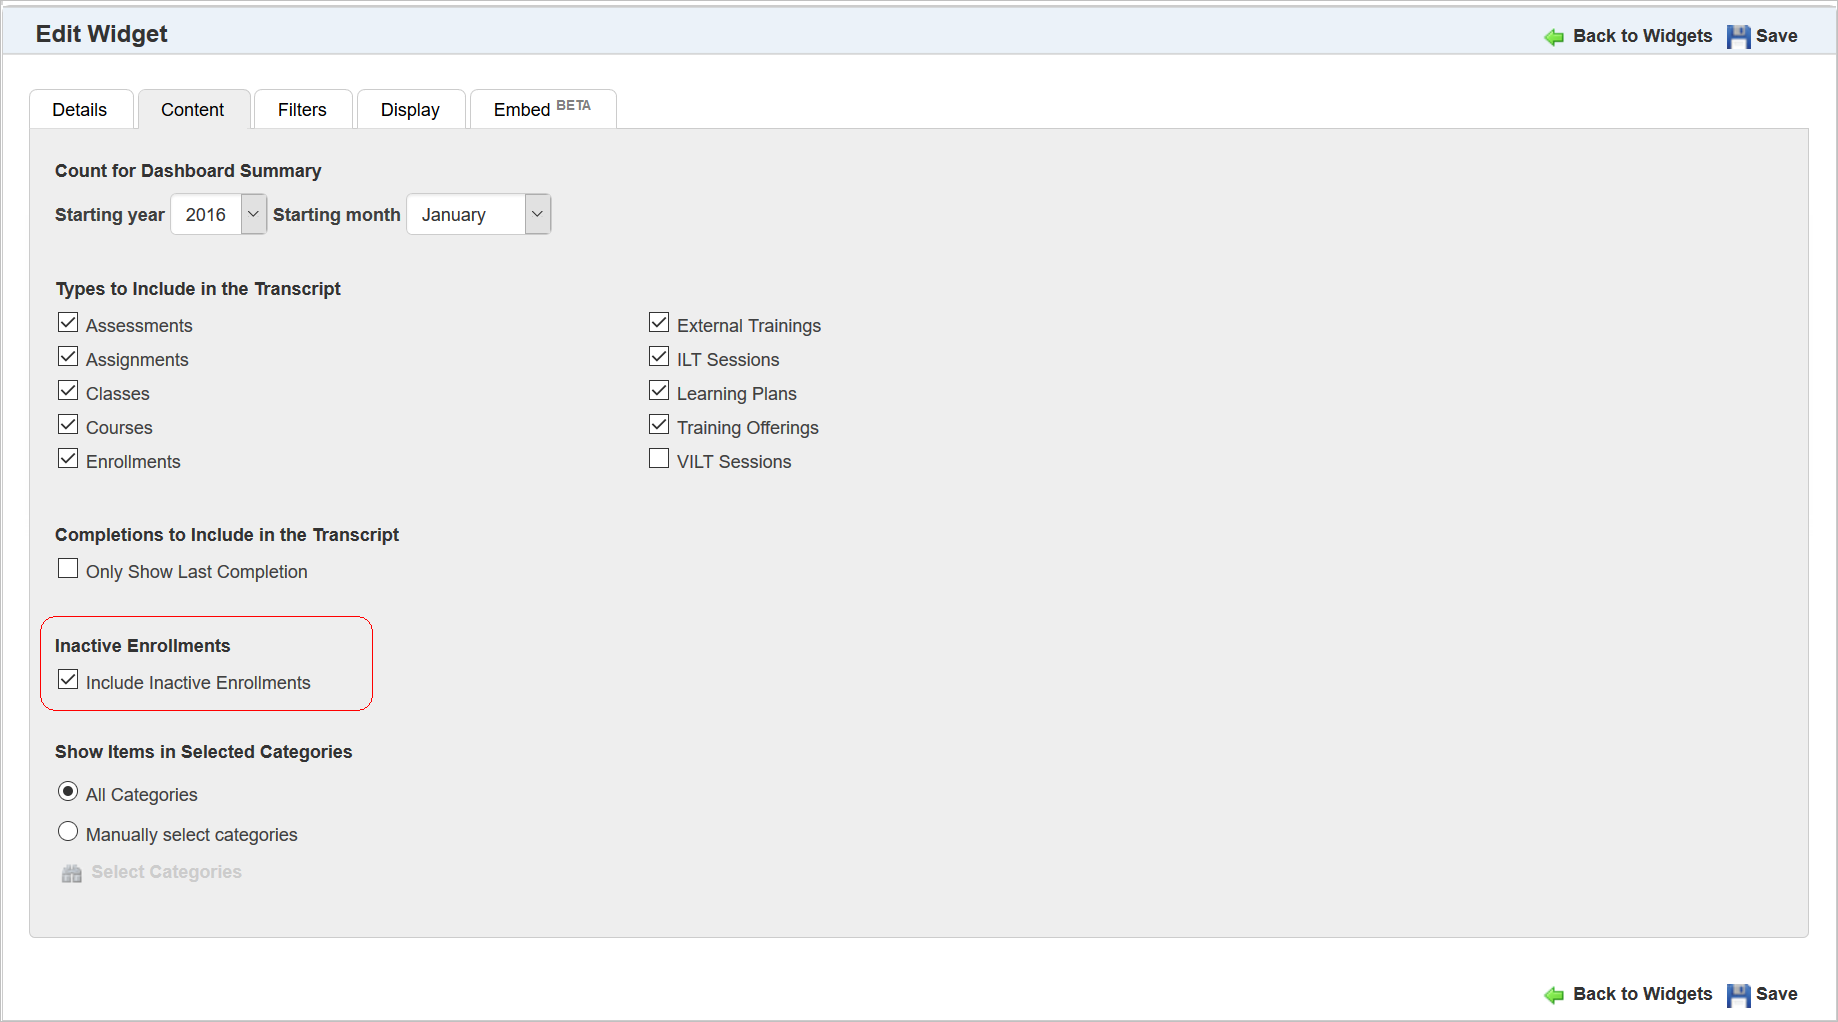
New Include Inactive Enrollments Check Box
If inactive Enrollments are included on the Transcript Widget, they are not selectable given their inactive state. You will not be able to print their mapped Certificates. They are merely listed on the Transcript Widget for reference.
Display Dashboard Only Option for More Widgets
The Skills Widget and My Task Widget now have the Only Display Mini Dashboard when page is opened.
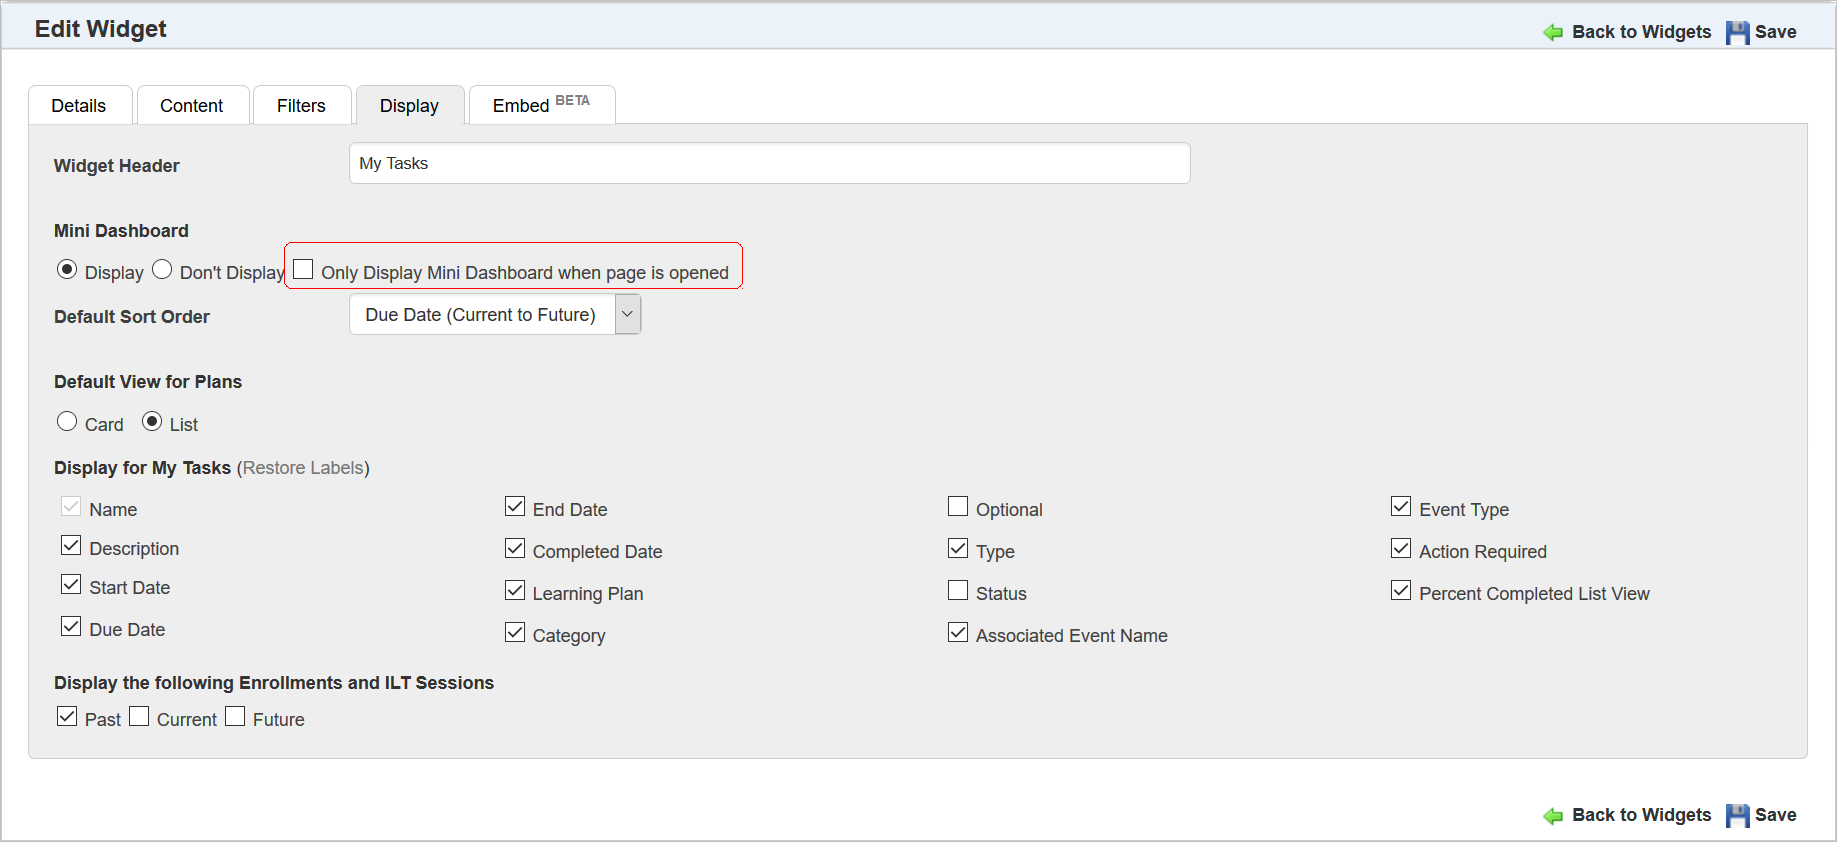
Only Display Mini Dashboard when page is opened check box
This was done to make these Widgets consistent with other Widgets that offer this feature.
The My Tasks Widget has been corrected to not include counts of learning events in other Sub LearnCenters. This makes the My Task Widget consistent regardless of the option setting for “Display global training history”
Completed Courses that have mapped Certificates now displays a Certificate icon on the My Task Widget.
Purchased eCommerce Classes Now display on the My Task Widget as a 0% complete. Purchased eCommerce Courses now also appear in the Courses in Progress Dynamic Object, with a Date Started and Last Viewed set to the purchase date.
A correction has been made to the Content tab for Team Monitor Setup. Now, when you select Learning Plans as the Widget Type, the drop-down list that appears only displays Active Learning Plans. Previously, it was erroneously showing Active and Inactive Learning Plans.
Skills and Search Widgets are now Portable
The Skills and Search Widgets are now portable. There is now an Embed tab in the setup for each Widget.
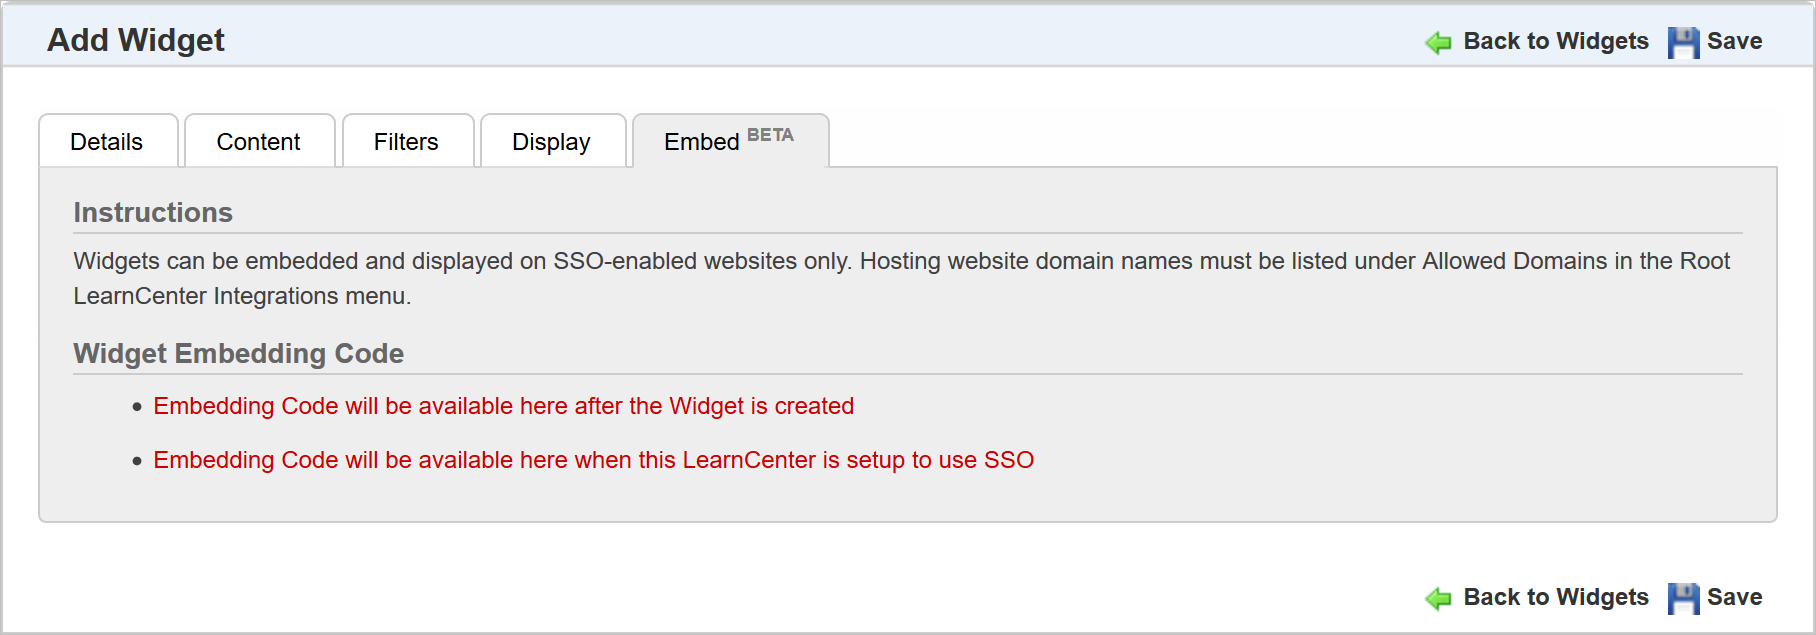
New Embed tab for Skills and Search Widgets
Widget Portability enables you to embed supported Widgets on external SSO-enabled websites by placing a snippet of code on the hosting page. This means you can use LearnCenter Widgets on your non-LearnCenter websites, Taleo Business Edition (TBE) sites, or internal intranet sites.
Refer to the online help topic called “Widget Portability” (TOC > LearnCenter Designer > Widgets > Widget Portability – BETA for complete details on using Widget Portability) for complete details on using this feature.
New Custom Fields for Learning Plans
You can now create custom fields for Learning Plans as you can with other LearnCenter modules. This allows you to capture and store additional data that may not covered by Learn Standard fields.
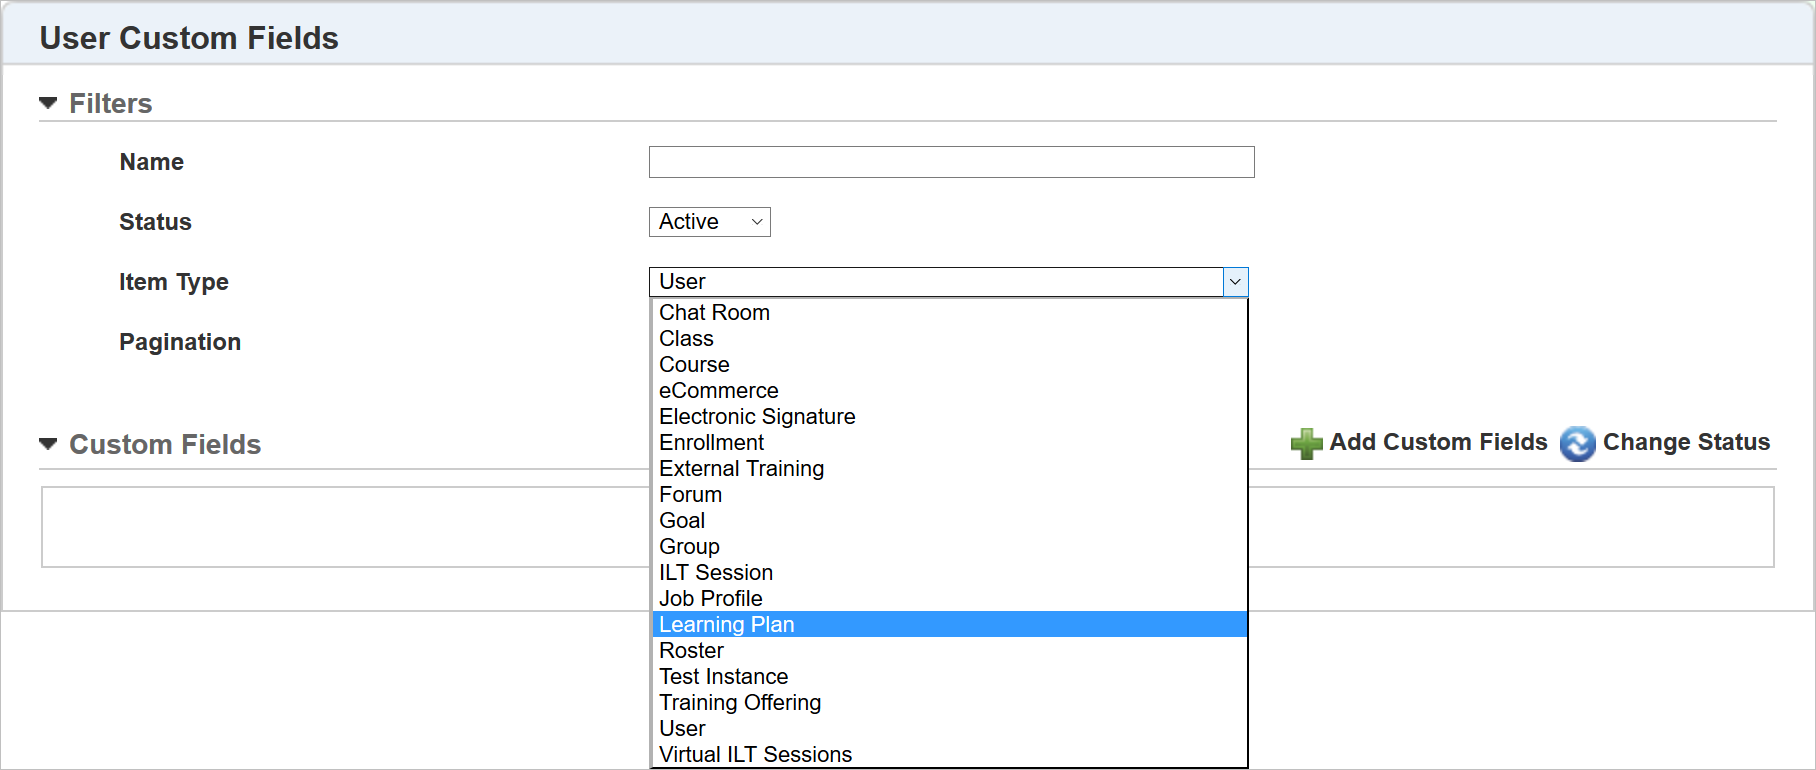
New Custom Fields for Learning Plans
Notice there is a new Learning Plan option in the Item Type drop-down list for custom fields. Select Learning Plan, and then click Add Custom Fields to add new fields for use with Learning Plans. Fields can be added and updated just as they can be with other item types.
Refer to the online help topic called “Adding New Custom Fields” (TOC > Options > Custom Field Settings > Adding New Custom Fields) for complete information about adding custom fields.
Important: There is no masking for custom Password fields. Anything you enter in custom Password fields will be displayed to end-Users.
Managing Learning Plan Field Settings
You can manage field settings just as you can with other items types.
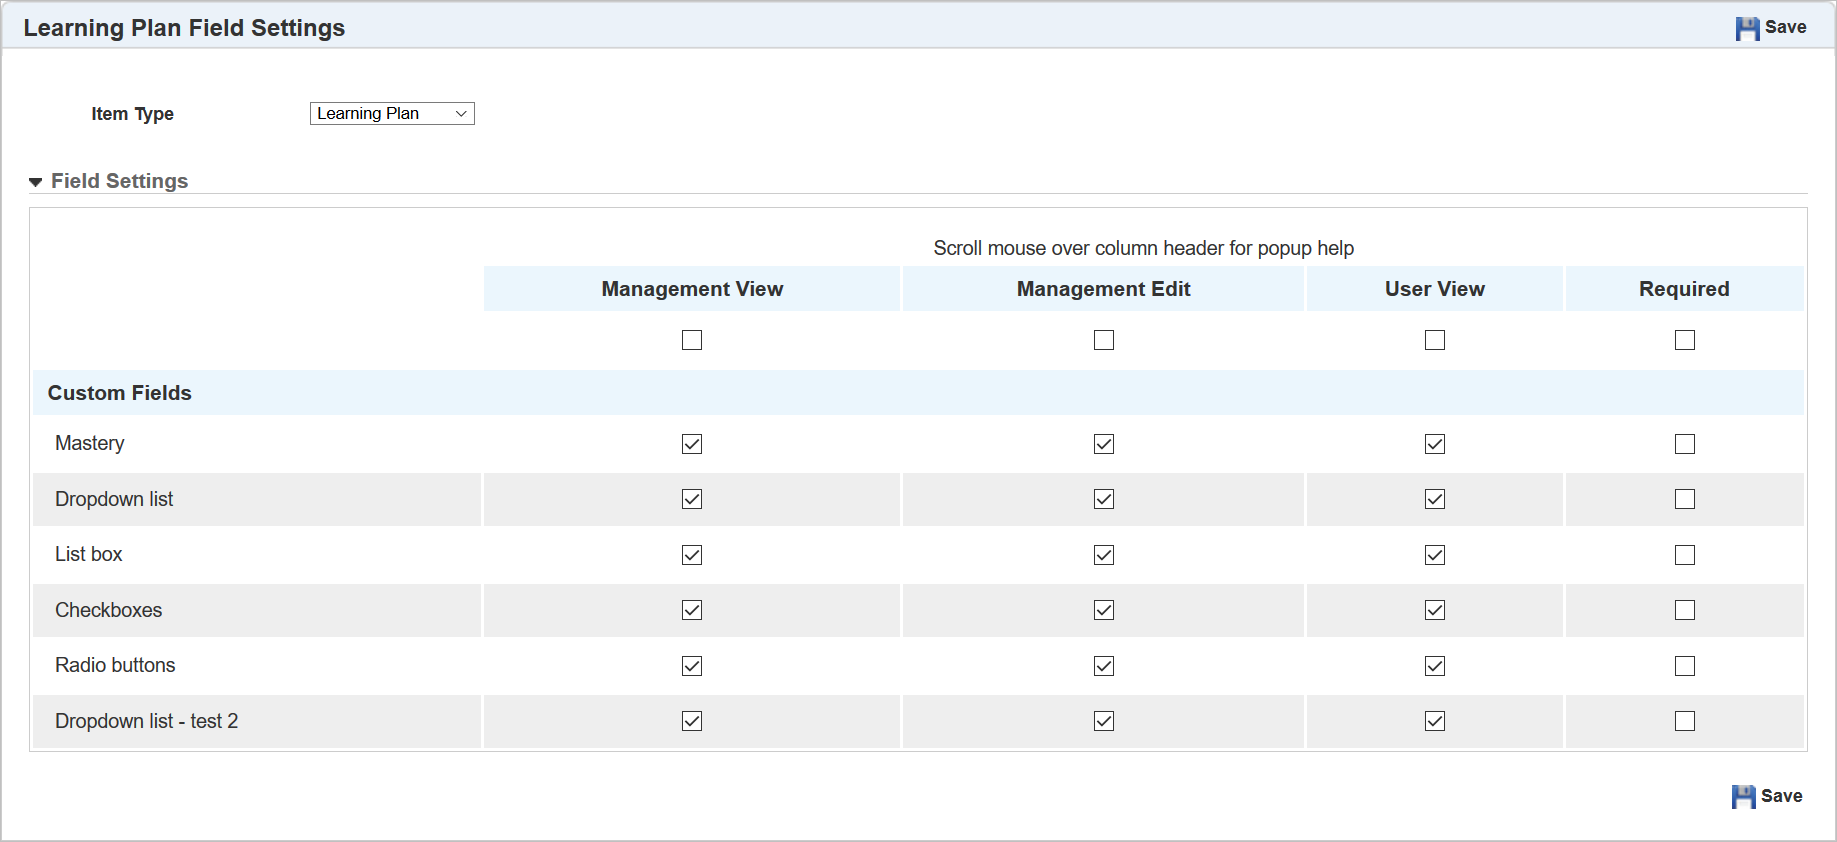
Custom Learning Plan Field Settings
For Learning Plan fields you are limited to Management View, Management Edit, User View and Required, as the other views are not necessary.
Refer to the online help topic called “Field Settings” (TOC > Options > Field Settings) for complete instructions on making custom fields accessible throughout LearnCenter.
Once custom fields have been made available for Admins (Management View and Management Edit), they are visible to Admins in a few places:
- Learning Plans Widget setup wizard Details tab.
- BI Reporting Data Fields
Custom Learning Plan fields are available to Admins on the Learning Plans setup widget Details tab.
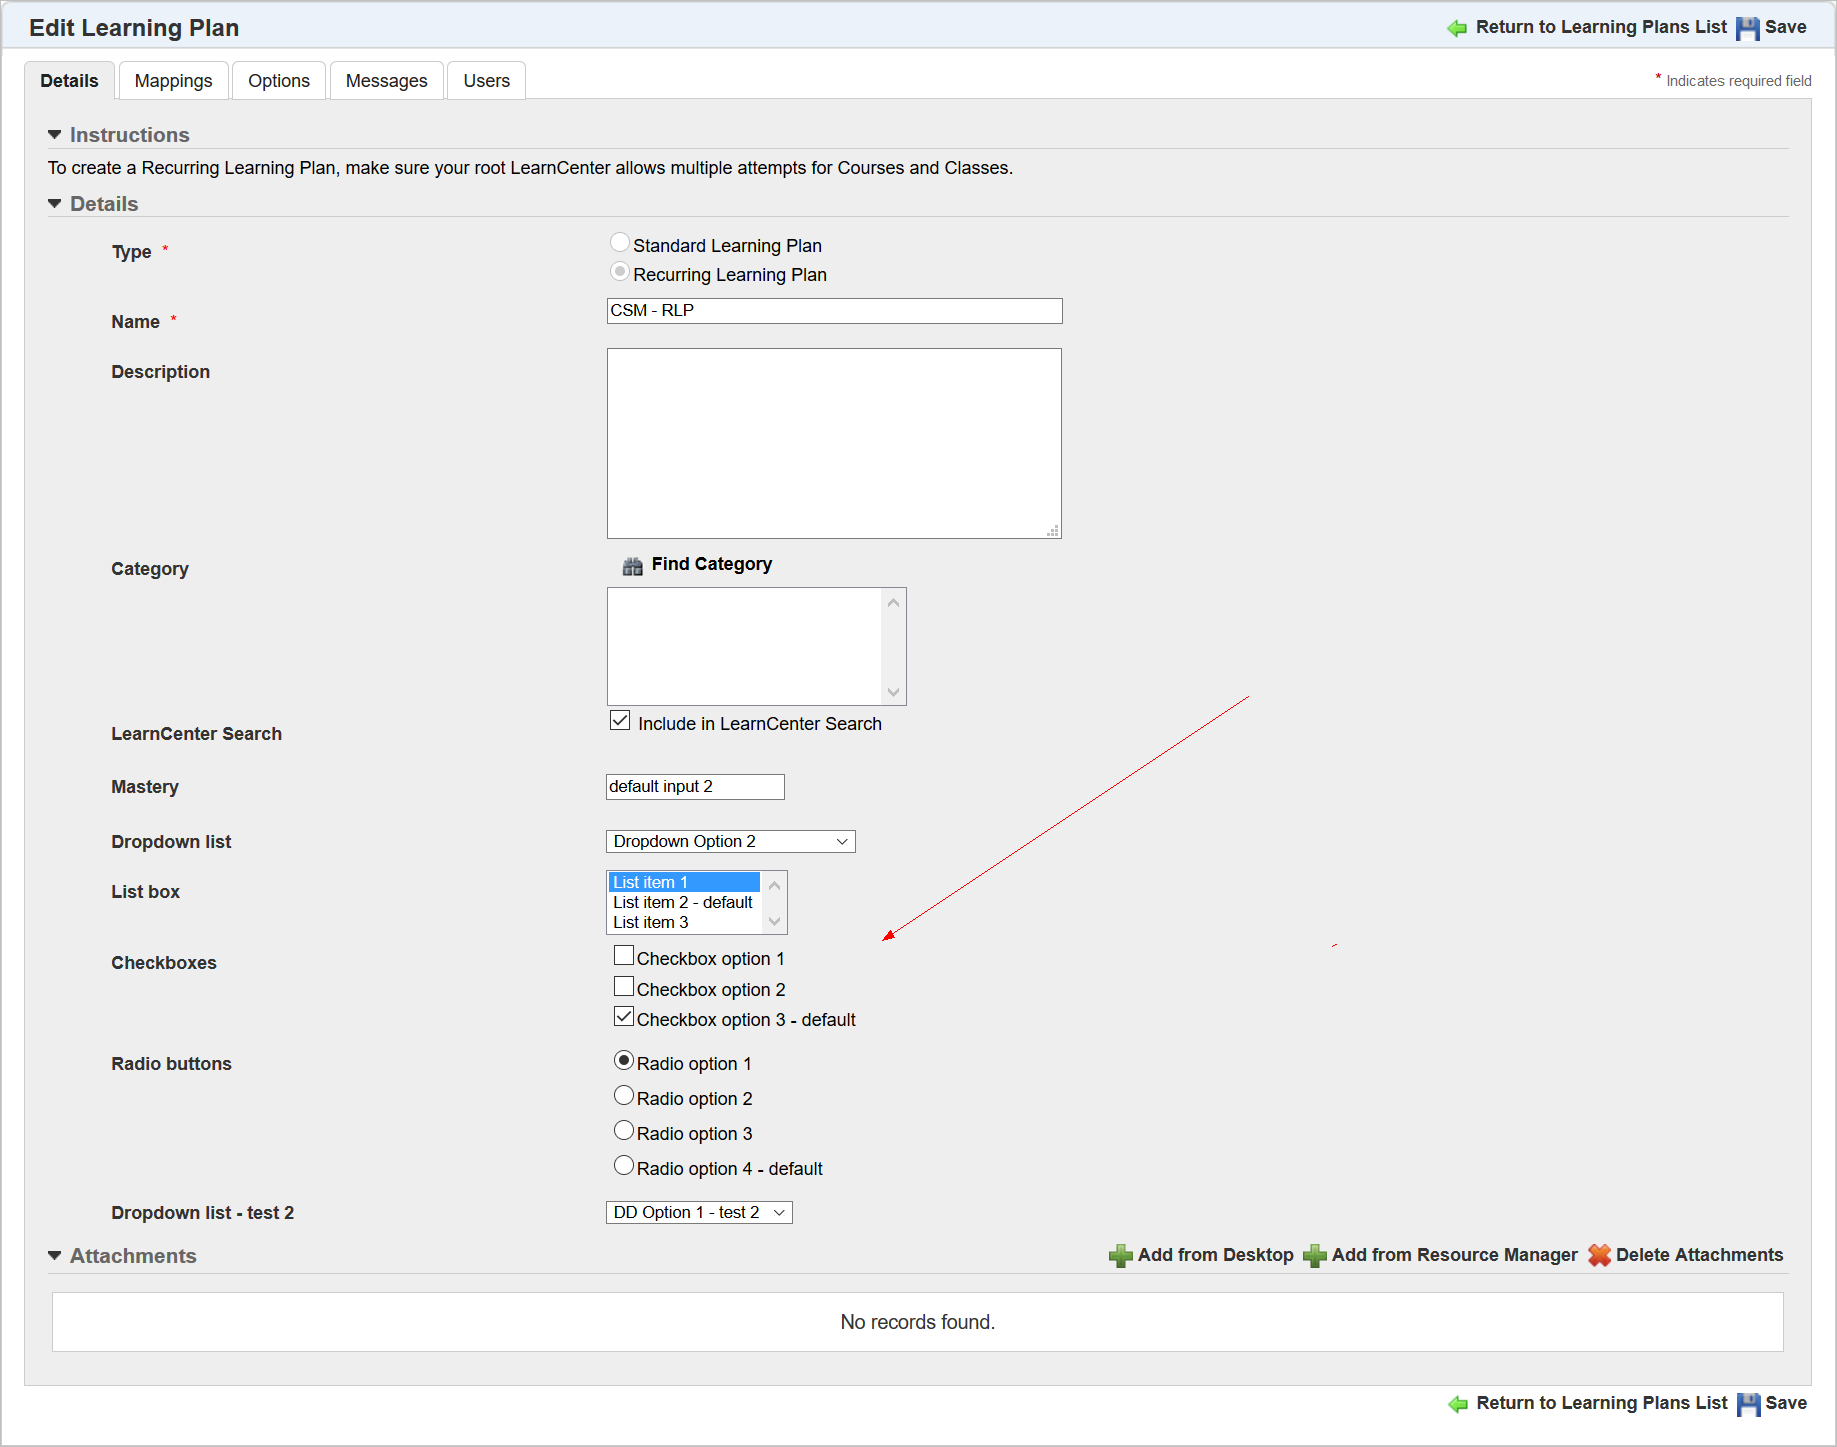
Custom Learning Plan Fields
Now, when adding a new Learning Plan, any custom fields that contain default values are pre-populated for you. You can edit the default values as you create or edit the Learning Plans.
If you made Custom Fields visible to end Users by selecting User View on the Learning Plans Field Settings page, Users will see the fields on the Learning Plans Widget under Details.
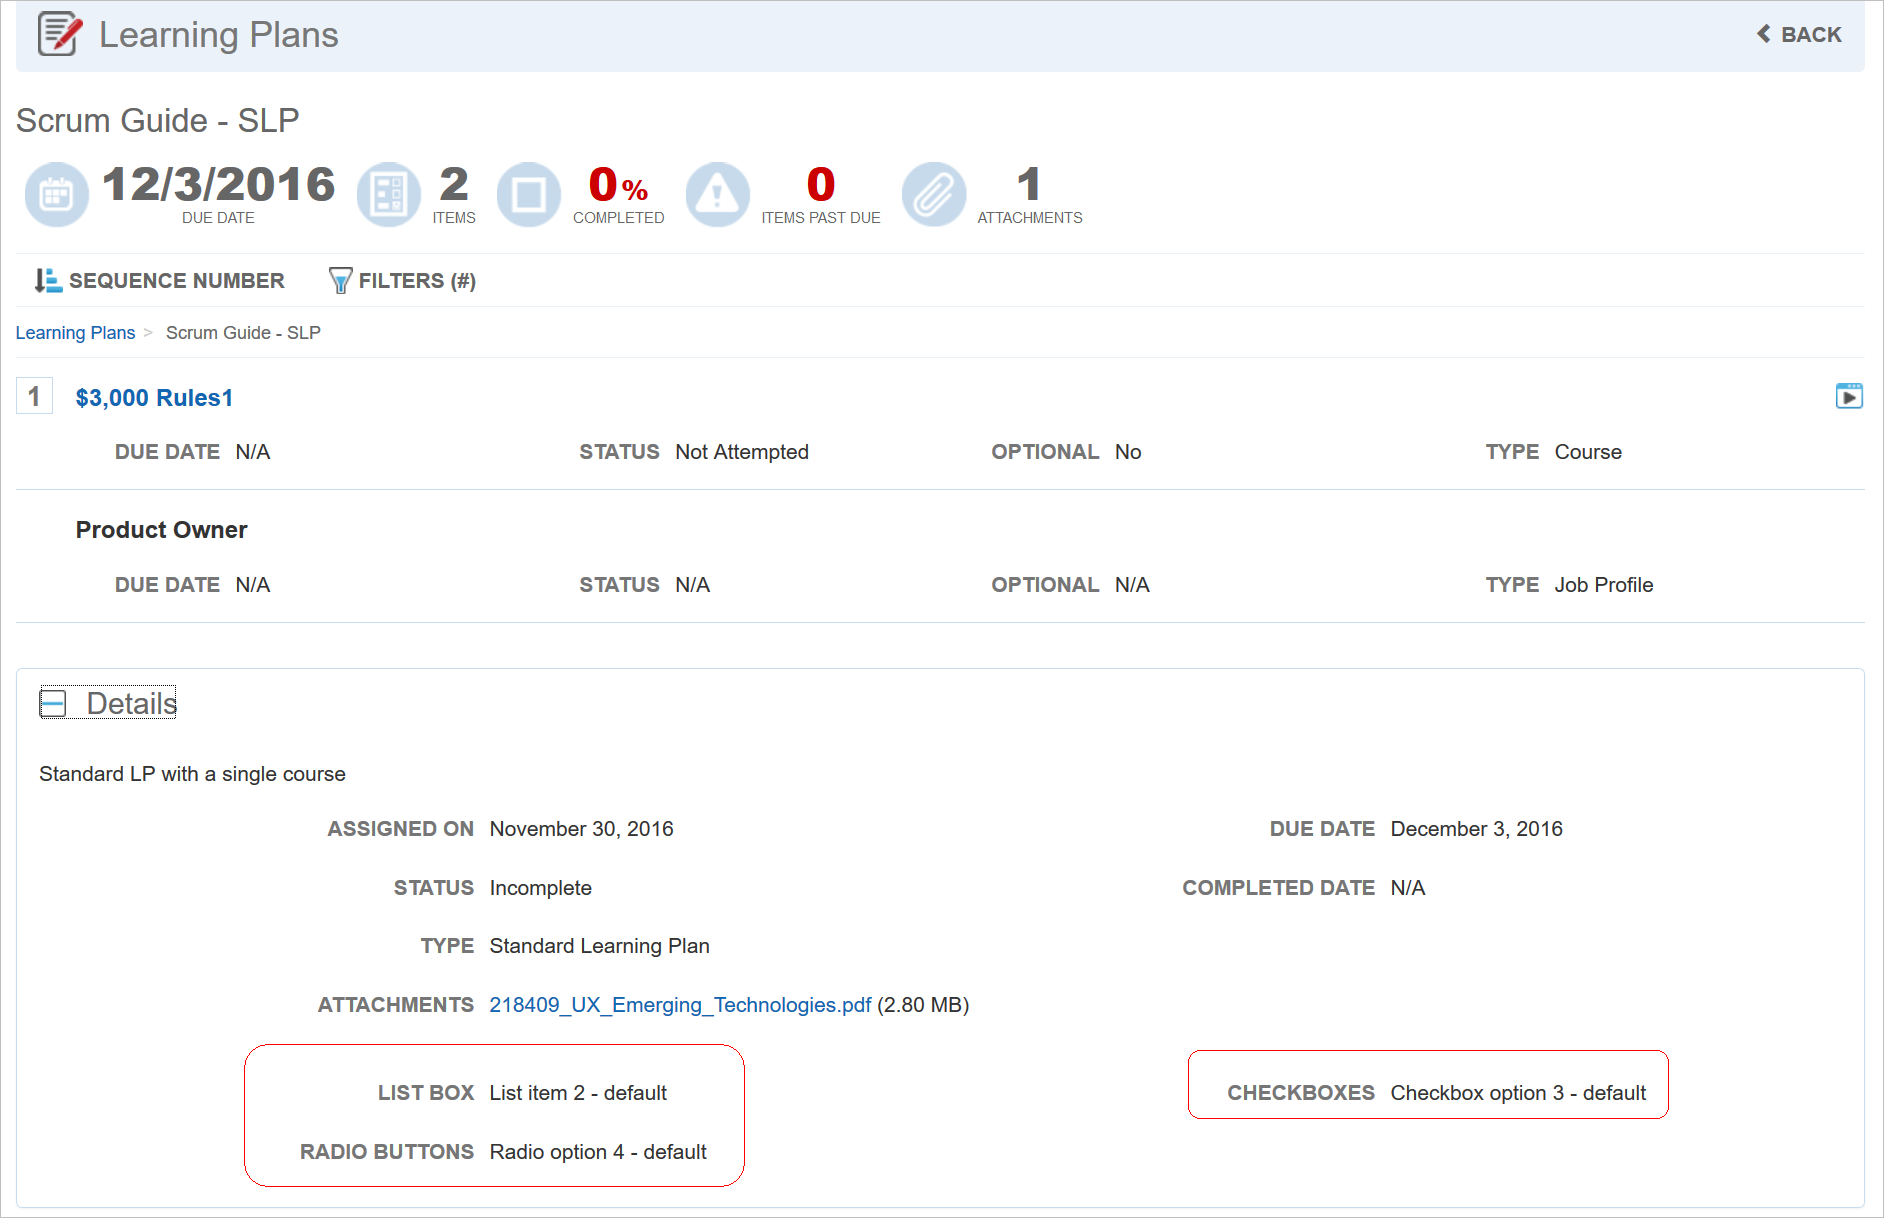
Custom Fields Display to Users in the Details Section of the Widget
NOTE: Fields only display on the Widget if the Admin entered a value for the field during the Learning Plan Widget setup.
Custom Fields are visible on the Learning Plans Data view for BI Reports.
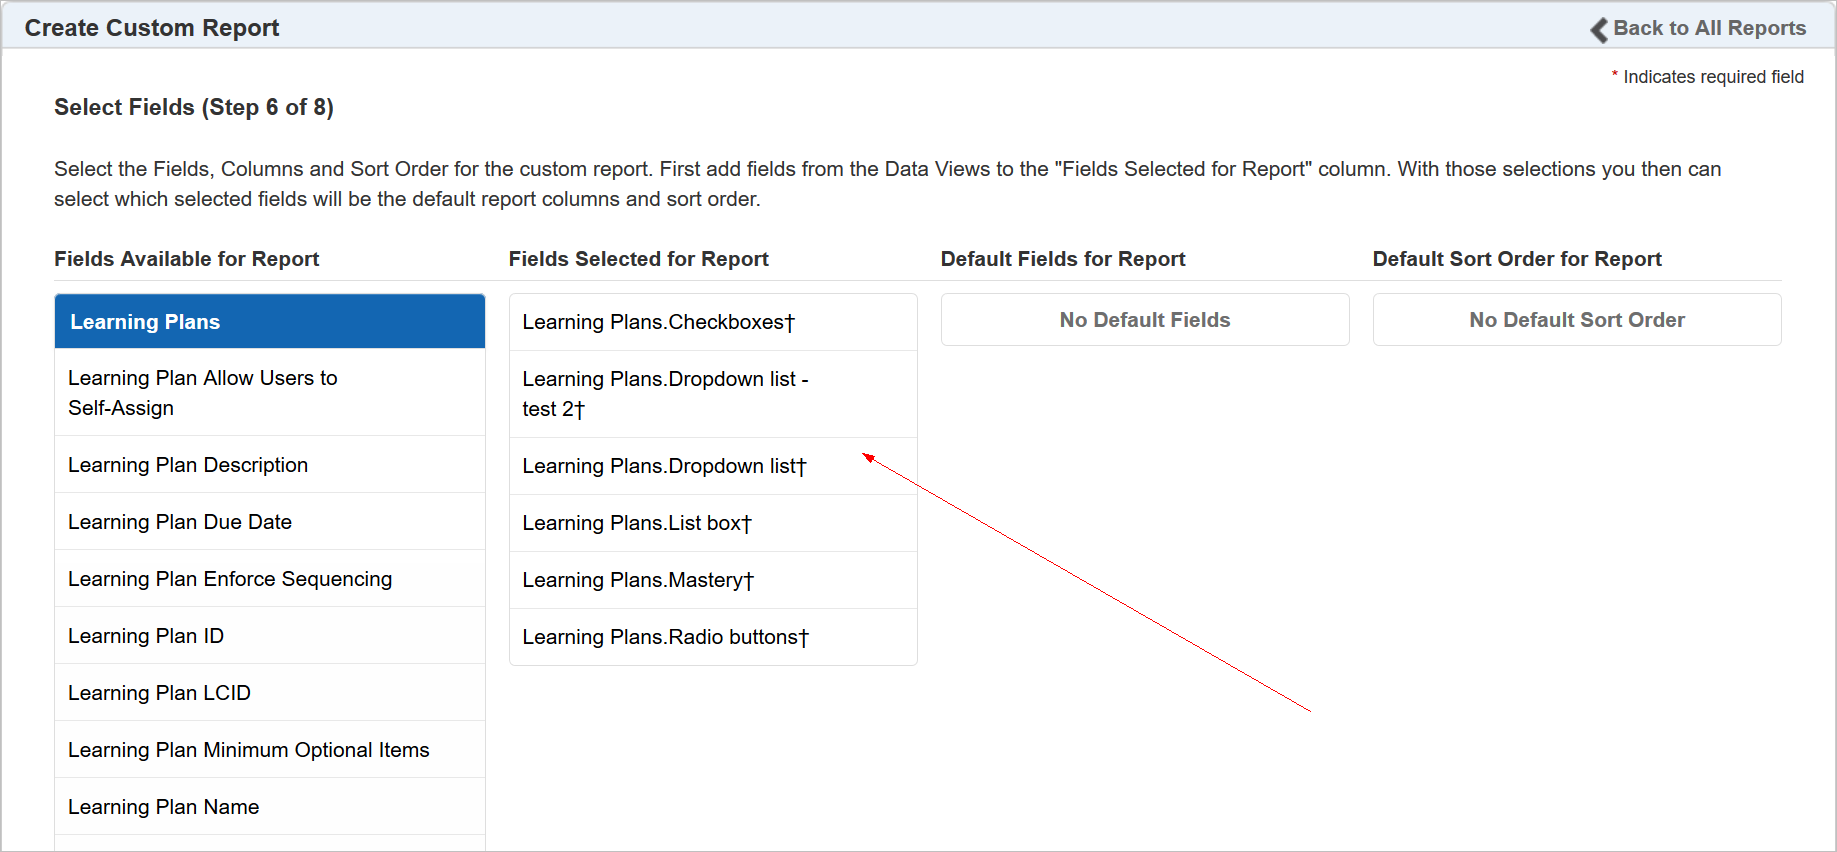
Custom Learning Plan Fields for BI Reports
Notice that custom fields are marked with the following symbol: †. As with other custom fields for BI Reporting, the custom Learning Plans fields are always pre-selected.
Refer to online help if you need additional instructions for creating custom BI Reports (TOC > Reports > BI Reporting > Creating Custom Reports).
New User Permissions for Learning Plan Custom Fields
There are new User Permissions associated with this feature. They are located under the existing Manage Custom Fields User Permissions:
- Add Learning Plan Custom Fields – Enables Admins to add Learning Plan Custom Fields. If you deny this permission, Admins will not be able to add Learning Plan Custom fields.
- Edit Learning Plan Custom Fields - Enables Admins to edit Learning Plan Custom Fields. If you deny this permission, Admins will not be able to edit Learning Plan Custom fields.
- Delete Learning Plan Custom Fields - Enables Admins to delete Learning Plan Custom Fields. If you deny this permission, Admins will not be able to delete Learning Plan Custom fields.
- View Learning Plan Custom Fields - Enables Admins to view Learning Plan Custom Fields. If you deny this permission, Admins will not be able to view Learning Plan Custom fields, nor will they be able to add, edit, or delete them.
NOTE: Only Users with Co-Owner permissions are initially granted access to these permissions. You will need to grant these permissions to the appropriate Users.
Refer to online help if you need step-by-step instructions on granting or denying these User Permissions (TOC > User Permissions > Custom Fields User Permissions).
New Ability to Import and Export Custom BI Reports
You can now transfer custom BI Reporting reports between LearnCenters, or exchange custom reports with other Learn Administrators. Only BI Reporting report definitions can be imported or exported. No data is included in the output files. This feature contains an import wizard that helps you to map similar Custom Fields from a source LearnCenter to the target LearnCenter.
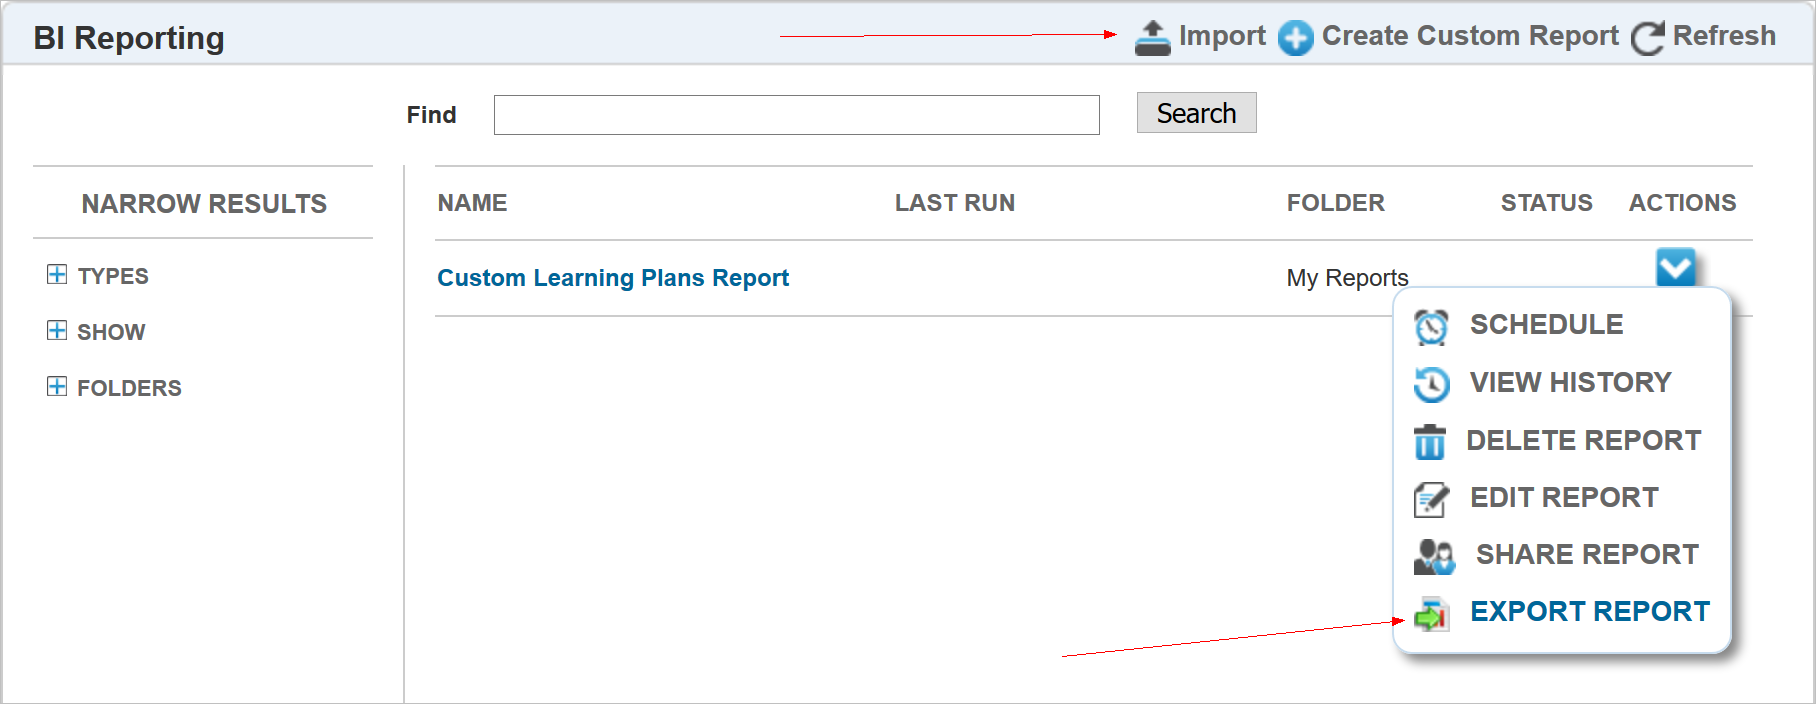
New Export Report Action
There is a new option at the top of the page called Import, which lets you import reports from other LearnCenters or Admins. There is another new option called Export Report in the Actions drop-down list for custom reports.
Click Export Report to export the report to a file. You are prompted to save the file to your PC or other designated location.
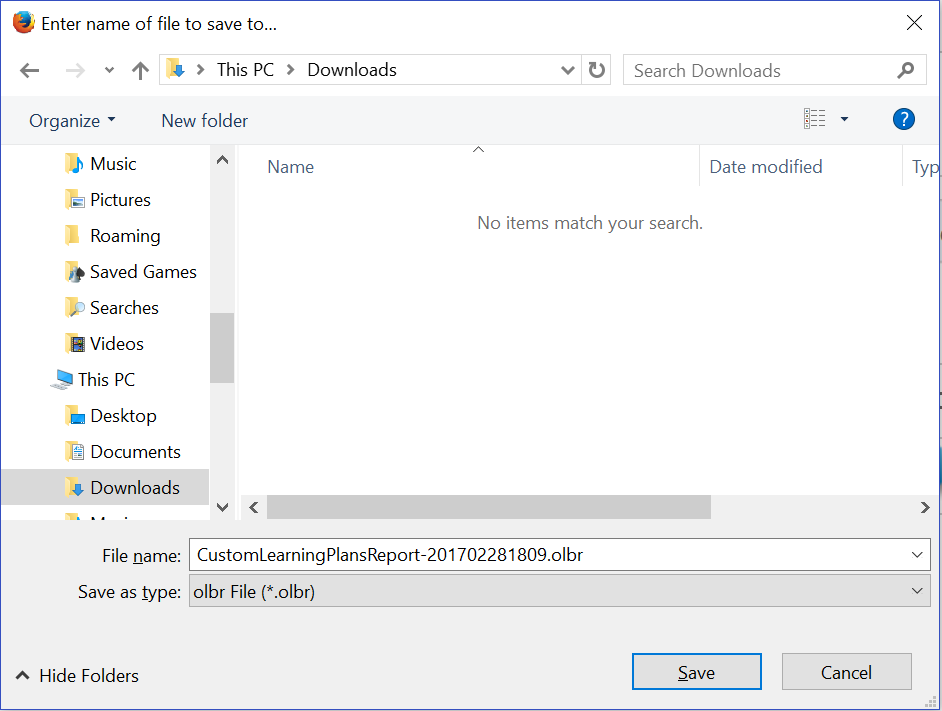
New File Extension for Oracle Learn Taleo Cloud BI Reporting Reports
The file extension is .OLBR (which stands for Oracle Learn BI Report).
NOTE: These files are encrypted and cannot be modified outside of LearnCenter.
Once exported, you can import the report to other LearnCenters, or provide them to other Administrators so that they can import them into their own LearnCenters.
To import a report, click Import at the top of the BI Reporting page. You are prompted with a browser window so that you can navigate to and select the .OLBR file you want to import. Click Open. The file is imported, and a preview displays any errors or messages alerting you to further actions.
In the example below, notice that the Admin is warned that the incoming report has the same name as a report that already exists in the target LearnCenter. Report names must be unique. You cannot use the same name as an existing report. This rule was put in place to prevent you from accidentally overwriting reports. Admins who encounter this message can use the Name field to update or give the incoming report a new, unique name.
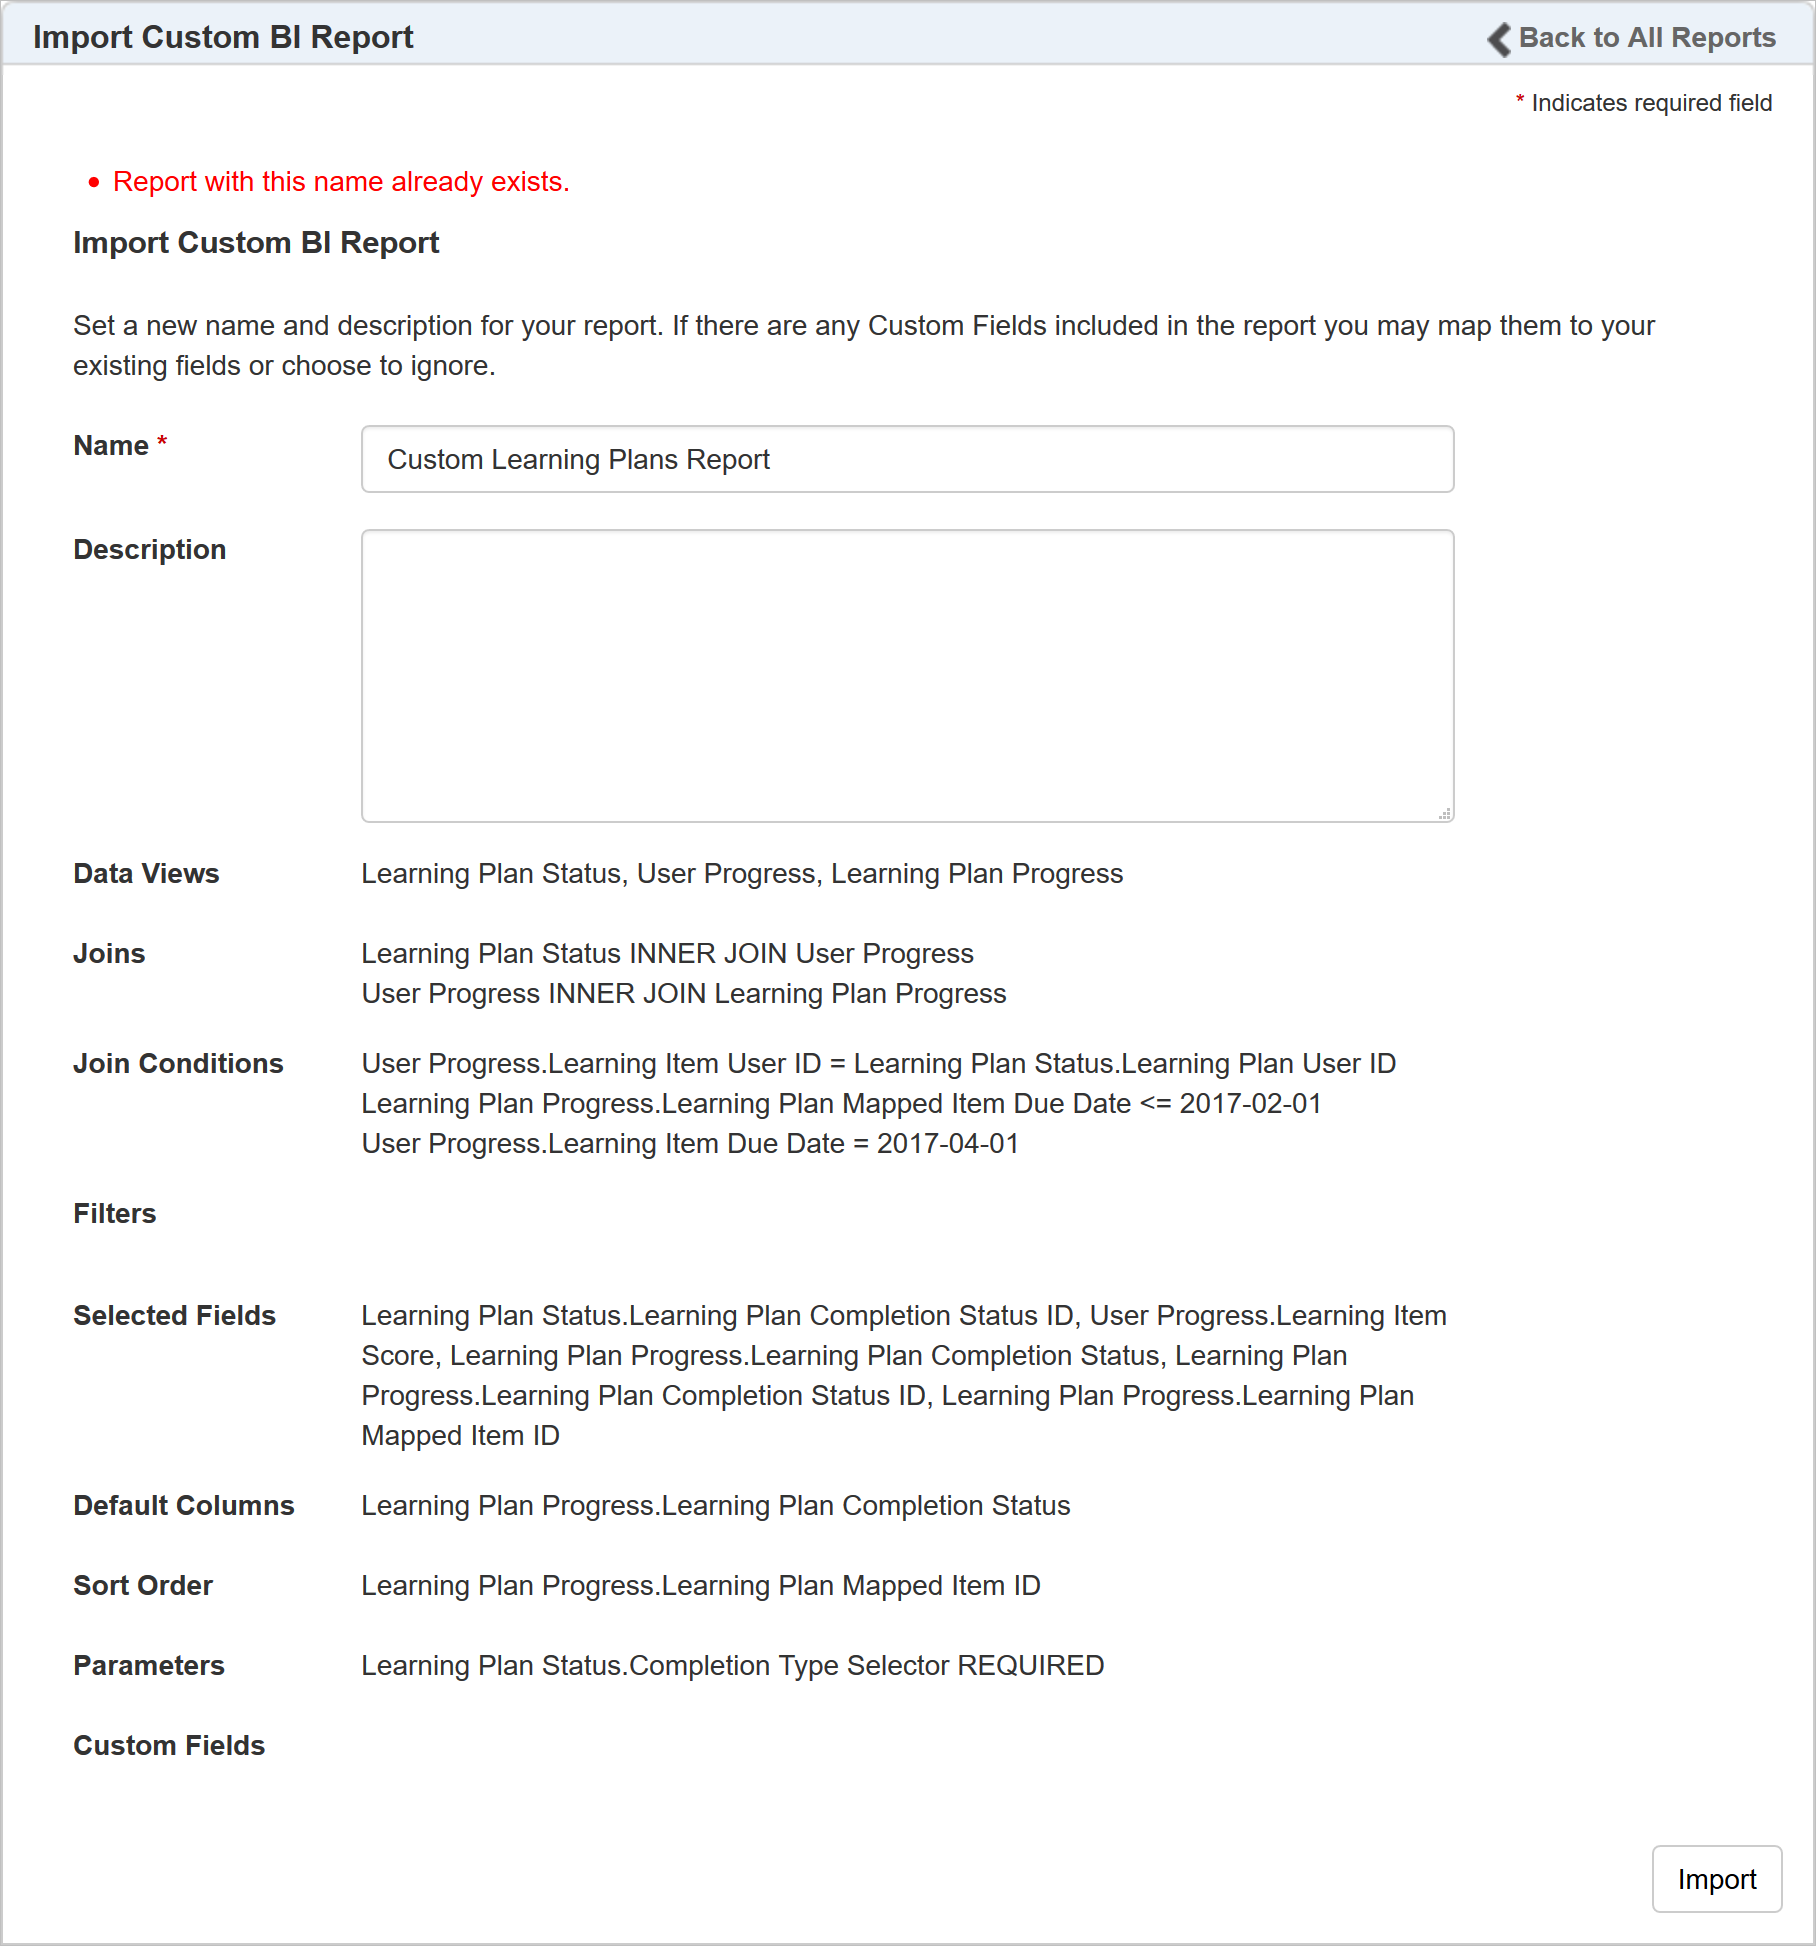
Imported Reports Must Have Unique Names
If the LearnCenter you are importing from has Custom Fields that have different names than fields in the target LearnCenter, you can map the appropriate fields so that they match up.
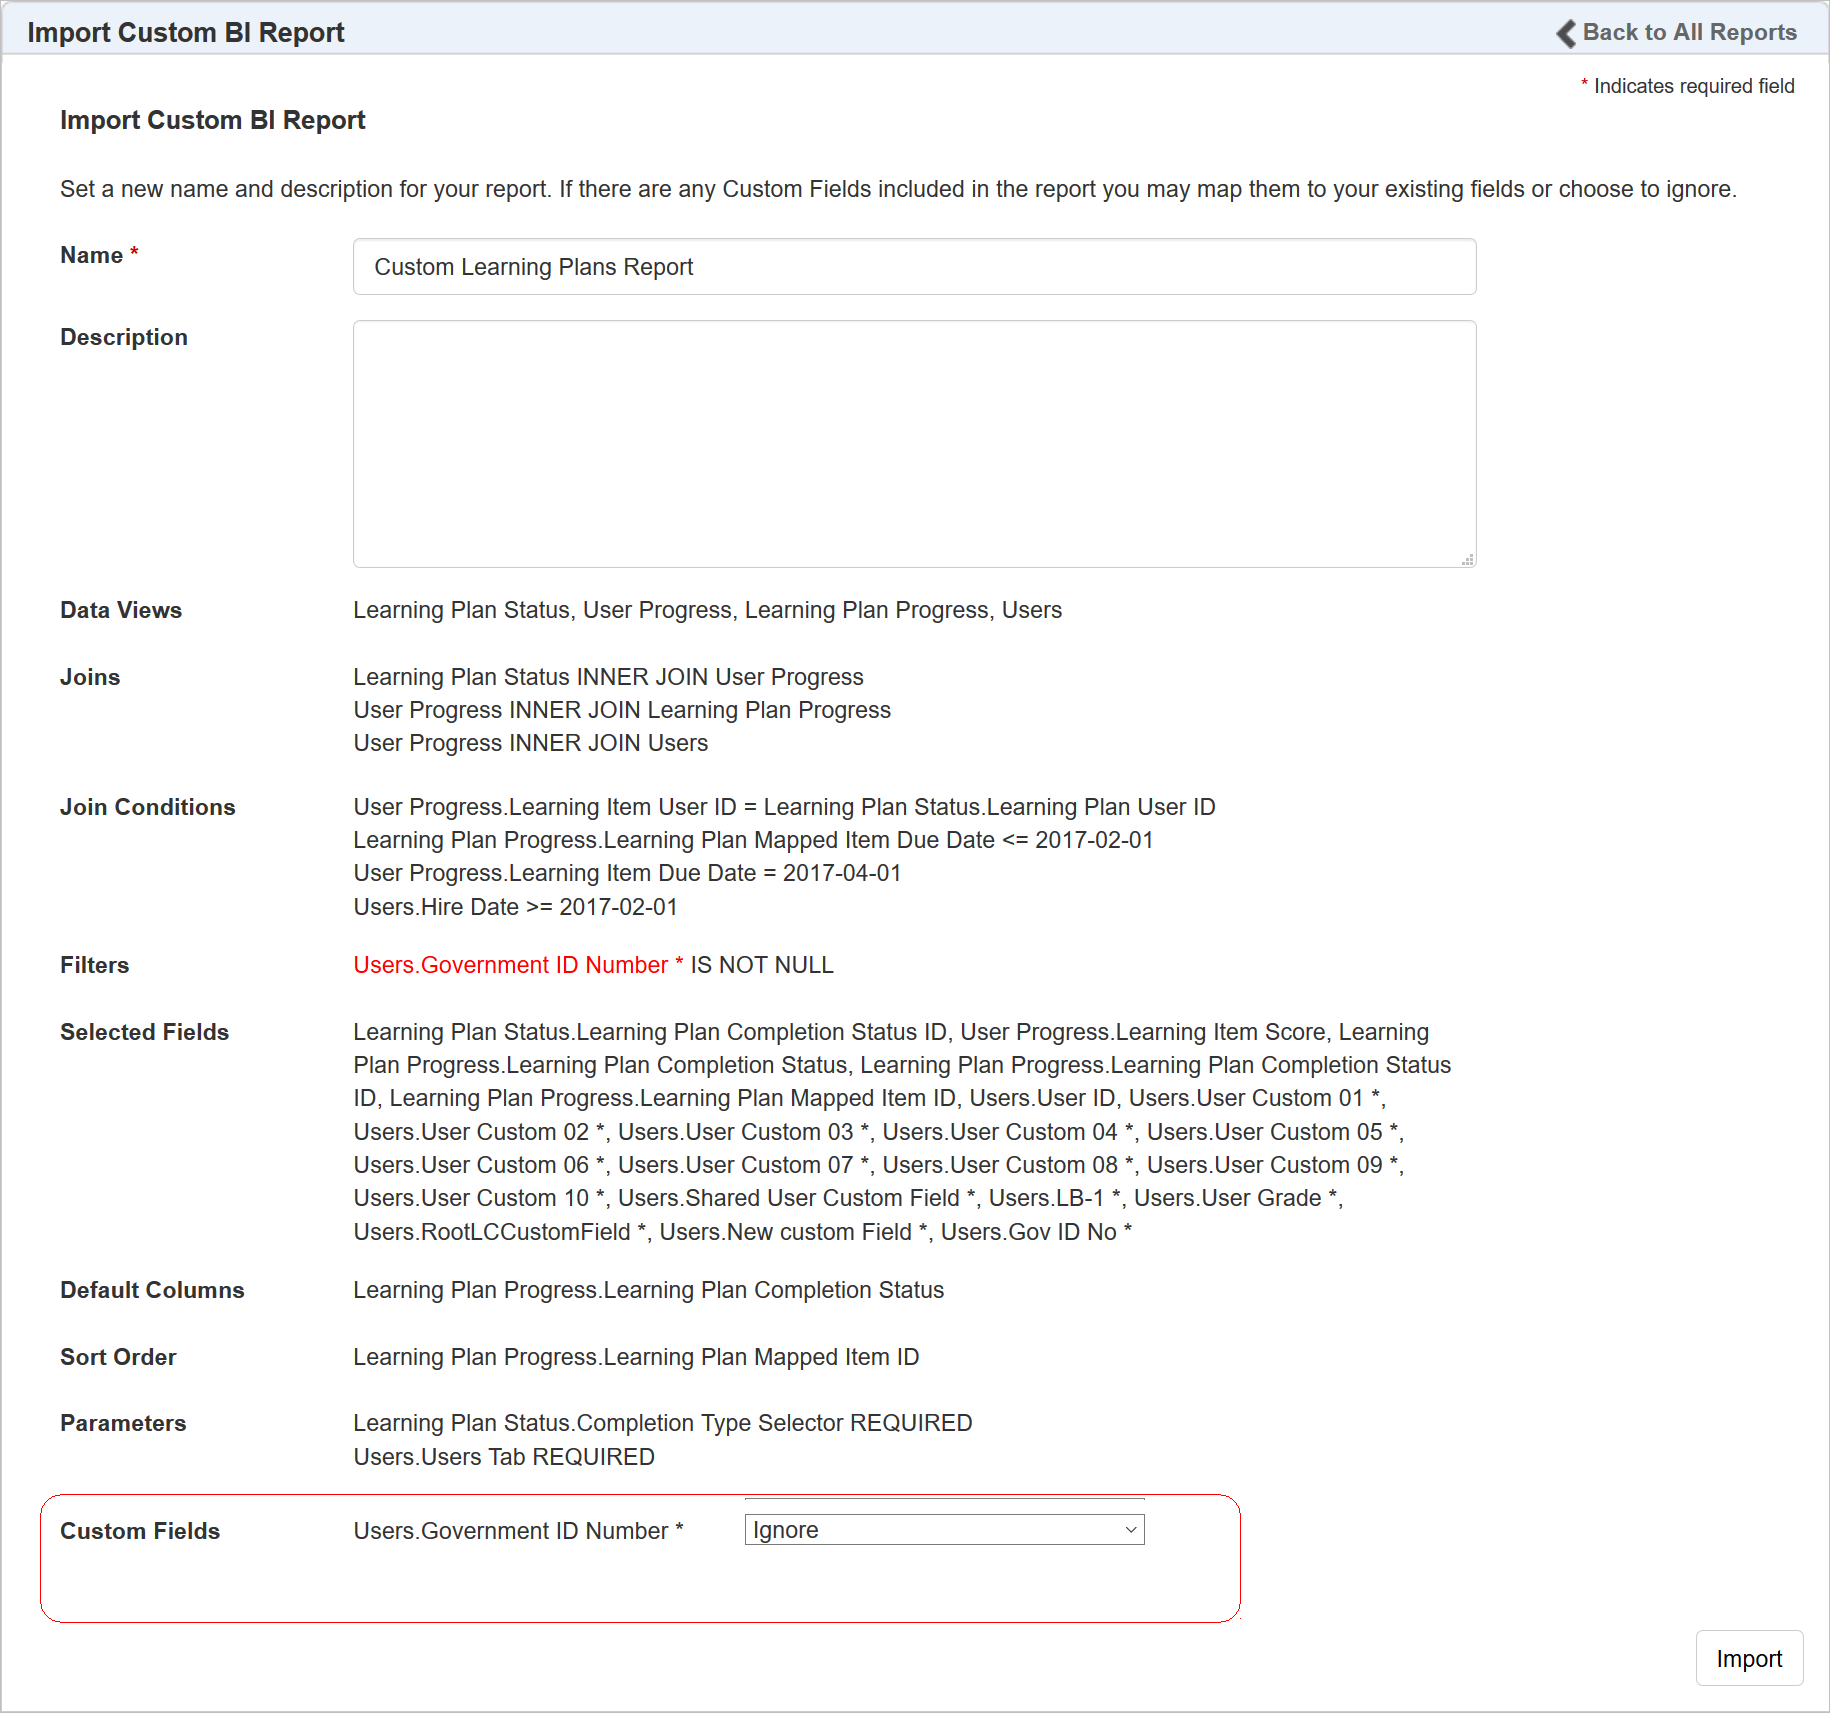
Match or Ignore Similar Custom Fields from Incoming Reports
For example, perhaps you have a custom text box called Government ID Number in the source LearnCenter, and a similar custom text box is called Gov ID No in the target LearnCenter.

Match Similar Custom Fields from Incoming Reports
You can map these two fields on this preview page so that the report uses the custom field properly in the target LearnCenter.
You can also ignore a source LearnCenter’s custom fields. You do not have to map any custom field if you do not want or need it. If the source LearnCenter’s report contains custom fields that do not match any custom fields in your LearnCenter, they will simply be ignored without any further intervention. Only those custom fields that are a possible match are presented for you to evaluate on the Preview page.
Click Import to complete the import process.
NOTE: Users who have been granted the Manage BI Reporting > Create & Edit Reports User Permission will also have the ability import or export custom BI Reports.
The new Sequenced Learning Plans feature enables you to map Learning Plans to other Learning Plans. You can then sequence the mapped Learning Plans as you would other mapped training items, so that you can have Users complete Learning Plans in a pre-defined order. You can create one- or two-level deep training structures. You can also offer nested plans for sale via eCommerce, or for self-mapping.
Only standard Learning Plans are supported for use with the feature. Recurring Learning Plans are not supported. Sequenced Learning Plans are only available for use with the Learning Plans Widgets. They are not available for use with the Learning Plan Dynamic Objects. This feature does not work with Taleo Enterprise Edition (TEE) Performance Integrations.
Refer to online help for complete instructions on sequencing training items in Learning Plans (TOC > Advanced Learning > Learning Plans > Customizing the Sequencing of Learning Plan Training Items).
This feature includes some new terminology and rules. The information presented in this section will help you to understand the information and examples discussed later in this documentation. We recommend that you read and understand these rules in this section before beginning work on Sequenced Learning Plans.
New Terms:
- Parent Learning Plan (P) - Represents a top level Learning Plan in a structure.
- Child Learning Plan (C) - Represents a plan mapped to a Parent plan
- Grandchild Learning Plan (G) - Represents a last Learning Plan in a structure. Grandchild represents a plan mapped to a Child plan.
- Direct User Mapping (D) - Represents a physical link between user and plan.
- Indirect User Mapping (I) - Represents a virtual link between user and plan.
Rules:
Learning Plans structures are defined by following rules:
- Can only be two levels deep. Structures could look like the following:
- X items wide - A Parent can have multiple Child Learning Plans mapped to it. A Child Learning Plan can have multiple Grandchildren Learning Plans mapped to it.
- Use once - A Learning Plan can be used only once in a structure. A Grandchild cannot be mapped to its Parent, and vice versa.
- Link vertically – Learning Plans can be linked vertically only.
| Up |
Down |
|
| P |
0 |
2 |
| C |
1 |
1 |
| G |
2 |
0 |
Examples of supported structures created by Sequenced Learning Plans:
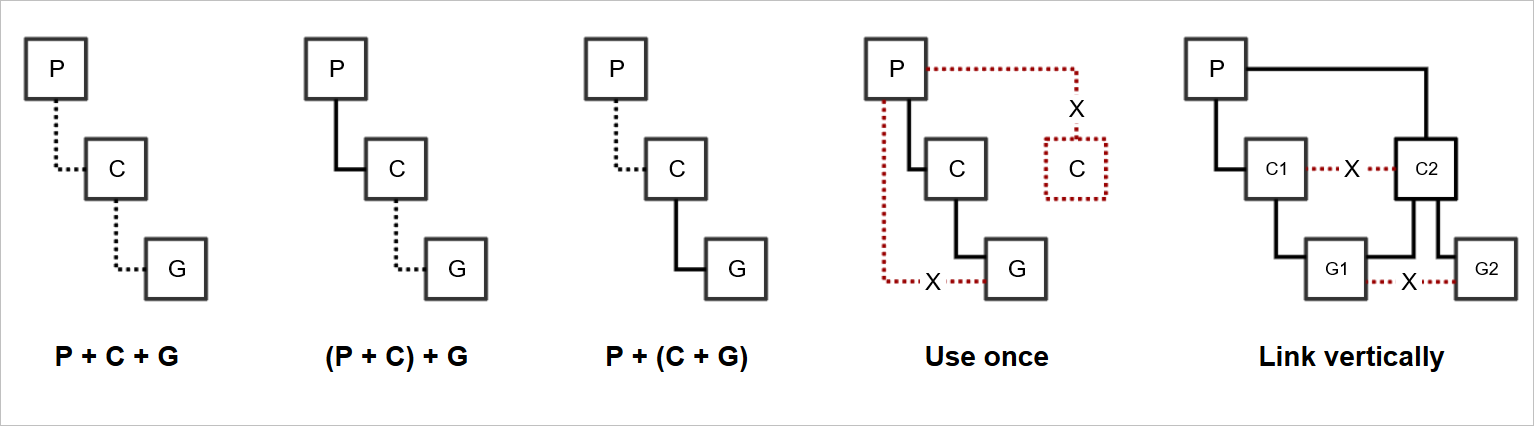
Supported Structures
User Mapping:
User mapping to Sequenced Learning Plans is defined by following rules:
- When Users are mapped:
- Users are mapped indirectly to lower level Learning Plans if they have no direct mappings to them.
- Users retain their direct mappings to lower level Learning Plans if they have direct mappings to them.
- Users are not mapped to higher level Learning Plans.
- When Users are un-mapped:
- Users retain direct mappings to Learning Plans if they have direct mappings to them.
- Users are unmapped from Learning Plans if they have indirect mappings to them.
- Users are unmapped from Learning Plans to which they have indirect mappings when the plan is removed from structure.
| Plan |
User Mapping |
Map to P |
Map to C |
Map to G |
| P |
X |
D |
X |
X |
| C |
X |
I |
D |
X |
| G |
X |
I |
I |
D |
| P |
X |
D |
X |
X |
There are new sub User Permissions under the Manage Learning Plans User Permission category as a result of this feature:
- Add Learning Plan Mapped Learning Plan - Enables Admins to map Learning Plans to other Learning Plans. If you deny this permission, Admins will not be able to map Learning Plans to other Learning Plans.
- Delete Learning Plan Mapped Learning Plan - Enables Admins to remove mapped Learning Plans from other Learning Plans. If you deny this permission, Admins will not be able to remove mapped Learning Plans from other Learning Plans
- View Learning Plan Mapped Learning Plan – Enables Admins to view the options for mapping Learning Plans to other Learning Plans. If you deny this permission, Admins will not be able to view the options for mapping Learning Plans to other Learning Plans
If Admins have been granted the View Learning Plan Mapped Learning Plan permission, they will see the following new option on the Mappings tab for Learning Plans.
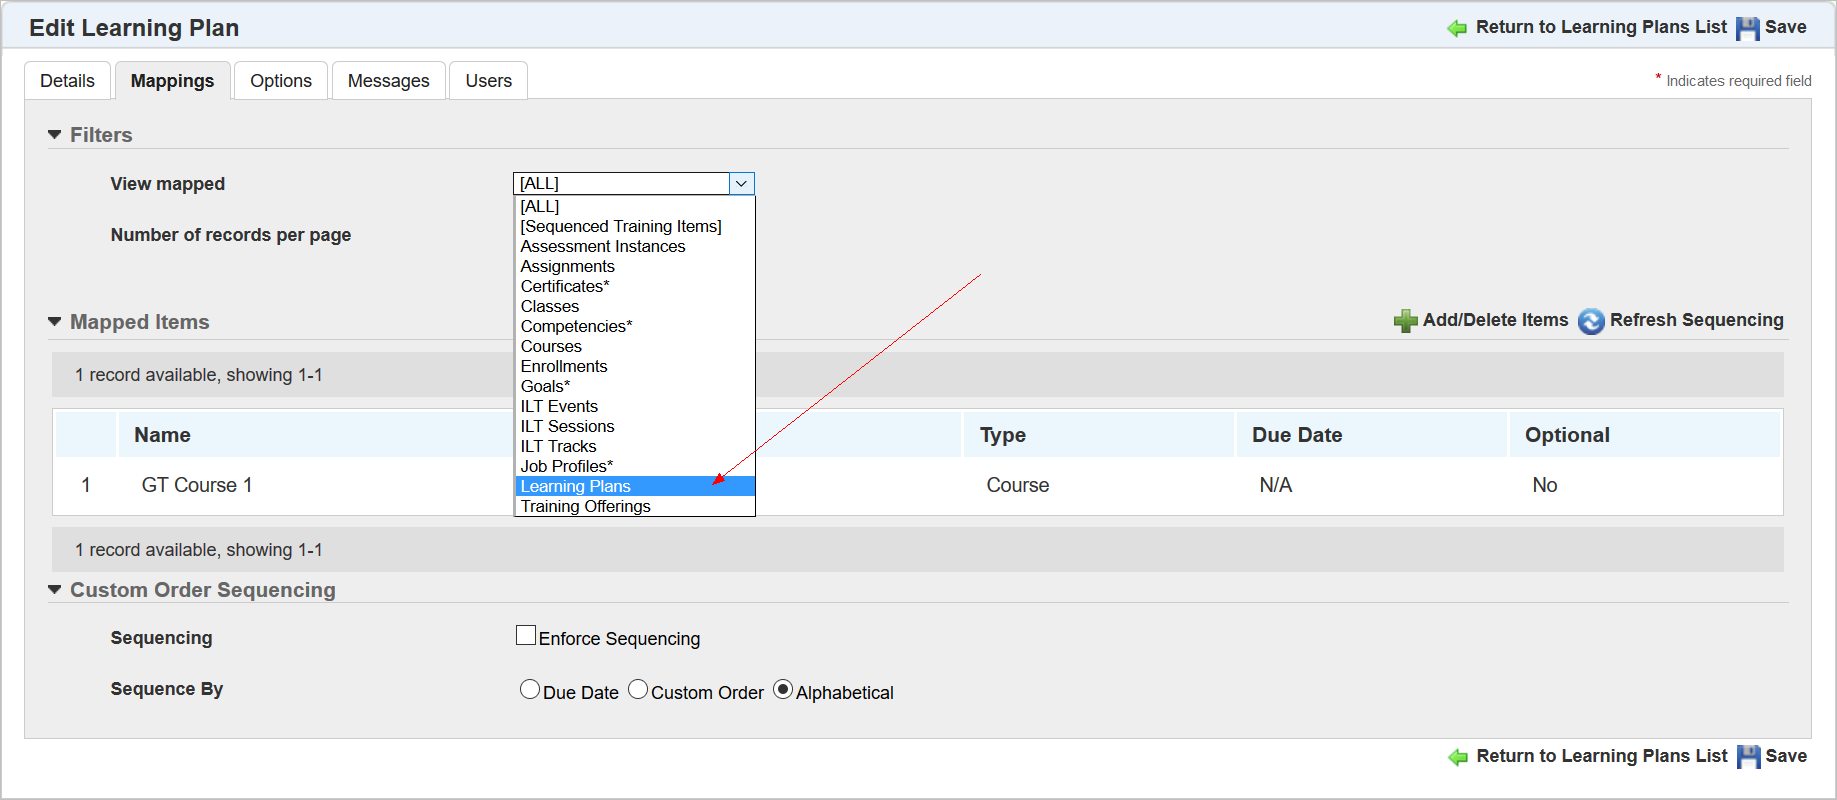
New Option to Map Learning Plans to Learning Plans
Admins will need to be granted the Add and Delete User Permissions to map Learning Plans to, or un-map Learning Plans from other Learning Plans.
NOTE: Only Users with Co-Owner permissions are initially granted access to these new User Permissions. You will need to grant the new permissions to the appropriate Users.
Refer to online help if you need step-by-step instructions on granting or denying these User Permissions (TOC > User Permissions > Custom Fields User Permissions).
For the purposes of this document, Learning Plans have been given names that mirror the terminology discussed earlier in this document.
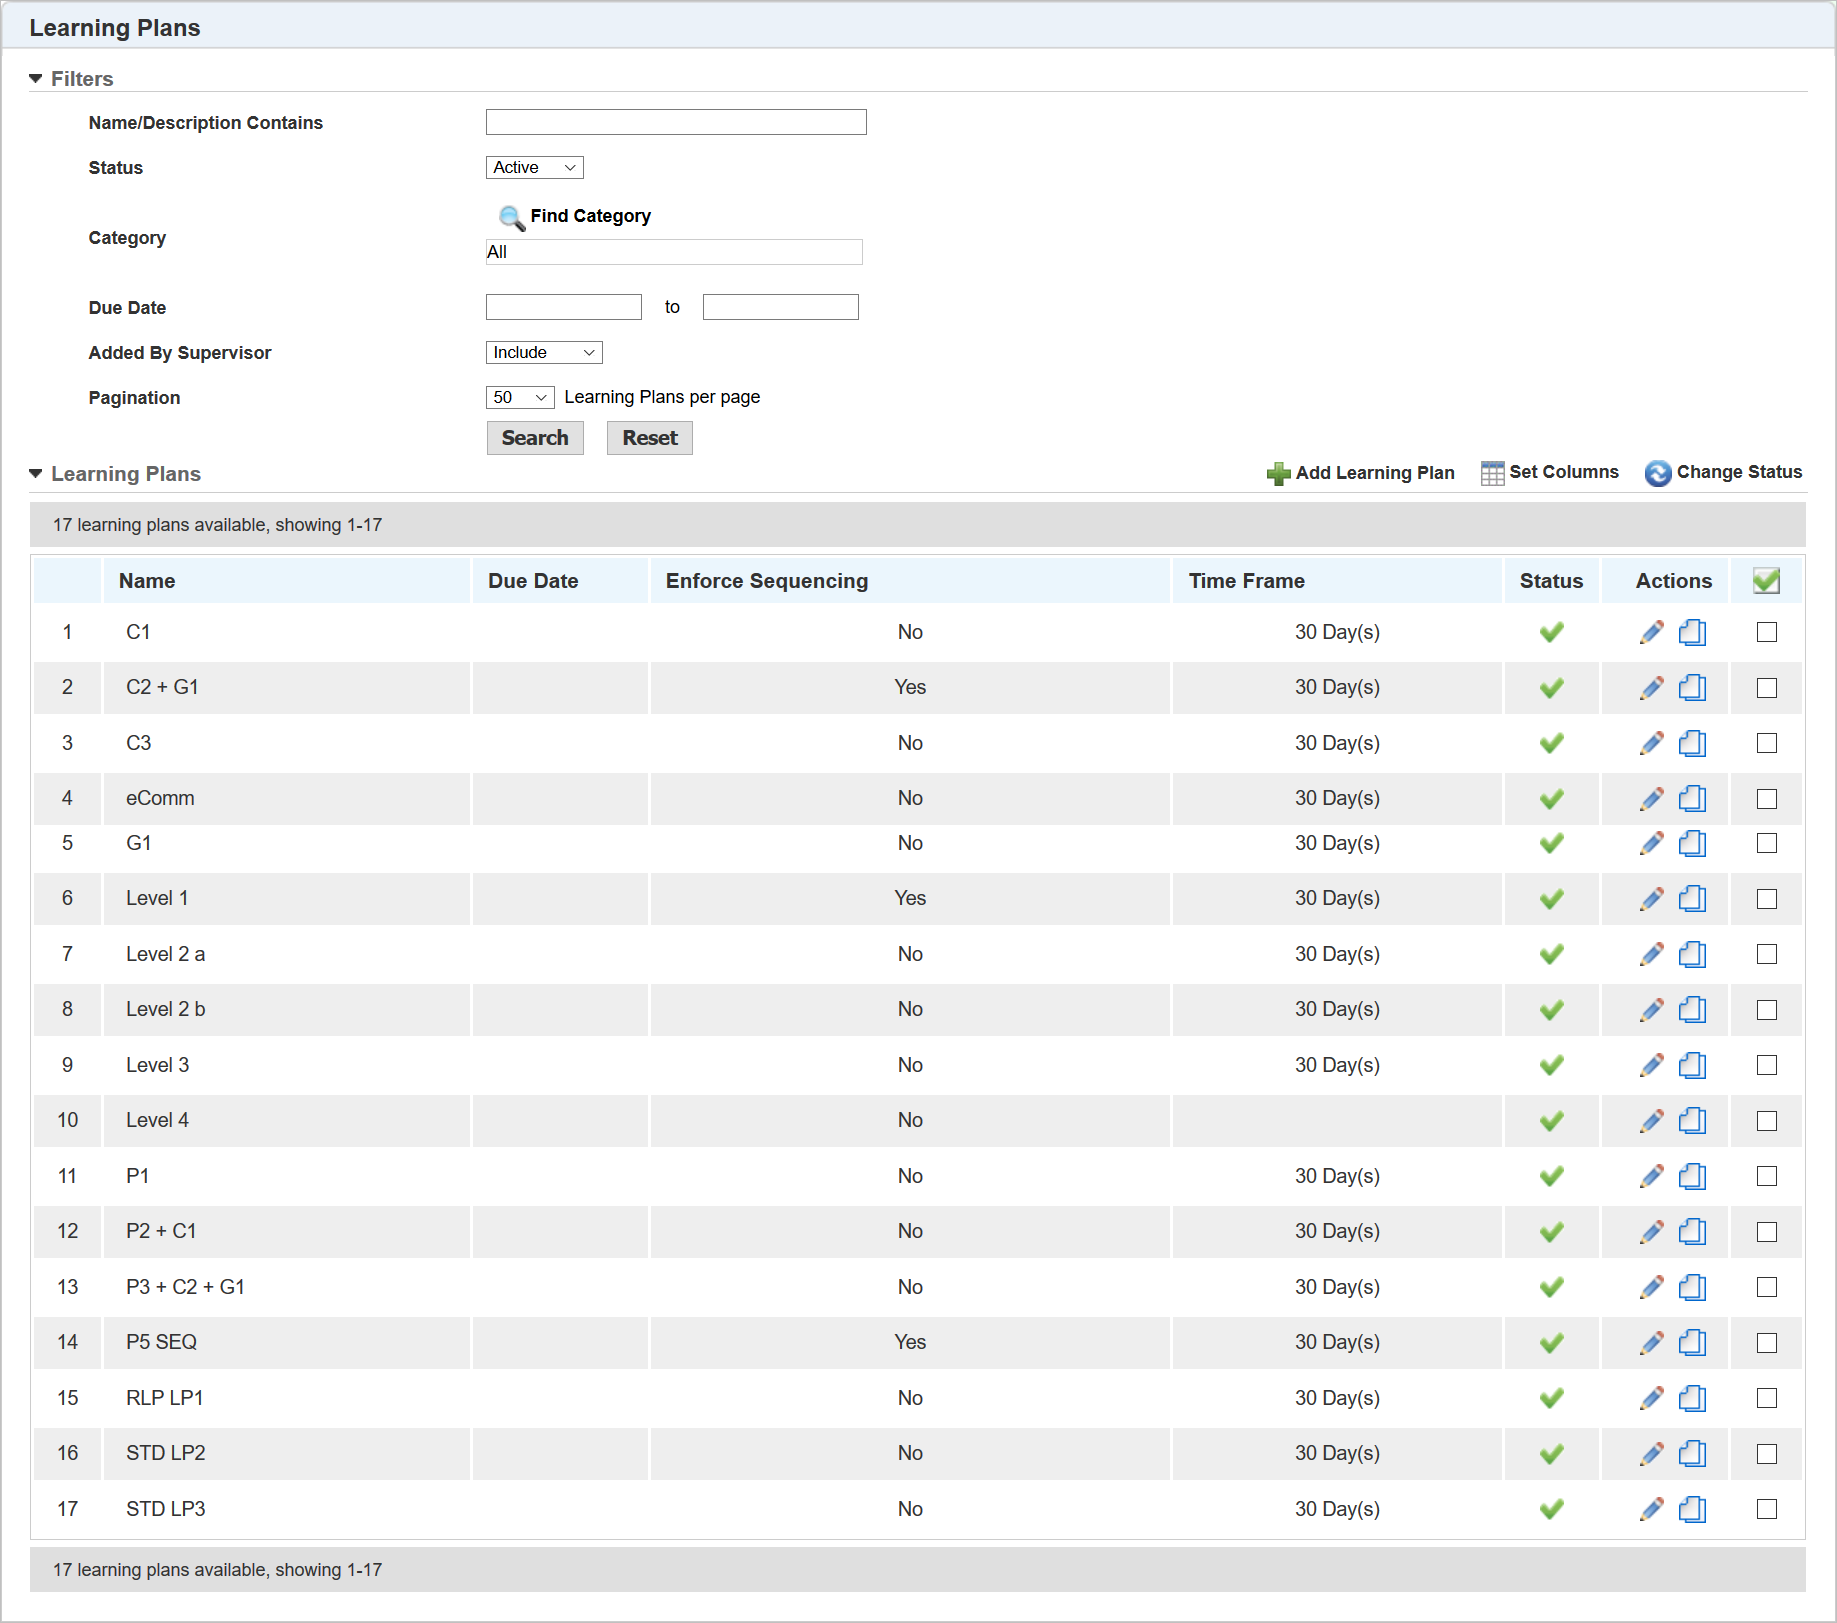
Example Learning Plans
You can now map Learning Plans in the same manner in which you map other training items to Learning Plans. When you add or edit a Learning Plan, select the Mapping tab. Select Learning Plans from the View Mapped Type drop-down list. Then click Add/Delete Item.
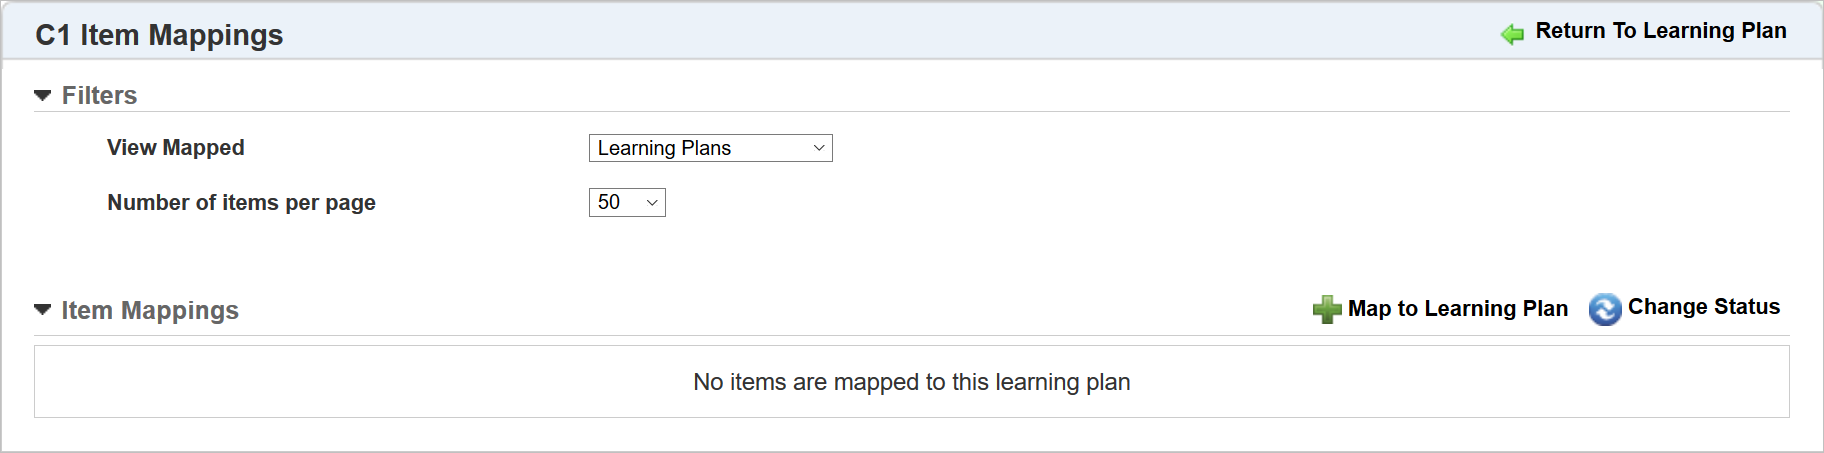
New Learning Plans Mapped Item Type
Click Map to Learning Plan. The Learning Plan Selector opens, displaying only those Learning Plans that are eligible to be mapped. This is determined by the mapping rules which were discussed earlier in this document.
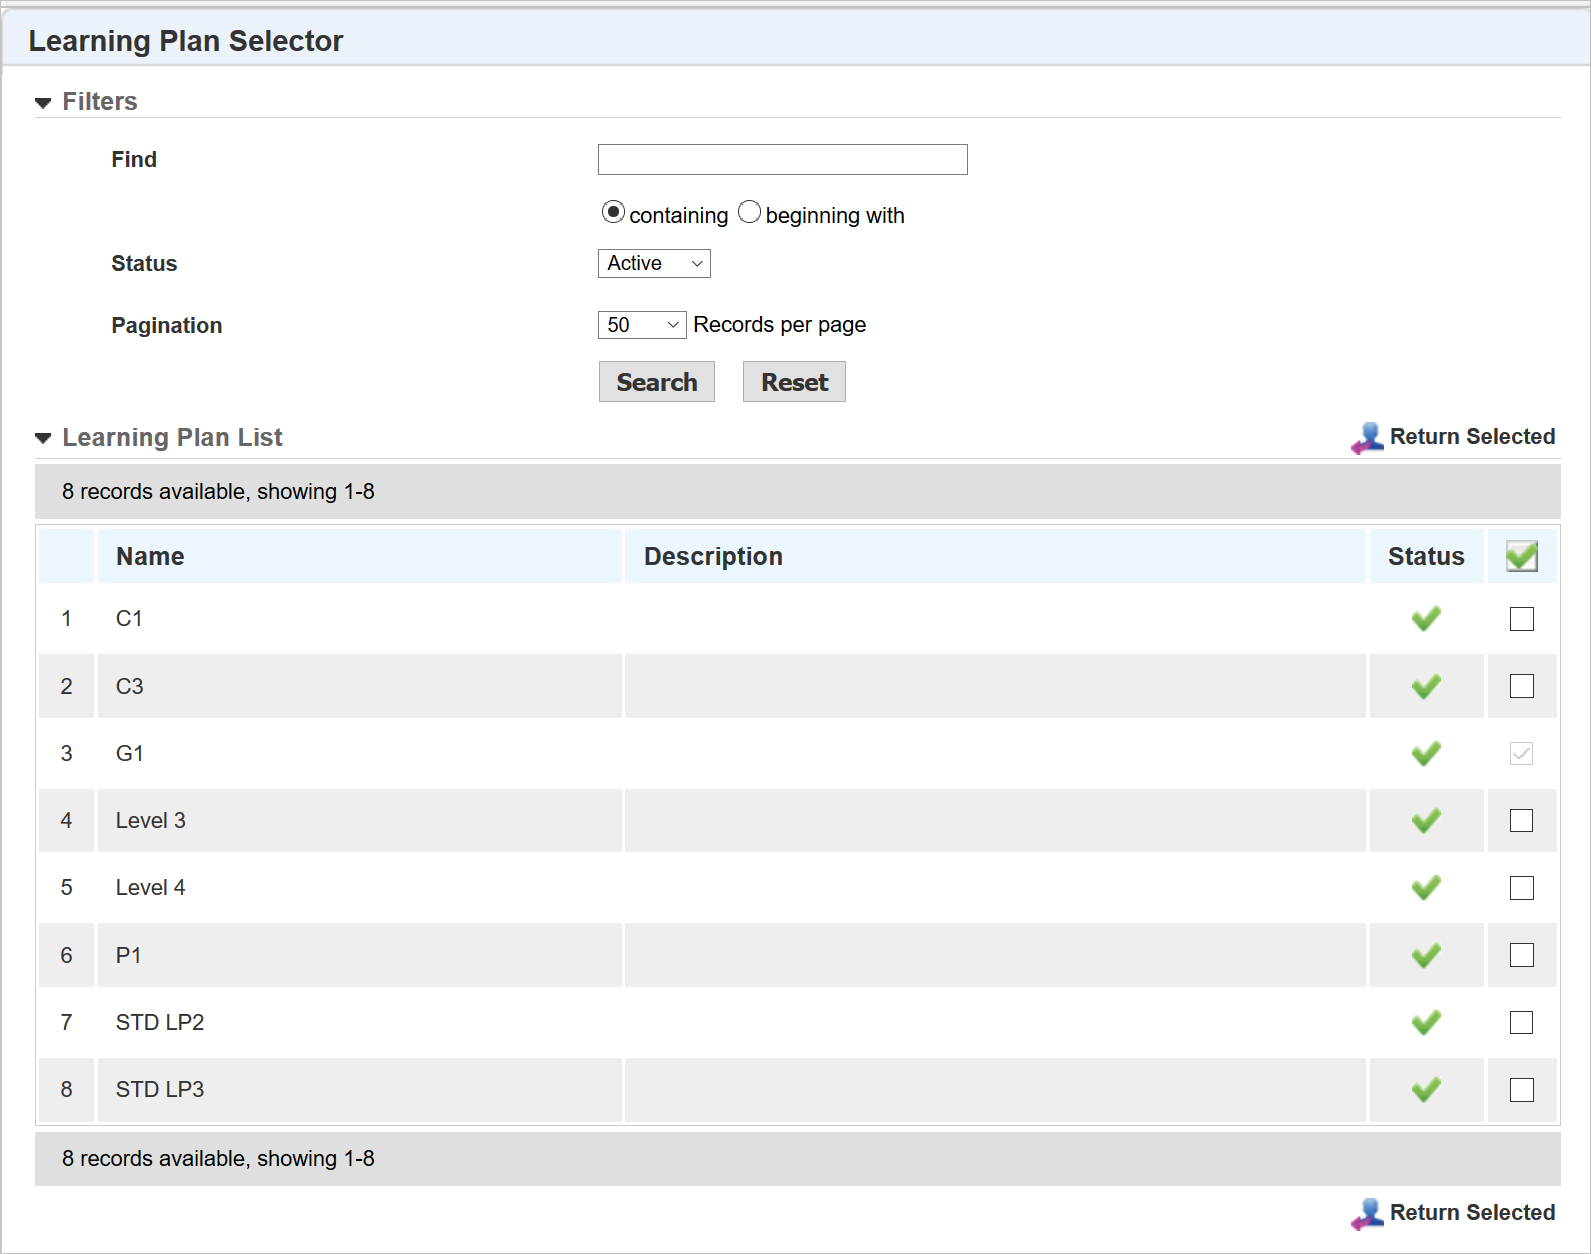
Available Learning Plans
In the example above, notice that the third item on the list, G1, is not selectable. That is because it is already mapped to the Learning Plan. Recall that a Learning Plan can only be mapped to the Sequenced Learning Plan structure once.
NOTE: Recurring Learning Plans are not eligible for selection, as they are not supported with this feature. They will not be displayed for selection here.
A change has been made to the Users tab for the Add and Edit Learning Plan page.
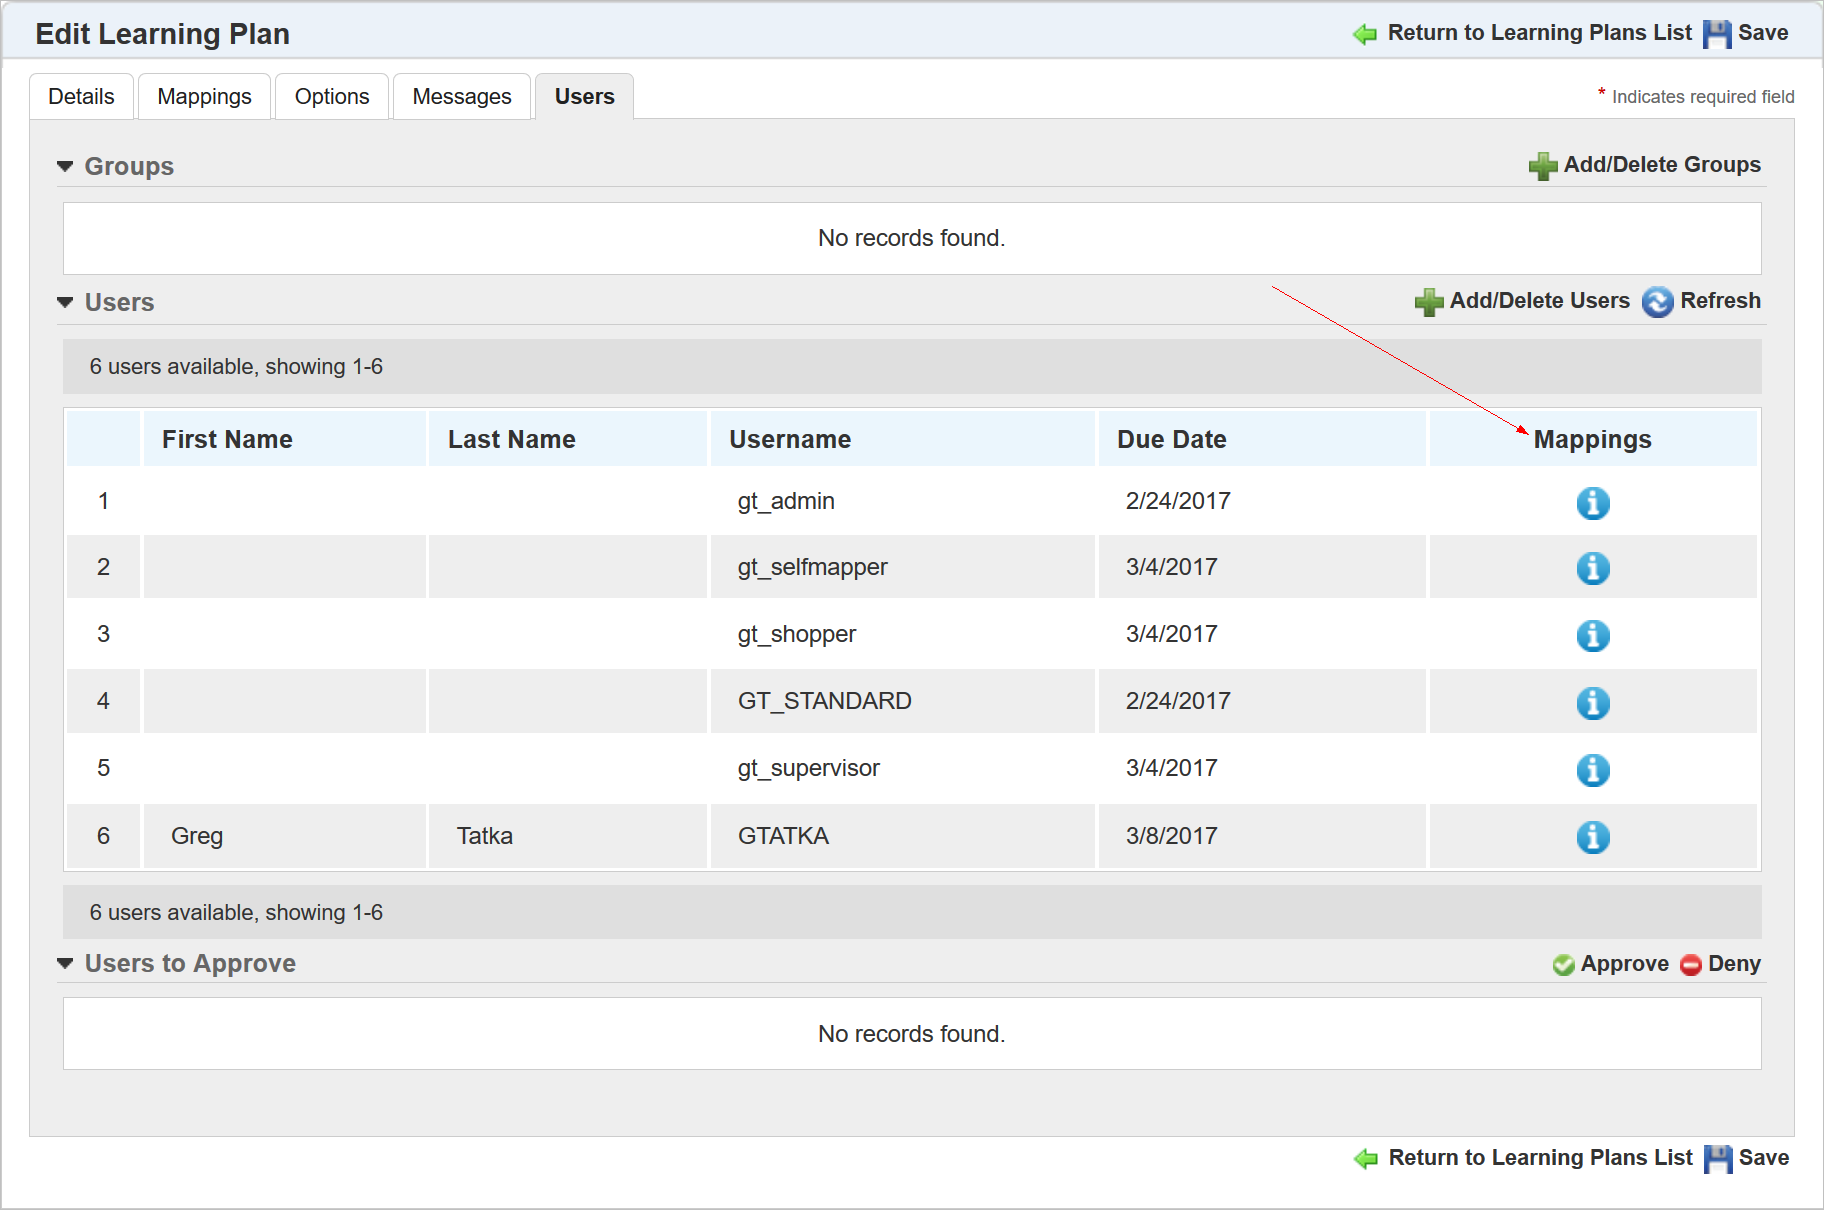
Previously, there was a column called Added by Group, and it noted whether Users were added directly to a Learning Plan, or because of their automatic inclusion in a Dynamic Group. This column has been renamed to Mappings, because Users can now be mapped to a Learning Plan because of their affiliation with other Learning Plans. Click ![]() in the Mappings column to open a window to display additional information.
in the Mappings column to open a window to display additional information.

User Mapped Directly to a Learning Plan
The window summarizes how a User was mapped to the Learning Plan:
- Directly – if a User was mapped directly to the Learning Plan either by an Admin, through self mapping, or via Bulk Loader.
- Via Learning Plan(s) – if the User was mapped because they were also mapped to one or more Learning Plans. The Learning Plans involved are listed.
- Via Group(s) – if the User was mapped because they became part of a Dynamic Group that automatically assigned the Learning Plan.
- Job Profile - If the User was mapped to the Learning Plan because of their mapping to a Job Profile.
In the example above, you can see that the User was mapped both directly, and because of a Learning Plan. In the example below, a User was mapped because of a Job Profile.
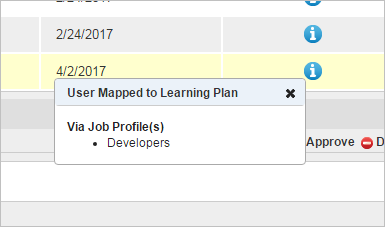
User Mapped via Job Profile
The following example shows a User mapped due to being part of a Dynamic Group.
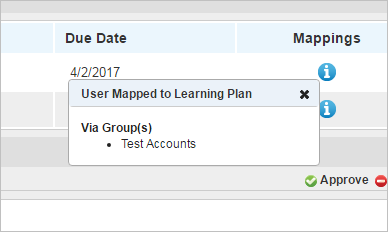
User Mapped Via Dynamic Group
How Sequenced Learning Plans Display to End Users
Sequenced Learning Plans display to end Users in the same Widgets that standard (non-recurring) Learning Plans already do:
- Learning Plans
- My Tasks
- My Transcript
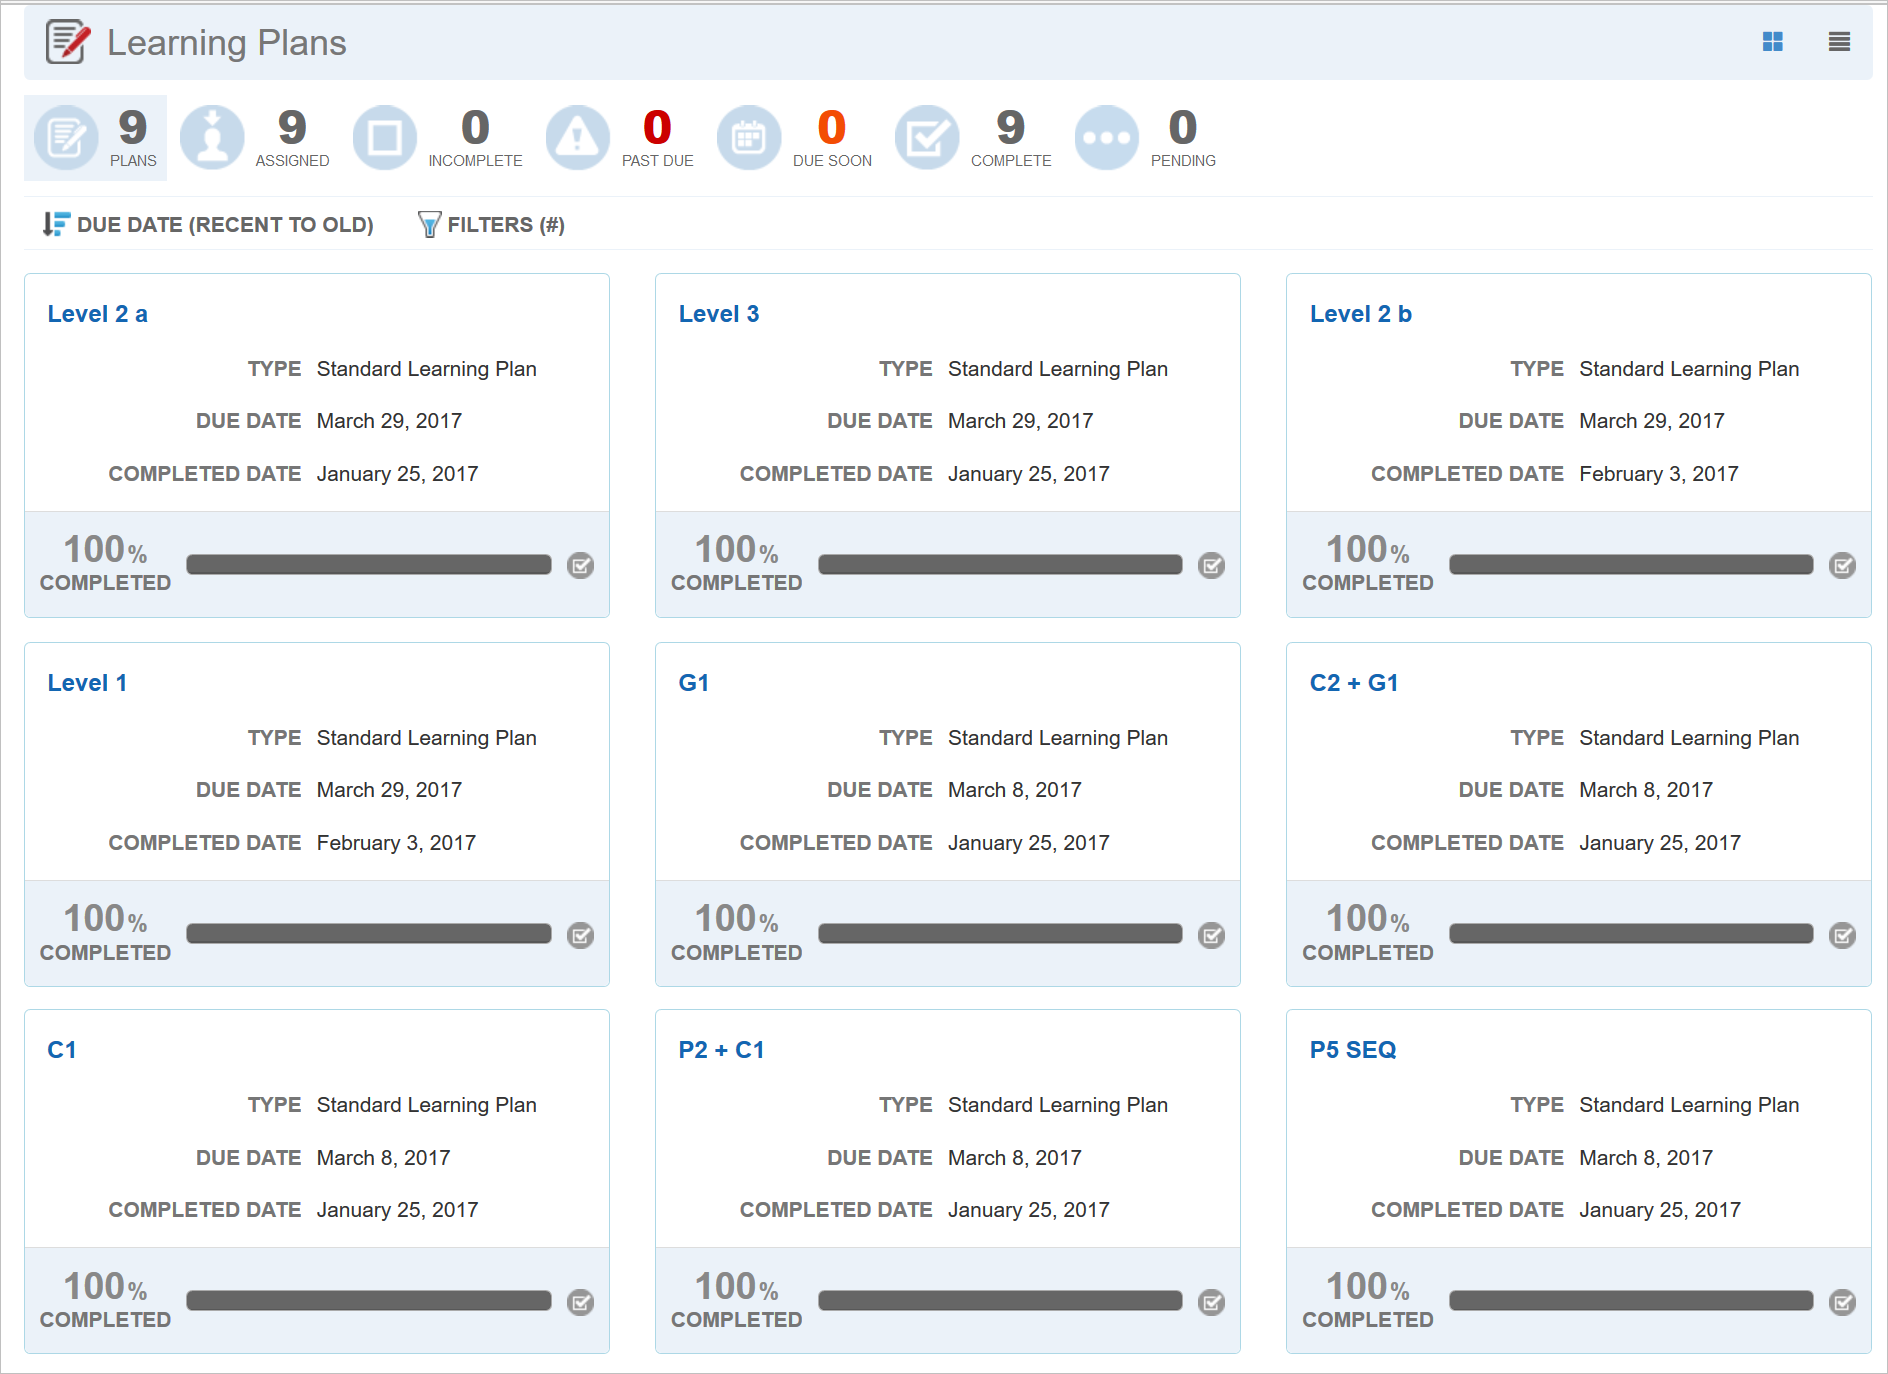
Example Learning Plans Widget with Sequenced Learning Plans
In the example above, you can see Sequenced Learning Plans, and individual Learning Plans listed, even if they are part of Sequenced Learning Plans. For example, the second row shows C2+G1 and G1 as separate items. Users can access individual Learning Plans directly from the Learning Plans Widget main page, or they can drill down from its parent Learning Plan on the main page to access it.
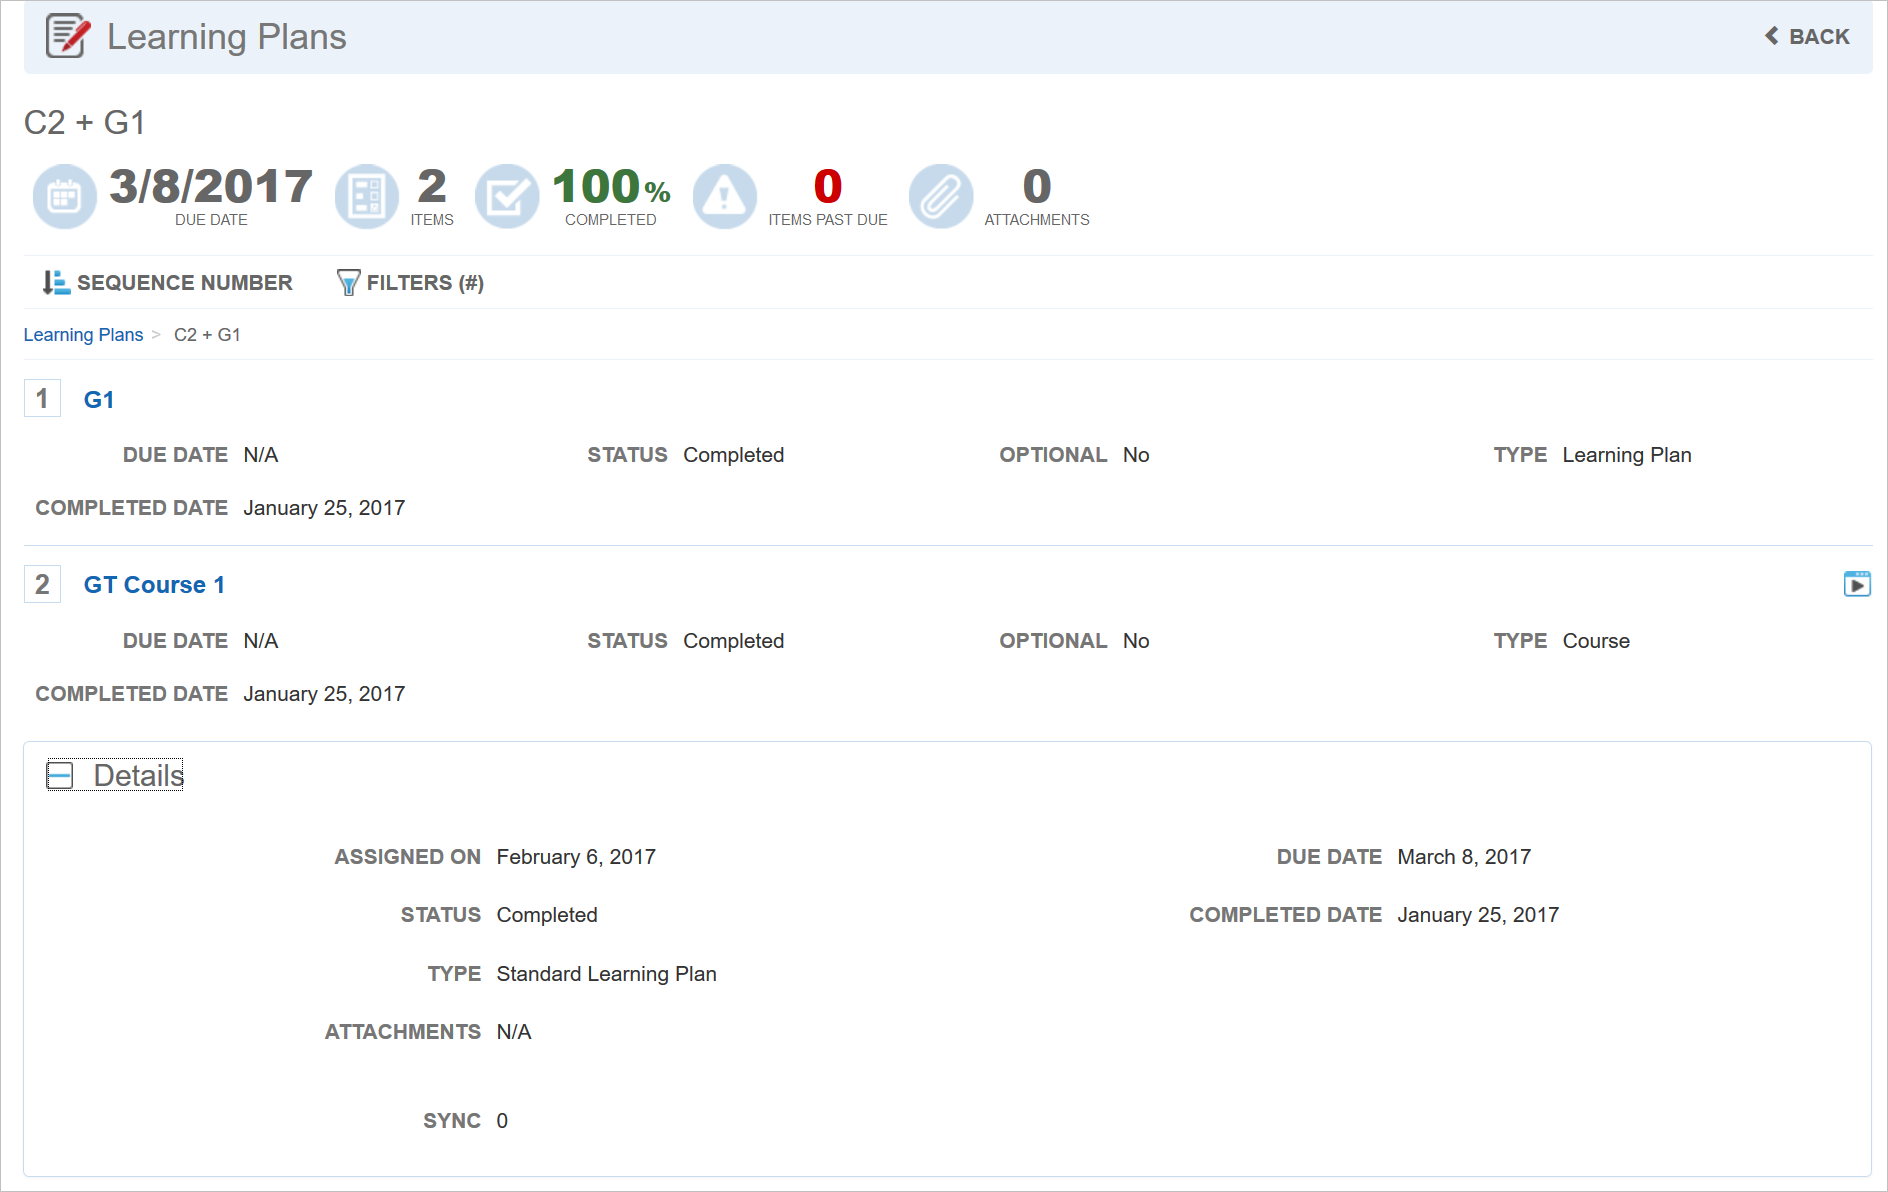
Learning Plan Details
Notice that Users can see all of the Learning Plans mapped to the parent Learning Plan, as well as the sequence in which the Learning Plans must be taken. You can drill down even further by selecting another Learning Plan.
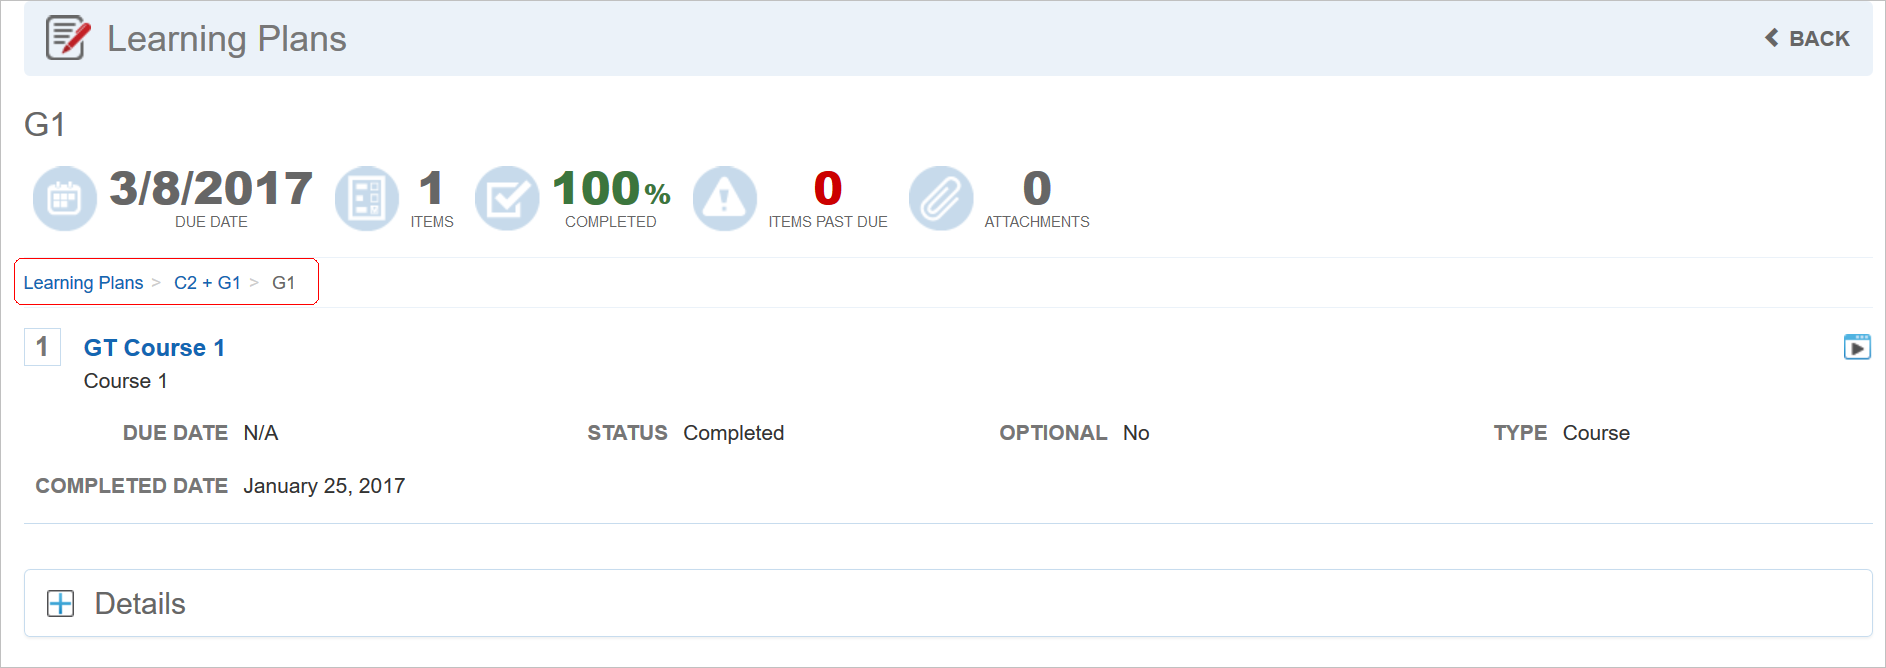
Breadcrumbs Help you to Navigate
Notice that there are breadcrumbs to help Users to navigate within the sequenced plans.
Similarly, in the My Tasks and the Transcript Widgets, Users can see both the individual Learning Plans, and the Sequenced Learning Plans.
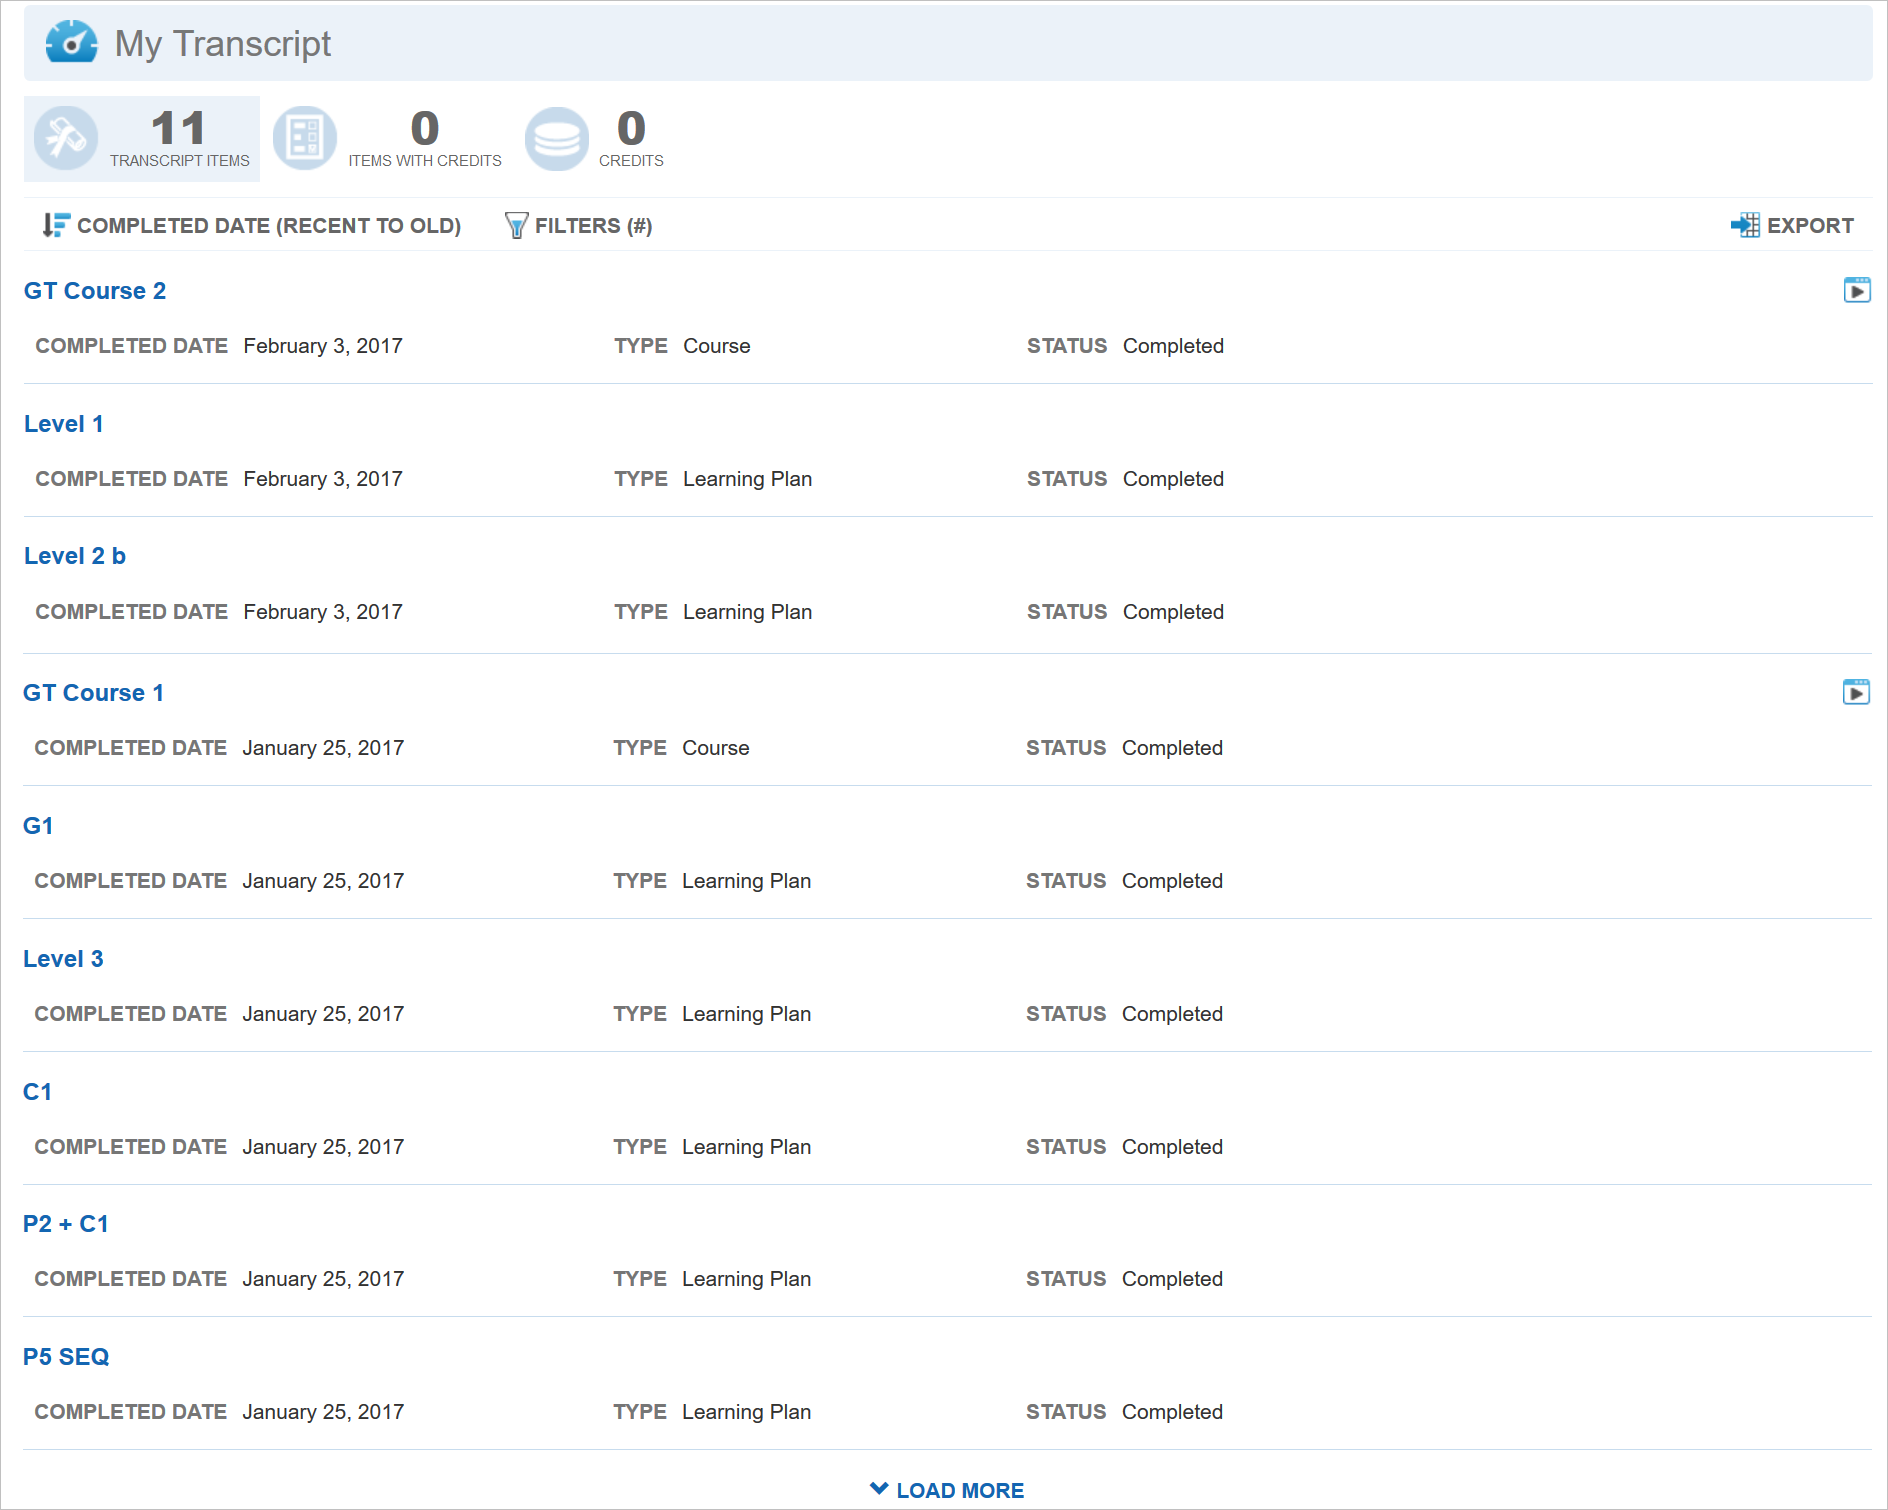
Example Transcript Widget with Sequenced Learning Plans
They can click the name of any Learning Plan to view additional information.
How Completion Percentage is Affected on the Widget
A Learning Plan’s Completion percentage is affected by the completion of its mapped items. For a parent Learning Plan to display as 100% Complete, a User must also complete all of its mapped items, included mapped Learning Plans.
Refer to online help for complete instructions on using Widgets (TOC > LearnCenter Designer > Widgets).
How Communication Messages Work with Sequenced Learning Plans
Communication Messages are sent to Users when they are mapped to Learning Plans. In the case of Sequenced Learning Plans, which maps Users to more than one Learning Plan at the same time, a Communication Message is only sent for the parent Learning Plan. For example, if a parent Learning Plan has 5 sequenced Learning Plans mapped to it, Users will only receive one Communication Message for the parent Learning Plan. This prevents Users from being inundated with email messages about all of the Learning Plan mappings.
Refer to online help for complete instructions on using Communication Messages (TOC > Communications > Communication Messages).
Any BI Reporting Reports that have access to Learning Plan Data View now have the ability to show Learning Plans as a mapped Item type in the output.

Sample Custom BI Report Showing Learning Plan as a Learning Plan Mapped Item Type
This means if you are mapping Learning Plans to other Learning Plans using the Sequenced Learning Plan feature, you will see the mapped Learning Plans in your report output, along with other learning items mapped to Learning Plans.
Refer to online help for complete instructions on BI Reporting (TOC > Reports > BI Reports).
Sequenced Learning Plans and eCommerce
Using the LearnCenter eCommerce feature, you can make Learning Plans available for purchase. Now, when a User buys a Sequenced Learning Plan, they will receive a single license that provides access to all Learning Plans mapped to the parent Learning Plan. If the license expires or is revoked, they will lose access to all of the mapped Learning Plans.
Refer to online help for complete instructions on using eCommerce (TOC >eCommerce).
---

Copyright © 2017, Oracle and/or its affiliates. All rights reserved.
This document is provided for information purposes only, and the contents hereof are subject to change without notice. This document is not warranted to be error-free, nor subject to any other warranties or conditions, whether expressed orally or implied in law, including implied warranties and conditions of merchantability or fitness for a particular purpose. We specifically disclaim any liability with respect to this document, and no contractual obligations are formed either directly or indirectly by this document. This document may not be reproduced or transmitted in any form or by any means, electronic or mechanical, for any purpose, without our prior written permission.
Oracle and Java are registered trademarks of Oracle and/or its affiliates. Other names may be trademarks of their respective owners.
Intel and Intel Xeon are trademarks or registered trademarks of Intel Corporation. All SPARC trademarks are used under license and are trademarks or registered trademarks of SPARC International, Inc. AMD, Opteron, the AMD logo, and the AMD Opteron logo are trademarks or registered trademarks of Advanced Micro Devices. UNIX is a registered trademark of The Open Group.