
This document will continue to evolve as existing sections change and new information is added. All updates are logged below, with the most recent updates at the top.
| Date |
What's Changed |
Notes |
|---|---|---|
| 12 JUL 2017 |
Initial Document Creation |
This guide outlines the information you need to know about new or improved functionality included in Releases 17B for Oracle Taleo Learn Cloud. Each section includes a brief description of the feature, the steps you need to take to enable or begin using the feature, any tips or considerations that you should keep in mind, and the resources available to help you.
For Licensing Information, please refer to My Oracle Support DOC ID 1461788.1 .
For the latest information on browser support, please refer to the Oracle Taleo Learn Cloud System Requirements document; My Oracle Support DOC ID 1461788.1 .
KEY RESOURCES
For additional information about any of the features and enhancements discussed in this document, refer to Oracle Taleo Learn Cloud Online Help.
Some of the new Release 17B features are automatically available to users after the upgrade and some require action from the User, the company Administrator, or Oracle.
The table below offers a quick view of the actions required to enable each of the Release 17B features.
| Action Required to Enable Feature |
||||
|---|---|---|---|---|
| Feature |
Automatically Available |
End User Action Required |
Administrator Action Required |
Oracle Service Request Required |
| Widget Enhancements |
||||
|
|
||||
|
|
|
|||
|
|
|
|||
|
|
|
|||
|
|
|
|||
|
|
||||
| Document Course Updates |
||||
|
|
|
|||
|
|
|
|
||
|
|
|
|||
| Bulk Loader Updates |
||||
| Updates to the User Learning Plan Mapping Loader Requirements |
|
|
||
|
|
|
|||
|
|
|
|||
| BI Reporting Enhancements |
||||
|
|
|
|||
|
|
|
|||
|
|
|
|||
|
|
|
|||
| Ability to report on an External Training’s Active/Inactive Status |
|
|
||
|
|
|
|||
|
|
|
|||
|
|
|
|||
|
|
|
|||
| New LearnCenter Default Page |
||||
|
|
|
|||
|
|
|
*See note in this section. |
||
|
|
||||
|
|
|
|||
|
|
||||
|
|
||||
|
|
|
|||
| New Ability to Copy LearnCenter Designer Pages |
|
|
||
| Enhancements for Recurring Learning Plans |
||||
|
|
|
|||
|
|
||||
| ILT Enhancements |
||||
|
|
||||
|
|
|
|||
|
|
|
|||

A number of enhancements have been made to Widgets for Oracle Taleo Learn Cloud Release 17B. These include:
- Catalog Widget Enhancements
- Search Widget Results Page Enhancements
- Learning Plan Widget Enhancements
- My Tasks Widget Support for Delayed Survey
- Team Monitor User Card
- New Image Column on the Categories Page
Each of these is described in the following sections.
Two new enhancements have been added to the Catalog Widget to improve its usability when viewing the Catalog search results on smaller screens, such as those found on mobile devices. The first, which is specific to smaller platforms, is a new filter icon. This icon appears when the display screen is too small to include the facets section of the Catalog.
.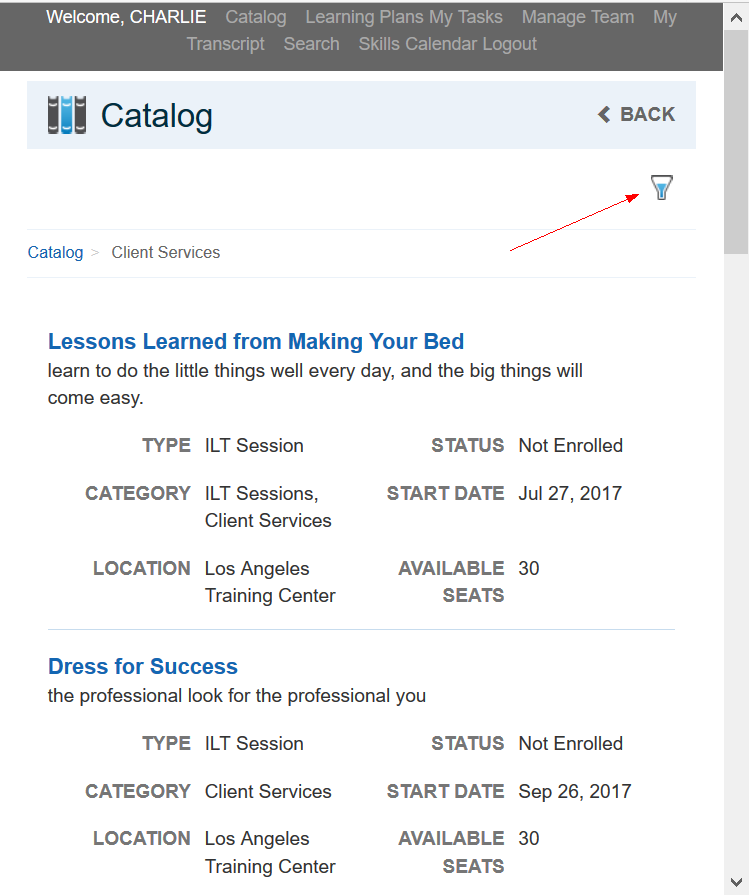
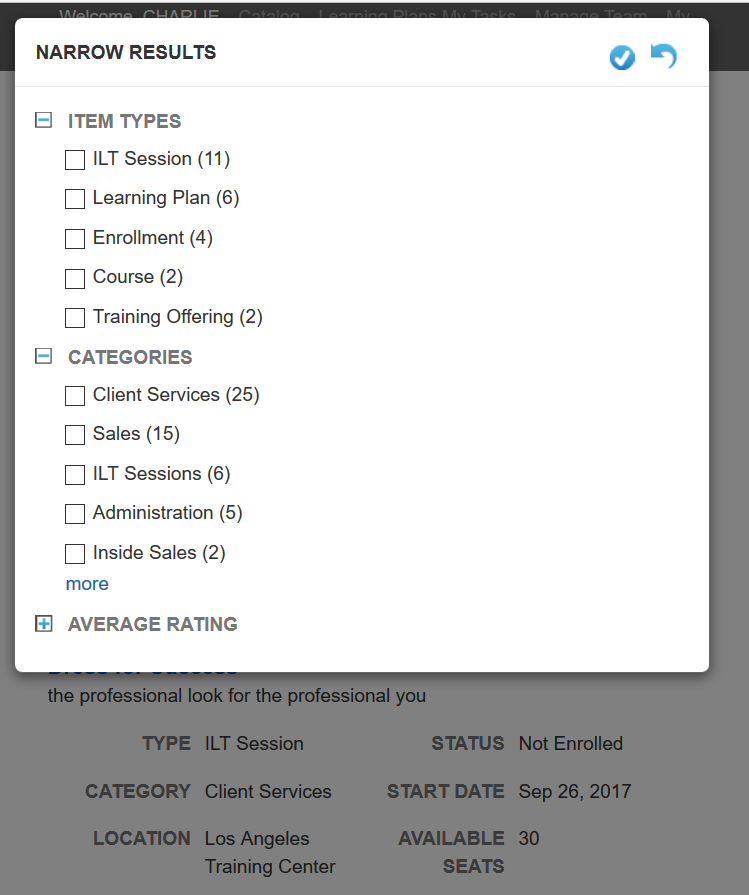
When you click the icon, the facets display on top of the results page.
There is also a new option to hide the Catalog Name hyperlinks for the Catalog names. This enhancement was added to make it easier to read large, multi-level Catalogs where the results page might return an excessive number of learning events.
You can do this by clearing a new check box on the Display tab during Catalog Widget setup.
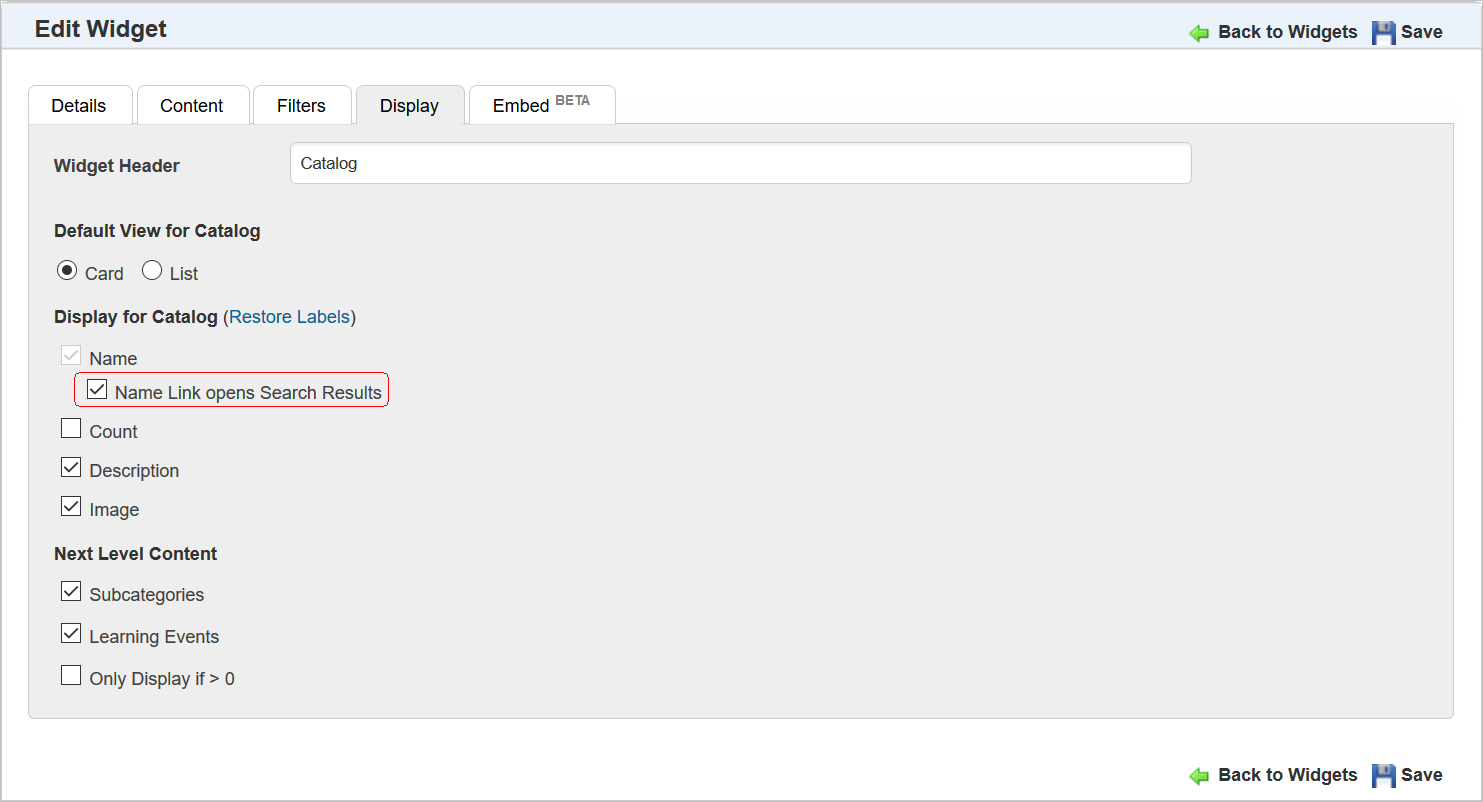
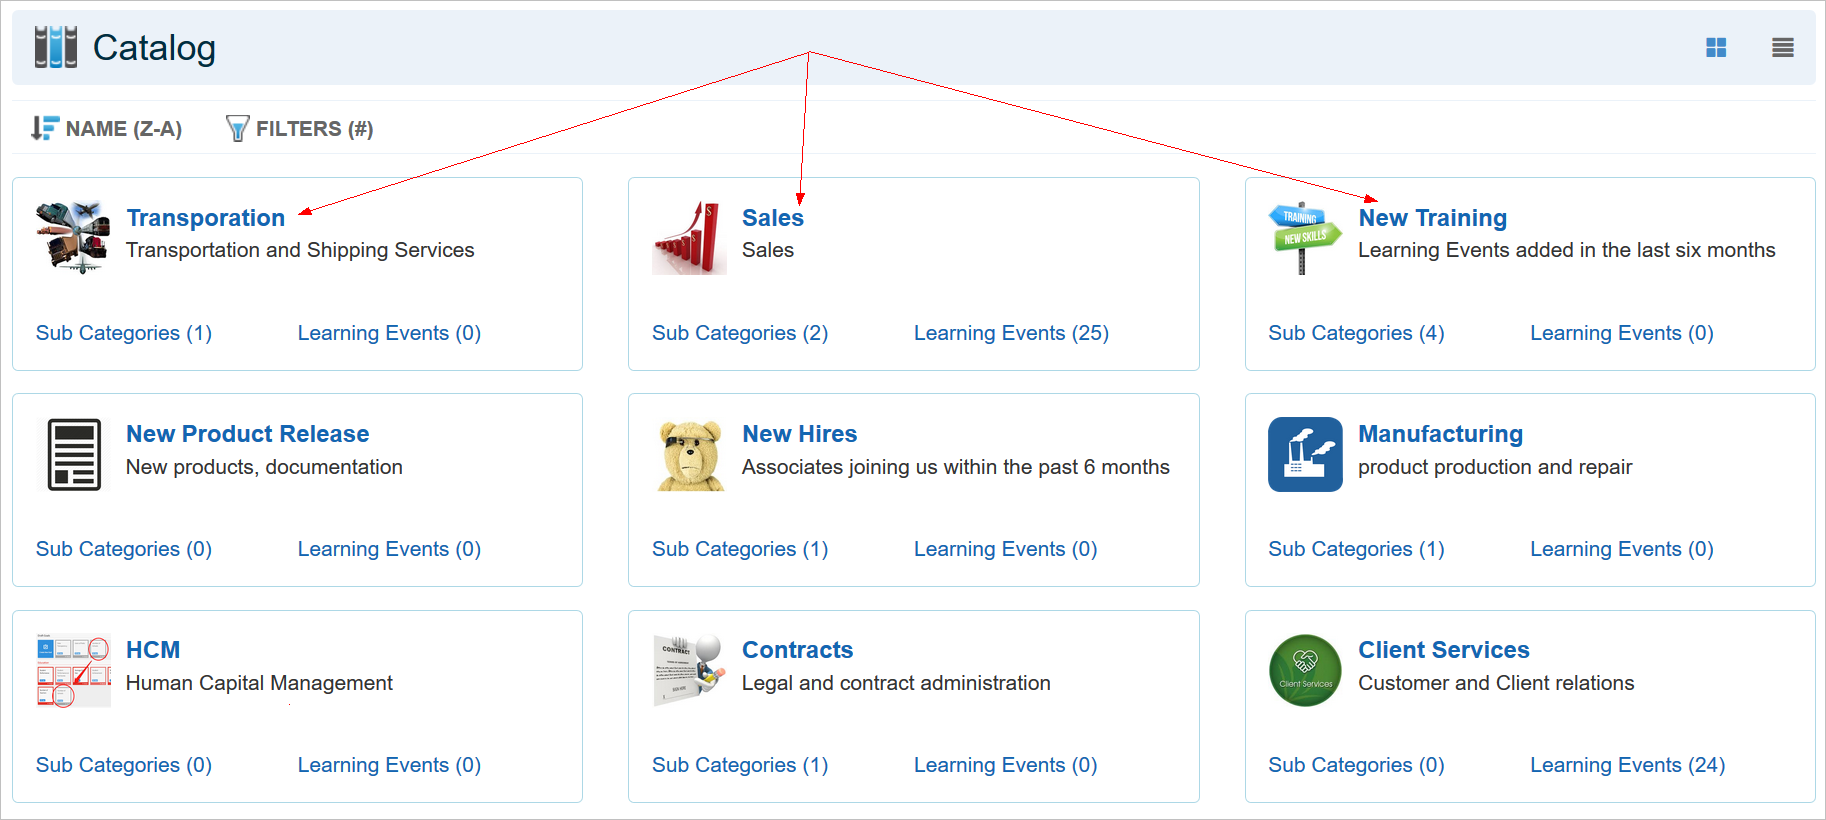
When you clear the Name Link opens Search Results check box, the Widget displays like the following example. (By default, this check box is cleared.)
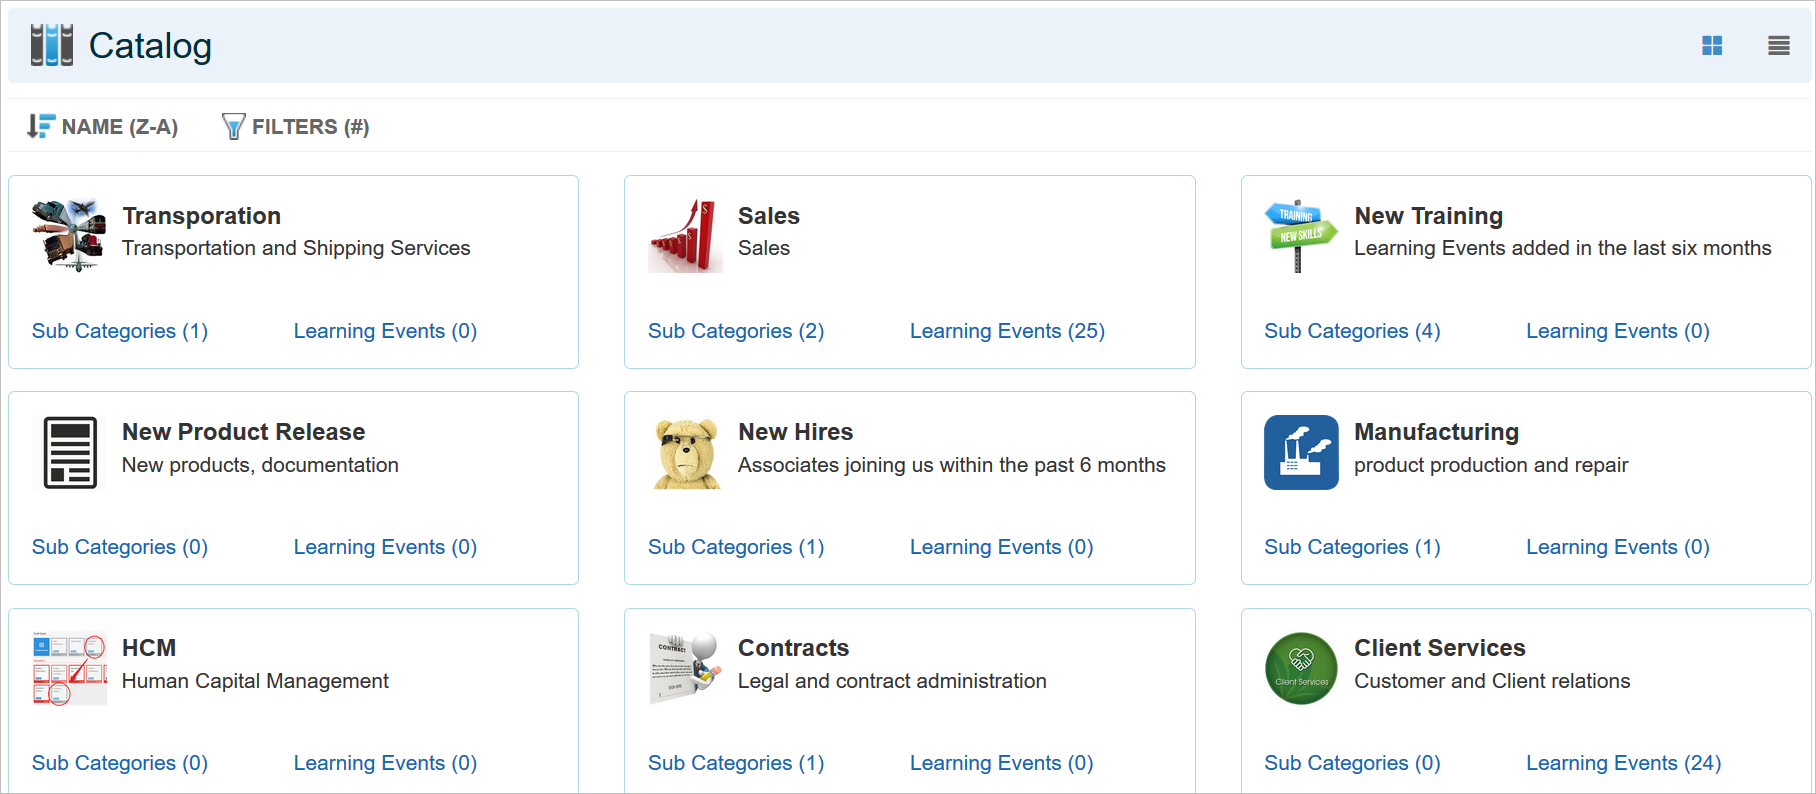
Once cleared, notice that the names still display on the Catalogs, but they no longer contain hyperlinks. Users can click the Sub Categories or Learning Events links to drill down further.
Search Widget Results Page Enhancements
A few enhancements have been made to the Search Widget list results, which are accessible from both the Search and Catalog Widgets. There is a new icon that appears only to Supervisors.
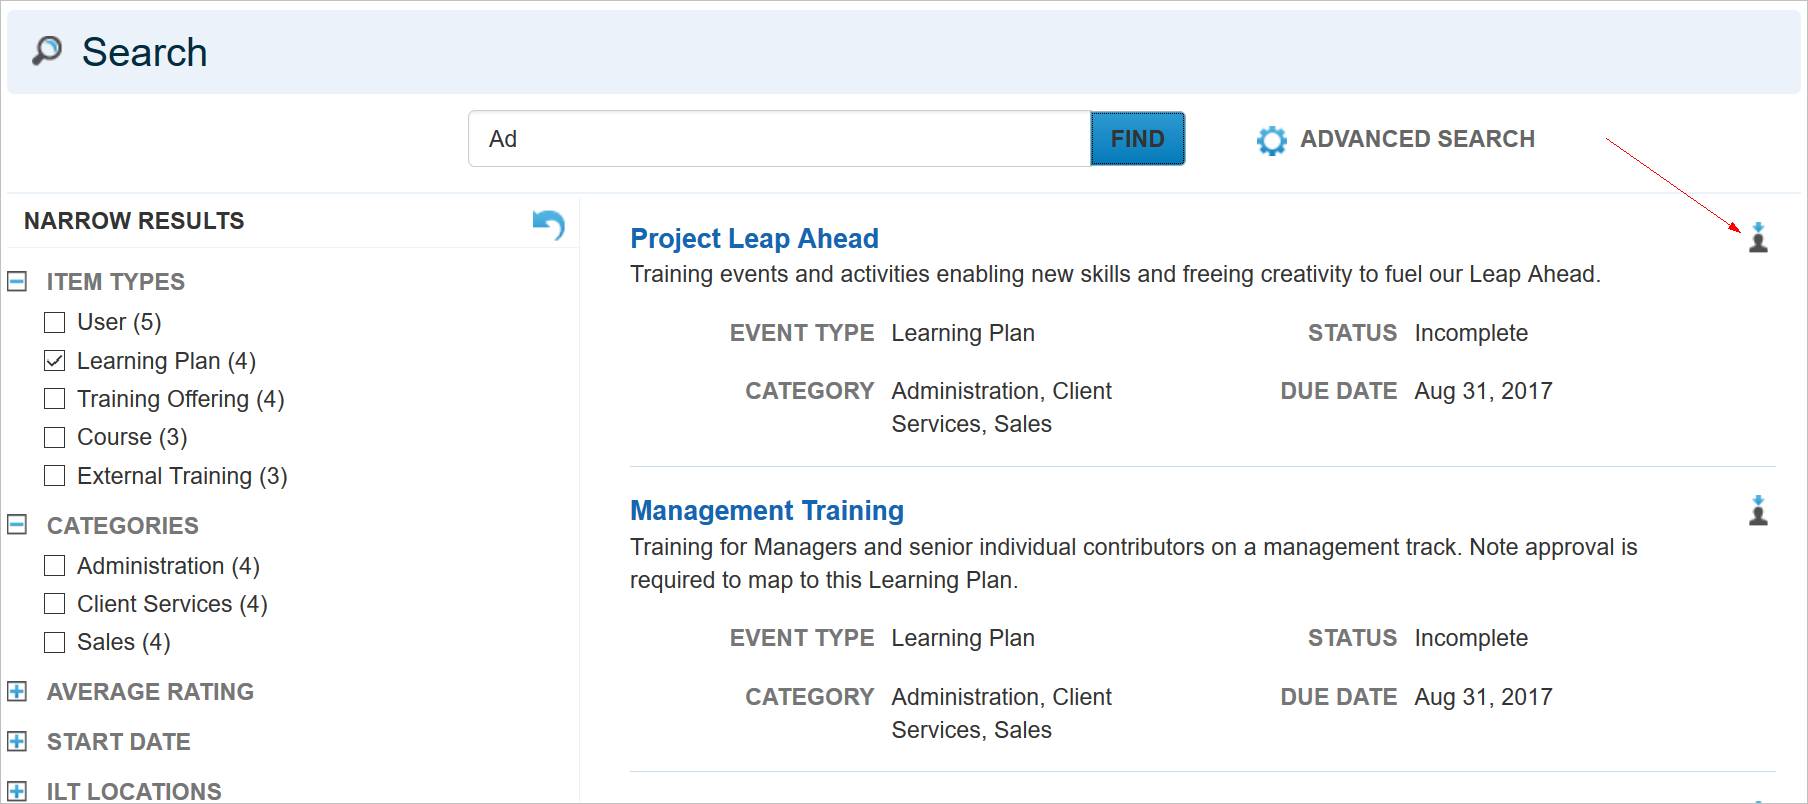
Supervisors can use it to assign Learning Plans and Enrollments to direct and indirect reports. When a Supervisor selects the icon, the following window opens.
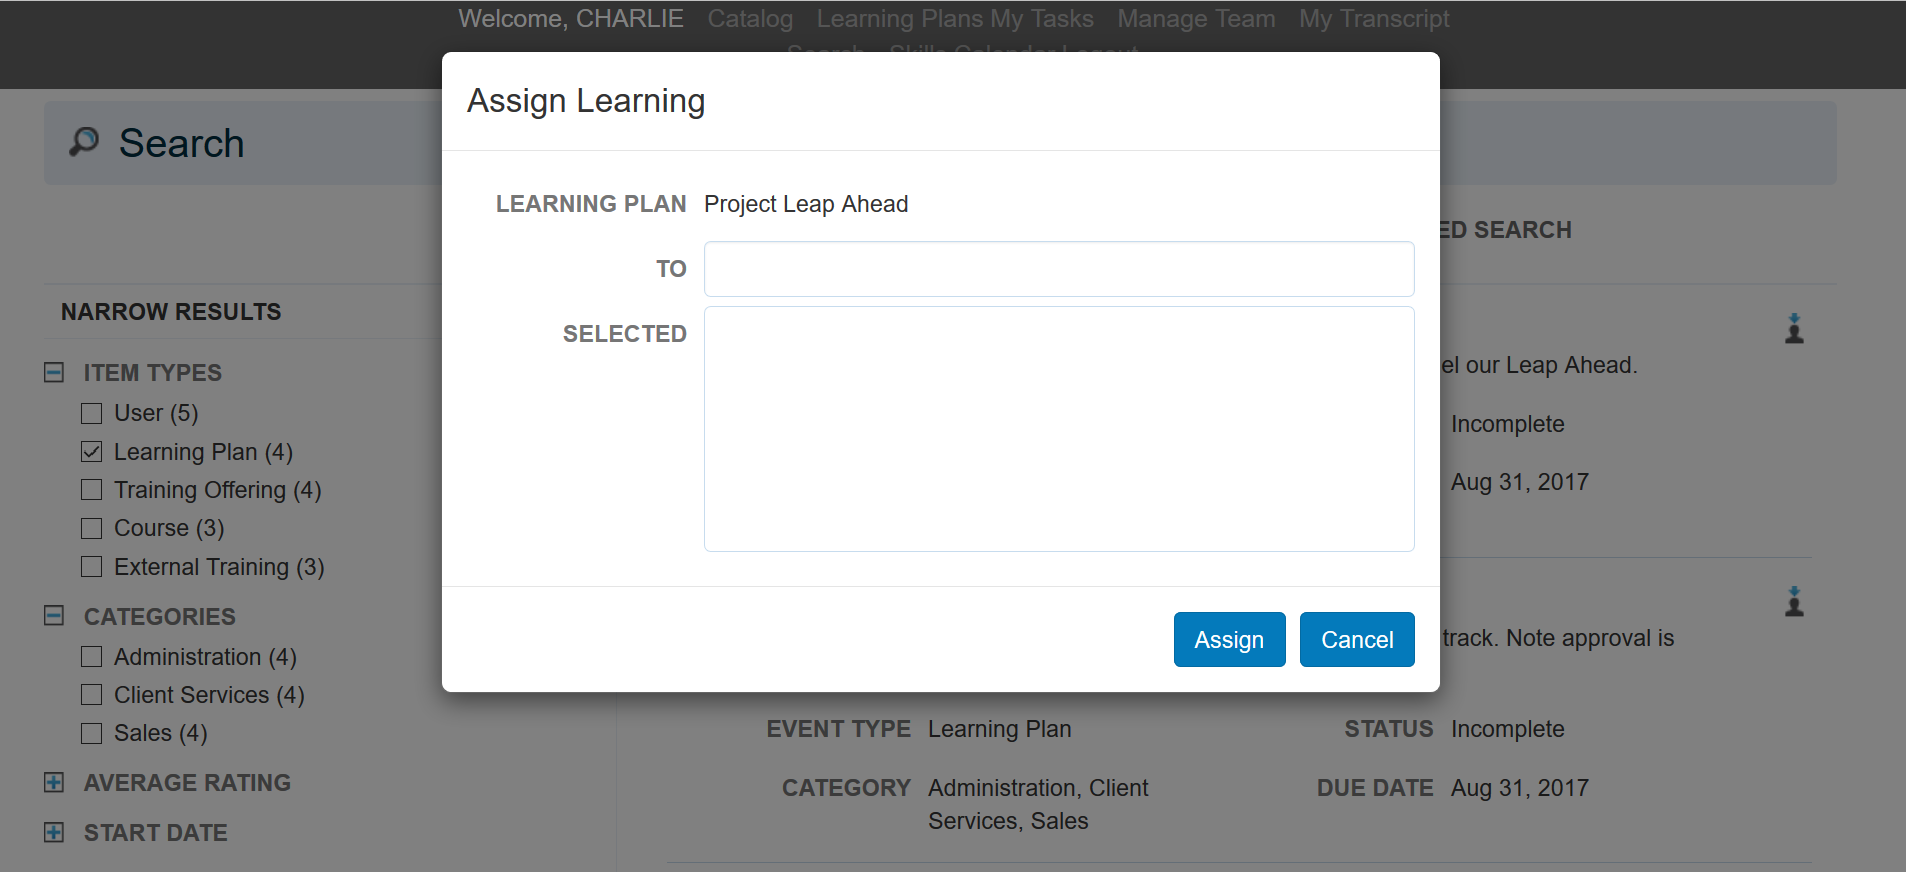
They can begin typing the name of the User they want in the To field. Matching team member names appear after just few letters. The only names available for selection are the current Supervisor’s own team members and any indirect reports if you have enabled this option. (See below for details.)

Once selected, the name appears in the Selected field.
NOTE: The formatting of the name in this list is dependent on what is selected for the Name Display Order field in Configuration Options > Localization Settings.
Click Assign. A confirmation message appears at the top of the page.
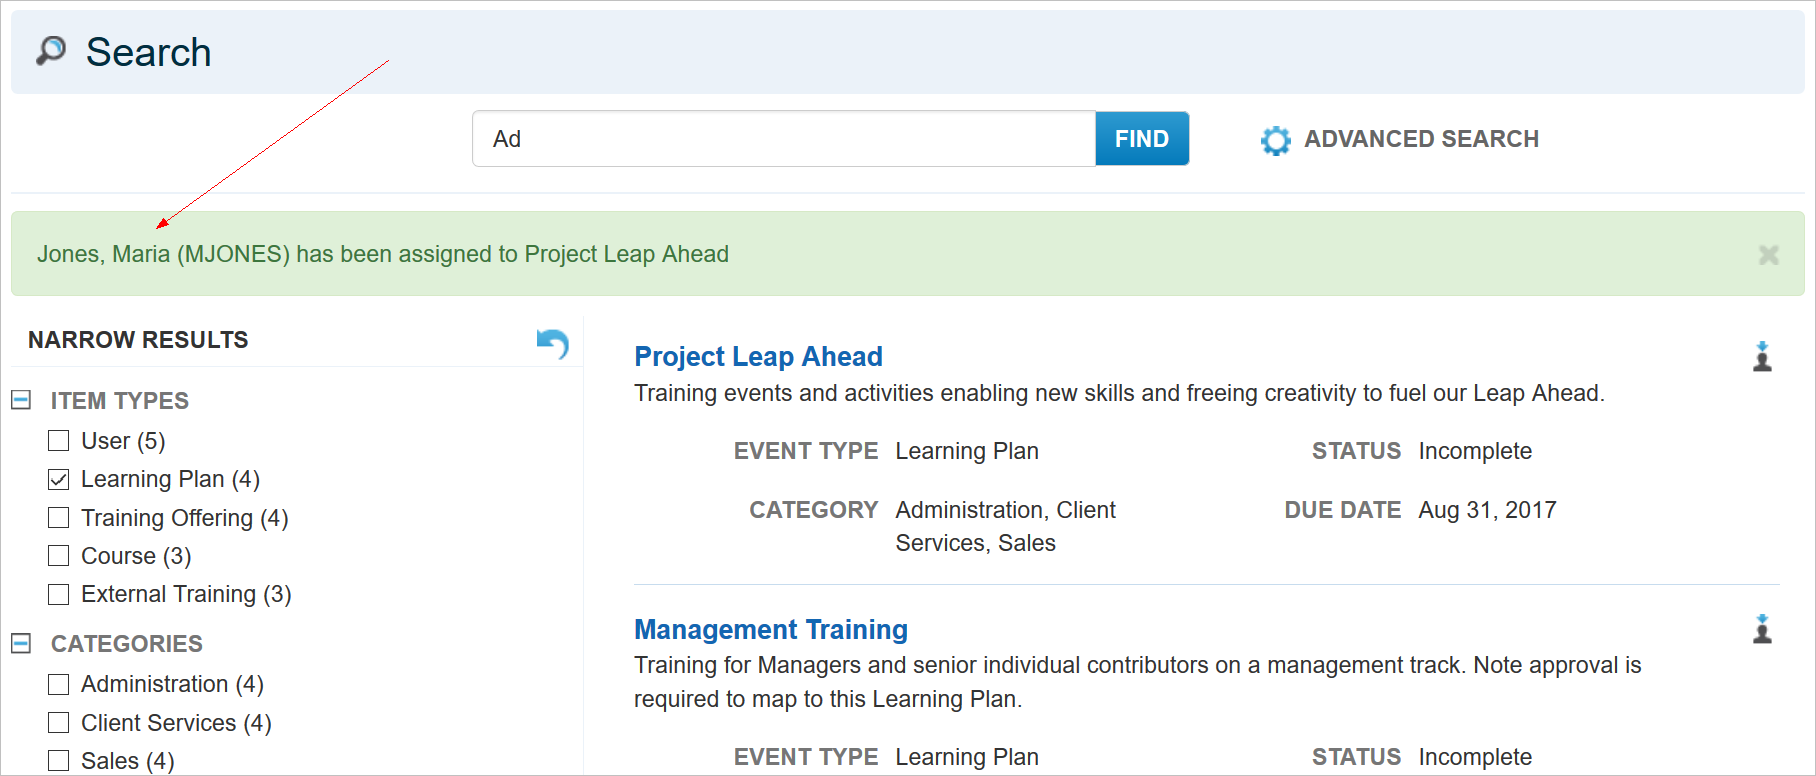
Once assigned, any Communication Messages already set up for Learning Plans and Enrollments will be sent to newly assigned Users.
There is a new Supervisor Assignment section on the Display tab of the Widget setup to customize this enhancement.
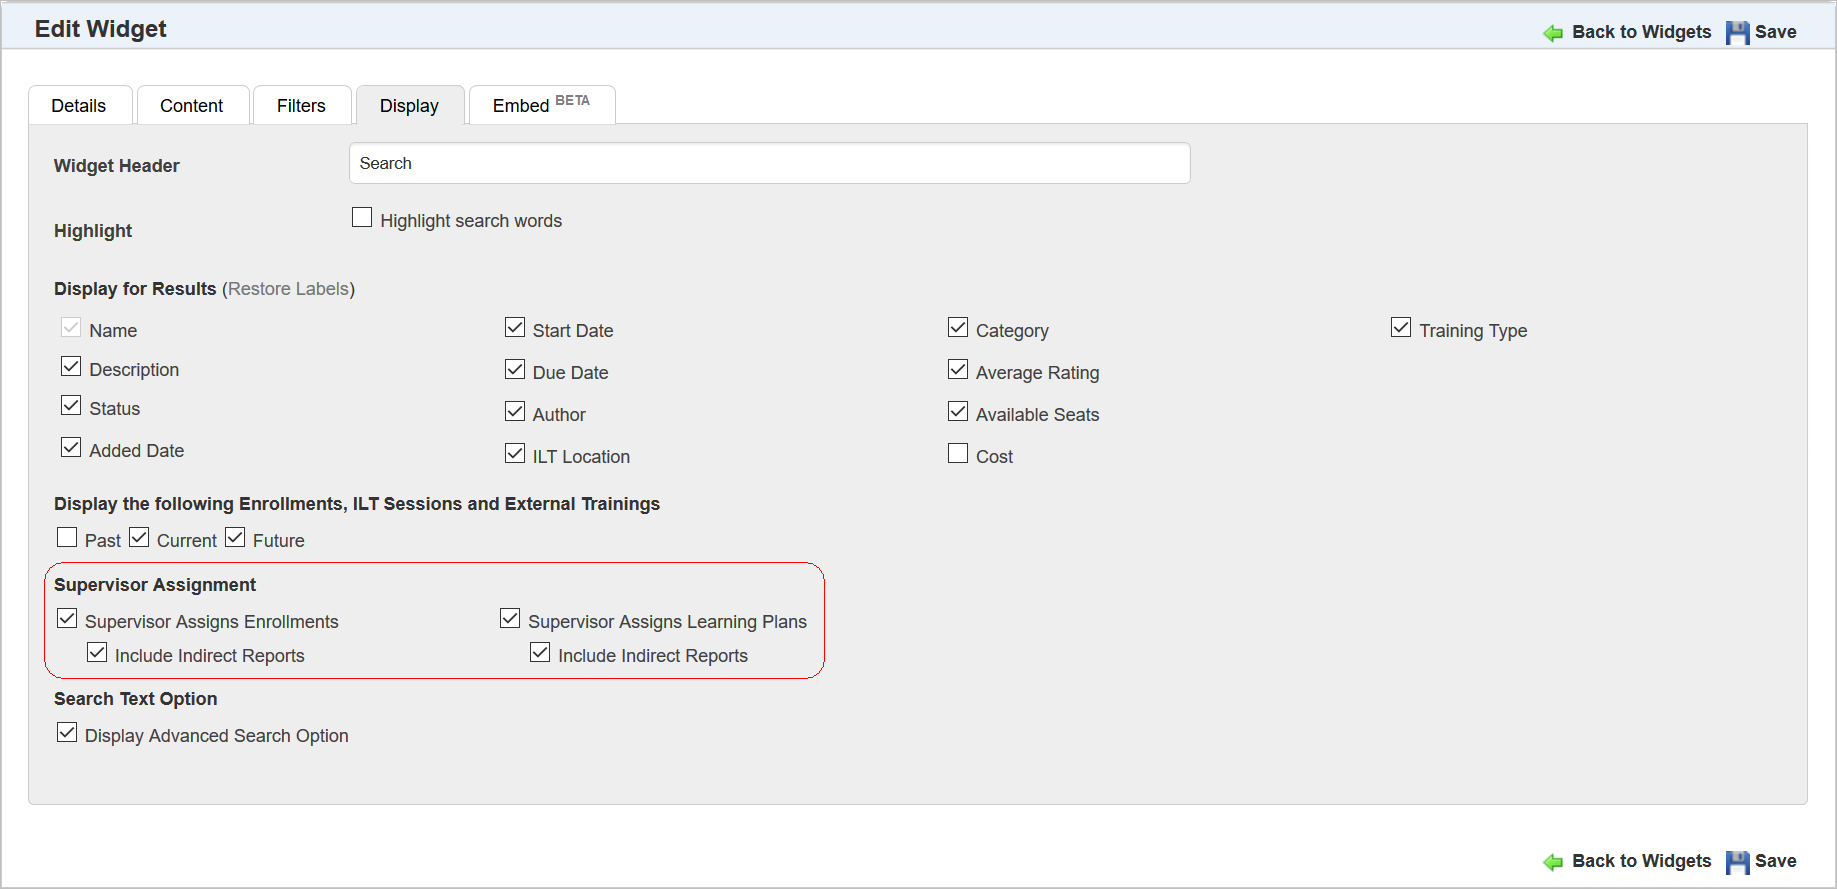
Use this section to indicate whether Supervisors can assign Enrollments and Learning Plans to their direct reports. Select the Include Indirect Reports check boxes to allow Supervisors to assign Enrollments and Learning Plans to their indirect reports.
Another change for the Search Widget is the revised page layout that improves readability on smaller screens.

Columns on smaller platforms are wider, which minimizes word wrapping on Label/Value pairs.
Learning Plan Widget Enhancements
A few enhancements have been made to the Learning Plan Widget. The first is a new sort for the ILT Sessions listed under an ILT Event. ILT Sessions listed for an ILT Track are now sorted by the ILT Start Date.
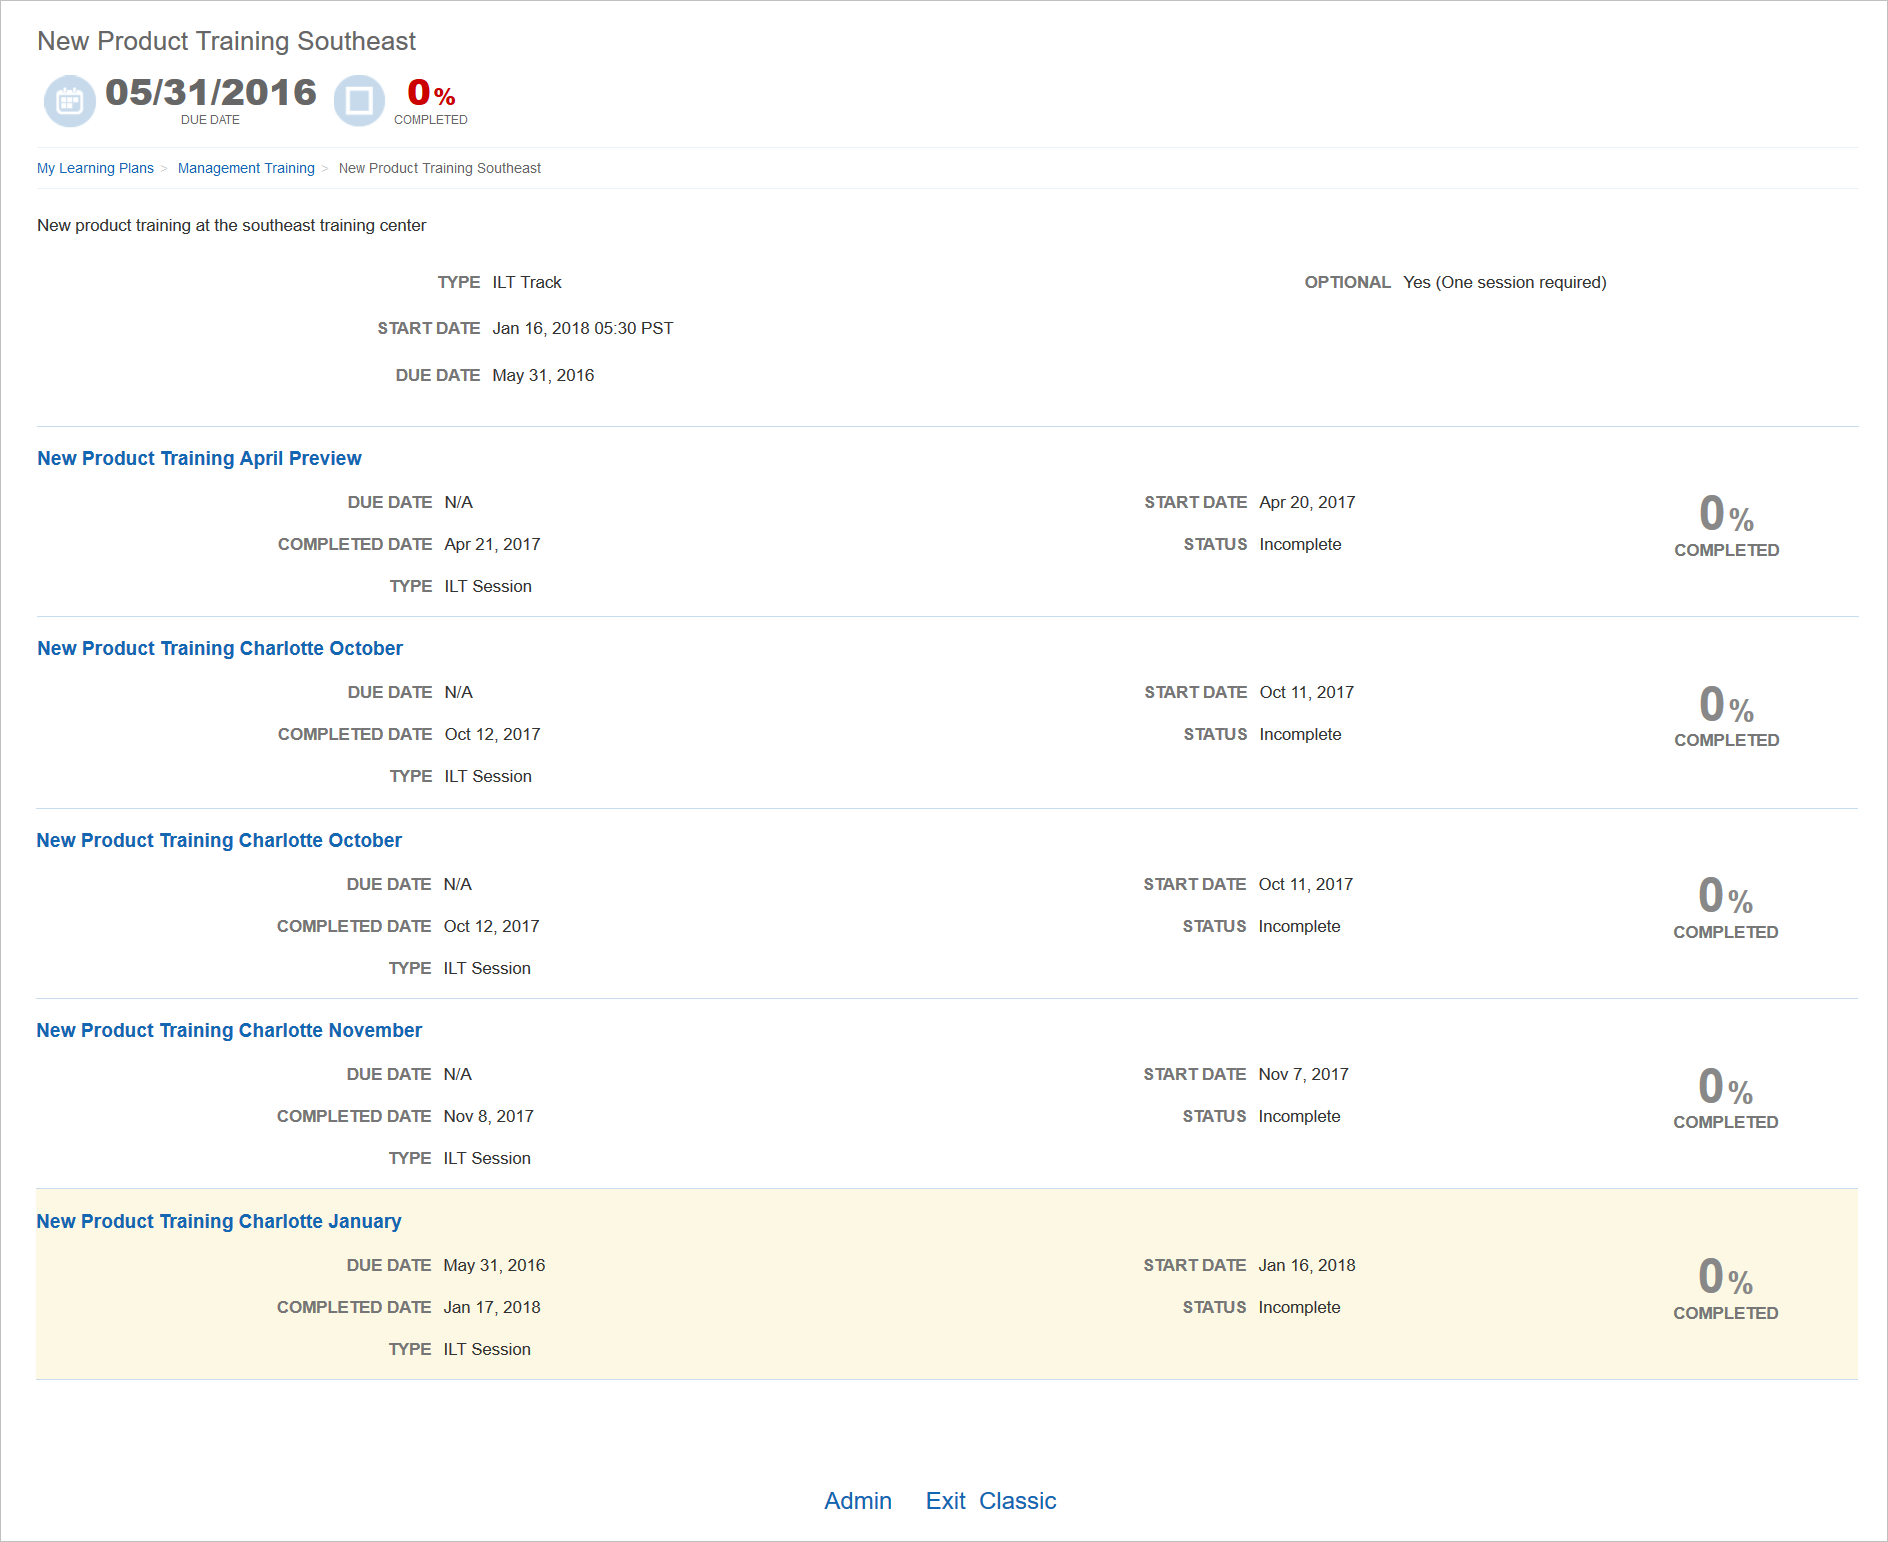
This was done to make it easier to find sessions.
There is now support for the Past/Current/Future display option for Training Offerings. If a Training Offering includes ILT Sessions or Enrollments, the events are visible to Users using the Past/Current/Future display rules.
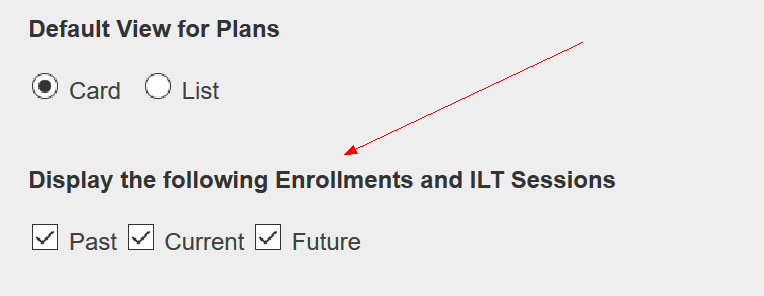
Recall that you can determine these rules in the Display the following Enrollments and ILT Sessions section of the Display tab of the Learning Plan Widget setup.
Refer to online help if you need additional information about these check boxes (TOC > LearnCenter Designer > Widgets > Adding a Custom Learning Plan Widget).
My Tasks Widget Support for Delayed Survey
You now have the option to activate Delayed Surveys for ILT Sessions, Courses, or Classes on the My Task Widget. There are new options on the Content tab of the My Task Widget setup.
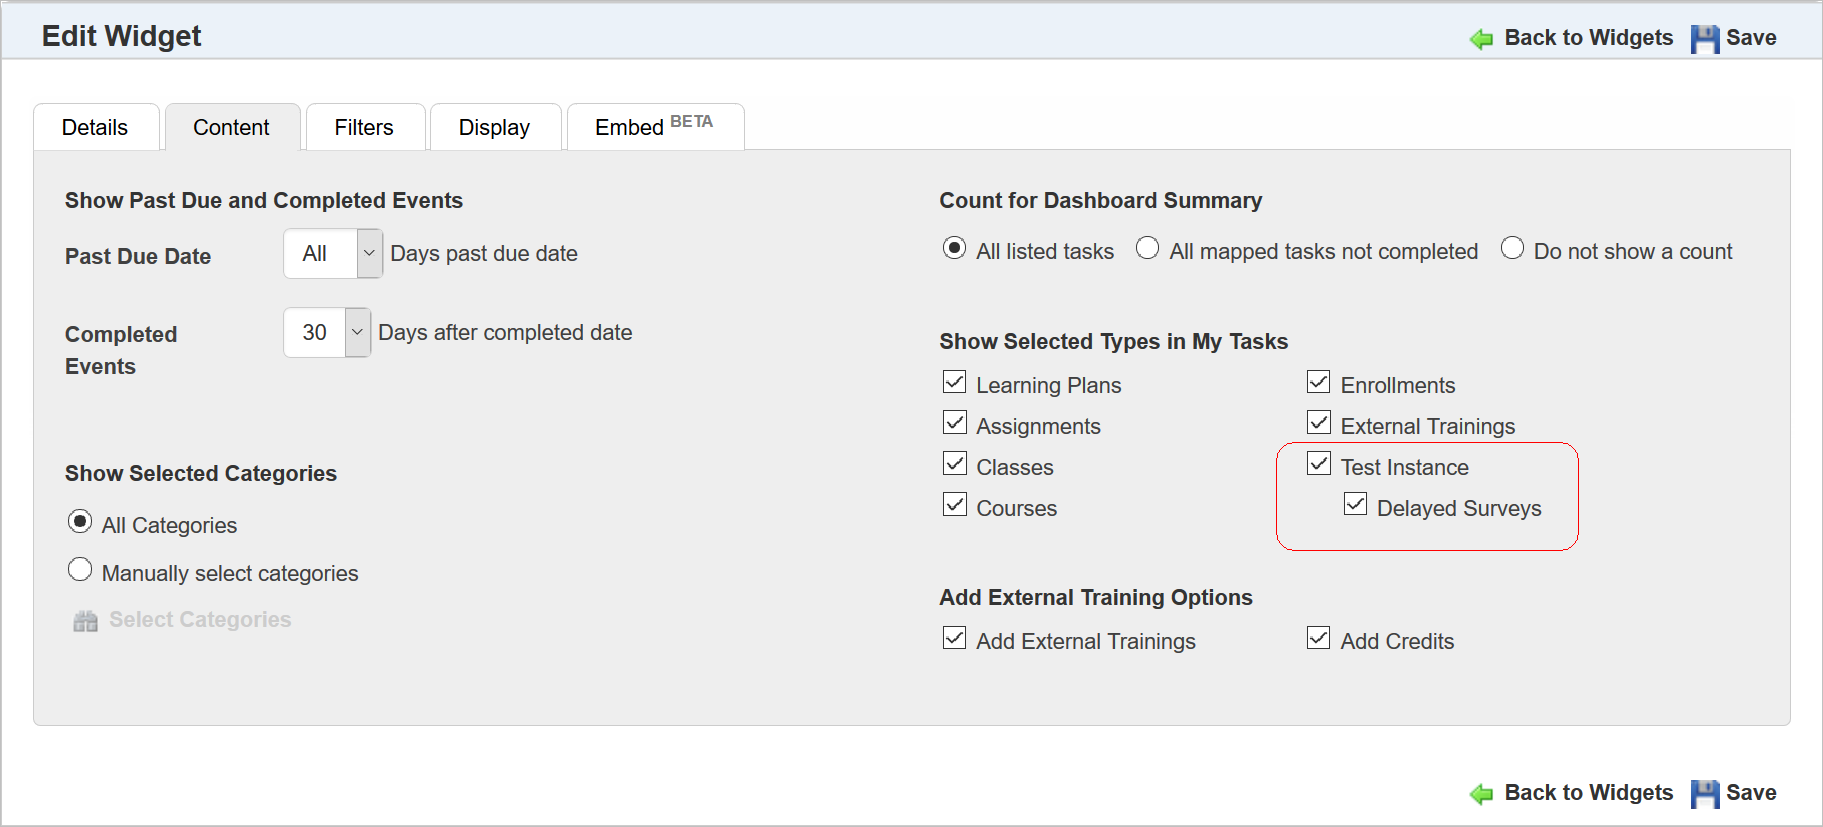
The Delayed Survey appears on Users’ My Task Widgets once a Survey’s elapsed time for delivery is reached. (The Delayed Surveys feature works for Courses, Classes, and ILT Sessions.)
Refer to online help if you need information about setting up Delayed Surveys (TOC > Assessments/Surveys > AddingNewAssessmentsandSurveys).
The Team Member names listed on the Team Monitor are now linked to the User Card functionality. Click the Team Member name to view information about the User.
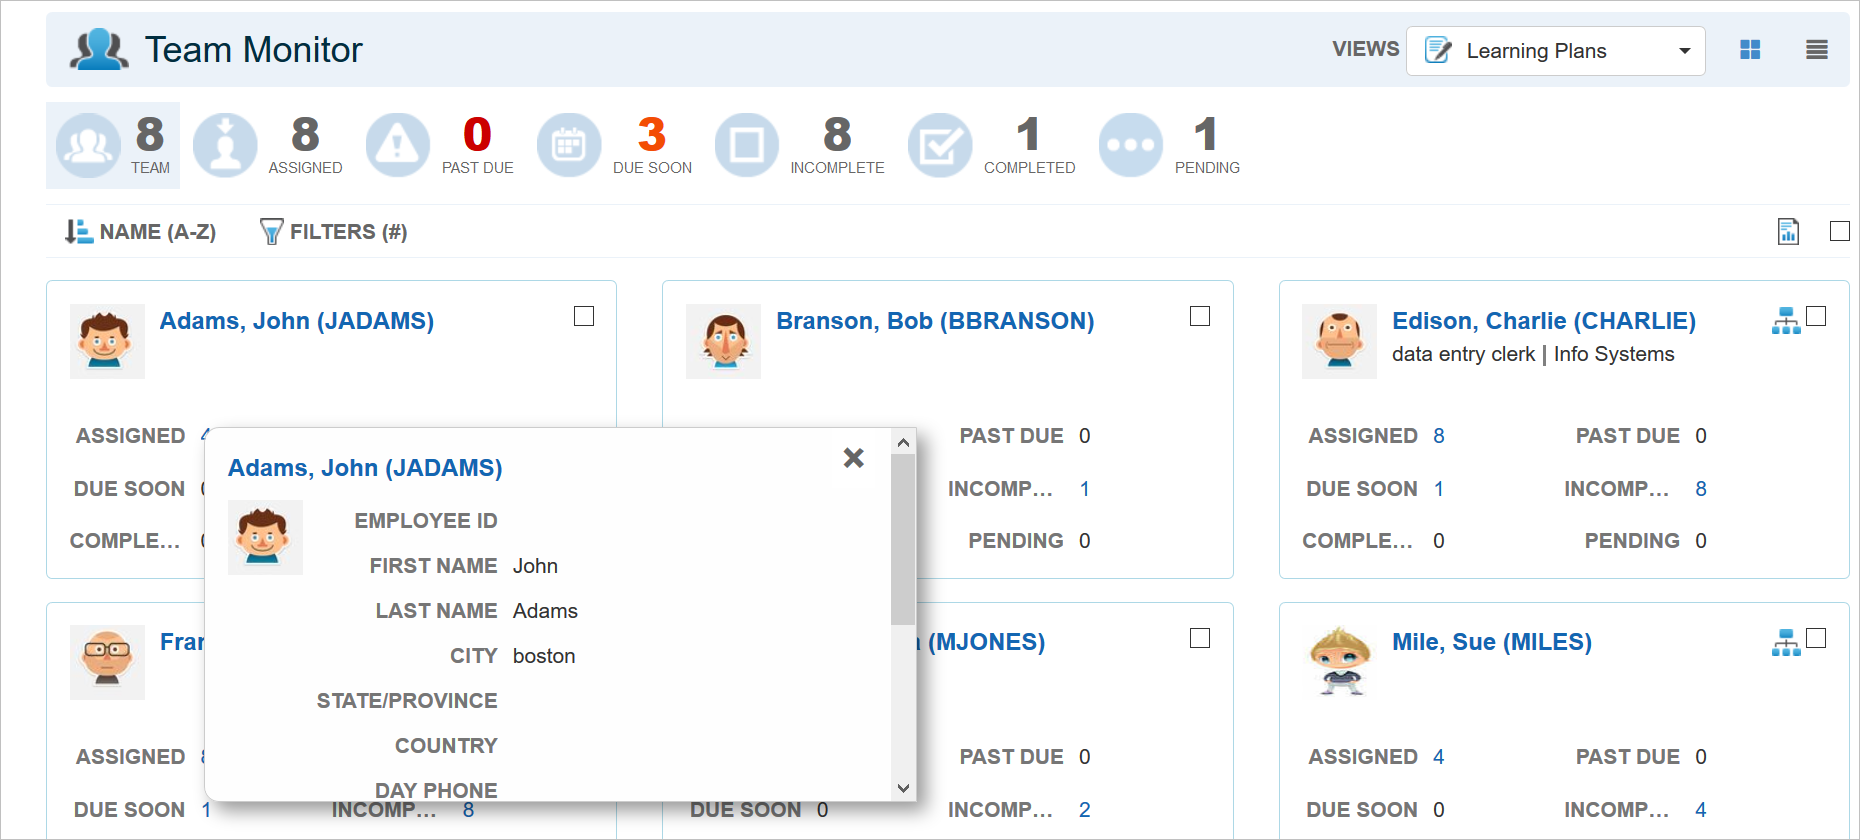
The User Card content is based on the User Field Settings for the User Card, found under the Control Panel.
Refer to online help if you need additional information about setting up User Cards (TOC > User Accounts > Managing Users > User Cards).
New Image Column on the Categories Page
There is a new Image column on the Categories page. The column displays the image selected for the Category if one has been assigned.

If an image has not been assigned to the Category, the default image displays in the column instead. In the example above, notice that the fourth Category in the list uses the default image.
Updates have been made to the Document Course feature. These include:
See the following sections for details.
Refer to online help for complete instructions on using the Content Manager and Document Courses (TOC > Content > Content Manager).
New Ability to Add Completion Criteria
In previous versions of LearnCenter, Users were able to complete Document Courses by launching them, or by launching the Course and then completing any post-Course workflows such as Electronic Signatures or post assessments. With Oracle Taleo Learn Cloud Release 17B, you now have the ability to define additional completion criteria for Document Courses. You can configure the Document Course to require Users to do any of the following before Document Course completes:
- Launch the Course
- View all of the pages of the Course
- Spend a minimum amount of time in the Course
There is a new section on the Course Properties window called Completion Criteria.

Select either of the following to indicate which action will drive Users toward completion:
- Launch Document Course – Users only need to launch the Course in order to complete it.
- View all Document Pages – Simply launching the Course will not drive it to completion. Users need to view all pages of the Course before it completes.
Optionally, you can set a Minimum Time in Course for either option. This means that that the completion is not just tied into launching the Course, but also to Users spending the appropriate amount of time consuming the Course material.
In addition, there is now Course bookmarking. Course bookmarking lets Users resume Courses on the pages on which they exited. When a User resumes a Course, LearnCenter retains the number of pages viewed and the amount of time the User last spent in the Course.
Visual Enhancements for End Users
There are some new visual enhancements for end Users. Image resolution has been increased from 72 to 96 dpi, which makes for crisper document page images. There is now a page counter in the upper right corner of Course page. This option only displays if View all Document Pages option was selected in the Course Properties.

There is a new countdown timer which also displays in the upper right corner of the Course page. This option only displays if the Minimum Time in Course option was selected in the Course Properties.
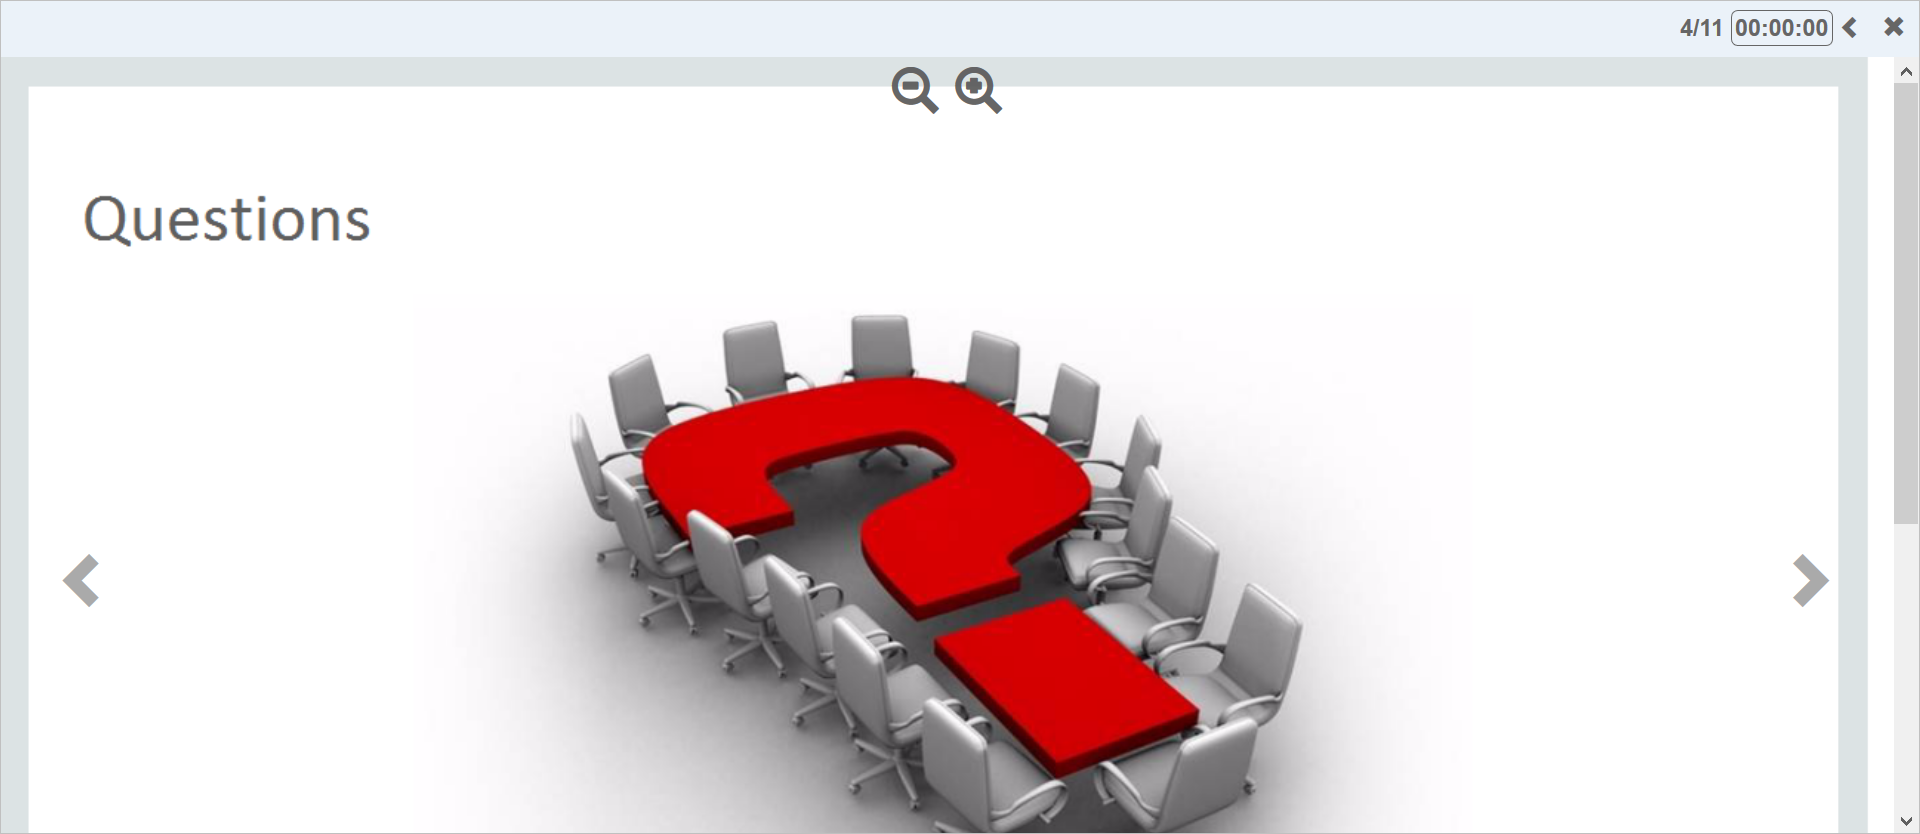
Users now have the ability to zoom in (up to 200%) or out (up to 50%). These options appear when Users rest their cursor over the top of the Course.
The Course Progress Data View has been updated with two new fields as a result of this feature. The fields are:
- Course Overall Time Spent
- Course Viewed Pages
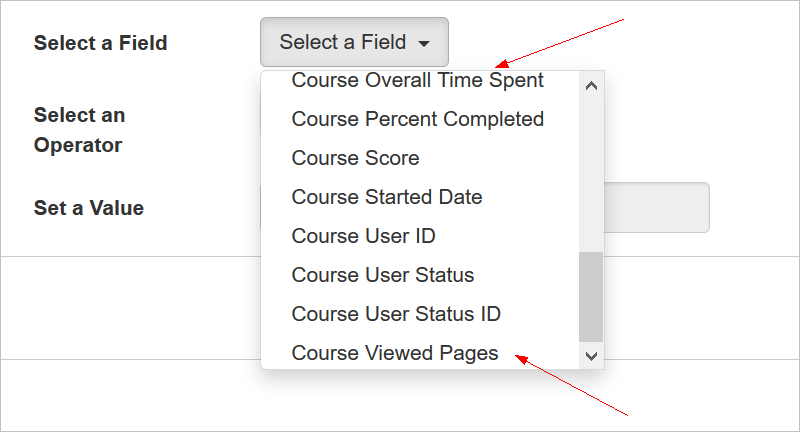
Refer to online help for complete instructions on using BI Reporting (TOC > Reports > BI Reporting).
There are new Bulk Loader enhancements included with Oracle Taleo Learn Cloud Release 17B.
- Course Creator Loader is Now the Course Manager Loader
- Updates to the User Learning Plan Mapping Loader Requirements
- Updates to the Course Completions Loader Requirements
Important: If you have any of these loaders scheduled to run automatically, after Release 17B is made available, you need to update the loader templates prior to their next scheduled run.
Course Creator Loader is Now the Course Manager Loader
A major change has been made to the Bulk Loader for the LearnCenter Course Creator requirements. This loader has been re-named to the Course Manager Loader. It retains all of the previous functionality of the Course Creator Loader requirements, but now it also includes support for bulk updating existing SCORM, AICC, and Document Courses. For Document Courses you have the ability to create placeholder Courses for the loading of historical data. New logic allows you to look up Courses by ID, and update Course Names.
Important: Beginning with Oracle Taleo Learn Cloud Release 17B, the Course Creator Loader will no longer be eligible for uploading to the LearnCenter. You will need to use the Content Manager loader instead.
NOTE: Due to the number of the changes made to the requirements for this loader, the updates for it will be available in online help upon 17B General Availability (GA), and on Customer Connect.
Updates to the User Learning Plan Mapping Loader Requirements
Enhancements have been made to the User Learning Plan Mapping requirements. A new column enables you to add or update a User’s Learning Plan Due Date in bulk. The new column should be added to your existing template using the following information as a guide.
| Text Editor Column |
Excel Column |
Required |
Notes |
|---|---|---|---|
| 7 |
G |
No |
Set the Users Learning Plan Due Date |
| Accepted Values |
The Date and Time format must be posted in the mm/dd/yyyy mm = Two digit month dd = Two digit Day yyyy = Four digit Year The date will appear based on the LearnCenter setting |
||
| Example: 01/02/2015 Example: 09/17/2015 |
|||
|
|
If field is blank the user will given the default due date. |
||
|
|
Refer to the online help topic called Best Practice for Setting Date and Time for additional information. |
||
|
|
Custom Excel Field Type Format: mm/dd/yyyy. |
||
Additionally, some changes have been made to the accepted values for the Date and Time format for columns 3 and 5 of the User Learning Plan Mapping requirements.
| Accepted Values |
The Date and Time format must be posted in the mm/dd/yyyy hh:mm AM/PM in 15 minute intervals format mm = Two digit month dd = Two digit Day yyyy = Four digit Year The date will appear based on the LearnCenter setting. |
| Example: 01/02/2015 Example: 09/17/2015 |
|
Updates to the Course Completions Loader Requirements
Enhancements have been made to the Course Completions Requirements. There is now support for the Document Course. As a result, there are two new columns for the data requirements. The new columns should be added to your existing template using the following information as a guide.
Important: If you have this loader scheduled, be sure that you have updated this template accordingly before the next scheduled run after 17B is released.
Pages Viewed
| Text Editor Column |
Excel Column |
Required |
Notes |
|---|---|---|---|
| 10 |
J |
No |
Set the number of pages that the users has viewed for the document course |
| Accepted Values |
Any numeric value of 1 to 99999 |
||
| Example: 1 Example: 623 |
|||
|
|
Supports Document Course created from the Content Manager only. |
||
Time In Course
| Text Editor Column |
Excel Column |
Required |
Notes |
|---|---|---|---|
| 11 |
K |
No |
Set the number of pages that the users has viewed Set the total time that the users has spent in a document course |
| Accepted Values |
Any numeric value to two decimal places If there Course score |
||
| Example: 00:10:00 Example: 02:15:45 |
|||
|
|
Supports Document Course created from the Content Manager only. |
||
|
|
The User time in Course can be greater than the minimum required for Course completion |
||
|
|
Refer to the online help topic called Best Practice for Setting Date and Time for additional information. |
||
|
|
Custom Excel Field Type Format: hh:mm:ss |
||
In addition, Column 1 (Course Type) now allows Media = Document Course as an accepted value.
| Accepted Values |
The Course Completion loader will create or update user completion records for the following course types AICC = AICC Course SCORM = SCORM Course LearnCenter = LearnCenter (WYSIWYG) Course Media = Document Course |
| Example: AICC Example: SCORM Example: LearnCenter Example: Media |
|
A number of enhancements have been made to BI Reporting Reports. These include several updates to existing Data Views, a new Course Feedback report and Data View, and additional options for output.
Refer to the BI Reporting section of online help for complete instructions on BI Reporting.
New Course Feedback BI Reporting Report
There is a new standard BI Reporting Report called Course Feedback that enables you to report on the comments you receive from the Course Feedback Form that Users complete after Courses.
NOTE: See online help if you need instructions on setting the Course Feedback Form (TOC > Options > Course Options > General Course Options).
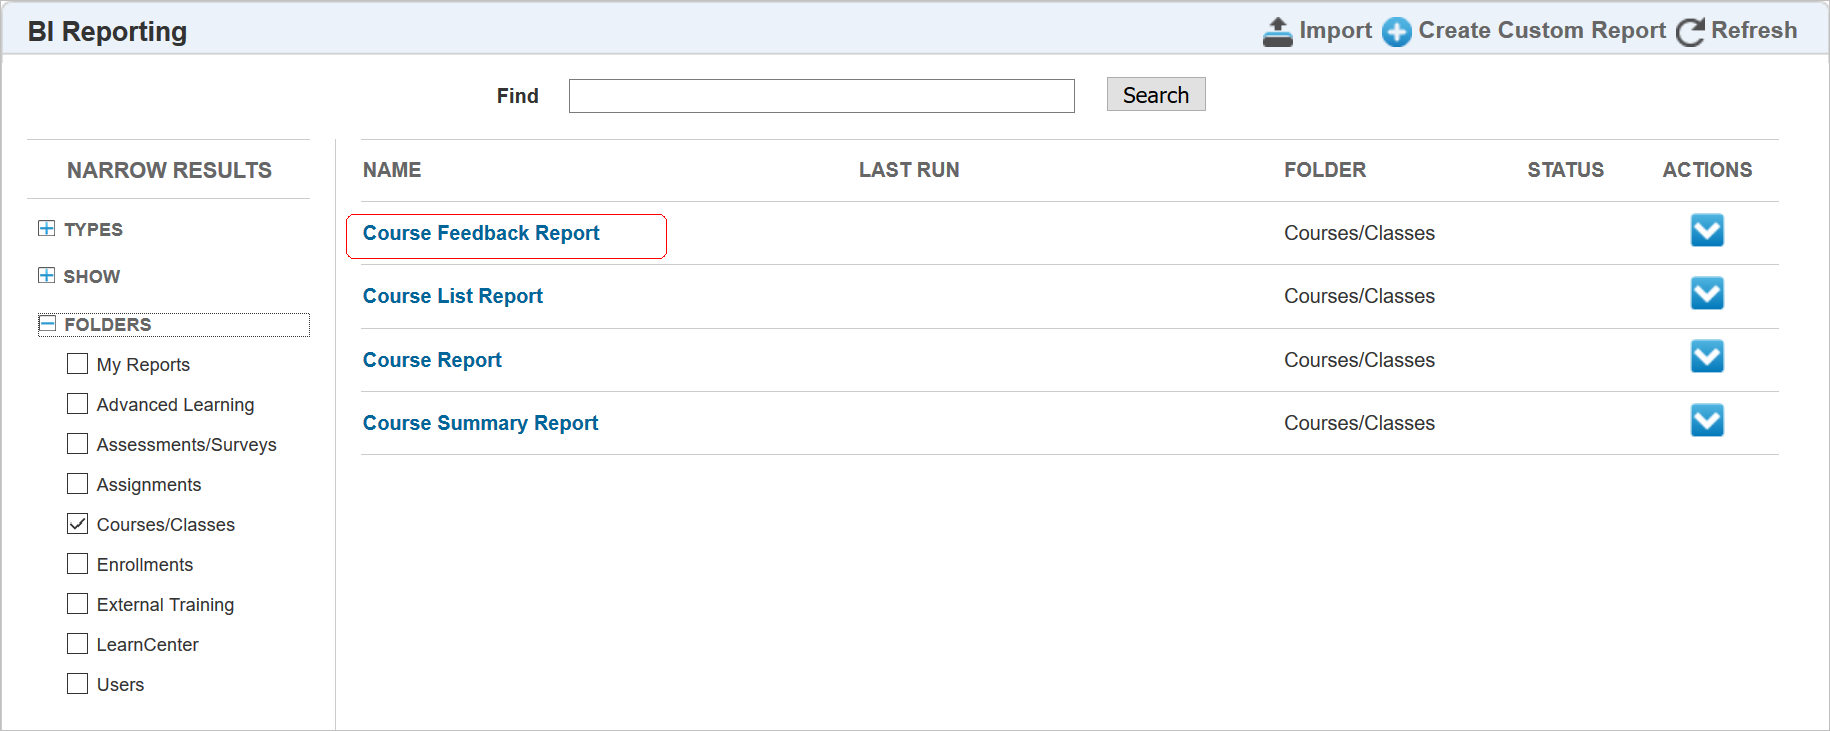
The new standard report includes the following Data Views:
- Users
- Courses
- LearnCenter Courses
- Course Feedback
A report may look similar to the following example.

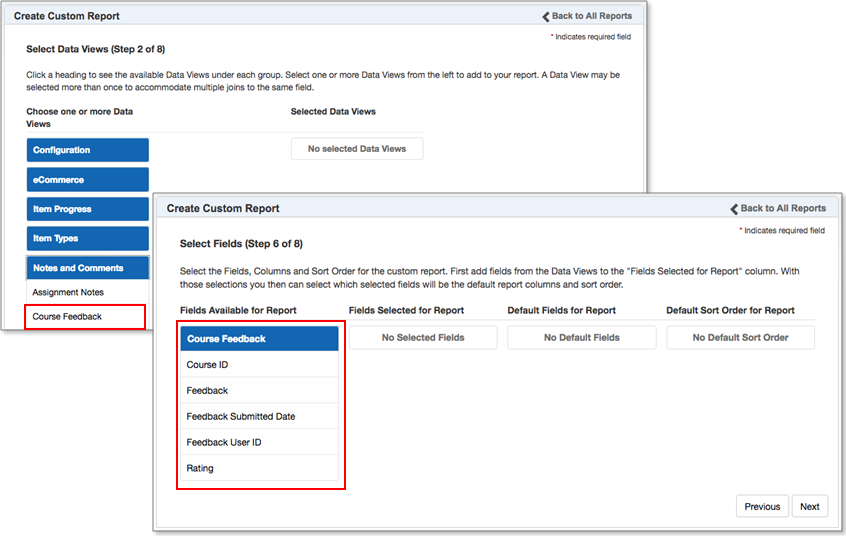
There is also a new Course Feedback Data View available for building custom reports.
Report on User Custom Fields for External Training Report
You can now report on User-entered custom field data in the External Training Progress Data View.
NOTE: At this time, only Admins can see custom External Training fields. Refer to online help for instructions on making custom fields accessible. (TOC > Options > Field Settings > Making Custom and Standard Fields Accessible to Others.)
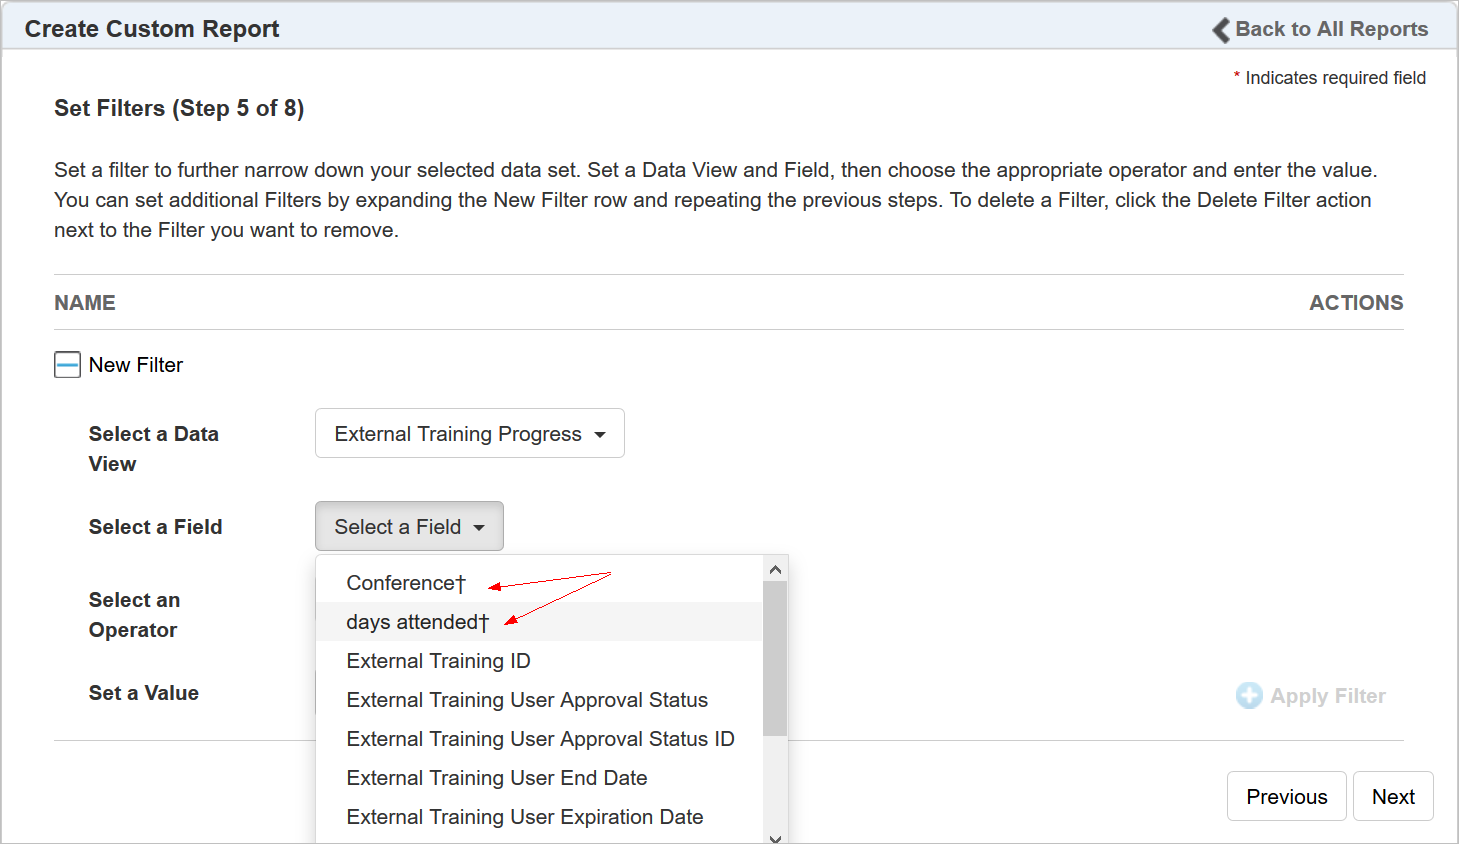
Notice that you can now filter by User custom fields. You can report on the information that Users entered for these custom fields using the External Training Progress Data View. This differs from the default data entered by the Admin for these fields, which is visible from the External Trainings Data
View. If there is no User-entered data in the field, the default data displays.
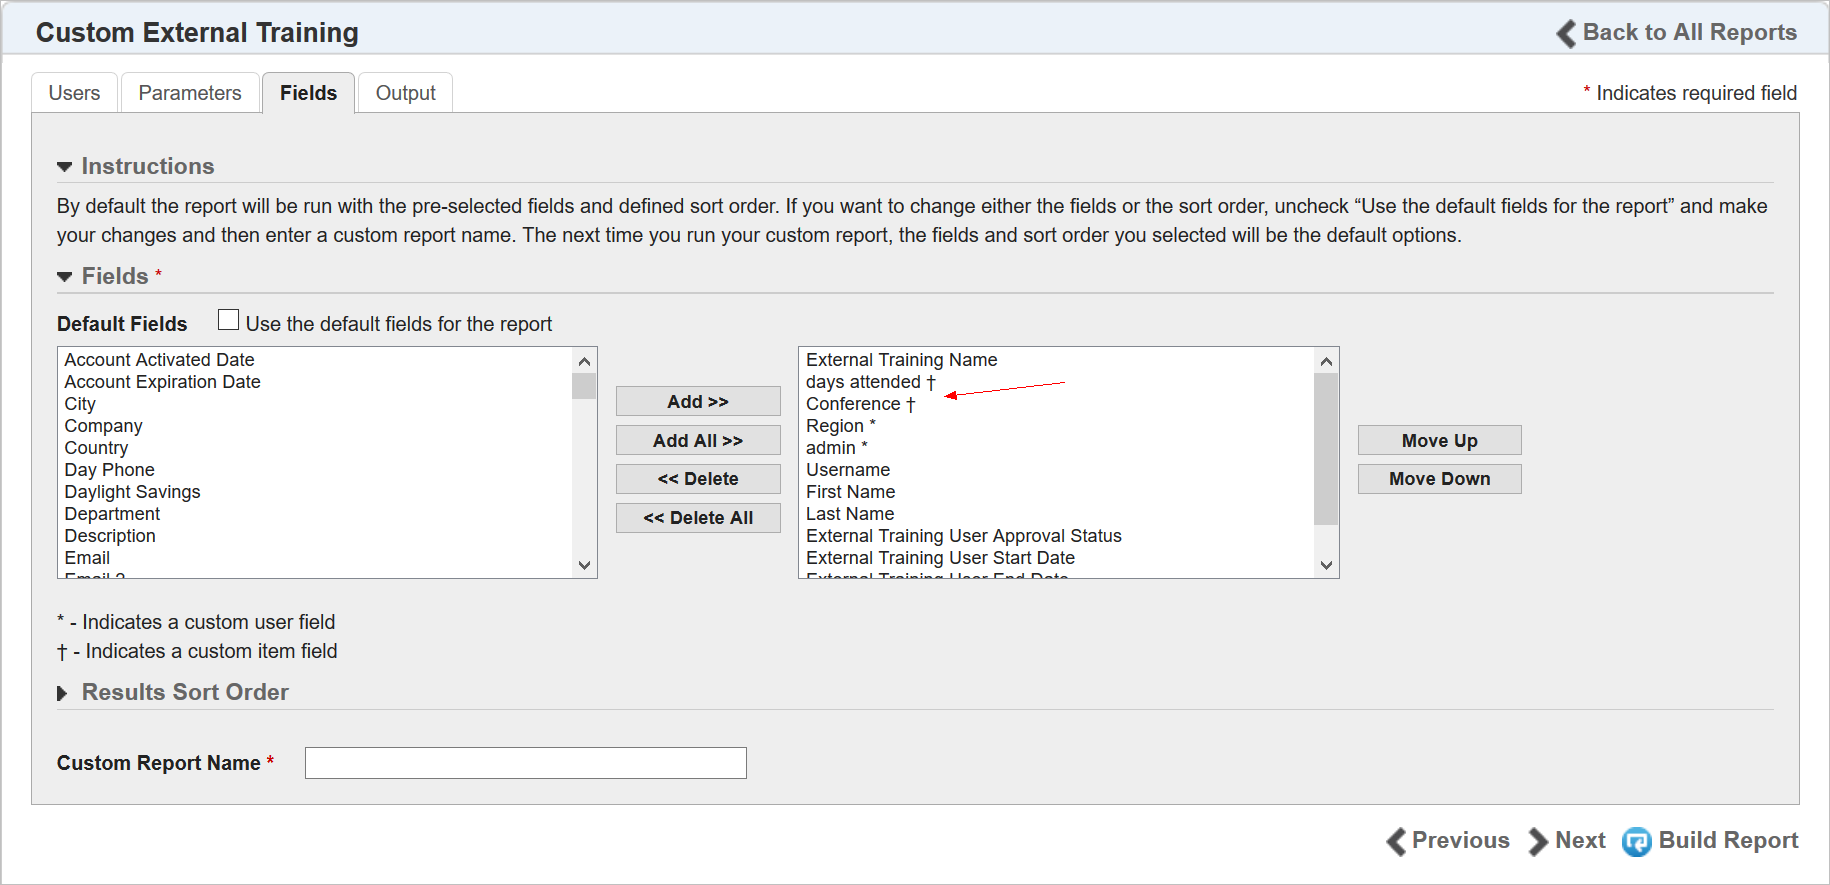
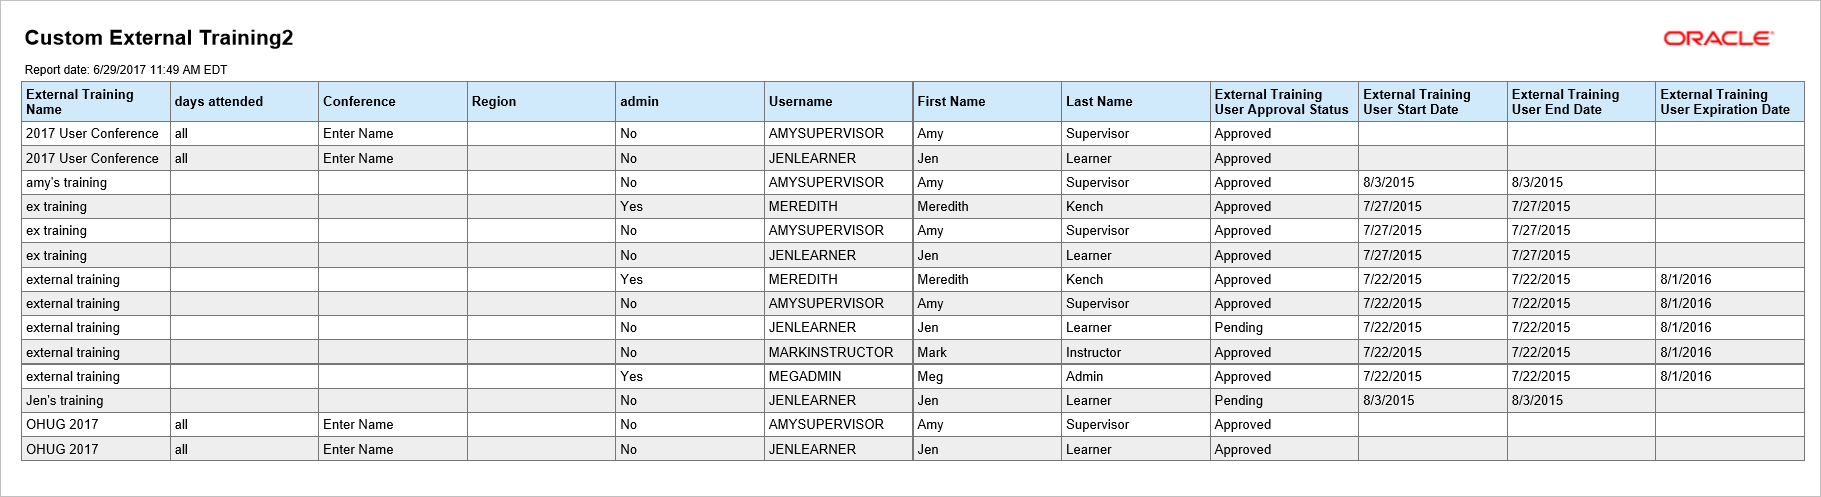
A report using these fields may look similar to the following example.
There are some new options on the Output tab when running a report. The first is the ability to determine whether you want a header on formatted reports (PDF, XLS, RTF, and HTML). Select either Use standard header or No header. Selecting No header may make it easier to sort and perform other options, particularly in XLS format.
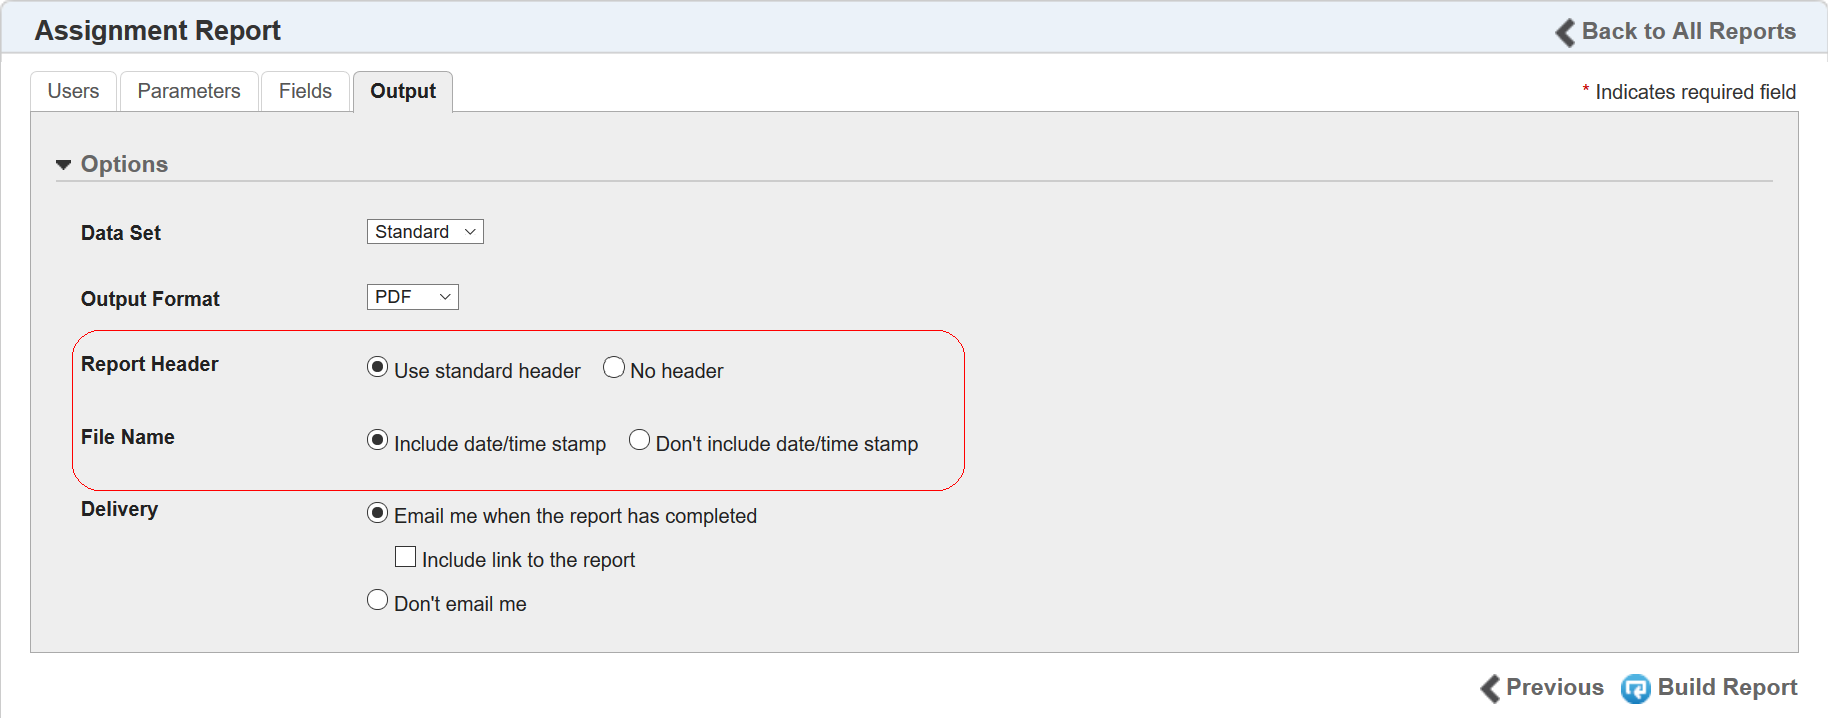
NOTE: The Report Header option is only available when you have selected Standard for the Data Set. It is not available for unformatted CSV reports.
You can also indicate how you want the output file name to be created with the new File Name options. Select either Include date/time stamp or Don’t include date/time stamp. If you select Include date/time stamp, the report file name is created with the date and time included in the file name. For example: CustomCourseSummary-201706290125.pdf, or UserReport-201706290207.pdf.
Selecting Don’t include date/time stamp is recommended if you have a Learn integration, because the same file name will be used every time.
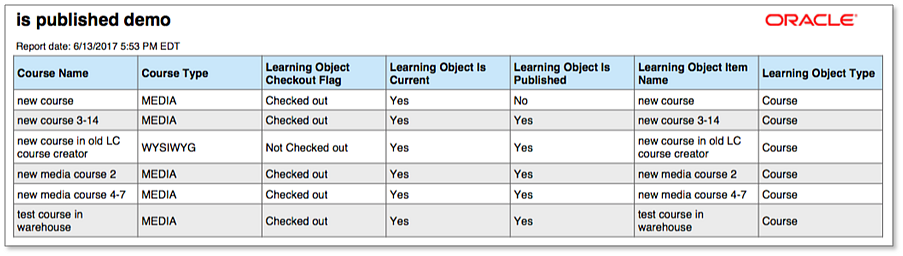
New Ability to Report on a Course’s “Is Published” Status
You now have the ability to run BI Reporting Reports to see whether learning items are published via the Learning Object Manager.
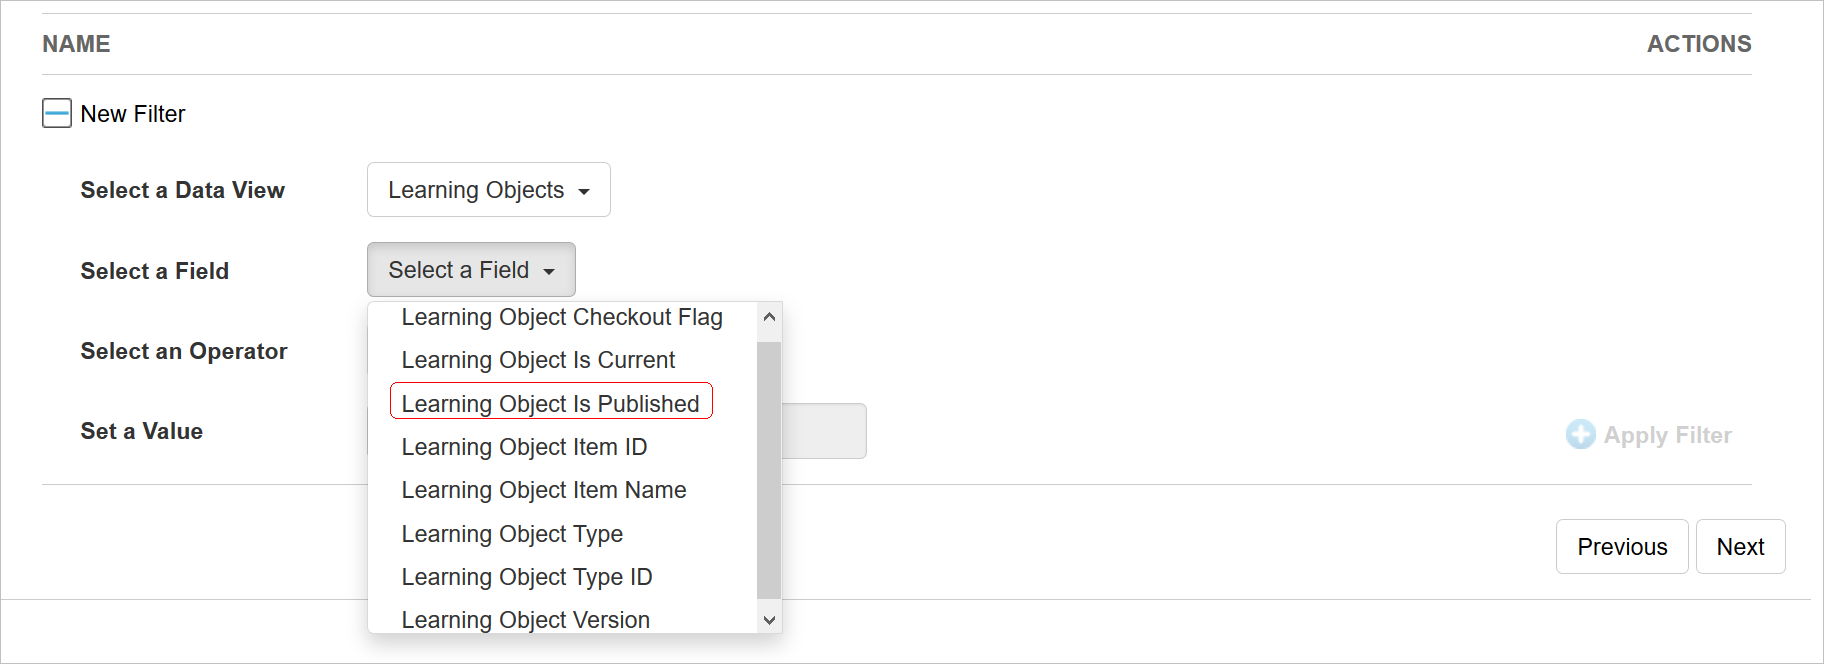
This field is available in the Learning Objects Data View. A report using this field might look like the following example.
Refer to online help for complete instructions on the Learning Object Manager (TOC > Learning Object Manager).
Ability to Report on an External Training’s Active/Inactive Status
You now have the ability to report on an External Training event’s active or inactive status. There is a new External Training Status Flag fields available for the External Trainings Data View.
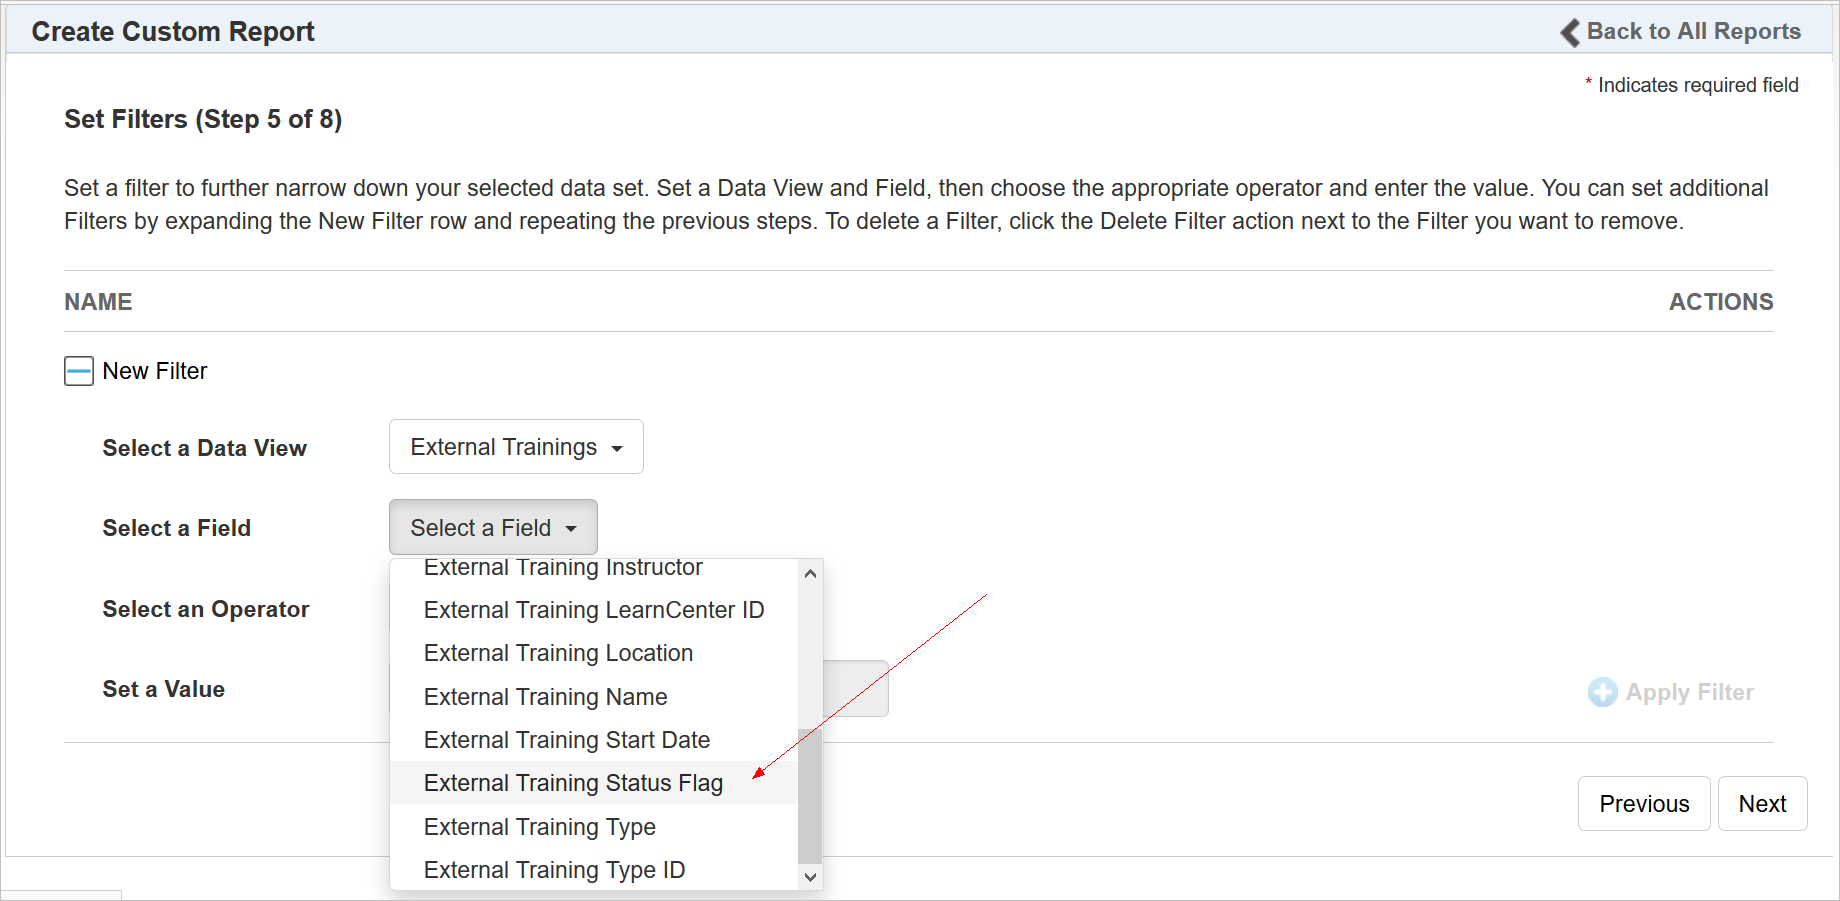
By design, this only returns active External Trainings on the report, unless you purposely filter for inactive.
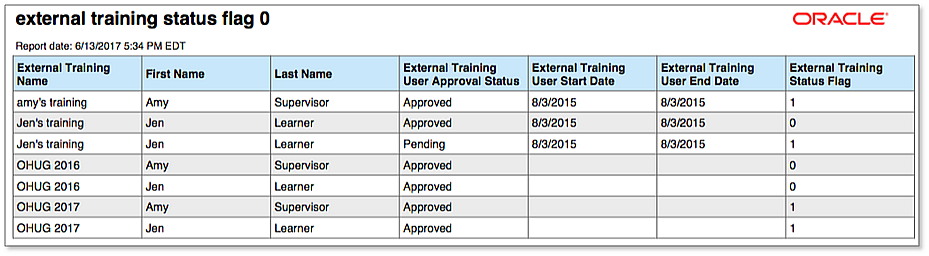
On the report, 1 = Active, and 0= Inactive.
New Ability to Report on the Assigned Date of a Skill
You now have the ability to report on when a Skill was assigned to a User. There is a new Skill Assigned Date field available under the Skill Progress Data View and under the Default Fields for the Skill Progress Report. Selecting this field returns the date on which a User was assigned or mapped to a Skill.
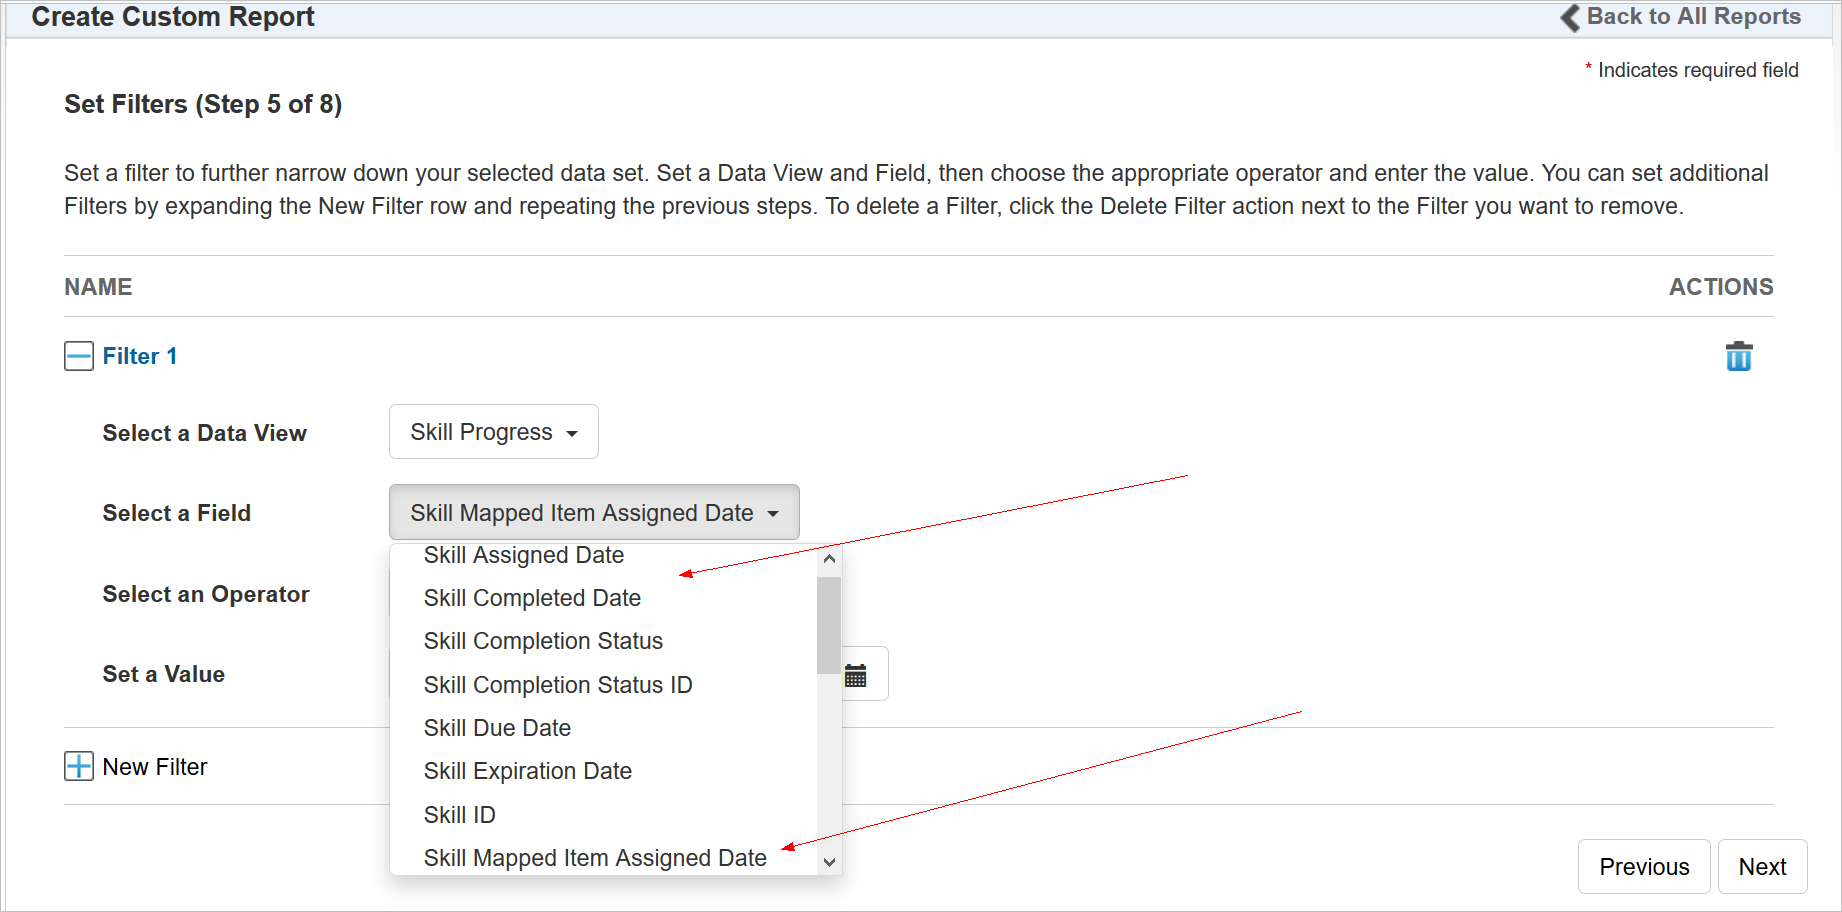
In addition, the Skill Mapped Assigned Due Date field was renamed to Skill Mapped Item Assigned Date. This field returns the date and time Skill mapped items were mapped to a User.
NOTE: This field functions the same way it always has, but it was renamed for clarity.
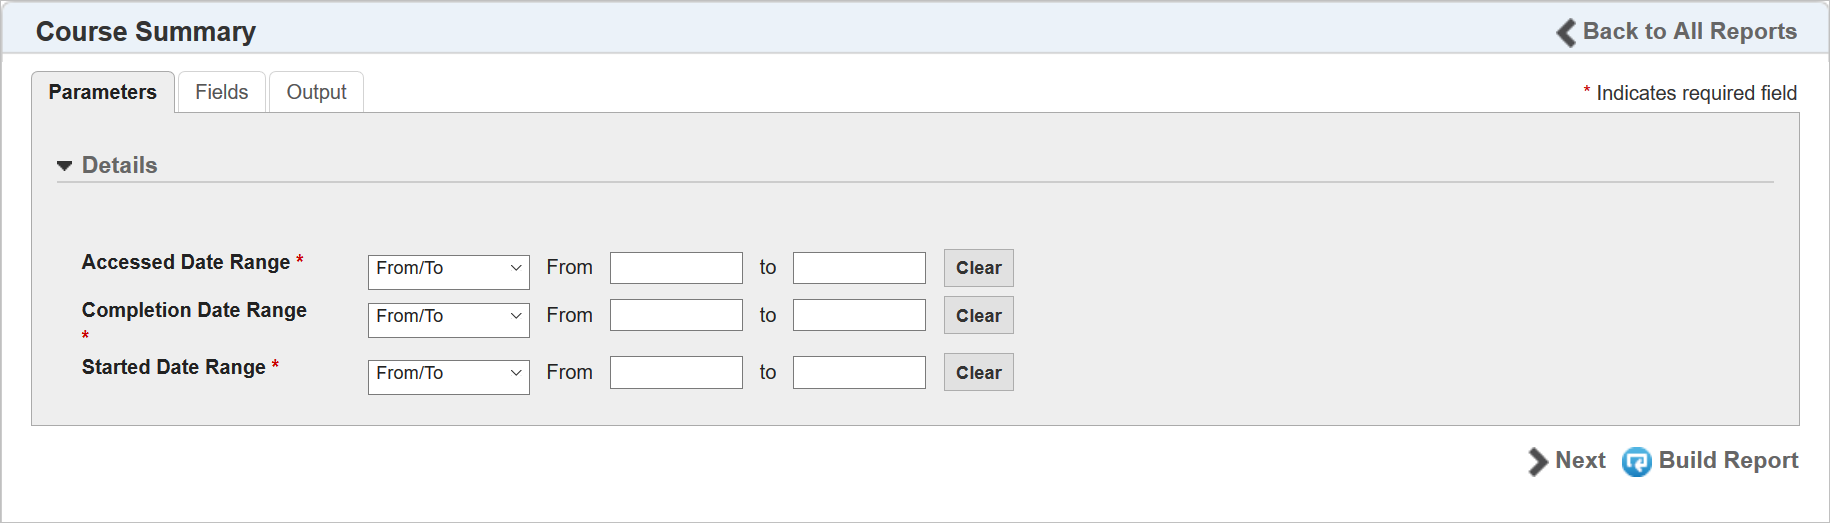
New Date Parameter Options for the Course Summary Data View
New Date parameter options have been added for the Course Summary Data View.
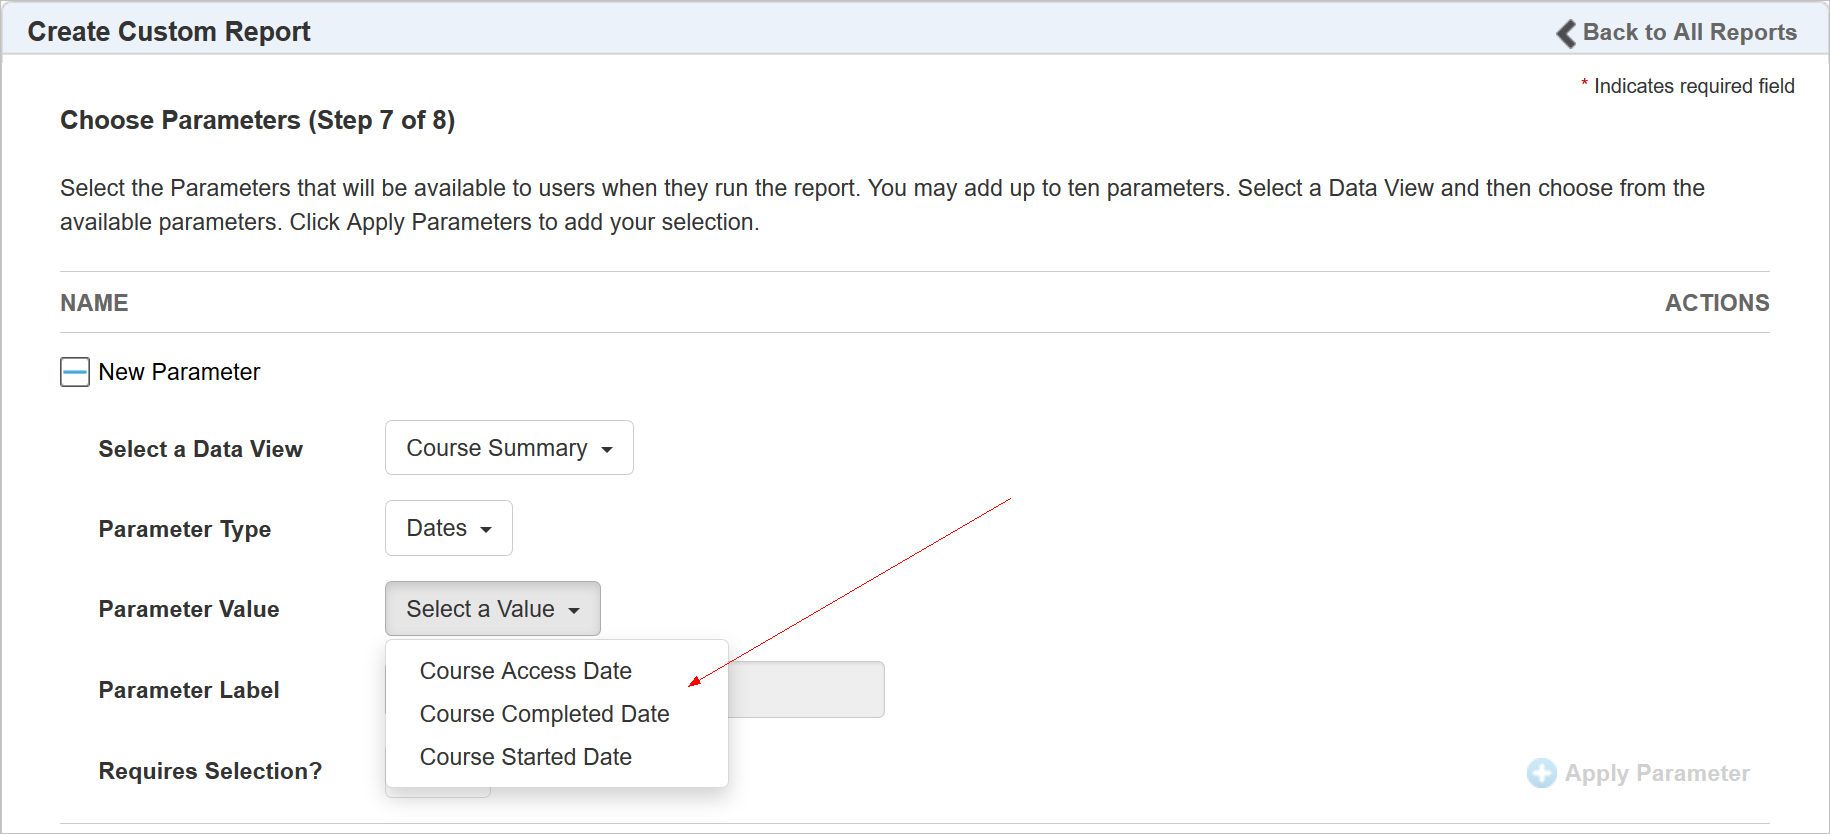
These enable you to report on a date range for the Course Summary.
New Minimum Passing Score for the Instances Data View
You now have the ability to report on a minimum passing score for instances.
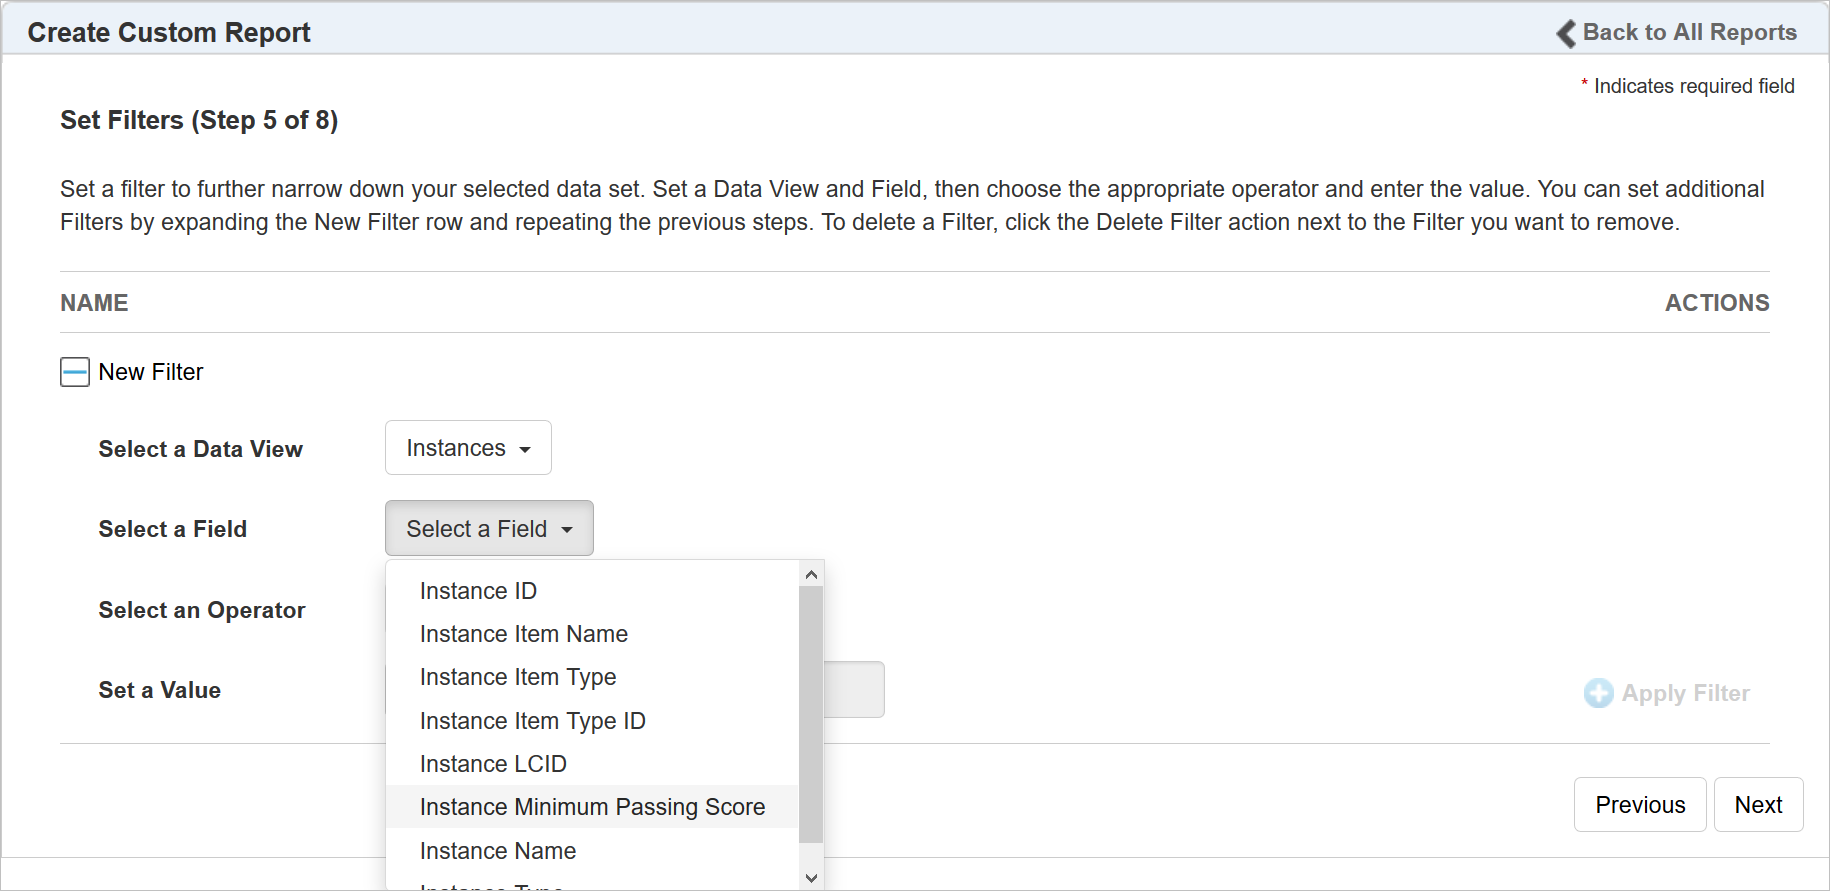
This Minimum Passing Score is available for join conditions, filters, and fields.
User Progress Data View Now Includes External Training
External Training is also available in the standard User Report.
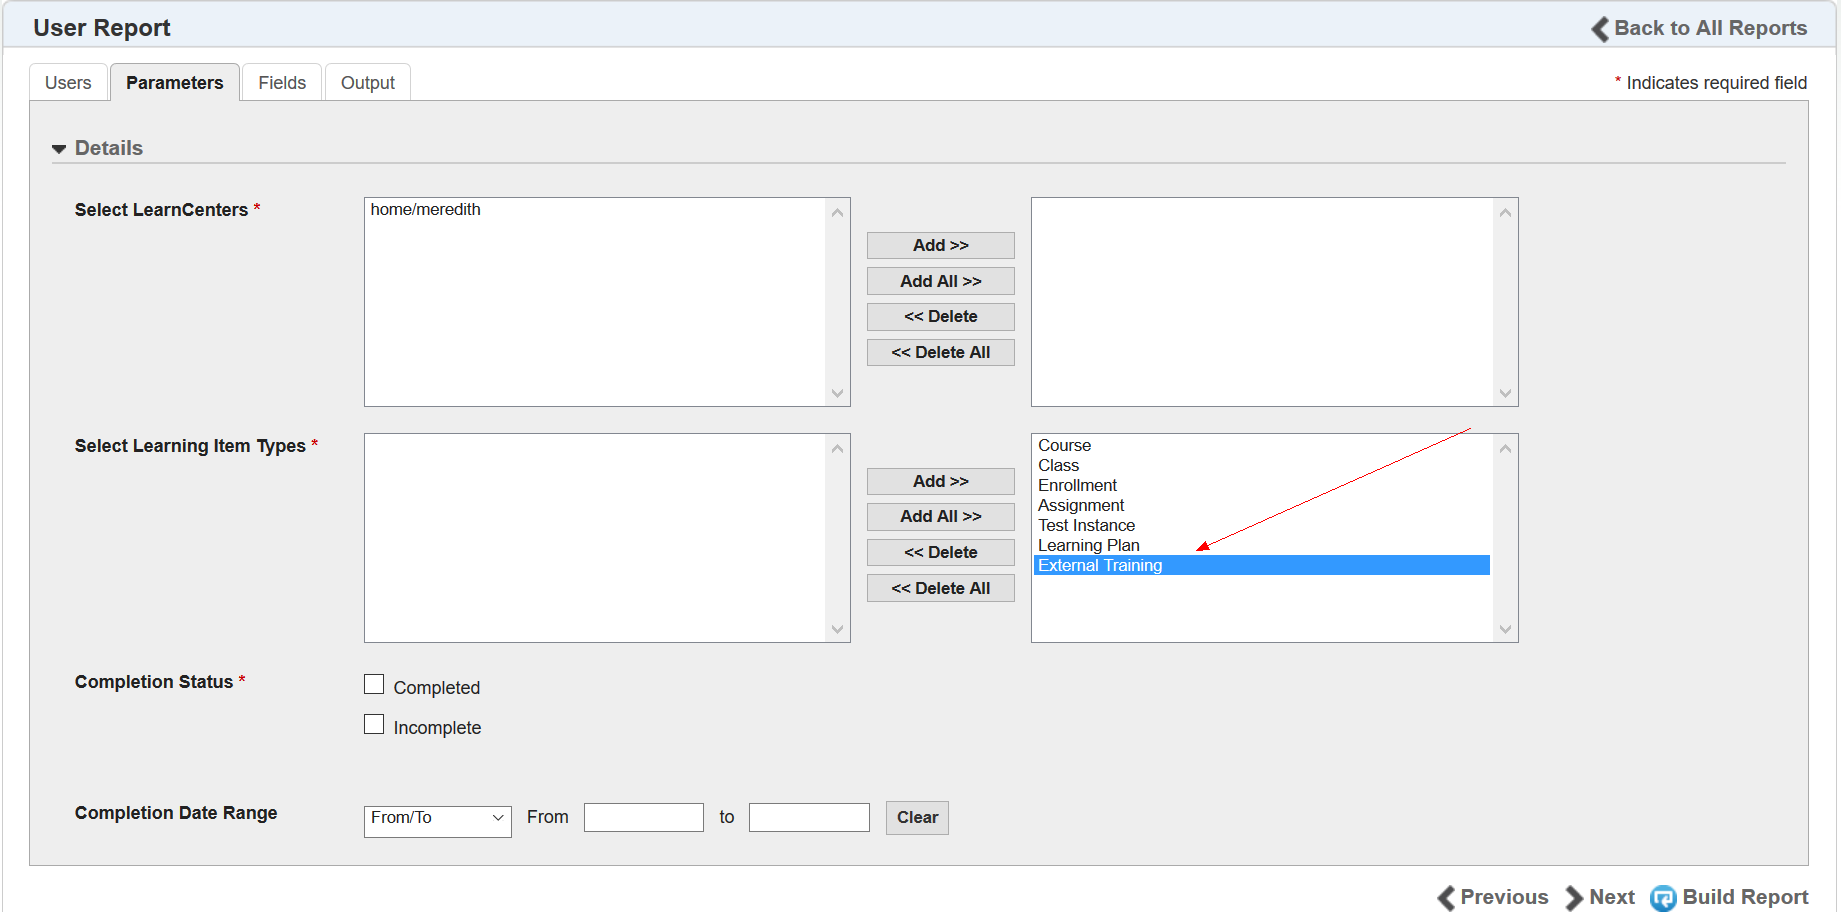
This field is also available for use with custom reports from the User Progress Data View.
New BI Reporting Links for Users
You can now add links to LearnCenter Design pages to make BI Reporting reports available to Users who are not necessarily Admins and Supervisors. You can let Users see any of the standard reports, and any custom reports you have shared with Users.
On any LearnCenter Design Edit Page, there is a new BI Reporting button.
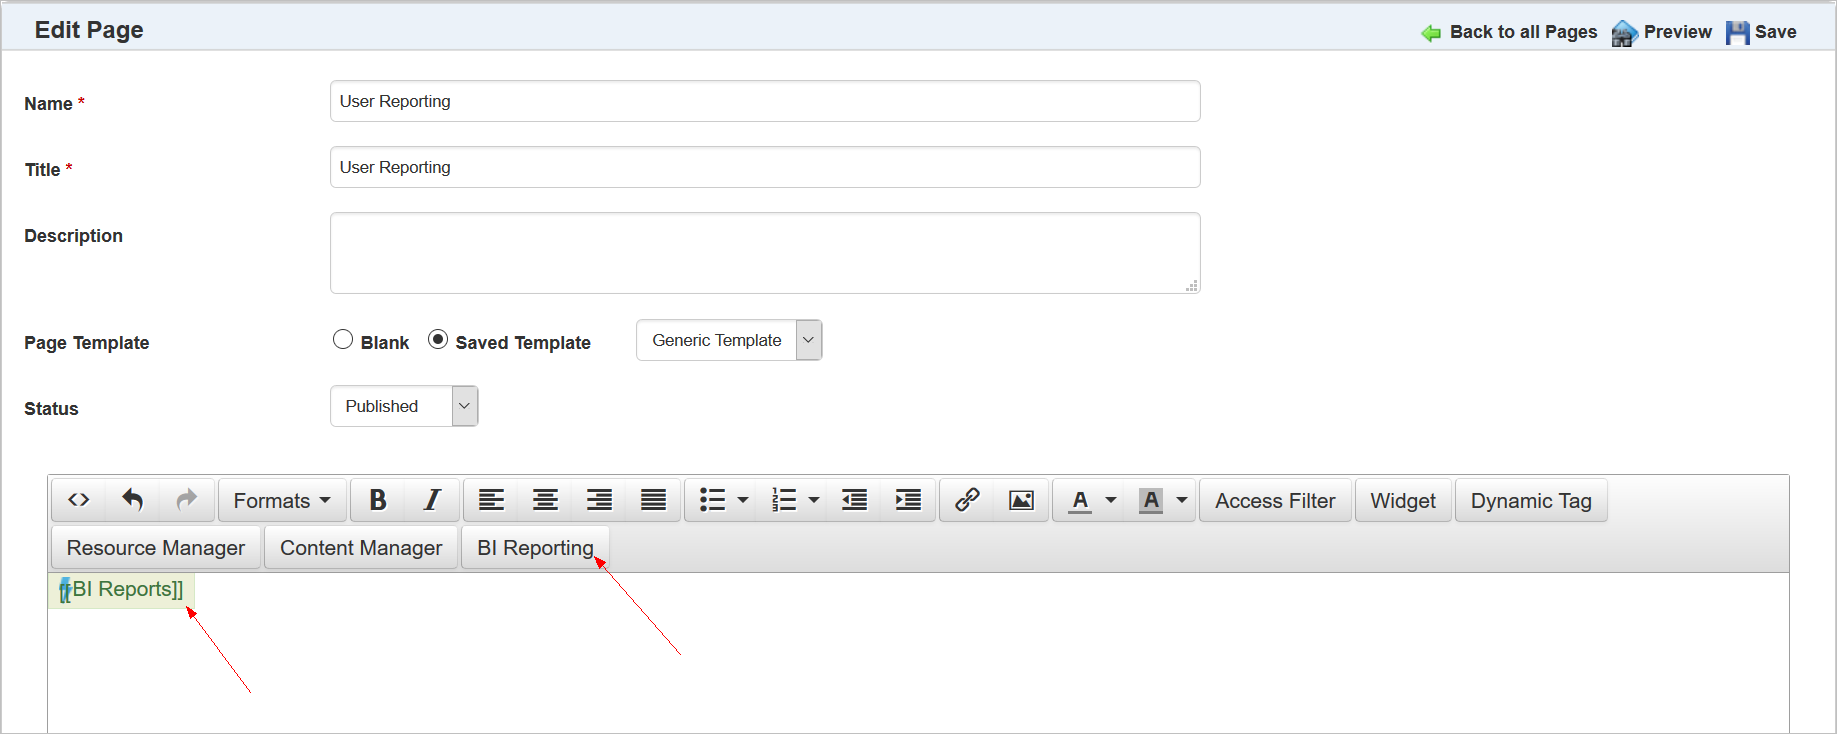
When you click it, the following window opens.
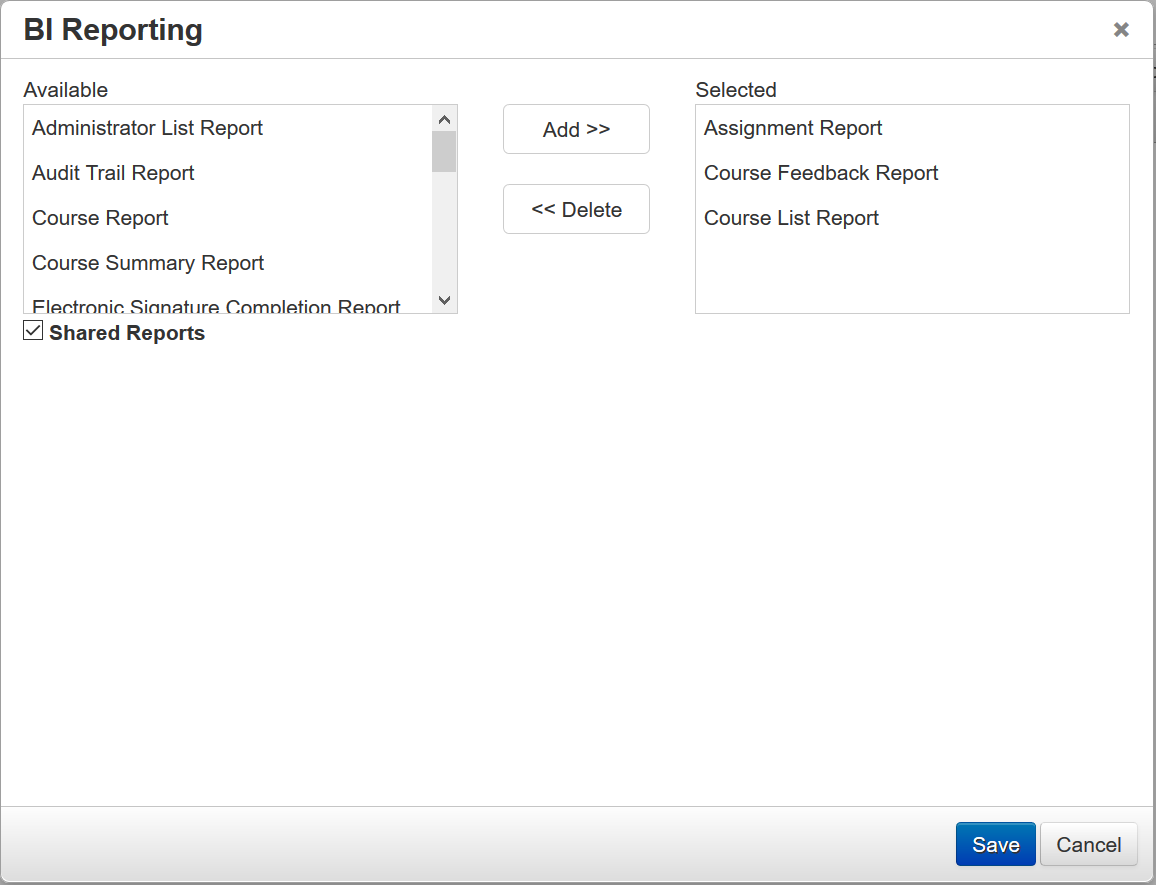
Select the reports you want to include in the link from the Available box, and then click Add to move them to the Selected box. Click the Shared Reports check box to include any reports you specifically shared with Users. Only those Users with which you have shared those reports will be able to access them. Click OK when you are done. The BI Reports tag appears on the page.
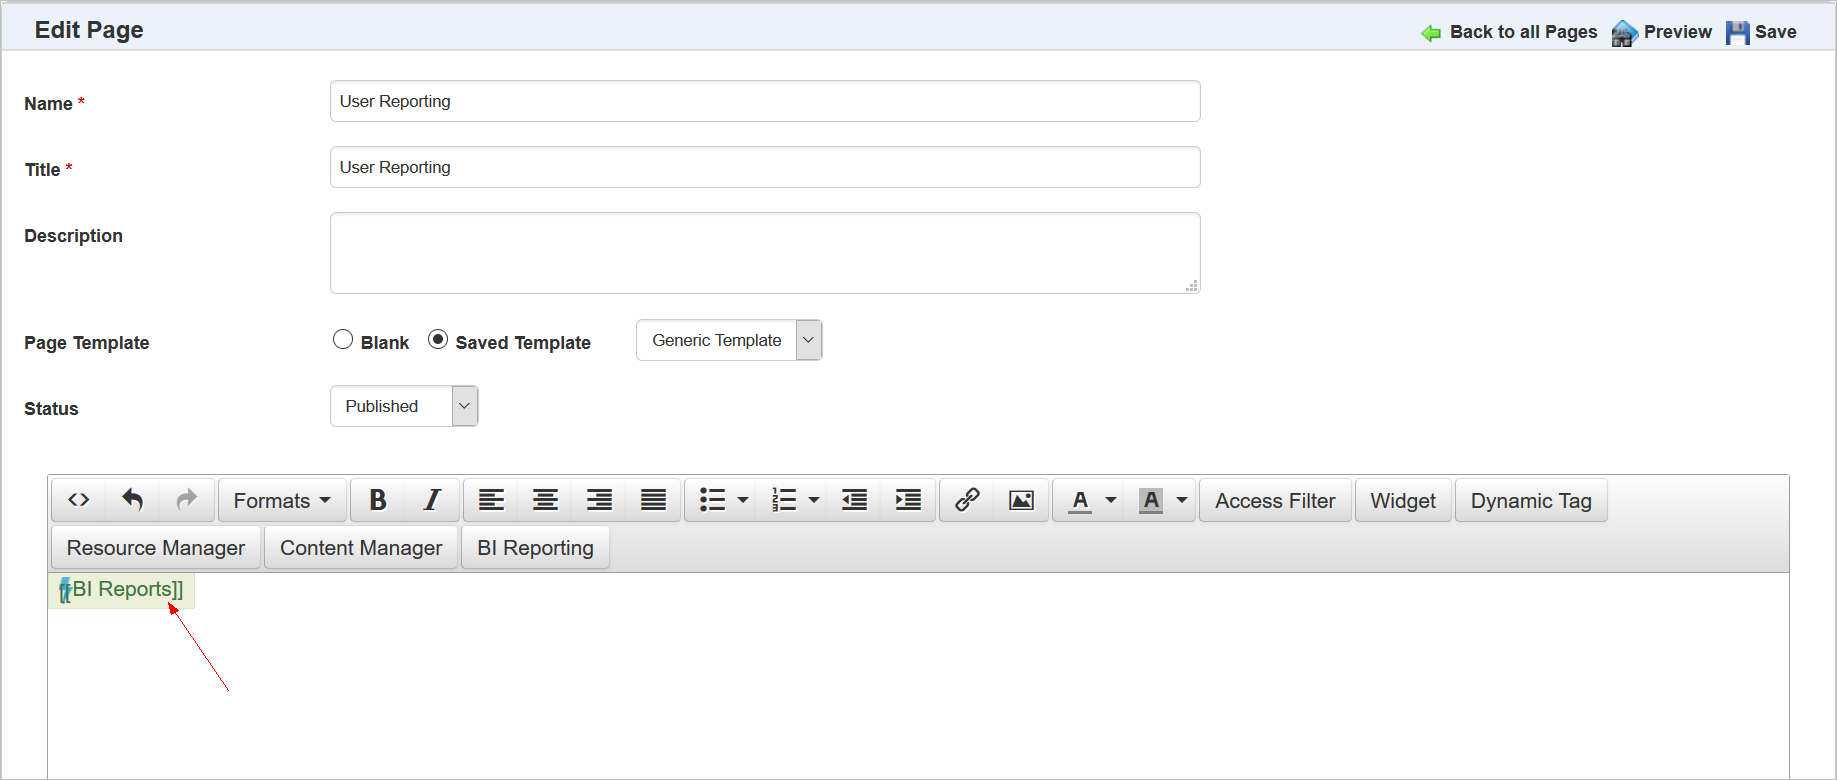
Tip: The text typed between the brackets is what displays on the page for the link. Anything typed between the brackets ([[ ]]) will be localized should you change the language for the LearnCenter. The brackets themselves will not appear to end Users.
Users will see a link on the page similar to the following.

Notice that the Admin typed something other than the default text between the brackets. When Users click the link, a BI Reporting interface opens in a new tab.
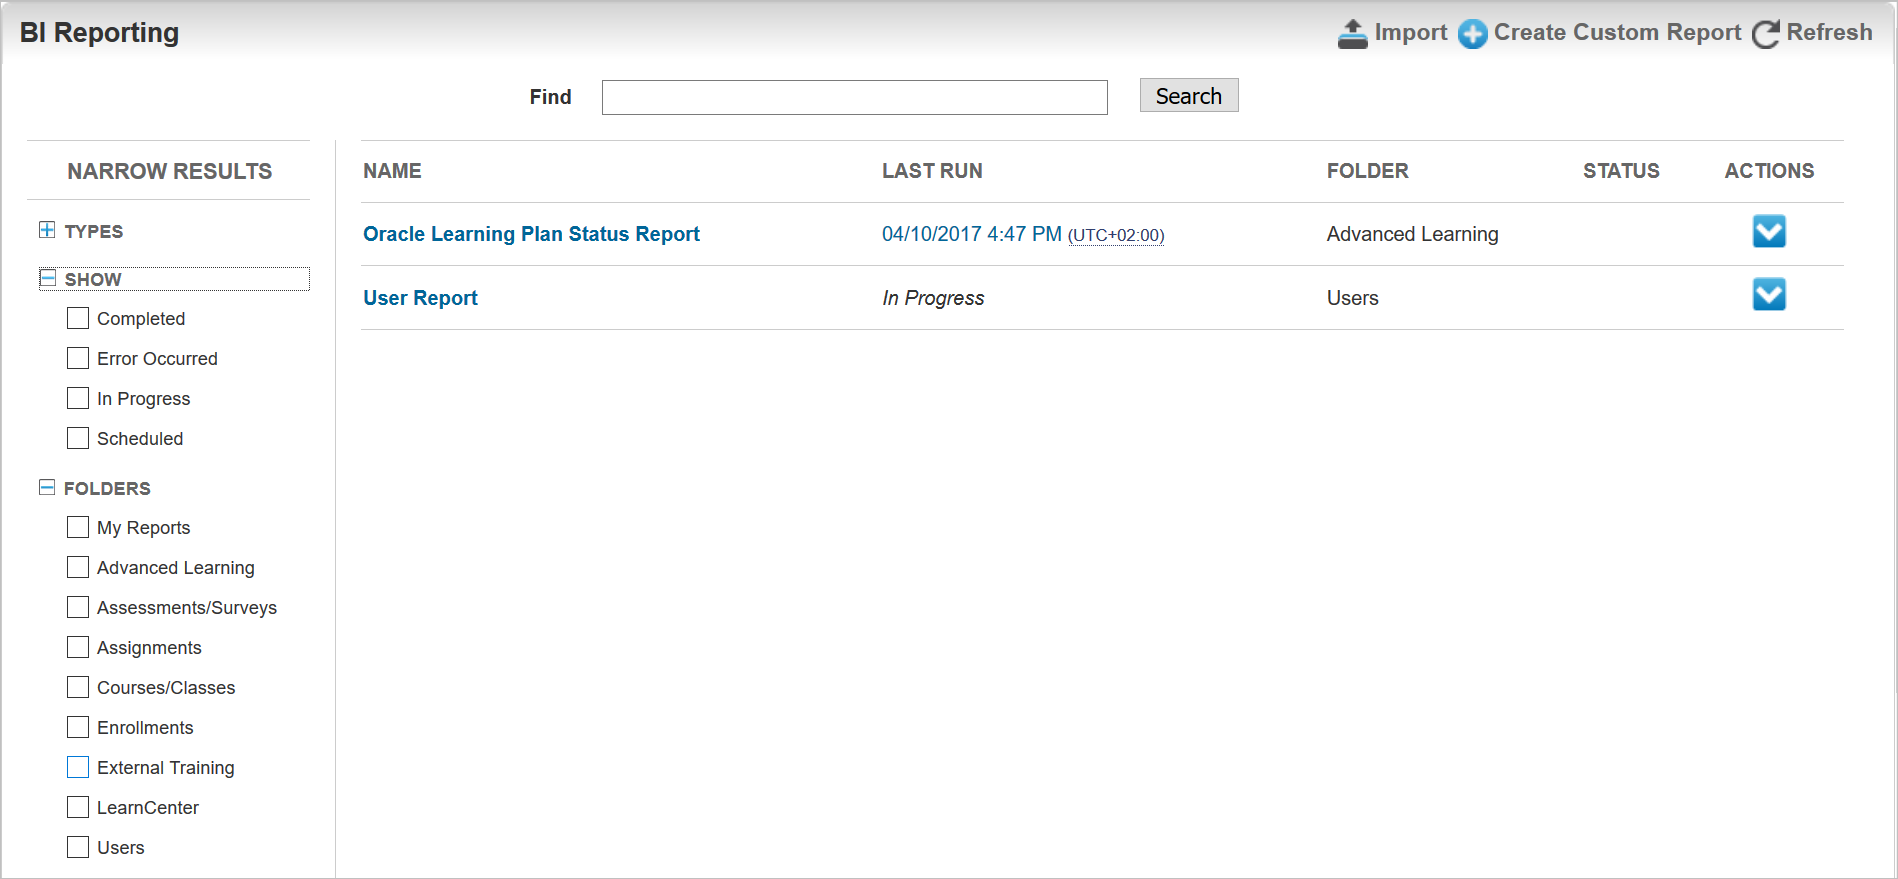
When Users run the reports, they only return data for themselves. They cannot access data about other Users. This is true even if the User clicking the link is an Administrator, however Supervisors can click the links and return information about their Users.
NOTE: Users must be granted the View Reports sub permission of the Manage BI Reporting Users Permissions in order to view and run the reports. The Create Custom Reports link, visible in the illustration above, only displays for Users who have been granted the Create & Edit Reports sub permission.
There are a number of new enhancements related to the new ability to determine a default start page for LearnCenter. Included with this enhancement:
- New Standard Start Page
- New Configuration Option for Start Page
- New Home Link
- New Default Page Link
- Last Viewed Page Button
- Links No Longer Display Unless Signed In
- Management Access Code for LearnCenter Designer Pages
Each of these items is discussed in detail in the following sections.
In previous versions of LearnCenter, when you created a new sub LearnCenter, you were presented with a blank first page. Beginning with Oracle Taleo Learn Cloud Release 17B, when you create a new sub LearnCenter, the first page looks like the following standard design.
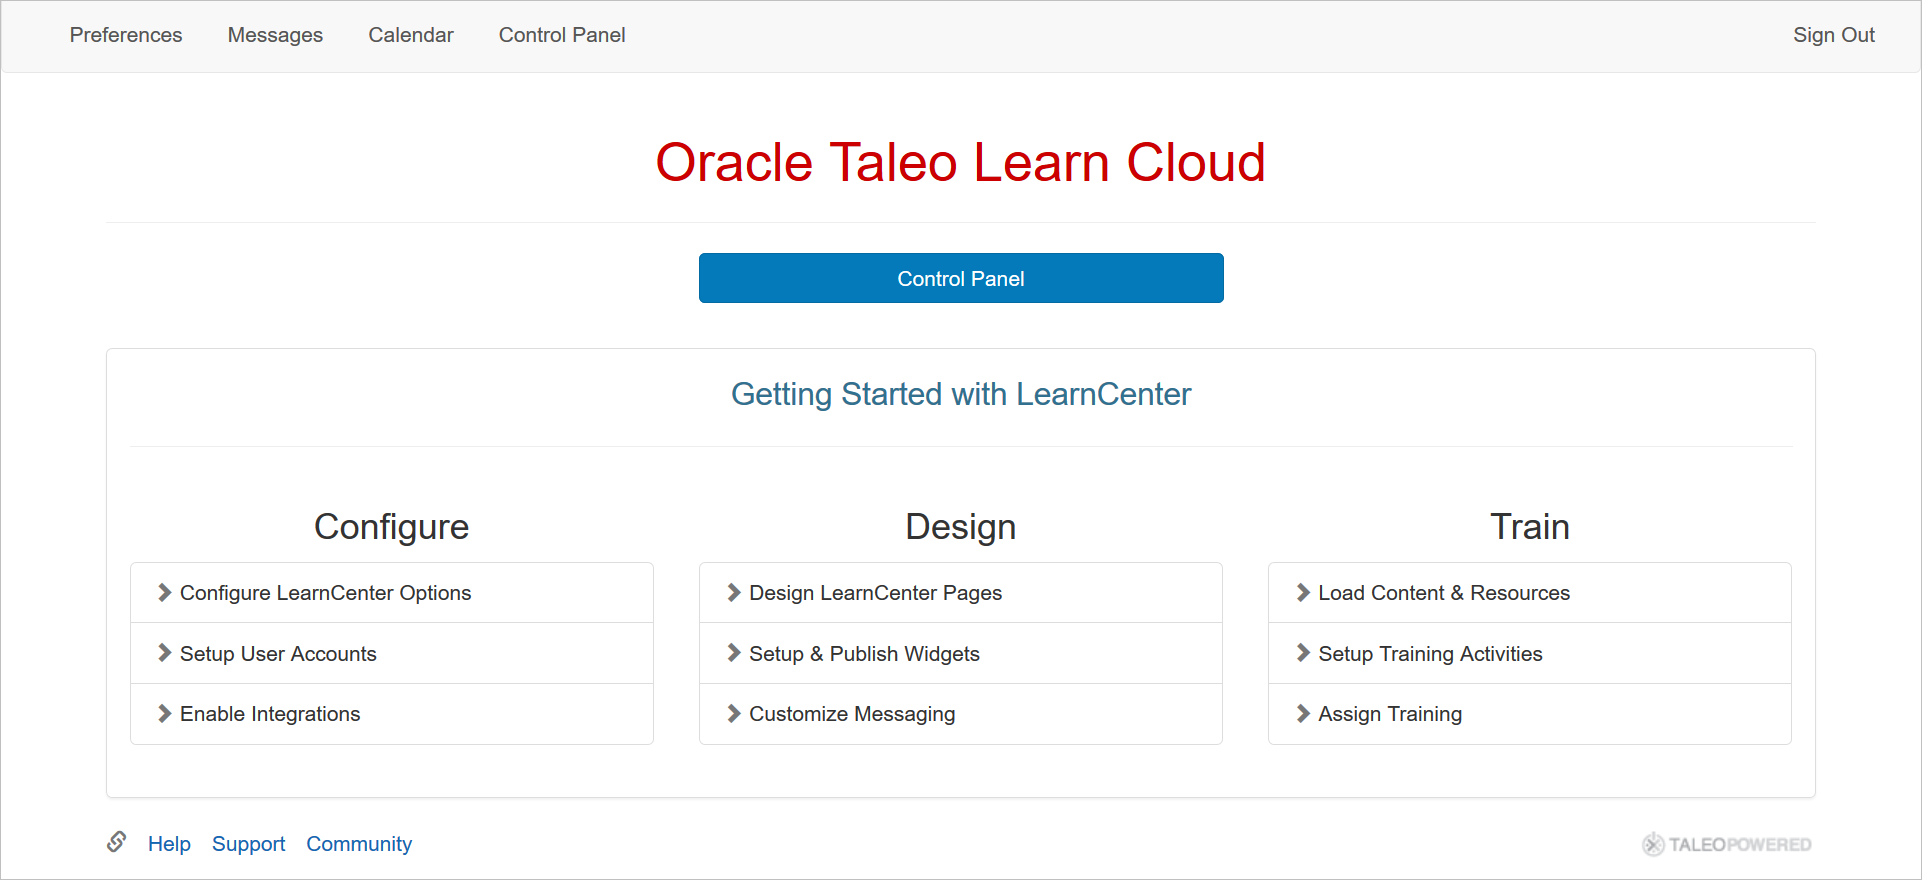
This is the standard “Default Page” The Default Page is the home page for LearnCenter. This out-of-the-box standard Default Page is designed to give you a starting point with which to begin configuring your new LearnCenter. For your convenience, we have provided links to Help, Support, and the Oracle Cloud Customer Connect Community at the bottom of this page. We have also provided you with a list of tasks for Getting Started with setting up a new LearnCenter. Everything on this page can be changed or removed using the LearnCenter Designer, or you can simply make the page inactive and create your own Default Page from scratch. (See New Configuration Option for Default Page for additional information about the Default Page.)
To edit this page, click the Control Panel button, and then click Pages on the LearnCenter Designer Control Panel menu.
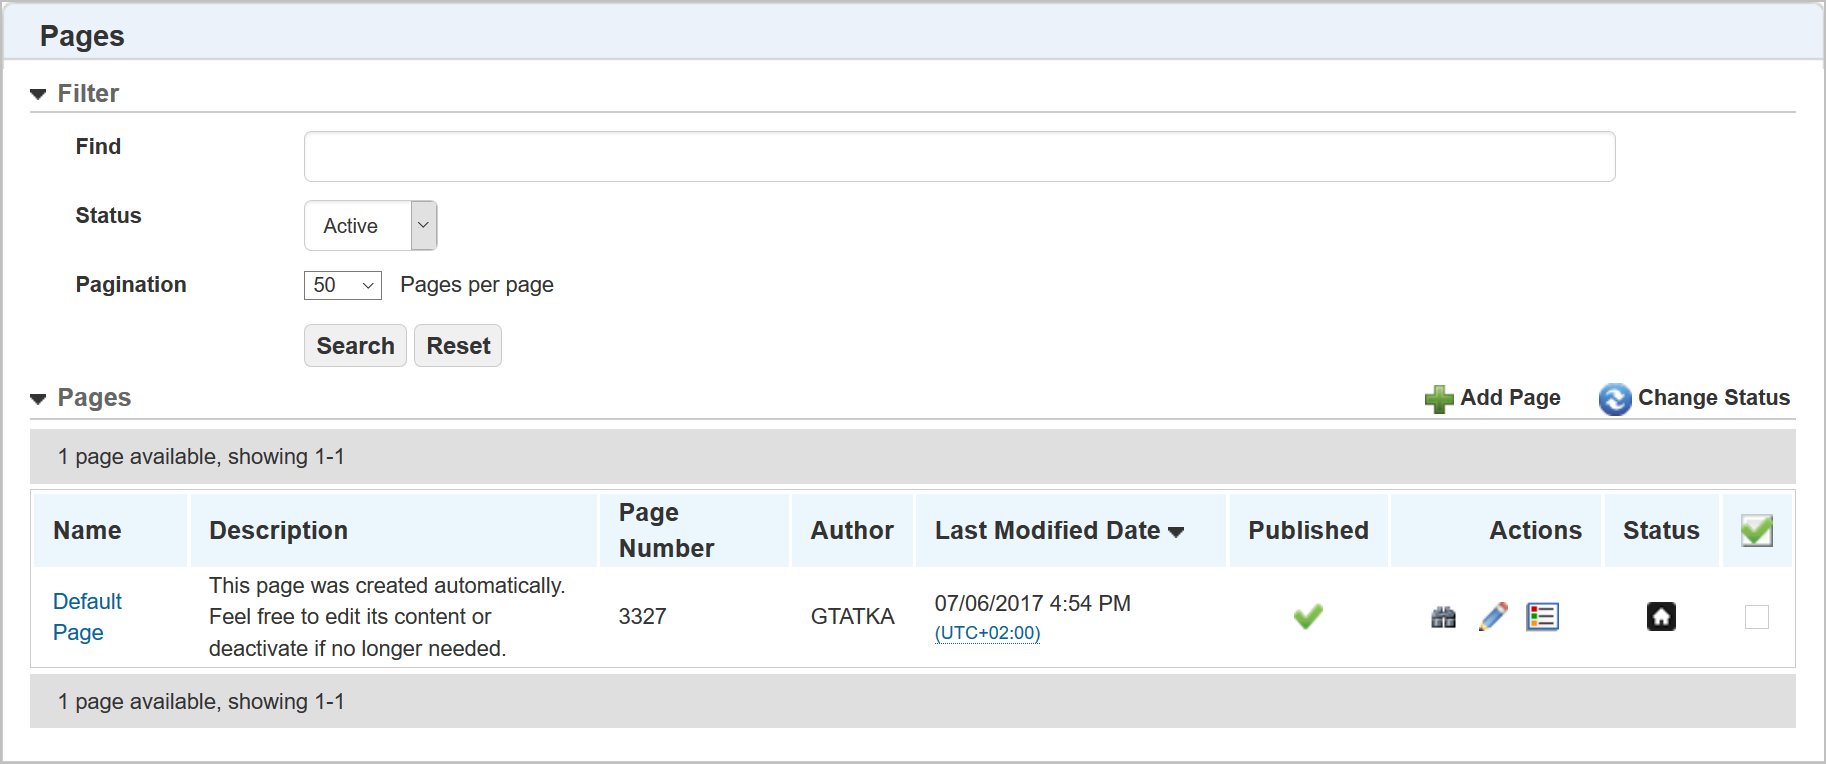
In the illustration above, notice that the default page is denoted by a house icon (![]() ) under the Status column. Click the
) under the Status column. Click the ![]() icon to open the page in edit mode in the LearnCenter Designer. Make any changes you see fit.
icon to open the page in edit mode in the LearnCenter Designer. Make any changes you see fit.
Refer to online help for complete instructions on editing pages using the LearnCenter Designer (TOC > LearnCenter Designer > Pages).
New Configuration Option for Default Page
You can now choose any LearnCenter page as the Default Page, no matter if it was created using the Classic Editor or LearnCenter Designer. Previously, the first page displayed was always Page 1, created using the Classic Page Editor. New sub LearnCenters created after Oracle Taleo Learn Cloud Release 17B will initially use standard Default Page which was created using the LearnCenter Designer. You can continue using Page 1 or the standard Default Page, or you can choose any page in the LearnCenter to be the default home page.
NOTE: If you previously opened a Service Request with Oracle Support to set up a temporary solution for indicating the default start page using registry keys, we recommend that you switch to this new enhancement instead. To do this, contact Customer Support through My Oracle Support and request to have the registry keys associated with the temporary solution deactivated. Then, select the appropriate Default Page.
Notice that there is a new Default Page option on the Configuration Page. You can indicate whether you the Default Page to be one of the LearnCenter Designer Pages or Classic Pages.
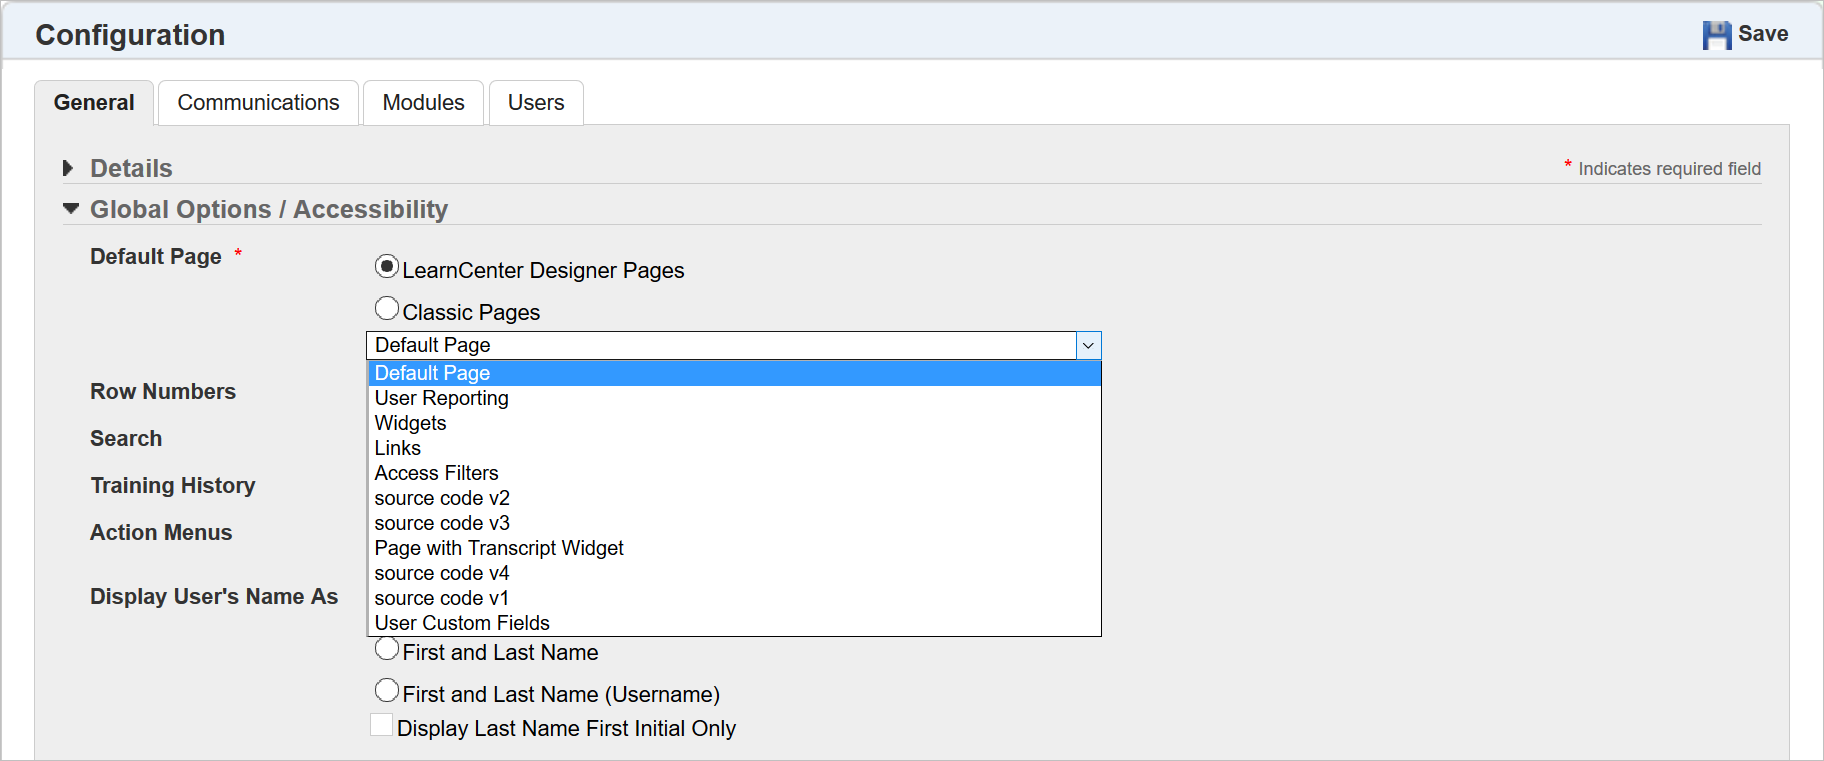
Select an option, and then select the appropriate page from the drop-down list. Once configured, this setting works in conjunction with two new enhancements discussed below:
There is a new Home link on the Management Control section in the Left Nav Bar.
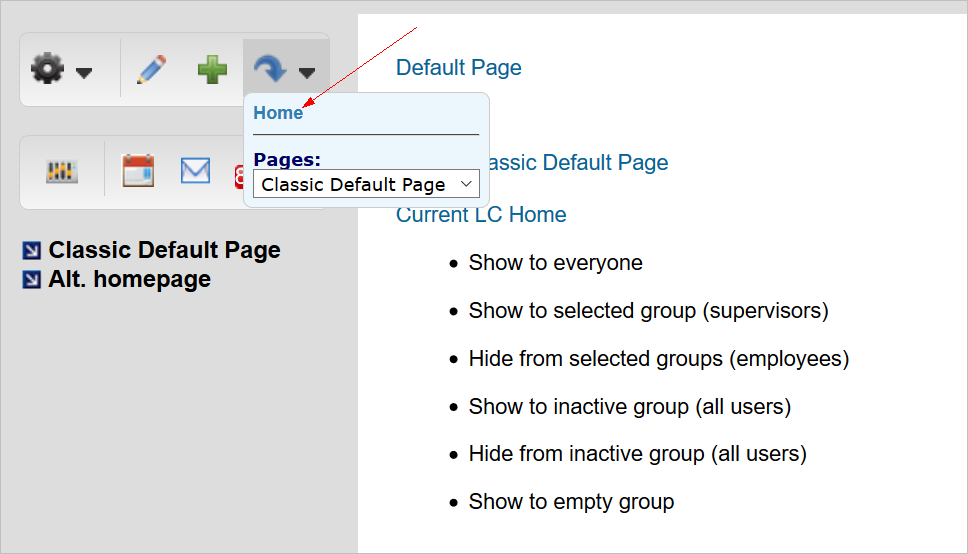
Click this link to return to the Default Page when you are done working on other pages.
There is a new Default Page Link that will always point to the Default Page. If you later change the Default Page in Configuration Options, this link will automatically update to point to the newly selected Default Page.
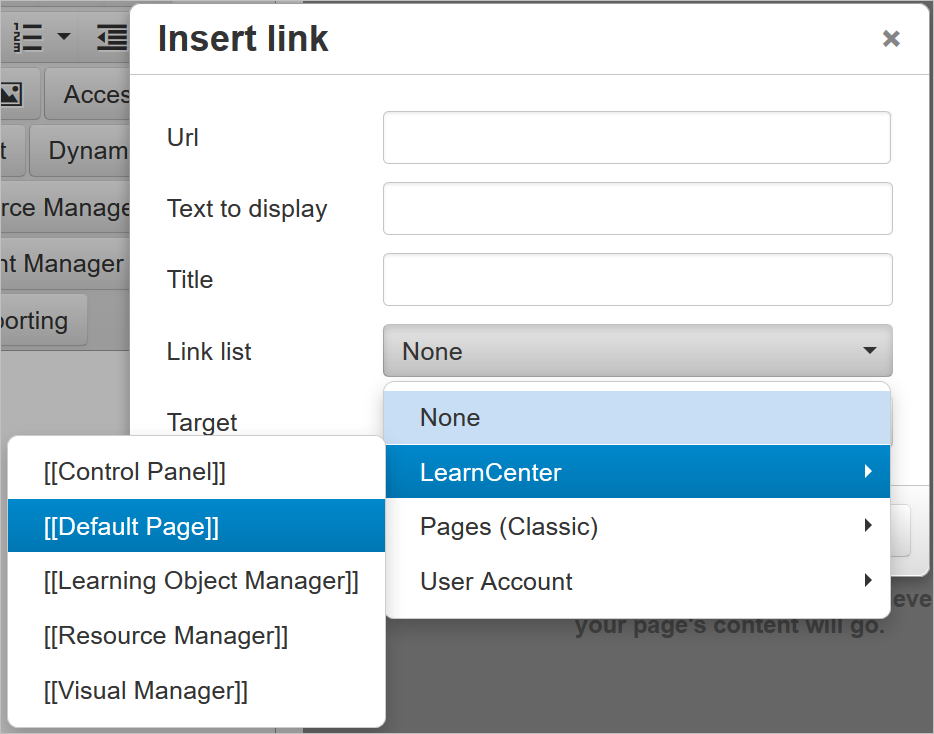
Refer to online help if you need further information on LearnCenter Designer Links (TOC > LearnCenter Designer > Links.)
Last Viewed Page Button Enhanced
The “Last Viewed Page” button above the Control Panel has been enhanced to include the LearnCenter Designer Pages. Previously, clicking this button only returned you to the last viewed Classic Editor Page.

Now when you click it, you are returned to the last viewed page, no matter if that page was a LearnCenter Designer page and Classic Editor page.
Links No Longer Display Unless Signed In
In previous versions on LearnCenter, the Messages and Calendar links were visible to Users who were not signed in to LearnCenter.
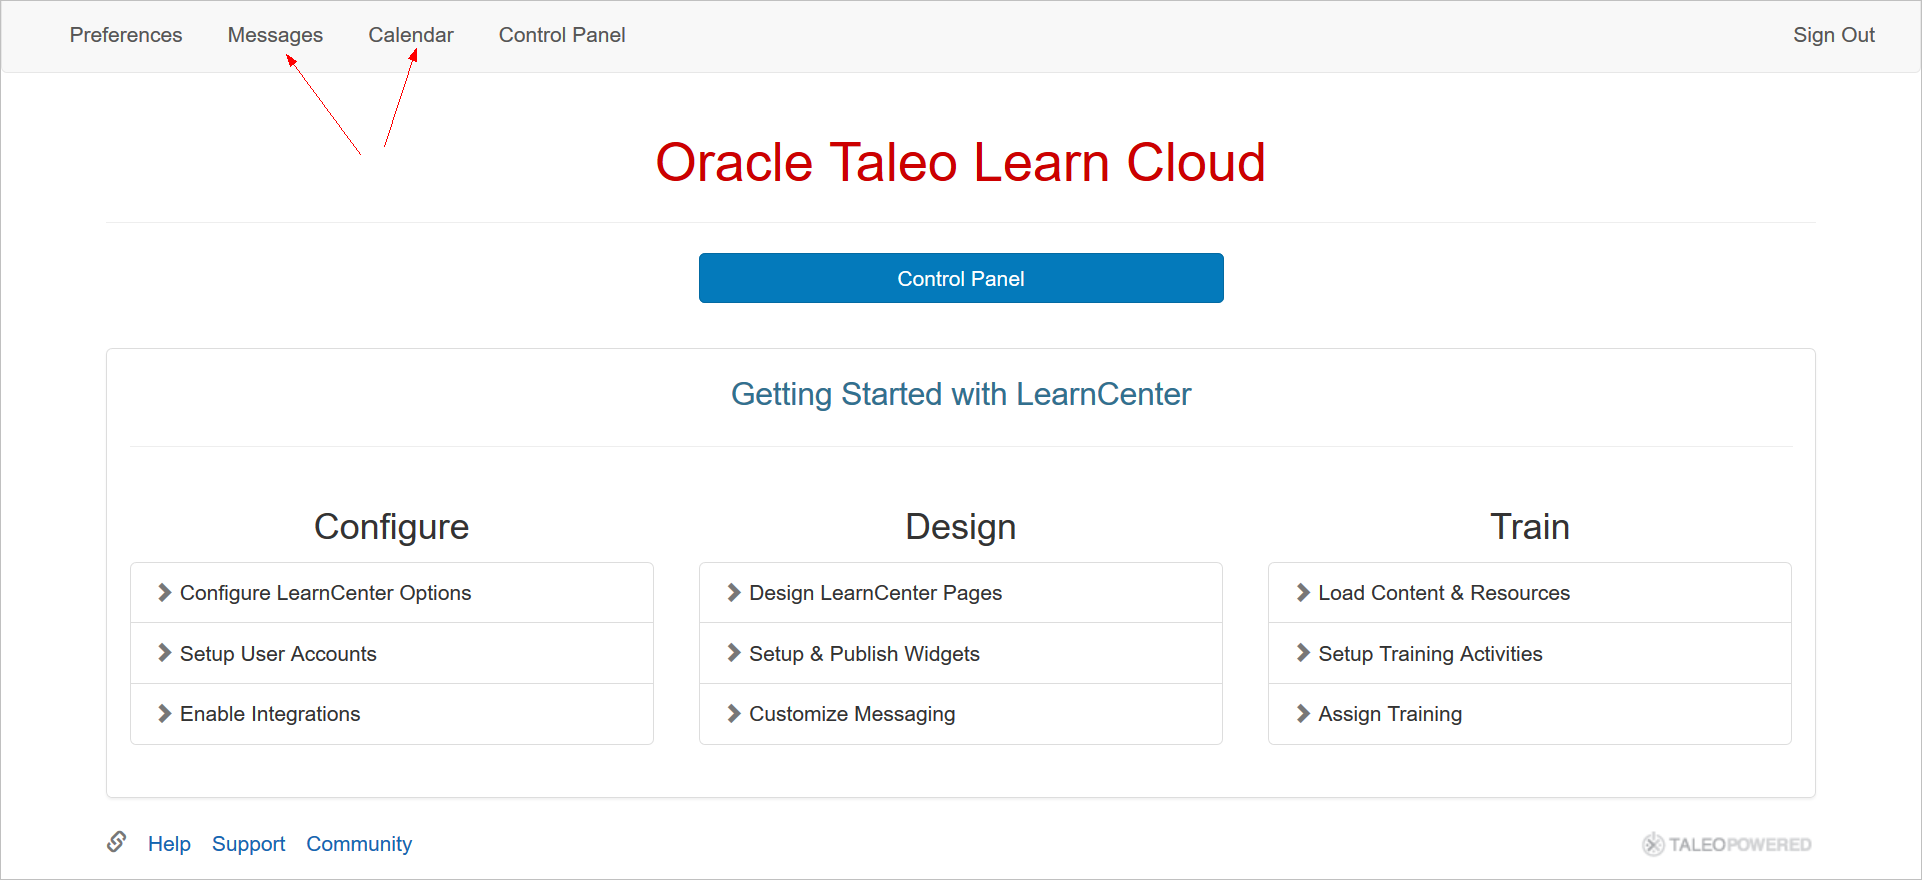
Users will no longer see these two links until they sign in to LearnCenter with their Username and Password.
Management Access Code for LearnCenter Designer Pages
You now have the ability to require Admins to enter the Management Access Code when they click a Control Panel button or link on a LearnCenter Designer Page. The following new window displays when either is clicked.
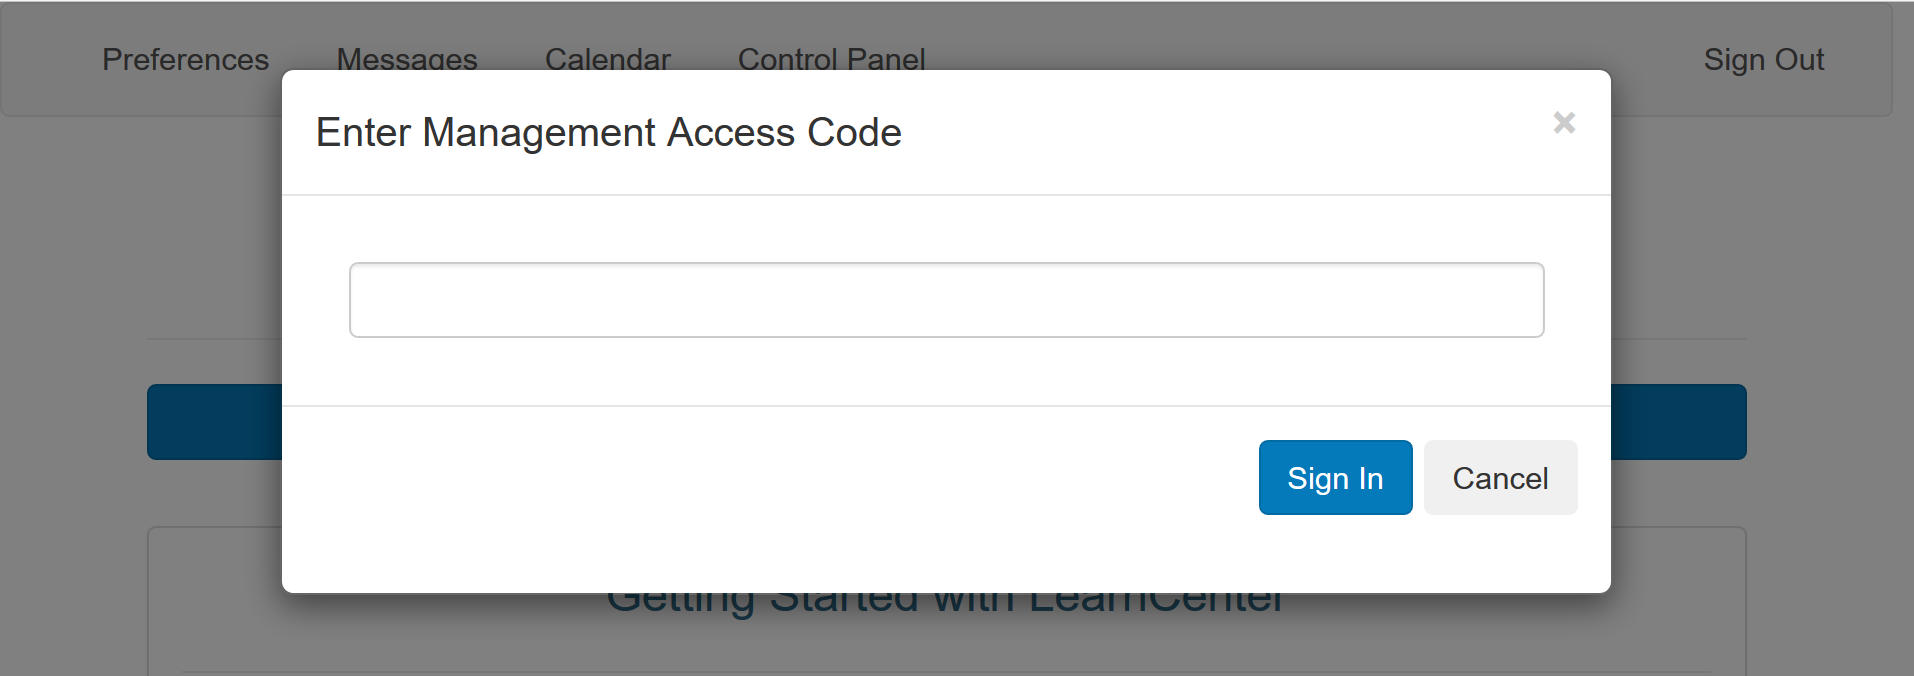
Admins enter the code and click Sign In. This password only needs to be entered once per session. This means that after the initial logon, if an Admin is moving between LearnCenter pages and the Control Panel, they will not need to enter the Management Access Code every time they click Control Panel during the same session.
New Ability to Copy LearnCenter Designer Pages and Templates
You now have the ability to copy LearnCenter Designer Pages and Templates as part of the Copy Sub LearnCenter procedure. All content, including Widgets, Links, Shared User Custom Fields and Access Filters, are also copied and re-configured to work in the target LearnCenter. The Default Page setting is transferred over as part of the same procedure.
When you click Copy Sub LearnCenters from the Sub LearnCenters Control Panel Menu, and the Copy Sub LearnCenters page opens, you will notice the Pages and Page Layout check box has been renamed to Pages and Page Templates.
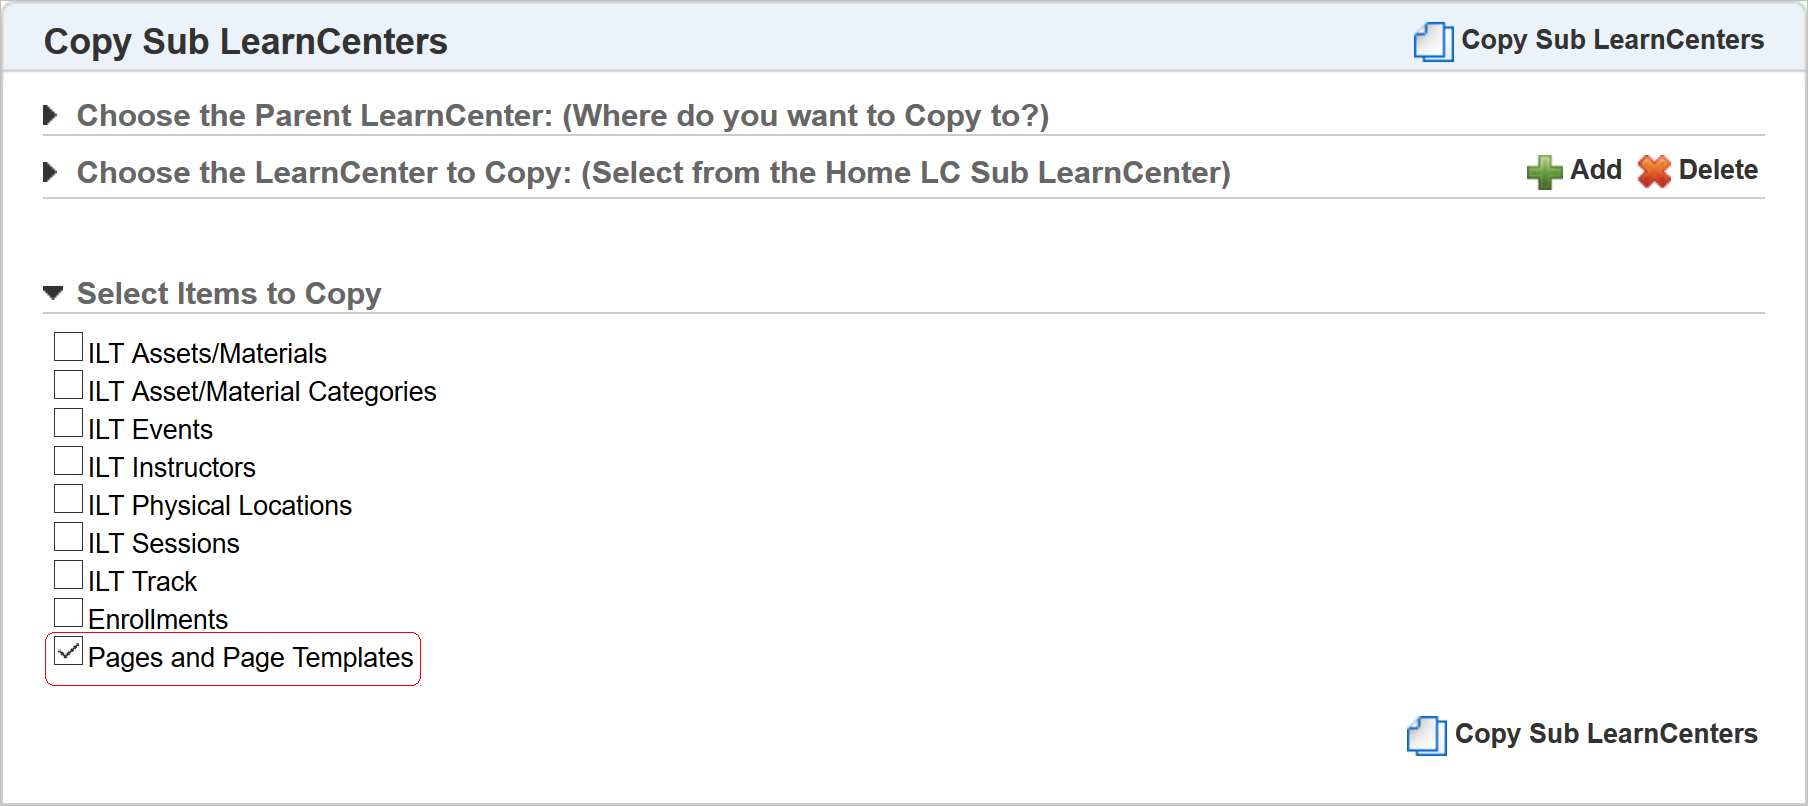
Click the Pages and Page Templates check box to include both Classic and Designer pages when you copy. Other items included in the copy:
- All Pages (Pages keep their Active or Inactive Status)
- The Default Page
- All Widgets
- Access Filters – Note: since Groups are not copied to sub LearnCenters, all Access Filters with references to Groups are changed to point to a non-existent Group. The content covered by those Access Filters is hidden from Users until you associate new Groups with them.
- Links to other pages and websites. Links included in original content will have their references updated to reference the target LearnCenter. This applies to LearnCenter Designer Pages, and BI Reports. If a link points to a page that is inactive, or does not exist, the original references are retained. This will result in a “page not found” message for Users trying to access the referenced page.
- Dynamic tags
- Shared Custom Fields
Items that are not copied include:
- Local Custom Fields specific to the source LearnCenter
- Custom Fields that are not shared
- Inactive Custom Fields
The results log, which is visible by clicking the ![]() icon after copying the sub LearnCenter, reflects some new items based on the changes mentioned above.
icon after copying the sub LearnCenter, reflects some new items based on the changes mentioned above.
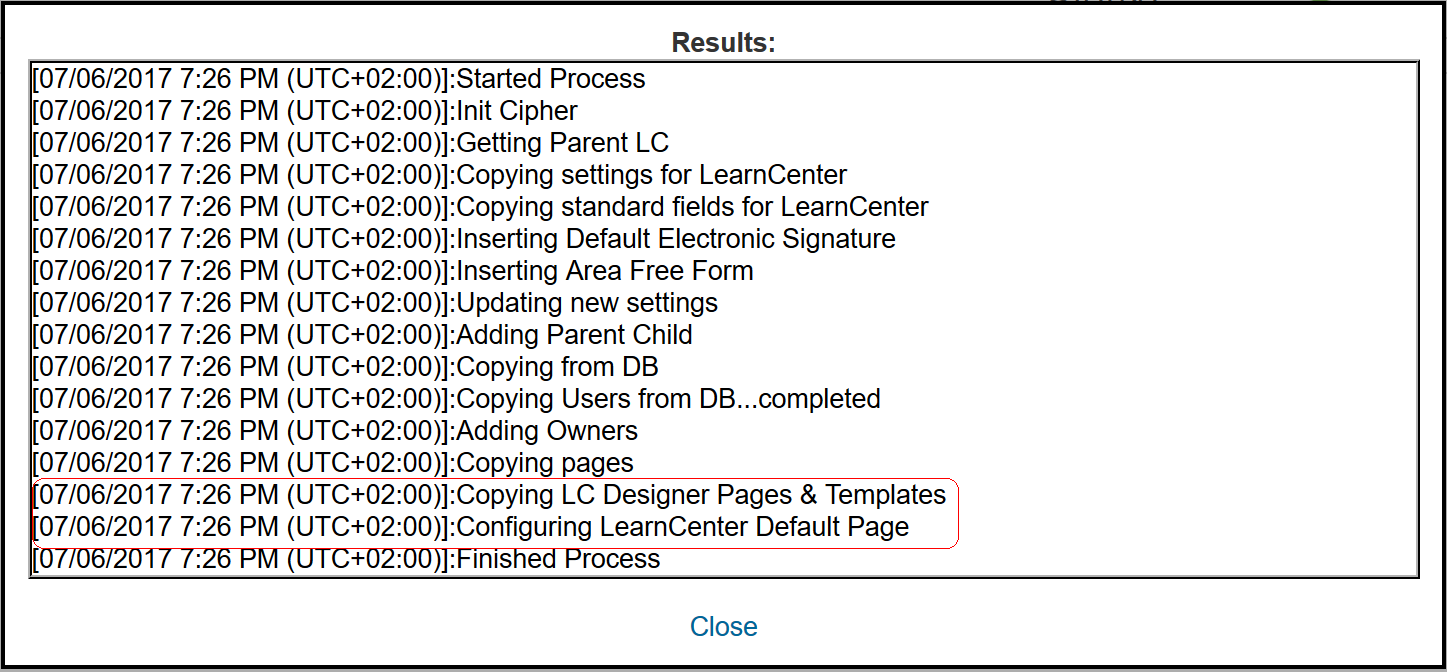
Notice the new messages about the: LC Designer Pages & Templates, and the LearnCenter Default Page.
Enhancements for Recurring Learning Plans
A few enhancements have been made to the Recurring Learning Plans feature.
New Ability to Reset Renewal Date
You now have the ability to reset Learning Plan renewal dates for all mapped Users. This enables you to synchronize your Users so that all Users’ Learning Plans renew at the same time. On the Learning Plans page, notice that a new calendar icon (![]() ) displays in the Actions column for Recurring Learning Plans.
) displays in the Actions column for Recurring Learning Plans.
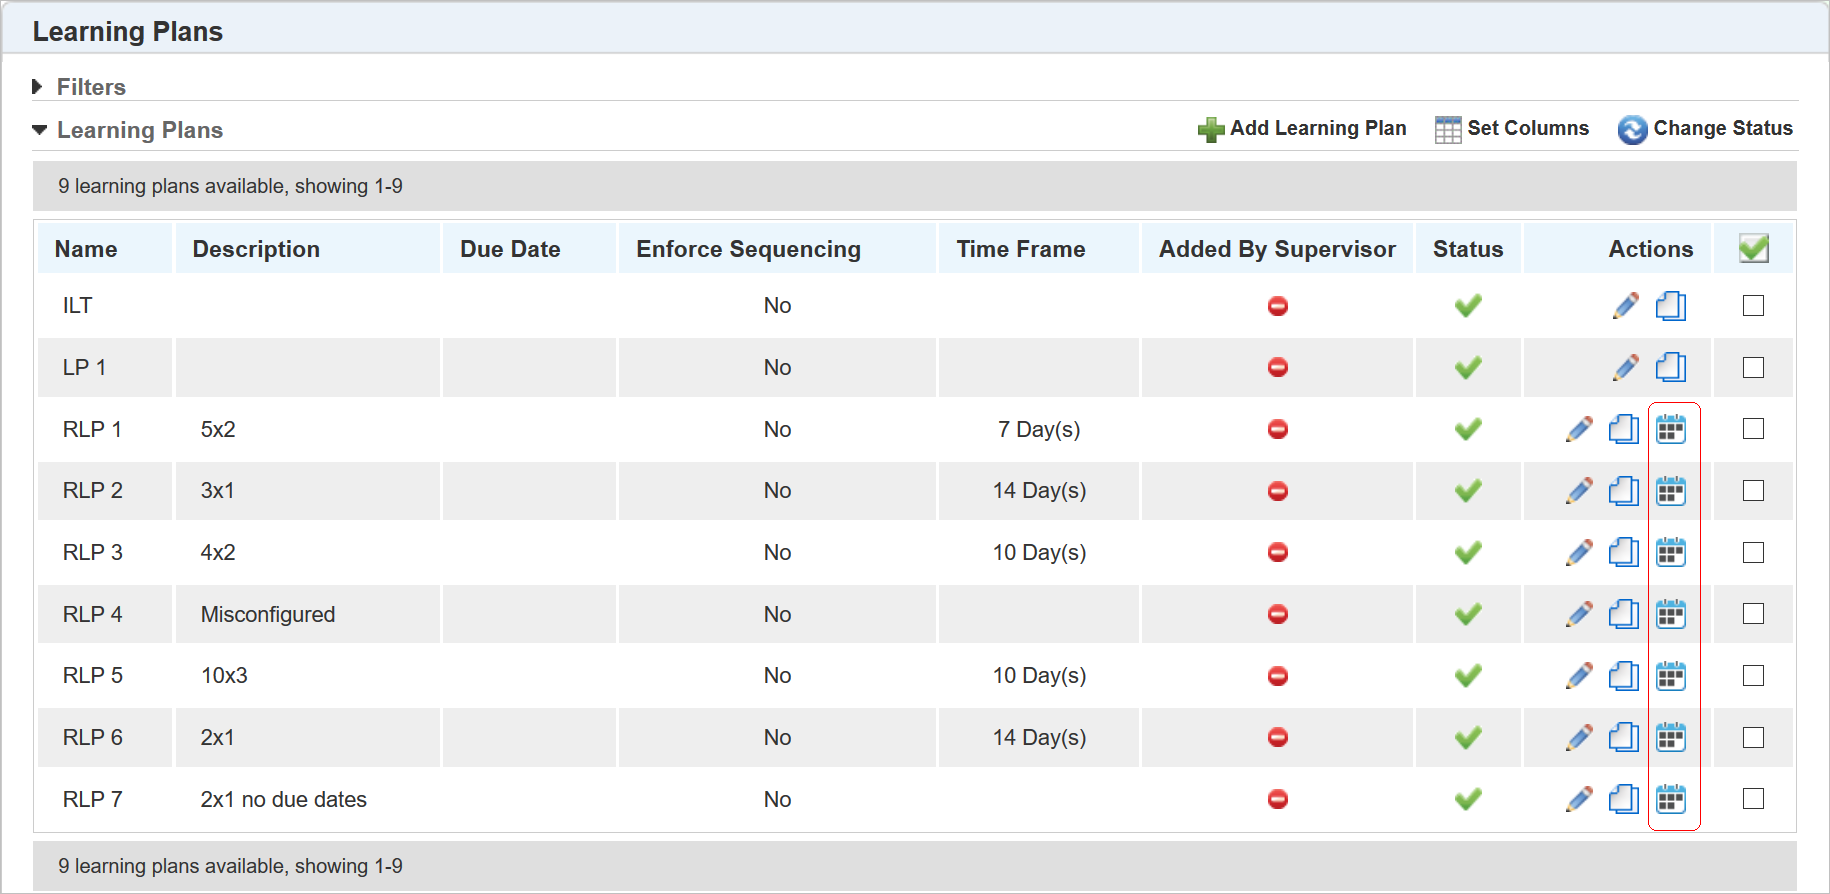
When you click the icon, the following window opens.
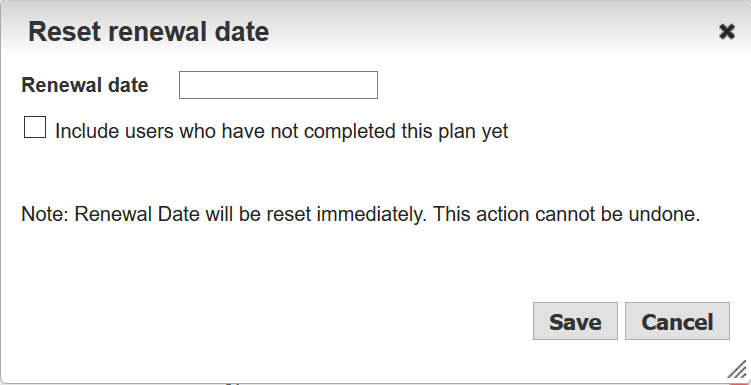
Click inside the Renewal date field to open a calendar and select a date.
NOTE: The dates available for selection on the calendar are affected by the Learning Plan Renewal Interval and the Renewal Prompt settings.
Select the Include users who have not completed this plan yet check box if you want include Users who have not yet completed the Learning Plan. Recall that a Learning Plan does not renew until a User completes it. This check box lets you override this setting so that you can force a User to renew by a different date.
Click Save. The following message displays at the top of the page.
![]()
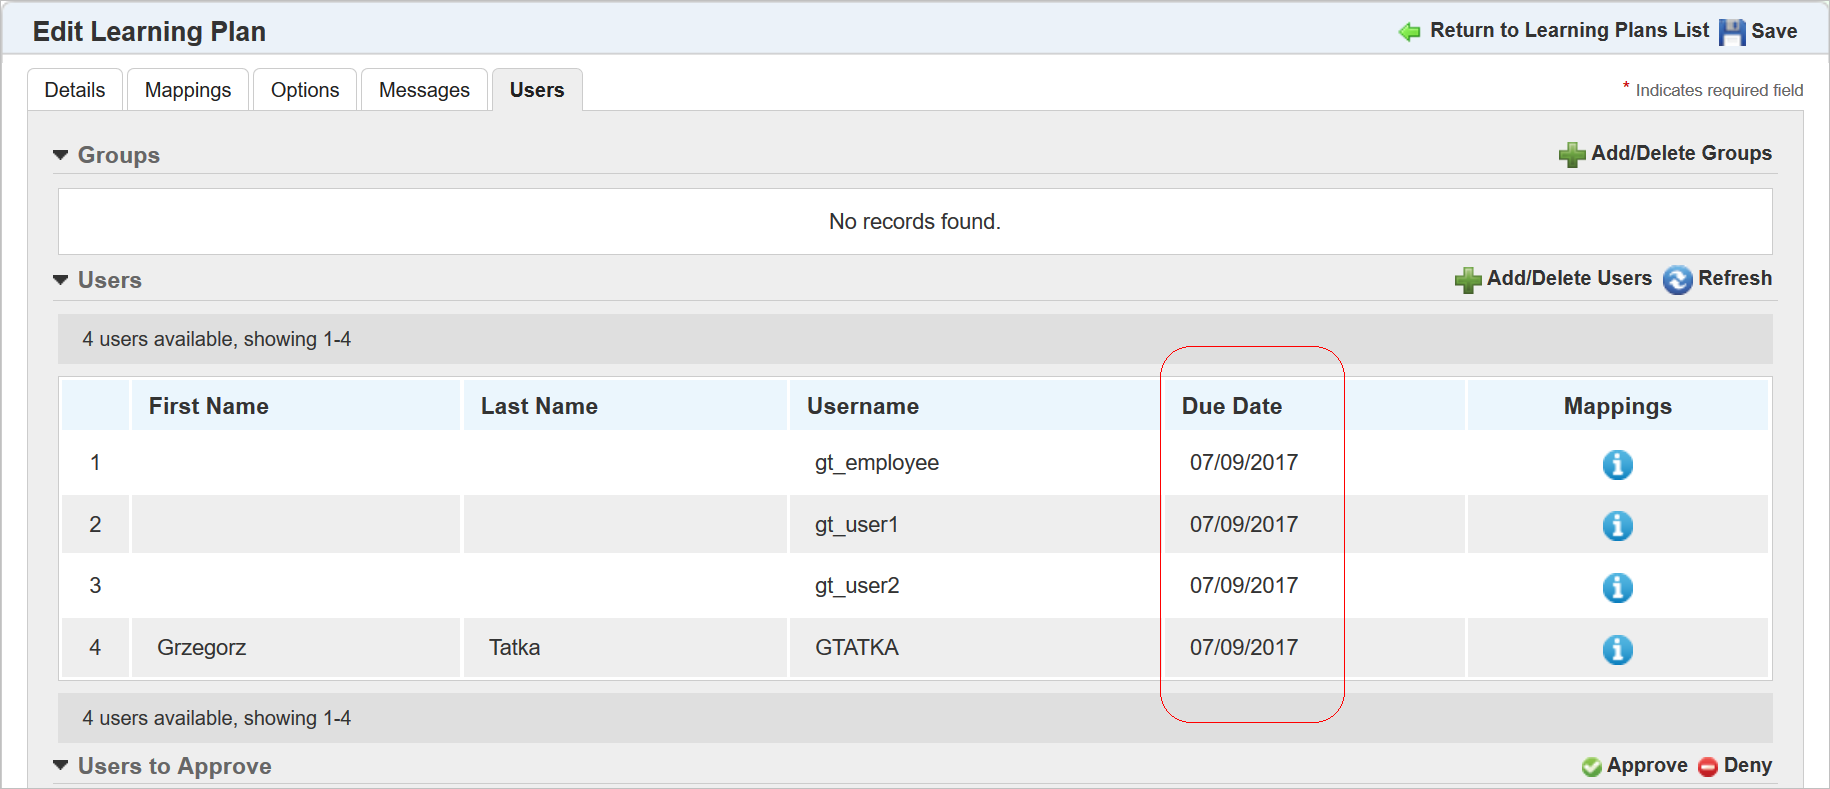
The Renewal Date is updated, and you will see the change on the Learning Plan Users tab.
Depending on the number of users being update, the request to renew may take a few moments to process.
With this enhancement there is also improved access to Courses that are mapped to Recurring Learning Plans that are due for renewal. With this enhancement, Users who need to renew a Learning Plan will bypass the ‘New Attempt/Preview’ window, and go directly to view a Course. This works with SCORM 1.2 courses viewed in Widgets using the LearnCenter Course Player.
There are three enhancements to the Instructor Let Training (ILT) feature.
- ILT Session Catgories Map Automatically to Enrollments
- New ILT User Permissions
- Ability to Move a Session to a Different Track
Each of these is described in the following sections.
ILT Session Catgories Map Automatically to Enrollments
If an ILT Session has mapped Categories, they are now automatically populated in the Mapped Categories field when adding Enrollments for those ILT Sessions.
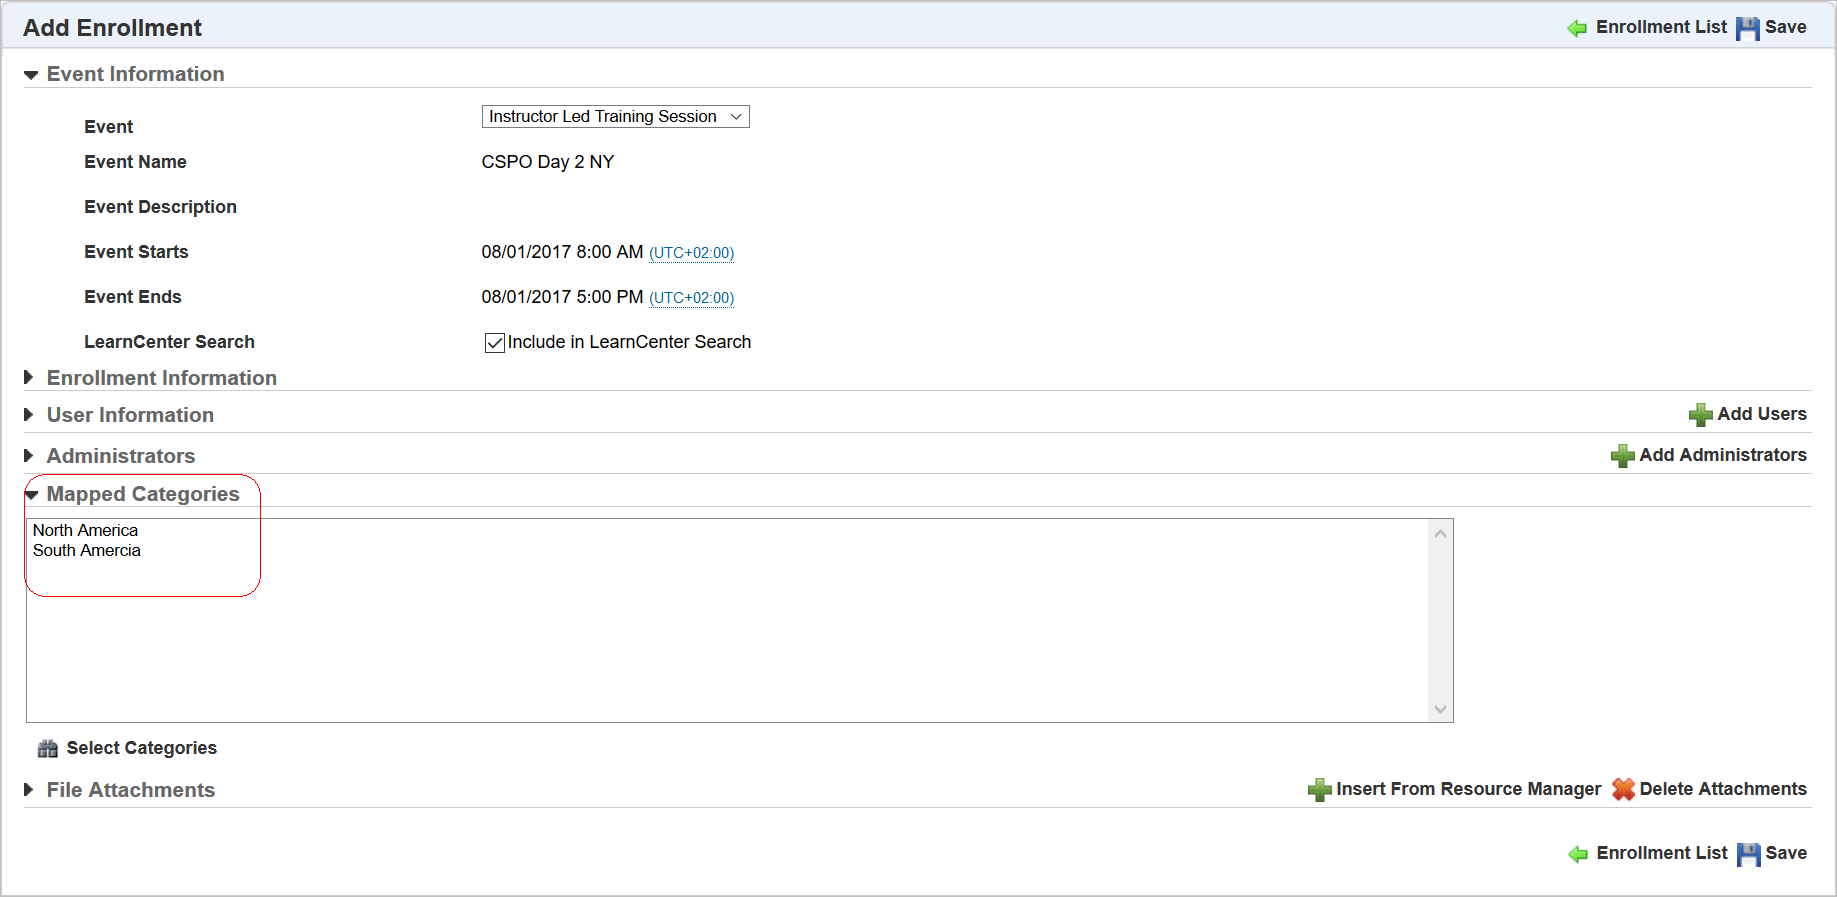
If you change the ILT Session before saving the Enrollment, the Mapped Categories field is updated accordingly.
There are new sub Permissions under the Manage Instructor Led Training User Permissions that enable you to better manage your ILT training at each level of your event structure. Using these permissions, you can distribute the responsibilities of administering Events, Tracks, and Sessions to different Administrators, should you choose. For example, perhaps you want only a certain group of Administrators creating Events so that Event naming conventions are consistent, but you want other Administrators to have the ability to create Tracks and Sessions under those Events.
| Permission |
Description |
|---|---|
| Add Instructor Led Training Event Tracks |
Enables Admins to add new Instructor Led Training Event Tracks. If you deny this permission, Admins will not be able to add new Instructor Led Training Event Tracks. |
| Edit Instructor Led Training Event Tracks |
Enables Admins to edit Instructor Led Training Event Tracks. If you deny this permission, Admins will not be able to edit Instructor Led Training Event Tracks. |
| Delete Instructor Led Training Event Tracks |
Enables Admins to delete Instructor Led Training Event Tracks. If you deny this permission, Admins will not be able to delete Instructor Led Training Event Tracks. |
| View Instructor Led Training Event Tracks |
Enables Admins to view Instructor Led Training Event Tracks. If you deny this permission, Admins will not be able to view Instructor Led Training Event Tracks. |
| Add Instructor Led Training Sessions |
Enables Admins to add new Instructor Led Training Sessions. If you deny this permission, Admins will not be able to add new Instructor Led Training Sessions. |
| Edit Instructor Led Training Sessions |
Enables Admins to edit Instructor Led Training Sessions. If you deny this permission, Admins will not be able to edit Instructor Led Training Sessions. |
| Delete Instructor Led Training Sessions |
Enables Admins to delete Instructor Led Training Sessions. If you deny this permission, Admins will not be able to delete Instructor Led Training Sessions. |
| View Instructor Led Training Sessions |
Enables Admins to view Instructor Led Training Sessions. If you deny this permission, Admins will not be able to view Instructor Led Training Sessions. |
Refer to online help for complete instructions on granting or denying User Permissions (TOC > User Permissions).
Ability to Move a Session to a Different Track
You now have the ability to move ILT Sessions to other Tracks within the same Event. On the ILT Events/Tracks/Sessions page, click ![]() next to the Session you want to move.
next to the Session you want to move.
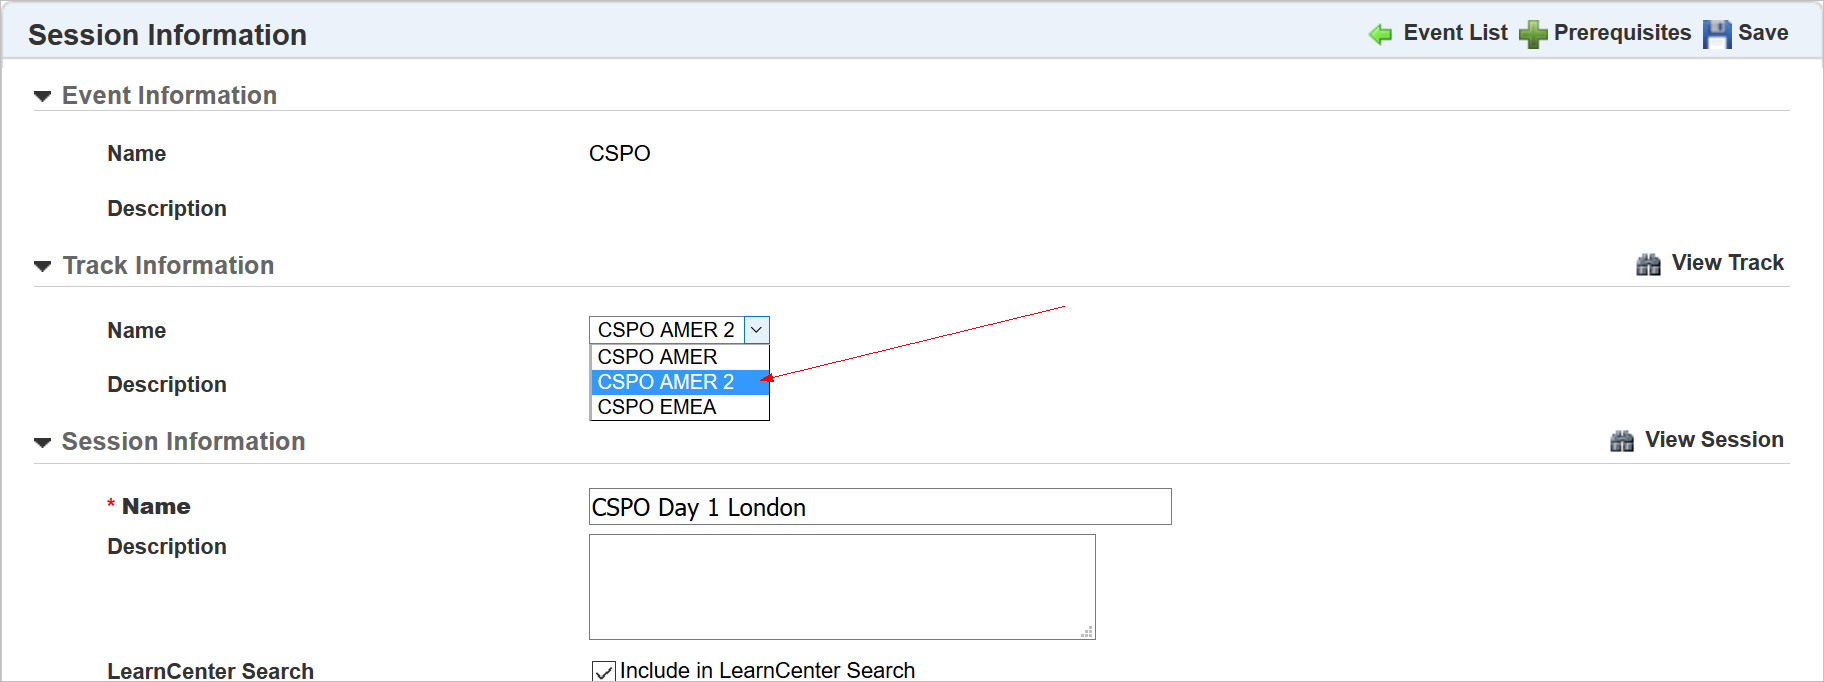
Notice the new Track Information section on the Session Information page. Click the down arrow on the Name drop-down list to display a list of Tracks within the current Event. Select the Track you want and click Save. The Session is moved to the selected Track.
NOTE: Moving Sessions to different Tracks may change statuses in some Learning Plans depending on the Track settings
Refer to online help if you need complete instructions on creating ILT Events, Tracks, and Sessions (TOC > ILT).
---

Copyright © 2017, Oracle and/or its affiliates. All rights reserved.
This document is provided for information purposes only, and the contents hereof are subject to change without notice. This document is not warranted to be error-free, nor subject to any other warranties or conditions, whether expressed orally or implied in law, including implied warranties and conditions of merchantability or fitness for a particular purpose. We specifically disclaim any liability with respect to this document, and no contractual obligations are formed either directly or indirectly by this document. This document may not be reproduced or transmitted in any form or by any means, electronic or mechanical, for any purpose, without our prior written permission.
Oracle and Java are registered trademarks of Oracle and/or its affiliates. Other names may be trademarks of their respective owners.
Intel and Intel Xeon are trademarks or registered trademarks of Intel Corporation. All SPARC trademarks are used under license and are trademarks or registered trademarks of SPARC International, Inc. AMD, Opteron, the AMD logo, and the AMD Opteron logo are trademarks or registered trademarks of Advanced Micro Devices. UNIX is a registered trademark of The Open Group.