

This document will continue to evolve as existing sections change and new information is added. All updates appear in the following table:
| Date |
Feature |
Notes |
|---|---|---|
| 16 FEB 2018 |
Created initial document. |
This guide outlines the information you need to know about new or improved functionality in Oracle Taleo Cloud for Midsize (Taleo Business Edition) Release 18A. Each section includes a brief description of the feature, the steps you need to take to enable or begin using the feature, and any tips or considerations that you should keep in mind.
Some of the new Release 18A features are automatically available to users after the upgrade and some require action from the user, the system administrator, or Oracle.
The table below offers a quick view of the actions required to enable each of the Release 18A features.
| Action Required to Enable Feature |
||||
|---|---|---|---|---|
| Feature |
Automatically Available |
End User Action Required |
Administrator Action Required |
Oracle Service Request Required |
| Platform Enhancements |
||||
|
|
||||
|
|
|
|||
| Career Center Enhancements |
||||
|
|
||||
| Oracle Integration Cloud (OIC) Support |
||||
|
|
||||
| Additional Information |
||||
| Change In Behavior When Attaching Candidates to Requisitions |
|
|||
|
|
||||

This release introduces a modernized user interface that more closely resembles the look of the Talent Center. The menus, list views, buttons, icons and page layouts have all been updated with this new UI. All information is still located in the same place, however, so your users will have an easy transition to the new look and feel.
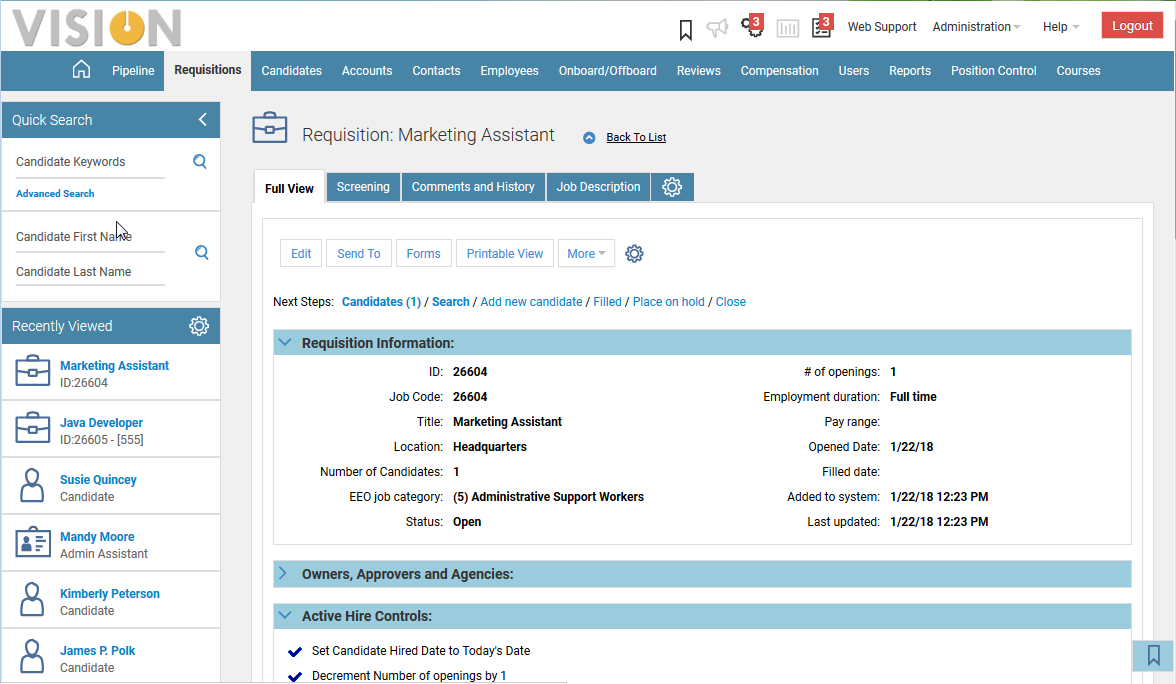
Viewing a Requisition in the New User Interface
There is one new color or ‘style’ available for users as well. This new ‘Gray Blue’ style aligns with the NetSuite software suite. Users must select their own styles.
Steps to Enable the Gray Blue Style
- Select My Settings from the Home tab.
- In the Display Preferences section, select the fourth TBE style, which is Gray Blue.
- Click Save.
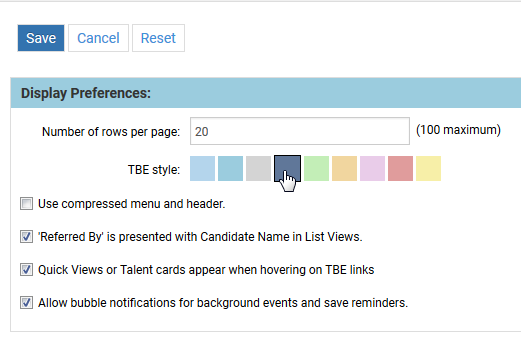
Users can change the color palette at any time.
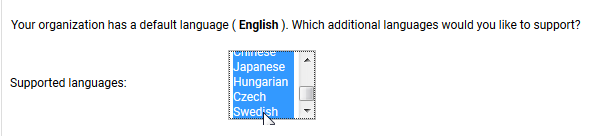
This release adds the Swedish language to the existing set of languages. Customers can choose to enable this language so that individual users, employees, and candidates can see data in this language. Once you enable this language, the language can be applied to a Career Center or a Talent Center as well.
Steps to Enable Swedish
- Select Administration, then select Organization.
- Select System & Email Settings.
- Scroll to the bottom of the Supported Languages list.
- Control-click to add or remove a language.
- Click Save.
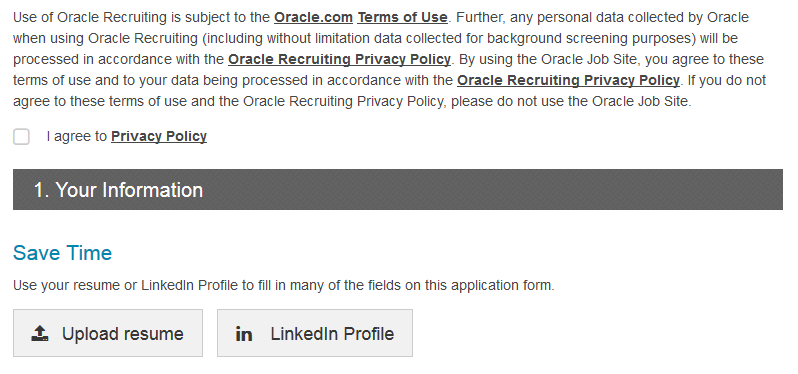
Candidate Application Notification and Consent
Customers can now set up a detailed notification page with their data privacy or other policies and require that potential candidates provide consent before starting an application. When this feature is enabled, this information is presented each time anyone applies for any requisition.
These optional statements can be different for each Career Center. A notification can also be enabled before a potential candidate can save a job alert.
Please note that this feature is not available for the legacy Careers Website.
Steps to Enable the Notification and Consent Feature
- Select Administration, then select Customize Recruit.
- In the Customize Forms section, select Statements.
- On the Statements page, click Add New.
- Enter a Name. The name will be used when choosing a statement for a particular Career Center.
- Enter a description (optional).
- Enter a Title, which will be presented to job seekers as a link on the page. This could be something such as ‘Privacy Policy’.
- The Notification field is optional. This field can contain up to 16,000 characters, and can contain HTML text including links. The information in this field is shown above the link to your full statement.
- Enter your complete information in the Statement field. This field can contain an unlimited number of characters. It can also be fully formatted. The information in this field will appear as another tab when job seekers click on the link, which is the Title you entered above.
- Click Save to save the statement.
- Once you have set up one or more statements, you choose which statement will appear on which Career Center by clicking Edit Settings for the desired Career Center.
- In the Settings section, click Enable Notification and Consent.
- Select the Correct Statement from the drop down.
- If you would also like a statement to be displayed when job seekers set up job alerts, choose a statement from the Statement drop down in the Job Alerts section. You may want to set up a statement with a shorter notification or no notification field for the job alert.
- Click Save.

NOTE: You cannot enable the Notification and Consent feature at the same time as the General Application feature. You should disable the General Application feature if you need the notification and consent to appear for your job seekers.
Once a Career Center has this feature enabled, when a new job seeker applies to a requisition, the registration page will look something like this:

Notification and Statement Appearing for a New Job Seeker on the Registration Page
The optional Notification field appears, followed by the checkbox with a link to your full Statement text. The job seeker must check the box to agree before continuing the application. If you do not add any text to the optional Notification field, then only the checkbox and link to your full statement will appear.
Candidates who have already agreed to the statement, but are returning for a Tier 2 application are not presented with this information again. Job Seekers who give consent and then save a draft of their application and then return later will see the information at the top of the application but the checkbox will already be checked.
Returning candidates who apply for a different requisition will be presented with the statement at the top of the application page, and then will need to agree again before continuing.
Notification and Statement Appearing for a Returning Candidate at the Top of the Application
If you have enabled a statement for Job Alerts, then job seekers will see the statement information when setting up a job alert, and they must consent before the job alert will save:
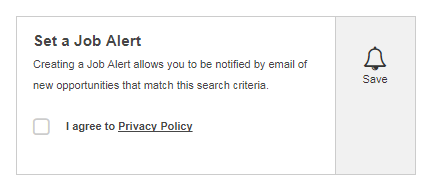
Statement Link on a Job Alert (no optional Notification field is shown here)
There are two new requisition-specific candidate fields added to capture this data. One is called Agreement, and the other is Consent Date. These fields can be added to any requisition-specific candidate list views, or to the embedded page layout called View Requisition Details.
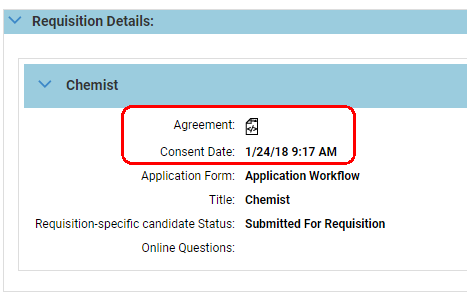
When you add these fields to a page layout or list view, the Consent Date will display the time and date when the job seeker agreed to the statement. In the case where the job seeker saved a draft, the time and date is when the agreement box was checked, and not when the job seeker continued the application.
The Agreement field is a link that will open the full text from the statement at the time the candidate agreed to it. The link opens in another tab, much like clicking on the Application Snapshot. If you make changes to your statement over time, this Agreement field will capture the statement at that point in time.
The Consent Date field is also available in custom reports. Any topic which contains the Requisition Candidates table will have this Consent Date field available.
Oracle Integration Cloud (OIC) Support for TBE
Support for Oracle Integration Cloud has been extended with new JSON hyperschemas along with updates to the existing JSON hyperschemas. With these updates, a broad set of integrations may be built between Oracle Taleo Cloud for Midsize and other Oracle and third party applications using the upcoming OIC Oracle Talent Cloud for Midsize adapter.
For the existing JSON hyperschemas, updates include:
- Requisition – New operation options DownloadAttachment and UploadAttachment
- Candidate – New operation options DownloadAttachment, DownloadResume, UploadAttachment and UploadResume
- Employee - New operation options DownloadAttachment and UploadAttachment
- Offer – A new operation option DownloadOfferLetter
New JSON hyperschemas have been added to build out the support for integrating Oracle Taleo Cloud for Midsize with other applications using the OIC Oracle Talent Cloud for Midsize Adapter. Each JSON hyperschema entity builds on an existing TBE REST API and offers the same Action options as the corresponding classic REST API, including relationship URL’s. Entities with new JSON hyperschemas include:
- Account – Operations supported include GetAccount, Delete, SearchAccount, UpdateAccount, UpsertAccount, UploadAttachment, DownloadAttachment and operations supporting Account relationships.
- AnswerQuestion – Operations supported include CreateAnswer, Delete, GetAnswer, UpdateAnswer, and UpsertAnswer.
- Approval – Operations supported include CreateApproval, GetApproval, UpdateApproval, UpsertApproval and operations supporting Approval relationships.
- Backgroundcheck – Operations supported include CreateBackgroundcheck, Delete, GetBackgroundcheckCandidate, GetBackgroundcheckUser, Getbackgroundcheck, UpdateBackgroundcheck, and UpsertBackgroundcheck.
- Candidateapplication – Operations supported include CreateCandidateapplication, Delete, DownloadAttachment, DownloadResume, GetCandidateapplication, UpdateCandidateapplication, UploadAttachment, UpsertCandidateApplication.
- Careerswebsite – Operations supported include GetCareerwebsite and SearchCareerWebsite.
- CertificateCandidate – Operations supported include CreateCertificate, Delete, GetAllCertificates, GetCertificate, UpdateCertificate, UpsertCertificate.
- CertificateEmployee – Operations supported include CreateCertificate, Delete, GetAllCertificates, GetCertificate, UpdateCertificate, UpsertCertificate.
- Comment – Operations supported include CreateComment, Delete, GetComment, UpdateComment, UpsertComment and operations supporting Comment relationships.
- Contact – Operations supported include CreateContact, Delete, DownloadAttachment, GetContact, SearchContact, UpdateContact, UpsertContact, and operations supporting Contact relationships.
- Contactlog – Operations supported include CreateContactlog, Delete, GetContactLogUser, GetContactlog, UpdateContactlog, and UpsertContactlog.
- Department – Operations supported include CreateDepartment, Delete, GetAllDepartments, GetDepartment, UpdateDepartment, UpsertDepartment and operations supporting Department relationships.
- Division – Operations supported include CreateDivision, Delete, GetAllDivisions, GetDivision, UpdateDivision, and UpsertDivision.
- EducationCandidate – Operations supported include CreateEducation, Delete, GetAllEducation, GetEducation, UpdateEducation, and UpsertEducation.
- EducationEmployee – Operations supported include CreateEducation, Delete, GetAllEducation, GetEducation, UpdateEducation, and UpsertEducation.
- EntityLink – Operations supported include CreateEntitylink, Delete, GetAllLinkedRecordsForOneRecord, GetEntitylink, and Getasinglerelationshipbyentityname.
- Expense – Operations supported include CreateExpense, Delete, GetExpense, GetExpenseCandidate, GetExpenseRequisition, GetExpenseUser, UpdateExpense, and UpsertExpense.
- Interview – Operations supported include CreateInterview, Delete, GetInterview, UpdateInterview, UpsertInterview and operations supporting Interview relationships.
- Interviewfeedback – Operations supported include CreateInterviewfeedback, Delete, GetInterviewfeedback, Updateinterviewfeedback, Upsertinterviewfeedback and operations supporting Interviewfeedback relationships.
- Location – Operations supported include CreateLocation, Delete, GetAllLocations, GetLocation, UpdateLocation, UpsertLocation, and operations supporting Location relationships.
- Packet – Operations supported include Delete, GetPacket, and operations supporting packet relationships.
- Pmreview – Operations supported include CreatePmreview, Delete, DownloadAttachment, GetPmreview, SearchPmreview, UpdatePmreview, UploadAttachment, UpsertPmreview and operations supporting Pmreview relationships.
- Question – Operations supported include CreateQuestion, Delete, GetAllQuestion, GetQuestion, UpdateQuestion, UpsertQuestion and operations supporting Question relationships.
- ReferenceCandidate – Operations supported include CreateReference, Delete, GetAllReferences, GetReference, UpdateReference and UpsertReference.
- ReferenceEmployee – Operations supported include CreateReference, Delete, GetAllReferences, GetReference, UpdateReference and UpsertReference.
- Region – Operations supported include CreateRegion, Delete, GetAllRegions, GetRegion, UpdateRegion, UpsertRegion and operations supporting Region relationships.
- Requisitiontemplate – Operations supported include CreateRequisitiontemplate, Delete, GetRequisitiontemplate, SearchRequisitiontemplate, UpdateRequisitionteamplate, UpsertRequisitionteamplate and operations supporting RequisitionTemplate relationships.
- ResidenceCandidate – Operations supported include CreateResidence, Delete, GetAllResidences, GetResidence, UpdateResidence, and UpsertResidence.
- ResidenceEmployee – Operations supported include CreateResidence, Delete, GetAllResidences, GetResidence, UpdateResidence, and UpsertResidence.
- Status – Operations supported include GetEntityStatus, GetEntityStatusByName, and GetStatus.
- User – Operations supported include CreateUser, Delete, DownloadAttachment, GetUser, SearchUser, UpdateUser, UpsertUser, and operations supporting User relationships.
- WorkhistoryCandidate – Operations supported include CreateWorkHistory, Delete, GetAllWorkHistories, GetWorkHistory, UpdateWorkHistory and UpsertWorkHistory.
- WorkhistoryEmployee – Operations supported include CreateWorkHistory, Delete, GetAllWorkHistories, GetWorkHistory, UpdateWorkHistory and UpsertWorkHistory.
The Talent Cloud for Midsize adapter will be available in an upcoming release of Oracle Integration Cloud (OIC), complementing the full suite of OIC adapters. This adapter will use the JSON hyperschemas to build secure integrations between Taleo Cloud for Midsize and other Oracle as well as third party applications. For more information on OIC and available integration adapters visit https://cloud.oracle.com/integration.
Change In Behavior When Attaching Candidates to Requisitions
There is a change in behavior from previous releases when manually attaching candidates to requisitions. To prevent an issue with candidates applying to requisitions to which they had already been attached by a user, perhaps unbeknownst to the candidate, there will no longer be an Apply button for those requisitions.
Because of this change, it is highly recommended that if you manually attach a candidate to a requisition, you use the Invite feature to invite them to fill out an application. When the Invite feature is used, the job seeker will see an Apply button next to the job listing, which will prevent confusion. The job will also appear on the My Jobs page in a section called ‘Positions for which you have been invited to apply:” as seen below.
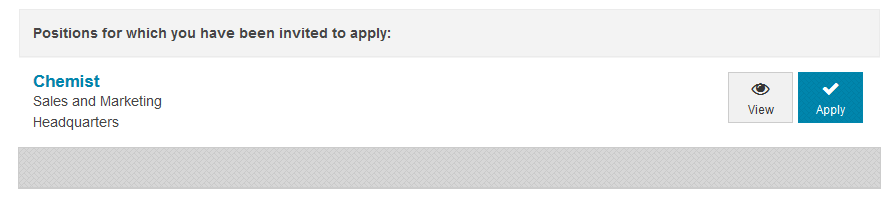
Table Shown When a Candidate is Invited to a Requisition.
When using the Invite feature for a Tier 2 application, the button will say Proceed rather than Apply.
Important Note About Integer Fields On Forms
If you are collecting data on onboarding forms with a very large number, such as a bank account number, it is highly recommended that you use a custom text field rather than a number field if you are binding the field on the form to a field on the Employee record.
Integer fields have a range from -2147483648 and 2147483647, as mentioned in the online Help. When employees enter numbers on a PDF form, the system cannot validate if a number is outside of this range. However, if the data is then bound to a field on the Employee record, the invalid number will cause problems on the record. Therefore, it is recommended that you use a text field if you know that the data you are collecting might be larger than this range.
If you only have the field on the form but do not use this field on the Employee record, there is no issue. If you already have PDF forms which contain integers and have set up binding to a field on the Employee record, please log an SR if you experience any issues with Employee records that might be tied to very long numbers.
---

Copyright © 2017,2018, Oracle and/or its affiliates. All rights reserved.
This document is provided for information purposes only, and the contents hereof are subject to change without notice. This document is not warranted to be error-free, nor subject to any other warranties or conditions, whether expressed orally or implied in law, including implied warranties and conditions of merchantability or fitness for a particular purpose. We specifically disclaim any liability with respect to this document, and no contractual obligations are formed either directly or indirectly by this document. This document may not be reproduced or transmitted in any form or by any means, electronic or mechanical, for any purpose, without our prior written permission.
Oracle and Java are registered trademarks of Oracle and/or its affiliates. Other names may be trademarks of their respective owners.
Intel and Intel Xeon are trademarks or registered trademarks of Intel Corporation. All SPARC trademarks are used under license and are trademarks or registered trademarks of SPARC International, Inc. AMD, Opteron, the AMD logo, and the AMD Opteron logo are trademarks or registered trademarks of Advanced Micro Devices. UNIX is a registered trademark of The Open Group.