

This document will continue to evolve as existing sections change and new information is added. All updates appear in the following table:
| Date |
Feature |
Notes |
|---|---|---|
| 09 MAY 2018 |
Created initial document. |
This guide outlines the information you need to know about new or improved functionality in Oracle Taleo Cloud for Midsize (Taleo Business Edition) Release 18B. Each section includes a brief description of the feature, the steps you need to take to enable or begin using the feature, and any tips or considerations that you should keep in mind.
Some of the new Release 18B features are automatically available to users after the upgrade and some require action from the user, the system administrator, or Oracle.
The table below offers a quick view of the actions required to enable each of the Release 18B features.
| Action Required to Enable Feature |
||||
|---|---|---|---|---|
| Feature |
Automatically Available |
End User Action Required |
Administrator Action Required |
Oracle Service Request Required |
| Platform Enhancements |
||||
|
|
|
|||
|
|
||||
| Career Center Enhancements |
||||
|
|
||||
|
|
||||
|
|
||||
| Talent Center Enhancements |
||||
|
|
|
|||
|
|
|
|||
| REST API Enhancements |
||||
|
|
||||
| Additional Information |
||||
|
|
||||
|
|
||||
|
|
||||
|
|
||||

There have been some changes to password settings in this release to provide more secure passwords, as well as consistency across the product. Previously, the password settings in the Security Level page only applied to TBE users. This release introduces the following changes:
These first two settings apply to TBE users, as well as the Career Center and Talent Center, along with the legacy Careers Website (CWS) and legacy Employee Website (EWS). These settings have the following defaults with the High security level selected:
- Minimum number of characters in password: 8
- Password must include non-alphabetical characters

Password Settings for TBE, Career Center, and Talent Center
Previously, the Career Center and legacy CWS had a password minimum of six characters, and the only special character allowed was an underscore. All passwords now accept the main special characters on the standard keyboard.
If you would prefer a different minimum password length, you should choose a custom security level instead. Password validation throughout the product will inform users/employees/candidates of the minimum password length you have set. For example, if you set the minimum length to 10 and a candidate attempts to save a password with eight characters, the message will reflect the 10-character password:
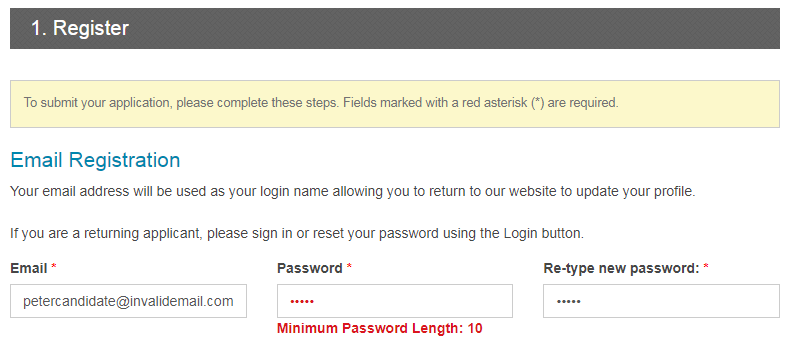
Message Presented to Candidate Reflects Password Settings
Once the job seeker enters a password with the minimum length, if the password does not include a non-alphabetical character, and this setting is enabled, this message will appear as well.
NOTE: The Registration application component on the Career Center previously contained text about the six-character minimum. This text has been removed, unless you had previously customized the Email Registration text on this page. You should check the wording on the registration page so that any reference to the minimum password matches your setting.
These next two settings apply to TBE users, as well as the Talent Center, along with the legacy Employee Website. These two settings do NOT apply to the Career Center or legacy CWS (candidate passwords do not currently expire). These settings have the following defaults with the High security level selected:
- Frequency of required password reset: 90
- Required that password cannot be one of last specific number of used passwords: 3
You can switch to a Custom security level if you want to change these password settings. These settings have been removed from the Talent Center Edit Settings page, as well as removed from the legacy Employee Website Settings page.
You may wish to place some static text on the Talent Center temporarily explaining that Employee passwords will now expire every XX amount of days so that employees are expecting this. Alternatively, you could send an email with this information.
After the 30 day grace period, the system will resume checking to see if an employee should be prompted to enter a new password upon attempting to log into the Talent Center or legacy Employee Website.
Interview Availability Lookup for Office 365
The Interview Ability Lookup now supports Office 365, as well as previously supported versions. Work with your system administrator in order to properly configure the information.
Steps to Configure Interview Availability Lookup for Exchange
- Select Administration, then select Organization.
- Click System & Email Settings.
- In the Interview Settings section, set the Schedule lookup type to Exchange Server.
- Enter the credentials for the Office 365 User with read access to free/busy calendar information.
- Select Office 365 from the Version picklist:
- Click Validate.
- Save the page.
The Exchange URL should be in the format:
https://outlook.office365.com/ews/exchange.asmx
The Domain is optional, but recommended. An example:
4development118.onmicrosoft.com
Since Exchange URL is shared across all Office 365 Cloud instances, username should be provided as full email address to distinguish specific tenant. Example:
tbe_qa@4development118.onmicrosoft.com
Once these credentials have been validated, and the User record also contains a valid Office 365 email address, the Interview Availability Lookup should work like any other version, showing busy and free time for the selected interviewers. Please refer to the online Help for more information about using this feature.
Job seekers on the Career Center can now share jobs to Facebook, Twitter, and LinkedIn, as well as emailing the link to a friend, as was available in previous releases. There is also an option to simply copy the link to the job to include in any form of communication. These same sharing options are available to users of Taleo Business Edition from the View Requisition page. This feature improves the communication between users of your talent community.
Steps to Enable Job Sharing for a Specific Career Center
- Select Administration, then select Customize Recruit.
- Click Edit Settings for the Career Center for which you want to enable sharing.
- Scroll down to the new Job Sharing section (the option to email requisitions has been removed from the previous section).
- Enable any of the desired options to allow copying of the job link, emailing to a friend, or sharing to Facebook, LinkedIn and Twitter.
- Click Save.
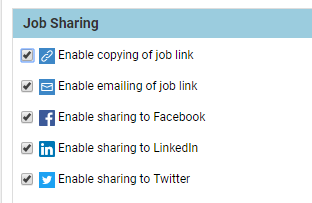
If only one option is selected (for example, the ‘Enable emailing of job link’ because this had previously been enabled) then only a single button will appear on the Career Center next to each listed job. However, if two or more options are selected, the single button will be replaced with a share icon, and clicking this icon will show all the available sharing options.

Job Sharing Options as Seen on the Career Center
Once jobs seekers click on one of these options, they will be asked to log in initially if applicable, and then they will be able to edit the default message that is suggested for sharing the job information.
As previously mentioned, you can enable the same options for your TBE users so that your recruiters and hiring managers can promote jobs.
Steps to Enable Job Sharing for TBE Users
- Select Administration, then select Customize Recruit.
- Click Page layouts in the Customize Pages section.
- Edit the View Requisition page layout (or version of this page you have assigned to those users who should be able to share jobs).
- Scroll down to the Requisition Posters [Placeholder] and click Edit.
- Enable the desired options.
- Click Submit to save this placeholder, then click Save to save the page layout.
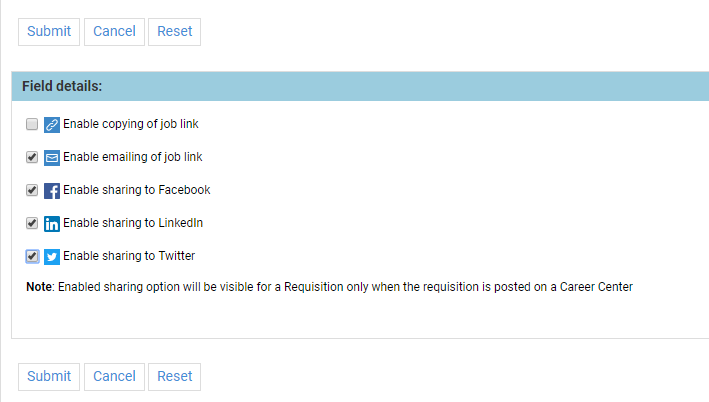
Now when viewing a requisition, your users will see the share icon. Clicking on the icon will display all the selected sharing options.

Job Sharing Options as Seen on View Requisition Page
Customers can create custom Candidate fields and mark them as voluntary, to be included on the Voluntary page of the Career Center. A requisition-specific field can automatically be created at the same time, for those fields that customers want to track over time for each requisition to which a candidate may apply. This feature allows customers to better customize the voluntary questions presented to their candidates.
Steps to Create Custom Voluntary Fields
- Select Administration, then select Customize Recruit.
- Click Candidate Fields in the Customize Fields section.
- Scroll to the Candidate Custom Fields table and click New Field.
- Choose the Data type, and click Next. All data types are supported except for URL and Weblink.
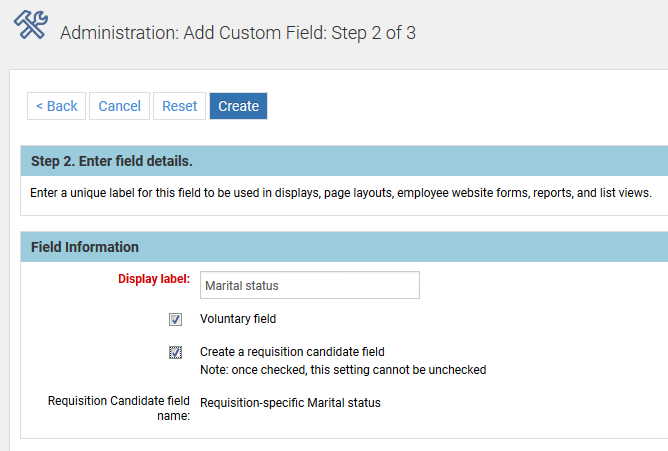
- After entering a Display Label, check the Voluntary field flag. You can also edit an existing Candidate field and choose this same option, instead of creating a new field.
- If you would like to track this data at the requisition-specific candidate level as well, check the second option to create a requisition candidate field. As soon as you check the second option, a name is provided for the requisition candidate field.
- Enter the rest of the field information, and complete adding the field.
- Continue adding other custom voluntary fields. Back in the list of fields, all voluntary fields will appear with an asterisk next to the name. This is also true for the standard voluntary fields of Race, Gender, Veteran/Disability, and Candidate Individual with Disabilities.
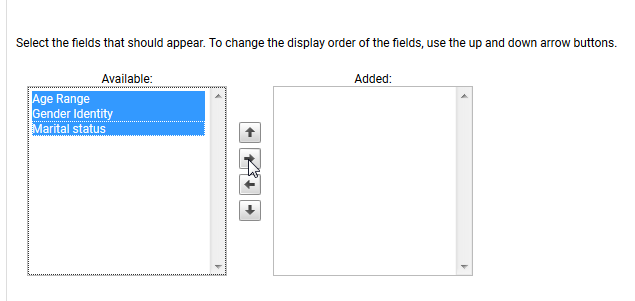
- Select which fields you wish to appear on your Career Center by going back to the Customize Recruit page, and selecting Career Center Pages in the Customize Pages section.
- Edit the Voluntary Information application component, or version of this page that you are using.
- There is a new Additional Information section that is hidden by default at the bottom of this page. You can choose to add the fields to this new section, or to the existing section, which contains the Gender and Race fields. To use the existing section, click Edit next to the top level section, called Equal Employment Opportunity by default. Add the fields from the Available side to the Added size, and click Submit.
- To put them in their own section, unhide the Additional Information section, and then click Edit.
- Update the title, if needed, and add any text to the HTML section as desired. Move the fields from the Available side to the Added side.
- Click Submit. You can drag the Additional Information section to another location on the page if needed.
- Click Save when you are done.
NOTE: You cannot turn off this option once you have saved the field. The requisition candidate field will be a child field to the parent Candidate-level field. It cannot be edited, once created. Deleting the parent field will delete the child field as well. You can uncheck the Voluntary field flag from the Candidate field if you no longer want it to be considered voluntary. However, the requisition-specific field that was created will still be considered voluntary. The two fields will still be linked, such that deleted the candidate level field will still delete the requisition-specific candidate field. Because of this behavior, it is recommended that you do not uncheck the Voluntary Field flag for the custom candidate field, and instead simply remove it from your Career Center voluntary page so that you are no longer collecting that data.
NOTE: Only fields with the Voluntary flag checked can appear on this page. These fields can only be used on the Voluntary page. If you had created custom fields and placed them in the Requisition Specific Questions and Fields section previously, you will need to remove them from that page and add them to the correct page, once you have updated those fields to be voluntary fields.
Once you have finished, candidates will see the new fields on the Voluntary page, if this is active in your application workflow. You can add the candidate and requisition candidate fields to page layouts and list views as needed. You can also use these merge fields in email templates, or report on the data.
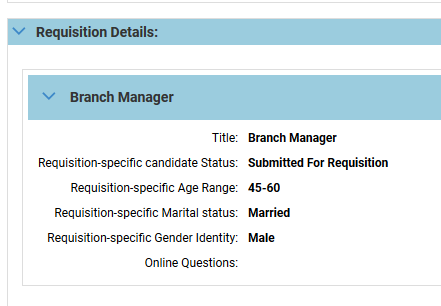
Custom Fields Added to Embedded Page Layouts
Requisition-specific candidate fields were added for Race, Gender, and Veteran/Disability as well. These fields will be populated going forward as of the 18B release.
Job Alert Email Confirmation Template
When a job seeker who does not yet have a Candidate record sets up a job alert, an email confirmation is sent to confirm that the job alert was intentionally set up. This email is now a configurable template that can be modified for each Career Center. The name of the template is Job Alert Email Address Confirmation (there is also an email template called Job Alert Notification, and this is the email that is sent when there are new jobs that match the search criteria).
You can also modify the existing template, or create your own email template, copying and pasting from this email template and updating the text, so that different Career Centers can have different emails.
NOTE: Only Common merge fields are supported in this template since the Candidate record does not yet exist. If you create your own template and use other merge fields, they will not work. Be sure not to delete the merge field called <<PROSPECT_EMAIL_CONFIRM_LINK>>. If you do, the job seeker will not be able to confirm.
Steps to Customize the Job Alert EMail Address Confirmation Email Template
- Update the text of the default template, or create your own after copying and pasting the text from the default template. Be sure not to remove the merge field, and do not use merge fields other than those available from the Common fields drop down.
- Select Administration, then select Customize Recruit.
- Locate the Career Center for which you want to choose a template, and select Edit Settings.
- In the Settings section, Job Alerts must be enabled in order to select a template. The default template is already selected. Select a different template as needed for the Job Alert Email Confirmation.
- Click Save.

NOTE: There is no ‘Do not Send’ option. In order to use the Job Alerts feature, a notification must be sent.
This release continues to add helpful features to the Talent Center, providing a better experience for your employees.
Employee Upload of Profile Picture
Employees can now add/update their own profile pictures on the Talent Center. The same options to allow uploads from Google Drive and Dropbox, as well as a local drive, pertain to this feature. Please refer to the online Help for information about allowing employees to upload from both Google Drive and Dropbox.
Steps to Allow Employees to upload their own Profile Picture
- Select Administration, then select Customize Recruit, Perform or Onboard/Offboard.
- Click Edit Pages for the Talent Center you wish to update.
- Click the My Info link at the top of the page.
- Click anywhere in the Employee Information widget to configure, and then click the Profile Picture field.
- Set the Read only flag to No to enable employees to add their own image.
- Set the Required flag to Yes if desired.
- Click Done to save changes to the widget.
- Click Save & Publish to save changes to the Talent Center. Click Exit to return to TBE.
NOTE: When the Profile Picture field is marked as required, once the employee has an image uploaded, either by the manager or the employee, there will not be an option to delete the image, but it can still be changed. If no image has yet been selected, the employee will not be forced to choose an image to continue working on the Talent Center.
When employees click on the My Info tab on the Talent Center, they will see a ‘Change Picture’ link under the avatar (either the default one when no image is uploaded, or an image which was previously uploaded by their manager).
Clicking this link allows employees to access an image from any of the options previously enabled for them.

Employees Can Add Profile Pictures from Numerous Sources
Once they choose a picture, the changes are automatically saved. If the field is not marked as required, then the employee will both be able to change the picture and delete the picture.
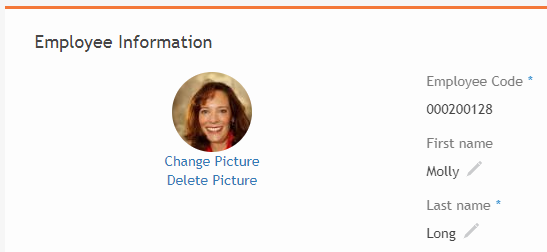
Employee Can Update or Delete Profile Picture
Manager Adding Attachments to the Talent Center
Managers will be able to expose attachments that are currently only visible from within TBE itself to the My Attachments widget on the Talent Center. This will allow a manager to share an attachment with an employee that should not be available to all employees via the Document Repository. For example, you may want the employee to have access to their offer letter or perhaps a letter detailing a performance improvement plan. These attachments would be specific to a particular employee.
Steps to Add Attachments to the Talent Center
- When adding a new attachment to an Employee record, select the option Show on Talent Center to allow the Employee to see the attachment from the My Attachments widget on the Talent Center.
- If you also wish for the employee to be able to edit the attachment by replacing it or updating the name, select the option Edit on Talent Center.
- Click Save.
- You can edit existing attachments as well and check these same options.

On the Talent Center, the employee will see a Delete button only for those attachments added by the Employee. Attachments added by the Manager will show either User for the type, or Offer or Resume, if the manager shared an existing offer letter or resumes with the employee. There will be an Edit button only for those added by the employee or those added by the manager and marked with the Edit on Talent Center option.
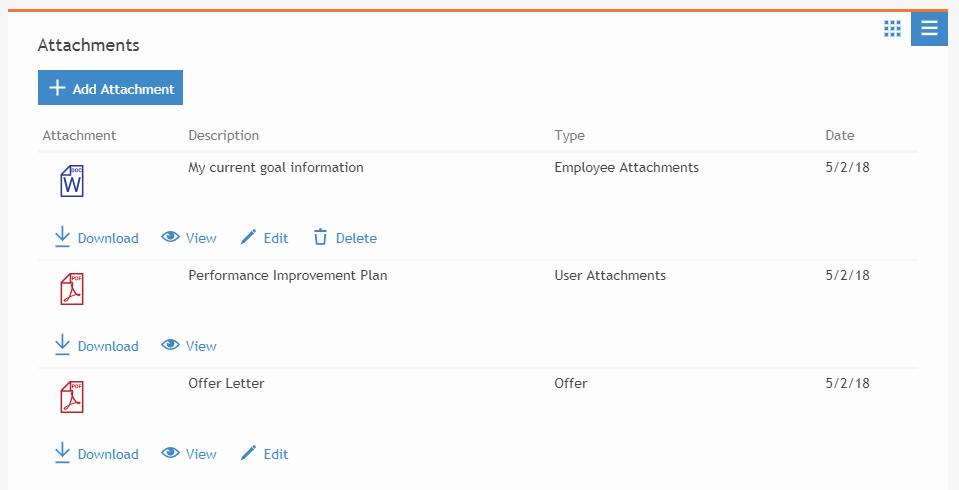
The Attachment Type and Available Buttons Vary Depending on Settings and the Document Type
New JSON Hyperschema for Competency
An additional JSON Hyperschema for Competency has been added to the REST API's. As with existing hyperschemas, the competency hyperschema is available to the Oracle Integration Cloud (OIC) Talent Cloud for Midsize adapter. With this hyperschema, integrations built with the adapter may now include the competency business object. TBE's REST API's now include more than 35 JSON hyperschemas.
Important Note Regarding Legacy Careers Website and HTTP
If you are still using the legacy Careers Website, Oracle highly recommends that you enable the HTTPS protocol. From time to time browsers update certain security settings that cause issues with career sites not running HTTPS. Enabling the HTTPS protocol will prevent these issues from happening. Even preferable is to migrate over to the responsive Career Center, which always runs with the HTTPS protocol.
Important Note Regarding Legacy Employee Website
The legacy Employee Website (EWS) will be discontinued for all existing customers as of the 19A release in February of 2019. You should set up your Talent Center as soon as possible in order to prepare for this change. There are several videos on the Talent Center discussing customization of widgets and page layouts. Administering a Talent Center is very easy and user-friendly. The widgets that you need to add depend on the services you have enabled. There is a Talent Center chapter in the Help in each of the three Help guides (Recruit, Onboard, and Perform). Here are some suggested action items you should take as you prepare for this translation:
- Add widgets not already on the page.
- Customize list views as needed
- Customize page layouts as needed
- Add background images and static HTML to the page to further customize the page
- Customize a theme if different colors are preferred
- Assign sample onboarding tasks, or reviews and goals to employees for a round of testing, or ask certain employees to complete their actual items from the Talent Center. It is best to provide them with the direct URL to the Talent Center during the testing.
- Update your system templates to include links to the Talent Center instead of the EWS. Adjust wording as necessary. Refer to the document on the Resource Center called ‘Updating System Email Templates with Talent Center links’ for suggestions. You may also want to include links to both the EWS and the Talent Center during your testing period.
- Check the ‘Make Talent Center the default website for Employees’ once you are ready to move over. This setting will change the Quick Access menu to direct Employees to the Talent Center from within TBE.
- If you wish to have multiple Talent Centers, set the Preferred Talent Center for those Employees that you prefer to access a Talent Center other than the default (please note that Talent Centers can support multiple languages, but you may wish to have one for interns, one for contractors, etc.).
NOTE: For Recruit customers, determine if you want Hiring Managers to use the Talent Center for requisition and offer approvals, as well as candidate management. Please refer to the Help section ‘My Approvals Widget’ on the page called ‘Configuring the Talent Center Home Page’ for important information about this widget, which shows both Offer and Requisition approvals.
Important Note About Sourcing Center
The Sourcing Center is no longer being enhanced or maintained. Customers that are currently using the Sourcing Center may continue to use it as is. Reported defects will not be addressed. With the introduction of requisition sharing in this release, one of the Sourcing Center’s main features is now available natively within Taleo Business Edition. Additional features are planned for future releases.
The Taleo Onboard W-4 form has been updated with the 2018 information. Any activity templates referencing this default W-4 form automatically include the new form. Completed activities are not affected. Already assigned activities that have not yet been updated by employees will also automatically refer to the new form.
Allowing Candidates to Request Deletion of Their Record
If you need to provide individual candidates with a method of requesting that their candidate information be removed, the recommendation is that you add HTML on one of your Career Center pages allowing customers to send an email with that request. For example, you can insert a Dynamic HTML section to either the My Jobs or My Info page with text such as:
To request that your personal information be removed from our systems, please send an email to HR from the email address associated with this account.
Then you would add a link to a portion of this string as seen here in this image. Once the email is received, a TBE Administrator would need to manually delete the Candidate record.
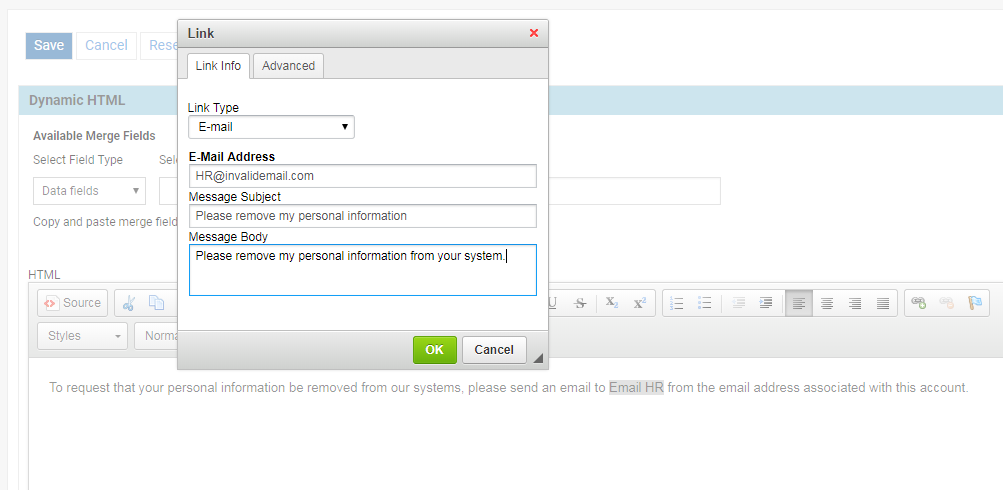
Example of Using an Email Link on the Career Center
Another suggestion is to use a custom field such as a checkbox that a candidate would mark if they wanted their record deleted. A filtered list view could be set up in TBE to search for candidates with this field populated, and then those records could be deleted routinely.
---

Copyright © 2018, Oracle and/or its affiliates. All rights reserved.
This document is provided for information purposes only, and the contents hereof are subject to change without notice. This document is not warranted to be error-free, nor subject to any other warranties or conditions, whether expressed orally or implied in law, including implied warranties and conditions of merchantability or fitness for a particular purpose. We specifically disclaim any liability with respect to this document, and no contractual obligations are formed either directly or indirectly by this document. This document may not be reproduced or transmitted in any form or by any means, electronic or mechanical, for any purpose, without our prior written permission.
Oracle and Java are registered trademarks of Oracle and/or its affiliates. Other names may be trademarks of their respective owners.
Intel and Intel Xeon are trademarks or registered trademarks of Intel Corporation. All SPARC trademarks are used under license and are trademarks or registered trademarks of SPARC International, Inc. AMD, Opteron, the AMD logo, and the AMD Opteron logo are trademarks or registered trademarks of Advanced Micro Devices. UNIX is a registered trademark of The Open Group.