

This document will continue to evolve as existing sections change and new information is added. All updates appear in the following table:
| Date |
What's Changed |
Notes |
|---|---|---|
| 03 AUG 2018 |
Created initial document. |
This guide outlines the information you need to know about new or improved functionality included in Release 18C for Oracle Taleo Learn Cloud. Each section includes a brief description of the feature, the steps you need to take to enable or begin using the feature, any tips or considerations that you should keep in mind, and the resources available to help you.
Oracle Taleo Learn Cloud platform and general technology updates can affect complex or custom LearnCenter pages. If you are using a custom CSS file, it is important to verify your site CSS with each product release. Based on changes in the platform, there is a chance that you could see alignment or positioning issues after a release due to the custom CSS used on your site. Often any updates that your CSS requires are minor and easy to make. Contact Customer Support through My Oracle Support for any additional information.
For the latest information on browser support, please refer to the Oracle Taleo Learn Cloud System Requirements document; My Oracle Support DOC ID 1461788.1 .
Key Resources
For additional information about any of the features and enhancements discussed in this document, refer to Oracle Taleo Learn Cloud Online Help.
Give Us Feedback
We welcome your comments and suggestions to improve the content. Please send us your feedback at talent_acquisition_doc_feedback_ww_grp@oracle.com.
We continue to add many new features to Oracle Cloud Applications and we now give you the option to take advantage of new functionality at a pace that suits you. The table below offers a quick view of the actions required to enable each of the new features.
| Action Required to Enable Feature |
||||
|---|---|---|---|---|
| Feature |
Automatically Available |
End User Action Required |
Administrator Action Required |
Oracle Service Request Required |
|
|
|
|||
|
|
||||
|
|
|
|||
|
|
|
|||
|
|
||||
|
|
||||
|
|
|
|||
|
|
|
|||

Update to Secured File Access (File Security)
A change has been made to the Resource Manager Secured File Access (File Security) feature that further enhances the security of protected files. However, this change has the potential to impact the availability of Resource Manager files that logged-in users were able to access prior to the 18C release.
NOTE: This update only impacts customers who are actively using the LearnCenter’s Secured File Access (File Security) feature to prevent anonymous access to Resource Manager images or files by people who are not logged in to LearnCenter.
After Secured File Access (File Security) is enabled (Control Panel > Options > Systems > Files > Secure Files from anonymous access), file access by users is controlled through the Sharing Properties of each file in the Resource Manager. The Resource Manager file setting “Allow Anonymous Access” will still allow users who are not logged in to your LearnCenter to see those images or files. That behavior has not changed.
However, Resource Manager images and files that are not shared at a LearnCenter level or globally or set to “Allow Anonymous Access” will not be accessible by logged-in users who do not own the files. Only the logged-in username who uploaded the file (the owner) will be able to see that file when it is presented to users in the LearnCenter. Users will see a “lock” icon for images, or they will not be able to download other types of files.
IMPORTANT: If you are actively using Secured File Access (File Security), it is recommended that prior to the 18C release, the owners of Resource Manager files in your LearnCenter should share any files either globally or at the LearnCenter level that are not currently set to “Allow Anonymous Access.” This action will ensure that all logged-in users will continue to be able to view and access those files after the 18C release.
Key Resources
- Refer to the online help topic called “Sharing Files” (TOC > Resource Manager > Sharing Files) for instructions on sharing Resource Manager files at a LearnCenter level or globally.
- For more information about how to set-up and use Secured File Access (File Security), go to My Oracle Support and see the article called “Configuring Secured File Access in the Oracle Taleo LearnCenter” (Doc ID 2277381.1).
New External Training Bulk Loader
The new External Training Bulk Loader enables administrators to create new, or update existing External Training in bulk. Administrators can also use it to manage mange the adding and updating of Users’ External Training completions from a single bulk loader. As with other Bulk Loaders, Administrators can create schedules to automatically load External Trainings from a file to an SFTP site. The External Training Loader expects the following items to be preexisting:
- Categories
- Custom Fields
- Credits
- Usernames
Table 1. External Training ID
| Text Editor Column |
Excel Column |
Required |
Notes |
| 1 |
A |
Yes if no External Training name and Type in Col 2 & 3. No If External Training name and Type in Col 2 & 3. |
Unique ID of the External Training. |
| Accepted Values |
The LearnCenter System generated External Training ID. |
||
| Example: 104 |
|||
|
|
The External Training ID is the Primary Identifier to find existing External Training. If included in the data file the External Training Type and Name fields will not be used to find the existing External Training. |
||
|
|
The External Training ID can be retrieved using BI Reporting and to run the standard External Training Report. In the report, add the External Training ID. This is the system generated ID to add to the data file. |
||
|
|
Use Caution. When using the External Training ID as the Unique identifier, it is possible to update existing External Trainings in the current LearnCenter or any Sub-LearnCenter. |
||
Table 2. External Training Name
| Text Editor Column |
Excel Column |
Required |
Notes |
| 2 |
B |
Yes if no External Training ID is in Column 1. No if there is an External Training ID in Column 1. |
The External Training name. Works in conjunction with the External Training Type field to help locate the precise External Training event, or to create a new one. |
| Accepted Values |
Any Value up to 1000 characters in length. |
||
| • Example: ET_1 |
|||
Table 3. External Training Type
| Text Editor Column |
Excel Column |
Required |
Notes |
| 3 |
C |
Yes if no External Training ID is in Column 1. No if there is an External Training ID in Column 1n |
The External Training type. Works in conjunction with the External Training Name field to help locate the precise External Training event, or to create a new one. |
| Accepted Values |
Any Value up to 1000 characters in length. |
||
| • Example: Class Room training • Example: ILT |
|||
Table 4. External Training Description
| Text Editor Column |
Excel Column |
Required |
Notes |
| 4 |
D |
No |
External Training description. |
| Accepted Values |
Any Value up to 4000 characters in length. |
||
| • Example: This is example External Training description. |
|||
Table 5. Start Date
| Text Editor Column |
Excel Column |
Required |
Notes |
| 5 |
E |
No |
External Training description. |
| Accepted Values |
|
||
| Example: This is example External Training description. |
|||
Table 6. End Date
| Text Editor Column |
Excel Column |
Required |
Notes |
| 6 |
F |
No |
External Training end date. |
| Accepted Values |
|
||
| • Example: 01/02/2015 • Example: 12/31/2018 |
|||
Table 7. Instructor
| Text Editor Column |
Excel Column |
Required |
Notes |
| 7 |
G |
No |
External Training instructor name. |
| Accepted Values |
Any Value up to 1000 characters in length. |
||
Table 8. Location
| Text Editor Column |
Excel Column |
Required |
Notes |
| 8 |
H |
No |
External Training Location. |
| Accepted Values |
Any Value up to 1000 characters in length. |
||
Table 9. Expiration Date
| Text Editor Column |
Excel Column |
Required |
Notes |
| 9 |
I |
No |
External Training expiration date. |
| Accepted Values |
|
||
| • Example: 01/02/2015 • Example: 12/31/2018 |
|||
Table 10. Status
| Text Editor Column |
Excel Column |
Required |
Notes |
| 10 |
J |
No |
External Training status. |
| Accepted Values |
Active = External Training is set to Active. Inactive = External Training is set to Inactive. Blank or <null> = Set to Active. |
||
| • Example: Active • Example: Inactive |
|||
Table 11. Categories
| Text Editor Column |
Excel Column |
Required |
Notes |
| 11 |
K |
No |
Sets the External Training Categories. |
| Accepted Values |
|
||
| • Example: Root Categories 01 • Example: Root Categories 01;Root Categories 02;Root Categories 03 • Example: Root Categories 01;Root Categories 02; Sub Categories 03;Sub Categories 04 |
|||
Table 12. Include in LearnCenter Search
| Text Editor Column |
Excel Column |
Required |
Notes |
| 12 |
L |
No |
Sets the LearnCenter External Training to be included in the LearnCenter Advanced Search. |
| Accepted Values |
|
||
| • Example: Yes • Example: No |
|||
Table 13. Populate Custom Field Default Values
| Text Editor Column |
Excel Column |
Required |
Notes |
| 13 |
M |
No |
Populates custom fields with Default Values. |
| Accepted Values |
|
||
| • Example: Yes • Example: No |
|||
Table 14. Custom Fields
| Text Editor Column |
Excel Column |
Required |
Notes |
| 14 |
N |
No |
Set the External Training Custom Fields. |
| Accepted Values |
|
||
| • Example: Course Custom Field 01=Custom Data Set 01 • Example: Course Custom Field 01=Custom Data Set 01;Course Custom Field 02=Custom Data Set 02;Course Custom Field 03=Custom Data Set 03 |
|||
Table 15. Credits
| Text Editor Column |
Excel Column |
Required |
Notes |
| 15 |
O |
No |
Set the External Training Credits Standard Field |
| Accepted Values |
Numeric value from 0 to 9999999 |
||
| Example: 10 |
|||
Table 16. Credits Action
| Text Editor Column |
Excel Column |
Required |
Notes |
| 16 |
P |
No |
Add or Remove Credits to External Trainings. |
| Accepted Values |
|
||
| • Example: Add • Example: Remove |
|||
Table 17. Usernames
| Text Editor Column |
Excel Column |
Required |
Notes |
| 17 |
Q |
No |
Users to be mapped to External Training. |
| Accepted Values |
|
||
| • Example: User1 • Example: : User1;User2;User3 |
|||
Table 18. User Action
| Text Editor Column |
Excel Column |
Required |
Notes |
| 18 |
R |
No |
Action to be applied on the Username. |
| Accepted Values |
|
||
| • Example: Add • Example: : Remove |
|||
Table 19. User Start Date
| Text Editor Column |
Excel Column |
Required |
Notes |
| 19 |
S |
No |
User’s Start date of External Training. |
| Accepted Values |
|
||
| • Example: 01/02/2015 • Example: : 12/31/2018 |
|||
Table 20. User End Date
| Text Editor Column |
Excel Column |
Required |
Notes |
| 20 |
T |
No |
User’s End date of External Training. |
| Accepted Values |
|
||
| • Example: 01/02/2015 • Example: : 12/31/2018 |
|||
Table 21. User Expiration Date
| Text Editor Column |
Excel Column |
Required |
Notes |
| 21 |
U |
No |
User’s Expiration date of External Training. |
| Accepted Values |
|
||
| • Example: 01/02/2015 • Example: : 12/31/2018 |
|||
Table 22. User Instructor
| Text Editor Column |
Excel Column |
Required |
Notes |
| 22 |
V |
No |
User’s specific External Training Instructor. |
| Accepted Values |
Any Value up to 1000 characters in length. |
||
Table 23. User Location
| Text Editor Column |
Excel Column |
Required |
Notes |
| 23 |
W |
No |
User’s specific External Training Location. |
| Accepted Values |
Any Value up to 1000 characters in length. |
||
Table 24. User Status
| Text Editor Column |
Excel Column |
Required |
Notes |
| 24 |
X |
No |
User’s specific External Training status. |
| Accepted Values |
|
||
| • Example: Active • Example: : Inactive |
|||
Key Resources
- Refer to the online help topic called “Bulk Loader” (TOC > Integrations > Bulk Loader) for complete details on using Bulk Loader.
- Refer to the topic called “External Training” (TOC > External Training) for information about External Training.
Course Manager Bulk Loader Enhancement
A new field has been added to the existing Course Manager Bulk Loader. This field becomes field 51, moving File Path to field 52.
IMPORTANT: If you have scheduled Course Manger bulk loaders, Oracle recommends that you update the template for them as soon as possible to avoid any Bulk Loader run failures after Learn 18C is deployed.
Table 51. Allow Document Download
| Text Editor Column |
Excel Column |
Required |
Notes |
| 51 |
AY |
No |
Indicates whether you want to download the document course to download. |
| Accepted Values |
|
||
| • Example: Yes • Example: No |
|||
Key Resources
- Refer to the online help topic called “Bulk Loader” (TOC > Integrations > Bulk Loader) for complete details on using Bulk Loader.
- Refer to the accompanying new enhancement called “Enhancement to Course Options for Document Courses” (below) for additional details about this field.
Enhancement to Course Options for Document Courses
There is a new field in the LearnCenter Course Player section of the Course Options page.

Figure 1. New Field on the Course Options Page
Upon release of this feature, the default setting for this field is No in the root LearnCenter, and Inherited for all sub LearnCenters and Course Properties pages. After 18C is released, you can decide when to change this value to Yes and make this setting available for any LearnCenter or Course. This setting is available at both the LearnCenter and individual Course level.
The ability to download source content is tied to the completion settings for the Course. For example, you may be required to view all Course pages before it is considered complete. Once the completion criteria for a Course is met, a new download icon displays on the page.

Figure 2. New Download Course Icon
Key Resources
- Refer to the online help topic called “LearnCenter Course Options” (TOC > Options > Course Options > LearnCenter Course Options) for complete details on setting LearnCenter Course Options.
- Refer to the online help topic called “Viewing and Editing Course Options” (TOC> Content > Managing Courses > Viewing and Editing Course Properties) for details on Document Course Completion settings.
- Refer to the online help topic called “Bulk Loader” (TOC > Integrations > Bulk Loader) for complete details on using Bulk Loader.
- Refer to the section called “Course Manager Bulk Loader Enhancement” (above) for further details.
Document Course Player Navigation Buttons Updated
The forward and back icons (formerly ![]() and
and ![]() ) in the Content Manager Document Course Player have been updated for improved visibility and use. The icons now appear on the navigation bar like the following example:
) in the Content Manager Document Course Player have been updated for improved visibility and use. The icons now appear on the navigation bar like the following example:

Figure 3. New Forward and Back Icons
Key Resources
Refer to the online help topic called “Content Manager” (TOC > Content > Content Manager) for complete details on using the Content Manager and the Document Course Player.
Assignment Button Label Update
The Grade button label on the Assignment Grade/Return page has been changed to Submit Grade to make it clear what the button is used for.
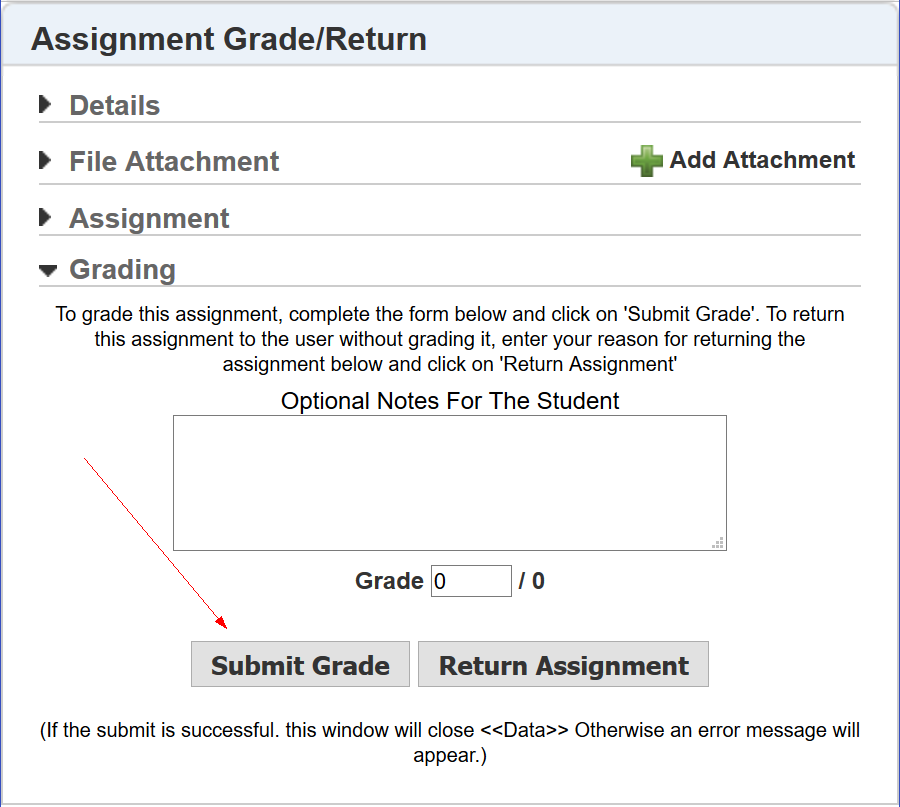
Figure 4. Submit Grade Button
Key Resources
Refer to the topic in online help called “Grading Assignments” (TOC > Assignments > Grading and Returning Assignments) for complete details on Assignments.
BI Reporting Scheduler Enhancements
Several enhancements have been made to BI Reporting.
You can now schedule BI Reporting reports to run on an hourly basis. A new Hourly option has been added to the Recurrence Pattern section of the Schedule Report Schedule tab.
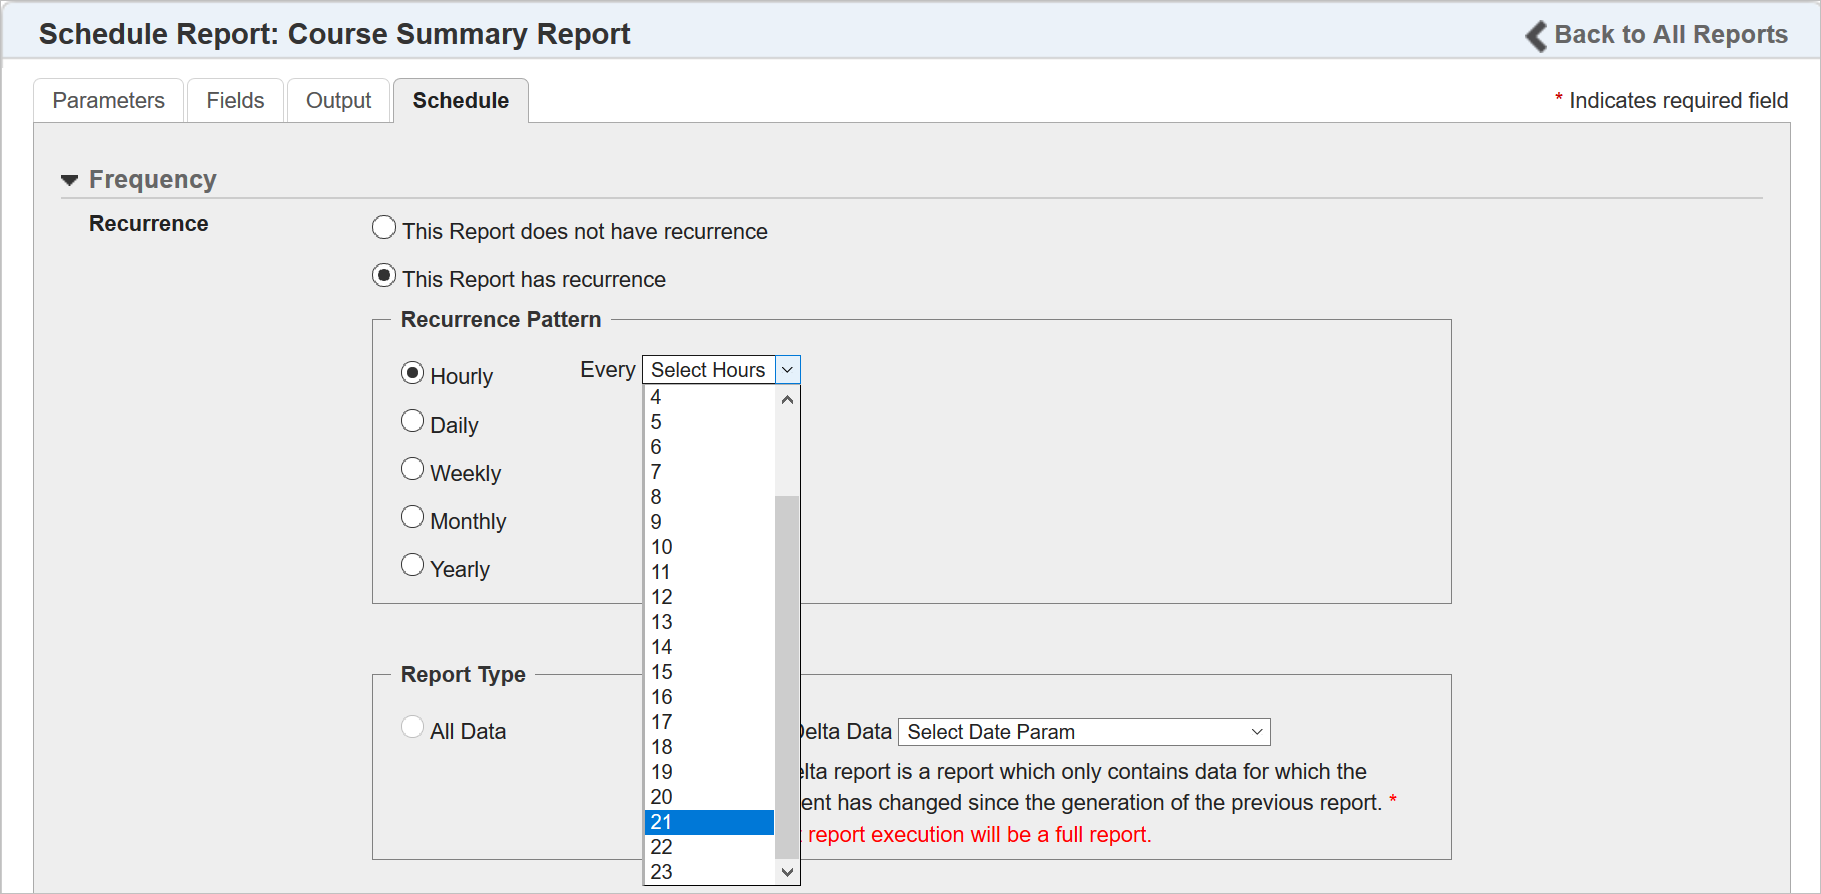
Figure 5. Hourly Recurrence Option
You can set an hourly recurrence for every 1 to 23 hours.
NOTE: The default setting for the Recurrence Pattern is Daily.
There is also a new section on this tab called Report Type.

Figure 6. New Report Type Section
The options in this section work in conjunction with the any of the recurrence patterns. You can choose to receive full reports (All Data) or delta reports (Delta Data). Delta reports contain only the data that has changed since the report was last run.
You can choose a data view and parameter from the Delta Data drop-down list to use as the basis for your delta reports. The data views and parameters in this list come directly from the data view selections in your report.
NOTE: If a report does not have a date and time parameter, you cannot run a delta data report.
There are enhancements to the Start & End Date section.

Figure 7. Start & End Date Section Enhanced
Prior to Release 18C, you could only choose the Start Date for your report. Now, you can also choose a time of day that you want report to enter the processing queue. Processing completion times can vary based on the number of other report requests already in the queue, and how much data has been requested.
NOTE: The time you select is based on your time zone, unless you select Run at System Time. Selecting Run at System Time means the report will be sent to the queue at 12 AM Eastern Standard Time. This is the default setting for all pre-existing scheduled reports.
A delta report does not necessarily run on the exact hour it enters the queue, because there may be other reports in the queue ahead of yours. However, LearnCenter does record the time at which the report starts processing. On the next execution of report, LearnCenter takes all of the data between that first execution time and “now” and records the “now” as a new current time. It continues using this rule until the schedule ends. The following is an example scenario of how this rule works with an hourly delta report.
- On 8/1/2018 at 6 AM, the scheduler sends the first execution of your report to the queue. There are 5 other report ahead of it, and it may take LearnCenter until 6:05 AM to start your report. This first report execution includes all Users enrolled as of 8/1/2018 6:05 AM. LearnCenter records “8/1/2018 6:05 AM” as the current time (or “now”).
- On 8/1/2018 at 7 AM, the scheduler sends the second execution for this report to the queue, with only 1 report ahead of it. LearnCenter begins your report at 7:01 AM. This report execution includes all Users enrolled between 8/1/2018 6:05 AM to 8/1/2018 7:01 AM. LearnCenter records “8/1/2018 7:01” as new current time (or the new “now”).
- On 8/1/2018 at 8 AM, the scheduler sends the third execution for this report to the queue, and no report is ahead of it. LearnCenter executes your report right away at 8:00 AM. This execution includes all Users enrolled from 8/1/2018 7:01 AM to 8/1/2018 8:00 AM. LearnCenter records “8/1/2018 8:00” as new current time (or new “now”).
You can have the recurrence run until a specific date, or after a specified number of occurrences for up to a 90 day period. After 90 days, you can simply extend the recurrence. Recall that you can use the existing Notification Expiration check box to indicate that you want to be alerted before the recurrence.
NOTE: Extending the expiration date for a delta report not cause LearnCenter to start over and send a full report on the first recurrence. Changing any of the other parameters for a delta report will cause LearnCenter to send a full report on the first recurrence.
Report History Page Enhancements
Some enhancements have been made to the Report History page.
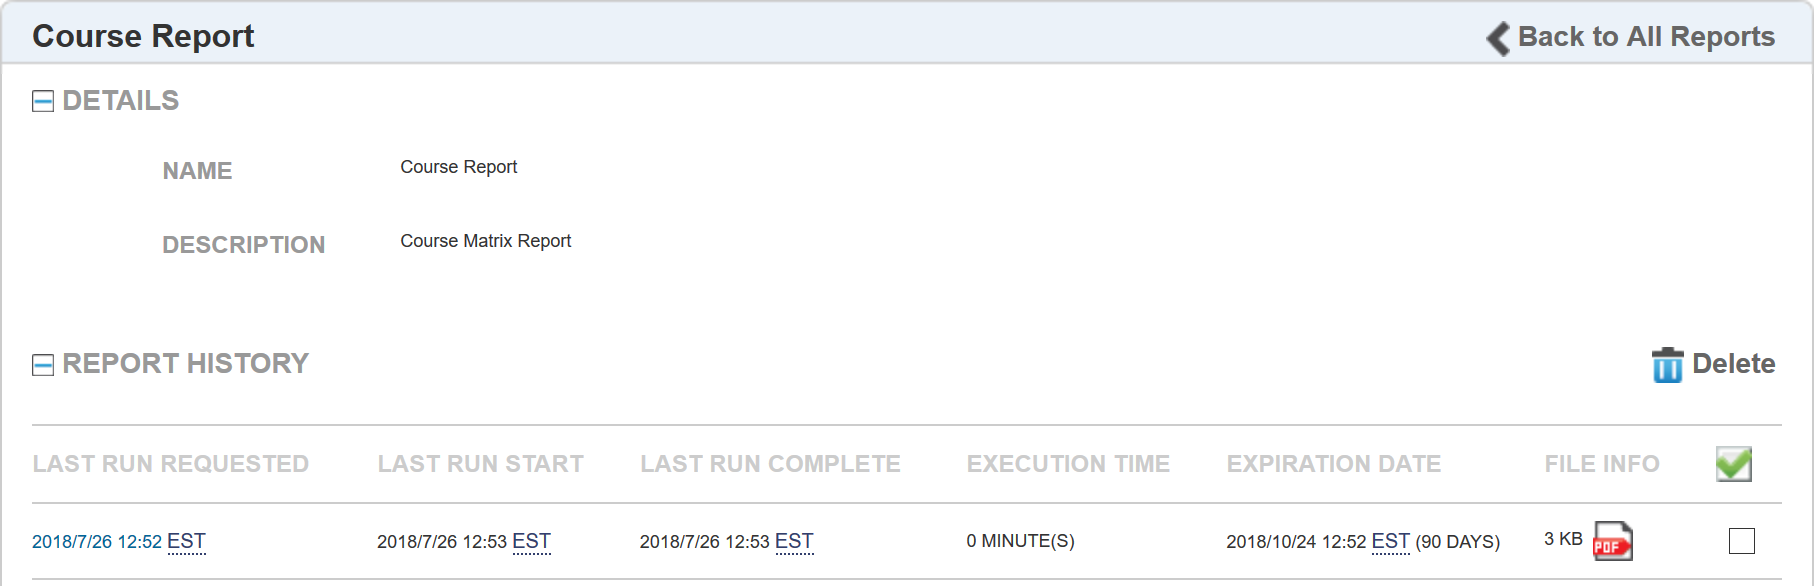
Figure 8. Report History Page Enhanced
The Last Run column has been renamed to Last Run Requested. This provides contextual clarity for the date and time displayed in this column, because it reflects the date and time the User requested that the report be run (or sent to the queue). This information is available for both scheduled and ad-hoc reports.
Additional columns have been added to the page:
- Last Run Start – Indicates the actual time the report generation began.
- Last Run Completed – Indicates the actual time the report generation completed.
- Execution Time – Indicates the length of time the report took to generate.
If for any reason a report does not generate (perhaps it took too long, the queue was full, or there was bad data in the report), it will display as “Skipped” in the Last Run Complete column.

Figure 9. Report Skipped
If a report does not execute, a notice is sent to the designated Admin to alert that person that the report was skipped. If a scheduled report is skipped 6 times consecutively, the scheduled report is automatically cancelled.
NOTE: If a delta report skips for any reason on one occurrence (the queue was full, a system error, etc.), but runs on the next occurrence, all of the delta data from the skipped report is included in the next report.
Key Resources
Refer to the topic in online help called “Scheduling BI Reporting Reports” (TOC > Reports > BI Reporting > Scheduling BI Reporting Reports) for complete details on how to schedule a report.
---

Copyright © 2018, Oracle and/or its affiliates. All rights reserved.
This document is provided for information purposes only, and the contents hereof are subject to change without notice.This document is not warranted to be error-free, nor subject to any other warranties or conditions, whether expressed orally or implied in law, including implied warranties and conditions of merchantability or fitness for a particular purpose. We specifically disclaim any liability with respect to this document, and no contractual obligations are formed either directly or indirectly by this document. This document may not be reproduced or transmitted in any form or by any means, electronic or mechanical, for any purpose, without our prior written permission.
Oracle and Java are registered trademarks of Oracle and/or its affiliates. Other names may be trademarks of their respective owners.
Intel and Intel Xeon are trademarks or registered trademarks of Intel Corporation.All SPARC trademarks are used under license and are trademarks or registered trademarks of SPARC International, Inc. AMD, Opteron, the AMD logo, and the AMD Opteron logo are trademarks or registered trademarks of Advanced Micro Devices. UNIX is a registered trademark of The Open Group.
