

This document will continue to evolve as existing sections change and new information is added. All updates appear in the following table:
| Date |
Feature |
Notes |
|---|---|---|
| 17 AUG 2018 |
Created initial document. |
This guide outlines the information you need to know about new or improved functionality in Oracle Taleo Cloud for Midsize (Taleo Business Edition) 18C. Each section includes a brief description of the feature, the steps you need to take to enable or begin using the feature, and any tips or considerations that you should keep in mind.
Some of the new TBE 18C features are automatically available to users after the upgrade and some require action from the user, the system administrator, or Oracle.
The table below offers a quick view of the actions required to enable each of the 18C features.
| Action Required to Enable Feature |
||||
|---|---|---|---|---|
| Feature |
Automatically Available |
End User Action Required |
Administrator Action Required |
Oracle Service Request Required |
| Recruit Enhancements |
||||
|
|
||||
|
|
||||
| Career Center Enhancements |
||||
|
|
||||
|
|
||||
|
|
||||
| Talent Center Enhancements |
||||
|
|
||||
| Additional Information |
||||
|
|
||||
|
|
||||
|
|
||||

Customers can set up a mass purge of data for Candidate records that have not been updated in a specified number of years. A list of candidates eligible to be purged is sent to security managers. Any security manager may then remove candidates from the list, if needed. The final list must be confirmed in order to purge the candidates. The actual deletion of candidates happens overnight, once confirmed. Security managers can also change the settings, which will restart the process, thereby creating a new purge list, or cancel it altogether. Any updates to specific candidates that were on the original list will remove those candidates from the list so that they will not be purged.
When setting up the purge criteria, customers can exclude candidates in a certain requisition-specific candidate status, candidates that have applied to specified requisitions, or even specific candidates by name.
The actual deletion process is the same as if an administrator manually deleted a specific candidate. All data is removed, and there is no longer a record of that candidate. This feature allows customers to keep a more manageable list of candidates in their database, easily removing those candidates who have not been updated in any way for a number of years.
NOTE: Security managers should be a subset of your users with the Administrator role. It is recommended that you have more than one security manager, but no more than five. Please refer to the online Help for more information about security managers.
Steps to Configure a Candidate Data Purge
- You must be a security manager to access these options. Select Administration, then select Organization.
- Click Data Management.
- Check the box to activate the candidate purge and choose a date.
- Set a repeat option, if desired.
- Choose a time period for candidate records that will be excluded, based on any updates to the Candidate records by users or the candidates themselves. For example, if you want to keep data that has been updated in the last 2 years, select 2 Years here. Anything that has not been updated in that time period is available to be purged.
- You can also exclude candidates based on either their req-specific candidate statuses, those that have applied to a particular requisition, or simply search for specific candidates to exclude. Please note that you need to select those particular checkboxes in order for those options to be taken into account.
- Click Save.
In the following example, only Candidate records that have not been updated in over a year will be added to the purge list. Hired candidates will be excluded, along with anyone who applied to the Branch Manager, Req 43. However, because the checkbox next to Wendy Donovan’s name isn’t selected, she will not be excluded. This behavior is intentional so that you can turn on or off these checkboxes without having to re-select all the data for each option.
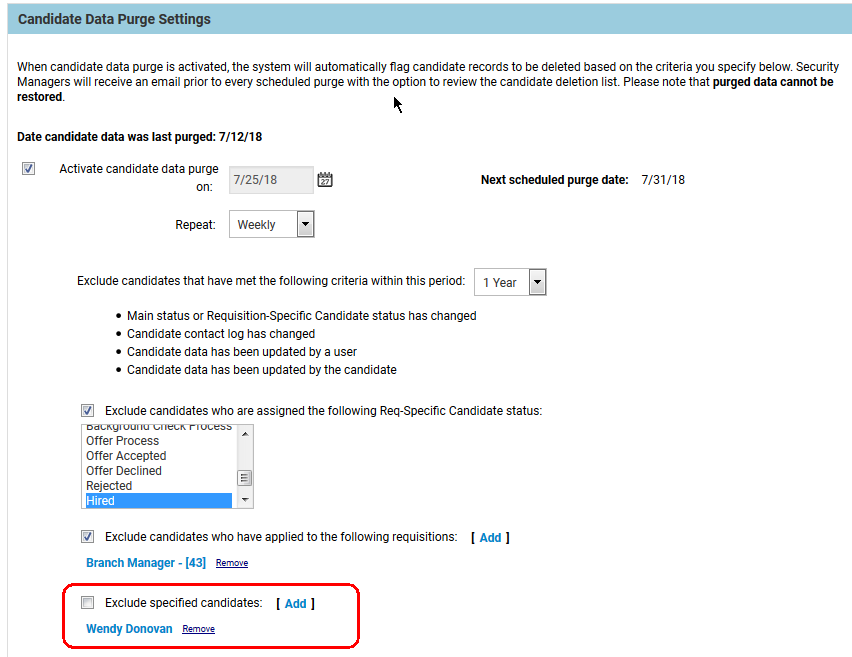
In This Example, Wendy Donovan Will Not Be Excluded Because the Checkbox Is Not Marked.
The task to generate the purge list runs overnight. After it has run, an email is sent to all security managers informing them that the list of candidates is available. A maximum of 1,000 candidates can be purged at once; if your system has additional candidates who are eligible, the email will give you this number so that you know you should schedule another purge to clean up your data. In this example here, no additional candidates are eligible:
Based on your current candidate data purge settings, a list of candidates to be deleted has been generated, and can be found here.
You can cancel the data purge or modify any exclusion criteria in the Data Management administration settings.
NOTE: If your list of candidates exceeds the maximum allowed, you can schedule another data purge once this purge has been completed.
Maximum number of candidates purged: 1,000
Number of remaining candidates eligible to be purged: 0
Steps to Confirm the Candidate Data Purge List
- To confirm the list of candidates for the purge, click on the link in the email, or select Administration, then select Organization.
- Select Candidate Purge List.
- This list can be sorted, or exported to Excel using the Export option:
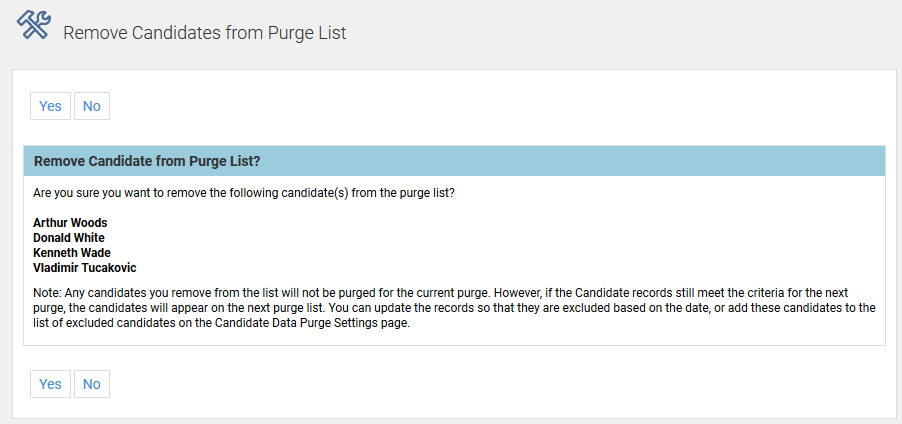
- If you see any candidates that you do not want purged, select them and choose Remove Candidates from Purge List. You will see a confirmation screen explaining that while the candidates are removed from the current purge, if they still meet the criteria they will be on the list the next time the task runs. You would need to manually update their records in order to prevent them from being eligible in the future.
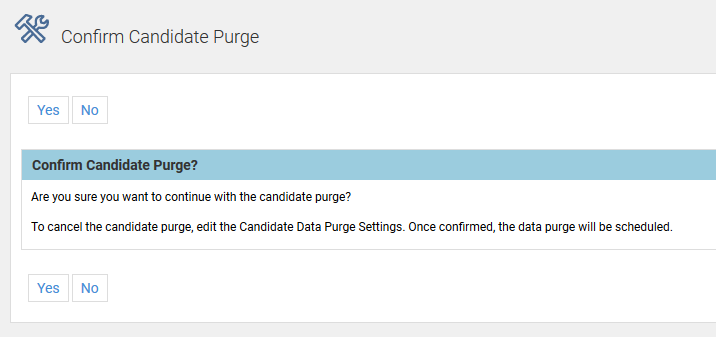
- Once you have excluded all desired candidates by removing them from the list, click Confirm Candidate Purge at the top of the screen. You do not need to select any candidates first, but you must confirm the purge before any records are deleted.
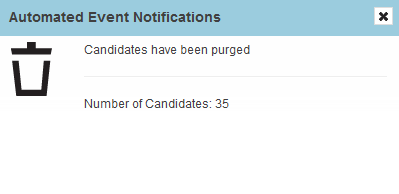
- Once the purge has been confirmed, it will run overnight. The next day, security managers will see an Auto Events notification, and clicking on it will list the number of candidates that were purged.
- If necessary, schedule another purge to initially clean up your database. Moving forward, determine the correct schedule for the purge—weekly, monthly, etc.
![]()
NOTE: The Candidate Purge performs the same delete as if you manually deleted a candidate record. The records cannot be restored. Therefore, please carefully consider your settings for this feature. No purge will actually take place until the confirmation happens. If you have the purge scheduled weekly, and an initial list is generated, but not confirmed, when the task runs the next week to generate the list, the initial list will be overwritten. Because the first list was never confirmed, those same candidates should appear on the next list, along with additional candidates, if applicable.
Requisition and Offer Approval Reminders
Requisition and offer approvals now have reminders, similar to other approvals in the system. There are two new system email templates, one for requisitions and one for offers. These templates are configurable, as is the frequency of the reminders. This feature keeps the approval process flowing so that approvers who may have deleted the initial email are reminded in a timely fashion that there is an approval waiting their response.
In addition, for the initial approval notification, as well as any reminder, customers can use a new merge field that includes approval comments. This new merge field provides each approver the ability to see the comments entered by the previous approvers. It can also be used if an email is sent to all parties once the requisition is finally approved or rejected, so that everyone involved can see all the comments.
Steps to Configure Requisition Approval Reminders
- Select Administration, then select Customize Recruit.
- In the Customize System Templates section, click System Email Templates.
- Edit the template called Requisition Approval Reminder, and update the text as desired. This template is similar to the Requisition Request for Approval Over Email template. Alternatively, you can create your own template.
- Back on the main Customize Recruit page, click Email Reminders.
- Edit the Requisition Approval Reminder.
- Select the Requisition Approver Reminder template, or one you have customized yourself.
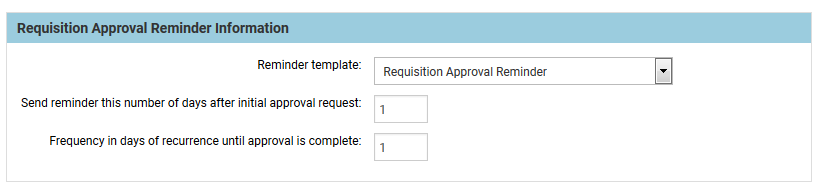
- In the first option, set the number of days after the initial email notification is sent out that you want to wait before a reminder is sent (zero would send out the reminder right away so you should enter 1 or more).
- In the second option, choose a frequency for how often the reminder is sent. In the following example, the reminder email will be sent to the current approver just one day after the initial request for notification. It will continue to be sent each day until the approver approves or rejects. A zero option in the second input box would mean that the reminder would not continue after the first reminder.
- Click Save.
Whether or not you have sequential approvals set, the email reminders are always sent sequentially. If you wish to turn off the reminders, go back to the page and choose ‘None’ for the template name.
Steps to Configure Offer Approval Reminders
- Select Administration, then select Customize Recruit.
- In the Customize System Templates section, click System Email Templates.
- Edit the template called Offer Approval Reminder, and update the text as desired. This template is similar to the Offer Request for Approval Over Email template. Alternatively, you can create your own template.
- Back on the main Customize Recruit page, click Email Reminders.
- Edit the Offer Approval Reminder.
- Select the Offer Approver Reminder template, or one you have customized yourself.
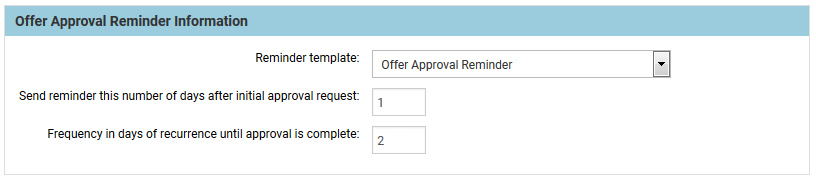
- In the first option, set the number of days after the initial email notification is sent out that you want to wait before a reminder is sent.
- In the second option, choose a frequency for how often the reminder is sent. In the following example, the reminder email will be sent to the current approver just one day after the initial request for notification. It will continue to be sent every two days until the approver approves or rejects.
Whether or not you have sequential approvals set, the email reminders are always sent sequentially. If you wish to turn off the reminders, go back to the page and choose ‘None’ for the template name.
New Merge Fields
As mentioned previously, there are two new merge fields available for notification and reminder emails that will include the comments from those approvers who have already approved. You can place these merge fields in the request for approval, which will result in comments appearing only for those approvers who have already approved and added a comment. You can also place this merge field into a final email you might send once the requisition or offer has been approved or rejected.
The following are some suggestions for templates in which you may want to include the new merge fields:
- Offer request for Approval
- Offer Request for Approval Over Email
- Offer Approved
- Offer Approval Reminder
- Requisition Approval Notification
- Requisition Rejection Notification
- Requisition Request for Approval
- Requisition Request for Approval Over Email
- Requisition Approval Reminder
Steps to Use the New Approval Merge Fields which include Comments
- Select Administration, then select Customize Recruit.
- In the Customize System Templates section, click System Email Templates.
- Edit one of the above templates for which you would like to add the approval comments.
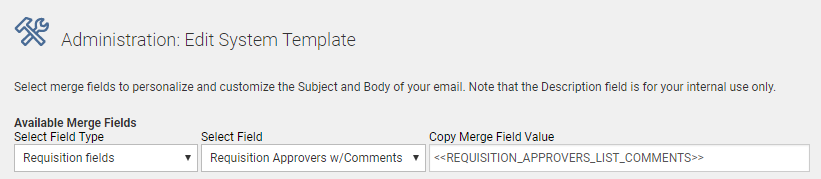
- For any template using the merge field <<REQUISITION_APPROVERS_LIST>>, replace this with the merge field <<REQUISITION_APPROVERS_LIST_COMMENTS>>,which is available from the Requisition fields drop down.
- For any template using the merge field <<OFFER_APPROVERS_LIST>>, replace this with the merge field <<OFFER_APPROVERS_LIST_COMMENTS>>, which is available from the Offer fields drop down. Please note that the <<OFFER_APPROVERS_LIST>> merge field is available from the Requisition drop down, but in order to retrieve the comments, the context has to be from the Offer fields instead.
- Save the templates.
When these merge fields are used in email templates during the approval process, you might see something like this:
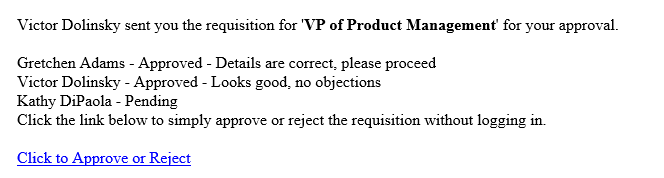
In this case, the email is sent to the third approver, and therefore there are no comments for this approver. If the merge fields are used in an email once all parties have approved or rejected, then all available comments will be listed.
This update introduces some new features that further enrich the candidate experience.
The Career Center now has an option to enable a guest login. This feature allows job seekers to apply for jobs without entering a password, requiring only an email. Job seekers can only be a guest one time, so that if they apply for a second requisition, they must enter a password to continue.
Guests are presented with the same application, including voluntary fields, if enabled. Guests cannot save a draft of their application, however, since this feature requires a password to return.
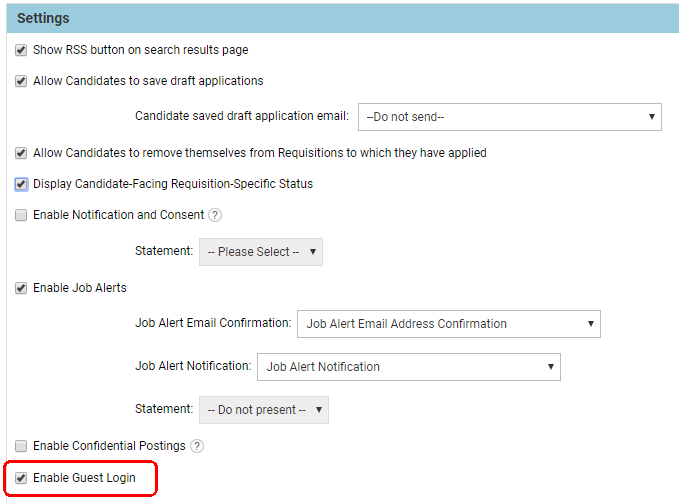
Steps to Enable Guest Login for a Career Center
- Select Administration, then select Customize Recruit.
- Click Edit Settings for the Career Center for which you want to enable this feature.
- Scroll down to the bottom of the Settings section, and enable the option for Guest Login.
- Click Save.
Once saved, job seekers will see the option to continue as a guest above the email and passwords field. The password fields will be disabled when selecting this option.
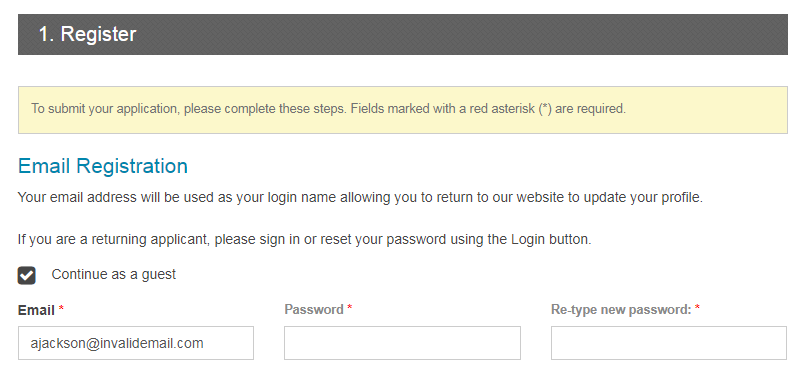 Job Seeker Choosing the Guest Login Option
Once the job seeker has submitted the application, a Candidate record is created as expected. There is no indication to the TBE user that the job seeker used the guest option.
If the job seeker clicks on the My Info option after completing the application, any attempt to save will require a password, and at that point, the job seeker would no longer be a guest once the password is saved.
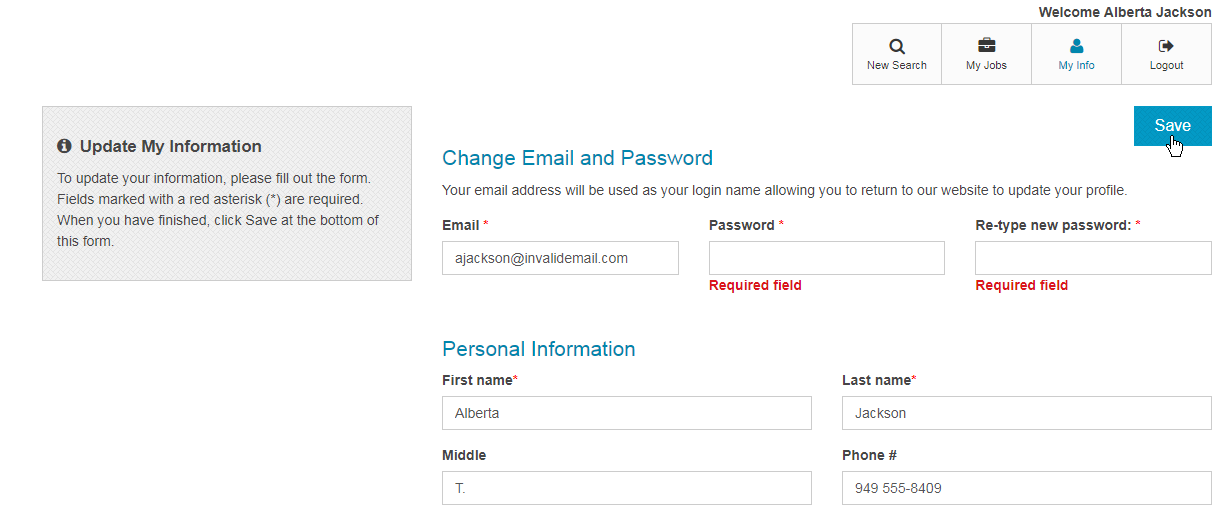
Job Seeker Logged in as a Guest Is Required to Create a Password to Update the Profile
NOTE: Guests receive the same Thank You page as candidates who register with a password. You may wish to review the text on your Thank You page to see if it needs to be altered for guests, if you choose to enable this feature.
Career Centers may now be flagged to optimize requisitions for inclusion in Google for Jobs search results. Requisitions will include the structured data specified by Google for inclusion in Google for Jobs.
This flag allows Career Center postings to be recognized by Google and included in job searches, thereby broadening the applicant pool.
Steps to Enable Google for Jobs for a Career Center
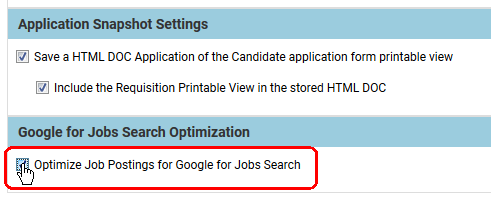
- Select Administration, then select Customize Recruit.
- Click Edit Settings for the Career Center for which you want to enable this feature.
- Scroll to the section called Google for Jobs Search Optimization, and check the option Optimize Job Postings for Google for Jobs Search.
- Click Save.
NOTE: You cannot use this feature for a Career Center that has Confidential Postings enabled. It is also recommended that you do not enable this feature for a test Career Center, or a Career Center for internal jobs.
Once this option is enabled, the correct tags are automatically included so that Google will recognize the posting as a job, and therefore include these postings on their Google for Jobs site. If you view the source of any Career Center posting once this option is enabled, you will see:
"@context" : "http://schema.org",
"@type" : "JobPosting"
This allows the posting to be seen as a job by Google.
The Career Center can now integrate with select Job Boards for candidate profile information. When a candidate initiates the application process from a supported job board, candidate information and resume are sent to the Career Center from the candidate’s Job Board account when the candidate is redirected. This minimizes the candidate’s time to complete the application, thereby reducing the number of abandoned applications. Candidates have the option to review and edit the profile information before submission. After submission, candidates may view and apply for other postings listed on the Career Center.
This integration is available for all Job Boards that utilize Job Board connectivity provided by reThinkData. A list of supported Job Boards along with other information is available from reThinkData at:
http://www.rethinkdata.net/TaleoBE/
This update continues to enhance the Talent Center, providing a better experience for your employees.
Employee Update of Login Name and Password
Employees can now update their Employee login and password directly from the Talent Center. Customers can add a new widget to the My Info page of the Talent Center if they wish to give their employees this access. Once an administrator places the widget on the page, an employee can update one or both of these fields, saving their manager time from having to update the information in the Employee record on behalf of the employee.
The employee can also more easily update the password on a regular basis, without having to click the Forgot Password link.
NOTE: This widget is only available for customers who are NOT using Single Sign On (SSO). If you have SSO enabled in your zone, this widget will not be available to select because your employees should not be changing their passwords on the Talent Center.
Steps to Allow Employees to update Login and Password
- Select Administration, then select Customize Recruit, Perform or Onboard/Offboard.
- Click Edit Pages for the Talent Center you wish to update.
- Click the My Info link at the top of the page.
- Click +Add new widget at the bottom of the screen.
- Select the Password and Login Name option, and then click Add widget.
- Drag the widget to the desired location on the page.
- Click the widget to configure. You can delete either of the fields or change one to read only, if desired. For example, you may wish to display the Employee Login field, but mark it as read only, and only give your employees the ability to update their password from the Talent Center.
- Click Done to save changes to the widget.
- Click Save & Publish to save changes to the Talent Center.
- Click Exit to return to Taleo Business Edition.
Once you have made these changes, your employees can update their fields when logged into the Talent Center.
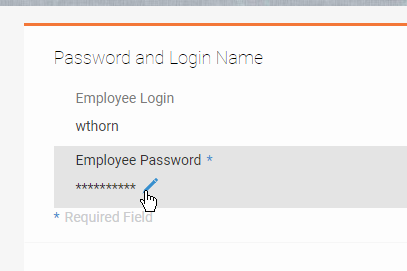
Example of Password and Login Name Widget with the Login as Read Only
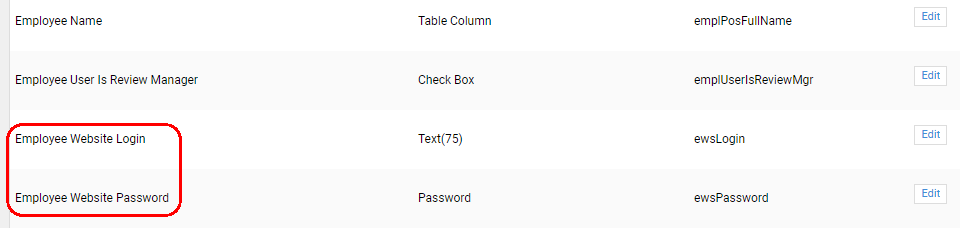
NOTE: If you previously used the Employee Website (EWS) your fields may still be named Employee Website Login and Employee Website Password. It is recommended that you change the display name of these fields, simply removing the word ‘website’ from the names. You may do this from the list of standard Employee fields. The external name can rename the same.
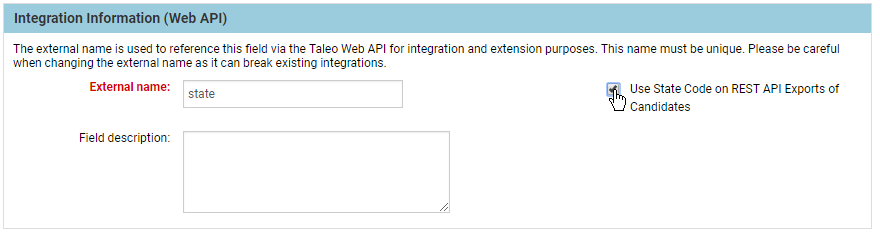
New Flag for API for the State
A new option for the Employee and Candidate State/Territory fields offers the choice of the state code or state name in REST API exports of Employee and Candidate records. This only applies when both the state code and name are used and separated by a pipe(|) symbol, such as California|CA. Currently, the REST API’s use the state name for Candidate and Employee exports.
Steps to Change the state export to code
- Select Administration, then select Customize Recruit. Perform, or Onboard.
- In the Customize Fields section, click Candidate Fields (Recruit) or Employee Fields (Perform or Onboard).
- Scroll down to State/Territory and click Edit.
- Confirm the Active states listed should be in <Name>|<Code> format.
- Under Integration Information (WEB API), update the checkbox for Use State Code on REST Exports of Candidates or Use State code on REST Exports of Employees.
- Click Save
NOTE: This feature is not applicable if the US-<XX> format for State is used
Both Candidate and Employee fields should be updated with the same option for consistent API exports.
Additional Fields Available for Employee Import
When importing a .CSV file to create Employee records or update existing ones, there are new fields that can now be included on the .CSV file. The following fields are now supported:
- Employment type
- Last Day Date
- Employee Login
- Indirectly Reports to
Your TBE zone may still use the label ‘Employee Website Login’ for this field. If so, it is recommended that you change the display label to Employee Login, but regardless of the label, you can now use this field during an Employee import.
The ‘Indirectly Reports to’ field must map to the Employee Code of the indirect manager, just as the Manager field works. Since an employee can have more than one value in the Indirectly Reports to field, you can use the pipe symbol to separate entries in the .CSV file:
Additional Fields Available for Reports
When creating custom reports, a few new fields that capture eSignature dates are now available.
For any report topic that contains the Offers table (Recruit only), the field Candidate eSignature Date is now available. This will return the date the candidate electronically signed the offer.
For any report topic that contains the Performance Reviews table (Perform only), the fields Employee eSignature Date and Manager eSignature Date are now available. These fields return the date the employee and manager electronically signed the performance review. Please note that there are older fields that were used before the release of the eSignature feature called Employee Signature Date and Manager Signature Date. These are most likely no longer on your review pages, as they are not needed when eSignature is used.
All of these new fields are computed in a way that prevents them from being used as parameters when running the report.
Behavior Change for Text Areas on the Talent Center
When an employee enters a large amount of information in a text area field on the Talent Center, either in a review comments field or on the My Info page, the behavior has changed slightly when editing the field. On Internet Explorer, there is no option to resize the field to display more text, as there is on Chrome and Firefox. The field will now display additional lines when editing, and the employee can double-click on the field to resize so that the entire text area can be seen at once.
Behavior Change for Creating Reviews
When you manually assign reviews to one or more employees, the system now creates the reviews in the background. This change was made to improve performance. You will see the following message once you have completed all the information:
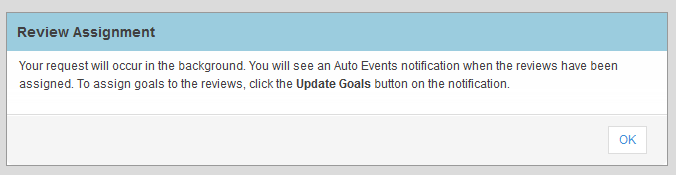
New Message That Appears when Manually Assigning Reviews
The reviews are available very quickly, depending on the number assigned. From the Auto Events icon, you will see a notification, and the message that appears depends on if any of the selected employees have goals that can be included in the reviews.
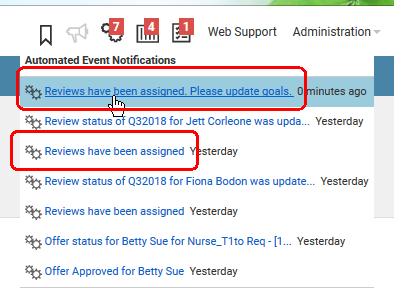
Auto Events Notification when Reviews Have Been Assigned when at Least One Employee Has Goals
If the auto event notification does contain the text ‘Please update goals’ you should click the notification, which will then tell you have many reviews were created, and contain a button which allows you to assign those goals.
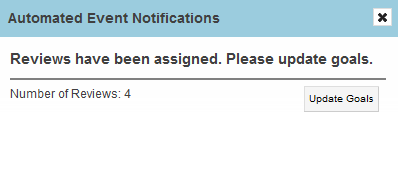
Click the Update Goals Button to Assign Goals to the Review
If none of the selected employees have goals, this button will not appear. You can also modify the goals for each review, as was previously available.
Important Note Regarding Legacy Employee Website
The legacy Employee Website (EWS) will be discontinued for all existing customers as of the 19A update in February of 2019. You should set up your Talent Center as soon as possible in order to prepare for this change. There are several videos on the Talent Center discussing customization of widgets and page layouts. Administering a Talent Center is very easy and user-friendly. The widgets that you need to add depend on the services you have enabled. There is a Talent Center chapter in the Help in each of the three Help guides (Recruit, Onboard, and Perform). Here are some suggested action items you should take as you prepare for this translation:
- Add widgets not already on the page.
- Customize list views as needed
- Customize page layouts as needed
- Add background images and static HTML to the page to further customize the page
- Customize a theme if different colors are preferred
- Assign sample onboarding tasks, or reviews and goals to employees for a round of testing, or ask certain employees to complete their actual items from the Talent Center. It is best to provide them with the direct URL to the Talent Center during the testing.
- Update your system templates to include links to the Talent Center instead of the EWS. Adjust wording as necessary. Refer to the document on the Resource Center called ‘Updating System Email Templates with Talent Center links’ for suggestions. You may also want to include links to both the EWS and the Talent Center during your testing period.
- Check the ‘Make Talent Center the default website for Employees’ once you are ready to move over. This setting will change the Quick Access menu to direct Employees to the Talent Center from within TBE.
- If you wish to have multiple Talent Centers, set the Preferred Talent Center for those Employees that you prefer to access a Talent Center other than the default (please note that Talent Centers can support multiple languages, but you may wish to have one for interns, one for contractors, etc.).
NOTE: For Recruit customers, determine if you want Hiring Managers to use the Talent Center for requisition and offer approvals, as well as candidate management. Please refer to the Help section ‘My Approvals Widget’ on the page called ‘Configuring the Talent Center Home Page’ for important information about this widget, which shows both Offer and Requisition approvals.
You may post questions and concerns on Customer Connect, https://cloudcustomerconnect.oracle.com/
---

Copyright © 2018, Oracle and/or its affiliates. All rights reserved.
This document is provided for information purposes only, and the contents hereof are subject to change without notice.This document is not warranted to be error-free, nor subject to any other warranties or conditions, whether expressed orally or implied in law, including implied warranties and conditions of merchantability or fitness for a particular purpose. We specifically disclaim any liability with respect to this document, and no contractual obligations are formed either directly or indirectly by this document. This document may not be reproduced or transmitted in any form or by any means, electronic or mechanical, for any purpose, without our prior written permission.
Oracle and Java are registered trademarks of Oracle and/or its affiliates. Other names may be trademarks of their respective owners.
Intel and Intel Xeon are trademarks or registered trademarks of Intel Corporation.All SPARC trademarks are used under license and are trademarks or registered trademarks of SPARC International, Inc. AMD, Opteron, the AMD logo, and the AMD Opteron logo are trademarks or registered trademarks of Advanced Micro Devices. UNIX is a registered trademark of The Open Group.
