
This document will continue to evolve as existing sections change and new information is added. All updates appear in the following table:
| Date | Feature | Notes |
|---|---|---|
| 06 FEB 2019 | Created initial document. |
This guide outlines the information you need to know about new or improved functionality in Oracle Taleo Cloud for Midsize (Taleo Business Edition) Update 19A. Each section includes a brief description of the feature, the steps you need to take to enable or begin using the feature, and any tips or considerations that you should keep in mind.
Column Definitions:
Report = New or modified, Oracle-delivered, ready to run reports.
UI or Process-Based: Small Scale = These UI or process-based features are typically comprised of minor field, validation, or program changes. Therefore, the potential impact to users is minimal.
UI or Process-Based: Larger Scale* = These UI or process-based features have more complex designs. Therefore, the potential impact to users is higher.
Features Delivered Disabled = Action is needed BEFORE these features can be used by END USERS. These features are delivered disabled and you choose if and when to enable them. For example, a) new or expanded BI subject areas need to first be incorporated into reports, b) Integration is required to utilize new web services, or c) features must be assigned to user roles before they can be accessed.
| Ready for Use by End Users Reports plus Small Scale UI or Process-Based new features will have minimal user impact after an update. Therefore, customer acceptance testing should focus on the Larger Scale UI or Process-Based* new features. |
Customer Must Take Action before Use by End Users Not disruptive as action is required to make these features ready to use. As you selectively choose to leverage, you set your test and roll out timing. |
|||||
|---|---|---|---|---|---|---|
| Feature |
Report |
UI or |
UI or |
|
||
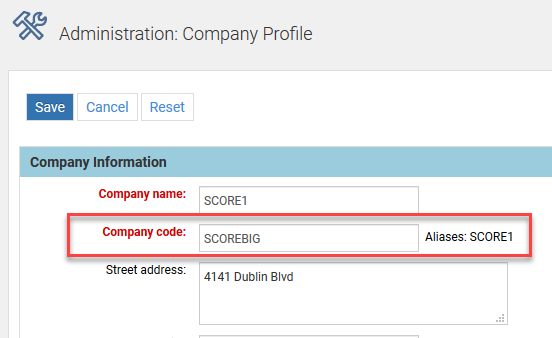
Customers can define a custom Company Code that acts as an alias to the originally assigned code. The alias can be used interchangeably with the original code, and is supported on all forms that require Company Code input. This feature can be useful if the company has undergone a name change.
URL parameters (for example, the URL for the Career Center) will continue to use the original Company Code. If you send emails with the merge field for the Company Code, the latest updated value will be used.
The Company Code alias must be between 2 and 30 alphanumeric characters, including underscores and hyphens. It also must start with a letter, and must be unique across all customers; you will see an error if the suggested alias is already in use.
Steps to Enable
- Select Administration, then select Organization.
- Click the Company Profile link.
- Replace the original Company Code with the desired new alias.
- Click Save.
When you return to the Company Profile, you will see the original code is listed as an alias, and the new code is listed in the Company code field. Both codes will work when users log in. If you need to add another code, the list of aliases will continue to grow.
New Company Code Along with the Original
Candidates who are linked to an Employee record, whether in an active or inactive status, can now be hired for another requisition and their Employee record will be updated. This allows customers to rehire former employees who have left the company without creating a duplicate Employee record. It also allows for the updating of Employee records for current employees who are moving to another position.
This rehire feature applies whether you hire by using the Next Step feature, or if you change the main status or requisition-specific candidate status to Hired for one or more candidates from a list view. It also applies when you use the Convert to Employee option from a list view.
The status of the updated Employee records is determined by your mappings. If the Employee record is in an active status (Employed, by default) when the candidate is hired a second time, the updated Employee record is still in an active status after the subsequent hire. Therefore, no 'welcome' email is sent to the employee. However, if the Employee record was in a Terminated or Suspended status, and the rehire moved it to an active status (Employed), the 'welcome' email is sent to the employee.
When the system detects that one or more of your selected candidates already has an Employee record, you will see a screen such as this, where any new candidates appear at the top, and then any existing employees will appear below this warning:

Message When One or More Candidates Is New and Others Have Existing Employee Records
If you click Cancel at this point, the Candidate records are still updated with the hire information, but no changes will flow through to the Employee records. If you click Proceed, you are then taken to the screen that allows you to complete the information for new and existing Employee records.
Please note that for existing employees, the original Hired Date and Manager are presented, but can be changed. Also, the existing Employee Login and Employee Code are shown as read-only. These cannot be changed at this point but the Employee record can be edited after the conversion, if needed.
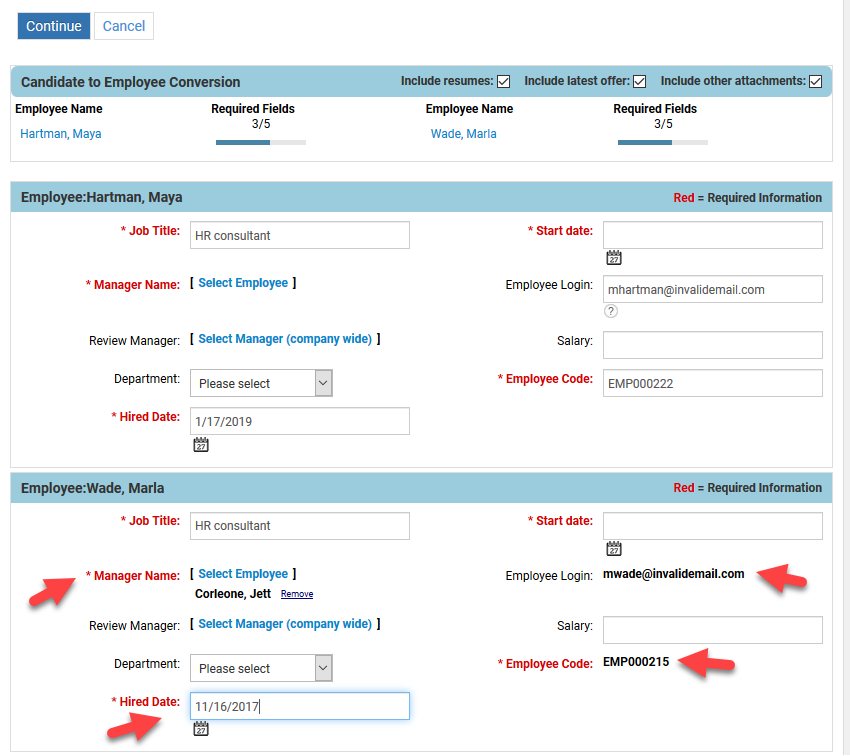
Candidate to Employee Conversion Screen Showing New and Existing Employees
If you include attachments, as shown in the upper right-hand corner, the latest resume, accepted offer, and all the other attachments are added to the Attachments table in the Employee record. This can result in some duplicates, but the time/date stamp is shown so that it is clear which are the latest. The Administrator can delete some attachments, if needed.
Once this screen has been completed, the Employee records are updated.
Steps to Enable
While the is no need to enable this feature, this is a good time to take a look at your current mappings when a candidate is converted to an employee.
- Select Administration, then select Customize Perform or Customize Onboard.
- In the Customize Processes section, click Candidate to Employee conversion process.
- Review the fields that will be mapped when a candidate is converted to an employee.
- It is recommended that you have option to present the 'Candidate to Employee Conversion' page checked so that your users can input the information.
- Verify that the Employee Status and Employee Login fields are set as desired.
- Click Save.
Tips And Considerations
Typically, candidates use personal emails when applying for a job. If the Candidate record has a personal email address, and then you hire this candidate, the resulting Employee record will have the same email address by default. Often the email is then changed in the Employee record to be the company email address. If the candidate applies for another job at a later date, and the Candidate and Employee records still have different email addresses, the system will still recognize that this is the same person because the two records are linked from the first hire. However, if the email address is one of the fields that is set up on your mapping page, then after the second hire, the Employee record will be updated once again with the personal email address. You can uncheck the email field as one of the fields that is mapped when candidates are converted to employees. However, this change will affect all hires, not just rehires. Alternatively, you can edit the Employee record and re-enter the email address after the rehire, or add the Email field to the page layout called 'Candidate to Employee Conversion Embedded Form' so that the user can see which email will be used and make adjustments as needed.
Please note that if a Candidate record and an Employee record exist with the same email address, but the two records are not linked through the hire process, the system will not be able to proceed with this rehire process.
Requisition Sharing Configuration
This update enhances the Requisition Sharing feature introduced in 18B. You can now configure the default content that is shared on Facebook, LinkedIn, Twitter, and Email when users and candidates share requisition information. Social Media templates have been added to allow you to change the default content that is presented with the Share button. A limited number of merge fields can be used in the templates.
In addition, a small custom logo can be added, which will be posted on Facebook, LinkedIn, and Twitter.
Steps to Enable
Steps to Customize the Social Media Templates:
- Select Administration, then select Customize Recruit.
- In the Customize System Templates section, click Social Media Templates.
- Click Edit to the right of the template you wish to customize.
- Change the text as desired, or remove any merge fields that you don't want to share.
- Choose any of the merge fields displayed in the Common Fields or Requisition Fields list.
- Click Save.
Steps to add an image:
- On the Customize Recruit page, click Manage Images.
- Add the image you wish to be used when requisitions are shared. The suggested size is 300x300 pixels.
- Upload and save the image.
- Back on the Customize Recruit page, click Edit for the correct Career Center.
- Scroll down to Job Sharing section.
- Select the image from the drop down.
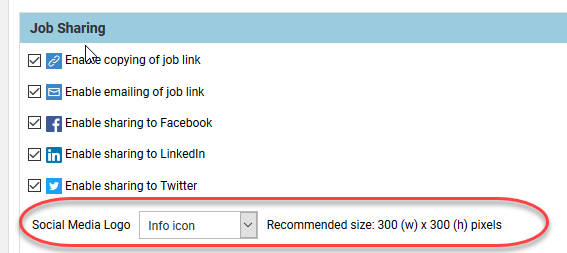
- Click Save.
Now this image will be used when job seekers click the Share button from the Career Center, or when users click the Share button from within TBE Recruit.
Tips And Considerations
- Use only the available merge fields when editing the social media templates. Do not paste in merge fields from other system templates.
- LinkedIn and Facebook both use the same template. However, LinkedIn uses only the Subject field; Facebook uses both the Subject and the Body.
- Be cautious not to add too many merge fields. There is a limit to the number of characters on the different sites.
- Use only JPG or PNG formats for your social media logo.
- The shape of the image is slightly different on LinkedIn then on Facebook or Twitter. You may need to experiment to get an image that looks optimal on all sites.
- Changes to the requisition content, any text or merge fields in the templates, or the social media image do not immediately reflect on Twitter, Facebook, or LinkedIn. The various sites differ in the amount of time it takes to recognize these changes. It is recommended that you do not make changes often to the templates.
2019 W-4 Form
The default W-4 form has been updated with the 2019 information. Any activity templates referencing this default W-4 form automatically include the new form. Completed activities are not affected. Already assigned activities that have not yet been updated by employees will also automatically refer to the new form.
Referral Source on an Application
When a candidate is directed to the Career Center or the legacy Careers Website and the URL contains a source, the job seeker will no longer be able to change the source field on the application itself. The drop down field will be disabled so that the original source is maintained. This change will result in more accurate tracking information.
History Log Changes
When permissions are removed or added to a User record or the role has been changed, the History Log of the User record will now track this information going forward.
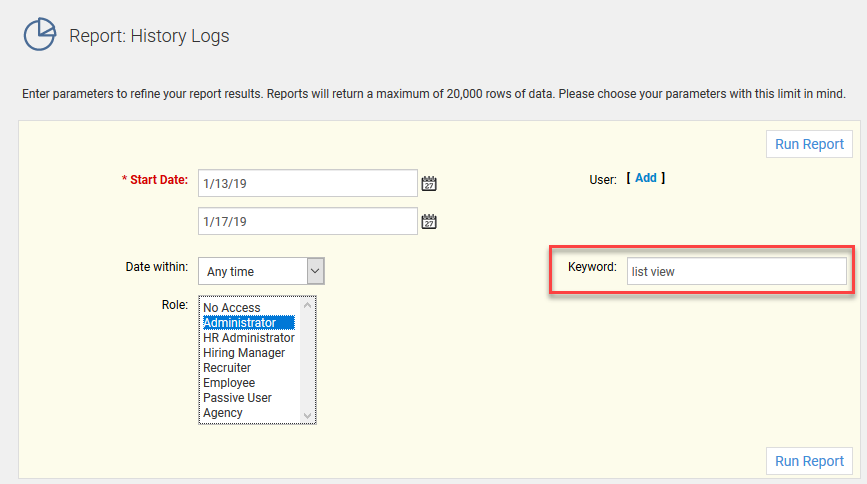
Also, when a page layout, list view, or custom field has been added, updated, or deleted, this information is now tracked in the History Log for the admin user who made the change, since those entities do not have History Logs. If you are trying to track down when a certain page layout was deleted, and by whom, for example, you can run the standard User report called History Log. This will prevent you from having to search the History Logs for each Admin.
You must enter a date range. It is recommended that you use the keyword field to narrow down your search. For example, enter 'list view' if you want to search for a change to a list view.
Standard User History Logs Report