
| Date | Feature | Notes |
|---|---|---|
| 10 MAY 2019 | Created initial document. |
This guide outlines the information you need to know about new or improved functionality in Oracle Taleo Cloud for Midsize (Taleo Business Edition) Update 19B. Each section includes a brief description of the feature, the steps you need to take to enable or begin using the feature, and any tips or considerations that you should keep in mind.
Column Definitions:
Report = New or modified, Oracle-delivered, ready to run reports.
UI or Process-Based: Small Scale = These UI or process-based features are typically comprised of minor field, validation, or program changes. Therefore, the potential impact to users is minimal.
UI or Process-Based: Larger Scale* = These UI or process-based features have more complex designs. Therefore, the potential impact to users is higher.
Features Delivered Disabled = Action is needed BEFORE these features can be used by END USERS. These features are delivered disabled and you choose if and when to enable them. For example, a) new or expanded BI subject areas need to first be incorporated into reports, b) Integration is required to utilize new web services, or c) features must be assigned to user roles before they can be accessed.
| Ready for Use by End Users Reports plus Small Scale UI or Process-Based new features will have minimal user impact after an update. Therefore, customer acceptance testing should focus on the Larger Scale UI or Process-Based* new features. |
Customer Must Take Action before Use by End Users Not disruptive as action is required to make these features ready to use. As you selectively choose to leverage, you set your test and roll out timing. |
|||||
|---|---|---|---|---|---|---|
| Feature |
Report |
UI or |
UI or |
|
||
In order to speed up employee productivity and improve talent retention, it is imperative to have a Talent Management solution that can deliver development and training throughout the entire employee lifecycle, in discrete multimedia units of consumption, at any time.
This release introduces the general availability of TBE Learn, a new service that delivers development and training content to employees and users, natively from the Taleo Business Edition platform. The content administrator can create and design single-unit, platform-native courses, based on content from existing multi-format documents or YouTube videos, and assign them to employees and users. They can in turn consume the courses via a mobile-friendly course player that allows TBE Learn to track progress. The courses can be exposed in a new Talent Center widget, added as development activities in onboard/offboard packets, and set up with due dates, completion expiration dates, completion methods, etc.
This service is available to all Taleo Business Edition customers who have either Onboard or Perform. You simply need to expose the main menu to the Administrator role.
- From the Administration menu, select any of the various 'Customize' links.
- In the lower right corner, click Application Views.
- To the right of the Administrator view, choose Edit from the Action menu.
- Move 'Courses' from the 'Available' list on the left to 'Added' list on the right using the right arrow.
- Use the up or down arrows to adjust where the Courses menu will appear.
- Click Save.
There is no need to add the Courses menu to other roles, as the administrator must add and design the courses.
BASIC CUSTOMIZATION
As with other TBE services, you can customize TBE Learn via the Administration menu. The Customize Learn page allows you to view the standard Course fields and Course Registration fields, as well as create custom fields. You also have access to both page layouts and list views, just as with other TBE services. There is currently only one system email template specific to Learn. It is called Course Assigned Notification (please note that the system email templates that appear for all services will also appear in the list when accessed from the Customize Learn page). This email template can be customized to better fit your needs. As with other email templates, you will have access to various merge fields to use in the email template.
COURSE AUTHORING
You must be logged in as a user with an Administrator role in order to author and design courses. Your User record should also be linked to an Employee record so that you can administer the Talent Center as well.
The supported file formats for a course are:
- PPT, PPTX, DOC, DOCX, RTF, PDF
There is a file size limit of 50 MB. You can also use a YouTube video. All courses are single unit courses.
When you add a new course, you can set up a due date that is based on a fixed date or a calculated date, such as one month after registration. You can also set a course completion to expire after a certain amount of time. For example, if you require your employees to retake a course on data protection every two years, you can expire the completion every two years. These fields will have more relevance with future releases. Currently, the only option available for the Course Attempts field is Single course attempt.
You first add the course, and then, once saved, you add the content to the course with the Course Design feature.
Steps to Add a Course:
- From the Courses menu, select New Course.
- Enter the required fields, as well as any optional fields you want.
- For the Course Due Date, you can choose None; enter a Fixed Date if everyone must complete it by a certain date; or choose a calculated date based on the registration date.
NOTE: When you assign a course as part of an onboard/offboard packet, the due date that is entered at the packet level will take precedence over the due date you enter at the course level. Therefore, you may want to leave the due date as None.
- Click Save.
Add more courses as needed. You can also go straight to the Design function by clicking Save & Design in the step above.
DESIGNING A COURSE
Once you have saved the course, you can add the content, which will be a document you have previously designed in another application such as PowerPoint, Word, etc. You must have the documents in a completed state before adding to TBE. You can also use an existing YouTube video.
Steps to Design a Course:
- From the list of Courses, choose Design from the Actions menu; Or, when viewing a course, click the Design button. If you clicked Save & Design above, you are taken here as well.
- Click Add Content. The Content Library launches. From the plus icon, click Upload file to upload a new file. You may upload more than one file to the library at this time, but each course can only be a single unit.
- To add a video instead of a document, choose Add YouTube video from the plus icon.
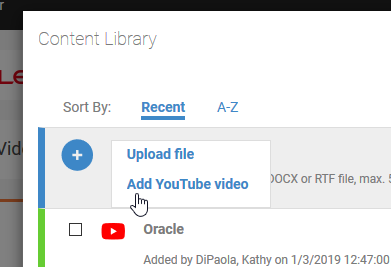
- Enter the URL to the YouTube video, along with the title to display for your employees. Click Done.
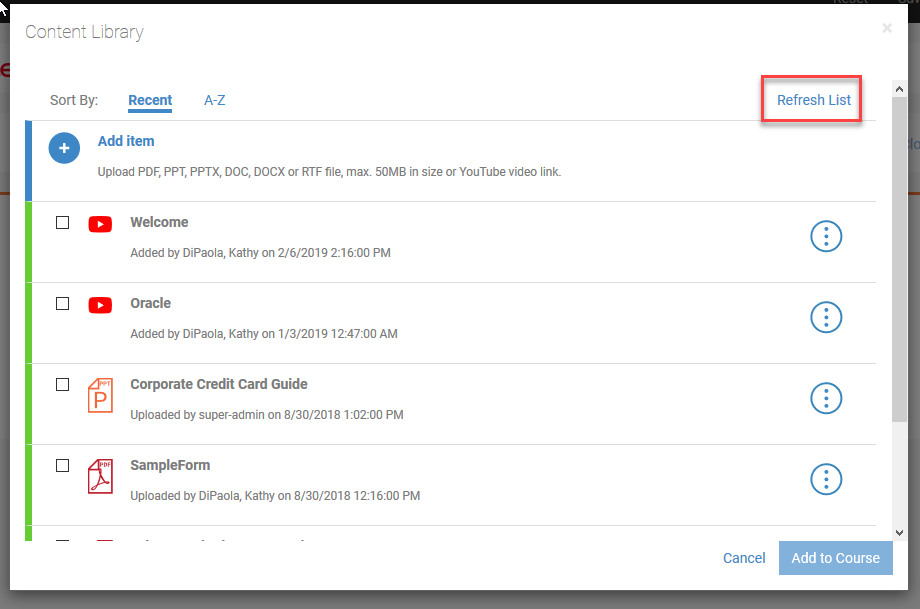
- Icons help identify the content type. You can preview a document or video from this screen by clicking Preview from the menu to the right of each document or video.
- Select a single document or video you wish to add to this course, and click Add to Course. If you are not able to add the file because it is still processing, click Refresh List first.
- The Course Designer launches. There is not much to configure on this screen. The course unit name and panel heading can be changed but this will be used in a future release.
- Choose a completion method. For videos, the options are Watch Video, and Mark Complete. For documents, the options are View Slides, Mark Complete, and Download Content.
- For documents, if you want to give your employees the option to download the course content in PDF format, check the Allow Download option (this is selected automatically if you choose Download Content as the completion method):

- You may proceed through the various slides by clicking either the Next button, or by clicking on the thumbnail of each slide to preview the contents as seen by your employees.
- For videos, you can preview the video, and jump around to different locations in the video.
- If you have selected the wrong file, you can click the Replace Content link. If you need to make any changes to the file, you can exit without saving your changes. Fix the content in the original application, and then start over again designing the course.
- When you are happy with the content, click Save Course, then click Exit.
You are taken back to the list of courses.
ASSIGNING COURSES
Once your course has been designed and is ready to go, you are ready to assign courses. You may typically be assigning courses as part of an onboard/offboard packet for new employees. However, you can also assign courses directly to users or to employees. Use this process to assign training for existing employees. Directions for both are provided below.
Steps to Assign Courses to Employees/Users (Administrators Only):
- Once you have saved a course, go to either an Employees list view or a Users list view.
- Select one or more employees or users, and click Assign Course.
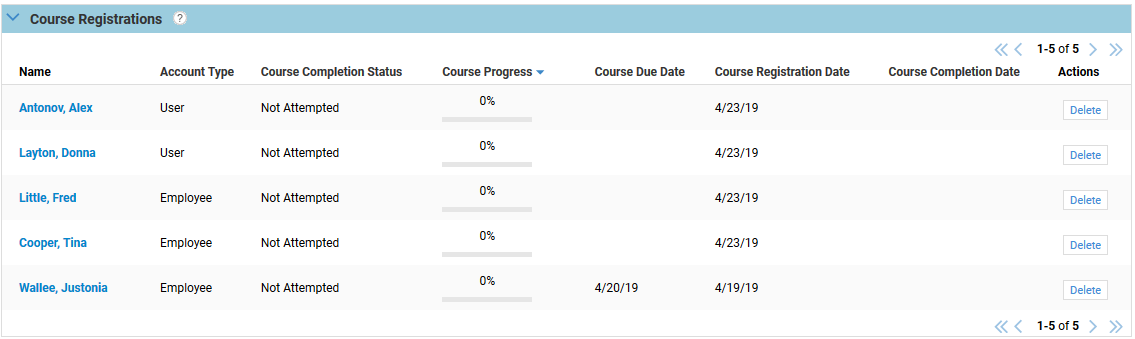
- From your list of courses, select a single course. After the window closes, you are taken to the Course page, where you can see that the Course Registrations table has been updated with the registered employees or users.
- Repeat as needed. The Account Type column displays if those registered are employees or users. This list view is configurable. You can also delete a registration from this table if needed.
 .
.
Steps to Add the Course Widget to the Talent Center:
- From the Customize Onboard/Perform/Recruit page, choose Edit Pages for the Talent Center you wish to modify.
- At the bottom of any page, click Add new widget. Select Courses from the list of widgets, and then click Add widget. Any courses assigned to your Employee record will appear in this list view widget.
- Click Save & Publish, and the Exit to return to Administration.
Employees can now access courses from this widget.
For new employees, you will assign the course as part of a packet, and when you do so, the employee name is added to the Course Registrations table.
Steps to Assign a Course via an Onboard or Offboard Activity (Any User Who Creates Packet):
- From Onboard/Offboard menu, choose Activity Library.
- Click New Activity Template.
- Add a Title and Description for this specific course.
- From the Activity Type drop down, select Training Activity.
- Add restrictions if desired, then click Next.
- In the Activity Details section, click the Select Course link and then choose the course you want to associate with this activity template.
- Enter the Due Date details, whether or not this training activity has dependencies, and the Employee Facing title and description. The due date entered here will override the due date that is set at the course level.
- Click Save.
- Repeat for other activity templates; you need to create one template per course.
- Edit an existing Onboard/Offboard packet and add this new activity, or create a new packet for the employee and assign to the new packet.
NOTE: By default, an email is sent to anyone assigned to a course. The email will contain a link which launches the course, once logged in. Your employees can also access the assigned course via the Courses widget. Courses assigned to users must be launched from the email only. Users must log in with their TBE login and password; Employees will log in with their Talent Center/Employee login and password.
COMPLETING COURSES
Once the activity has been assigned to the employee as part of an onboard/offboard packet, it will appear in the My Onboard/Offboard Tasks widget when the employee logs into the Talent Center. Before the course has been started, the status will be Not Attempted. If the employee pauses a course, the progress will be saved, and the status will change to Started for this course, as seen below.
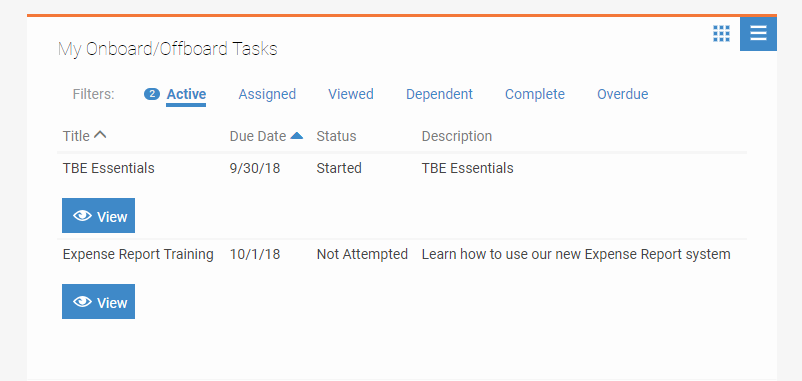
Once the entire course has been viewed, the status changes to Completed, and the activity will be removed from the Active list and appear under the Complete list.
Similarly, when employees are assigned to courses directly, the course will appear on the Courses widget. The status will change from Not Attempted to Completed once the employee has finished the course. Currently, courses remain in the Courses widget even once completed. Courses assigned to Users do not appear in the Courses widget.
If you had checked the option to allow download for the document course, your employees will see the download option while playing the course. No matter what format the original course was, the resulting download will be a PDF file.

Steps to Enable
Please refer to the individual sections above.
Tips And Considerations
Courses assigned to users require the TBE User login. Courses assigned to employees require the Talent Center/employee login. Although you can assign courses to both users and employees, it might be confusing to the person taking the course which login is required when clicking on the email. You might want to consistently assign courses either to employees or users, and then add some text to the 'Course Assigned Notification' email template which explains which login and password should be used. Be careful not to remove any of the HTML in the system email template which launches the course.
Currently, the only reporting available for TBE Learn is through the Onboard/Offboard activities custom topics.
NOTE: Once a course has either users or employee registrations, it is considered locked, and it can no longer be edited. You can clone the course at this point, and replace the content with a new file or video link, or change the completion settings as designed. The course registrations are not included as part of the cloning, so you will need to assign the course again. You can mark the original course as inactive and delete the registrations for anyone that has not yet taken the course. If anyone has completed the course already, the registration cannot be deleted. Due to the locking of a course with registrants, it is recommended that you review the contents carefully before assigning to users or employees.
The Talent Center is a fully responsive modern employee experience. With this update, you can now add up to ten custom pages. Widgets can now go on any of the standard pages, as well as the custom pages. This feature allows you to organize the Talent Center in a way that best meets your business needs. Widgets can be repeated on each page, if desired, so that employees can easily find certain widgets they may access often. As the Talent Center develops over time, the addition of custom pages prevents any single page from being too crowded.
Steps to Enable
- From any of the various 'Customize' pages, click the Edit Pages link for the Talent Center you wish to administer.
- Click the plus (+) sign to the right of the My Info page.
- In the Add page window that appears, add a name for your new page, and then click Done. The new page is added to the right of the standard pages.
- Add more pages as needed. The plus sign will disappear once you have reached the limit of 10 pages.
- To change the title, or add a custom title in another language, click the pencil icon that appears when you hover over the name. Change the title as needed, or choose another language from the drop down, provide a title in this language, and then click Done. Add titles in other languages one at a time, clicking Done for each language.
- Add the desired widgets to the custom pages. The layout for the custom pages is always a single column, like the My Info page.
- Click Save & Publish to allow employees to see the custom pages.
You can rename the Home and My Info pages, if desired. Click on the pencil icon to rename them. These standard pages cannot be deleted.
You can also re-order the custom pages simply by dragging and dropping them to a new location. Please note that Login, Home and My Info pages must stay in the given order. The custom pages can only be reordered to the right of these pages.
Tips And Considerations
- If you delete a custom page, just as if you delete a widget on the page, there is no verification message. You can click the Reset button, but this will remove all changes since you last saved and published. Therefore, it is recommended that you save often if you are adding several custom pages. You can always add static text to the page stating that the page is in progress if you are not ready for employees to start using that page.
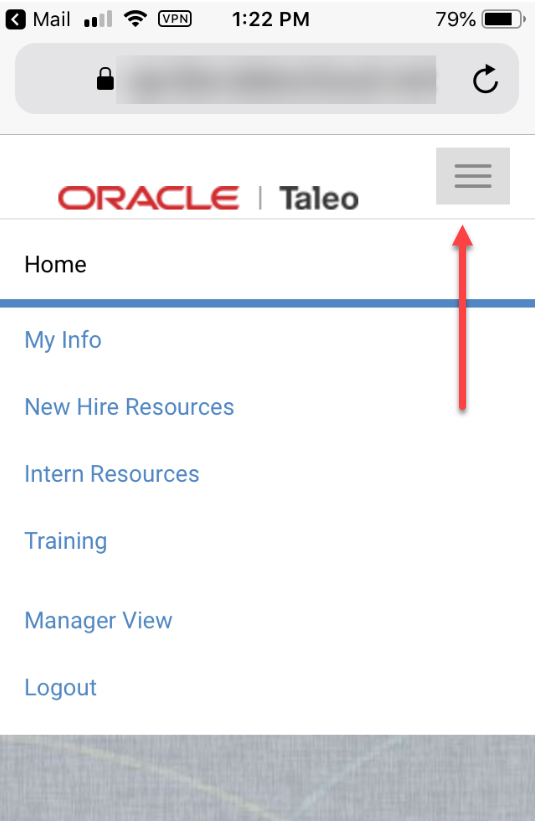
- When employees are on a phone, the custom pages are available from the menu. Avoid using names that are so long that they look odd on the phone, but because the names of the pages are in a vertical drop down, you can safely add more than one or two.
- Some widgets can be added to the same page more than once, while other widgets can only be added a single time. These rules remain the same with the custom pages feature. The difference is that the same widget can be added to each page, if desired, as previously mentioned.
This update introduces 2-Step authentication for users logging into Taleo Business Edition. This feature adds an extra layer of security to the login process. Once enabled, each user can decide to set up the 2-Step authentication or not. A verification code generated by a mobile app will be required to log in. Any authentication app can be used, such as Oracle Authenticator, Google Authenticator, Microsoft Authenticator, and Authy.
Steps to Enable
Steps for Administrators:
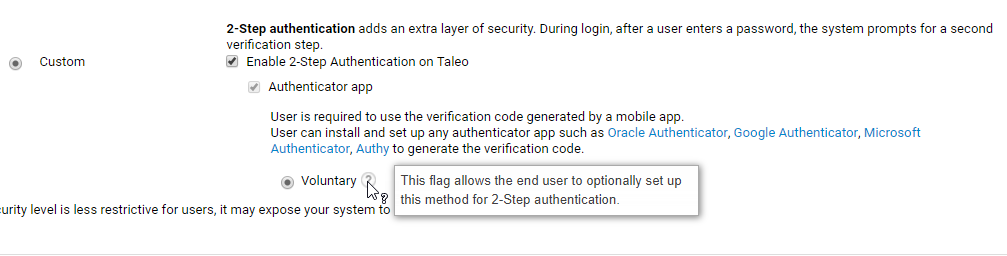
In order to enable 2-Step authentication, a custom security level must be selected.
- Select Administration, then select Organization.
- Click Security Level.
- Click the Custom security level, if not already selected.
- Check the Enable 2-Step authentication on Taleo option. The Authenticator app option is automatically checked. The Voluntary option is also automatically checked, as currently this feature is always optional to your end users.
- Adjust any other security options from your previously selected level, as desired.
- Click Save to save all the settings on the page.
If a user looses the mobile device and needs to reset the setup, the administrator can reset the user's information. To do so:
- Edit the user's record.
- Click the Change Settings button (it might be on the More menu).
- In the 2-Step authentication section, click the Reset option.
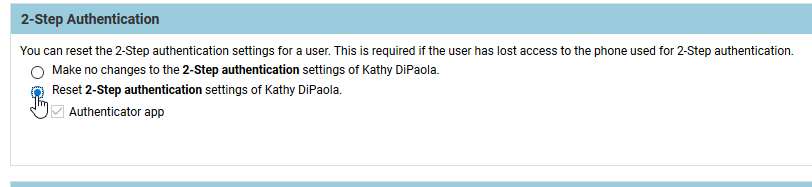
- Click Next, and then confirm the change. The 2-Step authentication will be removed for this user.
Steps for Users:
Once this is enabled at the organization level, when users log in, they are presented with an option to set up 2-Step authentication.
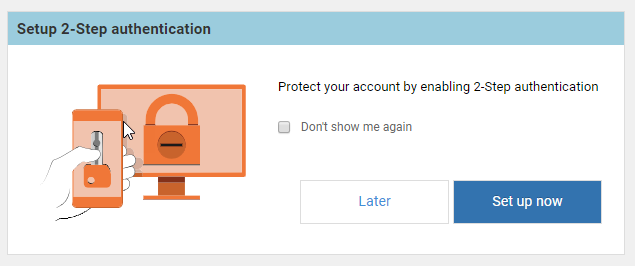
Users can click Later and be prompted the next time they log in, or they can click the Don't show me again option and they will no longer see the prompt. If they click Set up now, they are taken to their My Settings page, where they can choose to enable this feature for themselves. They can return to their My Settings page at any time to enable or disable this feature. They must have an authenticator app installed before setting this up for TBE.
Once the end user checks the Enable 2-Step authentication on Taleo option, the Setting Up Authenticator pops up with a QA code which must be scanned from their mobile device.
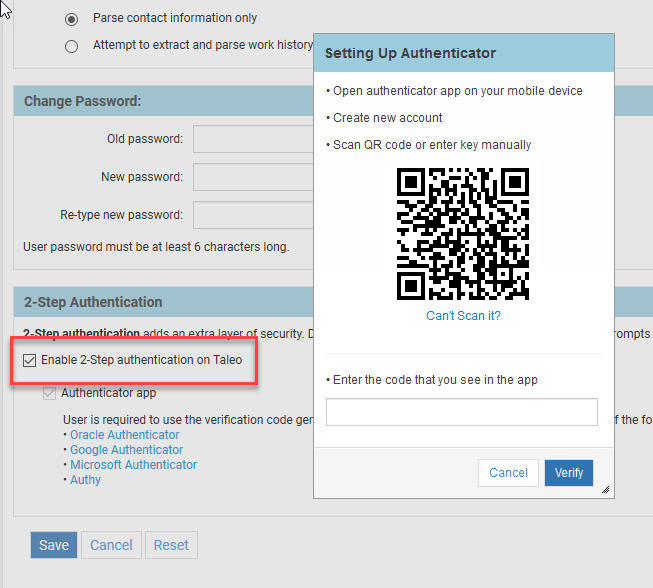
Users will enter the code shown on their mobile device, and then click Verify. A backup code is presented which the user can capture and keep in a safe place in case the mobile phone is lost.
End users will be asked to enter a code each time they log in. If they repeatedly enter the wrong code, the system treats this the same as when they enter a wrong password, and they will be blocked after a certain number of attempts, as set in the security settings. This feature can be disabled by the end user by going back to the My Settings page and disabling the option.
Tips And Considerations
Previous to enabling this feature, you may wish to email your users to explain this new option, and suggest an authenticator app, if your company has a preference.
There are three new system email templates for this feature:
- Admin Resets User's 2-Step authentication on Taleo
- User Disables 2-Step authentication on Taleo
- User Enables 2-Step authentication on Taleo
These can be customized as needed, but they will always be sent out to the user. There is no way to turn them off.
NOTE: The 2-step authentication only appears when users log directly into TBE. Users with SSO will not be prompted to use the 2-Step authentication. If all of your users use SSO, there is no need to enable this feature.
Reports
Two new fields have been added to any custom report topic which includes the Users table:
- 2-Step Authentication
- Authenticator app
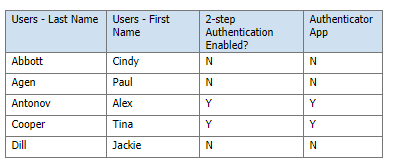
These fields can also be added as parameters. The field '2-Step Authentication' will return Y if the user has enabled this feature, and N if it is not enabled. Currently the only method of authentication is with an authenticator app, so this second field will always return Y is this feature is enabled for a user, but when additional methods are added in the future, this second field will be more helpful. Here is an example of a report you could create:
Company Code Alias
In the TBE 19A What's New document, it was noted that the <<COMPANY_CODE>> merge field will always return the most recent company code alias. This behavior has been changed to prevent an issue with iframe integration. This merge field will return the original company code issued for a customer.
There is a new merge field called <<COMPANY_CODE_ALIAS>> that will return the latest alias. You may wish to include this merge field in your welcome email to new users instead of the original merge field if you plan on adding an alias.
Copy Goals on the Talent Center
When employees use the Copy Goal button on the Talent Center, custom fields are now copied over to the new goal.
Inactive Review Workflows
In previous versions of TBE, some completed reviews did not appear on the Talent Center if the Reviews Workflow had been set as inactive. This was not intentional and has been corrected so that the reviews will now appear even if the workflow is no longer active. The only reason that reviews should not appear on the Talent Center is if they are in a status which is set up to not be visible to the employee.