
This document will continue to evolve as existing sections change and new information is added. All updates appear in the following table:
| Date | Feature | Notes |
|---|---|---|
| 16 AUG 2019 | Created initial document. |
This guide outlines the information you need to know about new or improved functionality in Oracle Taleo Cloud for Midsize (Taleo Business Edition) Update 19C. Each section includes a brief description of the feature, the steps you need to take to enable or begin using the feature, and any tips or considerations that you should keep in mind.
We are announcing the general availability of the 19C update of the Oracle Taleo Cloud for Midsize (TBE) on August 16th, 2019. This is considered a minor update.
Column Definitions:
Report = New or modified, Oracle-delivered, ready to run reports.
UI or Process-Based: Small Scale = These UI or process-based features are typically comprised of minor field, validation, or program changes. Therefore, the potential impact to users is minimal.
UI or Process-Based: Larger Scale* = These UI or process-based features have more complex designs. Therefore, the potential impact to users is higher.
Features Delivered Disabled = Action is needed BEFORE these features can be used by END USERS. These features are delivered disabled and you choose if and when to enable them. For example, a) new or expanded BI subject areas need to first be incorporated into reports, b) Integration is required to utilize new web services, or c) features must be assigned to user roles before they can be accessed.
| Ready for Use by End Users Reports plus Small Scale UI or Process-Based new features will have minimal user impact after an update. Therefore, customer acceptance testing should focus on the Larger Scale UI or Process-Based* new features. |
Customer Must Take Action before Use by End Users Not disruptive as action is required to make these features ready to use. As you selectively choose to leverage, you set your test and roll out timing. |
|||||
|---|---|---|---|---|---|---|
| Feature |
Report |
UI or |
UI or |
|
||
Security Setting Now Affects the Notification/Consent Feature |
||||||
Previously, users have been able to select the UK English locale, and the date format in Taleo Business Edition was in the UK format. However, there was not a separate translation for UK English. With this 19C update, there is now a translation for UK English across all features of the product. This language is available both at the organization level as well as the specific user level.
Steps to Enable
You don't need to do anything to enable this feature.
Tips And Considerations
The UK English translation will automatically appear for those customers and specific end users that have the UK English locale selected. There are no steps required for this translation to appear. If you are not sure of which locale you are using, or you would like to change, choose the My Settings option under the Home menu, and scroll to the locale field to make a selection.
Administrators can now define one or more default offer approvers for departments, divisions, locations, and regions. Similar to selecting default requisition approvers, these default offer approvers can save time when creating the requisition, as well as enforcing consistently for a particular organization level. Administrators can now define one or more default offer approvers for departments, divisions, locations, and regions. Similar to selecting default requisition approvers, these default offer approvers can save time when creating the requisition, as well as enforcing consistently for a particular organization level.
Steps to use this feature:
- Select Administration, then select Organization.
- Select Region, Location, Division and Department Settings.
- Edit the document for which you want to set up a default offer approver.Scroll down to the Assign Offer Approvers section, and click the add/edit link.

- Select one or more names, and click the arrow to move the names from the left 'Available Users' side to the right 'Selected' side.
- Click Save to close the window, and then click Save again to save the document.
- Continue the process for other region, location, division or department documents.
Steps to Enable
You don't need to do anything to enable this feature.
Tips And Considerations
Just as with the other default approvers, this feature works when creating a new requisition. If you update an existing requisition and change locations, for example, the offer approvers will not be recalculated. You will need to manually adjust them as needed.
Please note that regions are derived from locations. If you set up a default offer approver for a location and also for the region in which the location is associated, the system will gather names from both the region and the location, but any duplicates will only appear once. The same applies to departments and divisions, as divisions are derived from the selected department.
New Merge Field for Email Templates
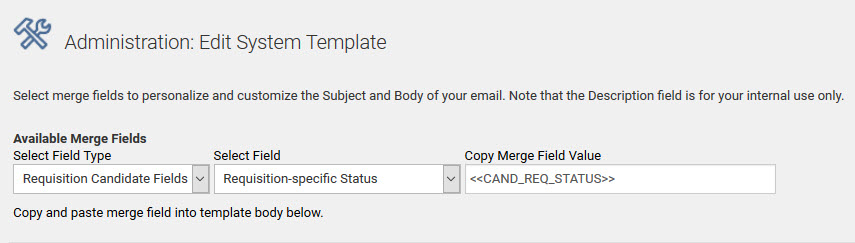
There is a new merge field available to capture the requisition-specific status in your email templates. You can use this merge field wherever other requisition-specific merge fields are used.
Steps to include this merge field in a template:
- Select Administration, then select Customize Recruit.
- Select System Email Templates in the Customize System Templates section.
- Edit the template in which you now want to include the requisition-specific status.
- From the Available Merge Fields list, select Requisition Candidate Fields.
- From the list of fields, select Requisition-specific Status.
- You will see the following merge field, and you can copy and paste the value into your template.
- Save the email template.
You may also include this merge field in the Candidate templates located under the Candidates menu.
Steps to Enable
You don't need to do anything to enable this feature.
Tips And Considerations
Be sure to include this merge field in templates for which the specific requisition can be determined. For example, you can include this in a status trigger notification for the Req-specific candidate workflow because as a candidate is moved through a workflow for a specific requisition, the status can be determined. You can include it in Candidate email templates as well, but this works when you select a specific requisition in Step 2 when sending a candidate an email. If you do not select a specific requisition, then the merge field could return a value for the wrong requisition, if attached to more than one. Consider if it makes sense to include this merge field in your email template.
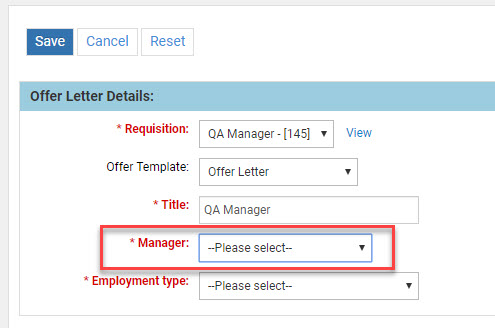
Change in Behavior in the Manager Field in an Offer Letter
When creating a new offer, the Manager field will now default to ‘Please Select’ rather than the first name in the list. This change is due to customer feedback that users could overlook this field, leaving many offers with the incorrect first manager on the list. Since this is a required field, users will now be forced to select the manager.
Steps to Enable
You don't need to do anything to enable this feature.
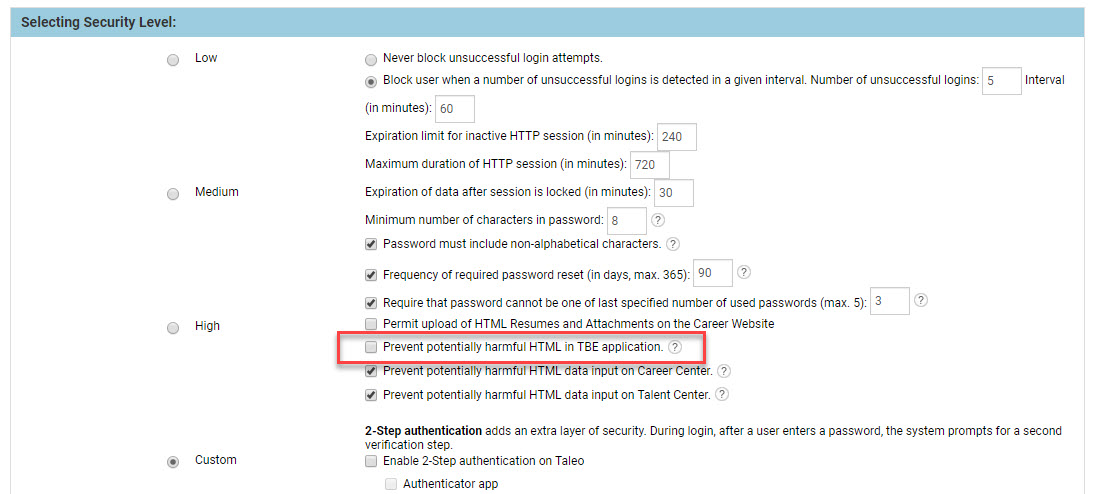
Security Setting Now Affects the Notification/Consent Feature
The setting ‘Prevent Harmful HTML in TBE application’ now affects the notification and consent statements in your system, used on your Career Center. If you have this setting checked, and you attempt to save your consent statement with any HTML links in it, you may get a notice that the statement was modified to prevent harmful HTML, and the link will be removed.
If your privacy statement needs to contain any HTML links, you will need to use the Custom security level, and uncheck this setting. With this setting unchecked, the system will still warn you about the HTML, but you will have the option of continuing with the text as is.
Steps to check your security level so that HTML can be included in the consent form:
- Select Administration, then select Organization.
- Click Security Level.
- Make a note of your current security level, and the various values for the selected level.
- Select Custom.
- Uncheck the option Prevent potentially harmful HTML in TBE application.
- Adjust any other values for this security level as needed to match your previous security level.
- Click Save.
- Click the link to go back to the main Administration page, or choose Customize Recruit from the Administration menu.
- Click Statements in the Customize Forms section.
- Edit your statement as needed, and enter any HTML links.
- Click Save.
- You should see an window giving you the option to Accept, Cancel, or Continue.
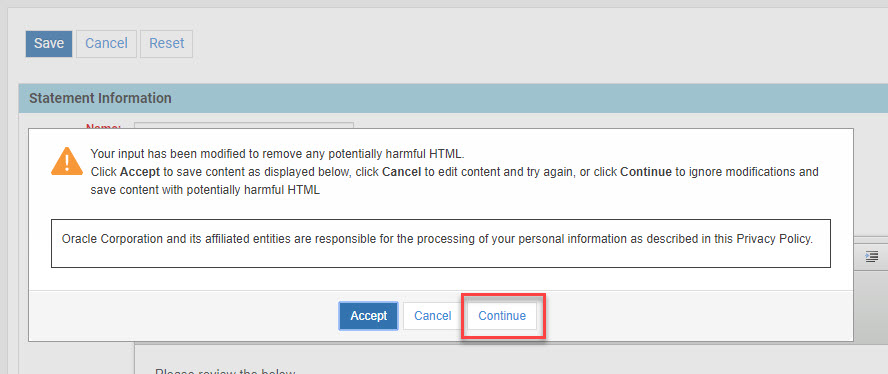
- Click Continue to save the statement with the HTML present. If you select Accept, it will be stripped out.
Steps to Enable
You don't need to do anything to enable this feature.