
This document will continue to evolve as existing sections change and new information is added. All updates appear in the following table:
| Date | Feature | Notes |
|---|---|---|
| 08 NOV 2019 | Created initial document. |
This guide outlines the information you need to know about new or improved functionality in Oracle Taleo Cloud for Midsize (Taleo Business Edition) Update 19D. Each section includes a brief description of the feature, the steps you need to take to enable or begin using the feature, and any tips or considerations that you should keep in mind.
We are announcing the general availability of the 19D update of the Oracle Taleo Cloud for Midsize (TBE) on November 15th, 2019.
Column Definitions:
Report = New or modified, Oracle-delivered, ready to run reports.
UI or Process-Based: Small Scale = These UI or process-based features are typically comprised of minor field, validation, or program changes. Therefore, the potential impact to users is minimal.
UI or Process-Based: Larger Scale* = These UI or process-based features have more complex designs. Therefore, the potential impact to users is higher.
Features Delivered Disabled = Action is needed BEFORE these features can be used by END USERS. These features are delivered disabled and you choose if and when to enable them. For example, a) new or expanded BI subject areas need to first be incorporated into reports, b) Integration is required to utilize new web services, or c) features must be assigned to user roles before they can be accessed.
| Ready for Use by End Users Reports plus Small Scale UI or Process-Based new features will have minimal user impact after an update. Therefore, customer acceptance testing should focus on the Larger Scale UI or Process-Based* new features. |
Customer Must Take Action before Use by End Users Not disruptive as action is required to make these features ready to use. As you selectively choose to leverage, you set your test and roll out timing. |
|||||
|---|---|---|---|---|---|---|
| Feature |
Report |
UI or |
UI or |
|
||
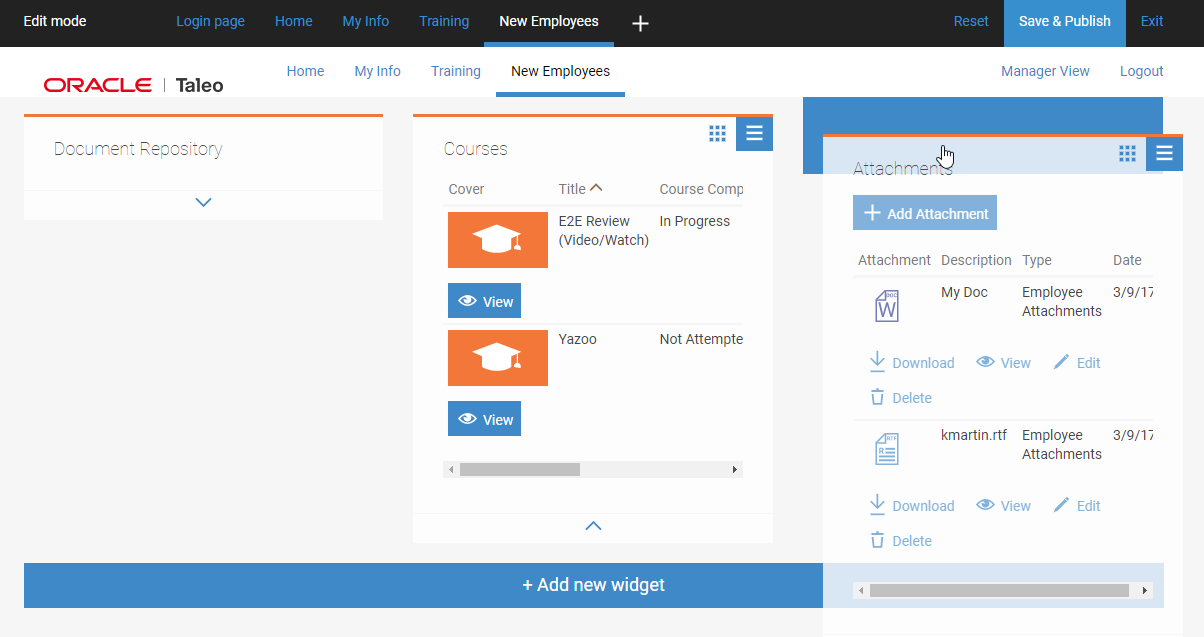
In this update, administrators can customize the layout of all standard and custom pages on the Talent Center. Administrators can choose from a single column, three different layouts with two columns, or a three-column layout. Existing widgets will automatically resize, according to the width of the column. Widgets can still be moved to any of the columns. Each page on the Talent Center can have a different layout. The main benefit to employees and managers is that custom page layouts will best optimize the visual presentation of Talent Center widget data.
When editing the pages of the Talent Center, you must first click on the page you want to change, and then click the Pencil icon to edit. The following layouts appear, with the current layout selected:

Layout Options on the Talent Center
Select a new layout and click Done. As usual with any changes to the Talent Center, you must click Save & Publish before the changes take affect.
If you switch from a two-column layout to a different two-column layout, the widgets on the page will resize as necessary. If you add a column, the new column will be blank. If you remove a column, any widgets that were in the 'last' column move to the bottom of the remaining column to its left.
When you add a new custom page and select a layout, any widgets will be placed in the first column, and continue to be added in this column until moved to another column. Once the second or third column has data in it, adding another widget will place the widget at the bottom of the right-most column which contains data. Simply drag widgets to another location, and drop them once you see the blue bar.
Dragging a Widget to the Third Column
As always, when employees are on a phone, they will see the data in a single column.
Steps to Enable
You don't need to do anything to enable this feature.
This update introduces a new candidate profile search and resume download capability, available from Monster's vast candidate repository. It provides recruiters with a complement to their sourcing strategies within Taleo Business Edition Recruit. With this integration, recruiters will be able to search for candidates uploaded to Monster, using specific search criteria or job descriptions, right from within TBE Recruit. Recruiters can also preview or download candidate resumes and add them to appropriate requisitions. Search criteria can be saved at the user level, so that the searches can be easily retrieved and run later. Advanced search criteria are also available, for example: Veteran Status, Location, and Security Clearance, among others. Recruiters can choose to display or hide such search criteria. Additionally, administrators can default the initial (both main and requisition-specific) status for candidates that are sourced from Monster.
This capability will be available to those clients who have previously set up an account for Monster Resume Data Solutions (MRSD) Integrated Search, which they can request directly with Monster Worldwide by calling +1-800-MONSTER . It is currently only available for the English locale.
Steps to Enable
- Once you have the appropriate account with Monster, you should have a Client ID and Client Secret. If you cannot locate this information, please contact Monster by calling 1-800-MONSTER.
- To enter this information into TBE, select Administration, then select Organization.
- Click System and Email Settings.
- Scroll to the 'Enable Application Integration Fields' section, and check the option for Monster Candidate Search.
- Click Save.
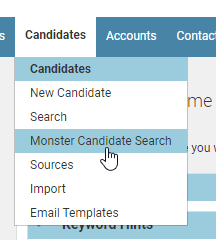
- From the Candidates menu, select Monster Candidate Search.
- The new Monster Search home page will appear. In the upper right-hand corner, select Settings, and then select Monster Credentials.
- Enter the Client ID and Client Secret you had previously obtained, and click Save.
- Click Search from the top menu to be taken back to the Monster Candidate Search home page.
- To validate if the credentials entered are correct, perform a simple search.
- If you have entered the wrong credentials, you will see the following error:

- Navigate back to the Monster Credentials page and enter the credentials again. If you continue to have problems, contact Monster Worldwide.
Once the basic searching is working for you, you can add more fields to the search page, import job descriptions to search against these, or save your searches, as well as view candidates and add them to requisitions.
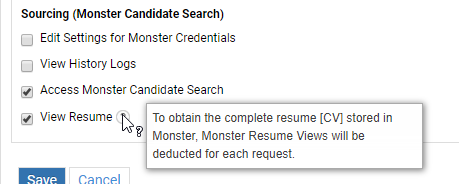
Steps to Add or Remove This Feature for a User Role:
Administrators can control which roles can access Monster Candidate Search. By default, the following roles will get access to the following features:
| Features | Admin | HR Admin | Recruiter |
|---|---|---|---|
| Edit Settings for Monster Credentials: Enables users to add/edit Client ID and Secret |
Yes | No | No |
| View History Logs: Users will be able to view the logs of different actions performed by users |
Yes | No | No |
| Access Monster Candidate Search: Enables the Monster Candidate Search option on the menu | Yes | Yes | Yes |
| View Resume: Enables the user to view the resume from Monster, which deducts a Resume View from the client's Monster account. | Yes | Yes | Yes |
To change any of the above settings:
- If you are still on the Monster Search page, click Exit in the upper right-hand corner to return to TBE Recruit.
- From the Users menu, select Roles.
- For the role in question, click Assign Access Control.
- Scroll to the Sourcing section at the bottom of the page.
- Change the settings as desired, and click Save. Repeat for the other roles.
NOTE: Currently this feature is available for only the Administrator, HR Admin, and Recruiter roles.
Steps to Set the Default Initial Status for Monster Candidates:
- By default, the initial status (both main and requisition-specific) for these Monster-sourced candidates will be set to whichever status has ID=2 in your system; for most customers, this is either 'NEW' or 'Submitted for Requisition.' If you want to change this, create your own new main status by editing the Candidate Workflow, or requisition-specific status by editing the Req-Specific Candidate Workflow.
- From the Customize Recruit page, click Status Mappings in the Customize Processes section.
- Click either of the 'Initial' status links.
- Select the desired status from the Monster setting at the bottom of the page.
- Click Save.
Now when candidates are added to TBE via the Monster Candidate Search, their statuses will reflect your settings.
NOTE: Two new sources have been added in this update:
- Monster - Sourced shall be used when candidates are added via the Monster Candidate Search
- Monster - Authenticated shall be used when candidates apply via the Career Center using their Monster credentials
Neither of these two sources can be edited.
Tips And Considerations
You can source potential candidates by entering either the job description of a TBE requisition, or a number of fields as search criteria. The search returns a maximum of 1000 resumes, ranked in descending order by a Monster-generated relevance score of between 10.0 and 1.0.
Search by Job Description
This method enables users to search potential candidates from Monster database using the text of a job description, which can be manually copied and pasted, or imported from an existing requisition in TBE. Any required and optional skills found in the job description will be extracted and automatically entered in the search criteria. Users can add more search criteria to further narrow the search result list.
Click the Search By Job Description button, and then either paste the job description into the box, or click the Import From Requisition link near the top to search through your requisitions.
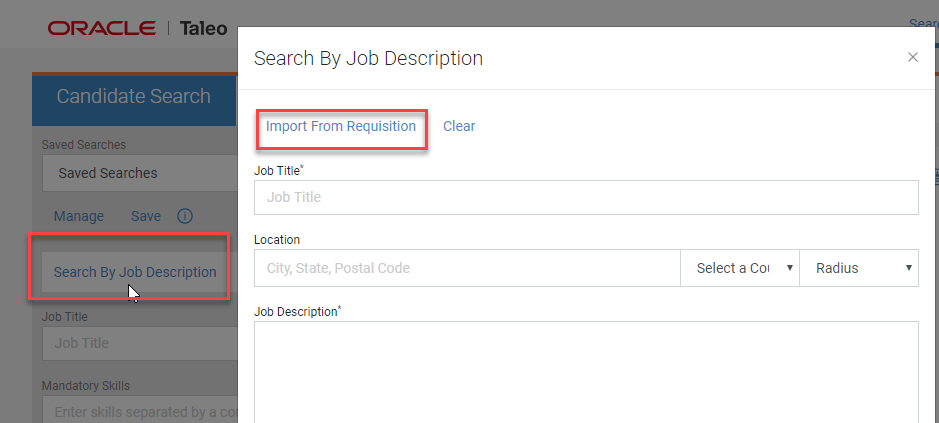
You can search for the requisitions using Job Title, Job ID or Location.
NOTE: Requisitions of all statuses are included in this list.
Search Using Search Fields
You will see basic search criteria by default, such as job title, skills, location, etc. Click the Manage Search Fields link at the bottom to add more search criteria to the search panel. These additional search fields will stay on the page for the current session only.
Two search fields allow toggling between ‘Must Have’ vs. ’Nice to Have’ conditions:
- Years of Experience
- Degree or Major
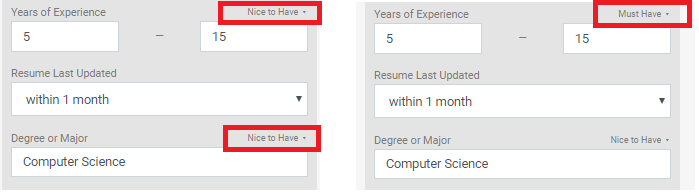
Example: If Years of Experience is defined as 5-15 Years and is defined as ‘Must Have’, then all the candidates that are part of search results will be between 5 -15 years.
If Years of Experience is defined as 'Nice to Have,' then someone who has 5-15 years will be ranked higher than someone who does not, everything else being equal.
Saving Searches
You may click Save and give the search a name, and then later retrieve this search by clicking the Manage link, where you can edit and delete the searches:
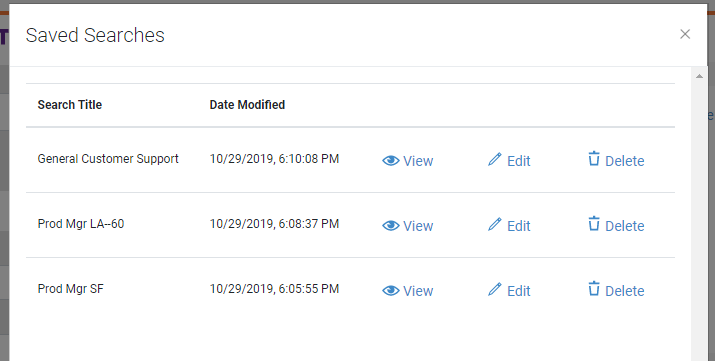
List of Saved Searches
When you select one of the saved searches from the dropdown, the system will populate the criteria so that you can update it if needed.
The Save option is disabled right after a save but enabled again after performing a search.
Viewing Resumes of Candidates
By clicking View Resume, you can preview the resume and download it. As soon as you click the View Resume link, one of your available views (you can think of this as a credit) is deducted from your Monster account. However, the first time you view the candidate, the candidate is copied to an internal sourcing database. Viewing the candidate again does not deduct another view from your account.
From either the preview screen or the search result list, you can choose to download the candidate’s resume in its original format, or add the candidate details directly to a requisition.
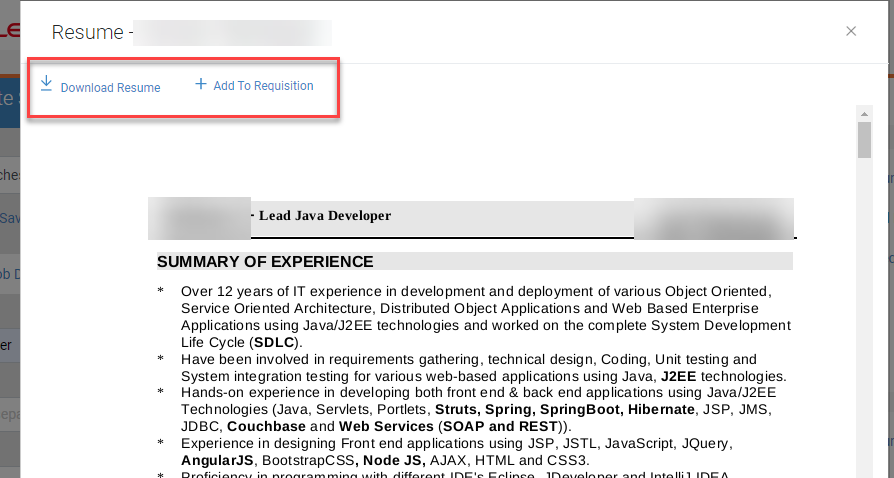
You must add the candidate to a requisition in order to access it from the Candidates tab in TBE. Once the candidate has been added to one or more requisitions, you can click More Details to see any requisitions to which the candidate has been added. Once the candidate has been 'sourced' or added to TBE, you can click the Exit link in the upper right-hand corner to return to TBE Recruit.
View History Logs
If you have access to the History Logs, you can access them on the Monster Search home page (Settings>History Logs). Please refer to the Help>Recruit guide for more details on the Monster History Log.
Linking of Candidate and Employee Records
Users can now manually link a Candidate record to an Employee record, so that the information will flow to the Employee record upon hire. If the Employee record was created first, and then the employee applied for a job, thereby creating a Candidate record, the two records will not be linked. The user can now link the records, so that any future hiring of this employee will copy the information from the Candidate record to the Employee record.
Steps to Enable
- Check to see if the field called 'Employee' is currently on your view and edit page layout. If not, add the field to both the 'Add/Edit Candidate' and the 'View Candidate' page layouts (you may be using a version of these page layouts with other names).
- If you also want to be able to see if employees are linked to candidates from the Employee record, add the field called 'Candidate' to the 'View Employee' page layout (the Edit Employee page layout is optional because you cannot take action from this page).
- Once the fields have been added, edit the Candidate record that needs to be linked to an existing Employee record, and click the Select Employee link next to the Employee field:
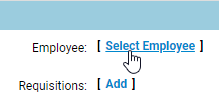
- You will see a warning that the records will be linked and cannot be undone once the Candidate record has been saved. Click OK.
- The Employee selector that appears is your standard selector, but it filters out any employees that are already linked to candidates so that you cannot select one of these employees by accident. Search for the correct employee, and select the name.
- Before saving the Candidate record, you can still remove the newly linked employee name, or cancel the edit without saving.
- Click Save.
- You can now navigate from the Candidate record to the linked Employee record, and vice versa, provided that you added the Candidate field to the 'View Employee' page layout.
Now that the records are linked, they will function the same as when the system creates the Employee record upon first hiring a candidate. If this candidate, who is already an employee, is hired for another position, the information will correctly be copied to the Employee record.
Tips And Considerations
You may want to add more fields to the Employee Selector list view to correctly identify the employee. These fields would help in all situations in which the Employee Selector is used.
The login page for Taleo Business Edition users will now contain the company's logo when the URL includes the company code, such as in a Welcome email. The company is also pre-selected so that users do not need to enter this information, but they can change it if needed. In addition, some extraneous text has been removed from the login page.
For example, after setting a password, a new user would be redirected to a URL similar to this:
https://chx.tbe.taleo.net/dispatcher/login.jsp?uname=john_smith&org=VISIONABC
Note that the user name and the Company Code is pre-populated as see here:
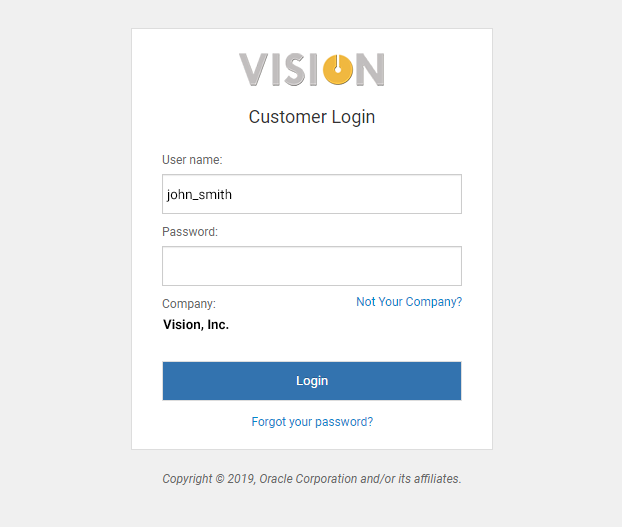
Login Screen with the Company Populated
You can suggest that your users bookmark the URL that they see on the login screen in order to simplify login.
The logo that is used is the one set under System & Email Settings.
Steps to Enable
You don't need to do anything to enable this feature.