
This document will continue to evolve as existing sections change and new information is added. All updates appear in the following table:
| Date | Feature | Notes |
|---|---|---|
| 05 MAY 2020 | Created initial document. |
This guide outlines the information you need to know about new or improved functionality in Oracle Taleo Cloud for Midsize (Taleo Business Edition) Update 20B. Each section includes a brief description of the feature, the steps you need to take to enable or begin using the feature, and any tips or considerations that you should keep in mind.
We are announcing the general availability of the 20B update of the Oracle Taleo Cloud for Midsize (TBE) on May 15th, 2020.
Column Definitions:
Features Delivered Enabled
Report = New or modified, Oracle-delivered, ready to run reports.
UI or Process-Based: Small Scale = These UI or process-based features are typically comprised of minor field, validation, or program changes. Therefore, the potential impact to users is minimal.
UI or Process-Based: Larger Scale* = These UI or process-based features have more complex designs. Therefore, the potential impact to users is higher.
Features Delivered Disabled = Action is needed BEFORE these features can be used by END USERS. These features are delivered disabled and you choose if and when to enable them. For example, a) new or expanded BI subject areas need to first be incorporated into reports, b) Integration is required to utilize new web services, or c) features must be assigned to user roles before they can be accessed.
| Ready for Use by End Users Reports plus Small Scale UI or Process-Based new features will have minimal user impact after an update. Therefore, customer acceptance testing should focus on the Larger Scale UI or Process-Based* new features. |
Action is Needed BEFORE Use by End Users Not disruptive as action is required to make these features ready to use. As you selectively choose to leverage, you set your test and roll out timing. |
|||||
|---|---|---|---|---|---|---|
| Feature |
Report |
UI or |
UI or |
|
||
The Sourcing service that enabled Monster Candidate Search, a simple search interface that displays candidate information in a card view, is now enhanced with the ability to search one's own internal candidate database stored in TBE Recruit. Recruiters can leverage Taleo Candidate Search to discover potential candidates from prior applicants, view their profiles and resumes, add them to requisitions, and save search criteria. Taleo Candidate Search supports the same search parameters as those currently available in the Advanced Search of TBE Recruit, including standard and custom fields. Recruiters can customize the fields that they want to search on via the 'Manage Search Fields' option. Candidate status and associated requisitions are presented as part of the matching search results.
You can think of the existing Advanced Candidate Search in TBE as being the primary method to find current or recent job applicants to specific requisitions, and move candidates through their respective candidate workflows. Taleo Candidate Search is more of a means to discover potential candidates so that they can be nurtured by recruiters, invited to apply to other requisitions, sent email communications, etc. It allows recruiters to source both internal and external candidates with an easy-to-use interface that makes it easy to save and manage the searches for future use.
Steps to Enable
Taleo Candidate Search must be enabled and then each role must be given access as well.
- Select Administration, then select Organization.
- Click System & Email Settings.
- Scroll down to the new Candidate Sourcing section.
NOTE: The Monster Candidate Search option has been removed from the Application Integration Fields section and is now included in the Candidate Sourcing Section.
- Check the box for Taleo Candidate Search.
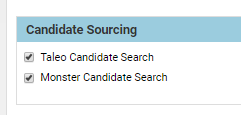
- Click Save.
By default, users with the Administrator, HR Administrator, and Recruiter roles will have access to Taleo Candidate Search. To give access to Hiring Manager, or remove access for other users, the role must be updated.
- Selects Users, then select Roles.
- Click Assign Access Control for the role to which you want to grant or remove access.
- At the bottom, select Access Taleo Candidate Search in the new Candidate Sourcing (Taleo Candidate Search) section. Uncheck this option to remove the access for a particular role that currently has access.
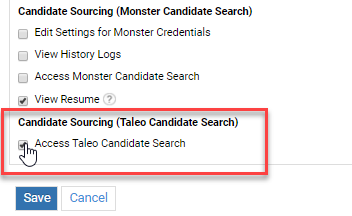
- Click Save.
- Continue for other roles as needed.
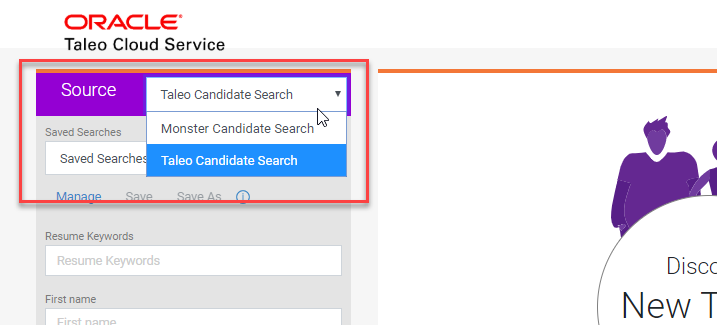
Once this feature has been enabled for users with a particular role, the Candidates menu displays this new option for Candidate Sourcing.

Please note that if you also have Monster Candidate Search enabled, this single menu item allows you to access both Monster Candidate Search and Taleo Candidate Search. The Search defaults to Taleo Candidate Search but users can select their sourcing option from the menu.
Tips And Considerations
Viewing Sourced Candidates
Enter some search criteria and click the Search button at the bottom of the panel on the left to see the resulting candidates from your own internal database. Candidates are listed in a card view with limited data displaying. Clicking the candidate's name reviews the full profile.

You can also view the resume or add the candidate to a requisition right from the search results list. Once you have viewed the resume by clicking on View Resume, returning to the list will now display an option to download the resume, as seen below:
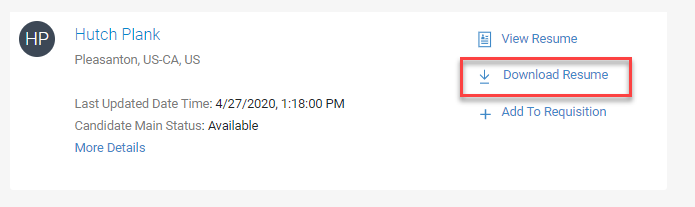
You also have the option to download the resume or add the candidate to a requisition when you are viewing the resume.
Searching for Candidates
The search panel includes certain default fields, and the Manage Search Fields link displays additional available fields.
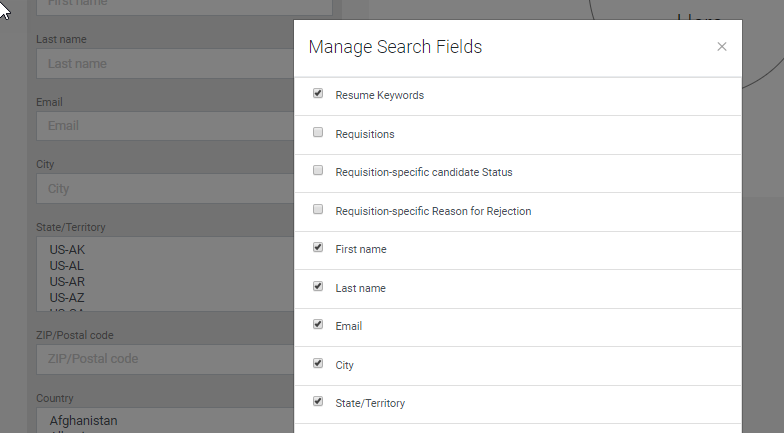
These fields are determined by the current configuration of the 'Search Candidate' page layout. If you have several versions of this page layout, it is the base version that determines the available fields. Each user can include more fields in the search panel for the existing session only. If there are fields that are needed for frequent searches, then these search combinations should be saved and then recalled from the list of save searches.
Saved Searches
Once you have entered some search criteria and executed the search, you can save the search, or do a Save As to create a copy of the search with altered criteria. Searches are saved at the User level, therefore users have access to only their own searches. You can click Manage to delete saved searches, or change the search name or view the criteria. You can sort the saved searches by title or date modified.
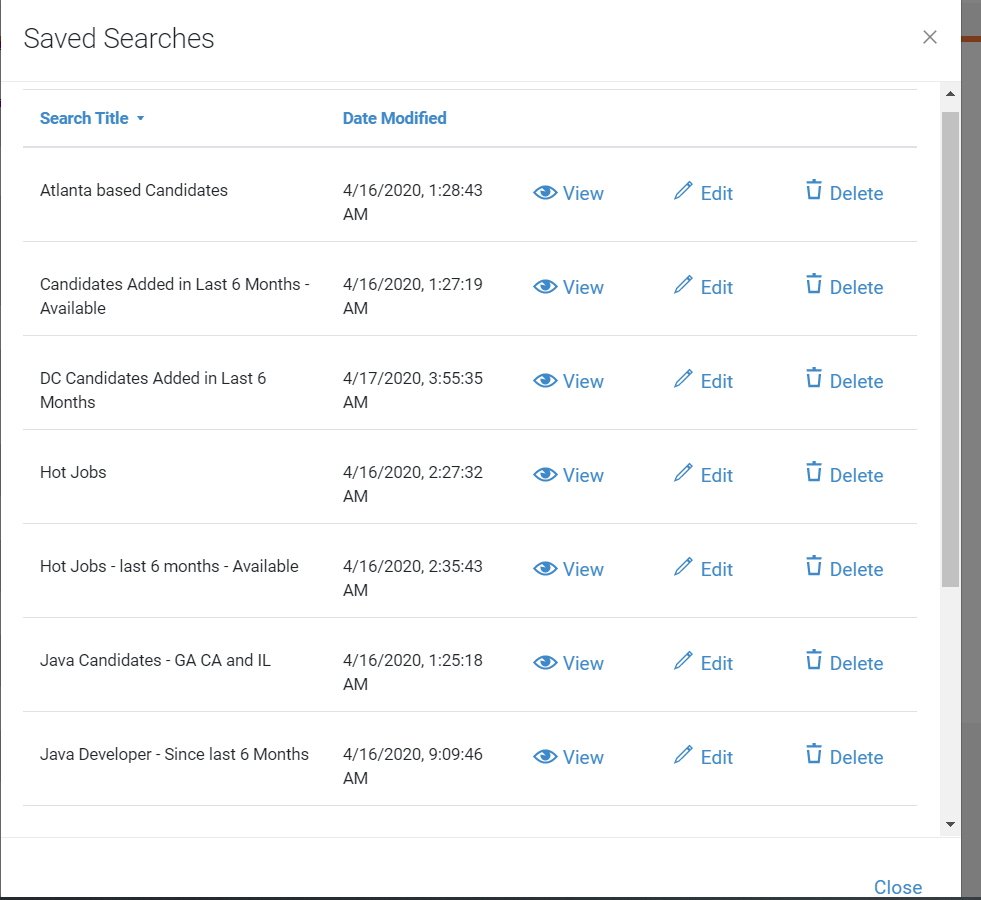
Once a search is saved, you can select it from the list of saved searches and the search criteria appears in the panel. Click Search to again retrieve those results.
Returning to Taleo Business Edition
In the upper right-hand corner are three options: Search, Exit, and Logout. When you select 'Candidate Sourcing' from the menu to access Taleo Candidate Search, you will notice that the Search menu item is highlighted.

The Exit button returns you to Taleo Business Edition. The Logout button logs you out entirely and brings you to the TBE login screen.
Known Issues with Taleo Candidate Search
- Currently the search results are not displayed in a ranked order, but by the ID of the candidate with the most recent at the top. The sort order will be improved in a future release.
- Searching by Requisition-specific candidate fields doesn't work at this time.
- There are some issues with searching in a non-English locale when the locale of the organization is English.
The Template HTML widget replaces the Static HTML widget found in the Talent Center. Content in your existing Static HTML widgets remains untouched, but if you edit such widgets you will see the new Template HTML UI. This feature allows for the insertion of supported merge fields, which include standard and custom Employee fields, as well as common fields such as Current Date, Company Address, or Company Phone Number.
With the Template HTML widget, Administrators can now add personalized text in addition to static text, and partner integrations that use iFrames containing such merge fields can now take advantage of the Template HTML widget as well.
When you edit the Template HTML widget, you now see a drop-down containing Employee Fields and Common fields. Selecting a particular field, Employee First Name in the below example, displays the correct merge field value on the right, which can then be pasted into the content below.
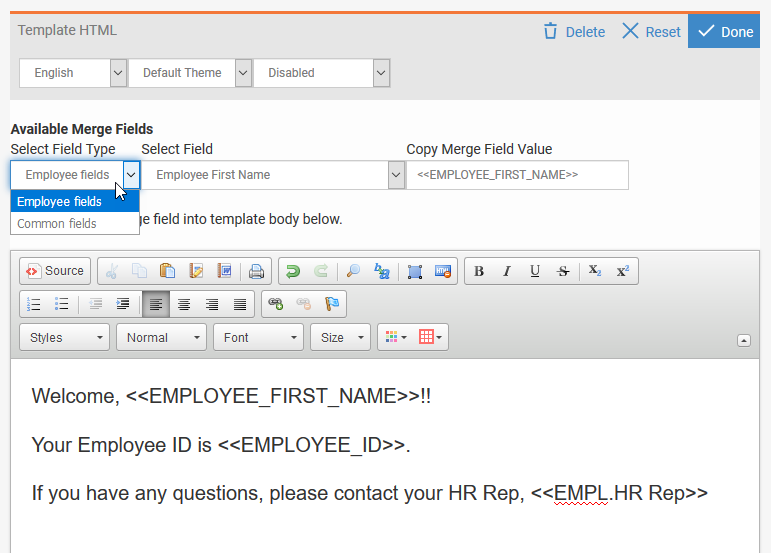
When an employee logs into the Talent Center, the merge fields are replaced with their current data.
Steps to Enable
You don't need to do anything to enable this feature.
Tips And Considerations
As a reminder, you may need to turn off the option which checks for harmful HTML on the Talent Center to save certain content within this widget, such as an iframe. This setting is located under Administration > Organization > Security Level. You must select a custom level in order to uncheck the Harmful HTML option for the Talent Center. When you do so, the system will still warn you that your content contains potentially harmful HTML, but you are allowed to continue and save the content as is.
Restricting 'No Access' Users from Receiving Email
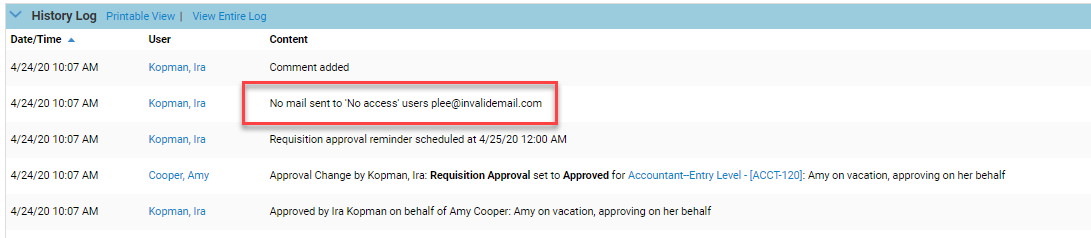
This update introduces an optional toggle to prevent TBE users with 'No Access' role from receiving emails. It is a highly requested idea on Customer Connect, and its main use case is to prevent the delivery of email reminders normally sent after an employee has left the company, or when emails are forwarded to another coworker who continues to receive such reminders. With this option enabled, TBE will not delivery initial notification or reminder emails to users with the 'No Access' role.
If Administrators enable this option, the History Log will reflect the fact that a particular user didn't receive an email due to the fact that the user has the 'No Access' role. The History Log is only updated in this manner for those instances where emails are tracked in the History Log currently (reminders are not tracked and therefore nothing is added to the History Log for 'No Access' users either).
Steps to Enable
- Select Administration, then select Organization.
- Click System & Email Settings.
- Scroll to the Email Settings section, and check the option Do not send any emails to 'No Access' Users.
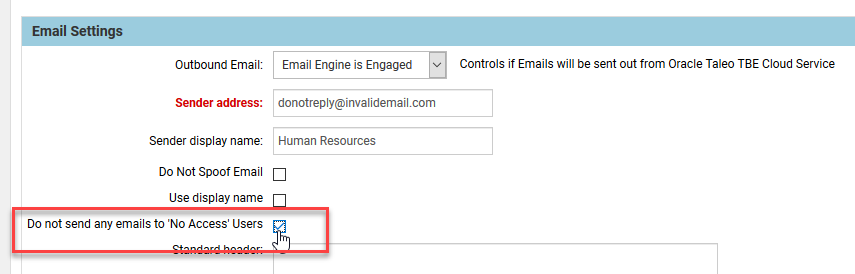
- Click Save.
Moving forward, any email that the system attempts to send to a 'No Access' user will not be sent.
Tips And Considerations
For those use cases where you may assign 'No Access' roles to users who do not need access to TBE but are involved in the interview process and need to receive email status notifications, the recommendation is to assign the 'Passive User' role instead. However, if you prefer to use the 'No Access' role for this purpose, you can choose to not enable this new option and email behavior will remain the same as previous releases.